
ICD-ST25VTP - Dictaphone SONY - Free user manual and instructions
Find the device manual for free ICD-ST25VTP SONY in PDF.


| Product Type | Digital Voice Recorder |
| Model | ICD-ST25VTP |
| Brand | Sony |
| Recording Format | MP3 / LPCM |
| Max Recording Time | Up to 57 hours (LPCM 44.1kHz) |
| Built-in Memory | 4 GB |
| Speaker | Built-in monaural speaker |
| Microphone | Built-in stereo microphone |
| Power Supply | 2 x AAA batteries (not included) |
| Battery Life | Approx. 30 hours (LPCM 44.1kHz) |
| Dimensions (W x H x D) | Approx. 45.2 x 113.2 x 20.5 mm |
| Weight | Approx. 76 g (including batteries) |
| Display | LCD with backlight |
| Connection | USB 2.0 (Type-A), Headphone jack (3.5mm) |
| Supported OS | Windows / Mac |
| File Transfer | Drag and drop via USB mass storage |
| Recording Modes | LPCM 44.1kHz, MP3 128kbps, MP3 192kbps |
| Other Features | Voice activated recording, A-B repeat, playback speed control |
| Cleaning | Wipe with a dry soft cloth; do not use solvents |
| Repairability | Batteries user-replaceable; other components not serviceable by user |
| Included Accessories | USB cable, carrying pouch, stereo earphones |
Frequently Asked Questions - ICD-ST25VTP SONY
User questions about ICD-ST25VTP SONY
0 question about this device. Answer the ones you know or ask your own.
Ask a new question about this device
Download the instructions for your Dictaphone in PDF format for free! Find your manual ICD-ST25VTP - SONY and take your electronic device back in hand. On this page are published all the documents necessary for the use of your device. ICD-ST25VTP by SONY.
USER MANUAL ICD-ST25VTP SONY
Dragon NaturallySpeaking®7
USER'S GUIDE

March 2003. Version 7. Professional, Medical, and Legal, Solution Series, Preferred, Standard, and Essentials editions.
This material may not include some last-minute technical changes and/or revisions to the software. Changes are periodically made to the information provided here. Future versions of this material will incorporate these changes.
ScanSoft, Inc. has patents or pending patent applications covering the subject matter contained in this document. The furnishing of this document does not give you any license to such patents. This software is protected under the following patents, among others: 5,027,406; 5,168,548 5,202,952; 5,231,670; 5,388,183; 5,428,707; 5,465,318; 5,526,463; 5,680,511; 5,715,367; 5,754,972; 5,765,132; 5,794,189; 5,799,279; 5,818,423; 5,822,730; 5,850,627; 5,890,181; 5,909,666; 5,915,236; 5,920,836; 5,920,837; 5,949,886; 5,960,394; 5,970,448; 5,970,460; 5,983,179; 6,029,124; 6,058,366; 6,064,959; 6,073,097; 6,088,671; 6,092,043; 6,092,044; 6,101,468; 6,125,342; 6,125,347; 6,138,098; 6,151,575; 6,163,768; 6,167,377; 6,212,498; 6,260,013; 6,292,779; 6,349,282; 6,424,943; and 6,456,972.
No part of this manual or software may be reproduced in any form or by any means, including, without limitation, electronic or mechanical, such as photocopying or recording, or by any information storage and retrieval systems, without the express written consent of ScanSoft, Inc. Specifications are subject to change without notice.
Copyright © 2002-2003 ScanSoft, Inc. All rights reserved.
ScanSoft, the ScanSoft logo, the Dragon logo, Dragon Naturally Speaking, Naturally Speaking, Naturally Mobile, RealSpeak, Nothing But Speech (NBS), Natural Language Technology, Select-and-Say, MouseGrid, and Vocabulary Editor are registered trademarks or trademarks of ScanSoft, Inc. in the United States or other countries. All other names and trademarks referenced herein are trademarks of ScanSoft or their respective owners. Designations used by third-party manufacturers and sellers to distinguish their products may be claimed as trademarks by those third-parties.
Pentium is a registered trademark of Intel Corporation.
Adobe and Acrobat are registered trademarks of Adobe Systems Incorporated.
Corel and WordPerfect are registered trademarks of Corel Corporation.
Lotus and Lotus Notes are registered trademarks of Lotus Development Corporation.
Microsoft, Outlook, Windows, Windows NT, Visual Basic, and PowerPoint are trademarks or registered trademarks of Microsoft Corporation.
Voice It, the Voice It logo, and Voice It Link are trademarks or registered trademarks of VXI Corporation.
AMD is a trademark of Advanced Micro Devices, Inc.
Sound Blaster is a registered trademark of Creative Technology Ltd.
America Online is a registered trademark of America Online, Inc., a division of AOL 'Time Warner.
Sony and Memory Stick are registered trademarks of the Sony Corporation
Panasonic is a registered trademark of the Matsushita Electric Industrial Co., Ltd
iPAQ is a registered trademark of the Hewlett-Packard Company
Dave Barry in Cyberspace, © Copyright 1996 by Dave Barry, published by Crown Publishers.
3001: The Final Odyssey, © Copyright 1997 by Arthur C. Clarke, published by HarperCollins Publishers.
Dogbert's Top Secret Management Handbook, © Copyright 1996 by United Feature Syndicate, Inc., published by HarperBusiness, a division of HarperCollins Publishers.
Success Is a Journey: 7 Steps to Achieving Success in the Business of Life, © Copyright 1999 by Jeffrey J. Mayer, published by McGraw Hill.
Charlie and the Great Glass Elevator, © Copyright 1972 by Roald Dahl, published by Alfred A. Knopf, Inc., and Penguin Books.
The Captain of Battery Park, © Copyright 1978 by Eugene Pool, published by Addison-Wesley.
Contents
CHAPTER 1 Introduction 1
About this guide 2
What's new in Version 7? 3
What should I expect from Dragon Naturally Speaking? 4
CHAPTER 2 Installation and Training 5
System requirements 5
Plugging in the microphone 6
Installing the software 7
Creating a new user 9
Setting up your microphone 11
Training a new user 13
Adapting to your writing style 15
CHAPTER 3 Starting to Dictate 17
Starting Dragon Naturally Speaking 17
'Turning on the microphone 17
Starting to dictate 18
Getting Help 21
Troubleshooting 22
The DragonBar 23
Using QuickStart 25
CHAPTER 4 Working on your Desktop 27
Programs, documents and folders 27
Switching between open windows 28
Opening and closing menus 28
Selecting buttons, tabs, and options 29
Selecting icons on the desktop 30
Resizing and closing windows 31
Scrolling in windows and list boxes 31
Opening lists and making selections 32
Pressing keyboard keys 32
Moving the mouse pointer and clicking the mouse 36
CHAPTER 5 Correcting and Editing 41
Correcting mistakes 41
Selecting text by voice 45
Moving around in a document 48
Copying, cutting, and pasting text 50
Deleting text 50
Spelling as you dictate 52
Playing back your dictation (Preferred and higher) 53
Using text-to-speech 57
CHAPTER 6 Formatting 61
Capitalizing text 61
Formatting text 64
CHAPTER 7 Working with Applications 67
Working with e-mail 67
Working with Microsoft Internet Explorer 70
Working with Microsoft Word 76
Working with Microsoft Excel (Preferred and higher) 80
CHAPTER 8 Dictating Names, Numbers, Punctuation & Special Characters 83
Dictating numbers 83
Punctuation 91
Dictating hyphenated words 93
Dictating compound words 94
Dictating names 95
Dictating abbreviations and acronyms 96
Dictating e-mail and Web addresses 96
Dictating special characters 97
Switching Recognition Modes 101
CHAPTER 9 Using the Command Browser 103
Supported Applications 103
Starting the Command Browser 104
Finding specific commands 105
Training commands 108
Working with Custom Commands (Preferred and higher) 109
CHAPTER 10 Improving Accuracy 115
The Accuracy Center 115
Tools to improve your acoustics 116
Tools to Manage Commands 118
Contents
Tools to improve your vocabulary 118
Training a word or command 129
Using the Performance Assistant 130
CHAPTER 11 Managing Users 131
Creating a new user 131
Opening a user 132
Renaming a user 133
Deleting a user 133
Backing up and restoring a user 134
Importing and exporting users 136
CHAPTER 12 Using Portable Recorders (Preferred and higher) 137
Installing recorder software 138
Creating a user adapted to your recorded speech 140
Dictating into your recorder 144
Transcribing recorded dictation 145
Correcting mistakes 151
Using the Dragon NaturallyMobile recorder as a microphone 151
CHAPTER 13 Automate Your Work (Preferred and higher) 153
Viewing and editing commands 154
Creating new commands 154
Deleting custom commands 159
Importing and exporting commands 160
Changing the command group and availability 160
CHAPTER 14 Customizing Dragon Naturally Speaking 161
Correction options 161
Startup/Shutdown options 163
View options 165
Hot key options 166
Miscellaneous options 169
Formatting options 170
APPENDIX Commands List 173
INDEX 207
CHAPTER 1
Introduction
Dragon Naturally Speaking lets you talk to your computer instead of typing. As you talk, your words are transcribed onto your screen and into your documents or e-mail messages.
Talking to a computer while it types what you say is called dictating. You can dictate into Microsoft® Word, Corel® WordPerfect®, e-mail programs, personal information organizers, and virtually any other program in which you normally type.
You can use Dragon Naturally Speaking to:
■ Compose letters, memos, and send e-mail messages. You can cut and paste inside your documents as well as revise and format text. Just think about what you want to say, and then say it into the microphone.
■ Enter data into forms or spreadsheets. Most people can dictate numbers faster than they can type. Using Dragon NaturallySpeaking Professional or higher editions, you can create custom voice commands to let you move from field to field on your form by voice.
■ Work on the Web. You can search the Web, access information, and navigate Web pages by speaking URLs and links.
■ Start programs and open menus.
■ Use handheld recorders to dictate while you are away from your computer. Dragon NaturallySpeaking can then transcribe what you said. (Available in Preferred and higher editions.)
About this guide
This guide covers all editions of Dragon NaturallySpeakingNaturallySpeaking. This includes:
■ Essentials
Standard
Preferred
■ Professional
■ Professional Solution Series
Most of the information presented in this guide is applicable to all the editions. Differences between the editions is noted in the text.
Conventions used in this guide
This guide contains many examples of words and phrases you can say when using Dragon NaturallySpeaking. These examples appear in italics with quotation marks, for example: "Format That Bold."
2 Some procedures also include sample text for you to dictate. Sample text appears in a different typeface, with punctuation in square brackets. For example:
US/Canada: When talking to a computer [comma] try to say every word clearly without trailing off at the end of a sentence [period]
Other Dialects: When talking to a computer [comma] try to say every word clearly without trailing off at the end of a sentence [full stop]
3 This guide applies to the five English dialects that ship with Dragon NaturallySpeaking:
■ US English
■ UK English
■ Australian English
■ Indian English
■ Southeast Asian English
US English uses US spelling, punctuation, and time and currency formats. We recommend US English for Canadian users since this dialect formats numbers (including times, telephone numbers, and currency) in North American formats.
All other dialects use UK spelling, punctuation, and time and currency formats (some number settings depend on your Windows Regional Settings). Where
multiple dialects are used in dictation examples, those dialects appear in a different font style. For example:
You can also correct a longer phrase by saying “Correct [text] Through [text]” (US/Canada) or “Correct [text] To [text]” (Other Dialects).
4 This guide uses US spelling and punctuation for consistency.
5 This guide also includes tips and notes to help you use the software more effectively. Tips and notes appear like this:
TIP If you pause correctly, but Dragon Naturally Speaking still types a command as dictation, you can force it to recognize what you say as a command by holding down the CTRL key.
NOTE With Numbers Mode on, Dragon Naturally Speaking tries to interpret everything you say as a number. If you dictate words, the results will be unpredictable. However, you can still navigate menus and switch between programs by voice when Numbers Mode is on.
What's new in Version 7?
Dragon NaturallySpeaking Version 7 includes the following new features:
■ New Performance Center
The Performance Center guides you through troubleshooting and performance optimization to be sure you're getting the most out of Dragon NaturallySpeaking.
■ Improved Command Browser
The new Command Browser gives you more flexibility when creating and managing your custom commands. The Command Browser is available in all editions, but functionality varies by edition.
■ Improved Text and Graphics Commands (Available only in Professional and higher editions)
Text and Graphics commands can now optionally match text to the font of the document you're creating or include special formatting and bitmaps, allowing you maximum flexibility.
■ Support for Additional Input Devices
Dragon Naturally Speaking Version 7 now supports certified Pocket PC devices as well as additional digital handheld recorders, array microphones and cordless microphones.
■ RealSpeak V2 (Available only in Preferred and higher editions)
Dragon NaturallySpeaking Version 7 now includes ScanSoft's RealSpeak V2.
■ Full Support for More Applications:
■ Outlook Express: Dragon Naturally Speaking automatically learns the contact names in your Outlook Express address book. (Available only in Standard and higher editions)
■ AOL 6, 7 and 8: Full Natural Language Command support.
■ WordPerfect 10: Full compatibility and Natural Language Command support (Available only in Standard and higher editions)
■ Microsoft Excel (Available only in Preferred and higher editions)
■ Microsoft Access (Available only in Preferred and higher editions)
■ Natural Punctuation (Available only in Standard and higher editions) You can have Dragon Naturally Speaking automatically insert periods and commas in dictated text.
■ Support for network installations and maintenance (Available only in Professional and higher editions) Dragon Naturally Speaking is available with an MSI file for network installations, and has been certified for SMS and Active Directory Services environments. (Available only in Professional and higher editions)
■ Ability to automatically launch NaturallySpeaking at system startup time.
■ Vocabulary Optimizer (Available only in Standard and higher editions) The Vocabulary Optimizer examines e-mail and documents to analyze sentence structure and word use frequency, and then adjusts the recognition engine to match your writing patterns.
What should I expect from Dragon NaturallySpeaking?
One reason to use Dragon Naturally Speaking is to do your writing more quickly; creating letters, reports, and other documents by voice. Another is to reduce the stress associated with keyboarding. Or maybe you just like the idea of being able to lean back in your chair, put your feet up on the desk, and still get work done.
Dragon NaturallySpeaking is good for all these reasons, but making it work well requires some effort from you. Dragon NaturallySpeaking learns about your voice and pronunciation as you use it. When you use words the program doesn't know, it will misrecognize them. By correcting your mistakes, you help Dragon NaturallySpeakingimprove its ability to recognize your way of speaking.
Do I still need my keyboard and mouse?
Although you can use Dragon Naturally Speaking to do almost everything on your computer by voice, some things are still easier to do by mouse or keyboard.
If using a mouse and keyboard is an option for you, try experimenting with using your voice and using your hands for different tasks, to see what works best. If using a mouse and keyboard is not an option, see “Working on your Desktop” on page 27.
CHAPTER 2
Installation and Training
This chapter describes how to install, set up, and train Dragon Naturally Speaking.
System requirements
To run Dragon Naturally Speaking, your system must meet the following requirements:
Intel ^ Pentium ^ III 500MHz or greater (or equivalent AMD ^TM processor)
NOTE Dragon Naturally Speaking will not install on machine with a processor of less than 500MHz.
■ 128 MB RAM for Essentials, Standard, and Preferred editions 256 MB RAM for Professional edition and Solution series.
■ 300 MB free hard disk space for a typical installation; 700 MB for a full installation.
■ Microsoft ^ Windows ^ ME, Windows ^ 98SE, Windows ^ NT'4.0 with Service Pack 6 or higher, Windows ^ 2000, or Windows ^ XP.
■ 16-bit Creative ^ Labs Sound Blaster ^ , or compatible sound card capable of and set to 16bit, 11KHz for Audio Recording
■ Microsoft ^® Internet Explorer ^® 5 or higher (free download available at www.microsoft.com.
■ CD-ROM drive (8x or faster) required for installation.
■ ScanSoft-approved noise-canceling headset microphone (included)
Speakers - optional for playback of recorded speech and text-to-speech features. (Available only in Preferred and higher editions)
Multiple users on one computer
Dragon NaturallySpeaking is licensed on a “per individual” basis. You are permitted to install the software on more than one computer (for example, on a desktop and a laptop computer, or on a work computer and a home computer), although you may not use the software concurrently on more than one computer, and you are permitted to create multiple voice profiles, so long as each voice profile is for you. If someone else desires to create or use another voice profile, however, that person must purchase a separate license for Dragon NaturallySpeaking. Volume license agreements are available.
Plugging in the microphone
To use Dragon Naturally Speaking, you will need to plug in your microphone.
1 Insert the microphone plug into the MIC input jack of your sound card. Microphones and sound cards vary, but the microphone jack is usually red and has a picture of a microphone. If your sound card does not have a MIC jack, use the LINE IN jack.
If you are not sure how to plug in your microphone, consult the documentation that came with your computer. Note the following:
Also, if you have a USB or array microphone (supported in Preferred and higher editions), follow the instructions that came with it instead of this description.
2 Insert the headphone plug into the LINE OUT jack on your sound card. If your sound card does not have a LINE OUT jack, use the SPEAKER or HEADPHONE jack.
NOTE If you already have speakers for your computer, you can also use these to playback recorded speech instead of your headphones.
Installing the software
Before installing Dragon NaturallySpeaking:
■ Close all open applications.
■ Turn off or disable any antivirus software; installation can sometimes trigger a false virus report.
NOTE You must have Administrator rights to install or uninstall Dragon NaturallySpeaking on Windows NT, Windows 2000 and Windows XP. Administrator rights are not required to create a user or use the software after installation. This also applies for an upgrade installation.
Upgrading from a previous version
Upgrading from Version 5:
You can upgrade your English users from any edition of Dragon NaturallySpeaking Version 5 to Version 7. The installation automatically migrates your english Version 5 user files and vocabularies to Version 7. If you upgraded from:
■ Version 5 English, the Version 5 English software will no longer be functional.
A non-English or multilingual Version 5, the software will remain fully functional, but the english Version 5 users will no longer be available in Version 5. Your non-English users files will not be upgraded and will still be available.
Upgrading from Version 6:
You can upgrade from any edition of Dragon Naturally Speaking Version 6 to Version 7. When upgrading from Version 6, you can choose to automatically migrate your V6 user files and vocabularies to Version 7. Once V7 is installed, Version 6 will no longer be functional.
To install Dragon NaturallySpeaking:
1 Insert the Dragon NaturallySpeaking CD into your CD-ROM drive. If the installation does not start automatically, use the Windows Explorer to find and double-click setup.exe on your CD-ROM drive.
Follow the on-screen instructions during installation.
2 Provide your customer information, including the serial number supplied with your NaturallySpeaking installation information.
3 Choose your destination location. If there are no previous version of Dragon NaturallySpeaking on your system, the default directory is:
C:\Program Files\ScanSoft\NaturallySpeaking
If you have Version 5 or 6 on your system, Version 7 will install to the previous version's directory.
4 Choose your Setup Type (Preferred and higher editions)
Most users in the US should choose “Typical Installation” and click Next. This installs Dragon Naturally Speaking with the US (American) English user files. To install non-US English user files, choose “Custom Installation” and follow the instructions below. Pick Custom Installation if you want to have more control over which components to install.
NOTE If you decide not to install some Dragon NaturallySpeaking components by selecting a Custom installation, you can install them later by running the Setup program again and choosing Modify.
Installing non-US user files (Preferred and higher)
To install user files for UK (British) English, Australian English, Indian English, or Southeast Asian English, choose “Custom Installation” from the setup screen and click Next.
Select the user file for the dialect you want and click Next to continue installation.
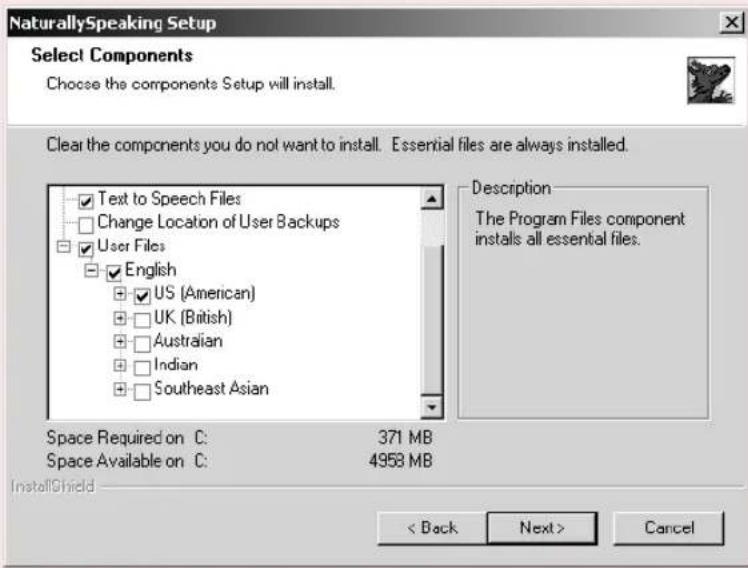
The user files for each region contain both spellings and pronunciations specific to that region. All users who wish to dictate US English spellings—including users with accents—should install the US (American) English user files.
Installation and Training
5 (Upgrade only) If you are upgrading from Version 5 or 6, the Version 7 installation prompts you to upgrade your users. You may be prompted later to re-train some of your existing users.
6 Continue following the on-screen instructions. The setup program will copy the files for Dragon Naturally Speaking to your computer.
7 When prompted, make sure to register your copy of Dragon Naturally Speaking. Once registered, we can notify you of product updates and other offers.
8 At the end of the installation, you can enable the Dragon NaturallySpeaking QuickStart option. By enabling Quickstart, NaturallySpeaking launches at system startup time and adds the NaturallySpeaking Quickstart icon to the Windows task bar. For more information on the QuickStart option, see “Using QuickStart” on page 25.
9 Click Finish to complete the installation. The program may ask you to reboot your computer.
Creating a new user
When you launch the software for the first time, the New User Wizard starts and leads you through creating a new user. For example:
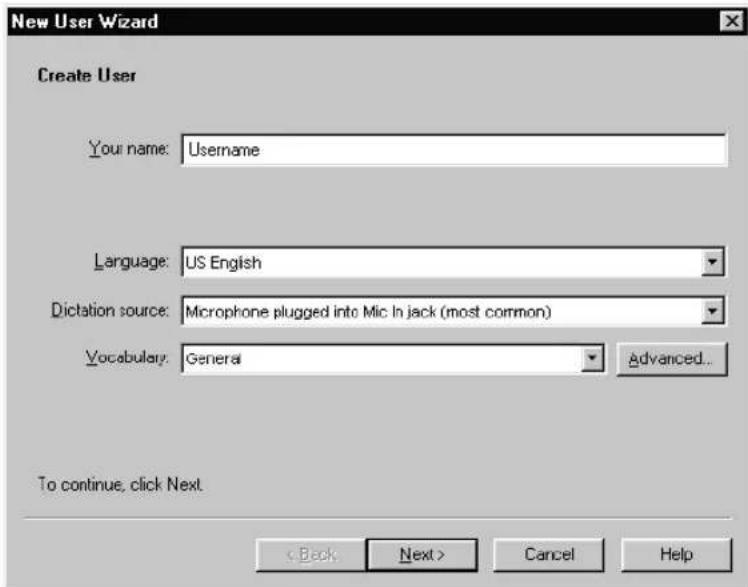
NOTE If you upgraded a single user from a previous version, NaturallySpeaking loads that user. If you upgraded multiple users, NaturallySpeaking displays the Open User dialog box.
Creating a user
To create a user, you must type a name in the Your Name field. The software automatically picks the best speech model and vocabulary settings for your system. For more information, see “About vocabularies and languages” below.
2 Select your dictation source. If you are using a USB microphone or another type of input device, choose the appropriate option from the “Dictation source” drop-down list.
3 Click Next to continue.
About vocabularies and languages
Languages
Some editions of Dragon NaturallySpeaking version 7 let you to create and train users in multiple languages. If you have purchased an edition with support for more than one language, you can add additional languages by choosing "Custom Install" during Setup. For Professional and higher editions, if you didn't select additional languages during Setup, you can also select an additional language when you create a new user. In this instance, you will need the Dragon NaturallySpeaking CD to install the language files before you can create the user.
Vocabulary
Dragon Naturally Speaking uses a vocabulary to recognize words correctly based not only on the sound of the words, but on their context.
The Vocabulary list is available only if your edition and language let you choose among different types of vocabularies. Check the list to see the available choices.
Vocabulary size
When you create a set of user files, Dragon Naturally Speaking recommends the vocabulary that best fits your computer's speed and memory. For most users, this recommendation should be followed.
Depending on your edition, you may see an Advanced button. Experienced users may want to click the Advanced button to specify a different vocabulary size:
■ Medium: for computers with 128 MB of RAM.
■ Large: for computers with more than 256 MB of RAM.
■ Empty Dictation: a vocabulary with a language model but without any words. Empty Dictation is designed for experienced users or re-sellers who want to create highly specialized vocabularies. (Professional and higher editions)
Speech Model
Dragon NaturallySpeaking uses the speech model to adapt to your voice during training. When you create a set of user files, Dragon NaturallySpeaking recommends the speech model that best fits your computer's speed and memory. Depending on your edition, you may see an Advanced button. Experienced users can use the Advanced dialog box to choose between different speech models. See the online help for more information.
Setting up your microphone
Click Next to have the New User Wizard lead you through setting up your microphone.
Positioning your microphone
The New User Wizard first explains how to position your microphone:
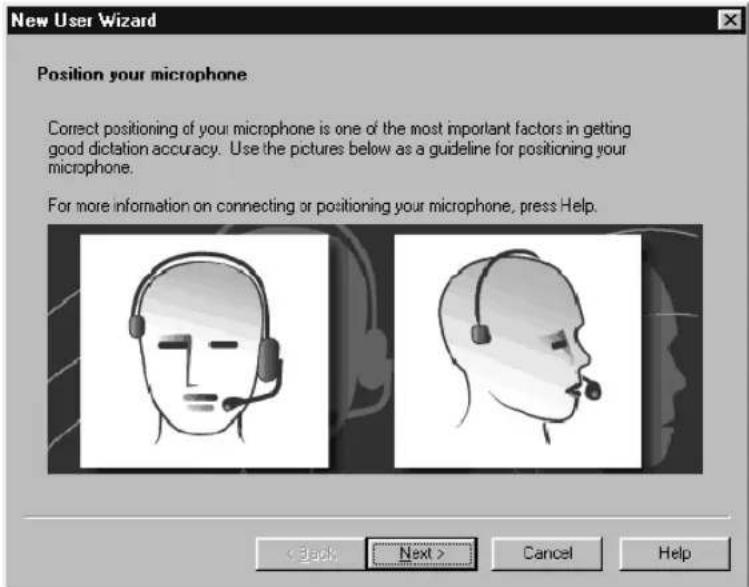
Once you have correctly positioned the microphone, click Next to continue.
Position the microphone
Positioning the microphone is important. If the microphone is out of place, Dragon Naturally Speaking may not be able to hear you clearly and may make more mistakes.
Consistent position is also important. Make sure that you position the microphone the same way each time you use Dragon NaturallySpeaking.
Using a headset microphone
■ Position the microphone about a half-inch (approximately the width of your thumb) from your mouth and a little off to the side. The microphone should not touch your mouth, but it can be almost touching your lips.
If you need to move the microphone out of the way, you can lift the "boom" up and over your head, rather than bending it out of position or removing the headset.
Using a handheld microphone (Preferred and higher)
- Hold the microphone one to three inches from your mouth and a little off to the side.
If the volume display on the DragonBar turns red, try holding the microphone slightly farther from your mouth.
Using an array microphone (Professional and higher)
■ Position the array between 18 and 30 inches from and pointed at your mouth.
- Avoid blocking the path between your mouth and the array, for example by holding a book or paper in front of your face.
- Avoid having any source of noise or signal other than your voice directly facing the array within at least 15 feet.
Check your volume
When the “Adjust Your Microphone: Volume Check” screen appears, click the “Start Volume Check” button and then read aloud the text displayed in the box.
When the program beeps to indicate it has finished checking the volume, click Next.
Sound quality check
When the “Adjust Your Microphone: Quality Check” screen appears, click “Start Quality Check” and then read aloud the text displayed in the box.
The program beeps when it has finished evaluating the sound quality of your system. If Dragon NaturallySpeaking displays “PASSED,” click the Next button to continue.
Training a new user
You must now train Dragon Naturally Speaking to recognize your voice.
NOTE For more information on training a mobile user, see "Using Portable Recorders (Preferred and higher)" on page 137.
A yellow arrow shows you where to start reading. To take breaks while you're training the program, click Pause.
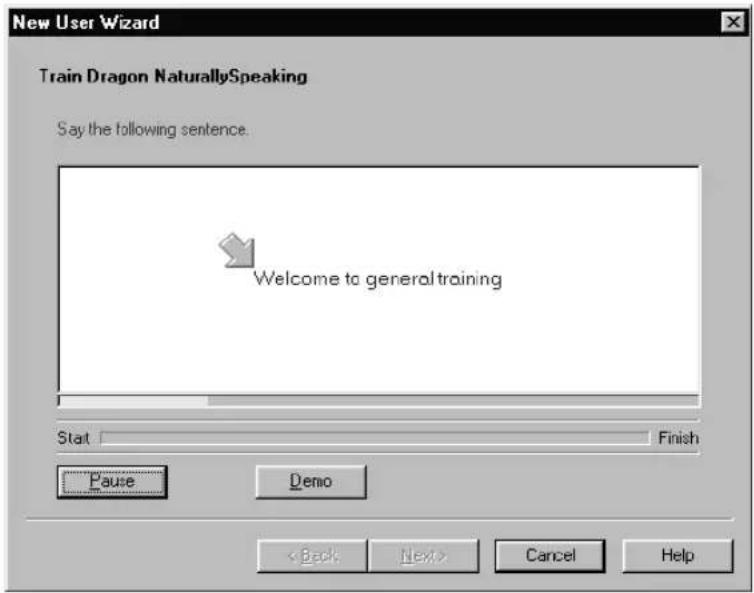
To advance through the first two screens, you must say the sentences without pausing. For the rest of the screens, it's okay to pause in the middle of a sentence.
When the words change color, it means the computer has heard and recognized them. If you keep reading the same words, and the computer still doesn't get it, just click Skip. Otherwise, click Next to continue.
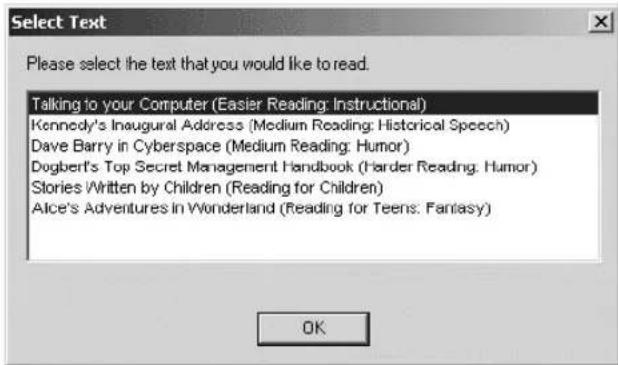
Choose a text to read aloud and click OK.
You only need to read for about five minutes to train NaturallySpeaking to recognize your voice.
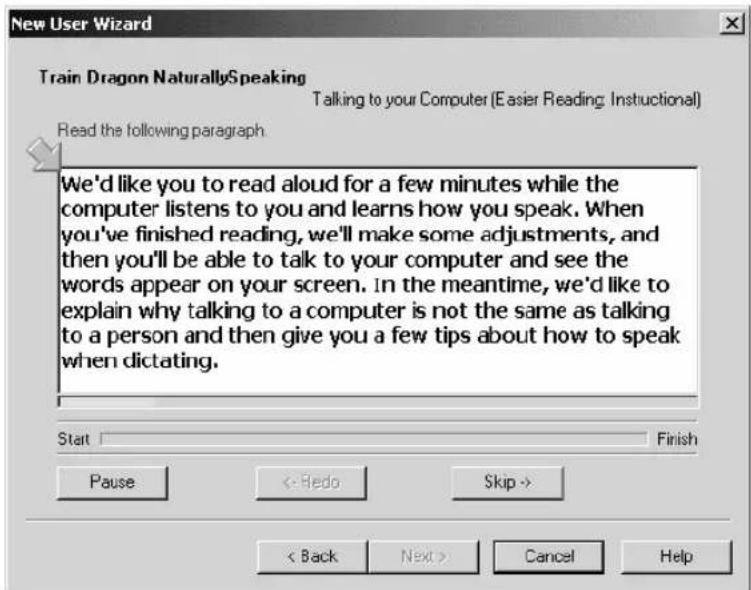
You can take breaks during this training by clicking Pause. Don't worry if you make mistakes or laugh. You should try to read exactly what you see on the screen, but it's okay if you read something incorrectly. The computer will either ignore the mistake or display the yellow arrow so you read the text again.
The progress bar shows how much text you have left to dictate.
NOTE During training, dictating punctuation is not necessary.
When you've read enough, the New User Wizard displays a congratulations message. When you click OK, NaturallySpeaking starts adapting to your voice.
Adapting to your writing style
After adapting to your voice, the New User Wizard prompts you to adapt Dragon NaturallySpeaking to your writing style.
Dragon Naturally Speaking can analyze your writing style to increase your overall recognition accuracy during dictation. This tool scans documents in your My Documents directory. These documents include Microsoft Word, Corel WordPerfect, text and rich text files (.rtf).
Adapting to your writing style can add 5 to 30 minutes to user training. Make sure all other programs are closed when you run this step.
NOTE Though we recommend that you run this part of the New User Wizard, if you plan to skip this part of User creation, select "Skip this step" rather than Cancel.
Click Start to continue. While scanning your system, the New User Wizard displays its status. When NaturallySpeaking is done adapting to your writing style, click Next.
You are now ready to dictate.
CHAPTER

Starting to Dictate
Now that you've installed your software and completed training, you're ready to dictate your first sentence.
Starting Dragon NaturallySpeaking
If Dragon Naturally Speaking is not already running, you can start it by:
■ Double-clicking the Dragon NaturallySpeaking icon:

- Selecting Programs>Dragon NaturallySpeaking from the Start menu.
■ Right-clicking the QuickStart taskbar tray icon and selecting Start NaturallySpeaking, if the QuickStart option is enabled. For more information on using the QuickStart option, see “Using QuickStart” on page 25.
Turning on the microphone
Before you can dictate, you need to turn on the microphone. You turn on the microphone by:
- Clicking the microphone icon on the DragonBar. You can click this icon again to turn it off.
- Pressing the plus (+) key on the numeric keypad to turn the microphone on, and then press it again to turn the microphone off.
- Clicking the microphone icon in the Windows task bar.
The button and the volume meter on the DragonBar change to show if the microphone is off or on.
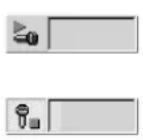
Shows that the microphone is off
Shows that the microphone is on
NOTE Once the microphone is off, you cannot turn it on again by voice.
Sleeping and waking up
To make Dragon Naturally Speaking stop listening temporarily:
1 Say "Go to Sleep" or "Stop Listening."
Dragon Naturally Speaking ignores everything except the "Wake Up" or "Listen To Me" commands.
2 To reactivate the microphone, say "Wake Up" or "Listen To Me."
You can also press the numeric (+) key to turn on the microphone.
Starting to dictate
To begin dictating, start a word processor (such as Microsoft® Word or Corel® WordPerfect®) and begin a new document. Make sure your text insertion point is at the start of the new document.
DragonPad
You can use the DragonPad, a simple word processor included with Dragon NaturallySpeaking. To open the DragonPad, from the Tools menu on the DragonBar, click DragonPad.
TIP Remember to click in the window you want to talk to before you speak.
Start talking. As you talk, text displays in the Results box while Dragon Naturally Speaking figures out what you said. The Results box is a small yellow window that appears on-screen as you dictate. For example:
talking to a computer
The words in the Results box may change as the program considers different interpretations of what it heard.
The Results box displays a line that changes from yellow to green as you speak, indicating the volume of your dictation.
NOTE When Dragon Naturally Speaking recognizes what you said as a command, the Results box displays a bold blue border.
You can also anchor the Results box permanently in one place. From the Tools menu of the DragonBar, click Options, then click the View tab and enable the Anchor option.
Don't worry about mistakes at this point; Dragon Naturally Speaking improves as you use it.
Using Natural Punctuation
Dragon Naturally Speaking can automatically add periods and commas at the appropriate places in your dictation without you having to explicitly speak that punctuation. The Natural Punctuation feature can be useful in helping you get used to dictation by focusing on what you are saying rather than how your speech is punctuated.
Natural Punctuation inserts only periods and commas. You have to dictate other punctuation marks. Even with Natural Punctuation turned on, you can still dictate periods and commas. As you become more adept at dictation and want more control over where punctuation appears, you may want to explicitly dictate all your punctuation.
NOTE You can turn Natural Punctuation on and off by voice by saying "autopunctuation on" and "autopunctuation off" or by selecting Options from the Tools menu of the DragonBar and clicking "Automatically add commas and periods" on the Formatting tab.
For more information on Natural Punctuation see “Using Natural Punctuation” on page 91.
Dictating punctuation
You can dictate punctuation at any time while you are using Dragon NaturallySpeaking, even when Natural Punctuation is enabled.
Use the following list as a guide to dictating the most common punctuation marks. (For a complete list of punctuation, see page 194.)
| TO ENTER | SAY (US/Canada) | SAY (Other Dialects) |
| , comma comma | ||
| . period full stop | ||
| ! exclamation point orexclamation mark | exclamation mark | |
| ? question mark question mark | ||
| - hyphen hyphen | ||
| : colon colon |
Starting new lines and paragraph
While you are dictating, you can use the following commands to duplicate the action of pressing the Enter key once (to add a new line) or twice (to add a new paragraph).
| TO | SAY |
| Add a new line | "New Line" |
| Add a new paragraph | "New Paragraph" |
Saying "New Paragraph" presses the Enter key twice and capitalizes the next word you dictate.
Tips for dictating text
■ To erase the last thing you said, say "Scratch That."
■ You can repeat "Scratch That" to undo a sequence of phrases.
To undo the effects of a command, say "Undo That." If "Undo That" fails to undo an action, try repeating the command until you completely undo the operation.
■ To stop a recognition in progress (and turn the microphone off), click the small red button inside the Results box.
- You can change the very last phrase you spoke by saying "Bold That," "Cap That," "Correct That," and so on; you do not have to select the text first.
■ To remove a trailing space after a word, you can say "Delete Previous Character."
- You can create a spoken form for words you prefer not to say aloud. For example, you can create a command that types "Snookums" whenever you say "Mary's nickname."
■ To clear (deselect) your last selection, say "Unselect That."
For information on correcting any mistakes, see Chapter 5, “Correcting and Editing.”
Printing and saving your dictated text
Printing
From the File menu of your word processor, use the mouse to choose Print. Or say "Click File," pause, and say "Print." You can also simply say, "Print Document" or "Print File" if the Natural Language Commands are enabled. See "Startup/Shutdown options" on page 163. Also see "Using the Command Browser" on page 103.
Saving
From the File menu, choose Save. You can also say "Click File" and then say "Save." Remember, you have to pause between the "Click File" and the "Save" commands to have Dragon Naturally Speaking recognize them as two separate commands. If the Natural Language Commands have been enabled, you can say "Save Document."
Getting Help
To access the online Help for Dragon NaturallySpeaking, click the Help menu on the DragonBar and choose Help 'Topics. Alternately, you can say "Give Me Help." You can print individual Help topics with the Print button in the Help window. To open the online Help links, just say their names. The links will be displayed next to the application window and will give you examples of the most common commands that work in the application you are currently using.
"What Can I Say?"
Saying “What Can I Say?” will bring up the Sample Commands window. The Sample Command window displays a small selection of useful commands that Dragon Naturally Speaking recognizes for the current context, whether it is a particular program you are using or the Windows desktop.
Additional commands are also summarized in the Commands List Appendix on page 173.
To open the Sample Command Window
Choose Sample Commands from the Help menu on the DragonBar or say “What can I say”. The Sample Commands window opens, displaying a selection of commands next to the window you are working in.
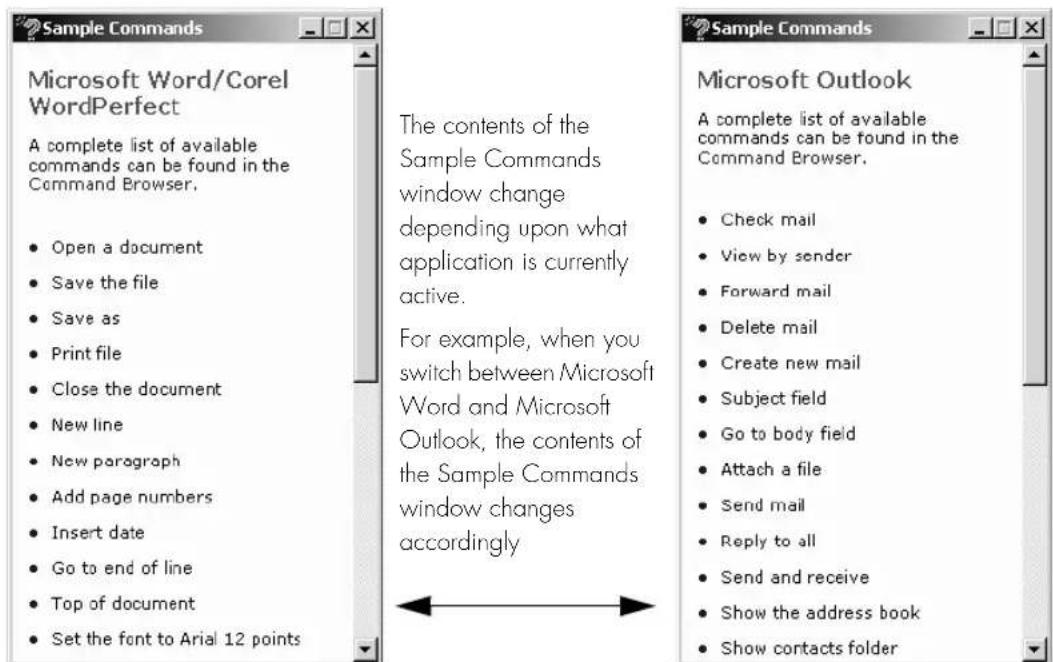
If you want to see additional commands that are available to you, click Command Browser at the top of the Sample Commands window. The Command Browser is described in more detail on page 103.
Notes
A list of Global commands (available everywhere) appears if there are no sample commands available for a specific program.
- Commands marked with an asterisk (*) are available only if the Enable Natural Language Commands check box is selected on the Startup/Shutdown tab of the Options dialog box.
Tutorial
To start the Tutorial, choose Tutorial from the Help menu on the DragonBar. The Tutorial includes a number of lessons covering the basics of Dragon NaturallySpeaking.
Troubleshooting
If you are having problems using Dragon NaturallySpeaking, or if you are getting unexpected results, please refer to the “Resolving Problems” and “Tips” section of the online help.
The DragonBar
The DragonBar gives you access to Dragon NaturallySpeaking functions and features.

The Sound menu and the Extras toolbar is available only in Preferred and higher editions.
Microphone button and volume display
When the microphone is on, the Volume Display shows the sound level. Yellow means silence or that your speaking too softly, green means you are speaking at a proper level, and red means you are speaking to loudly.

Extras toolbar (Preferred and higher edition)
If present in your edition, you can click the Extras button on the far right of the DragonBar to open the Extras toolbar. The Extras toolbar displays buttons for handheld recorder transcription and playing back your dictation.
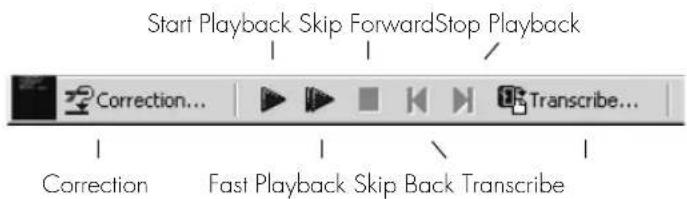
Correction
Clicking the Correction button opens the Correction menu to teach the computer what you said. See chapter 4, "Correcting and Editing."
Transcribe
Use this button to transcribe your speech from a handheld recorder. See chapter 15, "Using Portable Recorders (Preferred and higher)."
Start Playback, Fast Playback, and Stop Playback
When you select text and click the Start Playback button, you hear a recording of your dictation. A yellow arrow displays on your screen during playback, following what you said. Click the Fast Playback button to play the recording at a faster speed. Click the Start Playback button to return to a normal speed. Click the Stop Playback button to stop the recorded speech playback.
Skip Back and Skip Forward
Use these buttons to skip backward or forward one utterance. To Dragon NaturallySpeaking, an utterance is a group of words said together without pausing. The Extras menu items can be displayed in the main DragonBar. See “View options” on page 165.
Changing the DragonBar position
To change the position of the DragonBar, click the Dragon icon at the far left of the DragonBar. A menu displays which lets you move the DragonBar as follows:
| SELECT... TO... | |
| Docked to Top mode (default) lock the DragonBar to the top of the screen | |
| Docked to Bottom mode lock the DragonBar to the bottom of the screen | |
| Floating mode freely position the DragonBar | |
| Cling mode | make the DragonBar appear just above the window into which you are dictating. |
| Tray Icon Only mode | hide the DragonBar completely and only display the Microphone icon in the Windows task bar. |
NOTE You can also hide the DragonBar by saying "Switch to Tray Icon Only Mode." To make a hidden DragonBar reappear, right-click on the small microphone in the lower right corner of the screen. From the menu that appears, click Restore Previous DragonBar Mode.
Controlling Dragon Naturally Speaking with voice commands
You can operate Dragon NaturallySpeaking with voice commands. For example, to show the Extras toolbar, say “Show Extras Bar.” For a list of other voice commands that control Dragon NaturallySpeaking, see “Controlling the DragonBar” in the Appendix, page 174.
Using QuickStart
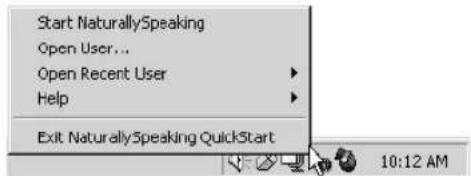
The NaturallySpeaking QuickStart taskbar tray icon gives you quick access to Dragon NaturallySpeaking and recent users. Right-clicking the QuickStart icon displays the QuickStart menu. For example:
NOTE This option is installed at the end of Dragon NaturallySpeaking Setup process.
Enabling QuickStart
By enabling QuickStart, NaturallySpeaking launches automatically at system startup time and adds the NaturallySpeaking icon to the Windows taskbar.
There are two ways to enable QuickStart:
During installation. The final installation screen includes the option to enable QuickStart.
From the Options dialog box. From the Tools menu on the DragonBar, click options and then click the Startup/Shutdown tab. To enable QuickStart, select "Launch in QuickStart mode on Windows startup." See page 26 for more information.
You must re-start Windows for the QuickStart option to take effect.
Shutting off QuickStart
To permanently disable QuickStart, de-select it from the Startup/Shutdown tab of the Options dialog box. You must re-start Windows for this option to take effect.
Temporarily Disabling QuickStart
To temporarily disable QuickStart, right-click the QuickStart taskbar tray icon and select "Exit NaturallySpeaking QuickStart." This removes the QuickStart taskbar tray icon from the Windows taskbar. When you re-start Windows, the QuickStart taskbar tray icon re-displays. You can also re-start QuickStart without re-starting Windows by selecting Start->Programs->Startup->Dragon NaturallySpeaking.
Using QuickStart
You access QuickStart by right-clicking the QuickStart taskbar tray icon. This displays the QuickStart menu.
| SELECT... TO... | |
| Start NaturallySpeaking Start NaturallySpeakingIf you have only one user defined, NaturallySpeaking opens with that user loaded. If you have more than one user, the Open User dialog box displays and NaturallySpeaking starts once you select a user to load. | |
| Open User... Display the Open User dialog box. Once you select (or create) a user, NaturallySpeaking starts. | |
| Open Recent User Open a menu listing your most recently loaded users. | |
| Help Open the Help menu | |
| Close DragonBar Unload all users and closes the DragonBar | |
| Exit NaturallySpeaking QuickStart | Remove the QuickStart taskbar tray icon from the Windows taskbar and closes NaturallySpeaking if it is currently running. You must re-start Windows to re-start the QuickStart feature. |
If the QuickStart icon becomes unavailable for any reason, you can always start the program from the Windows Start Menu.
CHAPTER 4
Working on your Desktop
This chapter describes how to control almost everything on your computer with Dragon Naturally Speaking voice commands.
NOTE If you are using Microsoft® Windows NT® version 4, you will need Service Pack 6 or later in order to be able to use most of the voice commands described in this chapter. If you are using Microsoft® Windows NT® 4 with a Service Pack lower than 6, then you will not have Active Accessibility installed on your system and an error message will appear. However, pressing keys by voice (page 32), and moving the mouse by voice (page 36) will work regardless of what Microsoft® Windows NT® Service Pack you have.
Programs, documents and folders
Using voice commands, you can start programs and open documents and folders that appear in your Start menu or desktop.
You can't start Dragon NaturallySpeaking by voice. However, you can automatically start Dragon NaturallySpeaking in sleep mode whenever you start Windows. See "Startup/Shutdown options" on page 163 for more information.
Starting a program
To start a program from the Start menu, say “Start” and then the name of the program exactly as it appears on the menu or submenu of the Start menu. You can also say the name displayed below the icon on your desktop.
For example, to start Microsoft® Internet Explorer®, say “Start Internet Explorer.”
Opening documents and folders from the Start menu
To open a document or folder from the Start menu, say “Start” and then the name of the document or folder exactly as it appears on the menu.
For example, to open a document named sales.doc, you could say “Start Sales dot doc.” To open a document named journal.wpd, you could say “Start journal dot w p d.”
To open a document or folder from your Windows ^® desktop, just say “Start” and then the name below the icon. For example, to open a folder named “Projects,” say “Start Projects.”

Projects
— Say "Start Projects"
Switching between open windows
You can switch between the windows you have open by saying “Switch to” and then say the name of the program or document window exactly as it appears in the title bar.
For example, if Microsoft® Word® is running, you can switch to it by saying “Switch to Microsoft word.”
You can also switch between open windows by saying “Switch to Previous Window” (same as pressing ALT+TAB) and “Switch to Next Window” (same as pressing ALT+SHIFT+TAB).
SAY THIS TO
Switch to Next Window Switch to the next application.
Switch to Previous Window Switch to the previous application.
Switch to Microsoft Word Make Microsoft
®Word the active application.
Switch to (name of application)
Switch to the open application you specify. Say the name of the application as it appears in the title bar of the application window.
Opening and closing menus
You can activate any menu by saying the menu name.
To open a menu:
1 Open a program window (for example, Microsoft ^ Word) and make it active.
Say the name of the menu you want to open (for example, say "File"). If the command does not work, try saying "Click" and then the name of the menu you want to open (for example, say "Click File").
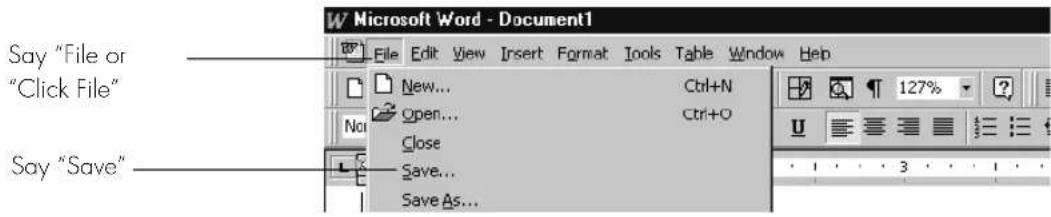
2 In this example, the File menu should open. If the command doesn't work (for example, if the word "click" is typed into your document), you may have paused in the middle of the command.
3 Say the name of a menu item to activate it (for example, say "Save").
4 To close a menu, say "Cancel."
TIP To open the Start menu, say "Click Start" or "Click Start Menu."
NOTE If commands are often typed into your document instead of recognized as commands, you can make Dragon Naturally Speaking recognize commands only when they are preceded by saying "Click." To do this, select the "Require 'Click' to select menu or control" check box on the Miscellaneous tab of the Options dialog box, described on page 169.
Selecting buttons, tabs, and options
When Dragon NaturallySpeaking is running, you can select any button, check box, text box, or other dialog box option you see by saying it's name. If that doesn't work, say "Click" and then its name.
For example, to select a check box labeled "Toolbar," say "Toolbar" or "Click Toolbar." To clear the check box (deselect it), say its name again.
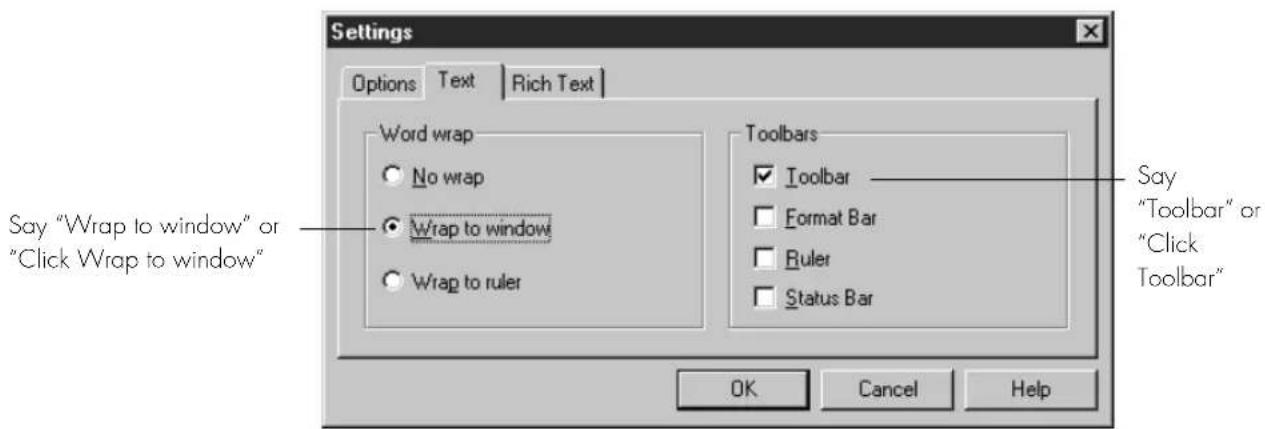
You can select tabs by saying the name of the tab, alone or preceded by “Click.” In the dialog box pictured, you could say “Options” or “Click Options” to select the Options tab. You can also move between tabs by saying “Go to Next Tab” and “Go to Previous Tab.”
NOTE In some programs, you may not be able to select dialog box items by saying their names. If this happens, the following method of selecting items may work: say "Tab Key" repeatedly to move to the item you want, then say "Press Space Bar" to select it. See also "Moving the mouse pointer and clicking the mouse," on page 36.
Selecting icons on the desktop
You can use voice commands to select icons on the Windows ^® desktop.
To select an icon on the desktop:
1 Switch to the Windows ^ desktop. To do this by voice, minimize all open applications and place the mouse pointer over the desktop icon. Say “Mouse Click” to make the desktop active.
2 Say the name of the icon (for example, "My Computer"). Dragon Naturally Speaking types the icon name and Windows® selects it.
3 To select another icon, say "Move" and then the direction (up, down, left, right) and number of icons (up to 20).
For example, say “Move Right 1,” “Move Down 2,” or “Move Up 3.”
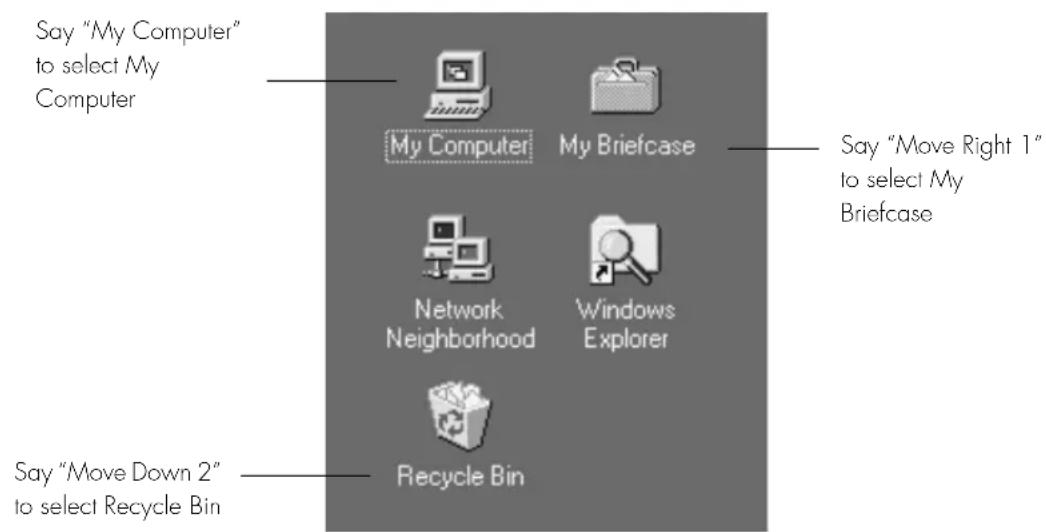
After you select an icon, you can say “Press Enter” to start or open it and “Press Shift F10” to display its menu (as if you right-clicked the icon with the mouse.)
You can also use voice commands for these actions. See “Marking and dragging objects” on page 38.
Resizing and closing windows
To resize and close windows, say "Click" and then one of the following window commands:
| SAY THIS TO | |
| Click Minimize or Click Control Menu (pause) Minimize | Minimize the active window. |
| Click Maximize or Click Control Menu (pause) Maximize | Maximize the active window. |
| Click Restore or Click Control Menu (pause) Restore | Restore window to previous size. |
| Click Close or Press ALT F4 | Close the active program. |
| Press CTRL F4 Close the active document, not the whole program (works in many programs). | |
| Click Start Menu or Click Start or Press CTRL ESC | Open the Windows® Start Menu. |
NOTE "Click" is NOT optional for the Control menu commands.
TIP If you have trouble getting Dragon NaturallySpeaking to recognize any of the window commands, you can open the Control menu by saying "Click Control Menu" and then say them.
Scrolling in windows and list boxes
You can scroll vertically in a window (for example, an online Help window) or list box by saying “Move Down” and “Move Up” and then a number of scroll bar arrow clicks (up to 20). For example, say “Move Down 4” or “Move Up 10.”
You can scroll horizontally by saying “Move Left” and “Move Right” and then a number of scroll bar arrow clicks (up to 20). For example, say “Move Left 10” or “Move Right 5.”
Opening lists and making selections
You can activate any list box by saying the list box name.
To open a list box:
1 Say the name of the list box you want to open.
2 Say "Show Choices," "Drop List," or "Open List." The list box opens to show all the choices available in the list.
To make a selection from an open list
1 Say the full name of the selection.
2 Say "Move Down" or "Move Up" and the number of places your selection is from the current selection.
Pressing keyboard keys
You can activate Windows ^® menus and controls by pressing keys. With Dragon NaturallySpeaking you can “press” any key on your keyboard by voice. You can press letters, numbers, modifier keys (SHIFT, CTRL, and ALT), and so on.
You can say “Press,” “Press Key,” or “Type”—all three voice commands work the same way.
NOTE "Scratch That" will not erase keystrokes dictated with the Press Key commands. You must select the text by voice or mouse and delete it or say "Press Delete."
Pressing letters
You can press any letter on your keyboard by saying “Press” and then the letter. When you’re pressing letters, you must say “Press” before each one. For example, to enter “txt,” say “Press t,” “Press x,” “Press t,” pausing between letters.
TIP You can also spell words using Spell mode. See "Switching Recognition Modes" on page 101 for more information.
For similar-sounding letters (such as b, d, and v), you can use the International Communications Alphabet (page 178) to “spell” the letter keys, for example, “Press alpha” or “Press bravo” or say “Press d as in David,” and so on (you can also say “Press
d for David," and so on) as you would if you were spelling something to another person over the phone.
SAY THEN
Press a
b
any letter a-z or any international alphabet word alpha through zulu
a as in Albert/Alice/alpha
b as in Bill/Buffalo/bravo
c as in Cathy/Carl/Charlie
d as in David/daughter/delta
e as in Edgar/enter/echo
f as in Frank/fancy/foxtrot
g as in George/gopher/golf
h as in Henry/helmet/hotel
i as in Iris/Ireland/India
j as in John/justice/Juliet
k as in Karen/kitchen/kilo
l as in Larry/lemon/lima
m as in Mickey/magic/Mike
n as in Nancy/nobody/November
o as in Otto/over/Oscar
p as in Paul/people/papa
q as in Quentin/question/Quebec
r as in Robert/Rachel/Romeo
s as in Sam/Singapore/sierra
t as in Terry/Tyler/tango
u as in Ursula/unit/uniform
v as in Valerie/visit/Victor
w as in Wendy/wake/whiskey
x as in Xavier/Xerxes/xray
y as in Yolanda/Yvonne/yankee
z as in Zachary/zookeeper/zulu
(you can also say "for" instead of "as in")
NOTE You can say "Press c" or "Press Charlie" but you cannot say "Press Cathy" or "Press Carl."
Capitalizing a letter
You can capitalize a letter by saying “Press Cap” and then the letter.
For example, to enter “28K” say “twenty eight” and then “Press Cap K” (or “Press Cap K for Karen”).
Pressing numbers
You can press numbers (0 to 9) by saying “Press” and then the number. For example, say “Press 8.”
Pressing key combinations
When you're pressing keys, you can press any combination of the modifier keys (SHIFT, CTRL, and ALT) at the same time as another key, such as a letter. For example, you can say:
■ "Press Control Z" (undoes last action)
■ “Press Alt F” (opens File menu)
■ “Press Shift Tab” (moves backward through dialog box options)
NOTE Dragon NaturallySpeaking ignores the command "Press Control Alt Delete" (the keyboard shortcut for restarting a computer).
Pressing function and numeric keypad keys
To press a function key (F1 to F12), say “Press Function” and then the name of the key. For example, say “Press Function 1” to bring up the online Help.
To press the keys on the numeric keypad, say “Press Keypad” and then the name of the key. For example, you can say “Press Keypad Minus” to press the keyboard shortcut that opens the Correction Menu. See the complete list below:
SAY THEN
Press Keypad 1
Keypad 9 (you can say any number from 0 to 9)
All Dialects: Keypad Point (.)
US/Canada: Keypad Period (.)
Other Dialects: Keypad Full Stop (.)
Keypad Slash (/)
Keypad Asterisk (*)
Keypad Minus (-) (opens the Correction menu)
SAY THEN
Keypad Plus (+) (turns the microphone on or off)
Keypad Star (*) (opens the NaturallySpeaking menu on the
DragonBar)
Keypad Enter
NOTE Num Lock must be on for the "Press Keypad" commands to work. You can say "Press Num Lock" to turn Num Lock on.
Pressing other keys
Here's a list of other keys you can press by voice:
SAY THEN
Press Up Arrow
Down Arrow
Right Arrow
Left Arrow
Home Key
End Key
Page Up
Page Down
Insert Key
Delete Key
Control Key
Shift Key
Alt Key
Print Screen
Scroll Lock
Pause Key
Num Lock
Caps Lock
Moving the mouse pointer and clicking the mouse
Dragon NaturallySpeaking provides hands-free mouse control with MouseGrid and the mouse motion voice commands. You can use these features to position the mouse pointer anywhere on the screen, click the mouse buttons, and drag objects—all by voice.
Moving the mouse pointer with MouseGrid
You can position the mouse pointer anywhere on the screen by using MouseGrid. You can move the pointer relative to the full screen or the active window.
To use MouseGrid:
Say "MouseGrid" to place the MouseGrid over the full screen (as in this example) or say "MouseGrid Window" to place it over the active window. For example:
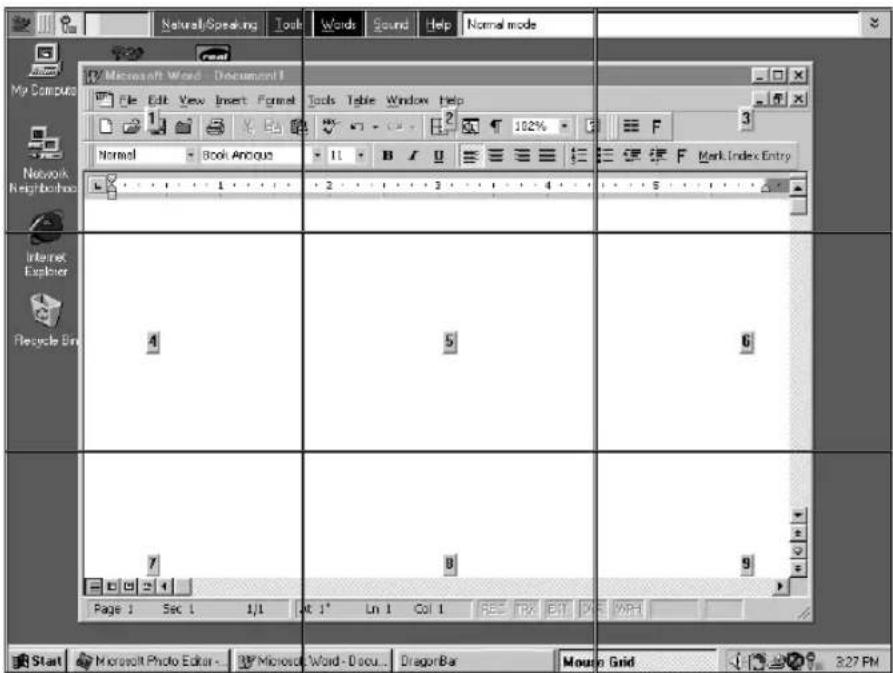
Say "4" to place a smaller MouseGrid over grid square number 4.
2 Say a grid number from 1 to 9 to position the pointer in that numbered area. In this example, to position the pointer over the Recycle Bin, say "4." A smaller MouseGrid will appear in the chosen grid square.
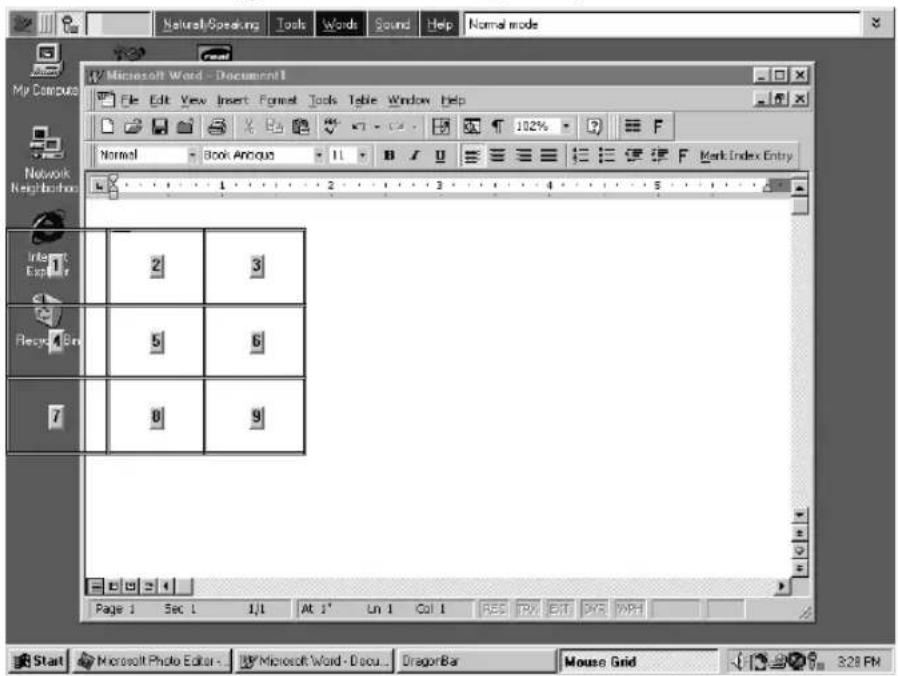
3 To zoom in over the desired area, say another grid number. In this example, say "4" to place the pointer over the Recycle Bin icon.
4 Continue to say the respective grid number to zoom in until the mouse pointer is over an icon or other object. You can use voice commands to click the mouse or mark and drag the object. See the following sections for instructions.
TIP You can undo the last MouseGrid action by saying "Undo That."
To close MouseGrid, say "Cancel."
Moving the pointer with the "Mouse" command
You can move the mouse pointer up, down, left, or right a short distance (a few millimeters) by using the mouse pointer commands.
You can combine moving the mouse pointer and clicking the mouse in a single voice command. For example, you can say "Mouse Up 3 Click" or "Mouse Right 2 Double Click."
To move the pointer:
1 Say "Mouse" followed by the direction and number of times to move it (up to 10). For example, say "Mouse Up 5" or "Mouse Left 10."
2 When the pointer is over an icon or other object, you can use voice commands to click the mouse or mark and drag the object.
Clicking the mouse
You can click, double-click, left-click, and right-click the mouse buttons by voice.
To click the mouse:
1 Position the mouse pointer over the object you want to select (for example, say "MouseGrid 9 1" or "Mouse 2").
2 Say “Mouse Click,” “Mouse Double Click,” “Mouse Left Click,” or “Mouse Right Click.”
When an object is selected, you can mark and drag the object (as described in the next section).
Marking and dragging objects
You can mark an object and drag it to a different location by voice.
To mark and drag an object:
1 Position the mouse over the icon or object you want to drag and then say "Mark" (for example, say "MouseGrid 9 1 Mark").
2 Move the mouse pointer to where you want to drag the object and then say "Drag" (for example, say "MouseGrid 6 3 Drag").
TIP Instead of "Drag," you can also say "Control Drag" and "Shift Drag" to drag while holding down the CTRL or SHIFT key.
Moving the pointer with the mouse motion commands
In addition to the mouse movement methods described above, you can also move the mouse by using the mouse motion commands. Say, for example, “Move Mouse Right.” The mouse pointer will begin moving to the right and will keep moving until you say “Stop.”
Enabling the mouse motion commands
To use the mouse motion commands:
From the Tools menu on the DragonBar, choose Options and then the Startup/Shutdown tab.
2 Select "Enable mouse motion commands" and click OK.
3 Click the Speed button to choose how fast the mouse pointer moves when you use a mouse motion command.
The mouse motion commands
Here is a summary of the available mouse motion commands.
| SAY THEN A | THEN A SPEED(OPTIONAL) | |
| DIRECTION | ||
| Move Mouse | Up | Fast |
| Mouse Move | Down | Faster |
| Drag Mouse | Right | Much Faster |
| Mouse Drag | Left | Very Fast |
| Upper Left | Slow | |
| Lower Left | Slower | |
| Upper Right | Much Slower | |
| Lower Right | Very Slow | |
While the mouse is moving, you can say any of the commands above. You can also say:
- “Stop” or “Cancel” to stop the mouse from moving
“Up,” “Down,” “Left,” “Right,” “Upper Left,” “Lower Left,” “Upper Right,” or “Lower Right” to change the direction in which the mouse is moving
“Faster,” “Much Faster,” Slower,” or “Much Slower” to change the speed at which the mouse is moving - “Click,” “Double Click, “Right Click,” or “Left Click” to click the mouse buttons
- “Go to Sleep,” “Stop Listening,” or “Microphone Off” to turn the microphone off
To specify which mouse button (left, right, or center) is being held down during mouse drags or if you want the SHIFT, CTRL, or ALT key held down during the mouse drag, use one of these commands before saying one of the drag commands in the table above:
■ Left
■ Middle (requires a three-button mouse)
Right
Shift
Control
Alt
■ Right Shift
■ Right Control
Right Alt
For example, to drag with the SHIFT key held down, you could say “Shift Mouse Drag Up.” To drag with the rightALT key held down (the ALT key on the right side of the keyboard), you could say “Right Alt Drag Mouse Upper Left.”
CHAPTER 5
Correcting and Editing
When Dragon Naturally Speaking types the wrong words, you should correct these mistakes. By giving the program the right word, you actually teach the program not to make the same mistakes again.
Correcting mistakes requires some extra effort, but it saves you time in the long run by making Dragon Naturally Speaking more accurate. You'll probably need to correct mistakes often when you first start dictating, and then less frequently as the program learns from your corrections.
Make it a habit to correct mistakes to continue to improve the accuracy of the program. Make sure you save your speech files when prompted, to preserve the adjustments the program makes.
TIP You must select a word before typing over it. Using the backspace key and retyping (or saying "Scratch That") will not enable the software to learn from corrections and improve recognition accuracy. For accuracy to improve, you must first select text and then correct it or overwrite it with the words you said.Mrs.
Correcting mistakes
There are a number of ways you can correct the misrecognitions in a document. The following techniques describe the most basic methods, but you can combine these techniques in any manner that suits your working style.
Correcting text with the keyboard
1 Move the insertion point to the beginning of the dictation you want to correct.
2 Press the Correction hot key to display the Correction menu. By default, this is the minus (-) key on the numeric keypad. You can change the hot key assignment on the Hot keys tab of the Options dialog box. You can also click the Correction button on the Extras toolbar of the DragonBar.
3 If one of the alternatives is correct, press the Down Arrow key to highlight that choice and then press Enter to accept it. If no alternative is correct, just type or say the correct text.
4 Continue until all the text is correct.
Correcting text using voice commands
1 Say "Select" or "Correct" and the text that is incorrect, the Correction menu appears with a number of alternatives.
If one alternative is correct, say "Choose" and the number of that alternative.
■If none of the alternatives is correct, say "Spell That," spell the correct word or words into the Spell dialog box, and then say "OK."
Selecting a large amount of text or an entire document and then saying “Spell That” can produce unpredictable results.
2 Verify that the correct text appears in the document in place of the misrecognized text and continue to the next misrecognition.
Correcting text while playing back dictation (Preferred and higher editions)
1 Move the insertion point to the beginning of the dictation you want to correct.
2 Click Play That Back on the Sound menu of the DragonBar or click the Start Playback button on the Extras toolbar. You can also say, "Play that back".
3 When the playback of your dictation reaches a recognition error, press the correction hot key. By default, this is the minus (-) key on the numeric keypad.
4 If one of the alternatives is correct, press the Down Arrow key to highlight that choice and then press Enter to accept it. If no alternative is correct, just type or say the correct text and press the Correction hot key again. Playback will continue automatically from the point where you stopped.
5 Continue until all the text is correct.
Using the Correction menu
The Correction menu shows Dragon NaturallySpeaking's best guess of the alternatives to the words you dictated and selected.
In the following example, Dragon Naturally Speaking heard the word “quick” as “clinic.”
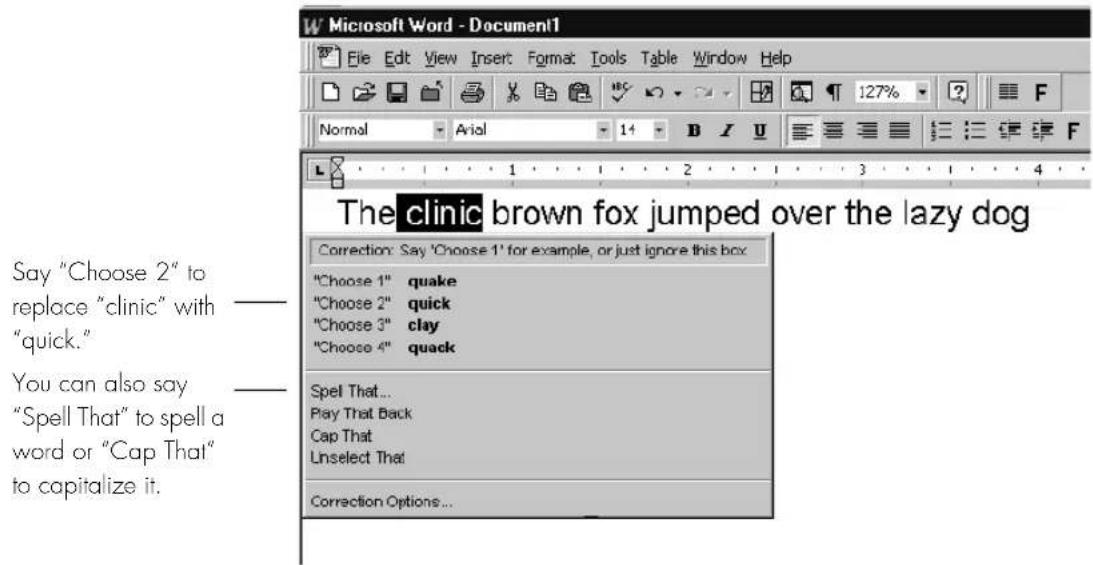
In this example, you would choose the correct word from the Correction menu by saying “Choose” and the number next to your choice.
TIP You can change the number of choices displayed to you. In the Options dialog box, click the Correction tab and increase the number in "Show no more than n choices." If you want to display your choices without the Correction menu taking up too much space on the screen, select the "Show only the choices" option. See "Correction options" on page 162.
When the Correction menu list appears, you can also choose to:
spell the word (in this example, say "Spell That q-u-i-c-k"). Selecting a large amount of text and then saying "Spell That" can produce unpredictable results.
- Pressing the Correction hot key (-) while the Correction menu is open will display the Spell Dialog box.
■ listen to a recording of what you just said (say "Play That Back")
■ capitalize it (say "Cap That," in this example, to get "Clinic")
■ say “Unselect That” to cancel the selection and close (dismiss) the Correction menu
ignore the Correction list and keep dictating (in the example above, just say "quick," which replaces the selected text)
TIP If you prefer not to see the Correction menu every time you select text by voice, you can turn it off. In the Options dialog box, click the Correction tab to display the Correction options, then clear the check box "Select" commands bring up Correction menu."
To help you quickly find the alternative you want, the recognition choices in the Correction menu appear in boldface where they differ from the word you've selected. (This is only applicable when you've selected more than one word at a time.)
The words that are different from the selection appear in bold, to help you find the correct alternative quickly.
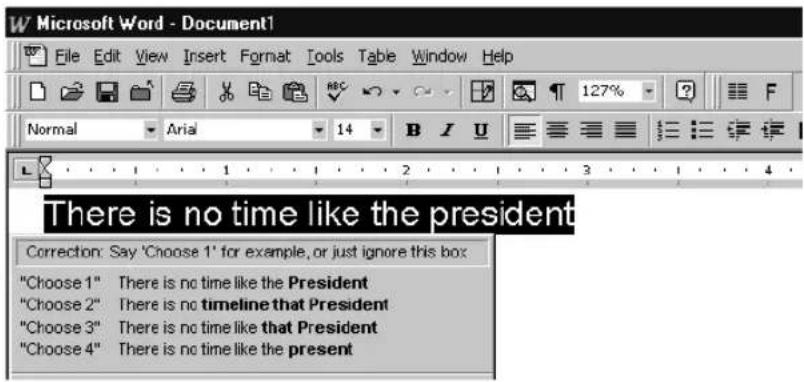
If you select any leading or trailing spaces (including paragraph marks) along with the text you want to correct, choosing one of the alternatives in the Correction dialog box deletes those leading and trailing spaces.
Correcting Punctuation
Note the following when correcting punctuation:
When you select a phrase (more than one word) that has punctuation, make sure to dictate that punctuation. For example, say you initially dictated, "Today is Thursday I have a meeting at 11 o'clock" and the text was transcribed as "Today is Thursday, I have a meeting at 11 o'clock." If you want to change the comma to a period, say "Select Thursday comma". If the correct punctuation appears in the Correction dialog box, select it. Otherwise you can dictate over the selection, for example by saying "Thursday period".
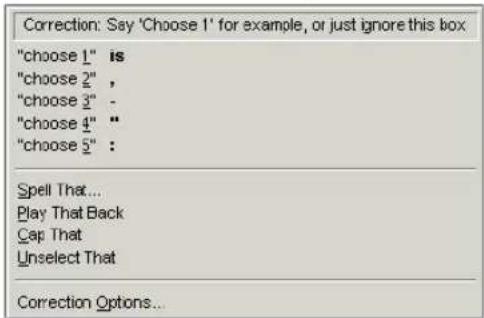
■ When you select punctuation, the Correction menu may include alternate punctuation. For example:
If Natural Punctuation is turned on, when you select a phrase that has punctuation added by NaturallySpeaking, the choices will include punctuation changes. For example:
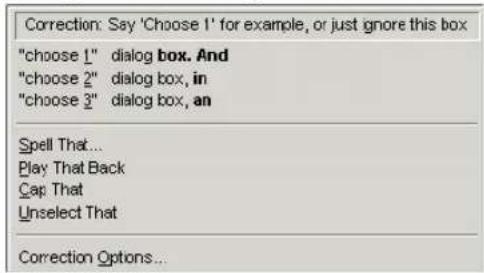
NOTE When you select a word that has adjacent punctuation added by the Natural Punctuation feature, the selection will extend to include that punctuation.
Selecting text by voice
Using Select-and-Say®
You can revise your dictation without correcting it by selecting the text using the "Select" command and then saying new words to replace the selected text.
To use Select-and-Say®:
1 Dictate the sentence below:
US/Canada: Let's meet for lunch on Tuesday [period]
Other Dialects: Let's meet for lunch on Tuesday [full stop]
2 Say "Select lunch on Tuesday." The words "lunch on Tuesday" should be highlighted on the screen.
3 Say "dinner on Wednesday." These words should replace "lunch on Tuesday."
Since “Tuesday” and “Wednesday” sound completely different, Dragon Naturally Speaking will know you are not correcting a recognition mistake but rather revising your dictated text.
TIP You can also select punctuation marks.
4 Say: "Select period" (US/Canada) or "Select full stop" (Other Dialects). If there's more than one period or full stop, you can say "Select Again" to select a different one.
5 To replace the period or full stop with an exclamation mark, say “exclamation mark.”
TIP It is often easier for Dragon Naturally Speaking to find the matching text if you select a short phrase rather than individual words. If you select some words that are already correct, just say them again along with the ones you want to change.
Selecting the same text again
If the words you're trying to select appear more than once on the screen and Dragon NaturallySpeaking selects the wrong ones, just say "Select Again." The program then looks for another instance of the same word or words.
You can also say “Select Again” if Dragon Naturally Speaking selects a word that sounds like the word you want, but is not the correct one (for example, “two” instead of “too”).
Unselecting words
If the wrong text is selected, say "Unselect That."
You can also “unselect” words by moving your insertion point (by mouse or voice) to another part of your document. For example, say “Go to End of Line” or click somewhere else in your document.
Selecting a longer phrase
You can select a longer phrase by saying “Select [text] Through [text]” (US/Canada) or “Select [text] To [text]” (Other Dialects). For [text], substitute the actual word or words at the beginning and the end of the range of wrong words. For example, you could correct the underlined words in the following sentence:
With a little practice, who will develop a habit of dictating an unclear, steady voice, and the computer will understand you better.
by saying:
(US/Canada) “Select who Through unclear” or “Select who will Through an unclear”
(Other Dialects) “Select who To unclear” or “Select who will To an unclear”
Then dictate the correct text:
"you will develop the habit of dictating in a clear"
The final corrected sentence reads:
With a little practice, you will develop the habit of dictating in a clear, steady voice, and the computer will understand you better.
NOTE If you're correcting more than one word, the words must all be in sequence (next to each other). You can't use a single command to correct words that are in different parts of your document.
Selecting your whole document
To select all the text in your document, say “Select Document” or “Select All.” This command is useful when you want to change the font or the way text is aligned.
When you want to copy all the text in a document to another window, the easiest way to do it is with the “Copy All to Clipboard” command. (See “Copying text to other programs,” on page 50.)
NOTE When a lot of text is selected, the "Scratch That" and "Cut That" commands don't work, nor can you overwrite the selection by dictating new text. This prevents you from accidentally deleting a large part of your document. To remove a large selection, you can say "Delete That" instead.
Selecting an entire paragraph or line
You can select the current paragraph by saying “Select Paragraph.” To select the current line, say “Select Line.”
You can also select a number of paragraphs or lines (up to 20). For example, you can say “Select Previous 5 Paragraphs.”
SAY THEN THEN
Select Next Paragraph
Previous 2...20 Paragraphs
Forward Line
Back 2.20 Lines
Last
Selecting a word or character
You can select the current word by saying “Select Word.” To select a character, say “Select Next Character” or “Select Previous Character.”
You can also select a number of words or characters (up to 20). For example, say “Select Previous 2 Words.”
SAY THEN THEN
Select Next Word
Previous 2...20 Words
SAY THEN THEN
Forward Character
Back 2...20 Characters
Last
Moving around in a document
When you're editing a document, you can move around in it by voice. After you place the insertion point where you want it, you can dictate more text, select text, copy and paste, or apply formatting.
Going to the top or bottom of a page or document
You can move to the top or bottom of the current page by saying “Page Up” (equivalent to pressing the PAGE UP key) or “Page Down” (equivalent to pressing the PAGE DOWN key).
You can move to the top or bottom of your document by saying “Go to Top” or “Go to Bottom.”
SAY THEN
Go to Top
Move to Bottom
Top of Document
Beginning of Document
Start of Document
Bottom of Document
End of Document
Going to the beginning or end of a line
You can move to the beginning or end of the current line by saying “Go to Beginning of Line” or “Go to End of Line.”
SAY THEN
Go to Beginning of Line
Move to Start of Line
End of Line
Placing the insertion point before or after a specific word
You can place the insertion point before a specific word by saying “Insert Before” and then the word or words. You can place the insertion point after a word by saying “Insert After” and then the word or words.
After you move the insertion point where you want it, you can dictate more text, paste text, add punctuation, and so on.
To place the insertion point before a specific word:
To move the insertion point before the word “lets” in the sentence below, say “Insert Before lets” (or “Insert Before lets me talk”). Remember not to pause between any of the words.
Dragon Naturally Speaking|lets me talk instead of type.
To place the insertion point after a specific word:
To move the insertion point after the word “talk” in the sentence below, say “Insert After talk” (or “Insert After lets me talk”).
Dragon Naturally Speaking lets me talk instead of type.
Moving up or down a paragraph or line
You can move up or down a paragraph by saying “Move Up a Paragraph” or “Move Down a Paragraph.” You can also move up and down a number of paragraphs (up to 20). For example, you can say “Move Up 3 Paragraphs.”
You can move up or down a line by saying “Move Up a Line” or “Move Down a Line.” You can also move up and down a number of lines (up to 20). For example, you can say “Move Down 3 Lines.”:
SAY THEN THEN
Move Up a Paragraph or 1 Paragraph
Back 2...20 Paragraphs
Down a Line or 1 Line
Forward 2...20 Lines
Moving right or left a word or character
You can move to the right or left of a word by saying “Move Right a Word” or “Move Left a Word.” You can also move right or left a number of words (up to 20). For example, you can say “Move Right 3 Words.”
You can move to the next or previous character by saying “Move Right a Character” or “Move Left a Character.” You can also move forward and backward a number of
characters (up to 20). For example, you can say “Move Left 4 Characters” or “Move Back 6 Characters.”
SAY THEN THEN
Move Right a Word or 1 Word Forward 2...20 Words Left a Character or 1 Character Back 2...20 Characters
Copying, cutting, and pasting text
You can move text from one place to another by using the “Copy That,” “Cut That,” and “Paste That” commands.
To copy, cut, or paste text:
1 Select the text you want to copy or cut.
2 Say "Copy That" or "Cut That."
3 Move the insertion point to where you want to paste the text.
4 Say "Paste That."
Deleting text
Deleting the last words you dictated
You can erase the last words you dictated by saying “Scratch That.” When you say this command, Dragon Naturally Speaking deletes the last thing it typed into your document. This may be a full sentence, a phrase, or just one word, if that’s all you said before pausing.
You can say “Scratch That” up to 10 times to delete the last few things you said. If you repeat the command, you must pause before saying it again. You can also say, for example, “Scratch That 5 Times.”
Going back as you dictate
When you're dictating, sometimes you may hesitate or think of a better way to say something right after you've said it. When this happens, you can use the "Resume With" command to return to where you were before the mistake.
Just say “Resume With” followed immediately by the word or words to which you want to return. Then, continue dictating. Any text after the new position of the insertion point will be replaced with your new dictation.
NOTE When using the "Resume With" command, remember not to pause in the middle. Say "Resume With" and then immediately say the words to which you want to return. These words must be in the last three or four sentences (100 characters) you said; you can't use "Resume With" to return to an earlier part of your document.
To go back as you dictate:
Suppose you dictate this sentence: “I have a deadline this week, but we could meet for lunch… um… er… next Wednesday.”
2 To correct the sentence, return to the last correct words you remember dictating. For example, say “Resume With meet for lunch.” (Remember not to pause in the middle.)
3 Then, dictate the rest of the sentence. For example, say “next Wednesday at noon.”
Deleting specific words
You can delete text by selecting it and saying "Delete That."
To delete text:
1 Select the text you want to delete.
2 Say "Delete That."
You can also say “Scratch That” to do the same thing.
Deleting the next or previous paragraph or line
You can delete the next or previous paragraph by saying “Delete Next Paragraph” or “Delete Previous Paragraph.” You can delete the next or previous line by saying “Delete Next Line” or “Delete Previous Line.”
You can also delete a number of paragraphs or lines (up to 20). For example, you can say “Delete Previous 5 Paragraphs.” See the complete list below:
SAY THEN THEN
Delete Next Paragraph
Previous 2...20 Paragraphs
SAY THEN THEN
Forward Line
Back 2...20 Lines
Last
Deleting the next or previous word or character
You can delete the next or previous word by saying “Delete Next Word” or “Delete Previous Word.” You can delete the next or previous character by saying “Delete Next Character” or “Delete Previous Character.”
You can also delete a number of words or characters (up to 20). For example, you can say “Delete Previous 5 Words.” See the complete list below:
SAY THEN THEN
Delete Next Word
Forward 2...20 Words
Previous Character
Back 2...20 Characters
Last 2...20 Characters
NOTE Another way to delete the previous character is by saying "Backspace." This is equivalent to pressing the BACKSPACE key. You can "press" it multiple times (up to 20) by saying, for example, "Backspace 5."
Spelling as you dictate
With the Spell command in Dragon NaturallySpeaking, you can easily spell a word or phrase you want to dictate into your document. This can be useful if you are dictating a word that is not likely to be in the Dragon NaturallySpeaking vocabulary, such as a proprietary term, a proper name, or a non-English word. Say, for example, "Spell b-u-o-n space g-i-o-r-n-o." The word you spelled appears right in your document.
You must say “Cap” if the word contains a capital letter. For example, say “Spell Cap R-u-m-p-e-l-s-t-i-l-s-k-i-n” to type “Rumpelstilskin.”
If you say "Spell" by itself, without any letters after it, the Spell dialog box opens.
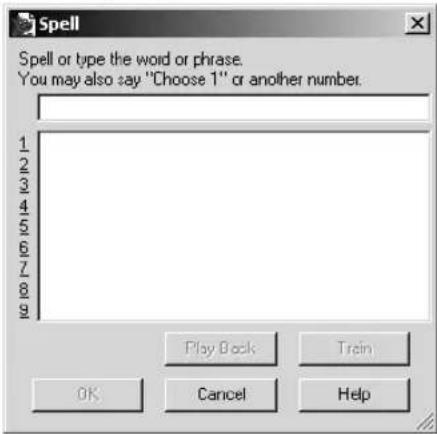
You can then speak the letters and Dragon Naturally Speaking will type them or you can correct any errors in the word you spelled.
When spelling, you can say numbers and special characters as well as letters. For example, to dictate an automobile license plate number, you could say “Spell y-h-m-6-0-9.” Dragon Naturally Speaking would type “yhm609.” Say “Spell Cap-m-a-c-m-i-l-l-a-n-trademark” to get “MacMillan™” in your document.
Spelling a word adds that word to the active vocabulary. Words that contain numbers are not added to the vocabulary.
TIP To dictate unusual text such as automobile license plate numbers or product codes, you can also switch to Spell mode by saying "Switch To Spell Mode," and then dictate letters.
You can make the Spell dialog box appear whenever you use the Spell command by setting the "Spell" commands bring up the Spell dialog box option on the Correction tab in the Options dialog box. See page 161 for more information.
You can also access the Spell dialog box when using the "Select" or "Correct" commands.
For a list of how to spell special characters, see the Spelling topic in the online Help or the “Commands List” on page 173.
Playing back your dictation (Preferred and higher)
Playback commands work in the DragonPad, Microsoft Word 97, 2000 and 2002, Corel WordPerfect 8 and 9, and Lotus Notes.
Although Dragon Naturally Speaking never makes a spelling mistake, the mistakes it does make can be challenging to find and fix. Sometimes, what the program types looks very different from what you actually said.
To make correcting mistakes easier, Dragon Naturally Speaking records your voice as you dictate. You can play back your voice whenever you cannot tell by looking at your document what you originally said.
NOTE Unless you have Dragon NaturallySpeaking Professional or a higher edition, playback is available only until you close a document. After you close a document, Dragon NaturallySpeaking deletes the recorded dictation for that document. See page 56 for information on saving dictation for later correction (Professional and higher editions).
Playing back dictation in the Correction dialog box
When you're working in the Correction dialog box, click the Play Back button or say "Play Back" to play the dictation that goes with the words you're correcting. Then edit the text to match what you said.
You can set up Dragon NaturallySpeaking to play back dictation automatically whenever you open the Correction dialog box. On the NaturallySpeaking menu, point to Advanced, click Options, and then click the Correction tab. Select “Automatic playback on correction.”
Sometimes, there's no dictation to play back. For example, you cannot play back text that wasn't entered by voice, such as words you typed or pasted into your document.
NOTE Even when you have entered text by voice, you cannot play it back after you have cut it, copied it, pasted it, or otherwise moved it around in the document.
If you have Dragon Naturally Speaking Professional or a higher edition, you can save your dictation with your document for later playback (see “Dictate now, correct later” on page 56). Otherwise, you cannot play back dictation after closing a document.
If dictation is not available, the Play Back button is dimmed (grayed out). When playback is not available, you may find text-to-speech useful for checking your work. See “Using text-to-speech” on page 57.
Playing back dictation in a document
To help you check your work for mistakes, you can play back a line, a paragraph, a selection, or the whole document. After playback starts, you can stop it as soon as you notice a mistake and automatically open the Correction dialog box.
The Playback toolbar is an extra section of the DragonBar that is normally hidden. To see the Playback toolbar, click the double chevron icon on the DragonBar to open the Extras toolbar (Preferred and higher editions).
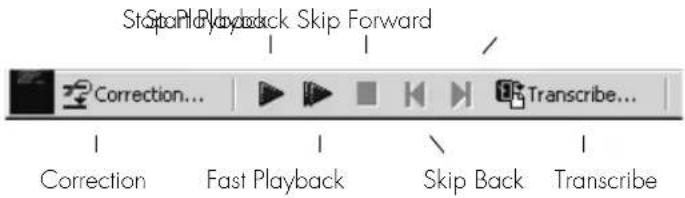
To play back dictation:
To play back dictation, do any of the following:
- Select the text you want to play back, and say "Play That Back."
- Click the Start Playback button on the Playback toolbar.
■ Move the insertion point to the text you want to play back and say any of the following commands:
| SAY TO |
| Play Back Line Play back dictation for the current line. |
| Play Back Paragraph Play back dictation for the current paragraph. |
| Play Back Document Play back dictation for the whole document. |
| Play Back Window Play back dictation for the text in view. |
| Play Back to Here Play back dictation from the top of the document window to the insertion point. |
| Play Back from Here Play back dictation from the insertion point to the bottom of the document window. |
To stop playback:
To stop playback, do any of the following:
■ Click the Stop Playback button on the Playback toolbar.
- Click anywhere in the document window.
■ Press the ESC key.
(It's not possible to stop playback by voice, because the computer cannot hear speech input when it's playing back dictation.)
To skip backward or forward:
You can skip backward or forward in your document by a few words by clicking the Skip Backward and Skip Forward buttons. To skip backward or forward, do one of the following:
To stop playback and correct a mistake:
To stop playback and correct a mistake, do any of the following:
- Click the Correction button on the Playback toolbar.
■ Press the minus (-) key on the numeric keypad.
This stops playback and simultaneously opens the Correction dialog box. 'There you can correct the text for the last phrase played back.
NOTE By default, Dragon Naturally Speaking stores about 30 minutes of dictation (40 MB). If you want to be able to store more dictation, you can change the amount of disk space that's set aside for storing it. On the Naturally Speaking menu, point to Advanced, click Options, and then click the Miscellaneous tab. Increase the number in the "Disk space reserved for speech data" box.
Dictate now, correct later
When you dictate into the DragonPad, you can save your dictation with your text so either you or someone else can correct it later. You must create and edit your file in the DragonPad to be able to play back dictation. This feature is available in Dragon NaturallySpeaking Professional and higher editions.
You can save dictation with your document if you select the Prompt to Save Dictation with Document box on the Startup/Shutdown tab of the Options dialog. The first time you save a document in DragonPad during an editing session, Dragon NaturallySpeaking asks you whether you want to save your speech data. If you save your speech data, you can reopen the document at a later time and play back your dictation. If you do not save your speech data, your dictation is stored only during the current editing session.
Correcting your own dictation
If you save your dictation, you can open your file later and play back and correct the text as if you had just dictated it.
Correcting someone else's dictation
You can play back someone else's dictation and correct the text to match the dictation. You can do this in two ways:
■ You can correct the dictation using your user files.
- You can correct the dictation using the document author's user files.
Correcting with your user files
You should use this correction technique if you regularly correct another person's text by voice and it is not important to maximize the author's recognition accuracy.
When you use your user files, you can correct the dictation just as you would correct your own dictation, using any combination of voice commands and keyboard typing. Even though you are correcting someone else's dictation, your work won't reduce
recognition accuracy for either you or the person who dictated the text. But your corrections to the other person's dictation won't improve recognition either.
Correcting with the document author's user files
You should use this correction technique if you do not need to correct by voice and it is important to maximize the author's recognition accuracy.
TIP This technique works if all work is done on a single computer. Consult your Dragon Naturally Speaking reseller about ways to dictate on one computer and correct on another.
If you correct dictation using the author's user files, you must not correct by voice, or you may reduce that person's recognition accuracy. You can, however, improve the author's recognition accuracy if you make corrections by using the keyboard and mouse with the Quick Correct list or Correction dialog box. See the following procedure for details.
To correct using someone else's user files:
1 Make sure you are not wearing the microphone headset, or that the microphone is not turned on or plugged in. This will ensure that you don't accidentally reduce the accuracy of someone else's user files by using your voice.
2 Make sure the DragonPad Extras toolbar is displayed so you can see the playback command buttons.
3 Open the user files of the person whose text you will correct.
4 In DragonPad, open the document to correct.
5 Use the buttons on the Extras toolbar to play back dictation.
6 Select the text you want to correct by mouse or keyboard.
7 Press the correction hot key (normally the minus [-] key on the numeric key pad) or click the Correct button on the DragonBar Extras toolbar. 'The Quick Correct list or Correction dialog box appears with the selected text.
8 Use the keyboard to correct the text.
9 Save the text and the user's speech files when you are done.
Using text-to-speech
Text-to-speech is available in Dragon Naturally Speaking Preferred and higher editions.
You can use text-to-speech to have text on your screen (not your current dictation) read aloud in a computer voice. For example, you can have a document that you (or someone else) dictated read back while you listen for mistakes and sections you may want to revise.
Text-to-speech is available only in the DragonPad, Microsoft Word, and Corel WordPerfect. You can, however, copy and paste text from other programs and then use text-to-speech.
To start text-to-speech:
To start text-to-speech, do any of the following:
- Select the text you want to hear (a line, a paragraph, and so on), and then say "Read That."
- Select the text you want to hear, and then select Read That from the Advanced submenu (or right-click in your document and click Read That from the shortcut menu).
■ Move the insertion point to the text you want to hear and say any of the following commands:
SAY TO
Read Line Read back the current line.
Read Paragraph Read back the current paragraph.
Read Document Read back the whole document.
Read Window Read back the text in view.
Read to Here Read back from the top of the document window to the insertion point.
Read from Here Read back from the insertion point to the bottom of the document window.
To stop text-to-speech:
To stop text-to-speech, do any of the following:
From the NaturallySpeaking menu, point to Advanced and click Stop Playback/Reading.
■ Right-click in your document and click Stop Playback/Reading from the shortcut menu.
■ Press the ESC key.
You can control the speed, pitch, volume, and other text-to-speech settings. From the NaturallySpeaking menu, point to Advanced, click Options, and then click the Text-to-speech tab.
Notes on correcting with another author's user files
This technique works if all work is done on a single computer. Consult your Dragon Naturally Speaking reseller about ways to dictate on one computer and correct on another.
To display the DragonBar Extras toolbar, click the double chevron icon 📋 on the DragonBar. You cannot display the Extras toolbar if the DragonBar is in cling mode.
In the Quick Correct list, you can use the mouse or keyboard to select any of the commands displayed below the correction choices. For example, you can click "Spell That" to open the Correction dialog box and spell the word.
You may want to select the following on the Correction tab of the Options dialog box:
■ “Correct” command brings up Correction dialog box
■ Automatic playback on correction box
With these settings, Dragon NaturallySpeaking will automatically play back the author's dictation for each text selection you correct. The Quick Correct list does not play back dictation.
When you correct someone else's dictation, make sure that the amount of disk space you have reserved for storing dictation is at least as large as the amount allocated for the user that created the text. You allocate the disk space on the Miscellaneous tab of the Options dialog box.
Saving dictation with documents can take up a lot of disk space, typically more than a megabyte per minute of dictation. To save this space, delete any dictation you no longer need. Dragon NaturallySpeaking saves dictation in a file with the same name as the document, but with the extension .dra. For example, if you dictate a document called MyDoc.rtf and save your dictation, Dragon NaturallySpeaking saves your dictation in a file called MyDoc.dra in the same directory as your document.
Formatting
You can bold text, change font sizes and styles, capitalize text, and apply other formatting by voice.
Many Dragon Naturally Speaking formatting commands work for text that is selected (highlighted) in your document. To select text by voice, say “Select” plus the words you want to select. See “Selecting text by voice” on page 45 for information.
Types of commands
Most of the commands listed in this chapter are global—they are available in virtually every application. In addition to the global commands listed here, Dragon Naturally Speaking includes many commands for editing and formatting that work in common applications. For more information on finding these commands see page 103.
NOTE You can change the formatting properties of a word (such as whether Dragon NaturallySpeaking should type a space before or after the word, or whether the word is capitalized in a title) by using the Word Properties dialog box, described in "Changing word properties" on page 126.
Capitalizing text
Capitalizing the first letter of the next word you dictate
Dragon NaturallySpeaking capitalizes many words automatically. It capitalizes the first word in a sentence (following a period, question mark, or exclamation mark). It capitalizes the first word after you say “New Paragraph” (though not when you say “New Line”) and it capitalizes proper names (when these words are already in the Dragon NaturallySpeaking vocabulary in capitalized form).
NOTE You can change the spacing and capitalization rules for a word in the Word Properties dialog box. See "Changing word properties" on page 126 for more information.
When you're dictating, you can capitalize words that aren't automatically capitalized by saying "Cap" and then the word. For example, say "Cap zelda" to get "Zelda."
TIP If saying "Cap
TIP To dictate the word "cap," for example, in this sentence: "The company is putting a cap on salary increases," you must say "the company is putting a" then say "Spell c-a-p," and then say "on salary increases." In this way, Dragon Naturally Speaking knows that you do not want to capitalize any of the words within the sentence.
Capitalizing consecutive words
When you want to capitalize consecutive words (for example, if you're dictating a book title), you can turn capitals on and then turn them off when you're finished. This is usually easier than saying “Cap” before each word. Another way to do consecutive capitalization is to dictate the words, pause, and then say “Capitalize That” or “Cap That.”
To capitalize consecutive words:
1 Say "Caps On" to turn capitals on.
NOTE When "Caps On" is active, Dragon Naturally Speaking uses title case. This means it capitalizes all words except for articles and prepositions (such as "the" and "to").
2 Dictate the words you want capitalized. For example, say: “success is a journey [colon] seven steps to achieving success in the business of life”
Dragon Naturally Speaking types: “Success Is a Journey: Seven Steps to Achieving Success in the Business of Life”
3 Say "Caps Off" to turn capitals off.
Dictating the next word in all capital letters
When you're dictating, you can enter a word in all capital letters by saying "All Caps" and then the word.
For example, say "All Caps please" to get "PLEASE."
Dictating consecutive words in all capital letters
When you want to dictate consecutive words in all capitals, you can turn all capitals on and then turn them off when you've finished.
To dictate consecutive words in all capitals:
1 Say "All Caps On" to turn all capitals on (like pressing the CAPS LOCK key).
2 Dictate the words that you want to appear in all caps. For example, say “the end”. Dragon Naturally Speaking types “THE END”
3 Say "All Caps Off" to turn all capitals off.
Dictating the next word in all lowercase letters
When you're dictating, you can enter a word in all lowercase letters by saying "No Caps" and then the word.
For example, say “No Caps Jennifer” to get “jennifer.” (Dragon Naturally Speaking normally capitalizes this and other proper names.)
Dictating consecutive words in all lowercase letters
When you want to dictate consecutive words in lowercase letters (for example, names of computer files or e-mail addresses), you can turn the “no capitals” feature on and then turn it off when you are finished. This is usually easier than saying “No Caps” before each word.
To dictate consecutive words in all lowercase letters:
1 Say "No Caps On" to turn no capitals on.
2 Dictate the words you want to appear in all lowercase.
3 Say "No Caps Off" to turn no capitals off.
Capitalizing (or uncapitalizing) text already in your document
You can change the capitalization of text already in your document by selecting it and then saying “Capitalize That,” “Cap That,” or “All Caps That,” or “Uncapitalize That,” “Uncap That,” or “No Caps That.”
To capitalize or uncapitalize text:
1 Select the text you want to change.
2 Say “Capitalize That,” “Cap That,” or “All Caps That,” or “Uncapitalize That,” “Uncap That,” or “No Caps That.”
Formatting text
You can use voice commands to specify any combination of font name, size, and style, in that order. These commands change text you dictate from then on or text you have selected.
To set a new style for text you are about to dictate, use the “Set Font” and “Set Size” commands. To change the style of text you have already selected, use the “Format That” command.
Changing the font as you dictate
While dictating, you can change the font face, size, and style by saying “Set Font” followed by the font attributes you want. For example, you can say “Set Font Times” or “Set Font Arial 12 Bold.” When you continue dictating, the new text appears with the font attributes you set.
Changing font face
| SAY THEN | |
| Set Font Arial | |
| Courier | |
| Courier New | |
| Garamond | |
| Helvetica | |
| Palatino | |
| Times | |
| Times New Roman | |
Changing font size
Say “Set Size” and then a size from 4 to 100 points. For example, say “Set Size 18.” Then, continue dictating.
Changing font style
| SAY THEN | |
| Set Font Bold | |
| Italics | |
| Bold Italics | |
| Underline | |
| Strikeout | |
| Plain or Plain Text or Normal or Regular | |
Changing a combination of font face, size, and style
Say “Set Font” and then the attributes you want (listed in the previous sections). You can specify any combination of font face, size, and style, but you must specify these attributes in that order (font face, then size, then style). See the list of examples below:
■ "Set Font Arial"
■ “Set Font Arial 12” or “Set Font Arial 12 Point”
■ "Set Size 12 Bold"
■ "Set Font Arial Bold"
■ "Set Font Bold"
NOTE If you're changing only the font size, use the "Set Size" commands, not the "Set Font" command.
Changing the font later
You can go back and change the font face, size, or style of text by selecting it and then using the “Format That” commands. “Format That” works on selected text with the same combinations of font face, size, and style as the “Set Font” commands (see the tables in the previous section.)
To change the font:
1 Select the text you want to change.
2 Say “Format That” and then the font attributes you want to apply as described in the previous section. For example, say “Format that Arial 18.”
Bold, italics, and underlining
You can apply formatting to text in your document by selecting it and then saying “Bold That,” “Italicize That,” or “Underline That.” You can also say “Strikeout That.”
To add bold, italics, and underlining:
1 Select the text you want to change.
2 Say "Bold That," "Italicize That," Underline That," or "Strikeout That."
To remove formatting:
1 Select the text you want to change.
2 Say "Restore That" to remove formatting.
Aligning text
You can change how text is aligned by placing your insertion point in the text and saying “Center That,” “Left Align That,” or “Right Align That.”
To align text:
1 Move the insertion point to the text you want to align.
2 Say "Center That," "Left Align That," or "Right Align That."
You can also use the following commands on selected text: "Format That Centered," "Format That Left Aligned," and "Format That Right Aligned."
Bulleted text
To add bullets to text, place your insertion point in the text and say “Format that Bullet Style.” To remove bullets, say “Format that Bullet Style” again.
Working with Applications
This chapter describes using Dragon Naturally Speaking with most popular e-mail programs, Microsoft® Internet Explorer, Microsoft® Word, and Microsoft® Excel.
NOTE If you are using Microsoft ^ Windows NT ^ version 4, you will need Service Pack 6 or later in order to be able to use most of the voice commands described in this chapter. If you are using Microsoft ^ Windows NT ^ 4 with a Service Pack lower than 6, then you will not have Active Accessibility installed on your system and an error message will appear. However, pressing keys by voice (page 34), and moving the mouse by voice (page 38) will work regardless of what Microsoft ^ Windows NT ^ Service Pack you have.
What can I say?
Saying “What Can I Say?” will bring up the Sample Commands window. The Sample Command window displays a small selection of useful commands that Dragon Naturally Speaking recognizes for the current context, whether it is a particular program you are using or the Windows desktop.
For more information, see "What Can I Say?" on page 21.
Working with e-mail
Dragon Naturally Speaking contains built-in commands for the following e-mail applications:
■ America Online ^ versions 6, 7, and 8. Only one version of version 8 is supported. Please check our Web site for the correct version information: www.ScanSoft.com/NaturallySpeaking/support/
■ Microsoft ^ Outlook ^ versions 97, 98, 2000, and 2002 (Professional and higher editions)
■ Microsoft ^ Outlook ^ Express versions 5 and 6 (Professional and higher editions)
■ Lotus ^® Notes ^® 5 and 6 (Professional and higher editions)
The e-mail commands described in this chapter are designed to work in these five applications. To use them, make sure Dragon Naturally Speaking and your e-mail application are both running.
If you use a different e-mail program
If you use an e-mail application that is not listed above, you can still compose, edit, and send e-mail using the global (use anywhere) commands described in “Working on your Desktop” on page 27.
TIP If you use Microsoft® Outlook®, Outlook® Express, or Lotus® Notes®, you can add the contact names in your address book to your vocabulary, which improves accuracy when you dictate these names. You can also have Dragon NaturallySpeaking automatically scan your sent e-mail messages so it can better learn your writing style. For instructions on how to do this, see "Increase accuracy from e-mail" on page 121.
Checking for new e-mail
To check for new mail, say “Check For New Mail” or “Check For E-Mail.” You must be connected to the Internet to check your e-mail.
TIP You can say "Mail," "Message," "Memo," or "E-Mail" interchangeably in any of the e-mail commands.
Opening and closing e-mail
To open an e-mail message, select it and say “Open Mail” or “Open That.” To close an open message, say “Close Mail.”
TIP You can also move to the message and select it by "pressing" function and arrow keys by voice (see "Pressing keyboard keys" on page 32) or using the mouse movement commands (see page 36).
Composing e-mail
To compose a new message, say “New Mail” or “New Message.” Once the new blank message appears, you can navigate to any field by voice and start dictating.
To navigate e-mail fields:
SAY THEN
Go to or To Field
Move to CC Field
BCC Field
Body Field
First Field
Last Field
Next Field
To dictate an e-mail message:
1 Say "New Mail." The new message opens on your screen.
2 Say “Go to To Field.” Pause (to make sure you are in the correct field), then dictate the recipient’s e-mail address, for example, “jeff at a-o-l dot com.” If you are entering more than one address, separate each one by saying “semicolon” or “comma”; depending on your application.
3 Say “Go to CC Field” or “Go to BCC Field,” pause, and dictate the addresses of the people who should receive copies or blind copies of your message (optional).
TIP In many e-mail programs, you can also say just "Subject" or "BCC" to move to the respective field by that name.
4 Say “Go to Subject Field,” pause, and dictate the subject of your message, for example, “Planning a trip to see you.”
5 Say "Go to Body Field," pause, and begin dictating the body of your message.
TIP For instructions on dictating e-mail addresses and Web URLs, see "Dictating e-mail and Web addresses" on page 96.
Sending and printing e-mail
Once your message is ready to send, you can simply say “Send Mail” to send your email on its way. To print a message, say “Print Mail” and the message will be sent to your printer.
Forwarding and replying to e-mail
To forward a message selected in your Inbox, simply say “Forward Mail,” then dictate the recipient’s address in the To Field of the new message.
Select a message and say “Reply to Mail” to create a new message addressed to the sender. To reply to everyone on the mailing list, say “Reply To All.” Then move to the Body Field and dictate your reply.
Deleting mail
You can delete the currently selected message by saying “Delete Mail.” This command will work on all selected messages, so make sure you have selected only those you want to delete.
NOTE If you use Microsoft® Word as your e-mail editor in Microsoft® Outlook®, some e-mail commands will not work when viewing or editing a e-mail message. In addition, you cannot select menu items by voice in the e-mail message window with Microsoft® Word as your default editor.
Working with Microsoft Internet Explorer
You can use Dragon NaturallySpeaking to control Microsoft® Internet Explorer® and browse the Web by voice. Just say the name of a link to click on it. To use this feature, you must have Microsoft® Internet Explorer® version 5.0 or later installed.
You can use voice commands to:
■ Go to any Web page on the Favorites menu
■ Enter a Web address (URL) in the Address bar
■ Go back to the previous Web page or forward to the next
■ Click links, buttons, and images
■ Scroll in a Web page
■ Select check boxes and other options
■ Enter text in a text box (such as a Search box)
To use Microsoft® Internet Explorer® by voice, simply start Microsoft® Internet Explorer® while Dragon NaturallySpeaking is running. To start Microsoft® Internet Explorer® “by voice, say “Start Internet Explorer.”
NOTE Any program that embeds the Microsoft® Internet Explorer® application, such as the Dragon NaturallySpeaking online Help, can also be used by voice.
Going to favorite Web pages
You can use voice commands to go to any Web site saved in your Favorites list by saying “Click Favorites” to displays the Favorites menu. Once the Favorites menu is displayed, simply say the site name exactly as it appears in the Favorites menu.
You can also jump to a site directly by saying “Start
TIP If Dragon Naturally Speaking misunderstands your command and opens the wrong page, you can return to where you were by saying "Go Back."
To add a page to the Favorites menu:
1 Go to the page you want to add to the Favorites menu.
2 Say "Click Favorites" to open the Favorites menu.
3 Say "Add to Favorites" to open the Add Favorites dialog box.
4 Type or dictate a name for the page. Select a short name, so it will be easy to open the page by voice.
5 Save the page anywhere on the Favorites menu.
6 Click OK or say "Click OK" to close the Add Favorites dialog box.
Entering a Web address in the Address bar
You can dictate Web addresses (URLs) by saying “Go to Address.” Follow these steps.
To enter a Web address:
1 Say "Go to Address" to move to the Address bar.
Address bar
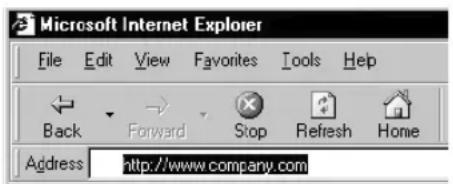
2 Dictate the Web address (for example, say “w w w dot company dot com”). Most URLs are not case sensitive, but you may need to say “Cap” if the Web address contains capital letters. For more information about dictating Web addresses, see “Dictating e-mail and Web addresses” on page 96.
3 Say "Go There" to open the page (same as pressing the ENTER key).
TIP You can also say "Click Go" instead of "Go There."
Going back to the previous Web page or forward to the next
You can Say “Go Back” or “Go Forward” to do the same the Back and Forward buttons do in Internet Explorer.
Here's a list of all the voice commands you can use to control the Microsoft® Internet Explorer® toolbar.
| SAY TO | |
| Go To Address Move the insertion point to the Address box. | |
| Click Go or Go There | Go to the Web address in the Address box. |
| Go Back Go back to the previous Web page (same as clicking the Back button). | |
| Go Forward Go forward to the next Web page (same as clicking the Forward button). | |
| Stop Loading Stop a Web page from loading (same as clicking the Stop button). | |
| Refresh or Reload | Refresh the current Web page (same as clicking the Refresh button). |
| Go Home Go to your home page (same as clicking the Home button). | |
Entering text in a text box
When Dragon Naturally Speaking is running, you can dictate text into Search boxes and other text boxes on a Web page.
To enter text in a text box:
1 Say "Type Text" to move to the first text box on the page.
TIP You can also say "Edit Box" or "Text Field" instead of "Type Text."
2 If the page has more than one text box, they will be numbered like this ①. (See the following procedures for examples.) Choose the number you want, or move to the next or previous text box by saying “Next” or “Previous.”
3 When the insertion point is in a text box, you can dictate text.
In text boxes, you can also correct recognition mistakes by voice, just as you do when you're dictating into a document.
Clicking links, buttons, and images
You can click the text links and buttons on a Web page simply by saying the link or button name.
If the text link or button name is long, you don't need to say all of it. Just say enough to distinguish it from other links on the page.
To click a text link:
1 Say the text link (it must be visible on the screen). For example, to click the link Finance and Budget on the Web page pictured below, say "Finance and Budget."
2 An arrow ↑ appears briefly to indicate which link was selected and then the page opens.
TIP You can also say "Click" and then the link text. For example, you could say "Click News and Events." Sometimes saying "Click" first is more reliable than just saying the link text alone.
3 If more than one link matches what you said (for example, if there are two links on the page that contain the word "Internship"), Dragon Naturally Speaking numbers all the links on the page like this
4 Say "Choose" plus the number of the link you want. For example, say "Choose 2."
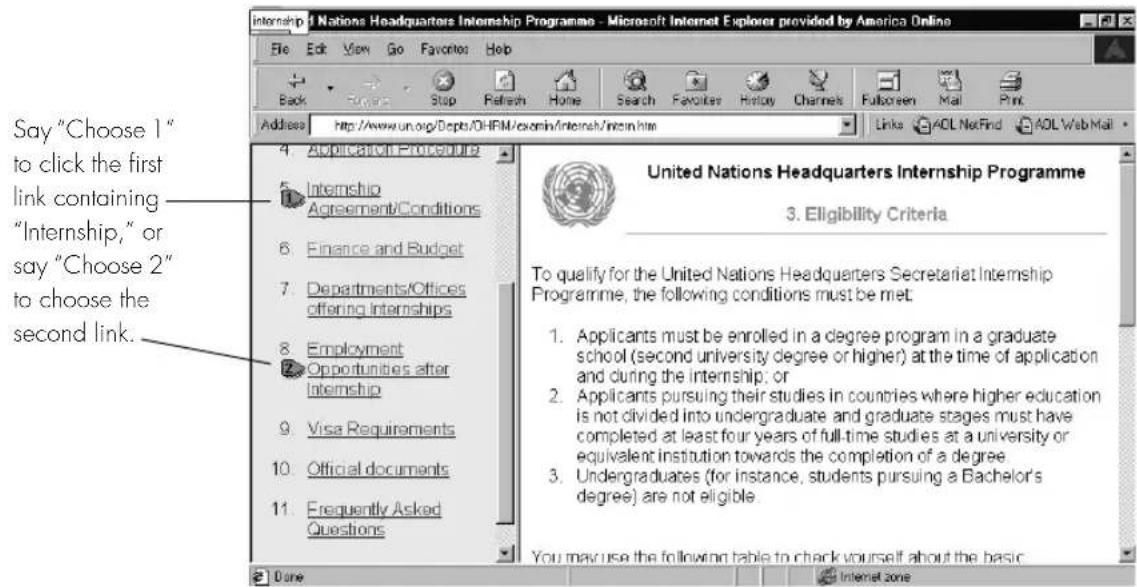
NOTE On secure Web pages this feature is disabled. You cannot select links on secure pages by voice.
To click an image:
When you say "Image" (or "Click Image"), Dragon Naturally Speaking numbers all the images on the page like this
Some Web pages, like this one, display text as graphic images. When you say "Image," Dragon Naturally Speaking numbers each image.
To click the "Travel resources" link, say "Choose 10." To click the Spanish flag, say "Choose 13."
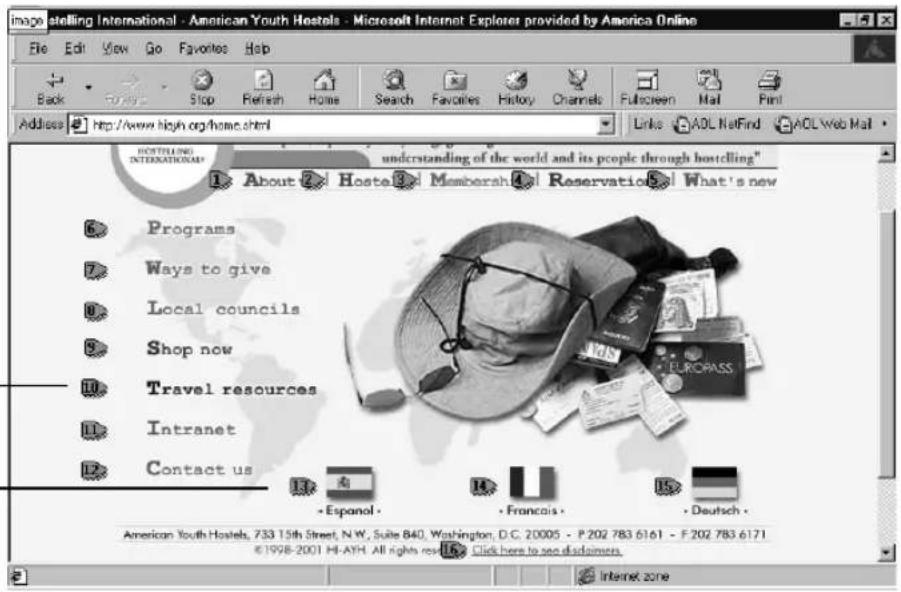
2 Click the image you want by saying, for example, "Choose 3."
TIP If Dragon Naturally Speaking misunderstands your command and opens the wrong page, you can return to where you were by saying "Go Back."
To click a button:
Say the button name. For example, to click the button pictured below, say "Search."
Speech recognition
Search
You can also say "Click" and then the button name. For example, you could say "Click Search" (or "Click Search Button").
To unselect the button, you must select a different one.
To click a check box, list box, or radio (option) button:
1 Say "Check Box," "List Box," or "Radio Button" to number the buttons like this ①. Then choose the number you want, as in the previous procedure.
Here is a table of commands you can use for clicking links, images, check boxes, lists, and buttons.
| SAY TO | |
| Type Text or Edit Box | Go to the first place on a Web page where you can enter text. |
| Click Check Box or Check Box | Number all check boxes on the page and go to the first one. |
| Click Image or Image | Number all images with links on the page and go to the first one. |
| Choose 2 | Select the image, option, button, and so on from the numbered list of choices. You can say any number that appears in the list. |
| Click Radio Button/Radio Button | Number all option (radio) buttons on the page and go to the first one. |
| Click List Box or List Box | Number all boxes with a list of choices (drop-down lists) on the page and go to the first one. |
| Show Choices Open a list of choices. | |
| Hide Choices Close a list of choices. | |
| Choose Thursday or Thursday | Choose an entry from a list of choices, in this example, Thursday. |
| Show Choices or Drop List or Open List | Opens the list box to show all the choices available in the list. |
Frames and panes
When you're viewing a Web page that uses frames, say "Next Frame" or "Previous Frame" to move between the different frames.
To move between different Microsoft® Internet Explorer® panes, say “Next Pane” or “Previous Pane.” Panes are different windows within the Microsoft® Internet Explorer® application, such as “Search” and “Tip of the Day.”
Scrolling in a Web page
When Dragon NaturallySpeaking is running, you can scroll in a Web page by voice. You can use voice commands to go to the top or bottom of a page or to move up or down a screen or line at a time.
You can also start automatic scrolling by saying “Start Scrolling Down” or “Start Scrolling Up.” Automatic scrolling is convenient when you want to read a Web page without using the mouse or keyboard. See the complete list of commands below:
| SAY TO | |
| Go to Bottom Scroll to the end of the Web page. | |
| Go to Top Scroll to the beginning of the Web page. | |
| Page Down Scroll down one screen (same as pressing the Page Down key). | |
| Page Up Scroll up one screen (same as pressing the Page Up key). | |
| Line Down Scroll down one line (same as clicking the down arrow in the scroll bar once). | |
| Line Up Scroll up one line (same as clicking the up arrow in the scroll bar once). | |
| Start Scrolling Down Start automatic scrolling toward the end of the page. | |
| Start Scrolling Up Start automatic scrolling toward the beginning of the page. | |
| Speed Up Increase scrolling speed. (Say it again to speed up more.) | |
| Slow Down Decrease scrolling speed. (Say it again to slow down more.) | |
| Stop Scrolling Stop automatic scrolling. |
While a Web page is scrolling, you can click by voice the text links and buttons you see if the page is moving slowly enough. 'The page will continue to scroll, however, unless you say "Stop Scrolling" before saying the link.
Working with Microsoft Word
Dragon Naturally Speaking provides a large number of commands that work with different versions of Microsoft Word. Since the number of valid commands is so large, you should just try saying what you want to do. If you get unexpected results, say "Undo 'I'hat" to undo the action and try a different way to say the command. Alternatively, you can open the Command Browser or the sample command window For more information. The Command Browser is described in more detail on page 103.
Using other word processing programs
Dragon Naturally Speaking works with other popular word processing programs other than Microsoft Word, for example Corel Word Perfect.
As with Microsoft Word, you should just try saying what you want to do; you can always say "Undo That." Naturally Speaking built-in commands that work with Corel Word Perfect as well as "global" commands that work in all applications. To see a list of these commands, see the "Commands List" appendix of page 173. You can also use the Command Browser for more information on these commands; for more information see "Using the Command Browser" on page 103.
Creating, opening, and closing a document
You can use the following voice commands to perform basic document operations using Microsoft Word:
| TO SAY | |
| Start Microsoft Word Start Microsoft Word | |
| Create a new document Create New File | |
| orOpen New File | |
| Open an existing document Open File | |
| or" dot", for example, "My Document Dot Doc".orClick Open | |
| Save a document as a .doc file Save Changes | |
| You may need to dictate a file name if this is the first time the file has been saved.Click Save | |
| Close a document Close File | |
| orClose Document | |
Selecting text
You can use the following voice commands to select text in Microsoft Word
| TO DO THE FOLLOWING | |
| Select a word, line, or paragraph | Move the insertion point to the word, line, or paragraph you want to select and say, "Select Word/Line/Paragraph." |
| Select an adjacent word, line or paragraph | Move the insertion point to either before or after the word, line, or paragraph you want to select and say, "Select Next/Previous Word/Line/Paragraph." |
For more information on selecting text, see "Correcting and Editing" on page41.
Formatting text
You can use the following voice commands to format text in Microsoft Word:
| TO SAY | |
| Change text properties Set Word/Line/Paragraph to Strikeout | |
| orUnderline this Word/Line/ParagraphorItalicize NextWordsorBold This Page | |
| Change font properties Turn on Bold and Italics | |
| orFormat That RegularorUnitalicise That | |
| Change font name and point sizes | Set the Font to Twenty Four Points Times in the Word/Line/ParagraphorIncrease/Decrease the Font Size to Eighteen or Points in the Word/Line/ParagraphorSet the Font to Courier in the Selection/Word/Line/Paragraph/Page/Section/DocumentorDecrease Selection by Two Points |
| Create and delete bullet points or list numbers | Set the paragraph to Bulleted/Numbered orDelete Bullets From the Document orUnnumber the Selection |
Working with tables
You can use the following voice commands to work with tables in Microsoft Word:
| TO DO THE FOLLOWING | |
| Create a table Move the insertion point to the location where you want to create a tableSay "Add a Table"orCreate aTable, for example, "Create a Five by Seven Table" | |
| Add rows and columns | Say: Add a New Row/ColumnorAddRows/Columns, for example, "Add Three Columns" |
| Delete rows and columns | Delete theColumn, for example, "Delete the Third Column"or"Delete this Column" |
| Move by cells, columns, rows, or tables | Right/Left/Up/DownColumnsorRight/Left/Up/DownRowsorGo Right/Left/Up/DownRowsorrows to the Right/Left/Up/DownorGo To Last/First Cell/Row/ColumnorGo To Next/Previous Table |
Working with Microsoft Excel (Preferred and higher)
Dragon NaturallySpeaking provides a large number of commands to use with different versions of Microsoft Excel. Using these commands, you can avoid the multiple menu-selection and mouse-movement steps associated with the traditional Microsoft Windows interface. Because the number of valid commands is so large, you should just try saying what you want to do. If you get unexpected results, say "Undo That" to undo the action and try a different way to speak the command. Alternatively, you can open the Command Browser or the sample command window for more information. The Command Browser is described in more detail on page 103.
You can also use Select-and-Say commands and built-in commands to enter and revise content and to navigate between cells in Microsoft Excel. For more information on using Select-and-Say, see “Selecting text by voice” on page 45.
Dictation and Editing Modes
There are two modes for using voice commands in Microsoft Excel. The two modes are described below.
Dragon Quick Edit Mode
Quick Edit Mode allows you to enter new content into a cell, overwrite the current contents of a cell, or format the entire contents of a cell. When you select a cell and begin dictating, a yellow background appears to indicate that the dictated text will be inserted into the cell. If the cell currently contains text, the new dictated text will overwrite the existing text. If you want to format the contents of a cell, select the cell, or select a portion of the cell's contents using Select-and-Say commands, and say a formatting command, such as "Set Font Arial 10 Point Bold". Line and Paragraph commands, such as "New Line" or "Move Left 3 Rows" change the focus to another cell in Quick Edit Mode.
Dragon Full Edit Mode
Full Edit Mode allows you to edit the existing contents of a cell. If you want to add to or edit the current contents of a cell, select the cell and say “Edit Cell” or “Press F2” to open the cell for editing. When you enter Full Edit Mode, the background color changes to blue. Entering Full Edit Mode is analogous to double-clicking a cell. Line and Paragraph commands, such as “New Line” operate within the selected cell in Full Edit mode.
Using Select-and-Say
In general, Select-and-Say is available in cells except when you type something into a cell before you dictate and when you enter Full Edit Mode. For example:
If you dictate into a cell, then type some characters, and dictate more text into that cell, Select-and-Say is available.
If you type at the beginning of a cell and dictate some text or numbers, Select-and-Say is not available.
■ Once you have edited a cell using any combination of typing and dictation, when you move back to that cell by voice, Select-and-Say is available in the entire cell.
Moving Around a Worksheet
You can use the following commands to navigate between cells in a worksheet:
| COMMAND FUNCTION | |
| Press Left, Right, Up, Down or Move Left, Right, Up, Down | Move to the next cell. If you are currently editing the cell, saying any of these commands completes the cell entry and moves to the next cell. If the cell is open for editing, these commands move the cursor within that cell. You can also add a number to any of these commands, as in “Move Down 3 Rows”. |
| Next/Previous Row/Column Move to the next or previous row or column. | |
| Start of Row/Column Move to the first cell in a row or column. | |
| Row, Column, Row/Column coordinates | Move to the specified row or column. For example, “Column H”. Move to a cell defined by a column and a row. For example, “Column D, Row 30” or “D 30”. |
| New Line Move down one cell in Quick Edit mode. Move to new line within the current cell in Full Edit Mode. | |
| Create New Worksheet, Workbook | Add a new worksheet or workbook. |
| Apply Complete a cell entry and stay in the cell. | |
| Press Enter Complete a cell entry and move down one cell. | |
| Press Escape or Press Cancel | Cancel a cell entry and remain in the cell. |
| Open Excel Help View the Microsoft Excel online help. | |
TIP If column letters are not being recognized correctly, try using the alpha-bravo version of the letters, as in "Move to Cell Alpha 3".
Editing and Formatting Content
Use the following commands to format a worksheet and the text and numbers you enter. The following commands are samples. Other commands that use similar
words should also work, such as saying “Make Row Height 5” in place of “Set Row Height 5”
NOTE If the numbers you dictate are transcribed as words, you can switch to Numbers Mode by saying "Numbers Mode On" or by choosing Numbers Mode from the Words menu on the DragonBar.
COMMAND FUNCTION
| Press F2, Edit Cell Switch to Full Edit Mode. The selected cell is opened for editing and the insertion point is placed at the end of the line. | |
| Set Row Height, Column Width | Change the height of a column or the width of a row. For example, "Set Column Width to 5". |
| Right/Left/Center Align Cell, Row, Column | Format the contents of the selection right aligned, left aligned or center aligned. |
| Color/Shade This Cell Open the Format Cell dialog box with the Patterns tab selected so you can choose a color. | |
| Format This Cell, Row, Column | Open the Format Cell dialog box so you can make selections by voice. |
| Clear Cell/Row/Column Clear the contents of the specified region. | |
Performing Operations
Use the following commands to enter formulas and to perform other Microsoft Excel operations by voice. These commands are samples. Other commands that use similar words should also work.
COMMAND FUNCTION
| Average the selected cells Compute the average of the selected cells and enter the result in the selected cell. | |
| Divide cell x by cell y | Divide one cell by another. For example, “Divide cell A2 by A4”. |
| Multiply cell x by ten percent Multiply the contents of cell x by 10% and enter the result in the selected cell. | |
| ComputeEndFormula | Compute a formula. For example, “Compute Five Plus Seven Times Three End Formula.” |
| Recalculate Recalculate the formula in the selected cell and overwrite the existing value with the new value. | |
| Sort This Column Ascending, Descending | Sort the selected column. |
| Hide/Unhide selection Hide or unhide a selection. | |
| Lock/Unlock selection Lock or unlock a selection. | |
Dictating Names, Numbers, Punctuation & Special Characters
This chapter describes how to dictate numbers, punctuation, Web addresses, and a few other special items.
NOTE If Dragon NaturallySpeaking is not formatting a word as you would like, you can change the formatting properties of the word by using the Word Properties dialog box. See "Changing word properties" on page 126.
Dictating numbers
In most cases you can dictate numbers, including postal codes, as you normally say them. Dragon Naturally Speaking will display either a number ("3") or the word ("three"), based on the context. To force recognition of digits as numerals instead of text without using the Numbers Mode, say "Numeral" before you say the digit, for example, say "Numeral Three" to get 3. When dictating numbers:
- You can use or omit the word "and" as part of a number. For example, say "one hundred fifty" instead of "one hundred and fifty" to get the number 150.
■ You can use "oh" and "zero" interchangeably to get 0.
If you want a comma in a four-digit number, you must speak it explicitly. Numbers with five or more digits automatically include commas, with the exception of US ZIP codes.
■ For a decimal point, say "point."
TIP If you want to dictate only numbers, you can switch to "Numbers Mode." See "Switching Recognition Modes" on page 101 for more information.
| TO ENTER SAY | |
| 1 | one |
| numeral one | |
| 5 five | numeral five |
| 17 seventeen | |
| 23 twenty three | |
| 179 one hundred seventy nine | one seventy nine |
| 5423 five thousand four hundred and twenty three | |
| 5,423 five [comma] four twenty three | |
| 12,537 twelve thousand five hundred and thirty seven | |
| 142,015 one hundred and forty two thousand and fifteen | |
| 35.23 thirty five [point] two three | |
| 0.03 All Dialects: zero [point] zero threeOutside US/Canada: nought [point] nought three | |
| 43.28% forty three [point] twenty eight [percent sign] | |
| 02460 oh two four six zero | |
| 02460-1458 | oh two four six zero [hyphen] one four five eight |
| 2 3/4 two and three fourths | |
| 11/32 | eleven over thirty two |
| $99.50 ninety nine dollars and fifty cents | |
| €45.35 | 45 Euros and thirty-five cents |
| £120.35 | pound sterling sign one hundred and twenty point thirty five[All Dialects] |
NOTE If you are having problems dictating numbers, currency, times, or dates, make sure that your Regional Settings match the language (dialect) you selected when you created your user.
Changing the format of a number
If Dragon Naturally Speaking enters a number in a format you don't want, you can use voice commands to convert it to a numeral or to spell it out.
For example, you can change “seven dollars” to “\7” (US/Canada) or “seven pounds” to “\7” (Other Dialects) by saying “Format That Number.”
And you can change “\7” to “seven dollars” (US/Canada) or “\7” to “seven pounds” (Other Dialects) by saying “Format That Spelled Out.”
These commands change the last number dictated or a selected number.
| SAY TO CHANGE | |
| Format That Number one to 1 | |
| first to 1stnineteenth to 19th5 million to 5,000,000five million to 5,000,000eight dollars to $8 (US/Canada)seven pounds to £7 (Other Dialects) | |
| Format That Spelled Out | 4th to fourth27 to twenty-seven5,000,000 to five million |
NOTE The "Format That Number" and "Format That Spelled Out" commands work for numerals and currency, but not for dates, times of day, telephone numbers, and most fractions.
Using Numbers Mode
Any time you need to dictate a series of numbers and do not want Dragon NaturallySpeaking to recognize them as words, you can turn on Numbers Mode. This could be useful, for example, if you are dictating in a spreadsheet program, such as Microsoft® Excel®.
To turn on Numbers Mode, say “Start Numbers Mode” or “Numbers Mode On.” To turn off Numbers Mode, say, “Stop Numbers Mode” or “Numbers Mode Off” or “Switch to Normal Mode.”
For more information on Numbers Mode and more ways to turn Numbers Mode on and off, see the section “Switching Recognition Modes” on page 101.
Dates
You can dictate most dates the way you would normally say them. Say “oh” or “zero” to enter 0. In dialects other than US/Canada, you can also say “nought.”
| TO ENTER SAY | |
| 22 January 1999 twenty two January nineteen ninety nine | |
| April 9, 2001 April 9 [comma] two thousand and one | |
| 14/07/85 fourteen [slash] oh seven [slash] eighty five | |
| 3/11/02 three [slash] eleven [slash] zero two | |
| 3/11/2002 three [slash] eleven [slash] two thousand and two | |
| April 1st April first | |
| March 22nd March twenty second | |
| the 1980s | the nineteen eighties |
Times of day
Dictate the time of day the way you would normally say it.
US/Canada: Dragon Naturally Speaking automatically types the colon (:) if you say “a m” or “p m” when dictating the time. Say “o’clock” or “colon zero zero” to enter:00.
| TO ENTER SAY | |
| 8:30 | eight [colon] thirty or eight [numeric colon] thirty |
| 7:45 AM seven forty five a m | |
| 10:22 PM ten twenty two p m | |
| 3:00 | three o'clock or three [colon] zero zero |
| 5:00 PM five o'clock p m | |
TIP Dragon Naturally Speaking will recognize times more accurately if you say "numeric colon" instead of "colon" when dictating times.
Other Dialects: Dragon Naturally Speaking automatically types the point (.) if you say “a m” or “p m” when dictating the time, depending on the regional setting. Say “o’clock” or “point zero zero” to enter .00.
| TO ENTER SAY |
| 8.30 eight [point] thirty |
| 7.45 AM seven forty five a m |
| 10.22 PM ten twenty two p m |
| 3.00 three o’clock |
| 5.00 PM five o’clock p m |
NOTE The format of "a.m." and "p.m." depends on your computer's regional Windows® settings.
Telephone numbers
North American phone numbers
Say US and Canadian phone numbers as you normally would, pausing briefly between each group of numbers.
You don't need to dictate hyphens for most phone numbers (numbers that are 7, 10, or 11 digits long). Dragon Naturally Speaking will add them automatically.
TO ENTER SAY
| 965-5200 nine six five fifty two hundred |
| 617-965-5200 six one seven nine six five fifty two oh oh |
| 1-800-555-1212 one eight hundred five five one two one two |
| (617) 965-5200 [open parenthesis] six one seven [close parenthesis] nine six five five two zero zero |
| 1-212-555-1212 one two one two five five one two one two |
Telephone numbers outside North America
To dictate other phone numbers, including European phone numbers, you must say all the punctuation, including the hyphens, spaces, and parentheses.
TO ENTER SAY
| (01628) 894150 | [open parenthesis] oh one six two eight [close parenthesis] eight nine four one five oh |
| 027 629 8944 oh two seven [space bar] six two nine [space bar] eight nine four four | |
| 61-7-4695-2055 six one [hyphen] seven [hyphen] four six nine five [hyphen] two zero five five | |
| (65) 2778590 [open parenthesis] six five [close parenthesis] two seven seven eight five nine zero | |
TIP In dialects other than US/Canada, you can say "bracket" instead of "parenthesis."
Fractions
You can dictate most common fractions the way you would normally say them. To dictate 1/2, 1/3, 1/4, 1/5, 1/6, 1/7, 1/8, 1/9, 1/10, and 1/16 or a multiple of these fractions, just say the fraction normally.
TO ENTER SAY
| 1/2 one half | |
| 1/4 one fourth or one quarter | |
| 15/16 fifteen sixteenths or fifteen over sixteen | |
| 3 7/8 | three and seven eighths or three and seven over eight |
If the denominator (bottom number in the fraction) is greater than 10, you can enter the fraction by saying “slash” or “over” between the two numbers.
TO ENTER SAY
| 9/12 nine [slash] twelve or nine over twelve |
| 5 3/56 five [space bar] three [slash] fifty six |
| 130/70 one thirty over seventy |
A few common fractions can also be displayed on your computer as special characters (such as 14 , 12 , or 34 ) instead of two numbers separated by a slash character (such as 1/4, 1/2, or 3/4). For information about dictating fraction characters, see “Dictating uncommon special characters” on page 98.
Roman numerals
You can dictate Roman numerals by saying “Roman numeral” and the number. For large numbers, say the number in small combinations (as in the examples shown here).
TO ENTER SAY
| I Roman Numeral one | |
| IV Roman Numeral four | |
| V Roman Numeral five | |
| X Roman Numeral ten | |
| L Roman Numeral fifty | |
| C Roman Numeral one hundred | |
| D Roman Numeral five hundred | |
| M Roman Numeral one thousand | |
| XXIV Roman Numeral twenty Roman four | |
| XXXI | Roman Numeral thirty Roman one |
| MCMXCVII | Roman Numeral one thousandRoman Numeral nine hundredRoman Numeral ninetyRoman Numeral seven |
TIP Don't pause after the word "Roman Numeral" when you're dictating a Roman numeral. If you pause, Dragon Naturally Speaking may enter, for example, "Roman numeral three" instead of "III."
Postal and ZIP Codes
Dragon NaturallySpeaking can automatically formats postal codes. This feature is controlled from the Formatting tab of the Options dialog box. For more information, see “Formatting options” on page 170.
US ZIP Codes
You can dictate US five-digit ZIP codes just as you dictate any group of numbers. When dictating nine-digit ZIP codes, you must say the hyphen.
TO ENTER SAY
01886 oh one eight eight six 94704-1150 nine four seven oh four [hyphen] one one five oh
UK and Canadian Postal Codes
You can dictate UK postcodes by saying “Postcode” followed by the letters and numbers that make up the postcode. For Canadian postal codes, say “Postal code” followed by the letters and numbers that make up the postal code. Spacing and formatting will happen automatically.
TO ENTER SAY
NG3 2HX Postcode n g three two h x E10 7BD Postcode e ten seven b d EC2Y 4LK Postcode e c two y four l k K1A 0M5 Postal code k one a zero m five X0A 0H0 Postal code x oh a oh h oh
Currency and coin
You can dictate your own currency as you would normally say it.
Currency in US/Canada (US English dialect)
TO ENTER SAY
| 58.00 fifty eight dollars and zero cents |
| 1.75 one dollar and seventy five cents |
| 5.25 five dollars and twenty five cents |
| 3.9 billion three point nine billion dollars |
| € 45 forty five euros |
| € 99.50 ninety-nine euros and five cents |
| £ 2.20 pound sterling sign two point two oh |
| £ 5 million pound sterling sign five million |
Currency in Other Dialects (UK, Australian, Indian, and Southeast Asian English)
TO ENTER SAY
| 58.00 dollar sign fifty eight |
| 1.75 dollar sign one point seventy five |
| € 4.25 four euros and twenty five cents |
| € 3.9 billion three point nine billion euros |
| £ 45 forty five pounds |
| £ 99.50 ninety nine pounds and fifty pence |
| £ 2.20 two pounds twenty |
| £ 5 million five million pounds |
NOTE Dragon NaturallySpeaking uses the currency symbol (\$, £, and so on) specified in your Windows Regional Settings as your default currency.
Dictate other currencies by first saying the currency symbol followed by the digits.
US/Canada: If your Regional Settings are set to the United States or Canada, your default currency is \$ (dollar). If you want to dictate a dollar currency amount, dictate it the way you normally do. If you want to dictate a pound sterling currency amount, say, for example, “pound sterling sign fifty eight” (to enter £ 58), and so on.
TIP In US/Canada, you must say "pound sterling sign" to enter £, since "pound sign" means # in the U.S. vocabulary. In all other dialects, you can say "pound sign" to type £.
Other Dialects: If your Regional Settings are set to the United Kingdom, your default currency is £ (pound sterling). If you want to dictate a pound sterling
currency amount, dictate it the way you normally do. If you want to dictate a dollar currency amount, say, for example, “dollar sign fifty eight” (to enter \$58) and so on.
NOTE Australian users can say "fifty eight dollars" to dictate \58, since the Australian default currency is \ in Windows Regional Settings.
Punctuation
Using Natural Punctuation
Dragon Naturally Speaking can automatically add commas and periods at the appropriate places in your dictation without your having to explicitly speak that punctuation. This Natural Punctuation feature can be useful in helping you get used to dictation by focusing on what you are saying rather than how your speech is punctuated.
Natural Punctuation only inserts periods and commas. You still have to dictate other punctuation marks. Even with Natural Punctuation turned on, you can still dictate periods and commas. As you become more adept at dictation and want more control over where punctuation appears, you may want to explicitly dictate all your punctuation.
For information on correcting punctuation, see Correcting Punctuation on page 44.
TIP Periods will only appear at the end of a sentence once you have started the next utterance or said "New Line" or "New Paragraph"
Enabling and disabling automatic punctuation
Natural Punctuation is turned on by default.
There are two ways of turning Natural Punctuation on and off:
1 Select Options from the Tools menu of the DragonBar and click "automatically add commas and periods" on the Formatting tab. For more information on this, see page 170.
2 By saying "autopunctuation on" and "autopunctuation off". Turning Natural Punctuation on and off by voice sets the option on the Formatting tab listed above. If your disable Natural Punctuation by voice, it stays disabled until to enable it again.
Dictating Punctuation
You can enter the punctuation marks and symbols listed below in text you dictate. For a list of all punctuation marks, see page 194 in the Appendix.
| TO ENTER SAY | ||||
| , | c | o | m | m |
| . period | ||||
| dot | ||||
| point | ||||
| [each one has different spacing characteristics] | ||||
| ? | q | u | e | s |
| ! exclamation mark (All Dialects) | ||||
| exclamation point (US/Canada) | ||||
| " open quote | ||||
| close quote | ||||
| ' open single quote | ||||
| close single quote | ||||
| ( open paren (US/Canada) | ||||
| left paren (US/Canada) | ||||
| left parenthesis (All Dialects) | ||||
| open parenthesis (All Dialects) | ||||
| ) close paren (US/Canada) | ||||
| right paren (US/Canada) | ||||
| right parenthesis (All Dialects) | ||||
| close parenthesis (All Dialects) | ||||
| ' apostrophe | ||||
| 's apostrophe-ess | ||||
| - | h | y | p | h |
| minus sign | ||||
| -- [double hyphen] | dash | |||
| space bar | ||||
You can use the Vocabulary Editor to view or change the formatting properties of the punctuation. For more information, see “Changing word properties” on page 126.
Words that end with 's
To dictate a word ending with (apostrophe) 's, just say it as you normally would. Dragon NaturallySpeaking will often add it. If Dragon NaturallySpeaking doesn't include the 's, you can add it later.
TO ENTER SAY
We took Mary's car We took Mary's car
that's enough that's enough
it's time to go it's time to go
Including 's as you dictate
When you want to make sure that Dragon Naturally Speaking types a word with 's, say "apostrophe ess" after saying the word. For words that already end in "s," say "apostrophe" after the word, as in the second example shown here.
TO ENTER SAY
We took my brother's car We took my brother [apostrophe ess] car
I met my friends' children I met my friends [apostrophe] children
TIP You can add 's to a word by selecting it and then saying it again with "apostrophe ess."
Dictating hyphenated words
Many hyphenated words and phrases are already in the Dragon Naturally Speaking vocabulary. To dictate a word or phrase that is usually hyphenated, just say it as you normally would.
TO ENTER SAY
long-lasting long lasting
up-to-date schedule up to date schedule
Tokyo-based company Tokyo based company
nine-year-old boy nine year old boy
Including hyphens as you dictate
To hyphenate words that Dragon Naturally Speaking doesn't hyphenate automatically, just say "hyphen" wherever you want a hyphen.
TO ENTER SAY
speech-recognition software speech [hyphen] recognition software power-sharing agreement power [hyphen] sharing agreement Elizabeth Walker-Smith Elizabeth Walker [hyphen] Smith
You can hyphenate words you just dictated with the command “Hyphenate That.” Select the words you want to hyphenate and say “Hyphenate That.” If you say this command when no words are selected, Dragon NaturallySpeaking will usually hyphenate the last few words that you said.
Removing hyphens
You can remove a hyphen by selecting it and replacing it with a space.
To remove a hyphen:
1 Say "Select hyphen."
2 Say "Space Bar."
Preventing hyphens
You can prevent Dragon Naturally Speaking from entering a hyphen by pausing where the hyphen would normally be.
For example, to type “long lasting” (normally hyphenated) say “long,” then pause for a moment, and then say “lasting.” Or you can say “long space bar lasting” without pausing, to insert a space in place of the hyphen.
Dictating compound words
Dragon Naturally Speaking joins compound words (such as “notebook”) automatically, based on standard usage. To dictate a compound word, just say it as you normally would.
Compounding words as you dictate
To compound words that Dragon Naturally Speaking doesn't join automatically, just say "No Space" between the words.
TO ENTER SAY
unitednations united [No Space] nations
WorldWide Web [Cap] world [No Space] [Cap] wide [Cap] web
You can also dictate consecutive words without spaces by turning “no spaces” on and then turning them off when you’ve finished.
To dictate consecutive words without spaces:
1 Say "No Space On" to turn spaces off.
2 Dictate the words you want to appear without spaces.
3 Say "No Space Off" to turn spacing back on.
Compounding words later
You can compound the last words you said or compound selected words by saying "Compound That." This command removes all spaces between selected words. Or, if no words are selected, it removes all spaces in the last utterance. Any tabs or line breaks are also removed.
To compound words:
1 Select the text you want to join. For example, if you want to join the words "Web TV," say "Select Web TV."
2 Say "Compound That."
Dictating names
Many names of people, places, and events are already in the Dragon Naturally Speaking vocabulary. For example, you can dictate “Martin Luther King,” “New York Times,” and “Boston.”
To dictate a name, first try dictating the name. Dragon NaturallySpeaking automatically capitalizes the names it knows. If Dragon NaturallySpeaking incorrectly types the name, correct it by keyboard or by voice (see “Correcting and Editing” on page 41).
If the program continues to type a name incorrectly after you've corrected it several times, train the word individually using the Train Word dialog box. See “Training a word or command” on page 129.
Dictating abbreviations and acronyms
Dragon Naturally Speaking knows many common abbreviations (such as NYC and BBC) and acronyms (such as NATO). To dictate an abbreviation or acronym, just say it as you normally would.
| TO ENTER SAY | |
| US/Canada: Dr. | Doctor |
| Other Dialects: Dr | |
| UK U K (say each letter) | |
| RSVP R S V P (say each letter) | |
| HTML | H T M L (say each letter) |
| 8 cm eight centimeters | |
| US/Canada: pp. 27–33 | pages 27 hyphen 33 |
| Other Dialects: pp 27–33 | |
| NATO NATO (say as one word) | |
| NASDAQ NASDAQ (say as one word) | |
If Dragon Naturally Speaking types the full word instead of the abbreviation or acronym, enters the wrong word, or includes incorrect punctuation, just correct it in your document by voice or by keyboard.
Dictating e-mail and Web addresses
Dictate e-mail and Web addresses as you would normally say them. Dragon Naturally Speaking automatically formats them for you.
| TO ENTER SAY | |
| Virginia@aol.com Virginia at a o l dot com | |
| info@samplecompany.com [No Caps On] info at sample company dot com [No Caps Off] | |
| http://www.scansoft.com | [No Caps On] h t t p w w w dot scansoft dot com [No Caps Off] |
Here are some guidelines for dictating e-mail and Web addresses:
When you say “http” or “www,” Dragon Naturally Speaking knows to format the next words you say as a Web address.
■ Say the following abbreviations by pronouncing them as words: "co," "com," "gov," "mil," "net," and "org."
■ Say the following abbreviations by saying each letter:
“a c,” “b n, “c a,” “e d u,” “ie” “h k,” “i d,” “i n,” “j p,” “m y,” “p h,” “s g,” “t h,” and “u k.”
Use the “No Caps On” and “No Caps Off” commands to enter an e-mail or Web address in all lowercase letters. For more information about controlling capitalization, see “Dictating consecutive words in all lowercase letters” on page 63.
TIP You can create Text and Graphics custom commands for e-mail and Web addresses you use often. See "Automate Your Work (Preferred and higher)" on page 153.
Dictating special characters
Dictating common special characters
The following special characters are in the Dragon NaturallySpeaking vocabulary. To dictate these characters, just say their names.
| TO ENTER SAY | ||||
| & | a | m | p | e |
| * asterisk | ||||
| @ | a | t | s | i g |
| ` backquote | ||||
| © copyright sign | ||||
| ^ caret | ||||
| ° degree sign | ||||
| $ dollar sign or dollar | ||||
| € | euros or euro sign | |||
| % percent sign | ||||
| ® | registered sign | |||
| § section sign | ||||
| TM trademark sign | ||||
| + plus sign | ||||
| - | m | i | n | u |
| « | open euro quote | |||
| » | close euro quote | |||
| # | All Dialects: hash sign or sharp signUS/Canada: number sign or pound sign | |||
s n
s s
| TO ENTER SAY |
| £ US/Canada: pound sterling signOther Dialects: pound sign or pound |
| :-) smiley face |
| :-( frowny face |
| ;-) winky face |
For more complete lists of special characters, see “Entering punctuation and special characters” on page 194 or the online Help.
Dictating uncommon special characters
If you use uncommon special characters in your writing (for example, a double-dagger sign ), you can enter them by voice using the Spell command. If you use a special character frequently, you can also add it as a new word using the Vocabulary Editor.
For the complete list of special characters and their names, see the Special Characters topic in the online Help and the following sections in the Appendix:
■ “Publishing symbols” on page 179
■ “Accented and international characters” on page 181
■ “Mathematical symbols” on page 181
■ “Currency symbols” on page 179
To dictate a special character:
Just say “Spell” plus the name of the character. For example, if you want to enter a double-dagger sign (‡) into your document, say “Spell double dagger.”
To add a special character to the vocabulary:
If you frequently want to dictate an unrecognized special character (for example, double-dagger sign - ‡) into your document, you could add “double dagger” as a new word in the Dragon NaturallySpeaking vocabulary. Follow these steps:
In your document, dictate the phrase you want to use to enter the special character (for example, say “double dagger”). Dragon Naturally Speaking enters the words into your document.
2 Say "Spell That" to open the Spell dialog box.
3 Say the name of the special character. (In this example, say "double dagger" to enter .)
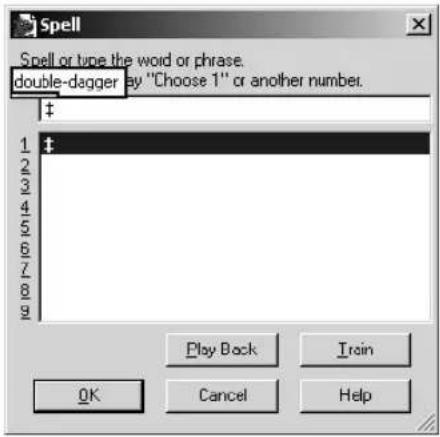
4 Click or say "OK." Dragon Naturally Speaking types the special character (‡) in your document and adds it to your vocabulary.
5 To give a special character a spoken form, choose View/Edit from the Words menu on the DragonBar. This opens the Vocabulary Editor.
6 From the Display drop-down list at the bottom of the Vocabulary Editor, choose Custom Words Only. You will see the special character you just entered under the Written form column, as shown in this illustration.
The special character you dictated is shown in the Written form column.
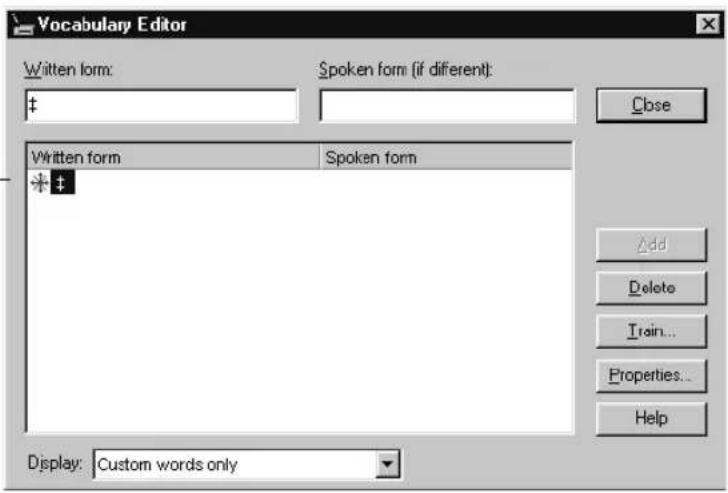
7 Click on the special character to select it. In the illustration above, the special character is already selected.
8 In the Spoken form field, type the name you want for this character and click Add.
Type the character's name (for example, "double dagger") in the "Spoken form" field.
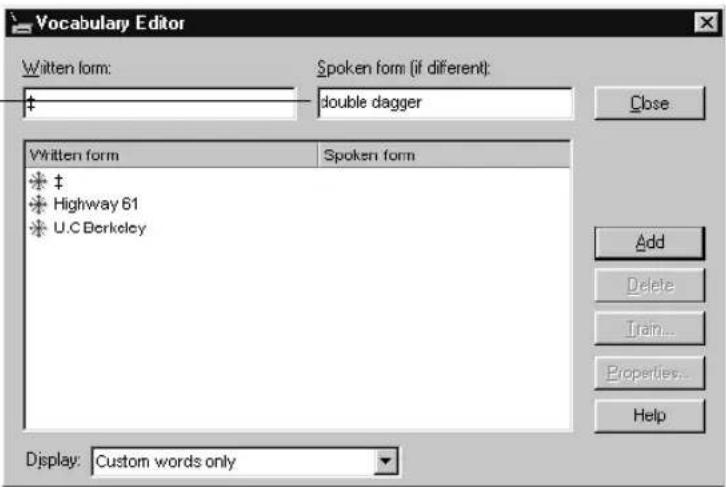
9 Click 'Train. 'The 'Train Words dialog box opens.
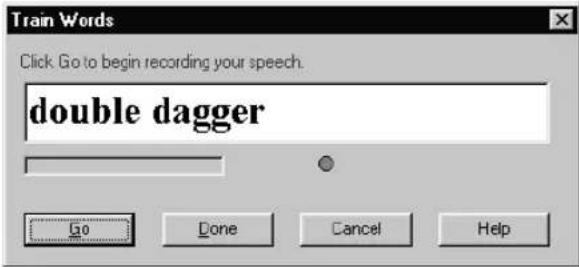
10 Click Go and say the name of the character, as shown in the Train Words dialog box. For example, say "double dagger."
11 Click Done to close the 'Train Words dialog box.
12 The Vocabulary Editor now has two words in the vocabulary with the same written form. One has a spoken form and one does not. Click on the word that does not have a spoken form and click Delete. This leaves the word that does have a spoken form in your vocabulary.
Click the word (the special character) with no spoken form.
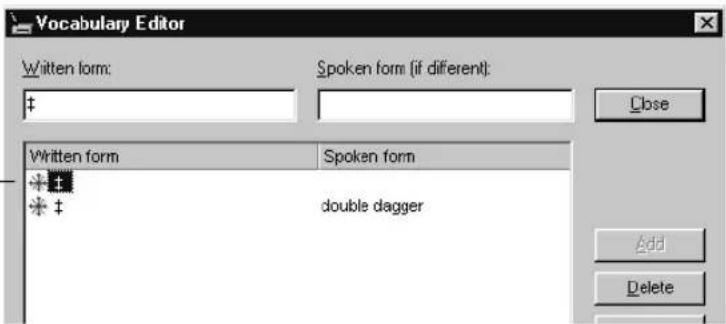
13 Click Close to close the Vocabulary Editor.
Now when you dictate the character name (in this example, “double dagger”), Dragon Naturally Speaking should enter the special character, not the words.
TIP You can perform this operation more quickly by directly opening the Vocabulary Editor, and directly adding the written and spoken form.
NOTE You can change the formatting properties of a word (such as whether Dragon Naturally Speaking should type a space before or after the word) by using the Word Properties dialog box. See "Changing word properties" on page 126.
Switching Recognition Modes
Dragon NaturallySpeaking lets you use different recognition modes in your dictation. Dragon NaturallySpeaking uses normal mode by default. In normal mode, the program distinguishes between words, numbers, and commands.
In addition to normal mode, there are four additional modes:
Numbers mode—The software recognizes only numbers, commands, and punctuation. If you are dictating only numbers (including currencies), working in this mode will increase recognition accuracy.
■ Spell mode—The software recognizes only letters, numbers, commands, and punctuation. In Spell Mode, Dragon Naturally Speaking allows you to say any combination of letters, digits, or symbols you might need dictate part numbers or license plate numbers. You can also say keystrokes such as space bar or backspace key. Spell Mode is also useful for dictating internet or Web addresses.
Command mode—The software interprets everything you say as a command and nothing is interpreted as dictated text.
- Dictation mode—The software interprets everything you say as dictation and nothing is interpreted as a command, except for a few commands such as “New Line” and “New Paragraph.”
To changes modes, you can:
1 Select the Words menu on the DragonBar and click the name of the mode you want.
2 Switch modes by voice by saying one of these commands:
| MODE TO TURN ON, SAY TO TURN OFF, SAY | |
| Numbers Mode Numbers Mode On orStart Numbers Mode orSwitch to Numbers Mode | Numbers Mode Off orStop Numbers Mode orSwitch to Normal Mode |
| Spell Mode Spell Mode On orStart Spell Mode orSwitch to Spell Mode | Spell Mode Off orStop Spell Mode orSwitch to Normal Mode |
| Command Mode Command Mode On orStart Command Modeor Switch to Command Mode | Command Mode Off orStop Command ModeorSwitch to Normal Mode |
| Dictation Mode Dictation Mode On orStart Dictation Mode orSwitch to Dictation Mode | Dictation Mode Off orStop Dictation Mode orSwitch to Normal Mode |
Turning a mode off by voice is the same as switching back to normal mode.
NOTE You cannot dictate fractions in number mode.
Using the Command Browser
The Command Browser is the most comprehensive place to find which command work in Dragon NaturallySpeaking. The Command Browser lets you view both “global” (available everywhere) commands and application-specific commands for editing, formatting, and controlling specific applications. These application-specific commands let you avoid the multiple menu-selection and mouse-movement steps associated with the traditional Microsoft Windows interface.
Since the number of valid commands is large, you should just try saying what you want to do. Try finding a way of saying commands that is easy to remember and that works in Dragon Naturally Speaking.
You use the Command Browser to:
■ View and train both global and application-specific commands. Global Commands are the commands Dragon NaturallySpeaking recognizes regardless of the context. Application-specific commands let you control the applications on your computer.
■ Create and modify custom commands. Custom commands are commands that have been added to the built-in command set. (Preferred and higher editions)
■ Change the availability of custom commands. (Preferred and higher editions)
- Import and export custom commands. (Professional and higher editions)
Supported Applications
In addition to the global commands, the Command Browser displays commands for the following applications:
■ America Online ^® 6, 7, and 8
■ Corel ® WordPerfect® 10 (Standard Edition and higher)
■ DragonPad and DragonBar
■ Lotus ® Notes 5 (Professional Edition and higher)
■ Microsoft ® Chat
■ Microsoft ^® Excel 97, XP, and 2000 (Preferred Edition and higher)
Using the Command Browser
■ Microsoft ® Express 5 and 6 (Standard Edition and higher)
■ Microsoft ^ Internet Explorer ^ versions 5 and 6 (Standard Edition and higher)
■ Microsoft ^® Outlook 98, XP, and 2000 (Professional Edition and higher)
■ Microsoft ® Paint
■ Microsoft ^® Powerpoint 97, XP, and 2000 (Professional Edition and higher)
■ Microsoft ^® Windows Explorer 98, XP, and 2000
■ Microsoft ® Word 97, XP, and 2000 (Standard Edition and higher)
■ Microsoft ® Wordpad
NOTE All editions display commands for these applications but support for these commands depends on your edition.
Starting the Command Browser
To open the Command Browser, click Command Browser from the Tools menu on the DragonBar. To launch the Command Browser by voice, say "Start the Command Browser." You can also start the Command Browser from the Accuracy Center.
What you see depends on your version. For example, Script and Manage are displayed only in the Preferred and higher editions.
![Command Browser Mode Browse Help Browse Script Manage Current command context: Global Commands Filter to show only commands containing all of these words: [No filter selected] Filter... Train Train later Train list Optional Or Ellipsis Refine Sub Unda AI To Script ... [ a | one ] character ... [ a | one ] line ... [ a | one ] paragraph ... [ a | one ] word accelerate [ the ] ( playback | play back ) add [ a ] [ new ] word add [ a ] spoken form add [ new ] words add [ this | that | it ] as [ a ] phrase add contacts add words from [ a ] document add words from [ a ] list](/content/2026/05/967576/images/6a7722735a90404858400e8c8e17cbe6f974a6f737b546309ed16a727bd90d2f.jpg)
When the Command Browser starts, it first displays a list of Global Commands. Global Commands are those commands available in every application. You can train these commands so that Dragon Naturally Speaking will understand you better, but you cannot change or remove most of these commands from your system.
Finding specific commands
To see what commands are available for specific applications, click the pull-down menu next to the field labeled Current command context. For example:
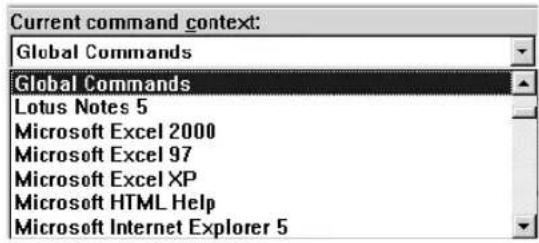
There may be more than one entry for any given application. Each entry is defined by Application Name - Window Caption. For example, Microsoft Outlook 2000 - Message (Rich Text) would show you the commands available in the following Outlook Message window:
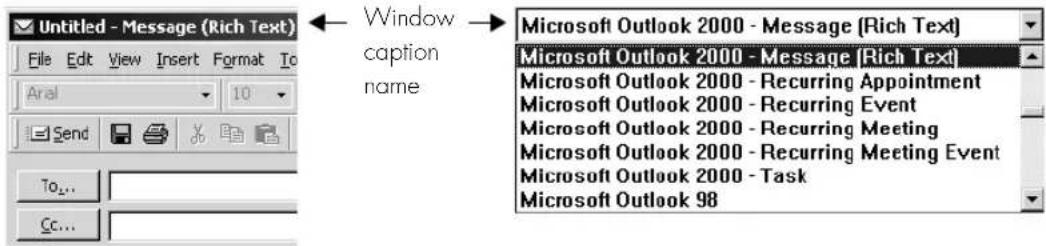
Finding commands
To see if a specific command is available:
1 Click the pull-down menu for the Current command context and select the appropriate application context. The Command Browser displays all the commands supported in the selected context.
2 Click the Filter button. This displays the Choose Word screen:
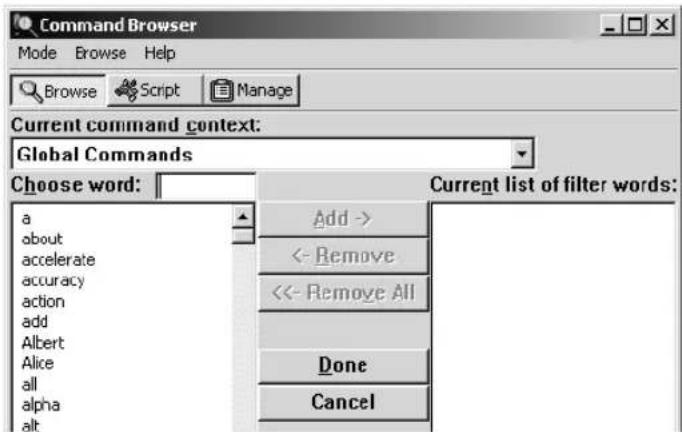
Using the Command Browser
3 Type or dictate in the specific command(s) you are looking for, one word at a time, in the "Choose Word" box.
4 Press the space bar or click Add until you have added as much of the specific command as you can to the "Current list of words" box.
If you type or dictate a word and nothing happens, this means that the word is not valid in any command in the current context.
5 When you are finished adding keywords, click or say "Done" or press or say "Enter". This displays the commands containing the words you entered, if any.
TIP Try to be as specific as possible when entering commands.
Example
To see if the command "set that to bold" exists in Microsoft Word 2000:
1 Select Microsoft Word 2000 - Message from the Current command context menu.
2 Click Filter.
3 Type or dictate the words "set", "that", and "bold" one word at a time in the "Choose Word" field.
4 Click Find or press Enter. The Command Browser displays the set of commands valid in the chosen context; in this case all those commands that contain the words "set," "that" and "bold":
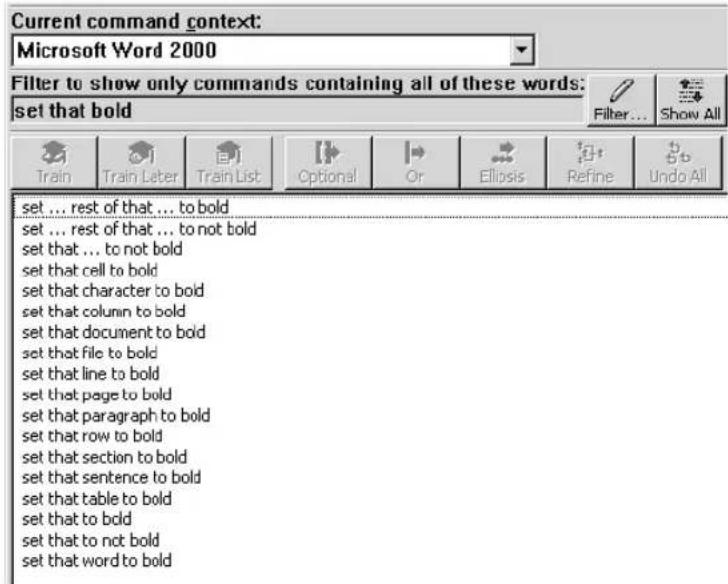
Expanding commands
Some commands will not be fully expanded; either due to their complexity or because only partial information was entered in "Choose Word" field. 'To expand a command:
1 Select the command in the Command Browser.
2 Use one of the following buttons to act on the selected command. The examples all assume that Global Commands is selected in the Current command context.
| BUTTON ACTION EXAMPLE | ||
 Refine Refine | Refine shows just the current selection and expands the selection. At this point, the selection can resolve to a single command or a list of similar commands that you may need to refine further. Using refine may be helpful if you have many displayed commands and want to look at only one. In many cases, clicking Refine will show you the commands you want. | Scroll down the list of Global Commands and select...mode on. Click Refine....mode on refines to:■command mode on.■dictation mode on.■numbers mode on.■spell mode on |
 Optional Optional | Optional expands optional statements. Optional statements are parts of the command you don't have to say for the command to work.Optional statements are shown in brackets: [ ]. | Scroll down the list of Global Commands and select close [the] list. This expands to:■close list.■close the list |
 Or Or | Or expands Or statements. Or statements are used to indicate a number of alternative commands. Or statements are usually preceded or followed by other commands. Or statements are shown by a separator bar, |, and are usually enclosed by parenthesis.Ellipses expands ellipsis. Ellipses indicate that more expansion is possible. | Scroll down the list of Global Commands and select close [the] (window | dialog | component). This expands to:■close component.■close dialog.■close the component.■close the dialog.■close the window.■close windowScroll down the list of Global Commands and select ...mode off. This expands to:·■ command mode off.■ dictation mode off.■ numbers mode off.■ spell mode off |
 | ||
 | Undo All reverses all operations and re-displays the list of commands in the currently selected context with your filtering criteria in place. | Click or say “Undo All” for any of the examples above. The full list of global commands display. |
| Undo All | ||
BUTTON ACTION EXAMPLE
Training commands
If Dragon NaturallySpeaking consistently misrecognizes a specific voice command (for example, it hears "Paste 'That" as "Paste dot"), you can train it to recognize your pronunciation of the command.
1 Open the Command Browser (say "Command Browser" or click Command Browser on the Tools menu of the DragonBar).
2 In the Command Browser, select the current command context from the Current command context list.
3 Locate the command you want to train and select it using the steps described in the Finding specific Commands section.
4 Click:
| BUTTON TO | |
 | To immediately train the selected command. Follow the directions on the Train Words dialog box that appears. |
| Train | |
 | Adds the command to a list of commands to the Train List for later training. By selecting Train Later, you activate the Train List button. |
| Train Later | |
 | Displays the Train Words dialog box with a list of commands to be trained.Note: If you close the Command Browser while you still have words in the Train List, you will be warned that you could lose those commands. |
| Train List | |
Working with Custom Commands (Preferred and higher)
Dragon Naturally Speaking comes with a limited set of custom commands that you can use "as is" to fit your needs.
You can view these custom commands only in the Preferred and higher editions. The ability to create, modify, delete, import, and export custom commands depends on your edition. The differences in editions is listed in each section.
Viewing Custom Commands
1 Open the Command Browser (say "Command Browser" or click Command Browser on the 'Tools menu of the DragonBar).
2 Click the Script button. This displays the command grammars where custom commands are available. By default, the custom global commands are displayed:
3 To change the command grammar, select a grammar from the Current command grammar list.
The Scripting window shows the following types of custom commands:
| ICON DESCRIPTION | |
| Advanced Scripting, which allows people familiar with programming languages such as Microsoft® VBA to program commands that can perform virtually any function on the computer with voice commands. (Professional and higher editions) | |
| ^4D | Text and Graphics, which you can use to enter text and graphics of your choosing. (Preferred and higher editions) |
| Step-by-Step, which lets you activate menu and keystroke commands to control your application. (Professional and higher editions) | |
| Macro Recorder, which lets you record a sequence of mouse movements and keystrokes. (Professional and higher editions) | |
You can expand each command by clicking the plus sign next to that command or by double-clicking the command name. The name of the command is what you say to execute that command. A variable in the commands is shown in brackets <>. The command name can be displayed as two parts:
■ Parts of the command name
■ Values for any variables
NOTE The displayed command name corresponds to the MyCommand name in the MyCommands Editor.
Creating a new command
You can automate your work by creating custom commands that let you type text, insert graphics, or activate menu and keystroke commands in any application. (Preferred and higher editions)
1 Open the Command Browser (say "Command Browser" or click Command Browser on the Tools menu of the DragonBar).
2 Click the Script button. This displays the command grammars where custom commands are available. By default, the custom global commands are displayed.
3 Select a grammar from the Current command grammar list to select a context where the new command will be used.
4 Click the New button. This displays the MyCommands Editor. Use the editor to name the command and assign properties to it. For information on how to use the MyCommands dialog box, click the Help button on the dialog box, or see the MyCommands section listed below.
You can also base a new command on an existing command. For more information, see Modifying a command below.
You can also use Tools>Add New Command from the DragonBar to create a new command.
Modifying a command
To modify an existing command:
1 Open the Command Browser (say "Command Browser" or click Command Browser on the Tools menu of the DragonBar).
2 Click the Script button. This displays the command grammars where custom commands are available. By default, the custom global commands are displayed.
3 Use the Current command grammar list to select the program or context in which the command is found. A list of commands display.
4 From the list, select the command that you want to modify.
5 Click:
| BUTTON DESCRIPTION | |
 Edit button Edit button | This displays the MyCommands Editor with current command. Use the editor to modify the command's properties. For information on how to use the MyCommands dialog box, click the Help button on the dialog box, or see the MyCommands section listed below. |
 New Copy button New Copy button | This displays the MyCommands Editor with current command, but with a unique name. For example, if you chose go to sleep in Global Commands, the new copy would be named go to sleep 2. Use the editor to modify the command's properties. For information on how to use the MyCommands dialog box, click the Help button on the dialog box, or see the MyCommands section. |
6 Click Save when you are done.
Deleting a command
You can delete commands that you have either created or imported.
1 Open the Command Browser (say "Command Browser" or click Command Browser on the 'Tools menu of the DragonBar).
2 Click the Script button. This displays the command grammars where custom commands are available. By default, the custom global commands are displayed.
3 Use the Current command grammar list to select the program or context in which the command is found. A list of commands display.
4 From the list, select the command that you want to delete.
5 Click the Delete button
6 Confirm that you want to delete the command. The command disappears from the Command Browser.
NOTE You cannot delete many application-specific commands, Natural Language Commands, or other built-in commands.
Importing and exporting commands (Professional and higher editions)
You can share custom commands with other users by exporting them to a file and then having the other user import that file. If you have created several users on your computer, this allows you to use these commands no matter which user you currently have open.
The ability to import and export commands is available only in Professional and higher editions.
Exporting commands
1 Open the Command Browser (say "Command Browser" or click Command Browser on the Tools menu of the DragonBar).
2 Click the Manage button. This displays the groups where custom commands are available. By default, the groups Dragon, User-defined, and all are available. Use the plus (+) icon to expand the commands. For example:
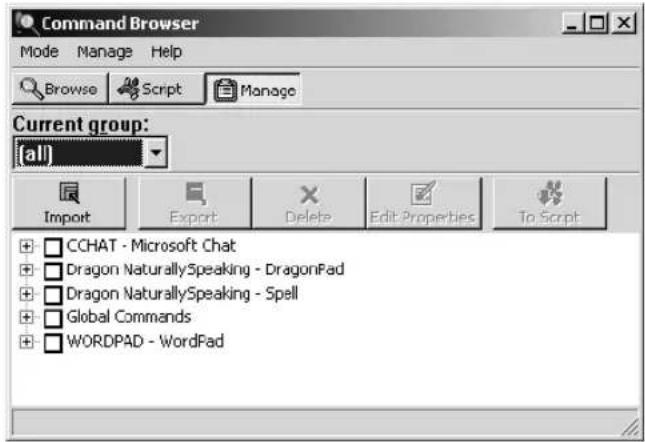
3 Select one or more commands to export by selecting the box to the left of the command name; causing a check to appear.
NOTE You can select an entire group by selecting the box to the left of the group name.
4 Click Export:. This displays the Choose a file to export to... dialog box.
5 In the Choose a File to Export to... dialog box you can:
- Choose a File name from the ones listed, click Save, and then Click either Overwrite, Merge, or Cancel on the Exporting MyCommands dialog box that appears. Overwrite replaces the commands in the existing file with the ones you selected. Merge adds the commands you selected to the ones already in the file.
■ Enter a new file name and click Save.
Importing Commands
1 Open the Command Browser (say "Command Browser" or click Command Browser on the Tools menu of the DragonBar).
2 Click the Manage button. 'This displays the groups where custom commands are available. By default, the groups Dragon, User-defined, and All are available.
Use the plus (+) icon to expand the commands.
3 Click Import
4 Use the "Choose a file to import from" dialog box to navigate to the location of the voice command file, for example, My_Commands.dat, which you want to import.
5 Click Open. 'The status of the import process and any error messages appear in the Import Status dialog box.
6 On the Importing MyCommands dialog box, select the commands you want to import and click the Import button. You may notice a delay, depending on the size of the file you are importing. For more information, click Help.
After importing a voice command file, you can use all the custom voice commands it contains in addition to any custom voice commands that were already in your voice command file. You can also edit commands that are contained in the imported file.
Changing the command group and availability
You can change the group or availability of a selected set of commands.
The command group is a category where you place the command. You use these groups to locate the command in the Command Browser. By default, the groups Dragon and User-defined are available. To create your own group, select User-defined and type over it with a group name of your choosing.
The Availability defines where the command will be available:
Global: 'The command will be available in every application.
■ Application-specific: The command will be available in the application you specify. When you select this option, the applications currently open appear. If the application you want is not open, use the Browse button to locate the application on your computer.
■ Window-specific: The command will be available in the window you specify. When you select this option, the Window list appears. If the window you want is not in the list, you must close the MyCommands Editor dialog box, open the
window you want, and reopen the MyCommands Editor dialog box to see the window listed.
Changing the command group and availability
1 Open the Command Browser (say "Command Browser" or click Command Browser on the Tools menu of the DragonBar).
2 Click the Manage button. This displays the groups where custom commands are available. By default, the groups Dragon, User-defined, and All are available. Use the plus (+) icon to expand the commands.
3 Select one or more commands to modify by selecting the box to the left of the command name. A check appears when you select the command.
NOTE You can select an entire group by selecting the box to the left of the group name.
4 Click Edit Properties. This displays the MyCommands Properties dialog box. For more information about this, see the My Commands Properties Dialog section in MyCommands or click Help on the MyCommands Properties dialog box.
5 In the MyCommands Properties dialog box, you can:
■ Change the group in which the command is found.
■ Create a new group. To create your own group, select the Group name and type or dictate over it with a group name of your choosing.
■ Change where the command will be available.
6 When you are done, click Save.
CHAPTER 10
Improving Accuracy
As you speak to Dragon NaturallySpeaking, it makes its best estimate as to what you are saying and it will make some mistakes. This chapter describes what you can do to improve your recognition accuracy.
You can take concrete steps toward improving your accuracy, which is one of the most important factors in using the program productively.
The Accuracy Center
The Accuracy Center provides a "home page" for taking advantage of all the Dragon Naturally Speaking tools available to ensure excellent recognition.
From the Accuracy Center, you can access the tools that Dragon Naturally Speaking provides to improve accuracy. To open the Accuracy Center, click Accuracy Center on the Tools menu of the DragonBar. In the Accuracy Center, either click or say the name of the link you want. Each tool in the Accuracy Center is described below.
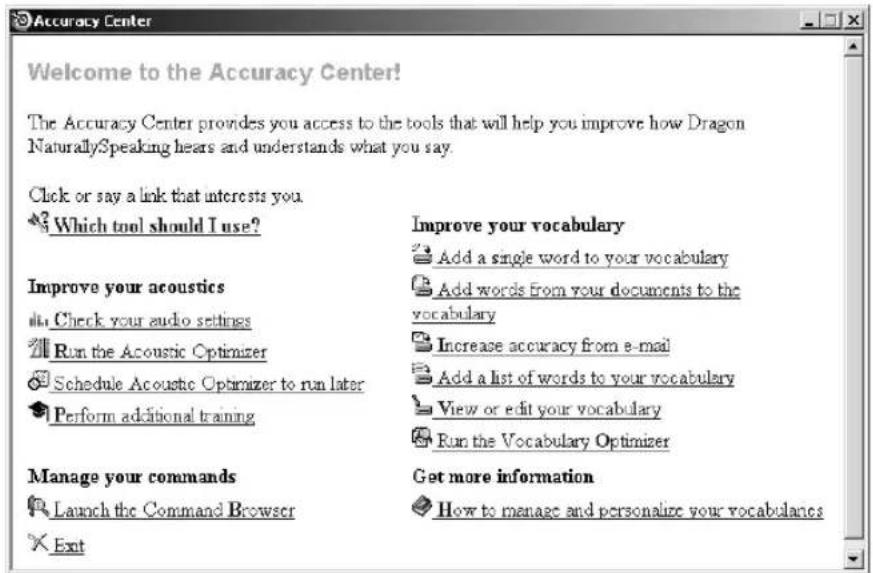
"Which tool should I use"t
If you are not sure where to begin or how to use the Accuracy Center, click the first link, “Which tool should I use?” The Accuracy Assistant will display a series of questions that will help you find the best tool for your needs.
NOTE You can also access the Accuracy Assistant by clicking Improve my accuracy on the Help menu of the DragonBar.
Tools to improve your acoustics
Check your audio settings
You can check the volume level of your microphone and your sound card by clicking or saying “Check your audio settings” in the Accuracy Center. This runs the Audio Setup Wizard, which checks the volume level of your microphone and sound card.
TIP You will need to run "Check your audio settings" if you change microphones.
Run the Acoustic Optimizer
As you make corrections and perform additional training, Dragon Naturally Speaking stores this data in an archive and uses it to enhance recognition accuracy. The Acoustic Optimizer accumulates this data from session to session. This has several advantages over normal adaptation and correction:
The Acoustic Optimizer uses much more data to enhance the user file and is therefore more accurate.
The Acoustic Optimizer allows you to change your mind about saving corrections and supplemental training to your user file if you find that your recognition accuracy is not enhanced or is even degraded by your changes.
Because it can take as long as an hour to incorporate the acoustic data into your user files, you can plan to run the Acoustic Optimizer at the most convenient time for you.
If you plan to run the Acoustic Optimizer, be sure that the "Store corrections in archive" option is selected on the Miscellaneous tab of the Options dialog box. Otherwise you may see a message that there is not enough data for the Acoustic Optimizer to process. The "Store corrections in archive" option should be selected.
To tell the software to make use of this information, in the Accuracy Center window, click the “Run the Acoustic Optimizer” link. The Acoustic Optimizer can take
several hours to complete its work, so run it at the end of your workday or when you don't need to use the computer for other tasks.
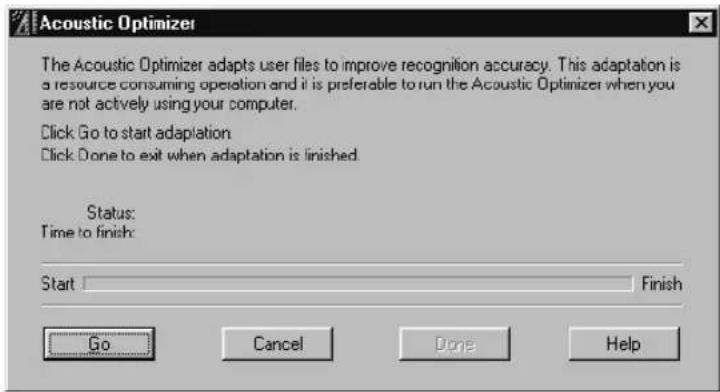
▲ Click the Go button to start the Acoustic Optimizer.
How often you should run the Acoustic Optimizer depends on how much you dictate. Run the Acoustic Optimizer about two weeks after you begin using Dragon Naturally Speaking and then once each month as you continue to use it.
Scheduling the Acoustic Optimizer
The Acoustic Optimizer Scheduler allows you to run the Acoustic Optimizer at a time that is convenient for you. Because the Acoustic Optimizer requires a significant amount of your computer's resources to run, you should schedule the Optimizer to run at a time when the computer will not be needed for any other task.
To schedule the Acoustic Optimizer, click or say “Schedule Acoustic Optimizer to run later” from the Accuracy Center. Use the lists to set the date and time you want the Acoustic Optimizer to run and click OK.
NOTE If your operating system requires a password to run (such as Windows NT, Windows 2000, or Windows XP) a dialog box will appear asking for your Windows user name and password. This dialog box will not appear if you are using Windows 98 or Windows ME. Dragon Naturally Speaking does not store this username or password.
Perform additional training
Additional training will help to improve your recognition accuracy. Consider doing additional training when:
You have used Dragon Naturally Speaking for a few days. By then, you will be accustomed to dictating, and supplemental training should reflect how you actually dictate.
- You move to an environment that is significantly noisier or quieter or that has different background sounds.
■ You change your microphone or sound card.
To perform additional training:
1 From the Accuracy Center, click or say "Perform additional training."
2 Follow the same guidelines as when you trained the first time.
3 When you are finished, click Finish.
Tools to Manage Commands
Launch the Command Browser
From the Accuracy Center, click or say “Launch the Command Browser” to display the Command Browser. The Command Browser lets you see many of the commands available in your edition of Dragon NaturallySpeaking. In the Command Browser, you can also create new commands customized to speed up your work. For more information on the Command Browser, see page 103.
Tools to improve your vocabulary
When Dragon NaturallySpeaking gets a word wrong, it's often because the word is not in the vocabulary. This is more likely if the word is an uncommon name or specialized term. The tools described in this section let you teach Dragon NaturallySpeaking these new words.
Add a single word to your vocabulary
To add any word to the vocabulary, click or say “Add a single word to your vocabulary.” When the Add Individual Word dialog box appears, type or say the word you want to add and click or say “Add.”
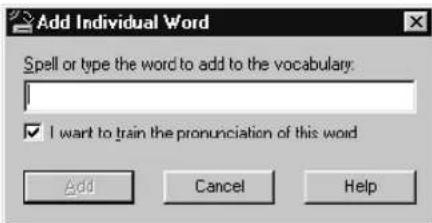
When you check “I want to train the pronunciation of this word,” Dragon Naturally Speaking displays the 'Train Word dialog box where you tech the program how you pronounce the new word you've added.
NOTE You can also access the Add Individual Word dialog box by clicking New from the Words menu on the DragonBar.
Add words from your documents to the vocabulary
You can have Dragon Naturally Speaking analyze your documents to analyze your writing style and the words you use most often.
This procedure will add:
■ Words that match backup dictionary words that have the same capitalization, for example, Punxsutawney (uppercase) or jackstraws (lowercase)
■ Unexpected capitalizations of words found in the active or backup dictionaries, for example, “I’ll see you at the Meeting today”
■ Words with at least one uppercase letter that are not in the backup dictionary, for example, eBusiness and Brooklynese, or a name, such as Rusinow
NOTE The program expects to find capitals at the beginning of sentences, or in a sequence of words that are all capitalized or have initial caps, such as a book title. It does not expect to find capitals in the middle of words or sentences.
This procedure will not add words written entirely in lowercase that are not in the backup dictionary.
To Add Words from Documents
You must have Microsoft® Word installed to process Microsoft® Word files and you must have Corel® WordPerfect® installed to process Corel® WordPerfect® files.
From the Accuracy Center, click or say "Add words from your documents to the vocabulary". This displays the Add Words from Documents dialog box.
2 Click or say "Add Document." Navigate to the documents you want to add and select them. For example:
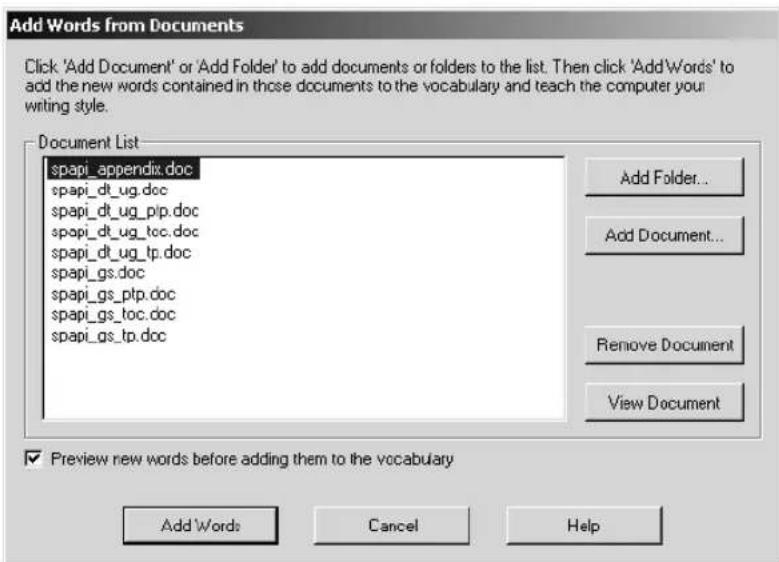
3 (optional) Click or say "Add Folder." This will add all the documents in the folder you select.
TIP Once you have selected the documents, you can often achieve very good results by skipping directly to Step 6.
4 (optional) To view any document in the list, select it and click or say "View Document."
5 (optional) Check or say "Preview new words before adding them to the vocabulary" to open the Preview Words dialog box and display the new words found in the document.
6 When you are finished, click OK to continue with the Add Words process.
7 (optional) If you chose to preview words, a checklist of words displays (from all the documents in the list) that are not in your current vocabulary. For example:
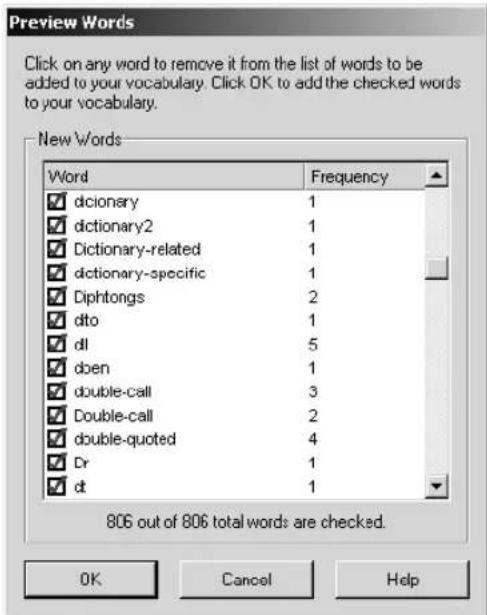
- Clear any check box to remove a word from the list.
- Add only words you think you'll use frequently, not ones you're unlikely to need.
- Don't add capitalized words unless you plan to dictate the capitalized form of the word often (for example, a pet's name "Fluffy").
8 Click "Done" to scan the documents for the words you want to add to the vocabulary. Your speech files will be updated and saved automatically.
Increase accuracy from e-mail
To increase accuracy, you can analyze your sent e-mail as well as add the names of the people in your e-mail address book. The following e-mail applications are supported:
APPLICATION: SUPPORTED IN:
Microsoft ^® Outlook ^® Express Standard and higher editions
Microsoft ^® Outlook ^® Professional and higher editions
Lotus® Notes® Professional and higher editions
To add contact names:
From the Accuracy Center, click or say "Add contact names to the vocabulary." The Increase Accuracy from E-mail dialog box opens. Click Next to continue.
2 Select the e-mail program you use from the choices provided. After selecting one or more e-mail programs and the appropriate options, select Next. For example:
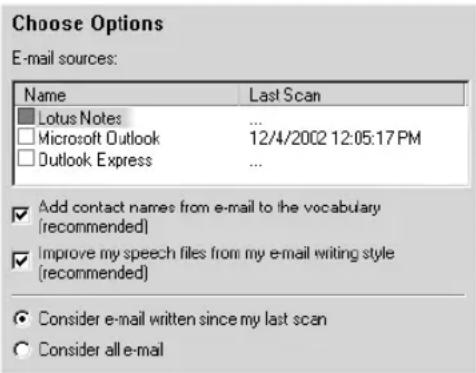
■ Scanning the contents of your sent e-mail can take several minutes if you have a large amount of e-mail in your program's Sent mail folder.
■ Depending on how your system is set up, you may be prompted to supply a password.
The “Improve my speech files from my e-mail writing style” option lets you analyze the e-mails that you’ve already sent for your style. For best accuracy when writing e-mail, leave this option selected.
3 Once e-mail processing is complete, the dialog box displays a list of contact names to add to your vocabulary. Check the contacts you would like to add to your vocabulary and click Next.
4 Check the contacts for which you would like to train the pronunciation and click Next. A check mark indicates that you want to train the word.
5 For each contact you selected to train, Dragon Naturally Speaking brings up the Train Words dialog, where you can speak the name of the contact. Once you train a name, the next name you selected appears in the dialog box until you have trained the entire list of selected names.
6 Once you are done, Dragon Naturally Speaking adapts your speech files based on your selections.
Add a list of words to your vocabulary
Using the “Add a list of words to your vocabulary feature”, you can add many new words to the Dragon Naturally Speaking vocabulary at the same time. This feature is useful when adding words from employee lists, product code lists, and similar documents.
To add a list of words:
1 Create a text (.txt) file and enter each word or phrase you want to add to the vocabulary on a separate line. Make sure words are spelled correctly. Each word, phrase or name that you add must be on a separate line.
2 From the Accuracy Center, click or say "Add a list of words to your vocabulary.
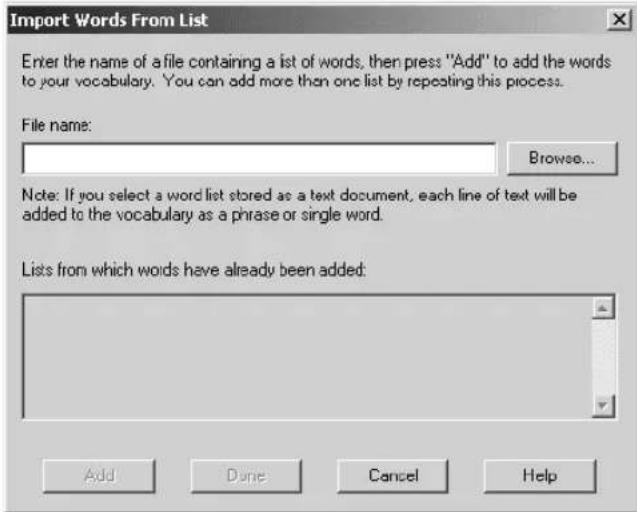
3 Click Browse and select the.TXT file that contains the new words you want to add.
4 Click Add. Dragon Naturally Speaking will add the words in the document you selected.
5 If you want Dragon Naturally Speaking to add words from more documents, repeat steps 3 and 4.
6 When you've finished selecting and processing the documents you want, click Done.
View or edit your vocabulary
The Vocabulary Editor shows you all the active words (the most commonly used words) in the Dragon Naturally Speaking vocabulary. You can open Vocabulary Editor to find out whether a word is in the active vocabulary. If it's not there, you can add it. If it is, you can create a different spoken form.
You can also use the Vocabulary Editorto
- Add words that are spoken one way but written a different way. This feature lets you add a word that, for example, types your phone number whenever you say “phone number line.”
- Change the formatting properties of a word, such as whether Dragon NaturallySpeaking should type a space before or after the word. You can do this by using the Word Properties dialog box. See “Changing word properties” on page 126.
By choosing the appropriate option from the Display list, you can view:
All words: displays all the words in the current vocabulary.
■ Custom words only: displays only words added to the vocabulary by the user.
■ Words with spoken forms only: displays only words with spoken forms that are different from their written forms.
■ Words with formatting properties only: displays only words with special formatting properties that influence how they appear in the transcription of dictated text.
To edit your vocabulary:
From the Accuracy Center, click or say "View or edit your vocabulary." You can also click View/Edit on the Words menu on the DragonBar. The Vocabulary Editor displays.
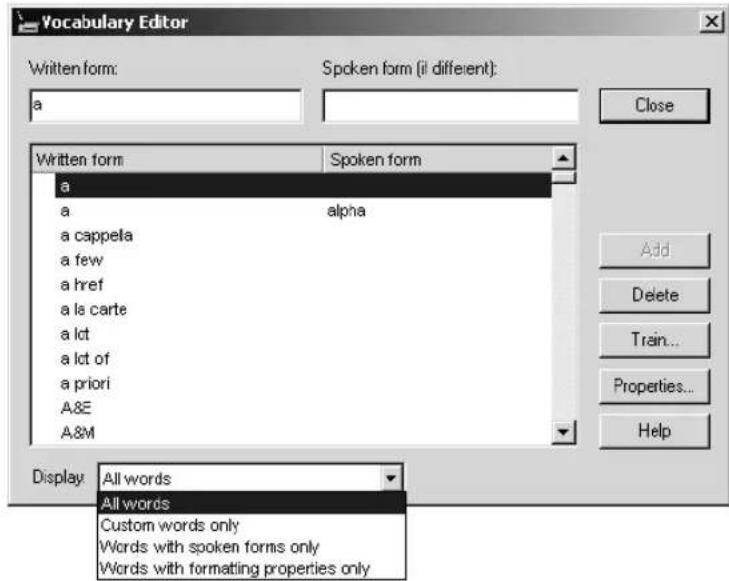
Words you have added are marked with a colored star (not including any words that were previously in the backup dictionary). To see only the words you have added, click “Show custom words only.”
A word's written form is what Dragon Naturally Speaking types when you say the word. The spoken form is how you say the word. For example, the spoken form for "Sgt." is "Sergeant."
TIP Want to check to see if a word is already in the vocabulary? Type the first few letters of the word into the Written form box. If the word is in the vocabulary, it will appear on the screen.
2 Type the new word or phrase into the Written form box. Leave the Spoken form box empty, unless the word or phrase is not pronounced the way it's spelled (as in the example pictured). If so, see "View or edit your vocabulary" on page 123.
3 Click Add
4 Click Close to close the Vocabulary Editor.
Notes:
If the spoken form is blank, you must say the written form for the word to be recognized.
■ Some special words have a blank written form. These words are special dictation words built into Dragon NaturallySpeaking. You cannot add your own words with a blank written form.
Words with a written form that begins with a number (for example, "99th" or a fraction like "1/2") appear in the list before words that begin with the letter "a". To see these words, you must scroll the list up.
To create a spoken form for a word or phrase:
Creating a spoken form can be useful in automating some words or phrases that you dictate frequently. 'To create a spoken form:
Find the word you want in the list by typing the first few letters in the Written form box of the Vocabulary Editor.
NOTE If the word you want to edit doesn't appear in Vocabulary Editor, it means the word isn't in the active vocabulary. You need to add it to the active vocabulary before you can edit it. (See "View or edit your vocabulary" on page 123.)
2 Select the word.
3 Type the new spoken form into the Spoken Form box. Make sure you type it exactly as is it pronounced.
4 (optional) Make any changes, such as punctuation or capitalization, to the Written Form box.
5 Click Add. This adds the word with your changes.
If the word was already in the active vocabulary before you edited it, you should then delete the original word.
Creating a spoken form can be useful in automating some words or phrases that you dictate frequently. For example, you can define a spoken form for a phone number that you frequently use instead of dictating a string of numbers.
Here are some examples of words with different written and spoken forms. Look in the Vocabulary Editor window for more examples.
| WRITTEN FORM SPOKEN FORM |
| eBusiness ee business |
| Daniell Daniel with two ells |
| Niamh Nev |
| CINCPAC sink pack |
| mdbowman@company.com my e-mail address |
WRITTEN FORM SPOKEN FORM
Robert F. Kennedy R. F. K.
Waldron, Lichtin & Foust Waldron Lichtin and Foust
(617) 965-5200 my phone number
To delete a custom word from your vocabulary
Normally, you do not need to delete words from the active vocabulary. If a word is regularly confused with another one that you never use, however, you might want to delete the word you never use.
To delete a word, select it and click Delete. (You can select multiple words by holding down the CTRL key while you click. Clicking while holding the SHIFT key will select consecutive words.)
Some common words (like “the”) cannot be deleted, since Dragon Naturally Speaking wouldn’t understand you very well without them.
Changing word properties
You can use the Vocabulary Editor to you change the formatting properties of a word, For example, you can change whether Dragon Naturally Speaking should type a space before or after the word, or whether the word should be capitalized when used in a title.
To change the properties of a word:
From the Accuracy Center, click or say “View or edit your vocabulary.” You can also click View/Edit on the Words menu on the DragonBar. The Vocabulary Editor displays.
2 Find the word whose properties you want to modify and select it,
3 Click the Properties button to open the Word Properties dialog box. 'The Property column lists the different possible properties for a word, namely, the spacing, capitalization, and other ways a word behaves when it is recognized and printed in your document.
The word whose properties you are editing.
Click on the word properly you want in the Properties column.
The Example column lists example words for each Property.
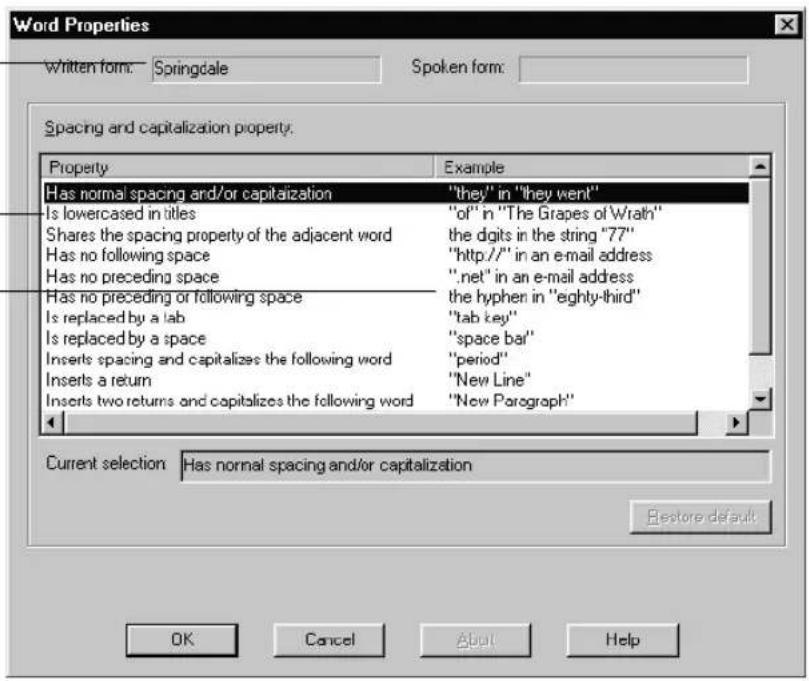
4 Click OK to close the Word Properties dialog box.
5 Click Close to close the Vocabulary Editor.
For more information on word properties, see the Dragon Naturally Speaking online Help.
Run the Vocabulary Optimizer
The Vocabulary Optimizer analyzes your writing style to increase your recognition accuracy during dictation. This tool scans the following for appropriate words to use when building the vocabulary:
- Documents in your My Documents directory. This includes Microsoft Word, Corel WordPerfect, text and rich text files (.rtf).
E-mail you have sent from Microsoft Outlook, Microsoft Outlook Express, and Lotus Notes.
To start the Vocabulary Optimizer:
1 On the Tools menu of the DragonBar, click or say "Accuracy Center."
2 In the Accuracy Center click or say "Run the Vocabulary Optimizer." This displays the Vocabulary Optimizer dialog box:
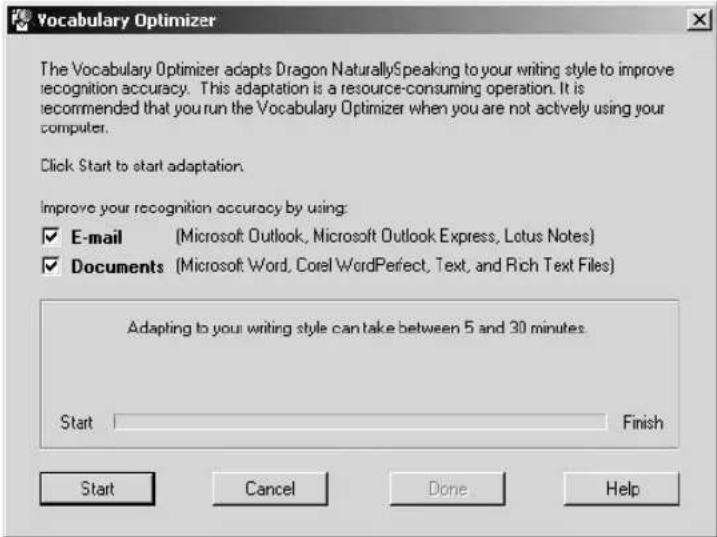
3 Select:
■ E-mail to have Dragon Naturally Speaking build a language model from the contents of your sent e-mail, so that it can better recognize the phrasing and word order you typically use in your communication.
■ Documents to have Dragon NaturallySpeaking build a language model from the contents of any Microsoft Word, Corel WordPerfect, text and rich text format file in your MyDocuments folder.
4 Click or say "Start" to continue. A status bar displays while the Vocabulary Optimizer scans your system.
5 Click or say "Done" when the Vocabulary Optimizer finishes.
Notes:
- Your sent e-mail must be from either Microsoft Outlook, Microsoft Outlook Express, or Lotus Notes or the Vocabulary Optimizer cannot scan it.
■ Documents older than 90 day and documents less than 512 bytes are not processed.
Because the scanning process can take a long time and use much of your computer's memory and processing power, it is best to run the Vocabulary Optimizer only when you are not using your computer for other purposes.
Managing your vocabularies
Click the last link in the Accuracy Center, “How to manage and personalize your vocabularies,” to open an online Help topic about vocabularies. (To display the Accuracy Center, click Accuracy Center on the Tools menu of the DragonBar.)
The Professional and higher editions of Dragon Naturally Speaking allow one user to create multiple vocabularies. This can be useful if you dictate on several unrelated topics—for example, if you dictate medical reports part of the time and dictate a e-mail at other times. In this case, you could create separate vocabularies for medical dictation and for your personal writing, thereby increasing accuracy.
Multiple vocabularies share the same pronunciations but have different words and word usage information. This means that you do not need to train for each vocabulary. Your acoustic information resides in your user files. You can imagine vocabularies as subdirectories of your user files, with one set of acoustic files that works across all your vocabularies. For additional information about using multiple vocabularies, see the online Help.
Training a word or command
Sometimes Dragon Naturally Speaking will misrecognize a word or command more than once, even after you correct the program's misrecognition. When this happens, use the Training dialog box to easily train the word or command.
To train a word or command:
1 Click Train on the Words menu of the DragonBar to open the Training dialog box.
2 'Type the word or command you want to train (capitalization does not matter).
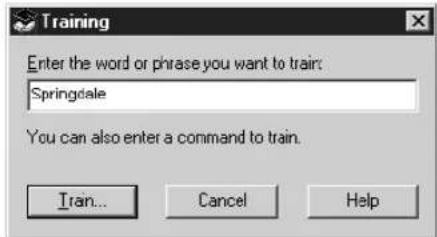
▲ In this example, the word to be trained is "Springdale."
3 Click Train to open the Train Words dialog box.
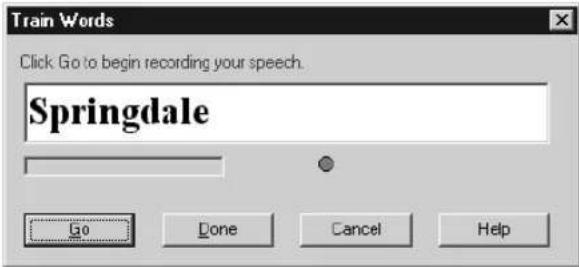
4 Click Go.
5 Say the word or command you are training.
6 Click Done.
Using the Performance Assistant
The Performance Assistant helps you determine how to increase the speed with which Dragon Naturally Speaking recognizes your speech.
The Performance Assistant is presented as a series of questions. As you answer questions about how you normally use Dragon NaturallySpeaking and click or say the corresponding link, you will get help with specific techniques to customize Dragon NaturallySpeaking for better performance.
To start the Performance Assistant, click or say "Performance Assistant" from the Dragon Bar Help menu.
As you answer questions about how you normally use Dragon NaturallySpeaking and click or say the corresponding link, you will get help with specific techniques to customize Dragon NaturallySpeaking for better performance.
CHAPTER 11
Managing Users
More than one person can use Dragon Naturally Speaking on the same computer. You can even dictate in different languages or dialects (Preferred and higher editions).
Each person who wants to use the program needs to create a new set of user speech files and train Dragon NaturallySpeaking to understand his or her voice. A single person might want to have more than one set of user speech files (called a user) if, for example, you dictate into a mobile recorder or in more than one language.
What are user speech files?
Your user speech files contain all the information that Dragon
NaturallySpeaking gathers about you: your pronunciation, your vocabulary, how often you use certain words, and your preferences (whether you want one or two spaces after a period or a full stop, for example).
This chapter explains how to set up Dragon Naturally Speaking so that more than one person can use it, and describes how to open, rename, delete, back up, and restore users.
Creating a new user
When someone new wants to use Dragon NaturallySpeaking, that person needs to follow the steps described in this section to create a new user.
To create a new user:
1 From the NaturallySpeaking menu, select Manage Users.
2 In the Manage Users dialog box, click New.
3 Follow the steps in the New User Wizard.
Creating a user on a portable device
You can create a user on a portable device or removable device, such as a Zip drive. Before creating the user, make sure the device is attached to your computer.
1 From the NaturallySpeaking menu, select Manage Users.
2 Click Open User from the NaturallySpeaking menu.
3 Select Browse and pick the appropriate location.
4 Click New to create the user. Follow the steps in the New User Wizard.
Viewing user properties
Opens the User Properties dialog box, where you can view information about the selected user, including the language, dictation source, speech model, and what steps you have taken to set up this user.
Use this dialog box to view information about a user, including the language, dictation source, speech model, and what steps you have taken to set up this user. Open this dialog box by selecting a user on the Manage User dialog box and clicking Properties.
Opening a user
When someone else has been using Dragon NaturallySpeaking, you need to open your own user before you start using the program. Or, if you have more than one user of your own (for example, you have a separate user for your portable recorder), always remember to switch to the appropriate user before you start.
To open a user:
1 From the NaturallySpeaking menu, select Open Users.
2 Select a user and click Open.
This loads your speech files. These files include information about your pronunciation that Dragon Naturally Speaking needs to recognize your voice.
Renaming a user
You can change the name of a user at any time.
To rename a user:
From the NaturallySpeaking menu, select Manage Users. The Manage Users dialog box opens.
2 Select a user and click Rename.
3 Type a new name and click OK.
The name can contain up to 128 characters, including spaces. Special characters are not allowed in user names.
4 To close the Manage Users dialog box, click Cancel.
TIP You cannot rename the currently open user. If you have only one user and want to rename that user, you must first export and then import that user. NaturallySpeaking will prompt you to change the name. You can then delete the user under the old username. See page 136 for more information.
Deleting a user
If you know you will not need a user that you have created, you can delete it and free up hard-disk space. Removing a user can't be undone, so make sure you don't need it before you remove it.
To delete a user:
From the NaturallySpeaking menu, select Manage Users. The Manage Users dialog box opens.
2 In the Manage Users dialog box, select the user you want to delete and click Delete.
3 A dialog box will appear asking if you really want to permanently remove this user. To confirm, click "Yes." To cancel, click "No."
If you want to delete the current user, you must close it first by opening a different user. There must be at least one user on the computer, so if you've got only one, you can't delete it.
NOTE Always use the Delete button to delete users. Don't remove folders from the ...NaturallySpeaking\Users folder on your hard disk. Using the Delete button is the only way to completely remove all information about a user from your computer.
Backing up and restoring a user
When you make changes to your user (for example, by adding words to the vocabulary), Dragon Naturally Speaking prompts you to save your user speech files. The program automatically makes a backup copy every fifth time you save your speech files.
You can change the frequency of automatic backups or turn this feature off. On the NaturallySpeaking menu, point to Advanced, click Options, and then click the Miscellaneous tab.
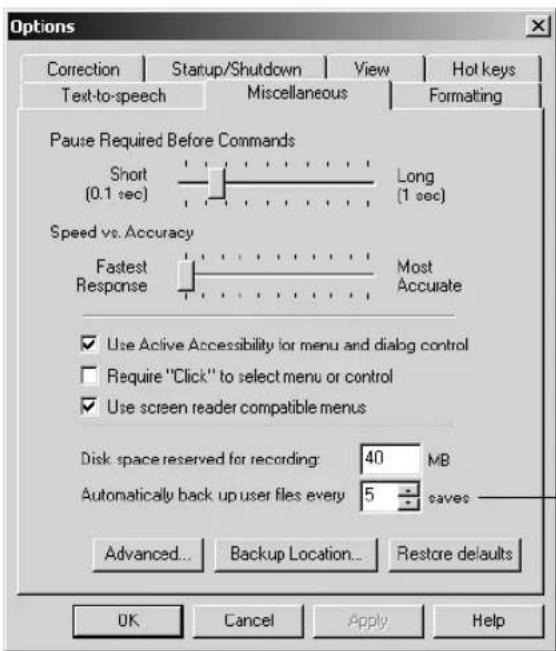
Change this number to set how often you want to back up your speech files automatically.
To back up a user:
You can only back up the current user. You cannot back up a user simply by selecting it in the Manage Users dialog box; you must open the user first.
1 From the NaturallySpeaking menu, select Manage Users.
2 In the Manage Users dialog box, select the user you want to back up.
3 Select Backup from the From the File menu. The File menu is located in the upper left corner of the Manage Users dialog box.
Dragon NaturallySpeaking makes a backup copy in a default location on your computer.
If you made recent changes to your user (for example, added words to the vocabulary), Dragon Naturally Speaking prompts you to save these changes before it makes the backup.
Restoring a backup copy of a user
If you make unwanted changes to your speech files (for example, you process the wrong documents in Vocabulary Builder), you can restore the last backup copy of your user.
To restore a user:
1 From the NaturallySpeaking menu, select Manage Users.
2 In the Manage Users dialog box, select the user you want to restore. For example, "Elmo."
3 Select Restore from the From the File menu. The File menu is located in the upper left corner of the Manage Users dialog box.
Dragon Naturally Speaking restores the last backup that was made and saves it with a different name, for example, “Elmo - Restored1.”
4 Open the restored user to begin working with it.
Delete the older version (in this example, the user named “Elmo”) and rename the one you just restored.
Changing the backup location
You can specify where NaturallySpeaking stores your user files and backs them up. You can define any location for which you have read and write permissions, including portable or removable drives and CD burners.
NOTE You can use a network device for the backup location but not for a portable user location.
To set a back up location:
1 Select Options from the Tools menu
2 Select the Miscellaneous tab.
11
Managing Users
3 Select the Backup Location button. This displays the Backup Location dialog box:
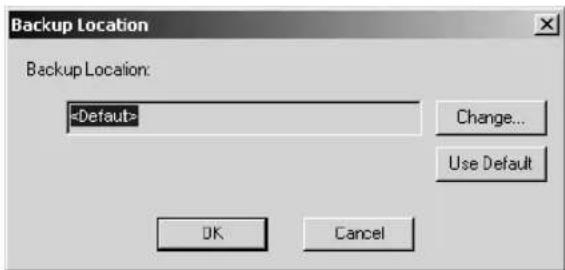
4 Click Change to pick a different location. This displays the "Browse for Folder" dialog box.
5 Select the location where you want to back up your user files and click OK. The default backup location is C:\Program Files\ScanSoft\NaturallySpeaking\Users\user_name\
Importing and exporting users
Importing and exporting users is available only in the Preferred and higher editions.
To export a user:
1 From the NaturallySpeaking menu, select Manage Users.
2 In the Manage Users dialog box, select the user you want to export.
3 Select Export from the From the File menu. The File menu is located in the upper left corner of the Manage Users dialog box. This displays the “Browse for Folder” dialog box.
Dragon Naturally Speaking makes a backup copy in a default location on your computer.
CHAPTER 12
Using Portable Recorders (Preferred and higher)
If you have Dragon Naturally Speaking Preferred or a higher edition, you can dictate into a portable recorder and then use Dragon Naturally Speaking to transcribe your recorded speech.
To prepare Dragon Naturally Speaking for use with a recorder, follow these steps:
■ Install the recorder software (required only for certain recorders).
■ Create a user specifically adapted to the sound of your recorded speech.
Once you have created a user, follow these steps whenever you want to use your recorder with Dragon NaturallySpeaking:
■ Dictate into your recorder
■ Transcribe the recorded dictation
■ Correct mistakes
Supported recorders
Dragon Naturally Speaking supports specific recorders that have been certified by ScanSoft, including:
■ Dragon NaturallyMobile recorder
■ Many Sony ^ recorders, including the Sony ^ Memory Stick ^ IC recorder ICD-MS, the Sony ^ IC recorder ICD-BP, and the Sony ^ ICD-R100.
■ Many Panasonic recorders, including RR-US and RR-XR series.
- Pocket PC devices, including the Compaq iPAQ. (If you are using a iPAQ 3830 with 32 MB of memory, you may need more memory to store both the training text and additional recordings.)
For a complete list of supported recorders, see the following Web site: http://www.scansoft.com/naturallyspeaking/support/
Installing recorder software
Some recorders require additional software to work with Dragon NaturallySpeaking. If you are using a:
■ Sony ^® ICD-BP recorder, you must install the Sony ^® Digital Voice Editor software. For more information, see the documentation that came with your recorder.
■ Sony ^® Memory Stick ^™ IC Recorder ICD-MS, you must install the Sony ^® Memory Stick ^™ Voice Editor or the Sony ^® Digital Voice Editor Version 2.01. For more information, see the documentation that came with your recorder.
■ Sony ^ ICD-R100 recorder, you must install the ICD-PCLINK software. For more information, see the documentation that came with your recorder.
A Panasonic ^® IC recorder, you must install the Panasonic ^® Voice Editor. For more information, see the documentation that came with your recorder.
A Pocket PC (for example, a Compaq iPAQ), you must install the ScanSoft Voice Recorder software. See below for more information.
A Dragon NaturallyMobile recorder, you can install the Voice It® Link software, which is not required, but can enhance the recorder's usability. This software is available on your Dragon NaturallySpeaking CD but it is not automatically installed when you install Dragon NaturallySpeaking. See below for more information.
Use the Voice It® Link software to perform functions for your Dragon NaturallyMobile recorder that you can't perform from the Dragon NaturallySpeaking 'Transcribe dialog box. Note that for normal transcription from the Dragon NaturallyMobile recorder, you don't need to have this software installed.
Pocket PC: Installing ScanSoft Voice Recorder
If you are using a Pocket PC device like the Compaq iPAQ as a mobile recorder, you can install ScanSoft Voice Recorder either at the same time you install Dragon NaturallySpeaking, or at a later time.
To install ScanSoft Voice Recorder at the same time you install Dragon NaturallySpeaking:
If you don't already have ActiveSync 3.5 on your desktop, you must install it. See http://www.microsoft.com/mobile/pocketpc/downloads/activesync35.asp for more information.
2 Connect your PocketPC device to your computer using the device's USB connection (or the COM port for NT systems).
3 Install Dragon NaturallySpeaking.
4 At the end of the installation process, a message will appear stating that the Setup program has detected a PocketPC device connected to the computer and asks if you want to install ScanSoft® Voice Recorder.
5 Click Yes.
6 Follow the instructions to install ScanSoft Voice Recorder on your device.
ScanSoft® Voice Recorder is automatically installed on your device.
Installing ScanSoft Voice Recorder after you install Dragon NaturallySpeaking:
If you don't already have ActiveSync 3.5 on your desktop, you must install it. See http://www.microsoft.com/mobile/pocketpc/downloads/activesync35.asp for more information.
2 Connect your PocketPC device to your computer using the device's USB connection (or the COM port for NT systems).
3 Place the Dragon Naturally Speaking CD in your computer's CD reader.
4 Open the Voicerec folder on the Dragon NaturallySpeaking CD.
5 Double-click on Setup.exe and follow the instructions on the screen.
ScanSoft® Voice Recorder is installed on your device.
Dragon NaturallyMobile recorder: Installing Voice It Link
1 Put the Dragon NaturallySpeaking CD in the CD-ROM drive of your computer.
2 Using Windows ^® Explorer, go to the VOICEIT folder of the Dragon NaturallySpeaking CD. The folder is on the top-level directory of the Dragon NaturallySpeaking CD.
3 Double-click Setup and follow the instructions of the Setup Wizard.
Creating a user adapted to your recorded speech
Before you can use Dragon Naturally Speaking with a handheld recorder or mobile device, you must create a user specifically adapted to the sound of your recorded speech. You do this by running the New User Wizard and selecting one of the recorder options as the dictation source.
NOTE Steps 1 and 2 assume that you have already created a headset microphone user. If you have not previously created a user for Dragon NaturallySpeaking, then the New User Wizard will appear when you first start the program and you can skip to step 3.
To create a user:
1 From the NaturallySpeaking menu on the DragonBar, click or say "Open User."
2 In the Open User dialog box, click or say "New." The New User Wizard guides you through the steps of creating a user. As you complete the steps, click Next whenever you are ready to continue.
3 On the Create User screen, enter a unique name for the user. Then select the appropriate recorder type from the Dictation source list.
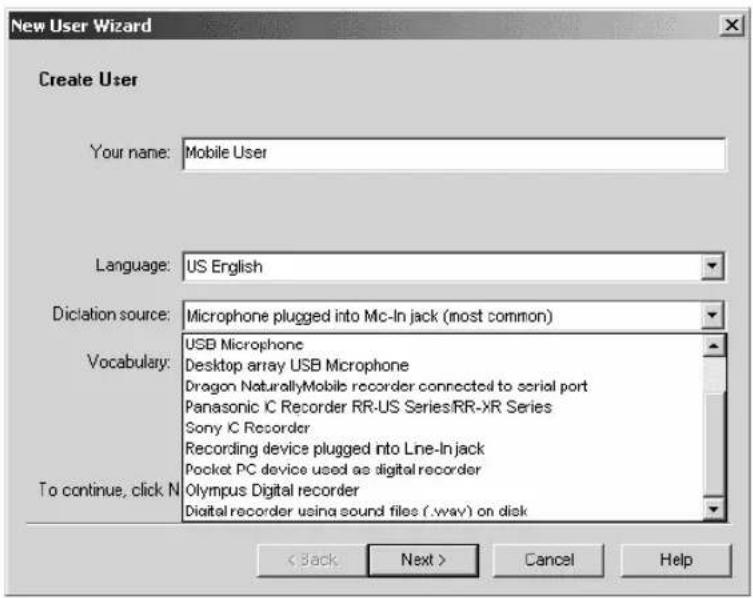
Use the following table as a guide for selecting a Dictation source and deciding what to do next.
| DICTATION SOURCE HOW TO PROCEED | |
| Dragon NaturallyMobile recorder connected to serial port | Use the recorder as a microphone attached to your computer with the supplied serial cable. Do not proceed any further with the training instructions in this chapter. Instead, use the instructions for new user training that begin on page 13. Also see "Using the Dragon NaturallyMobile recorder as a microphone" on page 151. |
| Sony® IC recorders Go to step 4. | |
| Panasonic IC recorder Go to step 4. | |
| Olympus Digital recorders Go to step 4. | |
| Pocket PC device used as digital recorder | Make sure that the power option "Turn off device if not used for " and "Turn off backlight if device is not used..." are not activated on your Pocket PC so that you can record for 10 minutes without interruption.Go to step 4 |
| Recording device plugged into Line-In jack | Be sure the recorder is connected to your computer with a cable plugged into your sound card, and proceed to step 4. |
| Digital recorder using sound files (.wav) on disk (includes the Sony® ICD-R100 recorder) | Go to step 4. |
4 The New User Wizard starts to guide you through training for the mobile user. Click Next to continue.
For the Pocket PC, choose the "Start a New Training Recording" option.
5 On the Training - Recording your speech screen, select the text you would like to read from the list of choices. Click View if you want to read the text from the screen. Click Print if you want to send the text to your printer so you can read it while away from your computer.
Printing out the text you selected to read may greatly help reading the text while using a handheld recorder.
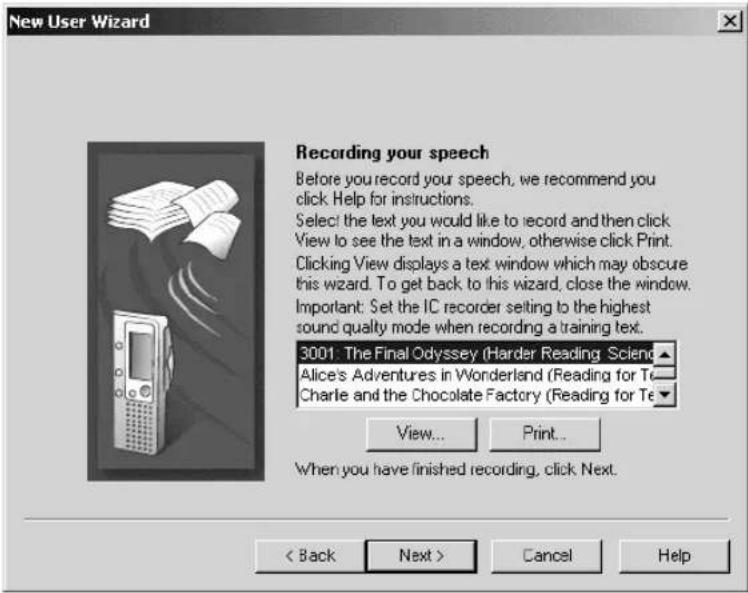
6 After you have recorded approximately 15 minutes of your reading the text selection, click Next.
Recording with ScanSoft Voice Recorder on a Pocket PC
If you are using the ScanSoft Voice Recorder on a Pocket PC, do the following on the Pocket PC:
■ Tap File and then tap Training.
■ Tap the name of the text file you want to record and then tap OK.
Tap the Record button on the screen or press your device's Record button and begin reading the text on the screen or from a print-out. Read for at least 10 minutes. Do not stop the recording when you make a mistake. You will get a message when enough training data is collected.
■ Attach the Pocket PC to your computer.
NOTE If you do not have enough available memory for 10 minutes of recording, a message box will warn you. Open the Pocket PC Main menu, tap Settings, tap the System tab, and then tap the Memory icon. Drag the Memory slider to the right until you have at least 12 MB of memory free for Storage.
7 The screen that appears and what you do next depends on the recorder type you have selected.
| RECORDER TYPE HOW TO PROCEED | |
| Sony® Memory StickTM IC Recorder ICD-MS | Click the "Sony Memory Stick Voice Editor" or "Sony Digital Voice Editor" button and follow the instructions on the screen. |
| Sony® ICD-BP recorder Click the "Digital Voice Editor" button and follow the instructions on the screen. | |
| Panasonic IC recorder Click the "Panasonic Voice Editor" button and follow the instructions on the screen. | |
| Pocket PC In the "Select training recording" screen, select the location of your training file. Click Next to adapt the file. | |
| Recording device plugged into Line-In jack | Be sure that the recorder is connected to the line-in jack on your computer and (optionally) select the Detect end of recording and automatically adapt user files box. If you do this, choose the number of seconds of silence before the wizard assumes that the recording is finished. Then click Start Recording and start your recorder to play back your dictation. |
| Olympus recorder Transfer the.wav file to your computer's hard disk and then use the Browse button to locate the file. If you are not sure how to transfer recorded data to your computer, see the documentation for your recorder. Finally, click Next and follow the instructions on the screen. | |
| Digital recorder using sound files (.wav) on disk (includes the Sony® ICD-R100 recorder) | Transfer the .wav file to your computer's hard disk and then use the Browse button to locate the file. If you are not sure how to transfer recorded data to your computer, see the documentation for your recorder. Finally, click Next and follow the instructions on the screen. |
8 Depending on your system, it can take up to 60 minutes to adapt your user for mobile recording. You do not have to sit at your computer while the program is adapting to your recorded voice.
Dictating into your recorder
You can start dictating once you have trained Dragon Naturally Speaking to recognize your recorded speech.
When you dictate into your recorder, you should follow the same guidelines you use when talking directly to the computer.
Here are some additional tips for getting good results:
If you talk directly into a built-in microphone, always hold your recorder at the same distance from your mouth. Some users report that it is easier to rest the recorder on their jaw for the most consistent results. Be sure to hold the recorder at the same distance you used when you dictated the training text.
- Don’t change the recording volume setting on your recorder (if it has one). Keep the same setting you used during training.
For a better quality recording, consider connecting your headset microphone to your recorder, rather than talking into the built-in microphone. Most recorders include connection for an external microphone a mike-in connection.
Using the ScanSoft Voice Recorder on a Pocket PC
To start ScanSoft Voice Recorder:
■ On the Start menu, tap ScanSoft Voice Recorder.
■ Tap the appropriate button to record, pause, stop, or play.
The amount of available recording time appears in the upper right in the Available box. The amount of available time depends on the amount of memory in your Pocket PC device.
For more information, see the ScanSoft Voice Recorder Help file on the Pocket PC.
The restricted command set
When you are dictating into a recorder, most of the Dragon Naturally Speaking voice commands cannot be used effectively because they require that you see the results on a computer screen. 'The restricted command set, however, can be used without visual feedback when you are dictating into your recorder.' These are the commands in the restricted command set:
■ New Paragraph
New Line
Tab Key
■ Cap [word] or Cap Next [word]
■ All Caps [word]
■ No Caps [word]
■ No Space [word]
■ Caps On/Caps Off
■ All Caps On/All Caps Off
■ No Caps On/No Caps Off
■ No Space On/No Space Off
Scratch That
■ Resume With
TIP "Resume With" is particularly useful when you are using a recorder. It lets you return to where you want to go within a recording if you misspeak or change your mind after dictating a phrase. For more information, see "Going back as you dictate" on page 50.
Later, when you transcribe your recorded dictation, you can choose to make Dragon Naturally Speaking ignore all commands except the restricted command set. This prevents potentially damaging recognition errors (for example, a phrase being incorrectly interpreted as the command “Delete Previous 5 Paragraphs,” which would actually delete the previous five paragraphs from your transcription). For more information on how to do this, see the “The Advanced Settings dialog box” on page 148.
Transcribing recorded dictation
Connecting a recorder to your computer
Before Dragon Naturally Speaking can transcribe your recorded dictation, you must connect your recorder (or, in some cases, your recorder's memory card) to your computer. Connect your recorder in the same way as you did when you created a user trained for your recorded speech.
The following procedures describe the different methods you use for transcription, depending on the type of recorder you are using. Use the method that is appropriate for your recorder.
Transcribing from a handheld recorder or Pocket PC
Dragon NaturallySpeaking has features specifically adapted to work with the Dragon NaturallyMobile recorder, Sony ^® IC recorders, Panasonic ^® IC recorders, and Pocket Pcs. To transfer files from these recorders, use the following procedure.
To transcribe recorded dictation:
1 Start Dragon Naturally Speaking. (You don't need to turn the microphone on.)
2 Open the user adapted (trained) for your recorded speech. (Click Open User from the NaturallySpeaking menu on the DragonBar, select the user you want, and click Open.)
3 From the Sound menu on the DragonBar, click Transcribe Recording. (If the Extras toolbar is displayed, you can click the Transcribe button instead.) What you see next depends on the type of recorder you have.
Transcribe a Recording dialog box
If you have Pocket PC, Panasonic IC recorder, or a Sony IC recorder, the Transcribe a Recording dialog box opens. The illustration below shows the text for Transcribe a Recording dialog box when you have a Sony® Memory Stick™ IC Recorder:)
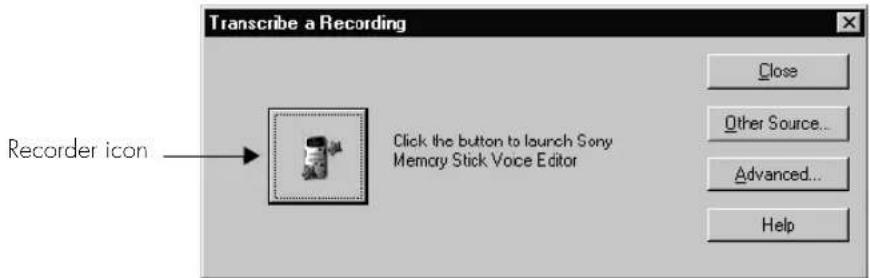
Click the recorder icon.
If you want to change the target window of the transcription, specify which commands Dragon Naturally Speaking will understand or change the recorder-specific options, and click the Advanced button. For a more detailed description of the options, see the “The Advanced Settings dialog box” on page 148.
Transcribe From... dialog box
If you have recorder using sound files (.wav) like the Sony ICD-R100, the Transcribe From... dialog box opens. For example:
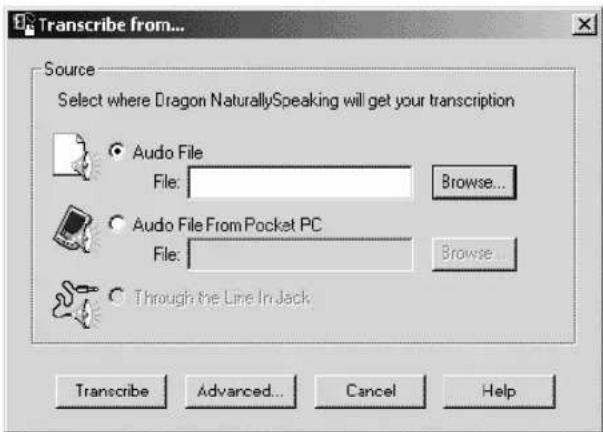
Click the Browse button to locate the sound file.
NOTE If you are transcribing a wave file, make sure the file is in the following format: PCM, 11.025 or 22.050 kHz, 16 Bit, Mono.
If you want to change the target window of the transcription, specify which commands Dragon Naturally Speaking will understand or change the recorder-specific options and click the Advanced button. For a more detailed description of the options, see the “The Advanced Settings dialog box” on page 148.
4 What you see next, depends on your recorder:
NOTE After transcription, your recorded speech should appear on the screen. If text doesn't appear, see "Troubleshooting" on page 150.
Dragon NaturallyMobile recorder or the ScanSoft Voice Recorder
If you are using the Dragon NaturallyMobile recorder or the ScanSoft Voice Recorder, the Select Files for Transcription dialog box opens.
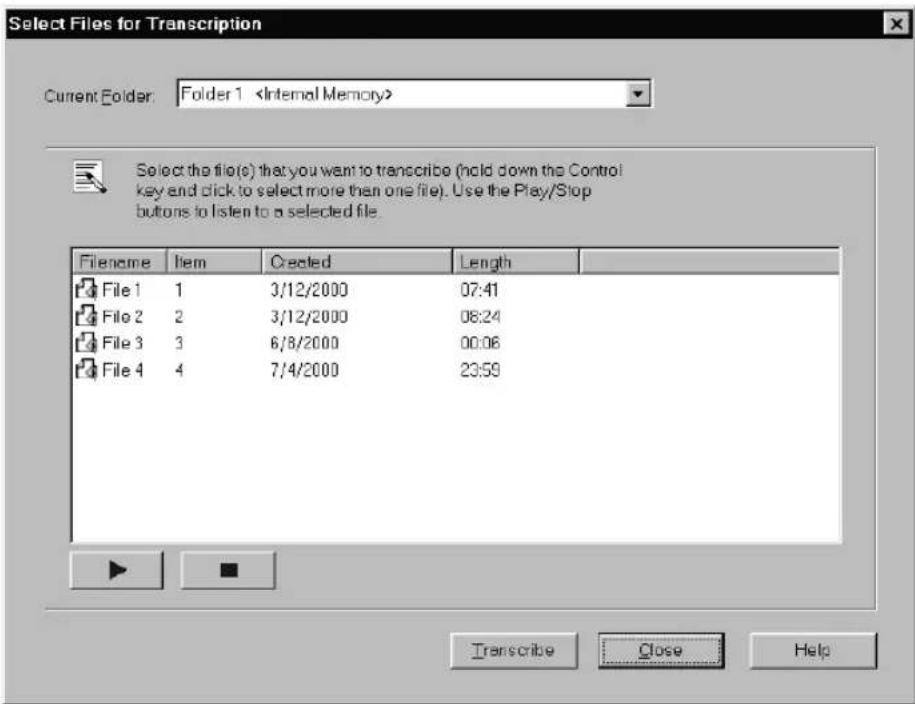
With the Dragon NaturallyMobile recorder or the ScanSoft Voice Recorder, select the file or files you want to transcribe, and click the Transcribe button. You can only transcribe the.uwv format with this dialog
You can also select the memory location of the Pocket PC folder if the file you want is not displayed in the list. You can store recording in either the device's internal memory or in a memory card, if you have one attached to your device.
Dragon NaturallyMobile recorders
With the Dragon NaturallyMobile recorder, select the file or files you want to transcribe and click the 'Transcribe button.
Pocket PCs
With Pocket PCs using the ScanSoft Voice Recorder, select the file or files you want to transcribe and click the Transcribe button. You can only transcribe files in the .uwv format from the this dialog box. To transcribe .wav or .cur files, open the Transcribe a Recording dialog box, and choose “Other Sources” and then “Audio File from Pocket PC”
Sony Memory Stick or ICD-BP recorders
If you are using the Sony® IC Recorder, the Sony® Memory Stick™ Voice Editor or Digital Voice Editor dialog box opens.
In the Sony® Voice Editor or Digital Voice Editor screen, click the Voice Recognition tool ☐ the toolbar or the Voice Recognition option on the File menu.
Panasonic IC recorders
If you are using a Panasonic IC recorder, the Panasonic Voice Editor dialog box opens. In the Panasonic Voice Editor, click the Dragon button.
Recorders using sound files (.wav)
If you are using a recorder that uses sound files (.wav) and you clicked the Browse button to locate the file, the Open dialog box displays.
Locate the files you want to transcribe and click the Transcribe button to begin transcription.
Recorders plugged into the Line-In jack
If your dictation source is “Recording device plugged into Line-In jack,” press the Play button on your recorder.
NOTE If you are playing back recorded dictation through the Line-In jack, transcription stops automatically by default as soon as the computer hears 10 seconds of silence.
Drag-and-drop transcription
You can transcribe a wave file (.wav) by dragging the file to the DragonPad window or onto the DragonBar. By doing this, NaturallySpeaking starts to transcribe the wave file automatically.
The Advanced Settings dialog box
The Advanced Settings dialog box allows you to change how Dragon Naturally Speaking transcribes the dictation from your recorder. The options you see when you open the dialog box depend on the type of recorder you are using. The
illustration shows the Advanced Settings dialog box that appears when you are transcribing from the Dragon NaturallyMobile recorder.
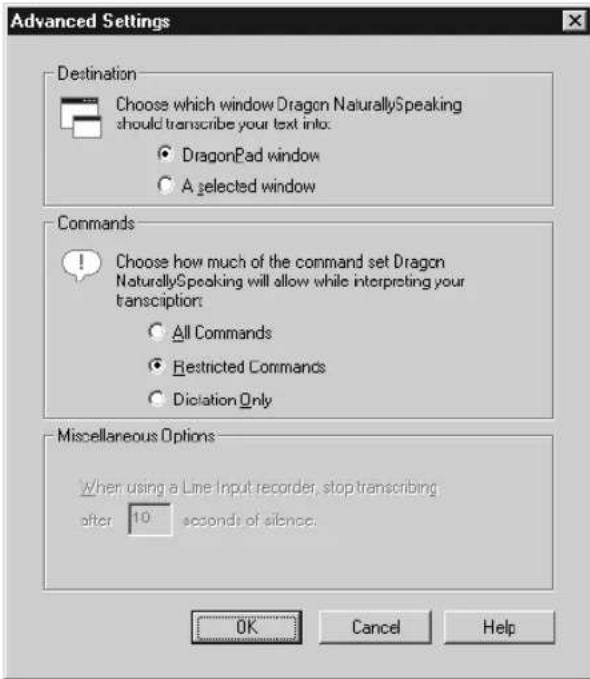
The following sections describe the options on the Advanced Settings dialog box:
Destination
You can choose to specify that the recording should be transcribed into the DragonPad window or into a selected window you click in after closing the Transcribe a Recording dialog box. Make sure the window you select accepts text.
Commands
You can choose either the All Commands, Restricted Commands, or Dictation Only option.
- “All Commands” enables all Dragon NaturallySpeaking commands during transcription. Any command recognized in the recording is carried out.
■ “Restricted Commands” disables all but the restricted command set during transcription. If other commands are recognized, they are entered as text. This prevents potentially damaging misrecognitions (for example, a phrase being misrecognized as “Delete Previous Paragraph”). For more information about the restricted command set, see page 144.
■ “Dictation Only” disables all commands during transcription, except for dictation commands. If the recording contains commands, they are entered as text in the document.
Communication options (for the Dragon NaturallyMobile recorder only)
“Select the Baud Rate to connect to the Dragon NaturallyMobile recorder” specifies the communication speed between your computer and your recorder. Generally, the speed should be set to the highest number (115,200). If you are having communication errors, try selecting a lower number.
“Dragon NaturallyMobile recorder is on
Miscellaneous options (for Line-In recorders only)
"When using a Line-In recorder, stop transcribing after
Troubleshooting
If text doesn't appear on the screen, check the following:
If you are using the Transcribe a Recording dialog box, did you click in a window after closing it? If you aren't transcribing in the DragonPad window, you must click in the window in which you want the text to appear.
If you selected Through the Line-In Jack as your source, did you remember to press the play button on your recorder? Is your recorder properly connected to the computer?
Are you playing the right part of the recording? Listen to the source file to make sure it contains dictation.
If you are using an analog recorder, have you changed the volume setting on your recorder since running training? If so, check the audio volume and quality again. From the Tools menu on the DragonBar, click Accuracy Center, then “Check your audio settings.”
Is your recorder working properly? Check the power source. If you are using a battery, make sure it is fully charged.
If you are transcribing a wave file, make sure the file is in the following format: PCM, 11.025 or 22.050 kHz, 16 Bit, Mono.
If you are having difficulties transcribing text from the Dragon NaturallyMobile recorder, consult the troubleshooting section of the online Help files for the Voice It® Link software. See the procedure “Dragon NaturallyMobile recorder: Installing Voice It Link” on page 139 for information on installing the Voice It® Link software.
Correcting mistakes
After Dragon Naturally Speaking transcribes your dictation, make sure you correct any mistakes. To help you check for mistakes, you can play back your recorded voice as you read what Dragon Naturally Speaking transcribed. Listening to your dictation as you read the transcription will help you identify misrecognized words or phrases. For more information, see “Correcting and Editing” on page 41
Using the Dragon NaturallyMobile recorder as a microphone
If you have a Dragon NaturallyMobile recorder, you can use it as a microphone when it is connected to the computer. This feature is convenient for editing your transcribed text by voice.
To use the recorder as a microphone:
Open the user you created for the Dragon NaturallyMobile recorder, if it is not already open.
2 Make sure the recorder is connected to the serial port of your computer.
3 Click the Microphone button on the DragonBar so the microphone is on ( ).
4 Wait until the recorder display reads "Mic On." This takes about two or three seconds after you click the Microphone button.
5 Begin speaking, holding the built-in microphone of the recorder almost touching the corner of your mouth and a bit to the side. Do not hold the recorder so that the microphone is directly in front of your mouth.
6 When you have finished, click the Microphone button again so the microphone is off.
NOTE Turning off the microphone in this way does not turn off the recorder. To conserve your batteries, turn off the recorder by pressing the Power button.
Automate Your Work (Preferred and higher)
If you have Dragon NaturallySpeaking Preferred or a higher edition, you can create your own custom voice commands using the MyCommands Editor. These commands let you automate repetitive text entry and graphics insertion tasks while working in virtually any Windows application. In some editions of Dragon NaturallySpeaking you can use the MyCommands command-and-control and advanced scripting features to create customized macros and scripts to speech-enable applications and to control them by voice.
There are four types of commands you can create.
■ Text and Graphics, which you can use to enter text and graphics of your choosing. (Preferred and higher editions)
■ Macro Recorder, which lets you record a sequence of mouse movements and keystrokes. (Professional and higher editions)
■ Step-by-Step, which lets you activate menu and keystroke commands to control your application. Step-by-Step commands are useful for controlling applications and for multistep tasks. (Professional and higher editions)
■ Advanced Scripting, which allows people familiar with programming languages such as Microsoft® VBA to program commands that can perform virtually any function on the computer with voice commands. (Professional and higher editions)
NOTE If you'd like to use Step-by-Step, Macro Recorder, or Advanced Scripting commands and you have Dragon NaturallySpeaking Preferred or lower edition, you can upgrade to a higher edition of Dragon NaturallySpeaking. For more information on how to upgrade, see page 215.
TIP In addition to the custom commands described in this chapter, there is another way to create a command that types up to 128 characters of text. You can use the Vocabulary Editor to create a new word that has a written form that is different from its spoken form; for instructions, see "View or edit your vocabulary" on page 123. You can use this technique for phone numbers, URLs, and short phrases.
MyCommands edition differences
The following information will help you determine whether your edition of Dragon NaturallySpeaking supports creating and editing MyCommands.
EDITION SUPPORTS...
Essentials & Standard Not supported
Preferred The creation of Text and Graphics commands only.
Professional and above All custom command types
Viewing and editing commands
You use the Command Browser to view and edit the commands available to you. These commands are the commands you create as well as the commands included with Dragon NaturallySpeaking that you can modify.
For more information, see “Working with Custom Commands (Preferred and higher)” on page 109.
Creating new commands
There are two ways to create a new command:
■ Using the Command Browser. For more information, see “Creating a new command” on page 110.
■ Select Tools>Add New Command from the DragonBar.
Both methods display the MyCommands Editor. See the section below for more information on using the MyCommands Editor.
Using the MyCommands Editor (Preferred and higher)
You use the MyCommands Editor to create and edit your voice commands. You use this dialog box to specify the command type, name, and other aspects of the command you are creating. You also can create and modify what the command does.
Note that not all command types are available in all editions of Dragon NaturallySpeaking.
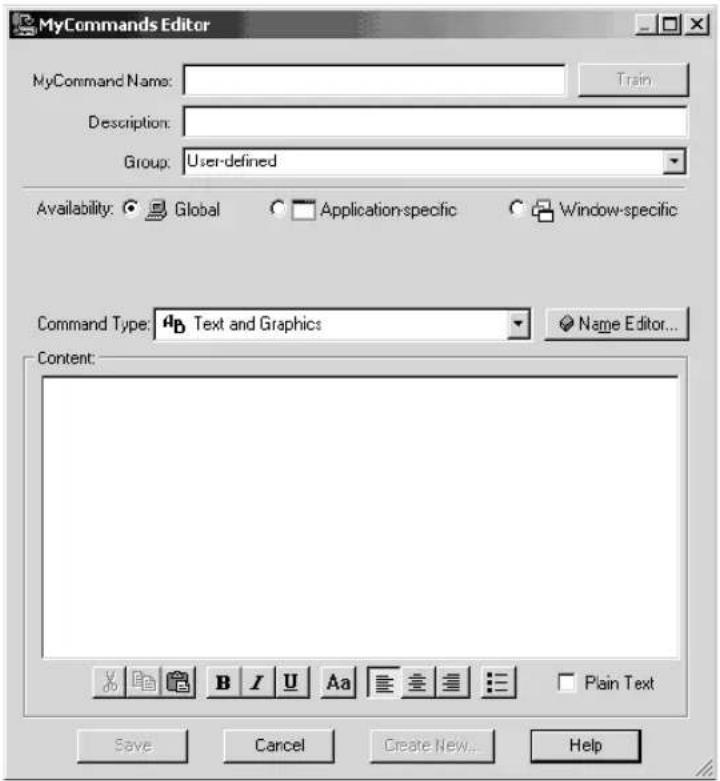
To create a new command:
1 Type a name for your new command in the MyCommand name box. This is what you will say to execute the command.
2 Optionally, you can type a description for this command in the Description field.
3 Pick a group into which to place the command. You use these categories to locate the command in the Command Browser. By default, the groups Dragon and User-defined are available. To create your own group, select User-defined and type over it with a group name of your choosing. The new group name will appear in the list the next time you create a command.
4 If you plan on creating many commands, use group names that will make it easy for you to find and manage your commands.
5 Define the Availability, or where the command will be available:
Global—the command will be available in every application. For example, if you are creating a command to type your address, you probably want it to be available globally so that the command can be used in all applications.
■ Application-specific—the command will be available in the application you specify. When you select this option, the Application list appears. This list displays all the applications open on your system. If the application you want is not open, use the Browse button to locate the application on your computer or open the application as you would normally.
■ Window-specific—the command will be available in the window you specify. When you select this option, both the Application list and Window list appears. If the application window you want is not in the list, open the application and check the list again.
6 Use the Command Type list to choose the type of command you want. The available Command Types depend on your version.
7 Create the content for your command. See the sections below for more information.
For information on Macro Recorder commands or Advanced Scripting commands, see the Dragon NaturallySpeaking online Help.
Creating Text and Graphics commands (Preferred and higher)
To create a Text and Graphics command, begin by following the steps in “Creating new commands” on page 154. Then follow the procedure described below.
In the Content box, supply the text, formatted text, bitmap, or combination of all three that this command will insert into a document.
You can type or dictate plain text into the Content box and press keys such as 'Tab or Enter. To format text, use the formatting buttons underneath the Content box or a keyboard shortcut, such as CTRL-b for making text bold. You can also copy formatted text from another application. For bitmaps, create the bitmap in another application and paste it here.
The example below creates a command called “home address” that types a street address.
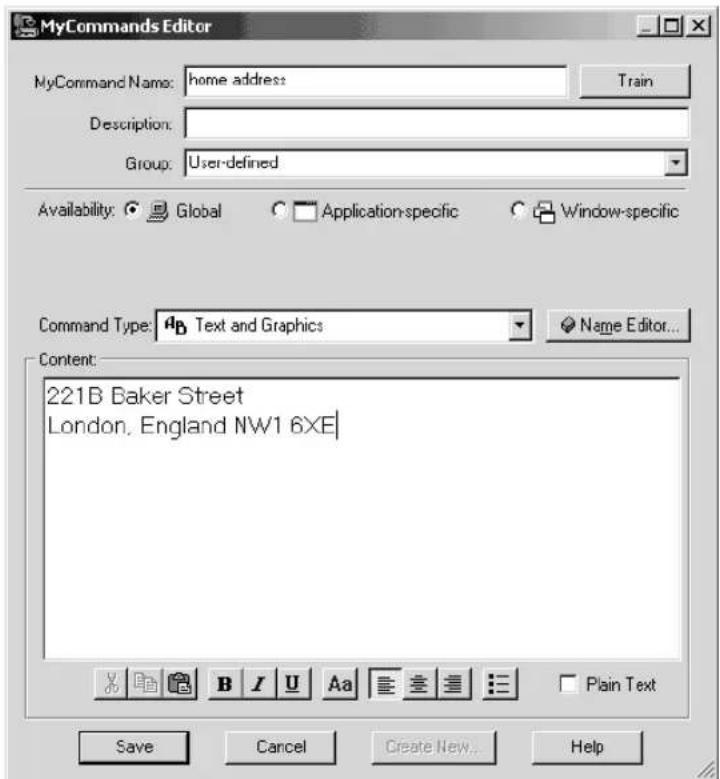
2 You can change the formatting of the text in the Content box with the formatting buttons below the Content box.
To have the text in the Content: field entered into documents with the same font style and size as the text preceding it in the document, select the Plain Text check box. This setting is not valid for graphics.
3 Click Save to save your new command.
4 Switch to the application you want and test your new command by saying its name. For example, switch to Microsoft® Word and say "home address." Your address should appear in your Word document. As with all commands, make sure to pause before and after saying the command.
Notes:
■ Text and Graphics commands create rich text (.RTF format) text that includes formatting information that you specify. Programs that cannot accept .RTF format text, such as Notepad, will only show a plain text version of the command's contents.
■ Make sure to test your command. For example, if you are in graphics program and you say "home address," the command may not work if the graphics program
does not accept keystrokes. Also, application-specific commands work only in the specific applications for which they were defined.
■ New commands are saved only when you save your user files. 'To save your user files, select Save User files from the NaturallySpeaking menu or say "Save User Files."
Creating Step-by-Step commands (Professional and higher)
To create a Step-by-Step command, begin by following the steps in “Creating new commands” on page 154. Then do the following:
1 Select Step-by-Step in the Command Type list.
2 Select a type of step from the list in the lower-left corner of the MyCommands Editor dialog box, as shown below.
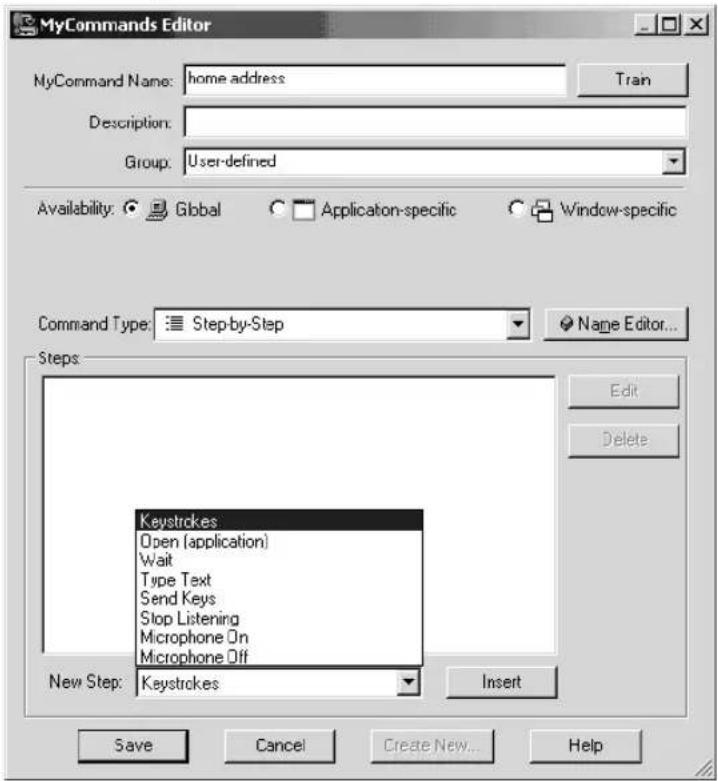
Select a type of step from the list.
There are eight different types of steps:
■ Keystrokes: acts as if you pressed a particular key.
- Open (application): Open a particular application or document or switches to that application or document if it's already open.
■ Wait: Do nothing for a specified time. This step is useful, for example, to pause while an application opens.
■ Type Text: Type the text you specify.
Automate Your Work (Preferred and higher)
- Send Keys: Type a sequence of keys including CTRL, ALT, and SHIFT key sequences.
■ Stop Listening: Put Dragon Naturally Speaking into sleep mode.
■ Microphone On: Turn the microphone on.
■ Microphone Off: Turn the microphone off.
For more information about each type of step, see the online Help.
3 Click the Insert button.
4 Depending on the type of step, Dragon Naturally Speaking may ask you for more information. For example, for a Keystrokes step, you'll be asked to enter the keystroke you want. Press the keystroke or dictate the keystroke using the "Press" command. Click OK.
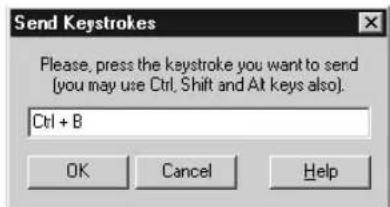
5 Continue adding steps (repeat items 2 through 4 above). To edit a step, select it and click Edit. To delete a step, select it and click Delete.
6 Click Save to save your new command.
7 Switch to the application in which you want to use the command and test your new command by saying its name.
NOTE New commands are saved only when you save your user files. To save your user files, select Save User files from the NaturallySpeaking menu or say "Save User Files."
Deleting custom commands
You use the Command Browser to delete commands that you have either created or imported. By clicking the Script button, you can display and then delete these commands.
For more information, see "Deleting a command" on page 111.
Importing and exporting commands
You can share custom commands with other users by exporting them to a file and then having the other user import that file. If you have created several users on your computer, this allows you to use these commands no matter which user you currently have open.
You use the Command Browser to import and export commands. By clicking the Manage button, you can display the commands to import and export.
For more information see “Importing and exporting commands (Professional and higher editions)” on page 112.
Changing the command group and availability
You can change the group or availability of a selected set of commands.
The command group is a category where you place the command. You use these groups to locate the command in the Command Browser. By default, the groups Dragon and User-defined are available. To create your own group, select User-defined and type over it with a group name of your choosing.
The Availability defines where the command will be available:
■ Global: The command will be available in every application.
■ Application-specific: The command will be available in the application you specify. When you select this option, the applications currently open appear. If the application you want is not open, use the Browse button to locate the application on your computer.
■ Window-specific: The command will be available in the window you specify. When you select this option, the Window list appears. If the window you want is not in the list, you must close the MyCommands Editor dialog box, open the window you want, and reopen the MyCommands Editor dialog box to see the window listed.
For more information, see “Changing the command group and availability” on page 113.
CHAPTER 14
Customizing Dragon NaturallySpeaking
Using the Options dialog box, you can customize Dragon NaturallySpeaking to specify hot keys, customize how text is formatted, start Dragon NaturallySpeaking with the microphone on, change how frequently your user files are backed up, and make many other changes to the standard behavior.
To open the Options dialog box, click Options on the Tools menu of the DragonBar, or say "View Options."
Correction options
Use this tab to control how correction and spelling features work.
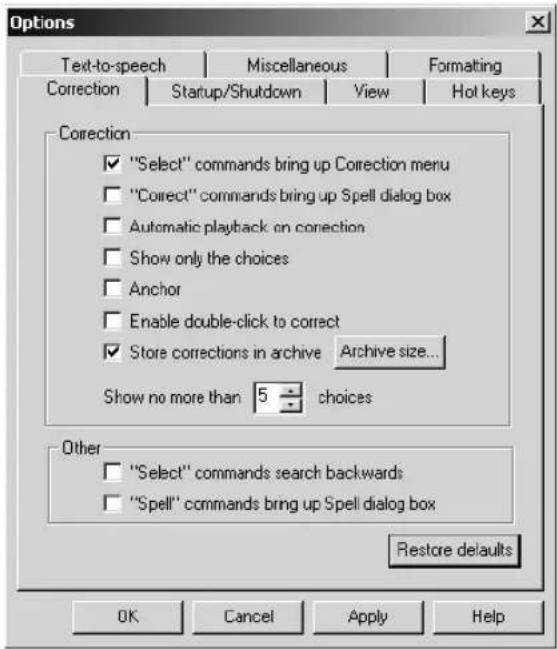
Correction options
The Correction options affect the Correction menu, which is the list of alternate recognitions that appears when you select words in your document.
■ "Select" commands bring up Correction menu: causes the Correction menu to appear every time you select a word or phrase using "Select" in the text you are dictating.
■ "Correct" commands bring up Spell dialog box: causes the Spell dialog box to appear every time you correct a word or phrase using "Correct" in the text you are dictating.
■ Automatic playback on correction: automatically enables the playback of your dictation when you make a correction.
■ Show only the choices: displays only the alternative words or phrases on the Correction menu rather than the additional commands. This reminds you of what you can say as well as taking up less space on your screen.
Anchor: locks the Correction menu in its current location until you drag it to a new location. Clearing this box lets the Correction menu float around the window as you select text by voice.
■ Enable double-click to correct: opens the Correction menu when you double-click a word to select it. Double-clicking to correct is useful if you are revising your dictation by mouse and keyboard, rather than by voice. Not available in all applications.
■ Store corrections in archive: Determines whether or not a list of your corrections are stored for later incorporation into your user files by the Acoustic Optimizer. Click the Archive size button to specify how much data is stored. If this option is not selected before you run the Acoustic Optimizer, you may see a message that there is not enough data for the Acoustic Optimizer to process. Be sure that this option is selected whenever you use Dragon NaturallySpeaking for an extended period of time.
- Click the Archive Size button to change the archive size by dragging a slider from 30 minutes of stored corrections (the minimum size) to 180 minutes of stored corrections (the maximum).
■ Show no more than n choices: Controls the maximum number of choices that can appear in the Correction menu.
TIP If you find that the Correction menu often does not contain the correct word, try increasing the number of choices displayed.
Other options
The second group of options in this dialog box lets you set additional correction preferences.
■ "Select" commands search backwards: causes the selection commands ("Select
for the nearest occurrence from the insertion point, and the Select Again commands to continue searching in the resultant direction.
■ "Spell" commands bring up Spell dialog box: causes the Spell dialog box to appear when you speak a spelling command ("Spell
For more information about spelling commands, see "Spelling as you dictate" on page 52.
Restore defaults
Click this button to restore the values of the Correction tab to what they were when you installed Dragon NaturallySpeaking.
Startup/Shutdown options
Use this tab to set options that control Dragon NaturallySpeaking when it starts and when you exit the program. Unless otherwise indicated, changing these options only affects the current user; any other users keep their existing settings.
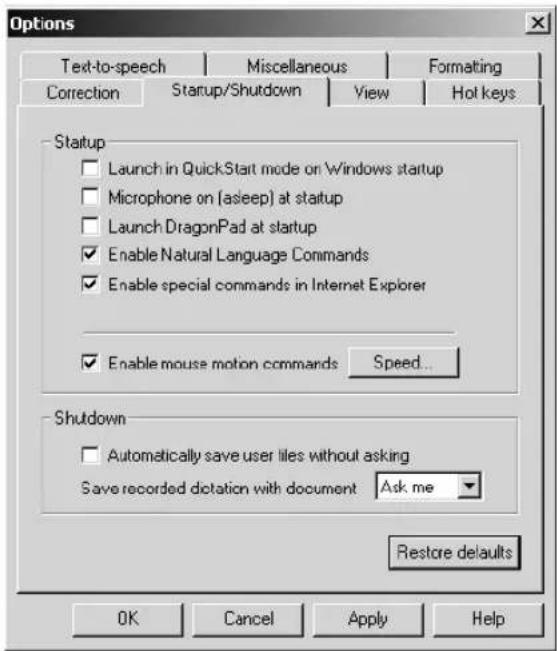
Startup options
■ Launch in QuickStart mode on Windows startup: causes Dragon NaturallySpeaking to load in the background when you start your computer or log in to your operating system, depending on your version of Windows. When Dragon NaturallySpeaking is loaded in QuickStart mode the microphone icon appears in the system tray. When you start Dragon NaturallySpeaking in
QuickStart mode, it is available for use more quickly than when you start it in normal mode. See page 25 for more information.
■ Microphone on (asleep) at startup: automatically puts the microphone in sleep mode when you start the program. You must say "Wake Up" or "Listen to Me" before Dragon Naturally Speaking will recognize dictation or other commands. This option is useful if you have a trouble using the keyboard.
■ Launch DragonPad at startup: opens DragonPad when you first start Dragon NaturallySpeaking.
■ Enable Natural Language Commands: allows the use of commands you can use with most word processors. This feature uses an additional 16 megabytes of memory. Preferred and higher editions.
■ Enable special commands in Internet Explorer: allows the use of commands designed specifically for use with Internet Explorer. Any change to this option does not take effect until you restart Dragon NaturallySpeaking and then start Internet Explorer.
■ Enable mouse motion commands: allows you to use mouse motion commands such as "Move Mouse left," "Faster," and "Slower." Click the Speed button to select a mouse motion speed between 2 (slowest) and 25 (fastest). The mouse motion commands are useful if you have problems using the mouse.
For more information on mouse motion commands, see “Moving the pointer with the mouse motion commands” on page 38.
Shutdown options
■ Automatically save user files without asking: saves your user files when exiting Dragon NaturallySpeaking without displaying a dialog box asking you to confirm that you want the user files saved.
■ Save recorded dictation with document: Use this list to have Dragon NaturallySpeaking always save dictation files when you save a document without asking, ask you with a prompt, or never save dictation files. Saving dictation allows you to play back your speech after the original dictation session. Saving dictation can take up a lot of disk space, possibly over a megabyte per minute of speech. (Professional and higher editions).
Restore defaults
Clicking this button restores the values of the Startup/Shutdown tab to what they were when you installed Dragon NaturallySpeaking.
View options
Use the View tab to control the behavior and appearance of the DragonBar and the Results box. Changing these options only affects the current user; any other users keep their existing settings.
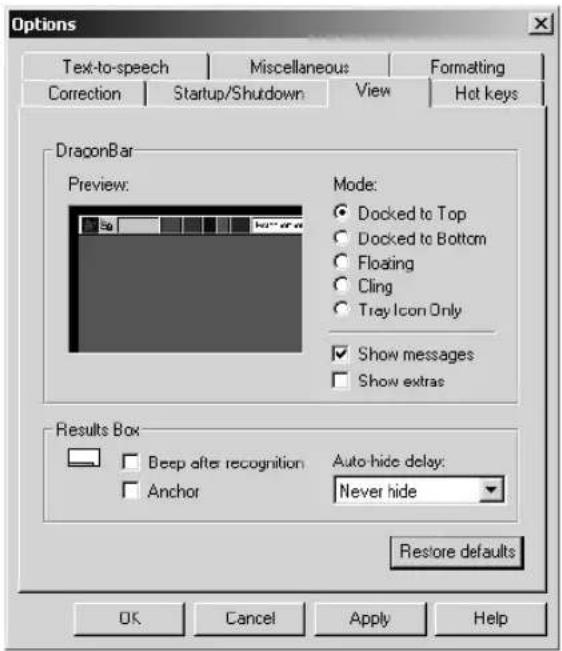
DragonBar options
■Preview: illustrates the selected DragonBar mode.
■ Mode: controls the appearance of the DragonBar. The choices are:
| Docked to Top The DragonBar appears along the top of the screen. | |
| Docked to Bottom | The DragonBar appears along the bottom of the screen. |
| Floating The DragonBar appears as a window on top of any other open window on your screen. You drag the DragonBar to reposition it. | |
| Cling | The DragonBar is attached to the top of the currently active window. |
| Tray Icon Only The DragonBar appears only as a microphone icon in the system tray. Right-click on the icon to see the DragonBar menu. | |
■ Show messages: displays useful hints that appear in the DragonBar periodically.
■ Show Extras: displays the extras toolbar automatically every time you start the DragonBar. (Preferred and higher editions)
Results Box
- Beep after recognition: Dragon Naturally Speaking beep each time it recognizes a word or phrase.
Anchor: Locks the Results box in its current location until you drag it to a new location. Clear this check box to allow the Results box to float around the window as you dictate.
■ Auto-hide delay: Adjusts the length of time before the Results box disappears after a recognition. From a list, you can choose to never hide it or never show it, or you can set a delay after which it automatically hides itself. The default setting is Never Hide.
Restore defaults
The Restore defaults button restores the values of the View tab to what they were when you installed Dragon NaturallySpeaking.
Hot key options
Use the Hot keys tab to specify hot key assignments. Changing these options only affects the current user, all other users keep their existing settings.
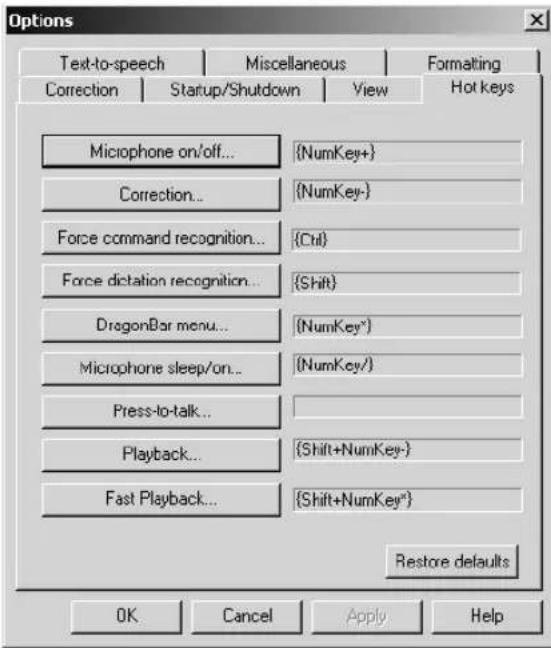
■ Microphone on/off: Changes the hot key that turns the microphone on or off. The default is the plus key (+) on the numeric keypad.
Correction: Changes the hot key that opens the Correction menu. The default is the minus key (-) on the numeric keypad.
■ Force command recognition: Changes the hot key that forces words to be recognized as commands rather than dictation words. 'The default is the CTRL key.
■ Force dictation recognition: Changes the hot key that forces words to be recognized as dictation words rather than commands. The default is the SHIFT key.
- DragonBar menu: Changes the hot key that opens the NaturallySpeaking menu on the DragonBar. The default is the asterisk key (*) on the numeric keypad.
■ Microphone sleep/on: Changes the hot key that causes the microphone to go to sleep or wake up. When the microphone is asleep, the only command it will recognize is "Wake Up," which turns the microphone back on. The default is the slash key (/) on the numeric keypad.
■ Press-to-talk: Changes the hot key that causes the microphone to turn on for as long as you hold down the key and turn off as soon as you release it.
■ Playback: Changes the hot key that causes Dragon NaturallySpeaking to play back your dictation so you can more easily identify what you meant to say during correction. The default is the SHIFT key plus the minus key (-) on the numeric keypad. Preferred and higher editions.
Fast Playback: Changes the hot key that increases the play back speed. The default is the SHIF'T key plus the asterisk key (*) on the numeric keypad. Preferred and higher editions.
Restore defaults
The Restore defaults button restores the values of the Hot keys tab to what they were when you installed Dragon NaturallySpeaking. Click the Related Topics button to see a list of the default hot keys.
NOTE If you are using a laptop computer that does not have a numeric keypad, you should assign different hot keys before you use them, as the defaults will be difficult to use or may not work.
Text-to-speech options (Preferred and higher editions)
Use the Text-to-speech tab to adjust the attributes of text-to-speech playback. Changing these options only affects the current user; any other users keep their existing settings.
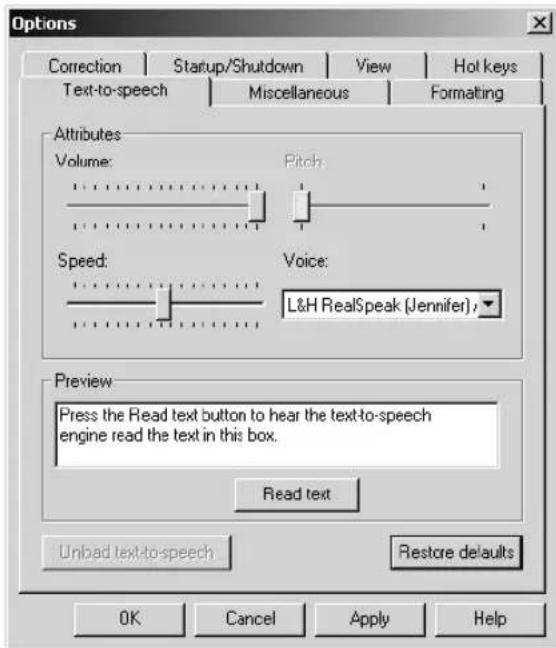
Attributes
Volume: Adjusts the volume of text-to-speech playback.
■ Pitch: Adjusts the pitch of text-to-speech playback if supported by your version of Text-to-Speech.
■ Speed: Adjusts the speed of text-to-speech playback.
■ Voice: Determines the voice to use for text-to-speech playback. You can select a voice from the list if you have more than one installed on your system.
Preview
Enter or paste text in this box to preview text-to-speech playback.
Read text: Click Read Text to start playback of the text in the Preview box.
Unload text-to-speech
Removes the text-to-speech engine from memory. Dragon NaturallySpeaking loads the text-to-speech engine the first time you use a text-to-speech command after starting Dragon NaturallySpeaking. The text-to-speech engine should not affect performance, so generally you will not need to unload it.
Restore defaults
Clicking this button restores the values of the Text-to-speech tab to what they were when you installed Dragon NaturallySpeaking.
Miscellaneous options
Use this tab to set miscellaneous options. Unless otherwise indicated, changing an option only affects the current user; any other users keep their existing settings.
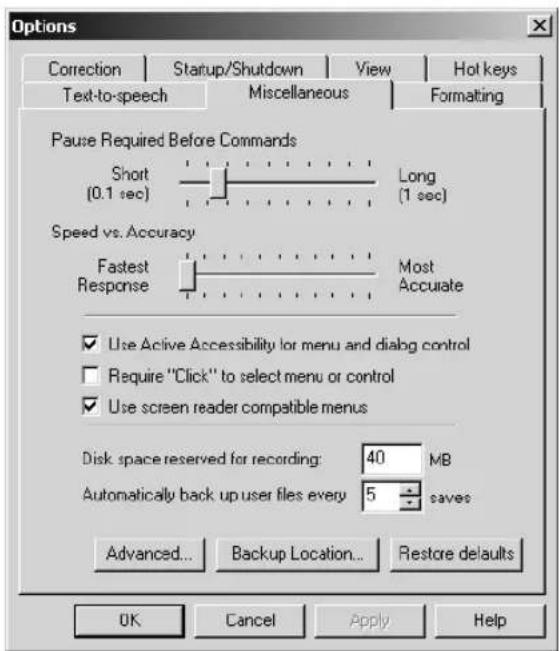
■ Pause required before commands: Adjusts the time interval considered to be a pause before you speak commands. 'The default setting is 250 milliseconds (.25 second). You should normally leave this at its default setting.
■ Speed vs. Accuracy: Adjusts the number of words and phrases that the program examines in order to find a word match. The more words examined, the greater the possibility of an accurate match at the expense of using more memory and taking a longer time to recognize your speech. You can use the Speed vs. Accuracy slider to influence the performance of Dragon NaturallySpeaking. As a general rule, you should move the slider farther to the right on faster machines than on slower ones.
■ Use Active Accessibility for menu and dialog control: Selecting this check box specifies that Dragon NaturallySpeaking should use Microsoft Active Accessibility features, which are required by some versions of Windows to control the menus and dialog boxes of certain applications by voice.
This option is dimmed if Active Accessibility is not installed or if your version of Windows does not require it. Changing this option affects all users.
- Require "Click" to select menu or control: requires you to speak the word "Click" to select a menu command or Windows control. By default, this feature is turned off.
■ Use screen reader compatible menus: allows a screen reader to read menu items out loud to vision-impaired users. Some of screen readers have trouble reading
menus unless this option is turned on. If this option is on, the small icons next to menus items will disappear.
- Disk space reserved for recording: Adjusts the amount of disk cache space set aside for any overflow from your computer's memory (RAM) of your actual dictation. Increase the amount of disk space if you want to save more dictation data. If you do not want to keep your dictation (to conserve disk space) set the amount to 0 MB.
Automatically back up user files every "n" saves: Adjusts how often your user files are automatically backed up. See "Backing up and restoring a user" on page 134 for instructions.
■ Backup Location: Click this button to open a dialog box in which you can specify where the program will store backup user files. The default location is the Natspeak folder although you can define any location for which your version of Windows has both read and write permission, including portable devices such as Zip drives and CD burners.
Restore defaults
Clicking the Restore defaults button restores the values of the Miscellaneous tab to what they were when you installed Dragon NaturallySpeaking.
Formatting options
Use this tab to set options that affect your dictation. Changing these options only affects the current user, all other users keep their existing settings.
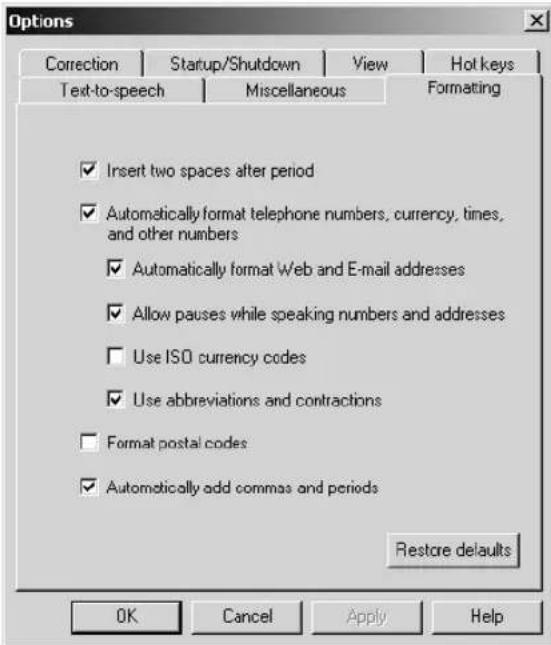
- Insert two spaces after period: Adds two spaces after the end of a sentence. Clear this check box to add only one space.
■ Automatically format telephone numbers, currency, times, and other numbers: Turns on automatic number formatting, which lets you dictate numbers in a natural manner. If this option is not selected you must dictate most numbers, including time, telephone numbers, and currency, by explicitly specifying the digits and format characters such as commas, periods, or dollar signs. Note that the exact formatting of numbers and currency depends on the settings on the Number and Currency tabs of the Windows Control Panel Regional Settings Properties sheet.
The following four options are available only if the "Automatically format telephone numbers, currency, times, and other numbers" option is selected.
■ Automatically format Web and E-mail addresses: Turns on automatic e-mail and Web address formatting, which lets you dictate these addresses in a natural manner. It concatenates names in Web and e-mail addresses and recognizes the word "at" as the @ sign.
- Allow pauses while speaking numbers and addresses: Allows number formatting to work if you pause while speaking a number.
■ Use ISO currency symbols: Select this box to have Dragon Naturally Speaking use the currency character and format specified on the Currency tab of the Regional Settings tool in your Windows Control Panel. You can open your Windows Control Panel by clicking Start on the Windows task bar, and then clicking Control Panel.
Use abbreviations and contractions: Select this box to have Dragon NaturallySpeaking recognize contractions and most standard abbreviations while transcribing your dictation. If you clear this box, Dragon NaturallySpeaking will transcribe spoken contractions in a more formal manner. For example, if you say "Don't go near the water.", Dragon NaturallySpeaking will transcribe "Do not go near the water."
Other Options:
■ Format postal codes: Allows automatic formatting of Canadian and UK postal codes in your dictation.
Automatically add commas and periods: tells Dragon Naturally Speaking to add commas and periods (full stop outside US/Canada) at the appropriate places in your dictation without your having to explicitly speak that punctuation. Dictation with this feature turned on should duplicate the same natural pauses for commas and periods that you typically use in conversational speech. If commas and periods consistently do not appear where they should, try changing the length of your pauses. For example, if you normally speak rapidly, try to lengthen the time of your pauses to indicate the need for punctuation. Even with this setting turned on, you can still dictate punctuation.
Restore defaults
The Restore defaults button restores the values of the Formatting tab to what they were when you installed Dragon NaturallySpeaking.
APPENDIX
Commands List
This appendix lists some of the Dragon NaturallySpeaking commands. Most of the commands listed here are described in detail elsewhere in this guide. For more information about commands, follow the page references provided throughout the appendix. This appendix does not list all the Dragon NaturallySpeaking commands. To see many more commands, use the Sample Commands window (see page 21) and the Command Browser (see page 103).
Which commands work in which programs?
Some commands work only in certain types of programs. For example, “Set Font Bold” works only in programs where you can make text bold. The best way to find out if a command works in your application is to try it within an application. You can also use the Command Browser to see if a command will be recognized in your application. See page 103 for more information on the Command Browser.
TIP If you say a command that does not work in the program you are using, the DragonBar may show a message, for example, "Formatting commands cannot be used here."
Controlling the microphone
SAY TO
| Go to Sleep or Stop Listening | Make the microphone stop listening temporarily. |
| Wake Up or Listen to Me | Reactivate the microphone when it's sleeping. |
| Microphone Off Turn the microphone off. (You cannot turn it back on by voice.) | |
Controlling the DragonBar
SAY TO
| Give Me Help Open the Dragon NaturallySpeaking online Help. | |
| Display Sample Commands | See a list of available commands in the currently open applications. |
| Save Speech Files | Save your user files. |
| Select Tray Icon Only Mode | Hide the DragonBar. You can show it by clicking on the microphone icon in the system tray (on the lower right of most computer screens) and choosing Restore Previous DragonBar mode. |
| Manage Users Open the Manage Users dialog box. | |
| Train My User Perform additional training to improve accuracy. | |
| Check Audio Open the Audio Setup Wizard. | |
| Show The Accuracy Assistant | Open the Accuracy Assistant window. |
| Open Accuracy Center | Open the Accuracy Center window. |
| Bring Up Command Browser | Open the Command Browser window. |
| Create Command | Make a new command. |
| Modify Custom Commands | Change an existing command. |
| Edit Vocabulary Open the Vocabulary Editor. | |
| View NaturallySpeaking Options | Open the Options dialog box. |
SAY TO
Show Extras Bar Display the Extras toolbar on the DragonBar.
Hide Extras Dar Removes the Extras toolbar
Start Open the DragonPad word processor.
DragonPad or
Open
DragonPad
Give Me Help Display Dragon Naturally Speaking online Help.
What Can I Say Display the Sample Commands List.
Close Exit the Dragon Naturally Speaking program.
NaturallySpeak-
ing
Controlling the DragonPad
SAY TO
Save Document Save the current document.
Save File As Save the current document in a different location or using a different name.
Print Document Print the current document.
Print Page 1 to Print the page range you specify. 3
Display Toolbar Display the DragonPad toolbar.
Start Playback Have your dictation played back to you.
Find Word Use the Find tool.
Quit Exit the DragonPad.
DragonPad
Adding paragraphs, lines, and spaces
SAY TO
New Line Press the ENTER key once.
New Paragraph Press the ENTER key twice. (Capitalizes the next word automatically.)
Tab Key Press the TAB key.
Space Bar Press the space bar.
Selecting text
Selecting specific words
| SAY TO | |
| Select glass Select a specific word or words that are visible on screen, in this example, the word glass. | |
| Select Again Select the same text again but in a different place that is also visible on screen. | |
| US/Canada: Select It was Through night Other Dialects: Select It was To night | Select a range of words visible on screen. In this example, It was a dark and stormy night is the selected text. |
| Unselect That Unselect (clear) selected text. | |
For more information about these commands, see “Selecting text by voice” on page 45.
Selecting an entire line or paragraph
| SAY THEN THEN |
| Select Next LinePrevious ParagraphForward 2...20 LinesBack 2...20 ParagraphsLast |
For more information about these commands, see “Selecting an entire paragraph or line” on page 47.
Selecting a word or character
| SAY THEN | THEN | |
| Select | Next | Word |
| Previous Character | ||
| Forward | 2...20 Words | |
| Back | 2...20 Characters | |
| Last | ||
TIP You can also say "Select Word," "Select Line," "Select Paragraph," or "Select Character."
For more information about these commands, see “Selecting a word or character” on page 47.
Selecting a document
SAY TO
| Select Document or Select All | Select all the text in your document. |
Correcting text
SAY TO
| Select [text] | Select the text you specify and display the Correction menu. |
Select That Select the last utterance.
Correct That Correct the selected text or the wrong utterance.
Spell Spell a word (brings up the Spell dialog box).
Spell g-l-a-s-s Spell the next word, in this example, glass.
Spell That g-l-a-s-s Correct either the last thing you said or selected text by spelling the correction, in this example, glass.
For more information about these commands, see “Correcting mistakes” on page 41 and “Spelling as you dictate” on page 52.
International Communications Alphabet
When spelling in the Spell dialog box, you can use the International
Communications Alphabet to enter letters. For a complete list of alphabet choices, see the online Help.
FOR SAY FOR SAY
| a | Alpha | n | November |
| b | Bravo o Oscar | ||
| c | Charlie | p Papa | |
| d | Delta | q Quebec |
e Echo r Romeo
f Foxtrot s Sierra
g Golf t Tango
h Hotel u Uniform
i India v Victor
j Juliett w Whiskey
| FOR SAY | FOR SAY | |||||
| k Kilo x Xray | ||||||
| l Lima y Yankee | ||||||
| m | M | i | k | e | z | Z |
U
NOTE When spelling, you can also say "letter," as in "letter alpha," or "a as in alpha."
Publishing symbols
When spelling in the Spell dialog box, you can enter the following special characters by voice. (If the program has trouble recognizing a character, try using the longest available spoken form.)
| TO ENTER SAY | |
| TM trademark sign or trademark | |
| © copyright sign or copyright | |
| ® | registered trademark sign or registered trademark or registered sign or registered |
| † | dagger |
| ‡ | double dagger |
| ¶ | paragraph sign or paragraph |
| § | section sign or section |
| — | em dash |
| — | en dash |
| - | soft hyphen |
| (nonbreaking space) | nonbreaking space or nonbreakable space or no break space or unbreakable space |
Currency symbols
When spelling in the Spell dialog box, you can enter the following special characters by voice. (If the program has trouble recognizing a character, try using the longest available spoken form.)
| TO ENTER | SAY |
| $ | dollar sign or dollar |
| ¢ | cent sign or cent |
| £ | pound sterling or sterling or sterling sign |
| ¥ | yen sign or yen |
| € (or EUR) | euro sign or euro |
| TO ENTER SAY | |
| f guilder sign or guilder | |
| o | general currency or general currency sign or international currency or international currency sign |
Accented and international characters
When spelling in the Spell dialog box, you can enter the following special characters by voice. (If the program has trouble recognizing a character, try using the longest available spoken form.)
| TO ENTER SAY | |
| '(acute) accent acute or acute | |
| '(grave) | accent grave or grave or backquote |
| ~ (tilde) accent tilde or tilde | |
| '' (umlaut) | accent umlaut or umlaut or dieresis |
| ^(circumflex) accent circumflex or circumflex | |
| , (cedilla) | accent cedilla or cedilla |
| á, Á, é, É, í, Í, ó, Ó, ú, Ú, ý, Ÿ | a accent acute or a acuteCap e accent acute or Cap e acuteand so on |
| à, À, È, è, ì, Í, ò, ò, ò, ò, ò, ò, ò, ò, ò, ò, ò, ò, ò, ò, ò, ò, ò, ò, ò, ò, ò, ò, ò, ò, ò, ò, ò, ò, ò, ò, ò, ò, ò, ò | a accent grave or a graveCap e accent grave or Cap e graveand so on |
| ã, Ã, ñ, Ñ, õ, õ, õ, õ, õ, õ, õ, õ, õ, õ, õ, õ, õ, õ, õ, õ, õ, õ, õ, õ, õ, õ, õ, õ, õ, õ, õ, õ, õ, õ, õ, õ, õ, õ | cap n accent tilde or Cap n tildeand so on |
| ä, Ä, ë, ë, ï, ï, ï, ï, ï, ï, ï, ï, ï, ï, ï, ï, ï, ï, ï, ï, ï, ï, ï, ï, ï, ï, ï, ï, ï, ï, ï, ï, ï, ï, ï, ï, ï, ï | a accent umlaut or a umlautCap e accent umlaut or Cap e umlautand so on |
| â, Â, ë, ë, ï, ï, ï, ï, ï, ï, ï, ï, ï, ï, ï, ï, ï, ï, ï, ï, ï, ï, ï, ï, ï, ï, ï, ï, ï, ï, ï, ï, ï, ï, ï | a accent circumflex or a circumflexCap o accent circumflex or Cap o circumflex andso on |
| ç, Ç | c accent cedilla or c cedillaCap c accent cedilla or Cap c cedilla |
| å, Å a angstrom | Cap a angstrom |
| i inverted exclamation point orinverted exclamation mark | |
| è | inverted question mark |
| «TO ENTER | open angle quotes or begin angle quotesUS/Canada: open euro quotesSAY |
| » close angle quotes or end angle quotesUS/Canada: close euro quotes | |
| β | eszet or German sharp or German sharp s or sharp s |
| œ | oe ligature or ligature oe or oe diphthong |
| æ | ae ligature or ae diphthong or ligature ae |
| ð Icelandic eth or eth | |
| þ Icelandic thorn or thorn | |
| ° masculine ordinal | |
| ° feminine ordinal | |
| š | s w |
| „ double comma | |
e
Mathematical symbols
When spelling in the Spell dialog box, you can enter the following special characters by voice. (If the program has trouble recognizing a character, try using the longest available spoken form.)
| TO ENTER SAY | |
| 14 | one quarter sign or one quarter or quarter sign or quarter |
| 12 | one half sign or one half or half sign or half |
| 34 three quarters sign or three quarters | |
| × | multiply sign or multiply or times sign or times |
| ÷ divide sign or divide | |
| ± | plus or minus sign or plus or minus or plus minus sign or plus minus |
| ‰ per thousand or per mille | |
| ; broken vertical bar | |
| ¬ | logical not sign or logical not or not sign or not |
| - macron sign or macron | |
| ° | degree sign or degree |
| 1 | superscript 1 |
| 2 | superscript 2 or squared or square |
| 3 | superscript 3 or cubed or cube |
| μ Greek mu or micro | |
| ø o slash | |
| . centered dot or middle dot or center dot | |
| , alternate comma | |
Deleting and undoing
| SAY TO | |
| Delete That Delete selected text. (For more information, see “Deleting specific words” on page 51.) | |
| Backspace | Press the BACKSPACE key. To press it more than once, say Backspace 2, Backspace 3, and so on (up to 20). |
| Undo That or Undo Last Action | Undo the last action. |
| Scratch That | Erase the last thing you said or selected text. You can say “Scratch That” up to 10 times to keep erasing previous words or phrases. (For more information, see “Deleting the last words you dictated” on page 50.) |
| Resume With Dear Susan | Search backward to find a specific word or words, so you can continue dictating from that point. In this example, resume dictating with Dear Susan. (For more information, see “Going back as you dictate” on page 50.) |
Deleting the next or previous line or paragraph
| SAY THEN THEN | ||
| Delete | Next | Paragraph |
| Previous 2...20 Paragraphs | ||
| Forward Line | ||
| Back 2...20 Lines | ||
| Last | ||
For more information about these commands, see “Deleting the next or previous paragraph or line” on page 51.
Deleting the next or previous word or character
| SAY THEN THEN | ||
| Delete | Next | Word |
| Forward Character | ||
| Previous 2...20 Words | ||
| Back 2...20 Characters | ||
| Last | ||
For more information about these commands, see “Deleting the next or previous word or character” on page 52.
Moving around in a document
Going to the top or bottom of a document
| SAY THEN |
| Go to Top |
| Move to Top of Document |
| Beginning of Document |
| Start of Document |
| Bottom |
| Bottom of Document |
| End of Document |
Going to the top or bottom of a page
| SAY TO | |
| Page Up | Move up one page (equivalent to pressing the PAGE UP key). |
| Page Down | Move down one page (equivalent to pressing the PAGE DOWN key). |
For more information about these commands, see “Going to the top or bottom of a page or document” on page 48.
Going to the beginning or end of a line
SAY THEN
Go to Beginning of Line
Move to Start of Line
End of Line
For more information about these commands, see “Going to the beginning or end of a line” on page 48.
Placing the insertion point before or after a specific word
SAY TO
Insert Before glass Place the insertion point before a specific word or words that are visible on screen. In this example, the insertion point is placed before glass.
Insert After glass Place the insertion point after a specific word or words that are visible on screen. In this example, the insertion point is placed after glass.
Insert Before That Place the insertion point before selected text that is visible on screen.
Insert After That Place the insertion point after selected text that is visible on screen.
For more information about these commands, see “Placing the insertion point before or after a specific word” on page 49.
Moving up or down a paragraph
SAY THEN THEN
Move Up a Paragraph or 1 Paragraph
Down 2...20 Paragraphs
Back
Forward
For example, you can say “Move Up a Paragraph” or “Move Down 6 Paragraphs.” For more information about these commands, see “Moving up or down a paragraph or line” on page 49.
Moving up or down a line
SAY THEN THEN
Move Up a Line or 1 Line
Back 2...20 Lines
Down
Forward
For example, you can say “Move Up a Line” or “Move Down 6 Lines.” For more information about these commands, see “Moving up or down a paragraph or line” on page 49.
Moving right or left a word
SAY THEN THEN
Move
Right
a
Word
Forward 2...20 Words
Left
Back
For example, you can say “Move Right a Word” or “Move Forward 6 Words.” For more information about these commands, see “Moving right or left a word or character” on page 49.
Moving right or left a character
SAY
THEN
THEN
Move
Right
a Character or 1 Character
Forward
2...20 Characters
Left
Back
For example, you can say “Move Right a Character” or “Move Left 6.” For more information about these commands, see “Moving right or left a word or character” on page 49.
Copying, cutting, and pasting text
SAY TO
Copy Selection Copy selected text to the Clipboard.
Cut Selection Cut selected text.
Copy That Copy the selected text to the Clipboard.
Cut That Cut the selected text.
Paste That Paste the contents of the Clipboard.
Copy All to Clipboard Copy all the text in your document to the Clipboard.
For more information about these commands, see “Copying, cutting, and pasting text” on page 50.
Capitalizing text
Capitalizing or uncapitalizing text already in your document
SAY TO
Cap That or Capitalize Capitalize the selected text or the last thing That you said.
Format That Capitals or Capitalize the selected text.
Format That Initial Caps
or Format That Cap or
Format That Caps
All Caps That Make the selected text all capitals.
Format That All Caps or Make the selected text all capitals.
Format That Uppercase
No Caps That Make the selected text lowercase.
Format That No Caps or Make the selected text all lowercase.
Format That Lowercase
or Uncapitalize That or
Uncap That
For more information about these commands, see “Capitalizing (or uncapitalizing) text already in your document” on page 63.
NOTE In many applications the commands "Cap That," "Capitalize That," "All Cap That," and "No Caps That" work on the selection and on the last thing you said. All other capitalization commands work only on selected text.
Capitalizing or uncapitalizing the next word you say
| SAY TO | |
| Cap glass or Cap Next glass | Start the next word with a capital, in this example, Glass. |
| All Caps glass | Type the next word in all capitals, in this example, GLASS. |
| No Caps Jack | Type the next word in all lowercase, in this example, jack. |
| No Space glass | Type the next word without a space before it; for example, window No Space glass = windowglass. |
For more information about these commands, see “Capitalizing text” on page 61.
Capitalizing or uncapitalizing consecutive words
| SAY TO |
| Caps On Turn initial caps on. |
| Caps Off Turn initial caps off. |
| All Caps On Turn all capitals on. |
| All Caps Off Turn all capitals off. |
| No Caps On Turn all lowercase on. |
| No Caps Off Turn all lowercase off. |
| No Space On Turn no spaces on. |
| No Space Off Turn no spaces off. |
For more information about these commands, see “Capitalizing text” on page 61.
Hyphenating or compounding text
SAY TO
Hyphenate That Hyphenate either the last thing you said or the selected text.
Format That With Hyphens Hyphenate the selected text.
Compound That Compound either the last thing you said or the selected text.
Format That Without Spaces Compound the selected text.
Formatting text
Adding or removing bold, italics, and underlining
SAY TO
Bold That Apply bold to the selected text.
Italicize That Apply italics to the selected text.
Bold Italicize That Apply bold and italics to the selected text.
Underline That Apply underlining to the selected text.
Restore That or Remove formatting from the selected text.
Format That Plain or
Format That Normal
or Format That
Regular
For more information about these commands, see “Bold, italics, and underlining” on page 66.
Changing font face
SAY THEN
Set Font Arial
Format That Courier
Courier New
Garamond
Helvetica
Palatino
Times
Times New Roman
For more information about these commands, see “Changing font face” on page 64.
Changing font size
SAY THEN
| Set Size | 8 |
| Format That Size 10 point | |
| Set Font Size 12 | |
| any point size from 4 to 100, as well as 120 | |
For more information about these commands, see "Changing font size" on page 64.
Changing font style
SAY THEN
| Set Font Bold |
| Format That Italics |
| Bold Italics |
| Underline |
| Strikeout |
| Plain or Plain Text or Normal or Regular |
For more information about these commands, see “Changing font style” on page 65.
Changing a combination of font face, size, and style
| SAY THEN THEN THEN | |||
| Set Font Times 8 Bold | |||
| Format That | Times New Roman | 10 point Italics | |
| Times New Roman | (any point size from 4 to 100, as well as 120) | Bold Italics | |
| Arial (any point size from 4 to 100, as well as 120) | Underline | ||
| Courier (any point size from 4 to 100, as well as 120) | Plain or Plain Textor Normal or Regular | ||
For more information about these commands, see “Changing a combination of font face, size, and style” on page 65.
Aligning text
| SAY TO | |
| Center That or Format That Centered | Center the current paragraph. |
| Left Align That or Format That Left Aligned | Left align the current paragraph. |
| Right Align That or Format That Right Aligned | Right align the current paragraph. |
For more information about these commands, see “Aligning text” on page 66.
Entering numbers
TO ENTER SAY
| 5 | f | i | v |
| 23 twenty three | |||
| 179 one hundred (and) seventy nine or one seventy nineNOTE: The word “and” is optional. | |||
| 5423 five thousand four hundred (and) twenty three | |||
| 5,423 five [comma] four twenty three | |||
| 12,537 twelve thousand five hundred and thirty seven | |||
| 142,015 one hundred and forty two thousand and fifteen | |||
| 35.23 thirty five [point] two three | |||
| 0.03 All Dialects: zero [point] zero threeOutside US/Canada: nought [point] nought three | |||
| 43.28% forty three [point] twenty eight [percent sign] | |||
| 22 January 1999 twenty two January nineteen ninety nine | |||
| April 9, 2001 April nine comma two thousand and one | |||
| 14/07/85 fourteen [slash] oh seven [slash] eighty five | |||
| 6/12/00 | six [slash] twelve [slash] double oh or six [slash] twelve [slash] double zeroNOTE: If you say “oh oh,” you must then say “Format That Number” to remove the extra space. | ||
| 1/22/2000 one [slash] twenty-two [slash] two thousand | |||
| 8:30 eight [colon] thirty | |||
| 4:45 am | four forty five a m | ||
| 10:22 pm | ten twenty two p m | ||
| 5:00 PM | five o’clock p m | ||
| £45 US/Canada: pound sterling sign forty fiveOther Dialects: forty five pounds | |||
| 99.50 ninety nine dollars and fifty cents | |||
| £5 million | US/Canada: pound sterling sign five millionOther Dialects: five million pounds | ||
| 3.9 billion | US/Canada: three point nine billion dollarsOther Dialects: dollar sign three point nine billion | ||
| 1/2 one half | |||
| 1/4 one fourth or one quarter | |||
| 15/16 | fifteen sixteenths or fifteen over sixteen | ||
| 3 7/8 | three and seven eighths or three and seven over eight | ||
| 9/12 | nine [slash] twelve or nine over twelve | ||
| TO ENTER SAY |
| 5 3/56 five [space bar] three [slash] fifty six |
| 130/70 one thirty over seventy |
| V Roman Numeral five |
| XXIV Roman Numeral twenty Roman four |
Telephone numbers
| TO ENTER SAY | |
| 617-965-5200 six one seven nine six five fifty two hundred | |
| 1-800-555-1212 one eight hundred five five one two one two | |
| (617) 965-5200 [open parenthesis] six one seven [close parenthesis] nine six five five two hundred | |
| 1-212-555-1212 one two one two five five one two one two | |
| (01628) 894150 open parenthesis oh one six two eight close parenthesis space bar eight nine four one five oh | |
| 027 629 8944 oh two seven space bar six two nine space bar eight nine four four | |
| 61-7-4695-2055 six one hyphen seven hyphen four six nine five hyphen two zero five five | |
| (65) 2778590 | open parenthesis six five close parenthesis two seven seven eight five nine zero |
NOTE You can say North American phone numbers (of 7, 10, or 11 digits) without hyphens by pausing briefly between each group of numbers. To dictate other phone numbers, including European phone numbers, you must say all the punctuation, including the hyphens. For more information, see "Telephone numbers" on page 86.
Postal and ZIP codes
TO ENTER SAY
| 02460 oh two four six zero |
| 02460-1458 oh two four six zero [hyphen] one four five eightNOTE: The hyphen is not optional. |
| K1A 0M5 Postal Code k one a oh m five orPostal Code kilo one alpha zero mike five |
| X0A 0H0 Postal code x oh a oh oh o orPostal code x-ray zero alpha zero hotel zero |
| SL7 1LW Postal Code s l seven one l w orPostal Code sierra lima seven one lima whiskey |
For more information about entering numbers, see “Dictating numbers” on page 83.
Changing number format
SAY TO
| Format That Number Convert a number from text to numeric format (for example, convert one hundred to 100). | |
| Format That Spelled Out Convert a number from numeric to text format (for example, convert 100 to one hundred). | |
| Start Numbers Mode/Numbers Mode On | Tell Dragon NaturallySpeaking to recognize all your dictation as numbers, typed as numerals. |
| Stop Numbers Mode/Numbers Mode Off | Resume normal dictation of text and numbers. |
For more information about these commands, see "Dictating numbers" on page 83.
Entering punctuation and special characters
| TO ENTER SAY TO ENTER SAY | ||
| & | a m and sign | * p a e s |
| ' apostrophe 'sapostrophe s @ at sign ` backquote | ||
| ' open single quote or begin single quote | ' close single quote or end single quote | |
| " open quote | open quotes or begin quote or begin quotes | " close quote or close quotes or end quote or end quotes |
| \ | backslash | / slash or forward slash |
| :(space) | colon | : numeric colon |
| ,(space) | comma | , numeric comma |
| ^ | caret | — dash |
| . | dot or point | . US/Canada: period Other Dialects: full stop |
| $ | dollar sign | ... ellipsis |
| = | equal sign | € euro sign/euro |
| ! | US/Canada: exclamation point All Dialects: exclamation mark | - hyphen or numeric hyphen |
| { | open curly bracket or left curly bracket US/Canada: open brace or left brace | } close curly bracket or right curly bracket US/Canada: close brace or right brace |
| [ | open square bracket or left square bracket US/Canada: open bracket or left bracket | ] close square bracket or right square bracket US/Canada: close bracket or right bracket |
| TO ENTER SAY | TO ENTER SAY | ||
| ( All Dialects:open parenthesis or left parenthesisUS/Canada:open paren or left parenOther Dialects:open bracket or left bracket | ) All Dialects:close parenthesis or right parenthesisUS/Canada:close paren or right parenOther Dialects:close bracket or right bracket | ||
| < open angle bracket < less than> close angle bracket > greater than- minus sign # number sign or% percent sign + plus sign£ US/Canada:pound sterling signOther Dialects:pound sign or pound | hash sign or sharp signUS/Canada:number sign or pound or pound sign | ||
| ? | q u | ||
| § section sign ; semicolon(space) space bar (tab)~ tilde _ underscore| vertical bar :-(-:-) smiley face | frowny face;-) | winky face | |
Playing back and reading text
Playing back dictation
| SAY TO | |
| Play That Back or Play That or Play Selection | Play back the selected text. |
| Play Back Line Play back dictation for the current line. | |
| Play Back Paragraph Play back dictation for the current paragraph. | |
| Play Back Document Play back dictation for the whole document. | |
| Play Back Screen Play back dictation for the text in view. | |
| Play Back to Here or Play Back Up to Here | Play back dictation from the top of the document window to the insertion point. |
| Play Back from Here or Play Back Down from Here | Play back dictation from the insertion point to the bottom of the document window. |
For more information about these commands, see page 53.
Using text-to-speech
| SAY TO | |
| Read Line Read back the current line. | |
| Read Selection Read back the selected text. | |
| Read Paragraph Read back the current paragraph. | |
| Read Document Read back the whole document. | |
| Read Screen Read back the text in view. | |
| Read to Here or Read Up to Here | Read back from the top of the document window to the insertion point. |
| Read from Here or Read Down from Here | Read back from the insertion point to the bottom of the document window. |
For more information about these commands, see page 57.
Working with your desktop and windows
Starting programs and opening documents and folders
SAY TO
| Start Calculator Start a program on your Windows® Start menu or desktop, in this example, Calculator. |
| Start Mail | Start your default e-mail program. |
| Start proposal.doc Open a document on your Windows® Start menu or desktop, in this example, proposal.doc. |
| Start My Documents | Open a folder on your Windows® Start menu or desktop, in this example, My Documents. |
| Click Start or Click Start Menu | Open a menu, in this example, the Start menu. |
| Give Me Help Open Dragon NaturallySpeaking online Help. |
| What Can I Say Display the Dragon NaturallySpeaking Sample Commands for the application you are currently working in. |
For more information about these commands, see “Programs, documents and folders” on page 27 and “Opening documents and folders from the Start menu” on page 27.
Switching windows
SAY TO
| Switch to Internet Explorer | Switch to a different program window, in this example, Internet Explorer. |
| Switch to Previous Window | Switch to the previous window (equivalent to pressing ALT+TAB). |
| Switch to Next Window Switch to the next window (equivalent to pressing ALT+SHIFT+TAB). |
| Switch to DragonPad | Switch to the DragonPad window. |
For more information about these commands, see “Switching between open windows” on page 28.
Opening and closing menus
SAY TO
| Click File or File | Open a menu or activate a menu command, in this example, the File menu. |
| Cancel Close an open menu. | |
For more information about these commands, see “Opening and closing menus” on page 28.
Selecting buttons, tabs, and options
SAY TO
| Click OK or OK | Activate a button or option, in this example, OK. |
| Click Properties or Properties | Activate a tab in a tabbed dialog box, in this example, the Properties tab. |
| Go to Next Tab or Move to Next Tab or Click Next Tab or Next Tab | Switch to the next tab in a tabbed dialog box. |
| Go to Previous Tab or Move to Previous Tab or Click Previous Tab or Previous Tab | Switch to the previous tab in a tabbed dialog box. |
For more information about these commands, see “Selecting buttons, tabs, and options” on page 29.
Resizing and closing windows
SAY TO
| Click Maximize Maximize the active window. |
| Click Minimize Minimize the active window. |
| Click Restore Restore the active window to its previous size. |
| Click Close Close the active window. |
| Click Control Menu Open the Control menu for the active window. |
| Click System Menu Open the System menu for the active window. |
For more information about these commands, see “Resizing and closing windows” on page 31.
E-mail commands
The following commands work only when you are in a supported e-mail program. For more information, see “Working with e-mail” on page 67.
E-mail commands
| SAY TO | |
| Check For New Mail or Check For Mail or Check For E-mail or Check Mail or Refresh Mail | Check the Inbox for new messages. |
| Create Mail or Create New Mail or New Mail or New E-mail or New Message | Create a new e-mail message. |
| Open Mail or Open E-mail or Open That | Open the selected e-mail message. |
| Close Mail or Close E-mail or Close That | Close the selected e-mail message window. This command does not close your main e-mail program. |
TIP You can say "Mail," "E-mail," "Message," or "Memo" in any of the commands specific to e-mail.
The following commands work if you have a message selected in your Inbox or if you are currently in an e-mail message.
Replying to, forwarding, sending, printing, and deleting e-mail
| SAY TO | |
| Reply Mail or Reply Message or Reply To E-Mail or Reply To Message | Reply to the sender of the current message. |
| Reply to All Reply to all recipients of the current message. | |
| Forward Mail or Forward E-Mail or Forward Message | Forward the current message. |
| Send Mail or Send E-Mail or Send Message | Sends the current message. |
| Send Now or Send Mail Now | In AOL only, sends the current message immediately. |
| Send Later or Send Mail Later | In AOL only, sends the current message later. |
| Print Mail or Print E-Mail or Print Message | Prints the current message. |
| Delete Mail or Delete E-Mail or Delete Message | Deletes the current message. |
The following commands let you move around when editing e-mail. You can also use the regular text editing commands to compose your messages.
Editing a message
| SAY TO | |
| Go To To Field or To | Move to the To field. In AOL only, you can say "Send To." |
| Go To CC Field or CC | Move to the CC field. In AOL only, you can say "Copy To." |
| Go To BCC Field or BCC | Move to the BCC field. |
| Go To Subject Field or Subject | Move to the Subject field. |
SAY TO
| Go To Body Field or Body | Move to the Body field. |
| Go To First Field or First | Move to the first field of the view. |
| Go To Next Field or Next | Move to the next field of the view. |
| Go To Previous Field or Previous | Move to the previous field of the view. |
| Go To Last Field or Last | Move to the last field of the view. |
TIP You can also say "Move To" instead of "Go To" in any of the commands above.
Using Lotus Notes
Lotus® Notes® commands are available only in Dragon NaturallySpeaking Professional and higher editions. These commands let you control and navigate using Lotus® Notes®.
Basic commands
SAY TO
Move to Tab 1..10 Move to the respective Lotus ^® Notes ^® tab.
Next Message Open the next message in the list.
Previous Message Open the previous message in the list.
Next Unread Open the next unread message.
Open Document Open the selected document.
Close Document Close the selected document.
Click Move to Folder Click the toolbar button named Move to Folder.
What Field Is This Display the Notes Field ID.
Format That Display the text properties dialog for selected text in a Notes document.
Refresh View Update the view.
TIP You can say "Move To" or "Go To" the name of any Lotus® Notes® field, such as "Move To Home Phone" in your address book to go to the Home Phone field.
You can also use Dragon NaturallySpeaking e-mail commands when composing e-mail in Lotus® Notes®. Use the standard Dragon NaturallySpeaking editing commands to work with text that you enter.
NOTE You cannot select paragraphs in Lotus® Notes® or format text using the Set Font and Format That commands.
For more information about Lotus ^® Notes ^® , see the online Help.
Using Microsoft Internet Explorer
Navigating the Web
| SAY TO | |
| Go to Address Move to the Address box. | |
| Click Go or Go There | Go to the Web page specified in the Address box (same as pressing the ENTER key). |
| Open United Nations | Go to a Web page on your Favorites list, in this example, United Nations. |
| Refresh or Reload | Refresh the current Web page (same as clicking the Refresh button). |
| Click Help on Searching or Help on Searching | Follow the link or click the button, in this example, Help on Searching. |
| Click Contact Us or Contact Us | Follow the link that appears in an image when the mouse moves over it, in this example, Contact Us. |
| Choose 2 Select an alternative from the numbered list and enter it in your document. You can say any number that appears in the list. | |
| Next Match or Next | Select the next matching link or object on the page. |
| Previous Match or Previous | Select the previous matching link or object on the page. |
| Click That or That One | Click the selected link, edit box, and so on. |
| Stop Loading Stop loading a Web page (same as clicking the Stop button). | |
| Go Back Load the previous Web page in your history list (same as clicking the Back button). | |
| Go Forward Load the next Web page in your history list (same as clicking the Forward button). | |
| Go Home Go to your home page (same as clicking the Home button). | |
Moving around a Web page
| SAY TO | |
| Page Down Scroll down one screen (same as pressing the PAGE DOWN key). | |
| Page Up Scroll up one screen (same as pressing the PAGE UP key). | |
| Line Down Scroll down one line (same as clicking the down arrow in the scroll bar once). | |
| Line Up Scroll up one line (same as clicking the up arrow in the scroll bar once). | |
| Go to Top Scroll to the beginning of the Web page. | |
| Go to Bottom Scroll to the end of the Web page. | |
| Start Scrolling Down Start automatic scrolling toward the end of the page. | |
| Start Scrolling Up Start automatic scrolling toward the beginning of the page. | |
| Stop Scrolling Stop automatic scrolling. | |
| Speed Up Increase scrolling speed. (Say it again to speed up more.) | |
| Slow Down Decrease scrolling speed. (Say it again to slow down more.) | |
| Next Frame | Go to the next frame in a multiframe page. |
| Previous Frame | Go to the previous frame in a multiframe page. |
| Next Pane | Go to the next pane in the browser application. |
| Previous Pane Go to the previous pane in the browser application. | |
Working with forms
| SAY TO | |
| Type Text or Edit Box | Go to the first place on a Web page where you can enter text. |
| Click Check Box or Check Box | Enumerate all check boxes on the page and go to the first one. |
| Click Image or Image | Enumerate all images with links on the page and go to the first one. |
| Choose 2 | Select the image, option, button, and so on from the enumerated list of choices. You can say any number that appears in the list. |
| Click Radio Button/Radio Button | Enumerate all option (radio) buttons on the page and go to the first one. |
| Click List Box or List Box | Enumerate all the boxes with a list of choices (drop-down lists) on the page and go to the first one. |
| Show Choices Open a list of choices. | |
| Hide Choices Close a list of choices. | |
| Cancel Choices Deactivate a list of choices, leaving the most recent choice selected. | |
| Choose Thursday or Thursday | Choose an entry from a list of choices, in this example, Thursday. |
You can use standard editing commands to work with text that you enter in a Web form.
For more information about Microsoft® Internet Explorer® commands, see "Working with Microsoft Internet Explorer" on page 70.
Working hands-free
Pressing keyboard keys
For lists of commands you can use to press keyboard keys, see “Pressing keyboard keys” on page 32.
Moving the mouse pointer and clicking the mouse
For lists of commands you can use to move the mouse pointer and click the mouse, see the mouse movement commands starting on page 36.
Index
A
abbreviations 96
accuracy
improving 115
Accuracy Assistant 116
Acoustic Optimizer 116
acronyms 96
Active Accessibility 169
active vocabulary 123
add a word 118
adding paragraphs, lines, and spaces 176
Advanced Settings dialog box 148
All Caps Off 63
All Caps On 63
All Caps That 63
All Caps [text] 62
America Online 67
American English 8
apostrophe's 93
applications
opening 27
switching 28
Audio Setup Wizard 11
Australian English 8
automating your work 153
B
backing up a user 134
BACKSPACE key 52
back-up location
changing 135
Bold That 66, 188
bold, adding or removing 188
bookmarks. See Favorites
British English 8
bulleted text 66
buttons, selecting 29
C
Cap That 63
Cap [word] 62
Capitalize That 63
Capitalize That 63
capitalizing text 186
already in a document 63
applying lowercase 63
consecutive words 62-63
next word 61
Caps Off 62
Caps On 62
Center That 66
characters
deleting 52
moving to next/previous 49
selecting 47
check boxes, selecting 29
clicking the mouse 38
Command Browser 103, 118
Command Mode 101
Index
commands
browsing available commands 103
training 129
undoing 182
using with a recorder 144
which ones work in which programs 173
See also custom commands
See also the Appendix for a list of commands
commas
autoimatically adding 91
Compound That 95
compound words 94-95
contact names, adding 121
contractions. See apostrophe's
Copy That 50, 186
copying text 50
Correct [text] Through [text] 3, 46
Correct [text] To [text] 3, 46
correcting
commands for 178
Correction menu 41
Correction options 162
creating a new user 9
currency 90
custom commands
creating 154
deleting 159
Step-by-Step 158
Text and Graphics 156
types of 153
viewing 154
custom words, deleting 124
custom words. See Vocabulary Editor
Cut That 47, 50, 186
cutting text 50
D
dates 85
deferred correction 56
Delete That 51
deleting commands. See custom commands, deleting
deleting text
backing up and resuming dictation 50
characters 52
last words dictated 50
lines 51
paragraphs 51
specific words 47, 51-52
deselecting text 46
dialects
dictating currency 90
dictating times of day 86
spelling and punctuation conventions 2
dictate now, correct later 56
Dictation Mode 101
dictation, saving for later playback 56
documents
moving to top/bottom 48
opening 27, 197
selecting all text in 47
dollar sign 90
Drag-and-drop transcription 148
Dragon NaturallyMobile recorder 138, 147-148
used as microphone 151
DragonBar 17, 23
Extras toolbar on 23
hiding 165
options 165
Tray Icon Only mode 165
DragonPad 18
E
Edit Vocabulary 123
e-mail 67, 199
adding contact names 121
checking for new 68
closing 68
composing 68
deleting 70
dictating 69
forwarding 69
navigating fields 69
opening 68
printing 69
replying to 69
sending 69
transferring dictation 69
Index
e-mail addresses, dictating 96
ENTER key 176
errors, reducing 115
ESC key 55, 58
Euro symbol, changing 171
Extras toolbar 23, 59
F
Favorites, in Web pages 70
folders, opening 27-28, 197
fonts, changing 64
Format That 65
Format That Centered 66
Format That Left Aligned 66
Format That Number 84
Format That Right Aligned 66
Format That Spelled Out 84
Formatting options 170
formatting text 64, 188
applying bold 66
applying italics 66
applying underlining 66
changing font face, size, and style 64
removing formatting 66
fractions 87
frames 75
G
Give Me Help 21
Go to Beginning of Line 48
Go to Bottom 48
Go to End of Line 48
Go to Sleep 18, 174
Go to Top 48
H
handheld recorder. See recorder
help
online 21
homophones, tips for selecting 46
Hot key options 166
Hyphenate That 94
hyphenated words 93
dictating 94
hyphens 94
preventing 94
removing 94
-
ICD-PCLINK 138
icons, selecting 30
improving performance. See accuracy
Indian English 8
Insert After [text] 49
Insert Before [text] 49
installation 7
installing recorder software 138
International Communications Alphabet 32, 178
Internet addresses 96
Internet Explorer
adding a favorite Web page 71
clicking check boxes, list boxes and radio buttons 74
clicking images 74
clicking named buttons 74
commands for 203
dictating URLs 71
entering a Web address 71
entering text in a text box 72
following links 72
frames and panes 75
going back or forward in Web pages 71
going to a favorite Web page 70
scrolling in a Web page 75
Italicize That 66, 188
italics, adding or removing 66, 188
K
keyboard shortcuts
stopping playback 55-56, 58
keyboard, pressing keys 32, 34-35
L
Left Align That 66
lines
adding 176
deleting 51
moving to beginning/end of 48
moving up/down 49
selecting 47
Index
list boxes 31-32
Lotus Notes 67, 202
lowercase, applying 63
M
macros. See custom commands
making selections
list boxes 32
measurements. See abbreviations
menus, opening and closing 28, 198
microphone
on/off key, changing 166
plugging in 6
proper positioning 11
sleep mode 18
turning on and off 17, 174
turning on/off 174
Microsoft
Excel 80
Internet Explorer 70
Outlook 67
Outlook Express 67
Word 76
minus (-) key 56
Miscellaneous options 169
modes 101
money 90
mouse
clicking 38
motion commands, enabling 164
moving the pointer 36-38
MouseGrid 36
Move to Bottom 48
Move to Top 48
moving around a document 183
before/after specific words 49
to beginning/end of line 48
by paragraphs or lines 49
scrolling 31
to top/bottom of page 48
by words or characters 49
multiple users 6
MyCommands. See custom commands
N
names
adding 121
dictating 95
Natural Punctuation 19, 91
new commands. See custom commands, creating
new features in version 6 3
New Line 176
New Paragraph 176
New User Wizard 131, 140
new user, creating 9
No Caps Off 63, 97
No Caps On 63, 97
No Caps That 63
No Caps [text] 63
No Space 95
No Space Off 95
No Space On 95
numbers 83, 191
changing formats 84
currency 84, 90
dates 85
fractions 87
Roman numerals 88
telephone numbers 86
times of day 86
Numbers Mode 85
0
Olympus Digital Recorders 141
Olympus DS-150/650 Recorder 143
opening
documents 197
e-mail 68
folders 27, 197
opening and closing menus 198
opening applications 27
Options dialog box 161
options, selecting 29
P
Page Down 48
Page Up 48
pages. See moving around a document
Panasonic IC recorder 138
Index
paragraphs
adding 176
deleting 51
moving up/down 49
selecting 47
Paste That 50, 186
pasting text 50
Pause Required Before Commands control 169
Performance Assistant 130
performance, improving 130
periods
automatically adding 91
periods, spacing after 170
phone numbers 86, 192
Play That Back 55
playback controls 53, 196
playing back dictation 53, 196
correcting mistakes 56
in the Correction dialog box 54
in a document 54
skipping backward 55
skipping forward 55
stopping 55-56
storage space for 56
portable devices
creating users on 132
portable recorder
using Dragon Naturally Speaking with 137
possessives. See apostrophe's
postal and ZIP codes 88
pound sterling 90
problems dictating currency or time 84
programs, opening. See opening applications
proper names, dictating 95
properties of words 126
punctuation 19, 91, 194
automatic 91

QuickStart 25

Read That 58
reading text 196
recorder
correcting mistakes 151
installing software for 138
transcribing with 145
transcribing with Drag-and-drop 148
Regional Settings control panel 84
removing Version 5 7
restoring a user 135
restricted command set 144
Resume With 50, 145
revising text. See Select-and-Say
Right Align That 66
Roman numerals 88

's93
saving dictation 56
storage space for 59
saving speech files 134
Scratch That 47, 50
scrolling 31
scrolling, in Web page 75
searching while selecting 46
Select Again 46
Select All 47
Select Document 47
Select [text] 45
Select-and-Say
selecting text 45
again 46
changing search direction 163
characters 47
commands for 176
a document 47
lines 47
paragraphs 47
punctuation 45
specific words 46-47
Set Font 64-65
Set Size 64
Shutdown options 164
Skip Backward 55
Skip Forward 55
Skip Word button 14
Index
sleeping 18
software installation 7
Sony ICD-BP recorder 143
Sony ICD-R100 recorder 138, 141
Sony Memory Stick IC Recorder ICD-MS 138, 143
Sony Memory Stick Voice Editor 138
Southeast Asian English 8
Space Bar 176
spaces
after periods 170
spaces, adding 176
speakers, plugging in 6
special characters 97, 179-181, 194
Speed vs. Accuracy control 169
Spell Mode 101
Spell That 42
Spell [text] 52
spelling
as you dictate 52
errors 54
spoken forms 124
creating 125
starting applications. See opening applications
starting programs 197
Startup options 163
Step-by-Step commands. See custom commands
Stop Listening 18
Strikeout That 66
student voice models 10
switching windows 28, 197
T
Tab key 30, 176
tabs (dialog box), selecting 29
tape recorder. See recorder
teenage voices 10
telephone numbers 86, 171
Text and Graphics commands. See custom commands
text-to-speech 57-58, 196
times of day 86
training
commands 129
for recorded speech 141
words 129
troubleshooting 22
recorder transcription 150
typeface, changing 64
U
UK English 8
Uncapitalize 63
Uncapitalize That 63
Underline That 66, 188
underlining, adding or removing 188
Undo That 182
unselecting text 46
Upgrading 7
URLs, dictating 71
user files
creating 9, 140
multiple users 6
users
backing up 134
creating new 131, 140
deleting 133
on portable devices 132
opening 132
renaming 133
restoring from a backup copy 135
speech files 131, 134
users. See user files
V
Version 5, removing 7
View options 165
vocabularies
editing 123
managing 129
vocabulary
adding contact names 121
Vocabulary Editor 123
vocabulary tools 118
Voice It Link 138
volume setting, on a recorder 144
W
Wake Up 174
Web addresses 71, 96
What Can I Say 21
what's new in version 6 3
Index
windows
closing 198
resizing 198
switching between 28
Word Properties dialog box 126
words
adding 118-119
adding a list 122
changing properties 126
deleting 47, 51-52
moving to next/previous 49
placing insertion point before/after 49
selecting 46-47
training 129
written forms 124

years 85

ZIP codes 88
Index
Technical Support
If you purchased your product directly from a certified ScanSoft Applications Solutions Partner, contact them directly for technical support.
The answers to many Dragon NaturallySpeaking technical support questions can be found on our Web site at www.ScanSoft.com/NaturallySpeaking/support/.
Information and Sales
ScanSoft, Inc.
9 Centennial Drive
Peabody, MA 01969
USA
Web: www.ScanSoft.com/Contact/
Training and Customization
Professional training and customization services from a ScanSoft-certified Applications Solutions Partner can help you achieve the maximum return on your investment. If you would like to unleash the full potential of Dragon NaturallySpeaking software, please contact one of our Partners for training, customization, and more.
ScanSoft Application Solution Partners are the best in the industry; distinguished by their expertise, experience, and commitment to providing top-level services for Dragon Naturally Speaking speech recognition products.
For details on ScanSoft Application Solutions Partners near you, please visit: www.ScanSoft.com/NaturallySpeaking/locator/
- Dragon NaturallySpeaking®7
- Contents
- CHAPTER 1 Introduction 1
- CHAPTER 2 Installation and Training 5
- CHAPTER 3 Starting to Dictate 17
- CHAPTER 4 Working on your Desktop 27
- CHAPTER 5 Correcting and Editing 41
- CHAPTER 6 Formatting 61
- CHAPTER 7 Working with Applications 67
- CHAPTER 8 Dictating Names, Numbers, Punctuation & Special Characters 83
- CHAPTER 9 Using the Command Browser 103
- CHAPTER 10 Improving Accuracy 115
- CHAPTER 11 Managing Users 131
- CHAPTER 12 Using Portable Recorders (Preferred and higher) 137
- CHAPTER 13 Automate Your Work (Preferred and higher) 153
- CHAPTER 14 Customizing Dragon Naturally Speaking 161
- CHAPTER 1
- Introduction
- About this guide
- Conventions used in this guide
- What's new in Version 7?
- What should I expect from Dragon NaturallySpeaking?
- Do I still need my keyboard and mouse?
- CHAPTER 2
- Installation and Training
- System requirements
- Multiple users on one computer
- Plugging in the microphone
- Installing the software
- Upgrading from a previous version
- Upgrading from Version 5:
- Upgrading from Version 6:
- To install Dragon NaturallySpeaking:
- Installing non-US user files (Preferred and higher)
- Creating a new user
- Creating a user
- About vocabularies and languages
- Languages
- Vocabulary
- Vocabulary size
- Speech Model
- Setting up your microphone
- Positioning your microphone
- Position the microphone
- Using a headset microphone
- Using a handheld microphone (Preferred and higher)
- Using an array microphone (Professional and higher)
- Check your volume
- Sound quality check
- Training a new user
- NOTE During training, dictating punctuation is not necessary.
- Adapting to your writing style
- CHAPTER
- Starting to Dictate
- Starting Dragon NaturallySpeaking
- Turning on the microphone
- Sleeping and waking up
- DragonPad
- Using Natural Punctuation
- Dictating punctuation
- Starting new lines and paragraph
- Tips for dictating text
- Printing and saving your dictated text
- Printing
- Saving
- Getting Help
- "What Can I Say?"
- To open the Sample Command Window
- Notes
- Tutorial
- Troubleshooting
- The DragonBar
- Microphone button and volume display
- Extras toolbar (Preferred and higher edition)
- Correction
- Transcribe
- Start Playback, Fast Playback, and Stop Playback
- Skip Back and Skip Forward
- Changing the DragonBar position
- Controlling Dragon Naturally Speaking with voice commands
- Using QuickStart
- Enabling QuickStart
- Shutting off QuickStart
- Temporarily Disabling QuickStart
- CHAPTER 4
- Working on your Desktop
- Programs, documents and folders
- Starting a program
- Opening documents and folders from the Start menu
- Switching between open windows
- SAY THIS TO
- Opening and closing menus
- To open a menu:
- Selecting buttons, tabs, and options
- Selecting icons on the desktop
- To select an icon on the desktop:
- Resizing and closing windows
- Scrolling in windows and list boxes
- Opening lists and making selections
- To open a list box:
- To make a selection from an open list
- Pressing keyboard keys
- Pressing letters
- SAY THEN
- Capitalizing a letter
- Pressing numbers
- Pressing key combinations
- Pressing function and numeric keypad keys
- Pressing other keys
- Moving the mouse pointer and clicking the mouse
- Moving the mouse pointer with MouseGrid
- To use MouseGrid:
- Moving the pointer with the "Mouse" command
- To move the pointer:
- Clicking the mouse
- To click the mouse:
- Marking and dragging objects
- To mark and drag an object:
- Moving the pointer with the mouse motion commands
- Enabling the mouse motion commands
- The mouse motion commands
- CHAPTER 5
- Correcting and Editing
- Correcting mistakes
- Correcting text with the keyboard
- Correcting text using voice commands
- Correcting text while playing back dictation (Preferred and higher editions)
- Using the Correction menu
- Correcting Punctuation
- Selecting text by voice
- Using Select-and-Say®
- To use Select-and-Say®:
- TIP You can also select punctuation marks.
- Selecting the same text again
- Unselecting words
- Selecting a longer phrase
- Selecting your whole document
- Selecting an entire paragraph or line
- SAY THEN THEN
- Selecting a word or character
- Moving around in a document
- Going to the top or bottom of a page or document
- Going to the beginning or end of a line
- Placing the insertion point before or after a specific word
- To place the insertion point before a specific word:
- To place the insertion point after a specific word:
- Moving up or down a paragraph or line
- Moving right or left a word or character
- Copying, cutting, and pasting text
- To copy, cut, or paste text:
- Deleting text
- Deleting the last words you dictated
- Going back as you dictate
- To go back as you dictate:
- Deleting specific words
- To delete text:
- Deleting the next or previous paragraph or line
- Deleting the next or previous word or character
- Spelling as you dictate
- Playing back your dictation (Preferred and higher)
- Playing back dictation in the Correction dialog box
- Playing back dictation in a document
- To play back dictation:
- To stop playback:
- To skip backward or forward:
- To stop playback and correct a mistake:
- Dictate now, correct later
- Correcting your own dictation
- Correcting someone else's dictation
- Correcting with your user files
- Correcting with the document author's user files
- TIP This technique works if all work is done on a single computer. Consult your Dragon Naturally Speaking reseller about ways to dictate on one computer and correct on another.
- To correct using someone else's user files:
- Using text-to-speech
- To start text-to-speech:
- SAY TO
- To stop text-to-speech:
- Notes on correcting with another author's user files
- Formatting
- Types of commands
- Capitalizing text
- Capitalizing the first letter of the next word you dictate
- Capitalizing consecutive words
- To capitalize consecutive words:
- Dictating the next word in all capital letters
- Dictating consecutive words in all capital letters
- To dictate consecutive words in all capitals:
- Dictating the next word in all lowercase letters
- Dictating consecutive words in all lowercase letters
- To dictate consecutive words in all lowercase letters:
- Capitalizing (or uncapitalizing) text already in your document
- To capitalize or uncapitalize text:
- Formatting text
- Changing the font as you dictate
- Changing font face
- Changing font size
- Changing font style
- Changing a combination of font face, size, and style
- Changing the font later
- To change the font:
- Bold, italics, and underlining
- To add bold, italics, and underlining:
- To remove formatting:
- Aligning text
- To align text:
- Bulleted text
- Working with Applications
- What can I say?
- Working with e-mail
- If you use a different e-mail program
- Checking for new e-mail
- Opening and closing e-mail
- Composing e-mail
- To navigate e-mail fields:
- To dictate an e-mail message:
- Sending and printing e-mail
- Forwarding and replying to e-mail
- Deleting mail
- Working with Microsoft Internet Explorer
- Going to favorite Web pages
- To add a page to the Favorites menu:
- Entering a Web address in the Address bar
- To enter a Web address:
- Going back to the previous Web page or forward to the next
- Entering text in a text box
- To enter text in a text box:
- Clicking links, buttons, and images
- To click a text link:
- To click an image:
- To click a button:
- To click a check box, list box, or radio (option) button:
- Frames and panes
- Scrolling in a Web page
- Working with Microsoft Word
- Using other word processing programs
- Creating, opening, and closing a document
- Selecting text
- Working with tables
- Working with Microsoft Excel (Preferred and higher)
- Dictation and Editing Modes
- Dragon Quick Edit Mode
- Dragon Full Edit Mode
- Using Select-and-Say
- Moving Around a Worksheet
- Editing and Formatting Content
- Performing Operations
- Dictating Names, Numbers, Punctuation & Special Characters
- Dictating numbers
- Changing the format of a number
- Using Numbers Mode
- Dates
- Times of day
- Telephone numbers
- North American phone numbers
- Telephone numbers outside North America
- Fractions
- Roman numerals
- Postal and ZIP Codes
- US ZIP Codes
- TO ENTER SAY
- UK and Canadian Postal Codes
- Currency and coin
- Currency in US/Canada (US English dialect)
- Currency in Other Dialects (UK, Australian, Indian, and Southeast Asian English)
- NOTE Dragon NaturallySpeaking uses the currency symbol (\$, £, and so on) specified in your Windows Regional Settings as your default currency.
- TIP In US/Canada, you must say "pound sterling sign" to enter £, since "pound sign" means # in the U.S. vocabulary. In all other dialects, you can say "pound sign" to type £.
- Punctuation
- Enabling and disabling automatic punctuation
- Words that end with 's
- Including 's as you dictate
- Dictating hyphenated words
- Including hyphens as you dictate
- Removing hyphens
- To remove a hyphen:
- Preventing hyphens
- Dictating compound words
- Compounding words as you dictate
- To dictate consecutive words without spaces:
- Compounding words later
- To compound words:
- Dictating names
- Dictating abbreviations and acronyms
- Dictating e-mail and Web addresses
- Dictating special characters
- Dictating common special characters
- Dictating uncommon special characters
- To dictate a special character:
- To add a special character to the vocabulary:
- Switching Recognition Modes
- Using the Command Browser
- You use the Command Browser to:
- Supported Applications
- Starting the Command Browser
- Finding specific commands
- Finding commands
- Example
- Expanding commands
- BUTTON ACTION EXAMPLE
- Training commands
- Working with Custom Commands (Preferred and higher)
- Viewing Custom Commands
- Creating a new command
- Modifying a command
- Click:
- Deleting a command
- Importing and exporting commands (Professional and higher editions)
- Exporting commands
- Importing Commands
- Changing the command group and availability
- CHAPTER 10
- Improving Accuracy
- The Accuracy Center
- "Which tool should I use"t
- Tools to improve your acoustics
- Check your audio settings
- Run the Acoustic Optimizer
- Scheduling the Acoustic Optimizer
- Perform additional training
- Tools to Manage Commands
- Launch the Command Browser
- Tools to improve your vocabulary
- Add a single word to your vocabulary
- Add words from your documents to the vocabulary
- To Add Words from Documents
- Increase accuracy from e-mail
- APPLICATION: SUPPORTED IN:
- To add contact names:
- Add a list of words to your vocabulary
- To add a list of words:
- View or edit your vocabulary
- To edit your vocabulary:
- To create a spoken form for a word or phrase:
- WRITTEN FORM SPOKEN FORM
- To delete a custom word from your vocabulary
- Changing word properties
- To change the properties of a word:
- Run the Vocabulary Optimizer
- To start the Vocabulary Optimizer:
- Notes:
- Managing your vocabularies
- Training a word or command
- To train a word or command:
- Using the Performance Assistant
- CHAPTER 11
- Managing Users
- What are user speech files?
- To create a new user:
- Creating a user on a portable device
- Viewing user properties
- Opening a user
- To open a user:
- Renaming a user
- To rename a user:
- Deleting a user
- To delete a user:
- Backing up and restoring a user
- To back up a user:
- Restoring a backup copy of a user
- To restore a user:
- Changing the backup location
- Importing and exporting users
- To export a user:
- CHAPTER 12
- Using Portable Recorders (Preferred and higher)
- Supported recorders
- Installing recorder software
- Pocket PC: Installing ScanSoft Voice Recorder
- To install ScanSoft Voice Recorder at the same time you install Dragon NaturallySpeaking:
- Installing ScanSoft Voice Recorder after you install Dragon NaturallySpeaking:
- Dragon NaturallyMobile recorder: Installing Voice It Link
- Creating a user adapted to your recorded speech
- To create a user:
- Recording with ScanSoft Voice Recorder on a Pocket PC
- Dictating into your recorder
- Using the ScanSoft Voice Recorder on a Pocket PC
- The restricted command set
- Transcribing recorded dictation
- Connecting a recorder to your computer
- Transcribing from a handheld recorder or Pocket PC
- To transcribe recorded dictation:
- Transcribe a Recording dialog box
- Transcribe From... dialog box
- Dragon NaturallyMobile recorder or the ScanSoft Voice Recorder
- Dragon NaturallyMobile recorders
- Pocket PCs
- Sony Memory Stick or ICD-BP recorders
- Panasonic IC recorders
- Recorders using sound files (.wav)
- Recorders plugged into the Line-In jack
- Drag-and-drop transcription
- The Advanced Settings dialog box
- Destination
- Commands
- Communication options (for the Dragon NaturallyMobile recorder only)
- Miscellaneous options (for Line-In recorders only)
- Using the Dragon NaturallyMobile recorder as a microphone
- To use the recorder as a microphone:
- Automate Your Work (Preferred and higher)
- MyCommands edition differences
- EDITION SUPPORTS...
- Viewing and editing commands
- Creating new commands
- Using the MyCommands Editor (Preferred and higher)
- Creating Text and Graphics commands (Preferred and higher)
- Creating Step-by-Step commands (Professional and higher)
- Deleting custom commands
- Importing and exporting commands
- CHAPTER 14
- Customizing Dragon NaturallySpeaking
- Correction options
- Other options
- Restore defaults
- Startup/Shutdown options
- Startup options
- Shutdown options
- View options
- DragonBar options
- Results Box
- Hot key options
- Text-to-speech options (Preferred and higher editions)
- Attributes
- Preview
- Unload text-to-speech
- Miscellaneous options
- Formatting options
- Other Options:
- APPENDIX
- Commands List
- Which commands work in which programs?
- Controlling the microphone
- Controlling the DragonBar
- Controlling the DragonPad
- Adding paragraphs, lines, and spaces
- Selecting a document
- Correcting text
- International Communications Alphabet
- Publishing symbols
- Currency symbols
- Accented and international characters
- Mathematical symbols
- Going to the top or bottom of a document
- Going to the top or bottom of a page
- Moving up or down a paragraph
- Moving up or down a line
- Moving right or left a word
- Moving right or left a character
- SAY
- THEN
- Capitalizing or uncapitalizing text already in your document
- Capitalizing or uncapitalizing the next word you say
- Capitalizing or uncapitalizing consecutive words
- Hyphenating or compounding text
- Adding or removing bold, italics, and underlining
- Entering numbers
- Changing number format
- Entering punctuation and special characters
- Playing back and reading text
- Working with your desktop and windows
- Switching windows
- E-mail commands
- Using Lotus Notes
- Basic commands
- Using Microsoft Internet Explorer
- Moving around a Web page
- Working with forms
- Working hands-free
- Index
- A
- B
- C
- D
- E
- F
- G
- H
- -
- K
- L
- M
- N
- 0
- P
- T
- U
- V
- W
- Technical Support
- Information and Sales
- Training and Customization
Brand : SONY
Model : ICD-ST25VTP
Category : Dictaphone