
DWC398KD1BSS - Drink cooler DANBY - Free user manual and instructions
Find the device manual for free DWC398KD1BSS DANBY in PDF.


| Product Type | Beverage Cooler |
| Brand | Danby |
| Model | DWC398KD1BSS |
| Capacity | 3.9 cu. ft. (110 L) |
| Dimensions (W x D x H) | 19.1 x 18.8 x 33.5 inches |
| Weight | 61.7 lbs (28 kg) |
| Power Supply | 120 V, 60 Hz, 1.0 A |
| Energy Consumption | ~0.8 kWh/24h (estimated) |
| Temperature Range | 34°F to 61°F (1°C to 16°C) |
| Control Type | Digital thermostat with LED display |
| Door Finish | Stainless steel with double-pane glass |
| Shelving | 4 adjustable chrome shelves |
| Interior Light | LED lighting with on/off switch |
| Lock | Keyed door lock |
| Reversible Door | Yes |
| Refrigerant | R600a (isobutane) |
| Noise Level | ~40 dB (estimated) |
| Defrost | Automatic |
| Maintenance | Clean condenser coils annually; hand wash interior |
| Safety Features | Leveling legs, tempered glass door |
| Spare Parts | Available through Danby authorized service centers |
Frequently Asked Questions - DWC398KD1BSS DANBY
User questions about DWC398KD1BSS DANBY
0 question about this device. Answer the ones you know or ask your own.
Ask a new question about this device
Download the instructions for your Drink cooler in PDF format for free! Find your manual DWC398KD1BSS - DANBY and take your electronic device back in hand. On this page are published all the documents necessary for the use of your device. DWC398KD1BSS by DANBY.
USER MANUAL DWC398KD1BSS DANBY
Owner's Manual....1 - 10
MODEL • MODÈLE • MODELO
DWC398KD1BSS

Important Safety Information READ AND FOLLOW ALL SAFETY INSTRUCTIONS
SAFETY REQUIREMENTS
To reduce the risk of fi re, electrical shock or injury when using the appliance, follow these basic precautions.
DANGER: Risk of fire or explosion. Flammable refrigerant used. Do not puncture refrigerant tubing.
- Do not use mechanical devices to defrost refrigerator.
- Ensure that servicing is done by factory authorized service personnel, to minimize product damage or safety issues.
• Children aged from 3 to 8 years are allowed to load and unload refrigerating appliances. - Cleaning and user maintenance shall not be made by children without supervision.
- Regularly clean surfaces that can come in contact with bottles and accessible drainage systems.
- Consult repair manual or owner's guide before attempting to service this product. All safety precautions must be followed.
- Dispose of properly in accordance with federal or local regulations.
- Follow handling instructions carefully.
WARNING: Keep ventilation openings, in the appliance enclosure or in the built-in structure, clear of obstruction.
WARNING: Do not use mechanical devices or other means to accelerate the defrosting process.
WARNING: Do not damage the refrigerant circuit.
WARNING: Do not use electrical appliances inside the food storage compartments of the appliance.
CAUTION: Children should be supervised to ensure that they do not play with the appliance.
DANGER: Risk of child entrapment. Before throwing away an old appliance:
- Remove the door or lid.
- Leave shelves in place so that children may not easily climb inside.
SAFETY REQUIREMENTS
This appliance is intended to be used in household and similar applications such as:
- Staff kitchen areas in shops, offi ces and other working environments;
- Farm houses and by clients in hotels, motels and other residential type environments;
• Bed and breakfast type environments;
• Catering and similar non-retail applications.
This appliance can be used by children aged from 8 years and above and persons whose physical, sensory or mental capabilities may be different or reduced, or who lack experience or knowledge, unless such persons receive supervision or training to operate the appliance by a person responsible for their safety.
Opening the door for long periods can cause a significant increase of the temperature inside the appliance.
To prevent damaging the door gasket ensure that the door is all the way open before removing a shelf.
This appliance must be positioned so that the plug is accessible. Do not move the cabinet while it is loaded with wine as this can warp the cabinet. Do not touch the compressor as it can be hot.
Do not store explosive substances such as aerosol cans with a fl ammable propellant in this appliance.
Never clean appliance parts with fl ammable fl uids. The fumes can create a fi re hazard or explosion.
Do not store or use gasoline or any other fl ammable vapors and liquids in the vicinity of this or any other appliance. The fumes can create a fire hazard or explosion.
If the refrigerant is R600a, fl ammable and explosive articles should not be put in or near the cabinet to avoid fi re or explosion.

SAVE THESE INSTRUCTIONS!

Important Safety Information READ AND FOLLOW ALL SAFETY INSTRUCTIONS
GROUNDING INSTRUCTIONS
This appliance must be grounded. Grounding reduces the risk of electrical shock by providing an escape wire for the electrical current.
This appliance has a cord that has a grounding wire with a 3-prong plug. The power cord must be plugged into an outlet that is properly grounded. If the outlet is a 2-prong wall outlet, it must be replaced with a properly grounded 3-prong wall outlet. The serial rating plate indicates the voltage and frequency the appliance is designed for.
WARNING - Improper use of the grounding plug can result in a risk of electric shock. Consult a qualified electrician or service agent if the grounding instructions are not completely understood, or if doubt exists as to whether the appliance is properly grounded.
Do not connect your appliance to extension cords or together with another appliance in the same wall outlet. Do not splice the power cord. Do not under any circumstances cut or remove the third ground prong from the power cord. Do not use extension cords or ungrounded (two prongs) adapters.
If the power supply cord is damaged, it must be replaced by the manufacturer, its service agent or similar qualified person in order to avoid hazard.
LOCATION
Remove interior and exterior packaging prior to installation. Wipe the outside of the appliance with a soft, dry cloth and the inside with a lukewarm wet cloth.
Place the appliance on a floor that is strong enough to support it when it is fully loaded.
Do not place the appliance in direct sunlight or near sources of heat, such as a stove or heater, as this can increase electrical consumption. Extreme cold ambient temperatures may also cause the appliance to perform improperly.
Do not use the appliance near water, for example in a wet basement or near a sink.
This appliance is intended for household use only. It is not designed for outside installation, including anywhere that is not temperature controlled (garages, porches, vehicles, etc.).
Before connecting the appliance to a power source, let it stand upright for approximately 6 hours. This will reduce the possibility of a malfunction in the cooling system from handling during transportation.
This appliance is 59.5 cm wide by 176.2 cm high by 71.8 cm deep.
LEVELING INSTRUCTIONS
There is an adjustable leg on the bottom of the appliance that can be turned up or down to ensure that the appliance is level.
- Turn the leveling leg counter-clockwise as far as it will go, until the top of the foot is touching the bottom of the cabinet.
- Slowly turn the leveling leg clockwise until the appliance is level.
INSTALLATION INSTRUCTIONS
PREPARING THE ENCLOSURE
Gloves and safety goggles should be worn during installation.
It is not recommended to install the appliance into a corner or directly beside a wall. The door will need to be opened more than 90° to allow full extension of the shelves. If it is necessary to place the unit next to a wall or in a corner, leave at least 5-10 cm of space between the wall and the appliance to allow for the door opening.
The cabinet opening must be at least 61 cm wide by 177.9 cm high by 71.3 cm deep.
Note: The listed depth requirement is assuming that the electrical outlet is located in the adjacent cabinetry or flush mounted in the rear wall, not surface mounted inside the enclosure.
If the electrical outlet is located inside adjacent cabinetry, cut a 3.8 cm diameter hole to admit the power cord. If the cabinet wall is metal, the hole edge must be covered with a bushing or grommet.
REQUIRED TOOLS
- Safety goggles
Gloves - Tape measure
- Carpenter square
- Level
- Flashlight
• Electric drill with hole bit
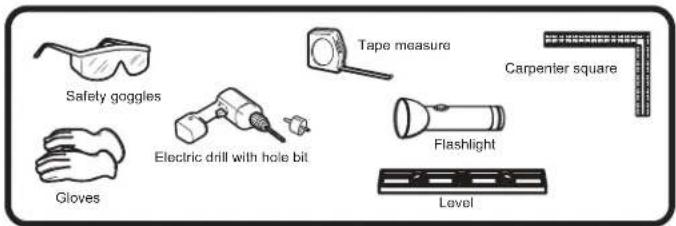
See image below.

INSTALLATION INSTRUCTIONS
ANTI-TIP BRACKET INSTALLATION
Important: Determine the final location of the appliance before attempting to install the bracket. You will need to choose one of the three installation methods below.

Drywall Installation:
- Place the bracket on the floor with mounting hole B against the wall.
- Use two screws to secure the bracket to the wall.
- Ensure at least one screw is secured to a wall stud.
- Place the unit so that the mounting hole E on the unit is lined up with mounting hole A on the bracket and secure with a bolt, a lock washer and a fl at washer.
Note: At least one screw must enter a wood wall stud. If there are no wall studs available, use floor installation.

Wood Floor Installation:
- Place the bracket on the floor and secure it with two screws.
- Place the unit so that mounting hole E on the unit is aligned with mounting hole A on the bracket and secure with a bolt, a lock washer and a fl at washer.

Concrete Floor Installation:
- Place the bracket on the floor and mark the location of mounting hole D on the floor.
- Using a concrete drill bit, drill an 8mm (3/8") pilot hole 45\~55mm (1.7"\~2") deep at the marked location.
- Remove the nut, spring washer and washer from the expansion screw.
- Carefully tap the expansion screw into the drilled hole using a hammer or mallet.
- Place the floor bracket with mounting hole D over the expansion screw and secure with the nut, spring washer and washer.
Place the unit so that mounting hole E on the unit is aligned with mounting hold A on the bracket and secure with a bolt, lock washer and fl at washer.
Important: After installing the bracket, try using light force to tip the unit. If the unit does not tip then the bracket is installed correctly. If the unit does tip, reinstall the bracket more securely.
OPERATING INSTRUCTIONS
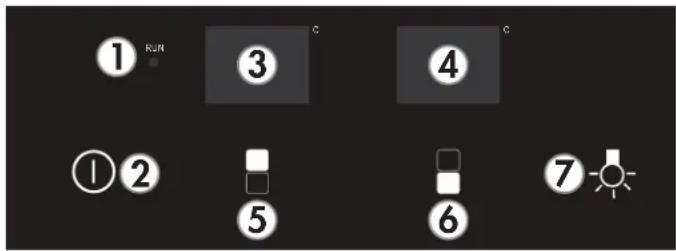
CONTROL PANEL
- Power indicator light: Illuminates to signify that the compressor is in operation.
- Power button: Press this button to turn the appliance on. Press and hold this button for 3 seconds to turn the appliance off.
- Upper display: Shows the set temperature in the upper chamber.
- Lower display: Shows the set temperature in the lower chamber.
- Upper chamber button: Used to adjust the temperature setting in the upper chamber in 1° increments. Press and hold for 3 seconds to display the actual temperature inside the cabinet. After 5 seconds the display will resume normal operation.
-
Lower chamber button: Used to adjust the temperature setting in the lower chamber in 1° increments. Press and hold for 3 seconds to display the actual temperature inside the cabinet. After 5 seconds the display will resume normal operation.
-
Light button
INTERIOR LIGHT
The interior light will default to turning on and off when the door is opened or closed.
Press and hold the light button for 5 seconds until the display shows "LP" to set the light to continuous illumination. After 4 seconds the display will return to normal operation and the light will remain on until manually turned off.
To resume normal light function, press and hold the light button for 5 seconds until the display show "LF". After 4 seconds the display will return to normal operation and the light will be set to turn on and off when the door is opened and closed.
FUNCTION INSTRUCTION
The default temperature setting in both chambers is 12^ C. The temperature can be set as low as 5^ C or as high as 18^ C.
Actual temperature inside the appliance can vary based on ambient temperature, how often the door is opened and how many warm bottles have recently been added to the appliance.
Temperature Memory: If the appliance loses power, the control panel will remember the set temperature. Once power is restored, the appliance will return to normal functioning automatically.
Temperature Alarm: If the inner cabinet temperature is higher than 23^ C for one hour, the error code "HI" will show on the display panel and an alarm will sound.
If the inner cabinet temperature is lower than 0^ C the error code "LO" will show on the display panel and an alarm will sound.
Door Ajar Alarm: If the door is not closed completely for 5 minutes, an alarm will sound. Close the door to silence the alarm.
If the door is closed and the alarm continues to sound, check that the actuator at the bottom of the door is making contact with the switch on the appliance.
Demo Mode: Demo mode can be used to show how the appliance will look while functioning without running the compressor. The fan will run on low speed but all alarms and beeping will be disabled.
To engage demo mode, press and hold the up and down buttons at the same time for 10 seconds. The display will flash "dE" and "On" five times to acknowledge demo mode is active.
To disengage demo mode, press and hold the up and down buttons at the same time for 10 seconds. The display will flash "dE" and "Of" five times to acknowledge demo mode is disabled.
OPERATING INSTRUCTIONS
STORAGE INSTRUCTIONS
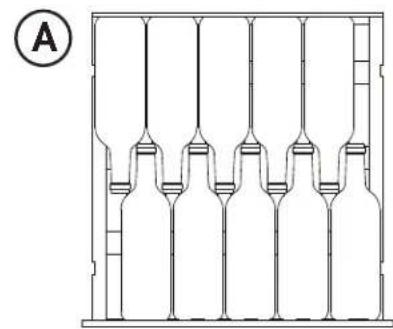
The maximum capacity of this unit is 135 wine bottles. The upper zone will hold 60 bottles and the lower zone will hold 75 bottles. This capacity is based on a standard 750 ml Bordeaux style bottle. Actual storage capacity may vary if different bottle sized are stored.
Upper Zone: To achieve maximum capacity, position bottles alternately on the upper six shelves as shown in figure A, for total storage of 60 bottles.
The upper zone has larger spacing between the shelves which can accommodate larger wine bottles such as Pinot or Burgundies. These bottles should be positioned alternately on the upper six shelves as shown in figure B, which allows for storage of 9 bottles per shelf.
Lower Zone: To achieve maximum capacity, position bottles alternately on the lower six shelves as shown in fi gure A, for total storage of 60 bottles. The bottom of the cabinet holds 15 bottles when stocked as per fi gure C.
natural_image
Technical line drawing of a mechanical component with multiple ports and internal channels (no text or symbols)
natural_image
Technical line drawing of a mechanical component with multiple cylindrical cavities and internal channels (no text or symbols)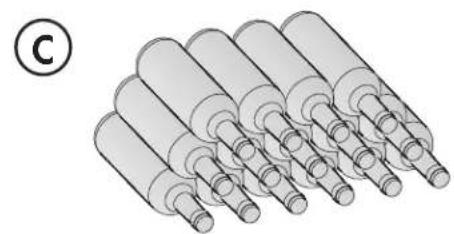
natural_image
Illustration of multiple cylindrical mechanical components arranged in a row (no text or symbols)SHELF INSTRUCTIONS
Do not cover the gaps on the racks with aluminum foil or any other material that will prevent adequate air circulation within the cabinet.
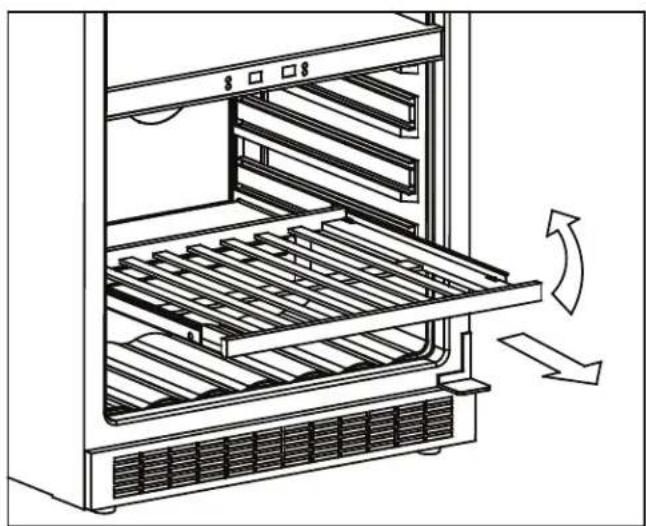
To remove a shelf:
- Fully extend the shelf.
- Lift the front of the shelf up.
- Holding the shelf track, push the shelf in and then up to release the shelf from the rear dampers.
To replace a shelf:
- Ensure the shelf is resting securely on the track.
- Push the shelf in until it locks into place.
natural_image
Line drawing of an oven interior showing tray, vent, and door mechanism (no text or symbols)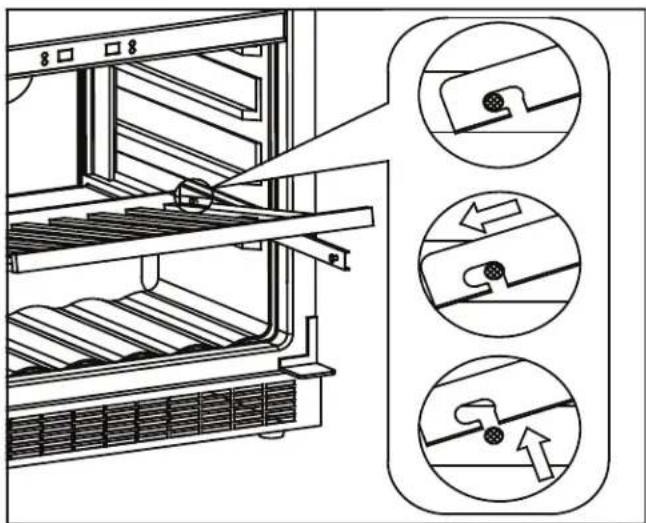
OPERATING INSTRUCTIONS
DOOR REVERSAL INSTRUCTIONS
If the appliance is placed on its back or side for any length of time it must be allowed to remain upright for 6 hours before plugging it in to avoid damage to the internal components.
- Remove the upper hinge. Remove the door and lay it fl at on the floor. It is advisable to put a blanket or similar item on the floor to protect both the door and the floor from damage.
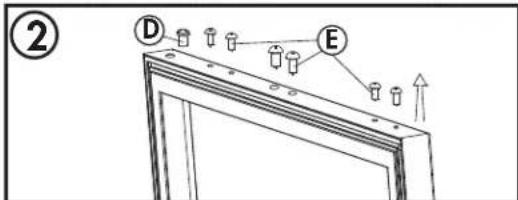
- Remove the hinge bushing and the screw hole covers from the top of the door.
- Remove the door stop, the actuator and the right door axis from the bottom of the door.
- Install the door stop, the actuator and the left door axis on the top of the door. The left door axis can be found in the accessory bag. Install the screw hole covers in the bottom of the door. The door will be fl ipped 180^ before being reinstalled on the cabinet to accommodate the handle.
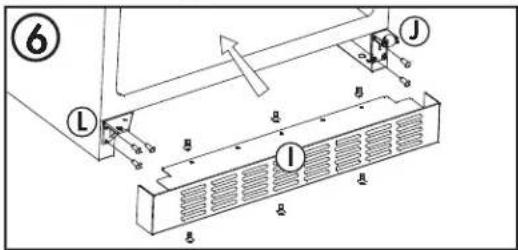
- Remove six screws from the kickplate and remove the kickplate. Remove the roller door support from the lower left side of the cabinet. Remove the lower right hinge from the lower right side of the cabinet.
- Install the roller door support on the lower right side of the cabinet. Install the lower left hinge on the lower left side of the cabinet. The lower left hinge can be found in the accessory bag. Reinstall the kickplate.
- Install the door on the cabinet. Make sure the fl ip the door 180° from its original position to accommodate the handle. Install the upper left hinge. The upper left hinge can be found in the accessory bag. Before tightening the upper hinge screws ensure that the top of the door is properly aligned with the top of the cabinet, that the actuator is making contact with the switch on the cabinet and that the rubber gasket makes a good seal with the cabinet all the way around.
A. Screws
B. Upper hinge
C. Door
D. Hinge bushing
E. Screw hole covers
F. Door stop
G. Actuator
H. Right door axis
I. Kickplate
J. Roller door support
K. Lower right hinge
L. Lower left hinge
M. Upper left hinge




CARE & MAINTENANCE
CLEANING
Ensure the appliance is unplugged before cleaning.
- To clean the inside of the appliance, use a soft cloth and a solution of a tablespoon of baking soda to one quart of water or some mild detergent.
- Wash removable shelves in a mild detergent solution, then dry and wipe with a soft cloth.
- Clean the outside with a soft, damp cloth and some mild detergent.
- It is important to keep the area clean where the door seals against the cabinet. Clean this area with a soapy cloth. Rinse with a damp cloth and let dry.
Note: Do not use cleaners containing ammonia or alcohol on the appliance. Ammonia or alcohol can damage the appearance of the appliance. Never use any commercial or abrasive cleaners or sharp objects on any part of the appliance.
POWER FAILURE
Most power failures are corrected within a few hours and should not affect the temperature of your appliance if you minimize the number of times the door is opened. If the power is going to be off for a longer period of time, take the proper steps to protect your contents.
Note: Wait 3 to 5 minutes before attempting to restart the appliance if operation has been interrupted.
DEFROST
This appliance is equipped with an automatic defrost function and does not require manual defrosting. Defrost water from the appliance is channeled into a drip tray located above the compressor. Heat transfer from the compressor causes the defrost water to evaporate.
VACATION
- Short vacations: Leave the appliance operating during vacations of less than three weeks.
- Long vacations: If the appliance will not be used for several months, remove all items and turn off the appliance. Clean and dry the interior thoroughly. To prevent odor and mold growth, leave the door open slightly, blocking it open if necessary.
MOVING
- Ensure the appliance is empty.
- Secure the door with tape.
- Turn the adjustable leg up to the base to avoid damage.
- Protect the outside of the appliance with a blanket or similar item.
- Ensure the appliance stays in the upright position during transportation.
- If the appliance is placed on its back or side during transportation, upon reaching the destination, allow it to remain upright for 6 hours before plugging in to avoid damage to the internal components.
DISPOSAL

This marking indicates that this product should not be disposed with other household wastes throughout the EU. To prevent possible harm to the environment or human health from uncontrolled waste disposal, recycle it responsibly to promote the sustainable reuse of material resources. To return your used device, please use the return and collection systems or contact the retailer where the product was purchased. They can take this product for environmental safe recycling.
TROUBLESHOOTING
Danby Consumer Care
Consumer Helpline: 0300 303 3904
Consumer Email: danby@ukwarranty.com
Appliance warranty registration: https://danby.warrantyonline.co.uk
Information in this manual is subject to change without notice.
| PROBLEM POSSIBLE CAUSE | |
| No power • A fuse may be blown or the circuit breaker tripped• Plug not fully inserted into the wall outlet | |
| Internal temperature not cold enoughAppliance runs continuously | • Door is not shut properly or opened excessively• Exhaust vent is obstructed• Recently added a large quantity of warm contents to the cabinet• Close proximity to heat source or direct sunlight• Ambient temperature or humidity is very high• Possible system leak, evaporator fan failure or compressor failure |
| Condensation on the cabinet or door • | Door is not shut properly or opened excessively• Ambient temperature or humidity is very high |
| Excessive noise • Appliance is not level | • Gurgling noises are normal; this is the coolant moving through the lines in the cabinet• Contraction and expansions of the inside walls can cause crackling or popping noises, especially if the ambient temperature is very warm |
| Door will not close • Appliance is not level | • Door gasket is dirty or bent• Shelves are not pushed all the way in• Door swing was reversed and not properly reinstalled |
WARRANTY
Congratulations on the purchase of your new Danby product. This appliance comes with a 2 year warranty.
Please call 0300-303-3904 to register your product and receive full terms and conditions.
This quality product is warranted to be free from manufacturer's defects in material and workmanship, provided that the unit is used under the normal operating conditions intended by the manufacturer. This warranty is available only to the person to whom the unit was originally sold by a Danby Products authorized dealer.
TERMS OF WARRANTY
During the first twenty-four (24) months, any functional parts of this product found to be defective will be repaired or replaced, at warrantor's option, at no charge to the original purchaser.
EXCLUSIONS
Save as herein provided, by Danby, there are no other warranties, conditions, representations or guarantees, express or implied, made or intended by Danby or its authorized distributors and all other warranties, conditions, representations or guarantees, including any warranties, conditions, representations or guarantees under any Sale of Goods Act or like legislation or statute is hereby expressly excluded. Save as herein provided, Danby shall not be responsible for any damages to persons or property, including the unit itself, howsoever caused or any consequential damages arising from the malfunction of the unit and by the purchase of the unit, the purchaser does hereby agree to indemnify and hold harmless Danby from any claim for damages to persons or property caused by the unit.
There are no express warranties other than those on the face here of and described above. No warranties whether expressed or implied, including but not limited to, any implied warranties of merchantability or fitness for a particular purpose, shall extend beyond the respective warranty periods provided above. This warranty does not affect the consumer's legal rights under applicable National legislation.
Service administered by UK Warranty Limited Pacifica House, Rainton Business Park Houghton Le Spring, England, DH4 5RA danby.warrantyonline.co.uk
0300-303-3904 08/18
MODEL
DWC398KD1BSS
Distributed by Exertis (UK) Ltd.
Technology House, Magnesium Way, Hampton, Burnley, England, BB12 7BF


- Important Safety Information READ AND FOLLOW ALL SAFETY INSTRUCTIONS
- SAFETY REQUIREMENTS
- SAVE THESE INSTRUCTIONS!
- GROUNDING INSTRUCTIONS
- LOCATION
- LEVELING INSTRUCTIONS
- INSTALLATION INSTRUCTIONS
- PREPARING THE ENCLOSURE
- REQUIRED TOOLS
- ANTI-TIP BRACKET INSTALLATION
- Drywall Installation:
- Wood Floor Installation:
- Concrete Floor Installation:
- OPERATING INSTRUCTIONS
- CONTROL PANEL
- INTERIOR LIGHT
- FUNCTION INSTRUCTION
- STORAGE INSTRUCTIONS
- SHELF INSTRUCTIONS
- DOOR REVERSAL INSTRUCTIONS
- CARE & MAINTENANCE
- CLEANING
- POWER FAILURE
- DEFROST
- VACATION
- MOVING
- DISPOSAL
- TROUBLESHOOTING
- Danby Consumer Care
- WARRANTY
- Please call 0300-303-3904 to register your product and receive full terms and conditions.
- TERMS OF WARRANTY
- EXCLUSIONS
- MODEL
- DWC398KD1BSS
Brand : DANBY
Model : DWC398KD1BSS
Category : Drink cooler