
889-005 - Nose trimmer Marquant - Free user manual and instructions
Find the device manual for free 889-005 Marquant in PDF.


| Product type | Nose trimmer |
| Brand | Marquant |
| Model | 889-005 |
| Power source | 1 AA battery (not included) |
| Blade material | Stainless steel |
| Blade type | Rotary |
| Washable head | Yes, removable and rinseable under running water |
| Dimensions (approx.) | 15 cm x 2.5 cm x 2.5 cm |
| Weight (approx.) | 100 g (including battery) |
| Functions | Trimming nasal and ear hair, shaping eyebrows |
| Safety features | Rounded tip to prevent injury, protective cap |
| Cleaning | Remove head and rinse under water; dry before reassembly |
| Maintenance | Replace blade when dull; clean after each use |
| Spare parts available | Replacement blades (sold separately) |
| Repairability | Battery compartment accessible; blade head replaceable |
| General information | Compact design for easy handling; suitable for men and women |
Frequently Asked Questions - 889-005 Marquant
User questions about 889-005 Marquant
0 question about this device. Answer the ones you know or ask your own.
Ask a new question about this device
Download the instructions for your Nose trimmer in PDF format for free! Find your manual 889-005 - Marquant and take your electronic device back in hand. On this page are published all the documents necessary for the use of your device. 889-005 by Marquant.
USER MANUAL 889-005 Marquant
User Instructions for Nose and Ear Hair Trimmer
889-005

natural_image
Black and silver Marquant electric toothbrush with no visible text or symbols on the body
Värna om miljön!
Care for the environment!
Must not be discarded with household waste! This product contains electrical or electronic components that should be recycled. Leave the product for recycling at the designated station e.g. the local authority's recycling station.
SE - Bruksanvisning i original
EN - Operating instructions (Translation of the original instructions)
Jula reserves the right to make changes. In the event of problems, please contact our service department. www.jula.com
Tillverkare/ Produsent / Produenci/ Manufacturer
Jula AB, Box 363, 532 24 SKARA
Importör/ Importör/ Importer/ Importer
Read these instructions carefully before use!
- This appliance can be used by children aged from 8 years and above and physical, sensory or mental capabilities or lack of experience and known given supervision or instruction concerning use of the appliance in a safety hazards involved. Children shall not play with the appliance. Cleaning is not made by children unless they are older than 8 and supervised.
- Keep the appliance and its cord out of reach of children less than 8 years.
- This personal grooming product is intended for trimming nose and ear hair. Do not use it for any other purpose.
- Do not insert the trimmer further than the length of the trimmer tip into your nostrils or ears.
- Do not apply any pressure against your ears or nostrils while using the trimmer.
- Do not use the trimmer if the casing or any blade is deformed or damaged. This can cause injuries in your nose and ears.
- The blade is precision-made and must not be exposed to knocks or blows.
- If the nose and ear trimmer is used once a week for approximately one minute, the blade has a lifetime of approximately four years.
TECHNICAL DATA
| Operating voltage | 1 x 1.5 volt AAR6 battery |
| Power consumption | 0.8 W |
| Safety class | III |
DESCRIPTION
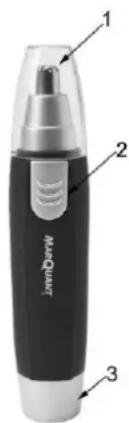
- Trimmer
- Power switch
- Battery compartment cover
OPERATION
Pull off the battery compartment cover at the bottom and insert one 1.5 volt AAR6 battery.
Turn on the power switch and carefully insert the trimmer tip into your nostrils and ears to remove unwanted hair growth.
MAINTENANCE
Turn off the appliance before cleaning or replacing the trimming blade. In order to remove the casing, turn the casing so that the markings are directly opposite each other and pull up.
Disconnect the inner blade from the outer blade and clean the blade of loose hair, dust, etc., using the cleaning brush and possibly a small cloth.
Refit the inner blade in the outer blade. Refit the casing so that the markings are directly opposite each other, and turn clockwise until the casing clicks into place.
Brand : Marquant
Model : 889-005
Category : Nose trimmer