
XDR-S7 - Radio SONY - Free user manual and instructions
Find the device manual for free XDR-S7 SONY in PDF.


| Product Type | Portable Radio |
| Brand | Sony |
| Model | XDR-S7 |
| Dimensions (approx.) | 180 x 110 x 40 mm (7.1 x 4.3 x 1.6 in) |
| Weight (approx.) | 400 g (14.1 oz) without batteries |
| Power Source | AC adapter (DC 6V) or 4 x AA batteries (not included) |
| Battery Life (approx.) | 50 hours (alkaline) at moderate volume |
| Tuning Range | FM 87.5–108 MHz, AM 530–1710 kHz |
| Speaker | 8 cm (3.15 in) full-range, 1.5 W output |
| Headphone Jack | 3.5 mm stereo mini-jack |
| Antenna | FM: telescopic rod; AM: built-in ferrite bar |
| Display | LCD with backlight, showing frequency and band |
| Preset Memory | 20 stations (10 FM, 10 AM) |
| Alarm | Single alarm with radio or buzzer |
| Sleep Timer | Yes, up to 60 minutes |
| Additional Features | Auto-scan, manual tuning, volume control, battery indicator |
| Accessories Included | AC adapter, user manual |
| Care Instructions | Wipe with dry cloth; avoid water and extreme temperatures |
| Safety | Do not disassemble; use only specified power source |
| Spare Parts Availability | Battery compartment cover, AC adapter (Sony genuine) |
| Repair Information | Contact Sony service center; not user-serviceable |
Frequently Asked Questions - XDR-S7 SONY
User questions about XDR-S7 SONY
0 question about this device. Answer the ones you know or ask your own.
Ask a new question about this device
Download the instructions for your Radio in PDF format for free! Find your manual XDR-S7 - SONY and take your electronic device back in hand. On this page are published all the documents necessary for the use of your device. XDR-S7 by SONY.
USER MANUAL XDR-S7 SONY
Operating Instructions_

XDR-S7

Digital Audio Broadcasting
©2008 Sony Corporation
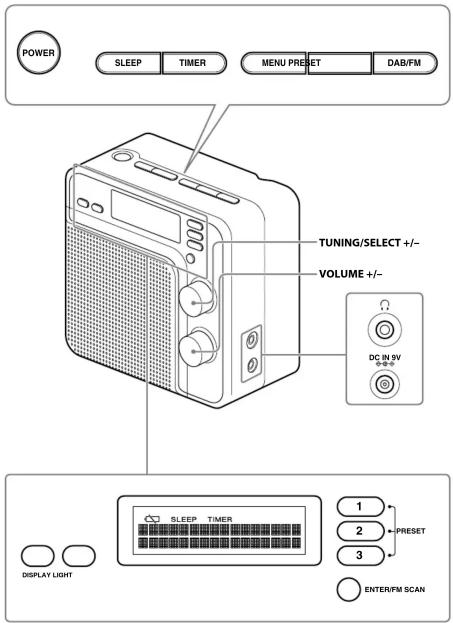
A
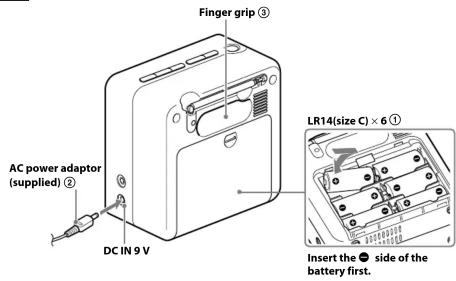
B

WARNING
To reduce the risk of fire or electric shock, do not expose this apparatus to rain or moisture.
To reduce the risk of fire, do not cover the ventilation of the apparatus with newspapers, tablecloths, curtains, etc. And do not place lighted candles on the apparatus. To reduce the risk of fire or electric shock, do not expose this apparatus to dripping or splashing, and do not place objects filled with liquids, such as vases, on the apparatus.
Do not install the appliance in a confined space, such as a bookcase or built-in cabinet.
As the main plug is used to disconnect the unit from the mains, connect the unit to an easily accessible AC outlet. Should you notice an abnormality in the unit, disconnect the main plug from the AC outlet immediately. Excessive sound pressure from earphones and headphones can cause hearing loss.
Notice for customers: the following information is only applicable to equipment sold in countries applying EU Directives
The manufacturer of this product is Sony Corporation, 1-7-1 Konan, Minato-ku, Tokyo, Japan. The Authorized Representative for EMC and product safety is Sony Deutschland GmbH, Hedelfinger Strasse 61, 70327 Stuttgart, Germany. For any service or guarantee matters please refer to the addresses given in separate service or guarantee documents.
WARNING
- Danger of explosion if battery is incorrectly replaced. Replace only with the same or equivalent type.
- Battery may explode if mistreated. Do not recharge, disassemble or disperse of in fire.
- Do not expose the batteries (battery pack or batteries installed) to excessive heat such as sunshine, fire or the like for a long time.
- Dispose of used battery promptly. Keep away from children.
Features
• DAB(Band-III) Digital Radio.
- Easy view, 2-line character dot LCD display.
- Simple operation for station selection
- Three Direct preset station buttons
- Sleep timer and clock display.
• Cooking timer
- Stereo headphone jack.
- Battery (LR14 × 6) or mains operated
Choosing power sources Installing batteries (See fig. A -①)
1 Open the battery compartment at the rear of the unit.
2 Install six LR14 (size C) alkaline batteries (not supplied), observing polarity, and then close the lid.
Battery Life (Approx. hours)
(JEITA*)
When using DAB FM
Sony alkaline LR14 (size C) 25 21
* Measured by JEITA (Japan Electronics and Information Technology Industries Association) standards. The actual battery life may vary depending on the circumstance of the unit.
Knowing when to replace the batteries
When the batteries become weak, the sound becomes
When the batteries are completely exhausted, "C"
appears in the display and the power is turned off.
When “☐” appears, replace all batteries with new ones.
Note on replacing the batteries
If the batteries are replaced while the power is on, the unit may revert to the factory setting.
Notes on batteries
- Do not attempt to recharge dry batteries.
- Do not carry batteries with coins or other metallic objects. It can generate heat if the positive and negative terminals of the batteries are accidentally contacted by
a metallic object. - If you are not going to use the unit for a long time, remove the batteries to avoid damage from battery leakage and corrosion.
- Do not use different types of batteries at the same time.
- When you replace the batteries, replace all with new ones.
Using house current
(See fig. A-②)
Connect the AC power adaptor (supplied) to the DC IN 9 V jack firmly, and plug it into a wall outlet.
Notes on the AC power adaptor
- When operating the unit with the internal batteries, remove the AC power adaptor from the wall outlet and the DC IN 9 V jack. Make sure that the plug of the external power source is disconnected before operating the unit.
- Use the supplied Sony AC power adaptor only. The polarity of the plugs of other manufacturers may be different. Failure to use the supplied AC power adaptor may cause the unit to malfunction.

Improving the reception (See fig. B)
DAB Band-III/FM:
Extend the telescopic aerial and adjust the length and the angle for best reception.
Note
Adjust the direction of the aerial by holding the bottom of it. The aerial can be damaged if you move the aerial with excessive force.

Initial setting for the unit
When the AC power adaptor is plugged in for the first time after purchase (or after resetting) the unit will automatically set the clock.
1 Plug in the unit
"Setting clock..." appears in the display, and DAB data adjusts the clock as it is received. When finished, the current time appears in the display.

2 Press POWER to turn on the radio.
The unit will automatically scan and create a list of
receivable DAB broadcasts.
Notes
- When you use only the batteries, carry out from
step 2. - If no services are found by the D4B scan, "No
Stations available" appears in the display.
Set the clock
Do the following if DAB broadcasts are not available (depending on area). The time setting mode by DAB becomes invalid.
1 Press MENU and turn TUNING/SELECT to select "Set clock," and then press ENTER. The hour indication will be displayed as follows.

2 Turn TUNING/SELECT to set the hour, and then press ENTER.
3 Repeat step 2 to set the minute, year, month and day.
After setting the time, the clock starts from 0 seconds.
When changing to FM mode, press DAB/FM, and then perform the above 3 steps.
Notes
- If you do not operate within 65 seconds while setting the clock, the clock setting mode will be cancelled.
- The time will be adjusted automatically when the unit receives a DAB service.
- The clock system of this unit is 24-hour system ("0:00" = midnight).
Time adjustment- Summer time
Time adjustment is performed only when receiving DAB service.
DAB service reception for at least one minute is required to reset the time to Summer time.
Operating the radio
The unit can receive DAB services and FM stations.
1 Press POWER to turn on the radio. When the unit is turned on again, the last band you listened to is received.
2 Press DAB/FM repeatedly to select the desired band
Each press changes the band as follows:

3 Turn TUNING/SELECT to tune to the desired service or station.
If you are selecting DAB, press ENTER.
4 Adjust the volume using VOLUME
Note in FM usage
The frequency can be set in 0.05 MHz steps for FM.
Notes in DAB usage
- If there are no services, you can choose only MANUAL mode. (See “Other useful functions for DAB”.)
- When the ensemble for the selected service cannot be received, "No Stations available" appears in the display.
About SC
(Secondary Component)
If the selected primary component has a secondary component, “<<” appears in the display.

Turn TUNING/SELECT and press ENTER to receive the desired secondary component. “<<” appears while the secondary component is received.
Note
When the selected secondary component is finished, the unit returns automatically to the primary component.
About the RDS
(Radio Data System)
When the unit receives an FM station transmitting RDS data, "RDS" appears in the display.
[EMPTY]

Each time you press DISPLAY, the display changes as follows: current time and date, frequency, text information.
To listen with headphones
You can enjoy the radio and external equipment connected to the line in by headphones (not supplied). Connect headphones (not supplied) to the ☐
(headphones) jack. The speaker is deactivated when headphones are connected.
[Non-Text]
[Non-Text]
[Non-Text]
[Non-Text]
[Non-Text]
[Non-Text]
[Non-Text]
,
[Non-Text]
[Non-Text]
[Non-Text]
[Non-Text]
[Non-Text]
[Non-Text]
[Non-Text]
[Non-Text]
[Non-Text]
[Non-Text]
[Non-Text]
[Non-Text]
[Non-Text]
[Non-Text]
[Non-Text]
[Non-Text]
[Non-Text]
[Non-Text]
[Non-Text]
[Non-Text]
[Non-Text]
Presetting your favourite services or stations
There are two ways to preset services and stations: Direct Preset and Preset Mode. You can preset 10 services in DAB and 10 stations in FM, including 3 services and stations stored on the Direct Preset buttons (PRESET 1 - 3).
You can enjoy any three preset services and stations as Direct Presets for immediate recall by pressing one of the PRESET 1 - 3 buttons. Preset services and stations you use often to Direct Preset for your convenience.
Presetting services or stations
To preset by Direct Preset
1 Follow steps 1 to 3 in "Operating the radio" and manually tune in to the service or station you wish to preset.
2 Hold down one of the PRESET 1 – 3 buttons for more than 2 seconds. “Preset”, a preset number and “saved” appear for 4 seconds in the display, and the service or station is stored.
To preset by Preset Mode
1 Follow steps 1 to 3 in "Operating the radio" and manually tune in to the service or station you wish to preset.
2 Press PRESET.
3 Turn TUNING/SELECT to select the favourite number to preset, then hold down PRESET. "Preset" a row number and "void" appear for
Preset, a preset number and 'saved' appear for 4 seconds in the display and the service or station is stored. (DAB services are stored with a service label.)
Notes
- To preset another service or station, repeat these steps. - To change the preset service or station, tune in to the desired service or station and repeat steps 2 and 3. The new service or station will replace the previous service or station.
- If a service or station is not registered, "Empty preset" appears in the display
- If you do not operate within 4 seconds during the above steps, otherwise the current mode will be cancelled.
Tuning in to a preset service or station
Direct Preset
Hold down one of the PRESET 1 - 3 buttons on which the desired service or station is stored.
Preset Mode
1 Press PRESET.
2 Turn TUNING/SELECT to select the desired preset station and then press ENTER.
Notes
- If a service or station is not registered, "Empty preset" appears in the display.
- If you do not operate within 4 seconds during the above steps, the current mode will be cancelled.
Scan tuning (for FM)
The unit will a
1 Press POWER to turn on the radio
- Press DAB/FM to select the FM band
3 Turn TUNING/SELECT to choose the direction, and then press FM SCAN. Turn right: Scans to the higher frequency. Turn left: Scans to the lower frequency. Scanning starts from the frequency being tuned in. When a station is received, scanning stops
4 If necessary, turn TUNING/SELECT to tune in to the station more precisely.
5 Adjust the volume using VOLUME.
Other useful functions for DAB
Changing the display
To change the display mode, press DISPLAY during DAB reception
The selected display mode remains even if you turn the unit off and on again, or change the band.
The display can be up to 16 characters. Each time you press DISPLAY, the bottom of the display changes as follows:

flowchart
graph TD
    A["SUC1 EUROPEAN EQUITIE"] --> B["SUC1 Pop Music"]
    B --> C["Signal strength"]
    C --> D["SUC1 519 strength 100"]
    D --> E["Bit rate and mono/stereo"]
    E --> F["SUC1 126kbps Stereo"]
    F --> G["Frequency"]
    G --> H["SUC1 110 222.06MHz"]
    H --> I["Date"]
    I --> J["SUC1 25-07-2008"]
    J --> K["Ensemble"]
    K --> L["Dynamic PTY"]
Station order
This function enables you to choose how the stations are arranged when selecting a station.
There are 4 modes available: Alphanumeric, Favourite stations, Active stations and Trim stations.
- Alphanumeric(default):
To select a stored service in
- Fav station: After a period of time the most listened to stations will move to the top of the station list and will be marked with the heart symbol.
Your ten favourite stations will be delivered.
• Active station: The display will show only those that a signal can be found for
The unit will delete stations that are
not currently being received. 1 Follow steps 1 and 2 in "Operating the radio" and select DAB.
2 Turn TUNING/SELECT to select "Station
order," and then press ENTER.
3 Turn TUNING/SELECT to select the desired mode, and then press ENTER.
Note
If you do not operate within 4 seconds during the above steps, the current mode will be cancelled.
Manual tune
This function allows you to tune and add the various DAB Band-III channels to your station list. UK DAB stations located in the range 11B to 12D. This function can be used to assist the positioning of the antenna or the unit to obtain the optimum reception for a specific channel / frequency.
1 Follow steps 1 and 2 in "Operating the radio" and select DAP
2 Turn TUNING/SELECT to select "Manual
tune," and then press ENTER.
3 Turn TUNING/SELECT to select the desired DAB channel, and then press ENTER. The signal strength bars will go up and down, showing the changing signal strength as you adjust the reception.
4 Press ENTER. A new DAB channel is added to the station list.
DRC value (DYNAMIC RANGE CONTROL)
DRC can make quieter sounds easier to hear when the unit is used in a noisy environment. When DAB broadcasts in dynamic range compression, you can adjust the dynamic range by this unit.
1 Follow steps 1 and 2 in "Operating the radio"
and select DAB.
2 Turn TUNING/SELECT to select "DRC value" and then press ENTER
3 Turn TUNING/SELECT to select the DRC level
The DRC level changes as follows:

4 Press ENTER.
Notes
- DRC is effective only in dynamic range compressed broadcasts.
- With the adjusted DRC level, sound can be heard more consistently.
Autoscan UK / Autoscan full
These functions allow you to automatically scan and
If you use this unit in the UK, "Autoscan UK" is
recommended. 1 Follow steps 1 and 2 in "Operating the radio"
and select DAB.
2 Press MENU and turn TUNING/SELECT to
select Autoscan UK or Autoscan full, and then press ENTER
"Scanning" appears in the display, scanning is
performed, and a list of receivable DAB broadcasts i created.
Autoscan takes about 30 - 90 seconds. When finished, the unit receives stored services in alphabetical order (see "Station order").
PTY (Programme type)
This function indicates services by programme type, such as NEWS, SPORTS, etc., in the PTY list, transmitted as DAB.
If the received service or station does not transmit the programme type, "NO PTY Data" appears.
| Programme type Display | |
| Undefined None | |
| News News | |
| Current Affairs Current Affairs | |
| Information Information | |
| Sport | Sport |
| Education | Education |
| Drama Drama | |
| Culture | Cultures |
| Science | Science |
| Varied | Varied Speech |
| Pop Music Pop Music | |
| Rock Music | Rock Music |
| Easy Listening Music | Easy Listening |
| Light Classical | Light Classics M |
| Serious Classical | Serious Classics |
| Other Music | Other Music |
| Weather Weather & Metr | |
| Finance | Finance |
| Children's programmes | Children's Progs |
| Social Affairs | Social Affairs |
| Religion Religion | |
| Phone In | Phone In |
| Travel | Travel & Touring |
| Leisure | Leisure & Hobby |
| Jazz Music Jazz Music | |
| Country Music Country Music | |
| National Music | National Music |
| Oldies Music | Oldies Music |
| Folk Music | Folk Music |
| Documentary | Documentary |
Setting the sleep timer
You can enjoy falling asleep to the radio using the built-in sleep timer that turns off the radio automatically after a preset duration.
1 Press SLEEP while the unit is turned on. "Sleep" appears in the display.

2 Press SLEEP to set the sleep timer duration. Each time you press SLEEP, the duration changes as follows:

The unit automatically turns off when the duration time is passed.
Press ENTER, or 4 seconds after you have finished the duration setting and released SLEEP. "SLEEP" will
appear in the display and then the sleep timer starts. The
To change the sleep timer setting
Repeat step 2 to select the desired sleep timer setting was after the sleep timer has been estimated.
even after the
To deactivate the sleep timer
- Press POWER. The unit will turn off.
- Press SLEEP to set the sleep timer "Off," only the sleep timer will be cancelled (the radio stays ON).
Note
The sleep timer and the cooking timer cannot be set at the same time.
Operating the cooking timer (countdown timer)
The timer can be set at one minute intervals between 1–120.
1 Press POWER to turn on the radio.
2 Hold down TIMER for more than 2 seconds. "000minutes" appears and "TIMER" indicator flashe in the display.
3 Turn TUNING/SELECT until the desired time appears in the display.
Press ENTER, or 4 seconds after you release
TONING/SELECT, "TIMLER will appear in the display and countdown starts.
To display the current preset time, press TIMER. The time is displayed for 4 seconds, and then the display returns to radio mode.
Cooking timer ON
When the time has elapsed, radio enters into mute; the buzzer sounds and the "TIMER" indicator flashes.
Cooking timer OFF
The buzzer is turned off automatically after 60 minutes, or if POWER is pressed. In this case, when the AC adaptor is used, the display shows current time and station band; when batteries are used, the unit shuts off.
To stop the cooking timer
ss POWER to turn off the buzzer
To deactivate the cooking timer
Hold down TIMER for more than 2 seconds. The "TIMER" indicator goes off and the current time appears in the display.
Notes
- If a power interruption occurs while the cooking timer is operating, the remaining time becomes invalid. - The cooking timer and the sleep timer cannot be set at the same time.
Other useful functions
To use the backlight
Press LIGHT
The backlight lights and remains for 5 seconds and automatically turns off if no operation is performed for 5 seconds.
To display the software version
When using DAB mode, turn TUNING/SELECT to select "Sw version." When using FM mode, press MENU. The current software version of the unit appears in the display.
To reset the unit
If the radio fails to function properly, do the following:
1 Press and hold MENU and ENTER at the same
time for a few seconds.
"Press ENTER to confirm reset" appears in the
2 Press ENTER
The clock settings, the services and stations you have preset, etc., will revert to the factory preset.
Precautions
- Operate the unit only on the power sources specified in "Specifications". For battery operation, use six LR6 (size AA) alkaline batteries. For AC operation, use only the supplied AC power adaptor. Do not use any other type of AC power adaptor.
- The unit is not disconnected from the AC power source (mains) as long as it is connected to the wall outlet, even if the unit itself has been turned off.
- Use the unit within a temperature range of 0^ to 40^ (32^ to 104^) . If it is used in temperatures higher than this range, numbers may appear in the display which have nothing to do with the frequency being received. If it is used in temperatures lower than this range, the numbers displayed may change very slowly. (These irregularities will disappear and there will be no damage to the unit when the unit is used in the recommended temperature range.)
- Do not carry the unit by its aerial or battery compartment, as it may be dropped. Carry by the finger grip (see fig. A - ③ on the front page) on the back of the unit.
- Avoid exposure to temperature extremes, direct sunlight, moisture, sand, dust or mechanical shock. Never leave in a car parked in the sun.
- Should any solid object or liquid fall into the unit, disconnect the AC power adaptor and remove the batteries, and have the unit checked by a qualified personnel before operating it any further.
- In vehicles or buildings, radio reception may be
- Since a strong magnet is used for the speakers, keep away personal credit cards using magnetic coding or spring-wound watches from the unit to prevent possible damage from the magnet.
- To clean the casing, use a soft cloth dampened with a mild detergent solution.

Disposal of Old Electrical & Electronic Equipment (Applicable in the European Union and other European countries with separate collection systems)
This symbol on the product or on its
Packaging indicates that this product shall not be treated as household waste. Instead it shall be handed over to the applicable collection point for the recycling of electrical and electronic equipment. By ensuring this product is disposed of correctly, you will help prevent potential negative consequences for the environment and human health, which could otherwise be caused by inappropriate waste handling of this product. The recycling of materials will help to conserve natural resources. For more detailed information about recycling of this product, please contact your local Civic Office, your household waste disposal service or the shop where you purchased the product.

Disposal of waste batteries (applicable in the European Union and other European countries with separate collection systems)
This symbol on the battery or on the
packaging indicates that the battery provided with this product shall not be treated as household waste. By ensuring these batteries are disposed of correctly, you will help prevent potentially negative consequences for the environment and human health which could otherwise be caused by inappropriate waste handling of the battery. The recycling of the materials will help to conserve natural resources.
In case of products that for safety, performance or data integrity reasons require a permanent connection with an incorporated battery, this battery should be replaced by qualified service staff only. To ensure that the battery will be treated properly, hand over the product at end-of-life to the applicable collection point for the recycling of electrical and electronic equipment.
For all other batteries, please view the section on how to remove the battery from the product safely. Hand the battery over to the applicable collection point for the recycling of waste batteries.
For more detailed information about recycling of this product or battery, please contact your local Civic Office, your household waste disposal service or the shop where you purchased the product.
If you have any questions or problems concerning your unit, please consult your nearest Sony dealer.
Troubleshooting
Should any problem persist after you have made the following checks, consult your nearest Sony dealer.
Display is dim, or no indication is displayed.
- The unit is being used in extremely high or low temperatures or in a place with excessive moisture
(1) 2017年1月1日
very weak of interrupted sound, or unsatisfactory reception.
- If you are in a building, listen near a window.
A station or service cannot be received when a
PRESET recalls. • The station or service has not been preset
- Another station or service is preset. Preset the station or service again.
The preset services and stations may be initialized, if a maintenance service is performed.
Please note down of your settings in case you want to preset them again.
Specifications
Time display
24-hour system
Frequency range
| Band | Frequency | Channel step |
| DAB (Band-III) | 174.928 - 239.200 MHz | |
| FM | 87.5 - 108 MHz | 0.05 MHz |
DAB (Band-III) frequency table
| No. | Channel | Frequency | No. | Channel | Frequency |
| 1 | 5A | 174.928 | 20 | 9D | 208.064 |
| 2 | 5B | 176.640 | 21 | 10A | 209.936 |
| 3 | 5C | 178.352 | 22 | 10B | 211.648 |
| 4 | 5D | 180.064 | 23 | 10C | 213.360 |
| 5 | 6A | 181.936 | 24 | 10D | 215.072 |
| 6 | 6B | 183.648 | 25 | 11A | 216.928 |
| 7 | 6C | 185.360 | 26 | 11B | 218.640 |
| 8 | 6D | 187.072 | 27 | 11C | 220.352 |
| 9 | 7A | 188.928 | 28 | 11D | 222.064 |
| 10 | 7B | 190.640 | 29 | 12A | 223.936 |
| 11 | 7C | 192.352 | 30 | 12B 225.648 | |
| 12 | 7D | 194.064 | 31 | 12C | 227.360 |
| 13 | 8A | 195.936 | 32 | 12D | 229.072 |
| 14 | 8B | 197.648 | 33 | 13A | 230.784 |
| 15 | 8C | 199.360 | 34 | 13B 232.496 | |
| 16 | 8D | 201.072 | 35 | 13C | 234.208 |
| 17 | 9A | 202.928 | 36 | 13D | 235.776 |
| 18 | 9B | 204.640 | 37 | 13E | 237.488 |
| 19 | 9C | 206.352 | 38 | 13F | 239.200 |
Speaker:
Approx. 7.7 cm (3½ in) dia. 4 Ω
Power output:
1 W (at 10 % harmonic distortion)
Output:
4.1 (headphones) jack (ø 3.5mm stereo mm jack)
0 V DC, six LR14 (c
[Unreadable]
DC IN 9 V
Dimensions:
Approx. 160.6 × 158.3 × 102.5 mm (w/h/d)
(Applor. 0/8 × 0/4 × 4/8 m) incl. projecting parts and controls
Mass:
Approx. 1.1 kg (2 lb 7 oz) incl. batteries
Supplied accessories:
AC power adaptor (1)
Design and specifications are subject to change without notice.
- WARNING
- Features
- Choosing power sources Installing batteries (See fig. A -①)
- Knowing when to replace the batteries
- Notes on batteries
- Using house current
- (See fig. A-②)
- Notes on the AC power adaptor
- Improving the reception (See fig. B)
- DAB Band-III/FM:
- Note
- Initial setting for the unit
- Plug in the unit
- Press POWER to turn on the radio.
- Notes
- Set the clock
- Time adjustment- Summer time
- Operating the radio
- Note in FM usage
- Notes in DAB usage
- About SC
- (Secondary Component)
- About the RDS
- (Radio Data System)
- To listen with headphones
- [Non-Text]
- Presetting your favourite services or stations
- Presetting services or stations
- Tuning in to a preset service or station
- Scan tuning (for FM)
- Other useful functions for DAB
- Changing the display
- Station order
- Manual tune
- DRC value (DYNAMIC RANGE CONTROL)
- Press ENTER.
- Autoscan UK / Autoscan full
- PTY (Programme type)
- Setting the sleep timer
- Operating the cooking timer (countdown timer)
- Cooking timer ON
- Cooking timer OFF
- To stop the cooking timer
- ss POWER to turn off the buzzer
- To deactivate the cooking timer
- Other useful functions
- To use the backlight
- To display the software version
- To reset the unit
- Precautions
- Troubleshooting
- Specifications
Brand : SONY
Model : XDR-S7
Category : Radio