Freesat+ SHDFSAT12 - Receiver Sandstrøm - Free user manual and instructions
Find the device manual for free Freesat+ SHDFSAT12 Sandstrøm in PDF.


| Brand | Sandstrøm |
| Model | Freesat+ SHDFSAT12 |
| Product Type | Satellite Receiver with 500GB Hard Disk Drive |
| Dimensions (W x D x H) | 281 x 240 x 56 mm |
| Power Supply | 100-240V AC, 50Hz, Max 13W (standby <0.5W) |
| Tuner | DVB-S/S2, Frequency 950~2150 MHz |
| LNB Supply | 14.0V/19.0V, max 350mA, short-circuit protected |
| Hard Disk Capacity | 500 GB |
| Video Outputs | HDMI (up to 1080p), SCART (TV/VCR), Composite/RGB |
| Audio Outputs | Optical S/PDIF (Dolby Digital & PCM), SCART stereo |
| USB Port | USB 2.0 (5V@1A max) for software upgrade |
| Ethernet | RJ-45 10/100 Base-T with Link/Data LEDs |
| Simultaneous Recording | Up to 2 channels |
| Live TV Pause | Up to 120 minutes (background recording) |
| Programme Guide | 7-day EPG with genre filtering and series link |
| On Demand TV | BBC iPlayer, ITV Player (requires internet) |
| Parental Control | PIN-protected guidance lock, adult channel hide |
| Non-Freesat Channels | Manual tuning for additional free satellite channels |
| Aspect Ratios | 4:3, 16:9, Letterbox; selectable in settings |
| Remote Control Range | Up to 5m, within 60° angle |
| Safety Features | Auto standby after 3 hours, power save in standby |
| Package Contents | Unit, remote control, batteries, HDMI cable, quick start guide, manual |
Frequently Asked Questions - Freesat+ SHDFSAT12 Sandstrøm
User questions about Freesat+ SHDFSAT12 Sandstrøm
0 question about this device. Answer the ones you know or ask your own.
Ask a new question about this device
Download the instructions for your Receiver in PDF format for free! Find your manual Freesat+ SHDFSAT12 - Sandstrøm and take your electronic device back in hand. On this page are published all the documents necessary for the use of your device. Freesat+ SHDFSAT12 by Sandstrøm.
USER MANUAL Freesat+ SHDFSAT12 Sandstrøm
Welcome to your new freesat+500GB satellite recorder.
How to set up and use your SHDFSAT12
natural_image
Exterior view of a modern audio device with no visible text or symbols on the bodyFor help with set-up or for more information about freesat please visit www.freesat.co.uk or call 0845 313 0051. For specific queries about this box and handy hints and tips please visit www.knowhow.com/knowledgebank or call 0844 5611234.
Contents
Safety Warnings....2
Unpacking 3
Product Overview....4
Front View 4
Rear View 4
Remote Control....5
Installing Batteries in the Remote Control....6
Remote Control Operation Range 6
Connecting the Receiver to a Satellite Dish ....7
System and Mains Connections....8
Basic Operation 9
Plug In and Switch On....9
Turning the Unit On and Off....9
Changing the Channel....9
Changing the Volume 9
Widescreen and Standard Viewing Formats 9
TV/DTV....9
First Time Installation....10
Using the Programme Guide ....12
Choosing a Channel....13
Setting a Reminder 13
Cancelling a Reminder....13
Interactive TV Services....13
Recording Freesat Programmes 14
Programming a Recording 14
Series Link 14
Instant Recording 15
Stopping a Recording 15
Using the Library....15
Watching a Recording....15
Previewing a Recording....16
Protecting a Recording 16
Deleting a Recording....16
Exiting the Library 16
Recording Clashes 16
The Browsing Bar......17
Subtitles, Audio Description, Pausing Live TV .....18
Turning Subtitles On and Off....18
The Audio Channel....18
Pausing Live TV....18
The Channel List ....19
Selecting a Channel from the Channel List....19
Regional Channels....19
Manual Channels 19
The Favourites List....19
Non-Freesat Channels 20
Tuning in Non-Freesat Channels 20
Watching Non-Freesat Channels....21
The Channel List....21
Setting Up Your Freesat+ Unit 22
Accessing the Main Menu 22
HDMI Output 22
Digital Audio 22
Screen Size 23
SCART Output 23
Menu Transparency Settings 23
Audio Language 24
Subtitle Language 24
Audio Description....24
The Parental Menu 25
Accessing the Parental Menu 25
The Guidance Lock 25
Changing the Parental PIN 25
Allowing Parental Settings Changes.... 26
Hide Adult Channels....26
Allow First Time Installation....26
Allow Hard Disk Drive Format 26
The Freesat+ Setting 27
Entering the Freesat+ Menu 27
Default Recording Mode....27
Add to Start of Recording 27
Add to End of Recording 27
Live Pause Length....27
Skip Forwards Time 27
Skip Backwards Time 28
Auto Disk Management 28
Show Available Space As 28
Format Hard Disk Drive....28
Network Settings......29
DHCP 29
Manual Settings 29
Revert to Default Settings 29
Checking the Internet Connection....29
On Demand TV 30
Setting Up for On Demand TV 30
Watching On Demand TV 31
Other Settings....31
Showing Non freesat Channels 31
Adding Non freesat Channels 31
Auto Standby 31
Power Save in Standby Mode....31
Upgrade Software 31
First Time Installation 31
System Information 32
Troubleshooting....33
Specifications....34

Safety Warnings
Read all the instructions carefully before using the unit and keep them for future reference.
Retain the manual. If you pass the unit onto a third party make sure to include this manual.
Check that the voltage marked on the rating label matches your adapter voltage.
Damage
- Please inspect the unit for damage after unpacking.
- Do not continue to operate the unit if you are in any doubt about it working normally, or if it is damaged in any way - switch off, withdraw the mains adapter and consult your dealer.
Location of Unit
- The unit must be placed on a flat stable surface and should not be subjected to vibrations.
- Do not place the unit on sloped or unstable surfaces as the unit may fall off or tip over.
- The mains socket must be located near the unit and should be easily accessible.
• This unit is designed for indoor use only.
Temperature
- Avoid extreme degrees of temperature, either hot or cold. Place the unit well away from heat sources such as radiators or gas/electric fires.
- Avoid exposure to direct sunlight and other sources of heat.
Naked Flames
- Never place any type of candle or naked flame on the top of or near the unit.
Moisture
• To reduce the risk of fire, electric shock or product damage, do not expose this unit to rain, moisture, dripping or splashing. No objects filled with liquids, such as vases, should be placed on the unit.
- If you spill any liquid into the unit, it can cause serious damage. Switch it off at the mains immediately. Withdraw the mains adapter and consult your dealer.
Ventilation
- To prevent the risk of electric shock or fire hazard due to overheating, ensure that curtains and other materials do not obstruct the ventilation vents.
- Do not install or place this unit in a bookcase, built-in cabinet or in another confined space. Ensure the unit is well ventilated.
Safety
• Always disconnect the unit from the mains supply before
connecting/disconnecting other devices or moving the unit.
- Unplug the unit from the mains during a lightning storm.
Mains Adapter Cable
- Make sure the unit or unit stand is not resting on top of the mains cable, as the weight of the unit may damage the mains cable and create a safety hazard.
- If the mains cable is damaged it must be replaced by the manufacturer, its service agent, or similarly qualified persons in order to avoid a hazard.
Interference
- Do not place the unit on or near appliances which may cause electromagnetic interference. If you do, it may adversely affect the operating performance of the unit, and cause a distorted picture or sound.
Standby
- The Button on the remote control does not switch off the unit completely. The unit will continue to draw electricity from the mains supply while in standby. In the interests of safety and to avoid unnecessary energy consumption, never leave the unit in standby while unattended for long periods of time, e.g. overnight, while on holiday or while out of the house. Switch it off and disconnect the mains adapter from the mains socket.
- The means of disconnecting this unit from the mains is via the mains adaptor which must be unobstructed and capable of being disconnected from the mains supply at all times.
Batteries
- Batteries used in the remote control for this unit are easily swallowed by young children and this is dangerous.
- Keep loose batteries away from young children and make sure that the battery holder tray is secure in the remote control. Seek medical advice if you believe a cell has been swallowed.
- Please dispose of batteries correctly by following the guidance in this manual.
Supervision
• Children should be supervised to ensure that they do not play with the unit and the remote control.
- Never let anyone especially children push anything into the holes, slots or any other openings in the case - this could result in a fatal electric shock.


The lightning flash with arrowhead symbol, within an equilateral triangle, is intended to alert the user to the presence of uninsulated "dangerous voltage" within the unit's enclosure that may be of sufficient magnitude to constitute a risk of electric shock.

The exclamation point within an equilateral triangle is intended to alert the user to the presence of important operating and maintenance (servicing) instructions in the manual accompanying the unit.
Service
• To reduce the risk of electric shock, do not remove screws. The unit does not contain any user-serviceable parts. Please leave all maintenance work to qualified personnel.
- Do not open any fixed covers as this may expose dangerous voltages.
Maintenance
- Ensure to unplug the unit from the mains socket before cleaning.
- Do not use any type of abrasive pad or abrasive cleaning solutions as these may damage the unit's surface.
- Do not use liquids to clean the unit.
Unpacking

Thank you for purchasing your new
Sandstrøm freesat+ Satellite Recorder.
We recommend that you spend some time reading this instruction manual in order that you fully understand all the operational features it offers. You will also find some hints and tips to help you resolve any issues.
Read all the safety instructions carefully before use and keep this instruction manual for future reference.
Remove all packaging from the unit.
Retain the packaging. If you dispose of it please do so according to local regulations.
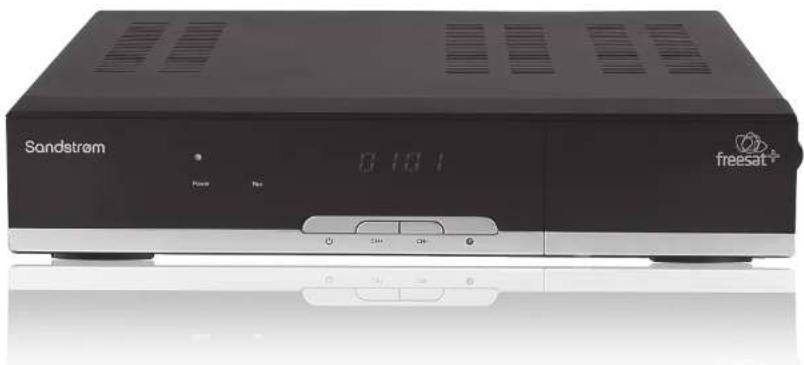
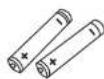
In addition to this manual the items shown on the right are included:

The Unit
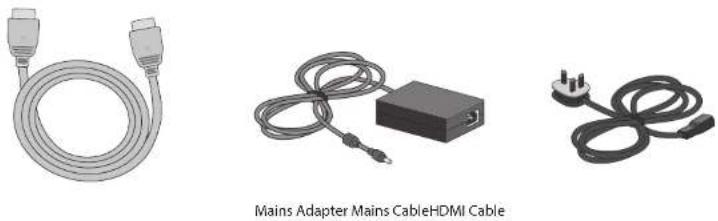
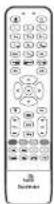
Remote Control Batteries
Quick Start Guide

Product Overview
Front View

Rear View

1. Power Indicator
• Lights up green when the unit is on.
- Lights up red when the unit is in Standby mode.
2. Recording Indicator
Indicates when live TV is recording.
3. LED Display
Displays the current channel number.
4. ⏻ Button
Switches the unit on and off.
5. CH+ Button
Selects the next channels.
6. CH-Button
Selects the previous channels.
7. Ⓞ Button
Records live TV.
8. TUNER 2 Socket
Connects to the satellite dish.
9. TUNER 1 (LNB in) Socket
Connects to the satellite dish.
10. S/PDIF Socket
Connects to a digital audio system.
11. Ethernet Socket
Connects to the Internet.
12. USB Socket
Connection port to upgrade.
13. HDMI Socket
Connects to a HD-ready TV.
14. TV SCART Socket
Connects to a non-HD TV.
15. VCR SCART Socket
Output/input connection to a video recorder or DVD recorder.
16. Power Socket
Connects the mains adapter.
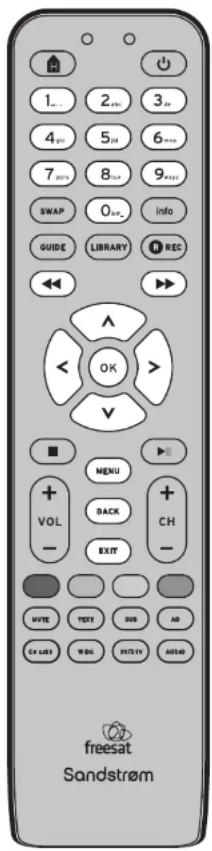
Remote Control
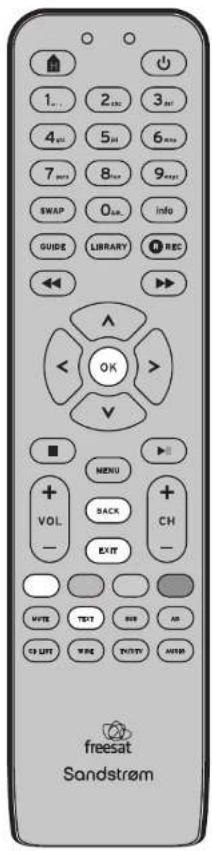
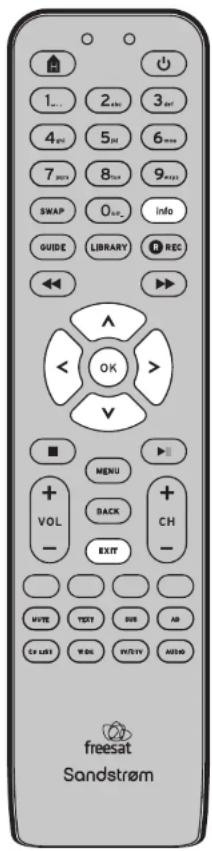
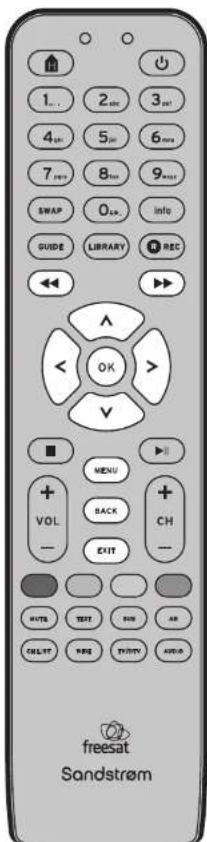
- HOME Button Exits all menus and returns to live TV.
- STANDBY Button Switches the unit on and off.
- 0-9 Number Button Directly select channels, enter numeric values in the set-up menus and enter your postcode.
- SWAP Button Switches back to the last channel watched.
- INFO Button Displays channel and programme information.
- GUIDE Button Displays the programme guide.
- LIBRARY Button Displays the library menu where your programmes are recorded.
- REC Button Records programme and scheduled recordings.
- Button • Skips backwards to the beginning of the track or to the previous channel. • Allows fast reversing of the recorded programmes.
- Button • Skips forwards to the next channel. • Allows fast forwarding of the recorded programmes.
- <Button Navigates menus and programme guides. OK Button Confirms the selection on a menu screen.
- Button Stops playback.
- ▶Button Plays/pauses/resumes playback.

- MENU Button Displays the main menu.
- BACK Button Returns to the previous menu.
- VOL+/VOL- Button Adjusts the volume up and down.
- CH+/CH- Button • Switches to the next or previous channel. • Moves one page up or down in the channel list.
- EXIT Button Exits a menu and returns to normal TV viewing.
- COLOUR Buttons (Red/Green/Yellow/Blue) Chooses options within menus.
- MUTE Button Silences the unit's sound.
- TEXT Button Displays interactive and digital text services (where available).
- AD Button Switches audio description on or off.
- SUB Button Displays the subtitles menu to select a subtitle language.
- CH LIST Button Displays the channel list.
- WIDE Button Switches between available screen display modes.
- AUDIO Button Displays the available audio menu to choose between normal sound and Audio Description.
- TV/DTV Button Switches the TV SCART output between freesat and the TV's tuner.

Remote Control
Installing Batteries in the Remote Control
- Squeeze the cover lever and lift the battery cover to access the battery compartment of the remote control.
- Insert two AAA size batteries (included). Ensure the polarities (+ and -) of the batteries match the (+) and (-) ends indicated in the battery compartment.
- Close the battery compartment cover.


Remote Control Operation Range
The remote control can be used at a maximum of 5 metres from the unit's remote control sensor, and within 60^ in front of the unit.
The operating distance may vary depending on the brightness of the room.

Handling the Batteries
- Improper or incorrect use of batteries may cause corrosion or battery leakage, which could cause fire, personal injury or damage property.
- Only use the battery type indicated in this manual.
- When the batteries are exhausted, the remote will not function. Replace both batteries at the same time with new ones.
- Do not install new batteries with used ones and do not mix different types of batteries.
- Do not dispose of used batteries as domestic waste. Dispose of them in accordance with local regulations.
Handling the Remote Control
- Do not drop or impact the remote control.
- Do not spill water or any liquid on the remote control.
- Do not place the remote control on a wet object.
- Do not place the remote control under direct sunlight or near sources of excessive heat.
- Remove the batteries from the remote control when not in use for a long period of time, as the batteries may leak causing corrosion that may result in physical injury and/or property damage, including fire.
Connecting the Receiver to a Satellite Dish
Satellite Dish Installation
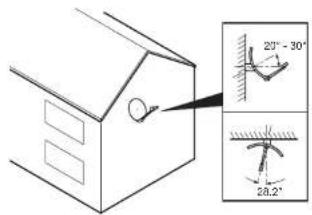
To receive freesat, you must connect your unit to an appropriate satellite dish.
For safety reasons and to provide reliable reception, we strongly recommend that you have your dish installed by a professional. You may be able to use a satellite dish already installed at your home. If you have any questions about the satellite dish, please consult your installer.
This freesat box requires a dual LNB to enable you to view and record channels at the same time.
Connecting the Satellite Dish to the Unit
Place the unit on a firm, level surface close to the TV, a mains electricity socket, and the cables from the dish.
Connect the cables from your satellite dish to the sockets on the back of the unit. For full functionality of your freesat+ recorder you will need to connect two cables from your satellite dish. If you only have one cable, please consult your retailer or installer for advice.
Connecting the two cables
- This allows you to watch one TV station and record another. Connect the two separate cables from your satellite dish to each of the TUNER 1 (LNB IN) and TUNER 2 sockets. For this, your Satellite Dish must be fitted with a Low Noise Block (LNB) that has at least two outputs. Please check with your installer if you are not certain about this.

The "F-connector" used for the satellite dish cable connection has a central wire that is inserted into the hole in the TUNER 1 or TUNER 2 (LNB IN) sockets while the collar is screwed onto the socket. When screwing on the collar, make sure that the central wire goes into the socket hole and is not bent to one side.


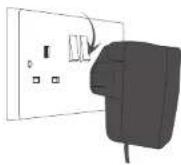
DO NOT connect this unit to the mains supply until all connections have been completed.

System and Mains Connections
Ensure your TV is switched off at the mains supply.
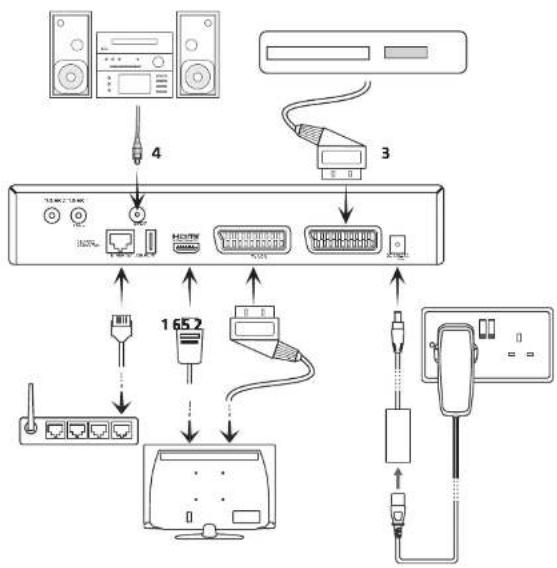
- Connect the HDMI cable supplied to the HDMI socket at the back of the unit and an HDMI socket on your TV. There may be more than one HDMI socket on your TV. If you are not sure which one to use, check the TV's instruction manual.
- If your TV set does not have an HDMI connection you can connect the SCART connection on the TV to the TV SCART socket on the unit.
- A video recorder or DVD recorder may be connected to the unit to record freesat programmes, back up recordings or play them back. You will need to use a SCART cable to connect the video or DVD recorder to the VCR SCART socket on the back of the freesat box, connect the other end to the video or DVD recorder. Check the recorder's instruction manual for guidance.
You can also connect the unit to an analogue stereo or surround sound system, so that you can listen to the TV sound through the sound system instead of (or as well as) the TV's speakers. You will need a special lead to connect the unit's TV SCART or VCR SCART socket(s) to the analogue inputs on your sound system to listen in stereo.
When using SCART connections, high definition channels will only be available in Standard Definition. - If you connect an optical lead between the S/PDIF socket on your unit and digital sound system, you can listen to the TV sound in digital audio quality, or even in surround sound, depending on the sound system used and the broadcast chosen.
- If you want to use the online features of the unit, connect a network cable from the Ethernet network socket on the back of the unit to either your broadband modem/router or a network switch in your home network, as appropriate. Consult your modem/router's instruction manual for guidance.
- Connect the mains cable to the mains adapter and then connect to the POWER socket at the back of the unit. Plug the mains cable into an available mains socket that is turned off.


If you require additional assistance please call our UK Call Centre on 0844 561 1234. Our UK Customer Contact Centre is open Monday Saturday 8am-8pm and Sunday 8am-6pm.
flowchart
graph TD
    A["Port 4"] --> B["Switch"]
    C["Port 3"] --> D["Switch"]
    B --> E["Internal Control Unit"]
    D --> E
    E --> F["Server 1"]
    E --> G["Server 2"]
    E --> H["Server 3"]
    E --> I["Server 4"]
    E --> J["External Connection"]
    K["Port 1"] --> L["Router"]
    M["Port 2"] --> N["Router"]
    O["Port 3"] --> P["Router"]
    Q["Port 4"] --> R["Router"]
    S["Port 5"] --> T["Router"]
    U["Port 6"] --> V["Router"]
    W["Port 7"] --> X["Router"]
    Y["Port 8"] --> Z["Router"]

Plug In and Switch On
- Switch your TV on and select the HDMI or SCART input.
- Switch the power on at the mains. The green power indicator and the LED display on the unit will illuminate. The first freesat installation screen will show on the television screen after a few seconds.
Turning the Unit On and Off
- Press the button on the unit or the remote control to turn the unit on or off.
Eco Standby
When the unit is operational the power light illuminates green. When you press the button to switch the unit off, the light remains green for 15 minutes after which time the unit enters power saving mode and the power light changes to red.

- Leave the unit plugged in with the socket switched on. When you are not using the unit, put it in standby by pressing the abduction on the unit or the remote control. - The unit will automatically switch to standby if it is not used for a period of time. This feature can be disabled - see the Advanced Use section of this guide.
Changing the Channel
- Press the CH+ / CH- buttons on the unit or on the remote control to step through the channels.
- Press the CH+ to select the next channel in the channel list. Press the CH- to select the previous channel in the list.
- If you know the channel's number, you can switch directly to the channel using the 0-9 buttons on the remote control. As you enter a channel number, each digit appears at the top left of the screen to show the number button you have pressed.

- Freesat channels have three digits. TV channels are stored from channel 101. Radio stations are stored from 700 to 799.
- There are some channel numbers missing in the channel list because spaces are left for future freesat channels.
- If you enter a number that does not exist, the channel will not change.
- Press the SWAP button to switch from the channel you are watching to the channel you were watching previously.
Other ways to change channel:
- Use the browsing bar at the bottom of the screen.
- Use the on-screen channel list.
- Use the programme guide.
Changing the Volume
- Use the VOL+ / VOL- buttons on the remote control to increase or decrease the volume level.
- Press the MUTE button to silence the sound. Press the MUTE button again to restore the sound.
Widescreen and Standard Viewing Formats
Programmes can be viewed in a number of alternative formats.
- Press the WIDE button repeatedly to toggle the available aspect ratios.
TV/DTV
If your TV is connected to the unit's TV SCART socket and your TV is connected to a regular TV aerial:
- Press the TV/DTV button to switch the display on the TV between the signal from the aerial (TV) and digital TV from freesat (DTV).
This button has no effect if your TV is connected to the unit's HDMI socket.

First Time Installation

- On the first installation the freesat installation screen will be displayed.
The signal check bar shows the strength and quality of the freesat signal received from your satellite dish. If the signal strength or quality is below 50%, you should check the satellite dish connection at the back of the unit (switch the unit off and reconnect the cable if necessary). If you are having trouble with the satellite dish, consult your dealer or installer.
When the signal strength and signal quality are 50% or more, continue tuning the unit. Press the OK button to continue.
- The receiver will automatically search for the Network ID and Transport ID, this may take a few seconds. Once these have been found, the ID boxes will be populated. Once the boxes have been populated, press the OK button to proceed.

If the signal strength is too low for reliable reception the scan will not proceed. You can only use the unit after the first time installation has successfully completed.
The Network ID refers to freesat reception. It is not an indicator of internet connectivity!
- Enter your postcode by using the number buttons on the remote control. You do not need to enter a space. Once you have entered your postcode, press the OK button to continue next step.
Press the <> buttons to select the screen format of your TV (16:9 Widescreen or the squarer 4:3 Traditional). Press the OK button to display next step.

Enter your postcode using the 0-9 buttons on the remote control. Press each number repeatedly to produce the relevant letter (printed above each button, or number, in the same way as 'texting' with a mobile phone. For example, for an 'S', press the 7 button four times. Press the >button to move to the next space. If you make a mistake, the <button deletes the last character entered.


- The unit will take a couple of minutes to find and store the available freesat channels. The number of freesat TV and radio channels found is shown on the screen as the scan proceeds, along with an indication of how far the scan has to go.
To use the unit's parental guidance function, hide adult channels, lock online content or lock channels of your choosing, you need to create a PIN.
-
Enter your choice of PIN by pressing the 0-9 buttons on the remote control for each of the four PIN digits.
-
Re-enter the PIN.

The default PIN is 0000. If you do not enter a new PIN this default number should be entered when the system requires one.
If you change the PIN, it is essential that you record and safely store the new PIN number. If you forget the PIN you will not be able to set parental guidance levels or carry out advanced setting procedures.
Contact the Knowhow helpline on 0844 5611234 for help.
- Press OK to view a programme.

When new freesat channels are introduced, you do not need to return the unit because it will be automatically updated.


Using the Programme Guide

The unit programme guide displays details of all programmes showing on freesat channels for the next week ahead.
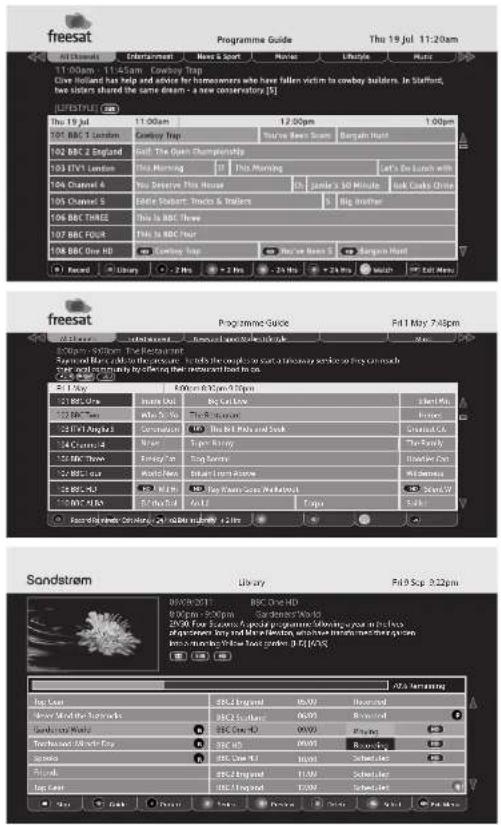
To access the guide, press the GUIDE button on the remote control. Choose the section of the guide you want to look at - either all channels or a specific channel genre - by pressing the <^buttons to highlight selection, and then press the OK button to confirm.

You can skip the genre choice stage by pressing the GUIDE button a second time, and jump straight to the programme guide for all of the channels.
The programme guide is a table of the programmes, with each page showing eight channels over a two-hour period. Information on the highlighted programme is shown above the table. A full synopsis of the highlighted programme will be shown whilst in the Programme Guide.
The current date and time is displayed in the top right of the screen and an orange line at the top of the table shows the present time in the schedule.
-
Press the▼ buttons to move through the channels and the<> buttons to highlight programmes showing at different times.
-
Use the 🔊 buttons to select different Genres as displayed at the top of the screen.

You can jump through the list more quickly using the CH+ / CH- buttons to move to the next or previous page. The GREEN / RED buttons move the highlight bar through the schedule two hours forward or back, and the BLUE / YELLOW buttons move a day forwards or backwards.

![freesat Programme Guide Thu 19 Jul 11:20am All Channels Entertainment News & Sport Movies Lifestyle Music 11:00am - 11:45am Cowboy Trap Cive Bullard has help and advice for homeowners who have fallen victim to cowboy builders. In Stafford, two sisters shared the same dream - a new conservatory [5] [LIFESTIVAL] (SB) Thu 19 Jul 11:00am 12:00pm 1:00pm 101 BBC 1 London Cowboy Trap You've Been Scam Bargain Hunt 102 BBC 2 England Back The Open Championship 103 STVT London This Morning IT This Morning Let's Do Lunch with 104 Channel 4 You Feel From This House Ch Jamie's 3D Minutes Get Checks China 105 Channel 5 Eddie Stuart Trucks & Stallers S Big Brother 106 BBC THREE This is BBC Three 107 BBC FOUR This is BBC Four 108 BBC One HD Cowboy Trap You've Been 5 Bargain Hunt Record Library 2-2 Ms +2 Ms 24 Ms +24 Ms Watch Help Edit Press](/content/2026/05/967011/images/188dd7790c33a79d29d0627bf823abf17a38d1f05947c7cf4ae7e604954604d6.jpg)
| Icon Function Icon Function | |||
| Record Records the upcoming programme you have selected. Manual Rec (blue) | Open the manual record window. | ||
| Library Opens the library menu. | Watch Watches the selected channel. | ||
| Hide (red) | Hides the selected channel. | Regions | Selects an alternative set of regional channels. |
| Add Fav (green) | Adds the selected channel to the Favourite list. | Exit Menu | Exits the menu. |
| Delete (yellow) | Delete the select channel. | Hidden Channel | Indicators the hidden channel. |
Using the Programme Guide
Choosing a Channel
As you move the highlight bar through the schedule, the programme summary shown above the list changes to reflect the programme highlighted.
Press the OK button to switch the unit to the channel and programme highlighted. If the programme is on at the time, the unit will switch to that channel immediately.
Setting a Reminder
If the programme is scheduled for later on, press the OK button to set a reminder so that when the programme is about to start, a message is displayed on-screen. After a few seconds, the unit will automatically switch to the relevant channel. In the programme guide a clock symbol (●) is shown next to a programme with a reminder set.
You can set as many reminders as you want but if you try to set a reminder on one channel for the same time as one you have already set on another channel, a warning is displayed on the screen.
Cancelling a Reminder
You can also cancel a reminder by highlighting the programme in the programme guide and pressing the OK button again.
To leave the programme guide and return to watching TV press the BACK button or the EXIT button.
Interactive TV Services
Several freesat channels broadcast a range of digital text and interactive services. e.g news, weather, sports information, etc, alongside normal TV. If interactive services are available, they will be indicated by an on-screen prompt - usually a red button in the top right-hand corner of the screen.
Pressing the TEXT button or the RED button while watching the TV channel will display a menu of the services available.
Press the TEXT button or the EXIT button to return to normal viewing.

When watching some channels (e.g BBC) the display screen will change depending on whether the unit is connected to the internet or not.
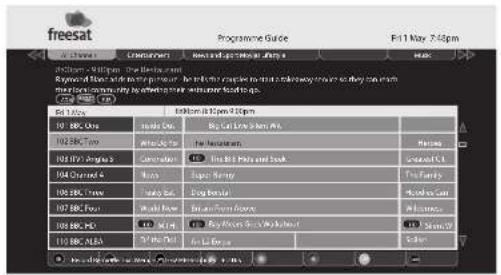

Programmes in standard definition that are also available on another channel in HD are labelled in the schedules with an HD symbol [HD]. You can see the time and channel that the HD version is broadcast by highlighting the programme and pressing the info button.
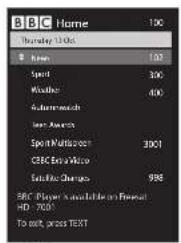

Internet not connected-no internet services available.


Internet connected -internet services available.

Recording Freesat Programmes

Two programmes can be recorded at the same time.
Programming a Recording
- Open the Programme Guide.
- Select a programme to be recorded.
- Press the ● button on the unit or the REC button on the remote.
When a recording has been set, the record ● icon is shown before the programme name.
Series Link
A series link will record all programmes in a series. If you set it to record Eastenders on a Monday and set the series link, each new episode of Eastenders will be recorded.
- Choose the programme to be recorded (from the Programme guide).
-
Press the REC button on the remote control.
-
Press the LIBRARY button on the handset.
- Press the buttons to select the scheduled programme.
- Press the GREEN button to set the series link.

This function is only available for programmes that have a series link.
Recording Freesat Programmes

Instant Recording
To record the programme you are currently watching:
- Press the ● button on the unit or the OREC button on the remote control. The programme records to its end and then exits the recording.
Stopping a Recording
- Press the LIBRARY button on the handset to open the Library.
- Press ■TOP to stop the recording.
Using the Library
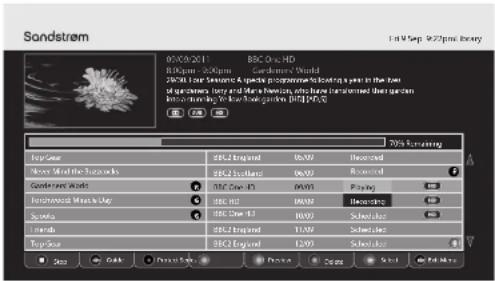
The Library displays all the programmes that have been recorded and those that are scheduled.
- Press the LIBRARY button on the remote control OR
- Select the LIBRARY option from the Programme Guide and press OK. • Programmes that are recording are marked as "Recording", • Programmes that have finished recording are marked as "Recorded", • Programmes that have been viewed are marked as "Viewed", • Programmes scheduled for recording are marked as Scheduled".
Watching a Recording
- Press the buttons to select the programme.
- Press the OK button to start playback. The status will show "Playing".

Move a page at a time through the channel list by using the CH+/CH- buttons.

You can watch a programme that is recording: you do not have to wait for it to finish recording.

| Icon | Function |
| Stop | Stops record the selected programme. |
| Guide | Opens the Programme Guide. |
| Protect(red) | Lock/unlock a recorded programme to prevent erasure. |
| Series (green) | Add/remove a series link from a scheduled recording. |
| Preview (yellow) | Previews the selected recorded programme. |
| Delete (blue) | Deletes the selected recorded programme. |
| Select | Starts recording the selected programme. |
| Exit Menu | Exits the menu. |

Recording Freesat Programmes

Previewing a Recording
- Access the Library.
- Select the recording by pressing the buttons.
- Press the YELLOW button to start the preview.
Protecting a Recording
- You can protect a recording from being accidentally deleted.
- Press the buttons to select a programme, and then press the RED button to protect the selected programme.
- To remove the protection, press the RED button again.
Deleting a Recording
Press the A buttons to select a programme, and then press the BLUE button to delete the selected programme.

cannot overwrite or delete a protected programme
Exiting the Library
- Press the LIBRARY button on the handset OR
- Press EXIT.
Recording Clashes
If you try to record more than 2 programmes at the same time, a warning screen will pop up with three options.
- Press the buttons to select an option.
- Press the OK button to confirm.

- You can change channel and watch a programme or recording at the same time when the digital TV recorder is recording one programme.
- It is not possible to record HD from the SCART socket. All recordings will be in Standard Definition.
- If you are recording a programme using the SCART connection do not use the channel list, programme guide, interactive services or any other menu while a recording is in progress as these functions will also be recorded.

The Browsing Bar
- To display the Browsing Bar Press the info button at any time OR press the OK button when you are watching TV
The browsing bar appears briefly at the bottom of the screen with information about the current channel and programme.
Browsing Bar Contents
• The name and number of the channel.
• The name of the programme you are watching.
• The start and finish time of the programme.
- The current time.
The information bar may also display symbols to indicate:
Programme is being broadcast in High Definition
Subtitles available
Digital texts available
Audio Description available
Dolby Digital audio available
Split the recorded programme into 2 files
- Parental guidance is advised as the programme contains language or scenes that may not be suitable for children
Channel is locked (see the Advanced Use section)
HD version available on another channel (press info for further details)
While the bar is displayed:
- Press the button to see details of the next programme, and the <button to go back again.
- Press the buttons to see what is on another channel.
- To move to the new channel, press OK while the bar is displayed.
- Press the Info button again to display more information about the selected programme, including a short summary.
- Press the info button once more to remove the extra information.
- To remove the bar from the screen at any time, press the EXIT button.

When the extra programme information is displayed, you can still press the <> buttons to see what is on now or next and the AButtons to see what is on other channels.


![101 BBC 1 South 13:56 Now: 13:45-14:15 Doctors Sound of Silence: A grieving woman needs Heston's help to face reality. Elsewhere, it is the day of Ruth's assessment, but will everyone be happy with the result? (S) [DRAM] Previous Next Closed Up Changed Down Select](/content/2026/05/967011/images/b5f8d6ae4ae490d4f0f71cc79d931a7cd1b12a9fe6050bae8f197252eb125527.jpg)

Subtitles, Audio Description, Pausing Live TV

Many freesat programmes are broadcast with subtitles for people who are hearing impaired. Channels with subtitles available show in the information bar.
Turning Subtitles on and off
- Press the SUB button to select 'subtitles on'.
- To turn off subtitles, press the SUB button repeatedly until they are turned off.
The Audio Channel
Some programmes have an extra sound track to tell people who are sight impaired what is happening on screen. Channels with this audio description available show in the information bar.
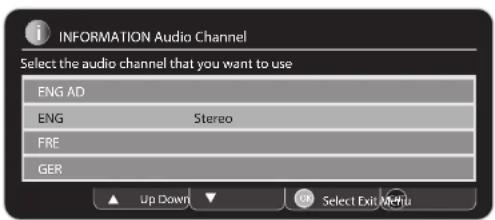
- While watching TV, press the AD button on the remote control to turn on the Audio description OR
- Select the AUDIO option from the menu and press OK.
- Press the buttons to select your desired audio channel.
- To close the menu, press EXIT on the remote control OR
- Select the 'Exit Menu' option from the display and press OK
Pausing Live TV
This function is sometimes referred to as time shifting, and is very useful if you are watching a programme and the phone rings.
- Press the button on the remote control to pause Live TV. The time counter will start, and show how long the programme has been paused. '01 secs' will be shown on the TV display.
- Press the button again to continue watching TV, and the programme will resume from where you paused.
- Use the <buttons to fast forward, and fast rewind.
- Repeatedly press the ◀-●-tons to change the speed.
- Press the ■ button to leave time shifting mode and return to Live TV.

natural_image
Nighttime black-and-white photo of the Eiffel Tower illuminated at dusk, with no visible text or symbols on the structure itself.The Channel List

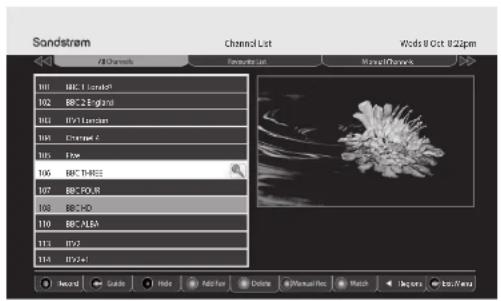
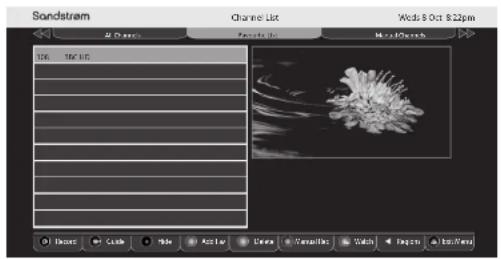
- Press the CH LIST button on the remote to display the Channel List. The Channel List displays the channels on the left-hand side of the screen, in numerical order, and displays a preview window of the currently selected channel on the right-hand side of the screen.
- Press the EXIT button to return to watching TV.
Selecting a Channel from the Channel List
TV channels are stored in lists shown on the bar at the top of the screen.
- Press the ◀◀▶ buttons to select All Channels, Favourite List or Manual Channels from the bar at the top of the screen.
- Press the buttons to view a channel in the preview window.
- Press OK button to exit and watch the selected channel full-screen.
Selecting an Option
Press the buttons to select an option. Press OK to confirm the option.
| Icon | Function | Icon | Function |
| ●Record | Record the current programme you are watching. | ◎Manual Rec (blue) | Open the manual record window. |
| ●Guide | Open the TV guide menu. | ●Watch | Watch the selected channel. |
| ●Hide/Show (red) | Hide (or show) the selected channel. | ◀Regions | Select an alternative set of regional channels. |
| ◎Add Fav (green) | Add the selected channel to the Favourites list. | ●Exit Menu | Exit the menu. |
| ◎Delete (yellow) | Delete the selected channel. | ◎Hidden Channel | Indicates a hidden channel. |
Regional Channels
Some channels, such as BBC1, broadcast regional variations of their programmes. The initial regional variations are based on the postcode that you entered when you installed the unit.
To replace the regional variation of a channel in the channel list
-
Highlight a channel from the Channel List
-
Press the button while the channel is highlighted. The current list will change to show the regional variations of that channel (if available).
- Press the buttons to move the highlight bar through the list and choose the region that you want.
- Press the OK button to confirm, OR
- Press the BACK button to leave the region setting unchanged.
Manual Channels
The manual channel shows you your selected non-freesat channels.
- Press the 🔊️ buttons to display the Manual Channel.
- Press the buttons to select the channel and press OK to view.
Refer to the next pages for information on the manual channel
The Favourites List
This is a custom list of your selected channels. It has the advantage that you can combine freesat and non-freesat channels in one list.
To add a channel to the Favourites List:
- Select a channel from either the All Channels or Manual Channels list.
- Press the GREEN button on the remote Control.

Non-Freesat Channels

In addition to freesat channels, the unit can be used to watch other free channels, as long as they are broadcast from the same satellites as freesat. To view non-freesat channels this option must be enabled in the main menu.
Tuning in Non-freesat Channels
Refer to the illustration on the right:
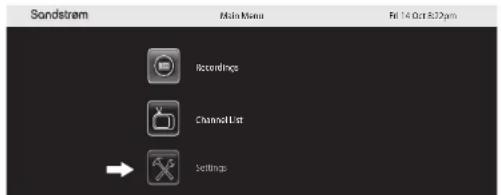
- Press the MENU button on the Remote Control to enter the main menu.
- Select Settings and press OK to Confirm.
- Press the 🔊 buttons to select Other in the section bar.
- Press the △v buttons to select Show Non-freesat Channels. Press the Press the <>buttons to enable the option.
- Press the AV buttons to select Add Non-freesat Channels. Press the OK button to confirm.
- Enter the frequency and symbol rate of the transponder to scan, using the 0-9 buttons, and its polarization by using the buttons. You can move between the three items using the buttons. When you have entered the tuning information, press the BLUE button to start the scan.
- The unit will take a few moments to complete the scan. While it is scanning, the unit displays the number of TV and radio channels found so far. When it is finished, the unit will display a list of all the channels found.
- You can choose to watch a non-freesat channel from this list by moving the orange bar using the A buttons to highlight the channel you want and pressing the OK button, or return to watching TV by pressing the BACK button or the EXIT button.

The tuning information for non-freesat channels may be printed in specialist magazines, or given on a specific channel's website.


Watching Non-freesat Channels
-
Enter the "Other" menu
-
Press the Buttons to select Show Non-freesat Channels.
-
Press the <buttons to enable the option.
Non-freesat channels and freesat channels are stored separately in the unit but you can switch between them quite easily.
While watching a non-freesat channel, you can step through the other non-freesat channels by pressing the CH+ / CH- buttons.
You can also switch directly to the channel you want using the 0-9 buttons. All the non-freesat channel numbers have four digits. If you enter the three digits of a freesat channel, the unit will switch to that freesat channel.

Non-freesat TV channels are stored from channel number 3001 and non-freesat radio channels from 4001.
While watching a freesat channel you cannot enter a four-digit channel number to switch to a non-freesat channel:
- Press the SWAP button to switch to the channel you last watched, whether it was a freesat or non-freesat channel.
You can browse through the non-freesat channels and programmes in the same way as you browse the freesat channels.
- Press the Info button or the >buttons to display the information bar and then press the >buttons to see what is showing at the moment on any of the other non-freesat channels, and the>button to see the programmes on next.
The Channel List
When you have non-freesat channels stored, the channel list displays both freesat and non-freesat channels.
-
Press the CH LIST button to go to the channel list by.
-
Press the ◀️tons to select the Manual Channels.
You can use the same channel list functions for any list: refer to the "Channel List" pages for further information.

You can store your favourite freesat and non-freesat channels in the "Favourite Channels" list, so you can switch from one to the other easily.



Setting Up Your freesat+ unit

Accessing the Main Menu
- Press the MENU button to enter the Main Menu.
- Press the buttons to select Settings in the section bar and then press the OK button to confirm.
- Press the BACK button or the EXIT button to exit the main menu.
HDMI Output
- Access the Settings menu.
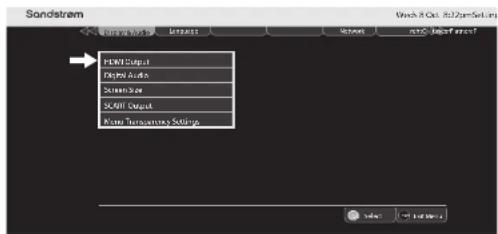
- Press the ◀◀▶ buttons to select Display & Audio in the section bar.
- Press the buttons to select HDMI Output.
- Press the <> buttons to choose the correct resolution for your TV. You should set the HDMI resolution to the highest that your TV can display (see your TV's instruction manual). If in doubt, set the resolution to 720p.
- Press the OK button to confirm your choice.
- Press the BACK button or the EXIT button to exit the main menu.
Digital Audio
This setting only applies if the unit is connected via a digital optical cable to an external audio receiver or amplifier using the S/PDIF connection.
- Access the Settings menu.
- Press the ◀◀▶ buttons to select Display & Audio in the section bar.
- Press the Buttons to select Digital Audio.
if the unit is connected to a surround sound A/V system:
- Press the <> buttons to select "Bitstream". This will pass a multichannel digital signal to your AV system.
If the unit is connected to a 2-channel (stereo) system:
- Use the "Stereo" setting.
- Press the OK button to confirm your choice.
- Press the BACK button or the EXIT button to exit the main menu.



Setting "Stereo" forces the digital output into two-channel mode. If you select "Stereo" and you are using a multichannel (5.1 or 7.1) A/V system the surround channels (and possibly the bass) may disappear.
Do NOT select the "Bitstream" output if you are using this unit with a Stereo system. If you do the sound will be distorted or may vanish completely!
Setting Up Your freesat+ unit

Screen Size
- Access the Settings menu.
- Press the ◀◀▶ buttons to select Display & Audio in the section bar and then press the ▲buttons to select Screen Size.
- Press the <buttons to choose between 16:9 Widescreen, 4:3 Widescreen, 4:3 Centre Cut-Out, and 4:3 Letterbox. Press the OK button to confirm your choice.
- Press the BACK button or the EXIT button to exit the main menu.
SCART Output
- Access the Settings menu.
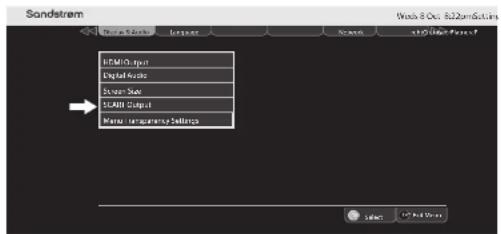
- Press the ◀◀▶ buttons to select Display & Audio in the section bar and then press the buttons to select SCART Output.
- Press the <buttons to choose between Composite and RGB for a TV connected to the unit's TV SCART output. Press the OK button to confirm your choice.
- Press the BACK button or the EXIT button to exit the main menu.

The RGB setting will usually produce the best quality SCART picture but a few TVs cannot accept this signal (see your TV's instruction manual). This setting has no effect on the unit's HDMI output.
Menu Transparency Settings
- Access the Settings menu.
- Press the ◀◀▶ buttons to select Display & Audio in the section bar and then press the ▲buttons to select Menu Transparency Settings.
- Press the <> buttons to select a transparency level. Press the OK button to confirm your choice.
- Press the BACK button or the EXIT button to exit the main menu.



Setting Up Your freesat+ unit

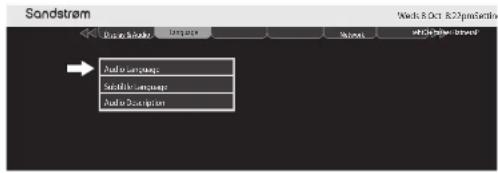
Audio Language
- Access the Settings menu.
- Press the ◀◀▶ buttons to select Language in the section bar and then press the ▲buttons to select Audio Language.
- Press the <buttons to select the desired language you want for the sound track. Press the OK button to confirm your choice.
- Press the BACK button or the EXIT button to exit the main menu.
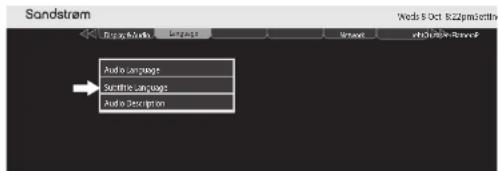
Subtitle Language
- Access the Settings menu.
- Press the ◀◀▶ buttons to select Language in the section bar and then press the ▲buttons to select Subtitle Language.
- Press the <buttons to select the desired language and then press the OK button to confirm.
- Press the BACK button or the EXIT button to exit the main menu.
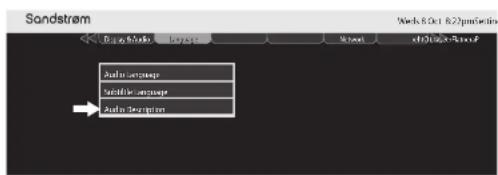
Audio Description
- Access the Settings menu.
- Press the ◀▶ buttons to select Language in the section bar and then press the ▲buttons to select Audio Description.
- Press the <buttons to switch on audio description for all channels that provide it and then press the OK button to confirm.
- Switch audio description off by pressing the OK button again.

You can also toggle Audio Description on/off by pressing the AD button on the remote control.
The Parental Menu
The Parental menu is password protected. It allows you to set parental guidance levels and set system parameters with restricted access.
Accessing the Parental Menu
- Access the Settings menu.
- Press the ◀◀▶ buttons to select Parental in the section bar.
- Enter your PIN number by pressing the 0-9 buttons on the handset. This is the four-digit PIN that you set when you first installed the unit. If you have not set a new PIN the system default is 0000.
- The Parental Menu will now appear.
The Guidance Lock
- Press the buttons to select Guidance.
- Press the <> buttons to turn on or off the parental guidance lock. When turned on, the broadcast programme displays a ● parental guidance warning, and cannot be watched without first entering the Lock PIN.
- Press the BACK button or the EXIT button to exit the main menu.
About the Lock PIN:
The difference between 'all IP TV guidance content' and 'all IP TV content' is a PIN is required for every programme for 'all IP TV content'. Guidance channels are enabled by the broadcaster - not all broadcasters use this.
Additionally, some functions can be locked to avoid accidental changes.
To use a locked menu function or watch a locked channel, enter the four-digit PIN that you set when you first installed the unit.
Changing the Parental PIN
- Press the ◀◀▶ buttons to select Parental in the section bar and then press the ▼v buttons to select Change Parental PIN. Press OK.
The Pin Change Menu will appear.
- Enter the current PIN (The system default PIN is 0000 unless you have previously changed it).
- Enter and confirm your chosen new PIN. Press OK.
- Press the BACK button or the EXIT button to exit the main menu.

Make sure you destroy the old PIN and record and save the new PIN.

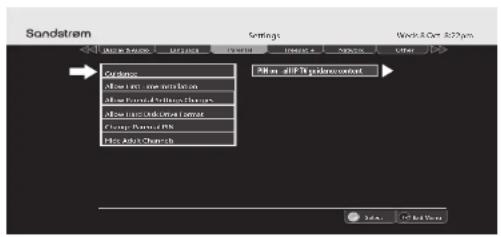


The Parental Menu

Allow Parental Settings Changes
This menu allows you to choose whether you want to access parental settings without always entering a PIN. To activate this however you have first to enter a valid pin.
- Press the ◀◀▶ buttons to select Parental in the section bar and then press the ▲buttons to select Allow Parental Settings Changes.
- Press the <buttons to switch between enabled or disabled.
- Press the BACK button or the EXIT button to exit the main menu.
Hide Adult Channels
The default setting is that adult settings are displayed in the Programme Guide. If you set the unit to hide adult channels, all adult genre channels are removed from the programme guide and the channel list, and cannot be selected by entering the channel number or with the CH+/CH- buttons.
- Press the ◀◀◀ buttons to select Parental in the section bar and then press the ▲buttons to select Hide Adult Channels.
- Press the OK button to hide or show the adult freesat channels. Press the BACK button or the EXIT button to exit the main menu.
Allow First Time Installation
- Press the ◀◀▶ buttons to select Parental in the section bar and then press the ▼v buttons to select Allow First Time Installation. Press OK.
- Press the <> buttons to switch between enabled or disabled. Press OK.

This setting enables you to allow a first time installation. On a first time installation all channels are erased. Follow the on-screen instructions to set up your freesal-recorder.
Allow Hard Disk Drive Format
- Press the ◀◀▶ buttons to select Parental in the section bar and then press the ▲buttons to select Allow Hard Disk Drive Format. Press OK.
- Press the <> buttons to switch between enabled or disabled. Press OK.

This setting allows the hard drive to be re-formatted. As a precaution we recommend that you disable this function until you need to erase and re-format the hard drive.

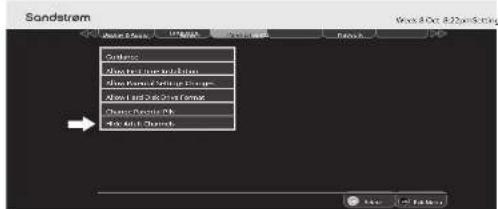


The Freesat+ setting
Entering the Freesat+ Menu
- Press the MENU button to enter the Main Menu. Press the buttons to select Settings in the section bar. Press the OK button to confirm.
- Press the ◀◀▶ buttons to select freesat+ in the section bar to deploy the Freesat+ menu.

Default Recording Mode
You can set the Digital TV Recorder to record in high or standard definition. High Definition offers better quality but uses much more hard drive space.
- Press the buttons to select Default Recording Mode.
- Press the buttons to select high definition or standard definition. Press the OK button to confirm.
- Press the BACK button or the EXIT button to exit the main menu.
Add to Start of Recording
This sets the amount of time that is added before the start of a recording.
- Press the ◀◀▶ buttons to select freesat+ in the section bar and then press the ▲buttons to select Add to Start of Recording.
- Press the <buttons to add the additional recording time before the programme start and then press the OK button to confirm.
- Press the BACK button or the EXIT button to exit the main menu.
Add to End of Recording
This sets the amount of time that is added after the end of a recording.
- Press the ◀◀▶ buttons to select freesat+ in the section bar and then press the ▲buttons to select Add to End of Recording.
- Press the <buttons to add the additional recording time after the programme finish and then press the OK button to confirm.
- Press the BACK button or the EXIT button to exit the main menu.
Live Pause Length
This sets the amount of time used for background recording of live TV.
- Press the ◀◀▶ buttons to select freesat+ in the section bar and then press the ▲buttons to select Live Pause Length.
- Press the <buttons to select 60 or 120 minutes for background recording of Live TV and then press the OK button to confirm.
- Press the BACK button or the EXIT button to exit the main menu.
Skip Forwards Time
This feature allows you to preset the amount of time in seconds by which the recorder skips. You may set the unit to skip forward by amounts of 10-30-40 or 60 seconds.
- Press the ◀◀▶ buttons to select freesat+ in the section bar and then press the ▲buttons to select Skip Forwards Time.
- Press the <buttons to set the default skip forwards time and then press the OK button to confirm.
- Press the BACK button or the EXIT button to exit the main menu.

Press the> button to skip forwards while watching TV.

The Freesat+ Setting

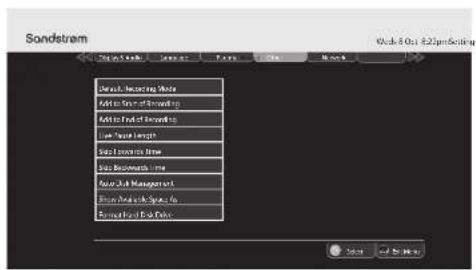
Skip Backwards Time
This feature allows you to set the unit to skip backward by amounts of 10-30-40 or 60 seconds.
- Access the Main Menu. Press the AV buttons to select Settings in the section bar and then press the OK button to confirm.
- Press the ◀◀▶ buttons to select freesat+ in the section bar and then press the ▲buttons to select Skip Backwards Time.
- Press the <buttons to set the default skip backwards time and then press the OK button to confirm.
- Press the BACK button or the EXIT button to exit the main menu.

Press the ◄button to skip backwards while watching TV.
Auto Disk Management
This will allow the oldest recordings that have been viewed to be overwritten if the Digital TV Recorder is short of space.
- Press the ◀◀▶ buttons to select freesat+ in the section bar and then press the ▲buttons to select Auto Disk Management.
- Press the <> buttons to select on or off and then press the OK button to confirm.
- Press the BACK button or the EXIT button to exit the main menu.

A recorded programme will not be erased when is protected.
Show Available Space As
This sets how you want remaining space to be shown in the menus. You can choose from the percentage of space, hours of standard definition, or hours of high definition available.
- Press the MENU button to enter the Main Menu. Press the _AV buttons to select Settings in the section bar and then press the OK button to confirm.
- Press the ◀▶ buttons to select freesat+ in the section bar and then press the Buttons to select Show Available Space As.
- Press the OK button to show the information.
- Press the BACK button or the EXIT button to exit the main menu.
Format Hard Disk Drive
This will reformat your hard disk drive.
- Press the MENU button to enter the Main Menu. Press the _AV buttons to select Settings in the section bar and then press the OK button to confirm.
- Press the ◀◀▶ buttons to select freesat+ in the section bar and then press the ▲buttons to select Format Hard Disk Drive.
- Press the OK button to confirm format.
- Press the <> buttons to select YES, and then press the OK button to confirm.

This will permanently delete all of your recorded programmes, even if they are protected.
Network Settings

Before proceeding, ensure that the unit is connected to your home network with a suitable ethernet connector.
- Press the MENU button to enter the Main Menu. Press the AV buttons to select Settings in the section bar. Press OK to confirm.
- Press the ◀◀▶ buttons to select Network in the section bar and then press the ▲buttons to select a parameter.
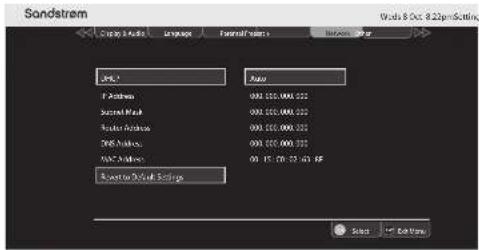
DCHP
This stands for 'Dynamic Host Configuration Protocol'.
Auto DCHP: is the default setting for all modern modems. When DHCP is set to Auto your freesat digital box will be set up when connected to your home network and all the boxes will be populated automatically.
Manual Settings: If your modem is of an older type or the default settings have been altered you will need to manually set each parameter. (Refer to your internet service provider for further guidance).
- Select DCHP. Press OK.
- Press the <> buttons to change the configuration to "Manual".
- Press the AV buttons to select IP Address, Subnet Mask, Router Address and DNS Address in turn. Press OK.
- To change the address: Highlight each of the four groups that are to be changed and enter the number required using the 0-9 buttons.
- Press the OK button to confirm the new address.
- When all four addresses have been set correctly, press the OK button to set the configuration and return to the system menu page.
- Press the BACK button or the EXIT button to exit the main menu.

IP Address: This is the unique IP (Internet Protocol) address number of your freesat digital box. Each item on your network will have its own IP address. An example IP address will look something like 192.168.1.0
Subnet Mask: This is used to split large networks into smaller sub groups to stop excessive data from being transmitted along a network. Each network group will have it's own subnet mask ID. A subnet mask number will look like 255.255.255.0
Router Address: This is the IP address of your broadband router.
DNS Address: This stands for 'Domain Name System'. Your DNS address will have been assigned to you by your internet provider.
MAC Address: The MAC address is embedded into your freesat digital box and allows you to connect to online services. It is not possible to change this number.
Revert to Default Settings.
- Select Reset Default Settings. Press OK to restore the default network settings. Any user-entered settings will be lost.
Checking The Internet Connection
- Press the MENU button to enter the Main Menu.
- Press the buttons to select System Information.
- Press OK to confirm.
- Use the ◀◀▶ buttons to select Network. Press OK.

If the IP address item shows a number in four sections separated by dots the unit is connected to your local network. If online services still do not work, you should check your router's connection to the Internet.
If no connection is shown, you should carefully check the broadband connection and the Network Configuration or consult your Internet service provider for assistance.
5. Press the BACK button or the EXIT button to exit the main menu.

On Demand TV
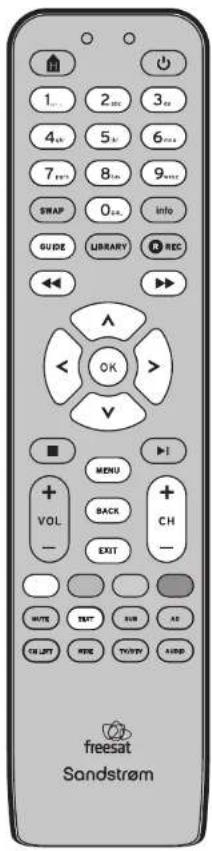
Setting Up for On Demand (Online) TV
Follow the procedure on the previous page to set up and configure the unit's network settings.
Watching On Demand TV
You can switch to online TV in various ways.
A: Via the Genre Screen
- Press the GUIDE button on the remote control.
- Press the <buttons to highlight On Demand.
- Press OK to confirm and access the relevant Programme Guide.
B: Via the Programme Guide
- Press GUIDE.
- Press the
buttons to highlight All Channels. Press OK The Programme Guide will appear. - Use the ◀◀▶ buttons to select ON Demand. Press OK.
The On Demand Channels Programme Guide will appear. You can now select the ON Demand Channel you wish to view.
C: While watching BBC (and some ITV) Channels
- Press TEXT or the RED button.
The relevant On Demand Service information will display allowing you to access the relevant channels.
D: Using the number keypad
- If you know the channel number of the station you can enter it directly from the remote control.

When you switch to an online TV channel, there may be a delay of a few seconds.


The quality of your online viewing depends on your network connection speed. An absolute minimum speed of 1MB/sec is needed for any kind of viewing and for HD viewing you will need a minimum of 2MB/sec. These figures are the minimum/acceptable low connection speeds may result in erratic reception and in some cases a loss of signal.
Other Settings

- Enter the Settings menu.
- Press the ◀◀▶ buttons to select Other in the section bar. Press OK.

Showing Non Freesat Channels
- Press the buttons to select Show Non freesat Channels. Press OK.
- Press the BACK button or the EXIT button to exit the main menu.
Adding Non Freesat Channels
- Press the buttons to select Add Non Freesat Channels.
- Press the OK button to tune the Non-freesat Channels. Press the BACK button or the EXIT button to exit the main menu.

See the "Non-freesat Channels" section of this instruction manual for full details of how you can add and watch Non-freesat Channels.
Auto Standby
To conserve power, the unit by default will switch to standby after three hours if no buttons are pressed on the unit or the remote control. To alter this setting:
- Press the buttons to select Auto Standby.
- Press the ◀◀▶ buttons to select Enabled/Disabled. Press OK 'to confirm.
- Press the BACK button or the EXIT button to exit the main menu.
Power Save in Standby Mode
- Press the buttons to select Power Save in Standby Mode.
- Press the <> buttons to select the enable or disable and then press the OK button to confirm.
- Press the BACK button or the EXIT button to exit the main menu.
Upgrade software
- Press the buttons to select Upgrade software.
- Press the <> buttons to select Automatic or Manual and then press the OK button to confirm.
- Press the BACK button or the EXIT button to exit the main menu.

To upgrade the unit manually, contact the UK Call Centre on 0844 561 1234 and ask for further guidance.
First Time Installation
- Press the buttons to select First Time Installation.
- Press the OK button to revert all the unit settings to what they were when you first got your unit and to start the First Time Installation procedure.
You must enter the Lock PIN (if this option has been set), and then confirm in another menu to start the process because it will delete all channels, favourite channels, favourite channel list names and the unit configuration.
- Press the BACK button or the EXIT button to exit the main menu.

To start this procedure you must have previously confirmed in the Parental menu that this procedure can take place.
This procedure deletes all channels and custom lists and reset the unit configuration.

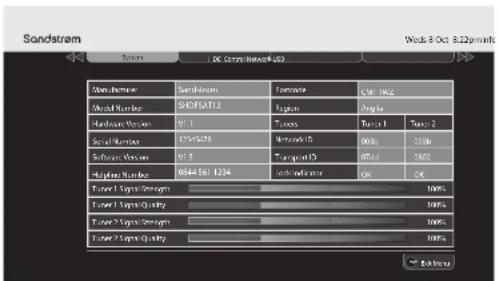
System Information

- Press the MENU button to enter the Main Menu.
- Press the buttons to select System Information in the section bar.
- Press the OK button to confirm.
- Press the ◀◀▶ buttons to change the information between System, HD Control, Network and USB.
The System Information menu is purely for information. No settings are involved in this menu and its associated submenus. - Press the BACK button or the EXIT button to exit the main menu.
Troubleshooting
If a problem does occur, it may often be due to something very minor. The following table contains various tips. If you require additional assistance please call our UK Call Centre on 0844 561 1234. Our UK Customer Contact Centre is open Monday-Saturday 8am-8pm or Sunday 8am-6pm.
| Problem Possible Cause Solution | ||
| Standby Indicator Off | • Mains adapter disconnected | • Check mains adapter connection on unit and mains socket |
| No set up screen | Unit not switched on • HDMI/SCART cable disconnected • TV not switched to HDMI/SCART input | • Switch on unit • Check HDMI/SCART cable connection to unit and TV • Select TV's HDMI/SCART input |
| Signal lock failed | Cable from the satellite dish disconnected • Satellite dish in the wrong position | • Check the satellite cable connections. Consult your installer if necessary • Reinstall the satellite dish. Consult your installer if necessary |
| Signal strength below 50% | • Satellite dish in the wrong position • LNB wrongly connected | • Reinstall the satellite dish. Consult your installer if necessary • Swap LNB1 and LNB 2 cables round |
| The unit switches off after 3 hours | • Auto Standby is on • Turn off the Auto Standby in the Time menu | |
| Not accepting postcode | • Broadcast error • Postcode tables are not being transmitted. Press BLUE button to activate default tuning | |
| “No signal” message | • Cable from the satellite dish disconnected • Satellite dish damaged or in the wrong position | • Check the satellite cable connections at the unit and the satellite dish. Consult your installer if necessary • Check the satellite dish. Consult your installer if necessary |
| No picture or sound | • HDMI/SCART cable disconnected • TV not switched to HDMI/SCART input | • Check HDMI/SCART cable connections at the unit and the TV • Select TV's HDMI/SCART Input |
| Full picture not visible | • Mismatched screen format | • Choose the correct Screen Size to suit your TV |
| Problem Possible Cause Solution | ||
| TV picture not HD | Tuned to an SD channelTV not capable of HDTV connected by SCART | Tune to an HD channelConnect the unit to an HD-Ready TVConnect the TV with a HDMI cable |
| No response with remote control | Unit in standbyRemote control not aimed at the unit correctlyRemote sensor on the front of the unit is obstructed | Switch on the unitAim remote control at the unitCheck for obstructions in front of the unit |
| Cannot view a channel | Wrong channel number usedChannel locked | Choose the channel from the channel listEnter the PIN. If you have forgotten the PIN, phone the helpline on 0844 561 1234 |
| No information for a channel in the programme guide | Information on the channel not downloadedYou are on a non-freesat channel | Wait for the downloadSelect a freesat channel |
| No digital text or interactive services | Services not available on chosen channel | Switch to a channel broadcasting interactive services |
| No BBC iPlayer or ITV Player | No connection to Internet | Check broadband connection and network configuration in system menu |
| Can't record a channel to a VCR/DVD recorder. | No connection to a recorderWrong recorder input selected | Install a SCART lead from the unit to the recorderSelect recorder's SCART input (see your recorder's instruction manual for guidance) |

Specifications
| Model SHDFSAT12 | ||
| Tuner | Standard DVB-S/S2 | |
| Input Frequency 950~2150MHz | ||
| Input Connector F type, female 75 ohm | ||
| LNB Supply | 14.0V / 19.0V(maximum .350mA),short-circuit protected | |
| Digital Signal InputLevel | -20 to -65 dBm | |
| Video | HDMI Output | Resolution 576i / 576p / 720p /1080i /1080p |
| SCART Output TV (CVBS/RGB) & VCR (CVBS) | ||
| Aspect Ratio 4:3, 16:9 and letter box | ||
| Audio | TV & VCR SCART Output Audio Left & Right | |
| Optical S/PDIF Output | Dolby Digital, Dolby Digital +& PCM | |
| USB Host | 2.0 (5V@1A max) for softwareupgrade only. | |
| InternetConnectivity | Ethernet | RJ-45 10/100 Base-T (withgreen Link LED & yellow DataLED) |
| PowerRequirements | Mains input voltage 100~240V AC~ 50Hz | |
| Power Consumption | Max 13W (LNB with 200mA) &Standby less than 0.5W | |
| Dimensions | Width, Depth andHeight | 281mm x 240mm x 56mm |
Features and specifications are subject to change without prior notice.
For help with set-up or for more information about
freesat please vslt www.freesat.co.uk or call 0845 313 0051.

For general information about this appliance
and handy hints and tips, please visit
www.knowhow.com/knowledgebank or call 0844 5611234.

Visit Partmaster.co.uk today for the easiest way to buy electrical spares and accessories. With over 1
million spares and accessories available we can deliver direct to your door the very next day. Visit
www.partmaster.co.uk or call 0844 800 3456 (UK customers only) Calls charged at National Rate.
Notes for battery disposal
The built-in batteries used with this product contain chemicals that are harmful to the environment. To preserve our environment, dispose of used batteries according to your local laws or regulations. Do not dispose of batteries with normal household waste. Contact a qualified technician to remove the built-in battery prior to disposal.
For more information, please contact the local authority or your retailer where you purchased the product.

This symbol on the product or in the instructions means that your electrical and electronic equipment should be disposed at the end of its life separately from your household waste. There are separate collection systems for recycling in the EU.
For more information, please contact the local authority or your retailer where you purchased the product.
The freesat service is marketed by freesat (UK) Ltd, registered company number 6250097.
The freesat word and logo are trademarks of freesat (UK) Ltd and are used under licence.
DVB is a trademark of the Digital Video Broadcasting Group.
HDMI, the HDMI Logo and High-Definition Multimedia Interface are trademarks or registered trademarks of HDMI Licensing
LLC.
Manufactured under license from Dolby Laboratories.
Dolby and the double-D symbol are trademarks of Dolby Laboratories.
All trademarks are the property of their respective owners and all rights are acknowledged.
All trademarks are the property of their respective owners and all rights are acknowledged.
DSG Retail Limited (Registered in England No. 504877)
Maylands Avenue, Hemel Hempstead, Hertfordshire, HP2 7TG, UK
- Contents
- Safety Warnings
- Damage
- Location of Unit
- Temperature
- Naked Flames
- Moisture
- Ventilation
- Safety
- Mains Adapter Cable
- Interference
- Standby
- Batteries
- Supervision
- Service
- Maintenance
- Unpacking
- Thank you for purchasing your new
- Product Overview
- Power Indicator
- Recording Indicator
- LED Display
- ⏻ Button
- CH+ Button
- CH-Button
- Ⓞ Button
- TUNER 2 Socket
- TUNER 1 (LNB in) Socket
- S/PDIF Socket
- Ethernet Socket
- USB Socket
- HDMI Socket
- TV SCART Socket
- VCR SCART Socket
- Power Socket
- Remote Control
- Installing Batteries in the Remote Control
- Remote Control Operation Range
- Handling the Batteries
- Handling the Remote Control
- Connecting the Receiver to a Satellite Dish
- Satellite Dish Installation
- Connecting the Satellite Dish to the Unit
- Connecting the two cables
- System and Mains Connections
- Ensure your TV is switched off at the mains supply.
- Plug In and Switch On
- Turning the Unit On and Off
- Eco Standby
- Changing the Channel
- Other ways to change channel:
- Changing the Volume
- Widescreen and Standard Viewing Formats
- TV/DTV
- First Time Installation
- Using the Programme Guide
- Choosing a Channel
- Setting a Reminder
- Cancelling a Reminder
- Interactive TV Services
- Recording Freesat Programmes
- Programming a Recording
- Series Link
- Instant Recording
- Stopping a Recording
- Using the Library
- Watching a Recording
- Previewing a Recording
- Protecting a Recording
- Deleting a Recording
- Exiting the Library
- Recording Clashes
- The Browsing Bar
- Browsing Bar Contents
- While the bar is displayed:
- Subtitles, Audio Description, Pausing Live TV
- Turning Subtitles on and off
- The Audio Channel
- Pausing Live TV
- The Channel List
- Selecting a Channel from the Channel List
- Selecting an Option
- Regional Channels
- To replace the regional variation of a channel in the channel list
- Manual Channels
- The Favourites List
- To add a channel to the Favourites List:
- Non-Freesat Channels
- Tuning in Non-freesat Channels
- Watching Non-freesat Channels
- Cnrs
- Setting Up Your freesat+ unit
- Accessing the Main Menu
- HDMI Output
- Digital Audio
- If the unit is connected to a 2-channel (stereo) system:
- Screen Size
- SCART Output
- Menu Transparency Settings
- Audio Language
- Subtitle Language
- Audio Description
- The Parental Menu
- Accessing the Parental Menu
- The Guidance Lock
- About the Lock PIN:
- Changing the Parental PIN
- The Pin Change Menu will appear.
- Allow Parental Settings Changes
- Hide Adult Channels
- Allow First Time Installation
- Allow Hard Disk Drive Format
- The Freesat+ setting
- Entering the Freesat+ Menu
- Default Recording Mode
- Add to Start of Recording
- Add to End of Recording
- Live Pause Length
- Skip Forwards Time
- Skip Backwards Time
- Auto Disk Management
- Show Available Space As
- Format Hard Disk Drive
- Network Settings
- DCHP
- Revert to Default Settings.
- Checking The Internet Connection
- On Demand TV
- Setting Up for On Demand (Online) TV
- Watching On Demand TV
- A: Via the Genre Screen
- B: Via the Programme Guide
- C: While watching BBC (and some ITV) Channels
- D: Using the number keypad
- Other Settings
- Showing Non Freesat Channels
- Adding Non Freesat Channels
- Auto Standby
- Power Save in Standby Mode
- Upgrade software
- System Information
- Troubleshooting
- Specifications
- Notes for battery disposal
Brand : Sandstrøm
Model : Freesat+ SHDFSAT12
Category : Receiver