SMMFOW13 - Oven Sandstrøm - Free user manual and instructions
Find the device manual for free SMMFOW13 Sandstrøm in PDF.


| Product Type | Built-in Electric Oven |
| Brand | Sandstrøm |
| Model | SMMFOW13 |
| Dimensions (H x W x D) | 595 x 595 x 560 mm |
| Weight | 30 kg |
| Power Supply | 230V, 50Hz, 3.0 kW |
| Energy Efficiency Class | A |
| Oven Capacity | 70 L |
| Cooking Functions | Convection, Grill, Fan-assisted, Defrost, Oven Light |
| Cleaning Type | Enamel interior, easy-clean coating |
| Safety Features | Auto shut-off, child lock, cool touch door |
| Installation | Built-in, requires ventilation |
| Spare Parts Availability | Contact Sandstrøm service centers |
| Warranty | 2 years |
Frequently Asked Questions - SMMFOW13 Sandstrøm
User questions about SMMFOW13 Sandstrøm
0 question about this device. Answer the ones you know or ask your own.
Ask a new question about this device
Download the instructions for your Oven in PDF format for free! Find your manual SMMFOW13 - Sandstrøm and take your electronic device back in hand. On this page are published all the documents necessary for the use of your device. SMMFOW13 by Sandstrøm.
USER MANUAL SMMFOW13 Sandstrøm
natural_image
Exterior view of a modern kitchen oven with digital display and control buttons (no text or symbols on main body)Sandstrøm
Contents
Safety Warnings....5
Unpacking 7
Product overview....8
Front View 8
Control Panel....8
Before using your new oven 9
Inserting the baking trays / wire racks 9
Using the grill pan handle 9
Using the control knobs 9
Setting the clock....10
Using your oven for the first time....11
Basic oven cooking....12
Using the grill....12
Selecting a cooking mode....13
Timer functions....14
Setting the cooking duration....14
Setting cooking to finish using the clock time....15
Setting a delayed cooking time and end time....17
Setting an alarm....19
Child lock....20
Oven light 21
Replacing the light bulbs....21
Cleaning and maintenance....22
Aqua clean 22
Appliance housing front 22
Aluminium surfaces....22
Stainless steel front panels (only with some models)....22
Lacquer-coated and plastic surfaces (only with some models)....22
Removing the wire rack guides....23
Lowering the grill element.... 23
Cleaning the oven cavity 24
Removing the door for cleaning 25
Removing the door glass for cleaning 26
Wiring the oven 27
Inserting the links....27
Connecting the wires....27
Installing the oven....28
Technical specification 29
Safety Warnings
IMPORTANT SAFETY INSTRUCTIONS
READ CAREFULLY AND KEEP FOR FUTURE REFERENCE
- It is recommended that this appliance is installed by a qualified electrical engineer. The manufacturer is not responsible for any damage caused by incorrect installation.
- Check whether there is any damage to the appliance after you have unpacked it. If any damage is found, do not use the appliance and contact the store where you purchased it.
- This appliance is for Indoor Domestic Use only.
- For disconnection from the mains supply you must have a switch with a contact separation of at least 3.0 mm in all poles and suitably rated that provides full disconnection, this must be incorporated in the fixed wiring in accordance with the local wiring rules.
- If your mains cable gets damaged, it should be replaced by an authorized service agent or qualified electrician in order to avoid a hazard.
- Only operate your appliance in a dry atmosphere.
- Ensure that the appliance is switched off at the mains supply switch and allowed it to completely cool down before cleaning, replacing the oven lamp or performing any maintenance to avoid the possibility of an electric shock.
- This appliance is not intended for use by persons (including children) with reduced physical, sensory and mental capabilities, or lack of experience and knowledge, unless they have been given supervision or instruction concerning the use of the appliance by a person responsible for their safety.
- Cleaning and user maintenance shall not be made by children without supervision.
-
Children should be supervised to ensure that they do not play with the appliance.
-
During use the appliance becomes hot. Care should be taken to avoid touching the heating elements inside the oven.
- The appliance and its accessible parts become hot during use. Young children should be kept away.
- Danger of fire: Do not store items in the oven other than the accessories supplied.
- When the oven is hot never touch the oven glass or any other parts that get hot. Allow the oven to cool before touching these parts.
- Do not use harsh abrasives cleaners or sharp metal scrapers to clean the oven door glass since they can scratch the surface, which may result in the glass shattering.
- Before starting to use your appliance, keep curtains, tulle, paper or flammable materials away from your appliance. Do not keep combustible or flammable things in or on the appliance.
- This appliance is for cooking purposes only. It must not be used for other purposes, for example room heating.
- Do not use steam cleaners for cleaning the appliance.
- Do not rest any items on or stand on the open door.
• Take care when handling parts with glass, knocks, chips, heavy handling and dropping could cause the glass to shatter. - The glass oven door uses toughened glass and is designed to break into many ‘nugget’ size pieces if it breaks. These pieces will still have sharp edges, please handle broken glass with care.
Thank you
Thank you for purchasing your new Sandstrøm Built In Oven. Like all Sandstrøm products our ovens take inspiration from traditional Scandinavian values of quality and functionality, combined with modern innovations and a flair for simply looking good. These operating instructions will help you use it properly and safely. You must spend some time reading this manual in order that you fully understand all the operational features it offers. Read all the safety instructions carefully before use and keep this manual for future reference.
Unpacking
Remove all packaging from the unit. Retain the packaging. If you dispose of it please do so according to local regulations.
The following items are included:

natural_image
Exterior view of a modern kitchen oven with control knobs and a blank display area (no visible text or symbols)
Screws x2
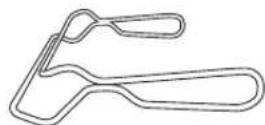
Grill pan handle x10ven

natural_image
Line drawing of a metal grate with slats and a handle (no text or symbols)
natural_image
Simple line drawing of a rectangular frame with rounded corners (no text or symbols)
natural_image
Simple line drawing of a rectangular container or tray (no text or symbols)Baking tray (deep) x1Wire rack x1 Grill pan x1

If items are missing or damaged, please contact Partmaster (UK only). Tel: 0844 800 3456 for assistance.
Product overview
Front View
- Control Panel
- Grill element
- Wire rack guide
- Fan
- Oven light

Control Panel

- Time/Clock display
- Thermostat light
- Temperature adjust control
-
- / - time control
- Child lock control
-
Clock set control
-
Alarm control
- Cooking end time control
- Cooking time control
- Option selector control
- Cooking mode
Before using your new oven
- Remove all protective film and packaging that may be in your oven.
- Use a damp cloth to wipe the oven cavity.
- Clean all of the baking trays, wire racks and any other accessories in warm soapy water.
Inserting the baking trays / wire racks
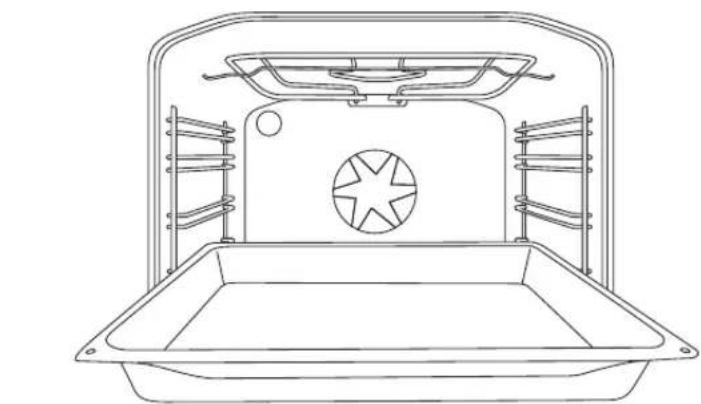
Your oven has 4 static wire rack guides.
The guides are numbered 1 to 4 this is to help you place your food on the correct shelf when cooking.
- Slide an oven tray or wire rack into the wire rack guides.
natural_image
Line drawing of a vehicle chassis with a star-shaped emblem on the back panel (no text or symbols)Using the grill pan handle
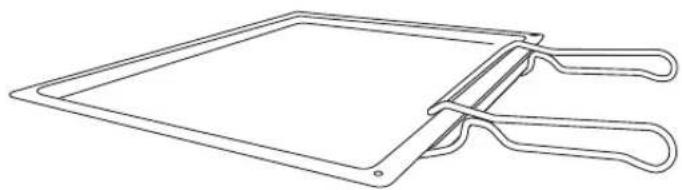
Slide the grill pan handle onto the lip of the grill tray. Make sure it is firmly connected and centred before lifting the tray.
natural_image
Line drawing of a metal cutting tool with two handles and a flat blade (no text or symbols)Using the control knobs
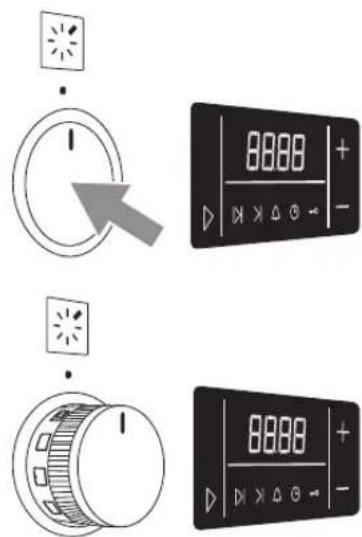
- Push the control knobs to release them and make them pop out.
- Turn the knobs to select a temperature or cooking mode.
- Push the control knobs back into the control panel when not in use.
Setting the clock
The clock on your oven is a 24 hour clock.
- When the oven is first switched on at the mains the clock display will flash.
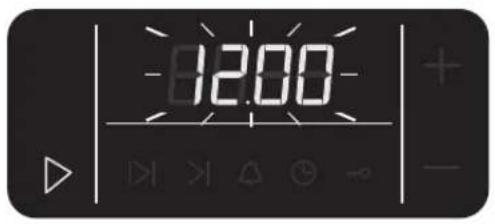
- Repeatedly touch the option control until the Ⓢ symbol lights up.

- Touch the + or - controls to set the time. If you touch and hold the + or - controls the time will change quickly the 10 mins at a time.

When you have set the time, wait a few seconds and the display will stop flashing. The time is now set.
Using your oven for the first time
Before you start to use your oven its recommended you first heat it up to check its working properly and to remove any protective substances left on the heating elements and interior metal. The elements and interior metal is coated to protect it from corrosion when it leaves the factory.
| ! | Make sure your room is well ventilated, you may wish to open a window or turn on your cooker hood if you have one.You may see and smell a little smoke, don't be alarmed this is normal the first time you heat up your oven. The smell should only last around 10-15 minutes.If you notice a smell the next time you use the oven you probably didn't manage to remove all the protective coating, leave your oven on for a little longer. This will not harm you or the oven. |
All of the heating element will need to be heated up for 10-15 minutes at a high temperature.
- Turn the cooking mode control and select the following modes:
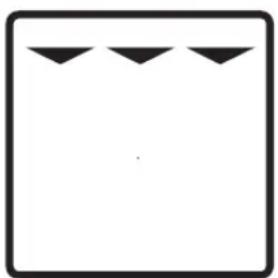
natural_image
Simple geometric diagram with three downward-pointing triangles inside a rounded rectangle (no text or symbols)
natural_image
Simple icon of a fan or impeller with six blades, enclosed in a circle (no text or symbols)200°C for 10-15 mins 200°C for 10-15 mins
- Turn the temperature adjust control and set the temperature to 200^ C let the oven heat up for 10-15 minutes in each heating mode.
Basic oven cooking
| ! | Under no circumstances should the oven be lined with aluminium foil as overheating may occur.Do not place dishes or baking trays directly onto the base of the oven as it becomes very hot and damage may occur.Bread may catch fire if the toasting time is too long. Close supervision is necessary during toasting.During use, this appliance becomes hot. Care should be taken to avoid touching hot surfaces, e.g., oven door, heating elements.Accessible parts may become hot when in use. Children should be kept away.Do not leave the handle in position when grilling. If the handle is left in position when grilling, it will get very hot. |
- Turn the cooking mode control to select your desired cooking mode.
- Turn the temperature control to select your desired cooking temperature.
The thermostat light will switch on and your oven will start to heat up. The light will go out when your desired temperature is reached. - Place your food in the oven.
- When cooking has finished turn the temperature control to ● and the cooking mode control to '0' to switch your oven off.
Using the grill
When cooking with the grill always keep the oven door closed.
- Turn the cooking mode control to


- Turn the temperature control to 250^ C it has a grill icon above the temperature.
The thermostat light will switch on and your oven will start to heat up. The light will go out when your desired temperature is reached. - Place your food on a wire rack or baking tray and place it on rack position 4.
- When cooking has finished turn the temperature control to ● and the cooking mode control to '0' to switch your oven off.
Selecting a cooking mode
Your oven has a combination of 10 different cooking modes. Turn the cooking mode control to select your desired mode.
| Cooking mode | Instruction |
 | The heat is only radiated by the element installed in the bottom of the oven. Select this operation mode when you wish to bake / cook the bottom side of the dish more thoroughly (e.g. for moist pastry with fruit filling). Set the temperature with the temperature control. The lower element can be used for cleaning the oven. Details are given in the "Cleaning and maintenance" section. |
 | With this operation mode, the lower element and the fan operate simultaneously. Used for baking low leavened dough and preserving fruit and vegetables. Use the first shelf position from the bottom and shallow rather than deep baking trays to allow the warm air circulate around the upper side of the dish as well. |
 | With this mode, the air is circulating without any heater being turned on. Only the fan is in operation. This is used for slow defrosting or thawing of frozen food. |
 | With this operation mode, the round heater and the fan operate simultaneously. The fan at the oven back wall causes the hot air to circulate constantly around a roast of pastry. This operation mode is appropriate for roasting meat and making pastry on several shelves simultaneously. Cooking temperature should be set lower than with conventional operation modes. |
 | With this operation mode, the lower element and the hot air fan operate simultaneously. This is particularly convenient for making pizza. Also ideal for moist or heavy pastry, fruit cakes made of leavened dough, short pastry, or cheesecakes. |
 | With this operation mode, whole of the upper element and the fan are activated simultaneously. It is appropriate for grilling meat and large chunks of meat or poultry on one shelf level. Also appropriate for cooking food au gratin or browning. |
 | With this operation mode, the whole of the upper element is activated simultaneously. The element installed on the oven interior ceiling radiates heat directly. This operation mode is appropriate for cooking smaller chunks of meat, such as steaks, roasts, chops, ribs, etc. |
 | Only the middle of the upper element is activated. This mode is appropriate for grilling smaller quantities of toasted sandwiches, grill sausages, or simply for toasting bread. |
 | The heaters on the upper and lower side of the oven radiate heat uniformly and evenly into the oven interior. Pastry and meat can be cooked on one shelf level only. |
 | Oven lighting can be selected independently, without selecting another function. With all other modes of operation, the oven lighting is turned on automatically when the operation mode is selected. |
Timer functions
Your oven has 3 different timer functions you can set.
Setting the cooking duration
This option allows you to set the amount of time you want you oven to operated for and then switch off. The maximum operating time you can set is 10 hours.
- Touch the control repeatedly to select I>1
The 1 symbol will flash rapidly.

- While the symbol is flashing rapidly touch the + / - controls to select the amount of cooking time.
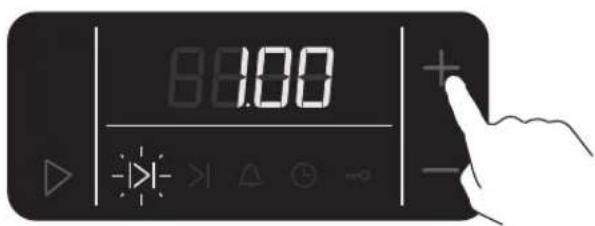
- Touch the ▷control to set the time. The 1 symbol now flash slowly and the time will start to count down.
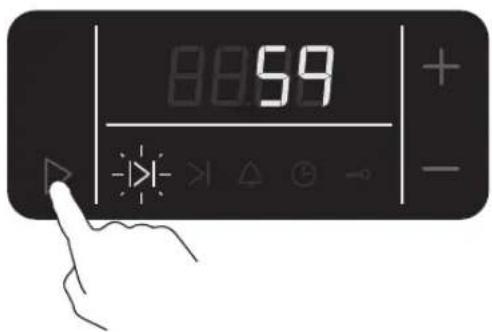
- Set your cooking mode and temperature. The oven will now be on and cooking.

200^ C
When the cooking time is finished the oven will stop cooking. An alarm will sound and the display will flash.
- Touch the ▷control to switch off the alarm, or it will automatically switch off after 1 minute.
If you decide you want to switch the timer off before the time runs out, set the time to 0.00.

Setting cooking to finish using the clock time
This option allows you to set the cooking time to finish at a set time using the clock e.g. the time may be currently 13:30 and you may want the oven to finish cooking at 16:00, so you set the finish time for 16:00. The maximum operating time is 10 hours from the current time.

Make sure the correct time is set before using this feature.
- Touch the control repeatedly to select >1
The >symbol will flash rapidly.
- While the ▶ symbol is flashing rapidly touch the + / - controls to select the time you want the oven to switch off at.


- Touch the ▷control to set the finish time.
The >symbol now flash slowly and the finish time will be displayed.

- Set your cooking mode and temperature. The oven will now be on and cooking.
200°C
When the cooking time is finished the oven will stop cooking. An alarm will sound and the display will flash.
- Touch the ▷control to switch off the alarm, or it will automatically switch off after 1 minute.

If you decide you want to switch the timer off before the time runs out, set the finish time to the current time.
Setting a delayed cooking time and end time
This option allows you to set the amount of cooking time and set the time you would like the cooking to finish. This feature is ideal if you want to come home and have your dinner ready and cooked, e.g. you want to cook for 2 hours and have it ready when you get in from work in the evening at 18:00. Your oven will switch on at 16:00. The end time can only be set an maximum of 24 hours from the current time. Remember your clock is a 24 hour clock.

Make sure the correct time is set before using this feature.
- Touch the control repeatedly to select I>1
The 1 symbol will flash rapidly.
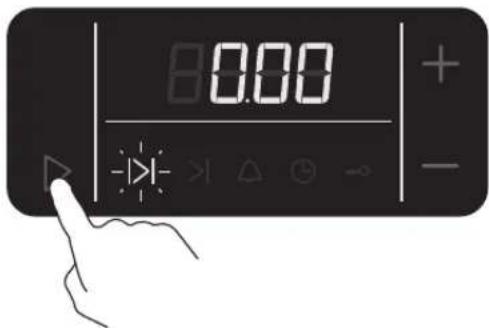
- While the 1symbol is flashing rapidly touch the + / - controls to select the amount of cooking time.
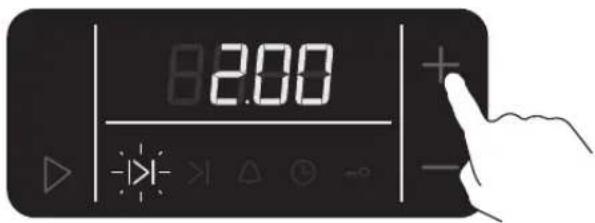
- Touch the ▷control to select .>The >symbol will flash rapidly.

- While the ▷ symbol is flashing rapidly touch the + / - controls to select the time you want the oven to switch off at.

- Set your cooking mode and temperature. The oven will now be on and cooking.
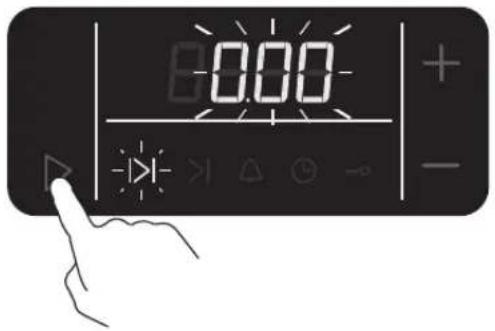
When the cooking time is finished the oven will stop cooking. An alarm will sound and the display will flash.
- Touch the ▷control to switch off the alarm, or it will automatically switch off after 1 minute.

200^ C
Setting an alarm
You can set an alarm to sound after a set amount of time. The maximum alarm time is 10 hours. This is useful if you want to time something cooking on your hob. The alarm is a separate feature, and can be set at any time and will not interfere with any of your cooking settings or timer functions.
- Touch the control repeatedly to select △
The symbol will flash rapidly.
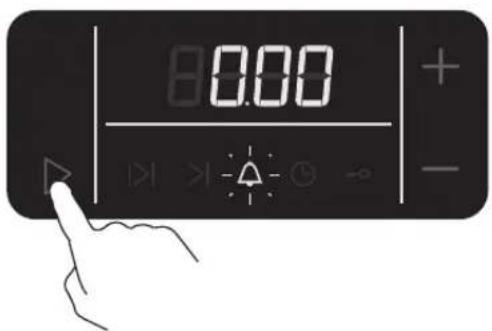
- While the symbol is flashing rapidly touch the + / - controls to select the amount alarm time.
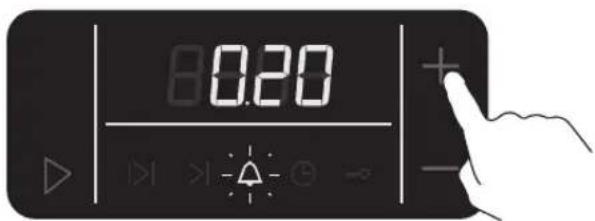
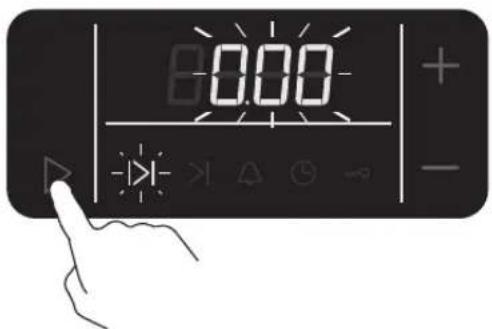
- Touch the ▷control to set the finish time.
The △ symbol now flash slowly and the display will start counting down.

When the alarm sounds and the display will flash.
- Touch the ▷control to switch off the alarm, or it will automatically switch off after 1 minute.
Child lock
The controls of your oven can be locked to prevent any of the controls from being accessed by children or accidentally touched. The child lock can only be set if you have already set a timer or alarm.
- Touch the control repeatedly to select -o
The symbol will flash rapidly.

- While the symbol is flashing rapidly touch the + / - controls to select the lock to on.
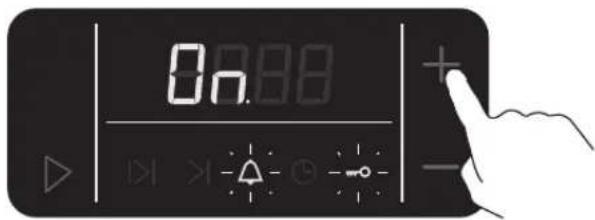
- Touch the ▷control to set the lock on.
The _symbol be lit in the display to show the child lock is active. You will not be able to select the timer or alarm functions.

- To switch the child lock off follow the instructions above but select OFF instead.

Oven light
The oven light will automatically switch on when you select a cooking mode, or you can select just the light to be on in the oven without any heat.
- Turn the cooking mode control to the symbol to switch the light on.
Replacing the light bulbs

Your oven light is on the rear of the oven.
Rear light
- Un-screw the glass cover anti-clockwise to remove the cover.
- Un-screw the bulb and replace it with a new E14, 230V, 25W, 300°C bulb.
- Replace the glass cover.

natural_image
Diagram of a vehicle cabin interior showing structural elements and a star-shaped emblem (no text or symbols)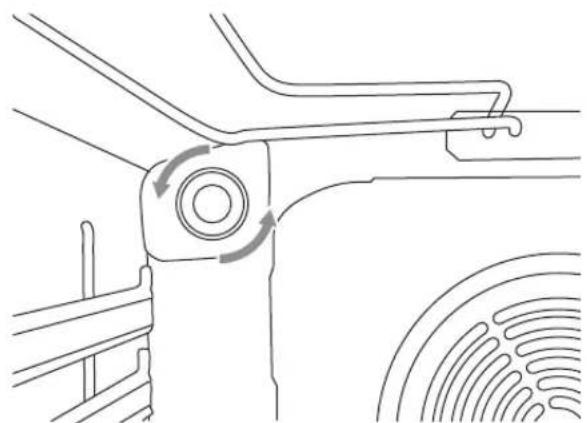
natural_image
Technical line drawing of a mechanical component with rotational arrows indicating motion (no text or symbols)Cleaning and maintenance
Aqua clean

The aqua clean setting switches the lower element on. Set your oven to 70^ C. Pour 0.5 litre of water into a baking tray and place the baking tray onto guide position 1. After 30 minutes the moisture will have softened any baked on food and make it easy to wipe clean.

Before cleaning make sure the oven is switched off at the mains power, and the oven has cooled down.
Appliance housing front
Clean the surfaces with liquid non-abrasive detergents intended for smooth surfaces, and a soft cloth. Apply the detergent on the cloth and wipe off the dirt; then, rinse with water. Do not apply the detergent directly to the surfaces. Do not use aggressive or abrasive cleaners, sharp objects or steel wool, as these will scratch the appliance.
Aluminium surfaces
Aluminium surfaces should be cleaned with non-abrasive liquid detergents intended for such materials. Apply the detergent on a wet cloth and clean the surface; then, rinse the surface with water. Do not apply the cleaner directly on the aluminium surface. Do not use abrasive cleaners or abrasive sponges. The surface should not come into contact with oven cleaning sprays.
Stainless steel front panels (only with some models)
Clean the surface with a mild cleaner (soapy water) and a soft sponge that will not scratch the material. Do not use abrasive or solvent-based cleaners. If these instructions are ignored, the housing surface can be damaged.
Lacquer-coated and plastic surfaces (only with some models)
Clean the buttons / knobs and the door handle with a soft cloth and liquid detergents intended for cleaning smooth lacquer-coated surfaces. You may also use the cleaners made especially for this type of surfaces; in this case, follow the manufacturer's instructions.

The above surfaces should never come into contact with oven cleaning sprays, as these will permanently damage the aluminium parts.
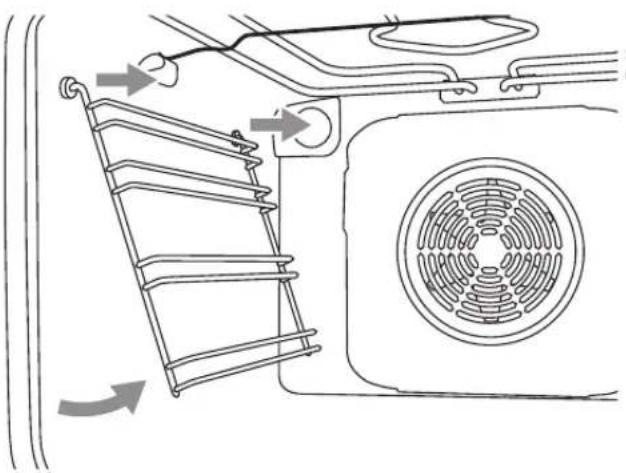
Removing the wire rack guides
The wire rack guides can be removed for cleaning. The wire rack guides can only be washed in soapy water DO NOT put them in your dishwasher.
- Hold the wire rack guide at the bottom and swing it up towards the middle of the oven.
- Un-hook the wire rack guides at the top.
- To replace the wire rack guides repeat the as above in the opposite order.
natural_image
Diagram of a vehicle air conditioner unit showing airflow path and fan structure (no text or symbols)Lowering the grill element
The grill element can be lowered to make it easier to clean the oven cavity ceiling.

- Switch the oven off at the mains before lowering the grill element.
-
Make sure the grill element has cooled down before touching the element.
-
Hold the grill element wire support with both hands and gently pull it forward and allow it to drop. Do not force the element down you could damage it.
-
To replace the grill element, pull it forwards and push it up at the same time and it will spring back into position.

Never try to use the grill in the lowered position.

natural_image
Diagram of a vehicle's seat frame with two upward arrows indicating top-down directions (no text or symbols)Cleaning the oven cavity
Before cleaning the oven, remove the baking trays, the grid, and the guides. Then, pull the grill element towards yourself. Pull the element until the crossbar is released from the supports on the left and right side of the oven. After cleaning, replace the element following the same procedure; the crossbar must be reinserted into the two support brackets.
Cavity
- Clean the interior of the oven with hot soapy water and wipe down with a damp cloth.
- Leave the door open until the interior is dry, before replacing the telescopic rack guide and easy clean inserts.
Accessories
- Wash the accessories (baking trays, wire rack, etc.) with hot water and some conventional detergent.
Special enamel coating
- The oven, interior side of the door, and baking trays, are covered with special enamel that has a smooth and resistant surface. This special layer enables easier cleaning at room temperature.
Catalytic layer
- Catalytic enamel is soft and sensitive to mechanical stress; therefore, the use of abrasive cleaners and sharp objects is not recommended.
- Coarse catalytic enamel speeds up the disintegration of grease and other types of impurity. Minor stains that remain after cooking normally disintegrate by the time the oven is used for the next time. In general, the stains will disappear at temperatures above 220°C, while with lower temperatures they will disappear only in part.
Removing the door for cleaning

Take care when handling parts with glass, knocks, chips, heavy handling and dropping could cause the glass to shatter.
It is possible to remove the door. Follow the steps below to remove the door. This may be required if easier access to the cavity is required or if you wish to clean the door parts.
- Open the oven door fully.
- Release the hinge clips on the left and right hinge as shown.
- With the clips released start closing the door until the hinge supports push against the hinge clips.
- The hinges should now release from the oven, gently lift and pull the oven door away from the oven cavity.
- To replace the door follow these instructions in reverse. If the clips will not fully close, remove the door and try again.

Always make sure the hinge attachment clips are firmly seated in their supports when installing the door. If not the main hinge that is operated by a strong spring may be released any time while installing or removing the door.

natural_image
Line drawing of a mechanical assembly with a curved arrow indicating rotation (no text or symbols)
natural_image
Technical line drawing of a mechanical assembly with a curved arrow indicating direction (no text or symbols)
natural_image
Diagram of a door frame with directional arrows indicating movement or force (no text or symbols)Removing the door glass for cleaning
The inner door glass can be removed for cleaning. The door must first be removed before you can remove the glass.
- Remove the door and place it on a soft surface (a large towel) to prevent damaging the door.
- Release the 2 plastic clips holding the glass by gently lifting (1) and sliding (2) away from the glass.
| ! | Remember which side of the glass is facing the oven cavity before you remove the glass. |
- Lift and slide the glass as shown to remove the inner piece of glass.
You will now be able to get access to the middle glass panel.
- Lift out the middle piece of glass from the top of the door as shown.
Be careful not to loose the rubber glass holders.
Replacing the middle piece of glass
Make sure you replace the glass in the top of the 2 positions as shown below.
Replacing the inner glass
Follow the instructions above in a reverse order.

natural_image
Diagram of a mechanical joint or connector with directional arrow indicating motion (no text or symbols)

natural_image
Line drawing of a rectangular frame with upward arrows indicating force or movement (no text or symbols)
natural_image
Technical line drawing of a mechanical component with mounting brackets and internal features (no text or symbols)
natural_image
Technical line drawing of a mechanical assembly with no visible text or symbols| ! | Make sure the plastic clips click into position when replacing the glass. |
Wiring the oven
An approved suitable cable must be connected from the Consumer Unit (mains fuse box) and be protected by its own 30 amp fuse or Micro Circuit Breaker (MCB). If in any doubt, consult a qualified electrician.
The installation must consist of a double-pole isolation switch, which disconnects both the line (live) and neutral conductors, with a contact separation of at least 3mm incorporated into the fixed wiring. The switch should be fitted to the kitchen wall, and must be placed in an easily accessible position in accordance with IEE regulations. Remove the cover of the power connection box and install the cable, in accordance with the connection diagram. The power supply cable must be positioned away from direct heat sources. It should not be subjected to a temperature rise of more than 50°C above room temperature.
Inserting the links
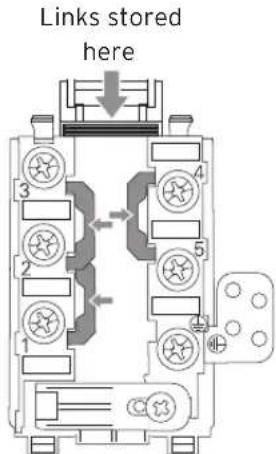
Before connecting the mains cable you may have to fit the 3 links.
The links are stored as shown opposite.
- Insert 1 link between positions 1 and 2.
- Insert 1 link between positions 2 and 3.
- Insert 1 link between positions 4 and 5.
Connecting the wires
- Connect the live (brown) wire to connection position 3 (recommended) or 2 or 1.
- Connect the neutral (blue) wire to connection position 4 (recommended) or 5.
- Connect the earth (green and yellow) wire to the connection marked ⏻ Make sure the earth wire is longer than the live and neutral wires.
- Tighten all the connection screws.
- Un-screw the cable clamp and place the cable under the clamp and then screw the clamp closed.
- Close the connection box and click the lid into place.

Installing the oven
- Veneer or other finish of the furniture the appliance is being built into should be processed with heat-resistant glue (100°C); otherwise, high temperatures may cause them to deform.
- Before installing the appliance, remove the back wall from the piece of kitchen furniture the appliance is being built into, along the entire length of the cutout.
- The installation cutout should be dimensioned as indicated in the figure.
- Level the piece of furniture the appliance was built into with a spirit level.
- The piece of kitchen furniture the appliance is built into must be secured against movement, e.g. attached to the adjacent pieces of kitchen furniture.
- Push the oven into the kitchen furniture cavity far enough that the plastic guides for the screws that are inserted in the oven frame holes are placed against the kitchen cabinet side walls.
- When attaching the appliance, don't over tighten the screws as this may damage the furniture or the ovens enamel coating.

natural_image
Line drawing of an oven with two screws attached, showing internal components and a star-shaped pattern on the door (no text or symbols)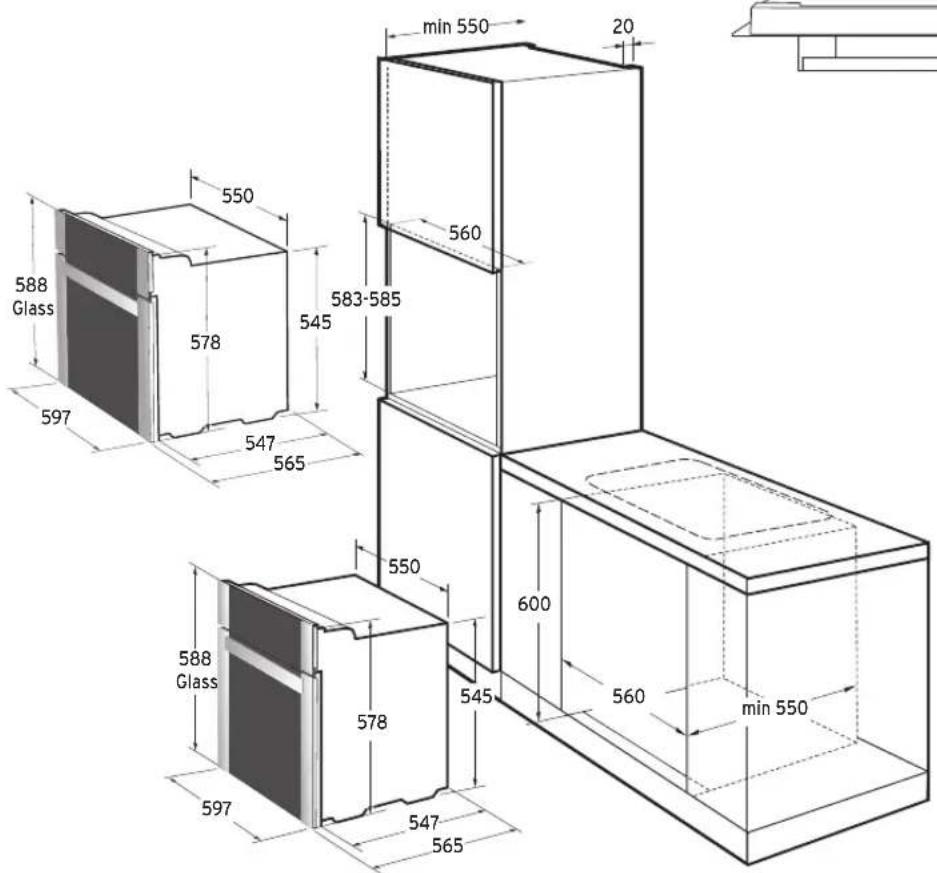
Technical specification
| Model No. SMMFOB13/SMMFOW13 | |
| Dimensions (w x h x d) (mm) 549 x 555 x 545 | |
| Voltage (V) 230 ~ | |
| Frequency (Hz) 50 | |
| Max Power Consumption (W) 3300 | |
| Standby Power Consumption (W) < 0.5Energy Efficiency Class AUsable Oven Capacity (litres) 65 | |
Features and specifications are subject to change without notice.

For general information about this appliance and handy hints and tips, please visit
www.knowhow.com/knowledgebank or call 0844 5611234.
Partmaster co.uk
Visit Partmaster.co.uk today for the easiest way to buy electrical spares and accessories. With over 1 million spares and accessories available we can deliver direct to your door the very next day. Visit www.partmaster.co.uk or call 0844 800 3456 (UK customers only) Calls charged at National Rate.

This symbol on the product or in the instructions means that your electrical and electronic equipment should be disposed at the end of its life separately from your household waste. There are separate collection systems for recycling in the EU.
For more information, please contact the local authority or your retailer where you purchased the product.
DSG Retail Limited (Registered in England No. 504877), Maylands Avenue, Hemel Hempstead, Hertfordshire HP2 7TG. UK
IB-SMMFOB13_W13-130604V1
- Contents
- Safety Warnings
- IMPORTANT SAFETY INSTRUCTIONS
- READ CAREFULLY AND KEEP FOR FUTURE REFERENCE
- Thank you
- Unpacking
- Product overview
- Front View
- Control Panel
- Before using your new oven
- Inserting the baking trays / wire racks
- Using the grill pan handle
- Using the control knobs
- Setting the clock
- Using your oven for the first time
- Basic oven cooking
- Using the grill
- Selecting a cooking mode
- Timer functions
- Setting the cooking duration
- Setting cooking to finish using the clock time
- Setting a delayed cooking time and end time
- Setting an alarm
- Child lock
- Oven light
- Replacing the light bulbs
- Rear light
- Cleaning and maintenance
- Aqua clean
- Appliance housing front
- Aluminium surfaces
- Stainless steel front panels (only with some models)
- Lacquer-coated and plastic surfaces (only with some models)
- Removing the wire rack guides
- Lowering the grill element
- Cleaning the oven cavity
- Cavity
- Accessories
- Special enamel coating
- Catalytic layer
- Removing the door for cleaning
- Removing the door glass for cleaning
- Replacing the middle piece of glass
- Replacing the inner glass
- Wiring the oven
- Inserting the links
- Connecting the wires
- Installing the oven
- Technical specification
- Partmaster co.uk
Brand : Sandstrøm
Model : SMMFOW13
Category : Oven