SPLDAB17 - Radio Sandstrøm - Free user manual and instructions
Find the device manual for free SPLDAB17 Sandstrøm in PDF.


| Product Type | Portable DAB+/FM Radio |
| Model | SPLDAB17 |
| Brand | Sandstrøm |
| Dimensions (approx) | 22 x 13 x 8 cm |
| Weight (approx) | 0.8 kg |
| Power Supply | AC adapter (included) or 6 x AA batteries |
| Radio Bands | DAB/DAB+ (Band III), FM (87.5-108 MHz) |
| Display | LCD screen with station info |
| Functions | DAB/FM auto scan, manual tuning, 30 presets, alarm, sleep timer, snooze |
| Audio Output | Built-in speaker (2W RMS), headphone jack 3.5mm |
| Additional Features | Clock auto-update via DAB, 12/24h format, dimmer |
| Cleaning and Maintenance | Wipe with dry soft cloth; avoid liquids; unplug before cleaning |
| Safety Instructions | Do not expose to rain/moisture; place on stable surface; use only supplied adapter |
| Spare Parts / Repairability | User replaceable batteries; no other serviceable parts; contact support for repairs |
| Environmental | CE marked; comply with WEEE; recycle at end of life |
Frequently Asked Questions - SPLDAB17 Sandstrøm
User questions about SPLDAB17 Sandstrøm
0 question about this device. Answer the ones you know or ask your own.
Ask a new question about this device
Download the instructions for your Radio in PDF format for free! Find your manual SPLDAB17 - Sandstrøm and take your electronic device back in hand. On this page are published all the documents necessary for the use of your device. SPLDAB17 by Sandstrøm.
USER MANUAL SPLDAB17 Sandstrøm
natural_image
Exterior view of a gray portable radio with antenna and speaker grille (no visible text or symbols)
Contents
Safety Warnings....6
Unpacking 12
Product Overview....13
Front View....13
Top View....14
Rear View 15
Connections 16
Using the AUX Connection....16
Using Earphones....17
Connecting to the Mains Supply....18
General Operation....19
Switching ON/OFF....19
Selecting Modes 20
Adjusting the Volume....20
System Settings 21
Sleep 21
Equaliser....22
Setting the Time and Date....23
Backlight 24
Inactive Standby 24
Language 25
System Reset 25
Software Version 26
DAB Operation 27
Auto Scan....28
Manual Tune 29
DRC 29
Presetting Stations....30
Recalling a Preset Station....31
DAB Display Modes....32
FM Operation 35
Selecting FM Mode 35
Searching for a Station Automatically....36
Searching for a Station Manually....36
Scan Setting....37
Audio Setting 37
Presetting Stations....38
Recalling a Preset Station....39
AUX Operation 40
Maintenance 41
Cleaning the Unit....41
Hints and Tips....42
Specifications 44
Safety Warnings
- Read all the instructions carefully before using the unit and keep them for future reference.
- Retain the manual. If you pass the unit onto a third party make sure to include this manual.
Damage
- Please inspect the unit for damage after unpacking.
- Do not continue to operate the unit if you are in any doubt about it working normally, or if it is damaged in any way - switch off and consult your dealer.
Location of Unit
- The unit must be placed on a flat stable surface and should not be subjected to vibrations.
- Do not place the unit on sloped or unstable surfaces as the unit may fall off or tip over.
- Do not place the unit close to table edge. It may fall off due to vibration during high volume listening.
Temperature
- Avoid extreme degrees of temperature, either hot or cold. Place the unit well away from heat sources such as radiators or gas/electric fires.
- Avoid exposure to direct sunlight and other sources of heat.
Naked Flames
• Never place any type of candle or naked flame on the top of or near the unit.
Moisture
- Do not submerge this unit in water. It can cause serious damage.
Ventilation
- To prevent the risk of electric shock or fire hazard due to overheating, ensure that curtains and other materials do not obstruct the ventilation vents.
- Do not install or place this unit in a bookcase, built-in cabinet or in another confined space. Ensure the unit is well ventilated.
Interference
- Do not place the unit on or near appliances which may cause electromagnetic interference. If you do, it may adversely affect the operating performance of the unit, and cause a distorted sound.
Service
- To reduce the risk of electric shock, do not remove screws. The unit does not contain any user-serviceable parts. Please leave all maintenance work to qualified personnel.
- Do not open any fixed covers as this may expose dangerous voltages.
Built-in Battery Care
- Your product is powered by a rechargeable battery.
• The battery can be charged and discharged hundreds of times, but will eventually wear out.
• Unplug the charger from the electrical plug and the product when not in use. - Do not leave a fully charged battery connected to a charger, since overcharging may shorten its lifetime.
• If left unused, a fully charged battery will lose its charge over time. - Leaving the product in hot or cold places, such as in a closed car in the summer and winter conditions, will reduce the capacity and lifetime of the battery.
-
Always try to keep your device in a cool, moisture-free environment that's less than 32^ . A product with a hot or cold battery may not work temporarily, even when the battery is fully charged. Battery performance is particularly limited in temperatures well below freezing.
-
The unit should be fully recharged after using the device each time. This will keep the health of the battery.
- If you plan to store your device for longer than six months, charge the battery for an hour every six months to keep it fresh.
Battery warning!
• The battery used in this product may present a risk of fire or chemical burn if mistreated.
- Do not attempt to open the product or replace the battery. It is built-in and not changeable. Use of other batteries may present a risk of fire or explosion and the warranty will be terminated.
- Only recharge your battery with the provided approved charger or USB cable designated for this product.
- Dispose of batteries according to local regulations. Please recycle when possible. Do not dispose as household waste or in a fire as they may explode.
• Batteries may explode if damaged.
Maintenance
- Do not use any type of abrasive pad or abrasive cleaning solutions as these may damage the unit's surface.
• Do not use liquids to clean the unit.
Thank you for purchasing your new product.
We recommend that you spend some time reading this instruction manual in order that you fully understand all the operational features it offers. You will also find some hints and tips to help you resolve any issues.
Read all the safety instructions carefully before use and keep this instruction manual for future reference.
Unpacking
Remove all items from the packaging. Retain the packaging. If you dispose of it please do so according to local regulations.
The following items are included:
- Main Unit
- Mains Adapter
• 3.5mm to 3.5mm Stereo Audio Cable
• Instruction Manual

If items are missing, or damaged please contact Partmaster (UK only). Tel: 0344 800 3456 for assistance.
Product Overview
Front View
- Speaker

Top View
- ON/OFF Button
- SCAN Button
- MODE Button
- INFO Button
- Display
- Aerial
- VOLUME +/- Dial
- TUNE Button
- MENU Button
- PRESET Button

Rear View
- RESET Button
- AUX IN Socket
- Earphones Socket
- DC IN-5V Socket

Connections
Using the AUX Connection
Use a 3.5 mm to 3.5 mm stereo audio cable (included) to connect a mobile device to the main unit's AUX IN socket.
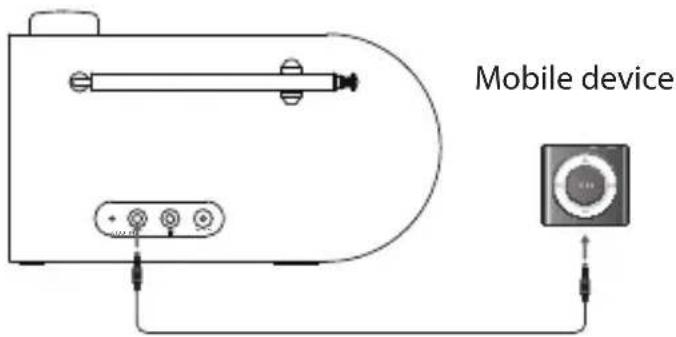
3.5 mm to 3.5 mm stereo audio cables (included)
Using Earphones
Turn down the volume before connecting the earphones. Slowly raise the volume with the earphones on until you reach your desired volume. When earphones are connected, the speakers automatically mute.

natural_image
Diagram of electronic device components including a USB cable, connector, and headphones (no text or symbols)
Long-term exposure to loud music may cause hearing damage. It is best to avoid extreme volume when using earphones, especially for extended periods.
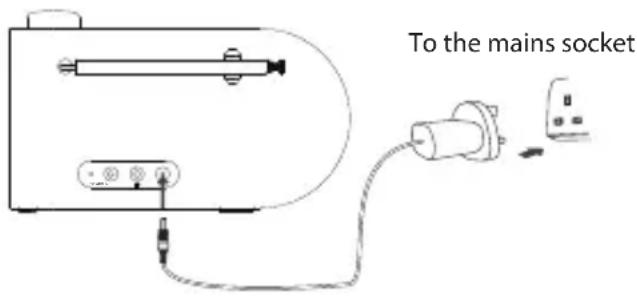
Connecting to the Mains Supply
- This unit is designed to operate with an AC power supply or with the built-in battery.
- Connecting the unit to any other power source may cause damage to the unit. Unwind the mains cable to its full length. Connect the end of the cable to the DC IN 5V socket at the rear of the unit and then connect the mains cable to the mains socket. Make sure the mains cable is firmly inserted into the mains socket. It starts battery charging and the unit is now ready to use.
- Charge the internal battery for 12 hours before first time use. It will automatically charge battery when the unit is connected to mains socket. The display will show "Charging #" for its charging status. Once the unit is fully charged, the display will show Mains Power.

Ensure all connections are connected before connecting to the mains power socket.
General Operation
Switching ON/OFF
While using battery power:
- Press and hold ⏻ button to switch the unit on.
- Press and hold button again to switch the unit off.
While using mains power:
- Press and hold ⏻ button to switch the unit on.
- Press and hold ⏻ button again to switch the unit in Standby mode.
• To switch the unit off completely, unplug the power plug from the mains socket.

The unit will enter STANDBY mode (while using mains power) or switch OFF (while using built-in battery power) for power saving, if the unit is muted, or it is in Auxiliary input mode but without input signal for approximately 10 minutes.
Selecting Modes
Press MODE button repeatedly on the unit to switch between DAB, FM, and Auxiliary Input mode. The selected mode will show on the display.
Adjusting the Volume
- Turn the +/- dial clockwise/anticlockwise to increase/decrease the volume.
- Press button to mute/resume playback.
System Settings
Sleep
You can set a sleep timer so if you are listening to your radio and fall asleep, it will automatically switch off at the preset time. The sleep timer can be activated for up to a maximum of 90 minutes.
- In On mode, press MENU button, and then press the +/- dial or press ◀◀▶▶ button to select System. Press the +/- dial to confirm.
- Turn the +/- dial or press ◀◀▶ button to select Sleep. Press the +/- dial to confirm.
- Turn the +/- dial or press ◀◀▶ button to select between Sleep off, 15 minutes, 30 minutes, 45 minutes, 60 minutes or 90 minutes, and then press +/- dial to confirm.
Equaliser
Your radio has preset equaliser setting. This feature enables you to set a sound equalization profile. The equalization setting will change the tone of the sound from your radio.
- In ON mode, press MENU button, and then turn the +/- dial or press ◀◀▶▶ button to select System. Press the +/- dial to confirm.
- Turn the +/- dial or press ◀◀▶ button to select Equaliser. Press the +/- dial to confirm.
- Turn the +/- dial or press ◀◀▶ button to select a profile through Normal, Classic, Jazz, Pop, Rock, and Speech and then press the +/- dial to confirm.
Adjusting the Bass and Treble
- After choosing My EQ... in the Equaliser menu, turn the +/- dial or press ◀◀▶▶ button to select between Treble and Bass, and then press the +/- dial to confirm.
- Turn +/- dial or press ◀◀▶ button to set the value of Treble and Bass among -3 to +3, and then press the +/- dial to confirm.
Your setting will now be stored into MY EQ... so you can access them at any time.
Setting the Time and Date
- In ON mode, press MENU button, and then turn the +/- dial or press ◀◀▶▶ button to select System. Press the +/- dial to confirm.
- Turn the +/- dial or press ◀◀▶ button to select Time. Press the +/- dial to confirm.
- Turn the +/- dial or press ◀◀▶ button to select options, and then press +/- dial to confirm the setting.
| Set Time/Date Here you | can manually set the time and date. |
| Auto update Choose how | you want the time to be automatically updated.Update from Any / Update from DAB / Update from FM / No update |
| Set 12/24 hour | Set 24 hour or Set 12 hour. |
Backlight
You can set the brightness for the power on screens and the Standby screen.
- In ON mode, press MENU button, and then turn the +/- dial or press ◀◀▶ button to select System. Press the +/- dial to confirm.
- Turn the +/- dial or press ◀◀▶▶ button to select Backlight. Press the +/- dial to confirm.
- Turn +/- dial or press ◀◀◀▶ button to select between High, Medium or Low, and then press the +/- dial to confirm.
Inactive Standby
- In ON mode, press MENU button, and then turn the +/- dial or press ◀◀▶ button to select System. Press the +/- dial to confirm.
- Turn the +/- dial or press ◀◀▶▶ button to select Inactive Standby. Press the +/- dial to confirm.
- Turn +/- dial or press ◀◀▶ button to select between Off, 2 hour, 4 hour, 5 hour or 6 hour, and then press the +/- dial to confirm.
Language
This feature enables you to change menu language.
- In ON mode, press MENU button, and then turn the +/- dial or press ◀◀▶ button to select System. Press the +/- dial to confirm.
- Turn the +/- dial or press ◀◀▶ button to select Language. Press the +/- dial to confirm.
- Turn +/- dial or press ◀◀▶ button to select a language, and then press +/- dial to confirm.
System Reset
There may be times when you need to reset your unit back to the factory settings especially when you have moved house. If you experience reception problems you may want to reset and try again. If you move to another part of the country and pick up the local and national DAB/TUNER stations in that area, your previously tuned channels may no longer be available.
- In ON mode, press MENU button, and then turn the +/- dial or press ◀◀▶▶ button to select System. Press the +/- dial to confirm.
- Turn the +/- dial or press ◀◀▶ button to select Factory Reset. Press the +/- dial to confirm.
- Turn the +/- dial or press ◀◀▶ button to select Yes to reset. Otherwise select No to cancel. Press the +/- dial to confirm.

After the system reset, all the tuned stations, DAB, & FM preset stations will be erased.
Software Version
This information may be requested when dealing with technical support issues.
- In ON mode, press MENU button, and then turn the +/- dial or press ◀◀▶ button to select System. Press the +/- dial to confirm.
- Turn the +/- dial or press ◀◀▶ button to select SW version. Press the +/- dial to confirm.
DAB Operation
When you turn on the radio it will automatically search and store all the available stations. You may conduct an additional full scan to ensure all stations are picked up and stored. It is also recommended every few months to run a new scan to pick up any new DAB/DAB+ that may have begun broadcasting after your radio scanned last time.
For initial use, your radio will conduct a full scan and store stations list in memory. Once the scanning is completed, the DAB/DAB+ stations will be displayed in alphanumeric order. The first station in the list will be selected. Make sure the aerial is fully extended before selecting DAB mode, because your radio will automatically scan for DAB radio stations. If the aerial is not fully extended your radio will not tune in properly.

The clock will be updated automatically if you can receive DAB/FM signal in your location. In order to synchronize to the current local time, you must leave it on the DAB/FM station for a period of time.

natural_image
Diagram of a portable electronic device with a sensor emitting an upward arrow (no text or symbols)Auto Scan
The auto scan will search for all DAB Band III channels. After the scan has finished, the first alphanumerically found station will be automatically selected.
- In ON mode, press MENU button, and then turn the +/- dial or press ◀◀▶▶ button to select Full scan. Press the +/- dial to confirm.
- The display will show "SCAN..." that indicates the progress of the scan and the amount of stations that have been found so far.
- Once the scan has finished, the unit will display the total number of stations have been found and a list of the found stations. All the stations that have been found will be stored automatically.
To explore the found stations, turn the +/- dial or press button to select a scanned station, and then press the +/- dial to confirm.

If you want to remove all the previously scanned stations, system reset is required.
Manual Tune
This function is for advanced users only. Stations are selected from the station list.
Manual scan enables you to tune to each multiplex channel, check if a multiplex is present and measure the signal strength.
-
In ON mode, press MENU button, and then turn the +/- dial or press ◀◀▶▶ button to select Manual tune. Press the +/- dial to confirm.
-
Turn the +/- dial or press ◀◀▶ button to select DAB stations from 5A to 13F. Press the +/- dial to confirm.
DRC
You can set the DRC (Dynamic Range Compression) to High, Low or Off. This will reduce the volume of loud sounds and increase the volume of quiet sounds.
-
In ON mode, press MENU button, and then turn the +/- dial or press ◀◀▶▶ button to select DRC. Press the +/- dial to confirm.
-
Turn the +/- dial or press ◀◀▶ button to select DRC off / DRC high / DRC low, and then press +/- dial to confirm.
Presetting Stations
You can store up to 10 of your favourite DAB stations to the memory. This will enable you to access your favourite stations quickly and easily.
- In ON mode, press MENU button, and then turn the +/- dial or press ◀◀▶▶ button to select Preset. Press the +/- dial to confirm.
- Turn the +/- dial or press ◀◀▶ button to select Save. Press the +/- dial to confirm.
- Turn the +/- dial or press ◀◀▶ button to select the preset position that you would like to store the station in then press the +/- dial to save the station. The words "Preset # Stored" will show on the display.
Recalling a Preset Station
- In ON mode, press MENU button, and then turn the +/- dial or press ◀◀▶▶ button to select Preset. Press the +/- dial to confirm.
- Turn the +/- dial or press ◀◀▶ button to select Recall. Press the +/- dial to confirm.
- Turn the +/- dial or press ◀◀◀▶ button to select your desired preset station number. Press the +/- dial to confirm.

The stored stations will be saved into the memory and power off will not erase it. Storing a new station in a preset location will erase the previously stored station in that location.
DAB Display Modes
Every time you press the INFO button, the display will cycle through the following display modes.
DLS (Dynamic Label Segment)
Dynamic label segment is a scrolling message that the broadcaster may include with their transmissions. The message usually includes information, such as programme details etc.

DAB – unlike normal radio, groups together several radio stations and transmits them on one frequency.
Signal Strength
The display will show a slide bar to indicate the signal strength, the stronger the signal, the longer the bar will be from left to right.
Programme Type
This describes the "Style" or "genre" of music that is being broadcast e.g. "Rock" or "Classical".
Ensemble Name
A Ensemble/multiplex is a collection of radio stations that are bundled and transmitted on one frequency. There are national and local multiplexes. Local ones contain stations that are specific to that area.
Channel Number
DAB digital radio can be broadcast on a wide number of frequencies.
Frequency
The frequency of the present station will be displayed.
Error in signal
A number showing the error rate. If the number is 0, it means the signal received is error free and the signal strength is strong. If the error rate is high, it is recommended to reorient the radio aerial or reposition the unit.
Audio Mode
The display will show the audio mode (Stereo or Mono) of the current station.
Bitrate
The display will show the digital audio bit rate being received.
Clock
The broadcaster (Radio station) provides clock information automatically. If the information is not available, the display will show the incorrect time.
Date
The broadcaster (Radio station) provides date information automatically. If the information is not available, the display will show the incorrect date.
FM Operation
Selecting FM Mode
The unit will automatically select a FM radio station with a good signal.
- Press MODE button repeatedly to select FM mode.
- For initial use, it will start at the beginning of the FM frequency range (87.50 MHz). Or it will play the last FM station you were listening to.

The clock will be updated automatically if you can receive DAB/FM signal in your location. In order to synchronize to the current local time, you must leave it on the DAB/FM station for a period of time.
Searching for a Station Automatically
In FM mode, press and hold the ◀◀▶ button until the tuner starts searching for a station. The tuner will stop searching after tuning into a radio station.

The search may not stop at a station with a very weak signal.
Searching for a Station Manually
In FM mode, repeatedly press the ◀◀▶ button until the desired frequency reception quality is found.

With FM radio it may be necessary to fine tune each station by pressing the ◀ button repeatedly. Each press will adjust the frequency by 0.05MHz. If reception is still poor adjust the position of the aerial or try moving the radio to another location.
Scan Setting
In the Scan Settings menu you can choose if you want your radio to tune to All stations or Strong stations only, and it will try to tune to all stations, however some may be very weak.
- In ON mode, press MENU button, and then turn the +/- dial or press ◀◀▶▶ button to select Scan setting. Press the +/- dial to confirm.
- Turn the +/- dial or press ◀◀▶ button to select All stations or Strong stations. Press the +/- dial to confirm.
Audio Setting
If you find that the station you are listening is not clear, you can select to listen to it in MONO this can often clear up some of the static.
- In ON mode, press MENU button, and then turn the +/- dial or press ◀◀▶▶ button to select Audio setting. Press the +/- dial to confirm.
- Turn the +/- dial or press ◀◀▶ button to select Stereo allowed or Forced mono. Press the +/- dial to confirm.
Presetting Stations
You can store up to 10 of your favourite FM stations to the memory. This will enable you to access your favourite stations quickly and easily.
- In ON mode, press MENU button, and then turn the +/- dial or press ◀◀▶▶ button to select Preset. Press the +/- dial to confirm.
- Turn the +/- dial or press ◀◀▶ button to select Save. Press the +/- dial to confirm.
- Turn the +/- dial or press ◀◀▶ button to select the preset position that you would like to store the station in then press the +/- dial to save the station. The words "Preset # Stored" will show on the display.
Recalling a Preset Station
- In ON mode, press MENU button, and then turn the +/- dial or press ◀◀▶▶ button to select Preset. Press the +/- dial to confirm.
- Turn the +/- dial or press ◀◀▶ button to select Recall. Press the +/- dial to confirm.
- Turn the +/- dial or press ◀◀◀▶ button to select your desired preset station number. Press the +/- dial to confirm.

The stored stations will be saved into the memory and power off will not erase it. Storing a new station in a preset location will erase the previously stored station in that location.
AUX Operation
There are AUX IN socket located at the rear of the unit. Analogue audio sound signals from other sources can be connected to the unit through these sockets.
- Connect to another audio device using the AUX IN socket via a RCA stereo audio cable (not included).
- While in the ON mode, press MODE button repeatedly to select Auxiliary Input mode.
- Turn the +/- dial to adjust the volume to your desired level.
- In Auxiliary Input mode, operate your audio device directly for playback features.
Maintenance
Cleaning the Unit

Ensure the unit is fully unplugged from the mains socket before cleaning.
• To clean the unit, wipe the case with a slightly moist, lint-free cloth.
- Do not use any cleaning fluids containing alcohol, ammonia or abrasives.
- Do not spray an aerosol at or near the unit.
Hints and Tips
If a problem occurs, it may often be due to something very minor. The following table contains various tips:
| Problem Solution | |
| No power • Ensure the mains | cable is connected securely.Make sure that the unit is switched on. |
| No Sound | Adjust the volume control, it may not be turned up. |
| Static Sound | Signal reception is too low. Adjust the aerial or move the unit to a stronger signal location. |
| Sound is distorted | Volume is too high. Adjust the volume control. |
| The unit does not respond when pressing any button | · The unit may freeze up during use. Switch the unit off and then on again at the mains socket to reset the unit. |
| Desired station not found | · Weak signal. Use the Manual Tune function. |
| No coverage in your area or poor reception | · Adjust the position of the aerial. |
| The display is blank | · This may occur if the broadcaster changes the label of a service or removes a label while tuned. The unit will try to re-tune or perform a scan. |

If any functional abnormality is encountered, unplug the unit from the mains socket and reconnect it again.
Specifications
| Model SPLDAB17 | |
| Power Consumption 1 × 3 W rms, 3.5 ohm | |
| Power Standby <1 W | |
| Frequency response 100 Hz-10 KHz (-10dB) | |
| THD <10% | |
| SNR >65 dB(A) | |
| Radio Frequency range FM: 87.5 MHz~108 MHz | |
| Battery Lithium battery 2200 mAh, 3.7 V | |
| Playback Time 6 hours (50% Volume) | |
| Net Weight 496 g | |
| Dimensions 171 mm (W) × 53 mm (D) × 99 mm (H) | |
Power Adapter (Use only power adapter listed below)
| Power Adapter Model PS06H050K1000BD | |
| Power Adapter Manufacturer Shenzhen Flypower Technology Co., LTD | |
| Power Supply Input: AC 100-240 V~, 50/60 Hz, 0.25 AOutput: 5 V =±0 A | ⊖⊖⊖ |
Features and specifications are subject to change without prior notice.

For general information about this appliance and handy hints and tips, please visit www.knowhow.com/knowledgebank or call UK: 0344 561 1234 Ireland: 1890 818 575.

Visit Partmaster.co.uk today for the easiest way to buy electrical spares and accessories. With over 1 million spares and accessories available we can deliver direct to your door
the very next day. Visit www.partmaster.co.uk or call 0344 800 3456 (UK customers only). Calls charged at National Rate.

The symbol on the product or its packaging indicates that this product must not be disposed of with your other household waste. Instead, it is your responsibility to dispose of your waste equipment by handing it over to a designated collection point for the recycling of waste electrical and electronic equipment. The separate collection and recycling of your waste equipment at the time of disposal will help conserve natural resources and ensure that it is recycled in a manner that protects human health and the environment.
For more information about where you can drop off your waste for recycling, please contact your local authority, or where you purchased your product.
All trademarks are the property of their respective owners and all rights are acknowledged.
DSG Retail Ltd. (co. no. 504877)
1 Portal Way, London, W3 6RS, UK
(IB-SPLDAB17-170509V1)
- Contents
- Safety Warnings
- Damage
- Location of Unit
- Temperature
- Naked Flames
- Moisture
- Ventilation
- Interference
- Service
- Built-in Battery Care
- Battery warning!
- Maintenance
- Thank you for purchasing your new product.
- Unpacking
- Product Overview
- Front View
- Top View
- Rear View
- Connections
- Using the AUX Connection
- Using Earphones
- Connecting to the Mains Supply
- General Operation
- Switching ON/OFF
- Selecting Modes
- Adjusting the Volume
- System Settings
- Sleep
- Equaliser
- Adjusting the Bass and Treble
- Setting the Time and Date
- Backlight
- Inactive Standby
- Language
- System Reset
- Software Version
- DAB Operation
- Auto Scan
- Manual Tune
- DRC
- Presetting Stations
- Recalling a Preset Station
- DAB Display Modes
- DLS (Dynamic Label Segment)
- Signal Strength
- Programme Type
- Ensemble Name
- Channel Number
- Frequency
- Error in signal
- Audio Mode
- Bitrate
- Clock
- Date
- FM Operation
- Selecting FM Mode
- Searching for a Station Automatically
- Searching for a Station Manually
- Scan Setting
- Audio Setting
- AUX Operation
- Cleaning the Unit
- Hints and Tips
Brand : Sandstrøm
Model : SPLDAB17
Category : Radio