
FRMA651W - Oven Profilo - Free user manual and instructions
Find the device manual for free FRMA651W Profilo in PDF.


| Product Type | Built-in Electric Oven |
| Brand | Profilo |
| Model | FRMA651W |
| Energy Source | Electric |
| Total Power Consumption | 3200 W (approximate) |
| Oven Capacity | 65 L |
| Number of Functions | 8 (including conventional, grill, fan-assisted, etc.) |
| Temperature Range | 50°C - 250°C |
| Control Type | Mechanical knobs with electronic timer |
| Display | LED timer display |
| Interior Light | Yes |
| Cooling System | Tangential fan cooling |
| Cleaning Type | Enamel interior, easy-clean |
| Safety Features | Child lock, automatic shut-off, overheat protection |
| Dimensions (H x W x D) | 595 x 595 x 548 mm (approximate) |
| Built-in Dimensions (H x W x D) | 590 x 560 x 550 mm (approximate) |
| Net Weight | 30 kg (approximate) |
| Door Type | Drop-down with cool touch glass |
| Warranty | 2 years parts and labor |
Frequently Asked Questions - FRMA651W Profilo
User questions about FRMA651W Profilo
0 question about this device. Answer the ones you know or ask your own.
Ask a new question about this device
Download the instructions for your Oven in PDF format for free! Find your manual FRMA651W - Profilo and take your electronic device back in hand. On this page are published all the documents necessary for the use of your device. FRMA651W by Profilo.
USER MANUAL FRMA651W Profilo
natural_image
Isometric line drawing of a double door with an oven, mounted on a wall (no text or symbols)3
D

4
natural_image
Technical illustration of a window with screw fasteners and a close-up of the interior panel (no text or symbols)de
Wichtige Hinweise
This appliance is intended for use up to a maximum height of 2000 metres above sea level.
If the appliance is being installed under a hob, refer to the assembly instructions for the hob.
Do not use the door handle to carry or install the appliance.
Before installation, check the appliance for transportation dan Before starting up the appliance, remove any packaging material and adhesive film from the cooking compartment and the door.
The appliance must be disconnected from the power supply all installation work.
Preparing the units - Figure1
This appliance is intended for use up to a maximum height of des 2000 metres above sea level.
■ The safe operation of this appliance can only be guarar installation been installed to a professional standard in accordance these installation instructions. The installer is liable for damage führemcurred as a result of incorrect installation.
■ Fitted units must be heat-resistant up to 90 °C, and neighbouring unit fronts up to 70 °C.
- Do not install the appliance behind a decorative panel. There is a risk of overheating.
- Carry out all cut-out work on the kitchen unit and work fitting the appliances. Remove any shavings or the function of the Electrical components may be impaired.
■ Caution during installation. Parts that are accessible during ventilation may have sharp edges. Wear protective gloves to prevent cuts
■ The power socket for the appliance must either be local hatched area B or outside of the area where the appliance is installed.
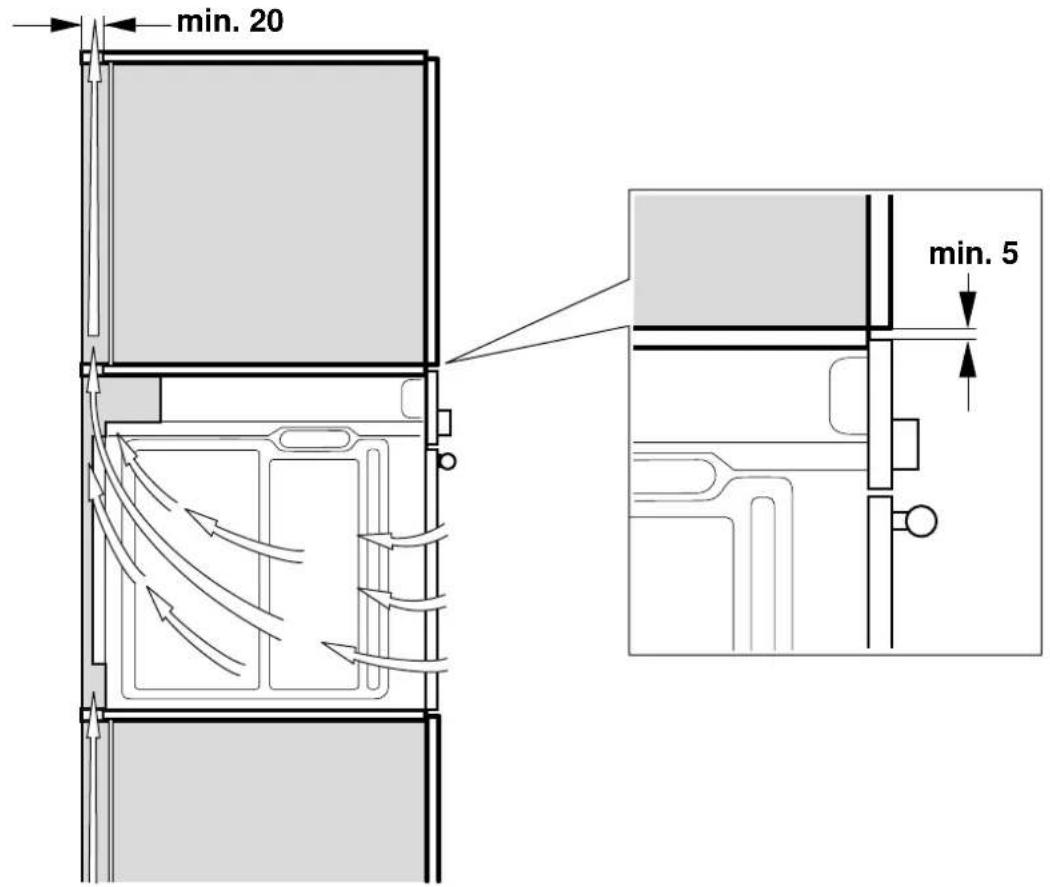
There must be an air gap of 5 mm between the appliance and adjacent cabinets.
- Secure any unsecured units to the wall using a standard C.
Appliance under the worktop - Fig. 1
There must be a ventilation cut-out made in the intermediate floor of the surround unit.
dem Secure the worktop to the fitted units.
If a fitted oven is to be built in underahob, pay attention umbrella installation instructions.
Appliance in a tall unit - Figs 2+4
The appliance may also be installed in a tall unit.
There must be a gap between the intermediate floors and the mounting wall of approx. 20 mm in order to provide ventilation to the oven.
Only fit the appliance at a height where removing baking trays does not present a problem.
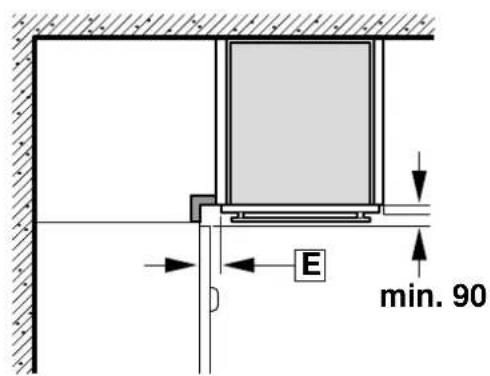
Corner installation - Fig. 3
For corner installation, dimension D must be taken into consideration. Dimension E is dependent on the thickness of the unit front and the handle.
Connecting the appliance to the power supply
Before using the appliance for the first time, make sure that the domestic power line is equipped with a conductor which complies with the relevant safety regulations. The appliance must only be connected by a qualified electrician and must comply with the statutory and official provisions, as well as the provisions of the local network operator.
In rare cases, failure of a conductor or an incorrect installation may cause material damage or serious injury (death or to electric shock). The manufacturer accepts no responsibility for personal injuries or damage to the appliance due to faulty or incorrect electrical connection.
■ During all installation work, the appliance must be discon from the power supply.
- The appliance fulfils the requirements of protection class I and may only be connected to an earthed mains socket.
■ The mains connecting cable must be at least type H05 V V-F 3G, 1.5 mm².
The yellow-green conductor must be connected first and be slightly longer than the two other wires on the appliance side.
In accordance with safety regulations, an all-pole sepa at least a 3 mm contact opening must be provided. A separator is not required during connection, which is carried out via an earthed power socket which is easily accessible at all times.
■ Contact protection must be ensured during installation.
■ Determine the phase conductor and neutral conductor (zero conductor) in the socket. The appliance may be damaged if incorrectly connected.
■ The oven must be connected in accordance with the on the rating plate.
- Place the appliance in front of the conversion cabinet it. The service cable must be long enough.
Caution: During installation, ensure that the mains cable is not jammed and does not come into contact with hot
- All work on the appliance, including replacing the cabling, must only be carried out by technical support.
Only in Sweden, Finland and Norway
The appliance can also be connected using the plug provided which has an earthing contact system. This must still be accessible after installation. If this is not the case, an all-pole isolating switch must be used on the installation side gap of at least 3 mm.
Screwing the oven to the conversion cabinet 5
■ Slide the appliance fully into the conversion cabinet. The mains cable must not be laid over sharp edges or underneath be jammed, bent or squashed, and must not come into contact with hot appliance parts.
- Align the oven centrally in the conversion cabinet and screw in using the screws provided (4 x 25).
If the conversion cabinet corresponds to the dimensions specified by us, there must be a ventilation slot above. To ensure sufficient ventilation, never cover this ventilation slot.
A safety distance of at least 5 mm is required between the appliance and the adjacent kitchen walls and units.
Removal
Disconnect the appliance from the power supply. Undo the securing screws. Raise the appliance slightly and pull it out completely.
fr
Recommendations importantes
- de
- Wichtige Hinweise
- Preparing the units - Figure1
- Appliance under the worktop - Fig. 1
- Appliance in a tall unit - Figs 2+4
- Corner installation - Fig. 3
- Connecting the appliance to the power supply
- Only in Sweden, Finland and Norway
- Screwing the oven to the conversion cabinet 5
- Removal
- fr
- Recommendations importantes
Brand : Profilo
Model : FRMA651W
Category : Oven