
WM-1270TVEME - Washing machine BUSH - Free user manual and instructions
Find the device manual for free WM-1270TVEME BUSH in PDF.


| Product Type | Automatic Drum Washing Machine |
| Brand | Bush |
| Model | WM-1270TVEME |
| Power Supply | 220–240 V, 50 Hz |
| Max Working Current | 10 A |
| Water Pressure Range | 0.03 – 1 MPa |
| Washing Power | 200 W |
| Spinning Power | 600 W |
| Rated Load | 7 kg |
| Maximum Spin Speed | 1200 rpm |
| Number of Washing Programs | 11 |
| Water Heating Power | 1800 W |
| Dimensions (H x D x W) | 840 x 610 x 595 mm |
| Net Weight | 72 kg |
| Control Type | Electronic with digital display |
| Delay Start | 0.5 – 24 hours |
| Extra Rinse | Selectable |
| Rinse Hold | Selectable (soak cycle) |
| Child Lock | Control panel lock function |
| Power-off Memory | Resumes cycle after power cut |
| Door Lock | Automatic, 2–3 min delay after stop |
| Detergent Drawer Compartments | 3 (pre-wash, main wash, softener) |
| Safety Protection | Earth connection, 13 A fuse, child lock |
| Included Accessories | Inlet hose, drainage hose, packing bolts, damp-proof board |
Frequently Asked Questions - WM-1270TVEME BUSH
Refer to the installation section in the manual for diagrams.
- The power cord is plugged in and the socket is switched on.
- The door is closed properly as the machine will not start if the door is open.
- The water tap is turned on.
- The programme dial is set correctly.
- Press the Start/Pause button. If still not working, check the fuse or circuit breaker.
Err1: Door not properly shut – close the door firmly.
Err2: Drainage error – clean the filter and check the drain hose.
Err3: Temperature sensor fault – contact service.
Err4: Heater error – contact service.
Err5: Water not filling – check tap and water pressure.
Err6/7: Motor error – contact service.
Err8: Water exceeds level – check circuit and contact service.
CLR.F: Excessive foam – use low-foam detergent or reduce dosage.
Unb: Unbalanced load – redistribute laundry.
User questions about WM-1270TVEME BUSH
0 question about this device. Answer the ones you know or ask your own.
Ask a new question about this device
Download the instructions for your Washing machine in PDF format for free! Find your manual WM-1270TVEME - BUSH and take your electronic device back in hand. On this page are published all the documents necessary for the use of your device. WM-1270TVEME by BUSH.
USER MANUAL WM-1270TVEME BUSH
natural_image
Front view of a white washing machine with a digital display and control panel (no visible text or symbols)WM-1270TVE
WM-1270TVEME
WM-1470TVE
WM-1470TVEME
Automatic Drum Washing Machine INSTRUCTION MANUAL
0020504619G
Customer helpline: 0845 6004632
Table of contents
Matters Needing Attention 1
Installation 2-3
Operational Functions 4-5
Guide to Operational Program Selection 6
Washing Methods 7-8
Other Functions 9
Maintenance 10-11
Trouble shooting 12
Electric Diagram 13
Specifications 14
Product Guarantee 15
Safety instructions.... 16
Safety instructions
Electrical connection (UK ONLY)
For your safety please read the following information
Warning: This appliance must be earthed.
The appliance must be connected to a 220–240 volts 50 cycle AC supply by means of a three pin socket, suitably earthed and should be protected by a 13 amp fuse.
The appliance is supplied with a standard 3 pin mains plug fitted with a 13 amp fuse. Should the fuse require replacement, it must be replaced with a 13 amp fuse approved to BS1363/A.
The plug contains a removable fuse cover that must be refitted when the fuse is replaced. In the event of the fuse cover being lost or damaged, the plug must not be used until a replacement cover has been obtained.
When disposing of the appliance the plug should be cut off as close to the plug body as possible and the fuse should be removed to prevent an electrical hazard. Dispose of the plug safely.
The use of adapters, multiple connectors and/or extension cables is not recommended.
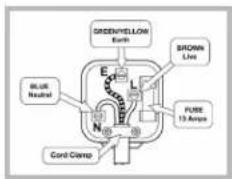
How to wire a 13 amp plug.
Important
The wires in the mains lead on this appliance are coloured in accordance with the following code:
Green and Yellow – Earth
Blue - Neutral
Brown - Live
As this may not correspond with your installation, proceed as follows:
The green and yellow wire must be connected to the terminal in the plug which is marked with the letter E or with the earth symbol – or coloured green and yellow,
The blue wire must be connected to the terminal marked N.
The brown wire must be connected to the terminal marked L.

PRODUCT GUARANTEE
This product is guaranteed against manufacturing defects for a period of

Year
This product is guaranteed for twelve months from the date of original purchase. Any defect that arises due to faulty materials or workmanship will either be replaced, refunded or repaired free of charge where possible during this period by the dealer from whom you purchased the unit.
The guarantee is subject to the following provisions;
- The guarantee does not cover accidental damage, misuse, cabinet parts, knobs or consumable items.
- The product must be correctly installed and operated in accordance with the instructions contained in this manual.
- It must be used solely for domestic purpose.
- The guarantee will be rendered invalid if the product is re-sold or has been damaged by inexpert repair.
- Specifications are subject to change without notice.
- The manufacturer disclaims any liability for the incidental or consequential damages.
- The guarantee is in addition to, and does not diminish your statutory or legal rights.
- In the event of a problem with the product within the guarantee period call the customer helpline on 0845 6004632
Guarantor: Argos Ltd
489 - 499 Avebury Boulevard
Central Milton Keynes
MK9 2NW
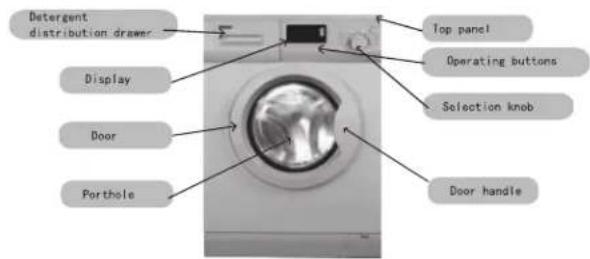
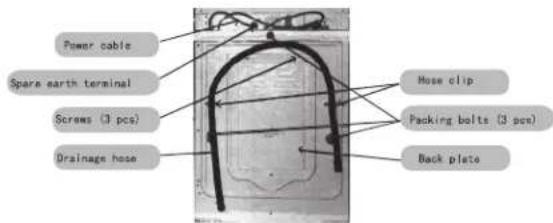
Washing Machine Diagram
Matters Needing Attention
IMPORTANT- SAFETY INFORMATION READ BEFORE USE & KEEP FOR FUTURE REFERENCE
At time of delivery
Please dispose of packaging materials properly and ensure that it is kept out of children's reach.
Installation
This appliance must not be exposed to weather conditions(rain, direct sun, etc...)
The appliance cannot be installed outdoors or in a damp area.
Ensure that the domestic wiring is properly earthed
Site the appliance and connect in accordance to the installation instructions
The appliance must be kept away from direct heat sources and direct sunlight
The mains electricity supply must conform to the rating plate as shown on the appliance
The washing machine must not be connected to the electricity supply during the installation process.
The use of adapters, multiple connectors and/or extension cables is not recommended.
After the appliance has been installed the mains plug should be easily accessible.
If the power cable is damaged in any way do not connect to the electrical supply. The power cable must be replaced by either the manufacturer or the authorised service agent.
If the appliance is to be installed on a carpeted floor ensure that the ventilation holes are not obstructed.
During Use
Do not allow children or inform persons to operate the appliance without adult supervision
Children should be supervised to ensure that they do not play with the appliance
Before initial use ensure that hose connections are firmly connected and the water pressure is sufficient.
Avoid contact with the door of the appliance as it may become hot during the heating process
Never touch the appliance with wet hands or feet
If the appliance is not operating or maintenance must be preformed, disconnect the appliance from the power supply.
Do not place heavy, heating sources or wet objects on top of the washing machine
The door is fitted with a self lock device and will not open for 2-3 minutes after the program has stopped.
Do not open the door if the water level is still visible through the porthole.
The detergent dispenser should not be opened whilst the machine is operating.
Specifications
| Item\Model | WM-1470TVE | WM-1470TVEME | WM-1270TVE | WM-1270TVEME |
| Power supply | (220~240V/(50Hz) | (220~240V/(50Hz) | (220~240V/(50Hz) | (220~240V/(50Hz) |
| Max working current (A) | 10 | 10 | 10 | 10 |
| Water pressure (MPa) | 0.03≤P≤1 | 0.03≤P≤1 | 0.03≤P≤1 | 0.03≤P≤1 |
| Washing power (W) | 200 | 200 | 200 | 200 |
| Spinning power (M) | 700 | 700 | 600 | 600 |
| Rated load (kg) | 7 | 7 | 7 | 7 |
| Spinning speed (r/min) | 1400 | 1400 | 1200 | 1200 |
| Washing programs | 11 | 11 | 11 | 11 |
| Water heating power (W) | 1800 | 1800 | 1800 | 1800 |
| Dimensions (H×D×W)mm | 840X610X595 | 840X610X595 | 840X610X595 | 840X610X595 |
| Weight (kg) | 72 | 72 | 72 | 72 |

The symbol on the product or on its packaging indicates that this product may not be treated as household waste. Instead it shall be handed over to the applicable collection point for the recycling of electrical and electronic equipment. By ensuring this product is disposed of correctly, you will help prevent potential negative consequences for the environment and human health, which could otherwise be caused by inappropriate waste handling of this product. For more detailed information about recycling of this product, please contact your local city office, your household waste disposal service or the shop where you purchased the product.

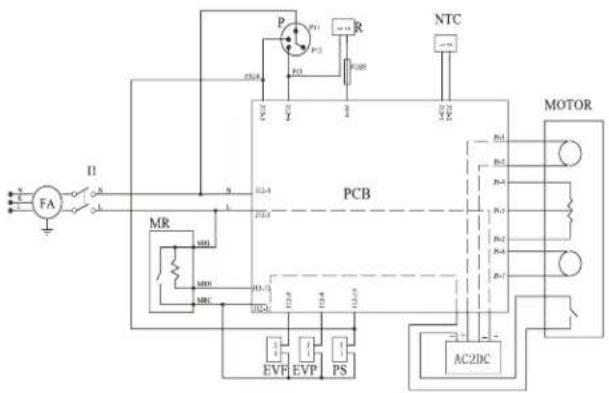
Electric Diagram
flowchart
graph TD
    FA["FA"] -->|I1| MR["MR"]
    MR -->|N| N
    N -->|I2| N1
    N1 -->|I3| N2
    N2 -->|I4| N3
    N3 -->|I5| N4
    N4 -->|I6| N5
    N5 -->|I7| N6
    N6 -->|I8| N7
    N7 -->|I9| N8
    N8 -->|I10| N9
    N9 -->|I11| N10
    N10 -->|I12| N13
    N13 -->|I14| N15
    N15 -->|I16| N17
    N17 -->|I18| N19
    N19 -->|I20| N20
    N20 -->|I22| N23
    N23 -->|I24| N25
    N25 -->|I26| N27
    N27 -->|I28| N29
    N29 -->|I30| N30
    N30 -->|I32| N33
    N33 -->|I34| N35
    N35 -->|I36| N37
    N37 -->|I38| N39
    N39 -->|I40| N40
    N40 -->|I42| N43
    N43 -->|I44| N45
    N45 -->|I46| N47
    N47 -->|I48| N49
    N49 -->|I50| N50
    N50 -->|I52| N53
    N53 -->|I54| N55
    N55 -->|I56| N57
    N57 -->|I58| N59
    N59 -->|I60| N60
    N60 -->|I62| N62
    N62 -->|I64| N64
    N64 -->|I66| N65
    N65 -->|I68| N67
    N67 -->|I70| N68
    N68 -->|I72| N69
    N69 -->|I74| N70
    N70 -->|I76| N71
    N71 -->|I78| N72
    N72 -->|I80| N73
    N73 -->|I82| N74
    N74 -->|I84| N75
    N75 -->|I86| N76
    N76 -->|I88| N77
    N77 -->|I90| N78
    N78 -->|I92| N79
    N79 -->|I94| N80
    N80 -->|I96| N81
    N81 -->|I98| N82
    N82 -->|N90| MOTOR["MOTOR"]
    MOTOR --> A["AC2DC"]
    A --> B["PS"]
    B --> C["EVP"]
    C --> D["MC"]
    D --> E["MR"]
    E --> F["MR"]
    F --> G["MR"]
    G --> H["MR"]
    H --> I["MR"]
    I --> J["MR"]
    J --> K["MR"]
    K --> L["MR"]
    L --> M["MR"]
    M --> N["MR"]
    N --> O["MR"]
    O --> P["MR"]
    P --> Q["MR"]
    Q --> R["MR"]
    R --> S["MR"]
    S --> T["MR"]
    T --> U["MR"]
    U --> V["MR"]
    V --> W["MR"]
    W --> X["MR"]
    X --> Y["MR"]
    Y --> Z["MR"]
    Z --> AA["MR"]
    AA --> AB["MR"]
    AB --> AC["MR"]
Motor - Motor
PCB - Printed Circuit Board
MR - Door Lock
R - Heating Element
PS - Drainage Pump
EVF, EVP - Water Inlet Magnetic Valve
P - Pressure Switch
FA - Interference Suppressor
NTC - Temperature Sensor
11-Power Switch
AC2DC-Commutator
Installation
- Remove all packaging materials from the base and around the appliance as shown in Fig.1.Upon opening of the package.water drops may be seen on the plastic bag and the porthole.This is normal phenomenon resulting from water test in the factory as shown in Fig 1.
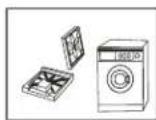
Fig. 1
- Dismantle the packing bolts as shown in Fig. 2. The packing bolts are designed for support of internal components of the appliance during transit. Before use:
- Remove the back plate;
- Remove the three packing bolts on the back plate and take out the rubber hose;
- Replace the back plate:
- Fill the holes left by the packing bolts with plastic plugs.
(Attention: The packing bolts and rubber hose should be kept in a safe place for later use)
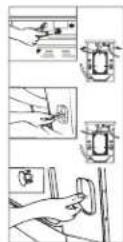
Fig. 2
● Adjusting the washing machine
There are adjustable feet under the bottom of the washing machine. The washing machine should be adjusted so that it is level as shown in Fig 3.

Fig. 3
Reminder:
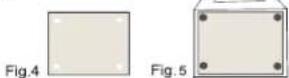
When open the shrink package, you will find a board which has four holes, as shown in Fig4, This board must be fixed before using. It is dampproof and can also be used for reducing the noise. Lay down the machine, screw off the four feet, put the four fix hole of the board right on the fix hole of the feet, then screw on the feet to fix the board as shown in Fig5.
13
Installation
Joining the Inlet Hose to the Washing Machine
- Connect the nut on the inlet hose to the connector on the water valve.
- Tighten the nut to secure the hose
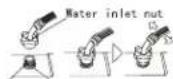
Water inlet valve connector
Drainage Hose
The height of the drainage outlet must be 80-100 cm. To prevent the drainage hose from dropping off, fix it to the drainage hose clip at the back of the washing machine.
- Use the drainage holder to keep the end of the drainage hose retained and prevent the outflow of water. It is recommended that the length of the drainage hose not be increased; if an increased length hose is required, please consult the approved service agent. The additional hose should be no more than 250 cm (overextended hoses could lead to siphonage). Note: The drainage hose should not be submerged in water and should be securely fixed and leak-free.

Connecting to the Power Supply
Before connecting to the power supply, check:
● The socket is adequate for the maximum power of the washing machine (For safety, fuses in the power circuit should be rated for no less than 15A).
● The voltage should meet the requirement.
The power outlet should be capable of accepting the washing machine plug. The washing machine must be earthed before use.
Troubleshooting
| The following circumstances do not constitute problems. Do not contact the maintenance service until the problem has been confirmed. | |
| Problem | Possible causes |
| The washing machine fails to operate | ● Poor connection to power supply● Power failure● Door is not properly closed● Machine has not been switched on |
| Washing machine cannot be filled with water | ● Water tap is not turned on● Water pressure is less than 0.03Mpa● The inlet hose is kinked● Water supply failure● The program dial is not properly set.● The door is not properly closed● The inlet hose filter is blocked |
| The machine is draining while is being filled | ● The height of the drainage hose is below 80cm (it should be within 80-100cm)● The drainage hose end is in water |
| Drainage failure | ● Drainage hose is blocked● Drainage hose end is exceed 100cm above the floor level● The filter is blocked |
| Strong vibration during spin drying | ● Not all packing bolts have been removed● Washing machine is located on an uneven surface or is not level● Machine load is over 7kg. |
| Operation stops before completion of a wash cycle | ● Water or electricity failure● Washing machine is in soaking cycle |
| Operation stops for a period of time | ● Washing machine is in anti-crease soaking cycle● Washing machine gives an error message. |
| Excessive foam in the drum, which is spilled to the distribution drawer | ● The detergent is not a low-foaming type or for manual wash● Excessive use of detergent |
| The following circumstances do not constitute problems. Do not contact the maintenance service until the problem has been confirmed. | |
| Problem | Possible causes |
| The washing machine fails to operate | ● Poor connection to power supply● Power failure● Door is not properly closed● Machine has not been switched on |
| Washing machine cannot be filled with water | ● Water tap is not turned on● Water pressure is less than 0.03Mpa● The inlet hose is kinked● Water supply failure● The program dial is not properly set.● The door is not properly closed● The inlet hose filter is blocked |
| The machine is draining while is being filled | ● The height of the drainage hose is below 80cm (it should be within 80-100cm)● The drainage hose end is in water |
| Drainage failure | ● Drainage hose is blocked● Drainage hose end is exceed 100cm above the floor level● The filter is blocked |
| Strong vibration during spin drying | ● Not all packing bolts have been removed● Washing machine is located on an uneven surface or is not level● Machine load is over 7kg. |
| Operation stops before completion of a wash cycle | ● Water or electricity failure● Washing machine is in soaking cycle |
| Operation stops for a period of time | ● Washing machine is in anti-crease soaking cycle● Washing machine gives an error message. |
| Excessive foam in the drum, which is spilled to the distribution drawer | ● The detergent is not a low-foaming type or for manual wash● Excessive use of detergent |
Maintenance
- To prevent blockage to the water supply by ingress of foreign substances, clean the water inlet and inlet filter regularly.
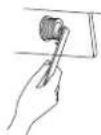
- If the machine is to be moved to a place, replace the vibration absorbing locks (packing screws, rubber gaskets) removed before installation to prevent damage as shown below.
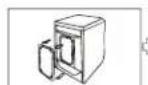
Remove the back cover and take out the three rubber plugs.
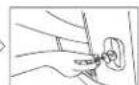
Insert the channel steel vibration locks and the
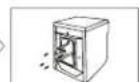
Insert the rubber bolt gaskets.
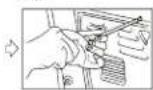
Replace the back cover.
- If the washing machine is left idle for a long period, pull out the electrical plug and turn off the water tap. If the machine is to remain dormant for a long period of time drain the excess water from the appliance and open the door to prevent moisture and odours.
Operational Functions

A: Power Switch
Pressing this button will switch the washing machine on and off.
B: Wash programming dial
By turning the dial clockwise/counterclockwise, the required program can be selected.
(Refer to Guide to Operational Program Selection).
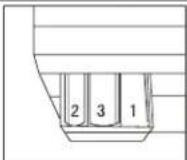
C: Detergent distribution drawer
Open the drawer, three compartments can be seen:
Compartment 1: Pre-wash detergent
Compartment 2: Normal - Quick wash detergent
Compartment 3: Softener, conditioning agent, perfume, etc.

D: Washing temperature dial
Press this button to select the required temperature (when a temperature is selected, the corresponding indicator will go on).
E: Display
Such information as remaining wash time, temperature and speed setting and error messages will be shown.
Note: After power is switched on, the display will go on and the remaining wash time decreases. As the water pressure and temperature may differ, the remaining time may be adjusted accordingly. When the laundry is not balanced during spinning, the time may be automatically prolonged. These are normal phenomena.
F: Washing indicator
It indicates the washing process of the selected program. When the light is on, it shows that the washing process being indicated is running.
11
4
Operational Functions
G : Delay Button
Press this button, the washing machine will start operation after a period of time and the corresponding indicator will go on. The range is 0.5-24 hours; each touch of this button increases half an hour. After the button being set, press the Start/Pause button to start countdown of the set time (the time is displayed on the screen until the program ends).
Note: The delay time must be longer than the program time; otherwise, the washing machine will start the wash program directly.
H : Extra rinse button
Press this button, the indicator will go on. An additional rinse operation will be activated.
Note: Select this function when program 1-6 or 9 is selected.
1 : Rinse hold button
Press this button, the overhead indicator will go on. When the washing machine is at the last rinsing operation, it will not drain but to start a soaking cycle. If you want to spin the laundry, press this button again the indicator will go off and operation will resume.
Note: Select this function when "prewash", "cotton&linen", "synthetics" "single rinse" is required.
J: €€ Time button
Prior to selecting a washing program, press this button to select the laundry load. (13 1:2 2:3 FULL), the washing machine will automatically adjust the water consumption, heating time and washing time. Users can select the washing load as acquired.
Note: 1. *1:3 — FULL * refers to the four levels of washing load. If the laundry is more than half of the drum content, it is recommended to select 2:3-FULL; otherwise, select 1:3-1:2
2.For'synthelics","sport",you can only select 1:3:1:2 2:3
- Please adjust the detergent quantity according to the washing load selected
K: Start / Pause button
When the washing machine is plugged and a program is selected, press this button to start operation. During a wash cycle, press it, the display will begin blinking and operation will stop. Press it again to resume operation.
L: Spin speed button
Press this button to select the desired speed. There are speed indicators over this button.
Note: Please refer to Guide to Operational Program Selection and Washing Instructions for the required washing temperature and spinning speed for different laundry. If you have no specific requirements, please use default settings.
Maintenance
-
If the machine is to remain dormant for a long period of time drain the excess water from the appliance and open the door to prevent moisture and odours.
-
Unplug the machine during cleaning and maintenance. Use a soft cloth dampened with soap liquid to clean the machine case and rubber components. Do not use organic chemicals or corrosive solvents.
-
Clean the detergent distribution drawer regularly.
Swing out the drawer, flush it clean with water and then replace it.
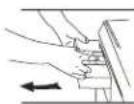
- Clean the filter Cleaning methods (once a month)
1) Push out the outer cover (Fig. 1-3);
2) Screw out filter by turning counterclockwise (Fig. 2);
3) Flash clean with running water;
4) Replace the filter by turning clockwise and remount the
cover. (Fig.3)
Caution: The filter must be in place, or it may lead to
leakage
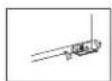
Fig.1
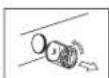
Fig.2

Fig.3

BUSH | WASHING MACHINE | USER MANUAL | CUSTOMER HELPLINE
0845 6004632
BUSH | WASHING MACHINE | USER MANUAL | CUSTOMER HELPLINE

0845 6004632
Other Functions
Special Functions
-
Control panel lock function: To prevent children from accidentally changing the settings. Press "Delay" and "Start/pause" at the same time for 3 seconds, this function will work and the "Lock" sign and the remaining program time will appear alternatively. When this function is on, all other buttons are locked. Press the two buttons again to unlock.
-
Power-off memory function: This machine has power-off memory function. In case of abrupt power failure or the power must be cut off during a program cycle, the present settings will be saved and the preset operation will resume when the power is on again.
Err1: Door is not properly shut. Correction: Shut the door properly.
Err2: Drainage error, water not emptied within 4 minutes. Correction: Clean the filter and check the drain hose for blockage. If error still exists, please contact the approved service agent.
Err3: Temperature sensor short circuit or open circuit. Correction: contact the approved service agent.
Err4: Heater error. Correction: contact the approved service agent
Err5: Water fails to meet the specified level within 8 minutes. Correction: Check the tap and the water pressure; if error still exists, please contact the approved service agent.
Err6: Motor error. It may be not properly connected or damaged. Correction: contact the approved service agent.
Err7: Motor error. Motor overheat protection or is damaged Correction: contact the approved service agent
Err8: Water exceeds protective level. Correction: Check the circuit and Contact the approved service agent
End: End of a wash cycle.
1:25: Status information: Remaining program time.
19:25: Status information: Preset time for delayed operation.
400: The dafult spin speed is 400rpm.
Unb: After the last rinsing cycle finishes, spinning fains completely due to unbalance of the laundry.
- Alarm sound can be cancelled if it is needed. Please follow the instruction as below: Switch on the washing machine and turn the program knob to spin cycle, then press the delay button and hold on for 3 seconds. The "b OFF" will be displayed on the screen which indicates that alarm sound has been canceled. To operate the above steps again so the alarm sound can be recovered and the display will show "b ON".
- CLR.F: Too much foam used in wash cycle. Washing machine can eliminate the foam automatically during spin cycle. If the washing machine fails to eliminate the excessive foam, it will end the cycle without spinning. Troubleshooting: Restart a new cycle without detergent or Use low foam detergent or Reduce the dosage of detergent next time.
Guide to Operational Program Selection
WM-1270TVE WM-1270TVEME WM-1470TVE WM-1470TVEME
| Mode Selection(Program Knob Position) | Recommended Laundry | Temperature | Default Setting | Detergent | |||||
| 1 | 2 | 3 | |||||||
| 1 | Prewash | Heavy-soil laundry | *·30°C40°C·50°C·60°C·90°C· | 1000rpm 40°C | ★ | ★ | ○ | ||
| 2 | Cotton- &linen | cotton fabric | *·30°C40°C·50°C·60°C·90°C· | 1000rpm 40°C | × | ★ | ○ | ||
| 3 | Synthetics | Synthetic fabrics | *-30°C·40°C50°C·60°C· | 1000rpm 40°C | × | ★ | ○ | ||
| 4 | Wool | Wool fabrics | *-30°C·40°C | ☒ | × | × | ★ | ○ | |
| 5 | Handwash | Hackers with a full-time finish and special case items identified as machines washable | *-30°C·40°C | ☒ | × | × | ★ | ○ | |
| 6 | Silk | Silk fabrics | *-30°C·40°C | ☒ | × | × | ★ | ○ | |
| 7 | Sport | Sports wear | *-30°C·40°C | 1000rpm 40°C | × | ★ | ○ | ||
| 8 | Quick Wash | Slight-soil cotton, linen and synthetic fabrics | *-30°C·40°C | 1000rpm 40°C | × | ★ | ○ | ||
| 9 | Rinse | × | 1000rpm | × | × | × | ○ | ||
| 10 | Spin | × | 1000rpm | × | × | × | × | ||
| 11 | Drain | × | ☒ | × | × | × | × | ||
Note: ○ indicates that softener can be added if needed; ★ indicates that detergent must be added; X indicates that detergent must not be added. * indicates cold water 1) The wash temperature indicates the maximum temperature.


Washing Methods
1. Loading
Open the door and place the laundry into the appliance. Note:
1) It is advisable that the appliance be run empty for the first use to flush the internal systems.
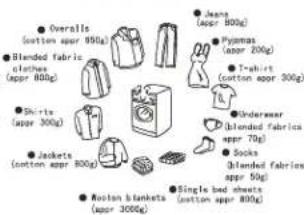
2) Do not overload the machine. Please see load reference diagram for estimated garment weights.
Load Reference
2. Adding detergent
Note. Only use detergents recommend for use in washing machines. Dry cleaning solvents must not be used in this appliance.
Slide out the detergent drawer and put the required detergent, softening agent into the corresponding boxes. Push back the drawer gently.
(Refer to the instructions on the drawer)
Caution:
1) For pre-washing program, detergent should be added to both compartments 1 and 2. For other programs, do not add detergent to compartment 1.
2) Do not overuse softener; otherwise, it will damage the artificial fibers. Refer to the instructions during use.
3. Selecting washing
To get the best washing effect, an appropriate washing program should be selected according to the guideline.
Washing Methods
4. Setting washing temperature
Please set the temperature knob at the "*" position if heating is not needed; otherwise, select an appropriate temperature as required (refer to the "Guide to Operational Program Selection" section for maximum washing temperatures).
5. Selecting functional
Select a functional button if necessary (refer to the "Operational Instructions" section).
6. Washing
Press the Start / Pause button, the washing machine will operate according to the pre-set programs.
7. Finish
The washing machine will stop operation automatically when a washing cycle ends. The "End" sign will appear. Open the door and take out the laundry.
Hints for saving energy
● During operation
- Collect clothes for one full wash load.
- Do not overload the washing machine.
- Pre-wash heavily soiled clothes.
- Reduce the amount of detergent or choose standard or delicate wash programs for slightly soiled clothes.
- Choose a proper washing temperature. Only exceed 60°C for heavily soiled clothes.
- Do not use more detergent than required.
- Softening agent makes clothes feel softer and easier to iron.
Other
To add fabric conditioner will not only make the clothes feel soft but also get rid of static condensation to facilitate ironing.
- Table of contents
- Safety instructions
- Electrical connection (UK ONLY)
- Warning: This appliance must be earthed.
- How to wire a 13 amp plug.
- Important
- PRODUCT GUARANTEE
- Washing Machine Diagram
- Matters Needing Attention
- IMPORTANT- SAFETY INFORMATION READ BEFORE USE & KEEP FOR FUTURE REFERENCE
- Specifications
- Electric Diagram
- Installation
- Drainage Hose
- Connecting to the Power Supply
- Maintenance
- Operational Functions
- G : Delay Button
- H : Extra rinse button
- : Rinse hold button
- J: €€ Time button
- K: Start / Pause button
- L: Spin speed button
- Other Functions
- Special Functions
- Guide to Operational Program Selection
- Washing Methods
- Loading
- Adding detergent
- Selecting washing
- Setting washing temperature
- Selecting functional
- Washing
- Finish
- Hints for saving energy
- ● During operation
- Other
Brand : BUSH
Model : WM-1270TVEME
Category : Washing machine