
PH13 - Powerline Adapter Tenda - Free user manual and instructions
Find the device manual for free PH13 Tenda in PDF.


| Product Type | Powerline Adapter (AV1000 Gigabit) |
| Brand | Tenda |
| Model | PH13 |
| Dimensions (L x W x H) | 82 mm x 60 mm x 32 mm |
| Input Power | AC 100-240V, 50/60Hz |
| Data Rate | Up to 1000 Mbps |
| Standards | HomePlug AV2, IEEE 802.3, IEEE 802.3u, IEEE 802.3ab |
| Encryption | 128-bit AES |
| Number of Ethernet Ports | 1 |
| Interface Type | RJ45 |
| LED Indicators | Power (green), PLC (green/red), LAN (green) |
| Buttons | 1 x Pair button (also for reset) |
| Operating Temperature | 0°C to 40°C |
| Storage Temperature | -40°C to 70°C |
| Operating Humidity | 10% to 90% RH (non-condensing) |
| Package Contents | 2 adapters, 2 Ethernet cables, 1 install guide |
| Compatibility | With any HomePlug AV compliant devices |
| Maximum Devices per Network | 8 adapters |
| Management Software | Available for Windows (UI for advanced settings) |
| Safety Certifications | CE, FCC Class B |
| Installation | Plug and play; no configuration required for basic use |
| Cleaning | Wipe with a dry cloth; do not use liquids or sprays |
Frequently Asked Questions - PH13 Tenda
User questions about PH13 Tenda
0 question about this device. Answer the ones you know or ask your own.
Ask a new question about this device
Download the instructions for your Powerline Adapter in PDF format for free! Find your manual PH13 - Tenda and take your electronic device back in hand. On this page are published all the documents necessary for the use of your device. PH13 by Tenda.
USER MANUAL PH13 Tenda
© 2016 Shenzhen Tenda Technology Co., Ltd. All rights reserved.
Tenda is a registered trademark legally held by Shenzhen Tenda Technology Co., Ltd. Other brand and product names mentioned herein are trademarks or registered trademarks of their respective holders. Copyright of the whole product as integration, including its accessories and software, belongs to Shenzhen Tenda Technology Co., Ltd. No part of this publication can be reproduced, transmitted, transcribed, stored in a retrieval system, or translated into any language in any form or by any means without the prior written permission of Shenzhen Tenda Technology Co., Ltd.
Disclaimer
Pictures, images and product specifications herein are for references only. To improve internal design, operational function, and/or reliability, Tenda reserves the right to make changes to the products without obligation to notify any person or organization of such revisions or changes. Tenda does not assume any liability that may occur due to the use or application of the product described herein. Every effort has been made in the preparation of this document to ensure accuracy of the contents, but all statements, information and recommendations in this document do not constitute the warranty of any kind, express or implied.
Contents
I Get to Know the Adapter .... 1
1 Overview .... 1
2 Package Contents....1
3 LED/Interface/Bu on....2
II Access the Internet.... 3
1 Install Your Adapters .... 3
2 Secure Your Powerline Network....4
3 Add Adapters to a Private Powerline Network 6
III Manage Your Adapters....7
1 UI Installa on....7
2 Run the UI 12
3 Change Device Name 13
4 Change Network Name....15
5 Reset....18
6 Upgrade....19
Appendix 21
1 Con gure Your Computer 21
Windows 8....21
Windows 7 22
2 FAQs 25
3 Technical Support....27
4 Technical Speci ca ons....27
5 Safety and Emission Statement.... 28
I Get to Know the Adapter
Before you use the PLC product, take a moment to become familiar with the package contents and the front panel. Pay particular attention to the LEDs on the front panel.
1 Overview
PH3 AV1000 Gigabit Powerline Adapters are designed for online video/audio player, web camera, IPTV and other high bandwidth applications. It adopts electrical circuit to transmit Internet data with electrical power, which in a sense reduces the Ethernet cable cost and easily extends network coverage to where the electrical power can get within the valid range. The rate of these powerline adapters are up to 1000Mbps, giving a guarantee of a more fluent online playing experience.
2 Package Contents
Unpack the package. Your box should contain the following items:
• AV1000 Gigabit Powerline Adapter * 2
- Install Guide * 1
- Ethernet Cable * 2
* If any item is incorrect, missing or damaged, please keep the original package and contact the vendor for replacement immediately.
3 LED/Interface/Button
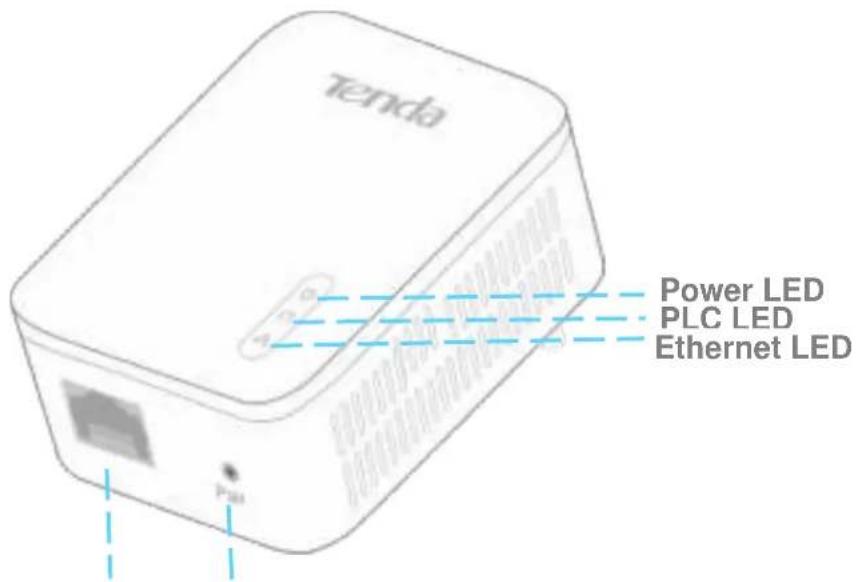
Ethernet Port Pair Button
| LED | Color | Status | Description |
| Power | / | Off | The device is NOT receiving electrical power. |
| Green | Solid | The electrical power is on. | |
| Green | Slow blinking | The device is in power saving mode. | |
| PLC | / | Off | The device doesn't pair with other powerline devices, or is powered off. |
| Green | Solid | The device is connected to a powerline network. | |
| Green | Fast blinking | The device is pairing with a powerline devices. | |
| Red | Solid | The powerline signal of the adapter is poor; try plugging the adapter closing to your router or modem until the PLC LED turns to green. | |
| Ethernet | / | Off | No Ethernet cable is detected on the Ethernet port. |
| Green | Solid | The Ethernet cable is connected properly. |
| Interface/Button | Description |
| Ethernet Port | For connecting to the Internet, a computer, or other network devices via an Ethernet cable. |
| Pair | Press and hold it for about 1 second to start pairing. |
| Press and hold it for about 6 seconds (the Power LED will be off and then light up again) to restore the adapter to factory default. |
II Access the Internet
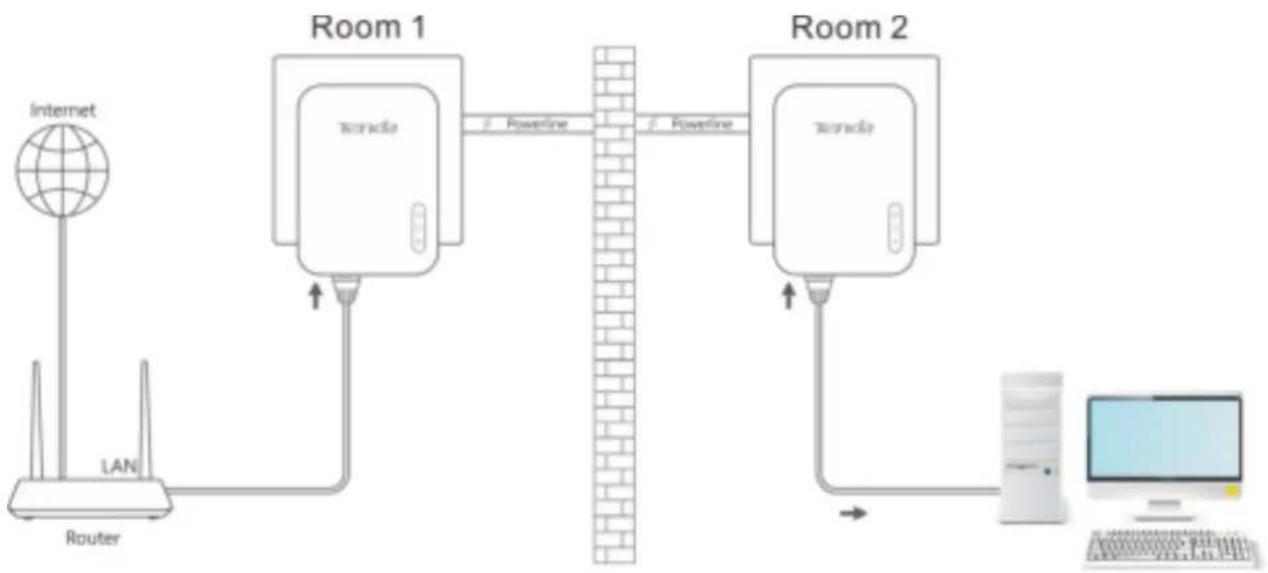
This section explains how to access the Internet via a pair of Powerline Adapters, including how to position and use your Powerline Adapters, how to connect them and access the Internet. Here's an example for you.
1 Install Your Adapters
Attention
The adapter can only be used in vertical directions.
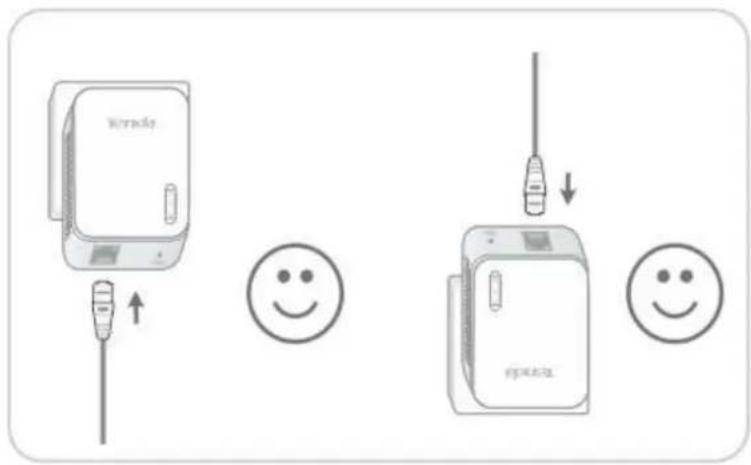
Plug and Play
flowchart
graph LR
    A["Internet"] --> B["Router"]
    B --> C["Tursole"]
    C --> D["Room 1"]
    D --> E["Tursole"]
    E --> F["Room 2"]
    F --> G["Computer"]
    style A fill:#f9f,stroke:#333
    style B fill:#ccf,stroke:#333
    style C fill:#cfc,stroke:#333
    style D fill:#fcc,stroke:#333
    style E fill:#cff,stroke:#333
    style F fill:#ffc,stroke:#333
    style G fill:#cfc,stroke:#333
1 Connect one adapter to one of the LAN ports of an ADSL modem/wireless router for Internet access, and plug it into a wall outlet nearby.
2 Connect the other adapter to a computer or other wired devices, and plug it to a wall outlet.
3 Wait until the PLC LEDs on the two adapters are lit.
Then you can try accessing the Internet via your computer. If you cannot access the Internet after the operation above, please refer to Q1 for solution.
2 Secure Your Powerline Network
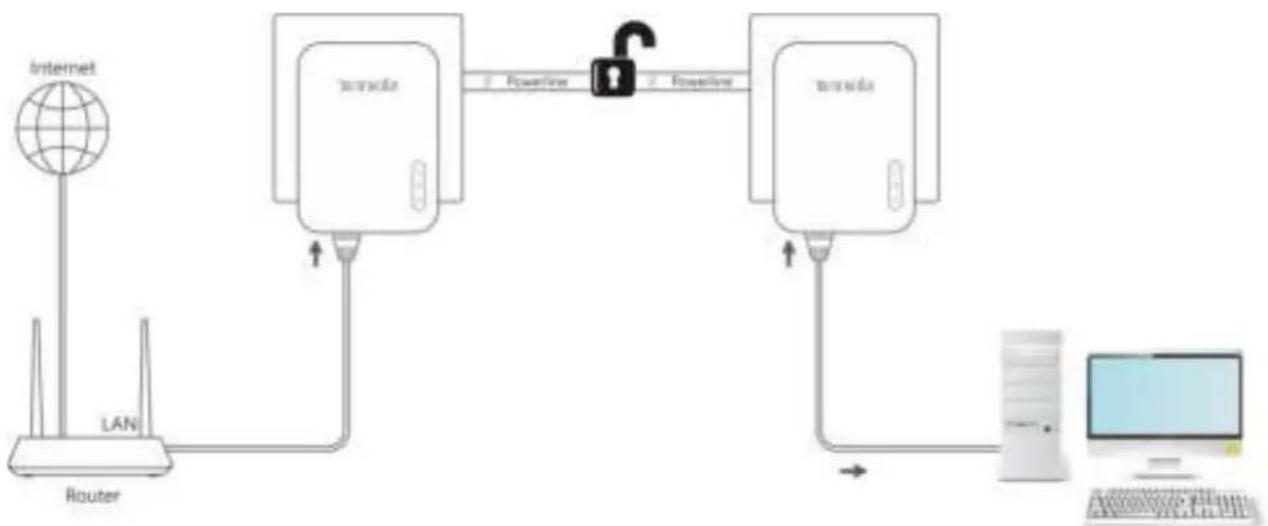
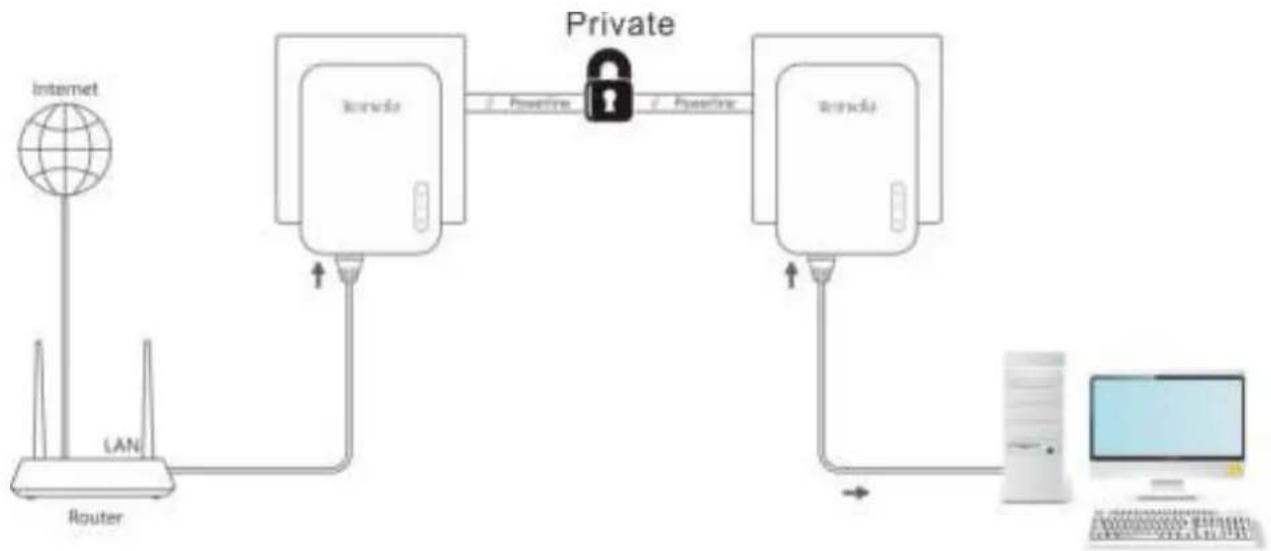
Two or more powerline adapters under the same electrical circuit will automatically interconnect to create an unencrypted public network (Named “HomePlugAV”).
flowchart
graph LR
    A["Internet"] --> B["Router"]
    B --> C["transceiver"]
    C --> D["Antenna"]
    D --> E["Computer"]
    C --> F["Powerline"]
    C --> G["Wireless"]
    style A fill:#f9f,stroke:#333
    style B fill:#ccf,stroke:#333
    style C fill:#cfc,stroke:#333
    style D fill:#fcc,stroke:#333
    style E fill:#cff,stroke:#333
    style F fill:#ffc,stroke:#333
    style G fill:#fcc,stroke:#333
If you want to create a secure powerline network (Named "Private"), use the Pair button to pair the two adapters with each other.
flowchart
graph LR
    A["Internet"] --> B["Router"]
    B --> C["Wireless"]
    C --> D["Private"]
    D --> E["Pulsifier"]
    E --> F["Internet"]
    style A fill:#f9f,stroke:#333
    style B fill:#ccf,stroke:#333
    style C fill:#cfc,stroke:#333
    style D fill:#fcc,stroke:#333
    style E fill:#cff,stroke:#333
    style F fill:#ffc,stroke:#333
Procedure:
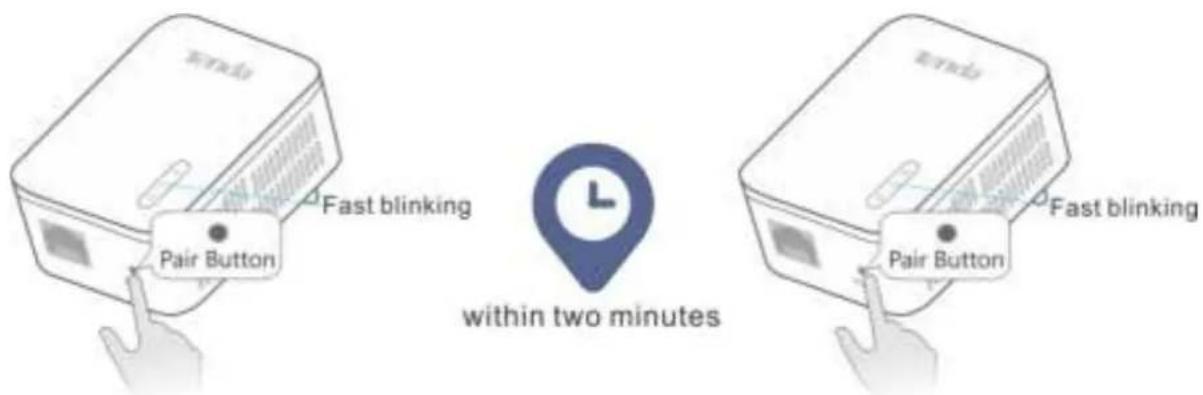
1 Plug in your adapters.
② Wait until the PLC LEDs on the two adapters are lit.
3 Press the Pair button on one adapter for 1 second, and the PLC LED on the adapter starts blinking.
4 Then press the Pair button on the other adapter for 1 second.
Both buttons must be pressed within two minutes.
Observe the PLC LEDs on the two adapters until they are lit again. It indicates that a secure powerline network is established successfully between the two adapters.
3 Add Adapters to a Private Powerline Network
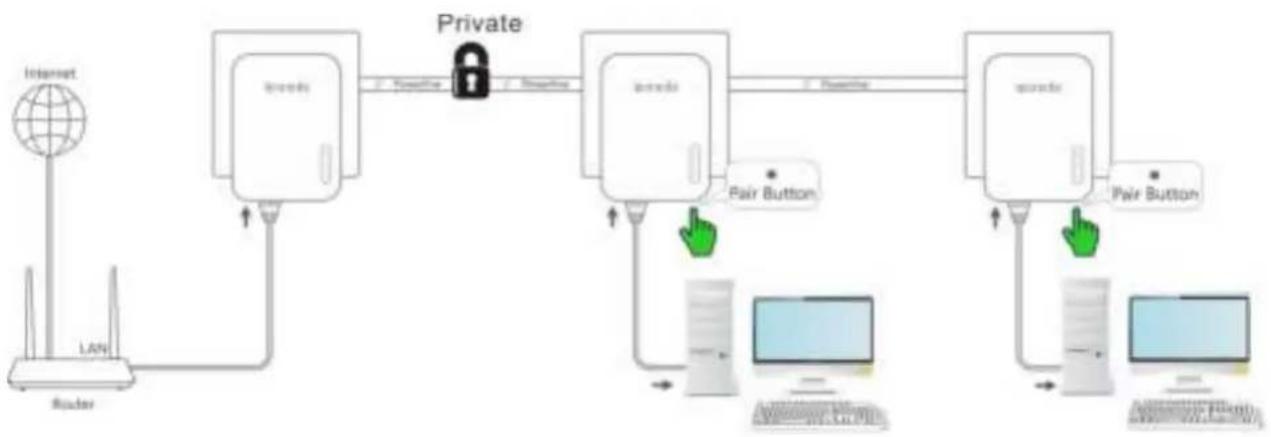
If you want to add more powerline adapters to a private powerline network, follow the steps below:
flowchart
graph LR
    A["Internet"] --> B["Router"]
    B --> C["Internet"]
    C --> D["Private"]
    D --> E["PeerButton"]
    E --> F["PC"]
    F --> G["Computer"]
    G --> H["User Interface"]
    H --> I["Peer Button"]
    I --> J["PC"]
    J --> K["User Interface"]
    K --> L["User Interface"]
    style A fill:#f9f,stroke:#333
    style B fill:#ccf,stroke:#333
    style C fill:#cfc,stroke:#333
    style D fill:#fcc,stroke:#333
    style E fill:#cff,stroke:#333
    style F fill:#ffc,stroke:#333
    style G fill:#cfc,stroke:#333
    style H fill:#fcc,stroke:#333
    style I fill:#ffc,stroke:#333
    style J fill:#cfc,stroke:#333
    style K fill:#fcc,stroke:#333
    style L fill:#ffc,stroke:#333
1 Press the Pair button on any powerline adapter in the security powerline network for 1 second.
② Within two minutes, plug in the new powerline adapter, and press its Pair button for 1 second.
3 Observe the PLC LEDs on the two adapters until they are lit.
4 Done.
III Manage Your Adapters
This section introduces how to manage your adapters using the UI, including changing your Powerline adapters' device name/network name, resetting your Powerline adapters, and etc.
1 UI Installation
This section instructs you to install the adapter s' UI on your computer.
If you are a Windows 8 user, simply follow steps below. If you are using other operation systems, instructions herein are also good for references.
To install the UI:
Go to Tenda official website http://www.tendacn.com to download the management software. Save it to your local host, and unzip it.
Double click the setup icon setup to run the management software, and click Next when you see the screen below.
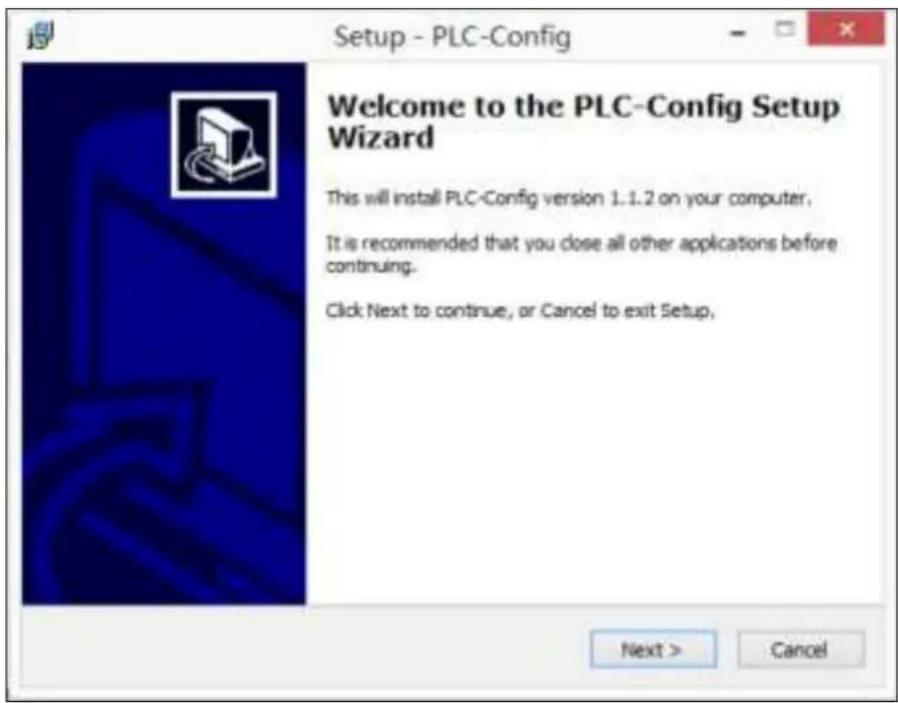
② After you read the license agreement shown as below, select “I accept the agreement” and click Next.
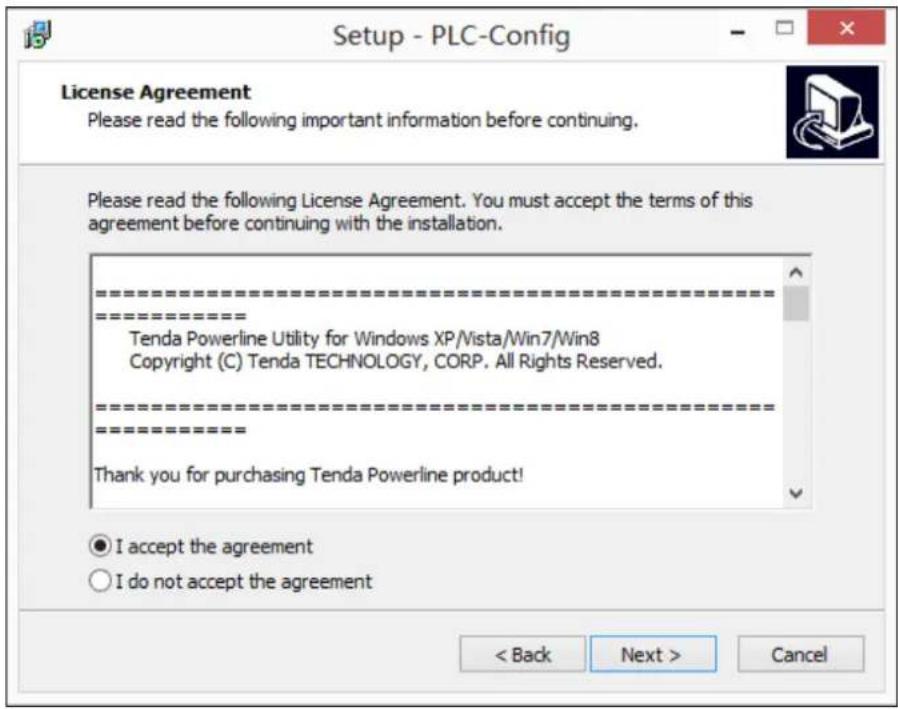
3 Click Browse... on below screen to locate where to install the UI and click Next to go forward.
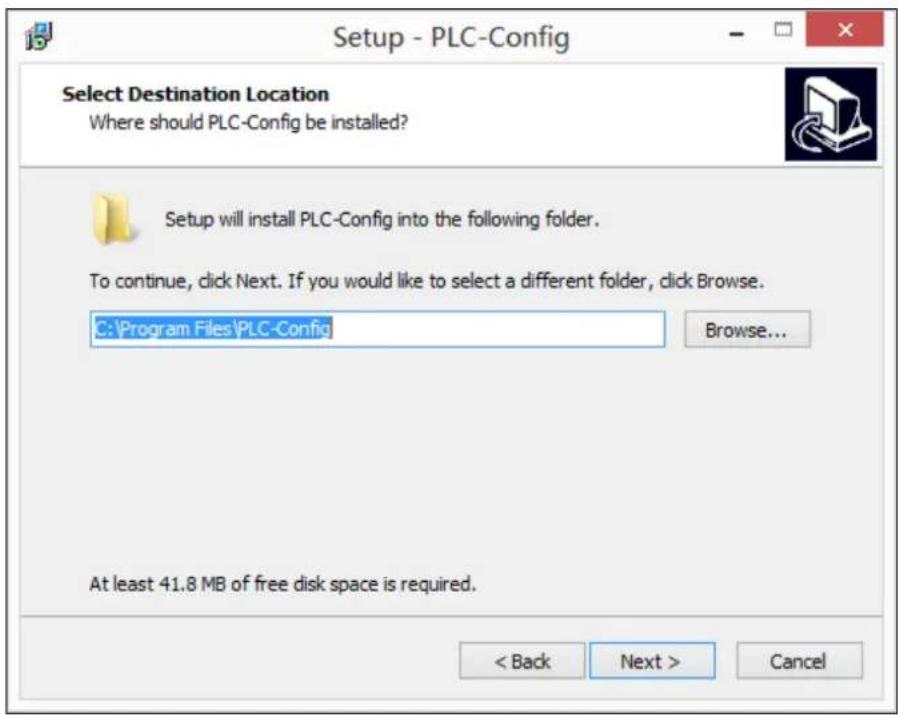
④ Keep clicking Next until the screen below displays. Then check the Create a desktop icon option and click Next.
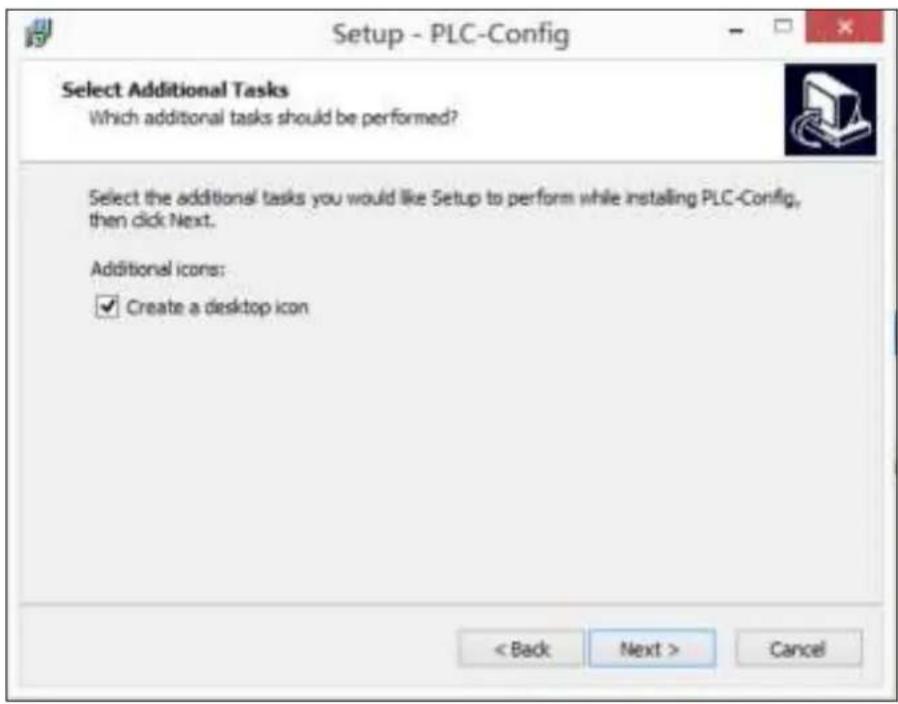
5 Click Install to install the UI.
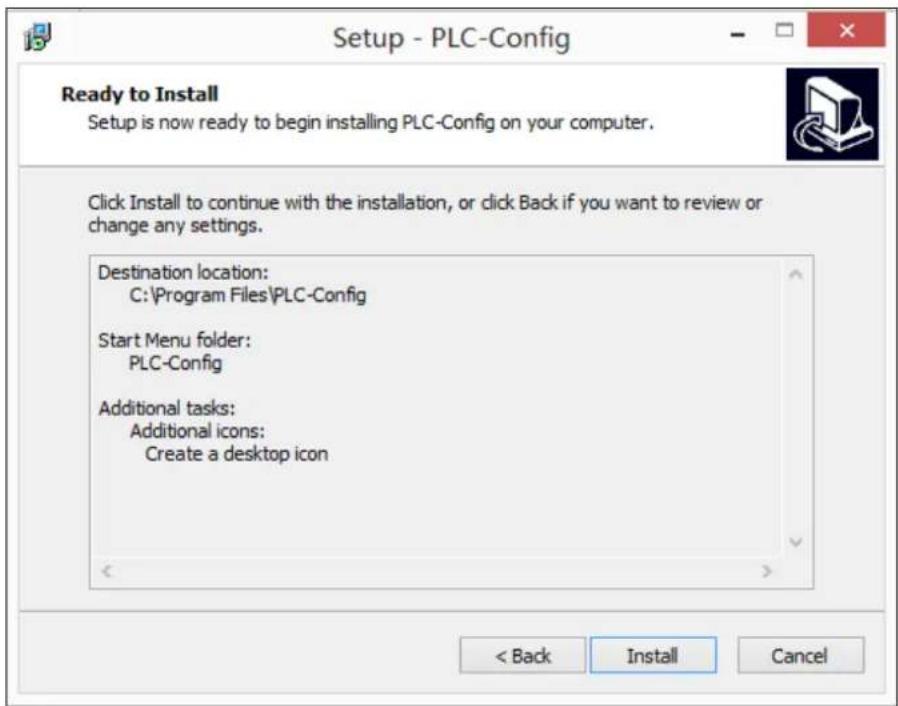
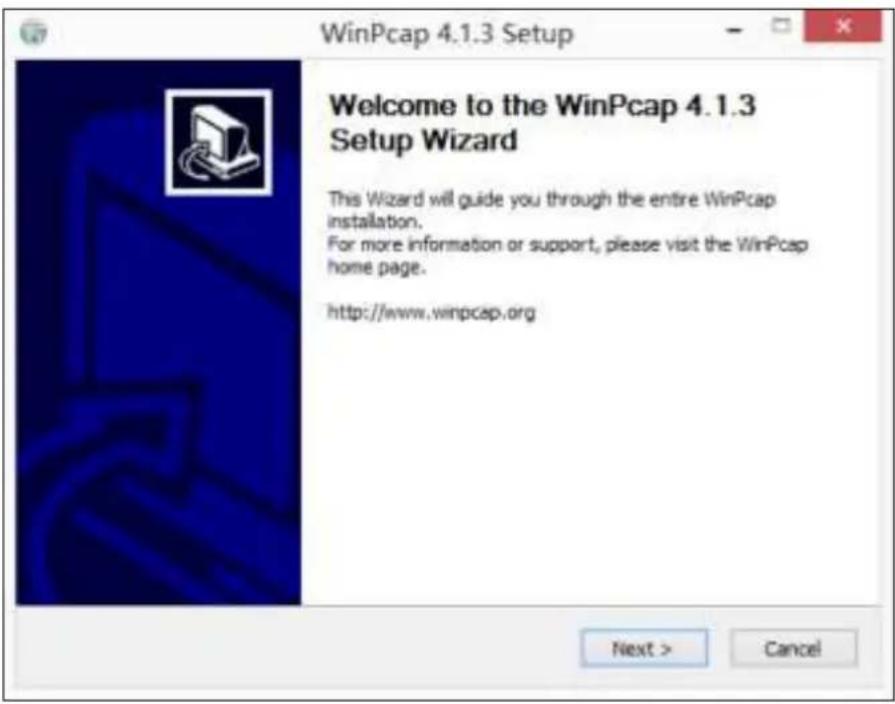
6 WinPcaP Setup Wizard will be displayed as below. Click Next to go forward.
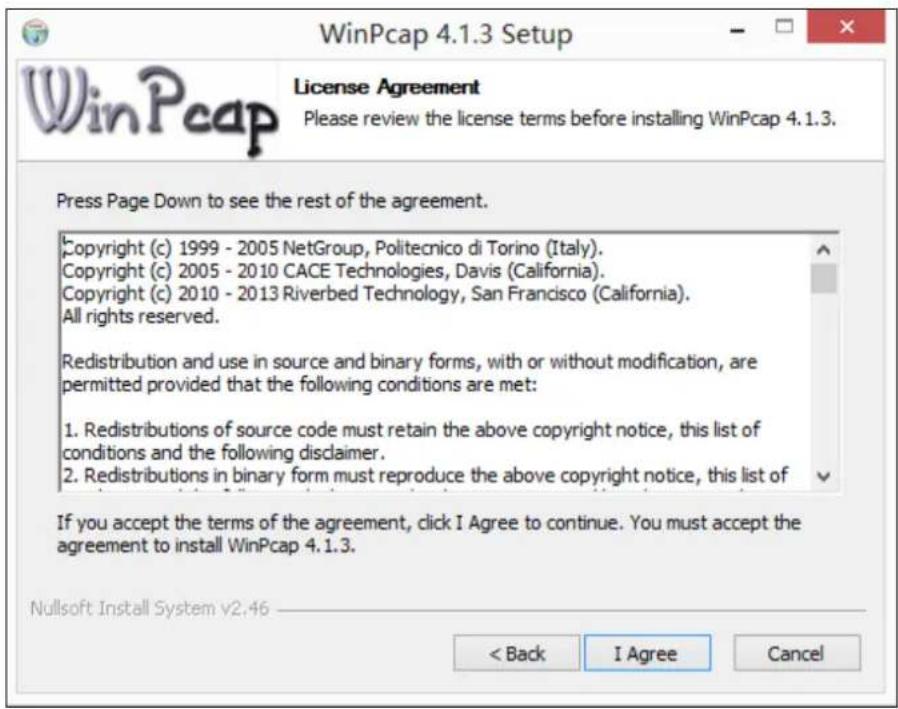
7 Click I Agree.
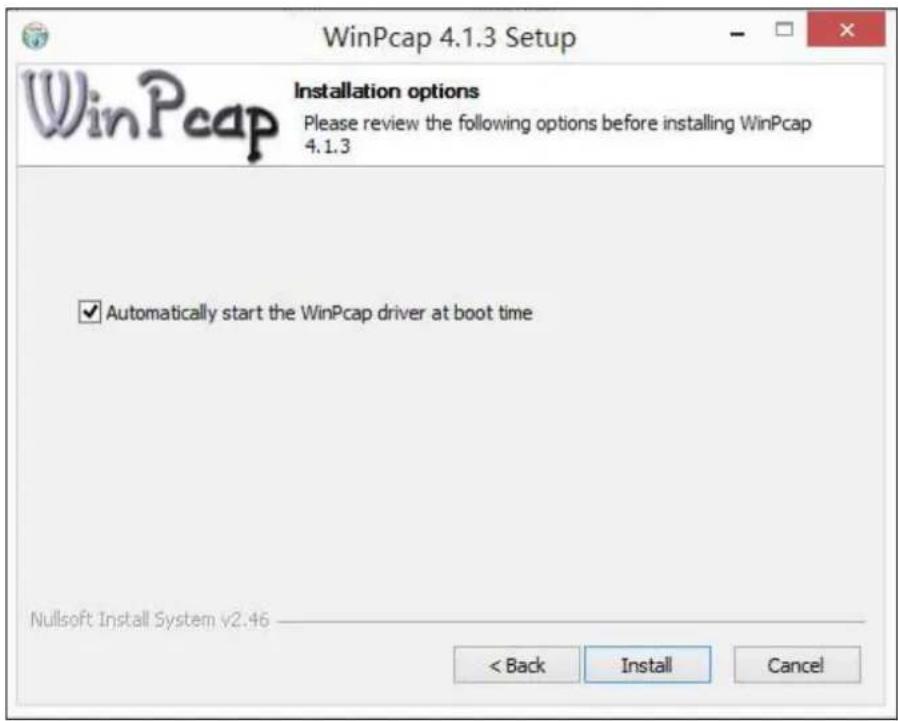
8 Click Install.
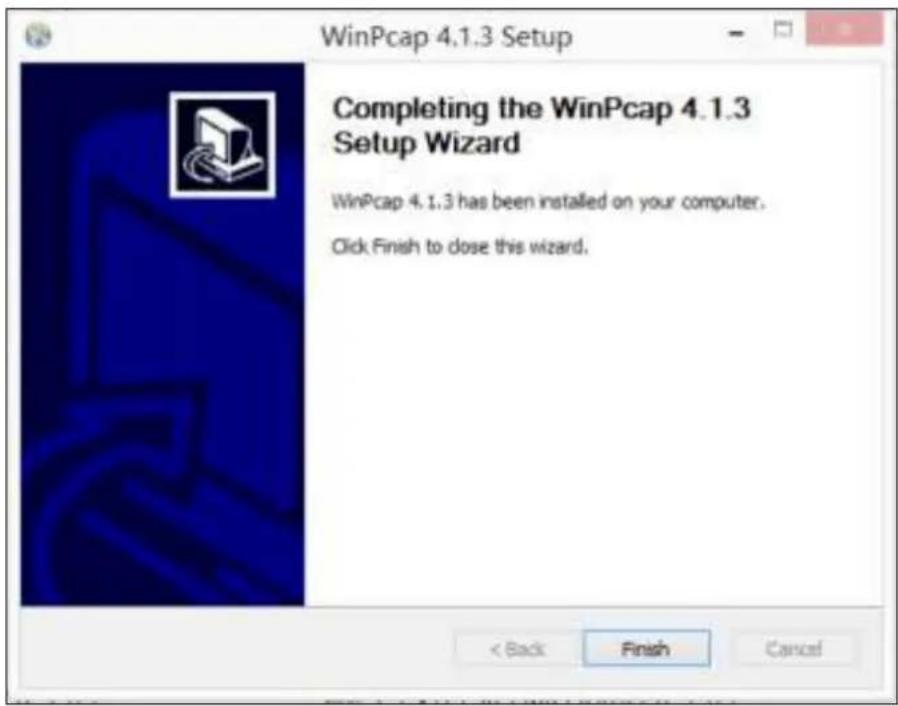
9 Click Finish.
10 Click Finish to complete the installation.
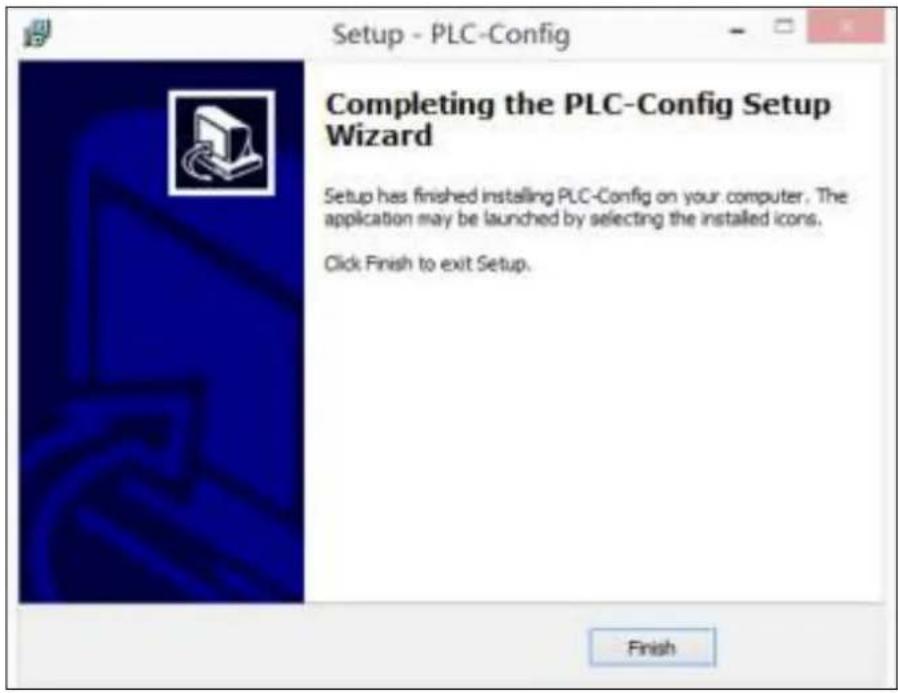
After you finish the installation, a UI shortcut will appear on your desktop.
2 Run the UI
After the UI is installed, double-click icon on your desktop to run the UI. The main interface is shown as below:
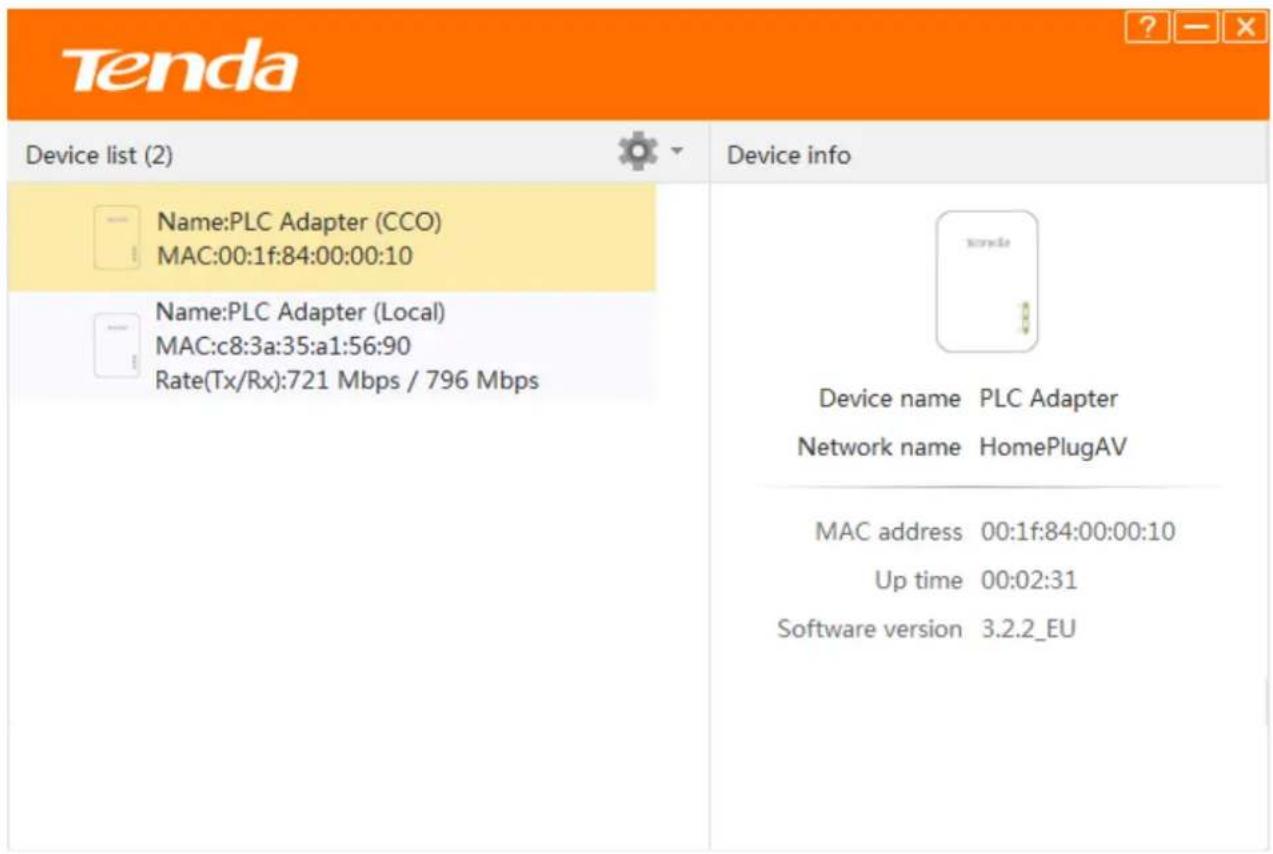
In the Device List, you can view the adapters in a same powerline network which have negotiated with each other.
| CCO | This adapter will be regarded as a station, to which other adapters will attempt to connect. When attempting to connect to each other, adapters automatically negotiate with each other to select an adapter as CCO. |
| Local | This adapter is connected to the computer with the UI installed. |
| Device Info | The Device Info of a currently selected adapter. |
| Network name/HomePlugAV | HomePlugAV is the local Powerline network name if you do not customize a Powerline network name, or use pair button to pair the adapters with each other. To establish a same powerline network, powerline adapters MUST share an identical network name. Based on the network name, the powerline network is classified into 2 types: a powerline network named “HomePlugAV” is considered a public network; a powerline network named “Private” is considered an encrypted network. |
| MAC Address | The MAC address of a currently selected adapter. |
| Click to see the User Guide. |
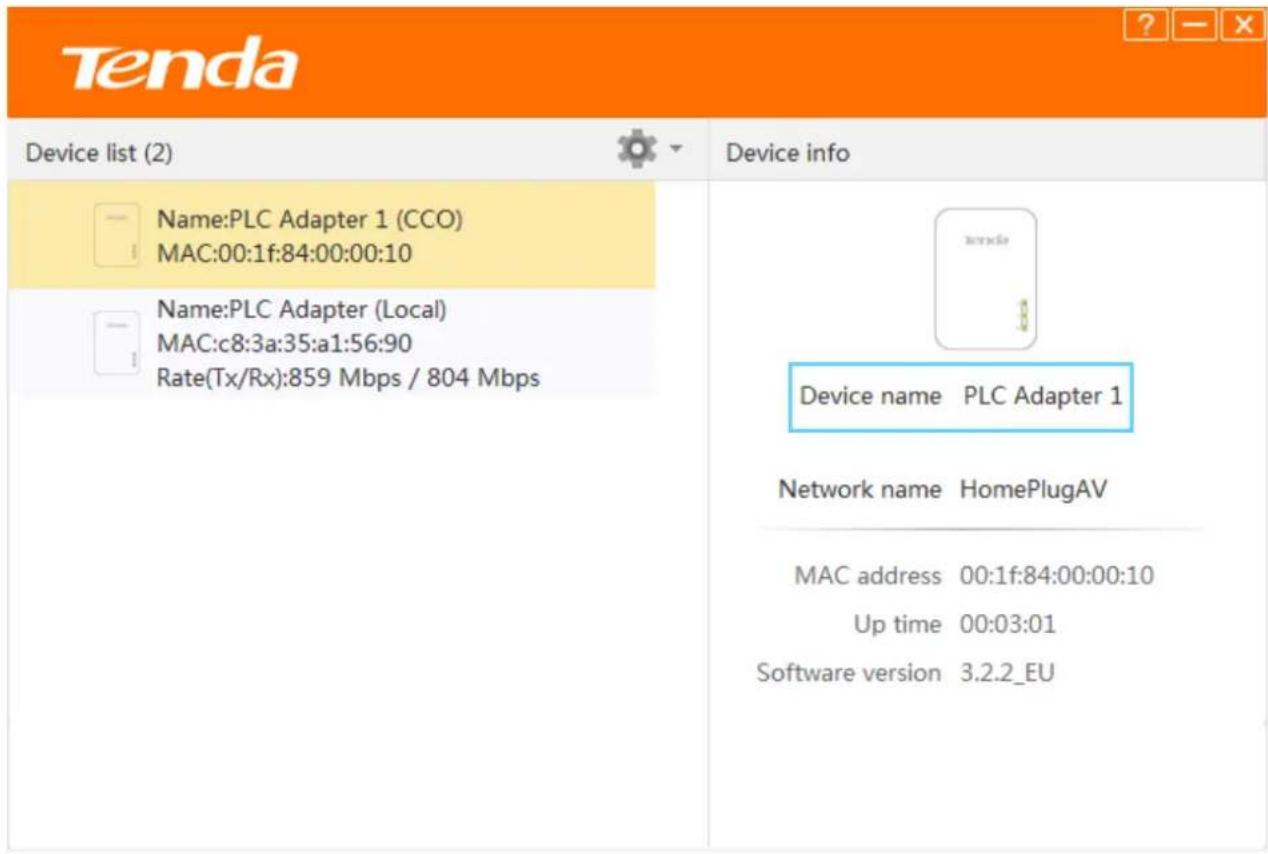
3 Change Device Name
For easy recognition and convenient management, you can change the adapter's name if there are multiple adapters managed by the UI.
To change device name:

Click

start configuration.

Select Change Device Name.
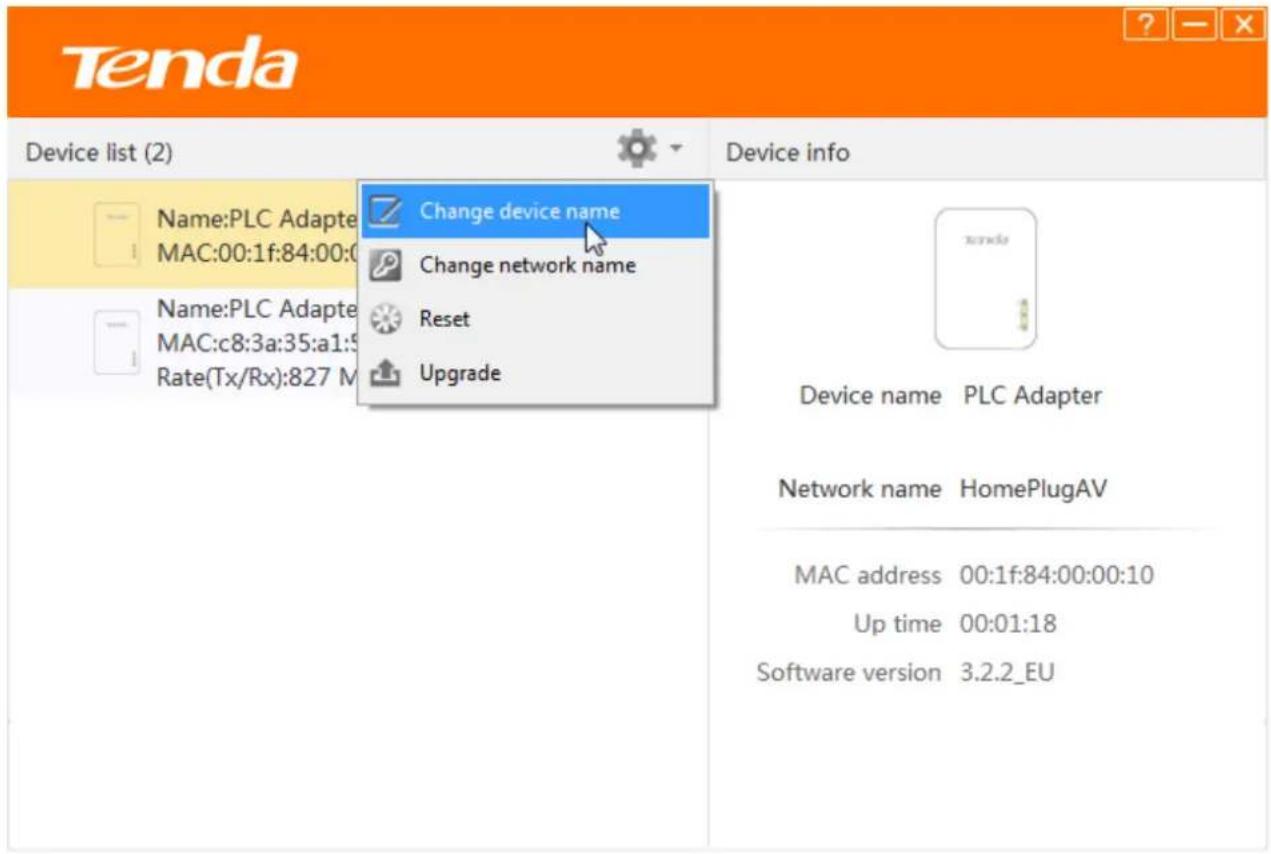
3 Select the adapter whose name you want to change, and specify a new name in the Device name edit box, and click OK.
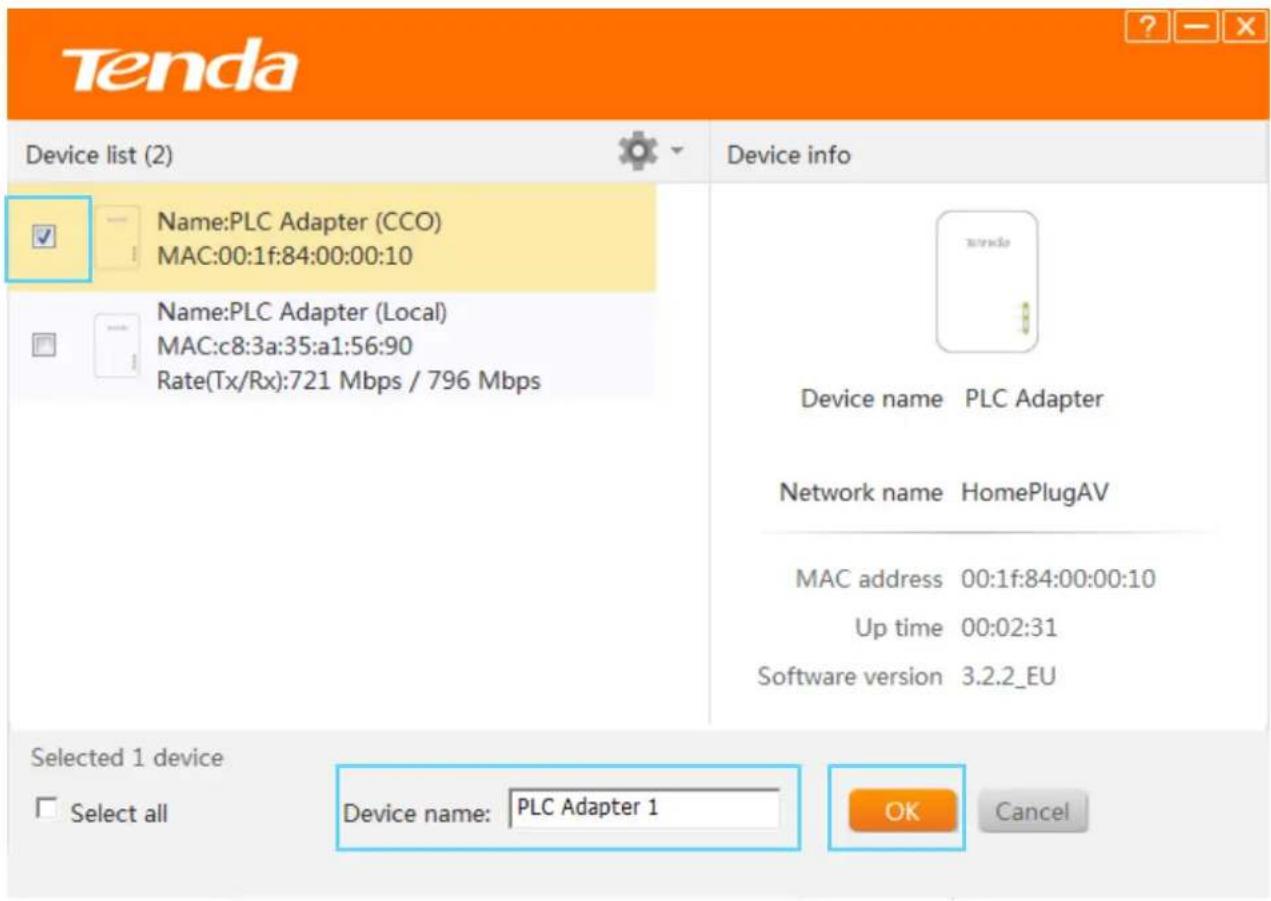
After it saved successfully, you'll find that the Device name displays the new name.
4 Change Network Name
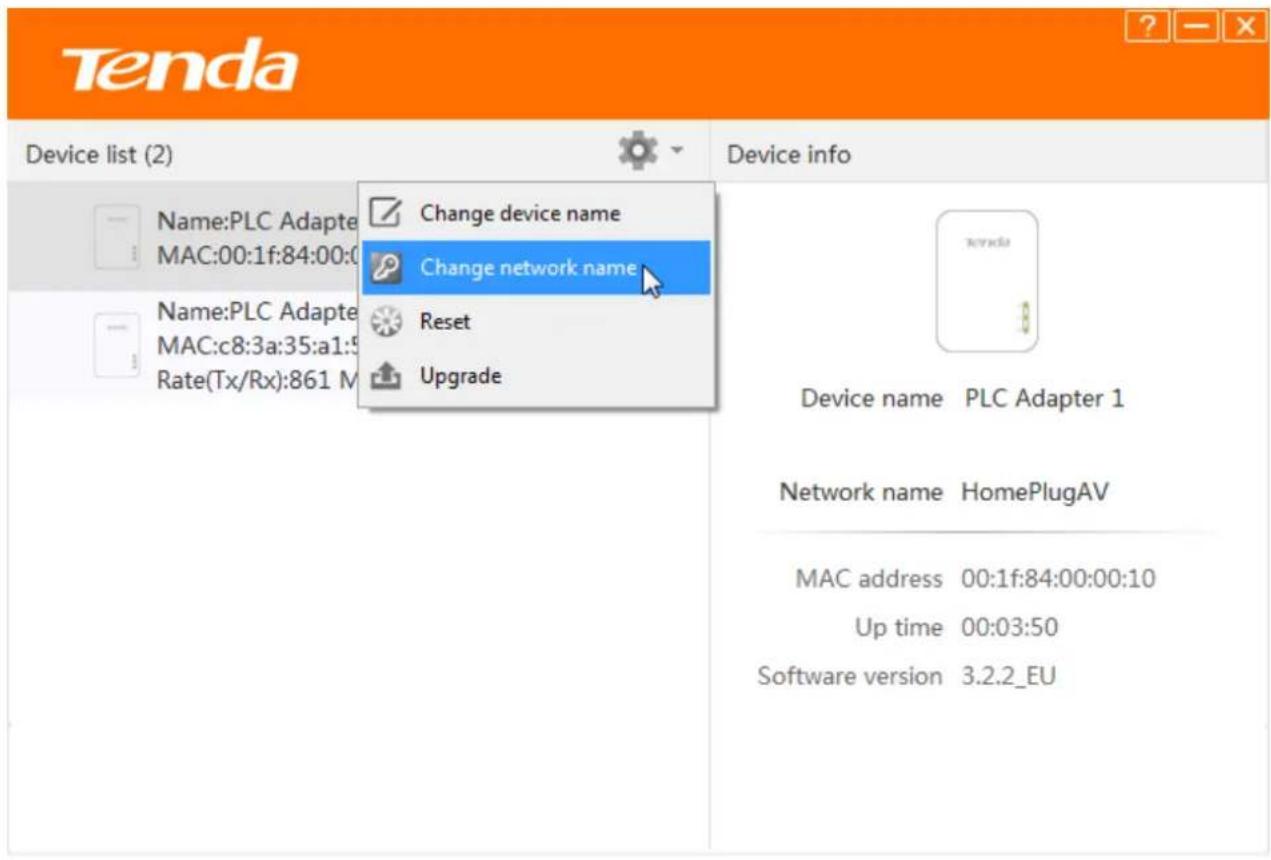
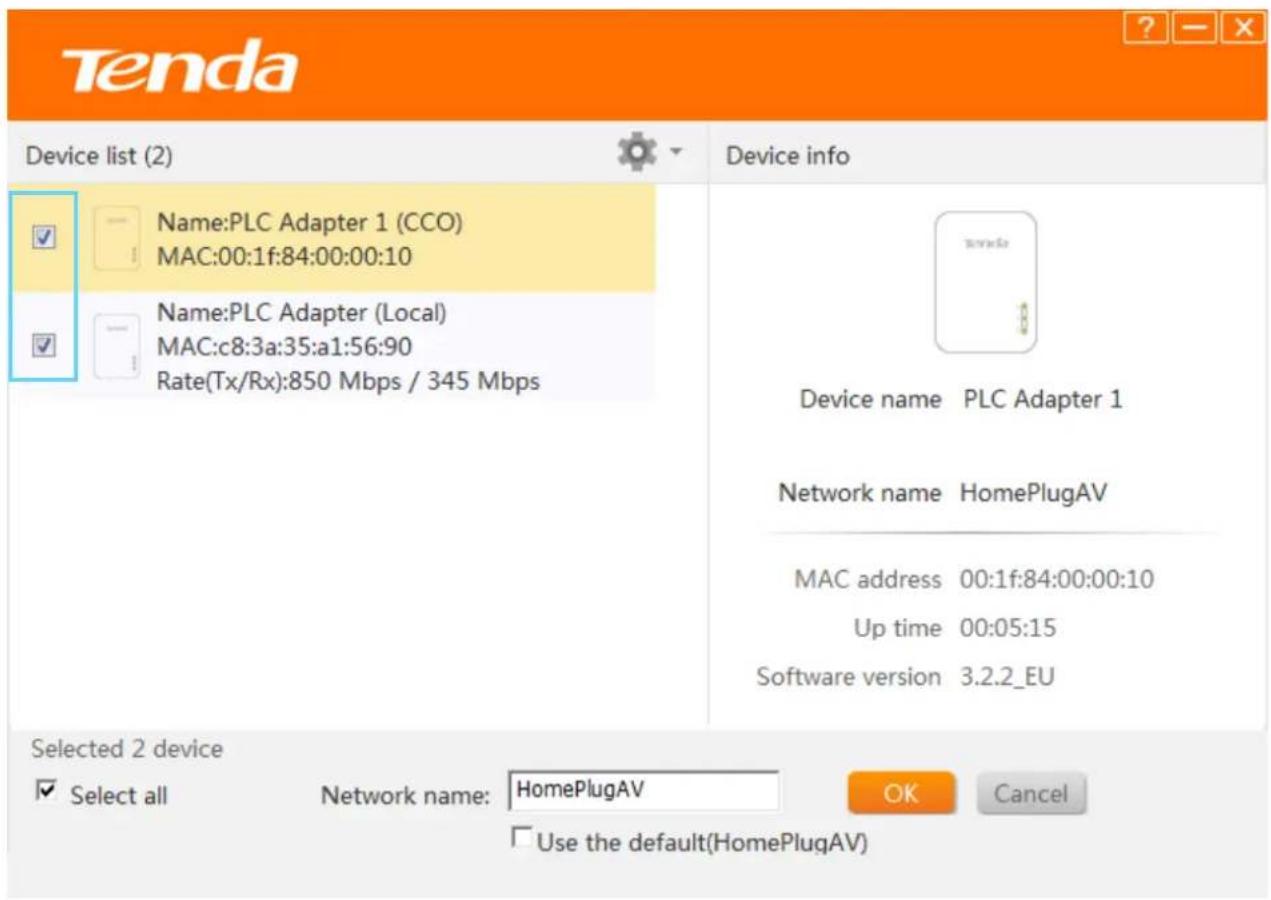
To establish a same powerline network, powerline adapters MUST share an identical network name. Therefore, if you change one adapter's network name in a powerline network, you MUST change the other adapters' as well. If not, the adapter will exit from the current powerline network. Also, if you change the default network name HomePlugAV into another one, this powerline network will become an encrypted private powerline network. You need to use the pair button to add more adapters into this powerline network.
To change the network name:
1 Click to start configuration.
② Then select Change Network Name.
3 Select all adapters whose name you want to change.
4 Type a new network name in Network Name edit box.
5 Click OK to activate the settings.
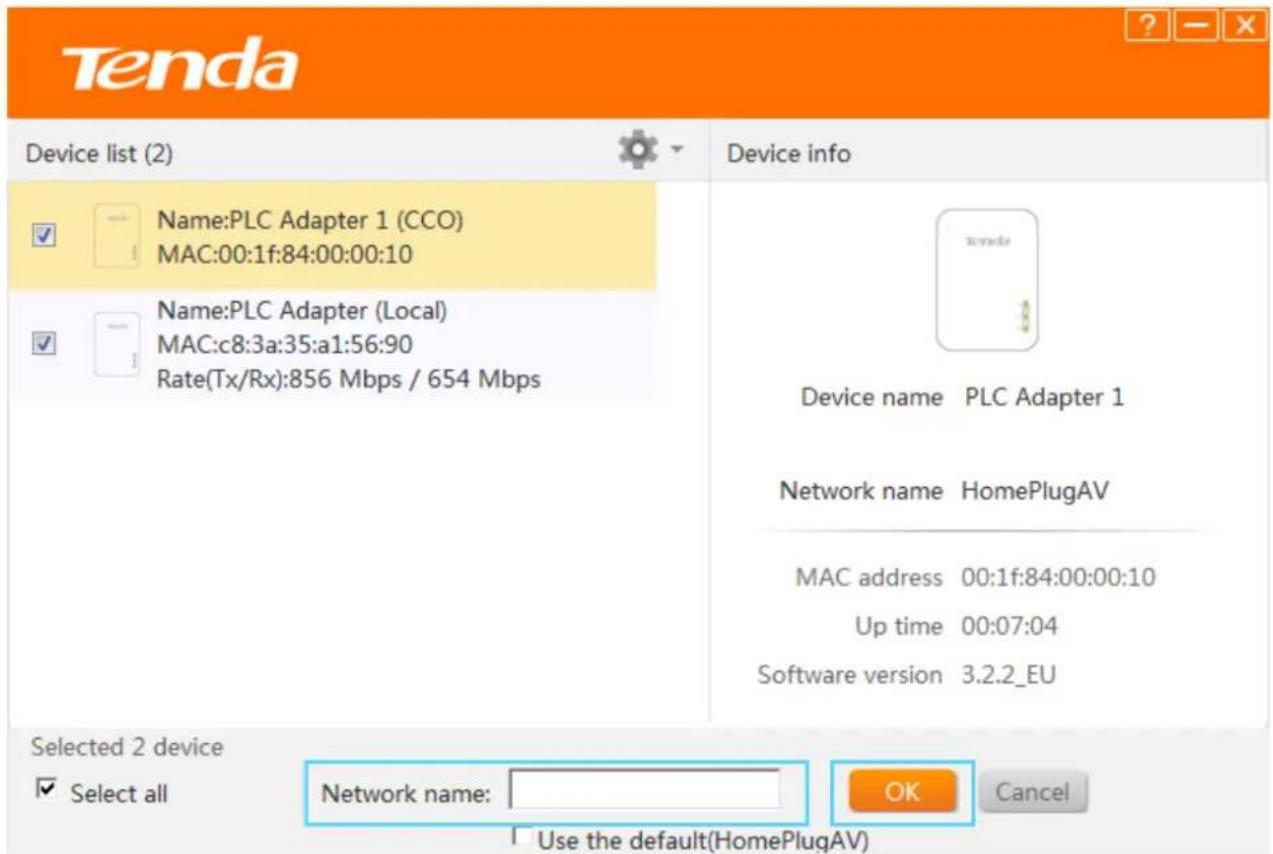
After successful network name configuration, the Network Name will be changed from "HomPlugAV" into "Private", which means it is a private and encrypted network.
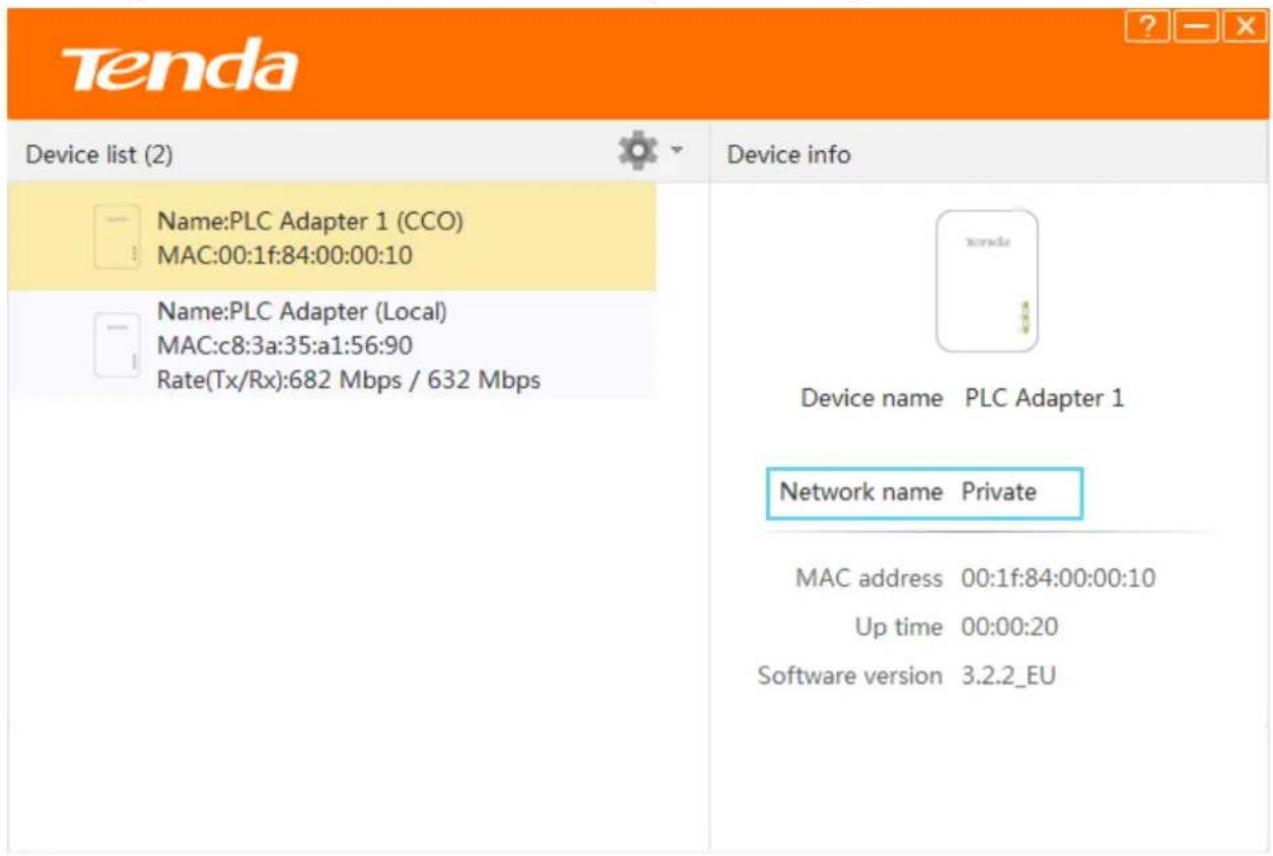
5 Reset
Device name will be PLC Adapter, and network name will be HomeplugAV once the device resets to factory default. You can reset the adapters here, or use the hardware button Pair button on the device.
To reset the adapters:
1 Click to start configuration.
2 Select Reset.
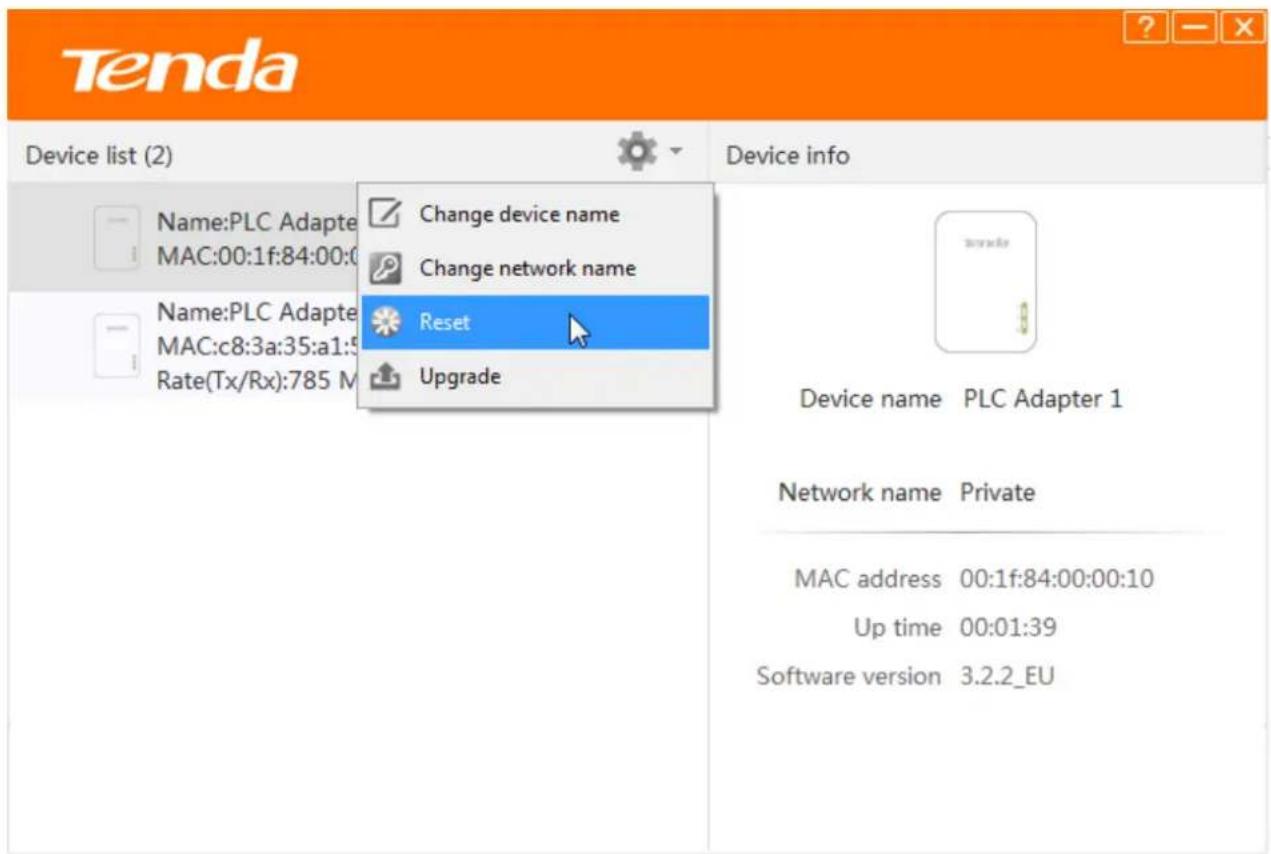
3 Select the adapter you want to reset or you can click Select All.
4 Click OK to activate the settings.
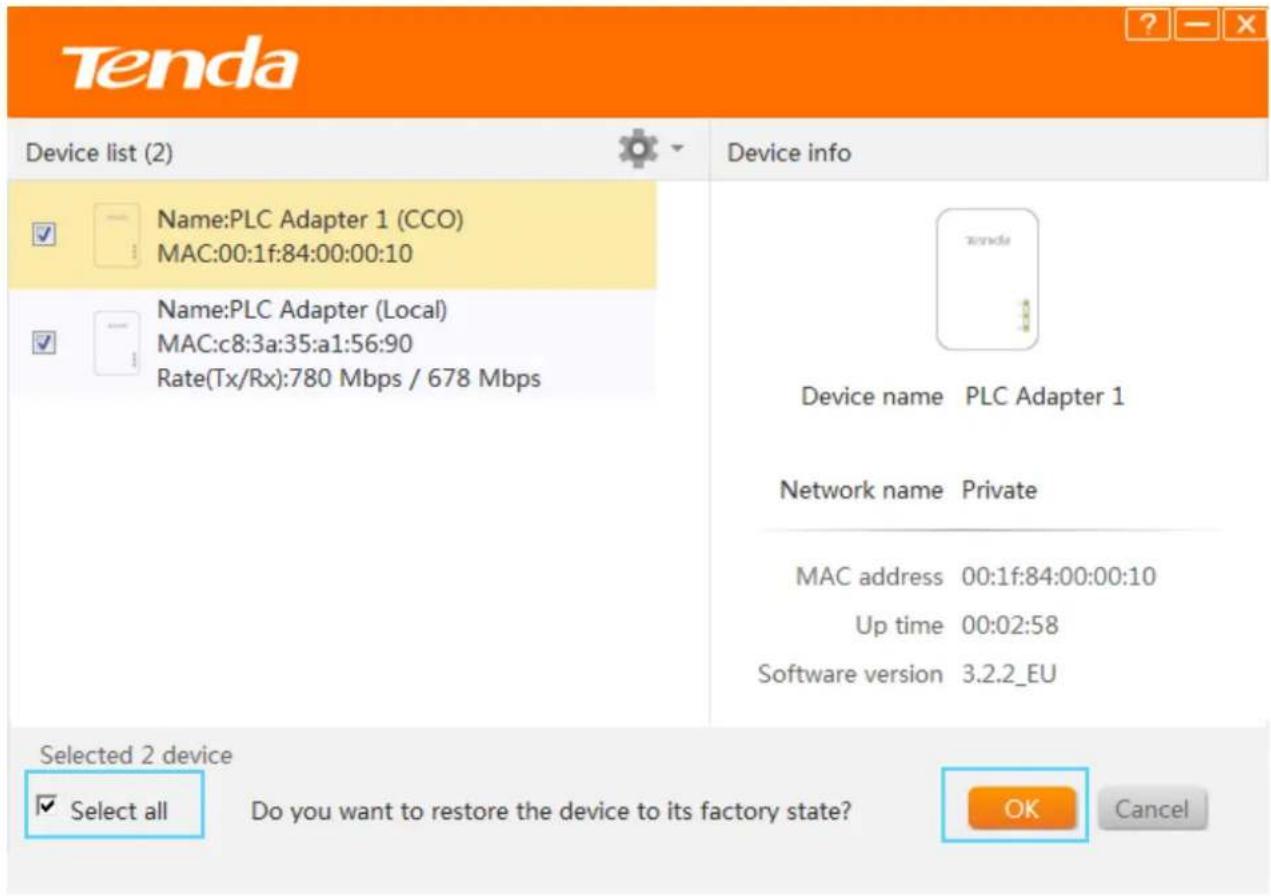
Tips
If it is a private network before, the adapter you select to restore to factory default won't display in Device list any more. But if the adapter you reset is connected to the configuration PC via an Ethernet cable, other adapters with different network name will disappear from the list. If you want to add the adapter which you reset to the Powerline network again, you need to use the pair button, or reset all of other adapters to factory default.
6 Upgrade
Upgrading the adapters' software may get more stable performance. Please go to Tenda website (http://www.tendacn.com) to download upgrade file.
To upgrade the adapters:

Click

to start configuration.

Select Upgrade.
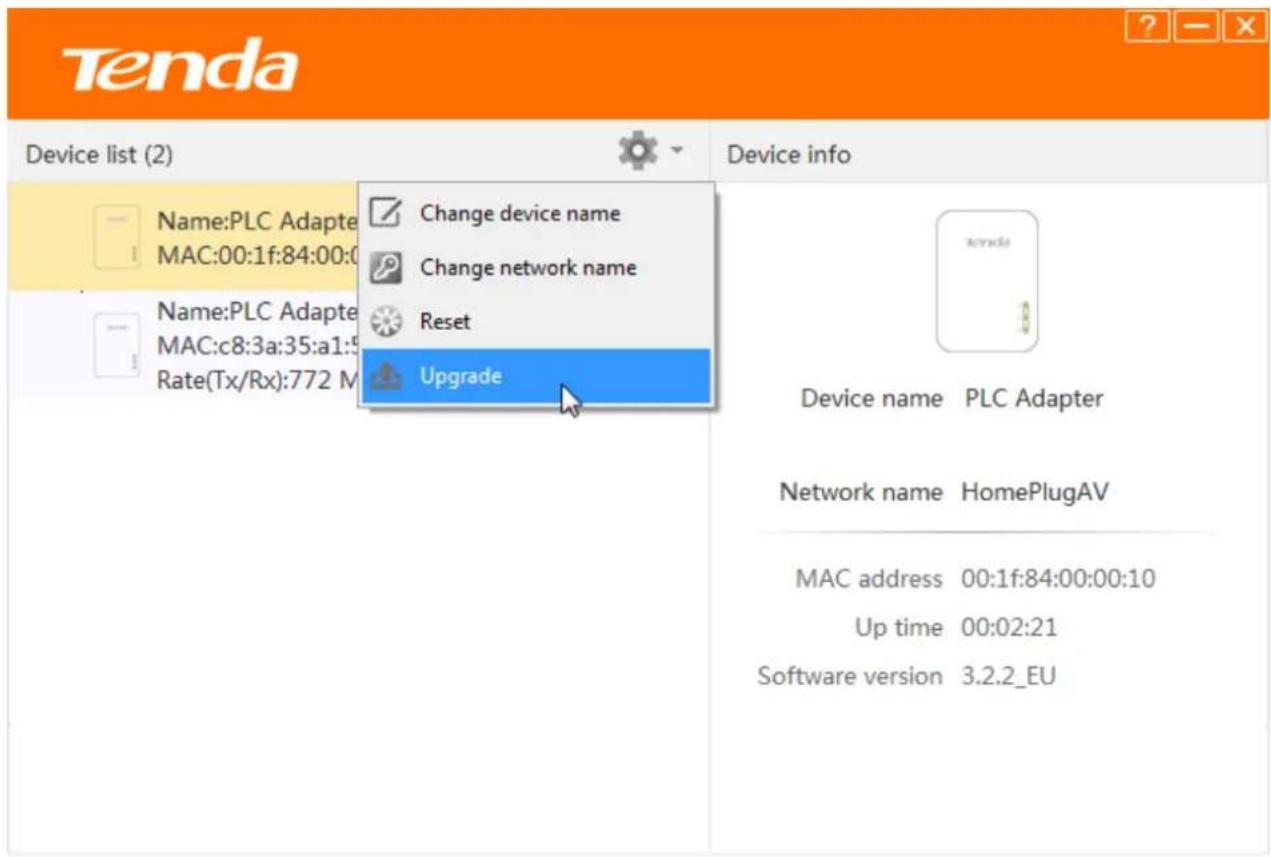
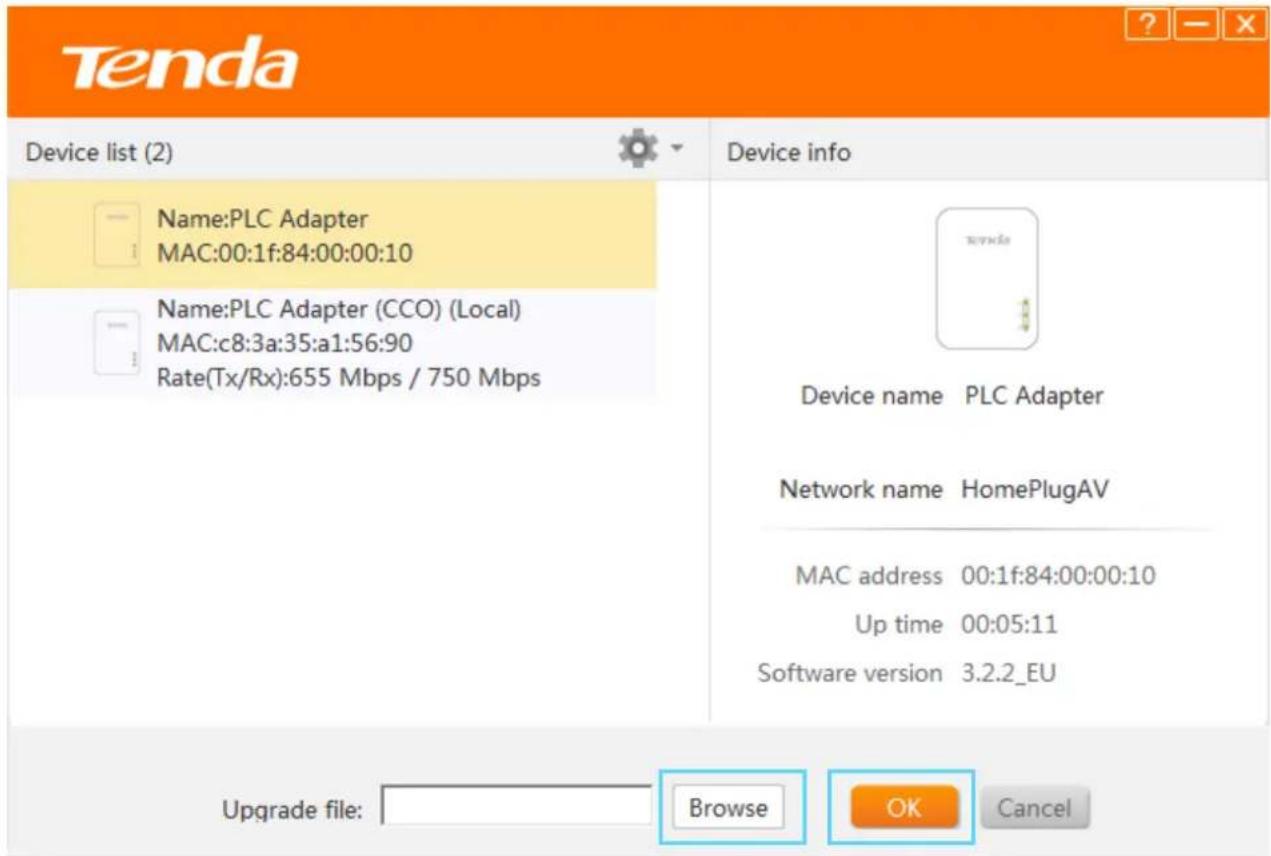
3 Click Browse to locate and upload the upgrade file you have downloaded.
4 Click OK to start upgrading.
Appendix
This Chapter provides you with more information about how to configure your computer, common questions and answers, and etc.
1 Configure Your Computer
We take Windows 8, Windows 7, and Windows XP as examples here.
Windows 8
1 Right click the icon 📋 on the bottom right corner of your desktop. Click Open Network and Sharing Center.


Tips
If you cannot find the icon, please move your cursor to the top right corner of your desktop, select Settings > Control Panel > Network and Internet > Network and Sharing.
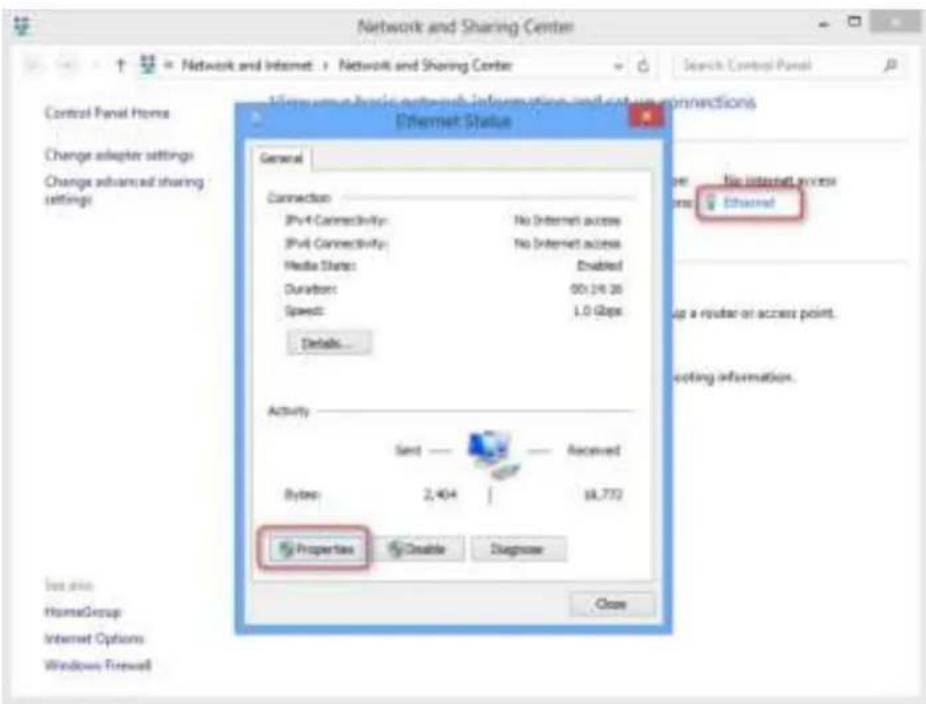
② Click Ethernet > Properties.
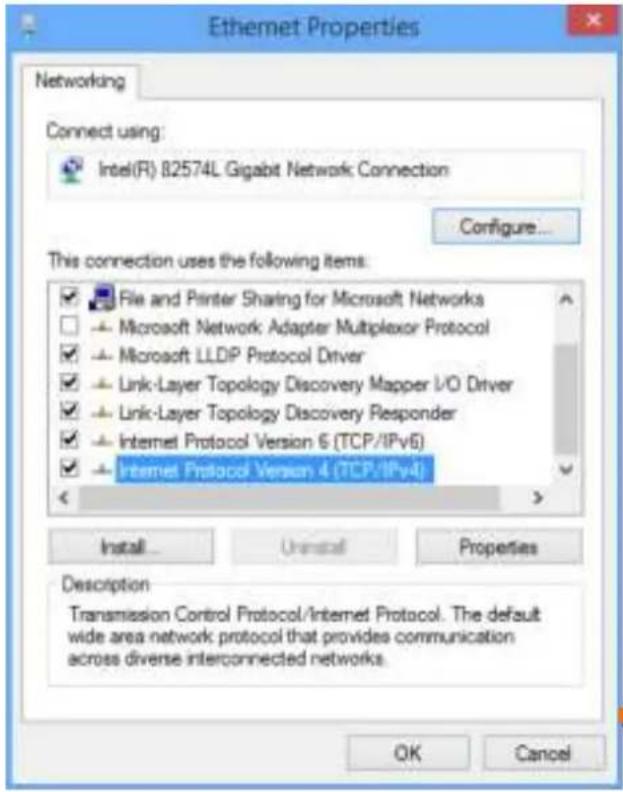
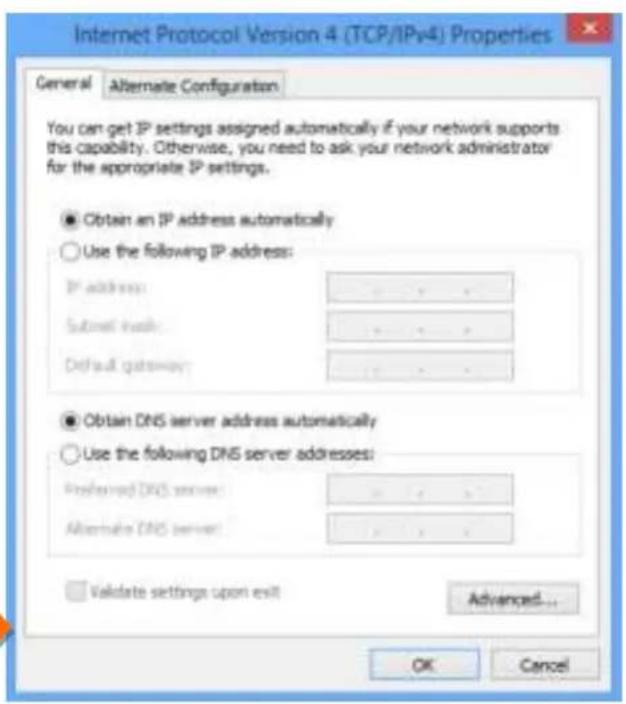
3 Find and double click Internet Protocol Version 4(TCP/IPv4). Select Obtain an IP address automatically and Obtain DNS server address automatically and click OK.
④ Click OK on the Ethernet Properties window (see ③ for the screenshot).
Windows 7
① Click the icon 📋 on the bottom right corner of your desktop. Click Open Network and Sharing Center.
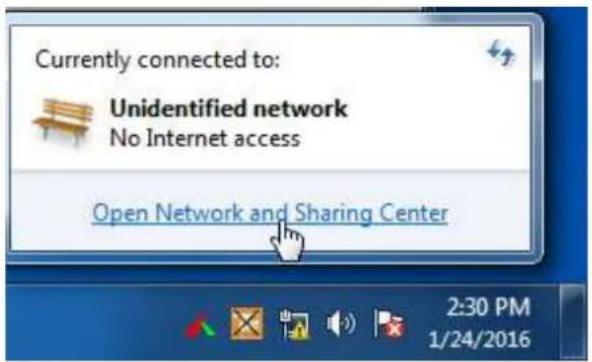

Tips
If you cannot find the icon on the bottom right corner of your desktop, follow steps below: Click Start > Control Panel > Network and Internet > Network and Sharing Center.
② Click Local Area Connection > Properties.
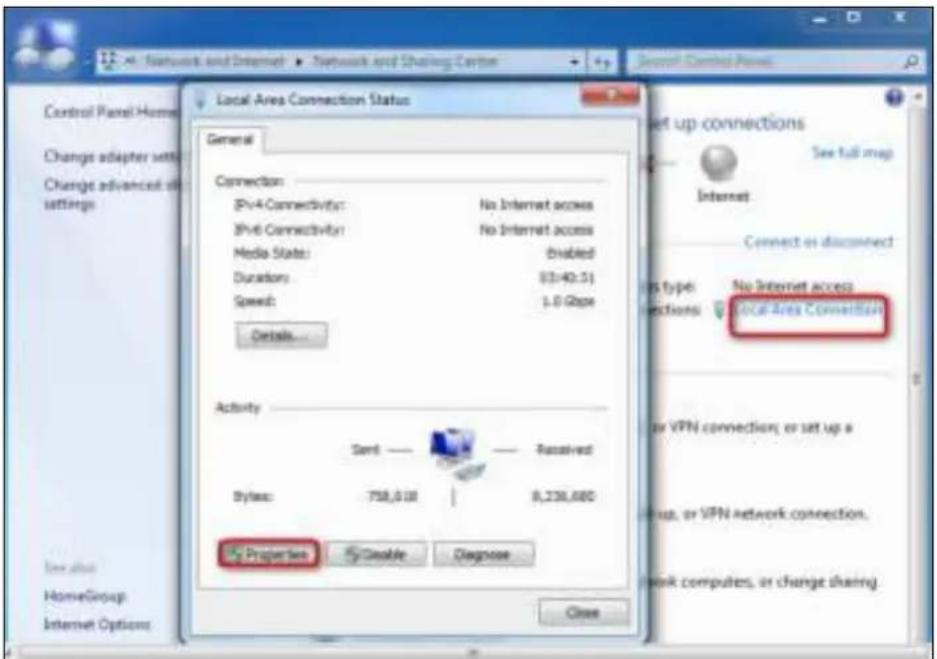
3 Find and double click Internet Protocol Version 4(TCP/IPv4). Select Obtain an IP address automatically and Obtain DNS server address automatically and click OK.
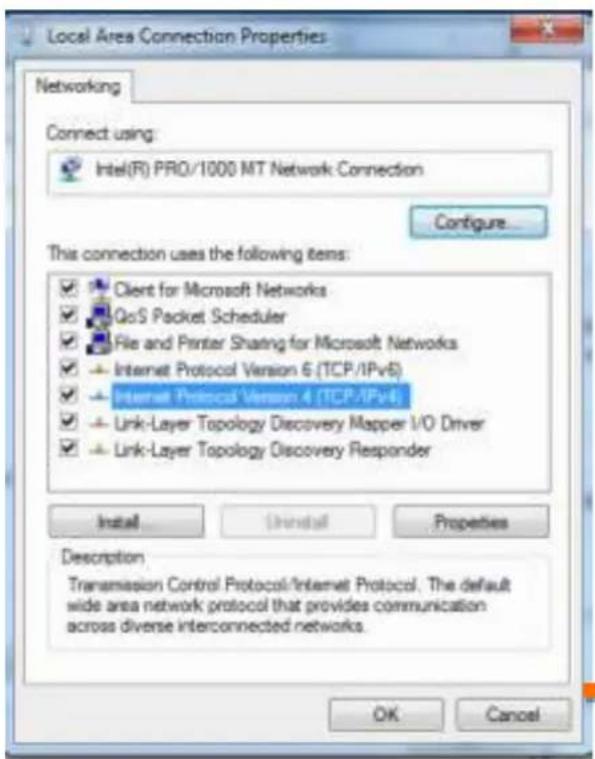
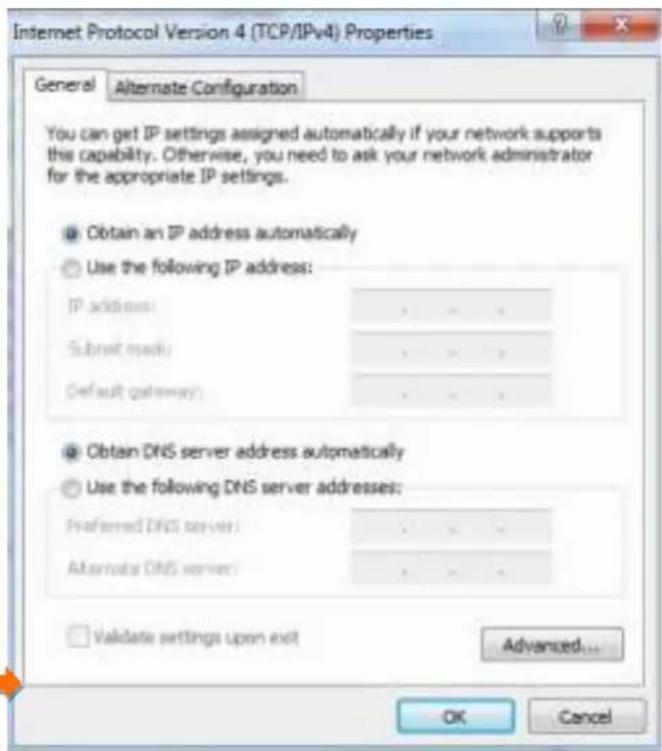
4 Click OK on the Local Area Connection Properties window (see 3 for the screenshot).
Windows XP
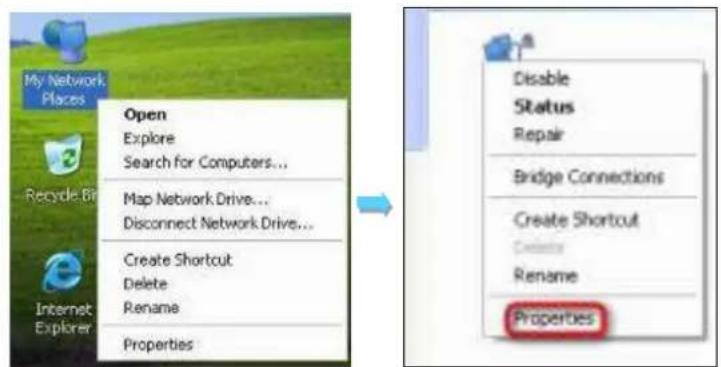
① Right click My Network Places on your desktop and select Properties. Right click Local Area Connection and select Properties.
② Scroll down to find and double click Internet Protocol (TCP/IP). Select Obtain an IP address automatically and Obtain DNS server address automatically and click OK.
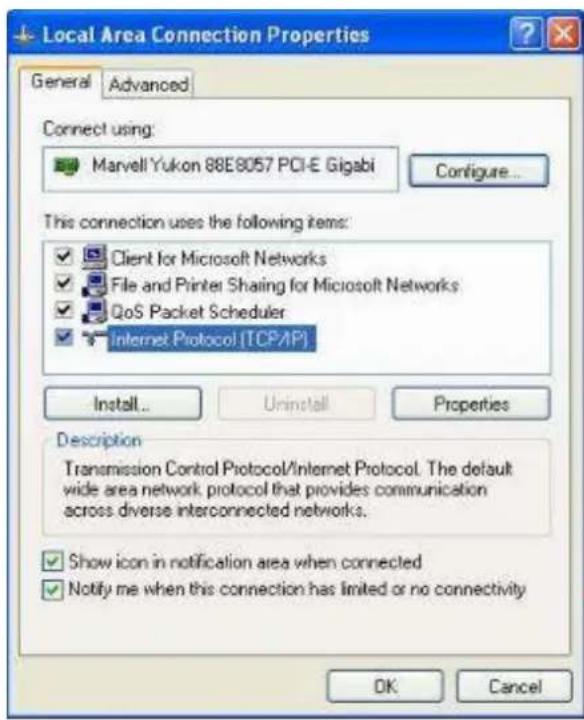
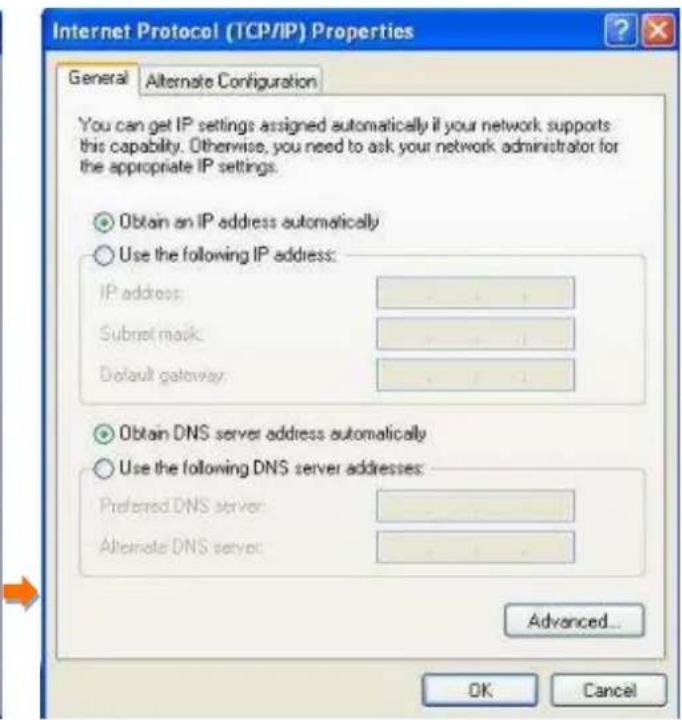
③ Click OK on the Local Area Connection Properties window (see ② for the screenshot).
2 FAQs
Here some questions come with solutions. If your problem is still unsolved, please go to our website (www.tendacn.com) for help or mail your questions to our support (support@tenda.com.cn).
Q1: I cannot access the Internet after finishing the installation in Plug and Play, what should I do?
A1: Please follow the instructions below step by step to troubleshoot.
a. Verify that your wireless router and the adapters are well-connected.
b. Verify that you can access the Internet normally by connecting your computer directly to the router or modem.
c. Verify that your computer has been set to obtain an IP address automatically. Please refer to Configure Your Computer for details.
d. Verify that the PLC LEDs on the adapters are solid green. If they are not, reset all adapters and then observe the PLC LEDs again.
e. Verify that all powerline adapters are on the same electrical circuit.
Q2: I cannot access the Internet after finishing the operations in Secure Your Powerline Network, what should I do?
A2: Please follow the instructions below step by step to troubleshoot.
a. Check if you can access the Internet before use the Pair button to secure your powerline network.
b. Verify that the PLC LEDs on the adapters are solid green. If they are not, reset all adapters and then use the Pair button to pair the adapters again.
c. Verify that all powerline adapters are on the same electrical circuit.
Q3: The adapter failed to connect to the powerline network after I moved it to a new location, what should I do?
A3: Please follow the instructions below step by step to troubleshoot.
a. Verify that all powerline adapters are on the same electrical circuit.
b. Verify that the PLC LED on the adapter is solid green before you move it to a new location.
c. Use the Pair button to pair it with one of the adapters in the powerline network again.
d. Observe the PLC LED on the adapter, if it is solid red, move it to another location until the PLC LED turns to solid green again.
Q4: Can I just plug one powerline adapter into a wall outlet to access the Internet?
A4: Sorry, you cannot. You must connect one more such adapter to an Internet-enabled ADSL Modem or Router, and another one to a computer. When the two adapters interconnect successfully, you can access the Internet.
Q5: Do I need to install a utility to use the device?
A5: No. PH3 are plug-and-play powerline adapters. Two such devices connected to the same electricity meter are able to interconnect automatically, no configuration required. Yet, there is still an included utility for advanced features such as Upgrade, private network, etc. See Manage Your Adapters for details.
Q6: How many powerline adapters at most can be included under a single electricity meter?
A6: Up to 8 adapters. However, you can create numerous private networks under the same electrical circuit.
Q7: Can powerline devices of different brands communicate with each other?
A7: Yes. PH3 complies with HomePlugAV standard and thus can communicate with other manufacturers' HomePlugAV- compliant powerline devices.
3 Technical Support
If you still have some problems, please contact our technical support.
| Country | Hotline |
| Global Hotline | (86) 755-27657180 |
| United States | 1-800-570-5892 |
| HongKong | 00852-81931998 |
| Canada Hotline | 1-888-998-8966 |
| Type | Details |
| Skype | Tendasz |
| Website | http://www.tendacn.com |
| support@tenda.com.cn |
4 Technical Specifications
| Hardware Specifications | ||
| Standards | RJ45: IEEE 802.3, IEEE 802.3u; IEEE 802.3abPLC: HomePlugAV2 | |
| Button | 1*Pair Button | |
| LEDs | 1*Power LED: Green Indicator1*PLC LED: Green Indicator (PLC is in good condition);Red Indicator (PLC is in poor condition)1*LAN LED: Green Indicator | |
| Input Power | AC 100V-240V 50/60Hz | |
| Dimensions | L (mm) | 82 |
| W (mm) | 60 | |
| H (mm) | 32 | |
| Electrical Security | 128-bit AES encryption | |
| Operating Temperature | 0°C~40°C | |
| Storage Temperature | -40°C~70°C | |
| Operating Humidity | 10%~90%RH Non-condensing | |
| Storage Humidity | 10% - 90%RH (non-condensing) | |
5 Safety and Emission Statement

CE Mark Warning
This is a Class B product. In a domestic environment, this product may cause radio interference, in which case the user may be required to take adequate measures.
-For PLUGGABLE EQUIPMENT,
the socket-outlet shall be installed near the equipment and shall be easily accessible.
NOTE: (1) The manufacturer is not responsible for any radio or TV interference caused by unauthorized modifications to this equipment. (2) To avoid unnecessary radiation interference, it is recommended to use a shielded RJ45 cable.

FCC Statement
This device complies with Part 15 of the FCC Rules. Operation is subject to the following two conditions: (1) This device may not cause harmful interference, and (2) this device must accept any interference received, including interference that may cause undesired operation.
This equipment has been tested and found to comply with the limits for a Class B digital device, pursuant to Part 15 of the FCC Rules. These limits are designed to provide reasonable protection against harmful interference in a residential installation. This equipment generates, uses and can radiate radio frequency energy and, if not installed and used in accordance with the instructions, may cause harmful interference to radio communications. However, there is no guarantee that interference will not occur in a particular installation. If this equipment does cause harmful interference to radio or television reception, which can be determined by turning the equipment off and on, the user is encouraged to try to correct the interference by one of the following measures:
— Reorient or relocate the receiving antenna.
— Increase the separation between the equipment and receiver.
— Connect the equipment into an outlet on a circuit different from that to which the receiver is connected.
— Consult the dealer or an experienced radio/TV technician for help.
Caution!
Any changes or modifications not expressly approved by the party responsible for compliance could void the user's authority to operate the equipment.
NOTE: (1) The manufacturer is not responsible for any radio or TV interference caused by unauthorized modifications to this equipment. (2) To avoid unnecessary radiation interference, it is recommended to use a shielded RJ45 cable.
- Disclaimer
- Contents
- I Get to Know the Adapter .... 1
- II Access the Internet.... 3
- III Manage Your Adapters....7
- Appendix 21
- I Get to Know the Adapter
- Overview
- Package Contents
- LED/Interface/Button
- II Access the Internet
- Install Your Adapters
- Attention
- Secure Your Powerline Network
- Procedure:
- Add Adapters to a Private Powerline Network
- III Manage Your Adapters
- UI Installation
- To install the UI:
- Click Install.
- Click Finish.
- Click Finish to complete the installation.
- Run the UI
- Change Device Name
- Change Network Name
- To change the network name:
- Click OK to activate the settings.
- Reset
- To reset the adapters:
- Tips
- Upgrade
- To upgrade the adapters:
- Appendix
- Configure Your Computer
- Windows 8
- Windows 7
- FAQs
- Technical Support
- Technical Specifications
- Safety and Emission Statement
- CE Mark Warning
- FCC Statement
Brand : Tenda
Model : PH13
Category : Powerline Adapter