USER MANUAL Viera TX-37LZD70 PANASONIC
Operating Instructions
LCD Television
Model No. TX-37LZD70
VIERA

VIERA
Link

DV3®


U.K. Standard
English
Please read these instructions before operating your set and retain them for future reference.
The images shown in this manual are for illustrative purposes only.

TQB0E0499-1
Turn your living room into a home theatre!
Experience an amazing level of multi-media excitement
■ Receive digital terrestrial broadcastings using an integrated (Digital Video Broadcasting) tuner (Display DVB programmes with TV Guide (p. 14) / Timer recording (p. 36) / Register and instantly call up favourite programmes with Profile Edit (p. 29)) ■ Sharp pictures with HDMI terminal ■ Control DVD recorder / VCR via TV with Q-Link connection (p. 40) ■ Create home theatre and Panasonic equipment link-ups with "VIERA Link" without complicated settings! (p. 42) ■ Support Audio Description signal (p. 12 and p. 22)
Audio description (AD) is an ancillary component associated with a broadcast which delivers a verbal description of the visual scene as an aid to understanding and enjoyment particularly for visually-impaired viewers.

FULL
FULL
HD
HHD
uses a high definition LCD panel
10930P
1080 pixels) to produce high definition
pictures close to their original resolution.

V-real Pro 2
Vineal Pro 2 technology is the collective name for original technologies developed by
Panasonic to enhance total Full HD (1080p) image quality:
V-real Pro 2 PROCESSOR: Enhance and output the incoming video signals as high-image-quality signals. The resulting video signals deliver the kind of high resolution that large screens require.
V-real Pro 2 DRIVER: Precisely controls panel drive to optimise its performance. Achieves high image quality with the equivalent of high steps of gradation.
V-real Pro 2 PANEL: Provide clear, vivid display of the video signal after processing by the V-real Pro 2 Processor and Driver. The high resolution of 1,920 × 1,080 pixels ensures beautiful images with clearer, sharper details.
1INT
Intelligent Scene Controller
J SCENE CONTROLLER
8500:1 Intelligent Scene Controller consists of Backlight Control and Gamma Correction
and achieves tighter black and more detailed expression.


IPS-Alpha Panel
IPS-Alpha Panel is one of LCD panels,
which offers 178-degree viewing angle. This delivers beautiful images regardless of the viewing angle.

Contents
Be Sure to Read
Safety Precautions 4 (Warning & Caution) Notes 5 Maintenance 5
Quick Start Guide
● Accessories / Options……6 ● Identifying Controls……7 ● Basic Connection……8 ● Auto Setup 10
Enjoy your TV!
Basic Features
● Watching TV 12 Using TV Guide 14 ● Watching VCR, DVD and Satellites …… 16 Viewing Teletext 18
Advanced Features
How to Use Menu Functions 21 (picture, sound quality, etc.) DVB Settings (DVB) 26 (pay-TV, software update) Editing Channels 28 ● Tuning Channels 30 Restore Settings 32 Owner ID 33 Input Labels 34 ● Displaying PC Screen on TV 35 Recording Controls (DVB) 36 Viewing from SD Card (Photos) 38 Q-Link Functions 40 HDMI Functions 41 (HDMI terminal / VIERA Link) External Equipment 44
FAQs, etc.
● Technical Information 46 FAQs 50 On screen messages 52 Specifications 54 Licence 55 Index 55
Safety Precautions
Warning & Caution
Handling the mains plug
- Ensure that the mains plug is easily accessible at all times. The On / Off switch on this model does not fully disconnect the TV from the mains supply. Remove the mains plug from the wall socket when the TV is not used for a prolonged period of time.
Power source
● This TV is designed to operate on 220-240 V, 50 / 60 Hz AC.
Do not remove the cover
- Do not remove the rear cover as live parts are accessible when it is removed. There are no user serviceable parts inside.
Do not expose to direct sunlight and other sources of heat
● Avoid exposing the TV to direct sunlight and other sources of heat. To prevent fire never place any type of candle or naked flame on top or near the TV.
AC 220-240 V
50 / 60 Hz

IMPORTANT: THE MOULDED MAINS PLUG
FOR YOUR SAFETY. PLEASE READ THE FOLLOWING TEXT CAREFULLY.
This appliance is supplied with a moulded three pin mains plug for your safety and convenience. A 5 amp fuse is fitted in this mains plug. Should the fuse need to be replaced, please ensure that the replacement fuse has a rating of 5 amps and that it is approved by ASTA or BSI to BS1362.
Check for the ASTA mark or the BSI mark on the body of the fuse.
If the mains plug contains a removable fuse cover, you must ensure that it is refitted when the fuse is replaced.
If you lose the fuse cover, the mains plug must not be used until a replacement cover is obtained.
A replacement fuse cover may be purchased from your local Panasonic Dealer.
If the fitted moulded mains plug is unsuitable for the socket outlet in your home, then the fuse shall be removed and the mains plug cut off and disposed of safely. There is a danger of severe electrical shock if the cut off mains plug is inserted into any 13 amp socket.
If a new mains plug is to be fitted, please observe the wiring code as shown below.
If in any doubt, please consult a qualified electrician.
IMPORTANT: – The wires in this mains lead are coloured in accordance with the following code: – Blue: Neutral, Brown: Live.
As the colours of the wire in the mains lead of this appliance may not correspond with the coloured markings identifying the terminals in your mains plug, proceed as follows.
The wire which is coloured BLUE must be connected to the terminal in the mains plug which is marked with the letter N or coloured BLACK.
The wire which is coloured BROWN must be connected to the terminal in the mains plug which is marked with the letter L or coloured RED.
Under no circumstances should either of these wires be connected to the Earth terminal of the three pin mains plug, marked with the letter E or the earth symbol.
How to replace the fuse.
For plug type shown in example 1:
Lift out the removable fuse compartment with a screwdriver and replace the fuse, then refit securely into the mains plug (see example 1).
For plug type shown in example 2:
Lift open the fuse compartment in the mains plug with a screwdriver, and replace the fuse, then press the fuse cover down securely (see example 2).
Example 1
Example 2
Notes
Do not expose to rain or excessive moisture
● To prevent damage which might result in electric shock or fire, do not expose this TV to rain or excessive moisture. This TV must not be exposed to dripping or splashing water and objects filled with liquid, such as vases, must not be placed on top of or above the TV.
Do not block the rear ventilation openings
● Ventilation should not be impeded by covering the ventilation openings with items such as newspapers, tablecloths and curtains.
Allow sufficient space around the TV for radiated heat
Minimum distance
Do not place the TV on sloped or unstable surfaces
● The TV may fall off or tip over.
Use only the dedicated stands / mounting equipment
● Using an unauthorized stand or other fixtures may make the TV shaky, risking injury. Be sure to ask your local Panasonic dealer to perform setup. ● Use optional stands / mounts (p. 6).
Do not allow children to handle SD card
- As with a small object, SD card can be swallowed by young children. Please remove SD card immediately after use.
■ Auto power standby function
- If no signal is received and no operation is performed in Analogue TV mode for 30 minutes, the TV will automatically go to standby mode.
■ Keep the TV away from these equipment
- Electronic equipment
In particular, do not place video equipment near the TV (electromagnetic interference may distort images / sound). ● Equipment with an infrared sensor
This TV also emits infrared rays (this may affect operation of other equipment).
■ Transport only in upright position
Maintenance
First, remove the mains plug from the socket outlet.
Display panel
Regular care: Gently wipe the surface clean of dirt by using a soft cloth.
Major contamination: Wipe the surface clean using a soft cloth dampened with clean water or diluted neutral detergent by 100 times of water. Then, using a soft dry cloth, evenly wipe the surface clean until it is dry.
Caution
● The surface of the display panel has been specially treated and may be easily damaged. Do not tap or scratch the surface with your fingernail or other hard object. - Use care not to subject the surface to insect repellent, solvent, thinner, or other volatile substances (this may degrade surface quality).
Cabinet
Regular care: Wipe the surface clean using a soft dry cloth. Major contamination: Dampen a soft cloth with clean water or water containing a small amount of neutral detergent. Then, wring the cloth and wipe the surface clean with it. Finally, wipe the surface clean with a dry cloth.
Caution
- Use care not to subject the TV's surfaces to detergent. (A liquid inside the TV could lead to product failure.)
- Use care not to subject surfaces to insect repellent, solvent, thinner, or other volatile substances (this may deteriorate the surface by peeling the paint).
- Do not allow the cabinet to make contact with a rubber or PVC substance for a long time.
Mains plug
Wipe the mains plug with a dry cloth at regular intervals. (Moisture and dust may lead to fire or electrical shock.)
Accessories / Options
Standard accessories
□Remote Control Transmitter
●N2QAYB000181

Check that you have the accessories and items shown
□Batteries for the Remote Control Transmitter (2)
●R6 (UM3)
□Clamper
●TMM8E18048


□Operating Instructions
□Pan European Guarantee Card
□1 Year Guarantee Registration
□CRM (Customer Relationship Management)
Installing remote's batteries


Caution
- Incorrect installation may cause battery leakage and corrosion, resulting in damage to the remote control.
- Do not mix old and new batteries.
- Do not mix different battery types (such as alkaline and manganese batteries).
- Do not use rechargeable (Ni-Cd) batteries.
- Do not burn or breakup batteries.
Using the clamper


- Do not bundle the RF cable and mains lead together (could cause distorted image). ● Fix cables with clampers as necessary.
- When using the optional accessory, follow the option's assembly manual to fix cables.
Optional accessories
Wall-hanging bracket
• TY-WK32LR2W

Please contact your nearest Panasonic dealer to purchase the recommended wall-hanging bracket. For additional details, please refer to the wall-hanging bracket installation manual.
WARNING!
●Failure to use a Panasonic bracket or choosing to mount the unit yourself will be done at the risk of the consumer. Any damage resulting from not having a professional installer mount your unit will void your warranty. ● Always be sure to ask a qualified technician to carry out set-up. Incorrect fitting may cause equipment to fall, resulting in injury and product damage. - Do not mount the unit directly below ceiling lights (such as spotlights, floodlights or halogen lights) which typically give off high heat. Doing so may warp or damage plastic cabinet parts.
■ How to remove the TV Stand
Remove four screws.

Rear of the TV
Identifying Controls


Basic Connection
External equipment and cables shown are not supplied with this TV.
Please ensure that the unit is disconnected from the mains socket before attaching or disconnecting any leads.
Example 1
Connecting aerial
Example 2
Connecting DVD Recorder / VCR
TV only, DVD Recorder or VCR
Note
- Connect to AV2 for a DVD Recorder / VCR supporting Q-Link (p. 40).
- Connect to AV1 for a Satellite receiver.
- If connecting the TV and Satellite receiver with SCART cable, you can watch satellite broadcast by RGB input signal.
• SCART: 21 pin connection used for video, audio and switching signals (Also known as Euro SCART and Peritel) • RF: Radio Frequency - Signal received from terrestrial aerial. - RGB / S-Video / Video:
Choose between these three video formats depending on personal preference and equipment requirement.
(RGB - Red, Green and Blue)
• VCR: Video Cassette Recorder • DVD: Digital Versatile Disc
Example 3
Connecting DVD Recorder / VCR and Satellite receiver
TV, DVD Recorder / VCR and Satellite Rear of the TV![graph TD A["AC 220-240 V\n50 / 60 Hz"] --> B["Mains lead"] B --> C["PC"] C --> D["AV1"] C --> E["AV2"] D --> F["SCART cable (fully wired)"] E --> G["SCART cable (fully wired)"] F --> H["Satellite receiver"] G --> I["DVD Recorder or VCR"] H --> J["RF OUTRF IN RF OR RF cable/RF IN"] I --> K["RF cable"…](/content/2026/05/966055/images/868e69fe40944413775dd9e8495ad8e85673cde6e09d0e62a049f49780c23e99.jpg)
Auto Setup
Search and store TV channels automatically.
These steps are not necessary if the setup has been completed by your local dealer.
![graph TD A["1: Plug the TV into mains socket and switch On (Takes a few seconds to be displayed)"] --> B["2: When inputting owner ID"] B --> C["3: Select the picture setting"] subgraph Section 1 D["Input"] --> E["INPUT OPTION SD CARD EXIT"] E --> F["MENU RETURN"] F --> G["1 2 3 4 5 6 7 8 9 0 VCR"] G…](/content/2026/05/966055/images/42566c06d5ba3f49d7162e3757c19d1d3a7fd46b9a61ff1d3a7024d4142c9e7f.jpg)
Plug the TV into the mains socket and switch it on (it takes a few seconds for the display to appear).

- You can now use the remote control to turn the TV on or put it into standby mode. (Power LED: On)
- Auto Setup will start to search for TV channels and store them in the numbered order as specified by the broadcasters.

- If compatible recording equipment with Q-Link or similar technologies (p. 40) is connected, analogue channel information is automatically downloaded to the equipment.


Follow the on-screen operation guide to enter your own choice of PIN number, name, etc.
- For detailed procedures
→ "Owner ID" (p. 33)
- Make a note of the PIN number in case you forget it.

- If you input the ID later
→ "Owner ID" (p. 33)
Select the picture setting


● Also possible to change the setting in Picture Menu (p. 22)

Auto Setup is now complete and your TV is ready for viewing.

- To check programme list at-a-glance
→ TV Guide (p. 14)
- To edit channels
→ Editing Channels (p. 28)
Analogue Programme Edit (p. 31)
Using the On Screen Displays
Many features available on this TV can be accessed via the On Screen Display menu.
■ How to use remote control

Open the main menu

Move the cursor / select the menu

Move the cursor / adjust levels / select from a range of options

Access the menu / store settings after adjustments have been made or options have been set

Return to the previous menu

Exit the menu system and return to the normal viewing screen
■ ON SCREEN HELP Instructions box
(example: Owner ID)

On-screen operation guide will help you.
Note
- If tuning has failed → "Auto Setup" (p. 30).
- If downloading has failed → "Download" (p. 23).
- If you turned the TV Off during Standby mode last time, the TV will be in Standby mode when you turn the TV On with Mains power On / Off switch.
Watching TV

Note
● To watch pay-TV (p. 27)
■ Other useful functions (Operate after ③)
![graph LR A["Off Timer"] --> B["Menu Display"] B --> C["Main Menu VIERA Link Picture Sound Setup"] C --> D{Select "Setup" ①} D -->|② access| E["Setup Menu Setup Menu 1/3"] D -->|① select| F["Setup Menu Setup ② set"] G["To cancel"] --> H["Set to "Off" or turn the TV off"] I["To display the r…](/content/2026/05/966055/images/830c8b6758b8f762f6d69f5b3b7d66b017bca646d75aba0794bb692f45442266.jpg)
■ Other useful functions (Operate after ③)
| Hold | Freeze / unfreeze picture | HOLD |
| Display subtitles | Display / hide subtitles (if available)To change the language for DVB→“Preferred Subtitles” (p. 23) (If available) | STTL |
| Display the current programme status | Check or change the current programme status instantlyTo change→②change1selectSubtitle Language(DVB mode)Possible if the programme has some languages of subtitlesMulti Audio(DVB mode)Possible if the programme has some languages of soundsNICAM(Analogue mode)Sound Menu (p. 22)Volume CorrectionAdjusts volume of individual channel or input modeAudio Description(DVB mode)This function can aid visually-impaired viewers by adding an additional audio track to describe events on-screen.Select “On” if the programme has this signal, then you will hear the description soundNoteAlso possible to change the settings in Menu list (p. 22 and p. 23). |
| Display information banner | Display programme informationiChannel Current time CategoryProgramme1 BBC ONE WALES23:35Profile 1Corotation Street20:00~20:55Now▶Change categoryFor info press↓Features availableblueDVB: ProgrammeStart / Finish timeMute Bad signal EncryptedSubtitlesAD TXT Multi-Audio 45Features availableAnalogue: ProgrammeStatusSound muteScrambled broadcastingAudio descriptionOff timerMultiple audioWeak TV signalTeletext●Information of another channel→●To set display timeout→“Banner Display Timeout” (p. 23)●Information on next programme(DVB)→●To hide→●●To watch the programme listed in the banner→OK●Appears also when changing channel●Information banner operation→i1st press→2nd pressBanner + programme synopsis (DVB)→3rd pressExit●“AD”, “Subtitles”, “TXT”, “Multi-Audio” indications are displayed as available on particular channels or services, but may not be available for all individual programmes being broadcast.Press the button twice to confirm availability of these functionsExample:LUO ONE WALES23:35Change CategoryCorotation Street20:00~20:55Now▶Exit Info↓(AD)Mate Bad Signal Encrypted AD Subtitles TXT Multi-Audio 43 |
| Change aspect ratio | Change the aspect ratio(p. 46)ASPECTEnjoy viewing the picture at its optimum size and aspect.To change the mode→Display Aspect ASPECT→During the list is displayed,→Store OKSelection list Select the modeTo change the mode using the ASPECT button only→ASPECT→(Press repeatedly until you reach the desired mode) |
Using TV Guide
TV Guide—Electronic Programme Guide (EPG) provides an on-screen listing of programmes currently broadcast and future broadcasts over the next seven days (depending on the broadcaster).
Analogue broadcasts will be listed after DVB broadcasts. "D" means DVB channel and "A" means Analogue channel.

■ Other useful functions (Operate after viewing TV Guide)
| Watch the programme | Select the channel or programme now on the air | Select “View” (DVB)  |  (TV screen) (TV screen) |
| View details of the programme (DVB mode) | Select the programme | View details |  –Details→i –Details→i |
| Timer programming to record (DVB mode) | Select the programme to be broadcast 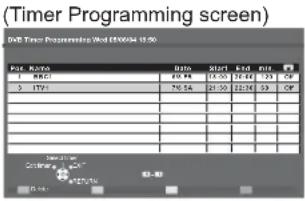 ■To check / change / cancel a timer programming event→“Timer Programming” (p. 36)Note●When recording programmes, you must make the proper settings on the external recording equipment connected to the TV.If a compatible recording equipment with Q-Link or similar technologies is connected to the TV (p. 8) and the “Q-Link Settings” (p. 23) are completed, no setting of the equipment is required.Also read the manual of the recording equipment.●If you select the programme now on the air, the confirmation screen whether watching or recording will appear. Select “Timer Programming” to record from the time you finish the Timer Programming setting. ■To check / change / cancel a timer programming event→“Timer Programming” (p. 36)Note●When recording programmes, you must make the proper settings on the external recording equipment connected to the TV.If a compatible recording equipment with Q-Link or similar technologies is connected to the TV (p. 8) and the “Q-Link Settings” (p. 23) are completed, no setting of the equipment is required.Also read the manual of the recording equipment.●If you select the programme now on the air, the confirmation screen whether watching or recording will appear. Select “Timer Programming” to record from the time you finish the Timer Programming setting. |
■ To check / change / cancel a timer programming event
Note
- When recording programmes, you must make the proper settings on the external recording equipment connected to the TV. If a compatible recording equipment with Q-Link or similar technologies is connected to the TV (p. 8) and the “Q-Link Settings” (p. 23) are completed, no setting of the equipment is required. Also read the manual of the recording equipment.
- If you select the programme now on the air, the confirmation screen whether watching or recording will appear. Select "Timer Programming" to record from the time you finish the Timer Programming setting.
Note
- When this TV is turned on for the first time, or the TV is switched off for more than a week, it may take some time before the TV Guide is completely shown.
Watching VCR, DVD and Satellites
Connect the external equipment (VCRs, DVD equipment, etc.) and you can watch the input.
Connect the Satellite receiver and you can watch satellite broadcasts.
To connect the equipment (p. 8 and p. 9)
The Remote Control is capable of operating some functions of selected Panasonic external equipment.
![graph TD A["1: Turn the TV on"] --> B["2: Display the Input select menu"] B --> C["3: Select the input mode connected to the equipment"] C --> D["4: View"] D --> E["5: View to return to TV"] subgraph Section 1 F["■ When connecting with SCART as example 2 or 3 (p. 8 and p. 9)"] G["→ Receives input si…](/content/2026/05/966055/images/d7f980043c64905a8bff80d1e17355a0b9ac82b3d3cea6339689bf1375c4dabc.jpg)
Screen display
| Terminal | AV1 AV2 AV3 | | Component PC HDMI1 HDMI2 | |
| Manual input (default setting in “Input Labels”) | AV1 AV1-RGB | AV2 AV2-S-Video AV2-RGB | AV3 AV3-S-Video | Component PC | HDMI1 HDMI2 | | |
| Auto Input (EC mode or VIERA Link) | EC/AV1 EC/AV1-RGB | EC/AV2 EC/AV2-S-Video EC/AV2-RGB | — | — | — | EC/HDMI1● Applicable for EC mode and VIERA Link | EC/HDMI2● Applicable for VIERA Link |
Panasonic equipment connected to the TV can be directly operated with the remote control.
VCR11DVD | VCR / DVD switch*Select VCR to operate Panasonic VCR or DVD equipmentSelect DVD to operate Panasonic DVD equipment or Player home theatre |
 | StandbySet to Standby mode / Turn on |
 | PlayPlayback videocassette / DVD |
 | StopStop the operations |
 | Rewind / Skip / SearchVCR: Rewind, view the picture rapidly in reverseDVD: Skip to the previous track or titlePress and hold to search backward |
 | Fast-forward / Skip / SearchVCR: Fast-forward, view the picture rapidly forwardDVD: Skip to the next track or titlePress and hold to search forward |
 | PausePause / RestartDVD: Press and hold to play at slow speed |
 | Programme Up / DownSelect programme |
REC | RecordStart recording |
*Setting your remote control to operate Panasonic VCR, DVD, etc.
1. Set the VCR / DVD switch to the appropriate position
VCR DVD

2. Press and hold during the following operations
Enter the appropriate code for the equipment to be controlled, see table below

→ Press


"VCR" position
| Equipment | Code |
| VCR | 10 (default) |
| DVD | 11 |
"DVD" position
| Equipment | Code |
| DVD | 70 (default) |
| Player home theatre | 71 |
Note
- Confirm correct operation after the code changed. ● The codes will be reset to default values if batteries are replaced. ● "DVD" means DVD player, DVD recorders and Recorder home theatre. Some operations may not be possible on some equipment models.
Viewing Teletext
You can enjoy news, weather forecasts and subtitles, etc. (depending on the broadcaster)
DVB (digital broadcasting) mode
DVB teletext services
DVB teletext services differ greatly from analogue teletext. When you switch to a DVB teletext service, the images you see can contain graphics and text, laid out and controlled in a manner decided by the broadcaster.
- You can check if the programme has teletext information.


If in Analogue mode
Select DVB

Switch to Teletext


How to use
In all cases, it is possible to navigate the pages using buttons on the remote control, but because the commands available must apply to all manufacturers of DVB equipment, some on screen commands may not correspond exactly to the remote control buttons.
For example:

Note
- As soon as you switch to a DVB channel with links to a teletext service, software is downloaded in the background to enable the teletext function. This means that when switching to a DVB channel, you should wait for approximately 5 seconds before pressing the TEXT button - this will allow the software to download. If you press the TEXT button before download is complete, there will be a short delay before the text screen is displayed.
- While navigating DVB teletext, you will find there is a short delay when moving between pages while the page downloads. There is often a prompt shown somewhere on the page (for example "Loading") to let you know that this is happening.
Analogue mode
What is FASTEXT mode (default)?
In FASTEXT mode, four differently coloured subjects are situated at the bottom of the screen. To access more information about one of these subjects, press the appropriately coloured button. This facility enables fast access to information on the subjects shown.
What is List mode?
In List mode, four differently coloured page numbers are situated at the bottom of the screen. Each of these numbers can be altered and stored in the TV's memory. ("Store frequently viewed pages", p. 20)
■To change mode → "Teletext" in Setup Menu (p. 23)![graph TD A["1"] --> B["If in DVB mode Select Analogue"] B --> C["2"] C --> D["Switch to Teletext"] D --> E["3"] E --> F["Select the page"] F --> G["■ To adjust contrast → MENU → Text (Press twice)"] F --> H["■ To return to TV → Press again to return to TV."]](/content/2026/05/966055/images/ed864b72e22771d77256b0359cee9edf2d30b6d03af081c26cab91f48fdb15f8.jpg)
■ Using Analogue teletext![graph TD A["Reveal hidden data"] --> B["MENU"] B --> C["re"] C --> D["Re-hide"] D --> E["red"] F["FULL / TOP / BOTTOM"] --> G["MENU"] G --> H["green"] H --> I["P100 Broadcast (Expand the TOP half)"] I --> J["(TOP) (BOTTOM) Normal (FULL) (Expand the BOTTOM half)"] J --> K["P100 Broadcast (Expand the…](/content/2026/05/966055/images/25b2b394d748591e83dd5b33c4a306f5974f1454eb603165a0f37d3015089a3f.jpg)
(Continued)
Viewing Teletext
■ Using Analogue teletext (Continued)
| HOLD | If you wish to hold the current page without updatingStop automatic updating   |
| INDEX | Return to the main index pageINDEX |
| Subtitles | View subtitles by pressing STTL buttonSTTL ● Factory setting is “P888” (subtitle service) on blue button (List mode). |
| View in multi window | Watch TV and Teletext in two windows at once[IMAGE]●Operations can be made only in Teletext screen.Each time pressed: Teletext TV and Teletext TV |
| Store frequently viewed pages | Store frequently viewed pages in the colour bar(List mode only)As page is displayedCorresponding colour buttonOK press and hold  ■To change stored pagesThe number changes to white. ■To change stored pagesThe number changes to white. Enter new page number1 2 34 5 67 8 90 OK press and hold Enter new page number1 2 34 5 67 8 90 OK press and hold |
| View sub page | View sub page (Only when teletext is more than one page) Appears at top of the screen■To view specific sub page Appears at top of the screen■To view specific sub page  Enter the 4-digit number example: P6 Enter the 4-digit number example: P6   The number of sub pages varies depending on the broadcasters (up to 79 pages).It may take some time for searching, during which time you can watch TV. The number of sub pages varies depending on the broadcasters (up to 79 pages).It may take some time for searching, during which time you can watch TV. |
| Watch TV while waiting for update | View the TV picture while searching for a teletext pageTeletext automatically updates itself when new information becomes available.Changes to TV screen temporarilyMENU yellow yellow P108yellow yellow Appears when updating is completed View the updated page(You cannot change the channel.)●The news page provides a function that indicates arrival of latest news (“News Flash”). |
View the TV picture while searching for a teletext page
Various menus allow you to make settings for the picture, sound, and other functions.

Select the item
Adjust or select
Choose from among alternatives
Adjust using the slide bar
Go to the next screen
To initialize all settings
→ "Shipping Condition"
(p. 32)
Menu list
| Menu | Item Adjustments / Configurations (alternatives) |
| VIERA Link | VIERA Link Control |
| Speaker Selection |
| Picture | Viewing Mode |
| Contrast, Brightness,Colour, Sharpness |
| Tint |
| Colour Balance |
| Colour Management |
| P-NR |
| 3D-COMB |
| Reset to Default |
| Sound | Mode |
| Bass |
| Treble |
| Balance |
| Headphone Volume |
| Surround |
| Volume Correction |
| Preferred Multi Audio |
| NICAM |
| HDMI1 Input |
| Audio Description | Audio Description |
| Menu | Volume |
| Speakers |
| Headphones |
| Reset to Default |
Menu list
| Menu | Item Adjustments / Configurations (alternatives) |
| Setup | DVB Timer Programming | Records future programmes (p. 36) |
| DVB Profile Edit | Creates list of favourite programmes (p. 29) |
| DVB Service List | Skips the unwanted DVB channels (p. 29) |
| Q-Link | Selects which AV terminal is to be used for data communication between this TV and a compatible recording equipment (AV1 / AV2) (p. 40)Select the connected terminal to the recording equipment even it is not compatible with Q-Link. |
| AV1 / AV2 out | Chooses the signal to be transmitted from the TV to Q-Link (Analogue / DVB / AV1 / AV2 / AV3 / Monitor)Monitor: Image displayed on screenComponent, PC and HDMI signals cannot be outputted |
| Download | Downloads analogue channel information to a Q-Link compatible equipment connected to the TV |
| Child Lock | Locks a programme channel to prevent access to it (p. 29) |
| Tuning Menu | Auto Setup |
| Analogue Programme Edit |
| DVB Manual Tuning |
| Analogue Manual Tuning |
| Add New DVB Services |
| New Service Message |
| DVB Signal Condition |
| Off Timer | Sets the time the TV automatically turns Off (Off / 15 / 30 / 45 / 60 / 75 / 90 minutes) |
| Power on Preference | Set to “TV” to view picture from TV tuner.Set to “AV” to view input from an external equipment connected to a SCART terminal, e.g. satellite receiver (TV / AV)The external equipment must be switched on and sending a control signal for automatic switching at power on to occur |
| Teletext | Analogue teletext display mode (FASTEXT / List) (p. 19) |
| Preferred Subtitles | Selects the preferred language for DVB subtitles (depending on the broadcaster)To display subtitles p. 13 |
| Shipping Condition | Resets all settings, for example, when moving house (p. 32) |
| Owner ID | Inputs the owner ID (p. 33) |
| Common Interface | Uses include to watch pay-TV (p. 27) |
| System Update | Downloads new software to TV (p. 27) |
| Picture Overscan | Selects the screen area displaying the image (Off / On)On : Enlarged the image to hide the edge of the image.Off : Displayed the image in the original size.Set to “On” if noise is generated on the edge of the screen.This function is available when aspect is set to Auto or 16:9.This function can be memorized for SD (Standard definition) and HD (High definition) signals separately. |
| Input Labels | Labels or skips each input terminals (p. 34) |
| Banner Display Timeout | Sets how long the information banner (p. 13) stays on screen0 (No display) to 10 sec. in 1-sec. increments |
| VIERA Link | Sets to use VIERA Link functions (Off / On) (p. 42) |
| Software Licence | Displays the software licence information |
| System Information | Displays the system information of this TV |
A different menu will be displayed while PC or SD Card is used. (p. 35 and p. 39) - Only available items can be selected.
(picture, sound quality, etc.)
How to Use Menu Functions
Advanced
![graph TD A["VIERA Main Menu"] --> B["Picture"] A --> C["Sound"] A --> D["Setup"] B --> E["VIERA Link Menu"] E --> F["Recording"] E --> G["Speaker Selection"] E --> H["Home Cinema"] H --> I["(p. 43)"] D --> J["Picture Menu"] J --> K["1/2 Viewing Mode"] J --> L["Contrast"] J --> M["Brightness"] J -->…](/content/2026/05/966055/images/79bff7e0cbe460e48f521ee1e94198cdf7d35fc698ae933a980c0c1dfd38a4f0.jpg)
NTSC (National Television System Committee): One of television signal used in USA, etc.
![graph TD A["File Name"] --> B["Data"] B --> C["Start"] C --> D["End"] D --> E["Line Color: 100%"] E --> F["1 BBC1"] E --> G["65/7R"] E --> H["19/2A"] E --> I["21:33"] E --> J["22:30"] E --> K["23"] E --> L["24"] E --> M["25"] E --> N["26"] E --> O["27"] E --> P["28"] E --> Q["29"] Q --> R["Q-Link Se…](/content/2026/05/966055/images/d23ea61fdc4e54169b6e15251281865e1a5446418320b0d04f3442cf3921d67f.jpg)
DVB Settings (DVB mode)
DVB Settings provide access to various advanced features.
![graph TD A["1 If in Analogue mode Select DVB"] --> B["2 Display the menu MENU"] B --> C["3 Select "Setup""] C --> D["4 Select "Common Interface" or "System U Setup Menu 2/3"] D --> E["5 Set"]](/content/2026/05/966055/images/963f8ed47d8508aad0c3821ec48d5c6655d83dd16723b705a468281ba8f60fa0.jpg)
The Common Interface Module menu provides access to software contained on Common Interface (CI) Modules.
This TV receiver works only with Pay TV modules complying with CI standard.
Caution
- Turn Off Mains power On / Off switch whenever inserting or removing the CI module.
- If a view card and a card reader come as a set, first insert the card reader, then insert the view card into the card reader.
- Do not insert the module upside down.

① Insert the CI module (optional)
● The features that appear on screen are dependent on the contents of the selected CI module. - Normally pay-TV services will appear without ② and ③. If pay-TV services do not appear, perform ② and ③. - For more details, see the manual of the CI module, or check with the broadcaster.
② Access "Common Interface"

③ Follow the on-screen instructions
![graph LR A["select, go"] --> B["OK"] B --> C["▲▼▲"] C --> D["●"] E["Coloured characters"] --> F["red"] E --> G["green"] E --> H["yellow"] E --> I["blue"]](/content/2026/05/966055/images/b9d80f2f3f200e8d9edc58f2231b93e80a10a5697cd351ce932e77111a0e8454.jpg)
- On-screen operation guide may not correspond to the remote control buttons.
Download new software to TV.
For details (p. 47)
If System Update is performed, the software will be updated (it may change TV functions). If you do not wish to do so, set "Auto Update Search in Standby" to Off.
Select "Auto Update Search in Standby" and then set "On" or "Off".

● On: Automatically performs a search in standby and downloads an update, if any software updates are available.
Select
"System Update Search Now"


Searches for an update (for several min.) and displays a corresponding message if any.

Download

- Download may take about 20 min.
Editing Channels
You can make your favourite channel lists, skip unwanted channels and control channel audience.

| List favourite channelsDVB Profile Edit(DVB mode) | Create your favourite channel list (Profile) from various broadcasters (up to 4: Profile 1 to 4). The list is added to "Category" in TV Guide (p. 14) and information banner (p. 13) and then easily accessed.1 Select a channel and add it to the listA channel is added1.1.2.3.4.5.6.7.8.9.10.11.12.13.14.15.16.17.18.19.20.21.22.23.24.25.26.27.28.29.30.31.32.33.34.35.36.37.38.39.40.41.42.43.44.45.46.47.48.49.50.51.52.53.54.55.56.57.58.59.60.61.62.63.64.65.66.67.68.69.70.71.72.73.74.75.76.77.78.79.80.81.82.83.84.85.86.87.88.89.90.91.92.93.94.95.96.97.98.99.10.11.12.13.14.15.16.17.18.19.20.21.22.23.24.25.26.27.28.29.30.31.32.33.34.35.36.37.38.39.40.41.41.42.43.44.45.46.47.48.49.50.51.52.53.54.55.56.57.58.59.60.61.62.63.64.65.66.67.68.69.70.71.72.73,74.75.76.77.78.79.80.81.82.83.84.85.86.87.88.89.90.91.92.93.94.95.96.97.98.99.10.11.12.13.14.15.16.20.21.22.23.24.25.26.27.28.29.30.31.32.33.34.35.36.37.38.39.40.41.42.43.44.45.46.47.48.49.50.51.52,53.54.55.56.57.58.59.60.61.62.63.64.65.66.67.68.69.70.71.72.73.74.75.76.77.78.79.80.81.82.83.84.85.90.91.92.93.94.95.96.97.98.99.10.11.12.13.14.15.16.20.21.22.23.24.25.26.27.28.29.30.31.32.33.34.35,36,37,38,39,40,41,42,43,44,45,46,47,48,49,50,51,52,53,54,55,56,57,58,59,60,61,62,63,64,65,66,67,68,69,70,71,72,73,74,75,76,77,78,79,80,81,82,83,84,85,86,87,88,89,90,91,92,93,94,95,96,97,98,99,10,11,12,13,14,15,16,17,18,19,20,21,22,23,24,25,26,27,28,29,30,31,32,33,34,35,36,37,38,39,40,41,42,43,44,45,46,47,48,49,50,51,52,53,54,55,56,57,58,59,60,61,62,63,64,65,66,67,70,71,72,73,74,75,76,77,78,79,80,81,82,83,84,85,86,87,88,89,90,91,92,93,94,95,96,97,98,99,10,11,12;To edit ProfileSelect the field of Profile to edit and:To name the Profileto move the channelTo delete the channelTo store:Select the field of Profile to edit and:To name the Profileto move the channelTo delete the channelTo store:Select the field of Profile to edit and:To name the Profileto move the channelTo delete the channelTo store:Select the field of Profile to edit and:To name the Profileto move the channelTo delete the channelTo store:Select the field of Profile to edit and:To name the Profileto move the channelTo delete the channelTo store:Select the field on Profile to edit and:To name the Profileto move the channelTo delete the channelTo store:Select the field on Profile to edit and:To name the Profileto move the channelTo delete the channelTo store:Select the field on Profile to edit and:To name the Profileto move the channelTo delete the channelTo store:Select the field on Profile to edit and:To name the Profileto move the channelTo delete the channelTo store:Select the field on Profile to edit an except in this function.Use this function to skip unwanted services.Select a service and add / deleteDVB Service List70 CBBC Channel72 Cartoon Nwk105 BBCi719 BBC Radio Wales720 BBC Radio Cymru1 BBC ONE Wales7 BBC THREE②add / delete①select✓:add□:delete (skip)You can hide unwanted services. The deleted services cannot be displayed except in this function.(When a channel is selected, a message appears; by entering the PIN number, you can watch the channel.)Enter the PIN number (4 digits)Please enter new PINPIN③Enter the PIN number twice at first settingMake a note of the PIN number in case you forget it.Select “Service List”Child LockChange PINService ListAccess④ Select the channel to be lockedService NameTypeLock1.1.2.3.4.5.6.7.8.9.10.11.12.13.14.15.CBCC channel70Corton Nav72BBC-05BBC Radio Wava7-0BBC Radio Cymu22dCAcsc#1 select② set① selectTo cancelSelect the locked channelOKTo lock all channelsyellowTo cancel all channel locksblueAppears when the channel is locked■ To change the PIN numberSelect “Change PIN” in ② and enter a new PIN number twice.Note● Setting “Shipping Condition” (p. 32) erases the PIN number and all settings. |
| Skip unwanted channelsDVB Service List(DVB mode) |
| Control channel audienceChild Lock |
Tuning Channels
You can re-tune all TV channels when moving house or search for new services which may have recently started broadcasting.

Set DVB and Analogue channels automatically
Auto Setup
Automatically set the DVB and Analogue channels received in the area. If a Child Lock PIN number (p. 29) has been set, it must be entered.
Start Auto Setup

Settings are made automatically
● All previous settings are erased. ● The analogue settings are downloaded to a Q-Link compatible equipment connected to the TV.
- When the operation is completed, the digital service at programme position "1" will be displayed. If no DVB services are found, the first analogue service will be displayed.
- If tuning has not done completely → "DVB Manual Tuning", "Analogue Manual Tuning"
① Press repeatedly until "Auto Setup" appears

② Access "Auto Setup"

③ Start "Auto Setup"

■ To return to TV → F

| Edit Analogue channelsAnalogue Programme EditDeleteAddMoveChange name | Edit the analogue programme position settings1 Select the channel to edit  —— select Cursor2 Edit —— select Cursor2 Edit → After confirming, press red → After confirming, press red → After confirming, press green → After confirming, press green √ √ → →  | To change channel number→“Analogue Manual Tuning”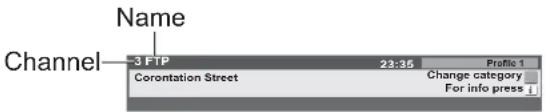 ■ To change the name of the broadcaster displayed when selecting channels ■ To change the name of the broadcaster displayed when selecting channels Select the “Name” fieldEnter the “User input” modeSelect the characterOK Set (Maximum: five characters)RETURN Store Select the “Name” fieldEnter the “User input” modeSelect the characterOK Set (Maximum: five characters)RETURN Store |
| Set DVB channel manuallyDVB Manual Tuning | Normally use “Auto Setup” or “Add New DVB Services” to add DVB channels to your service list. If tuning has not done completely, use this function.[IMAGE]● All services found will be added to the DVB Service List (p. 29) automatically. |
| Set Analogue channel manuallyAnalogue Manual Tuning | Set Analogue channel manually after Auto Setup. If a VCR is connected with only the RF cable, select programme position “0”. |
| Add DVB channel automaticallyAdd New DVB Services | Any new services found will be added to the DVB Service List (p. 29) automatically.[IMAGE]● The new service is added with the current settings saved as they are. |
| Display a notification messageNew Service Message | Selects whether to give a notification message when a new DVB service is found. (Off / On)[IMAGE]● Selecting OK (Auto Setup) will delete current Profile and Childlock settings. |
| Check DVB signalDVB Signal Condition | Selects a channel and checks the DVB signal condition. Use for adjusting the direction of the aerial.● To change the programme→(during the menu appears)DVB Signal ConditionDVB Programme 170 CBBC ChannelSignal QualitySignal Strength0 5 10 | A good Signal Strength is not an indication of suitable signal for DVB reception. Please use the Signal Quality indicator as follows:Signal Quality:● Green bar ➕ Good● Yellow bar ➕ Poor● Red bar ➕ Bad (Check the aerial) |
Restore Settings
Resets the TV to its original condition, i.e. no channels tuned in.
All settings other than "Owner ID" (channels, picture, sound quality, etc.) are reset.
![graph TD A["1 Display the menu"] --> B["2 Select "Setup""] B --> C["3 Select "Shipping Condition""] C --> D["4 Set"]](/content/2026/05/966055/images/833e523bde02e8aa9958eb17ee39cff2a6245355650936c26573c5198ccd0622.jpg)
Restore Settings
Shipping Condition
① Check the message and initialise

② Follow the on-screen instructions
- "Auto Setup" will automatically start when Mains power On / Off switch is next turned On. (p. 10)
■ To re-tune TV channels only, e.g. after moving house
→ "Auto Setup" (p. 30)
Owner ID
Entry of the security code (PIN number) and "personal information" (your name, address and post code). In the unfortunate event of theft it will help the Police to determine the owner.
If you have skipped the Owner ID input in "Auto Setup" (p. 10), and input it later, start from ①.
If you input the Owner ID in "Auto Setup" (p. 10), perform 4.

1
MENU
2
Select "Setup"
Select "Owner ID"
Set
① Enter the PIN number (4 digits)

● Enter the PIN number twice at first setting.
● Make a note of the PIN number in case you forget it.
② Enter your name, address, and post code, in that order

Select the entry field

Enter the "User input" mode

Select the character

Set

Store
Hold down for about 3 sec.

Displays the information on the screen (for several sec.)


● The PIN number is not displayed.
■ To change the PIN number
Select the "PIN" field

② access
① select

Enter a new PIN number twice
For easier identification and selection of the input mode, you can label each input terminal or skip a terminal that is not connected to any equipment.
(To select the input mode → p. 16)

The labels you set will be displayed in the "Input Selection" menu (p. 16) or banner.
- If "Skip" is selected, you cannot select the mode.
You can name each input terminal freely.
![graph LR A["Select "User input""] --> B["① select"] A --> C["② access"] B --> D["Set characters"] C --> D D --> E["User Input\nName"] E --> F["① select"] E --> G["# set"] F --> H["Store\nRETURN"] G --> H style A fill:#f9f,stroke:#333 style H fill:#ccf,stroke:#333](/content/2026/05/966055/images/3a1afcc84cbcd27f469b67a319946772c0789ff68f0e01209f9942fc913e6260.jpg)
Displaying PC Screen on TV
The screen of the PC connected to the TV can be displayed on the TV.
You can also listen to PC sound with the audio cable connected. To connect PC (p. 44)

Corresponding signals (p. 49) - If "H-freq." or "V-freq." is shown in red, the signals may not be supported.
■ PC menu setting (changed as desired) ● To make settings → "How to Use Menu Functions" ① to ④ (p. 21)
| Menu | Item Adjustments / Configurations (options) |
| Picture | Advanced PC Settings | R-Gain Adjusts the white balance for red areas |
| G-Gain Adjusts the white balance for green areas |
| B-Gain Adjusts the white balance for blue areas |
| Gamma (2.0 / 2.2 / 2.5) |
| Setup | PC Setup | Input Resolution | Switches to a wide viewVGA (640 × 480 pixels), WVGA (852 × 480 pixels), XGA (1,024 × 768 pixels), WXGA (1,366 × 768 pixels)Options change depending on signals |
| Clock Set to the minimum level if noise occurs |
| H-pos | Adjusts horizontal position |
| V-pos | Adjusts vertical position |
| Clock Phase | Eliminates flicker and distortionAdjust after Clock adjustmentSet to the minimum level if noise occurs |
| Sync | Chooses another synchronous signal if the image is distorted (H & V / On G)H & V : by the horizontal and vertical signals from your PCOn G : by the green signal from your PC (if available) |
● Other items → p. 22 and p. 23
Recording Controls (DVB mode)
The Timer programming menu allows you to choose programmes that you wish to record. At the correct time, the DVB system will switch on and tune to the correct station (even if the TV is in Standby mode). TV Guide may also be used to set timer programmes. (p. 14)
- If the recording equipment is compatible with Q-Link or similar technologies (p. 40), and setup / connection are done completely (p. 40 and p. 44), you do not need to programme the equipment – the DVB system will control the recording progress.
- If the recording equipment is not compatible with Q-Link or similar technologies, set "Q-Link" in Setup Menu (p. 23) to the connected terminal (AV1 or AV2), and make timer programming of the recording equipment (Read the manuals of the equipment).
![graph TD A["1: If in Analogue mode Select DVB"] --> B["2: Display the menu MENU"] B --> C["3: Select "Setup""] C --> D["4: Select "DVB Timer Programming""] D --> E["5: Set to return to TV EXIT"] D --> F["6: Store to stop recording GUIDE EXIT"]](/content/2026/05/966055/images/6eb0bd7835eb5c26380698e71dadb26795dd0bf3f4f11a59a1a5bedfd42e8aed.jpg)
Caution
● The TV must either be On or in standby. - For preparations of a recording equipment, read the manual of equipment. - No other DVB channel can be selected during recording. However you can watch analogue channels. It may not be possible to record an encrypted programme (which is copy-protected).
Set timer programming details
① Start making the settings

② Repeat the operations as below, and set items in the order of ① to ⑤

●①, ③ and ④ can also be entered with numeric buttons.

■To change a timer programming event
→ Select the programme to be changed using → Correct as necessary (as above)

and press

■To cancel a timer programming event
→ Select the programme to be deleted using

and press


■Direct TV recording:
You can record the current programme to DVD Recorder or VCR immediately. (p. 40)
Note
- Confirm the DVB LED lights (Orange). If not, a timer programming is not available. ● A message will appear if you try to programme a timer event which overlaps an already programmed event.
- 2 min. before the starting time: a reminder message appears. (To remove the message → OK; To cancel the programming → ○) ● 10 sec. before the starting time: in DVB mode, the TV automatically selects the programmed channel.
- Cancelling the programming may not be valid immediately before the starting time. In this case, directly operate the recording equipment to cancel recording.
TV Guide—Electronic Programme Guide (EPG)—Timer Recording
① View TV Guide
GUIDE
● There are two styles of display for TV Guide (Landscape / Portrait)
② Select the programme to be broadcast


(Timer Programming screen)
DVB LED will turn on if Timer Programming is set.

● Orange DVB LED
(Rapid blinking during recording)
■ To check / change / cancel a timer programming event ➤ "Timer Programming" (above)
Viewing from SD Card
The still images recorded by the digital camera will be displayed.

Insert the SD Card
● Warning message for output signal is displayed.
Signal output from all AV terminals will be disabled during SD card view.
Press OK to proceed.
Press EXIT to return to TV viewing.


Caution
During the operation, no signals are output from the monitor output terminals. - "Date" shows the date on which the recording was made by the digital camera. It shows "**/**/****" when recordings are made without date signal.

Cautions in handling SD Card
- Do not remove the card while the TV is accessing data (this can damage card or TV).
- Do not touch the pins on the back of the card.
- Do not subject the card to high pressure or impact.
- Insert the card in the correct direction (otherwise, the card may be damaged). Electrical interference, static electricity, or erroneous operation may damage the data or the card.
- Back up the recorded data at regular intervals in case of deteriorated or damaged data or erratic operation of the TV. (Panasonic is not liable for any deterioration or damage of recorded data.)
(Photos)
SD Card ● For details on SD Cards (p. 48)
Slide show
■ Start Slide show (operate in step ③ or ④)
① Select the photo for the first view
② Start Slide show


To pause → OK
■ Slide show settings (operate in step ③ or ④)
① Display the menu


② Select "Viewing Setup"

③ Select the functions and set


● "Picture Menu" (p. 22)
| Menu | Item | Adjustments / Configurations (alternatives) |
| Setup Viewing | Interval | Select slide show interval (5 / 10 / 15 / 30 / 60 / 90 / 120 seconds) |
| Repeat | Slide show repeat (Off / On) |
On screen messages
Message
Is SD Card in?
No valid file to play
Cannot read file
Meaning / Action
- Insert a SD card.
The card has no data.
● The file is broken or unreadable.
The TV does not support the format. (For the applicable formats and data, see p. 48.)
Q-Link Functions
Q-Link connects the TV and VCR / DVD recorder, enables easy recording and playback.
Condition
- Use the VCR / DVD recorder with the following logos: "Q-Link", "NEXTVIEWLINK", "DATA LOGIC", "Easy Link", "Megalogic", or "SMARTLINK" Connect the equipment to this TV's AV1 or AV2 terminal via a "fully-wired" SCART cable. (p. 44) ●Q-Link terminal setup in Setup Menu (Q-Link, AV1 / AV2 out). (p. 23)
■ Download analogue channel settings
● Perform Auto Setup. (p. 30) When first using this TV, see "Auto Setup". (p. 10) ● Perform download to the equipment. (p. 23)
■ Features available
Some recording equipments are not applicable. Read the manuals of the equipment.
| What you see is What you record |  | Recording: the current programme in VCR / DVD recorder ly.When Direct TV Recording is performed, the recording equipment is automatically turned on if it is in Standby mode.The recording equipment is recording from its own tuner. You can turn the TV off during recording (Analogue only).If you turn the TV off during recording from an AV source, the recording will be stopped.When Direct TV Recording is performed while watching DVB channel, the DVB programme position is locked and no other DVB channel can be selected. However you can watch analogue channels. |
| age DVB channel, stop recordingEXIT |
| Information / Message | Recording information or if recording is not possible, a message is displayed. (Only when the programme number is “0” or “AV mode” for some equipment.) |
| Power on link and Easy playback | When VCR or DVD recorder starts playback or direct navigator / function menu for the equipment are activated, the TV is turned on and input mode is switched automatically so that you can view the content. (Only when TV is in Standby mode.) |
| Power off link | When TV is set to Standby mode, the recording equipment is also automatically set to Standby. (Only when the videocassette or DVD is not active.) |
- "DATA LOGIC" (a trademark of Metz Corporation) • "Megalogic" (a trademark of Grundig Corporation)
- "Easy Link" (a trademark of Philips Corporation) • "SMARTLINK" (a trademark of Sony Corporation) Read the manuals of the equipment too.
HDMI Functions
HDMI (high-definition multimedia interface) allows you to enjoy high-definition digital images and high-quality sound by connecting the TV and the equipment.
HDMI-compatible equipment (*1) with an HDMI or DVI output terminal, such as a set top box or a DVD player, can be connected to the HDMI terminal using an HDMI compliant (fully wired) cable.
About connections, see "External Equipment" (p. 44).
Note
- HDMI is the world's first complete digital consumer AV interface complying with a non-compression standard.
- If the external equipment has only a DVI output, connect to the HDMI1 terminal via a DVI to HDMI adapter cable (*2).
- When the DVI to HDMI adapter cable is used, connect the audio cable to the audio input terminal (HDMI1: use COMPONENT-AUDIO terminals).
● Audio settings can be made on the "HDMI1 Input" menu screen. (p. 22)
● Applicable audio signal sampling frequencies (2ch L.PCM): 48 kHz, 44.1 kHz, 32 kHz
● HDMI2 terminal is for digital audio signal only.
- Use with a PC is not assumed.
- If the connected equipment has an aspect adjustment function, set the aspect ratio to "16:9".
- These HDMI connectors are "type A".
- These HDMI connectors are compatible with HDCP (High-Bandwidth Digital Content Protection) copyright protection.
- An equipment having no digital output terminal may be connected to the input terminal of either "Component", "S-VIDEO", or "Video" to receive analogue signals.
The HDMI input terminal can be used with only the following image signals: 480i, 480p, 576i, 576p, 720p, 1080i and 1080p. Match the output setting of the digital equipment.
- For details of the applicable HDMI signals, see p. 49.
(*1): The HDMI logo is displayed on HDMI-compliant equipment.
(*2): Enquire at your local digital equipment retailer shop.
■ Summary of Control functions
Connecting with an HDMI cable to Panasonic equipment with VIERA Link function, you can control the equipment (p. 42). You can use VIERA Link and Q-Link functions together.
| Function\Connection | VIERA Link and Q-Link VIERA Link only Q-Link only (HDMI) (SCART) (HDMI) (SCART) | |
| Easy playback | ○ | ○ |
| Power on link | ○ | ○ |
| Power off link | ○ | ○ |
| Speaker control | ○(not via SCART) | ○ |
| Access and control the connected equipment by VIERA remote control | ○(not via SCART) | ○ |
| Direct TV Recording | ○(not via HDMI) | - |
| Analogue channel download | ○(not via HDMI) | - |
HDMI Functions
VIERA Link "HDAMtrol
Enjoy additional HDMI Inter-Operability with Panasonic products which have "HDAVI Control" function. This TV supports "HDAVI Control 2" function.
Connections to some Panasonic equipment (DVD Recorder DIGA, HD Video Camera, Player theatre, Amplifier, etc.) with HDMI cables allow you to interface them automatically.
The equipment with "HDAVI Control" function enables the following operations:
● Easy playback (p. 43)
● Power on link (p. 43)
● Power off link (p. 43)
● Speaker control (p. 43)
In addition, the equipment with "HDAVI Control 2" function enables the following operation:
- Access and control the connected equipment by VIERA remote control (p. 43)
These features are limited to models incorporating Panasonic's "HDAVI Control" and "VIERA Link". VIERA Link "HDAVI Control", based on the control functions provided by HDMI which is an industry standard known as HDMI CEC (Consumer Electronics Control), is a unique function that we have developed and added. As such, its operation with other manufacturers' equipment that supports HDMI CEC cannot be guaranteed.
Refer to individual manuals for compatibility information. About applicable equipment, consult your local Panasonic dealer or refer to the URL: www.panasonic.co.uk
■HDMI cable
This function needs an HDMI compliant (fully wired) cable. Non-HDMI-compliant cables cannot be utilized. It is recommended that you use Panasonic's HDMI cable. Recommended part number:
RP-CDHG15 (1.5 m) RP-CDHG30 (3.0 m) RP-CDHG50 (5.0 m)
■Preparations
Set up the equipment to enable this function. Read the manuals of the equipment.
For connections, see "External Equipment" (p. 45). Also read the manuals of the equipment.
■For the first time / When adding new equipment, reconnecting equipment, or changing setup: After connection, turn on the equipment and then switch on the TV.
Select the input mode to HDMI1 or HDMI2 (p. 16), and make sure that an image is displayed correctly.

Display the menu
Select "Setup"


Select "VIERA Link"

Set to "On" (default is On)

| Access and control the connected equipment by VIERA remote control | You can control some functions of the connected Panasonic equipment with this TV remote control (point the remote control at the TV's signal receiver).● If you cannot access the menu, check the settings and the equipment (p. 42).Access and operate the menu of the equipment1 Display "VIERA Link Menu"→VIERA LinkSelect "VIERA Link Control"选择3 Select the equipment you want to access● "Home Cinema" means Player theatre, Recorder theatre and Amplifier. |
| ■ When the equipment with "HDAVI Control 2" function is connectedVIERA Link MenuVIERA Link ControlRecorder/ Player / Home Cinema/ Video CameraDisplayed the type of the connected equipment.Select the type of the equipment and access.1 select2accessThe menu of the accessed equipment (Input mode will be changed automatically) | ■ When the equipment with "HDAVI Control" function is connectedVIERA Link MenuVIERA Link ControlRecorder/ Player / Home Cinema/ Video CameraDisplayed the type of the connected equipment. But you cannot access it. Use its own remote control to operate the equipment.■ When other type or other manufacturer of the equipment is connectedVIERA Link MenuVIERA Link ControlOthers | ■ When other type or other manufacturer of the equipment is connectedVIERA Link MenuVIERA Link ControlOthers |
|
|
|
|
|
|
|
|
|
|
|
|
|
|
|
|
|
| 4 Operate the menu of the equipment● Available VIERA remote control buttons (depending on the connected equipment): |
| Move the cursor / select the menu | EXIT |
| Move the cursor / access / adjust | OPTION |
| Store / set / access | |
| Return to the previous menu | red green yellow blue |
| ● About the operations for the equipment, read the manual of the equipment. |
| Easy playback | Automatic Input switching-When the connected Panasonic equipment is operated, input mode is switched automatically. When it is stopped operating, input mode is returned. |
| Power on link | When the connected Panasonic equipment starts playback or direct navigator / function menu for the equipment are activated, the TV is automatically turned on. (Only when TV is in Standby mode.) |
| Power off link | When TV is set to Standby mode, the connected Panasonic equipment is also automatically set to Standby.● This function will work even if the TV enters standby mode automatically by Off Timer function or auto power standby function. |
| Speaker control | You can control the theatre speaker with TV's remote control.This function is available when Panasonic Amplifier or Player theatre is connected.● If you cannot access the menu, check the settings and the equipment (p. 42).1 Display "VIERA Link Menu"→VIERA LinkSelect "Speaker Selection"3 Set to "Home Cinema"or "TV"set | ■ Home CinemaAmplifier or Player theatre will be automatically turned on (if it is in Standby mode) and the sound is from theatre speakers connected to the equipment.Volume up / downMuteThe sound of TV speakers is mute.When the equipment is turned off, TV speakers will be active.TVTV speakers are active. |
External Equipment
These diagrams show our recommendations for how to connect the TV to your various equipment. For other connections, consult the instructions for each piece of equipment, the table below, and the specifications (p. 54).
![graph TD A["Headphones"] --> B["(M3 stereo mini plug)"] B --> C["(AUDIO)"] C --> D["(VIDEO) or (S-VIDEO)"] D --> E["(AVID)"] E --> F["(AV3+)"] F --> G["PC"] G --> H["AV2AV1"] H --> I["Audio OUT"] I --> J["Fullly wired HDMI compliant cable"] J --> K["ACV"] K --> L["ACV1"] L --> M["ACV2"] M --> N["ACV…](/content/2026/05/966055/images/ff708e486dbbff459aa695e88361c159fda862cec5df6d74b224fa0958c0fc08.jpg)
Camcorder / Game equipment
■Types of connectable equipment to each connector
| Recording / Playback(equipment) | AV1[WK8] | AV2 | AV3 (Side of TV) | COMPONENT | AUDIO OUT[used] | |
| 1 | 2 |
| ■To record / playback videocassettes / DVDs(VCR / DVD recorder) | ○ | ○ | | | | | |
| ■To watch DVDs (DVD player) | ○ | ○ | ○ | ○ | | ○ | ○ |
| ■To watch camcorder images (Video camera) | ○ | ○ | ○ | | | ○ | ○ |
| ■To watch satellite broadcasts (Set top box) | ○ | ○ | ○ | | | ○ | |
| ■To play games (Game equipment) | ○ | ○ | ○ | | | | |
| ■To use amplifier with speaker system | | | | | ○ | | |
| ■Q-Link | ○ | ○ | | | | | |
| ■Direct TV Recording | ○ | ○ | | | | | |
| ■VIERA Link | | | | | | ○ | ○ |
○: Recommended Connection
![graph TD A["To watch satellite broadcasts"] --> B["HD Satellite receiver"] B --> C["SCART cable"] C --> D["DVD Recorder / VCR"] D --> E["RF cable"] E --> F["or"] G["HDMI equipment"] --> H["DVD Recorder"] H --> I["(Viewing)"] I --> J["Conversion adapter (if necessary)"] J --> K["PC"] K --> L["Compute…](/content/2026/05/966055/images/f24b2d6fff87f7453e7b984657c0644276ca555a614b3f7013f1629ee2982834.jpg)
VIERA Link (p. 42)
- Use fully wired HDMI compliant cable.
- Read the manuals of the equipment too.
■ Easy playback: Access and control the connected equipment by VIERA remote control

Panasonic DVD Recorder, HD Video Camera, etc.
Home Cinema![graph TD A["HD Video Camera"] -->|HDMI cable| B["Panasonic Amplifier"] A -->|HDMI cable| C["Speaker system"] A -->|HDMI cable| D["Panasonic DVD Recorder"] A -->|HDMI cable| E["Speaker system"] F["Panasonic Player theatre"] --> G["Speaker system"] H["RCA cable"] --> I["HDMI cable"] H --> J["RCA cable…](/content/2026/05/966055/images/4dd654c55aeaae47bbcc3150f4cb50d081970fe3e6c468a58a2e1b3b099b0c7d.jpg)
![graph LR A["Computer"] --> B["HDMI cable"] A --> C["RCA cable"] B --> D["Panasonic Player theatre"] C --> D D --> E["Speaker system"]](/content/2026/05/966055/images/45d09a25a51645b43814d1f2ab979ce60be30292905eab95c7fdb341f9ecb244.jpg)
Aspect Ratio
The optimum size and aspect can be chosen, and you can enjoy finer images. (p. 13)
■ Auto: Auto aspect determines the best aspect ratio to use to fill your screen. It does this using a four step process to determine if the picture being viewed is a widescreen picture.
If Auto aspect detects a widescreen signal it switches into the appropriate 16:9 or 14:9 widescreen mode. If Auto aspect does not detect a widescreen signal then this advanced TV enhances the picture for optimum viewing pleasure.
The text shown on the screen indicates how Auto aspect determined which ratio to use:
"WIDE" appears in the top left of the screen if a widescreen identification signal (WSS) is found or a signal found through a SCART terminal. Auto aspect switches to the appropriate 16:9 or 14:9 widescreen ratio. This function will also work in any aspect mode. "Auto" appears in the top left of the screen if black stripes above and below the picture are detected. Auto aspect chooses the best ratio and expands the picture to fill the screen. This process can take several minutes, depending on the darkness of the picture.
- The ratio varies depending on the programme, etc. If the ratio is greater than the standard "16:9", black bands may appear at the top and bottom of the screen.
- If the screen size looks unusual when a widescreen-recorded programme is played back on a VCR, adjust the tracking of the VCR. (See the VCR manual.) ● Aspect mode can be memorized for SD (Standard definition) and HD (High definition) signals separately. ● To select the ratio manually: (Only "16:9" or "4:3" in PC mode)

The best ratio is chosen and the picture expanded to fill the screen.

Directly displays the image at "16:9" without distortion (anamorphic).

Displays the image at the standard "14:9" without enlargement.

Displays the image at the standard "4:3" without distortion.

Displays a "16:9" letterbox or "4:3" image without distortion.

Displays a "16:9" letterbox (anamorphic) image full-screen without distortion.

Displays a "2.35:1" letterbox (anamorphic) image full-screen without distortion. At "16:9", displays the image at its maximum (with slight enlargement).
Updating the DVB software
From time to time, a new version of software for DVB mode may become available for download to enhance performance or operations of the TV.
A notification banner will appear when you tune to one of the BBC channels, or you can search for a new version
software by using the "System Update Search Now" function (p. 27).
New version 1.00 found.
Do you really want to update the software and reboot the system?
Press OK to download the new version
Press EXIT to Ignore
To start downloading press "OK", this may take up to 20 minutes to complete.
To ignore the new software press “EXIT”, but this banner will keep appearing during the period of new software availability, usually 2 to 3 days.
To download any new software automatically, ensure that the "Auto Update Search in Standby" function in the System Update menu is set to "On" (p. 27).
The TV will then download new software automatically at night if it is left in standby without any timer programme in progress.
Note
● During software download and update, DO NOT switch off the TV.
VIERA Link "HControl
TM”
HDMI connections to some Panasonic equipment allow you to interface them automatically. (p. 42)
● This function may not work normally depending on the equipment condition. - Image or sound may not be available for the first few seconds when the playback starts. - Image or sound may not be available for the first few seconds when Input mode is switched. ● Volume function will be displayed when adjusting the volume of the equipment. - Easy playback is also available by using the remote control for Amplifier or Player theatre. Read the manuals of the equipment. - If more than one equipments of the same type are connected to the TV by HDMI cables, for example two DIGA DVD recorders to HDMI1 and 2, VIERA Link will only be available for the lower terminal number, in this case HDMI1. - "HDAVI Control 2" is the newest standard (current as of February, 2007) for Panasonic's HDAVI Control compatible equipment. This standard is compatible with Panasonic's conventional HDAVI equipment.
Photo : Still images recorded with digital still cameras compatible with JPEG files of DCF* and EXIF standards
Data format : Baseline JPEG (Sub-sampling 4:4:4, 4:2:2 or 4:2:0)
Max. number of files : 9,999
Image resolution : 160 × 120 to 10,000,000
- Compliant card type (maximum capacity): SDHC Card (4 GB), SD Card (2 GB), Multi Media Card (128 MB), miniSD Card (1 GB) (requiring miniSD adapter)
- If miniSD Card is used, insert / remove it together with the adapter.
- Check the latest information on the card type at the following website. (English only) http://panasonic.co.jp/pavc/global/cs/
*DCF (Design rule for camera file system): Unified standard established by Japan Electronics and Information Technology Industries Association (JEITA).
Note
● A JPEG image modified with a PC may not be displayed. Images imported from a PC must be compatible with EXIF (Exchangeable Image File) 2.0, 2.1, and 2.2. - Partly degraded files might be displayed at a reduced resolution. - Only “.JPG” extension can be read by this TV. ● The folder and file names may be different depending on the digital camera used. - Do not use two-byte characters or other special codes. ● The card may become unusable with this TV if file or folder names are changed.
■ AV1 SCART terminal
(RGB, VIDEO, Q-Link)
Suitable inputs for AV1 include RGB (Red / Green / Blue).

■ AV2 SCART terminal
(RGB, VIDEO, S-VIDEO, Q-Link)
AV2 - Pins 15 and 20 are dependent on AV2 S-VHS / VIDEO switching.

■ AV3 S-VIDEO 4 pin terminal

■ HDMI terminal

PC connection
A PC may be connected to this TV so that the PC screen is displayed and sound is heard from the TV.
- PC signals that can be inputted: Horizontal scanning frequency 31 to 69 kHz; vertical scanning frequency 59 to 86 Hz (more than 1,024 signal lines could result in incorrect display of the image). ● A PC adapter is not necessary for the DOS/V-compliant D-sub 15-pin connector.
Note
● Some PC models cannot be connected to this TV. - When using PC, set the colour display quality of PC to the highest position. - For details of the applicable PC signals, see below. ● Max. display resolution
| Aspect | 4:3 | 1,440 × 1,080 pixels |
| 16:9 | 1,920 × 1,080 pixels |
● D-sub 15-pin connector signal

| Pin No. | Signal Name | Pin No. | Signal Name | Pin No. | Signal Name |
| 1 | R GND (Ground) NC (not connected) | 11 | |
| 2 | G GND (Ground) NC (not connected) | 12 | |
| 3 | B GND (Ground) | HD | 13 | |
| 4 | NC (not connected) | 9 | NC (not connected) | 14 | VD |
| 5 | GND (Ground) | 10 | GND (Ground) NC (not connected) |
COMPONENT (Y, PB, PR), HDMI
* Mark: Applicable input signal
| Signal name COMPONENT HDMI | |
| 525 (480) / 60i | * | * |
| 525 (480) / 60p | * | * |
| 625 (576) / 50i | * | * |
| 625 (576) / 50p | * | * |
| 750 (720) / 60p | * | * |
| 750 (720) / 50p | * | * |
| 1,125 (1,080) / 60i | * | * |
| 1,125 (1,080) / 50i | * | * |
| 1,125 (1,080) / 60p | | * |
| 1,125 (1,080) / 50p | | * |
| 1,125 (1,080) / 24p | | * |
PC (D-sub 15P)
| Signal name Horizontal frequency (kHz) Vertical frequency (Hz) |
| 640 × 400 @70 Hz 31.47 70.07 | |
| 640 × 480 @60 Hz 31.47 59.94 | |
| 640 × 480 @75 Hz 37.50 75.00 | |
| 800 × 600 @60 Hz 37.88 60.32 | |
| 800 × 600 @75 Hz 46.88 75.00 | |
| 800 × 600 @85 Hz 53.67 85.06 | |
| 852 × 480 @60 Hz 31.44 59.89 | |
| 1,024 × 768 @60 Hz 48.36 60.00 | |
| 1,024 × 768 @70 Hz 56.48 70.07 | |
| 1,024 × 768 @75 Hz 60.02 75.03 | |
| 1,024 × 768 @85 Hz 68.68 85.00 | |
| 1,280 × 1,024 @60 Hz 63.98 60.02 | |
| 1,366 × 768 @60 Hz 48.39 60.04 | |
| Macintosh13” (640 × 480) 35.00 66.67 | |
| Macintosh16” (832 × 624) 49.73 74.55 | |
| Macintosh21” (1,152 × 870) 68.68 75.06 | |
Note
● Signals other than above may not be displayed properly. ● The above signals are reformatted for optimal viewing on your display. ● Applicable input signal for PC is basically compatible to VESA standard timing. - PC signal is magnified or compressed for display, so that it may not be possible to show fine detail with sufficient clarity.
FAQs
Before requesting service or assistance, please follow these simple guides to resolve the problem. If problem still persists, please contact your local Panasonic dealer or Panasonic Customer Care Centre for assistance. For details (p. 56)
White spots or shadow images (noise)


- Check the position, direction, and connection of the aerial.
Neither image nor sound is produced
Is the TV in "AV mode"? ● Is the mains lead plugged into the socket outlet? Is the TV turned On? - Check Picture Menu (p. 22) and volume. - Check all required SCART cables and connections are firmly in place.
Auto aspect
● Auto aspect is designed to provide you with the best aspect ratio to use to fill your screen. For user control please see p. 46.
S-Video / black and white picture
● Using AV button please confirm your selection is S-Video I.e. AV2/AV2S (p. 16).
No programmes shown on TV Guide

- Check the DVB transmitter.
- Adjust the direction of the aerial to another transmitter installed nearby.
- Check the analogue broadcast. If the image quality is poor, check the aerial and consult your nearest dealer.

On Screen messages - I.e. EC/AV1
- You can simply clear these by pressing the i button. Press again to redisplay.
Direct TV record / Q-Link functions not recording
- Please confirm SCART cable and connection. Also please set "AV1 / AV2 out" in the Setup Menu (p. 23).
There may be red spots, blue spots, green spots and black spots on the screen.
This is a characteristic of liquid crystal panels and is not a problem. The liquid crystal panel is built with very high precision technology giving you fine picture details. Occasionally, a few non-active pixels may appear on the screen as a fixed point of red, green, blue or black. Please note this does not affect the performance of your LCD.
The LCD panel moves slightly when it is pushed with a finger. Clattered sound might be heard.
There is some looseness around the panel to prevent damage to the panel. The panel might move slightly when it is pushed with a finger, and a clattered sound might be heard. This is not a malfunction.
| Problem Actions | |
| Screen Sound DVB | Chaotic image, noisy | ● Set “P-NR” in the Picture Menu (to remove noise). (p. 22)● Check nearby electrical products (car, motorcycle, fluorescent lamp). |
| No image can be displayed | ● Is “Colour” or “Contrast” in the Picture Menu set to the minimum? (p. 22) |
| Blurry or distorted image (no sound or low volume) | ● Reset channels. (p. 30) |
| Unusual image is displayed | ● Turn off the TV with Mains power On / Off switch, then turn it on again. |
| No sound is produced | ● Is “Sound mute” active? (p. 7)● Is the volume set to the minimum? |
| Sound level is low or sound is distorted | ● Sound signal reception may be deteriorated.● Set “NICAM” (p. 22) in the Sound Menu to “Off”. (Analogue only) |
| HDMI Other | ● Due to the digital reception technologies involved, quality of the DTV signals may be relatively low in some cases, despite good reception of analogue programmes. |
| Interference or frozen / disappearing image in DVB | ● Check “DVB Signal Condition”. (p. 31)If “Signal Quality” or “Signal Strength” are displayed in red, check aerial.If problem persists, consult your local Panasonic dealer.Turn the TV off with the Mains power On / Off switch, then turn it On again. |
| Sound is unusual | ● Set the sound setting of the connected equipment to “2ch L.PCM”.● Check the “HDMI1 Input” setting in the Sound Menu. (p. 22)● If digital sound connection has a problem, select analogue sound connection. (p. 41) |
| Pictures from external equipment are unusual when the equipment is connected via HDMI | ● Is the HDMI cable connected properly? (p. 44)● Turn Off the TV and equipment, then turn them On again.● Check an input signal from the equipment. (p. 49)● Use an equipment compliant with EIA/CEA-861/861B. |
| “VIERA Link” function does not work and an error message appears | ● Confirm the connection.● Turn the connected equipment on and then switch the TV on. (p. 42) |
| TV goes into “Standby mode” | ● Off Timer function is activated.● The TV enters “Standby mode” about 30 min. after analogue broadcasting ends. |
| The remote control does not work | ● Are the batteries installed correctly? (p. 6)● Has the TV been switched On? |
| An error message appears | ● Follow the message’s instructions.● If the problem persists, contact the authorized Service Centre. |
On-screen messages
Message Meaning / Act
| All tuning data will be erased | ● “Shipping Condition” will erase all tuning data (p. 32). ▶ “Auto Setup” will be erased all present DVB and Analogue tuning datas (p. 30). |
| Are you sure? | ▶ Make sure the operation is with your desire. |
| Are you sure you want to delete this timer?Press OK to delete timerPress Exit to return | ▶ Make sure the deleting programme event is with your desire. |
| Bad Signal | ▶ The signal is weak. Check the aerial. |
| DOWNLOAD IN PROGRESS PLEASE WAIT | ▶ Q-Link channel download is in progress. |
| Feature not available | ▶ Check the Q-Link connection and setting (p. 40). ● The impossible source (Component / HDMI / PC) to be record. |
| Invalid DVB Channel | ▶ Invalid DVB channel is selected. |
| Invalid system time. Please exit! | ▶ Cannot get the time information. Check the connection of the RF cable. |
| Max. number of Timers already set! | ▶ Maximum timer programming event is 8. |
| New DVB Service Found!Press OK start Auto SetupPress EXIT to Ignore.Selecting Auto Setup will delete current Profile and Childlock settings | ▶ There is a new DVB station. |
| New version 1.90 found.Do you really want to update the software and reboot the system?Press OK to download the new versionPress EXIT to Ignore | ▶ There is a new software available. |
| No DVB Service found | ▶ No DVB signal can be found in Auto Setup. |
| No module inserted | ▶ Check the CI module inserted completely (p. 27). |
| No Recording - Check Tape or Disc | ▶ The tape or disc may be “write protected”, missing or damaged. The equipment may already be recording. |
| No Recording - UNKNOWN REASON | ▶ The recording cannot be done by any reason. Check the equipment. ● Disc or tape may be full. |
| No Service | ▶ The station stops the services. |
| No Signal | ▶ Check the connection of the RF cable. |
Message Meaning / Act
| No stations foundPlease insert the aerial | ► No analogue signal can be found in Auto Setup. |
| PIN incorrect ! | ► The PIN number you entered is wrong. |
| Please check aerial or local DVB service availability.Press OK to start Auto Setup | ► Please follow the message.If it is still failed, consult your local Panasonic dealer. |
| Please check settings and connections on HDMI devices. | ► Communication error in VIERA Link function (p. 42). |
| Please wait. | ► A function is in progress. |
| Recording in progress | ► The recording equipment is recording the programme signal from its own tuner. You can turn the TV off and leave the equipment recording in the normal way. |
| Shipping condition completed.TV can now be switched off. | ► “Auto Setup” will automatically start when Mains power On / Off switch is next turned On. (p. 10) |
| Software successfully updatedPress EXIT to continue | ► The software updating is finished. |
| Software Update failed. Please try again later.Press EXIT to continue | ► Perform “System Update Search Now” in System Update (p. 27).If it is still failed, there may not be the new software. |
| This service is locked!Press OK to enter PIN | ► The selected channel is locked in Child Lock (p. 29). |
| Timer already expired ! | ► Starting time in Timer Programming is already past. Set correctly (p. 37). |
| Timer Event Due to StartDVB 1: BBC1 has beenprogrammed for recording at 20:00 | ► This message will appear 2 minutes before timer programming event due to start. |
| Timer incorrect ! | ► Set Starting and Ending times in Timer Programming correctly (p. 37). |
| Timer overlap ! | ► The timer programme events are overlapped. Cannot record other channel at the same time. Check the Starting and Ending times in Timer Programming (p. 37). |
| Tuner LockedPlease stop recording to operate | ► If you want to unlock, cancel Direct TV Recording (p. 40) or Timer Programming (p. 36). |
| Unable to download, Check Equipment | ► The tape or disc is active. Stop the equipment and try again. |
Specifications
| Power Source AC 220-240 V, 50 / 60 Hz |
| Power Consumption | Average use 194 W | |
| Standby condition 0.4 W (Without DVB recording) / 19 W (With DVB recording) |
| Display panel | Aspect Ratio 16:9 | |
| Visible screen size | 94 cm (diagonal) |
| 819 mm (W) × 460 mm (H) |
| Number of pixels 2,073,600 (1,920 (W) × 1,080 (H)) |
| Sound | Speaker 160 mm × 42 mm × 2 pcs, 8 Ω |
| Audio Output 20 W (10 W + 10 W) |
| Headphones M3 (3.5 mm) | stereo mini Jack × 1 |
| PC signals | VGA, SVGA, XGASXGA ...... (compressed)Horizontal scanning frequency 31 - 69 kHzVertical scanning frequency 59 - 86 Hz |
| Receiving Systems / Band name | PAL I :UHF E21-68PAL 525/60 :Playback of NTSC tape from some PAL Video recorders (VCR) or NTSC disc playback from DVD player and recorder.DVB :Digital terrestrial services via UHF aerial input.M.NTSC :Playback from M.NTSC Video recorders (VCR).NTSC (AV input only) :Playback from NTSC Video recorders (VCR). |
| Aerial - Rear UHF | |
| Operating Conditions | Temperature : 0 °C - 35 °CHumidity : 20 % - 80 % RH (non-condensing) |
| Connection Terminals | AV1 (Scart terminal) | 21 Pin terminal (Audio/Video in, Audio/Video out, RGB in, Q-Link) |
| AV2 (Scart terminal) | 21 Pin terminal (Audio/Video in, Audio/Video out, RGB in, S-Video in, Q-Link) |
| AV3 | VIDEO | RCA PIN Type × 1 1.0 V[p-p] (75 Ω) |
| S-VIDEO | Mini DIN 4-pin Y:1.0 V[p-p] (75 Ω) C:0.286 V[p-p] (75 Ω) |
| AUDIO L - R | RCA PIN Type × 2 0.5 V[rms] |
| COMPONENT | VIDEO | Y 1.0 V[p-p] (including synchronization)PB, PR ±0.35 V[p-p] |
| AUDIO L - R | RCA PIN Type × 2 0.5 V[rms] |
| Others | HDMI1 / 2 | TYPE A Connectors ● This TV supports “HDAVI Control 2” function. |
| PC | HIGH-DENSITY D-SUB 15PIN R,G,B/0.7 V[p-p] (75 Ω)HD, VD/TTL Level 2.0 - 5.0 V[p-p] (high impedance) |
| Card slot | SD CARD slot × 1 |
| Output | AUDIO L - R | RCA PIN Type × 2 0.5 V[rms] (high impedance) |
| Dimensions (W × H × D) | 1,031 mm × 634 mm × 300 mm (With TV Stand)1,031 mm × 588 mm × 120 mm (TV only) |
| Mass | 27.0 kg Net |
Note
- Design and specifications are subject to change without notice. Weight and dimensions shown are approximate. This equipment complies with the EMC standards listed below.
EN55013, EN61000-3-2, EN61000-3-3, EN55020, EN55022, EN55024.
Licence
Trademark credits
DVB is a trademark of the DVB Digital Video Broadcasting Project (1991 to 1996). VGA is a trademark of International Business Machines Corporation. Macintosh is a registered trademark of Apple Computer, USA. S-VGA is a registered trademark of the Video Electronics Standard Association.
Even if no special notation has been made of company or product trademarks, these trademarks have been fully respected.
- SDHC Logo is a trademark.
- HDMI, the HDMI Logo and High-Definition Multimedia Interface are trademarks or registered trademarks of HDMI Licensing LLC. HDAVI Control™ is a trademark of Matsushita Electric Industrial Co., Ltd.
Index
Accessories 6
Add New DVB Services 31
Analogue Manual Tuning 31
Analogue Programme Edit 31
Aspect 13,46
Audio Description 13,22
Auto Setup 10,30
AV1 / AV2 out 23, 40
B Banner Display Timeout 23
Category list 14
Child Lock 29
CI module 27
Clamper 6
COMPONENT 44,49
Connection 8,44
Direct TV Recording 40
Download to equipment 10,23
D-sub 15-pin 49
DVB LED 7,15,37
DVB Manual Tuning 31
DVB Profile Edit 29
DVB Settings 26
DVB Signal Condition 31
DVB Timer Programming 36
DVI 41
DVDs 8,16
E PEG 14
External equipment 8,16,44
External input 16,35
F FAQs 50, 51
H HDMI 41-43,48
Hold 13,20
Home Cinema 43,45
Information banner 13
Input Labels 34
Input signal 49
Licence 55
M Mains Lead 8
Mains power On / Off switch 7,12
Maintenance 5
Menu Functions 21-25
Mode 22
Multi Audio 13
New Service Message 31
NICAM 22
NTSC 24,54
Off timer 12,23
Optional accessories 6
Owner ID 10,33
P PAL 54
PC 35,49
Photo View 38
Picture Overscan 23
PIN number 10, 29, 33
P-NR 22
Power LED 7,10
Q-Link 23,40
Quick Start Guide 6-11
Remote control 6,7
Reset to Default 22
RGB 8
Sales and Support Information 56
Satellite receiver 9, 16, 44
SCART 8.48
SD Card 38,48
Shipping Condition 32
Slide show 39
Specifications 54
Subtitles 13,20
Surround 22
S-Video 8.48
System Update 27,47
Teletext 18-20
Tuning Menu 30
TV Guide 14
TV speaker 43
Type list 14
Update the software 27,47
User input 34
V Video 8,16
VIERA Link 42, 45, 47
Viewing Mode 10,22
Volume Correction 22
W WSS 46
Zoom 46
7 Zoom 46

This symbol on the products and/or accompanying documents means that used electrical and electronic products should not be mixed with general household waste.
For proper treatment, recovery and recycling, please take these products to designated collection points, where they will be accepted on a free of charge basis. Alternatively, in some countries you may be able to return your products to your local retailer upon the purchase of an equivalent new product.
Disposing of this product correctly will help to save valuable resources and prevent any potential negative effects on human health and the environment which could otherwise arise from inappropriate
waste handling. Please contact your local authority for further details of your nearest designated collection point.
Penalties may be applicable for incorrect disposal of this waste, in accordance with national legislation.
For business users in the European Union
If you wish to discard electrical and electronic equipment, please contact your dealer or supplier for further information.
This symbol is only valid in the European Union.
If you wish to discard this product, please contact your local authorities or dealer and ask for the correct method of disposal.
Customer Care Centre
• For customers within the UK : 0844 844 3852 • For customers within the Republic of Ireland: 01 289 8333 - Visit our website for product information www.panasonic.co.uk • E-mail: customer.care@panasonic.co.uk
Direct Sales at Panasonic UK
- Order accessory and consumable items for your product with ease and confidence by phoning our Customer Care Centre Monday – Thursday 9:00am – 5:30pm, Friday 9:30am – 5:30pm (Excluding public holidays).
- Or go online through our Internet Accessory ordering application at www.panasonic.co.uk.
- Most major credit and debit cards accepted.
- All enquiries, transactions and distribution facilities are provided directly by Panasonic UK Ltd.
- It couldn't be simpler! • Also available through our Internet is direct shopping for a wide range of finished products, take a browse on our website for further details.
Interested in purchasing an extended guarantee?
Please call 0870 240 6284 or visit www.panasonic.co.uk/guarantee.
Customer's Record
The model number and serial number of this product may be found on its rear panel. You should note this serial number in the space provided below and retain this book, plus your purchase receipt, as a permanent record of your purchase to aid in identification in the event of theft or loss, and for Warranty Service purposes.
Model Number Serial Number
Panasonic (U. K.) Ltd.
Willoughby Road, Bracknell, Berks RG12 8FP Web Site : http://www.panasonic-europe.com
© 2007 Matsushita Electric Industrial Co., Ltd. All Rights Reserved.