
Artisan KCF0103 - Food processor KITCHENAID - Free user manual and instructions
Find the device manual for free Artisan KCF0103 KITCHENAID in PDF.


| Product Type | Food Processor |
| Model | Artisan KCF0103 |
| Brand | KitchenAid |
| Power | 250 Watts |
| Bowl Capacity | 12 Cups (2.8 Liters) |
| Dimensions (H x W x D) | 15.0 x 10.5 x 8.5 inches |
| Weight | 12.0 lbs (5.4 kg) |
| Voltage | 120 V / 60 Hz |
| Cord Length | 3.5 feet (1.07 m) |
| Main Functions | Chopping, Slicing, Shredding, Mixing, Dough Kneading, Pureeing |
| Discs Included | Stainless Steel Slicing & Shredding Discs (Reversible) |
| Blade Type | Stainless Steel Multi-Purpose Blade (Sabatier Edge) |
| Dough Capabilities | Up to 5 lbs of pizza dough |
| Feed Tube | Large Feed Tube with Lock-On Lid |
| Bowl Material | BPA-Free Plastic (Clear) |
| Blade Material | Stainless Steel |
| Safety Features | Interlock Locking System (Lid, Bowl, Base) |
| Non-Slip Base | Yes, Suction Feet |
| Dishwasher Safe Parts | Bowl, Lid, Blade, Discs, Pusher, Splash Shield |
| Control | 2-Speed Control + Pulse |
| Cleaning Instruction | Hand Wash or Dishwasher (Upper Rack) for Removable Parts |
| Warranty | 1-Year Limited |
| Country of Origin | USA (Assembled) |
| Included Attachments | Multi-Purpose Blade, Dough Blade, Slicing/Shredding Disc, Pusher, Splash Shield |
| Certifications | UL Listed |
Frequently Asked Questions - Artisan KCF0103 KITCHENAID
User questions about Artisan KCF0103 KITCHENAID
0 question about this device. Answer the ones you know or ask your own.
Ask a new question about this device
Download the instructions for your Food processor in PDF format for free! Find your manual Artisan KCF0103 - KITCHENAID and take your electronic device back in hand. On this page are published all the documents necessary for the use of your device. Artisan KCF0103 by KITCHENAID.
USER MANUAL Artisan KCF0103 KITCHENAID
natural_image
Exterior view of a kitchen stand mixer with control panel and digital display (no visible text or symbols)KitchenAid
TABLE OF CONTENTS
COOK PROCESSOR SAFETY
Important safeguards....4
Electrical requirements 6
Electrical equipment waste disposal....6
PARTS AND FEATURES
Parts and features....7
Control panel 8
Accessories....8
COOKING MODES GUIDE......10
Automatic cooking modes.... 10
ADDITIONAL FUNCTIONS
Timer option 12
Quick Stir....13
Pulse 13
MiniBowl and Mini MultiBlade.... 13
GETTING STARTED
Preparing the Cook Processor for use 14
Using the Cook Processor.... 14
START UP AND CONTROL SETUP
Welcome screen....15
Display language 15
Changing between degrees Fahrenheit and Celsius 15
USING AUTOMATIC COOKING MODES 16
USING STEAMING BASKETS
Using the round internal steamer basket 19
Using the upper and lower steamer baskets 20
USING MANUAL COOKING MODES 21
Cooking with manual settings.... 22
CARE AND CLEANING
Cleaning your Cook Processor.... 24
Storing Accessories 25
TROUBLESHOOTING 26
For more information, visit our website at:
KitchenAid.com.au
Your safety and the safety of others are very important.
We have provided many important safety messages in this manual and on your appliance. Always read and obey all safety messages.

This is the safety alert symbol.
This symbol alerts you to potential hazards that can kill or hurt you and others.
All safety messages will follow the safety alert symbol and either the word "DANGER" or "WARNING." These words mean:
! DANGER
You can be killed or seriously injured if you don't immediately follow instructions.
WARNING
You can be killed or seriously injured if you don't follow instructions.
All safety messages will tell you what the potential hazard is, tell you how to reduce the chance of injury, and tell you what can happen if the instructions are not followed.
IMPORTANT SAFEGUARDS
When using electrical appliances, basic safety precautions should always be followed to reduce the risk of fire, electric shock, and/or injury to persons including the following:
- Read all instructions.
- To protect against risk of electrical shock do not put appliance in water or other liquid.
- Unplug the appliance from outlet when not in use, before putting on or taking off parts and before cleaning.
- Avoid contacting moving parts. Keep hands, hair, clothing, as well as spatulas and other utensils away from beater during operation to reduce the risk of injury to persons and/or damage to the appliance.
- Do not operate appliance with damaged cord or plug or after the appliance malfunctions, or is dropped or damaged in any manner. Return the appliance to the nearest Authorised Service Center for examination, repair or electrical or mechanical adjustment.
- The use of attachments not recommended or sold by KitchenAid may cause fire, electrical shock or injury.
- Do not use the appliance outdoors.
-
Do not let the cord hang over edge of table or counter.
-
Appliances can be used by persons with reduced physical, sensory or mental capabilities or lack of experience and knowledge if they have been given supervision or instruction concerning use of the appliance in a safe way and if they understand the hazards involved.
- The temperature of accessible surfaces may be high when the appliance is operating.
- The appliance is not intended to be operated by means of an external timer or separate remote-control system.
- Do not immerse the drive assembly in water.
- This appliance is intended for household use only.
- To reduce the risk of injury, never place cutting blade or discs on base without first putting bowl properly in place.
- Be certain cover is securely locked in place before operating appliance.
- Do not attempt to defeat the cover interlock mechanism.
- Be careful if hot liquid is poured into the Cook Processor as it can be ejected out of the appliance due to a sudden steaming.
- Care shall be taken when handling the sharp cutting blades, emptying the bowl, and during cleaning.
- This appliance shall not be used by children. Keep the appliance and its cord out of reach of children.
- Children shall not play with the appliance.
- If the bowl is overfilled, boiling water may be ejected.
- The appliance is only to be used with the base provided.
- CAUTION: Ensure that the appliance is switched off before removing it from its base.
- The heating element surface is subject to residual heat after use.
- The Cook Processor should be positioned in a stable situation with the handles positioned to avoid spillage of hot liquids.
- Avoid spillage on the connector.
SAVE THESE INSTRUCTIONS
Electrical requirements
Voltage: 220–240 VAC
Frequency: 50-60 Hz
Wattage: 1050 Watts
Motor: 450 Watts
NOTE: This product has a grounded (earthed) plug. To reduce the risk of electrical shock, this plug will fit in an outlet only one way. If the plug does not fit in the outlet, contact a qualified electrician. Do not modify the plug in any way.
Do not use an extension cord. If the power supply cord is too short, have a qualified electrician or technician install an outlet near the appliance.
Electrical equipment waste disposal
Disposal of packing material
The packing material is 100% recyclable and is marked with the recycle symbol. The various parts of the packing must therefore be disposed of responsibly and in full compliance with local authority regulations governing waste disposal.
Scrapping the product
- This appliance is marked in compliance with European Directive 2012/19/EU, Waste Electrical and Electronic Equipment (WEEE).
- By ensuring this product is disposed of correctly, you will help prevent potential negative consequences for the environment and human health, which could otherwise be caused by inappropriate waste handling of this product.
- The symbol on the product or on the accompanying documentation indicates that it should not be treated as domestic waste but must be taken to an appropriate collection centre for the recycling of electrical and electronic equipment.
For more detailed information about treatment, recovery and recycling of this product, please contact your local city office, your household waste disposal service or the shop where you purchased the product.
Parts and features
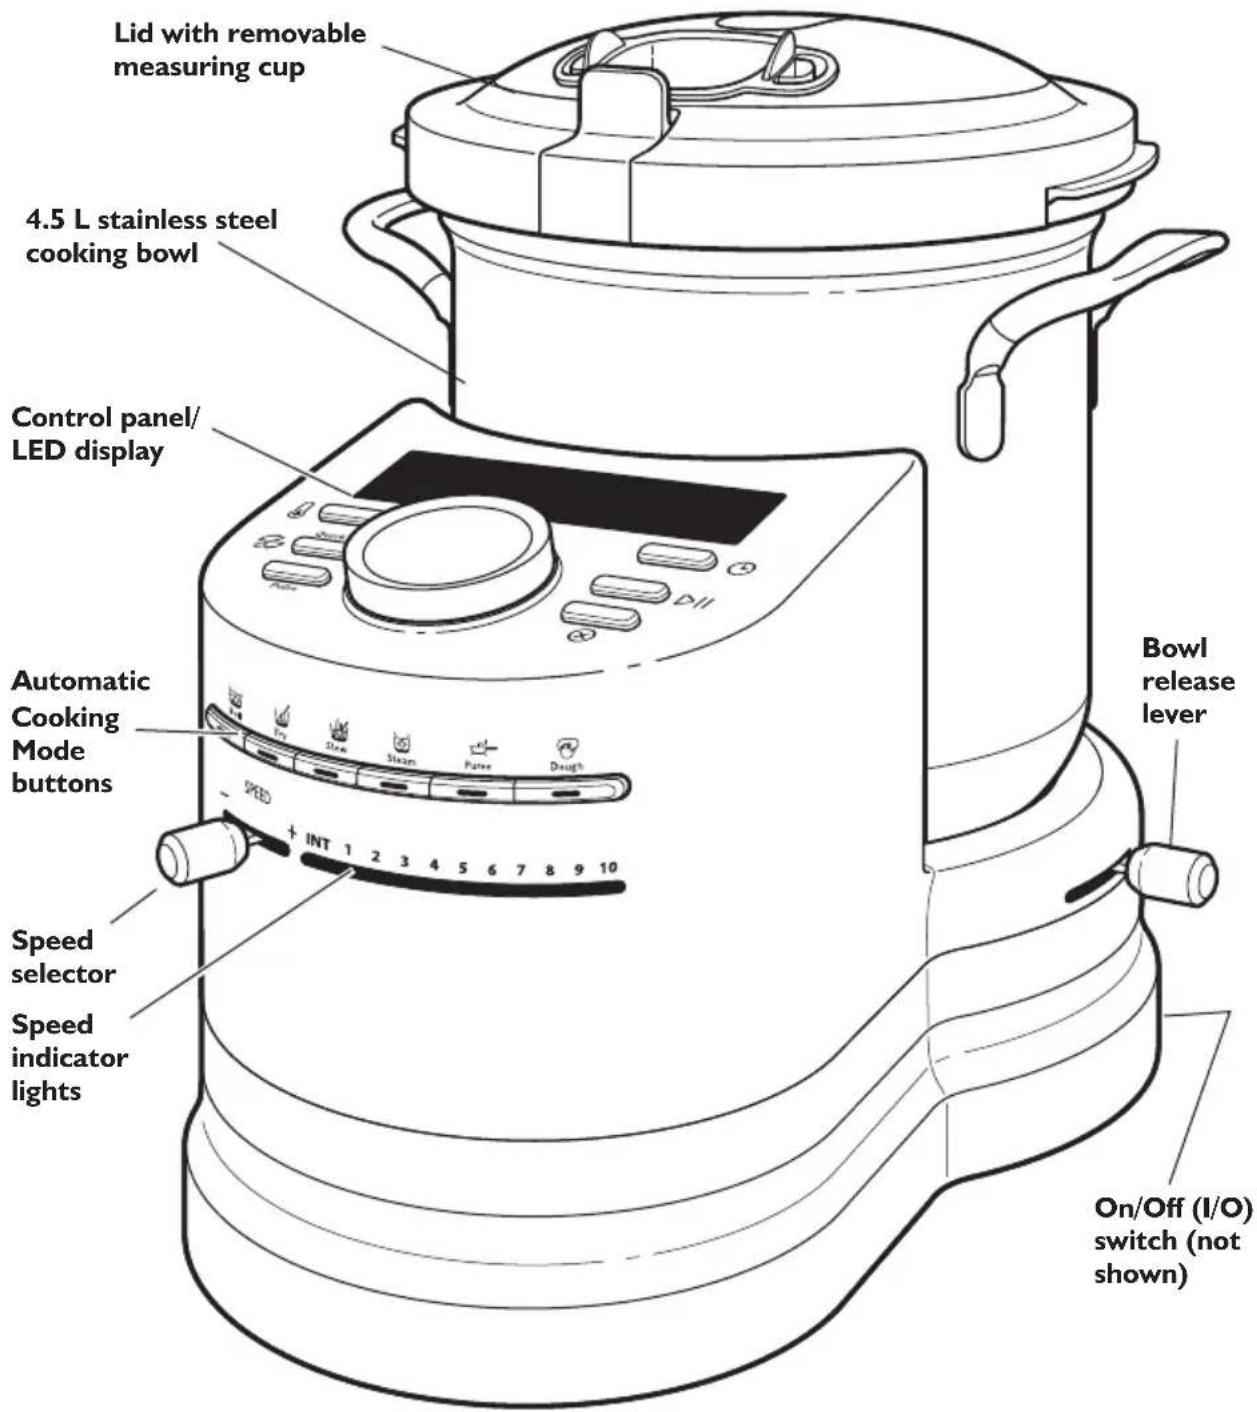
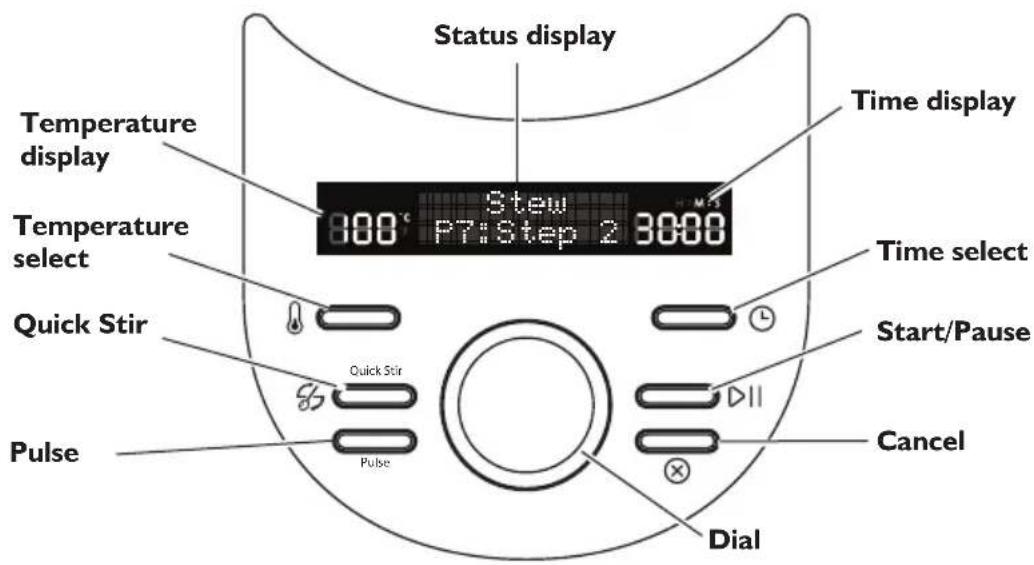
Control panel
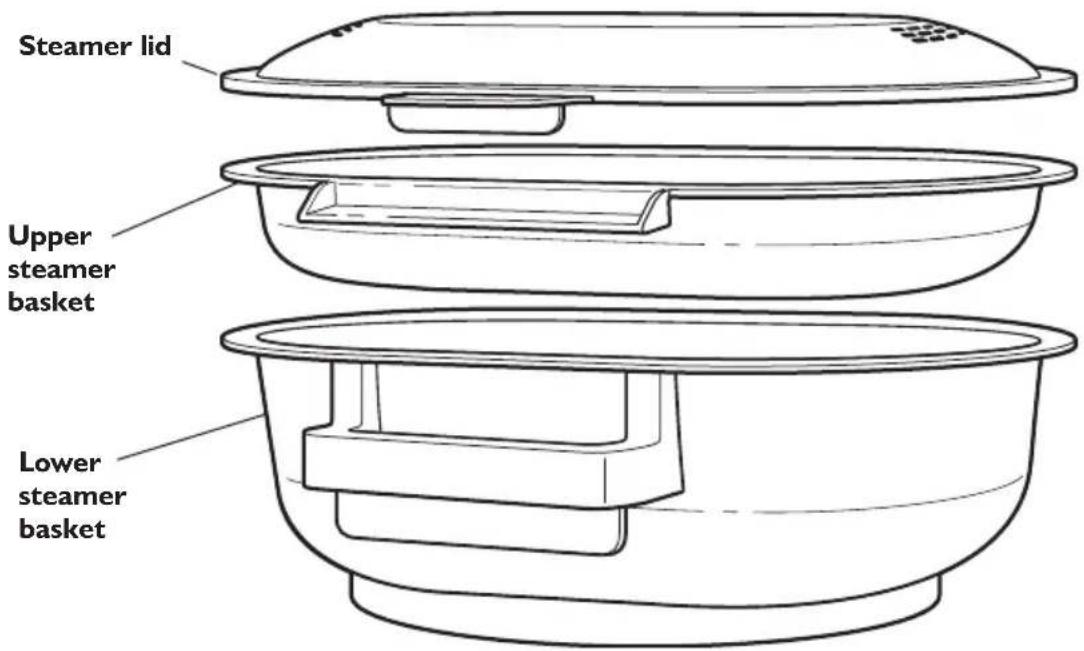
Accessories
natural_image
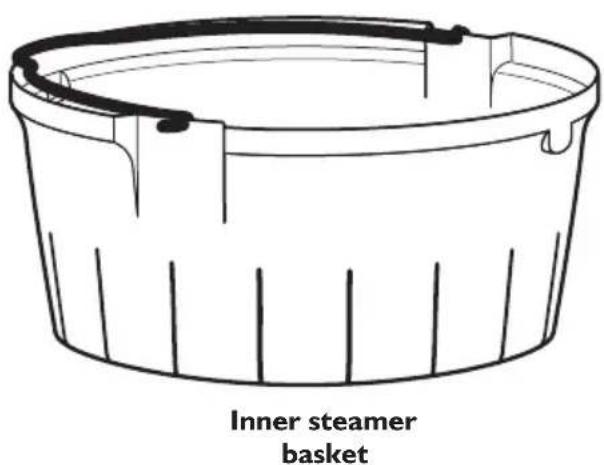
Line drawing of an inner steamer basket (no text or symbols on the diagram itself)Steamer Capacity
| Basket Capacity (examples) | |
| Upper | 3-4 small fish |
| Lower | 500 g chopped or sliced vegetables3-4 large or 6-8 small potatoes |
| Inner | 6-8 medium-sized shrimp |
Food quantities for capacity are recommendations only.
Accessories
IMPORTANT: To avoid splashing, always follow recommended speeds when using the Egg Whip, Dough Blade, or MultiBlade.
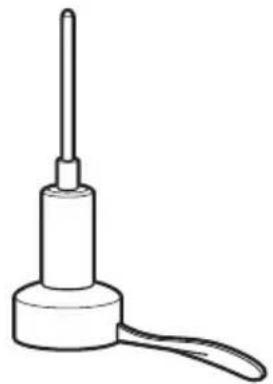
natural_image
Line drawing of a mechanical tool or device with a cylindrical body and a handle, no text or symbols present.StirAssist
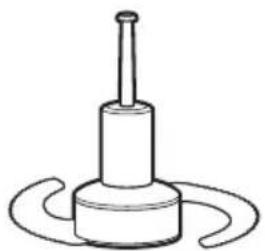
natural_image
Simple line drawing of a mechanical device with a cylindrical shaft and curved base (no text or symbols)MultiBlade
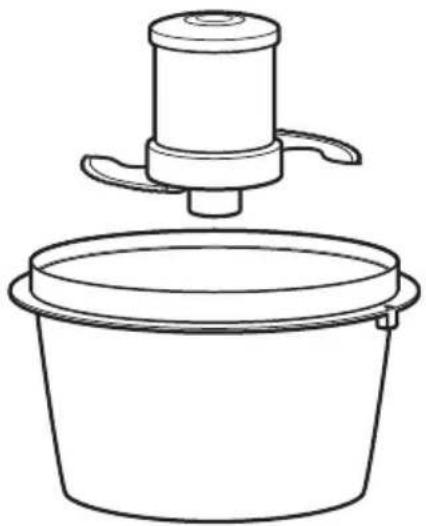
natural_image
Line drawing of a bucket with a lid and handle, no text or symbols presentMini Bowl and Mini MultiBlade
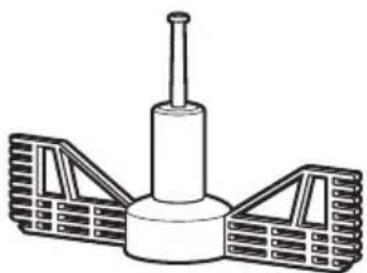
natural_image
Technical line drawing of a mechanical component with two structural supports (no text or symbols)Egg Whip
(max. temperature = 100°C)*
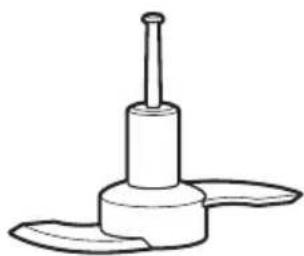
natural_image
Simple line drawing of a mechanical component with a cylindrical shaft and two curved blades (no text or symbols)Dough Blade
(max. temperature = 40^ )*
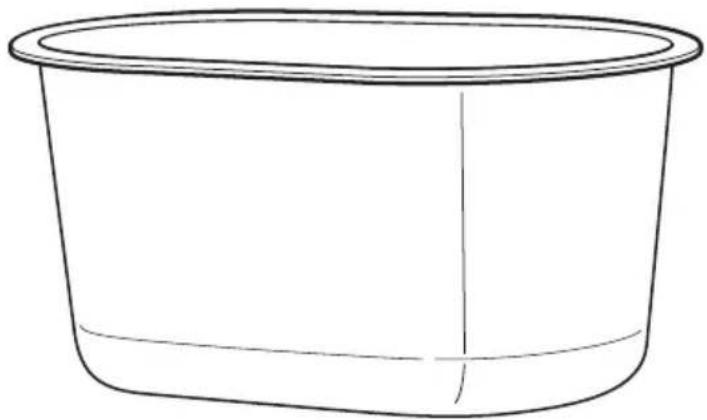
natural_image
Simple line drawing of a rectangular container with a vertical line inside (no text or symbols)Storage case
* Do not exceed these temperatures unless specified in a recipe in the KitchenAid cookbook or app.
COOKING MODES GUIDE
Your Cook Processor features 6 automatic cooking modes, each with specialty modes, designed for a variety of cooking tasks.
The included recipe book features a selection of recipes optimized to work with these cooking modes.
Refer to the provided cookbook for directions on selecting attachments, cooking modes, and settings when using Automatic Cooking modes.
Reference quick guide below for Cooking Mode operations and tips.
You can also use it to cook in manual mode, to develop your own recipes, or create cold dishes such as Mayonnaise, Guacamole, Tapenades, Tartare, and Rouille.
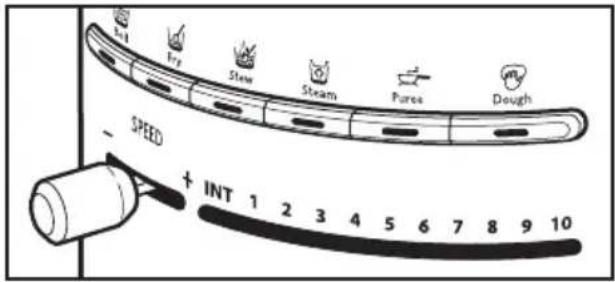
Automatic cooking modes
Temperatures, times, and speeds for multistep Cooking Modes are indicated with an to show the value for each step.
| Cooking Mode Temp (°C) | Time(minutes) | Speed | Recipes (see included recipebook for details) | |
 Boil (MultiBlade/StirAssist) Boil (MultiBlade/StirAssist) | ||||
| Boil P1 120 20 2 Carrot-Ginger Soup, | Zucchini Cappuccino, Jams/Jellies, Fruit Coulis | |||
| Boil P2 | 130→110 | 5→30 | INT→2 | Artichoke Soup, Clear GyozaBouillon, Tomato Soup, PeaSoup, Bisque, Onion Soup |
| Boil P3 | 130→100→100 | 5→8→13 | 2→2→2 | Minestrone, Asparagus Soup |
 Fry (MultiBlade/StirAssist) Fry (MultiBlade/StirAssist) | ||||
| Fry P1 | 140 | 10 | INT | Stir-Fried Asparagus, Gyros |
| Fry P2 | 130→130 | 10→3 | 2→2 | Oriental Noodles withScampis, Fried Rice with Tofu,Chop-Choy |
| Fry P3 | 130→130 | 2→1.3 | 1→2 | Scrambled Eggs with Bacon |
Automatic cooking modes
Temperatures, times, and speeds for multistep cooking modes are indicated with an to show the value for each step.
| Cooking Mode Temp (°C) | Time(minutes) | Speed | Recipes (see included recipebook for details) | |
 Stew (MultiBlade/StirAssist/Inner Steamer) Stew (MultiBlade/StirAssist/Inner Steamer) | ||||
| Stew PI 100 | 72 Bavarois, Panna Cotta, Pesto | |||
| Stew P2 | 110 | 45 | 1 | Couscous with Lamb, Chutney,Tajini Chicken, Coq au Vin,Chicken Tikka Masala, Chilicon/sin Carne |
| Stew P3 | 120 | 10 | 2 | Moroccan Meatballs, PepperCream Sauce, Tomato Sauce,Bouillabaisse, Curry Sauce |
| Stew P4 | 95 | 90 | 1 | Rillettes, Beef Stew |
| Stew P5 | 120→100 | 10→25 | 2→2 | Rice Pudding |
| Stew P6 | 100→100 | 60→10 | 1→1 | Cassoulet, Irish Stew |
| Stew P7 | 130→100→100 | 5→30→12 | 1→1→1 | Fish Stew, Bolognaise + Pasta |
| Stew P8 | 80→80 | 6→2 | 3→3 | Béarnaise, Sabayon |
| Stew P9 | 120→100→110→100 | 2→3→3→15 | 2→2→2→2 | Risotto |
| Stew PI0 | 120 9 0 | Vongole | ||
| Stew PI1 | 120→100 | 10→15 | 2→2 | Ratatouille, Chicken GreenCurry |
 Steam (MultiBlade/StirAssist/Steamers) Steam (MultiBlade/StirAssist/Steamers) | ||||
| Steam PI | 130 | 10 | 0 | Fish in Oriental Bouillon,Salmon in Papilotte, Dim Sum/Scampi |
| Steam P2 | 120 5 | 2 | Mussels in White Wine,Steamed Vegetables | |
 Puree (MultiBlade/StirAssist/Inner Steamer) Puree (MultiBlade/StirAssist/Inner Steamer) | ||||
| Puree PI | 120 5 2 | Hummus | ||
| Puree P2 | 120 | 25 | 2 | Salt Cod Brandade (Puree),Potato-Savoy |
| Puree P3 | 80→110→130 | 20→5→10 | 2→1→2 | Cheese and Shrimp Croquettes |
| Puree P4 | 120 | 10 | 2 | Baby Food |
| Puree P5 | 120 | 15 | 0 | Broccoli Mousse |
 Dough (Dough Blade) Dough (Dough Blade) | ||||
| Dough PI | 40→0→40 | 2→1.5→30 | 3→10→0 | Pizza Dough, Raisin Bread,Spelt Bread, White Bread,Whole Grain Bread |
AUTOMATIC COOKING MODES
Boil

Select Boil to create delicious soups and bisques. It is also great for creating jams and jellies, stock, and other foods that need to cook at a boil for several minutes.
Fry

Use Fry modes to create delicious stir-fries, oriental-style dishes, and easy scrambled eggs and bacon.
Stew

Stew mode features a wide range of preprogrammed modes for creating everything from sauces to risotto. Whether you want Irish Stew,
Béarnaise sauce, or Ratatouille, stew mode presets allow you to prepare everyday dishes quickly and easily.
Steam

Steam mode uses upper, lower, and inner steamer baskets to allow you to steam vegetables, fish, mussels, and more. This mode is excellent for foods and cooking with indirect heat.
Puree

Puree combines the cooking and chopping abilities of the KitchenAid Cook Processor to make preparing hummus or shrimp croquettes a snap.
Dough

Knead and proof doughs easily and with minimum effort. Whether you are preparing homemade pizza crust or making bread, the KitchenAid
Cook Processor makes it easy.
ADDITIONAL FUNCTIONS
Timer option
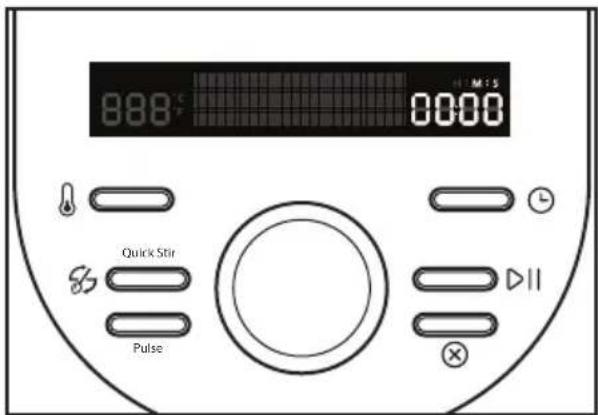
The timer can be used as a cooking timer, or as a kitchen timer. For use with cooking modes, see Manual Cooking section.
To use as a kitchen timer:
I. Press (time). The time indicator will blink 00:00.
2. Turn the dial clockwise to increase the time, counterclockwise to decrease the time.
3. Press ▷||(start) to begin the countdown. A tone will sound when the countdown reaches 00:00.
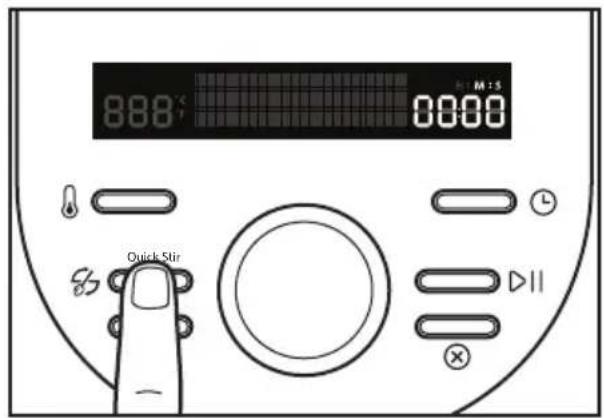
Quick Stir
With the StirAssist paddle installed, press (Quick Stir) once to stir for 2 seconds at low speed.
You may also press and hold the 85 (Quick Stir) button; the StirAssist paddle will operate at low speed until the button is released.
The timer will count up as long as the 85 (Quick Stir) button is held down.
Pulse
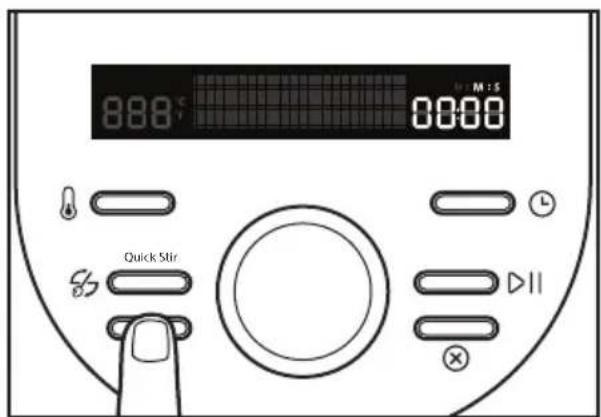
Press Pulse to run the installed attachment at high speed. Release to stop.
NOTE: If the StirAssist paddle is installed, it will turn at low speed only.
The timer will count up as long as Pulse is held down.
MiniBowl and Mini MultiBlade
Use the MiniBowl and Mini MultiBlade for processing smaller quantities.
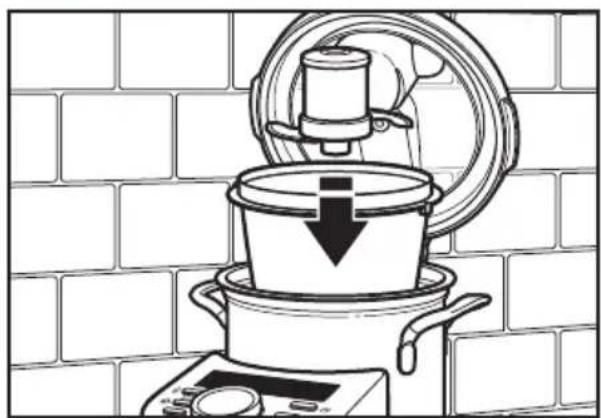
I. Insert the MiniBowl into the Cook Processor Bowl, aligning the arrows on the MiniBowl with the arrows on the Cook Processor bowl.
2. Insert the Mini MultiBlade.
3. Add foods to be processed.
4. Close and latch lid.
Use the MiniBowl for food processing only. Do not use the MiniBowl with cooking cycles.
natural_image
Line drawing of a cooking pot with a lid and downward arrow, placed on an induction cooktop against a brick wall background (no text or symbols)Preparing the Cook Processor for use
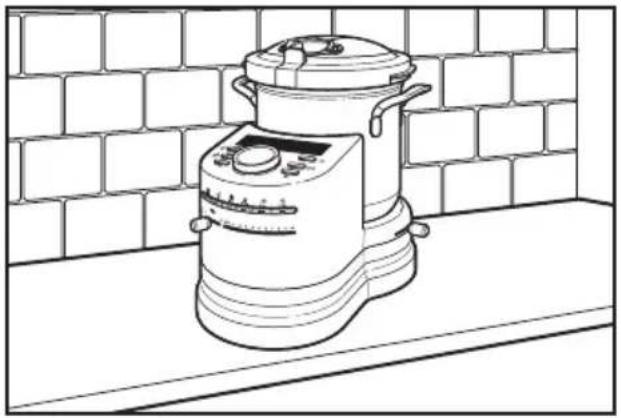
- Place the Cook Processor on a dry, flat, level surface such as a countertop or table.
- Be sure to provide enough room above the Cook Processor to open lid and remove bowl.
- Remove all packaging materials, if present.
- Wash lid and attachments in hot, sudsy water and rinse thoroughly. Wipe out inside of bowl with a damp cloth. Do not immerse bowl. Dry thoroughly.
natural_image
Line drawing of a kitchen electric cooker on a counter against a brick wall background (no text or symbols)Using the Cook Processor
WARNING

Electric Shock Hazard
Plug into a grounded outlet.
Do not use with an adaptor or T.
Do not use with an extension cord.
Failure to follow these instructions could result in death, fire, or electric shock.
natural_image
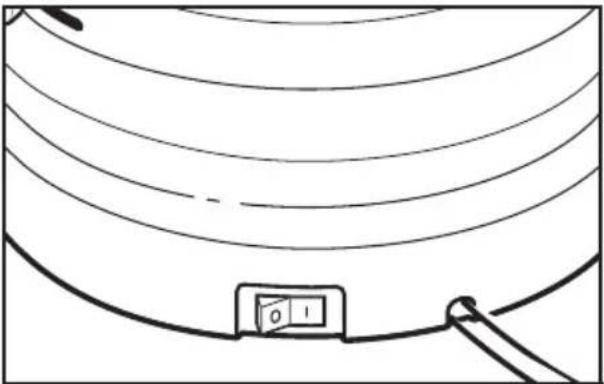
Simple line drawing of a curved surface with a small rectangular object on the ground (no text or symbols)Plug into an earthed (grounded) outlet. The Cook Processor should be the only appliance operating on the circuit. The Cook Processor is now ready to use. Turn the main power switch to I (ON).
Welcome screen
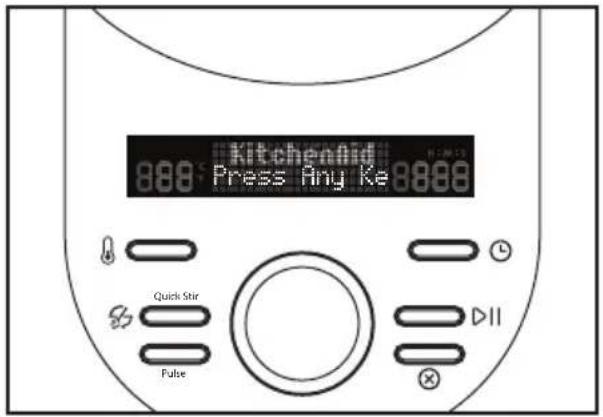
A welcome screen will be displayed any time the Cook Processor is first turned on after being plugged in, after the main power switch is turned on, or after a power outage.
Press any key on the control panel to continue.
Display language
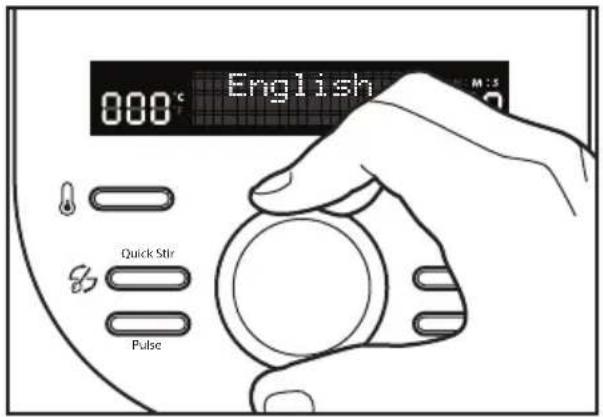
You will be asked to select the display language the first time the Cook Processor is turned on:
I. Turn the dial until the desired language is displayed.
2. Press ▷(Start/Pause) to select and save.
To change the display language:
I. Press and hold ▷(Start/Pause) and Ⓛ (Time) at the same time for 3 seconds.
2. The display will show the current language.
3. Turn the dial until the desired language is displayed.
4. Press ▷(Start/Pause) to select and save.
Changing between degrees Fahrenheit and Celsius
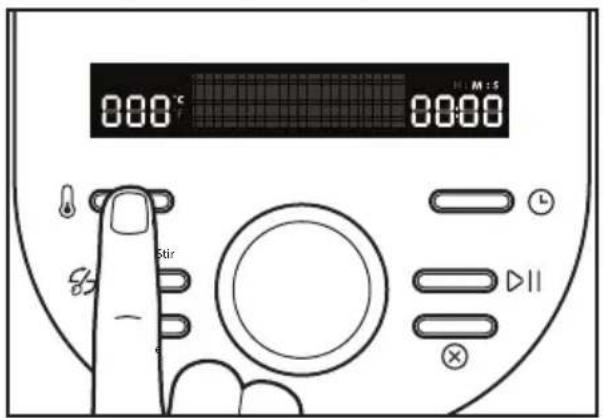
The default setting for the Cook Processor temperature is degrees Celsius.
To change between Celsius (°C) and Fahrenheit (°F):
I. Press and hold the 🔒(Temperature) button for 3 seconds to switch between Celsius and Fahrenheit.
USING AUTOMATIC COOKING MODES
IMPORTANT: Refer to the provided cookbook for directions on selecting attachments, cooking modes, and settings when using Automatic Cooking modes.
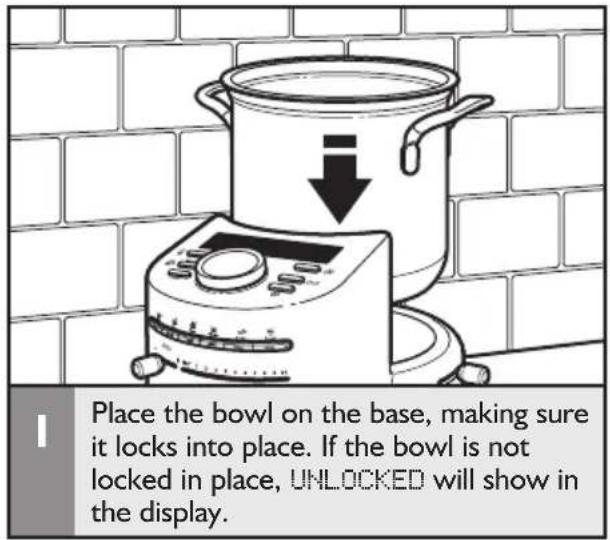
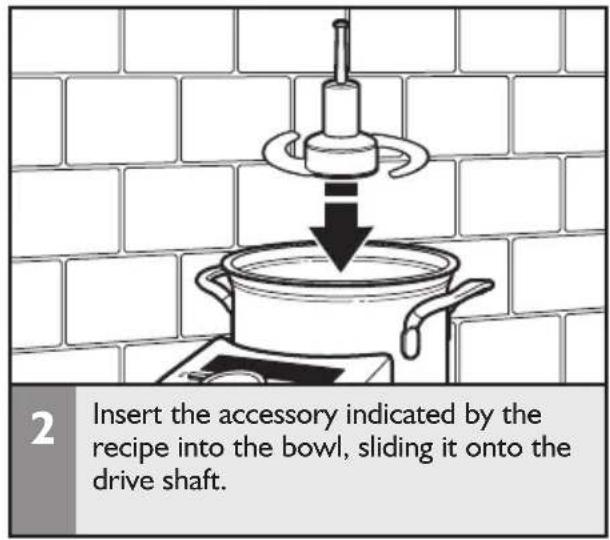
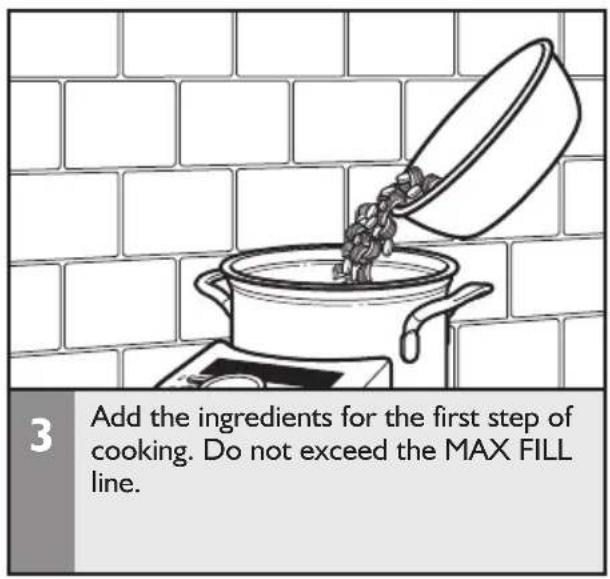
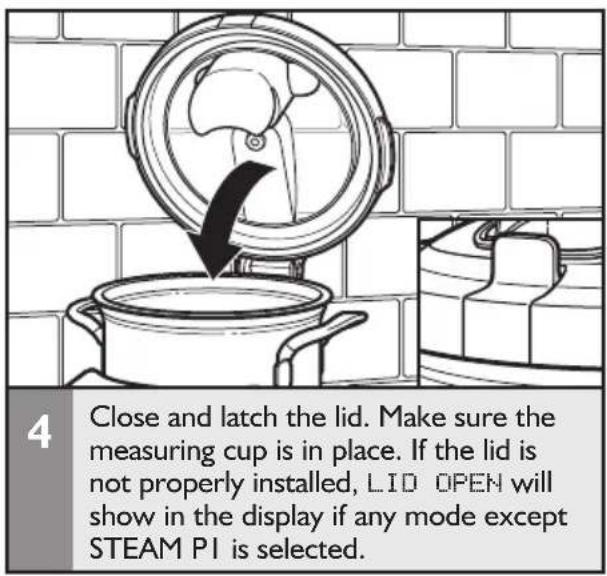
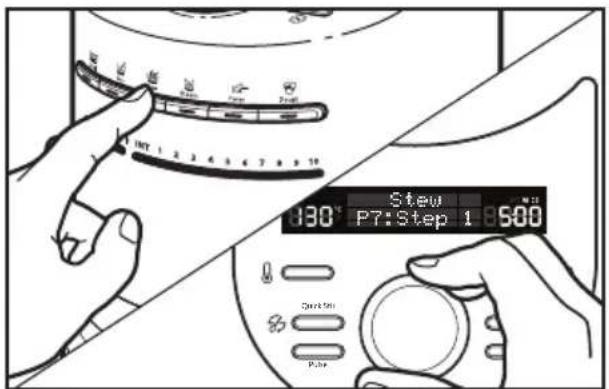
5
Select the desired preset cooking mode by pressing the mode button, then use the dial to select the mode version, for example, Stew P7. The default time and temperature will flash in the display.
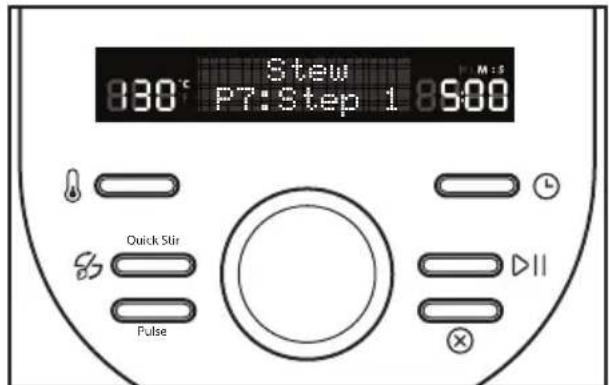
6
Press ▷II (Start). For cooking modes with multiple steps, the next cooking step will appear in the lower part of the display, and the default time and temperature will flash in the display. Use the dial to change the step, if desired.
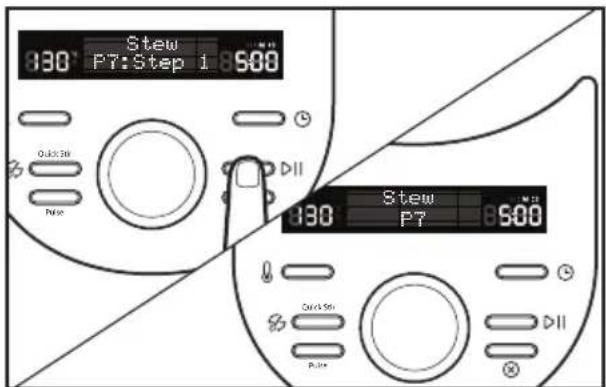
7
Press D(Start) again. The temp and time will stop flashing. Once the set temperature is reached, the time will begin counting down.
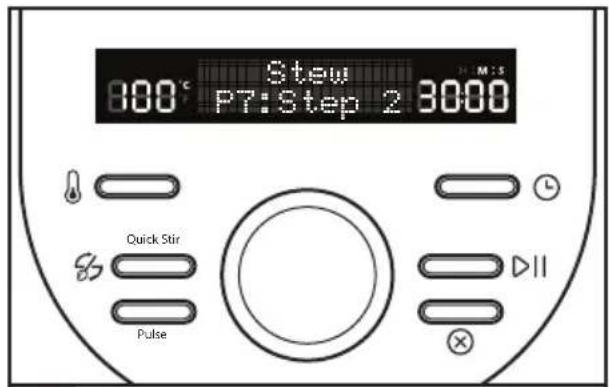
8
Once the first step is complete, a tone will sound and the settings for the next step will blink in the display.
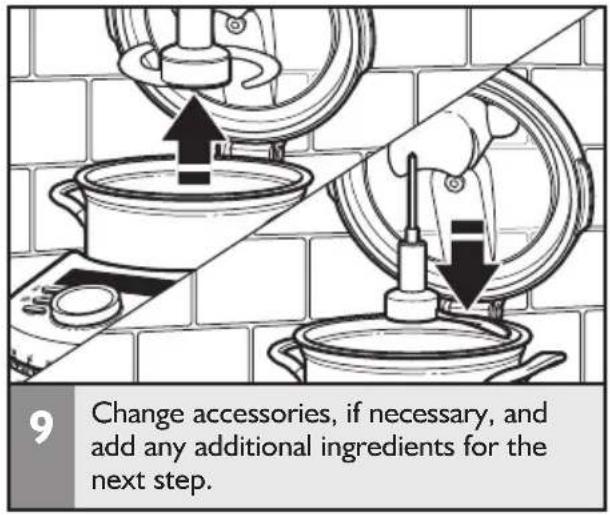
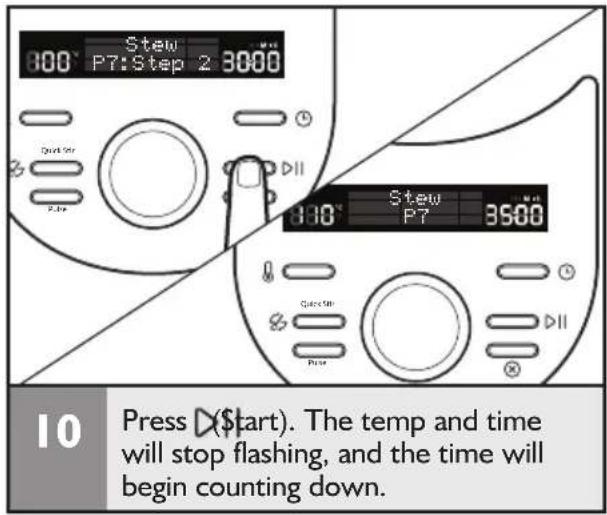
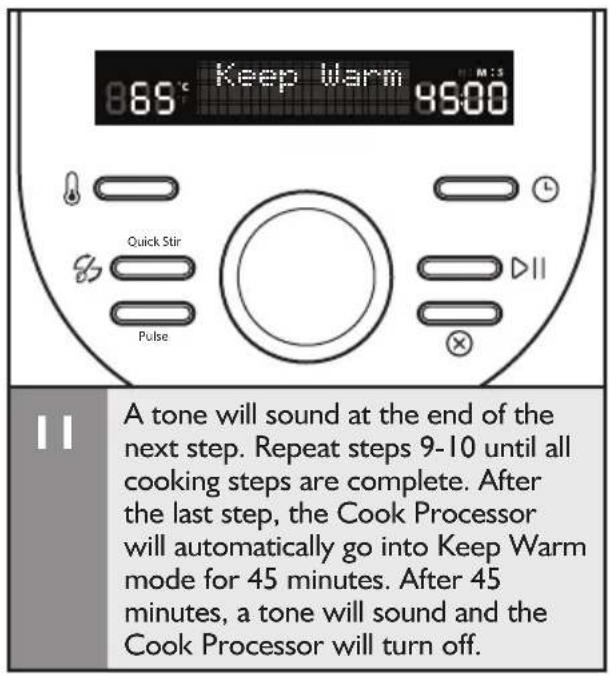
IMPORTANT: To avoid splashing, always turn motor OFF before unlatching the lid.
USING STEAMER BASKETS
The Cook Processor includes two different types of steamer baskets that can be used when cooking in certain modes. NOTE: Steamer baskets cannot be used with food processing attachments such as the MultiBlade, StirAssist, Dough Blade, or Egg Whip.
Using the round internal steamer basket
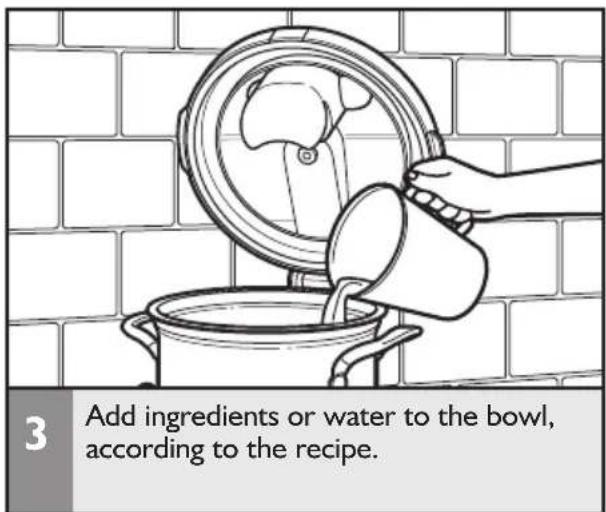
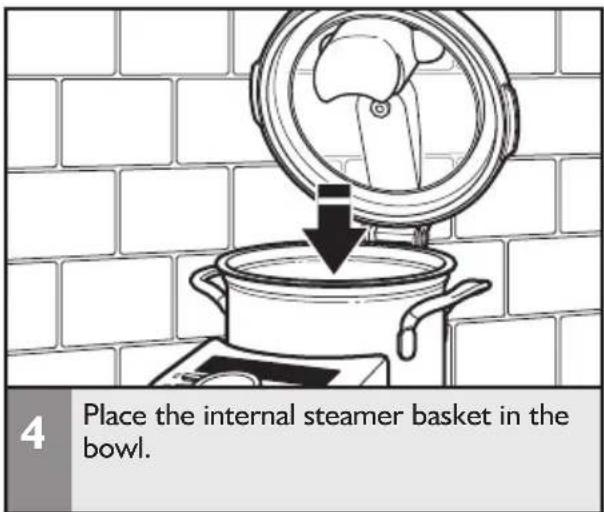
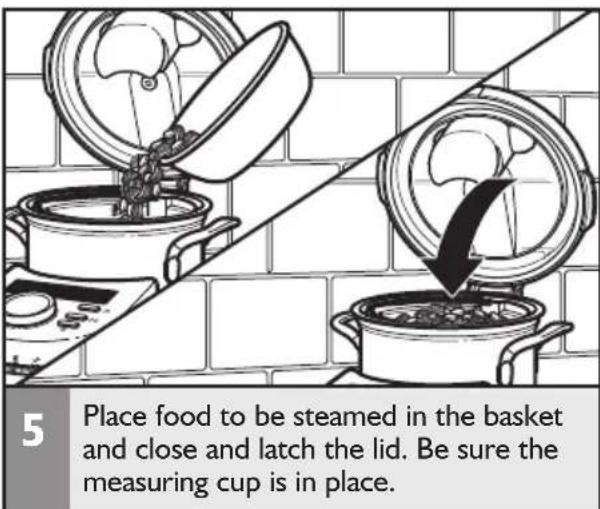
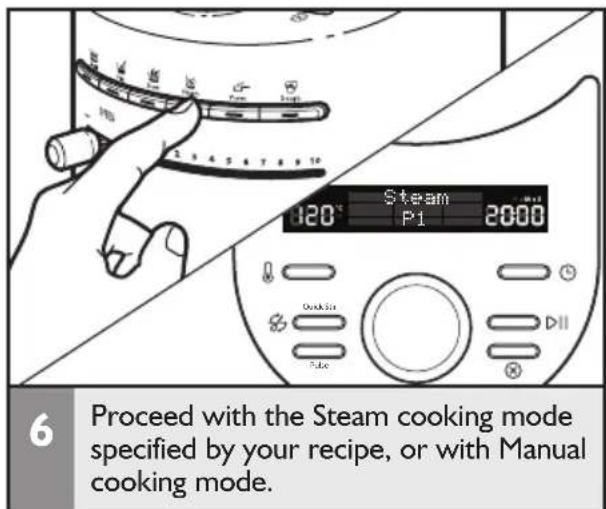
USING STEAMER BASKETS
You can use the upper and lower steamer baskets together, or just the lower steamer basket. You may also use the lower steamer basket with the inner steamer basket. The instructions below show an example of using both upper and lower baskets.
Using the upper and lower steamer baskets
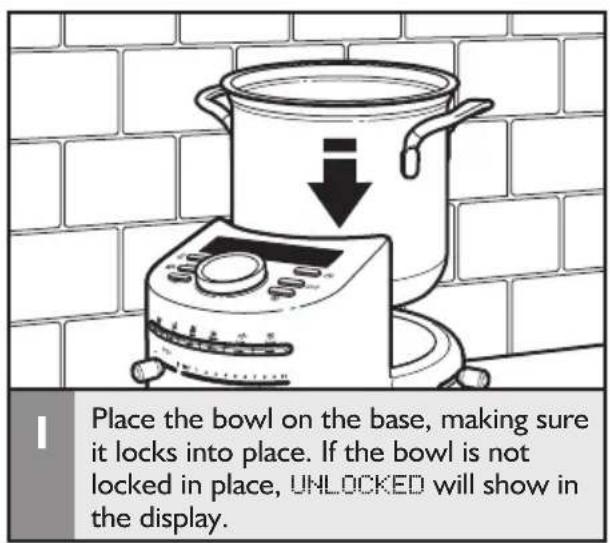
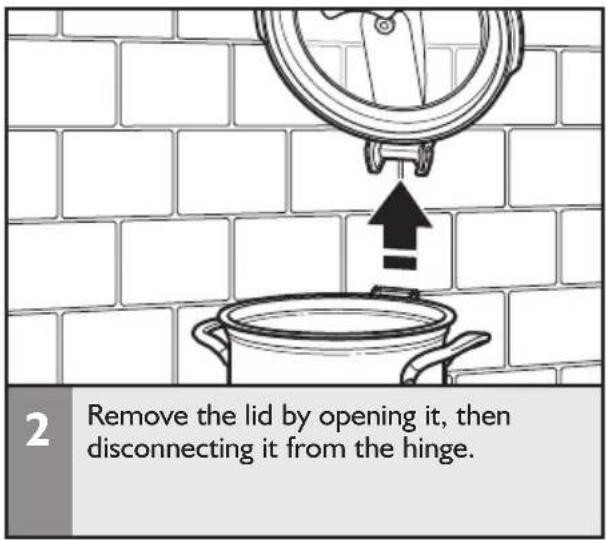
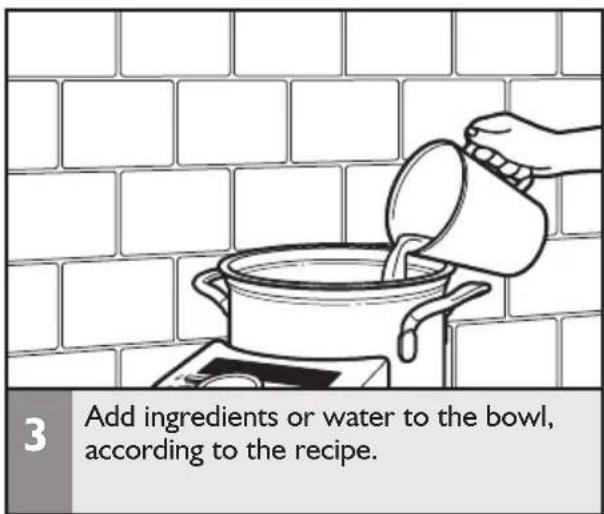
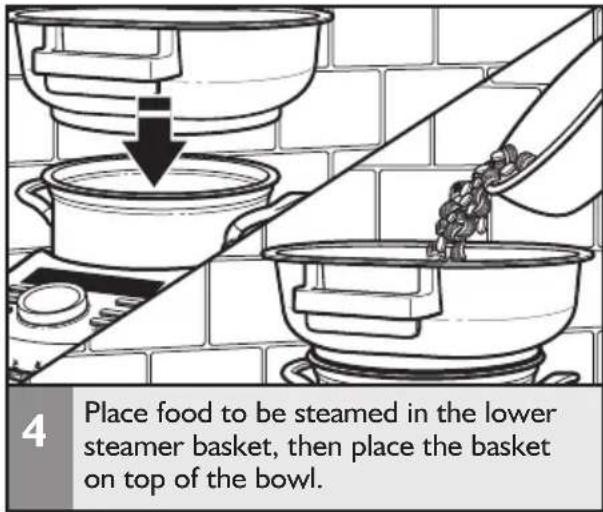
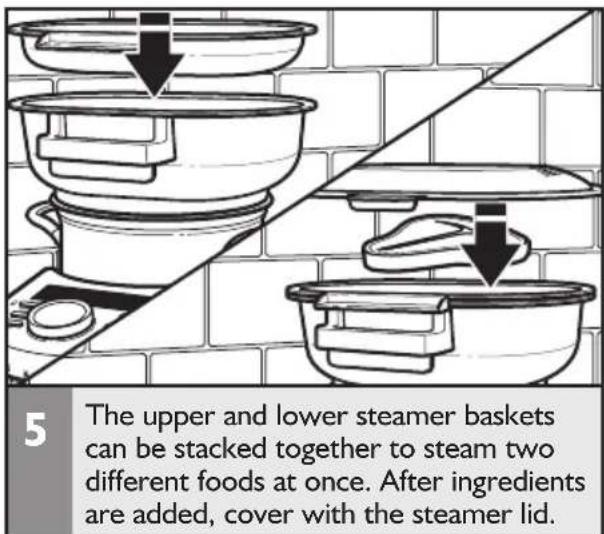
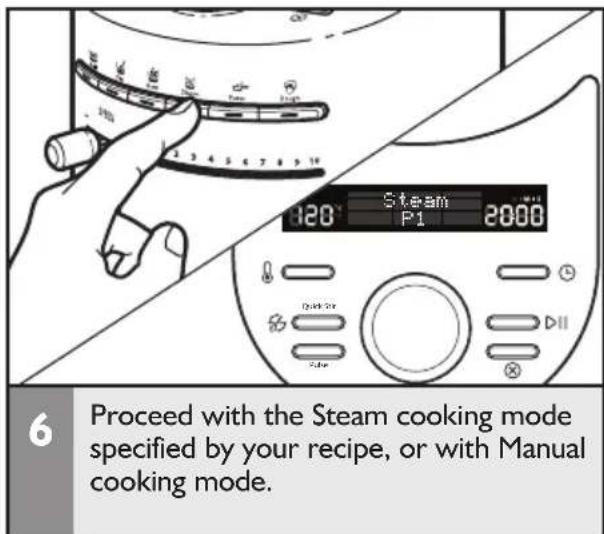
USING MANUAL COOKING MODES
Refer to the guide below for recommended speeds and quantities for accessories when using manual cooking modes. IMPORTANT: To avoid splashing, always follow recommended speeds when using the Egg Whip, Dough Blade, or MultiBlade.
| Accessory Food Speed | Quantity Operating Time | |||
MultiBlade Pureed soups 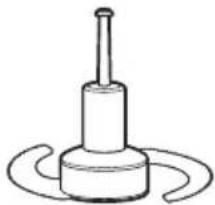 | 10 2.5 L Up to 1 min. for puree† | |||
| Meat (boneless) 10 1.0 kg | Up to 1 min. for puree† | |||
| Fish (boneless) 10 1.0 kg | Up to 1 min. for puree† | |||
| Vegetables 10 1.0 kg 2 min.† | ||||
| Compote 10 500 g | 30 sec. | |||
| Nuts (almonds, pecans, walnuts, peanuts) | 10 | 700 g | 30 sec. | |
Mini MultiBlade and Mini Bowl 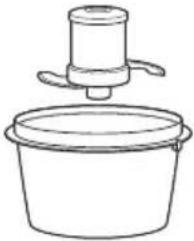 | Pureed soups 10 1.0 L Up to 1 min. for puree† | |||
| Meat, fish (boneless). | 10 | 500 g | Up to 1 min. for puree† | |
| Nuts (almonds, pecans, walnuts, peanuts) | 10 | 300 g | 30 sec. | |
| Pesto | 10 | 450 g | 30 sec. | |
StirAssi 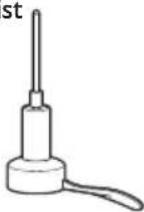 | Fry (2x2 cm cubed meats, bacon, onion) | 1 | 600 g 5 min. | |
| Risotto | 1 | 1.5 kg (350 g of rice) | 20 min. | |
| Mijotes | 1 | 2.5 L | 30–45 min. | |
E 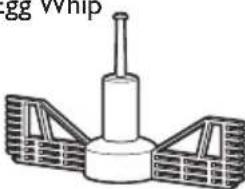 | Egg whites | 7–9 | 8 eggs | 5–10 min. |
| Mayonnaise, whipped cream | 7–9 | 1.3 L | 5–8 min. | |
| Cremes, sauces | 4–6 | 1.2 L | 5–10 min. | |
Dough Blade 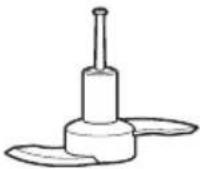 | Bread dough | 5–9 | 1.2 kg | 2–3.5 min. |
| Pastry | 5–9 | 1.2 kg | 2–3.5 min. | |
| Brioche bread 5–9 | 1.2 kg | 2–3.5 min. | ||
| Cake batter | 5 | 1.5 L | 2 min. | |
| Crepe batter | 10 1.5 L | 2 min. |
^† Cut into 2 cm pieces
Cooking with manual settings
natural_image
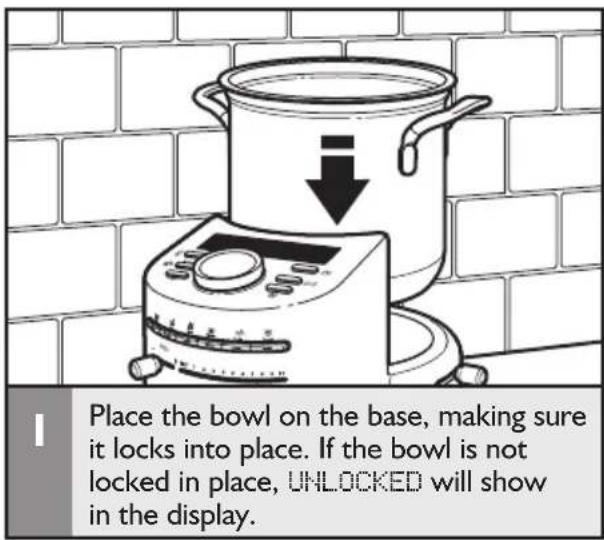
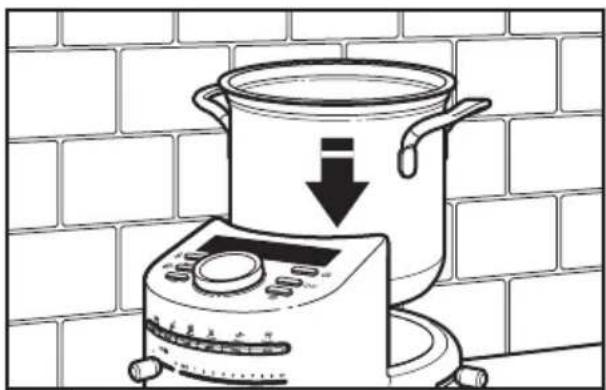
Illustration of a cooking pot and toaster on a brick wall, with a downward arrow indicating cooling (no text or symbols)Place the bowl on the base, making sure it locks into place.
natural_image
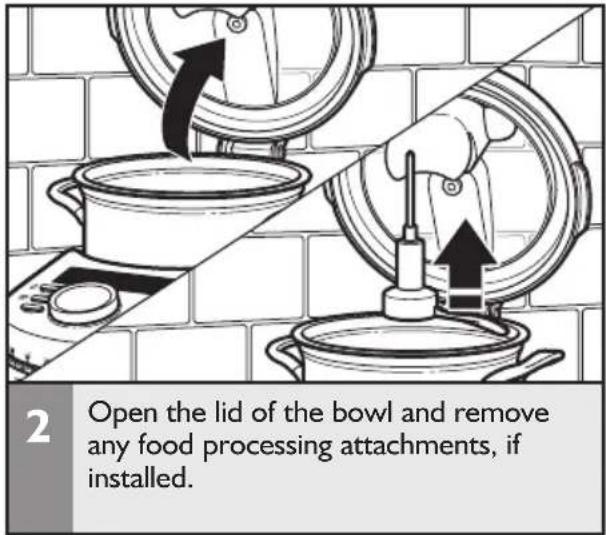
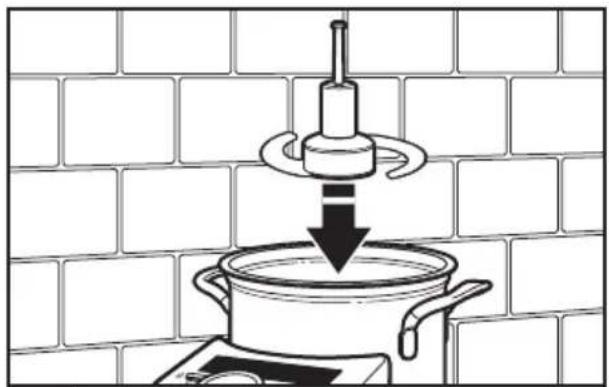
Illustration of a cooking pot with a rotating tool above it, set against a brick wall background (no text or symbols)2 OPTIONAL: Insert the desired accessory into the bowl, sliding it onto the drive shaft.
natural_image
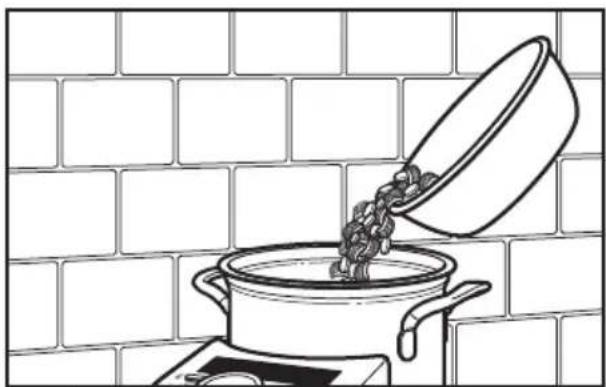
Line drawing of a pot pouring sauce into a pot on a stove against a brick wall background (no text or symbols)3 Add the ingredients for the first step of cooking. Do not exceed the MAX FILL line.
natural_image
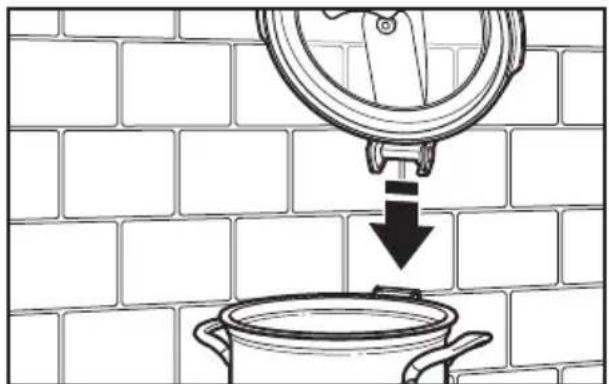
Diagram showing a cooking pot being poured into a container on a brick wall, with a downward arrow indicating the process (no text or symbols present)4 Close and latch the lid. If the lid is not properly installed, LID OPEN will show in the display if the speed lever, Pulse, or (Quick Stir) buttons are activated.
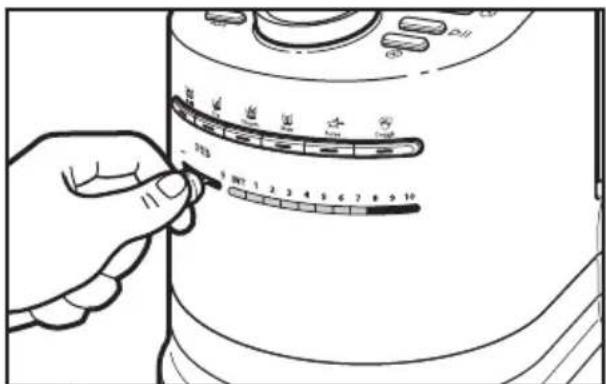
5 If using an accessory: Press the speed lever right (+) or left (-) to select the desired speed, or press the Pulse or 87 (Quick Stir) button.
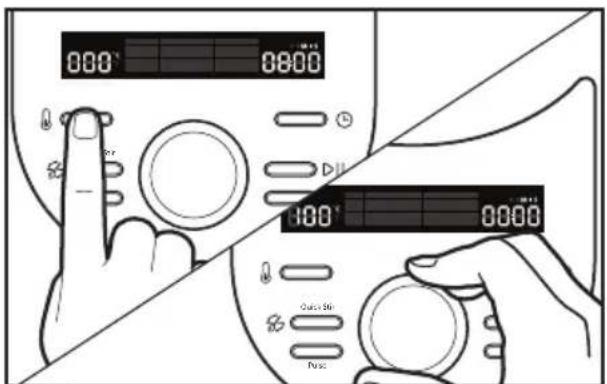
6 Press (Temperature) and use the dial to set the desired cooking temperature.
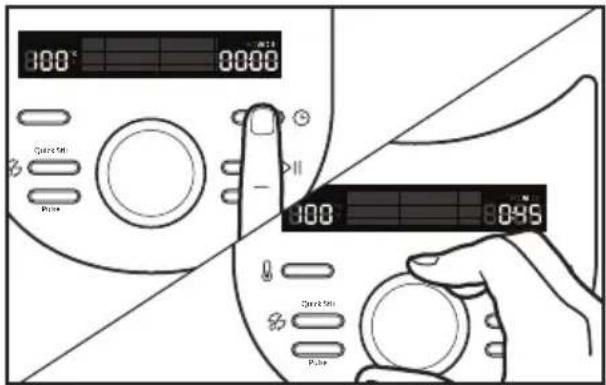
7 Press (Time) and use the dial to set the desired cooking time.
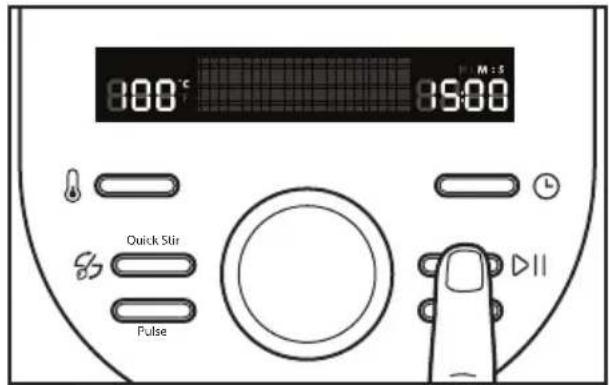
8 Press D(\$start). The temperature and time will stop flashing and the time will begin counting down. PREHEATING will appear in the display until the set temperature is reached.
NOTE: If the Cook Processor is at a higher temperature, and a lower temperature is selected, COOLING will appear in the display until the lower temperature is reached.
IMPORTANT: To avoid splashing, always turn motor off before unlatching the lid.
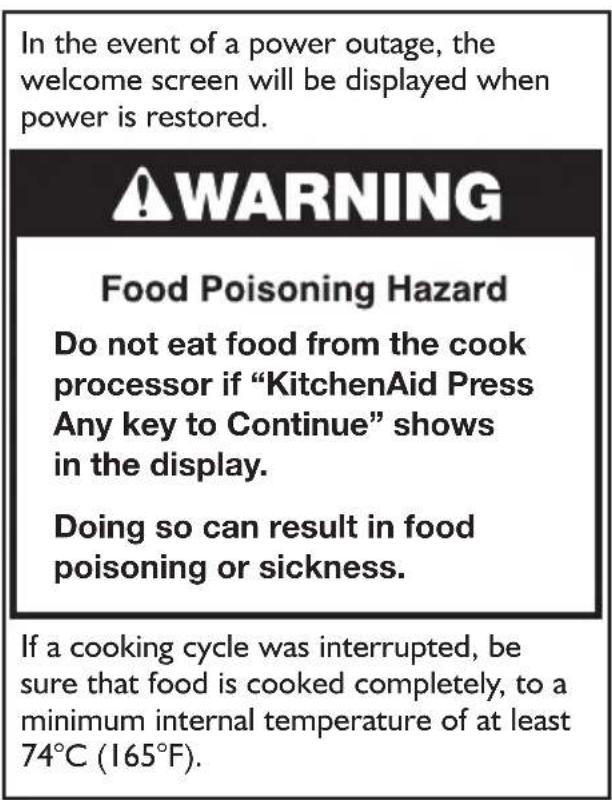
In the event of a power outage, the welcome screen will be displayed when power is restored.
WARNING
Food Poisoning Hazard
Do not eat food from the cook processor if "KitchenAid Press Any key to Continue" shows in the display.
Doing so can result in food poisoning or sickness.
If a cooking cycle was interrupted, be sure that food is cooked completely, to a minimum internal temperature of at least 74^ C ( 165^ F).
natural_image
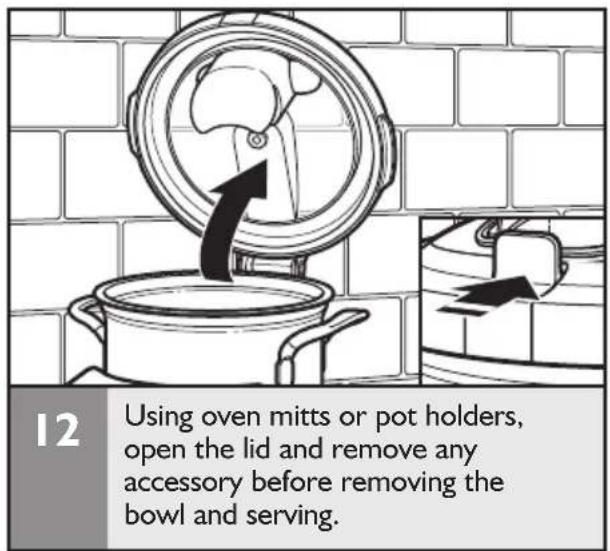
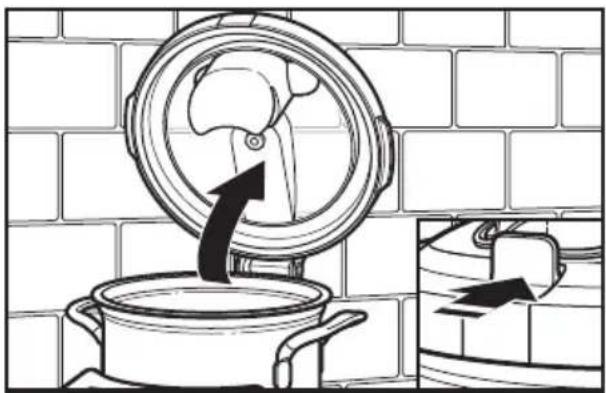
Diagram of a cooking pot with a lid and arrow indicating direction, set against a brick wall (no text or symbols)9 When the timer reaches 00:00, a tone will sound and the Cook Processor will turn off. Use oven mitts or pot holders to open the lid and remove any accessory before removing the bowl and serving.
natural_image
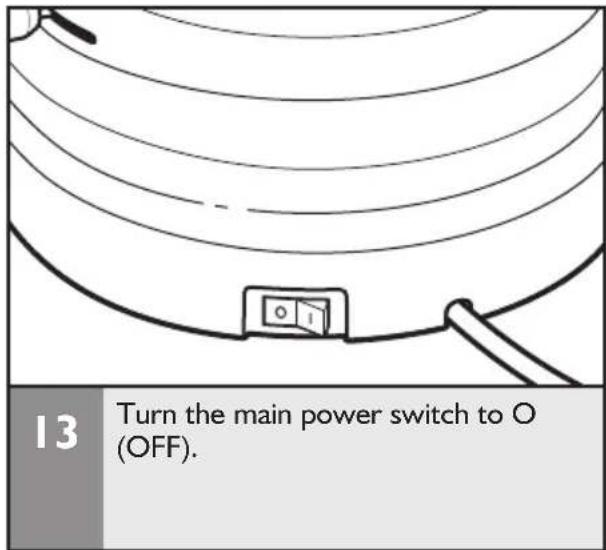
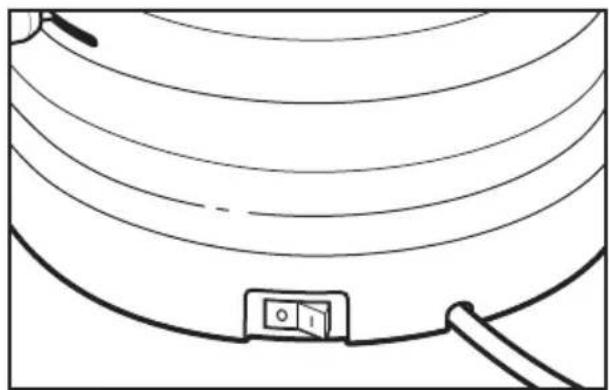
Simple line drawing of a curved surface with a small rectangular object on the ground (no text or symbols)10 Turn the main power switch to O (OFF).
Cleaning your Cook Processor
Unplug your Cook Processor from the wall socket before cleaning.
- Allow Cook Processor and accessories to cool completely before cleaning.
Bowl:
- Do not immerse the bowl in water or place in a dishwasher. To clean the inside of the bowl, wipe with a non-abrasive damp, sudsy cloth, then wipe out with a clean damp cloth. To remove tough cooked-on foods, fill bowl with hot, soapy water, and allow to soak before cleaning.
• To remove baked-on stains, scrub with a paste made from baking soda and water. Rinse and dry thoroughly.
Inner Lid Seal:
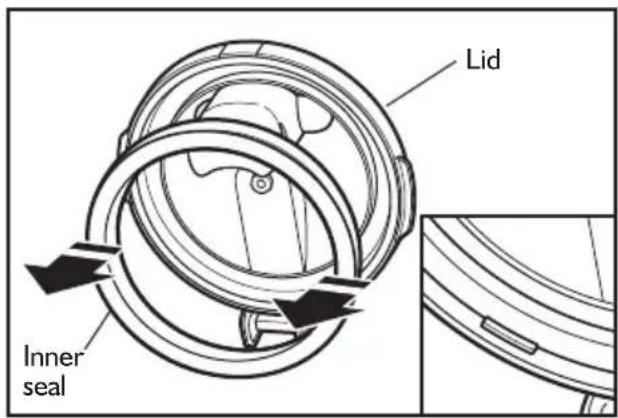
The lid contains drain holes covered by an inner rubber seal.
- When washing the lid in the dishwasher or by hand, remove the inner seal from the lid by pulling it from under the tabs on the bottom of the lid.
Wash the seal in warm, soapy water, and dry before reinstalling. Reinstall the seal before placing the lid back on the Cook Processor.
Exterior Surfaces:
- Do not use abrasive cleaners or metal scouring pads. They could scratch the surface.
- Wipe the outside of the Cook Processor with a clean, damp cloth and dry thoroughly.
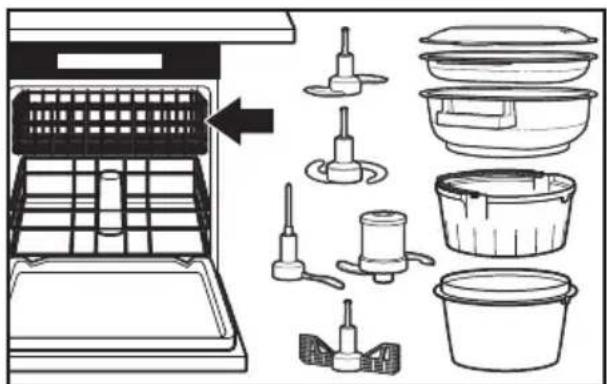
All accessories and blades are top rack dishwasher-safe. Thoroughly dry all parts after washing. Use gentle dishwashing cycles such as normal. Avoid high temperature cycles.
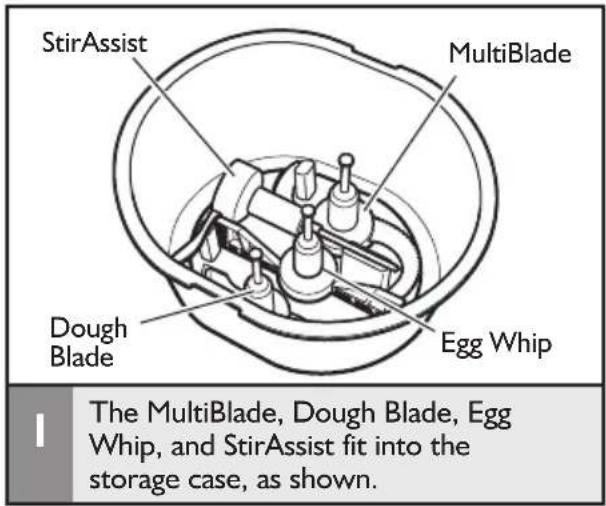
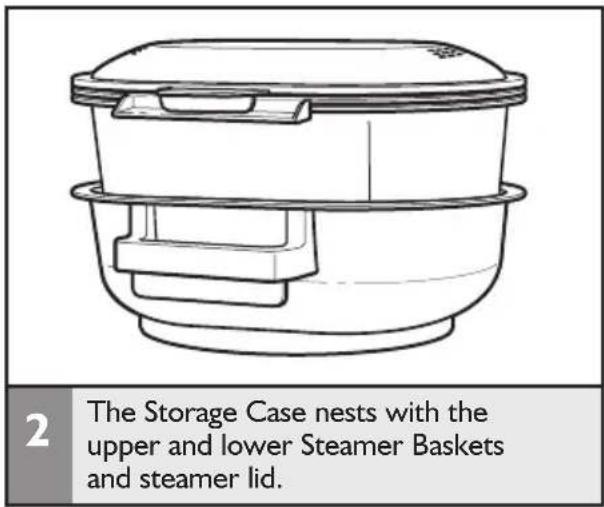
Storing accessories
If your Cook Processor malfunctions or fails to operate
WARNING

Electrical Shock Hazard
Plug into a grounded outlet.
Do not remove ground prong.
Do not use an adapter.
Do not use an extension cord.
Failure to follow these instructions can result in death, fire, or electrical shock.
• Is the Cook Processor plugged into a grounded outlet?
Plug the Cook Processor into a grounded outlet.
• Is the fuse in the circuit to the Cook Processor in working order?
If you have a circuit breaker box, make sure the circuit is closed. Try unplugging the Cook Processor, then plug it back in.
• Display shows UNLOCKED:
Bowl is not locked into the base correctly. Check the bowl to be sure it is locked into place.
• Display shows LID OPEN:
Lid is not latched on the bowl and an Automatic Cooking Mode other than Steam PI or a manual attachment speed, Pulse or Quick Stir is being selected. Check the lid to be sure it is latched into place.
• Display shows MODE:
The display will show MODE if Quick Stir or Pulse is pressed during an Automatic Cooking Mode. These functions are disabled during Automatic Cooking modes.
• Display shows ACCESSORY:
The display will show ACCESSORY if the StirAssist blade is installed and Pulse or a higher speed is selected.
• Display shows COOLING:
Unit is cooling down if a temperature lower than the current cooking temperature is selected.
Error messages:
- Motor turns off during processing and display shows "Error I":
The motor is overloaded. Reduce the amount of ingredients and turn off the unit to allow the motor to cool down for several minutes.
- Motor and/or heater will not turn on and display shows "Error 2":
Turn off and unplug the Cook Processor. Call for service.
- Cook Processor turns off before the end of the cycle and display shows "Error 3":
Unit is malfunctioning. Turn off and unplug the Cook Processor. Call for service.
• If the problem cannot be corrected:
See the "Warranty and Service" section. Do not return the Cook Processor to the retailer – retailers do not provide service.
KitchenAid
© 2014. All rights reserved. Specifications subject to change without notice.
- TABLE OF CONTENTS
- COOK PROCESSOR SAFETY
- PARTS AND FEATURES
- COOKING MODES GUIDE......10
- ADDITIONAL FUNCTIONS
- GETTING STARTED
- START UP AND CONTROL SETUP
- USING AUTOMATIC COOKING MODES 16
- USING STEAMING BASKETS
- USING MANUAL COOKING MODES 21
- CARE AND CLEANING
- TROUBLESHOOTING 26
- Your safety and the safety of others are very important.
- ! DANGER
- WARNING
- IMPORTANT SAFEGUARDS
- When using electrical appliances, basic safety precautions should always be followed to reduce the risk of fire, electric shock, and/or injury to persons including the following:
- SAVE THESE INSTRUCTIONS
- Electrical requirements
- Electrical equipment waste disposal
- Disposal of packing material
- Scrapping the product
- Control panel
- Accessories
- COOKING MODES GUIDE
- Automatic cooking modes
- Boil
- Fry
- Stew
- Steam
- Puree
- Dough
- Timer option
- Quick Stir
- Pulse
- MiniBowl and Mini MultiBlade
- Preparing the Cook Processor for use
- Using the Cook Processor
- Welcome screen
- Display language
- Changing between degrees Fahrenheit and Celsius
- USING AUTOMATIC COOKING MODES
- 5
- 6
- 7
- 8
- USING STEAMER BASKETS
- Using the round internal steamer basket
- Using the upper and lower steamer baskets
- USING MANUAL COOKING MODES
- Cooking with manual settings
- Food Poisoning Hazard
- Cleaning your Cook Processor
- Bowl:
- Inner Lid Seal:
- Exterior Surfaces:
- Storing accessories
- If your Cook Processor malfunctions or fails to operate
- Error messages:
- KitchenAid
Brand : KITCHENAID
Model : Artisan KCF0103
Category : Food processor