
C57M70N3GB - Microwave NEFF - Free user manual and instructions
Find the device manual for free C57M70N3GB NEFF in PDF.


| Product Type | Built-in Microwave |
| Brand | Neff |
| Model | C57M70N3GB |
| Category | Microwave |
| Color | Black |
| Dimensions (H x W x D) | 382 x 595 x 320 mm |
| Oven Capacity | 25 L |
| Microwave Power | 900 W |
| Grill Power | 1100 W |
| Convection Power | 1600 W |
| Number of Power Levels | 5 |
| Control Type | Electronic with LCD display |
| Door Type | Drop-down with handle |
| Interior Light | Yes |
| Child Lock | Yes |
| Timer | Up to 90 minutes |
| Defrost Function | By weight or time |
| Auto Cook Programs | 10 |
| Cleaning | Easy-clean enamel interior |
| Energy Consumption | 0.9 kWh (microwave), 1.5 kWh (convection) |
| Weight | 22 kg |
| Voltage | 220-240 V |
| Frequency | 50/60 Hz |
| Warranty | 2 years |
Frequently Asked Questions - C57M70N3GB NEFF
User questions about C57M70N3GB NEFF
0 question about this device. Answer the ones you know or ask your own.
Ask a new question about this device
Download the instructions for your Microwave in PDF format for free! Find your manual C57M70N3GB - NEFF and take your electronic device back in hand. On this page are published all the documents necessary for the use of your device. C57M70N3GB by NEFF.
USER MANUAL C57M70N3GB NEFF
natural_image
Close-up of a stainless steel oven with control knobs and indicator lights (no readable text or symbols)[en] Instruction manual
C57M70N3GB
C57M70S3GB
Microwave

EFF
en Table of contents
Important safety information .... 2
Causes of damage 4
Energy and environment tips .... 5
Saving energy....5
Environmentally-friendly disposal....5
Your new appliance .... 5
Control panel 5
Operating mode selector 6
Accessories 6
Cooking compartment 6
Switching the appliance on and off 7
Switching on 7
Switching off....7
Before using the appliance for the first time.... 7
Setting the clock 7
Heating up the cooking compartment ....7
Cleaning the accessories....7
Operating the appliance 7
Setting the operating mode and temperature ....7
Rapid heat up 8
The microwave 8
Notes regarding ovenware....9
Microwave power settings....9
Setting the microwave....9
Microwave combi operation....9
Suitable microwave power settings....9
Setting Microwave Combi operation 9
1, 2, 3 series of operations.... 10
Ovenware 10
Setting a series of operations.... 10
Electronic clock 10
Clock display 10
Timer 11
Cooking time 11
Setting the clock 11
Childproof lock.... 11
Changing the basic settings 12
Basic settings 12
Care and cleaning.... 12
Cleaning agents 12
Malfunction table 13
Malfunction table.... 13
Replacing the cooking compartment bulb 14
After-sales service.... 15
E number and FD number 15
Technical data 15
Automatic programmes.... 15
Setting a programme 15
Defrosting and cooking with the automatic programmes..... 16
Tested for you in our cooking studio.... 17
Defrosting, heating up and cooking with the microwave..... 18
Microwave tips.... 20
Cakes and pastries 20
Baking tips ......21
Roasting and grilling 22
Tips for roasting and grilling.... 23
Bakes, gratins.... 23
Frozen convenience products 24
Test dishes 24
Baking 25
Grilling....25
Acrylamide in foodstuffs.... 25
Additional information on products, accessories, replacement parts and services can be found at www.neff-international.com and in the online shop www.neff-eshop.com
⚠️ Important safety information
Read these instructions carefully. Only then will you be able to operate your appliance safely and correctly. Retain the instruction manual and installation instructions for future use or for subsequent owners.
This appliance is only intended to be fully fitted in a kitchen. Observe the special installation instructions.
Check the appliance for damage after unpacking it. Do not connect the appliance if it has been damaged in transport.
Only a licensed professional may connect appliances without plugs. Damage caused by incorrect connection is not covered under warranty.
This appliance is intended for domestic use only. The appliance must only be used for the preparation of food and drink. The appliance must be supervised during operation. Only use this appliance indoors.
This appliance may be used by children over the age of 8 years old and by persons with reduced physical, sensory or mental
capabilities or by persons with a lack of experience or knowledge if they are supervised or are instructed by a person responsible for their safety how to use the appliance safely and have understood the associated hazards.
Children must not play with, on, or around the appliance. Children must not clean the appliance or carry out general maintenance unless they are at least 8 years old and are being supervised.
Keep children below the age of 8 years old at a safe distance from the appliance and power cable.
Always slide accessories into the cooking compartment correctly. See "Description of accessories in the instruction manual.
Risk of fire!
- Combustible items stored in the cooking compartment may catch fire. Never store combustible items in the cooking compartment. Never open the appliance door if there is smoke inside. Switch off the appliance and unplug it from the mains or switch off the circuit breaker in the fuse box.
■ Using the appliance for anything other than its intended purpose is dangerous and may cause damage. The following is not permitted: drying out food or clothing, heating slippers, grain or cereal pillows, sponges, damp cleaning cloths or similar. For example, heated slippers and grain or cereal pillows may catch fire, even several hours after they have been heated. The appliance must only be used for the preparation of food and drinks.
- Food may catch fire. Never heat food in heat-retaining packages. Do not leave food heating unattended in containers made of plastic, paper or other combustible materials. Do not select a microwave power or time setting that is higher than necessary. Follow the information provided in this instruction manual. Never use the microwave to dry food. Never defrost or heat food with a low water content, e.g. bread, at too high a microwave power or for too long.
■ Cooking oil may catch fire. Never use the microwave to heat cooking oil on its own.
Risk of explosion!
Liquids and other food may explode when in containers that have been tightly sealed. Never heat liquids or other food in containers that have been tightly sealed.
Risk of serious damage to health!
■ The surface of the appliance may become damaged if it is not cleaned properly. Microwave energy may escape. Clean the appliance on a regular basis, and remove any food residue immediately. Always keep the cooking compartment, door seal, door and door stop clean; see also section Care and cleaning.
- Microwave energy may escape if the cooking compartment door or the door seal is damaged. Never use the appliance if the cooking compartment door or the door seal is damaged. Contact the after-sales service.
- Microwave energy will escape from appliances that do not have any casing. Never remove the casing. For any maintenance or repair work, contact the after-sales service.
Risk of electric shock!
- Incorrect repairs are dangerous. Repairs may only be carried out and damaged power cables replaced by one of our trained after-sales technicians. If the appliance is defective, unplug the appliance from the mains or switch off the circuit breaker in the fuse box. Contact the after-sales service.
■ The cable insulation on electrical appliances may melt when touching hot parts of the appliance. Never bring electrical appliance cables into contact with hot parts of the appliance. - Do not use any high-pressure cleaners or steam cleaners, which can result in an electric shock.
- When replacing the cooking compartment bulb, the bulb socket contacts are live. Before replacing the bulb, unplug the appliance from the mains or switch off the circuit breaker in the fuse box.
A defective appliance may cause electric shock. Never switch on a defective appliance. Unplug the appliance from the mains or switch off the circuit breaker in
the fuse box. Contact the after-sales service.
■ The appliance is a high-voltage appliance. Never remove the casing.
Risk of burns!
■ The appliance becomes very hot. Never touch the interior surfaces of the cooking compartment or the heating elements. Always allow the appliance to cool down. Keep children at a safe distance.
■ Accessories and ovenware become very hot. Always use oven gloves to remove accessories or ovenware from the cooking compartment.
■ Alcoholic vapours may catch fire in the hot cooking compartment. Never prepare food containing large quantities of drinks with a high alcohol content. Only use small quantities of drinks with a high alcohol content. Open the appliance door with care.
- Foods with peel or skin may burst or explode during, or even after, heating. Never cook eggs in their shells or reheat hard-boiled eggs. Never cook shellfish or crustaceans. Always prick the yolk when baking or poaching eggs. The skin of foods that have a peel or skin, such as apples, tomatoes, potatoes and sausages, may burst. Before heating, prick the peel or skin.
■ Heat is not distributed evenly through baby food. Never heat baby food in closed containers. Always remove the lid or teat. Stir or shake well after the food has been heated. Check the temperature of the food before it is given to the child.
■ Heated food gives off heat. The ovenware may become hot. Always use oven gloves to remove ovenware or accessories from the cooking compartment.
- Airtight packaging may burst when food is heated. Always observe the instructions on the packaging. Always use oven gloves to remove dishes from the cooking compartment.
Risk of scalding!
■ When you open the appliance door, hot steam may escape. Open the appliance
door with care. Keep children at a safe distance.
■ Water in a hot cooking compartment may create hot steam. Never pour water into the hot cooking compartment.
There is a possibility of delayed boiling when a liquid is heated. This means that the liquid reaches boiling temperature without the usual steam bubbles rising to the surface. Even if the container only vibrates a little, the hot liquid may suddenly boil over and spatter. When heating, always place a spoon in the container. This will prevent delayed boiling.
Risk of injury!
- Scratched glass in the appliance door may develop into a crack. Do not use a glass scraper, sharp or abrasive cleaning aids or detergents.
■ Unsuitable ovenware may crack. Porcelain or ceramic ovenware can have small perforations in the handles or lids. These perforations conceal a cavity below. Any moisture that penetrates this cavity could cause the ovenware to crack. Only use microwave-safe ovenware.
Causes of damage
Caution!
■ Creation of sparks: Metal - e.g. a spoon in a glass - must be kept at least 2 cm from the oven walls and the inside of the door. Sparks could irreparably damage the glass on the inside of the door.
■ Water in the cooking compartment when the cooking compartment is hot: Never pour water into the cooking compartment when the cooking compartment is hot. Steam will be created. The temperature change can cause damage to the ceramic floor panel.
■ Foil containers: Do not use foil containers in the appliance. They damage the appliance by producing sparks.
■ Moist food: Do not store moist food in the closed cooking compartment for long periods. This will damage the enamel. Do not use the appliance to store food. This can lead to corrosion.
■ Cooling with the appliance door open: Only leave the cooking compartment to cool with the door closed. Do not trap anything in the appliance door. Even if the door is only slightly ajar, the fronts of adjacent units may be damaged over time.
■ Heavily soiled seal: If the seal is very dirty, the appliance door will no longer close properly during operation. The fronts of adjacent units could be damaged. Always keep the seal clean.
■ Using the appliance door for standing on or placing objects on: Do not stand or place anything on the open appliance door. Do not place ovenware or accessories on the appliance door.
■ Transporting the appliance: Do not carry or hold the appliance by the door handle. The door handle cannot support the weight of the appliance and could break.
- Operating the microwave without food: Operating the appliance without food in the cooking compartment may lead to overloading. Never switch on the appliance unless there is food in the cooking compartment. An exception to this rule is a short crockery test (see the section "Microwave, suitable crockery").
■ Never use the enamel baking tray when cooking with microwave operation. It will result in a technical fault.
Microwave popcorn: Never set the microwave power too high. Use a power setting no higher than 600 watts. Always place the popcorn bag on a glass plate. The disc may jump if overloaded.
Energy and environment tips
Here you can find tips on how to save energy when baking and roasting and how to dispose of your appliance properly.
Saving energy
Only preheat the oven if this is specified in the recipe or in the operating instruction tables.
Use dark, black lacquered or enamelled baking tins. They absorb the heat particularly well.
Open the appliance door as little as possible during cooking, baking or roasting.
It is best to bake several cakes one after the other. The cooking compartment is still warm. This may reduce the baking time for the second cake.
For longer cooking times, you can switch the oven off 10 minutes before the end of the cooking time and use the residual heat to finish cooking.
Environmentally-friendly disposal
Dispose of packaging in an environmentally-friendly manner.

This appliance is labelled in accordance with European Directive 2012/19/EU concerning used electrical and electronic appliances (waste electrical and electronic equipment - WEEE). The guideline determines the framework for the return and recycling of used appliances as applicable throughout the EU.
Your new appliance
In this section, you will find information on
■ the control panel
■ the operating modes
■ the shelf heights
■ the accessories
Control panel

Operating controls Use
| 90 Selects 90 watt microwave power |
| 180 Selects 180 watt microwave power |
| 360 Selects 360 watt microwave power |
| 600 Selects 600 watt microwave power |
| 1000 Selects 1000 watt microwave power |
123
Selects a series of operations
Operating controls Use
| Clock function buttonSelects the required clock function or rapid heat up (see section: Electronic clock) | |
| Rotary selector Makes the settings in one of the clock functions or switches on rapid heat up (see section: Electronic clock) | |
| Operating mode selector | Selects the desired operating mode (see section: Switching on the appliance) |
Operating controls Use
| i | Info buttonActivates the childproof lock (see section: Childproof lock)Calls up the Basic settings menu (see section: Basic settings) |
| Temperature selector | Temperature selectorSets the temperature (see section: Operating the appliance)Changes the settings in the Basic settings menu (see section: Basic settings) |
| Selects automatic programmes | |
| Starts oven operation | |
| Stops oven operation or cancels a setting |
Microwave power settings and operating controls
When you press a button, the relevant item lights up on the display.
Retractable operating knob
The rotary, temperature and operating mode selectors can be pushed in and popped out. Press them towards the relevant operating knob to pop it in and out.
Operating mode selector
Use the operating mode selector to set the operating mode. Below is an overview of the operating modes on your appliance.
Operating modes Application
| Hot air For baking sponge cakes in tins, flans and cheesecakes and cakes, pizzas and small baked products on the baking tray. | ||
| Hot air grilling For poultry and larger pieces of meat. | ||
| Circulated air grilling | For cooking pieces of meat. | |
| Full-surface grill | For large amounts of flat, small items for grilling (e.g. steaks, sausages). | |
| Centre-area grill | For small amounts of flat, small items for grilling (e.g. steaks, bread). | |
| Programmes 4 defrosting programmes11 cooking programmesThe operating mode and cooking time are determined depending on the weight. | ||
Notes
■ When you press the operating mode selector, the appliance switches on. The Ⓑ symbol lights up.
■ The microwave only functions if you press the selector. The Ⓑ symbol lights up.
Accessories
The accessories can be inserted into the appliance at four different heights.

Note: Microwaveable ovenware can be placed on the oven floor (level 0).
Caution!
- Do not insert the enamel baking tray on the oven floor (level 0).
- Do not use any enamel baking trays or unsuitable microwave dishes while operating the microwave.
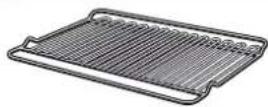
Wire rack
For ovenware, cake tins, grilled food and frozen meals.
Note: You can pull the wire rack two thirds of the way out without it tipping. This allows meals to be removed more easily.
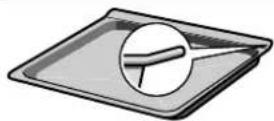
Enamel baking tray
For cakes and biscuits.
Note: Slide the baking tray with the tapered edge as far as possible into the oven.
Caution!
Do not use the enamel baking tray when operating the microwave and microwave combi.

Wire rack
For grilled food. Always place the wire rack in the enamel baking tray. This ensures that dripping fat and meat juices are collected.
Caution!
The wire rack is not suitable for operation with the microwave.
Cooking compartment
Your appliance has a cooling fan.
Cooling fan
The cooling fan switches on and off as required. The hot air escapes above the door.
Caution!
do not cover the ventilation slots. Otherwise the oven will overheat.
Notes
■ The cooling fan continues to run for a certain time after operation.
■ The appliance remains cool during microwave operation. The cooling fan will still switch on. The fan may run on even when microwave operation has ended.
■ Condensation may appear on the door window, interior walls and floor. This is normal and does not adversely affect microwave operation. Wipe away the condensation after cooking.
Switching the appliance on and off
Switch the microwave oven on and off using the operating mode selector.
Switching on
- Press the operating mode selector.
The appliance switches on. The Ⓑ symbol lights up.
- Select a function:
■ 90, 180, 360, 600 or 1000 W button for a microwave power level
■ 123 button = series of operations
■ Setting an operating mode and temperature
■ Pkg button = automatic programmes
Please refer to the individual sections for information on how to make the settings.
Switching off
Turn the operating mode selector back, and push in. The appliance switches off and the time appears in the clock display.
Before using the appliance for the first time
In this section, you can read about
■ How to set the clock after connecting up your appliance
■ How to clean your appliance before using it for the first time
Setting the clock
0:00 and the ◀▷ Symbol symbols light up in the clock display.
- Turn the rotary selector to set the time of day.
- Press the ◀ clock function button.
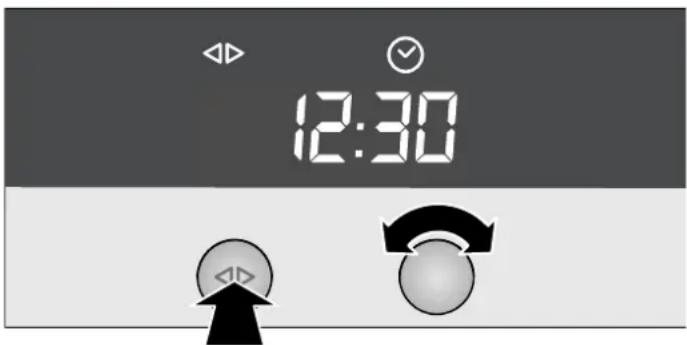
Your setting is applied.
Changing the clock
To subsequently change the clock time, press the ◀clock function button repeatedly until the ◀ and ☺ symbols light up. Use the rotary selector to change the time of day.
Note: In order to reduce the energy consumption of your appliance in standby, you can switch off the clock display. Refer to the section entitled Electronic clock.
Heating up the cooking compartment
To remove the new appliance smell, heat up the cooking compartment when empty and with the oven door closed.
Make sure that the cooking compartment contains no leftover packaging, e.g. polystyrene pellets.
Heat the cooking compartment for 60 minutes with the 🔒 Hot air grill at 200 °C.
Note: Keep the kitchen ventilated while the appliance is heating up.
- Use the operating mode selector to set the ☑ Hot air grill.
- Using the temperature selector, set the temperature to 200\ ircC
- Press the Start button.
- Switch off the appliance after 60 minutes.
To do this, turn the operating mode selector back to Ⓞ and push it in.
Once the cooking compartment has cooled, clean it with hot, soapy water.
Cleaning the accessories
Before you use the accessories for the first time, clean them thoroughly with hot soapy water and a soft dish cloth.
Operating the appliance
In this section, you can read about
■ which operating modes are available for your oven.
■ how to select an operating mode and temperature.
■ how to set rapid heat up
The following operating modes are available for your microwave appliance. A default temperature always appears when you make a setting.
| Operating mode Default temperature in °C, grill settings | Temperature range in °C, grill settings |
Hot air 160 40, 100-250
Hot air grilling 160 100-250
| Operating mode | Default temperature in °C, grill settings | Temperature range in °C, grill settings |
| Circulated air grilling | 160 100-250 | |
| Full-surface grill high (3) medium (2) low (1) | ||
| Centre-area grill -- | ||
Setting the operating mode and temperature
Example in diagram:
Hot air 📋, 190 °C.
- Turn the operating mode selector until the required operating mode is set.
A default temperature appears on the temperature display.

- Turn the temperature selector to change the default temperature.
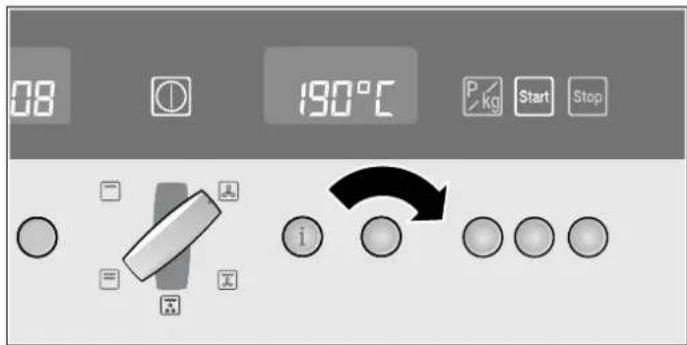
- Press the Start button.
The operation starts. The heating bars in the temperature indicator appear in the temperature display.
Switching off the oven
Turn operating mode selector back to Ⓓ and push in.
Opening the appliance door during operation
Operation is suspended. The cooling fan may continue to run. After closing the door, press the 📄 button. Operation will then continue.
Pausing operation
Open the appliance door or briefly press the Stop button. Microwave operation is interrupted. Press the Start button again once you have closed the door. Operation will then continue.
Changing the settings
The type of heating and temperature or grill setting can be changed at any time using their respective selectors.
Cancelling operation
Press the □ button, turn the operating mode selector back and push in.
Note: If you also set a cooking time, the operation which you have set will automatically switch off at the end of this time. See the section Electronic clock.
Rapid heat up
With rapid heating, your oven reaches the temperature set particularly quickly.
Use the rapid heating function when temperatures above 100\ °C are set.
Suitable types of heating
Hot air
Hot air grilling
Circulated air grilling
Setting rapid heating
Condition: a suitable operating mode and temperature must have been set.
- Set the operating mode and temperature.
-
Repeatedly press the clock function button until the ◀▶/□ and ∥ symbols light up and OFF appears on the clock display.
-
Turn the rotary selector clockwise.
The clock display shows Ωn and the symbol lights up. Rapid heat up is activated.
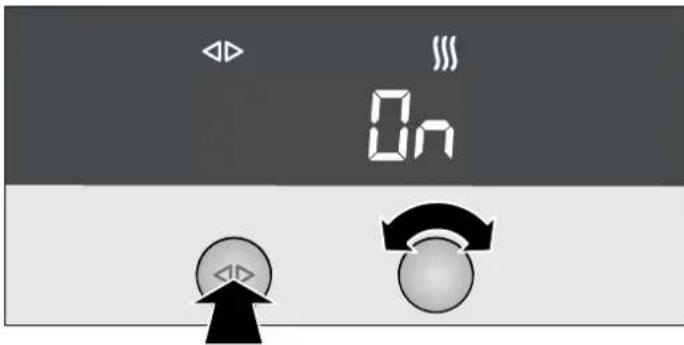
- Press the slot button.
The appliance heats up.
To ensure an even cooking result, do not place your food in the oven until rapid heat up is complete.
The rapid heat up process is complete
After reaching the set temperature, Rapid heat up switches off. The symbol goes out. Put your food in the oven.
Cancelling rapid heat up
Press the clock function button repeatedly until Ωn appears on the clock display. Turn the rotary selector anti-clockwise until ΩFF appears on the clock display. The symbol on the clock display goes out.
Notes
■ If you change an operating mode, rapid heat up is cancelled.
Once a cooking time has been set, it will start counting down immediately after the oven is started, regardless of the rapid heat up function.
The microwave
Microwaves are converted to heat in foodstuffs. The microwave can be used solo, i.e. on its own, or in combination with a different type of heating.
In this section, you will find
■ information about ovenware
■ how to set the microwave
Note: In the Tested for you in our cooking studio section, you will find examples for defrosting, heating and cooking with the microwave oven.
Notes regarding ovenware
Suitable ovenware
Suitable dishes are heat-resistant ovenware made of glass, glass ceramic, porcelain, ceramic or heat-resistant plastic. These materials allow microwaves to pass through.
You can also use serving dishes. This saves you having to transfer food from one dish to another. You should only use ovenware with decorative gold or silver trim if the manufacturer guarantees that they are suitable for use in microwaves.
Unsuitable ovenware
Metal ovenware is unsuitable. Metal does not allow microwaves to pass through. Food in covered metal containers will remain cold.
Caution!
Creation of sparks: metal – e.g. a spoon in a glass – must be kept at least 2 cm from the oven walls and the inside of the door. Sparks could destroy the glass on the inside of the door.
Ovenware test
Do not switch on the microwave unless there is food inside. The following ovenware test is the only exception to this rule.
Perform the following test if you are unsure whether your ovenware is suitable for use in the microwave:
-
Heat the empty ovenware at maximum power for 12 to 1 minute.
-
Check the temperature occasionally during that time.
The ovenware should still be cold or warm to the touch.
The ovenware is unsuitable if it becomes hot or sparks are generated.
Microwave power settings
Use the button to set the desired microwave power.
| 90 W for defrosting delicate foods |
| 180 W for defrosting and continued cooking |
| 360 W for cooking meat and heating delicate foods |
| 600 W for heating and cooking food |
| 1000 W for heating liquids |
Notes
■ When you press a button, the selected power lights up.
The microwave power can be set to 1000 watts for a maximum of 30 minutes. With all other power settings a maximum cooking time of 1 hour 30 minutes is possible.
Setting the microwave
Example: microwave power 600 W, cooking time 10 minutes.
- Press the operating mode selector. The appliance is ready for operation.
- Press the button for the microwave power setting you require. The selected power setting lights up and a suggested cooking time is displayed.
- Set the cooking time using the rotary selector.
- Press the Start button.
The operation starts. The cooking time starts counting down.
The cooking time has elapsed
A signal sounds. Microwave operation has finished. You can stop the audible signal by pressing the ▶ button. Switch off or reset the appliance.
Opening the appliance door during operation
Operation is suspended. The cooling fan may continue to run. After closing the door, press the 📄 button. Operation will then continue.
Changing the cooking time
Change the cooking time using the rotary selector.
Changing the microwave power setting
Press the button for the new microwave power setting. Use the rotary selector to set the cooking time and restart.
Cancelling operation
Press the illuminated button for the set microwave power setting. Make new settings or switch off the appliance.
Note: If you open the appliance door during cooking, the fan may continue running.
Microwave combi operation
This involves the simultaneous operation of another operating mode with the microwave. Using the microwave makes your meals ready more quickly, but they are still nicely browned.
In this section, you will read about
■ which operating modes are suitable
■ how to set the microwave combi mode
■ Suitable types of heating
Suitable types of heating
Hot air
Hot air grilling
■ Circulated air grilling
Note: Rapid heat up cannot be switched on in microwave combination mode.
Suitable microwave power settings
All microwave power settings, except for 1000 watts, can be combined with an operating mode.
Setting Microwave Combi operation
Example:
Microwave 360 W, 17 minutes and circulated air grilling 2 180 °C.
- Set the operating mode using the operating mode selector and the temperature using the temperature selector.
-
Press the button for the microwave power setting you require. A suggested cooking time appears.
-
Set the cooking time using the rotary selector.
- Press the Start button.
The operation starts. The cooking time starts counting down.
The cooking time has elapsed.
A signal sounds. Combination mode has finished. You can use the ↔ button to cancel the signal before the time has elapsed and switch the appliance off or make new settings using the operating mode selector.
Opening the appliance door during operation
Operation is suspended. The cooling fan may continue to run. After closing the door, press the button. Operation will then continue.
Changing the temperature or cooking time
Use the temperature selector or rotary selector to change the cooking time or temperature.
Changing the microwave power setting
Press the button for the new microwave power setting. Use the rotary selector to set the cooking time and restart.
Cancelling operation
Press the illuminated button for the set microwave power setting. Make new settings or switch off the appliance.
Note: If you open the appliance door during cooking, the fan may continue running.
Pausing operation
Open the appliance door or briefly press the Stop button. Microwave operation is interrupted. Press the Start button again once you have closed the door. Operation will then continue.
1, 2, 3 series of operations
You can use the series of operations function to set up to three different consecutive settings and then start.
In this section, you can find out how to set a series of operations.
Can be used with:
■ all microwave power settings
Ovenware
Always use microwave-safe, heat-resistant ovenware.
Setting a series of operations
The operating mode selector must not be pushed in.
- Press the 123 button.
The ☐ for the first operation in the series lights up. - Set the first microwave power setting and cooking time.
-
Press the 123 button again.
The for the second operation in the series lights up. -
Set the second microwave power setting and cooking time.
-
Press the 123 button again.
The 3 lights up for the third operation in the series.
-
Set the third microwave power setting and cooking time.
-
Press the Start button.
The operation starts. In the clock display, the total cooking time is displayed and the currently activated operation is lit.
The cooking time has elapsed
A signal sounds. The series of operations is finished. To stop the signal, press the button. Switch off or reset the appliance.
Opening the appliance door during operation
Operation is suspended. The cooling fan may continue to run. After closing the door, press the ☐ button. Operation will then continue.
Changing the setting
Changes can only be made before operation begins. Press the button to go to the desired setting, and make the changes.
Cancelling operation
Press the illuminated button for the set microwave power setting. Make new settings or switch off the appliance.
Pausing operation
Press the ☐ button briefly. Microwave operation is interrupted. Press the ☐ button to continue the operation.
Note: You can also combine an operating mode with the Series of operations function. First, set the series of operations.
Electronic clock
Your appliance has various clock functions.
In this section, the following are explained:
■ The clock display
■ how to set the timer
■ how your appliance is automatically switched off (cooking time)
■ how to set or change the clock.
Clock display

Clock function button Rotary selector
Clock function Use
Timer You can use the timer as an egg timer or a kitchen timer. The appliance does not switch on or off automatically
Clock function Use
I→ICooking time The appliance switches off automatically after a set cooking time I→I (e.g. 1:30 hours)
Clock Setting the clock
Rapid heat up Shortens the preheat time
Notes
■ Between the times 22:00 and 5:59 the clock display is dimmed if you do not make any settings in that period or no clock function is activated.
■ When the Timer △ and Cooking time I→I clock functions are in use, a signal sounds after the settings have elapsed and the corresponding symbol flashes. To stop the audible signal early, press the clock function button.
- You can check your settings at any time. Press the clock function button repeatedly until the corresponding symbol lights up.
If you wish to cancel a setting, turn the set time back to 0:00 and switch the appliance off.
■ The setting can be corrected using the rotary selector if necessary.
Switching the clock display on and off
- Press and hold the clock function button◀▶ for a few seconds. The clock display is switched off. If a clock function is active, the associated symbol remains illuminated.
- Press and hold the clock function button◀ for a few seconds.
The clock display switches on.
Timer
- Press the ◀clock function button repeatedly until the ◀ and △ symbols light up.
- Set the duration using the rotary selector (e.g. 5:00 minutes). The setting is applied automatically. Then the clock is displayed again and the minute minder starts counting down.

Cooking time
Automatic switch-off after a cooking time setting has elapsed.
-
Set the operating mode and temperature.
-
Press the clock function button repeatedly until the ◀ and |→| (cooking time) symbols light up.
- Set the cooking time using the rotary selector (e.g. 1:30 hours).
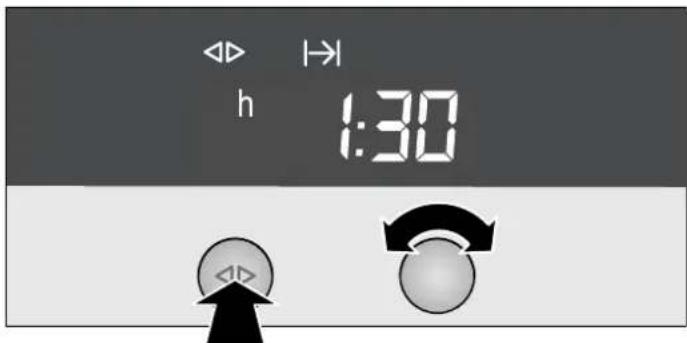
- Press the Start button.
The appliance heats up.
Once the cooking time has elapsed, the appliance switches off automatically.
Setting the clock
You can only change the clock when no other clock function is active.
- Press the clock function ◀ button repeatedly until the ◀ and ⏰ symbols light up.
- Turn the rotary selector to set the time of day.

- Press the ◀▶ clock function button.
Your setting is applied.
Changing the clock
e.g. from British Summer Time to Greenwich Mean Time. Make the settings as described in steps 1 and 2.
Checking, correcting or deleting settings
- To check your settings, press the ◀ clock function button repeatedly until the corresponding symbol lights up.
- If necessary, you can correct your setting using the rotary selector.
- If you wish to cancel your setting, turn the rotary selector anti-clockwise to the original value.
Childproof lock
The appliance has a childproof lock to prevent children switching it on accidentally.
In this section, you can read about
■ how to lock your appliance
■ how to unlock your appliance
Locking the appliance
Press the operating mode selector. Your appliance is ready for operation.
- Press and hold the i button.
c 11 appears in the clock display.
- Turn the temperature selector clockwise.
c 12 appears in the clock display.
- Press and hold the i button until the ≈ symbol lights up.
Unlocking the appliance
Press the operating mode selector. Your appliance is ready for operation.
- Press and hold the i button.
c 12 appears in the clock display.
-
Turn the temperature selector until c // appears.
-
Press and hold the i button. The ⇔ symbol goes out.
Changing the basic settings
Your appliance has various basic settings which you can change at any time.
Basic settings
In the table, you will find all the basic settings and options for changing them.
Basic setting Options Explanation
| c1 | Childproof lock 1 = off | Childproof lock: 2 = on | automatically activates the childproof lock |
| c2 | Audible signal duration: 2 = medium = 2 minutes | Audible signal duration: 1 = short = 10 seconds 3 = long = 5 minutes | Signal after the cooking time has elapsed |
| c3 | Audible signal volume: 2 = medium | Audible signal volume 1 = low 3 = high | Audible signal volume |
| c4 | Button tone: 1 = on | Button tone: 2 = off | Confirmation tone when a button is pressed |
Press the operating mode selector. Your appliance is ready for operation.
-
Press and hold the i button for several seconds. The first basic setting appears on the clock display.
-
Press the i button repeatedly until the required basic setting is shown.
-
Use the temperature selector to make the desired setting.
-
When finished, press and hold the i button for several seconds.
All settings are applied.
You can change the settings at any time.
Care and cleaning
With careful care and cleaning your microwave oven will retain its looks and remain good order. We will explain here how you should care for and clean your appliance correctly.
⚠️ Risk of short circuit!
Never use high-pressure cleaners or steam cleaners to clean the oven.
Risk of burns!
Never clean the appliance immediately after switching off. Let the appliance cool down.
Notes
■ Slight differences in colour on the front of the appliance are caused by the use of different materials, such as glass, plastic and metal.
■ Shadows on the door panel which look like streaks, are caused by reflections made by the oven light.
■ Enamel is baked on at very high temperatures. This can cause some slight colour variations. This is normal and does not affect their function. The edges of thin trays cannot be
completely enamelled. As a result, these edges can be rough. This will not impair the anti-corrosion protection.
■ Unpleasant odours, e.g. after fish has been prepared, can be removed very easily. Add a few drops of lemon juice to a cup of water. Place a spoon into the container as well, to prevent delayed boiling. Heat the water for 1 to 2 minutes at maximum microwave power.
Cleaning agents
To ensure that the different surfaces are not damaged by using the wrong cleaning agent, observe the information in the table. Do not use:
■ any caustic or abrasive cleaning agents,
■ metal or glass scrapers to clean the glass in the appliance door,
■ metal or glass scrapers to clean the door seal,
■ hard scouring pads and sponges,
■ cleaning agents with high concentrations of alcohol.
Rinse out new sponge cloths thoroughly before use.
For easier cleaning, you can switch on the oven light. Open the appliance door to do so.
| Area Cleaning agents | |
| Appliance front Hot soapy water:Clean using a dish cloth and then dry with a soft cloth. Do not use glass cleaners or metal or glass scrapers for cleaning. | |
| Stainless steel Hot soapy water:Clean using a dish cloth and then dry with a soft cloth. Remove traces of limescale, grease, starch and albumin (e.g. egg white) immediately. Corrosion can form under such residues. Special stainless steel cleaning agents can be obtained from the after-sales service or from specialist retailers. | |
| Cooking compartment made of stainless steel | Hot soapy water or a vinegar solution: Clean using a dish cloth and then dry with a soft cloth.If the oven is very dirty: use oven cleaner, but only when cooking compartment is cold. It is best to use a stainless-steel sponge. Do not use oven spray or other aggressive oven cleaners or abrasive materials. Scouring pads, rough sponges and pan cleaners are also unsuitable. These agents scratch the surface. Allow the interior surfaces to dry thoroughly. |
| Door panels Glass cleaner:Clean with a dish cloth. Do not use a glass scraper. | |
| Glass cover for the cooking compartment light | Hot soapy water: Clean with a dish cloth. |
| Door sealDo not remove. | Hot soapy water: Clean with a dish cloth; do not scrub. Do not use a metal or glass scraper for cleaning. |
| Area Cleaning agents |
| Accessories Hot soapy water:Soak and clean with a dish cloth or a brush. |
Cleaning the glass cover
The glass oven-light cover is located on the left side wall inside the oven. Undo the screw from the cover. Then you can clean the glass with soapy water.
Self-cleaning surface in the cooking compartment
The back panel of the oven is coated with self-cleaning enamel. It cleans itself while the oven is in operation. Sometimes, larger splashes of food may not disappear until the oven has been operated several times.
Notes
■ Never treat the self-cleaning surface with oven cleaner. If oven cleaner accidentally gets onto the rear wall, remove it immediately with a sponge and plenty of water.
■ Never use abrasive cleaning agents. You will scratch or destroy the highly porous coating.
■ Never clean the self-cleaning surface with a scouring pad.
■ Light discolouration of the enamel does not affect self-cleaning.
Cleaning the cooking compartment floor, ceiling and side walls
Use a dish cloth and hot soapy water or a vinegar solution.
It is best to use oven cleaner if there are very heavy deposits of dirt. Only use oven cleaner in a cold oven.
Malfunction table
Malfunctions often have simple explanations. Please refer to the malfunction table before calling the after-sales service.
If a meal does not turn out exactly as you wanted, refer to the Tested for you in our cooking studio section, where you will find plenty of cooking tips and tricks.
⚠️ Risk of electric shock!
Incorrect repairs are dangerous. Repairs may only be carried out by one of our trained after-sales engineers.
Malfunction table
| Problem Possible cause Remedy/information | |
| The appliance does not work Faulty circuit breaker Look in the fuse box to make sure that the circuit breaker for the appliance is OK. | |
| Plug not plugged in Plug the plug in | |
| Power cut Check whether the kitchen light is working. | |
| Incorrect operation Switch off the circuit breaker in the fuse box.Reconnect it after approx. 10 seconds. | |
| Three zeros are flashing in the dis-play. | Power cut Reset the clock. |
The appliance is not in operation. A cooking time appears in the display. The button was not pressed after the set-Press the button or switch the appliance off. ting had been made.
Problem Possible cause Remedy/information
| The microwave does not switch on. The door was not fully closed. Check whether food remains or foreign material is trapped in the door. Make sure that the sealing surfaces are clean. Check whether the door seal is twisted. | |
| The button has not been pressed. Press the button. | |
| It takes longer than before for the food to heat up. | The microwave power setting is too low. Select a higher power setting. |
| A larger amount than usual has been placed in the appliance. Double the amount = almost double the time | |
| The food was colder than usual. Stir or turn the food during cooking | |
| A signal sounds. The two dots in the display are flashing. | The appliance is in demo mode. 1. Press the button.2. Press and hold the button for three seconds.Demo mode is deactivated. |
Error messages
You can take remedial action yourself for some error messages.
Error message Possible cause Remedy/Note
| Error message "Er1" or "Er4" appears in the display. | The temperature sensor has failed. Call the after-sales service. | |
| Error message "Er11" appears in the display. "Button jammed" | The buttons are dirty or the mechanics have jammed. | Press all buttons several times and, if this does not help, contact the after-sales service. |
| Error message "Er19" appears in the display. | There is extreme overheating (possibly a fire inside). Microwave power setting too high. | Do not open the door. Disconnect from the mains or switch off the fuse in the fuse box and allow to cool down. |
Error message "Er17", "Er18" or "E305" appears in the text display. Technical malfunction. Call the after-sales service.
Replacing the cooking compartment bulb
You can replace the cooking compartment bulb. Heat-resistant 25 watt, 240 V halogen bulbs can be obtained from the after-sales service or from a specialist retailer.

Risk of electric shock!
Never replace the oven light when the appliance is switched on. Pull out the mains plug or switch off the appliance at the circuit breaker in the fuse box.
Note: Always remove the new halogen bulb from the packaging using a dry cloth. This increases the service life of the bulb.
Method
Note: You must remove the whole appliance in order to replace the cooking compartment light. Follow the installation instructions.
- Unplug the appliance from the mains or switch off the circuit breaker in the fuse box.
- Open the appliance door. Undo the securing screws on the right and left-hand side of the oven. Follow the installation instructions.
- Carefully lift out the appliance.
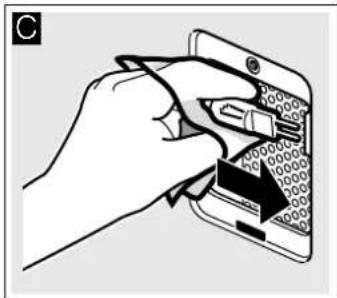
- Undo the screw from the light cover on the outer left-hand side wall and remove the cover. (Fig. A) Pull out the halogen light. (Fig. B).

natural_image
Technical line drawing showing a door opening and a cabinet with an open lid (no text or symbols)
natural_image
Diagram of a smartphone showing the left side with a magnified view of its screen and battery cover, no text or symbols present.
natural_image
Illustration of a smartphone with a key inserted into the screen, showing no text or symbols on the device itself.- Insert the new halogen bulb (Fig. C)
natural_image
Illustration of a hand inserting a card into a smartphone (no text or symbols visible)- Screw the lamp cover in place.
Reassemble the appliance in the reverse order. - Switch the circuit breaker in the fuse box back on or plug in the mains plug.
After-sales service
Our after-sales service is there for you if your appliance needs to be repaired. We will always find the right solution in order to avoid unnecessary visits from a service technician.
E number and FD number
When calling us, please give the product number (E no.) and the production number (FD no.) so that we can provide you with the correct advice. The rating plate bearing these numbers can be found in the oven. You can make a note of the number of your appliance and the telephone number of the after-sales service in the space below to save time should it be required.
E no.
FD no.
After-sales service
Please note that there will be a fee for a visit by a service technician in the event of a malfunction, even during the warranty period.
Please find the contact data of all countries in the enclosed customer service list.
To book an engineer visit and product advice
GB 0844 8928989
Calls from a BT landline will be charged at up to 3 pence per minute. A call set-up fee of up to 6 pence may apply.
IE 01450 2655
0.03 € per minute at peak. Off peak 0.0088 € per minute.
Trust the expertise of the manufacturer, and rest assured that the repair will be carried out by trained service technicians using original spare parts for your domestic appliance.
Replacing the glass cover
If the glass cover in the oven is damaged, it must be replaced. You can obtain covers from the after-sales service. Please supply your appliance's E number and FD number.
This appliance corresponds to the standards EN 55011 and CISPR 11. It is a Group 2, Class B product.
Group 2 means that microwaves are produced for the purpose of heating food. Class B states that the appliance is suitable for private households.
Technical data
| Power supply 220 - 240 V, 50 Hz |
| Maximum total connected load 3100 W |
| Microwave power setting 1000 W (IEC 60705) |
| Grill output power 2000 W |
| Hot air output power 1950 W |
| Microwave frequency 2450 MHz |
| Fuse 15 A |
Dimensions (HxWxD)
| - appliance 454 x 595 x 563 mm |
| - cooking compartment 236 x 445 x 348 mm |
VDE approved yes
| CE mark | yes |
Automatic programmes
The automatic programmes enable you to prepare food very easily. You select the programme and enter the weight of your food. The automatic programme makes the optimum setting. You can choose from 15 programmes.
Setting a programme
Once you have selected a programme, make settings as follows.
Requirement: the operating mode selector must not be pushed in.
Example in diagram:
Programme 2 with a weight of 1 kilogramme.
- Press the Pkg button.
The first programme number appears on the temperature display.

- Select the desired programme using the temperature selector.

- Press the Pkg button again.
The temperature display suggests a weight.
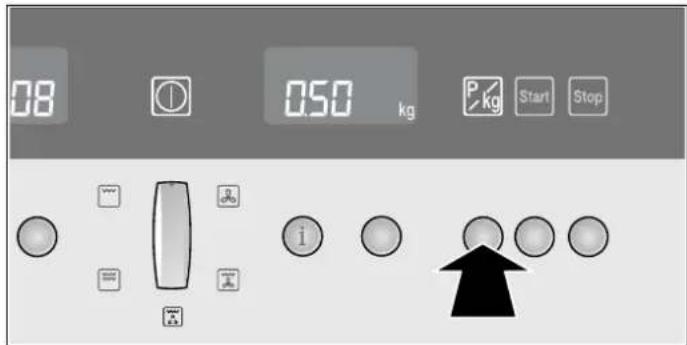
- Set the weight using the temperature selector.

- Press the Start button.
The programme starts. The cooking time → 1 starts counting down on the clock display.
The programme has finished
A signal sounds. The appliance stops heating. The display shows 0:00. Switch the appliance off or make new settings.
Changing the programme
Once you have started the programme, the programme number and weight cannot be changed.
Changing the cooking time
With automatic programmes, you cannot change the cooking time.
Cancelling the programme
Press and hold the ☐ button and switch off the operating mode selector.
Defrosting and cooking with the automatic programmes
Notes
Take the food out of its packaging and weigh it. If it is not possible to enter the exact weight, you should round it up or down.
■ Always use microwaveable ovenware, e.g. made of glass, ceramic or the universal pan. Observe the accessories tips in the programme table.
■ Place the food in the cold cooking compartment.
A table of suitable types of food with appropriate weight ranges and the accessories required can be found in the section after the tips.
■ It is not possible to set a weight outside the weight range.
■ With many dishes, a signal sounds after a certain time. Turn or stir the food.
Defrosting
Notes
As far as possible, freeze and store food flat and in portion-sized quantities at -18 °C.
■ Place the frozen food on a flat ovenproof dish, e. g. a glass or porcelain plate.
■ After defrosting, allow the food to defrost for a further 15 to 90 minutes until it reaches an even temperature.
- Liquid will be produced when defrosting meat, poultry or fish. Drain off this liquid when turning meat and poultry and under no circumstances use it for other purposes or allow it to come into contact with other foods.
- Bread should only be defrosted in the required amounts, as it quickly becomes stale.
■ After turning, remove any minced meat that has already defrosted.
■ Whole poultry should be placed in the dish breast-side down and poultry portions skin-side down.
Vegetables
Notes
■ Fresh vegetables: Cut into pieces of equal size. Add one tablespoon of water for every 100 g vegetables.
■ Frozen vegetables: This programme is only suitable for blanched, not pre-cooked vegetables. It is not suitable for frozen vegetables in cream sauce. Add 1 to 3 tablespoons of water. Do not add water to spinach or red cabbage.
Boiled potatoes
Note: Cut into equal sized pieces. Add a little salt and a tablespoon of water for every 100 g of potatoes.
Rice
Notes
■ Do not use boil-in-the-bag rice.
■ Add two to two and a half times the amount of water to the rice.
Fish
Note: Fish fillet, fresh: Add 1 to 3 tablespoons of water or lemon juice.
Meat
Note: The joint should cover two thirds of the dish base. Add 50 to 100 ml of liquid.
Poultry
Notes
■ Place the chicken in the dish breast-side down.
■ Place chicken portions in the dish flesh-side down.
Pizza, frozen
Note: Use prebaked, frozen pizza and pizza baguettes.
Resting times
Some dishes need to rest in the oven after the programme has ended.
Dish Resting time
| Vegetables approx. 5 minutes |
| Boiled potatoes approx. 5 minutes. First pour off the remaining water. |
Rice 5 to 10 minutes
| Joint of pork, meat loaf 10 minutes |
Programme table
| Progr. no. Suitable food Weight range in | kg | Ovenware/accessories, shelf height | ||
| Defrost | ||||
| 1 | Loaf of bread* Wheat bread, mixed wheat bread, wholemeal bread | 0.20 - 1.50 Flat ovenware without a lidCooking compartment floor | ||
| 2 | Minced meat* Minced beef, lamb, or pork 0.20 - 1.00 Flat ovenware without a lidCooking compartment floor | |||
| 3 | Whole poultry* Chicken, duck | 0.60 - 2.00 Flat ovenware without a lidCooking compartment floor | ||
| 4 | Fish fillet* | Fillet of pike, cod, rosefish, pollock, pike-perch | 0.20 - 1.00 Flat ovenware without a lidCooking compartment floor | |
| * Observe the turning signals. | ||||
| Cooking | ||||
| 5 | Fresh vegetables* | Cauliflower, broccoli, carrots, kohl-rabi, leeks, peppers, courgettes | 0.20 - 1.00 Ovenware with lidCooking compartment floor | |
| 6 | Vegetables, frozen* | Cauliflower, broccoli, carrots, kohl-rabi, red cabbage, spinach | 0.20 - 1.00 Ovenware with lidCooking compartment floor | |
| 7 | Boiled potatoes* | Waxy potatoes, mainly waxy pota-toes or floury potatoes | 0.20 - 1.00 Ovenware with lidCooking compartment floor | |
| 8 | Rice, long grain rice | 0.10 - 0.50 Deep ovenware with lidCooking compartment floor | ||
| 9 | Steam fresh fish fillet | Fillet of pike, cod, rosefish, pollock, pike-perch | 0.20 - 1.00 Ovenware with lidCooking compartment floor | |
| * Observe the stirring signals | ||||
| Combi-cooking | ||||
| 10 | Pizza, frozen | Pizza with thin base, prebaked | 0.15 - 0.55 | Wire rackLevel 3 |
| 11 | Lasagne bolognese, fro-zen | 0.40 - 1.00 Ovenware without lidCooking compartment floor | ||
| 12 | Chicken, fresh* | Whole chicken | 0.80 - 1.80 Ovenware with lidCooking compartment floor | |
| 13 | Chicken portions, fresh | Chicken thigh, half chicken | 0.40 - 1.60 | Ovenware with lidCooking compartment floor |
| 14 | Meat loaf | Approx. 8 cm deep | 0.80 - 1.50 Ovenware without lidCooking compartment floor | |
| 15 | Roast pork joint* | Boned neck joint, rolled roasting joint | 0.80 - 2.00 Ovenware with lidCooking compartment floor | |
* Observe the turning signals.
Tested for you in our cooking studio.
Here you will find a selection of recipes and the ideal settings for them. We will show you which type of heating and which temperature or microwave power setting is best for your meal. You can find information about suitable accessories and the height at which they should be inserted. There are also tips about ovenware and preparation methods.
Notes
The values in the table always apply to food placed into the cooking compartment when it is cold and empty. Only preheat the appliance if the table specifies that you should do
so. Before using the appliance, remove all accessories from the cooking compartment that you will not be using.
- Do not line the accessories with greaseproof paper until after they have been preheated.
■ The times specified in the tables are only guidelines. They will depend on the quality and composition of the food.
■ Use the accessories supplied. Additional accessories may be obtained from specialist retailers or from the after-sales service.
■ Always use an oven cloth or oven gloves when taking accessories or ovenware out of the cooking compartment.
Risk of scalding!
When pulling out the enamel baking tray, hot liquid may overflow. Pull out the enamel baking tray carefully from the cooking compartment.
Defrosting, heating up and cooking with the microwave
The following tables provide you with numerous options and settings for the microwave.
The times specified in the tables are only guidelines. They may vary according to the ovenware used, the quality, temperature and consistency of the food.
Time ranges are often specified in the tables. Set the shortest time first and then extend the time if necessary.
It may be that you have different quantities from those specified in the tables. A rule of thumb can be applied: Double the amount - almost twice the cooking time, Half the amount - half the cooking time.
Stir or turn the food several times during the heating time. Check the temperature.
Defrosting
Notes
- Place the frozen food in an open container on the oven floor.
Delicate parts such as the legs and wings of chicken or fatty outer layers of roasts can be covered with small pieces of aluminium foil. The foil must not touch the cooking compartment walls. You can remove the foil half way through the defrosting time.
■ Turn or stir the food once or twice during the defrosting time. Large pieces of food should be turned several times. Turn to remove any liquid that results from defrosting.
Leave defrosted items to stand at room temperature for a further 10 to 60 minutes so that the temperature can stabilise. The giblets can be removed from poultry at this point.
| Defrosting Weight Microwave power setting in watts, cooking time in minutes | Notes | |
| Whole pieces of beef, veal or pork (on the bone or boned) | 800 g 180 W, 15 mins + 90 W, 15-25 mins Turn several times | |
| 1 kg 180 W, 15 mins + 90 W, 25-35 mins | ||
| 1.5 kg 180 W, 20 mins + 90 W, 25-35 mins | ||
| Meat in pieces or slices of beef, veal or pork | 200 g 180 W, 5 mins + 90 W, 4-6 mins Separate any defrosted parts when turning | |
| 500 g 180 W, 10 mins + 90 W, 5-10 mins | ||
| 800 g 180 W, 10 mins + 90 W, 10-15 mins | ||
| Minced meat, mixed 200 g 90 W, 15 mins Freeze food flat if possible. Turn sev- | eral times during defrosting and remove any minced meat that has already defrosted. | |
| 500 g 180 W, 5 mins + 90 W, 10-15 mins | ||
| 800 g 180 W, 10 mins + 90 W, 15-20 mins | ||
| Poultry or poultry portions 600 g 180 W, 5 mins + 90 W, 10-15 mins Turn during cooking. | ||
| Duck 2 kg 180 W, 20 mins + 90 W, 30-40 mins Turn several times. | ||
| Goose | 4.5 kg 180 W, 30 mins + 90 W, 60-80 mins Turn every 20 minutes. Remove any liquid that results from defrosting. | |
| Fish fillet, fish steak or slices 400 g | 180 W, 5 mins + 90 W, 10-15 mins Separate any defrosted parts. | |
| Whole fish | 300 g 180 W, 3 mins + 90 W, 10-15 mins Turn during cooking. | |
| 600 g 180 W, 8 mins + 90 W, 15-25 mins | ||
| Vegetables, e.g. peas | 300 g 180 W, 10-15 mins | Stir carefully during defrosting. |
| 600 g 180 W, 10 mins + 90 W, 8-13 mins | ||
| Fruit, e.g. raspberries | 300 g 180 W, 7-10 mins | Stir carefully during defrosting and separate any defrosted parts. |
| 500 g 180 W, 8 mins + 90 W, 5-10 mins | ||
| Butter, defrosting | 125 g 90 W, 6-8 mins | Remove all packaging. |
| 250 g 180 W, 2 mins + 90 W, 3-5 mins | ||
| Loaf of bread | 500 g 180 W, 3 mins + 90 W, 10-15 mins Turn during cooking. | |
| 1 kg 180 W, 5 mins + 90 W, 15-25 mins | ||
| Cakes, dry, e.g. sponge cake | 500 g 90 W, 10-15 mins | Only for cakes without icing, cream or crème pâtissière, separate the pieces of cake. |
| 750 g 180 W, 3 mins + 90 W, 10-15 mins | ||
| Cakes, moist, e.g. fruit flan, cheese-cake | 500 g 180 W, 5 mins + 90 W, 15-20 mins Only for cakes without icing, cream or gelatine | |
| 750 g 180 W, 7 mins + 90 W, 15-20 mins | ||
Defrosting, heating up or cooking frozen food
Notes
■ Take ready meals out of the packaging. They will heat up more quickly and evenly in microwaveable ovenware. The
different components of the meal may not require the same amount of time to heat up.
■ Food which lies flat will cook more quickly than food which is piled high. You should therefore distribute the food so that it
is as flat as possible in the ovenware. Different foodstuffs should not be placed in layers on top of one another.
■ Always cover the food. If you do not have a suitable cover for your ovenware, use a plate or special microwave foil.
■ Stir or turn the food 2 or 3 times during cooking.
■ After heating, allow the food to stand for a further 2 to 5 minutes so that it can achieve an even temperature.
■ Always use an oven cloth or oven gloves when removing plates from the oven.
This will help the food retain its own distinct taste, so it will require less seasoning.
| Defrosting, heating up or cooking frozen food | Weight Microwave power setting in watts, cooking time in minutes | Notes |
| Menu, plated meal, ready meal (2-3 components) | 300-400 g 600 W, 11-15 mins Covered | |
| Soup 400-500 g 600 W, 8-13 mins Ovenware with lid | ||
| Stews 500 g 600 W, 10-15 mins Ovenware with lid | ||
| 1 kg 600 W, 20-25 mins | ||
| Slices or pieces of meat in sauce, e.g. goulash | 500 g 600 W, 12-17 mins Ovenware with lid | |
| 1 kg 600 W, 25-30 mins | ||
| Fish, e.g. fillets 400 g 600 W, 10-15 mins Covered | ||
| 800 g 600 W, 20-25 mins | ||
| Side dishes, e.g. rice, pasta 250 g 600 W, 2-5 mins Ovenware with lid; add liquid | ||
| 500 g 600 W, 8-10 mins | ||
| Vegetables, e.g. peas, broccoli, carrots | 300 g 600 W, 8-10 mins Ovenware with lid, add 1 tbsp of water | |
| 600 g 600 W, 14-17 mins | ||
| Creamed spinach 450 g 600 W, 11-16 mins Cook without additional water | ||
Heating food
Risk of scalding!
There is a possibility of delayed boiling when a liquid is heated. This means that the liquid reaches boiling temperature without the usual steam bubbles rising to the surface. Even if the container only moves a little, the hot liquid can suddenly boil over and spatter. When heating liquids, always place a spoon in the container. This will prevent delayed boiling.


natural_image
Glass with a black X mark symbol crossed out, representing an orange glass (no text or symbols present)Caution!
Metal - e.g. a spoon in a glass - must be kept at least 2 cm from the oven walls and the inside of the door. Sparks could irreparably damage the glass on the inside of the door.
Notes
Take ready meals out of the packaging. They will heat up more quickly and evenly in microwaveable ovenware. The different components of the meal may not require the same amount of time to heat up.
■ Always cover the food. If you do not have a suitable cover for your container, use a plate or special microwave foil.
■ Stir or turn the food several times during the heating time. Check the temperature.
■ After heating, allow the food to stand for a further 2 to 5 minutes so that it can achieve an even temperature.
■ Always use an oven cloth or oven gloves when removing plates from the oven.
| Heating food Weight | Microwave power setting in watts, cooking time in minutes | Notes | |
| Menu, plated meal, ready meal (2-3 components) | 350-500 g | 600 W, 4-8 mins | Covered |
| Drinks | 150 ml | 1000 W, 1-2 mins | Place a spoon in the glass; do not overheat alcoholic drinks; check occasionally while heating |
| 300 ml | 1000 W, 2-3 mins | ||
| 500 ml | 1000 W, 4-5 mins | ||
| Baby food, e.g. baby bottle | 50 ml | 360 W, 12-1 mins | No teats or lids. Always shake well after heating. You must check the temperature |
| 100 ml | 360 W, 12-112 mins | ||
| 200 ml | 360 W, 1-2 mins | ||
| Soup 1 cup | 175 g each | 600 W, 2-3 mins | - |
| Soup, 2 cups 175 g | each | 600 W, 3-4 mins | - |
| Soup, 4 cups 175 g | each | 600 W, 6-8 mins | - |
| Meat or pieces of meat in sauce | 500 g | 600 W, 8-11 mins Covered | |
| Heating food Weight Microwave power setting in watts, cooking time in minutes | Notes |
| Stew 400 g 600 W, 6-8 mins Ovenware with lid | |
| 800 g 600 W, 8-11 mins | |
| Vegetables, 1 portion 150 g 600 W, 2-3 mins Add a little liquid | |
| Vegetables, 2 portions 300 g 600 W, 3-5 mins |
Cooking food
Notes
- Food which lies flat will cook more quickly than food which is piled high. You should therefore distribute the food so that it is as flat as possible in the ovenware. Different foodstuffs should not be placed in layers on top of one another.
- Cook the food in ovenware with a lid. If you do not have a suitable lid for your ovenware, use a plate or special microwave foil.
This will help the food retain its own distinct taste, so it will require less seasoning.
■ After cooking, allow the food to stand for a further 2 to 5 minutes so that it can achieve an even temperature.
■ Always use an oven cloth or oven gloves when removing plates from the oven.
| Cooking food Weight Microwave power setting in watts, cooking time in minutes | Notes | |
| Whole chicken, fresh, no giblets 1.2 kg 600 W, 25-30 mins Turn halfway through the cooking time | ||
| Fish fillet, fresh 400 g 600 W, 7-12 mins - | ||
| Vegetables, fresh 250 g 600 W, 6-10 mins Cut vegetables into pieces of equal size. | ||
| 500 g 600 W, 10-15 mins | Add 1 to 2 tbsp water per 100 g of vegetables. Stir during cooking | |
| Sweet foods, e.g. blancmange (instant) | 500 ml 600 W, 6-8 mins Stir the custard | pudding thoroughly 2 to 3 times during cooking using an egg whisk. |
| Fruit, compote | 500 g 600 W, 9-12 mins - | |
| Side dishes | ||
| e. g. potatoes | 250 g 600 W, 8-10 mins Cut the potatoes into pieces of equal size; | |
| 500 g 600 W, 12-15 mins | Add 1 to 2 tbsp water for every 100 g. Stir during cooking | |
| 750 g 600 W, 15-22 mins | ||
| e.g. rice | 125 g 600 W, 4-6 mins + 180 W, 12-15 mins | Add double the amount of liquid. |
| 250 g 600 W, 6-8 mins + 180 W, 15-18 mins | ||
Microwave tips
| You cannot find any information about the settings for the quantity of food you have prepared. | Increase or reduce the cooking times using the following rule of thumb:Double the amount = almost double the cooking timeHalf the amount = half the cooking time |
| The food has become too dry. | Next time, set a shorter cooking time or select a lower microwave power setting. Cover the food and add more liquid. |
| When the time has elapsed, the food is not defrosted, hot or cooked. | Set a longer time. Large quantities and food which is piled high require longer times. |
| When the time has elapsed, the food is overheated at the edge but not done in the middle. | Stir it during the cooking time and next time, select a lower microwave power setting and a longer cooking time. |
| After defrosting, the poultry or meat is defrosted on the outside but not defrosted in the middle. | Next time, select a lower microwave power setting. If you are defrosting a large quantity, turn it several times. |
Cakes and pastries
About the tables
Notes
■ The times given apply to food placed in a cold oven.
The temperature and baking time depend on the consistency and amount of the mixture. This is why temperature ranges are given in the tables. Begin with the lower temperature and, if necessary, use a higher setting the next time, since a lower temperature results in more even browning.
■ Additional information can be found in the Baking tips section following the tables.
■ Always place the cake tin in the centre of the wire rack.
Baking tins
Note: It is best to use dark-coloured metal baking tins.
| Cakes in tins Accessories Level Type of | heating | Temperature °C | Cooking time in minutes | ||
| Sponge cake, simple or sponge cake, del- icate (e.g. sand cake)* | Ring-shaped cake tin/ Vienna ring tin/cake tin | 1 | ∞ | 160-170 | 60-80 |
| 1 | ∞ | 150-160 | 60-70 | ||
| Sponge flan base with crust made from shortcrust pastry | Springform cake tin 1 | ∞ | 160-170 35-45 | ||
| Sponge flan base Flan tin 1 | ∞ | 160-170 35-45 | |||
| Sponge flan (hot water sponge cake) Springform cake tin 1 | ∞ | 170-180 45-50 | |||
| Cake with dry topping (sponge) Baking tray 2 | ∞ | 160-170 30-40 | |||
| Cake with moist topping e. g. yeast dough with apple crumble | Baking tray 2 | ∞ | 150-160 50-60 | ||
| Plaited loaf with 500 g flour Baking tray 2 | ∞ | 160-170 30-40 | |||
| Stollen with 500 g flour Baking tray 2 | ∞ | 170-180 60-70 | |||
| Pizza Baking tray 2 | ∞ | 200-210 25-35 | |||
| Yeast bread 1 kg** Baking tray 2 | ∞ | 180-190 50-60 | |||
* Allow cake to cool in the oven for approx. 20 minutes.
** Never pour water directly into a hot oven.
| Cake | Ovenware | Level | Microwave power in watts | Cooking time in minutes | Type of heating | Temperature in °C |
| Nut cake | Springform cake tin | 1 | 90 W | 30-35 | 170-180 | |
| Fruit tart or cheesecake with short-crust pastry* | Springform cake tin | 2 | 360 W | 40-50 | 150-160 | |
| Fruit pie, delicate with sponge | Ring cake tin or springform cake tin | 1 | 90 W | 30-45 | 170-190 | |
| Savoury cakes (e. g. quiche/onion tart) | Springform cake tin or quiche tin | 2 | 90 W | 50-70 | 160-180 |
* Allow cake to cool in the oven for approx. 20 minutes.
| Small baked items | Level Type of heating | Temperature in °C | Cooking time in minutes | ||
| Biscuits | Baking tray | 2 | 150-170 | 20-35 | |
| Meringue | Baking tray | 2 | 100 | 90-120 | |
| Macaroons | Baking tray | 2 | 110 | 35-45 | |
| Puff pastry | Baking tray | 2 | 170-180 | 35-45 | |
| Bread rolls (e.g. rye bread rolls) | Baking tray | 2 | 180-190 | 35-45 | |
Baking tips
| You want to bake according to your own recipe. | Use similar items in the baking tables as a guide. |
| Use baking tins made of silicone, glass, plastic or ceramic materials. | The baking tin must be heat-resistant up to 250 °C. Cakes in these baking tins will be less brown. When using the microwave, the cooking time will be shorter than the time shown in the table. |
| How to establish whether sponge cake is baked through. | Approximately 10 minutes before the end of the baking time specified in the recipe, poke the cake with a cocktail stick at its highest point. If the cocktail stick comes out clean, the cake is ready. |
| The cake collapses. | Use less liquid next time or set the oven temperature 10 degrees lower and extend the baking time. Observe the specified mixing times in the recipe. |
| The cake has risen in the middle but is lower around the edge. | Only grease the base of the springform cake tin. After baking, loosen the cake carefully with a knife. |
| The cake is too dark. | Select a lower temperature and bake the cake for a little longer. |
| The cake is too dry. | When it is done, make small holes in the cake using a toothpick. Then drizzle fruit juice or an alcoholic beverage over it. Next time, select a temperature 10 degrees higher and reduce the baking time. |
| The bread or cake (e.g. cheesecake) looks good, but is soggy on the inside (sticky, streaked with water). | Use slightly less fluid next time and bake for slightly longer at a lower temperature. When baking cakes with a moist topping, bake the base first, cover with almonds or bread crumbs and then add the topping. Please follow the recipe and follow the baking times. |
| The cake cannot be turned out of the dish when it is turned upside down. | After baking, allow the cake to cool for a further 5 to 10 minutes, then it will be easier to turn out of the tin. If it still sticks, carefully loosen the cake around the edges using a knife. Turn the cake tin upside down again and cover it several times with a cold, wet cloth. Next time, grease the tin well and sprinkle some bread crumbs into it. |
| You have measured the temperature of the oven using your own meat thermometer and found there is a discrepancy. | The oven temperature is measured by the manufacturer after a specified period of time using a test rack in the centre of the cooking compartment. Ovenware and accessories affect the temperature measurement, so there will always be some discrepancy when you measure the temperature yourself. |
| Sparks are generated between the tin and the wire rack. | Check that the tin is clean on the outside. Change the position of the tin in the cooking compartment. If this does not help, continue baking but without the microwave. The baking time will then be longer. |
Roasting and grilling
About the tables
The temperature and roasting time depend on the type and amount of food being cooked. This is why temperature ranges are given in the tables. Begin with the lower temperature and, if necessary, use a higher setting the next time,
For more information, see the section entitled Tips for grilling and roasting which follows the tables.
Ovenware
You may use any heat-resistant ovenware which is suitable for use in a microwave. Metal roasting dishes are not suitable for roasting with microwaves.
The ovenware can become very hot. Use oven gloves to take the ovenware out of the oven.
Place hot glass ovenware on a dry kitchen towel after they have been removed from the oven. The glass could crack if placed on a cold or wet surface.
Tips for roasting
Use a deep roasting dish for roasting meat and poultry.
Check that your ovenware fits in the cooking compartment. It should not be too big.
Meat:
Cover approx. two thirds of the ovenware base with liquid. Add a little more liquid for pot roasts. Turn pieces of meat halfway through the cooking time. When the roast is ready, turn off the oven and allow it to rest for an additional 10 minutes. This allows better distribution of the meat juices.
Poultry:
Turn the pieces of meat after 23 of the cooking time has elapsed.
Tips for grilling
Notes
■ Always keep the oven door closed when grilling and do not preheat.
As far as possible, the pieces of food you are grilling should be of equal thickness. Steaks should be at least 2 to 3 cm thick. This will allow them to brown evenly and remain succulent and juicy. Do not add salt to steaks until they have been grilled.
■ Use tongs to turn the pieces of food you are grilling. If you pierce the meat with a fork, the juices will run out and it will become dry.
Dark meat, e.g. beef, browns more quickly than lighter-coloured meat such as veal or pork. When grilling light-coloured meat or fish, these often only brown slightly on the surface, although they are cooked and juicy on the inside.
■ The grill element switches off and on again automatically. This is normal. The grill setting determines how frequently this will happen.
Tips for braising
Use ovenware with a lid for braising fish.
Add two to three tablespoons of liquid and a little lemon juice or vinegar into the ovenware.
Meat, poultry, fish
| Microwave power setting in W, cooking time in minutes | Level Type of heating | Temperature in °C, grill setting | Notes | |
| Pot-roasted beef approx. 1000 g | 180 W, 80-90 mins 0 | 英 | 160-170 Ovenware with lid, on the cooking compartment floor. | |
| Sirloin, medium rare approx. 1000 g | 180 W, 30-40 mins 0 | 英 | 180-200 Ovenware without lid. Turn halfway through the cooking time. When finished, leave to stand for 10 minutes. | |
| Pork without rind approx. 750 g, e.g. neck | 360 W, 35-45 mins 0 | 英 | 170-180 Ovenware without lid. When finished, leave to stand for 10 minutes. | |
| Pork with rind* approx. 1 kg, e. g. shoulder | 180 W, 80-90 mins 0 | 英 | 170-180 Ovenware without lid. When finished, leave to stand for 10 minutes. Do not turn. | |
| Pork loin approx. 500 to 600 g | 180 W, 35-40 mins 0 | 英 | 180-190 Ovenware without lid. When finished, leave to stand for 10 minutes. | |
| Meat loaf approx. 750 g | 360 W, 30-35 mins 0 | 英 | 200-210 Ovenware without lid, on the cooking compartment floor. When finished, leave to stand for 10 minutes. | |
| Chicken, whole approx. 1000 to 1200 g | 360 W, 30-40 mins 0 | 英 | 230-250 Ovenware with lid, on the cooking compartment floor. Place with the breast side up. Do not turn. | |
* Make cuts in the pork rind.
| Microwave power setting in W, cooking time in minutes | Level | Type of heating | Temperature in °C, grill setting | Notes | |
| Chicken portions, e.g. chicken quarters approx. 800 g | 360 W, 20-30 mins 0 | 230-250 Ovenware without lid. Place with the skin side up. Do not turn. | |||
| Duck 1500 to 1700 g | 180 W, 70-80 mins 0 | 220-240 Ovenware with lid, on the cooking compartment floor. Do not turn. | |||
| Duck breast approx. 500 g duck breast 2 pieces, 250 to 300 g each | 180 W, 15-20 mins 0 | 3 Ovenware without lid, on the cooking compartment floor. Place with the skin side up. Do not turn. | |||
| Goose breast, goose legs 700 to 900 g | 180 W, 30-40 mins 0 | 2 Deep ovenware without lid, on the cooking compartment floor. Do not turn. | |||
| Fish, scalloped approx. 500 g | 600 W, 10-15 mins 0 | 3 Ovenware without lid. Defrost frozen fish before cooking. | |||
* Make cuts in the pork rind.
| Quantity Weight Level Type of | heating | Grill setting | Cooking time in minutes | |
| Steaks2 to 3 cm thick | 2 to 3 pieces approx. 200 g each 1+3** | 3 | 1st side: approx.10-15 | |
| 3 | 2nd side: approx. 5-10 | |||
| Neck steaks2 to 3 cm thick | 2 to 3 pieces approx. 120 g each 1+3** | 2 | 1st side: approx. 15-20 | |
| 2 | 2nd side: approx. 10-15 | |||
| Grilled sausages 4 to 6 pieces approx. 150 g each 1+3** | 3 | 1st side: approx.10-15 | ||
| 3 | 2nd side: approx. 5-10 | |||
| Fish steak* 2 to 3 pieces approx. 150 g each 1+3** | 3 | 1st side: approx. 10-12 | ||
| 3 | 2nd side: approx. 8-12 | |||
| Fish, whole e. g. trout | 2 to 3 pieces approx. 300 g each 1+3** | 2 | 1st side: approx.10-15 | |
| 2 | 2nd side: approx. 10-15 | |||
| Toast 12 slices - 3 | 3 | 1st side: approx. 3-5 | ||
| 3 | 2nd side: approx. 2-3 | |||
| Toast 4 slices*** - 3 | - 1st side: approx. 5-6 | |||
| 2nd side: approx. 3-4 | ||||
| Toast with topping 2 to 4 slices**** - 1+3** | 3 | Depending on topping: 8-10 | ||
* Grease the wire rack first with oil.
** Slide the wire rack in at level 3 and the baking tray at level 1.
***Place the slices of bread next to each other in the centre of the wire rack.
****Toast the slices of bread in advance
Tips for roasting and grilling
| The table does not contain information for the weight of the joint. | For small roasts, select a higher temperature and a shorter cooking time. For larger roasts, select a lower temperature and a longer cooking time. |
| How to tell when the roast is ready. | Use a meat thermometer (available from specialist shops) or carry out a “spoon test”. Press down on the roast with a spoon. If it feels firm, it is ready. If the spoon can be pressed in, it needs to be cooked for a little longer. |
| The roast looks good but the juices are burnt. | Next time, use a smaller roasting dish or add more liquid. |
| The roast looks good but the juices are too clear and watery. | Next time, use a larger roasting dish and add less liquid. |
| The roast is not well-done enough. | Carve the roast. Prepare the gravy in the roasting dish and place the slices of roast meat in the gravy. Finish cooking the meat using the microwave only. |
Bakes, gratins
Notes
■ The table applies to dishes placed in a cold oven.
- Place the bake in microwaveable ovenware on the cooking compartment floor.
■ Use large flat ovenware for bakes and gratins. Food takes longer to cook in narrow, deep containers and browns more on top.
■ Bakes and gratins should be left to cook in the oven for a further 5 minutes after the oven has been switched off.
| Bakes, gratins Ovenware Level Type of | heating | Temperature in °C | Microwave power in W | Cooking time in minutes | ||
| Sweet bakes (e. g. quark soufflé with fruit) approx. 1.5 kg | Flat ovenproof dish 4 to 5 cm | 0 | 130-150 180 W | 25-35 | ||
| Savoury bakes made from cooked ingredients (e.g. pasta bake) approx.1 kg | Flat ovenproof dish 4 to 5 cm | 0 | 160-190 600 W | 20-30 | ||
| Savoury bakes made from raw ingredients (e. g. potato gratin) approx.1.1 kg | Flat ovenproof dish 0 | 170-180 600 W | 25-35 | |||
Frozen convenience products
Notes
- Please observe the instructions on the packaging.
■ The values in the table apply to dishes placed in a cold oven.
- Do not put chips, croquettes and rösti on top of each other
| Convenience products Accessories Level Type of | heating | Temperature in °C Cooking time in minutes | |||
| Strudel with fruit filling Baking tray | 2 | ☒ | 180-200 | 40-50 | |
| Chips | Baking tray | 2 | ☒ | 180-200 | 25-35 |
| Pizza | Wire rack | 2 | ☒ | 180-200 | 10-20 |
| Pizza baguettes | Wire rack | 2 | ☒ | 160-190 | 15-20 |
| Croquettes | Baking tray | 2 | ☒ | 180-200 | 25-35 |
| Rösti | Baking tray | 2 | ☒ | 180-200 | 25-35 |
Test dishes
The quality and function of microwave combination appliances are tested by testing institutes using the following dishes.
In accordance with EN 60705, IEC 60705 or DIN 44547 and EN 60350 (2009)
Microwave defrosting
| Dish | Microwave power in W Cooking time in minutes | Note |
| Meat | 180 W, 7+ 90 W, 8-12or programme 2, 500 g | Place a Pyrex dish with a diameter of 22 cm on the oven floor. |
Microwave cooking
| Dish | Microwave power in W Cooking time in minutes | Notes |
| Custard, 1,000 g | 600 W, 11-12 + 180 W, 15-20 | Place a Pyrex dish on the oven floor. |
| Sponge, 475 g | 600 W, 8-10 | Place a Pyrex dish with a diameter of 22 cm on the oven floor. |
| Meat loaf, 900 g | 600 W, 25-30 | Place a Pyrex dish on the oven floor. |
Combined microwave cooking
| Dish | Microwave power in W Cooking time in minutes | Type of heating | Temperature in °C, grill setting | Notes |
| Potato gratin | 360 W, 25-30 | 1 | Place a Pyrex dish with a diameter of 22 cm on the oven floor. | |
| Cake | 180 W, 20-25 | 190-200 | Place a Pyrex dish with the diameter of 22 cm on the wire rack, at level 1. | |
| Chicken | 360 W, 30-35 | 240 | Put the chicken breast-side down in deep ovenware without a lid and place on the cooking compartment floor. Turn halfway through the cooking time. |
Baking
In accordance with DIN 44547 and EN 60350 The values in the table apply to dishes placed in a cold oven.
| Accessories Level Type of | heating | Temperature in °C | Baking time in minutes | |
| Viennese whirls Baking tray 2 | ☒ | 160-170 30-35 | ||
| Small Cakes* Baking tray 2 | ☒ | 160-170 25-30 | ||
| Hot water sponge cake Springform cake tin on the wire rack 1 | ☒ | 170-180 45-50 | ||
| Yeast cakes on a baking tray Baking tray 2 | ☒ | 150-160 50-60 | ||
| Apple pie 20 cm diameter tinplate springform cake tin directly on the wire rack | 2 | ☒ | 170-190 80-100 | |
* Preheat the oven for 5 minutes.
Grilling
The values in the table apply to food placed in a cold oven.
| Dish Accessories Level | Grill, large area ☎ | Cooking time in minutes | ||
| Toast | Wire rack | 3 | 3 | 4-5 |
| Beefburgers, x 12* | Wire rack + Baking tray | 3 | 3 | 30-35 |
| 1 | ||||
* Turn after half of the cooking time.
Acrylamide in foodstuffs
Which foods are affected?
Acrylamide is mainly produced in grain and potato products that are heated to high temperatures, such as potato crisps,
chips, toast, bread rolls, bread, fine baked goods (biscuits, gingerbread, cookies).
| Tips for keeping acrylamide to a minimum when preparing food | |
| General | Keep cooking times to a minimum. Cook meals until they are golden brown, but not too dark. Large, thick pieces of food contain less acrylamide. |
| Baking biscuits | Max. 200 °C in Top/bottom heating or max. 180 °C in 3D hot air or hot air mode.Max. 190°C in Top/bottom heating or max. 170 °C in 3D hot air or hot air mode. Egg white and egg yolk reduce the formation of acrylamide. |
| Oven chips | Distribute thinly and evenly over the baking tray. Cook at least 400 g at once on a baking tray so that the chips do not dry out. |
Constructa Neff
Vertriebs-GmbH
Carl-Wery-Straße 34
D-81739 München

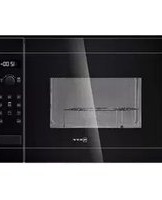
- en Table of contents
- ⚠️ Important safety information
- Risk of fire!
- Risk of explosion!
- Risk of serious damage to health!
- Risk of electric shock!
- Risk of burns!
- Risk of scalding!
- Risk of injury!
- Causes of damage
- Caution!
- Energy and environment tips
- Saving energy
- Environmentally-friendly disposal
- Your new appliance
- Microwave power settings and operating controls
- Retractable operating knob
- Operating mode selector
- Notes
- Accessories
- Wire rack
- Enamel baking tray
- Cooking compartment
- Cooling fan
- Switching the appliance on and off
- Switching on
- Switching off
- Before using the appliance for the first time
- Setting the clock
- Changing the clock
- Heating up the cooking compartment
- Cleaning the accessories
- Operating the appliance
- Setting the operating mode and temperature
- Switching off the oven
- Opening the appliance door during operation
- Pausing operation
- Changing the settings
- Cancelling operation
- Rapid heat up
- Suitable types of heating
- Setting rapid heating
- The rapid heat up process is complete
- Cancelling rapid heat up
- The microwave
- Notes regarding ovenware
- Suitable ovenware
- Unsuitable ovenware
- Ovenware test
- Microwave power settings
- Setting the microwave
- The cooking time has elapsed
- Changing the cooking time
- Changing the microwave power setting
- Microwave combi operation
- Suitable microwave power settings
- Setting Microwave Combi operation
- The cooking time has elapsed.
- Changing the temperature or cooking time
- 1, 2, 3 series of operations
- Can be used with:
- Ovenware
- Setting a series of operations
- Changing the setting
- Electronic clock
- Clock display
- Clock function Use
- Switching the clock display on and off
- Timer
- Cooking time
- Checking, correcting or deleting settings
- Childproof lock
- In this section, you can read about
- Locking the appliance
- Unlocking the appliance
- Changing the basic settings
- Basic settings
- Care and cleaning
- ⚠️ Risk of short circuit!
- Cleaning agents
- Cleaning the glass cover
- Self-cleaning surface in the cooking compartment
- Cleaning the cooking compartment floor, ceiling and side walls
- Malfunction table
- ⚠️ Risk of electric shock!
- Error messages
- Replacing the cooking compartment bulb
- Method
- After-sales service
- E number and FD number
- To book an engineer visit and product advice
- GB 0844 8928989
- IE 01450 2655
- Replacing the glass cover
- Automatic programmes
- Setting a programme
- The programme has finished
- Changing the programme
- Cancelling the programme
- Defrosting and cooking with the automatic programmes
- Defrosting
- Vegetables
- Boiled potatoes
- Rice
- Fish
- Meat
- Poultry
- Pizza, frozen
- Resting times
- Tested for you in our cooking studio.
- Defrosting, heating up and cooking with the microwave
- Defrosting, heating up or cooking frozen food
- Heating food
- Cooking food
- Cakes and pastries
- About the tables
- Baking tins
- Roasting and grilling
- Tips for roasting
- Meat:
- Tips for grilling
- Tips for braising
- Bakes, gratins
- Frozen convenience products
- Test dishes
- Baking
- Grilling
- Acrylamide in foodstuffs
- Which foods are affected?
Brand : NEFF
Model : C57M70N3GB
Category : Microwave