
Turbo-X - Drone AXIS - Free user manual and instructions
Find the device manual for free Turbo-X AXIS in PDF.


| Product Type | Quadcopter Drone |
| Dimensions (Folded) | 30 x 30 x 10 cm |
| Weight | 250 g |
| Power Supply | Rechargeable Li-Po 7.4V 1800mAh |
| Charging Time | 90 minutes |
| Flight Time | 20 minutes |
| Control Range | 500 m |
| Camera Resolution | 1080p HD |
| GPS Function | Yes |
| Motor Type | Brushless |
| Max Speed | 50 km/h |
| Remote Frequency | 2.4 GHz |
| Maintenance | Clean with soft cloth; avoid moisture. |
| Cleaning | Use compressed air for motors and vents. |
| Safety Warnings | Do not fly near airports; keep away from people. |
| Spare Parts Available | Propellers, batteries, camera modules. |
| Repairability | User-replaceable parts; modular design. |
| Ideal For | Beginners and hobbyists. |
| Country of Origin | China |
| Warranty | 1 year limited warranty. |
Frequently Asked Questions - Turbo-X AXIS
User questions about Turbo-X AXIS
0 question about this device. Answer the ones you know or ask your own.
Ask a new question about this device
Download the instructions for your Drone in PDF format for free! Find your manual Turbo-X - AXIS and take your electronic device back in hand. On this page are published all the documents necessary for the use of your device. Turbo-X by AXIS.
USER MANUAL Turbo-X AXIS
By operating this device you acknowledge and accept all risks and responsibilities of the use, storage and proper disposal of any and all included lithium batteries.
Warning
You agree to follow the safety precautions outlined below in addition to any and all state, local or federal laws regarding lithium batteries.
Axis Drones and its affiliates are not responsible for any misuse.
Please read and understand the following regarding the usage of Lithium batteries.
Guarantee of the lithium battery:
The Lithium battery included with your device is guaranteed to be free from any manufacturing defects prior to initial use. Once the device has been used, owner accepts any and all liability for the Lithium battery, maintenance and disposal.
Lithium Battery Warnings:
- Through the use of the included Lithium battery, you have assumed all risk and responsibility regarding a Lithium battery and its use.
- ALWAYS unplug your battery from the charger immediately upon full charge.
- Do not attempt to charge your battery if it becomes swollen or hot.
- It's best to store your batteries charged and at room temperature. Storing a fully discharged battery may cause irreversible damage to the battery.
- Never disassemble, puncture or modify the battery pack in any way.
- Never allow the battery temperature to exceed 150^ F [65° C].
- If your battery begins to swell or "puff" during charge or discharge, or becomes damaged in any way, stop using it and contact Axis Drones at 800-610-0605 to learn the proper way to dispose of your battery.
Charge Warnings:
- Only use the included charger with the included Lithium battery.
- Do not leave the charger unattended while in use, and always charge your battery in a fire-resistant location.
- Disconnect the battery and remove input power from the charger immediately if either become hot.
- Do not allow water or other foreign objects to enter the charger. Keep the charger away from moisture and do not submerge in water.
- Please keep all electronic components out of the reach of children.
WHAT'S IN THE BOX
TURBO-X

USB Charging Cable

Spare Blades
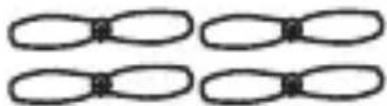
natural_image
Simple diagram of four identical oval shapes with internal dots, arranged in a 2x2 grid (no text or symbols)REMOTE CONTROL

| No | Function switch | Function description |
| 1 | Trimmer A | Fine tuning of forward and backward movement |
| 2 | Left stick | Throttle - Rotation - Speed Selection |
| 3 | Power Indicator | Slow Blink: Not TransmittingFast Blink: Attempting to pairSolid: Paired and Operational |
| 4 | Power switch | Right: OFF Left: ON |
| 5 | Right stick | Directional Movement - Trick Mode |
| 6 | Trimmer B | Fine tuning of left and right movement |
ENVIRONMENT FOR FLIGHT
Please be aware of your surroundings when operating your TURBO-X. As this device can reach high speeds, it is recommended to fly outdoors.

Note
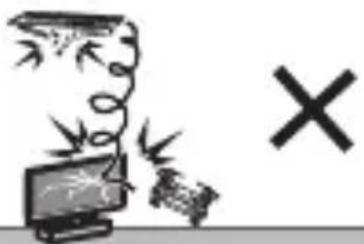
- DO NOT FLY NEAR PEOPLE, ANIMALS OR PROPERTY
- Adult supervision is recommended for users under 18
- Indoor flight should have plenty of open space
- Damage to property or injury to people is a risk, fly safely.
ATTENTION
- Always keep the TURBO-X Drone in your line of sight
- If device travels too far away from user it may lose control
- When flying outdoors please do not operate in med-high wind
- Always make sure your TURBO-X is fully charged before flight
- Replace remote control batteries before they become too weak
- Avoid colliding with people, property or animals
| Releasing throttle at high altitude may result in injury or damage to device, people or property. | Always keep device at a safe distance from the ground and other objects. | Please DO NOT fly in areas with many obstacles or around objects that can be easily damaged. |
 |  |  |
INSTALLING BATTERIES IN CONTROLLER
Battery install
Please load the batteries with the correct polarity, as shown below:


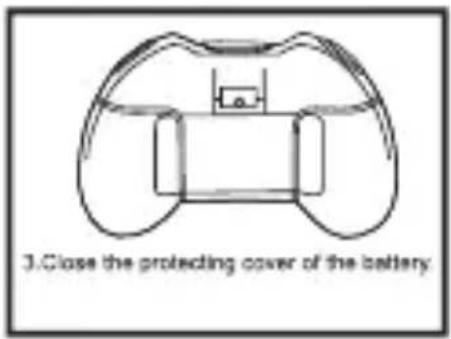
CHARGING DRONE
- Connect charging cable to the drone FIRST, then plug the USB side in.
- It is recommended to charge with a computer USB port, not a wall adapter.
- The red light will be OFF while charging and ON when fully charged.
- Promptly remove the cable from both the USB and drone upon full charge.
- DO NOT LEAVE drone unattended while charging.

natural_image
Diagram of a drone connected to a device via cable, showing four propellers (no text or symbols)GETTING STARTED
natural_image
Illustration of a handheld game controller with two circular buttons and a central screen (no text or symbols)(Figure 1)

natural_image
Simple line drawing of four propellers in a circular arrangement (no text or symbols)
natural_image
Line drawing of a vintage binocular device with dual lenses and a scroll wheel (no text or symbols)(Figure 2)

natural_image
Line drawing of a binocular device with multiple lenses (no text or symbols)(Figure 3)
- Place the TURBO-X Drone on a flat LEVEL surface and turn power on
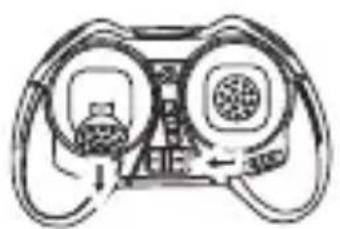
- Align joysticks as shown in (Figure 1), Left stick down, right stick center
- Turn the controller on by sliding the power switch to the left
- Power Indicator light will begin flashing, indicating it is ready to pair
- Move left joystick FULLY UP (Figure 2) then FULLY DOWN (Figure 3)
- Lights on both the TURBO-X and the Controller will remain solid
- Your TURBO-X and Controller are now paired and ready for flight!
The throttle on the TURBO-X will take some practice to achieve a good hover. We recommend using your thumb and index finger to make small adjustments to the throttle stick; you can progress to just your thumb with experience. The TURBO-X will start out in LOW Speed, please start here to get acquainted.
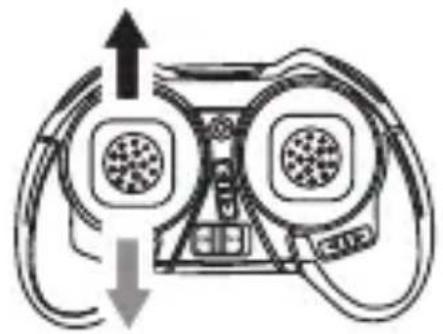
Moving Left Stick Up/Down controls the Rise/Fall of the TURBO-X Drone
natural_image
Diagram of a handheld device with circular ports and directional arrows indicating movement or force (no text or symbols)
Moving Left Stick Left/Right controls the Yaw (Rotation) to adjust orientation

natural_image
Diagram of a VR headset with two circular components and directional arrows indicating motion (no text or symbols)
flowchart
graph TD
    A["Left Rotation"] --> B["Four Blenders"]
    B --> C["Right Rotation"]
    C --> D["Four Blenders"]
    D --> A
    style A fill:#f9f,stroke:#333
    style B fill:#ccf,stroke:#333
    style C fill:#cfc,stroke:#333
    style D fill:#fcc,stroke:#333
Moving Right Stick Up/Down controls Forward and Reverse Flight Direction

natural_image
Diagram of a device with circular components and directional arrows indicating movement or force (no text or symbols)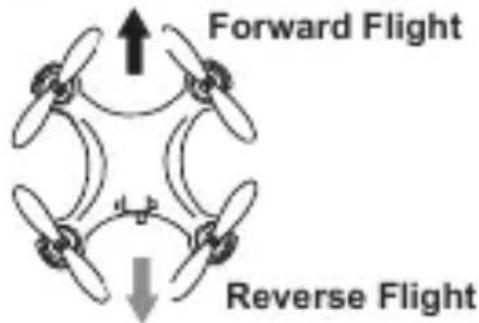
Moving Right Stick Left/Right controls Left and Right Flight Direction

natural_image
Diagram of a VR headset with two circular components and directional arrows indicating movement (no text or symbols)
flowchart
graph TD
    A["Left Flight"] --> B["Four Blenders"]
    B --> C["Right Flight"]
    style A fill:#f9f,stroke:#333
    style C fill:#bbf,stroke:#333
TRIMMER
| Backward trimmer | Drift Forward | Trim Backward |  | Backward limmer |
| Forward trimmer | Drift Backward | Trim Forward |  | forward limmer |
| Left Flying trimmer | Drift Right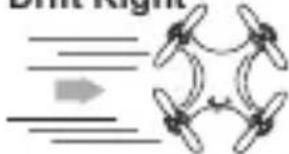 | Trim Left |  | Left Flying limmer |
| Right Flying trimmer |  | Tri |  | Right Flying limmer |
When you first take off you should attempt to level the TURBO-X into a hover.
Begin with the drone in front of you with the bow of the drone facing forward.
Take off and begin to maintain a steady height around 3 feet off the ground.
If the TURBO-X drifts in any one direction you can use the Trimmer Tabs to make precision adjustments to the motors in order to keep the drone centered.
For Example: If the TURBO-X drifts toward you (reverse) press Trimmer A UP one click at a time until it stays steady, if it drifts away (forward) press DOWN.
Each click is one adjustment, you can click in the opposite direction until you hear a LONG BEEP, that indicates you are back at the center setting.
The same is true if it drifts Left, you would press Trimmer B RIGHT and if it drifts Right, you would adjust the Trim LEFT until it stays centered.
This is important if you want to have precision flight with takeoff and landing.
If you just want to fly around and have fun, it may not matter if it drifts a little.
SPEED SETTINGS
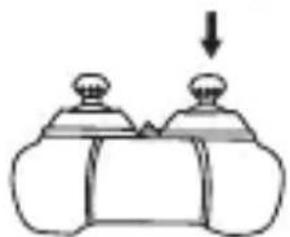
There are 3 unique speed settings programmed into the TURBO-X. To change speeds at any time simply press the Left Stick IN (Figure 1) Pressing multiple times allows you to cycle through all of the speeds. Each speed is indicated by a corresponding number of beeps.

natural_image
Simple line drawing of a container with two handles and a downward arrow, no text or symbols present.(Figure 1)
Low Speed:
This is the Default speed every time you power up, indicated by a single beep. Low speed on the TURBO-X is the equivalent of most other models' medium or high speed.
Medium Speed:
Indicated by two beeps. Medium speed is twice as fast as low speed and is able to be used both indoors and outdoors in light winds.
TURBO-X Speed:
Indicated by three beeps, this is the fastest speed available in a drone this small. Clocked at speeds of 30 MPH, it is capable of flight outdoors in low-med winds but is not recommended for indoor use, particularly in tight or crowded areas where damage may occur. DO NOT FLY INTO PEOPLE, ANIMALS or PROPERTY!
FLIPS AND ROLLS
The TURBO-X is pre-programmed with an algorithm to perform flips and rolls with ease, simply press the Right Joystick IN (Figure 2) to enter "Trick Mode" Once in "Trick Mode" - indicated by beeping, simply push the Right Stick fully in the direction you want to flip or roll! (SEE NEXT PAGE)
natural_image
Simple line drawing of a mechanical component with two ports and a downward arrow (no text or symbols)(Figure 2)
FRONT FLIP
Press Right Stick IN, Controller will beep, Push Right Stick FULL UP

natural_image
Simple line drawing of a mechanical component with two ports and a downward arrow (no text or symbols)
natural_image
Illustration of a handheld device with two circular buttons and an upward arrow, no text or symbols present.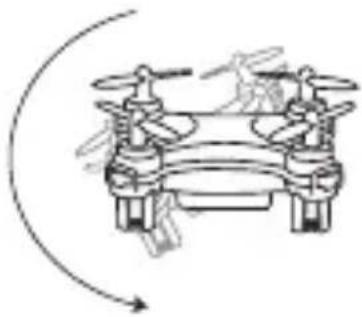
natural_image
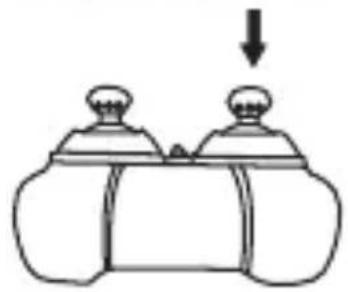
Diagram of a drone with propellers and propellers, shown in flight (no text or labels)BACK FLIP
Press Right Stick IN, Controller will beep, Push Right Stick FULL DOWN
natural_image
Simple line drawing of a cylindrical object with two handles and a downward arrow, no text or symbols present.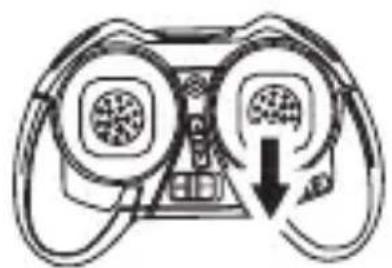
natural_image
Diagram of a handheld device with circular ports and a central display, showing a downward arrow (no text or symbols)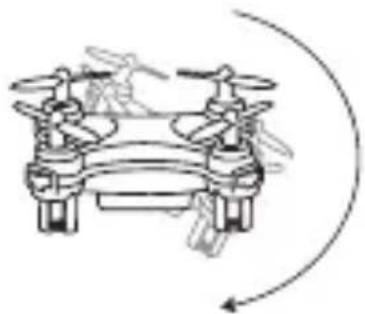
natural_image
Diagram of a drone with propellers and control panels, showing no text or symbolsROLL LEFT
Press Right Stick IN, Controller will beep, Push Right Stick FULL LEFT

natural_image
Simple line drawing of a mechanical component with two cylindrical parts and a downward arrow indicating force or motion (no text or symbols)
natural_image
Diagram of a handheld device with two circular ports and connecting cables, no text or symbols present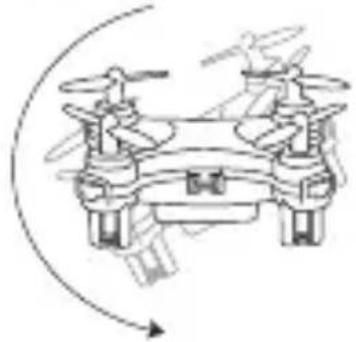
natural_image
Diagram of a drone with propellers and rotor, showing no text or symbolsROLL RIGHT
Press Right Stick IN, Controller will beep, Push Right Stick FULL RIGHT

natural_image
Simple line drawing of a container with two handles and a downward arrow indicating flow or movement (no text or symbols)
natural_image
Line drawing of a vintage game controller with scroll wheel and circular buttons (no text or symbols)
natural_image
Diagram of a drone with propellers and control panels, showing no text or symbolsTROUBLESHOOTING
In the event you have issues with your TURBO-X please check here:
Drone won't lift off of ground:
- Check the orientation of your blades to match (Figure 1) below
- Make sure your drone and remote batteries are fully charged
- Check that blades are not bent or damaged, replace as needed
Drone drifts heavily in one direction:
- Make sure your Trimmer settings are at CENTER (page 6)
- Make sure all blades are evenly and fully seated on driveshafts
- Restart and Pair Drone and Controller (page 4)
- If 1-3 did not solve please recalibrate your drone (page 10)
- If 1-4 did not work you are in a hurricane, seek shelter
Controller and Drone won't connect:
- Replace the batteries in the controller with BRAND NEW ones
- Fully charge the drone and try again (page 4)
Drone won't hover, keeps going up and down:
- Use thumb and index finger on throttle to make smaller adjustments
- Check that blades are not damaged or on incorrectly
- Drink less coffee, take yoga, breathe and relax :)
One or more lights/motors stopped working:
- You broke it dude, give us a shout for a discount on your next one!
CHANGING BLADES
- To remove blades, firmly grasp the center of the blade and pull UP.
- To replace blades, firmly press the new blade DOWN onto shaft.
- Orientation of blades should be as shown below when viewing drone from rear to front AND from front to rear:

RECALIBRATION OF ACCELEROMETER
If your TURBO-X begins to be unstable during flight, drifts heavily in one direction or troubleshooting doesn't work please do the following:
- Turn off Drone and Controller
- Make sure that all batteries are fully charged
- Place Drone on flat LEVEL surface
- Turn Drone on, Turn Controller on and pair (page 4)
- Keep Throttle (Left Stick) at lowest point
- Set speed level to TURBO-X (three beeps, page 7)
- Push the Throttle (Left Stick) to Lower Left, HOLD
- Push Control (Right Stick) to Upper Left, HOLD

- Drone will flash for 1-2 seconds indicating success.
- Take off and enjoy!
POWER FAILURE FROM CRASH
If your TURBO-X crashes, becomes entangled or blades jam, it should automatically shut itself off to prevent further damage or danger.
If battery is fully charged, you should be able to turn the power switch off and then back on and repeat the pair cycle (page 4).
If the drone fails to turn back on, please turn it off and fully charge. Be sure to watch the drone after a bad crash to make sure the battery does not overheat while charging; if it does, please dispose of it.
- Guarantee of the lithium battery:
- Lithium Battery Warnings:
- Charge Warnings:
- WHAT'S IN THE BOX
- REMOTE CONTROL
- ENVIRONMENT FOR FLIGHT
- ATTENTION
- INSTALLING BATTERIES IN CONTROLLER
- Battery install
- CHARGING DRONE
- GETTING STARTED
- TRIMMER
- SPEED SETTINGS
- Low Speed:
- Medium Speed:
- TURBO-X Speed:
- FLIPS AND ROLLS
- FRONT FLIP
- BACK FLIP
- ROLL LEFT
- ROLL RIGHT
- TROUBLESHOOTING
- Drone won't lift off of ground:
- Drone drifts heavily in one direction:
- Controller and Drone won't connect:
- Drone won't hover, keeps going up and down:
- One or more lights/motors stopped working:
- CHANGING BLADES
- RECALIBRATION OF ACCELEROMETER
- POWER FAILURE FROM CRASH
Brand : AXIS
Model : Turbo-X
Category : Drone