
WDNSX86B - Washing machine BUSH - Free user manual and instructions
Find the device manual for free WDNSX86B BUSH in PDF.


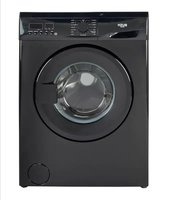
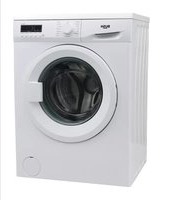
| Product Type | Freestanding Washing Machine |
| Brand | Bush |
| Model | WDNSX86B |
| Capacity | 8 kg |
| Spin Speed | 1600 rpm |
| Energy Efficiency Class | A+++ |
| Annual Energy Consumption | 175 kWh |
| Annual Water Consumption | 9500 L |
| Noise Level (Wash/Spin) | 52 dB / 76 dB |
| Dimensions (H x W x D) | 85 x 60 x 60 cm |
| Weight | 66 kg |
| Power Supply | 220-240 V ~ 50 Hz |
| Number of Programs | 15 |
| Key Programs | Cotton, Synthetics, Delicates, Quick Wash, Eco, Wool, Spin, Rinse & Spin |
| Features | Delay Start, Child Lock, Overflow Protection, Anti-Foam Control |
| Display | LED Digital |
| Drum Type | Stainless Steel |
| Door Hinge | Left |
| Mains Cable Length | 1.5 m |
| Spare Parts Availability | 7 years after discontinuation |
| Repairability Index | 8.5/10 |
| Maintenance | Clean filter regularly, descale every 3 months |
Frequently Asked Questions - WDNSX86B BUSH
User questions about WDNSX86B BUSH
0 question about this device. Answer the ones you know or ask your own.
Ask a new question about this device
Download the instructions for your Washing machine in PDF format for free! Find your manual WDNSX86B - BUSH and take your electronic device back in hand. On this page are published all the documents necessary for the use of your device. WDNSX86B by BUSH.
USER MANUAL WDNSX86B BUSH
natural_image
White BUSH washing machine with digital display and orange geometric pattern overlay (no text or symbols on main body)You'll soon be enjoying your new washer-drier.
It all begins here, with your instructions. Don't worry, there's nothing too technical coming up. Just simple, step-by-step guidance to get you up and running quickly. Sound good? Then let's get started.
Help and Guidance
We're here to help you get the most from your washer-drier. Should you require any guidance, a simple solution can often be found online at:
www.argos-support.co.uk
If you still require further assistance, call one of our experts on 0345 257 7271.
Contents

1 Safety information
Safety information 6
2 Getting to know your washer-drier
Ready? Let's begin 10
Accessories 12
3 Installing your washer-drier
Installation requirements 14
Unpacking 14
Connections (electrical, water, gas) 15
4 Functions
Functions 18
5 Using your washer-drier
First use of washer-drier 24
Standard and advanced functions/use 25
6 Care and Maintenance
Cleaning 30
Maintenance actions 30
Technical specifications 32
7 Product support
Troubleshooting 34
Help and assistance 35
Declaration of conformance to product standards 36
Disposal 37
1

natural_image
Abstract geometric pattern composed of orange triangles on a white background (no text or symbols)
Safety information
Important - Please read these instructions fully before installing or operating
- If the supply cord is damaged, it must be replaced by the manufacturer, its service agent or similarly qualified persons in order to avoid a hazard.
- The new hose-sets supplied with the appliance are to be used and that old hose-sets should not be reused.
- This washer-drier is for indoor use only.
- The openings must not be obstructed by a carpet.
- This appliance can be used by children aged from 8 years and above and persons with reduced physical, sensory or mental capabilities or lack of experience and knowledge if they have been given supervision or instruction concerning use of the appliance in a safeway and understand the hazards involved.
Cleaning and maintenance shall not be made by children without supervision.
- This appliance is not intended for use by persons (including children) with reduced physical, sensory or mental capabilities, or lack of experience and knowledge, unless they have been given supervision or instruction concerning use of
the appliance by a person responsible for their safety.
- Pull out its plug from the power socket before cleaning or maintenance.
• Make sure that all pockets are emptied. - Sharp and rigid items such as coin, brooch, nail, screw or stone etc. may cause serious damages to this machine
- Pull out its plug and cut off water supply after the operation.
- Please check whether the water inside the drum has been drained before opening its door. Please do not open the door if there is any water visible.
- Pets and children may climb into the machine. Check the machine before every operation.
- Glass door may be very hot during the operation. Keep children and pets far away from the machine during the operation.
• Take care that power voltage and frequency shall be identical to those of .washer-drier - Do not use any socket with rated current less than that of washer-drier. Never pull out power plug with wet hand.
- To ensure your safety, power cord plug must be inserted into an earthed three-pole socket. Check carefully and make sure that your socket is properly and reliably earthed.

Safety information
Important - Please read these instructions fully before installing or operating

- Children of less than 3 years should be kept away unless continuously supervised.
- Do not let kids play with the the machine.
- Packing materials may be dangerous to the children. Please keep all packing materials (plastic bags,foams etc) far away from the children.
- W shall not be asher-drier installed in bath room or very wet rooms as well as in the rooms with explosive or caustic gases.
- Make sure that the water and electrical devices must be connected by a qualified technician in accordance with the manufacturer's instructions and local safety regulations.
- Before operating this machine, all packages and transport bolts must be removed. Otherwise, the washer-drier may be seriously damaged while washing the clothes.
- Before washing the clothes at first time, the shall be washer-drier operated in one round of the whole procedures without the clothes inside.
-
The with single washer-drier inlet valve only can be connected to the cold water supply. The washer-drier with double inlet valves can be connected to the hot water and cold water supply.
-
Your is only washer-drier for home use and is only designed for the textiles suitable for machine washing.
- Flammable and explosive or toxic solvents are forbidden. Gasoline and alcohol etc. Shall not be used as detergents. Please only select the detergents suitable for washer-drier, especially for drum.
- Be careful of burning when washer-drier drains hot washing water. Never refill the water by hand during washing.
- After the program is completed, Please wait for two minutes to open the door.
- Please remember to disconnect water and power supply immediately after the clothes are washed.
- Do not climb up and sit on top cover of the machine. Do not lean against machine door.
- Please do not close the door with excessive forces. If it is found difficult to close the door, please check if the excessive clothes are put in or distributed well.
- The householder isn't intended to be built-in.
-
Cautions during Handling Machine 1. Transport bolts shall be reinstalled to the machine by a specialized person.
-
The accumulated water shall be drained out of the machine.
-
Handle the machine carefully.
- Never hold each protruded part on the machine while lifting. Machine door can not be used as the handle during the conveyance.
Getting to know your washer-drier
2

natural_image
Abstract geometric pattern with orange triangles and white gaps on a white background (no text or symbols)
Getting to know your washer-drier
You'll be up and running in no time
Ready? Let's begin...
Please read these instructions carefully. They contain important information which will help you get the best from your washer-drier and ensure safe and correct installation and operation. If you require any further assistance, our technical experts are happy to help. For full details, refer to the product support section at the end of these instructions.
Getting to know your washer-drier
You'll be up and running in no time
Component
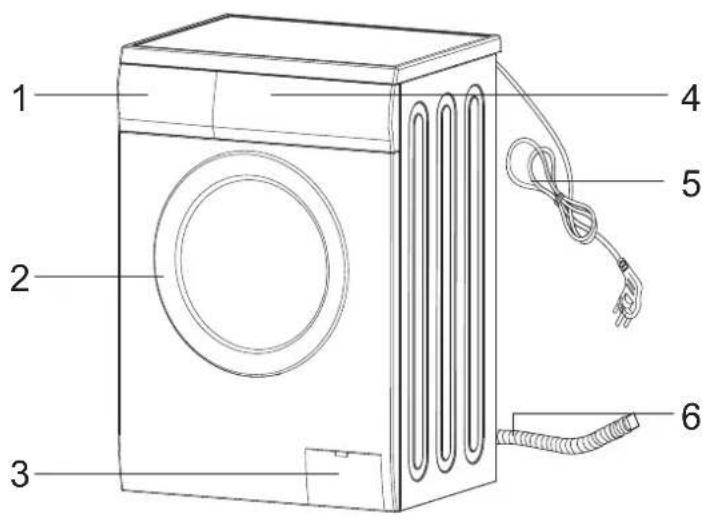
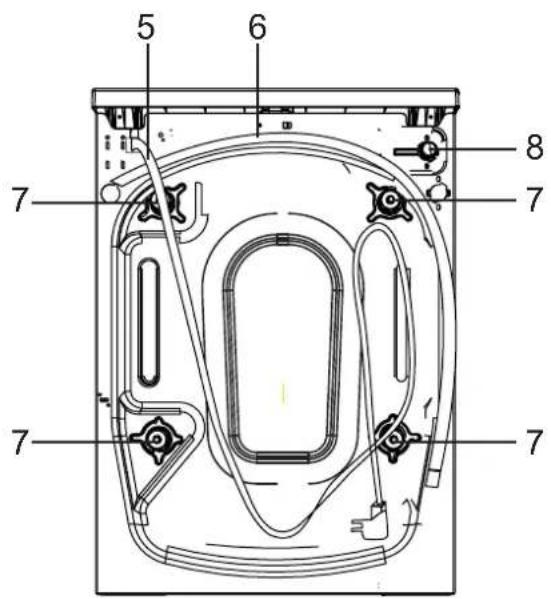
-
Detergent Drawer
-
Door
3.Filter
- Control Panel
5.Power lead
-
Drain hose
-
Transport bolt x 4
-
Water inlet
Getting to know your washer-drier
You'll be up and running in no time
| Model | capacity | Spin Speed Energy class |
| WDNSX86W 8kg 140rpm B | ||
| WDNSX86B 8kg 140rpm B |
Accessories
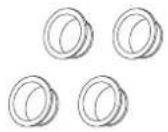
This machine includes below accessories, please install these parts by yourself before operating.
- plastic hole plug x 4
- Inlet hose

Tools
You may use this tools to help install above parts
- glove
- spanner

natural_image
Line drawings of two types of gloves: a handle and a pair of gloves (no text or symbols)If you require any technical guidance or find that your product is not operating as intended, a simple solution can often be found in the Troubleshooting section of these instructions,
Installing your washer-drier
3

natural_image
Abstract geometric pattern composed of orange triangles on a white background (no text or symbols)Installing your washer-dried
Bringing it all together
Installation requirements
- In addition to the instructions mentioned here, special regulations of the relevant water and companies may apply. If in doubt, have the washer-drier connected by a qualified technician.
- The washer-drier is heavy - caution when lifting it.
- Do not lift by projecting components (e.g. washer-drier door).
- Warning: Frozen hoses may tear/burst. Do not install washer-drier in outdoor areas or where there is a risk of frost. Please operate washer-drier above 0°C.
- Lay hoses and cables in such a way that there is no risk of tripping over them.

An additional space (approximately 120mm) is required at the rear of the washer-drier.
This is to allow enough space for the water hose and drain hose connections.
Unpacking
Unpacking your washer-drier
Caution:2 people are required to unpack the washer-drier, it is recommended that gloves are worn.
Carefully remove all packing materials including the foam base, dispose of correctly.
Note: When opened, water droplets may be visible in the drum etc. this is normal as each appliance is tested before delivery.
Removing the transport bolts
Important: The transport are designed to support the internal components during transit these MUST be removed before use.
1: Loosen the screws by rotating counterclockwise with a suitable wrench, (Fig 1 2)
2:Remove the bolts by pulling them.(F3)
3: When the transport bolts have been removed, insert the plastic transport screw taps found in the accessories bag into the holes.(Fig 4)
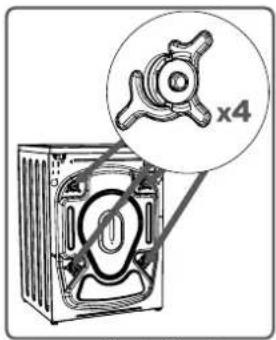
Fig1 Fig2
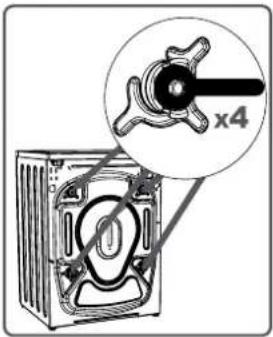
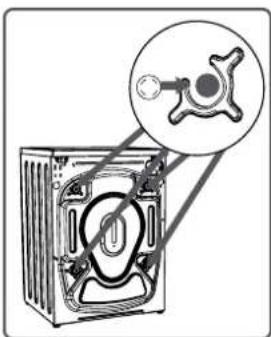
Fig3 Fig4
Levelling feet
1: For your machine to work efficiently with minimum vibration it should be settled on flat, nonslippery, firm ground.
2: You can adjust the balance of your machine by changing the positioning of its feet.
3:First,loosen the plastic adjustment nut.(Fig 5)
4: Adjust by rotating the feet upwards or downwards.(Fig 6)
5: After the desired position has been reached, tighten the plastic adjustment nut again by rotating it upwards.
Note: Never put cartons, wooden blocks or similar materials under the machine to balance irregularities in the level of the ground.

If you require any technical guidance or find that your product is not operating as intended, a simple solution can often be found in the Troubleshooting section of these instructions,
Installing your washer-drie
Bringing it all together
Connections
Water inlet hose connections
Important: This MUST only bewasher-drier connected to a cold water supply.
1: Connect the water inlet hose, the angled connection attaches to the water inlet on the back of the washer-drier. (Fig 7)

natural_image
Diagram of a device with a cable and connector, labeled Fig7 (no text or symbols on the diagram itself)2: The straight connection attaches to the water supply valve.(Fig 8)
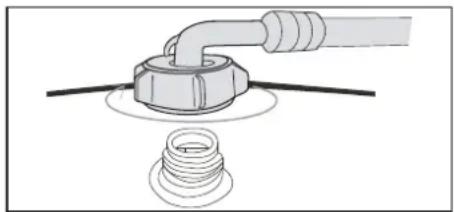
natural_image
Diagram of a mechanical assembly with a pipe fitting and a threaded component (no text or symbols)Fig8
3: Ensure all seals are in place before connecting.
Important: Only tighten the hose connection nut by hand - do not overtighten.
Drain hose connections
Important: The height of the top of the curve in the drain hose MUST be between 60 - 100cm from the floor. (Fig 9)
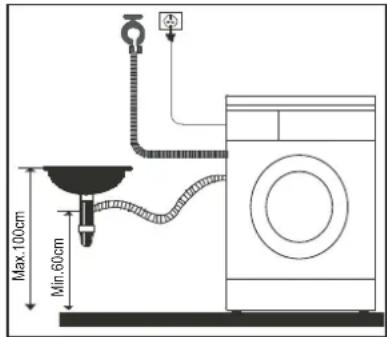
Fig9
Important: Drain hose can be fitted to the drainer or a wash basin.
Electrical

Any electrical work that is required to install this appliance MUST be carried out by a qualified electrician.

Warning: THIS APPLIANCE MUST BE EARTHED
Before making any electrical connections, ensure that:
- Electrical safety is only guaranteed when the earth system of your house is in accordance with the related local regulations.
- Do not bend, stretch or pull the supply cable to avoid electric shock.
- Ensure the power socket is suitable for the maximum power of the machine (fuses in the power circuit must be 13 amp).
- The supply voltage should be the same as that indicated in the technical specifications and the appliance rating plate.
- The appliance should be earthed and in complicance with the applicable law.
- When installed, the power socket must be within easy reach.
- If the socket outlets in your home are not suitable for the plug supplied with this unit check with a qualified electrician for replacement.
- To avoid the risk of overloading your plug socket, the use of adapters, multiple connectors or extension cables are not recommended.
- The appliance must be connected to a 220-240 volt 50Hz AC supply by means of a three pin socket, suitably earthed and protected by a 13 amp fuse.
- Should the fuse need to be replaced, a 13 amp fuse approved to BS 1362/A must be used.
- The plug contains a removable fuse cover that must be refitted when the fuse is replaced. if the fuse cover is lost or damaged, the plug must not be used until a replacement cover has been fitted or the plug is replaced.
- A damaged plug should be cut off as close to the plug body as possible, the fuse should be removed and the plug disposed of safely.
Installing your washer-drie
Bringing it all together
Plug replacement (UK Ireland only)&
Should you need to replace the plug;the wires in the power cable are coloured in the following way:
Blue - Neutral ' N'
Brown - Live ' L'
Green Yellow - Earth 'E' &
As the colour of the wires in the power cable may not correspond with the coloured markings identifying the terminals in your plug, and proceed as follows(Fig10):
The green &yellow wire must be connected to the terminal in the plug that is marked with the letter E or by the earth symbol.
The blue wire must be connected to the terminal that is marked with the letter N.
The brown wire must be connected to the terminal that is marked with the letter L.
If power supply cord is damaged, it must replaced by the manufacturer or its service agent or a similar qualified person in order to avoid a hazard.

Fig10
If you require any technical guidance or find that your product is not operating as intended, a simple solution can often be found in the Troubleshooting section of these instructions,
Functions
4

natural_image
Abstract geometric pattern with orange triangles and white gaps on a white background (no text or symbols)Functions
Simple everyday use
Introduction of control panel
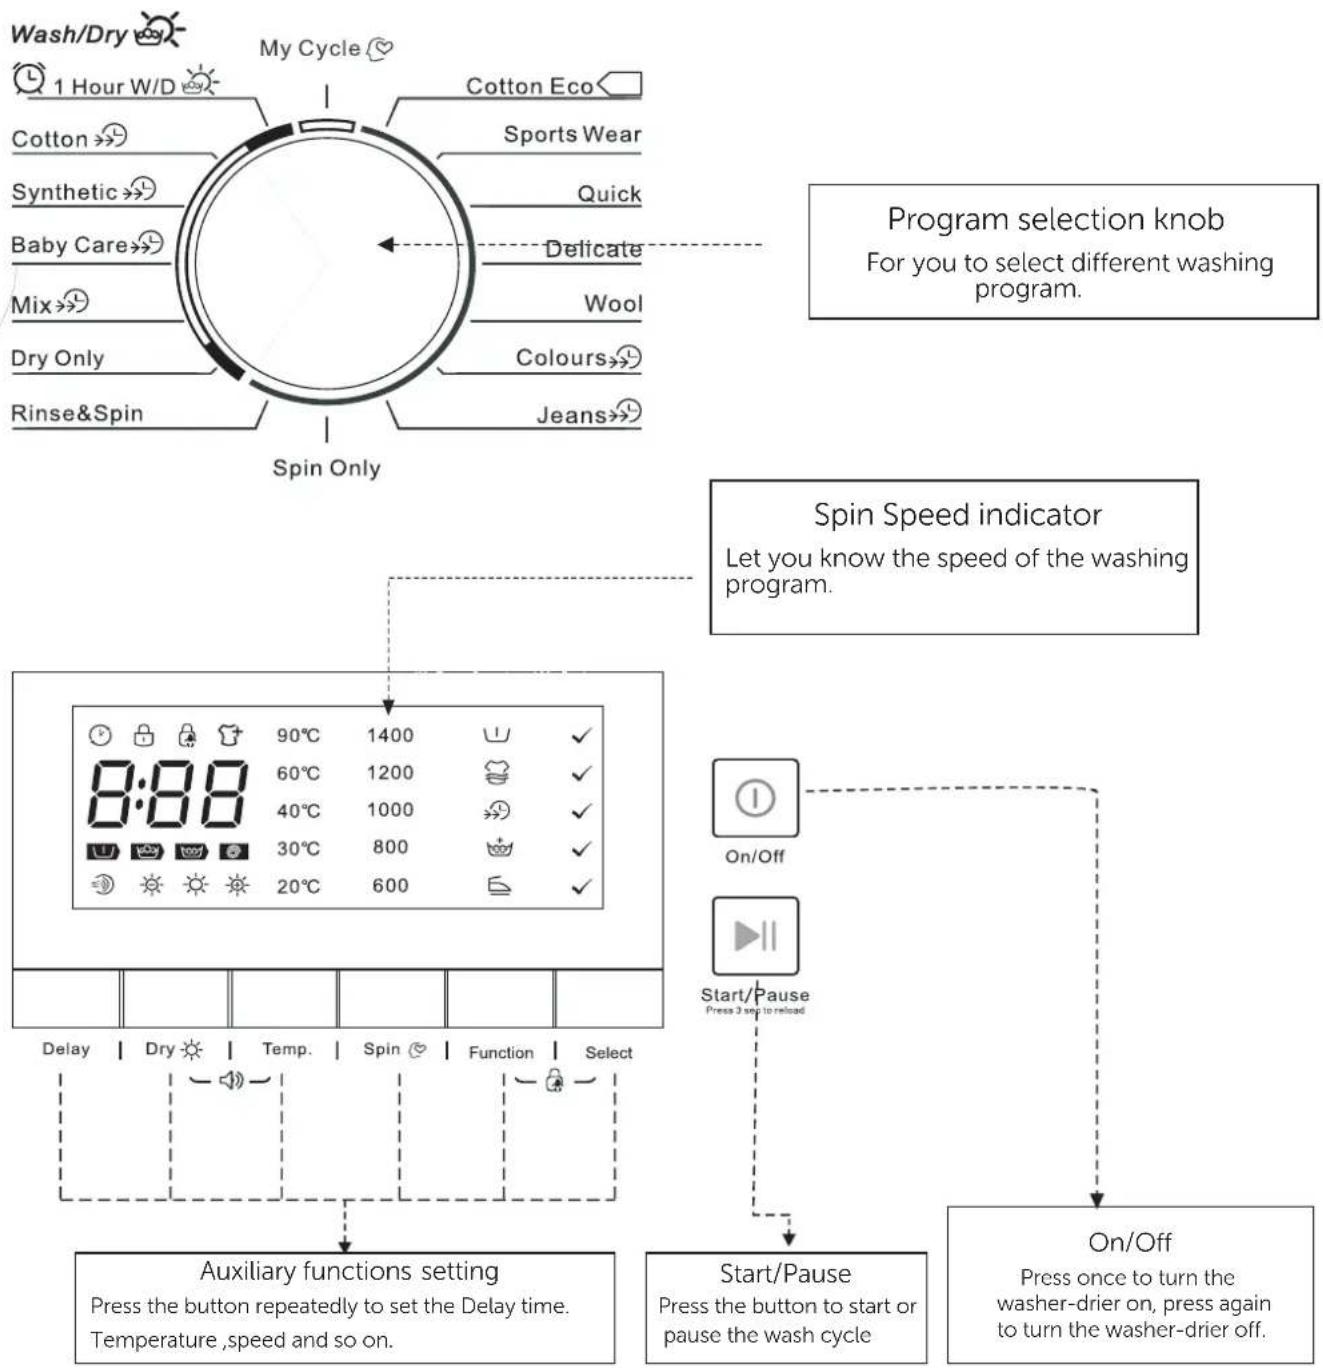
flowchart
graph TD
    A["Program selection knob"] --> B["For you to select different washing program."]
    B --> C["Spin Only"]
    C --> D["8:88"]
    D --> E["90°C 1400"]
    D --> F["60°C 1200"]
    D --> G["40°C 1000"]
    D --> H["30°C 800"]
    D --> I["20°C 600"]
    E --> J["Auxiliary functions setting"]
    F --> J
    G --> J
    H --> J
    I --> J
    J --> K["Start/Pause"]
    K --> L["On/Off"]
    L --> M["Press once to turn the washer-drier on, press again to turn the washer-drier off."]
    M --> N["On/Off"]
    N --> O["Press 3 sp to reload"]
    O --> P["Start/Pause"]
    P --> Q["Press the button to start or pause the wash cycle"]
    Q --> R["Delay"]
    R --> S["Dry"]
    S --> T["Temp."]
    T --> U["Spin"]
    U --> V["Function"]
    V --> W["Select"]
    W --> X["Spin Speed indicator Let you know the speed of the washing program."]
If you require any technical guidance or find that your product is not operating as intended, a simple solution can often be found in the Troubleshooting section of these instructions.
Functions
Simple everyday use
Introduction of control panel
Turning the machine on
Plug in your machine. Place the laundry in the machine and add detergent and softener. Press the "on/off" button.
program selection
First, switch the program knob to select suitable program according to the types of textiles.
Second, select a proper temperature by following the care instructions on the clothes.
Last, select the proper spin speed.
Generally, the higher temperature will consume more energy; the higher spin speed will cause more noise.
PLEASE NOTE: to protect the clothes, the delicate lower spin speed shall be selected.
The main washing procedures depend on the types of the clothes to be washed as follows:
Main program
Depending on the type of textile, the following main programs are available: Each of these main programs comprise of a complete washing process, including washing, rinsing and, if required, spin cycles.
- Cotton
Suitable for textiles made of cotton or linen, for example coats, bed sheets, towels, etc.
- Cotton ECO
This is the most energy efficient programme to clean all kinds of soiled cotton laundry.
- Baby Care
You can select this procedure to wash your baby's clothes, it can make the baby's wear cleaner and make the rinse performance better to protect the baby skin.
- Synthetic
You can select this procedure to wash the quite delicate clothes. The procedure is shorter compared with that for cottons and the washing movement is quite gentle. It is recommended to wash synthetic articles, for example: shirts, coats, blending. As for curtains and laced textiles, the procedure "Synthetic" shall be selected. While washing the knitting textiles, detergent quantity shall be reduced due to its loose string construction and easily forming bubbles.
- Delicate
You can select this procedure to wash your delicate clothes. Its washing movement is gentler and spin speed is less compared with the procedure "Synthetic". It is recommended for the articles to be washed softly.
- Wool
You can select this procedure to wash the wool textiles labeled with "Machine Wash". Please select the proper washing temperature according to the label on the articles to be washed. Furthermore, the proper detergent shall be selected for wool textiles.
- Colours
You can choose the program washing brightly coloured clothing, it can protect the bright colour better.
- Spin Only
Separate spin only procedure. Soap water or rinse water shall be drained out before spinning.
- Quick
This procedure is suitable for washing few and not very dirty clothes quickly.
- Rinse&Spin
Separate Rinse&Spin Procedure.
- Drain Only
Separate Drain only Procedure.
• Mix
This program is suitable for daily wash. Cotton / Synthetic / Jeans / Kids textiles can all be mixed and washed together with like colours. Do not use this programme for wool and delicate clothes such as silks.
Functions
Simple everyday use
Introduction of control panel
- Sports Wear
You can select this procedure to wash the activewear.
- Jeans
This program is specially designed for washing jeans.
- Hour W/D1
For small synthetic clothes or shirts, load limitation is 1 kg (about 4 shirts). When you have an urgent appointment but no more clean shirt left in your cupboard, this program will help you. Time duration is only 1 hour including wash and dry. Remark: Big towels or jeans is not suitable for this program, they will enlarge the time duration and affect the moisture content.
- My Cycle
Press Spin 3sec. for my cycle to memory the procedure. The default my cycle is cotton.
Auxiliary function
These functions can be used based on main program, you can press these functions after you chose the main program.
Note: you can't use these functions after the main program started.
- Prewash
The indicator of prewash will light up on the display.
The Prewash function can get an extra wash before main wash.
- Speed Wash
The function can decrease the washing time.
- Extra Rinse
The laundry will undergo extra rinse once after you select it.
- Delay
Delay function can be set with this button, the delaying time is 0-24 H.
Set the Delay function:
-
Select a programme;
-
Press the Delay button to choose the time;
-
Press Start/Pause to commence the delay operation.
Cancel the Delay function: Press the Delay button until the display will be 0H. It should be pressed before starting the program. If the program already started, should press the On/Off button.
Notes: If there is any break in the power supply while the machine is operating, a special memory stores the selected programme and when the power is restarted, press the Start/Pause button the left time is continues.
- Extra Wash
So dirty clothes can choose this function. It can select the prewash function to increase the washing effect, you need to put detergent into the Case (I) when using pre-wash function.
- Less Iron
Less Iron function can be used to reduce the wrinkles of clothes.
- Reload
This operation can be executed during the washing procedure. When the drum of the washing machine is still rolling and there is large amount of water with high temperature in the drum. The state is unsafe and the door cannot be opened forcefully. To press
【Start/Pause】for 3 sec. to reload, and start the clothes adding in the midway function. Please follow the steps as bellow:
-
Wait until the drum stops rotation.
-
The door lock is unlocked.
-
Close the door when the clothes needs are loaded and repress the Start/Pause button. 【】
- Child Lock
To avoid that the washing procedure cannot operate normally due to the mis operation by kids during the washing procedure, you can select this function. In this case, the other buttons except On/Off button can not work, at this state, the machine power off when press the key on/off. The machine remembers the program child lock and the program during powered off when press the key on/off again. Press Extra Rinse and Pre Wash together 3 seconds during the running procedure, the buzzer will beep, Start/Pause button as well as the rotary switch are locked. Press the two buttons for 3 seconds together and buzzer will beep to release to locking. But cut off the power supply, the kid's protection is also release to locking. The kid's protection will not be cancelled after all procedures are completed.
- Suppression of the acoustic signals
This is an additional buzzer function on your appliance. After deactivating the buzzer function, the buzzer will be closed. After starting the machine, press the "Temp.&Spin" button for 3 seconds and you will hear a beep, then the buzzer will be closed. To restart the buzzer function, press the "Temp.&Spin" button again for 3 seconds. The setting will be kept until the next reset.
Warning: After deactivating the buzzer function, the sounds will not be activated any more.
- Bubble Removal Function
Bubble Check Function: Redundant bubbles will occur when there is excessive detergent, which will affect wash and rinse effects. The procedure will check automatically and one bubble removal procedure will be added automatically to remove bubbles when excessive bubbles are checked.
Functions
Simple everyday use
Program Selection Guide - 8WDNSX86Adrier( WDNSX86B)
| Procedure Description | Max. Load(kg) | Detergent Box | Delay | Speed Wash | Extra Rinse | Prewash | Extra Wash | Less Iron | Max.Water Temp.(°C) | Washing Time (H) | Max.Speed(RPM) | ||
| WDNSX86W WDNSX86B | Case I | Case II | Softener Case | WDNSX86W WDNSX86B | 1400 | ||||||||
| Cotton ECO | 8.0 | × | ● | ○ | ○ | × | × | × | × | × | 60 | 4:52 | 1400 |
| Sportwear | 4.0 | ○ | ● | ○ | ○ | × | ○ | ○ | ○ | ○ | 40 | 0:45 | 1200 |
| Quick | 2.0 | × | ● | ○ | ○ | × | × | × | × | × | Cold | 0:15 | 800 |
| Delicate | 2.5 | × | ● | ○ | ○ | × | ○ | × | × | ○ | 30 | 0:50 | 600 |
| Wool | 2.0 | × | ● | ○ | ○ | × | ○ | × | × | ○ | 40 | 1:07 | 600 |
| Colors | 8.0 | × | ● | ○ | ○ | ○ | ○ | × | × | ○ | Cold 1000 | 1:10 | |
| Jeans | 8.0 | ○ | ● | ○ | ○ | ○ | ○ | ○ | × | ○ | 60 | 8001:45 | |
| Spin Only | 8.0 | × | × | × | ○ | × | × | × | × | ○ | - | 0:12 | 1000 |
| Rinse&Spin | 8.0 | × | × | ○ | ○ | × | ○ | × | × | ○ | - | 10000:20 | |
| Dry Only | 6.0 | × | × | × | ○ | × | × | × | × | × | - | 14003:28 | |
| Mix | 8.0 | ○ | ● | ○ | ○ | ○ | ○ | ○ | ○ | ○ | 40 | 1:13 | 800 |
| Baby Care | 8.0 | ○ | ● | ○ | ○ | ○ | ○ | ○ | ○ | ○ | 30 | 8001:20 | |
| Synthetic | 4.0 | ○ | ● | ○ | ○ | ○ | ○ | ○ | ○ | ○ | 40 | 1:40 | 800 |
| Cotton | 8.0 | ○ | ● | ○ | ○ | ○ | ○ | ○ | ○ | ○ | 40 | 2:40 | 800 |
| 1 Hour W/D | 1.0 | × | ● | ○ | ○ | × | × | × | × | × | 14000:5940 | ||
- Half load for 8.0Kg machine:4.0Kg.
1) Test cycle in compliance with directive 96/60/EC: Set Cotton ECO with temperature of 60C for washing
- The cycle is designed for cotton loads with a normal soil level and is the most efficient in terms of both electricity and water consumption; it should be used for garments which can be washed at 60°C. The actual washing temperature may be differ from the indicated value.
2) Test cycle in compliance with directive 96/60/EC: Set Dry Only for drying - The cycle is designed for cotton loads with a normal soil level and is the most efficient in terms of both electricity and water consumption; it should be used for garments which suitable for machine drying.
● Means must ○ Means optional × Means not necessary
Note : Water and power consumption and programme duration may differ from the table shown, subject to changes in water pressure, water hardness and temperature, ambient temperature, type and amount of laundry, selection of auxiliary functions, and fluctuations in the supply voltage.

Using your washer-drier
5

natural_image
Abstract geometric pattern with orange triangles and white squares on a white background (no text or symbols)Using your washer-drier
Getting the most from your appliance
Organising Laundry
- Read the washing label on each garment to help you sort your washing into different loads.
- Sort the laundry by colour, type of fabric and by how soiled it is. This will help you choose the correct programme and temperature for each wash.
Normal wash Ganlie wash Ganlie wash | 40Warm wash(max 40°C) | Hand washDo not wash | BleachDo not bleach | Chlorine bleachmay be used | Tumble dry Medium(max 150°C.) |
| Chlorine bleachnot be used | Tumble dry Low heat(max 110°C.) | ||||
 Do not iron Do not iron | 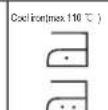 Warm iron medium(max 150°C) Warm iron medium(max 150°C) | 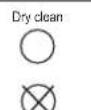 Do not dry clean Do not dry clean |  Dry clean normal cyclepanckam sewn only Dry clean normal cyclepanckam sewn only | 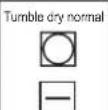 Dry flat Dry flat |  Hang to dry/Line dry Hang to dry/Line dry |


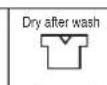








- Do not exceed the maximum load! See the programme selection table for the maximum load for the programme you require.
| Articles / clothes | Approx. weight(g) |
| Cotton quilt covers (single/double) | 900/1500 |
| Bed sheets (single/double) | 600/900 |
| Work clothes | 1120 |
| Large tablecloths | 700 |
| Small tablecloths | 350 |
| Tea napkins | 100 |
| Bath towels | 700 |
| Hand towels | 300 |
| Blouses | 150 |
| Cotton shirts | 300 |
| shirts | 180 |
| cotton dresses | 500 |
| Jeans | 800 |
| Jacket | 800 |
| Handkerchiefs | 100 |
| T-shirts | 150 |
| Shorts | 70 |
| Socks | 50 |
Preparing Laundry
- Treat stains before washing.
- Some items should be put into a cleaning net before going into the washer-drier. i.e. bras with metal wires, tights and lace clothing to prevent damage.
- Check that pockets do not contain any objects which may damage your clothes and the .washer-drier
- Tie up any loose strings on laundry, close zippers and reverse clothing with zips inside out.
- To prevent any large, heavy objects (e.g., buckles, large buttons, etc.) from hitting the glass door, turn your clothing inside out, or remove the heavy objects. These could damage your laundry or the washer-drier.
- Remove any surplus hair, animal fur, sand, and other materials with a brush before washing.
- If clothes have raised fabric turn them inside out.
- Clothes that are not colour fast should be washed separately.
- Insert your clothes into the washer-drier.
- Close the washer-drier door. Ensure that you do not trap any items of clothing between the loading door and the rubber seal.
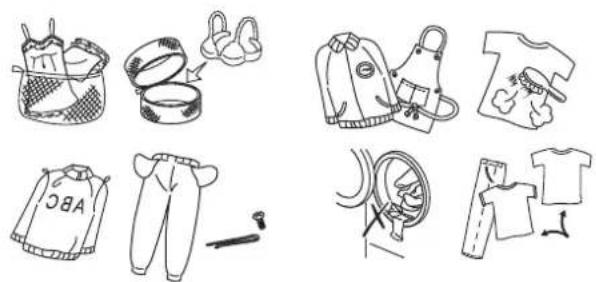
natural_image
Illustration of various clothing and footwear items including a jacket, patterned coat, sweater, jeans, and accessories (no text or symbols)If you require any technical guidance or find that your product is not operating as intended, a simple solution can often be found in the Troubleshooting section of these instructions.
Using your washer-drier
Getting the most from your appliance
Adding Detergent and Softener
- Add detergent into the appropriate dispenser.
- Apply softener before you start washing.
- Apply detergent and softener according to the washing amount, the soiling level, the water hardness in your area and the manufacturer's instructions of these products.

Dilute viscous fabric softener and fabric conditioner with water. Prevent blockage of the overflow. Maximum level is 40ml.
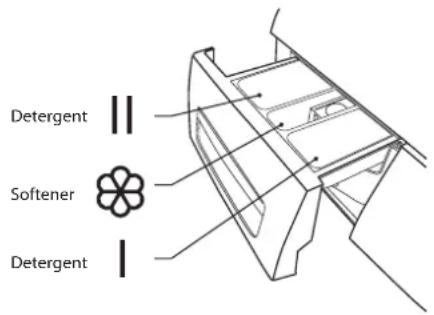
- Do not use the washer-drier when the detergent drawer is removed. It may cause a water leak or it may not work normally.
- If you forget to add detergent, you can drain the washer-drier by running a drain only programme. Then you can add detergent and start the programme again.
- Detergent only reaches the drum when water flushes through the detergent drawer.
- To prevent powder detergent staying in the drawer, dry the inside of the drawer with a cloth. Make sure the powder isn't lumpy when you add it into the drawer.
- If the rinse cycle isn't removing all the detergent from your wash, use less detergent.
- Softener should not exceed the MAX level in the compartment.
Wash out unused softener with a splash of water or a damp cloth after the programme has finished.
Before First Use
- Prior to the first use of the appliance, it is recommended to run a wash programme without clothes. A small amount of washing detergent should be used.
Wash Setting
Standard Washing
- Pull the door handle and put the laundry in the drum. (Refer to Preparation to sort your laundry before it goes into the drum.) Make sure no washing gets caught in the door.
- Close the door and press the On/Off button.
- Turn the Programme selection dial to select your wash programme.
- Select the temperature if desired.
- Add detergent into the detergent drawer. The quantity of detergent will depend on the amount of laundry, the degree of soiling and the water hardness. Use the amount of detergent suggested on the packaging.
- Press the Start/Pause button to start the washing.
- The washer-drier will sound when the programme is complete.
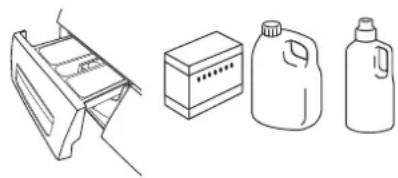
natural_image
Illustration of four different household items: a front-loading refrigerator, a battery pack, a water bottle, and a plastic bag (no text or symbols present)
If the door is locked and you switched the washer-drier off and then on - or if there's a power cut - it will stay locked for 1 minute.


Using your washer-drier
Getting the most from your appliance
Removing Washing (Once programme is finished)

Door remains locked for 1 minute after wash stopped.
- Open the washing machine door and remove your washing.
- Remove any foreign objects to avoid risk of rusting.
-
Leave the door and detergent drawer open so that residual water can evaporate.
-
Changing the selection after the program started?
If you need to change a setting after the wash has started, press on/off, then on/off again, Re-select the program, spin speed and optional functions, and then press the Start / Pause button. (Ensure the Child Lock is off, otherwise the original program will continue.)
- Adding/removing laundry in pause mode?
To press Start/Pause button for 3 seconds, wait until the drum stops rotating. Then the door lock is unlocked, you can add/remove laundry and repress Start/Pause button after close the door.
- Door lock
The icon lock will light up automatically once the program start. The door lock icon will fade out as soon as the program end and the door will be allowed to open automatically.
4.End of program
It will sound for 5 seconds after the end of program and the display will indicate "end" icon.
Using your washer-drier
Getting the most from your appliance
Quick start

flowchart
graph TD
    A["1. Open the door and Load the laundry"] --> B["2. Measure out the detergent"]
    B --> C["3. Close the door"]
    C --> D["4. Plug the power supply"]
    D --> E["5. Press the On/Off"]
    E --> F["6. Select the desired programme"]
    F --> G["7. Press the 【start/pause】"]
After washing :
- The washer-drier will sound several times for 5 seconds.
- It is recommend to close the water tap and pull out the power plug.
Care and maintenance
6

natural_image
Abstract geometric pattern composed of orange triangles on a white background (no text or symbols)
Care and maintenance
Looking after your appliance
Before your maintenance starts, please do pull out the power plug or disconnect power and close the tap.

- Do not use solvents clean to avoid that the washer-drier, it will damage, and toxic gases are generated or exploded.
- Do not use the detergents containing PCMX to clean the .washer-drier
Cleaning and Maintenance of Washer-drier Cabinet
- Proper maintenance on the washer-drier can extend its working life. The surface can be cleaned with diluted nonabrasive neutral detergents when necessary. If there is any water overflow, use the wet cloth to wipe it off immediately.
- No sharp items are allowed to strike the cabinet.
Notes: Do not use formic acid and its diluted solvents or equivalent.
Clean Internal Drum
- The rusts left inside the drum by the metal articles shall be removed immediately with chlorine-free detergents.
- Never use steel wool.
Defrost a Frozen Washing Machine
When the temperature drops below zero and your gets frozen, you may:washer-drier
-
Disconnect the power supply for the washer-drier.
-
Wash the tap with warm water to loosen inlet pipe.
-
Take down inlet pipe and immerse it in warm water.
-
Pour warm water into washing drum and wait for 10 minutes.
-
Reconnect inlet pipe to the tap and check whether inlet and outlet are working normally.
Notes: when the washer-drier is reused, make sure the ambient temperature is above 0^ C
Anti-freeze
If your is located in the room washer-drier where it can get frozen easily, please drain the remaining water inside drain pipe and inlet pipe thoroughly.
Remove the remaining water in inlet pipe:
- Close the tap.
-
Screw off the inlet pipe from tap and put its end into the container.
-
Start up any procedure except single Wash or Drain procedure. Water will be drained out of inlet pipe if any for about 40 seconds.
-
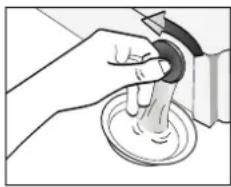
Reconnect the inlet pipe to tap. Remove the remaining water in drain pump (Fig11).
natural_image
Illustration of a hand holding a circular object with a ring, possibly a tool or device (no text or symbols visible)Fig 11
Clean detergent drawer and grooves
-
Press down the arrow location on softener cover inside the drawer.
-
Lift the clip up and take out softener cover and wash all grooves with water.
3.Restore the softener cover and push the drawer into position.
Clean inlet filter
Inlet filter shall must be cleaned if there is not any or insufficient water in when the tap is opened.
Clean the tap filter:
-
Close the tap.
-
Select any procedure except "Wash" or "Drain" procedure.
-
Press the button "Start/Pause" and keep the procedure running for about 40 seconds.
-
Remove the inlet pipe from the tap.
-
Use water to wash the filter.
- Reconnect the inlet pipe.
Washing the filter in washing machine:
-
Screw off the inlet pipe from the backside of the machine.
-
Pull out the filter with long nose pliers and reinstall it back after being washed.
-
Reconnect the inlet pipe.
-
Open the tap and make sure there is no water leakage.
-
Close the tap.
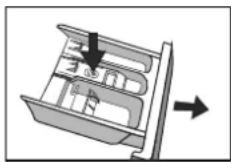
Fig 12
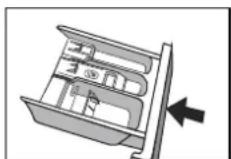
Fig 13

Fig 14
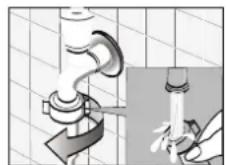
Fig 15
If you require any technical guidance or find that your product is not operating as intended, a simple solution can often be found in the Troubleshooting section of these instructions,
Care and maintenance
Looking after your appliance
Notes: Generally, the tap filter is washed first and then the filter in washer-drier will be washed.
If only the filter in is washed, washer-drier then the steps 1\~3 in cleaning the tap filter shall be repeated. (Fig16,17)
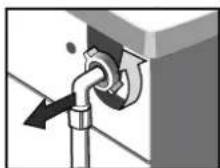
Fig 16 Fig 17

!
Pull out the power plug to avoid electrical shock before washing.
After using the , take out the washer-drier clothes and close the door tightly to avoid pinching the children.
Remove foreign matters
Drain Pump Filter:
Drain pump filter can filter the yarns and small foreign matters from the washings.
Clean the filter periodically to ensure the normal operation of washer-drier.
According to the soil level within the cycles and the frequency of the cycles, you have to inspect and clean the filter regularly.
The pump should be inspected if the machine does not empty and/or spin; The machine makes an unusual noise during draining due to objects such as safety pins, coins etc. blocking the pump.
Clean the pump filter :
-
After the power is disconnected, use hand to open the filter cover(Fig18).
-
Turn the filter down as shown with the figure and take out sundries matters .(Fig19)
-
Reinstall each part back after sundries matters are removed .(Fig20)
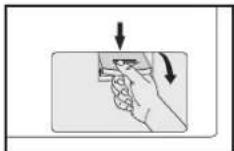
Fig 18
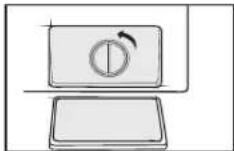
Fig 19
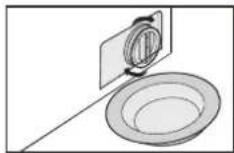
Fig 20
Warning!
When the appliance is in use and depending on the programme selected there can be hot water in the pump. Never remove the filter during a wash cycle, always wait until the appliance has finished the cycle, and is empty. When replacing the filter, ensure it is securely retight end so.

Care and maintenance
Looking after your appliance
Technical specification
| Brand | BUSH |
| Type/Description | WDNSX86W, BWDNSX86 |
| Capacity | 8kg |
| Spin Speed | 1400 rpm |
| Energy efficiency class | B |
| Annual energy consumption always using the driver | 1296 kWh/annum |
| Annual energy consumption never using the driver | 240 kWh /annum |
| Power consumption of off-mode | 0.5W |
| Annual water consumption always using the driver | 20800L/annum |
| Annual water consumption never using the driver | 11200L/annum |
| Spin-drying efficiency class | B |
| Standard washing cycle | Cotton ECO |
| Standard drying cycle | Dry Intensive |
| Energy consumption of the washing cycle | 1.20 kwh/cycle |
| Energy consumption of the drying cycle | 5.28 kwh/cycle |
| Programme duration of standard washing cycle | 292 min |
| Programme duration of standard drying cycle | 370 min |
| Water consumption of the standard washing cycle | 56L/cycle |
| Water consumption of standard drying cycle | 48L/cycle |
| Remaining moisture content of the standard washing cycle | 53% |
| Remaining moisture content of the standard drying cycle | 0 % |
| Noise level of washing | 59dB (A) |
| Noise level of spinning | 78dB (A) |
| Noise level of drying | 62dB (A) |
| Mounting | Free standing |
| Height | 850 mm |
| Width | 595 mm |
| Depth | 470 mm |
| Power consumption | 2050W |
| Rate voltage/frequency | 220-240V~/50Hz |
| Water pressure | 0.05-1 MPa |
If you require any technical guidance or find that your product is not operating as intended, a simple solution can often be found in the Troubleshooting section of these instructions,
Product support

natural_image
Abstract orange geometric shapes on white background (no text or symbols)
natural_image
Abstract geometric pattern composed of orange triangles and white squares on a white background (no text or symbols)
Product support
Help is always at hand
Troubleshooting
- Washer-drier does not operate?
You can check if the door is closed tightly, power plug is inserted well and then press start/pause button.
- does not receive water? Washer-drier
You can check if the water tap is opened and clean the filters of water inlet hose.
- is not draining water? Washer-drier
You can check the drain hose and clean pump filter.
- is vibrating ?Washer-drier
You can check if the feet are adjusted well and make sure transportation screws are removed.
- The washing result is poor?
You can select suitable program and use more detergent.
- No water is seen in the drum during washing?
No failure. The water is in the lower part of the drum.
- There are residues of detergent on the clothes?
Some detergents contain ingredients which are not soluble in water and which may form white stains on your clothes. Please adjust your machine, carry out an additional rinse, or eliminate the stains after drying, with a brush.
- There are grey stains on the clothes?
These stains may be caused by oil, cream or ointment. In the next washing operation, use the maximum detergent amount declared by the detergent producer.
If you require any technical guidance or find that your product is not operating as intended, a simple solution can often be found in the Troubleshooting section of these instructions,
Product support
Help is always at hand
Help and assistance
If you require any technical guidance or find that your washer-drier is not operating as intended, a simple solution can often be found in the Troubleshooting section of these instructions or online at
www.argos-support.co.uk
If you still require further assistance, call one of our experts on 0345 257 7271* To help give us give you a fast and efficient service please have the following information ready:
| Model Ref. | You can find these on the rating plate - a small information panel (usually a sticker or metal plate) on the rear of your appliance | |
| Serial number | ||
| Date of purchase | This will be shown on your receipt |
Local call rates applies*
Lines open 8am-7pm Monday to Saturday and 10am-4pm Sunday.
*Calls to Argos enquiry lines may attract a charge and set up fee from residential lines depending on your call plan/tarif. Mobile and other providers costs may vary, see www.bt.com/pricing for details.
For Security and training purposes, telephone calls to and from customer service centres maybe recorded and monitored. Calls from Republic of Ireland will attract international call charges.

This appliance complies with the following EEC directives:
2006/95/EEC low voltage directive
2004/108/EMC directive
2009/125/EC EU Directive
Notes on disposal:
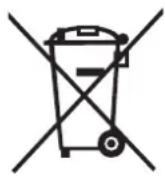
This marking indicates that this product should not be disposed with other household wastes throughout the EU. To prevent possible harm to the environment or human health from uncontrolled waste disposal, recycle it responsibly to promote the sustainable reuse of material resources. To return your used device, please use the collection systems or contact the retailer where the product was purchased. They return and can take this product for environmental safe recycling.
If you require any technical guidance or find that your product is not operating as intended, a simple solution can often be found in the Troubleshooting section of these instructions,
Product support
Help is always at hand
BUSH
Call us now and activate your 12 month guarantee
Thank you for choosing Bush. Your new product is guaranteed against faults and breakdowns for 12 months. Don't forget to register it with us today so we can provide you with our best possible after-sales service and useful updates.
www.bushregistration.co.uk
FREEPHONE*
0800 597 8548
Lines are open 8am - 8pm, 365 days a year. *Calls may be recorded and monitored.
Your Bush Guarantee
This product is guaranteed for twelve months from the date of original purchase. Any defect that arises due to faulty materials or workmanship will be repaired free of charge (or if applicable the product will be replaced or the purchase price refunded) where possible during this period by the dealer from who your purchased the unit.
The guarantee is subject to the following provisions:
- The guarantee does not cover accidental damage, misuse, cabinet parts, knobs or consumable items.
- The product must be correctly installed and operated in accordance with the instructions contained in the manual.
- It must be used solely for domestic purposes. The guarantee will be rendered invalid if the product is
re-sold or has been damaged by inexpert repair.
- Specifications are subject to change without notice.
- Bush disclaim any liability for loss or damage arising from the breakdown of the product.
- This guarantee is in addition to and does not diminish your statutory or legal rights.
Important Data Protection Information
If you provide us with information about another person, you confirm that they have appointed you to act for them, to consent to the processing of their personal data including sensitive personal data and that you have informed them of our identity and the purposes (as set out in the Important Data Privacy notice displayed overleaf) for which their personal data will be processed.
You are entitled to ask for a copy of the information we hold about you (for which we may charge a small fee) and to have any inaccuracies in your information corrected.
For quality control and training purposes, we may monitor or record your communications with us.
If your personal details change, if you change your mind about any of your marketing preferences or if you have any queries about how we use your information, please let us know by contacting our Data Protection Officer, Domestic & General, Leicester House 17 Leicester Street, Bedworth, Warwickshire CV12 8JP.
Guarantor Argos Limited - 189 - 199 Avebury Blvd, - Milton Keynes - MCS PNow
BUSH
- Help and Guidance
- Contents
- Safety information
- Getting to know your washer-drier
- Installing your washer-drier
- Functions
- Using your washer-drier
- Care and Maintenance
- Product support
- 1
- Safety information
- Important - Please read these instructions fully before installing or operating
- Getting to know your washer-drier
- 2
- Ready? Let's begin...
- Accessories
- Tools
- Installing your washer-drier
- 3
- Installing your washer-dried
- Installation requirements
- Unpacking
- Removing the transport bolts
- Levelling feet
- Installing your washer-drie
- Bringing it all together
- Connections
- Electrical
- Functions
- 4
- Turning the machine on
- program selection
- Main program
- - Cotton
- - Cotton ECO
- - Baby Care
- - Synthetic
- - Delicate
- - Wool
- - Colours
- - Spin Only
- - Quick
- - Rinse&Spin
- - Drain Only
- • Mix
- Simple everyday use
- - Sports Wear
- - Jeans
- - Hour W/D1
- - My Cycle
- Auxiliary function
- - Prewash
- - Speed Wash
- - Extra Rinse
- - Delay
- - Extra Wash
- - Less Iron
- - Reload
- - Child Lock
- - Suppression of the acoustic signals
- - Bubble Removal Function
- Using your washer-drier
- Getting the most from your appliance
- Organising Laundry
- Preparing Laundry
- Adding Detergent and Softener
- Before First Use
- Wash Setting
- Standard Washing
- After washing :
- Care and maintenance
- 6
- Looking after your appliance
- Cleaning and Maintenance of Washer-drier Cabinet
- Clean Internal Drum
- Defrost a Frozen Washing Machine
- Anti-freeze
- Clean detergent drawer and grooves
- Clean inlet filter
- Notes: Generally, the tap filter is washed first and then the filter in washer-drier will be washed.
- !
- Remove foreign matters
- Clean the pump filter :
- Warning!
- Product support
- Troubleshooting
- Help and assistance
- Notes on disposal:
- BUSH
- Call us now and activate your 12 month guarantee
- www.bushregistration.co.uk
- Your Bush Guarantee
- The guarantee is subject to the following provisions:
- Important Data Protection Information
Brand : BUSH
Model : WDNSX86B
Category : Washing machine