CS-950 - Router Planet - Free user manual and instructions
Find the device manual for free CS-950 Planet in PDF.


| Product Type | Router |
| Brand | Planet |
| Model | CS-950 |
| Dimensions (W x D x H) | Approximately 200 x 150 x 40 mm |
| Weight | Approximately 0.5 kg |
| Power Supply | 12V DC, 1A external adapter |
| Wireless Standard | IEEE 802.11 b/g/n |
| Frequency Band | 2.4 GHz |
| Max Wireless Data Rate | Up to 300 Mbps |
| LAN Ports | 4 x 10/100 Mbps Fast Ethernet |
| WAN Port | 1 x 10/100 Mbps Fast Ethernet |
| Antenna Type | 2 external omnidirectional antennas (detachable) |
| Security | WEP, WPA/WPA2, WPS, MAC address filtering |
| Firewall | NAT, SPI firewall |
| VPN Support | PPTP, L2TP, IPSec passthrough |
| Management | Web-based GUI, firmware upgrade via web |
| Operating Temperature | 0°C to 40°C |
| Humidity | 10% to 90% non-condensing |
| Maintenance | Clean with a soft, dry cloth |
| Safety | Keep away from water and heat sources |
| Spare Parts | Power adapter, antennas, mounting kit (if applicable) |
| Reparability | User replaceable antennas, professional repair for internal components |
Frequently Asked Questions - CS-950 Planet
User questions about CS-950 Planet
0 question about this device. Answer the ones you know or ask your own.
Ask a new question about this device
Download the instructions for your Router in PDF format for free! Find your manual CS-950 - Planet and take your electronic device back in hand. On this page are published all the documents necessary for the use of your device. CS-950 by Planet.
USER MANUAL CS-950 Planet
UTM Content Security Gigabit Gateway
CS-950
Quick Installation Guide
Table of Contents
- Package Contents .... 3
- Hardware Introduction ...... 4
2.1 Hardware Interface.... 4
2.2 Hardware Installation....6
2.2.1 Desktop Installation....6
2.2.2 Rack Mounting 7
- Setup of the UTM Content Security Gateway....9
3.1 Requirements....9
3.2 Logging in to the Security Gateway....9
3.3 Setting the LAN/WAN IP Interfaces 10
- Appendix ......11
- Further Information ....12
1. Package Contents
- CS-950 x 1
- Quick Installation Guide x 1
- Adapter x 1
- Power Cord x 1
- Console Cable x 1
- Ethernet Cable x 1
- Screw Package x 1
- Rack-mount Ear x 2
- Feet Pads x 4
If any of the above items are damaged or missing, please contact your dealer immediately.
2. Hardware Introduction
The following are instructions for setting up PLANET CS-950. Refer to the illustration and follow the simple steps below to quickly install your UTM Content Security Gateway.
2.1 Hardware Interface
Front Panel:

■ Power Indicator: Lights up when the power is on.
■ System Indicator: Blinks frequently when system is rebooting. When it starts to blink irregularly, the system boots successfully.
■ Ethernet Port 1\~4 Indicators:
| Port Description | |||
| 1~4 | LED1 (Right) | Green | "Steady on" indicates the port is connected to a network device."Blink" indicates there is traffic on the port. |
| LED2 (Left) | Green | "Steady on" indicates the port is connected at 1000Mbps speed. | |
| Orange | "Steady on" indicates the port is connected at 100Mbps speed. | ||
| Off | "Turn off" indicates the port is connected at 10Mbps speed. | ||
Rear Panel:

■ DC in: 12V DC, 3.3A power input.
■ Console Port: A DB-9 console port (115200, 8, N, 1) to inspect internal network setting, or restore to its factory default.
■ USB Port: USB 2.0 port for system configuration backup and recovery.
■ Reset Button: Power on the device and press the reset button for five seconds to reboot it or twenty seconds to restore it to factory default settings.
■ Port 1\~4:
| Port Description | |
| 1 It is a LAN port for connecting to a switch. | |
| 2 It is a WAN port for connecting to a perimeter router. | |
| 3 | Default is off. It can be defined as LAN Port or WAN Port. |
| 4 | Default is off. It can be defined as WAN Port or DMZ Port.DMZ Port is for providing the public with services, such as email or Web, using a physically-separated network segment, while at the same time preventing any potential security threats. |
■ Port LED Indications:
| LED State | Description | |
Port1~4D2 D1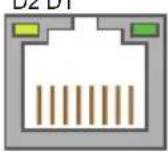 | D1 Green Port is connected at the 1Gbps. | |
| D1 Orange Port is connected at the 100Mbps. | ||
| D1 Off Port is connected at the 10Mbps. | ||
| D2 Flashing Green Network Activity at the Port. | ||
| D2 Green Correct cable is used and power is on port. | ||
| D2 Off No link. | ||

The reset button is an SMT component; please don't press it too hard. Otherwise, damage to reset function may happen.
2.2 Hardware Installation
2.2.1 Desktop Installation
To install the CS-950 on desktop, simply follow the following steps:
Step 1: Attach the rubber feet to the bottom of the CS-950.
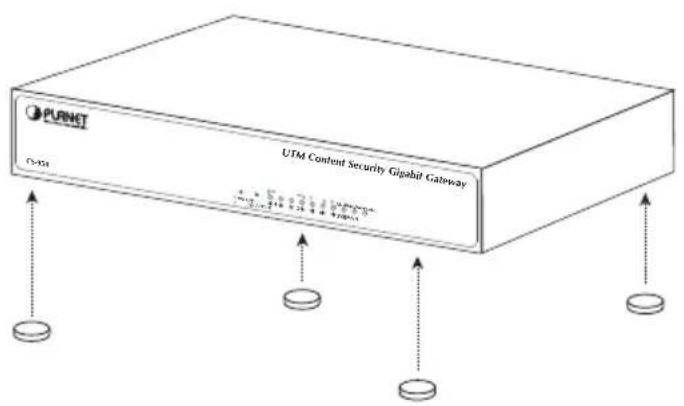
Step 2: Place the CS-950 on desktop.
Step 3: Keep enough ventilation space between the CS-950 and the surrounding objects.

Note
When choosing a location, please keep in mind the environmental restrictions should be under the specifications of CS-950.
Step 4: Connect your CS-950 to hub / switch.
A. Connect one end of a standard network cable to the LAN port (port 1) on the rear panel of the CS-950.
B. Connect the other end of the cable to the hub / switch.

Note
The UTP Category 5, 5e, 6 network cabling with RJ45 tips is recommended.
Step 5: Connect your CS-950 to internet.
A. Connect one end of a standard network cable to the WAN port (port 2) on the rear panel of the CS-950.
B. Connect the other end of the cable to the ADSL router's LAN port or an upper layer port to outer network layer.

Note
If there is only one line connected to the outer network in your network environment, it is suggested that you use WAN port (port 2).
Step 6: Power on the CS-950 by the included 12V/3.3A DC adapter. When the CS-950 receives power, the Power LED should remain solid Green.
2.2.2 Rack Mounting
To install the CS-950 in a 19-inch standard rack, follow the instructions described below.
Step 1: Place your CS-950 on a hard flat surface, with the front panel positioned towards your front side.
Step 2: Attach a rack-mount bracket to each side of the CS-950 with supplied screws attached to the package. In the picture below, it shows how to attach brackets to one side of the CS-950.
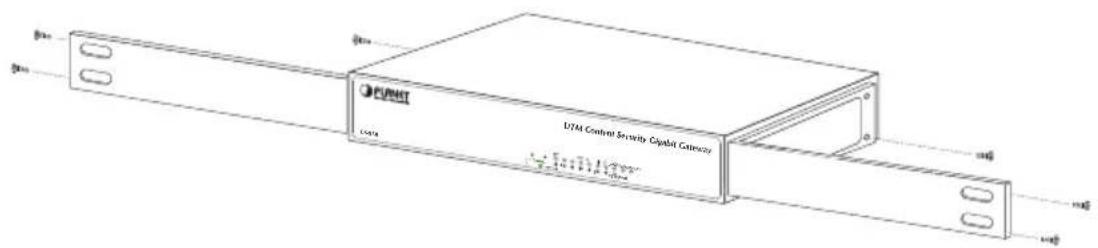

Note
You must use the screws supplied with the mounting brackets. Damage caused to the parts by using incorrect screws would invalidate the warranty.
Step 3: Secure the brackets tightly.
Step 4: Follow the same steps to attach the second bracket to the opposite side.
Step 5: After the brackets are attached to the CS-950, use suitable screws to securely attach the brackets to the rack, as shown in the picture below.
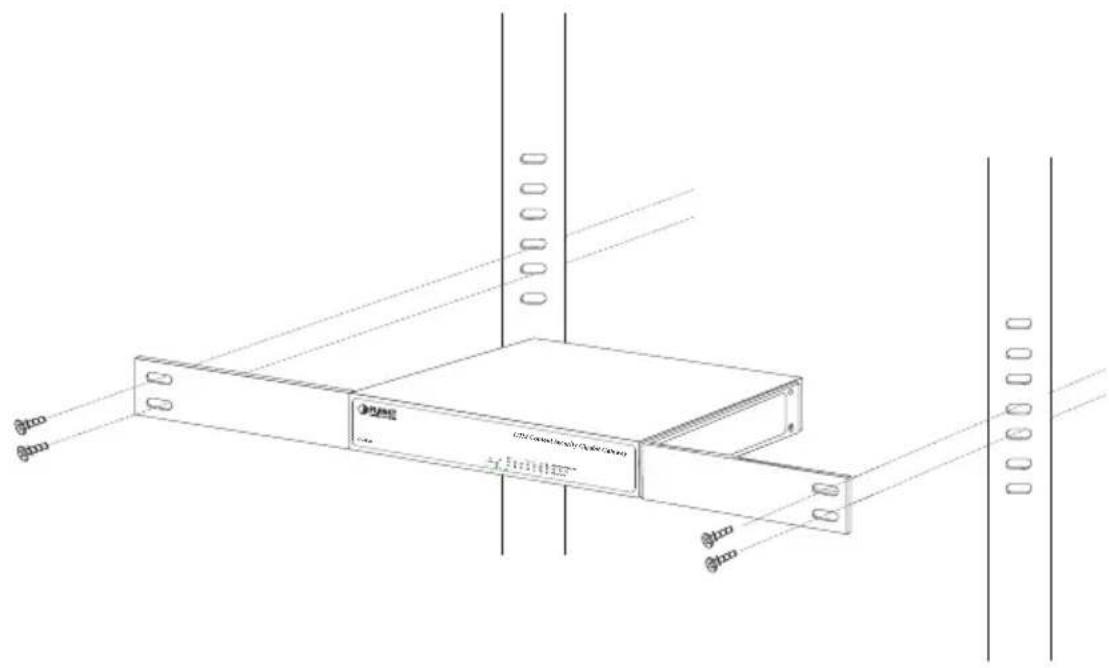
natural_image
Technical line drawing of a server rack unit with mounting holes and ventilation ducts (no text or symbols)
Note
The width of the rack should be at least 453 mm.
Step 6: Proceed with Steps 4, 5 and 6 of session 2.2.1 Desktop Installation to connect the network cabling and power on the CS-950.
3. Setup of the UTM Content Security Gateway
3.1 Requirements
Please confirm the following items before configuration:
- Please confirm the network is working properly: It is strongly suggested to test your network connection by connecting your computer directly to ISP.
- Suggested operating systems: Windows 7 / 8 / 10.
- Recommended web browsers: IE / Firefox / Chrome.
3.2 Logging in to the Security Gateway
Then refer to the steps to configure the CS-950:
Step 1: Connect the IT administrator's PC and CS-950's LAN port (port 1) to the same hub / switch, and then launch a browser to link the management interface address which is set to http://192.168.1.1 by default. Therefore, the IP addresses of LAN PC must be configured within the range between 192.168.1.2 and 192.168.1.254 inclusively, and assigned the subnet mask of 255.255.255.0.
Step 2: The browser prompts you for the login credentials. (Both are "admin" by default.)
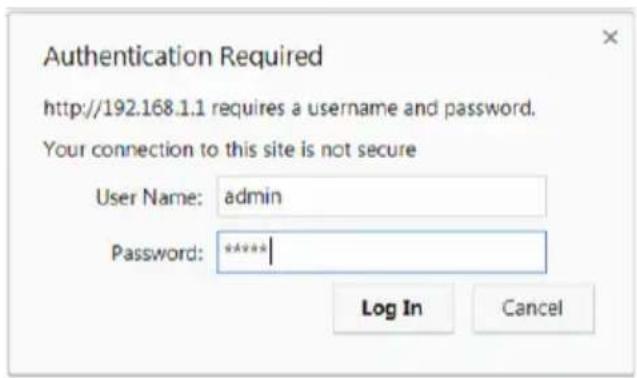
Default IP Address: 192.168.1.1
Default User Name: admin
Default Password: admin

Note
Administrators are strongly suggested to change the default admin and password to ensure system security. Please follow these steps:
Configuration > Administration > Administrator > Account and Privilege. And then click on "Save" to complete setting.
3.3 Setting the LAN/WAN IP Interfaces
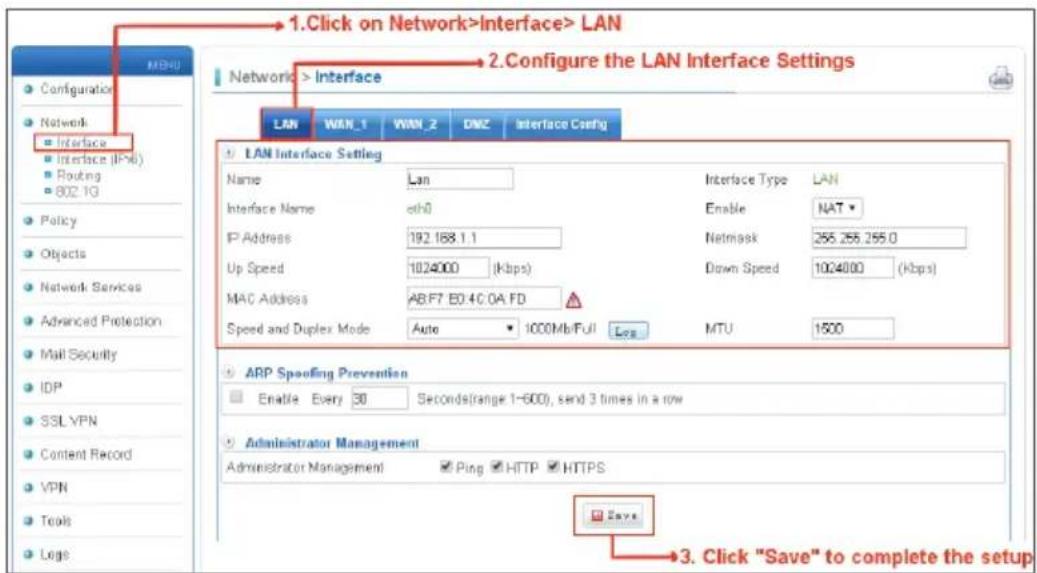
Step 1: Click on Network > Interface > LAN (Port 1) to configure the LAN settings. Lastly, click on "Save" to complete the setup.
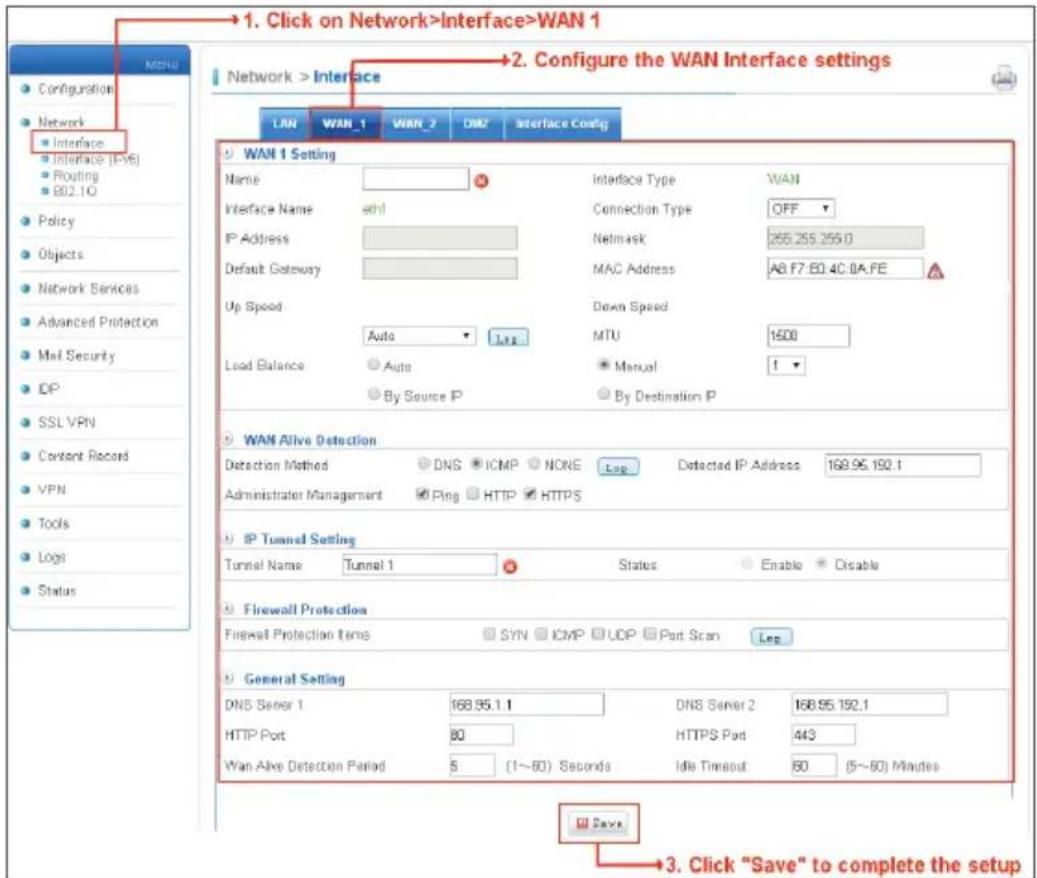
Step 2: Click on Network > Interface > WAN 1 (Port 2) to configure the WAN settings. Lastly, click on "Save" to complete the setup.
4. Appendix
| Appendix A: Default Setting | |
| Default IP Address 192.168.1.1 | |
| Default Login User Name admin | |
| Default Login Password admin | |
| Default DHCP Server On | |
| Default LAN Port Ethernet Port 1 | |
| Default WAN Port Ethernet Port 2 | |
| Appendix B: User's Manual | |
| User's Manual |  |
5. Further Information
Thank you for purchasing PLANET CS-950. The above steps introduce the simple configuration of the CS-950. If you have other questions, please contact the local dealer where you purchased this product or you can contact PLANET directly at the following email address: support@planet.com.tw.
Copyright © PLANET Technology Corp. 2017.
Contents are subject to revision without prior notice.
PLANET is a registered trademark of PLANET Technology Corp. All other trademarks belong to their respective owners.
- UTM Content Security Gigabit Gateway
- Table of Contents
- Package Contents
- Hardware Introduction
- Hardware Interface
- Front Panel:
- Rear Panel:
- Hardware Installation
- Desktop Installation
- Rack Mounting
- Setup of the UTM Content Security Gateway
- Requirements
- Logging in to the Security Gateway
- Setting the LAN/WAN IP Interfaces
- Appendix
- Further Information
Brand : Planet
Model : CS-950
Category : Router