
Premium Autofocus KQ245AA - Security Camera HP - Free user manual and instructions
Find the device manual for free Premium Autofocus KQ245AA HP in PDF.


| Product Type | Security Camera |
| Model | Premium Autofocus KQ245AA |
| Brand | HP |
| Dimensions | 85 x 45 x 45 mm (3.3 x 1.8 x 1.8 in) |
| Weight | 120 g (4.2 oz) |
| Power Supply | USB 5V DC, 1A (cable included) |
| Resolution | 1920 x 1080 pixels (Full HD) |
| Frame Rate | 30 fps |
| Night Vision | IR LEDs, range up to 10 meters |
| Field of View | 110° diagonal |
| Audio | Built-in microphone and speaker (two-way audio) |
| Connectivity | USB 2.0 |
| Storage | Not included; utilizes computer or cloud storage |
| Mounting | Built-in tripod mount and clip |
| Compatibility | Windows, macOS, Linux |
| Operating Temperature | 0°C to 40°C (32°F to 104°F) |
| Autofocus | Yes, premium autofocus with face tracking |
| Motion Detection | Yes, configurable sensitivity |
| Privacy Shutter | Integrated physical shutter |
| Cleaning | Use a soft, dry cloth; avoid liquids |
| Safety | Indoor use only; keep away from moisture and heat |
Frequently Asked Questions - Premium Autofocus KQ245AA HP
User questions about Premium Autofocus KQ245AA HP
0 question about this device. Answer the ones you know or ask your own.
Ask a new question about this device
Download the instructions for your Security Camera in PDF format for free! Find your manual Premium Autofocus KQ245AA - HP and take your electronic device back in hand. On this page are published all the documents necessary for the use of your device. Premium Autofocus KQ245AA by HP.
USER MANUAL Premium Autofocus KQ245AA HP
natural_image
Green logo with stylized 'hp' letters inside a circle (no text or symbols beyond the graphic design)HP Webcam User's Guide
Version 1.0
Copyright © 2008 Hewlett-Packard Development Company, L.P.
The information contained herein is subject to change without notice.
The only warranties for HP products and services are set forth in the express warranty statements accompanying such products and services. Nothing herein should be construed as constituting an additional warranty. HP shall not be liable for technical or editorial errors or omissions contained herein.
Product Registration
Registration is quick, easy and offers: e-mail updates containing notifications about product enhancements, the most recent support alerts, and driver updates specific to the product(s) you own.
For faster help, be sure to register your recently purchased product at https://register.hp.com
Table of Contents
Welcome 1
Overview 1
Using Your HP Webcam 3
Recording a Video.... 3
Starting a Video Chat 4
Using Your Webcam as a Video Monitor 5
Editing a Video 6
Editing a Video in ArcSoft WebCam Companion 6
Editing a Video in ArcSoft Videolmpression 6
Taking a Picture 7
Editing a Picture 7
Adjusting Settings 9
Adjusting Brightness and Control....9
Creating a Personal Profile 10
Adjusting Capture Settings.... 11
Adjusting Webcam Settings.... 12
Troubleshooting 13
Welcome
Congratulations on purchasing one of the following products:
■HP Deluxe Webcam
■HP Premium Autofocus Webcam
This guide shows you how to use your new webcam to record videos, start video chats, use your webcam as a security cam, take pictures, and adjust the webcam settings.
Overview
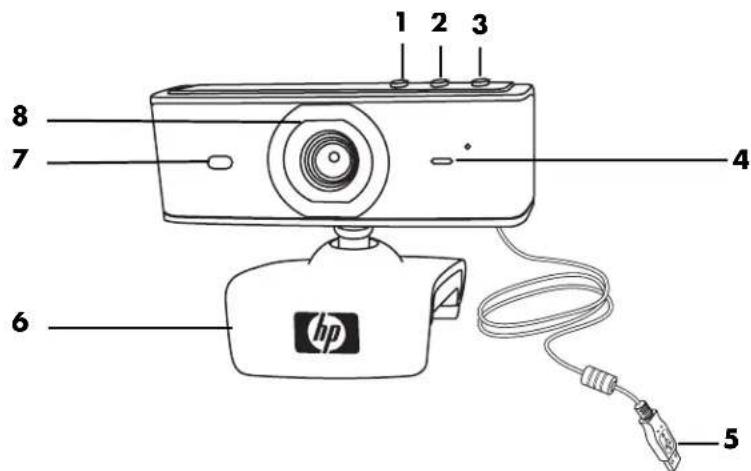
1 Video Record button
2 HP Instant Chat button
3 Snapshot button
4 Integrated microphone
5 USB connector
6 Adjustable clip
7 Status LED
8 Camera lens
Using Your HP Webcam
Recording a Video
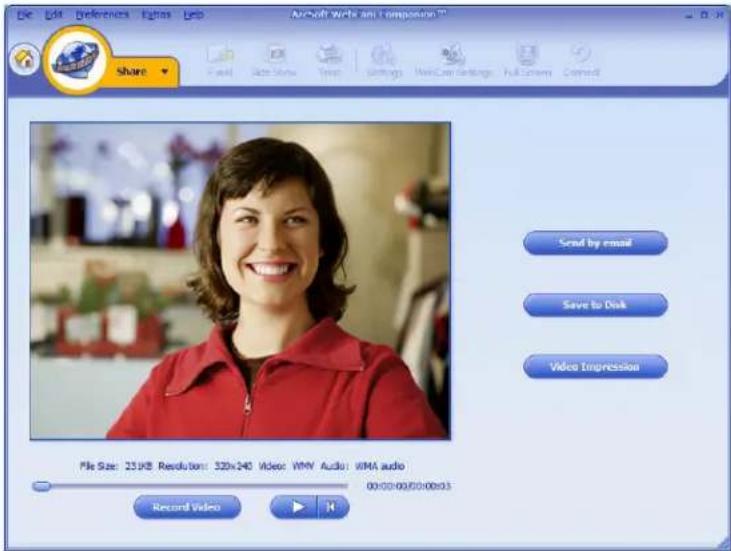
1 Press the Video Record 📋 button on your webcam to open ArcSoft WebCam Companion™.
2 If prompted, select a folder to store your videos.
3 Press the Video Record 📋 button or click Record Video to begin recording.
4 Press the Video Record 📋 button again or click Stop Recording to stop recording.
5 Select one of the following buttons:
Send by email: Enables you to send the video as an email attachment.
■ Save to disk: Enables you to save the video on your computer.
■ Videolmpression: Opens the video for editing in ArcSoft Videolmpression®.
To learn more about using ArcSoft WebCam Companion, click the Help menu.
Starting a Video Chat
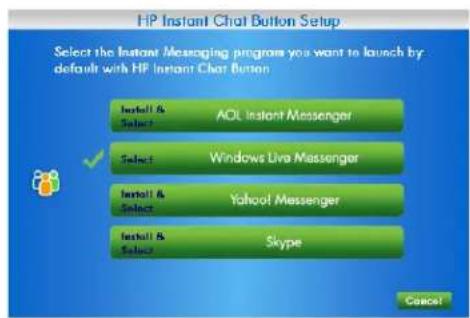
You can add live video to the most popular instant messaging (IM) applications (ISP connection required):
■AOL ® Instant Messenger™ (AIM®)
■Windows Live ™ Messenger
■Yahoo! ® Messenger
■Skype ®
1 Press the HP Instant Chat button on your webcam.
2 Select the instant messaging (IM) application you want to use.
3 If prompted, follow the onscreen instructions to install and set up the IM application.
4 Follow the video chat steps in the IM application's documentation.
NOTE: The HP Instant Chat Button Setup options appear only during initial setup. The next time you press the HP Instant Chat button, the selected IM application opens automatically.
To select a different IM application after you complete initial setup, click
Start > All Programs > ArcSoft Magic-i 3 > HP Instant Chat Button Setup.
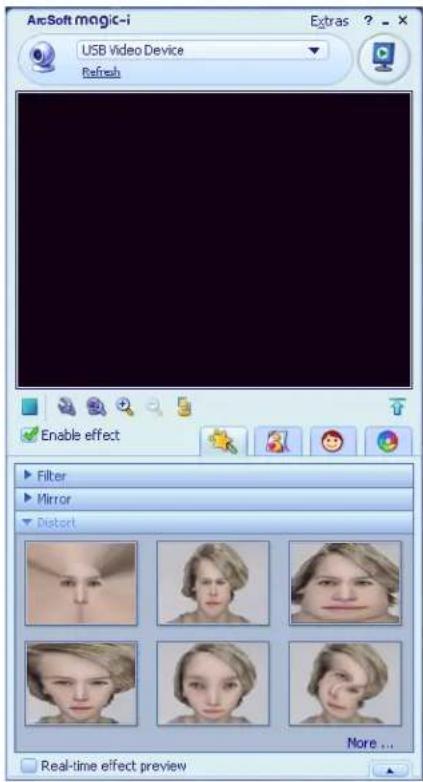
Now you're ready to enhance your video chats with special effects and to broadcast videos from your PC hard drive. To learn more about using ArcSoft Magic-i™ 3, click the Help ? icon in the upper-right corner of the Magic-i 3 window.
Using Your Webcam as a Video Monitor
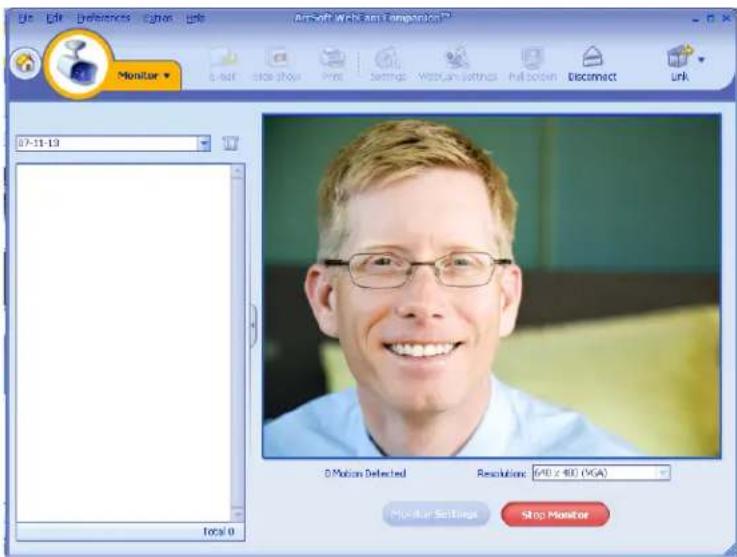
1 Double-click the WebCam Companion icon on the Windows® desktop.
2 Click Monitor

3 Click Start Monitor to begin monitoring.
4 Click Stop Monitor to finish monitoring and save the video to your PC.
If you want to send a video snapshot by e-mail, upload the video to your FTP site, or change the location of your media folder, ArcSoft WebCam Companion can do all that and more. To learn more about using ArcSoft WebCam Companion, click the Help menu.
Editing a Video
You can edit your videos in ArcSoft WebCam Companion or in ArcSoft VideoImpression. For basic editing functions, use ArcSoft WebCam Companion, for advanced editing functions use ArcSoft VideoImpression.
Editing a Video in ArcSoft WebCam Companion
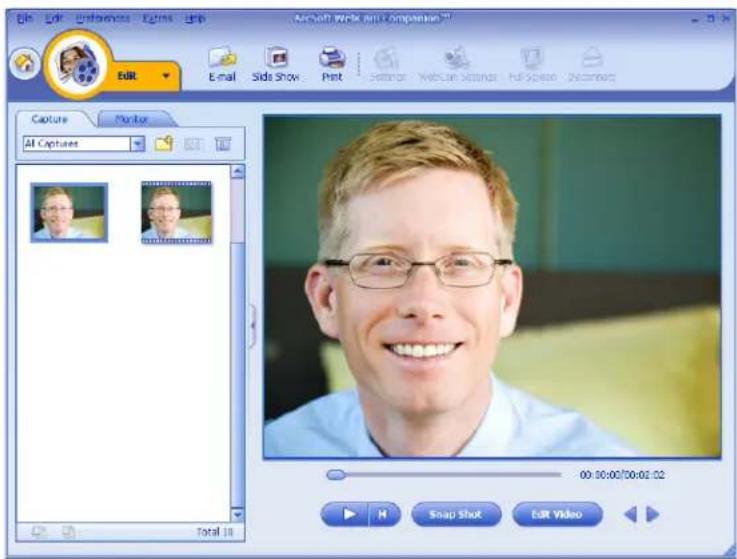
1 Double-click the WebCam Companion icon on the Windows desktop.
2 Click Edit
3 Highlight the video you want to edit, and then click Edit Video. To learn about specific editing functions, click the Help menu.
Editing a Video in ArcSoft VideoImpression
1 Double-click the ArcSoft Videolmpression icon on the Windows desktop.
2 Click Open an Existing Project.
3 Select the video you want to edit.
To learn about using ArcSoft VideoImpression, click the Help menu.
Taking a Picture
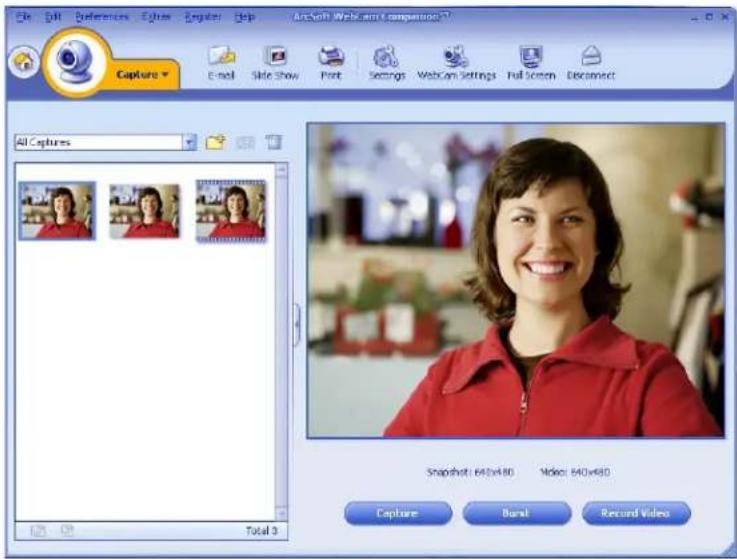
1 Press the Snapshot 📄 button on your webcam to open ArcSoft WebCam Companion.
2 Press the Snapshot 📋 button again or click Capture to take the picture. To learn more about taking pictures with ArcSoft WebCam Companion, click the Help menu.
Editing a Picture
1 Double-click the HP Photosmart Essential icon on the Windows desktop.
2 Click the Help ? icon in the upper-right corner of the Photosmart Essential window to learn more about editing, printing, and sharing pictures with HP Photosmart Essential.
Adjusting Settings
This chapter shows you how to adjust settings in ArcSoft Magic-i 3 and ArcSoft WebCam Companion.
Adjusting Brightness and Control
1 Double-click the Magic-i 3 📁 icon on the Windows desktop.
2 Click the Generic Settings icon.
3 Remove the check mark from the Auto Enhance box.
4 Drag the sliders to adjust these settings:
Brightness
Contrast
5 Click OK.
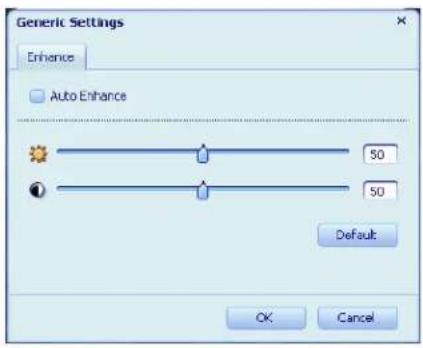
NOTE: To restore all the factory settings, click Default.
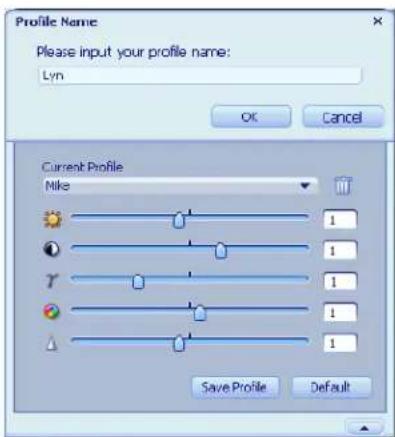
Creating a Personal Profile
1 Double-click the Magic-i 3 icon on the Windows desktop.
2 Click the Profiles tab. (If this tab is not visible, click the Expand tab to expand the screen.)
3 Drag the sliders to adjust these settings:
Brightness
Contrast
gamma
Saturation
Sharpness
4 Click Save Profile.
5 Enter a name for the profile.
6 Click OK.
NOTE:
■To restore the factory settings, click Default.
■To apply a previously saved profile, select the profile name from the Current Profile list.
■To delete a profile, select the profile name from the Current Profile list, and then click the Delete 📋 icon.
Adjusting Capture Settings
1 Double-click the WebCam Companion

icon on the Windows desktop.
2 Click Capture

3 Click the Settings icon.
4 Adjust any of these settings:
■Image Format sets the default file format for still image captures.
■Image Quality sets the default resolution for still image captures.
■Video Format sets the default file format for videos you record.
■ Video Quality sets the default resolution for videos you record.
■ Number of photos in burst sets the number of images captured in burst mode.
- With Audio turns the webcam's microphone on and off.
5 Click OK.
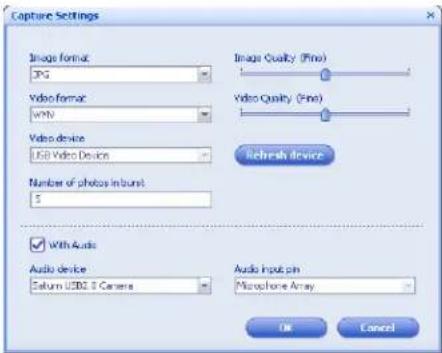
NOTE: To restore all the factory settings, click Refresh device.
Adjusting Webcam Settings
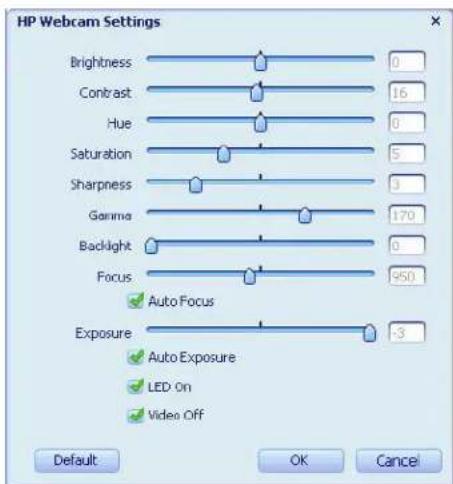
1 Do one of the following:
■Double-click the WebCam
Companion Icon on the
Windows desktop, click Capture 🔒, and then click the WebCam Settings icon.
■ Double-click the Magic-i 3 📋 icon on the Windows desktop, and then click the Settings 🔊 icon.
2 Do any of the following:
■Drag the sliders to adjust the individual settings.
■(HP Premium Autofocus Webcam only) Manually adjust the focus by removing the check from the Auto Focus check box and then dragging the Focus slider.
3 (Magic-i 3 only) Do any of the following:
■ Manually adjust the exposure by removing the check from the Auto Exposure check box and then dragging the Exposure slider.
■ Turn off the LED by removing the check from the LED On check box.
■ Turn off the video input by inserting a check in the Video Off check box. When the video is turned off, you cannot be seen, but you can still be heard.
4 Click OK.
NOTE: To restore the factory settings, click Default.
Troubleshooting
Problem Solution
| The image is fuzzy Make sure that you removed the protective film from the webcam lens.(HP Premium Autofocus Webcam only) Turn off the autofocus feature and use the software settings to manually adjust the focus. SeeAdjustingWebcam Settingsfor details. | |
| I don’t want to use Magic-i 3 with my IM application | Open your IM application and use the preference settings to select a different video device. See the documentation for your IM application for details. |
| I closed Magic-i 3 during a chat, and now my webcam isn’t connected to my IM application | Reopen Magic-i 3 by double-clicking the Magic-i 3icon on your computer desktop, or select a different video device in your IM application. See your IM documentation for details. |
| I want to turn off the autofocus feature (HP Premium Autofocus Webcam only) | 1 Do one of the following:Double-click theWebCam Companionicon on the Windows desktop, and then click theWebCam Settingsicon.Double-click theMagic-i 3icon on the Windows desktop, and then click theSettingsicon.Remove the check fromAuto Focuscheck box.Drag theFocusslider to manually adjust the focus.Click OKor Apply. |
| Magic-i 3 closes when I press the Snapshot button | Only one application can use your webcam at a time. If the video stream has disappeared from your IM application, close the IM application and then press theHP Instant Chatbutton again to open both Magic-i 3 and your IM application. |
| ArcSoft WebCam Companion closes when I press the HP Instant Chat button | Only one application can use your webcam at a time. To reopen ArcSoft WebCam Companion, press theSnapshotbutton. |
| The webcam buttons are not working properly | Look in the Windows System Tray for the HP Button Manager icon. If you don't see the HP Button Manager icon, then open My Computer, navigate to the Program Files\HP\Button Manager folder, and double-click the BM.EXE file to restart it. |
| I hear an echo or feedback in the speakers | On Windows XP computers (Classic view):1 Click Start > Control Panel > Sounds and Audio Devices.2 Click the Audio tab.3 Under Sound playback, click Volume, and drag the Master Volume slider to adjust the speaker volume.4 Under Sound recording, click Volume, and drag the Microphone slider to adjust the microphone volume.On Windows Vista® computers (Classic view):1 Click Windows Vista start buttonTM > Control Panel > Sound.2 Click the Playback tab.3 Select the Speaker you are using and then click Properties.4 Click the Levels tab and drag the sliders to adjust the output level.5 Click the Recording tab.6 Select the Microphone you are using and then click Properties.7 Click the Levels tab and drag the sliders to adjust the input level. |
| The webcam audio is not synchronized with the webcam video | From the Video Capture screen, select the Resolution list, and set the video resolution to 640x480 to synchronize the video and audio. After synchronizing the audio and video, try increasing the resolution to the next level. If the problem recurs, go back to the previous resolution setting. |
Still need help? Please refer to the warranty that came with your webcam for support phone numbers and Web site information.
- HP Webcam User's Guide
- Product Registration
- Table of Contents
- Welcome 1
- Using Your HP Webcam 3
- Adjusting Settings 9
- Troubleshooting 13
- Welcome
- Overview
- Using Your HP Webcam
- Recording a Video
- Starting a Video Chat
- Start > All Programs > ArcSoft Magic-i 3 > HP Instant Chat Button Setup.
- Using Your Webcam as a Video Monitor
- Editing a Video
- Editing a Video in ArcSoft WebCam Companion
- Editing a Video in ArcSoft VideoImpression
- Taking a Picture
- Editing a Picture
- Adjusting Settings
- Adjusting Brightness and Control
- Creating a Personal Profile
- NOTE:
- Adjusting Capture Settings
- Adjusting Webcam Settings
- Troubleshooting
Brand : HP
Model : Premium Autofocus KQ245AA
Category : Security Camera