TDI110 - Tumble dryer Caple - Free user manual and instructions
Find the device manual for free TDI110 Caple in PDF.


| Product Type | Vented Tumble Dryer |
| Brand | Caple |
| Model | TDI110 |
| Installation Type | Integrated (fits 600mm deep kitchen units) |
| Dimensions (Height x Width x Depth) | 86.5 – 89 cm x 59.5 cm x 53 cm |
| Maximum Dry Load (Cotton/Linen) | 6.0 kg |
| Maximum Dry Load (Synthetics) | 2.0 kg |
| Fuse Rating | 13 A |
| Power Consumption (Estimated) | 2400 W |
| Programmes | 8 programmes: Extra Dry, Cupboard Dry, Mid Dry, Extra Iron Dry, Iron Dry, Damp Dry, 30 min Timed Dry, 30 min Airing |
| Heat Settings | High (for cotton) and Low (for delicate fabrics) |
| Anti-Crease Function | Yes, automatic after cycle, rotates drum every 6 minutes |
| Cool-Down Period | 12 minutes at end of drying cycles |
| Door Reversible | Yes, can be hung left or right |
| Filter Type | Lint filter, must be cleaned after each cycle |
| Venting System | Vent hose included, can be vented through wall (100mm hole) |
| Safety Features | Thermal cut-out (reset button at rear), child safety (supervision advised) |
| Spare Parts | Genuine parts available from service agent |
| Warranty / Compliance | EEC regulations; WEEE Directive 2002/96/EC |
Frequently Asked Questions - TDI110 Caple
User questions about TDI110 Caple
0 question about this device. Answer the ones you know or ask your own.
Ask a new question about this device
Download the instructions for your Tumble dryer in PDF format for free! Find your manual TDI110 - Caple and take your electronic device back in hand. On this page are published all the documents necessary for the use of your device. TDI110 by Caple.
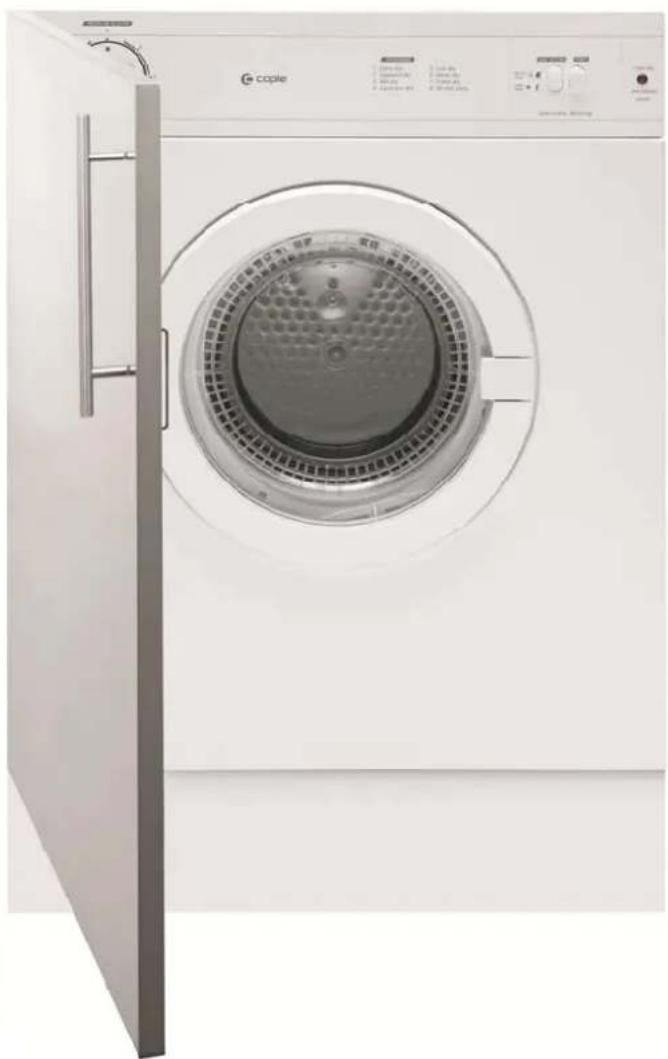
USER MANUAL TDI110 Caple
Instruction manual for integrated tumble dryer
Model code: TDI110
natural_image
Exterior view of a white disposable air purifier with a circular vent and side door (no visible text or symbols)CONTENTS
Important User Information
Installation
The Filter
Operating Instructions
Drying your Laundry
Door & Decor Door Reversal
Technical Data & Problem Guide
IMPORTANT USER INFORMATION
These notes are provided in the interest of safety. You must read them carefully before installing or using this appliance.
- Children should not be allowed to tamper with the controls and should be supervised to ensure they do not play with the appliance.
- This appliance is not intended for use by persons (including children) with reduced physical, sensory or mental capabilities, or lack of experience and knowledge, unless they have been given supervision or instruction concerning the use of the appliance responsible for their safety.
- This tumble dryer is intended for domestic use only.
- The room must be adequately ventilated to avoid back flow of gases into the room from appliances burning gas or any other fuels. This includes open fires.
- Any electrical work required to install the appliance should be carried out by a qualified person.
- This tumble dryer should be serviced by an appointed service organization and only genuine spare parts used.
- It is dangerous to alter or modify the product in any way, other than fitting authorized accessories.
- It is important to clean the lint filter after each drying cycle.
- Under no circumstances should anything other than the recommended articles be placed in the tumble driver. These can cause fires.
- Do not place articles which have been in contact with dry cleaning fluid, petrol, cooking oil, fat, hair lacquer or other flammable substances in the tumble dryer.
- Items that have been soiled with substances such as cooking oil, acetone, alcohol, petrol, kerosene, spot removers, turpentine, waxes and wax removers should be washed in hot water with an extra amount of detergent before being dried in the tumble dryer.
- Do not place articles which have been in contact with dry cleaning fluid or other flammable substances in the tumble dryer.
- Remove all objects from pockets such as lighters and matches.
- Do not attempt to dry dripping wet articles.
- Fabric softeners, or similar products, should be used as specified by the fabric softener instructions.
- Items such as foam rubber (latex foam), shower caps, waterproof textiles, rubber backed articles and clothes or pillows fitted with foam rubber pads should not be dried in the tumble dryer.
- Do not dry unwashed items in the tumble dryer.
- Do not use the tumble dryer if you suspect that it is damaged in any way. Under no circumstances should you attempt to repair the appliance yourself. Repairs carried out by inexperienced persons may cause serious injury.
- We recommend that the appliance is switched off each time after use. It should be disconnected from the electricity supply if it is to be unattended for long periods, (i.e. weekends or holiday etc).
- DO NOT use a two-way or multi-way adapter, or extension lead. The dryer must be connected to its own individual socket.
- The special mains cable and plug assembly must be replaced with a genuine part from the manufacturer or his service agent.
- When installing, position the appliance so that that the plug is accessible.
- This appliance must be earthed.
- Exhaust air must not be discharged into a flue which is used for exhausting fumes from appliances burning gas or other fuels.
INSTALLATION
The tumble dryer is fully compatible with any 600mm deep kitchen units and complies with stringent EEC regulations.
Your dryer is provided with a vent hose which will extend to approx 2.4m (8ft). We strongly recommend that this is vented through the wall with the attachment provided. The position of the hole (100mm diameter) for the vent directly behind the tumble dryer is shown in the diagram.
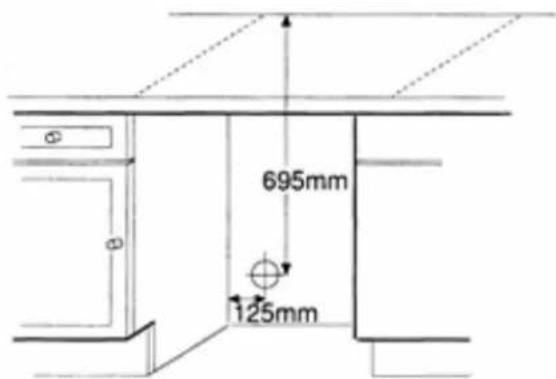
If the through the wall vent is to be positioned other than behind the dryer, the vent hose should be positioned at floor level and through adjacent side panel to a relevant position. The plinth must be cut-out to accommodate the air vent grill at the bottom front of the tumble dryer.

I M P O R T A N T
The air vent at the front of the appliance must never be covered or blocked in any way as this will cause the dryer to overheat.
This appliance must not be installed behind a lockable door, a sliding door or a door with hinges on the opposite side to that of the tumble dryer.
The dryer should not be placed directly next to ovens or cookers, as the performance of the dryer may be affected.
ELECTRICAL CONNECTIONS: We strongly recommend that any electrical work is carried out by a qualified person complying with the IEE 17 ^th addition of the electrical regulations.
IMPORTANT
Please remember that the tumble dryer must be capable of being switched off, (disconnected from the supply), when fitted in position
THE FILTER
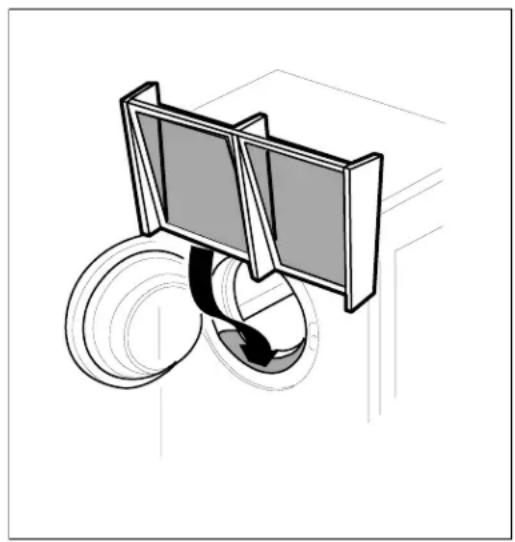
The filter is found, as seen from the diagram, by opening the door and must always be in position when drying items in the appliance. To allow the dryer to operate efficiently it should be cleaned after each drying cycle. Do not be alarmed by the amount of fluff deposited on the mesh. It is not due to excessive wear caused by the dryer but more an indication of it's efficient operation. All fabric loses fluff when drying but it goes unnoticed into the air. In a tumble dryer it simply collects in the filter.
natural_image
Pure technical diagram of a mechanical assembly with no text, numbers, or symbolsCONTROL PANEL GUIDE
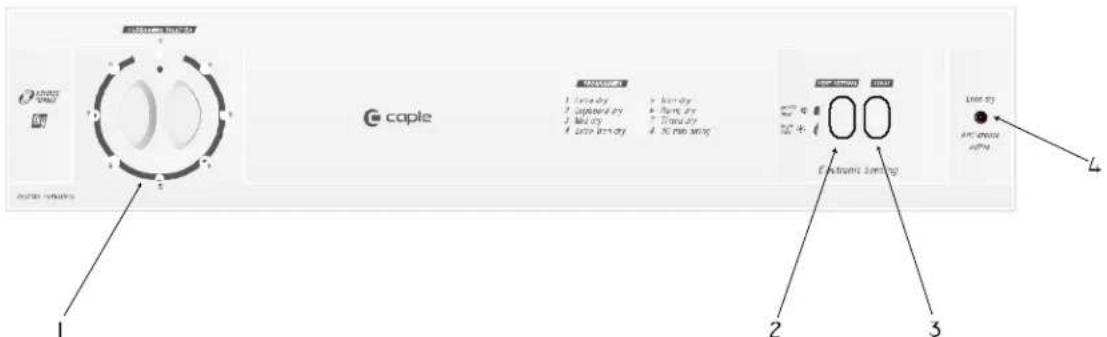
- PROGRAMME SELECTOR:
Choose the final dryness of the load by selecting the desired dryness setting (see the programme chart). The dryer will stop automatically when the chosen dryness is achieved. Note: the use of an iron dry programme will use 30% less energy than a cupboard dry programme.
- HEAT SETTINGS:
High – For fabrics insensitive to higher temperatures, such as cotton. Low – For temperature sensitive clothes.
- START BUTTON:
Press to start the drying cycle.
- ANTI-CREASE ACTIVE NEON
When lit constantly, the neon indicates that the drying cycle is completed and clothes can be removed. To reduce creasing of clothes, anti-crease will automatically start once the drying cycle is complete.
PROGRAMME DESCRIPTIONS
-
extra dry
-
iron dry
-
cupboard dry
-
damp dry
-
mid dry
-
timed dry
-
extra iron dry
-
30 mins airing
Program 1 – Extra dry: clothes are dry enough to be put away
Program 2 – Cupboard dry: clothes are dry enough to be put away
Program 3 – Mid dry: depending upon fabric, clothes are generally dry enough to be put away
Program 4 – Extra iron dry: clothes are almost dry but can be easily ironed
Program 5 – Iron dry: clothes are slightly damp and ready to be ironed
Program 6 – Damp dry: clothes are damp and ready to be ironed
Program 7 – 30 minute timed drying program
Program 8 – 30 minute timed ‘airing’ program; useful for freshening up clothing.
Programs 1-7 can be operated on either full heat or half heat setting and have a 12 minute cool-down period at the end of the cycle
Program 8 operates without the heater (regardless of the heat switch setting), circulating air through the dryer at the ambient temperature.
PLEASE NOTE: THE DRYER WILL CONTINUE TO RUN IN ANTI-CREASE MODE UNTIL THE DOOR IS OPENED.
BEFORE DRYING
Check care labels inside the garments
CARE LABELS YOU
MAY FIND ON YOUR FABRICS
| ○ 'Tumble drying beneficial' |
| ✕ 'Do not tumble dry' |
| — 'Dry flat' |
Do not tumble dry woolen or wool mixture articles unless the article is labeled to be suitable due to possibility of shrinkage.
Place delicate articles, e.g. tights and scarves, inside a pillowcase.
Sort out the clothes into groups of similar fabrics and colours.
Check the care label inside the garment.
We suggest that a fabric conditioner be used to reduce static electricity.
Delicate articles e.g. tights should be placed inside a pillowcase.
It is better to dry small and large articles together.
Do not dry unwashed items in the tumble dryer.
Remove all objects from pockets such as lighters and matches.
To avoid the need to iron easy care polyester/cotton items it is better to only dry small loads (i.e. half fill the drum).
It is better to dry small and large articles together.
Do not overload the dryer or dry large bulky items such as duvets or sleeping bags as it is important that the air flow through the dryer is not obstructed.
RUNNING THE MACHINE
Open the door.
Load clothes loosely into the drum.
Load sheets first starting with one corner.
Close the door.
Dry your hands
Switch on the machine at the socket.
Select correct heat position (See programme chart on facia panel).
Set the programme to the required dryness setting (See programme chart on facia panel).
Press the start button.
The drum will rotate in anticlockwise direction for a short period of time.
The drum will then begin to rotate clockwise and will stop automatically when your clothes are dry. The drum will stop and rotate anti-clockwise every few minutes to reduce creasing.
There is an automatic 12-minutes cool down period at the end of every cycle, during which the heater is switched off. This is to help minimize creasing.
After each of the programmes, the machine goes into anti-crease. This feature rotates the drum for briefly every 6 minutes until the dryer is stopped or the door is opened.
NOTE: NEVER SWITCH THE DRYER OFF AND LEAVE A HOT LOAD IN THE DRUM – RISK OF FIRE.
When drying large items such as sheets, we suggest you periodically stop the dryer to redistribute the load. To stop the machine during a programme, simply open the door, the drum will stop rotating automatically and restart when you close the door. Press the start button to restart the machine.
WARNING: Never stop a tumble dryer before the end of a drying cycle unless all items are quickly removed and spread out so that heat is dissipated.
AFTER REMOVING THE DRIED CLOTHES: ALWAYS CLEAN THE FILTER.
Failure to clean the filter will extend drying times and cause the safety cut-out to operate.
Pull the filter upwards and away from the appliance.
Remove threads or fluff by hand or with a soft brush.
Slide the filter back.
Wash the filter occasionally in detergent solution and with a soft brush to remove small particles.
TO AVOID MINOR FAULTS
If the clothes are not dry after normal drying time:
Check that you used the correct heater setting.
Check the fuse in the moulded plug.
Check that the lint filter has been cleaned. A blocked filter will restrict the airflow.
Check that your dryer is heating – the right side below the door should feel warm after the first 10 – 15 minutes of its programme. Failure to heat may indicate the safety cut-out has operated. To reset, simply press the red button at the rear of the machine. If operated, a sharp click will be heard. This cut-out only operates if the air flow is severely restricted so make sure the filter is clean, the air inlets and outlets at the front and back are not blocked, and that all other restrictions are removed before re-starting. If the cut-out continues to operate after checking the above points, you should contact your service agent.
Your dryer is designed to operate in a room temperature range of 5^ C to 30^ C.
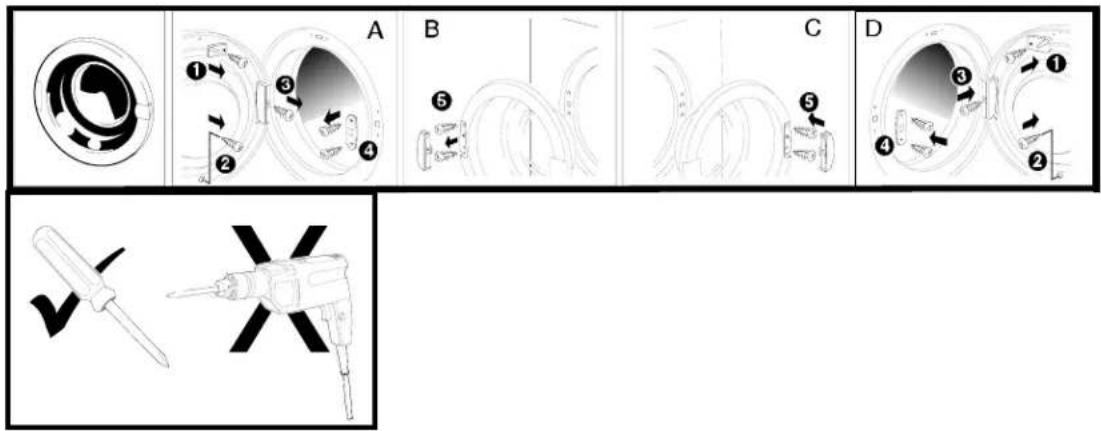
DOOR REVERSAL APPLIANCE DOOR
The door on the dryer can be positioned either with the left or right hand hanging. Please follow illustrations below to change the door position.
flowchart
graph TD
    A["Rotation"] --> B["Window 1"]
    B --> C["Section 2"]
    C --> D["Section 3"]
    D --> E["Section 4"]
    E --> F["Section 5"]
    F --> G["Section 6"]
    G --> H["Section 7"]
    H --> I["Section 8"]
    I --> J["Section 9"]
    J --> K["Section 10"]
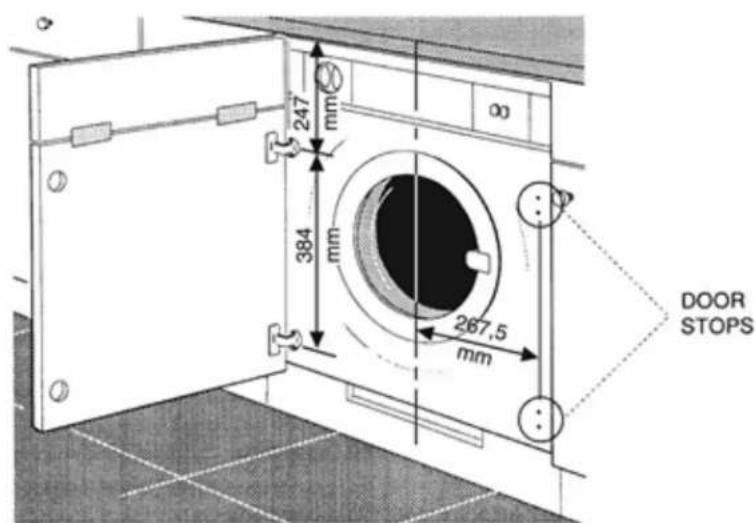
THE DECOR DOOR
The hinges can be fastened through the pre-drilled holes on either the left or right hand with the door stops being fitted on the other side.
TECHNICAL DATA
Overall dimensions : height 86.5 – 89cm width 59.5cm depth 53cm Maximum dry weight of cotton, linen 6.0kg synthetics 2.0kg. For electrical ratings see plate on rear of machine. Fuse rating: 13amp.
DON'TS.
Do not – Overload the dryer.
Do not – Dry articles singly as they tend to roll up and so increase drying time.
Do not – Dry woolen or wool mixture articles unless the article is labeled as suitable.
This should avoid shrinkage.
Do not - Allow venting hose (where applicable) or filter to become blocked.
Do not – Allow fluff to accumulate around the tumble dryer.
NEVER SWITCH THE DRYER OFF AND LEAVE A HOT LOAD IN THE DRUM – RISK OF FIRE.
ANY PROBLEMS
If the clothes are not dry after normal drying time:
- Check that the filter is clean.
- Check that you used the correct heat setting.
- Check that the venting hose is not blocked (sometimes a strong wind may cause a back pressure).
- Check that you have not set the timer within a cool down period.
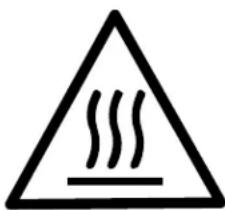
This label positioned on the rear of your dryer, indicates the surface is hot when in operation – avoid touching.
CAUTION HOT SURFACE
natural_image
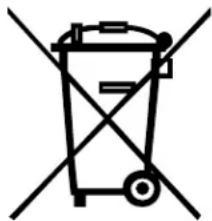
Symbol of a trash bin crossed with a diagonal line, representing waste sorting or disposal (no text or labels)This appliance is marked according to the European Directive 2002/96/EC on Waste Electrical and Electronic Equipment (WEEE). This guideline is the frame of a Europen wide validity of return and Recycling on Waste Electrical and Electronic Equipment.
- Instruction manual for integrated tumble dryer
- CONTENTS
- IMPORTANT USER INFORMATION
- INSTALLATION
- I M P O R T A N T
- IMPORTANT
- THE FILTER
- CONTROL PANEL GUIDE
- PROGRAMME DESCRIPTIONS
- PLEASE NOTE: THE DRYER WILL CONTINUE TO RUN IN ANTI-CREASE MODE UNTIL THE DOOR IS OPENED.
- BEFORE DRYING
- CARE LABELS YOU
- MAY FIND ON YOUR FABRICS
- RUNNING THE MACHINE
- TO AVOID MINOR FAULTS
- DOOR REVERSAL APPLIANCE DOOR
- THE DECOR DOOR
- TECHNICAL DATA
- DON'TS.
- ANY PROBLEMS
- CAUTION HOT SURFACE
Brand : Caple
Model : TDI110
Category : Tumble dryer