C86AB - Tumble drier White Knight - Free user manual and instructions
Find the device manual for free C86AB White Knight in PDF.


| Product Type | Tumble Dryer, Vented |
| Brand | White Knight |
| Model | C86AB |
| Drying Capacity | 6.0 kg (cotton) |
| Energy Efficiency Class | C (typical for vented models) |
| Annual Energy Consumption | ~560 kWh |
| Dimensions (H x W x D) | 850 x 600 x 600 mm |
| Weight | 35 kg |
| Power Supply | 230 V / 50 Hz |
| Power Consumption | 2200 W (max) |
| Drying Programs | Cotton, Synthetics, Delicates, Time Drying, Cool Air |
| Heat Settings | High, Low, Off (cool) |
| Timer | 0-120 minutes mechanical timer |
| Drum Material | Stainless Steel |
| Door Opening | Hinged, reversible |
| Lint Filter | Removable, washable mesh filter |
| Condenser / Vent | Vented (requires external hose or wall vent kit) |
| Noise Level | ~65 dB(A) |
| Anti-crease Function | Yes (30 min cool tumbling after cycle) |
| Child Lock | No |
| Spare Parts Availability | Yes, through authorized dealers (drum belt, thermostat, element, etc.) |
| Installation Type | Freestanding |
Frequently Asked Questions - C86AB White Knight
User questions about C86AB White Knight
0 question about this device. Answer the ones you know or ask your own.
Ask a new question about this device
Download the instructions for your Tumble drier in PDF format for free! Find your manual C86AB - White Knight and take your electronic device back in hand. On this page are published all the documents necessary for the use of your device. C86AB by White Knight.
USER MANUAL C86AB White Knight
INSTRUCTIONS FOR USE SENSING AIR VENTED TUMBLE DRYERS

White Knight
IMPORTANT: PLEASE READ THESE
INSTRUCTIONS THOROUGHLY BEFORE USING
THIS APPLIANCE. KEEP THEM IN A SAFE PLACE FOR FUTURE REFERENCE.
IMPORTANT USER INFORMATION
- This tumble dryer is intended for NORMAL DOMESTIC USE ONLY.
- Adequate ventilation must be provided to avoid back flow of gases into the room from appliances burning other fuels, including open fires.
- Exhaust air must not be discharged into a flue which is used for exhausting fumes from appliances burning gas or other fuel.
- Please note, it is not recommended that the dryer is placed directly next to ovens, cookers or other heating appliances as the performance of the dryer may be affected.
- A carpet must not obstruct the ventilation openings in the base of the dryer.
- Do not stack the tumble dryer on top of other appliances without the correct stacking kit.
- Any electrical work required to install the appliance should be carried out by a qualified person.
- It is important to clean the lint filter after each drying cycle or the restrictions to airflow will extend drying times and could cause the safety cut-out to trip.
- Under no circumstances should anything other than the recommended articles be placed in the tumble dryer.
- The dryer should be serviced by an appointed service organisation and only genuine parts used.
- It is dangerous to alter or modify the product in any way other than fitting authorized accessories.
- We recommend that the appliance is unplugged each time after use. It should always be disconnected from the electricity supply for long periods (i.e. weekends, holidays etc.)
- The rear of the dryer gets quite hot during use. Position the dryer so that the back is not accessible while in operation, but ensure that the sides have a space available to allow airflow.
- The special mains cable and plug assembly must only be replaced with a genuine part from the manufacturer or our appointed service agent.
- It is important to clean fluff from the window of the dryer and around the door seal after each drying cycle. Failure to do so could result in water leaking.
- This appliance can be used by children aged from 8 years and above and persons with reduced physical, sensory or mental capabilities or lack of experience and knowledge if they have been given supervision or instruction concerning use of the appliance in a safe way and understand the hazards involved. Children shall not play with the appliance.
Cleaning and user maintenance shall not be made by children without supervision. Children of less than 3 years should be kept away unless continuously supervised.
WARNING: Never stop a tumble dryer before the end of a drying cycle unless all items are quickly removed and spread out so that heat is dissipated.
Remove all objects from pockets such as lighters and matches.
DO NOT use a two-way adaptor, or extension lead. The dryer must be connected to its own socket.
DO NOT block the air inlets at the front, base, rear and side of your dryer.
DO NOT allow fluff to accumulate around the tumble dryer. Risk of fire
DO NOT exceed the recommended maximum load.
DO NOT dry unwashed items in the tumble dryer
DO NOT place articles in the dryer if anything other than a water solution has been used in the cleaning process.
DO NOT attempt to dry dripping wet articles.
DO NOT use the tumble dryer if you suspect that it is damaged in any way. Under no circumstances should you attempt to repair the appliance yourself. Repairs carried out by inexperienced persons may cause serious injury. Consult your local appointed service engineer and insist on genuine spare parts.
WARNING: The appliance must not be supplied through an external switching device, such as a timer, or connected to a circuit that is regularly switched on and off by a utility.
INSTALLATION
Position the tumble dryer so that the plug remains accessible after installation. Do not block the vent at the front or base of the dryer, as this will impair the working of the machine. This appliance must not be installed behind a lockable door, a sliding door or a door with hinges on the opposite side to that of the tumble dryer.
TUMBLE DRYER VENTING
Your tumble dryer will release warm, damp air in one of three ways.
1) EXTENDIBLE REAR VENTING - A long flexible vent hose is built into the dryer and can be extended from the large opening at the rear of the machine
2) FIXED REAR VENTING - Venting is through the large opening at the bottom of the rear panel. A separate extendible vent hose can be attached if desired.
3) FRONT VENTING - This is a special type of dryer which vents through a grille on the plinth. The opening on the rear panel is blanked off during manufacturing.
Rear vented dryers can be used without a vent hose but not in a confined space. Rear vented dryers must have a vent hose if they are installed under a work surface or against a wall. To minimise condensation it is preferable to vent to outside. This may be through an open door or window. The best solution is to connect the vent hose to a permanent connection through a wall or a single glazed window. This is particularly recommended for small, cool rooms. A kit for this purpose is available as an accessory. Front venting machines must be converted to extendible rear venting before a permanent connection can be made to the outside.
When using a vent hose, remember the following points:
The vent hose must be at least 10cm (4 in) in diameter.
No more than three right-angled bends should be allowed when positioning the vent hose.
Do not distort or constrict the vent hose as this will reduce the airflow.
The vent hose must not be shared with other appliances, for example, a cooker hood outlet.
FINAL INSTALLATION
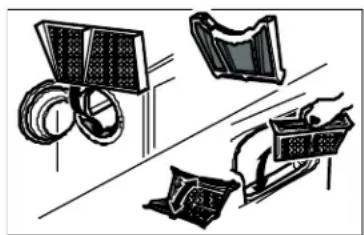
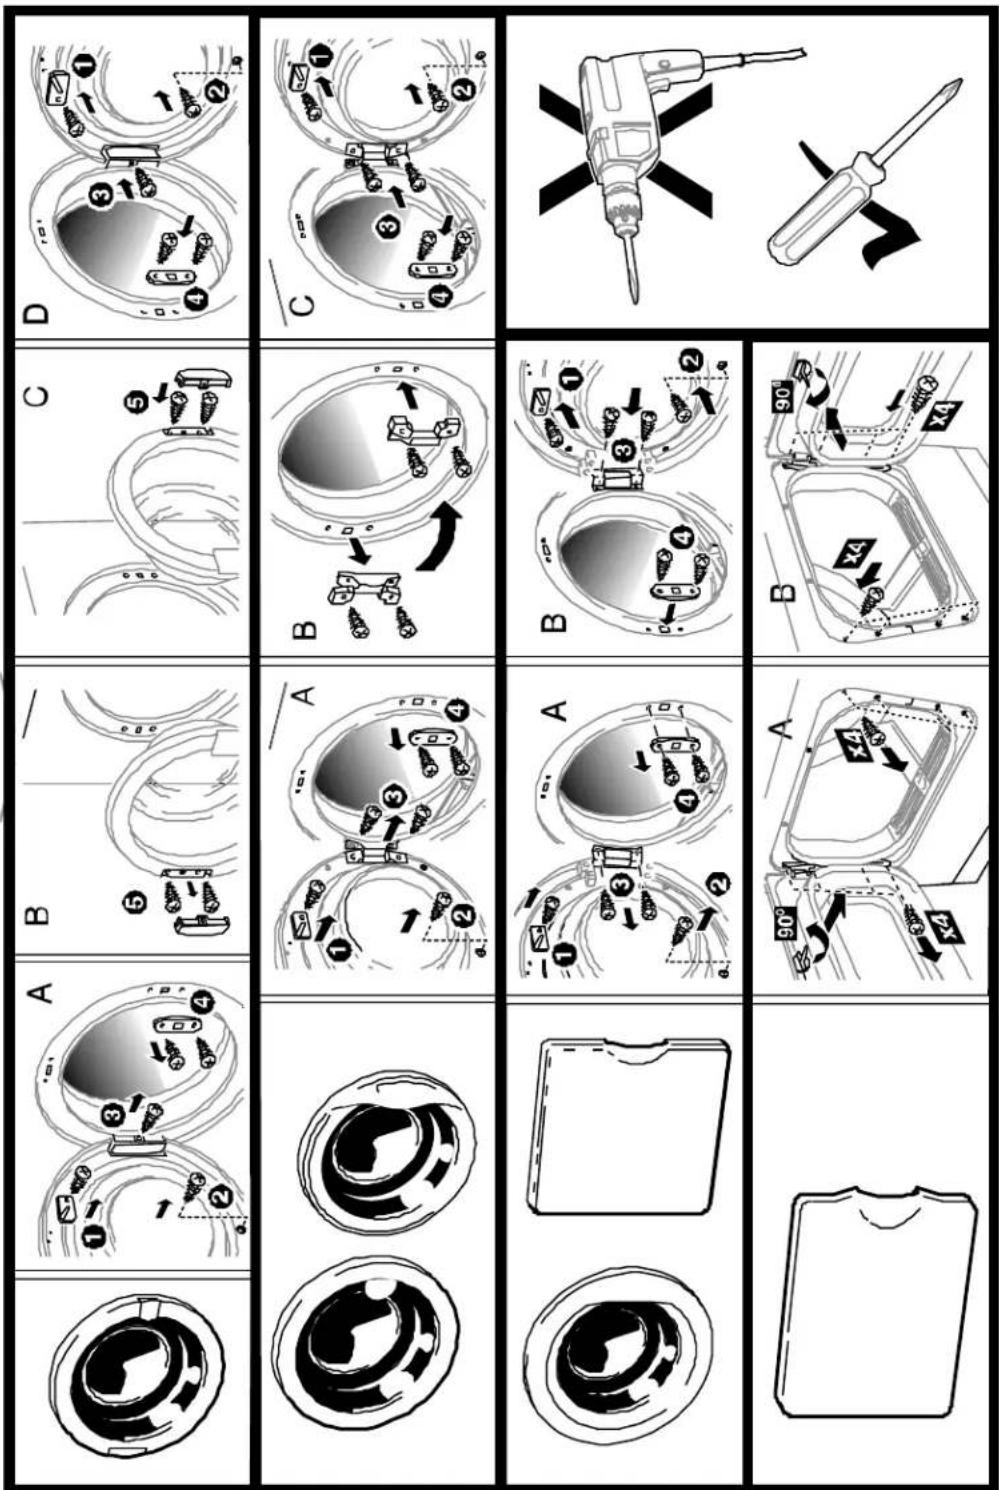
Push the filter into its operating position as shown in the diagram. If you wish to change the side on which your door opens, see the instructions on the back page. Remove any dust by wiping the drum and door with a damp cloth. Any initial smell of burning will be caused by dust on the heater and will quickly disappear.
natural_image
Illustration of three electronic devices with no visible text or symbolsTHE CONTROLS
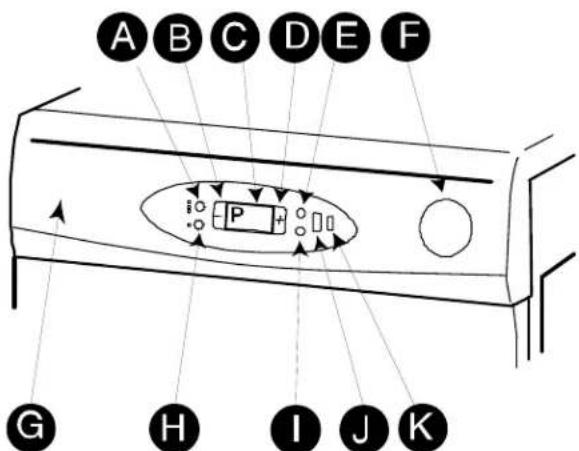
A. Heat push button, press to select appropriate heat setting (some programs have limited choice of heat setting). High is used for drying cottons and linens; half heat is used for drying synthetics and delicates; cool does not apply any heat
B. “-” push button, changes program or time selected downwards
C. Display Window, indicates Program number / drying time / delay time
D. “+” push button, changes program or time selected upwards
E. Start push button, starts the drying cycle
F. Activate push button, illuminates the Display Window.
G. Program Chart
H. Anti-crease push button, press to select anti-crease mode. Indicator illuminates when anti-crease has been selected and flashes when the dryer is in the anti-crease phase of the cycle.
I. Reset push-button, resets the program to the default settings
J. Delay Start display, shows delay time selected
K. Delay Start push button, press to select delay start mode and set delay time
MOISTURE SENSING DRYER - FUNCTIONS
This sensing tumble dryer has a full moisture sensing system so you can choose the level of dryness required on your clothing/items. Alternatively you can select a timed drying cycle.
P1 – Extra dry: clothes are extra dry and can be put away
P2 – Cupboard dry: clothes are dry enough to be put away
P3 - Mid dry: depending upon fabric, clothes are generally dry enough to be put away
P4 – Extra iron dry: clothes are almost dry but can be easily ironed
P5 - Iron dry: clothes are slightly damp and ready to be ironed
P6 – Damp dry: clothes are damp and ready to be ironed
Programs 1-6 can be operated on the full heat, half heat or cool setting.
P7 - 30 minute fixed time drying program. This program can be operated on the full or half heat setting.
P8 – 30 minute fixed time ‘airing’ program; useful for freshening up clothing. This program operates without the heater, circulating air through the dryer at the ambient temperature.
P9 – Variable Time program – can be set from 10 min. to 180 min. drying time and can be operated on the full heat, half heat or cool setting. To return from a time program to the main menu, press the Reset button.
All programs from P1 to P9 can be used with the Delay Start feature. A maximum of 9 hours delay time is available in 1 hour increments.
The anti-crease function can be selected to minimize creasing by continuing to turn the drum periodically after the main drying cycle has finished.
PREPARATION
Check care labels inside the garments.
CARE LABELS YOU MAY FIND ON YOUR FABRICS
| Suitable for tumble drying | |
| Tumble dry using full heat | |
| Tumble dry using half heat | |
| Do not tumble dry |
Do not tumble dry woollen or wool mixture articles unless the article is labelled as being suitable. This should avoid shrinkage.
Place delicate articles, e.g. tights, scarves, inside a pillowcase.
To avoid the need to iron easy-care polyester/cotton items it is better to only dry small loads (i.e. half fill drum). It is better to dry small and large articles together.
Fabric softeners, or similar products, should be used as specified by the Fabric Softener instructions. Do not overload the dryer or dry large bulky items such as duvets or sleeping bags as it is important that the airflow through the dryer is not obstructed.
Items that have been soiled with substances such as cooking oil, acetone, alcohol, petrol, kerosene, spot removers, turpentine, waxes and wax removers should be washed in hot water with an extra amount of detergent before being dried in the tumble dryer.
Items such as foam rubber (latex foam), shower caps, waterproof textiles, rubber-backed articles and clothes or pillows fitted with foam rubber pads should not be dried in the tumble dryer.
OPERATION
Open the door.
Load clothes loosely into the drum. Load sheets first, starting with one corner.
Close the door.
Dry your hands.
Plug in the machine and press the Activate button. The Display Window will illuminate. If no further buttons are pressed, the display will go into sleep mode after 1 minute. To reactivate, press the Activate button.
The dryer will automatically remember the program and heat setting last used. To change the program use the (-) or (+) buttons on either side of the display window. Change the heat setting if required.
If your appliance is a reversing, small door opening. A full load will typically take 121 minutes and will use approximately 3.68kWh of electricity. A half load will typically take 78 minutes and will use approximately 2.23kWh of electricity.
The power consumption of the off-mode and the left-on mode is zero.
If P9 (variable time program) has been selected press the coloured Start button. A default of 120 minutes will appear in the display window. Use the (-) or (+) buttons to adjust the drying time for your laundry from 10 minutes up to 180 minutes. Holding the button down will rapidly change the time selected.
Select anti-crease function if required.
Press the coloured Start button to commence the drying cycle. The drum will begin rotating and will stop automatically when your clothes are dry or the timed cycle has finished. An audible alert will sound to indicate that the drying cycle has finished.
If you have selected the anti-crease function, the drum will continue to turn periodically for up to 8 hours or until the dryer is stopped by opening the dryer door or by disconnecting from the mains.
If the door is opened during a drying cycle the dryer will stop. To restart, close the door, press the Activate button then press the coloured Start button.
There is an automatic 12 minute cool down period at the end of each cycle, during which the heater is switched off and the green cool indicator is on. This helps to minimize creasing, and must always be used fully to avoid the risk of fire.
DELAY START
To use the Delay Start feature press the Delay Start button before pressing the Start button. The Delay Start display will show 1 hour of delay time. Repeated pressing, or holding down, of the Delay Start button will increase the amount of delay time to a maximum of 9 hours. To cancel Delay Start, press the Reset button. To start the delay period press Start. The delay time will start to count down in the display window. To cancel Delay Start once the countdown has started, de-power the machine by opening the dryer door.
NEVER SWITCH THE DRYER OFF AND LEAVE A HOT LOAD IN THE DRUM DUE TO THE RISK OF FIRE.
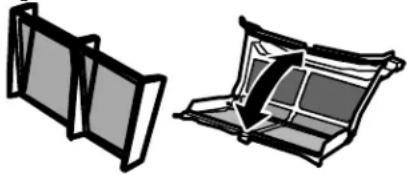
ALWAYS CLEAN THE FILTER AFTER EACH USE. Failure to do so could cause the safety cut-out to operate.
natural_image
Two abstract geometric shapes resembling folded panels or screens, one with a diagonal arrow overlay (no text or symbols)- Pull the filter upwards and away from the appliance.
- Remove any threads or fluff by hand or with a soft brush.
- Slide the filter back.
- Wash the filter occasionally in detergent solution using a soft brush to remove small particles.
- If your filter becomes damaged, replace it to ensure no damage is caused to the dryer.
ANY PROBLEMS
If the clothes are not dry after normal drying time:
- Check that you used the correct heat setting.
- Check that the lint filter has been cleaned. A blocked filter will restrict the airflow.
- Check that your dryer is heating – the area below the door should feel warm to the touch after the first 10-15 minutes of its programme.
Failure to heat may indicate the safety cut-out has operated. To reset, simply press the red button at the rear of the machine. If it has operated then a sharp “click” will be heard. This cut-out only operates if the airflow is severely restricted so make sure the filter is clean, the air inlets and outlets at the front and back are not blocked, and that all other restrictions are removed before re-starting.
If the cut-out continues to operate after checking the above points, you should contact your service agent.
Check that the machine has the correct weight load in the drum before starting the appliance.
If your machine does not work check the following before calling a service engineer:-
- Check that there is a supply of electricity.
- Check that the Activate button has been pressed and that the Display is illuminated.
- Check that the door has been properly closed.
- Check the fuse in the moulded plug.
OPTIONAL EXTRAS
Front to Extendible Rear Venting Kit - Converts your dryer from front venting to extendible rear venting.
Vent Hose - Only available for fixed rear dryers; leads the warm, damp air to outside.
Wall/Window Vent Kit - Makes a permanent connection through a wall or window. Front venting dryers need to be converted to rear venting before installing this kit (see ‘Front to Extendible Rear Venting Kit’ above). This kit is not suitable for double glazed windows.
Stacking Kit - Enables your dryer to be secured onto the top of a front loading washing machine (to save floor space). Instructions for stacking, if required, are supplied with the stacking kit.
The above items can be purchased as accessories for your tumble dryer from your supplier.
TECHNICAL DATA
OVERALL DIMENSIONS:
Height: 85 cm Width: 59.5 cm Depth: 53 cm
MAXIMUM DRY WEIGHT LOADS:
Cotton 6kg (For minimum creasing 2kg)
Delicates 6kg
For electrical ratings see plate on back of dryer.
For Model No. see serial plate inside door (needed when requesting service).
Room temperature range 5°C to 30°C. (Drying performance decreases as room temperature falls).
Your washing machine should have a spin speed of not less than 1000rpm for maximum efficiency.
Performance measurement to EN61121 is assessed against programs P2 and P5.
CUSTOMER ADVICE – BEFORE CALLING FOR ASSISTANCE
If the clothes are not dry after normal drying time:
-Check that you used the correct heat setting.
-Check that you have not set the timer within a cool down period.
-Check that the lint filter has been cleaned. A blocked filter will restrict the airflow.
- Check that your dryer is heating - below the door to the left side, should feel warm to the touch after the first 10-15 minutes of its programme.
Failure to heat may indicate the safety cut-out has operated. To reset, simply press the red button at the rear of the machine. If it has operated then a sharp “click” will be heard.
This cut-out only operates if the airflow is severely restricted so make sure the filter is clean, the air inlets and outlets at the side and back are not blocked, and that all other restrictions are removed before re-starting.
If the cut-out continues to operate after checking the above points, you should contact your service agent. Check that the machine has the correct weight load in the drum before starting the appliance.
If your machine does not work check the following before calling a service engineer:-
- Check that there is a supply of electricity.
- Check that the door has been properly closed and the machine is switched on.
- Check that the bottle full warning light is off. If it is on then the bottle may be full or incorrectly fitted.
If your machine does not work check the following before calling a service engineer:-
- Check that the Activate button has been pressed and that the Display is illuminated.
- Check that the door has been properly closed.
- Check that the water bottle has been withdrawn from, and replaced into the machine. The bottle full warning light should be off.
- Check the fuse in the moulded plug.
A call out charge will be applied for a service visit, if the call could have been avoided by following these instructions.
ESSENTIAL CONTACT INFORMATION FOR “IN GUARANTEE” AND “OUT OF GUARANTEE” REPAIRS.
If problems continue after checking the above points you should contact our service agent. Please ensure that you have your serial number and model number to hand when you make the call. To locate the serial number on your dryer, open the door and look for a white label inside the door opening. This will indicate the appliance model number along with the serial number.
APPROVED SERVICE AGENTS: UK & SOUTHERN IRELAND
Call White Knight ON 0800 988 1323 (calls are free from landlines however calls from mobiles may be charged at your network provider's rates) OR 0344 8797422 (Calls charged at basic rate.)
OR
APPROVED SERVICE AGENT: NORTHERN IRELAND
Call: Service Network 2000 ON 028 90365222 (Daytime calls cost up to 17p plus 10.5p per minute from BT lines Monday-Friday. Mobile and other providers' charges may vary).
THIS APPLIANCE MUST BE EARTHED
natural_image
Simple line drawing of a trash bin with crossed lines indicating no waste or restriction (no text or symbols)This appliance is marked according to the European Directive 2012/19/EU on Waste Electrical and Electronic Equipment (WEEE).
At end of life this product should be recycled and not disposed in household waste.
Contact your retailer, council or local authority for further information.
| LAV SDO MF | |
| Suppliers name or trade mark WHITE KNIGHT | |
| Model identifier | 86A, 86C - TYPE |
| Rated capacity at full load 6kg | |
| Appliance type Air Vented | |
| Energy efficiency class C | |
| Energy consumption of the appliance* 457kWh | |
| The figures above is based on 160 drying cycles of the standard cotton programme at full and partial load and the consumption of the low-power modes. Actual energy consumption per cycle will depend on how the appliance is used. | |
| Automatic/non-automatic | Automatic |
| EU Ecolabel N/A | |
| E_dry 3.68kWh | |
| E_dry12 2.23kWh | |
| Eg_dry N/A | |
| Eg_dry12 N/A | |
| Eg_dry,a N/A | |
| Eg_dry12,a N/A | |
| Off mode power ( P_o ) | 0W |
| Left on mode power ( P_i ) | 0W |
| Duration of left-on mode N/A | |
| The standard cotton programme used at full and partial load is the standard drying programme to which the information in the label and the fiche relates. This programme is suitable for drying normal wet cotton laundry. It is the most efficient programme in terms of energy consumption for cotton. | |
| T_t 96mins | |
| T_dry 121mins | |
| T_dry12 | 78mins |
| Condensing efficiency class | N/A |
| C_t | N/A |
| C_dry | N/A |
| C_dry12 | N/A |
| Sound power level | 62dBA |
| Built in/not built in | This appliance is not intended to be built in. |
REVERSING THE DOOR OPENING
flowchart
graph TD
    A["Initial Contact"] --> B["Step A: Screen with clips and buttons"]
    B --> C["Step B: Screen with clips and buttons"]
    C --> D["Step C: Screen with clips and buttons"]
    D --> E["Step D: Screen with clips and buttons"]

    subgraph Initial Contact
        F1["1"] --> F2["2"] --> F3["3"] --> F4["4"] --> F5["5"] --> F6["6"] --> F7["7"] --> F8["8"] --> F9["9"] --> F10["10"]
    end

    subgraph Closing Contact
        G1["1"] --> G2["2"] --> G3["3"] --> G4["4"] --> G5["5"] --> G6["6"] --> G7["7"] --> G8["8"] --> G9["9"] --> G10["10"]
    end

    subgraph Final Contact
        H1["1"] --> H2["2"] --> H3["3"] --> H4["4"] --> H5["5"] --> H6["6"] --> H7["7"] --> H8["8"] --> H9["9"]
    end

    subgraph Final Package
        I1[" "] --> J1[" "] --> J2[" "] --> J3[" "] --> J4[" "] --> J5[" "] --> J6[" "] --> J7[" "] --> J8[" "] --> J9[" "] --> J10[" "]
    end
SELECT DOOR TYPE
- INSTRUCTIONS FOR USE SENSING AIR VENTED TUMBLE DRYERS
- White Knight
- IMPORTANT: PLEASE READ THESE
- INSTRUCTIONS THOROUGHLY BEFORE USING
- THIS APPLIANCE. KEEP THEM IN A SAFE PLACE FOR FUTURE REFERENCE.
- IMPORTANT USER INFORMATION
- INSTALLATION
- TUMBLE DRYER VENTING
- FINAL INSTALLATION
- THE CONTROLS
- MOISTURE SENSING DRYER - FUNCTIONS
- PREPARATION
- CARE LABELS YOU MAY FIND ON YOUR FABRICS
- OPERATION
- DELAY START
- NEVER SWITCH THE DRYER OFF AND LEAVE A HOT LOAD IN THE DRUM DUE TO THE RISK OF FIRE.
- ANY PROBLEMS
- OPTIONAL EXTRAS
- TECHNICAL DATA
- OVERALL DIMENSIONS:
- MAXIMUM DRY WEIGHT LOADS:
- CUSTOMER ADVICE – BEFORE CALLING FOR ASSISTANCE
- A call out charge will be applied for a service visit, if the call could have been avoided by following these instructions.
- ESSENTIAL CONTACT INFORMATION FOR “IN GUARANTEE” AND “OUT OF GUARANTEE” REPAIRS.
- APPROVED SERVICE AGENTS: UK & SOUTHERN IRELAND
- OR
- APPROVED SERVICE AGENT: NORTHERN IRELAND
- THIS APPLIANCE MUST BE EARTHED
Brand : White Knight
Model : C86AB
Category : Tumble drier