Di454 - Dishwasher Caple - Free user manual and instructions
Find the device manual for free Di454 Caple in PDF.


| Product Type | Built-in Dishwasher |
| Brand | Caple |
| Model | Di454 |
| Capacity (Place Settings) | 9 |
| Dimensions (H x W x D) | 82 cm x 45 cm x 58 cm |
| Power Supply | 220-240 V ~ 50 Hz |
| Total Absorbed Power | 1900 W |
| Water Pressure | 0.03 - 0.6 MPa |
| Number of Programs | 6 (Heavy Duty, Normal Wash, Light Wash, Glassware, Eco, Soak) |
| Half Load Function | Yes (Upper rack only) |
| Delay Start | 2, 4, or 6 hours |
| Salt Consumption Adjustment | Yes (4 levels) |
| Rinse Aid Dispenser | Yes, adjustable dosage (6 settings) |
| Filter System | Self-cleaning (semi-circular and fine filter) |
| Spray Arms | Top, bottom, and third sprayer |
| Upper Rack Height Adjustable | Yes |
| Water Connection | Cold water (3/4" threaded) or hot water up to 60°C |
| Electrical Connection | 13 A plug, earthing required (CE compliant) |
| Maintenance | Filter cleaning, spray arm cleaning, water inlet filter cleaning |
| Installation Type | Built-in with decor door compatibility, adjustable feet up to 870 mm |
Frequently Asked Questions - Di454 Caple
User questions about Di454 Caple
0 question about this device. Answer the ones you know or ask your own.
Ask a new question about this device
Download the instructions for your Dishwasher in PDF format for free! Find your manual Di454 - Caple and take your electronic device back in hand. On this page are published all the documents necessary for the use of your device. Di454 by Caple.
USER MANUAL Di454 Caple
Domestic dishwasher Di454
natural_image
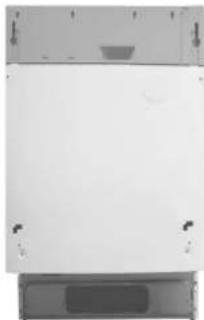
Exterior view of a white rectangular electronic device with gray casing and mounting base (no visible text or symbols)GB
012050
Safety Is a Good Habit to Get Into
NOTICE
Carefully read the instructions contained in this manual, as they provide important information which is essential to safe and proper installation, use and maintenance of the appliance.
CE This appliance complies with the following EEC directives:
- 73/23/EEC of 19 February 1973 (Low Voltage) and subsequent modifications;
- 89/336/EEC of 3 May 1989 (Electromagnetic Compatibility) and subsequent modifications.
- Carefully dispose of the packing material.
- Alter removing the packing, check to make sure that the appliance is not damaged. If in doubt, contact a qualified professional.
- The dishwasher must only be used by adults for the washing of household dishes and cooking utensils.
- The appliance is not intended for use by young children or inform persons without supervision.
- Young children should be supervised to ensure that they do not play with the appliance.
- Keep detergents out of the reach of children, who must also be kept away from the dishwasher when it is open.
- This appliance cannot be installed outdoors, not even if the area in which it is installed is covered by a roof; it is also very dangerous to leave it exposed to the rain and elements.
- Do not touch the heating element during or after a wash cycle.
- Do not lean or sit on the door when it is open as this could over turn the dishwasher.
Close-up View (control panel)
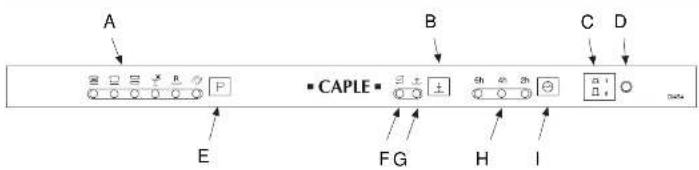
A
B "HALF LOAD" Button
C ON-OFF Button
D ON-OFF Light
E Cycle Select ButtonCycle Indicator Light
F Low Salt Indicator Light
G "HALF LOAD" Indicator Light
H Delay Indicator Light
Delay Select Button
Close-up View (Interior)
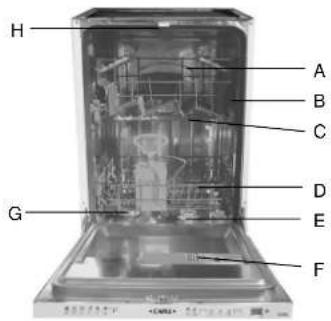
A Upper Rack
B Rack Height Adjustor
C Top Spray Arm
D Lower Rack
E Washing Filter
F Detergent and Rinse Aid Dispenser
G Bottom Spray Arm
H Third Sprayer
Technical characteristics
| Width | 45 cm |
| Depth | 58 cm |
| Height | 82 cm |
| Capacity | 9 standard place settings |
| Mains water pressure | 0.03-0.6MPa |
| Power voltage | 220-240V~ 50Hz |
| Total absorber power | 1900W |
Salt……
Salt
The hardness of the water varies from place to place. If hard water is used in the dishwasher, deposits will form on the dishes and ulensils.
The appliance is equipped with a special softener that uses a salt specifically designed to eliminate lime and minerals from the water.
Loading the Salt into the Softener
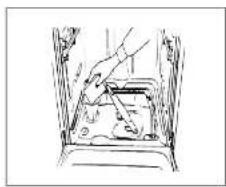
The salt container is located beneath the lower rack and should be filled as follows:
- Remove the lower rack and then unscrew and remove the cap from the salt container;
- If you are filling the container for the first time, fill it with water;
- Place the end of the funnel (supplied) into the hole and introduce about 2 kg of salt. It is normal for a small amount of water to come out of the salt container.
Always use salt intended for use with dishwashers.
- Carefully screw the cap back on.
natural_image
Hand placing a small object into a container with a tray, no visible text or symbolsThe salt container must be filled when the "low salt" indicator light (located on the control panel), comes on.
To prevent the formation of rust, load the salt just before beginning a wash cycle.
Adjusting Salt Consumption
The dishwasher is designed to allow for adjusting the amount of salt consumed based on the hardness of the water used. This is intended to optimize and customize the level of salt consumption so that it remains at a minimum.
To adjust salt consumption, proceed as follows:
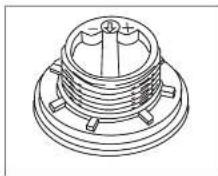
- Unscrew the cap from the salt container;
- There is a ring on the container with an arrow on it (see figure to the side).
- If necessary, rotate the ring in an anticlockwise direction from the '-' setting towards the '-' sign, based on the hardness of the water being used.
It is recommended that adjustments be made in accordance with the following schema:
| Water Hardness | ||||||
| Level | Clarke degrees | ^a pH | mmol/l | Selector position | Salt consumption (grame/cycle) | Autonomy (cycles/2kg) |
| 1 | 0 + 14 | 0 + 17 | 0 + 1.7 | / | 0 | / |
| 2 | 14 : 36 | 18 : 44 | 1.8 : 4.4 | - | 20 | 60 |
| 3 | 36 : 71 | 45 : 89 | 4.5 : 8.9 | MED | 40 | 40 |
| 4 | >80:7 | >8.9 | 60 r | 25 | ||
Detergent and Rinse Aid……
Detergent
Detergent specifically intended for use with dishwashers must be used. The dispenser must be refilled before the start of each wash cycle following the instructions provided in the "Wash Cycle Table". The detergent dispenser is located on the inside panel the door.
Loading the detergent
To open the "A" cover on the dispenser, press the "B" button. The detergent for the wash cycle should be poured into the "C" compartment.
After the detergent has been placed in the dispenser, close the cover and press down until it clicks in place.
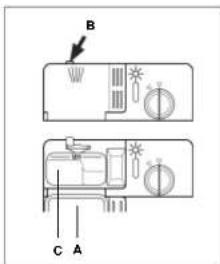
Notice: To facilitate closing the cover, remove any excess detergent on the edges of the dispenser.
Rinse Aid
This product makes dishes sparkle and helps them to dry without spotting. The dispenser is located on the inside panel of the door and should be filled after every 80 wash cycles (or when the "low rinse aid" indicator light comes on for those models with this feature).
Loading the Rinse Aid
Regardless of the type of detergent dispenser installed on your appliance, you must proceed as indicated below when loading the rinse aid.
To open the dispenser, turn the "C" cap in an anti-clockwise direction and then pour in the rinse aid, making sure not to overfill. The amount of rinse aid used for each cycle can be regulated by turning the "F" dose adjustor, located beneath the "C" cap, with a screwdriver. There are 6 different settings: the normal dosage setting is 3.
Important
Proper dosage of the rinse aid improves drying.
If drops of water remain on the dishes or spotting occurs, the dosage adjustor should be turned to a higher setting. If the dishes have white streaks, turn the dosage adjustor to a lower setting.
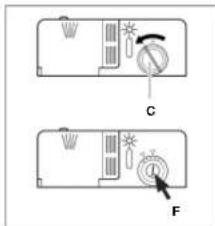
Loading the Dishwasher
Before placing the dishes in the dishwasher, remove the large food particle to prevent the filter from becoming clogged, which results in reduced performance.
If the pots and pans have baked-on food that is extremely hard to remove, we recommend that they be allowed to soak before they are washed. This will eliminate the need for extra wash cycle. Pull out the rack to facilitate loading the dishwasher.
How to use the lower rack
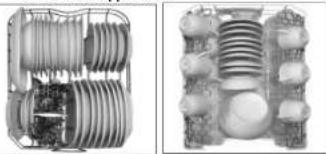
We recommend that you place the most difficult to clean items on the bottom rack: pots, pans, lids, serving dishes and bowls, as shown in the figure to the right.
It is preferable to place serving dishes and lids on the sides of the racks in order to avoid blocking the rotation of the top spray arm. Pots, serving bowls, etc. must always be placed face down.
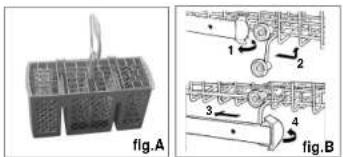
- Deep pots should be slanted to allow the water to flow out. - The silverware basket can not be doubled (see fig.A).
- Silverware should be placed in the silverware basket with the handles at the bottom; if the rack has side baskets, the spoons should be located individually into the appropriate slots. Especially long utensils should be placed in the horizontal position at the front of the upper rack.
How to Use the Upper Rack
The upper rack is designed to hold more delicate and lighter dishware, such as glasses, coffee and tea cups and saucers, as well as plates, small bowls and shallow pans (as long as they are not too dirty).
Position the dishes and cookware so that they do not get moved by the spray of water.
The upper rack can be adjusted for height. (See Fig. B)
Lower Rack Upper Rack
natural_image
Two technical diagrams showing internal components of a mechanical or electrical assembly, with no visible text or symbols.Load for 9 Standard Settings
Starting the Appliance
Starting a wash cycle...
After having completed all of the installation steps in the preceding paragraphs, turn on the water to the unit, partially open the door of the dishwasher, and press the ON-OFF button "C" located on the control panel. The "D" indicator light will come on. At this point, the appliance is on and ready to be programmed.
Setting and Starting a wash Cycle
Choose the desired cycle by pressing the cycle selection button "E". Each time it is pressed, one of the cycle indicator lights "A" will come on in succession.
Choose the wash cycle you feel is most appropriate for the type of dishes that need washing (consult the wash cycle table contained in this manual, especially when first using the appliance). Close the door and after a few seconds, a short acoustic signal will sound indicating that the wash cycle has begun and cannot be modified. If necessary, read the paragraph entitled, "Canceling or modifying a cycle while underway." The end of the cycle will be signalled by a double acoustic sound, and the indicator light "A" will begin to blink.
Cancelling or modifying a cycle while underway...
A cycle that is underway can only be modified if it has only been running for a short time, otherwise, the detergent may have already been used, and the appliance may have already drained the wash water. If this is the case, the detergent dispenser must be refilled (see the paragraph entitled, "Loading the Detergent").
To change the cycle currently underway, open the door and press the ON-OFF button "C", follow the instructions contained in the paragraph entitled, "Setting and Starting a Wash Cycle."
If you forget to load some of the dishes...
The wash cycle can be interrupted by opening the door carefully (In order to avoid being sprayed by hot water). When the door is closed again, the cycle will automatically restart at the point where it left off.
At the end of the wash cycle...
The end of the cycle will be indicated by a double acoustical signal and the blinking of the "A" indicator light. Open the door, turn off the appliance using the ON-OFF switch and turn off the water supply to the unit. Wait a few minutes before removing the dishes so as to avoid handling them while still hot (when they are more susceptible to breakage) and to get better drying results.
Setting The Start Delay Time
Open the door of the dishwasher partially. If the "I" button is pressed (see, Close-up View Control Panel). The start time for the wash cycle can be delayed for 2,4 or 6 hours.
Each time the button is pressed, the "H" light will come on indicating the length of the delay.
After selecting the delay time, the wash cycle can be set, as explained in 'Starting a wash cycle...' There will be a short acoustic signal, and at this point the delay period will begin to count down. During this period the delay indicator light 'H' will blink. At the end of the delay time, the indicator will stop blinking and the cycle will start.
NOTE:
a) During the delay period, none of the settings can be modified. If necessary, they can be cancelled by pressing cycle selector "E" for about 5 seconds.
b) If the power to the appliance goes off or the door is opened during the delay period, the clock will stop the countdown. It will start again when the power has come back on, or when the door has been closed.
Wash Cycle Adjustment Buttons
1/2 Load Button
This button (see" Close-up View-Control Panel", letter "B") makes it possible to wash dishes using only the upper rack if there are not enough dishes for a full load. This will allow you to save on water and electrical energy.
It cannot be used with the heavy duty wash cycles.
Wash Cycle Table
| Cycle | Cycle Selection Information | Description of Cycle | Detergent Rinse Aid | |
 Heavy Duty Heavy Duty | Very dirty dishes, pots and pans. (Not to be used with delicate items) | Pre-wash with hot water. Extended wash at 65°C. Rinse with cold water. Rinse with hot water. Drying. | 30g | ★ |
 Normal Wash Normal Wash | Normal dirty dishes, pots and pans. Standard daily cycle. | Pre-wash use cold water. Extended wash at 55°C. Rinse with cold water. Rinse with hot water. Drying. | 30g | ★ |
 Light Wash (IEC-EN50242) Light Wash (IEC-EN50242) | Normal dirty dishes, pots and pans without dried on residue. | Pre-wash with cold water. Extended wash at 50°C. Rinse with hot water. Drying. | 30g | ★ |
 Glassware Glassware | Economic, fast cycle to be used for items which are sensitive to higher. Run immediately after dishes are used. | Wash at 55°C. Rinse with warm water. Hot rinse. Drying. | 15g | ★ |
 [Lapricet al.ash] [Lapricet al.ash] | Economic, fast cycle to be used to on not very dirty dishes right after they are used. No drying cycle. | Short wash at 40°C. Cold rinse. | 15g | |
| [2c8c] Soak | Pre-wash of dishes, pots and pans while waiting for the load to be completed after the subsequent meal. | Short cold wash to prevent food residue from drying on the dishes. | ||
Energy Saving Tips
-It is important to try and run the dishwasher when it is fully loaded in order to save on energy. In order to prevent odors from forming and food from caking onto the dishes, you can run the soak cycle.
- Choose the right wash cycle: the choice of cycle depends on the type of dishware, cookware and utensils being washed and how dirty they are.
-Use the right amount of detergent: if you use too much detergent, the result will not be cleaner dishes, but, rather, a greater negative impact on the environment.
- There is no advantage in rinsing dishes, cookware and utensils before placing them in the dishwasher.
How to keep Your Dishwasher in Shape
After Every Wash
After every wash, turn off the water supply to the appliance and leave the door slightly ajar so that moisture and odors are not trapped inside.
Remove the plug
Before cleaning or performing maintenance, always remove the plug from the socket. Do not run risks.
No solvents or Abrasive Cleaning Products
To clean the exterior and rubber parts of the dishwasher, do not use solvents or abrasive cleaning products. Rather, use only a cloth and warm soapy water.
To remove spots or stains from the surface of the interior, use a cloth dampened with water and a little while vinegar, or cleaning product made specifically for dishwashers.
When You Go on Holiday
When you go on holiday, it is recommended that you run a wash cycle with the dishwasher empty and then remove the plug from the socket, turn off the water supply and leave the door of the appliance slightly ajar. This will help the seals last longer and prevent odors from forming within the appliance.
Moving the Appliance
If the appliance must be moved, try to keep it in a vertical position. If absolutely necessary, it can be positioned on its back.
Seals
One of the factors that cause odors to form in the dishwasher is food that remains trapped in the seals. Periodic cleaning with a damp sponge will prevent this from occurring.
Cleaning and Special Maintenance
Filter Assembly
For best performance and results, the filter assembly must be cleaned frequently.
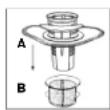
The filter efficiently removes food residue from the wash water, allowing it to be recirculated during the cycle. For this reason, it is a good idea to remove the larger food particles trapped in the filter after each wash cycle by rinsing the "A" semi-circular filter and cup under running water. To remove the filter assembly, pull on the cup handle in the upward direction. The entire filter assembly (made up of the "A" semicircular filter and the "B" fine filter) should be cleaned at least once a month.
To clean the filter and the fine filter, use a cleaning brush. Then, reassemble the filter parts as shown in the figures below and reinsert the entire assembly in the dishwasher, positioning in its seat and pressing downward.
The dishwasher must never be used without the filters. Improper replacement of the filters may reduce level of the appliance and damage dishes and utensils.
Cleaning the Spray Arms
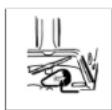
It may happen that food particle become encrusted on the spray arms and block the holes(see"Close up view(interior)"letters G-G). Check the spray arms periodically and clean them when needed.
Cleaning the Water Inlet Filter
Periodically clean the water inlet filter (see fig) located on the outlet of the water supply tap.
After turning off the water tap, unscrew the end of the water supply hose, remove the filter and clean it carefully under running water. Then, return the filter to its place and tighten the water supply hose back into position.
Troubleshooting
It may occur that the dishwasher does not function or does not function properly. Before calling for assistance, let us see what can be done first: have you forgotten to press one of the buttons or to perform an essential operation?
The Dishwasher Does Not Start
Have you checked whether:
- the plug is pushed into the socket correctly;
- the power is on in the house:
- the door is closed properly;
- the ON-OFF switch is on "ON";
- the water supply is turned on.
The Dishwasher Does Not Load Water
Have you checked whether:
- the water is turned on and the hose is connected properly;
- the water supply to the house is on and has sufficient pressure;
- the water supply hose is crimped or bent;
- the filter for the water supply hose is clogged.
The Dishes Are Not Clean
Have you checked whether
- the water is turned on and the hose is connected properly;
- the water supply to the house is on and has sufficient pressure;
- the water supply hose is crimped or bent;
- the filter for the water supply hose is clogged.
The Dishwasher Does Not Drain
Have you checked whether
- the drain hose is crimped or bent.
Lime Deposits or a White Film Form on the Dishes
Have you checked whether
- the lid to the salt container is closed properly;
- the rinse aid dosage is correct.
Error Messages
The dishwasher is equipped with a safety system that is able to detect operating problems and malfunctions. These malfunctions are signalled by the rapid blinking of one of the "A" program LEDs. Only in the case where the indicator light for the soak cycle (see table for cycles) blinks rapidly should you cancel the cycle as described in the section entitled, "Changing a Cycle while Underway". Then check to make sure that there is water in the mains and that the tap is turned on. If the message continues, call for technical assistance, indicating which message appeared. If any of the other indicator lights begins to blink rapidly, turn off the appliance and call for technical assistance, indicating which light began to blink.
II, despite all these checks, the dishwasher still does not function and/or the problem persists, contact the nearest authorised service centre and provide them with the following information: - the nature of the problem;
- the model type number (Mod...) And the
serial number (S/N...), which are indicated on the plate located on the side of the inner part of the door.
Never call on unauthorised technicians and refuse to allow parts to be installed that are not original spare parts.
Installation
Positioning the Appliance
Positioning the appliance in the desired location. The back should rest against the wall behind it, and the sides, along the adjacent cabinets or wall. The dishwasher is equipped with water supply and drain hoses that can be positioned to the right or the left to facilitate proper installation.
Levelling the Appliance
Once the appliance is positioned, adjust the feet (screwing them in or out) to adjust the dishwasher, making it level. In any case, the appliance should not be inclined more than 2'. If the appliance is level, it will help ensure proper performance.
Cold Water Connection
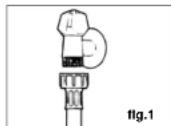
Connect the cold water supply hose to a threaded 3/4 (gas) connector, making sure that it is fastened tightly in place (see fig.1). If the water pipes are now or have not been used for an extended period of time, let the water run to make sure that the water is clear and free of impurities. If this precaution is not taken, there is a risk that the water inlet can get blocked and damage the appliance.
Hot Water Connection
The water supply to the appliance can also be connected to the house's hot water line (centralised system, heating system), as long as it does not exceed a temperature of 60 °C.
In this case, the wash cycle time will be shortened by about 15 minutes and the wash efficiency slightly reduced.
The connection must be made to the hot water line following the same procedures as those for the connection to the cold water line.
Drain Hose Connection
Insert the drain hose into a drain pipe with a minimum diameter of 4cm. Or let it run into the sink, making sure to avoid bending or crimping it. Use the special plastic support that comes with the appliance (see fig.2). The free end of the hose must be at a height between 40 and 100 cm and must not be immersed in water.
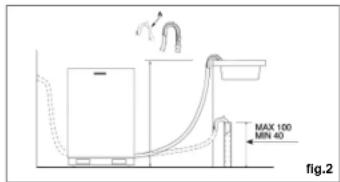
Attention:
The special plastic hose support must be solidly fastened to the wall to prevent the drain hose from moving and allowing water to spill outside the drain.
Electrical Connection
After making sure that the voltage and frequency values for the current in the home correspond to those on the rating plate (located on the stainless steel inner door of the appliance) and that the electrical system is correct for the maximum voltage on the rating plate. Insert the plug into an electrical socket which is earshed properly (the earthing of the appliance is a safety requirement mandated by law).
If the electrical socket to which the appliance must be connected is not appropriate for the plug, replace the plug, rather than using adaptors or the like as they could cause overheating and burns.
Caution:
The dishwasher plug must be accessible even when the appliance is installed as a built-in unit so that maintenance can be done safety.
Installation cont..
Stage 1
Supplied with the appliance is a plastic (self adhesive) anticondensation strip, this should be fixed to the underside of your worktop along the front edge. The adjustable feet of the appliance allow it to be
raised up to 870mm, if the space between the floor and the underside of the work surface is greater than 870mm, then the
fig 1a
appliance should be positioned on suitable wooden spacers which should always be fixed to the floor. Always use a spirit level to make sure that the appliance is level left to right and front to back. (If the appliance is installed on a carpet, ensure there is clearance beneath the appliance). The four adjustable feet should be adjusted to the correct height; the rear feet are adjustable via studs at the front of the appliance (fig 1a).
To prevent damage to the floor covering, the appliance must be installed using the plastic skids provided.
Stage 2
Connect the water, drain and electrical supplies (230 - 240V, 50Hz, 13A). We recommend that the appliance is connected to a cold water supply.
Stage 3
Measure the width of the decor door. Align the template on the rear of the door with the top of the door level with the top of the template, and the left hand edge of the door in line with the measured door width. Mark the four fixing positions. Repeat on the right hand side. Remove the template, and drill pilot holes in the door in all eight positions using a suitable drill (take care not to drill through the door). Attach the upper plastic studs and lower fixing brackets to the decor door as shown below.
Stage 4
Position the decor door onto the front of the dishwasher by locating the brackets into the two plastic studs mounted either side on the top of the door. Lift the decor door until the lower brackets locate into the slots in the appliance door.
Stage 5
Align the top of the decor door with adjacent cabinets. Gently open door whilst supporting the decor door. Once in the lowered position, secure the decor door using the fixing screws provided as shown in the diagram. Cover the screw heads using the plastic caps provided.
Stage 6
The dishwasher should now be screwed to the underside of the worktop, via the two fixing holes in the top trim. For non-wooden worktops (e.g. marble) two brackets are provided to allow the appliance to be secured to the sides of the adjacent cabinets. The should be secured to the appliance using the two screws at the top of the chassis (see fig 1b), adjusted to the correct width and then screwed to the adjacent sides panels using suitable screws.
Stage 7
The door balance can be adjusted via two screws accessed through two holes in the top of the front frame. Adjust these until the door just remains open under its own weight and is level when open.
Stage 8
Cut clearance in the plinth to allow the door to open fully and seal edges with a suitable varnish to prevent water ingress.
.11.
Installation
Diagram
The symbol on the product or on its packaging indicates that this product may not be treated as household waste. Instead it shall be handed over to the applicable collection point for the recycling of electrical and electronic equipment. By ensuring this product is disposed of correctly, you will help prevent potential negative consequences for the environment and human health, which could otherwise be caused by inappropriate waste handling of this product. For more detailed information about recycling of this product, please contact your local city office, your household waste disposal service or the shop where you purchased the product.
GB
GB
.12.
- Safety Is a Good Habit to Get Into
- NOTICE
- Close-up View (Interior)
- Salt……
- Salt
- Loading the Salt into the Softener
- Adjusting Salt Consumption
- Detergent and Rinse Aid……
- Detergent
- Loading the detergent
- Rinse Aid
- Loading the Rinse Aid
- Important
- Loading the Dishwasher
- How to use the lower rack
- How to Use the Upper Rack
- Starting the Appliance
- Starting a wash cycle...
- Setting and Starting a wash Cycle
- Cancelling or modifying a cycle while underway...
- If you forget to load some of the dishes...
- At the end of the wash cycle...
- Setting The Start Delay Time
- NOTE:
- Wash Cycle Adjustment Buttons
- 1/2 Load Button
- Energy Saving Tips
- How to keep Your Dishwasher in Shape
- After Every Wash
- Remove the plug
- No solvents or Abrasive Cleaning Products
- When You Go on Holiday
- Moving the Appliance
- Seals
- Cleaning and Special Maintenance
- Filter Assembly
- Cleaning the Spray Arms
- Cleaning the Water Inlet Filter
- Troubleshooting
- The Dishwasher Does Not Start
- The Dishwasher Does Not Load Water
- The Dishes Are Not Clean
- The Dishwasher Does Not Drain
- Lime Deposits or a White Film Form on the Dishes
- Error Messages
- Never call on unauthorised technicians and refuse to allow parts to be installed that are not original spare parts.
- Installation
- Positioning the Appliance
- Levelling the Appliance
- Cold Water Connection
- Hot Water Connection
- Drain Hose Connection
- Attention:
- Electrical Connection
- Caution:
- Installation cont..
- Stage 1
- fig 1a
- Stage 2
- Stage 3
- Stage 4
- Stage 5
- Stage 6
- Stage 7
- Stage 8
- Diagram
Brand : Caple
Model : Di454
Category : Dishwasher