
MTT4W - Dishwasher MATSUI - Free user manual and instructions
Find the device manual for free MTT4W MATSUI in PDF.


| Product Type | Tabletop Dishwasher |
| Brand | Matsui |
| Model | MTT4W |
| Dimensions (W x D x H) | 45 x 50 x 45 cm |
| Weight | 18 kg |
| Power Supply | 220-240 V, 50 Hz, 10 A |
| Power Consumption | 1300 W |
| Water Consumption | 9 L per cycle |
| Place Settings | 4 |
| Programs | Normal, Quick, Eco, Intensive |
| Noise Level | 50 dB(A) |
| Control Type | Electronic with LED display |
| Safety Features | Child lock, Leak protection |
| Maintenance | Clean filter, Check spray arms, Descale regularly |
| Spare Parts Available | Spray arms, Filters, Cutlery basket, Rack |
| Reparability | Most components replaceable; consult service manual |
| Water Connection | Cold water only, inlet hose length 1.5 m |
| Drain Hose Length | 1.5 m |
| Energy Efficiency Class | F (typical for compact models) |
Frequently Asked Questions - MTT4W MATSUI
User questions about MTT4W MATSUI
0 question about this device. Answer the ones you know or ask your own.
Ask a new question about this device
Download the instructions for your Dishwasher in PDF format for free! Find your manual MTT4W - MATSUI and take your electronic device back in hand. On this page are published all the documents necessary for the use of your device. MTT4W by MATSUI.
USER MANUAL MTT4W MATSUI
Table of Contents
Page
Unit Parts Identification----1
Important Safety Instructions 2
Installation Instructions 3
Water Pressure 4
Connecting & Disconnection Instructions 5
Features 6
Cleaning The Filters 8
Operating Instructions 9
Program Summary/Selection----10
Common Problems and Solutions 11
Unit Part Identification
Front view

Inside view

-
Steam Vent
-
Door Release button
-
Salt refill indicator light
-
LED Display
-
Program key
-
Delayed start button
-
Pause/Start button
-
Power light
-
Power button
-
Door
-
Water softener
-
Sprayer assembly
Back view

-
Filter assembly
-
Rinse aid dispenser
-
Water inlet Connector(Inlet valve)
-
Drain Hose Connector
-
Power Cord
Important Safety Instructions
WARNING
When using your dishwasher, follow basic safety precautions, including the following:
→ Please read the installation and flashing instructions carefully before using the dishwasher for the first time.
→ The instructions contains very important information with regard to installation, use and maintenance of your dishwasher.
→ The manufacturer cannot be responsible for problems caused by ignoring these safety and caution instructions.
→ This dishwasher is designed for normal household use.
→ Do not use the dishwasher for industrial and commercial use, or other purpose.
→ Electrical safety is only guaranteed when the earth system of your house is in accordance with the related local regulations. (Do not use an extension cable or cord.)
→ Only suitable household utensils should be placed in the dishwasher. (Please avoid utensils; that are non-heat resistant, metal decorated, etc.)
→ Keep detergents away from children.
→ If the hot water exceeds 65° C, adjust the water heater setting. If the hot water temperature can not be maintained below 65° C, the dishwasher must be connected to cold water.
→ Do not use any kinds of solvent in your dishwasher. They may cause an explosion or fire.
→ Do not spray water on the appliance. It may cause the failure of electrical parts or electric shock.
→ Do not allow children to operate the dishwasher.
→ Do not allow children to play around the dishwasher when opening and closing the door.
→ Do not push down or sit on the inner door when the door is opened. It may cause the deformation or failure of your dishwasher.
→ Do not use the detergent for hand washing. The detergent for dishwasher should be used for normal operation.
→ Do not open the door when the Unit LED is flashing, the hot steam may causes personal injury.
→ power supply cord is damaged, it must been replaced by the manufacturer or service agent or a similar qualified person in order to avoid a hazard.
→ This appliance must be positioned so that the plug is accessible.
→ The appliance is not intended for use by young children or infirm persons without supervision.
→ Young children should be supervised to ensure that they do not play with the appliance.
→ Dishwasher detergents are strong alkaline. They can be extremely dangerous if swallowed. Avoid contact with skin and eyes and keep children away from the dishwasher when the door is open. Check that the detergent receptacle is empty after completion of the wash cycle.
→ The appliance is to be connected to the wash mains using new hose-sets and that old hose-sets should not be re-used.
Save These Instructions
WARNING
Instructions pertaining to a risk of fire, electric shock, or injury to persons.
Electrical Instructions:
An electrical supply of 220-240 volts AC only, 50Hz is required. Make sure that a suitable electrical supply socket is located close to where the dishwasher is to be placed. For your personal safety, the appliance must be earthed. The appliance is equipped with a power supply cord having a 3-pin grounding plug. To minimize possible shock hazards it must be plugged into a matching 3-pin grounding type electrical outlet. If the mains plug is unsuitable for the socket outlet in your home or is removed for any other reason, a new plug must be connected by a qualified person before use.
Installation Instructions
Remove All Packing Materials Carefully
-
The water inlet hose from the machine terminates in a 3/4 " female connector. The water supply should therefore terminate in a similar male connector and should have a stopcock close by in the pipe. It is recommended to connect the machine to hot water supply. Connect the straight connector of the inlet hose to the water supply securely. Connect the other end (bent connector) to the water inlet valve at the back of the dishwasher cabinet. Do not over-tighten to avoid damage to threads.
-
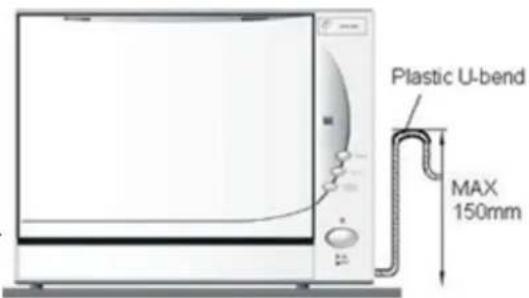
Prepare the drainage hose so that it has hooked end. Use the plastic U-bend fitting provided for this purpose. The end of this should be dropped into a drainage standpipe, the maximum height of which should be no more than 6" above the base of the dishwasher. To allow for an air gap around the end of the drain hose, the diameter of the standpipe should be at least 30 mm. Connect the other end of the drain hose (L shaped) to the drain port connection at the back of the dishwasher cabinet. Tighten the drain hose end on to the drain port using the metal clip included in the package.
- If you so wish, you may connect the water inlet hose on to the kitchen sink tap. Connect the water supply hose to a threaded 3/4(inch) connector and make sure that it is fastened tightly in place.
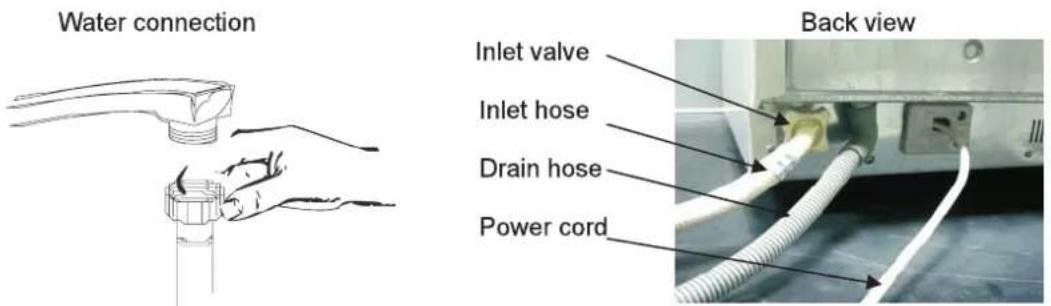
- If leaks are located, immediately shut the water supply and check the hose connections fully. Tighten connections if necessary.
- If for any reason you are unable to stop the leak yourself please seek advice from a qualified plumber.
- The minimum height clearance required to install your dishwasher on a countertop surface with overhead cupboards is 19" (48cm).
- Make sure there is an electrical power supply within easy reach of the machine. The power cord is 200cm long.
- The dishwasher must be installed on a 'solid' level surface.
- To level the dishwasher, adjust the 4 level screws (feet) under the dishwasher.
Water Pressure
For best operating results, incoming water pressure should be between 0.03\~1Mpa. Incoming water supply for the dishwasher is controlled by a 'low water switch' application, so if household water supply should be disrupted dishwasher will stop.
For Best Results:
Your dishwasher cleans by spraying a mixture of hot clean water and detergent (under pressure) against the soiled surface of dishes. The water is pumped through a rotating spray arm, drained through a filter removing food and soiled particles and pumped back through the spray arm.
Soiled water is pumped out and replaced with clean water at the end of each cycle (the number of times depends on the cycle being used). For best cleaning results, the water temperature must be at least 55° C. To prevent dishwasher damage, the temperature of the incoming water supply should not exceed 70° C.
NOTE: Hard Water conditions will adversely affect wash ability performance of your dishwasher. Hard Water conditions will also contribute to "Lime" (white film substance) deposits and/or "Scaling" on the stainless steel surface of the dishwasher tub and "Heater Element" located in the sump underneath the removable filter screen. To assist in minimizing these conditions, it is recommended to periodically operate/rinse the inside of the dishwasher (empty) using 1 cup of white vinegar (at least once a week).
Disconnecting your Dishwasher
→ Close the water supply at the stopcock.
→ Disconnect the power supply cord.
→ Disconnect the inlet hose assembly from the water supply. When the dishwasher is not in use, place/store the hose on the hanger hose bracket located on the rear wall of the dishwasher cabinet.
→ Appliances that are to be discarded must be made unusable. Pull off the plug, remove cable and make the door lock and latch unusable
NOTE
Once you open the water supply line, (even if it is closed immediately thereafter) the water inlet hose will be pressurized.

WARNING
Do not let children disconnect the dishwasher. Close supervision of children is always important around appliances.
Control panel and the LED display
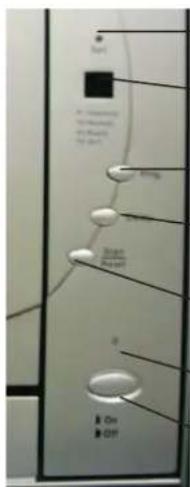
1 Salt Warning Light: To come on when the softener needs to be refilled salt
2. Display window: Program indicator, delay time, Error codes
3. Program button: press the button to select washing program
-
Delayed Start Button:: Press this button to set the delayed hours for washing. You can delay the start of washing up to 24 hours. One press on this button delays the start of washing by one hour.
-
Start / Reset Button : Press this button to start or pause the dishwasher, the program lights will blink.
- Power Light: To come on when the ON/OFF Button is Pressed down.
- Power button: Turn on/off the power supply
Loading your Dishwasher

The dishwasher is designed to receive a standard "4 piece" plate setting consisting of the following:
NOTE: for ease of loading/unloading large size dinner plates from the dish rack it may be necessary to (temporarily) remove the cutlery basket. When loading/unloading is complete, return the cutlery basket to its original position.
Preparing your Dishes for Washing
Scrape off all solid food particles from the dishes.
→ Remove excessive quantities of oil or grease.
→ Empty any liquids from glasses and cups.
→ NOTE: Dishes with dried-on foods are more difficult to wash and may not come clean in a normal wash cycle.
→ Arrange all items with recessed or curved sections on a slant to drain water away.
→ Cups, pots, glasses, etc should be placed upside down.
When loading items to be washed:
→ Locate sharp items so that they are not likely to damage the door seal.
→ Load sharp knives with the handles up to reduce the risk of cut-type injuries
→ Do not load plastic items unless they are marked "dishwasher safe" or the equivalent. For plastic items not so marked, check the manufacturer's recommendations.
→ Do not load glasses over the dish rack pins. Glasses loaded over dish rack pins are not properly supported and are likely to get damaged.
→ Items with wooden or bone handles and items joined together with glue are unsuitable as they cannot resist hot water.
→ Do not touch the heating element during or immediately after use.
→ Do not operate your dishwasher unless all enclosure panels are properly in place.
→ Do not tamper with controls.
→ Do not abuse, sit on, or stand on the open door or dish-rack of the dishwasher. The machine may topple over.
→ Protect cables and hoses from high temperatures.
→ To reduce the risk of injury, do not allow children to operate or play with the dishwasher.
Using the Right Detergent

The recess for the detergent
Use only detergent specifically made for use in dishwashers, as other types will cause over-sudding. If your detergent is old and/or lumpy, throw it away. Old detergent loses its washing power. Lumpy detergent won't dissolve.
Please put the detergent at the recess which is at the left of the inner door.
How much Detergent Should You Use
That depends if your water is 'hard' or 'soft'.
HARD WATER REQUIRES MORE DETERGENT TO GET DISHES CLEAN. SOFT WATER REQUIRES LESS DETERGENT TO GET DISHES CLEAN.
→ The recessed detergent area located on the inside door panel will hold approximately 12g of detergent. Follow the detergent manufacturer's guidelines.
How to use the 3 in 1 program
Your dishwasher has a 3 in 1 program which needs no salt and rinse aid but a 3 In1 tablet. And this dishwasher comes with a 3 in 1 tablet container as an accessory.
Note:
Only 3 in 1 program uses 3 in 1 tablet. If using 3 in 1 tablet in other programs, the appliance will not get a best performance.
- Hang the 3 in 1 tablet container on the basket..
- Put the 3 in 1 tablet into the container then start the 3 in 1 program.

The tablet container
Note:
When using a 3in1 tablet, you do not need to add any rinse aid into the dispenser. If there is any residual Rinse aid in the unit, turn the dispenser to setting 1.
Using a Rinsing Agent

You can help prevent unsightly spots on dishes and glassware, and reduce drying time by using a rinse agent. A rinse agent is specially formulated to rinse away food and detergent residues that can be left behind on your dishes. Used regularly, a rinse agent will automatically provide you with cleaner dishes every time you wash.
To fill the rinse agent dispenser, unscrew the dispenser cap located on the inner door (or on the back of the tub). Add the rinse agent slowly into the container until it just reaches the bottom of the filling cap inside the dispenser opening. Replace the cap..
Note: Clean off large particles of food sediments before placing dishes in the dishwasher.
How to use the water softener (for models with softener)
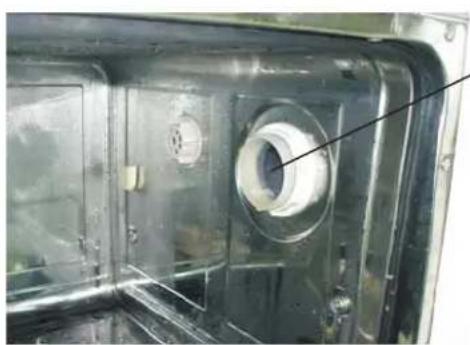
Add the salt
The hardness of the water varies from place to place. If hard water is used in the dishwasher, deposits will be formed on the dishes and utensils. This appliance is equipped with a water softener which uses a salt specifically designed to eliminate the minerals from the water.
- Unscrew the cap from the salt container anticlockwise, which is located on the right side of the inner box.
- Load the salt into the container. Each time you may load 250g of salt, which can be used for 15 cycles.
- Fill the water into the salt container until a small amount of water comes out(it is very important when you use it for the first time).
- Screw the cap back carefully.
Note:
- Load the salt before the beginning of wash cycle so as to prevent corrosion.
- Load the salt when the salt indicator light in the control panel.
- Only use dishwasher salt.
Cleaning the Filters
Filter assembly
For best performance and results, the filter assembly must be cleaned.
The filter efficiently removes food particles from the wash water, allowing it to be recirculated during the cycle. For this reason, it is a good idea to remove the larger food particles trapped in the filter after each wash cycle by rinsing the semicircular filter and cup under running water. To remove the filter assembly, pull on the cup handle in the upward direction. The entire filter assembly should be cleaned once a week. To clean the coarse filter and the fine filter, use a cleaning brush. Then, reassemble the filter parts as shown in the figures below and reinsert the entire assembly in the dishwasher, positioning in its seat and pressing downward. The dishwasher must never be used without the filters. Improper replacement of the filter may reduce the performance level of the appliance and damage dishes and utensils.
Please clean the filter by blow steps when it blocked.
- & 2. Take the filter system out from the dishwasher.


-
Disassembly the filter, then clean the coarse filter.
-
Clean the fine filter


- Assembly the fine filter and coarse filter, then fix on the dishwasher.
Note:
Never run the dishwasher without the filters in place. When cleaning the filters, don't knock on them. Otherwise the filters could be contorted and the performance of dishwasher could be debased.
Operating Instructions
To operate the dishwasher:
Make sure the inlet and drain hoses are correctly and securely connected.
- Push the door release button to open the door.
- Check to make sure that the filter is in the right position.
- Place the dishes on the dish rack and cutlery inside the cutlery basket.
- Check to make sure that the rotating spray arm can turn freely all the way round. If necessary remove any obstacles.
- Fill the detergent in the recessed area on inner door panel. (approx. 12 grams).
- Close the door firmly
- Open the water supply.
- Push the power (on/off) button.
-Push Button in = power on
-Push Button out = power off
The LED and the power light will illuminate indicating the machine is receiving power.
- Select the desired program by press the program button. The LED will display the washing code which you selected.
P1=Intensive Wash
P2=Normal Wash
P3=Rapid Wash
P4=3 in 1 Wash
P5=Rinse Wash
Note: The LED will default to P2"Normal Wash"each time it is switched on.
- Press the pause/start key to start. The LED will flash the program and the washing state during operation.
- At the end of the cycle the dishwasher will stop, the LED will stop flash, the dishwasher will beep. The LED will default to P2"Normal Wash"each time it is switched on. The power light remain illuminated, until the power (on/off) button is switched off.
- The dishwasher is designed to stop if the door is opened accidentally during operation.
- You can select another program during operation by pressing the pause/start key first, then pressing the program key to the desired program, and pressing the pause/start key to start.
- After washing, dishes should be allowed to cool down for about 15 minutes so they are not too hot to handle. Dishes will cool quicker if the door is opened slightly.
- After unloading the dishwasher, remove the filter, clean off any bits of food, and put the filter back in its position.
NOTE: At the beginning of each cycle, the dishwasher always starts in the "drain" mode. This is because the drain pump always retains a small amount of water (in the sump) from the previous cycle. This is necessary to keep the pump primed. Therefore, do not be alarmed if you see a small amount of water being pumped-out from the drain hose prior to the start of the regular wash cycle (This is normal).
Programme Summary/Selection
Intensive Wash
Water Temperature: Wash 54°C/Rinse 69°C
Programme Duration + Heating Time: 125 minutes
Water Consumption: 10.4 litres
Normal Wash
Water Temperature: Wash 52°C/Rinse 67°C
Programme Duration + Heating Time: 130 minutes
Water Consumption: 10.4 litres
Rapid Wash
Water Temperature: Wash 49°C/Rinse 55°C
Programme Duration + Heating Time: 70 minutes
Water Consumption: 9.6 litres
3 in 1 Wash
Water Temperature: Wash 54°C/Rinse 69°C
Programme Duration + Heating Time: 120 minutes
Water Consumption: 10.4 litres
Rinse-Wash
Water Temperature: Incoming Water Supply
Programme Duration Time: 12 minutes
Water Consumption: 5.4 litres
(Note: the washing time may vary according to the incoming water temperature and the environmental temperature).
Main technical data
| Model | MTT4W |
| Power input | 1280W |
| Outer dimension(LxWxH) | L575 x W480 x H466 mm |
| Weight | About 22.5kg |
| Max. water Consumption | 10.4L |
| Water pressure | 0.03~1MPa |
| Control manner | Automatic |
| Detergent dosage | 12g |
| Plate setting | 4 sets 51 pieces |
ERROR CODE
Your dishwasher has a error code display function, that means if the appliance falls into a certain malfunction, the corresponding error code will be shown in the displaying window.
| CODE | MEANS | POSSIBLE PROBLEM |
| E1 | longer inlet time | faucet is not opened |
| E2 | longer drain time | the installation position of the drain pipe is too high |
| E3 | longer heating time | malfunction of temperature sensor or of heating element |
| E4 | abnormal water level | too much inlet water |
COMMON PROBLEMS AND SOLUTIONS
| Problems | Reasons | Directions |
| E1 | The water supply is turned off | Turn the water supply on |
| Inlet hose is kinked | Put the hose in the right way | |
| The water pressure is too low | Minimum water pressure of 0.03Mpa | |
| Water valve or hose is blocked | Disassemble and clean the water valve or hose | |
| E2 | Drain hose is obstructed or kinked | Lay hose correctly |
| Filter may be blocked | Check and unblock filter assembly (page 8) | |
| E3 | Water inlet temperature may be lower than normal,especially duringthe winter period | Connect to hot water inlet |
| E4 | Filter may be blocked | Check and unblock filter assembly, restart the appliance,check the water lever goes down before the wash cycle begins(page 8) |
| Salt leakage (for equipped with softener) | The cover of the softener is loose | Tighten the cover |
| Poor Cleaning | Drain hose loop is too low. | Move drain hose to proper height. |
| Drain hose connected to a floor drain not properly vented. | Install a vent air gap at counter top. | |
| Debris in bottom of tub sump area | Clean out the sump area | |
| Pump parts are not properly installed | Inspect the pump and correct and installation errors | |
| The filter is obstructed | Clear the filter | |
| The filter is not in position | Put filter and micro filter in position | |
| The filter is distorted | Repair or replace filter | |
| Obstructed spray arm | Rotate the spray arm before start | |
| Improper loading of dishes, pots etc. | Instruct the customer on proper loading of the dishes, refer to the owners manual | |
| Too less of the detergent | ||
| The wrong wash program be chosen | ||
| Defective detergent/rinse module | Replace the detergent/rinse | |
| Spray arm is blocked | Clear or replace the spray arm | |
| Too few of the inlet water | Check as the ERROR 2 | |
| Defective pump | Replace the pump | |
| No salt in the softener | Add salt to the softener | |
| Obstructed spray arm | Rotate the spray arm to ensure free rotation | |
| Poor drying | Improper loading of dishes, pots etc. | Instruct the customer on proper loading of the dishes, refer to the owners manual |
| The wrong wash program be chosen | ||
| Defective detergent/rinse module | Replace the detergent/rinse |

This symbol on the product or in the instructions means that your electrical and electronic equipment should be disposed at the end of its life separately from your household waste. There are separate collection systems for recycling in the EU. For more information, please contact the local authority or your retailer where you purchased the product.
NOTE:
This product has been wet tested to ensure correct operation. As a result some water can remain inside the unit. This is normal and safe. Please remove any water droplets from the exterior if necessary.

Visit Partmaster.co.uk today for the easiest way to buy electrical spares and accessories. With over 1 million spares and accessories available we can deliver direct to your door the very next day.
Visit www.partmaster.co.uk
or call
0870 6001 338
(UK customers only)
Calls charged at National Rate.
- TABLE OF CONTENTS
- UNIT PART IDENTIFICATION
- IMPORTANT SAFETY INSTRUCTIONS
- WARNING
- SAVE THESE INSTRUCTIONS
- ELECTRICAL INSTRUCTIONS
- INSTALLATION INSTRUCTIONS
- REMOVE ALL PACKING MATERIALS CAREFULLY
- WATER PRESSURE
- FOR BEST RESULTS
- DISCONNECTING YOUR DISHWASHER
- NOTE
- CONTROL PANEL AND THE LED DISPLAY
- PREPARING YOUR DISHES FOR WASHING
- WHEN LOADING ITEMS TO BE WASHED
- THE RECESS FOR THE DETERGENT
- HOW MUCH DETERGENT SHOULD YOU USE
- HOW TO USE THE 3 IN 1 PROGRAM
- HOW TO USE THE WATER SOFTENER (FOR MODELS WITH SOFTENER)
- ADD THE SALT
- CLEANING THE FILTERS
- FILTER ASSEMBLY
- OPERATING INSTRUCTIONS
- TO OPERATE THE DISHWASHER
- P1=INTENSIVE WASH
- P2=NORMAL WASH
- P3=RAPID WASH
- P4=3 IN 1 WASH
- P5=RINSE WASH
- PROGRAMME SUMMARY/SELECTION
- ERROR CODE
Brand : MATSUI
Model : MTT4W
Category : Dishwasher