
RDW1260FI - Dishwasher RANGEMASTER - Free user manual and instructions
Find the device manual for free RDW1260FI RANGEMASTER in PDF.


| Product Type | Dishwasher |
| Brand | Rangemaster |
| Model | RDW1260FI |
| Energy Efficiency Class | A++ |
| Drying Efficiency Class | A |
| Standard Cycle | Eco 50°C |
| Program Time (Standard) | 162 minutes |
| Energy Consumption (Standard) | 0.90 kWh |
| Water Consumption (Standard) | 9 litres |
| Annual Energy Consumption | 258 kWh |
| Annual Water Consumption | 2520 litres |
| Capacity | 12 place settings |
| Noise Level | 47 dB |
| Power Supply | 220-240V ~ 50 Hz, 10 A |
| Standby Power Consumption | 1.00 W |
| Off Mode Power Consumption | 0.05 W |
| Wash Programs | 9 programs: AutoIntensive, AutoNormal, AutoDelicate, Hygiene, Normal, Eco, Rapid, Prewash, Hygiene Extra |
| Additional Functions | Delay start (1-19h), Half load, Tablet function, Upper/Lower basket wash |
| Adjustable Upper Basket | Yes (2 height positions) |
| Water Softener | Yes, with adjustable salt consumption |
| Rinse Aid Dispenser | Yes, adjustable dosage (6 levels) |
| Active Drying Unit | Yes |
| Safety Features | Earth connection, door safety switch, water overflow protection (error codes) |
| Maintenance | Clean filters and spray arms regularly; check salt and rinse aid indicators |
| Installation Type | Built-under or built-in |
| Service | Authorized service centres; use original spare parts |
Frequently Asked Questions - RDW1260FI RANGEMASTER
User questions about RDW1260FI RANGEMASTER
0 question about this device. Answer the ones you know or ask your own.
Ask a new question about this device
Download the instructions for your Dishwasher in PDF format for free! Find your manual RDW1260FI - RANGEMASTER and take your electronic device back in hand. On this page are published all the documents necessary for the use of your device. RDW1260FI by RANGEMASTER.
USER MANUAL RDW1260FI RANGEMASTER
natural_image
Empty white square with a thin gray border (no text or symbols)User Guide
&
Installation & Service Instructions

U110283 - 01
1. Before You Start 1
At Time of Delivery 1
About these Instructions 1
During Installation 1
During Normal Use 1
If a Fault Occurs 2
Caring for the Environment 2
Recommendations 2
2. Overview and Operation 3
Getting to Know Your Dishwasher 3
Rinse Aid 5
Detergent 6
What You Should Not Put Into the
Dishwasher
Damage to Glassware and Other Dishes 7
Arranging Crockery, Glasses, etc. in the
Dishwasher
Using the Lower Basket 7
Using the Upper Basket 8
Program Overview 10
3. Looking after your Dishwasher 14
Care 14
Overall Condition of the Dishwasher 14
Solvents or Abrasive Cleaning Products 15
Moving the Dishwasher 15
Seals 15
Hose Filter 15
When You Go on Holiday 15
4. Troubleshooting 16
Resolving Minor Problems Yourself 16
Problems When the Unit is Switched On 16
Problems With the Dishwasher 16
Problems During Washing 17
Problems With the Dishes, Cutlery, etc. 17
5. Installation 19
Positioning the Dishwasher 19
Drain Hose Connection 19
Electrical Connection 20
Installing the Dishwasher 20
General 20
6. Circuit Diagram 21
7. Technical Data 22
1. Before You Start
This dishwasher is for use in GB and IE only. After sales service applies to GB and IE only.
At Time of Delivery
Check packaging and dishwasher immediately for signs of transport damage. If the dishwasher is damaged DO NOT USE. Contact your supplier or customer services.
Please dispose of packaging materials properly.
About these Instructions
Please read these instructions carefully before using this dishwasher. The instructions contain important information which will help you get the best out of the dishwasher and ensure safe and proper installation, use and maintenance.
Keep this manual in a convenient place so you can always refer to it for the safe and proper use of the dishwasher.
If you sell the dishwasher, give it away, or leave it behind when you move house, make sure you also pass this manual so that the new owner can become familiar with the dishwasher and safety warnings.
During Installation
- Site the dishwasher and connect in accordance with the installation instructions.
• DO NOT connect the dishwasher to the electricity supply while carrying out the installation.
• Make sure that the wiring is properly earthed. - The mains electricity supply must conform to national and local regulations and the details shown on the dishwasher nameplate.
• DO NOT connect the dishwasher to the electricity supply with an extension cable.
• DO NOT connect the dishwasher to a socket with multiple outlets. - Built-under and built-in dishwashers should always be installed under a continuous work surface attached to adjacent cupboards. This will make sure that the dishwasher is stable.
• After the dishwasher has been installed, the mains plug should be easily accessible. - DO NOT excessively bend or flatten the power supply cord during installation. The dishwasher should not stand on the power supply cord.
During Normal Use
- Following installation the first wash cycle must be with the dishwasher unloaded.
- Commercial use of the dishwasher will void the guarantee.
- The dishwasher MUST only be used for washing household dishes and cooking utensils.
• This dishwasher cannot be installed outdoors.
• DO NOT place heavy objects on the door or stand on it when it is open. The dishwasher may tip forward. - The water inside the dishwasher is NOT suitable for drinking.
• DO NOT use solvents of any kind inside your dishwasher. They could cause an explosion. - Use only detergent and rinse aid specifically designed for use in domestic dishwashers.
- The suitability of plastic items must be checked before placing them in the dishwasher.
- Do not place items in the dishwasher that are not suitable for dishwashing.
- Do not overfill the dishwasher baskets. This may result in basket movement and damage the dishwasher.
- We do not recommend that the door is opened during operation. However, the dishwasher door is fitted with a safety device that stops the dishwasher if the door is opened during operation. As hot water may escape the dishwasher, DO NOT open the door fully until the spray arms have stopped rotating. Also, be careful of hot water escape at the base of the door.
- The dishwasher door should not be left open. Failure to close the dishwasher door may lead to accidents.
- Sharp ended objects and knives should be placed into the cutlery basket with the blade or sharp end facing down toward the base of the dishwasher.
• NEVER touch the dishwasher with wet hands. - If the dishwasher is not operating properly or maintenance is required, disconnect from the power supply.
- This dishwasher is not intended for use by persons (including children) with reduced physical, sensory or mental capabilities, or lack of experience and knowledge, unless they have been given supervision or instruction concerning use of the dishwasher by a person responsible for their safety.
- Keep detergents out of reach of children.
- When unpacking the dishwasher make sure that the packaging material is out of reach of children.
- Keep children away from the dishwasher when the door is open.
- Keep children away from detergents and rinse aid.
• DO NOT allow children to play with or start the dishwasher.
If a Fault Occurs
If the dishwasher malfunctions, turn off the water supply and disconnect the plug from the wall socket. If you cannot solve the problem, contact our service centre on the below number:
SERVICE CENTRE Tel: 0844 847 6711.
Only authorized persons should make repairs.
If the supply cord is damaged it must be replaced by the manufacturer, service agents or authorized persons.
To maintain the efficiency and safety of this dishwasher we recommend:
- Call only Service Centres authorized by the manufacturer.
• Always use original spare parts.
Caring for the Environment
Disposing of Your Packaging
Your new dishwasher was protected by suitable packaging while on its way to you. All of the materials used are environmentally friendly for disposal and can be recycled. Please make a contribution to protecting the environment by disposing of the packaging appropriately.
Disposing of Your Old Dishwasher
Old dishwashers still have some residual value. An environmentally friendly method of disposal will make sure that valuable raw materials can be recovered and used again.
When your dishwasher has reached the end of its working life unplug it from the mains. Cut off the mains cable and dispose of it together with the plug.
Destroy the door locking mechanism so that children and pets cannot accidentally lock themselves in.

This symbol on the product or its packaging indicates that the product may not be treated as household waste. Instead it should be handed over to your local community waste collection/recycling centre.
By disposing of this product correctly, you will help prevent potential negative consequences for the environment and human health, which could otherwise be caused.
For more detailed information about recycling of this product, please contact your local council, your household waste disposal service or the shop where you purchased the product.
Recommendations
Removing coarse residue from items before placing them into the dishwasher will save energy and water.
Try only to use your dishwasher when it is fully loaded.
Use the pre-wash program only whenever necessary.
Place hollow items such as bowls, glasses and pots face down into the dishwasher.
DO NOT overload your dishwasher.
2. Overview and Operation
Getting to Know Your Dishwasher
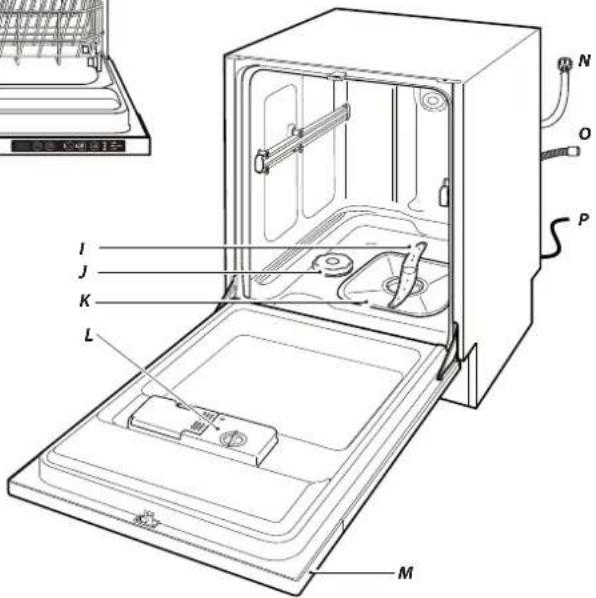
Dishwasher Interior
| A Top basket handle | |
| B Upper basket with racks | |
| C Upper basket track latch | |
| D Upper spray arm | |
| E Lower basket handle | |
| F Lower basket | |
| G Cutlery basket | |
| H Control panel | |
| I Lower spray arm | |
| J Salt dispenser | |
| K Washing filter | |
| L | Detergent and rinse aid dispenser |
| M Rating plate | |
| N Water inlet hose | |
| O Drain hose | |
| P Power supply cord | |
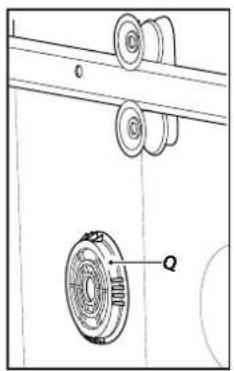
| Q Active drying unit | |
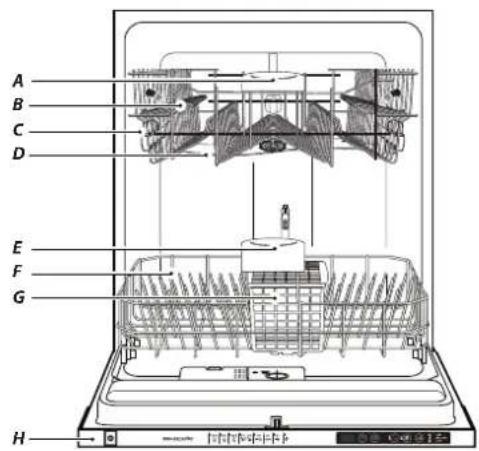
Fig.2-1
Control Panel
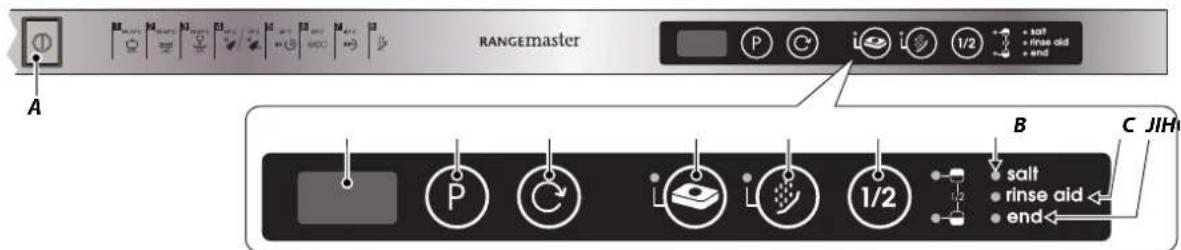
Fig.2-2
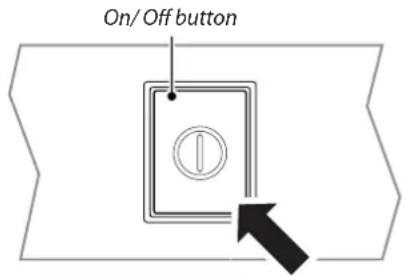
| A | ON-OFF button |
| B | Program display |
| C | Program selection button |
| D | Delay timer button |
| E | Detergent tablet button |
| F | Prewash button |
| G | Half (1⁄2) load button |
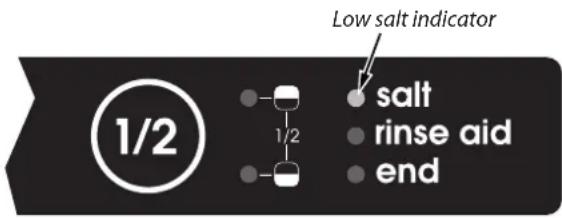
| H | Low salt indicator |
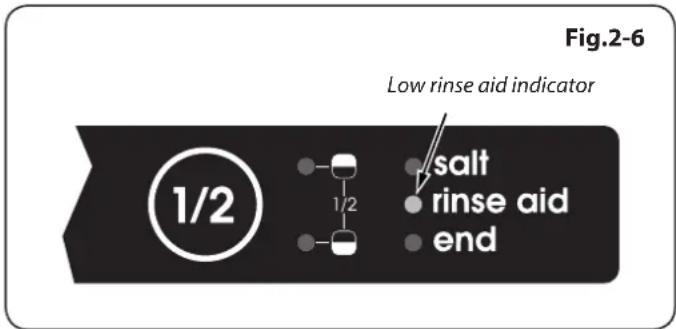
| I | Low rinse aid indicator |
| J | End of program indicator |
Fig.2-3
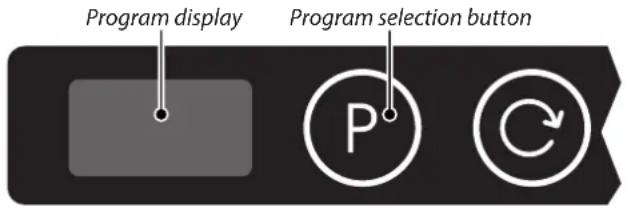
Fig.2-4
| Water Hardness level | Hardness dE | Hardness Level Indicator |
| 1 0 - 9 L1 | shown in display | |
| 2 10 - 20 L2 | shown in display | |
| 3 21 - 30 L3 | shown in display | |
| 4 31 - 40 L4 | shown in display | |
| 5 41 - 55 L5 | shown in display | |
| 6 56 - 90 L6 | shown in display |
Table 2-1
Fig.2-5
Salt
The hardness of water varies from place to place. If hard water is used in the dishwasher, deposits will form on the dishes and utensils.
The dishwasher is equipped with a special softener that uses a salt specifically designed to eliminate lime and minerals from the water.
Please contact your local water authority to confirm the hardness level of your water.
Adjusting Salt Consumption
The dishwasher is designed to adjust the amount of salt consumed based on the hardness of the water used. This is intended to optimize and customize the level of salt consumption so that it remains at a minimum.
To adjust salt consumption:
- With the dishwasher switched off press and hold the program selection button (Fig.2-3).
- Press the On/Off button (Fig.2-4). Keep the program selection button pressed until 'SL' disappears from the program display.
- The display will indicate the water hardness setting; the dishwasher is supplied set to level 3. The hardness level can be adjusted by pressing the program selection button (Fig.2-3).
We recommend that the hardness level is set in accordance with Table 2-1.
To save the setting press the On/Off button.
Loading the Salt into the Container
Always use salt intended for use with dishwashers.
The salt container is located beneath the lower basket and should be filled as follows:
- When the low salt indicator (Fig.2-5) lights, you must fill the salt container. Remove the lower rack and then unscrew and remove the cap from the salt container.
Note: If you are filling the container for the first time, fill it with water. - Place the end of the funnel (supplied) into the hole and introduce about 2 kg of salt. It is normal for a small amount of water to come out of the salt container.
- Carefully screw the cap back on.
IMPORTANT: To prevent the formation of rust, load the salt just before beginning a wash cycle.
Rinse Aid
This product makes dishes sparkle and helps them to dry without spotting. The dispenser is located on the inside panel of the door.
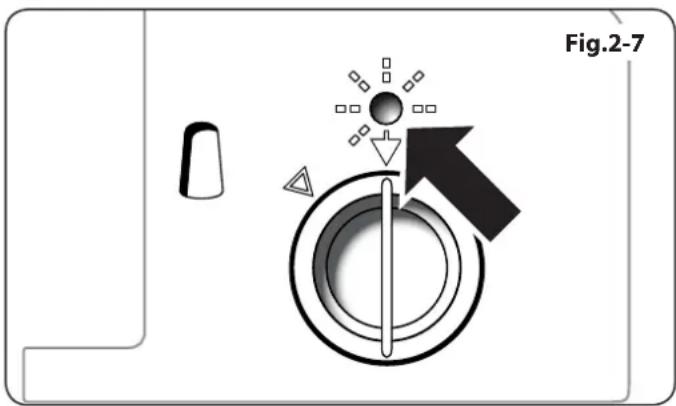
When the low rinse aid indicator on the control panel (Fig.2-6) and the indicator on the dispenser (Fig.2-7) lights you must add rinse aid.
Note: When 3-in-1 or similar combination detergent tablets are used, the rinse-aid is no longer required.
Loading the Rinse Aid
To load the rinse aid:
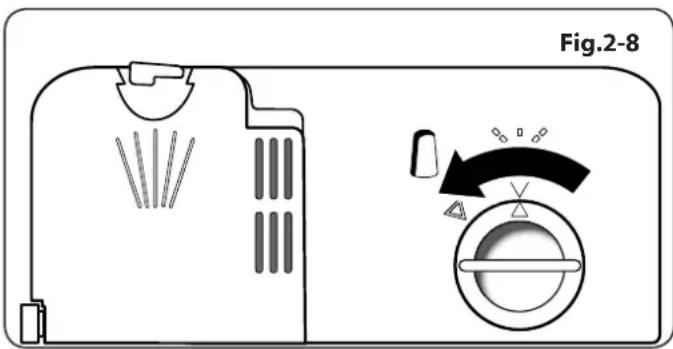
- To open the dispenser, turn the cap in a counterclockwise direction and remove (Fig.2-8).
- Pour in the rinse aid, making sure not to overfill. The rinse aid indicator will turn off when full.
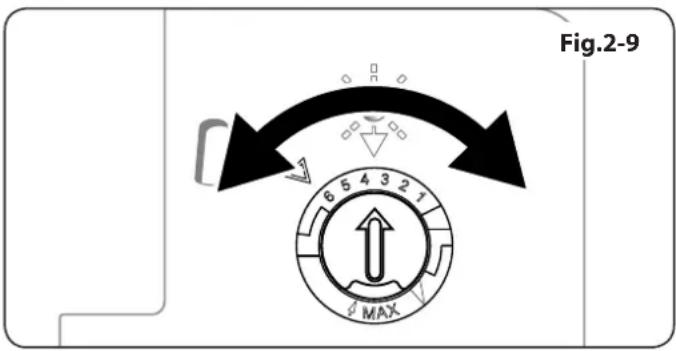
Regulate the amount of rinse aid used for each cycle by turning the dose adjuster (Fig.2-9), located beneath the cap, with a screwdriver.
There are 6 different settings; the normal dosage setting is 3.
IMPORTANT: Proper dosage of rinse aid improves drying. If drops of water remain on the dishes or spotting occurs, the dosage adjuster should be turned to a higher setting. If the dishes have white streaks, turn the adjuster to a lower setting.
Detergent
Detergent specifically intended for use with dishwashers must be used. The dispenser must be refilled before the start of each wash cycle following the instructions provided in the 'Program overview'. The detergent dispenser is located on the inside panel of the door.
Loading the Detergent
To load the detergent:
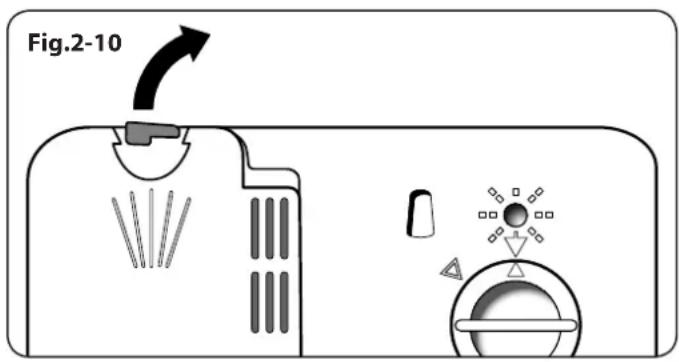
- Open the cover on the dispenser by lifting the catch (Fig.2-10).
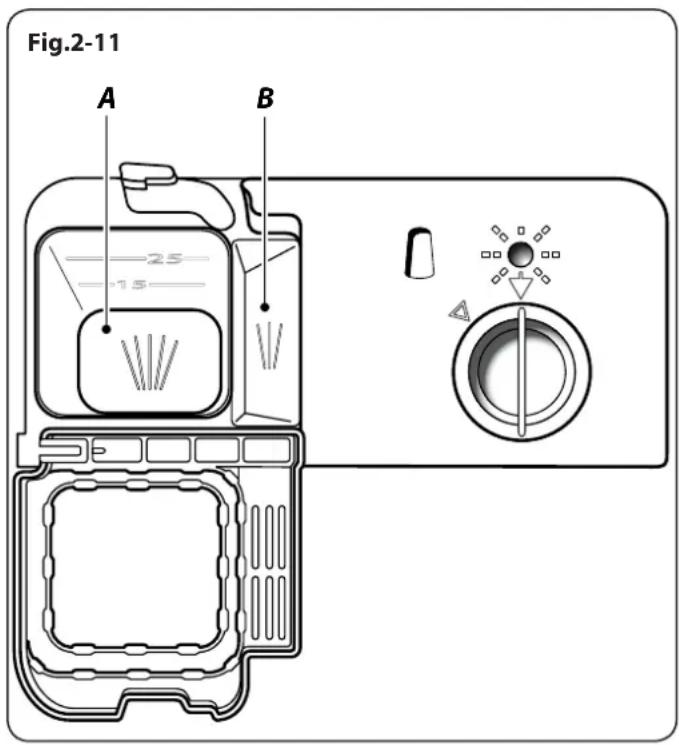
- Pour the detergent for the wash cycle into compartment 'A' (Fig.2-11).
- Pour the detergent for the prewash cycle into compartment 'B' (Fig.2-11).
- After the detergent has been placed in the dispenser, close the cover and press down until it clicks in place.
Note: To allow the cover to close properly, remove any excess detergent from the edges of the dispenser.
If you are using 3-in-1 or similar tablets, make sure you select the tablet function.
The solubility of tablets can vary depending on manufacturer. Therefore we do not recommend tablets are used in short programs. It is more suitable to use powder detergents in short programs.
What You Should Not Put Into the Dishwasher
Cutlery and tableware manufactured in whole or part from wood, bone, ivory or mother of pearl (nacre). They become faded and unsightly in appearance. Furthermore the adhesives that are used are not suitable for the temperature that occurs inside the dishwasher.
Delicate decorative glassware and vases, special antiques or irreplaceable china. The decorative patterns on such items will not be dishwasher-proof.
Plastic objects that are not resistant to hot water, copper and pewter utensils are also not suitable. Decorative patterns printed or painted onto the surface of crockery, glasses, etc., aluminium and silver items tend to become discoloured or faded if washed in the dishwasher.
Some types of glass can become opaque in appearance after they have been washed many times in a dishwasher. Highly absorbent materials, such as sponges and towels should never be placed in the dishwasher.
IMPORTANT: Dishes or cutlery that have been soiled by tobacco ash, wax, grease or paint, should not be put in the dishwasher.
Damage to Glassware and Other Dishes Possible Causes
• Type of glass or manufacturing process.
• Chemical composition of detergent.
• Water temperature and duration of dishwasher program.
Suggested Remedy
• Use glassware or porcelain dishes that have been marked 'dishwasher-proof' by the manufacturer.
- Use a mild detergent that is described as 'kind to dishes'. If necessary, seek further information from detergent manufacturers.
- Select a program with a low temperature and a short duration.
• To prevent damage, take glass and cutlery out of the dishwasher as soon as possible after the program has ended.
Arranging Crockery, Glasses, etc. in the Dishwasher
Before placing the dishes in the dishwasher, remove larger food particles to prevent the filter from becoming clogged, resulting in reduced performance.
If the pots and pans have baked-on food that is extremely hard to remove, we recommend that they are soaked before washed. This will eliminate the need for extra wash cycles.
Pull out the basket to load the dishwasher.
Using the Lower Basket
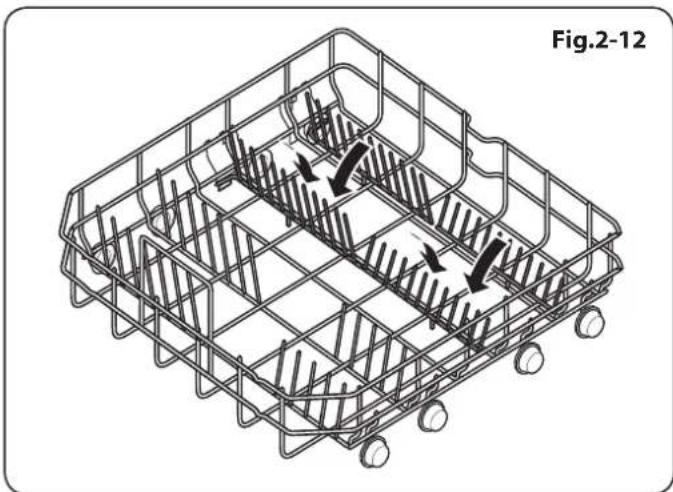
The lower basket has adjustable supports that fold down to allow larger items to be placed (Fig.2-12). We recommend that you place the most difficult to clean items on the lower rack: pots, pans, lids, serving dishes and bowls (Fig.2-13).
It is preferable to place serving dishes and lids on the sides of the racks to avoid blocking the rotation of the top spray arm.
Pots, serving bowls, etc. must always be placed face down.
Deep pots should be slanted to allow the water to flow out.

WARNING!
Knives and other utensils with sharp points must be loaded in the basket with their points down or placed in a horizontal position.
natural_image
Isometric line drawing of a wire mesh structure with internal structural elements and directional arrows (no text or symbols)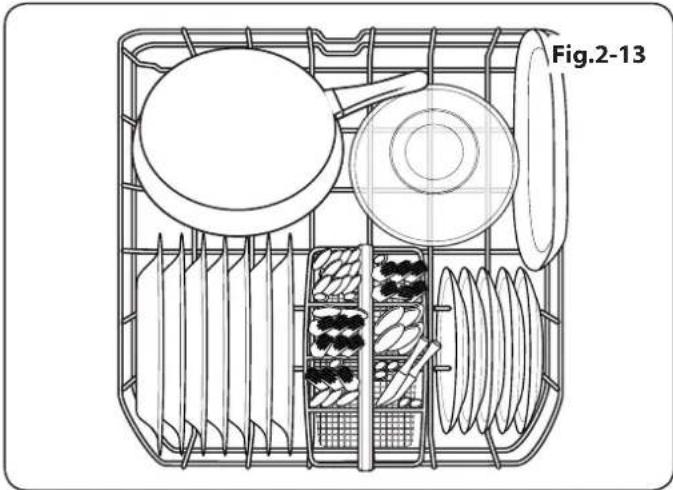
natural_image
Technical line drawing of a mechanical device with multiple compartments and components (no text or symbols)Fig.2-14
natural_image
Top-down technical drawing of a mechanical assembly with multiple components and no visible text or symbolsFig.2-15
natural_image
Diagram of a mechanical or electrical system with layered components and directional arrows, labeled Fig.2-15 (no readable text or symbols)Using the Upper Basket
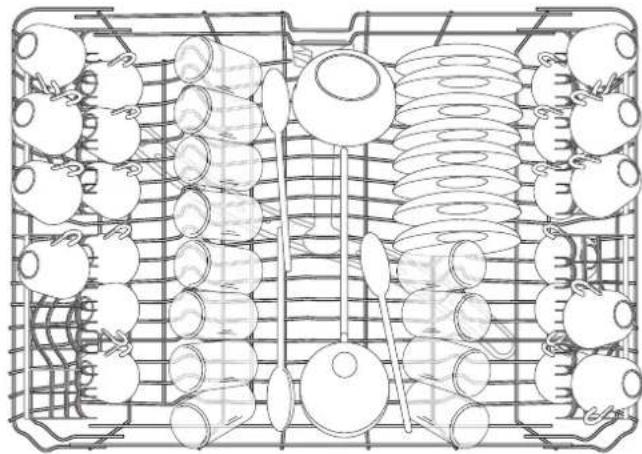
The upper basket (Fig.2-14) is designed to hold more delicate and lighter dishware, such as glasses, cups and saucers, plates, small bowls and shallow pans (as long as they are not too dirty).
Position the dishes and cookware so that the spray of water does not move them.
The upper basket can be adjusted for height. The basket is supplied in its upper position, allowing more space to accommodate taller pans and trays in the bottom basket.
To adjust the height of the basket, hold both sides, lift and lower. Repeat this to adjust from the lower to upper position.
Upper Basket Shelves
Lean tall glasses and those with long stems against the shelves. DO NOT lean them against other items to be washed.
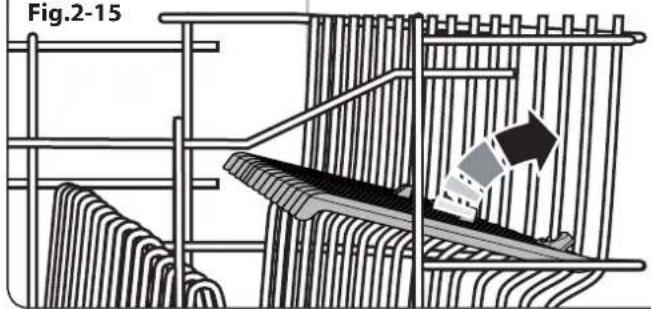
Place glasses, cups and small bowls on the shelves. The shelves can be swivelled in or out as required (Fig.2-15).
Washing Dishes
Program overview
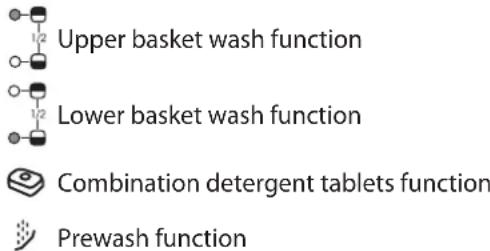
① On/Off function
P Program select function
Time delay function
Additional options:
Program Selection
The most appropriate program can be identified by comparing the type of crockery, cutlery, etc., as well as the amount and condition of food remains, with the details contained in Table 2-2, the wash cycle table.
The corresponding program sequence, duration and consumption details are shown.
Example: Use the normal program for dishes and utensils that are heavily soiled.
Program Data
The stated program data are based on standard operating conditions. The values can vary considerably according to:
• Different amounts of dishes
• Temperature of mains water supply
• Pressure of mains water supply
• Ambient temperature
• Fluctuations in mains voltage
• Machine-related factors (e.g. temperature, water volume)
Program Overview
| Wash program | 60-70°Cauto | 50-60°Cauto | 30-50°Cauto | 60°CH | 60°C55 | 50°Ceco | 40°C30L | 70°CH | |
| AutoIntensive | AutoNormal | AutoDelicate | Hygiene | Normal wash | Eco wash | Rapid wash | Prewash | Hygiene Extra | |
| Program display | P1 | P2 | P3 | P4 | P5 | P6 | P7 | P8 | |
| Program temperature | 60 -70°C | 50-60°C | 30-50°C | 60°C | 60°C | 50°C | 40°C | - | 70°C |
| Type of food waste | Automatically adjusts the wash time,temperature and amount of water dependingupon the level of soiling | Soiled items left for along time requiringa hygienic wash | Soups, sauces, pasta,eggs, pilaf, potato andoven cooked dishes,fried foods | Coffee, milk, tea, coldmeats and vegetables | Coffee, milk, tea, coldmeats and vegetables | Pre-wash to rinseor loosen residuefrom items awaitinga full load | Items with heavysoiling that have beenstacked a long timeor require ahygienic wash | ||
| High | High | Small | High | Medium | Medium | Small | Program Level ofsoiling | High | |
| Detergent amountA: 25 cm3/ 15cm3B: 5 cm3 | A + B | A + B | A | A + B | A + B | A + B | A | - | A + B |
| Automatically adjusts the wash time,temperature and amount of water dependingupon the level of soiling | Prewash | 60°C Wash | Prewash | Prewash | Prewash | 50°C Prewash | |||
| 60°C Wash | Warm rinse | 50°C Wash | 40°C Wash | End | 70°C Wash | ||||
| Cold rinse | Hot rinse | Cold rinse | Cold rinse | Cold rinse | |||||
| Hot rinse | End | Hot rinse | Hot rinse | Warm rinse | |||||
| Dry | Dry | End | Hot rinse | ||||||
| End | End | Dry | |||||||
| End | |||||||||
| Program duration (minutes) | 111 - 183 | 100 - 127 | 64 - 92 | 123 55 | 162 | 30 | 15 | 161 | |
| Electricity consumption (kW hours) | 1,22 - 1,8 1,12 - 1,3 | 0,81 - 0,96 | 1,55 | 1,07 | 0,90 | 0,88 | 0,02 | 1,75 | |
| Water consumption (litres) | 13,3 - 24,6 | 10,9 - 18,5 15 11 | 10,6 - 17,7 | 9,0 11 4,2 | 22,7 | ||||
Note: Short programs do not include a drying stage.
The values declared above are the values obtained under laboratory conditions according to relevant standards. These values can change depending on local conditions (water pressure, water temperature and environment temperature).
Switching the Dishwasher ON
- Turn on the tap.
- Open the door.
- Set ON-OFF button to ON (Fig.2-16); the program display will light (Fig.2-17).
- Press the program button 'P'; the selected program will appear in the program display (Fig.2-17).
- Select any additional options.
- Close the door and the dishwasher will start automatically.
End of Program
Five beeps will indicate that the wash cycle has finished and the end of program indicator will light (Fig.2-18).
Switching the Dishwasher OFF
Several minutes after the program has ended:
- Open the door.
- Set the ON-OFF button to OFF.
- Remove dishes, etc. when they have cooled down.
Note: For the best drying performance, we recommend that you do not remove the contents for at least 30 minutes. This allows residual heat in the dishwasher to remove any small droplets of water that may occur.
Interrupting the Program

CAUTION!
There is a risk of water coming out from inside the dishwasher. DO NOT open the door fully until the spray arm has stopped rotating.
If the dishwasher has already heated up or the hot water was switched ON and then the dishwasher door opened, leave the door ajar for several minutes and then close.
After 30 seconds the program will start from the point it was interrupted.
Cancelling a Program

CAUTION!
There is a risk of water coming out from inside the dishwasher. DO NOT open the door fully until the spray arm has stopped rotating.
To cancel a program that is underway, carefully open the door and press the program button and hold it in for about 3 seconds. When the door is closed the water will be discharged for about thirty seconds. Five beeps will indicate that the program is cancelled; the end of program indicator will turn on.
Fig.2-16
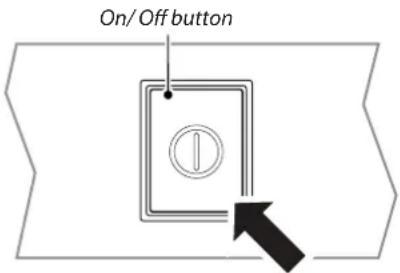
Fig.2-17
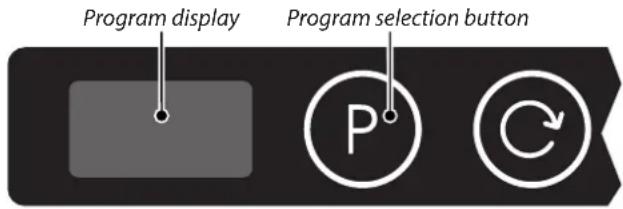
Fig.2-18
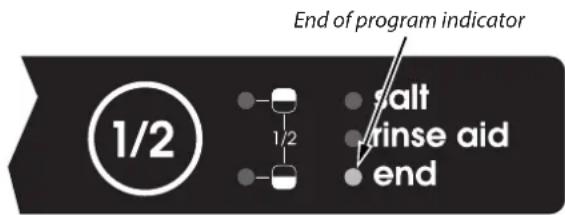
Fig.2-19
Modifying a Program

CAUTION!
There is a risk of water coming out from inside the dishwasher. DO NOT open the door fully until the spray arm has stopped rotating.
A cycle that is underway can be modified if it has only been running for a short time. Otherwise, the detergent may have already been used and the dishwasher may have already drained the wash water. If this is the case, the detergent dispenser must be refilled (see 'Loading the detergent').
To modify a cycle that is already underway, open the door and select a new program by pressing the program selection button. Closing the door will start the new program from a suitable point in the old program.
Using 3-in-1 Detergent Tablets
General Advice
- Before using these products you should first check that the water hardness in your supply is compatible with their use, as per the detergent manufacturers instructions (on the product packaging).
- These products should be strictly used according to the detergent manufacturers instructions.
- If you encounter problems when using 3-in-1 products for the first time then please contact the detergent manufacturers care line (the telephone number is given on the product packaging).
Special Advice
When using combination products, there is no need to add additional salt or rinse aid as these are not required. Indicator lights for salt and rinse aid can be ignored. It may be helpful to select the lowest possible setting for water hardness.
To Select the 'Tablet' Function:
- Open the door.
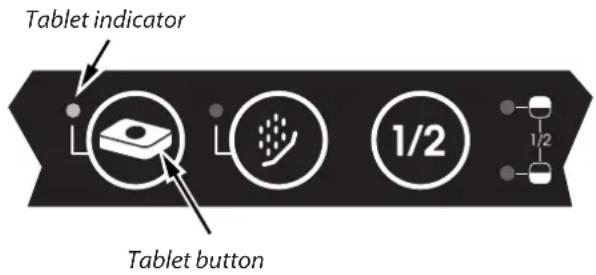
- Select the program and then press the 'tablet' button (Fig.2-19). The tablet indicator will light.
- Close the door. The dishwasher will start immediately.
To Cancel the 'Tablet' Function:
Follow the 'Cancelling a Program' instructions.
If you decide to switch to the use of a standard detergent system we advise that you:
- Refill both the salt and rinse aid compartments.
- Switch the water hardness setting to the highest possible position and run for three normal cycles without a load.
- Readjust the water hardness setting again according to the conditions for your region. For more information please refer to your instruction manual.
Upper Basket Wash
This function allows the dishwasher to wash dishes using only the upper basket. This will allow you to save on water and energy consumption if there are not enough dishes for a full load.
To select upper basket wash:
-
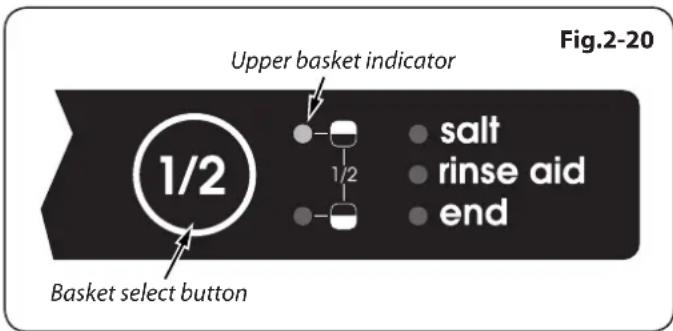
Open the door. Select the program and then press the 'basket select' button. The upper basket indicator lights (Fig.2-20).
-
Close the door, the dishwasher will start immediately.
To cancel the upper basket wash:
Follow the 'Cancelling a program' instructions.
Note: Please keep in mind that the amount of detergent should also be adapted to the load.
Lower Basket Wash
This function allows the dishwasher to wash dishes using only the lower basket. This will allow you to save on water and energy consumption if there are not enough dishes for a full load.
To select lower basket wash:
-
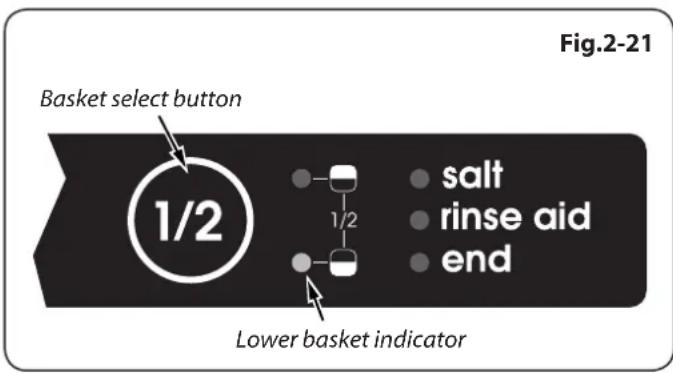
Open the door. Select the program and then press the 'basket select' button twice. The lower basket indicator lights (Fig.2-21).
-
Close the door, the dishwasher will start immediately.
To cancel the lower basket wash:
Follow the 'Cancelling a program' instructions.
Note: Please keep in mind that the amount of detergent should also be adapted to the load.
Delayed Start Program
You can delay the start of a program from 1 hour up to 19 hours.
- Open the door, switch the dishwasher ON.
- Press program button to choose the desired program.
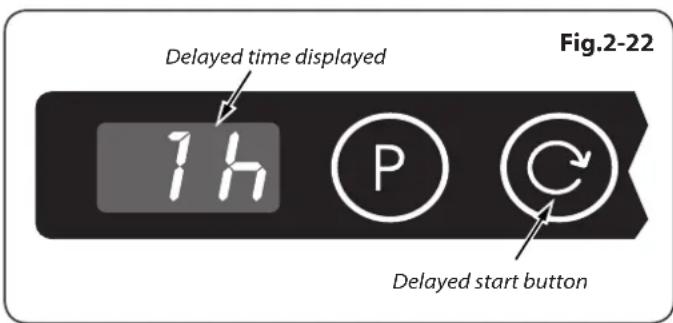
- Press the Delayed Start button (Fig.2-22); the time-remaining is displayed within the program indicator display. This changes to '1h'.
- Press the Delayed Start button as many times as necessary until the numerical display shows the required delay.
- To cancel the time delay setting, press the Delayed Start button until the time remaining indicator shows '0 h'.
- Close the door, the time-remaining indicator will blink and start to count down. The program will start when the delayed start indicator goes out and the wash cycle will begin.
To cancel a delayed start program in progress, follow the 'Cancelling a Program' instructions.
3. Looking after your Dishwasher
Fig.3-1
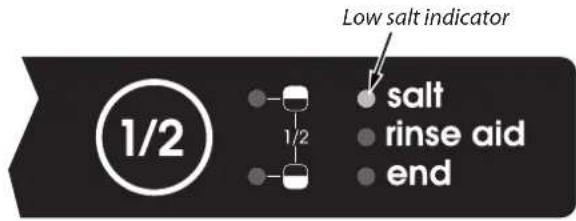
Fig.3-2
natural_image
Technical illustration of a mechanical component with a magnified inset showing internal structure (no text or symbols)Care
After Every Wash
After every wash, set the ON-OFF button to OFF and leave the door slightly ajar so that moisture and odours are not trapped inside.

Before cleaning or performing maintenance isolate from mains.
Overall Condition of the Dishwasher
Check that no grease or scale has accumulated on the inside of the dishwasher. If you discover any deposits: Clean the interior of the dishwasher thoroughly with a detergent solution.
Dishwasher Salt
Check the LOW SALT indicator (Fig.3-1). If required, top up with salt.
Rinse Aid
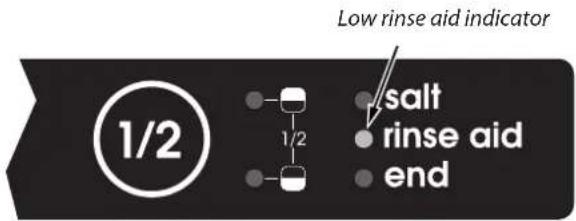
Check the low rinse indicator (Fig.3-2) on the control panel. If required, top up with rinse aid.
Filters
The filters prevent larger particles of food in the water from reaching the pump. These particles may occasionally block the filters.
When the dishwasher has finished washing, check the filters for particles of food and, if required, clean.
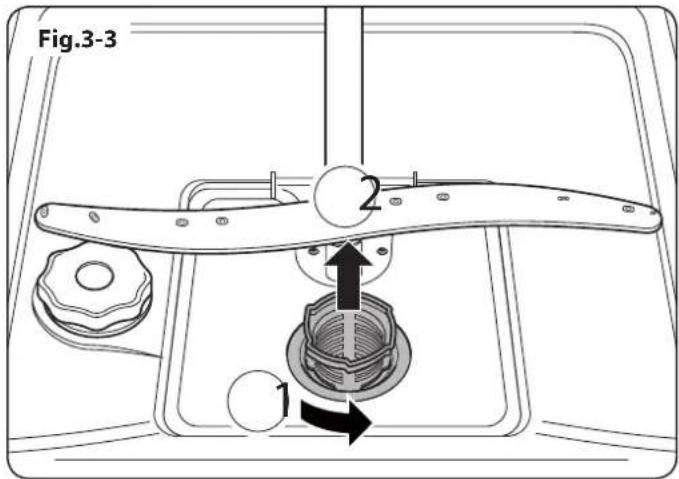
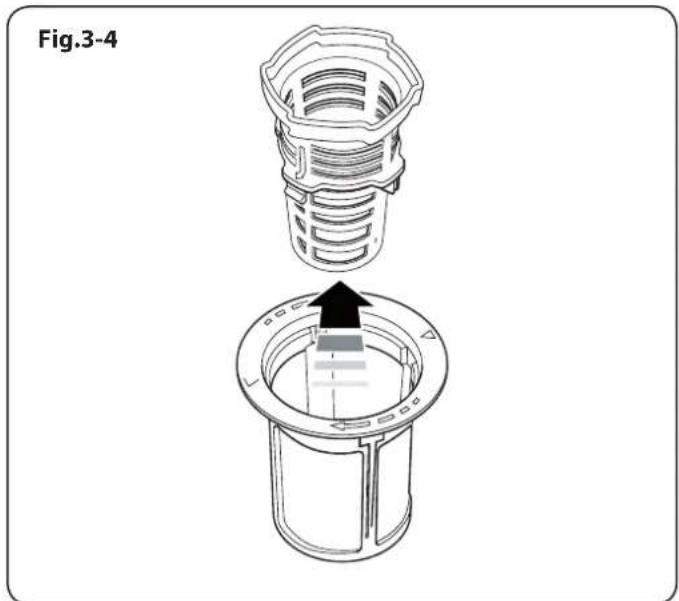
After removal (Fig.3-3), the course and micro filter unit can be separated (Fig.3-4). Remove any particles of food and rinse the filters under running water.
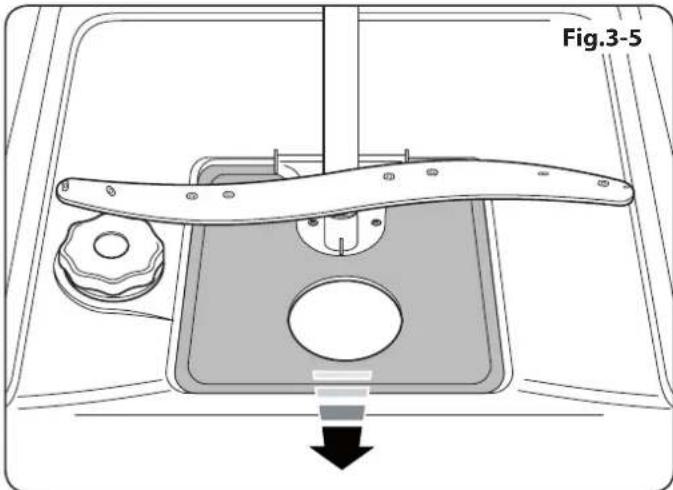
With the course and micro filters removed, the base filter can be removed. Lift at the front and pull clear (Fig.3-5).
Once cleaned, replace the filters. Tighten the course and micro filters by turning counter clockwise.

Never use the dishwasher without the filters fitted.
Spray Arms
Limescale and remnants of food in the washing water can block the nozzles in the spray arms and the arm mountings.
Inspect the nozzles in the spray arms for blocked holes due to remnants of food.
If necessary, pull the lower arm (Fig.3-6) upwards and lift it off. Unscrew the upper spray arm (Fig.3-7).
Clean both spray arms under running water.

Refit the spray arms. Make sure that the lower arm has locked into place and the upper one is screwed tight.
Solvents or Abrasive Cleaning Products
To clean the exterior and rubber parts of the dishwasher, do not use solvents or abrasive cleaning products. Rather, use only a cloth and warm soapy water.
To remove spots or stains from the surface of the interior, use a cloth dampened with water and a little white vinegar or a cleaning product made specifically for dishwashers.
Moving the Dishwasher
If the dishwasher must be moved, try to keep it in a vertical position. If absolutely necessary, it can be positioned on its back.
Seals
One of the factors that cause odours to form in the dishwasher is food that remains trapped in the seals. Periodic cleaning with a damp cloth will prevent this from occurring.
Hose Filter
To prevent particles of rust, sand etc. entering your dishwasher the inlet hose is fitted with a filter. To clean the filter, turn off the water tap and unscrew the hose. After cleaning insert the filter into the hose. Refit the hose and turn the water tap on.
When You Go on Holiday
When you go on holiday, it is recommended that you run a wash cycle with the dishwasher empty and isolate from the mains. Turn off the water supply and leave the door of the dishwasher slightly ajar. This will help the seals last longer and prevent odours from forming within the dishwasher.
natural_image
Technical diagram of a mechanical assembly with a lever and base plate, showing a downward force arrow (no text or symbols)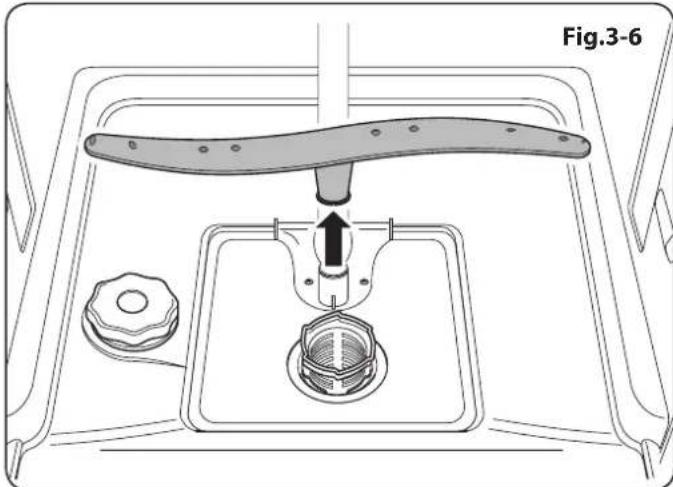
natural_image
Technical diagram of a mechanical assembly with a central component and a bolt, labeled Fig.3-6 (no text or symbols on the diagram itself)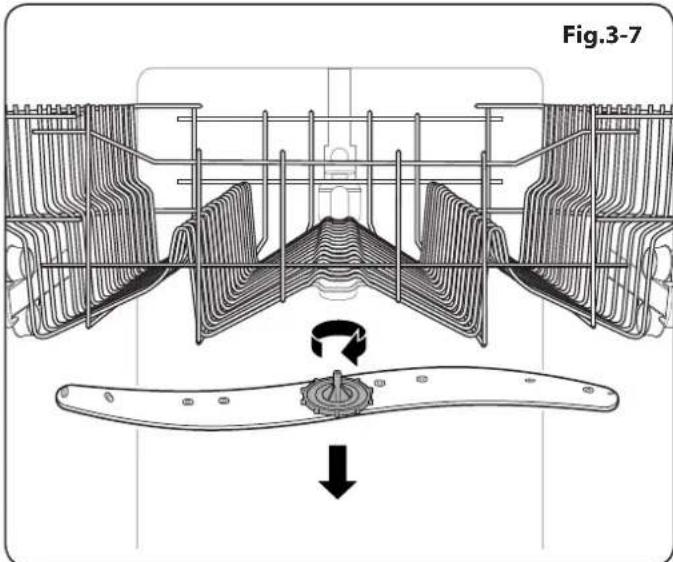
4. Troubleshooting
Fig.4-1
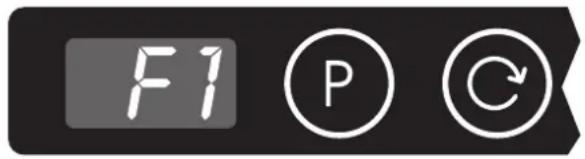
Fig.4-2

Fig.4-3
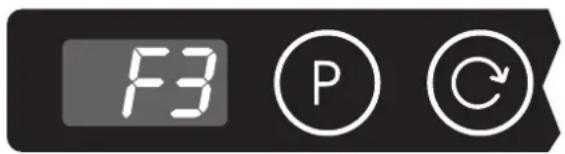
Fig.4-4
Resolving Minor Problems Yourself
Experience has shown that you can resolve most problems that occur during normal daily usage yourself, without having to call out a service engineer. Not only does this save costs but it also means that the dishwasher is available to use. The following list of common occurrences and their remedies should help you identify the causes of most problems.
Problems When the Unit is Switched On
Dishwasher does not start up
• Fault with fuse in mains electricity supply.
• Plug not inserted in wall socket.
• Dishwasher door not closed properly.
• Program button has not been pressed.
• Water tap not turned on.
- Blocked filters.
- Blocked strainer in water intake hose.

CAUTION!
Remember that repairs should only be carried out by a suitably qualified specialist. Improper repairs can lead to considerable equipment damage as well as danger to the user.
Problems With the Dishwasher
Error display on the program display
When the program display displays 'F' (Fig.4-1) this means there is a risk of water overflow. Turn off the water tap and contact the nearest authorized service centre.
When the program display displays 'F2' (Fig.4-2) this means that the waste water within the machine cannot be discharged. Check if:
• The filters within the dishwasher are clogged;
• The drain hose is crimped or bent;
• The drain hose is clogged.
If after checking the above the problem continues, contact the nearest authorized service centre.
When the program display displays 'F3' (Fig.4-3) this means that the flow of water into the dishwasher cannot be stopped. Turn off the water tap and contact the nearest authorized service centre.
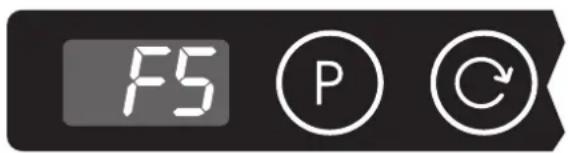
When the program display displays 'FS' (Fig.4-4) this means that there is not enough water for the dishwasher to operate correctly.
Check if:
- The water is turned on and the hose is connected properly;
- The water supply to the house is on and has sufficient pressure;
• The water supply hose is crimped or bent;
• The filter for the water supply hose is clogged.
If, after these checks the dishwasher still does not function or has any other error displayed, then press the ON-OFF button to OFF. Wait a few minutes then turn the dishwasher back on and try again.
When the program display displays 'FE', 'F6', 'F7', 'F8' or 'F9' contact the nearest authorized service centre.
When contacting the nearest authorized service centre provide them with the following information:
-
The nature of the problem (Error code).
-
The model number and serial number (S/N: ...), as indicated on the plate located on the side of the inner part of the door.
Lower spray arm rotates with difficulty
• The spray arm is blocked by small items or food remains.
Lid in detergent compartment cannot be closed
• Detergent compartment has been overfilled.
- Mechanism is clogged with remnants of detergent.
Remnants of detergent stuck inside dispenser
- Compartment was damp when it was filled up with detergent. Compartment must be dry before detergent is added.
Water remains inside dishwasher after program has ended
• Blockage or kind in drainage hose.
- Pump is jammed.
- Filters are blocked.
- The program is still running. Wait for the program to end.
Problems During Washing
Unusual amount of foam
- Normal washing up liquid has been poured into the rinse-aid container.
- Excess amount of rinse aid. Remove any spilled rinse aid with a cloth as it could otherwise lead to excessive foaming during the next washing cycle.
Dishwasher stops suddenly while washing is taking place
• Electricity supply to dishwasher has been cut off.
• Water supply has been interrupted.
Knocking sound can be heard while washing is taking place
- A spray arm is knocking against the dishes inside the dishwasher.
Rattling sound can be heard while washing is taking place
- Crockery has not been stacked properly inside the dishwasher.
Knocking sound coming from inlet valves
- This is caused by the way the water pipes have been laid and it has no effect upon the way the dishwasher functions.
Problems With the Dishes, Cutlery, etc.
Remnants of food are stuck to the dishes, cutlery etc.
- Dishwasher was not loaded properly. Jets of water could not reach all parts of the dishes, etc.
• Too many items in the rack. - Items in the rack were touching each other.
• Not enough detergent was added to dispenser. - Selected wash program was not intensive enough.
• Rotation of spray arm obstructed by dishes, etc. - Nozzles in spray arm are blocked by remnants of food.
- Filters are blocked.
• Filters have been incorrectly fitted.
• Waste water pump is jammed.
Plastic items are discoloured
• Not enough detergent was added to dispenser.
- Detergent has insufficient bleaching properties. Use a detergent containing a chemical bleaching agent.
White stains are left on crockery and glasses have a milky appearance
- Not enough detergent added to the dispenser compartment.
• Amount of rinse-aid set too low. - Although water is quite hard, no salt has been put in dishwasher.
• Water softener set too low.
• Lid on salt container not screwed tight. - If you use a phosphate-free detergent, try a detergent containing phosphates and compare results.
Dishes, cutlery, etc. have not been dried
- Selected program did not include drying function. Amount of rinse-aid set too low.
- Items were removed from dishwasher too soon. For the best drying performance, do not remove the contents for at least 30 minutes. This allows residual heat in the dishwasher to remove any small droplets of water that may occur.
Glasses have a dull appearance
• Amount of rinse-aid set too low.
Tea stains or traces of lipstick have not been completely removed
• Detergent does not have a sufficient bleaching effect.
• Washing temperature set too low.
Traces of rust on cutlery
• Cutlery is not rustproof.
• Salt content in washing water is too high.
• Lid on salt container not screwed tight.
• Salt spilt while filling container.
Glasses become clouded and discoloured; coating cannot be wiped off
• Unsuitable detergent was used.
• Glasses are not dishwasher-proof.
Smears left behind on glasses and cutlery; glasses have acquired a metallic appearance
• Amount of rinse-aid set too high.
5. Installation
This dishwasher is for use in GB and IE only. After sales service applies to GB and IE only.
Positioning the Dishwasher
Do not install the dishwasher in a room where the temperature is likely to fall below freezing (0 °C).
Do not grip the door when moving the dishwasher.
The dishwasher should be aligned to the front of the adjacent cabinets, with allowance made for the door thickness. The dishwasher has water supply and drain hoses that can be positioned on either to the left or the right.
Before installing the dishwasher into a kitchen cabinet, holes must not be drilled into the sides, or door, to avoid compromising the performance and operation of the dishwasher.
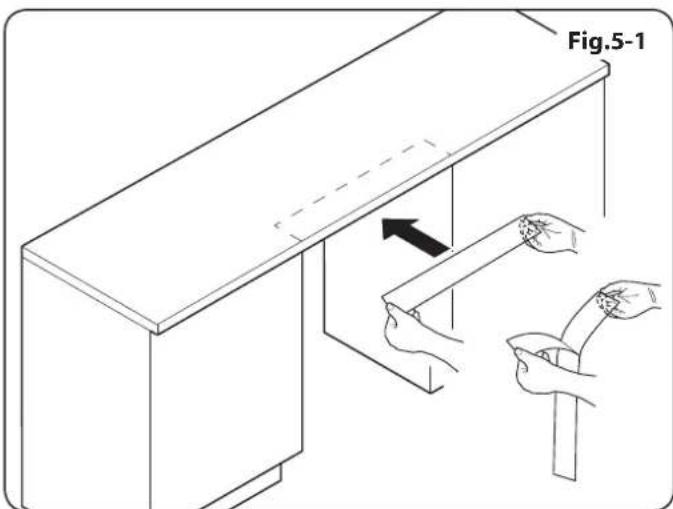
A plastic self-adhesive anti-condensation strip is supplied with the dishwasher. Fix the strip to the underside of the worktop, along the front edge (Fig.5-1).
Connect up the cold water supply, the drain hose and the electrical connections (see below) then slide the dishwasher into the cabinet opening.
Cold Water Connection
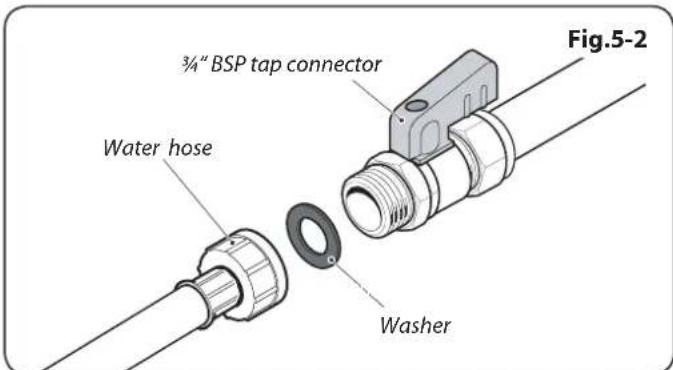
Connect the water supply hose (supplied loose) to the cold water inlet at the rear. Connect the other end to a 34 " BSP tap connector (Fig.5-2). Make sure that the washers are in place and that it is fastened securely in place.
IMPORTANT: If the water pipes are new or have not been used for an extended period of time, run the water for a while to make sure that the water is clear and free of impurities BEFORE connecting to the dishwasher. Failure to carry out this precaution may lead to the water inlet becoming blocked and causing damage the dishwasher.
The water pressure should be between 0.03 Mpa and 1Mpa. Pressures above 1Mpa will require a pressure relief valve to be fitted.
Drain Hose Connection
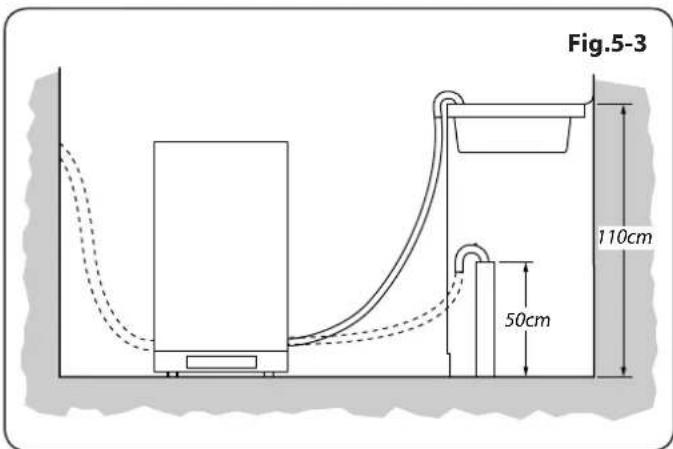
Connect the drain hose to the water outlet. Insert the hose into a drainpipe with a minimum diameter of 40 mm, or let it run into a sink, making sure to avoid bending or crimping. If necessary, fit a siphon trap (U-bend) with a connecting piece. The free end of the hose must be at a height of between 50 -110 cm and must not be immersed in water (Fig.5-3).
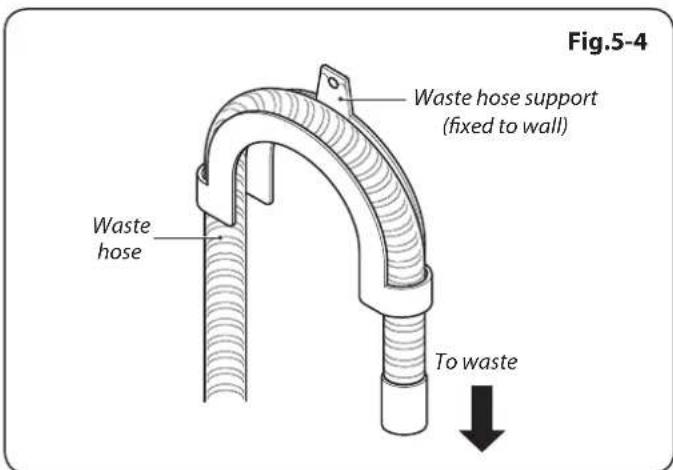
WARNING! The connecting piece for the siphon trap (U-bend) must be solidly fastened to the wall to prevent the drain hose from moving and allowing water to spill outside the drain (Fig.5-4).
Electrical Connection
The dishwasher must be installed by a qualified electrician, in accordance with all relevant British Standards/Codes of Practice (in particular BS 7671), or with the relevant national and local regulations.

WARNING: THIS DISHWASHER MUST BE EARTHED
All external wiring must comply with the IEE Regulations for the Electrical Equipment of Buildings. Connection to the electrical supply can be made with either a plug and socket or be permanently wired via a double pole switch. The dishwasher is supplied with a 3-core cable.
Should the plug not fit the socket in your home, it should be removed and replaced with a suitable plug.
Note: If the plug that is fitted is not suitable, it must be cut off and disposed of properly. To avoid the risk of electrocution, the plug must not be left where children might find it and plug it into a supply socket.
Three pin plugs to BS 1363 with a capacity of not less than 13 A must be used and fitted with a 13 amp fuse 'ASTA' approved to BS 1362.
After replacing the fuse the cover must be refitted. If the cover is lost, the plug must not be used until a replacement cover has been obtained from your supplier. The colour of the correct fuse carrier is that of the coloured insert in the base of the fuse recess, or stated elsewhere on the plug. Always state this colour when ordering a replacement fuse carrier.
IMPORTANT: The wires in the mains lead are coloured in accordance with the following code:
Green and yellow: EARTH
Blue:
NEUTRAL
Brown:
LIVE

CAUTION
The dishwasher plug must be accessible even when the dishwasher is installed as a built-in unit so that maintenance can be carried out safely.
Care for the external cable
- Hold the plug, not the electrical cable, when unplugging the dishwasher.
- Make sure that the dishwasher does not trap the electric cable.
• Do not step on the cable. - Avoid damage to the electric cable when moving the dishwasher.
Damaged electrical cable
If the electrical cable is damaged or worn, switch off the dishwasher and consult an authorized agent for replacement.
Installing the Dishwasher
The dishwasher is supplied with a template for marking and drilling decorative door fronts. This template also contains details for installing the dishwasher.
General
Measures must be taken to ensure that the units that are subsequently re-sited as freestanding dishwashers cannot topple over. This can be achieved by bolting the dishwasher to the wall or fitting it under a continuous work surface, that is screwed to the adjacent cupboards.
For detailed information on performance tests, please contact the following:
Dishwasher@standardtest.com
In your e-mail, please provide the model name and serial number (20 digits) which can be found on the side of the dishwasher door.
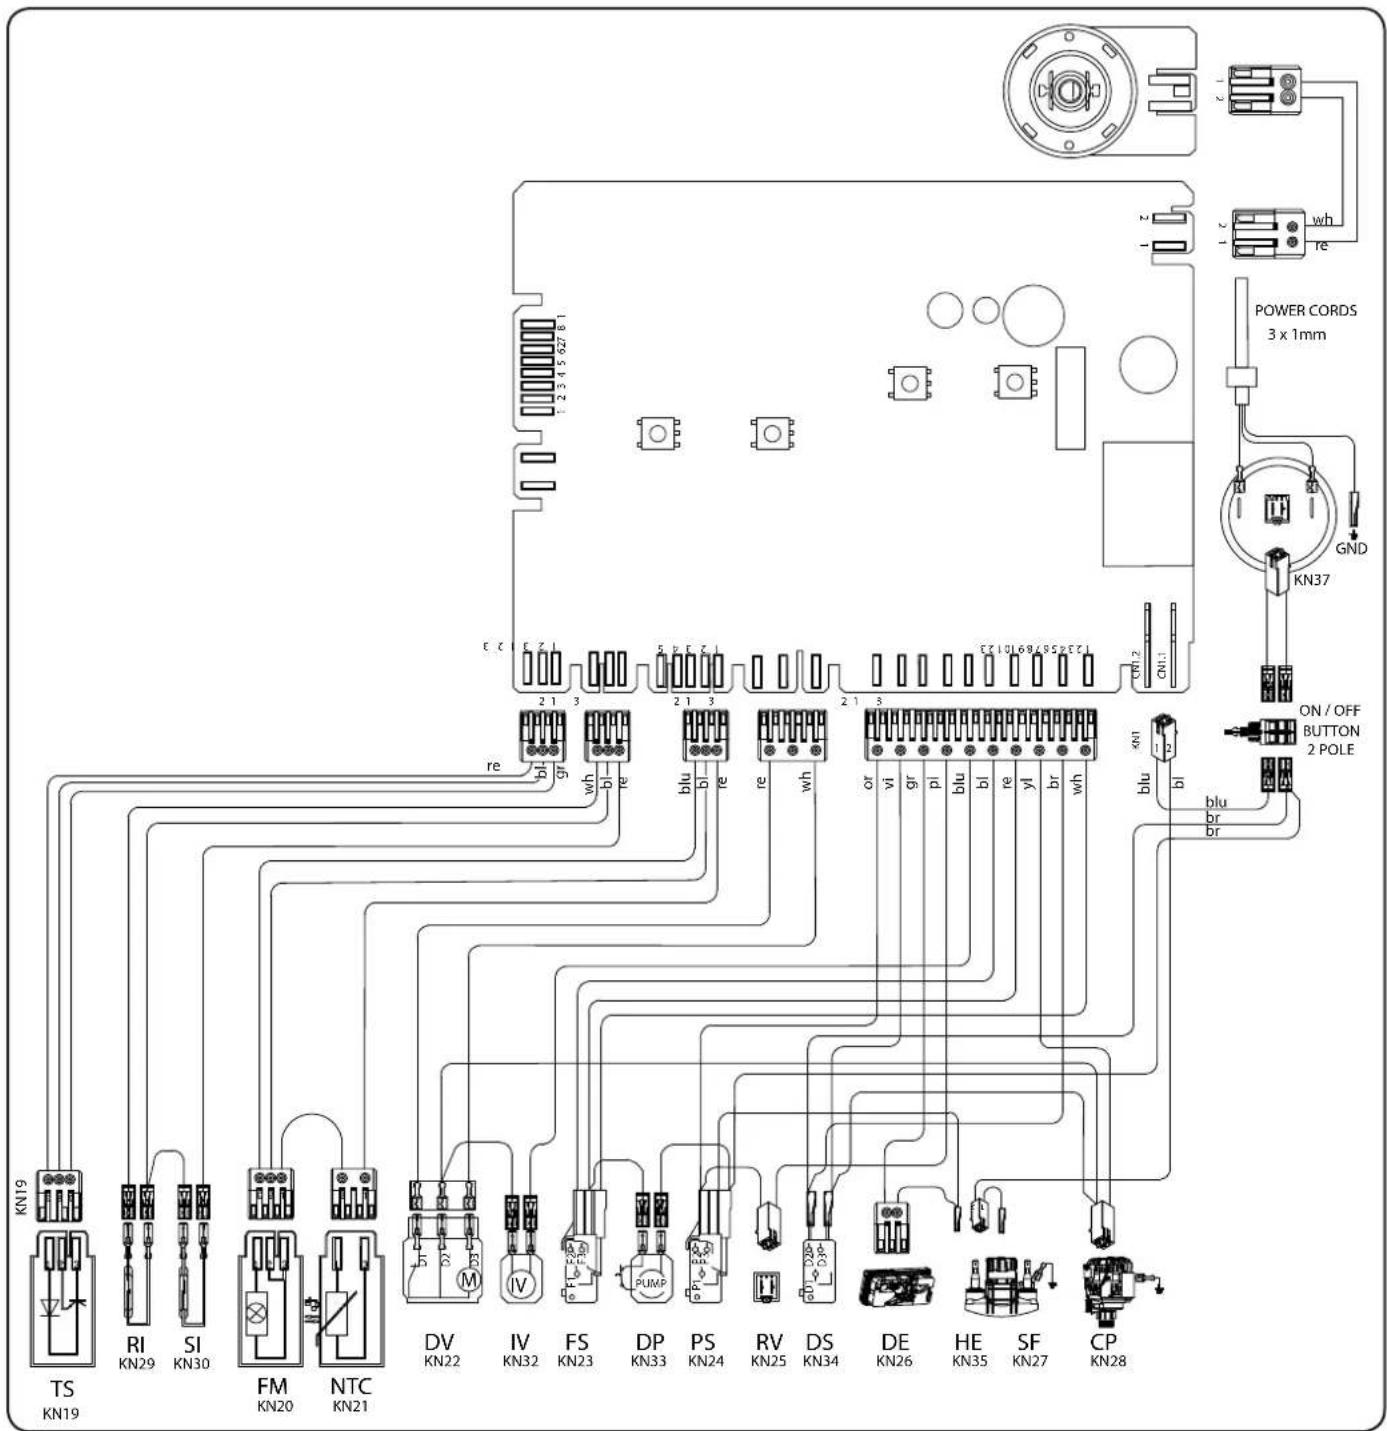
6. Circuit Diagram
flowchart
graph TD
    A["TS KN19"] --> B["RI KN29"]
    A --> C["SI KN30"]
    A --> D["FM KN20"]
    A --> E["NTC KN21"]
    F["KN19"] --> G["DV KN22"]
    F --> H["IV KN32"]
    F --> I["FS KN23"]
    F --> J["DP KN33"]
    F --> K["PS KN24"]
    F --> L["RV KN25"]
    F --> M["DS KN34"]
    F --> N["DE KN26"]
    F --> O["HE KN35"]
    F --> P["SF KN27"]
    F --> Q["CP KN28"]
    R["ON/OFF BUTTON 2 POLE"] --> S["GND KN37"]
    T["POWER CORDS 3 x 1mm"] --> U["wh re"]
    V["Power CORDS 3 x 1mm"] --> W["wh re"]
    X["Power CORDS 3 x 1mm"] --> Y["wh re"]
    Z["Power CORDS 3 x 1mm"] --> AA["wh re"]
    AB["Power CORDS 3 x 1mm"] --> AC["wh re"]
    AD["Power CORDS 3 x 1mm"] --> AE["wh re"]
    AF["Power CORDS 3 x 1mm"] --> AG["wh re"]
    AH["Power CORDS 3 x 1mm"] --> AI["wh re"]
    AJ["Power CORDS 3 x 1mm"] --> AK["wh re"]
    AL["Power CORDS 3 x 1mm"] --> AM["wh re"]
    AN["Power CORDS 3 x 1mm"] --> AO["wh re"]
    AP["Power CORDS 3 x 1mm"] --> AQ["wh re"]
    AR["Power CORDS 3 x 1mm"] --> AS["wh re"]
    AT["Power CORDS 3 x 1mm"] --> AU["wh re"]
    AV["Power CORDS 3 x 1mm"] --> AW["wh re"]
    AX["Power CORDS 3 x 1mm"] --> AY["wh re"]
    AZ["Power CORDS 3 x 1mm"] --> BA["wh re"]
    BB["Power CORDS 3 x 1mm"] --> BC["wh re"]
    BD["Power CORDS 3 x 1mm"] --> BE["wh re"]
    BF["Power CORDS 3 x 1mm"] --> BG["wh re"]
    BH["Power CORDS 3 x 1mm"] --> BI["wh re"]
    BJ["Power CORDS 3 x 1mm"] --> BK["wh re"]
    BL["Power CORDS 3 x 1mm"] --> BM["wh re"]
    BN["Power CORDS 3 x 1mm"] --> BO["wh re"]
    BP["Power CORDS 3 x 1mm"] --> BQ["wh re"]
    BR["Power CORDS 3 x 1mm"] --> BS["wh re"]
    BT["Power CORDS 3 x 1mm"] --> BU["wh re"]
    BV["Power CORDS 3 x 1mm"] --> BW["wh re"]
    BX["Power CORDS 3 x 1mm"] --> BY["wh re"]
    BZ["Power CORDS 3 x 1mm"] --> CA["wh re"]
    CB["Power CORDS 3 x 1mm"] --> CC["wh re"]
    CD["Power CORDS 3 x 1mm"] --> CE["wh re"]
    CF["Power CORDS 3 x 1mm"] --> CG["wh re"]
    CH["Power CORDS 3 x 1mm"] --> CI["wh re"]
    CJ["Power CORDS 3 x 1mm"] --> CK["wh re"]
    CL["Power CORDS 3 x 1mm"] --> CM["wh re"]
    CN["Power CORDS 3 x 1mm"] --> CO["wh re"]
    CP["Power CORDS 3 x 1mm"] --> CQ["wh re"]
    CR["Power CORDS 3 x 1mm"] --> CS["wh re"]
    CT["Power CORDS 3 x 1mm"] --> CU["wh re"]
    CV["Power CORDS 3 x 1mm"] --> CW["wh re"]
    CX["Power CORDS 3 x 1mm"] --> CY["wh re"]
    CZ["Power CORDS 3 x 1mm"] --> DA["wh re"]
    DB["Power CORDS 3 x 1mm"] --> DC["wh re"]
    DD["Power CORDS 3 x 1mm"] --> DJ["wh re"]
    DK["Power CORDS 3 x 1mm"] --> DL["wh re"]
    DV-DV-DC-V-DV-DC-V-DV-DC-V-DV-DC-V-DV-DC-V-DV-DC-V-DV-DC-V-DV-DC-V-DV-DC-V-DV-DC-V-DV-DC-V-DV-DC-V-DV-DC-V-DV-DC-V-DV-DC-V-DV-DC-V-DV-DC-V-DV-DC-V-DV-DC-V-DV-DC-V-DV-DC-A-DV-DC-A-DV-DC-A-DV-DC-A-DV-DC-A-DV-DC-A-DV-DC-A-DV-DC-A-DV-DC-A-DV-DC-A-DV-DC-A-DV-DC-A-DV-DC-A-DV-DC-A-DV-DC-A-DV-DC-A-DV-DC-A-DV-DC-A-DV-DC-A-DV-DC-A-DV-DC-BD-DC-A-DV-DC-A-DV-DC-A-DV-DC-A-DV-DC-A-DV-DC-A-DV-DC-A-DV-DC-A-DV-DC-A-DV-DC-A-DV-DC-A-DV-DC-A-DV-DC-A-DV-DC-A-DV-DC-A-DV-DC-A-DV-DC-A-DV-DC-A-DV-DC-BD-DC-A-DV-BD-DC-A-DV-BD-DC-A-DV-BD-DC-A-DV-BD-DC-A-DV-BD-DC-A-DV-BD-DC-A-DV-BD-DC-A-DV-BD-DC-A-DV-BD-DC-A-DV-BD-DC-A-DV-BD-DC-A-DV-BD-DC-A-DV-BD-DC-A-DV-BD-DC-BD-DC-A-DV-BD-DC-A-DV-BD-DC-A-DV-BD-DC-A-DV-BD-DC-A-DV-BD-DC-A-DV-BD-DC-A-DV-BD-DC-A-DV-BD-DC-A-DV-BD-DC-A-DV-BD-DC-A-DV-BD-DC-BD-DC-A-DV-BD-DC-A-DV-BD-DC-BD-DC-A-DV-BD-DC-A-DV-BD-DC-A-DV-BD-DC-A-DV-BD-DC-A-DV-BD-DC-A-DV-BD-DC-A-DV-BD-DC-A-DV-BD-DC-A-DV-BD-DC-A-DV-BD-DC-A-DV-BD-DC-A-CB-KN28]
| Code | Description |
| TS | Turbidity sensor |
| RI | Rinseaid indicator |
| SI | Salt indicator |
| FM Flow meter | |
| NTC | NTC sensor |
| DV Diverter | |
| IV | Inlet valve |
| FS | Float sensor |
| Code | Description |
| DP | Drain pump |
| PS | Pressure switch |
| RV | Regeneration valve |
| DS | Door switch |
| DE | AC dispenser |
| HE | Heating element |
| SF | Heating safety |
| CP | Circulation pump |
| Code | Colour |
| or | Orange |
| wh White | |
| blu | blu |
| re | Red |
| br | Brown |
| pi | Pink |
| vi | Violet |
| Code | Colour |
| bl | Black |
| gr | Green |
| yl | Yellow |
| yl/gr | Yellow / Green |
| gry | Grey |
7. Technical Data
INSTALLER: Please leave these instructions with the user.
DATA BADGE LOCATION: Inside face on the side of the door.
COUNTRY OF DESTINATION: GB, IE.
Dimensions
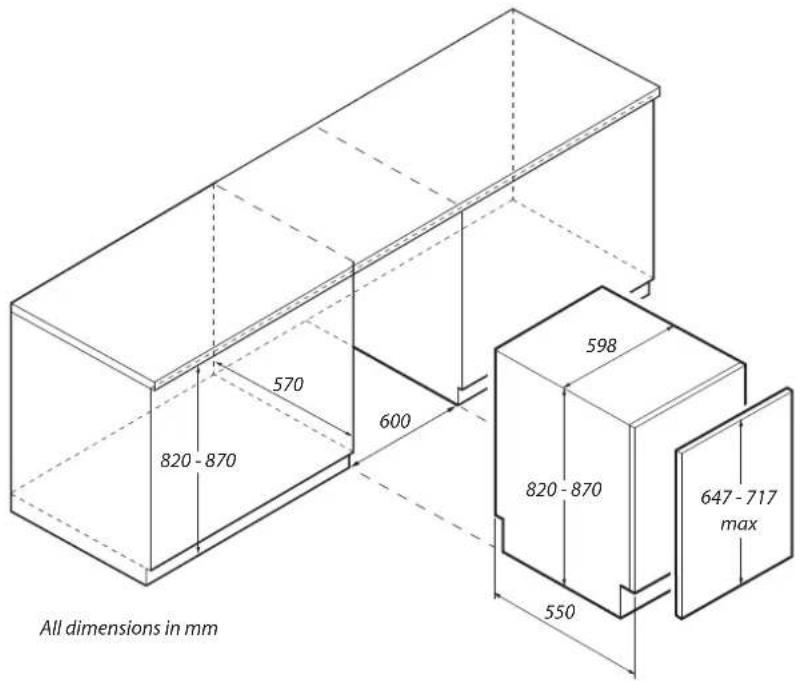
Connections
| Electric | 220–240V 50 Hz |
Ratings
| Energy efficiency class on a scale of A (more efficient) to G (less efficient)* A++ | |
| Water consumption 9 litres | |
| Annual water consumption (AWc) (280 cycles)** 2520 litres | |
| Drying efficiency class on a scale of A (more efficient) to G (less efficient) A | |
| Standard cycle used *** Eco 50°C | |
| Program time for standard cycle 162 minutes | |
| Energy consumption (Et) per cycle 0.90 kWh | |
| Annual energy consumption (AEc) (280 cycles) 258 kWh | |
| Capacity 12 place settings | |
| Noise level | 47 dB |
| Maximum rated current | 10 A |
| Power consumption - Off mode (Po) 0.05W | |
| Power consumption - Standby mode (Pi) | 1.00W |
* Energy consumption of 258 kwh per year, based on 280 standard cleaning cycles using cold water fill and the consumption of low power modes. Actual energy consumption will depend on dishwasher use.
** Water consumption of 2520 litres per year based on 280 standard cleaning cycles. Actual water consumption will depend on dishwasher use.
*** "Eco 50 °C" is the standard cleaning cycle to which the information in the table relates. This program is suitable to clean normally soiled tableware and it is the most efficient program in terms of combined energy and water consumption.
AGA RANGEMaster
Clarence Street, Royal Leamington Spa,
Warwickshire, CV31 2AD, England.
Tel: +44 (0) 1926 457400 Fax: +44 (0) 1926 450526
E-mail: consumers@rangemaster.co.uk
- User Guide
- Before You Start 1
- Overview and Operation 3
- Looking after your Dishwasher 14
- Troubleshooting 16
- Installation 19
- Circuit Diagram 21
- Technical Data 22
- Before You Start
- At Time of Delivery
- About these Instructions
- During Installation
- During Normal Use
- If a Fault Occurs
- Caring for the Environment
- Disposing of Your Packaging
- Disposing of Your Old Dishwasher
- Recommendations
- Overview and Operation
- Getting to Know Your Dishwasher
- Dishwasher Interior
- Control Panel
- Salt
- Adjusting Salt Consumption
- Loading the Salt into the Container
- Rinse Aid
- Loading the Rinse Aid
- Detergent
- Loading the Detergent
- What You Should Not Put Into the Dishwasher
- Damage to Glassware and Other Dishes Possible Causes
- Suggested Remedy
- Arranging Crockery, Glasses, etc. in the Dishwasher
- Using the Lower Basket
- WARNING!
- Using the Upper Basket
- Upper Basket Shelves
- Washing Dishes
- Program overview
- Program Selection
- Program Data
- Switching the Dishwasher ON
- End of Program
- Switching the Dishwasher OFF
- Interrupting the Program
- CAUTION!
- Cancelling a Program
- Modifying a Program
- Using 3-in-1 Detergent Tablets
- General Advice
- Special Advice
- To Select the 'Tablet' Function:
- To Cancel the 'Tablet' Function:
- Upper Basket Wash
- To select upper basket wash:
- To cancel the upper basket wash:
- Lower Basket Wash
- To select lower basket wash:
- To cancel the lower basket wash:
- Delayed Start Program
- Looking after your Dishwasher
- Care
- After Every Wash
- Overall Condition of the Dishwasher
- Dishwasher Salt
- Filters
- Spray Arms
- Solvents or Abrasive Cleaning Products
- Moving the Dishwasher
- Seals
- Hose Filter
- When You Go on Holiday
- Troubleshooting
- Resolving Minor Problems Yourself
- Problems When the Unit is Switched On
- Dishwasher does not start up
- Problems With the Dishwasher
- Error display on the program display
- Check if:
- Lower spray arm rotates with difficulty
- Lid in detergent compartment cannot be closed
- Remnants of detergent stuck inside dispenser
- Water remains inside dishwasher after program has ended
- Problems During Washing
- Unusual amount of foam
- Dishwasher stops suddenly while washing is taking place
- Knocking sound can be heard while washing is taking place
- Rattling sound can be heard while washing is taking place
- Knocking sound coming from inlet valves
- Problems With the Dishes, Cutlery, etc.
- Remnants of food are stuck to the dishes, cutlery etc.
- Plastic items are discoloured
- White stains are left on crockery and glasses have a milky appearance
- Dishes, cutlery, etc. have not been dried
- Glasses have a dull appearance
- Tea stains or traces of lipstick have not been completely removed
- Traces of rust on cutlery
- Glasses become clouded and discoloured; coating cannot be wiped off
- Smears left behind on glasses and cutlery; glasses have acquired a metallic appearance
- Installation
- Positioning the Dishwasher
- Cold Water Connection
- Drain Hose Connection
- Electrical Connection
- WARNING: THIS DISHWASHER MUST BE EARTHED
- CAUTION
- Care for the external cable
- Damaged electrical cable
- Installing the Dishwasher
- General
- Circuit Diagram
- Technical Data
- AGA RANGEMaster
Brand : RANGEMASTER
Model : RDW1260FI
Category : Dishwasher