WMi1012 - Washing machine Caple - Free user manual and instructions
Find the device manual for free WMi1012 Caple in PDF.


| Product Type | Washing Machine |
| Brand | Caple |
| Model | WMi1012 |
| Capacity | 7 kg |
| Dimensions (H x W x D) | 850 x 595 x 545 mm |
| Weight | 65 kg |
| Power Supply | 220-240 V, 50 Hz |
| Power Consumption | 2000 W |
| Energy Class | A+++ |
| Spin Speed | 1200 rpm |
| Number of Programs | 15 |
| Display | LED |
| Drum Material | Stainless steel |
| Water Connection | Cold water only |
| Noise Level (Spin) | 76 dB |
| Safety Features | Child lock, anti-flood system |
| Maintenance | Clean filter monthly, descale every 3 months |
| Spare Parts | Drum bearing, door seal, pump filter |
| Repairability | Modular design, easy access to components |
| Included Accessories | Inlet hose, drain hose, manual |
| Warranty | 2 years parts and labor |
Frequently Asked Questions - WMi1012 Caple
User questions about WMi1012 Caple
0 question about this device. Answer the ones you know or ask your own.
Ask a new question about this device
Download the instructions for your Washing machine in PDF format for free! Find your manual WMi1012 - Caple and take your electronic device back in hand. On this page are published all the documents necessary for the use of your device. WMi1012 by Caple.
USER MANUAL WMi1012 Caple
INSTRUCTIONS MANUAL GB
GB
Contents
- The new washing system 3
- Safety warnings 4
- Installation instructions 6
- Description of controls 9
- Washing instructions 13
- Cleaning and maintenance 19
- Troubleshooting 21
- Control panel symbols 23
This new washing machine is the outcome of years of research.
The leading-edge design and the quality of the production processes used to manufacture this product ensure it will give you many years of excellent service.
Its concept satisfies all current and future washing requirements.
Its low water, power and detergent consumption help protect the environment and reduce running costs to a minimum.
Water and power consumption has been reduced in all programmes.
These results were achieved by means of a special washing system valid for all programmes and all fabrics.
The drum is fitted with three external vanes that keep the water constantly circulating, thereby offering intensive and uniform washing whilst consuming less water.
This ensures your laundry is washed and treated with utmost care.
The new washing system is so effective that normally dirty laundry can even be cleaned without a pre-wash cycle.
Washing times have also been reduced.
Pre-washing is only recommended for very dirty laundry.
Please read the operating instructions with care in order to take full advantage of all the features offered by this washing machine.
Warning!
Please read all the instructions contained in this manual in order to understand how to operate this appliance correctly and safely.
This manual is divided into paragraphs which provide a step-by-step description of all the functions of the appliance. The instructions are easy to understand and are accompanied by detailed illustrations.
This manual provides a quick and easy reference for answering all your questions concerning the use of your new washing machine.
Keep this manual near the machine for future consultation.
When selling or moving the appliance, make sure this manual remains with the machine.
2. SAFETY WARNINGS
Attention!
These warnings are given for safety reasons.
Please read them carefully before installing and using the appliance.
This manual forms an integral part of the appliance and must therefore be kept intact together with the machine. Before using the appliance, carefully read all the instructions contained in this manual. Installation must be performed by a qualified technician in compliance with the regulations in force. It has been designed for domestic use and complies with EEC Directives 72/23, 89/336 (including 92/31 and 93/68) currently in force. The appliance is designed for the following purpose: washing linen or fabrics declared by their manufacturers to be suitable for machine washing by means of an appropriate symbol. Any other use shall be considered improper. The manufacturer declines all responsibility for uses other than those described above.
The name plate featuring the technical data, serial number and markings is visibly positioned on the inner edge of the door. This name plate must never be removed.
Do not leaving discarded packaging materials unsupervised within the home. Separate the various packaging materials and take them to the nearest sorted waste collection centre.
The electrical and plumbing work require to install the appliance may only be performed by qualified technicians.
The appliance must be provided with an earth connection in accordance with the electrical safety regulations in force. The manufacturer declines all responsibility for damage to persons or property resulting from failure to earth the appliance or from a defective earth connection.
If the appliance is not connected to the electrical power supply by means of a plug, it is necessary to install an isolation switch with a contact opening gap of at least 3 mm.
The plug on the power cord and the corresponding socket must be of the same type and must conform to the regulations in force. Check that the voltage and frequency of the electrical power supply match the ratings on the name plate. Avoid using adaptors or shunt connections. Never unplug the appliance by pulling the power cord.
The machine is only disconnected from the electrical power supply if the plug has been removed from the socket or if the general switch has been turned off. After installation, the plug must remain accessible.
The appliance must always be connected to the water supply with new hoses (supplied with the appliance). Old hoses must never be reused.
Make sure the appliance does not lie on the power cord.
Before use, make sure the tub assembly has been released (see instructions).
If the tub assembly has not been released, it may damage the appliance or adjacent furniture or appliances during the spin cycle.
The washing machine must never be used in vehicles, on ships or planes, or in special environmental conditions such as explosive or corrosive (powder, vapour and gas) atmospheres or near explosive and/or corrosive liquids.
Do not install the washing machine in areas subject to frosting. Frozen pipes may burst under pressure.
Make sure that the drain hose is securely attached to the basin and cannot move.
If it is not securely fitted, the repulsive force of the water may detach it from the basin and cause flooding.
When attaching the hose to the basin, make sure the water drains away rapidly and does not fill the basin up.
Do not overload the appliance.
Never use detergents containing solvents or chemicals.
These may damage the machine and form poisonous fumes.
They may also catch fire and explode.
Do not wash petrol-soaked garments in the washing machine. Make sure there are no inflammable items (e.g.: lighters, matches, etc.) in pockets before washing.
If volatile fluids have been used to clean garments, make sure that the substances have been removed before loading them in the washing machine.
Before loading garments for washing, make sure the pockets are empty, the buttons securely fixed and the zips closed.
Do not wash frayed or torn garments.
The glass of the door will heat up considerably when washing at elevated temperatures.
Make sure all the water has drained away before you open the door.
If water is present, only open the door after draining it. If in doubt, read the instructions manual.
The water in the machine is not drinkable!
Swallowing washing machine detergents can cause lesions in your mouth and throat.
Before removing laundry from the washing machine, make sure the drum has stopped moving.
Always switch off the appliance after use to avoid wasting electricity.
Leave the door ajar between one wash and the next in order to keep the gasket in good condition.
Prolonged inactivity.
If the machine is left inactive for a long period: disconnect the machine from the electricity and water supplies and leave the door ajar to prevent bad smells from forming.
In the event of a fault, never attempt to repair the machine yourself. Disconnect the appliance from the electrical power supply and shut off the water tap. Then call a qualified technician. Repairs may only be performed by qualified technicians.
Repairs performed by unqualified people may be hazardous for users.
Obsolete appliances must be rendered unusable: make sure that the door cannot be closed (to prevent children from getting trapped inside while playing and risking their lives) and cut off the power cord after unplugging it.
The appliance must then be taken to a sorted waste collection centre.
This appliance is intended for use by adults.
Do not allow children to tamper with the controls or play with the washing machine.
Do not allow children to approach the appliance while it is working.
Keep children away from the appliance.
Small animals or children may get inside the washing machine.
Always check the inside of the drum before use and do not allow children to play with the appliance.
Packaging materials (plastic bags, polystyrene, metal profiles, etc.) must not be left within reach of children.
Keep children away from the machine when the door or detergent tray is open; the appliance may contain residues of detergent which can cause irreversible damage to the eyes, mouth and throat, as well as possible death by suffocation.
Important!
This appliance is easy to use.
In order to obtain the best results, however, read this manual with care and follow all the instructions before starting.
The manual gives instructions and useful advice on how to install, use and service the appliance correctly.
The manufacture declines all responsibility for damage to persons or property resulting from failure to observe the above precautions, from tampering with even just a single component of the appliance, or from the use of unoriginal spare parts.
3. INSTALLATION INSTRUCTIONS
Important!
The appliance must be installed by a specialised technician according to current regulations. The washing machine is very heavy. Take care when lifting it.
3.1 UNPACKING
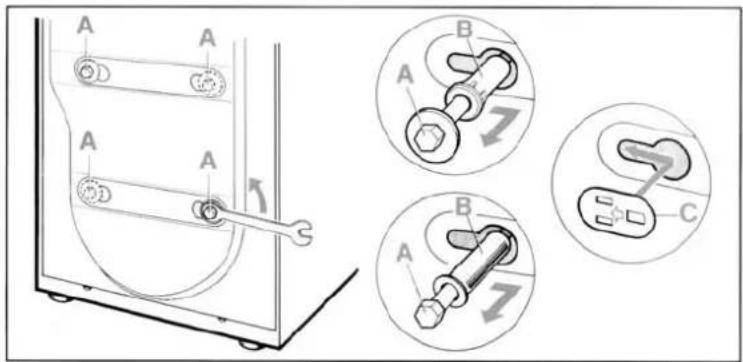
The inside of the machine comprises a moving assembly which is blocked for transport purposes by the screws (A) located at the rear of the washing machine.
- Release the assembly by removing these screws with a 13 mm wrench.
- Remove the screws (A) and relative plastic spacers (B) from the back of the washing machine.
- To prevent water from entering the machine or people from touching live components with their fingers, close the four holes left open by the screws with the supplied plastic plugs (C).
Attention!
- Do not turn the machine upside down and do not place it on its side.
- Keep all the components used to block the drum assembly as they will be needed if you decide to move the appliance in future.
3.2 REMOVING THE WOODEN BASE
-
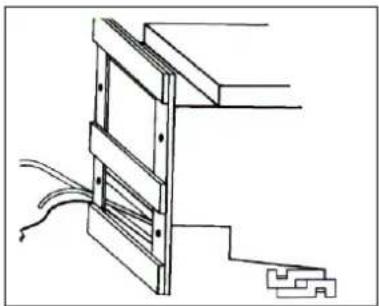
Place the white polystyrene corner pieces on the floor, approximately 50 centimetres behind the machine, as shown in the diagram.
-
Carefully place the machine on the corner pieces.
natural_image
Technical line drawing of a structural frame with beams and supports (no text or symbols)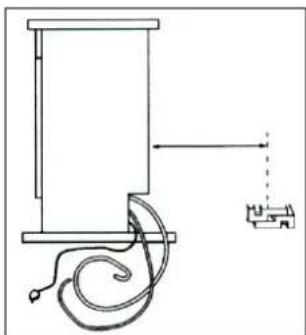
natural_image
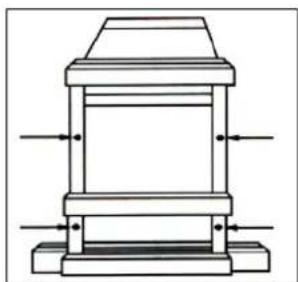
Pure mechanical diagram showing a vertical frame with scroll and base, no text or symbols present- Remove the four screws fixing the wooden base with a 10 mm wrench.
natural_image
Technical line drawing of a mechanical assembly with no visible text or symbols3.3 POSITIONING AND LEVELLING
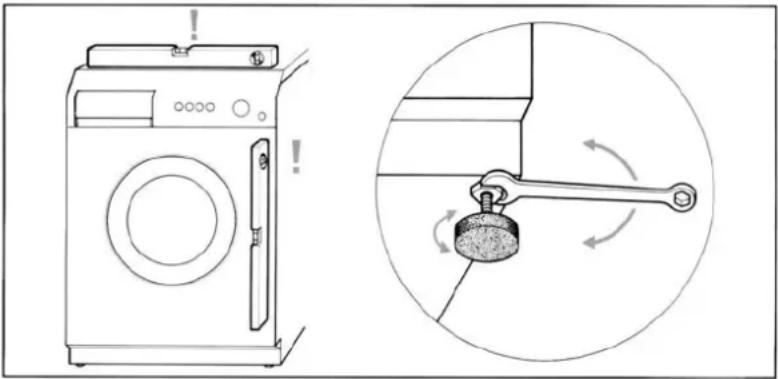
- Screw the 4 feet (supplied) onto the underside of the washing machine with the relative lock nuts and place the appliance in the required position.
- Carefully level the machine in all directions using a spirit level and adjusting the height of the feet if necessary. After adjusting the machine, lock the feet with the relative lock nuts.
natural_image
Line drawing of a washing machine and its mechanical lever mechanism (no text or symbols)The water inlet and drain hoses can be turned to the right or left depending on installation requirements.
Attention!
- Carry out this operation carefully to prevent the washing machine from vibrating, generating noise or moving during operation.
- If the appliance is installed on a carpeted floor, ensure that the openings on its underside are not obstructed.
• Make sure the washing machine does not touch walls, furniture, etc., while it is working.
3.4 WATER SUPPLY CONNECTION
- Check that inlet pressure lies between the following values: 50-900kPa. For higher pressures, install a pressure reducer.
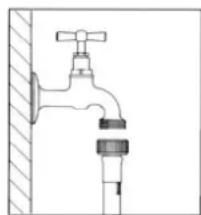
- Connect the cold water inlet hose (light blue ring nut) to the cold water tap with a 34 gas thread, taking care to screw it firmly into place in order to prevent leaks. The water inlet hose must not be bent or crushed and must not be replaced or cut.
- If a hot water inlet is used, inlet water temperature must not exceed 60^ C and the hose with the red ring nut must be connected to the hot water tap.
natural_image
Simple line drawing of a faucet with a valve and base (no text or symbols)Attention!
- If the water pipe is new or has not been used for a long time, let a certain amount of water run before attaching the inlet hose. This stops any deposits of sand and other impurities from clogging the filters used by the machine to protect the water inlet valves.
3.5 DRAIN CONNECTION
- Insert the end of the drain hose into a drain pipe having an internal diameter of at least 4 cm and a height ranging between 50 and 90 cm, or attach it (using the relative curved plastic profile) to a basin or bath tub.
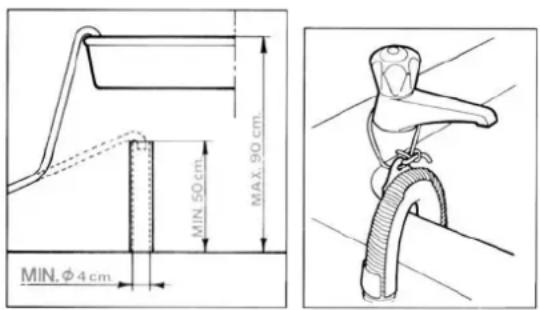
- Always check that the end of the drain hose is securely attached in order to prevent the repulsive force of the water from moving it out of position.
Attention!
- Do not bend or obstruct the hose as this will reduce the flow of water.
- Any extensions to the drain hose must not exceed 1 metre, they must have the same internal diameter and must not be obstructed in any way.
• In no case may the end of the drain hose be submerged in water.
3.6 ELECTRICAL CONNECTION
Before fitting the plug into the socket, make sure that:
- Input voltage matches that indicated on the name plate attached to the inner edge of the door.
- The contactor, pressure relief valves, power line and socket are capable of withstanding the maximum rated power input indicated on the name plate.
- The socket is compatible with the plug supplied with the machine without the need to fit multiple sockets, adaptors or extension leads that could cause overheating or burning. If the socket does not correspond to the supplied plug, replace the socket with one of a suitable type.
Attention
- The plug must be accessible after installation.
• The appliance must be earthed. Plug the machine into a socket fitted with an efficient earth connection.
The manufacturer declines all responsibility for damage to persons or property resulting from failure to earth the appliance or from a defective earth connection. Correct electrical connections guarantee maximum safety.
- This appliance complies with EEC directive 89/336 of 3.5.89 (modified by EEC directive 92/31) relative to the elimination of radio interference.
- If the power cord is damaged, only replace it with an original spare part available from our service department.
- Do not insert/remove the plug from the socket if your hands are wet.
- Remove the plug from the socket by gripping the plug and not the cord.
4. DESCRIPTION OF CONTROLS
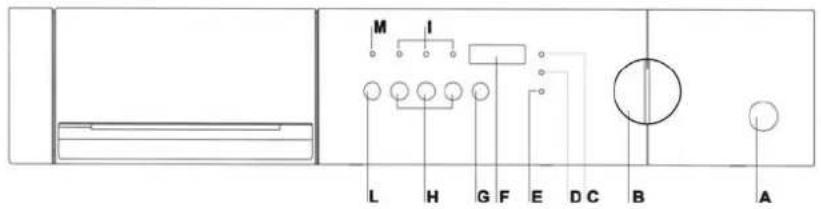
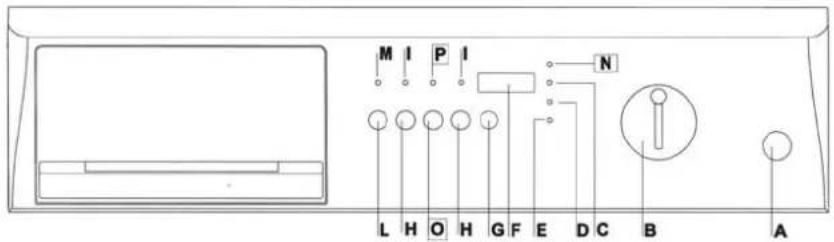
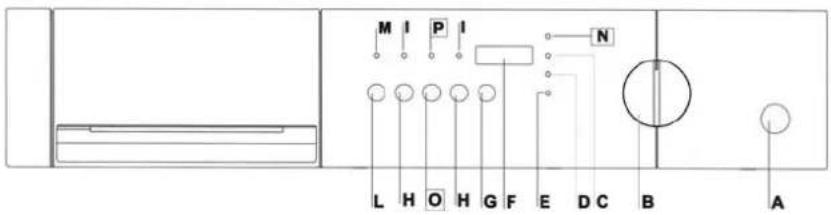
4.1 CONTROL PANEL
All the commands and controls of the appliance are assembled together on the front panel.
Models without delayed start option
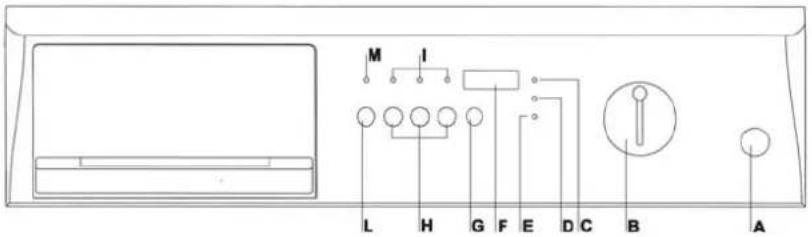
Models with delayed start option
Description of controls
| A | Open door button |
| B | ON-OFF and programme selection knob |
| C | Time remaining shown on display LED |
| D | Spin speed shown on display LED |
| E | Heating phase LED |
| F | Display |
| G | Select spin speed button |
| H | Options buttons |
| I | Options enabled LED's |
| L | Start-Pause button |
| M | Start-Pause button LED |
| N | Delayed start time shown on display LED |
| Q | Select delayed start button |
| R | Select delayed start button LED |
A Open door button

Press the button to open the door. Chapter 5 – Washing instructions – explains how the door works and how to use it.
B ON-OFF and washing programme selection knob
This knob lets you:
- switch the machine on and off by moving it in either direction from the OFF position (knob indicator vertical)
- select washing temperatures within the various fabric sectors by turning it in both directions
The knob does not move while the programme is running. The programme is electronically controlled by the machine.
C Time remaining shown on display LED
○ Time remaining

This LED indicates that the display is showing the total duration of the selected programme before the programme starts, and the time remaining while the programme is running.
D Spin speed shown on display LED

This LED indicates that the display is showing the maximum spin speed for the selected programme. It stays on while spin speed is being selected with the relative button.
E Heating phase LED
During the heating cycle, this LED indicates that the programme is in the washing water heating phase.
F Display
The display shows the following information:
- time remaining for the selected programme, given hours/minutes. The stated value is an estimate based on the achine's normal operating parameters (size of load, incoming ater temperature, etc.). The program time may therefore be a w minutes longer or shorter than stated here.
-
delayed start (for models featuring this option). Iven in hours/minutes. When the time remaining before the ogramme starts is less than 60 minutes, this information is even in minutes/seconds.
-
spin speed
-
cycle pause - flashing STOP
- end of cycle - END
- error codes
To find out which of the first 3 pieces of information are down on the display, check which of the LED's, C, D, or N (the letter for models featuring the delayed start option) is lit.
G Select spin speed button or stop with tub full

Press the button repeatedly to select the required spin speed. The following spin speeds are available:
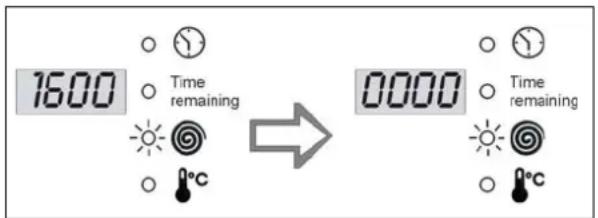
- 0000: spin disabled and stop with tub full. The machine does not perform the final spin and ends the washing programme with water in the tub. To drain the water, see the explanations shown in paragraph 5.14
• from 600 rpm to the maximum speed indicated for
| the model: for cotton and coloured programmes, speed increases by 100 rpm starting from 600 rpm up to the maximum speed indicated for the modelfrom 600 to 900 rpm: for synthetics, delicates and woollens programmes, speed increases by 100 rpm starting from 600 rpm up to 900 rpm. | ||
| H | Options buttons | The options that may be available on the washing machine are shown below. |
Quick wash Button | This button reduces the overall duration of the washing cycle. This option is used to wash small loads or less dirty washing in less time. | |
Easy-iron button | This washing machine is programmed to use a certain quantity of water and consume a certain amount of power considered to be sufficient for a normal washing cycle.Only press this button for specific requirements, e.g.: for very delicate fabrics (curtains or wool).The water level for washing and rinsing rises and power consumption for heating increases. | |
Delicates button | Press this button for cottons programmes, the machine will perform an extended wash at 35°C (biological step) thereby offering good washing performance combined with power saving.The machine then continues the cycle at the selected temperature.N.B.:Press the economy cycle button to obtain a maximum washing temperature of 60°C. | |
| Half load button1/2 | If the machine is used with a smaller amount of washing than that indicated in the “Programme Chart”, press this button to save water, detergent and electricity.This option should not be used for synthetics or woollens.The recommended doses of detergents should be reduced in proportion to the load. | |
| L | “Start/Pause” button | Press this button to start the selected washing programme. During washing, press the “Start/Pause” button for about 3 seconds to pause the washing cycle. During the pause, the “Time remaining” Led flashes and STOP appears on the display. To resume the washing cycle from where it left off, simply press the “Start/Pause” button again. |
| M | Start-Pause button LED | This LED lights up when the washing cycle starts (Start-Pause button pressed) and remains on until the end of the programme. |
| N | Select delayed start button* | Press this button repeatedly to select after how many hours you want the selected washing/drying programme to start.The default value is 0 hours 0 minutes and each time the button is pressed it increases by 30’ up to 12h and by 60’ for the following 12 hours, up to 24 hours. |
| O | Select delayed start button LED* | The LED lights up while the delayed start time is being selected and remains on until the programme starts. |
| P | Delayed start time shown on display LED* | This LED indicates that the display is showing the selected delayed start time. |
* Only for models featuring the delayed start option
4.2 DETERGENT TRAY
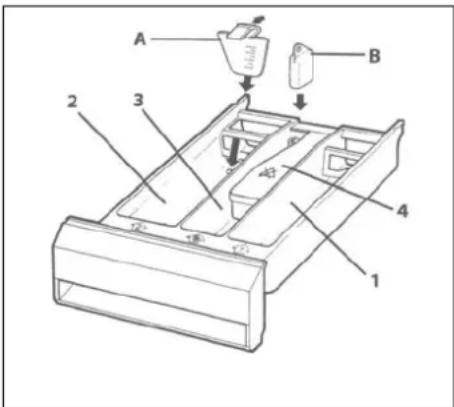
This is located to the left of the control panel. Pull it out to open.
The tray comprises four compartments which are marked as follows
"1": pre-wash detergent
“2”: main wash detergent
“✗” or “3”: fabric softener, starch, etc. (treatment products).
Compartment "4" is used for bleach. If there is a cover marked
A, this means that bleach cannot be used with this model of machine. If bleach can be used with the machine, there is no cover.
5. WASHING INSTRUCTIONS
5.1 PREPARING THE WASHING
- Separate the washing according to the type and colourfastness of the fabrics.
- Wash whites and coloureds separately. Wash new coloured garments separately for the first time. A label is normally applied to garments giving information on how to clean them. A brief description of these labels is shown below.
| WASHING | BLEACHING | ||||
| 90 | Machine wash at max. 90°C |  Bleaching allowed Bleaching allowed |  Do not bleach Do not bleach | ||
| 60 | Machine wash at max. 60°C | ||||
| IRONING | |||||
| 40 | Machine wash at max. 40°C |  Hot iron Hot iron |  Warm iron Warm iron |  Cool iron Cool iron |  Do not iron Do not iron |
| 30 | Machine wash at max. 30°C | ||||
| DRY CLEANING | |||||
| 60 | Machine wash, delicate cycle at max. 60°C | Any solvent | Any solvent except trichloroethylene | Petroleum solvent and R113 | Do not dry clean |
| 40 | Machine wash, delicate cycle at max. 40°C | ||||
| 30 | Machine wash, delicate cycle at max. 30°C | ||||
| DRYING | |||||
| Hand wash | High temperature | Less than 60°C | Do not tumble dry | ||
| Do not wash | |||||
Attention!
- Do not wash unhemmed or torn garments as they may fray.
- Foreign bodies may damage garments or machine components. Therefore, empty all pockets and turn them inside out, remove rollers from curtains or put them in a string bag.
- Put very small articles (belts, handkerchiefs, socks, bras with stiffeners, etc.) into a white canvas bag. Close push buttons and zips and sew on dangling buttons.
- Modern detergents and correct washing temperatures are generally sufficient to remove stains from fabrics. However, some stubborn stains, such as grass, fruit, egg, blood, rust and biro, should be pre-treated before washing. Depending on the type of fabric, many stain removers can be found in the shops. Stains should always be cleaned or diluted immediately as the older they get, the more difficult they are to remove.
• Garments may be damaged if fabric care symbols are not observed.
Wool – Only pure wool, identified by 📄 or with the label <
5.2 OPENING THE DOOR
The machine is fitted with a safety device that prevents the door from opening while it is working.
- Before opening the door, wait 1 or 2 minutes after the programme ends ("End" LED on) to allow the safety device to disengage.
- Make sure there is no water in the tub and that the drum is not moving. Open the door by pressing the "Open door" button on the front panel and pulling it open.
Attention!
- If the washing programme is interrupted, you will have to wait from 3 to 15 minutes, depending on the temperature of the water, before the door opens.
Attention!
The water may still be boiling if the washing cycle was performed at high temperatures.
If there is still water inside the drum, do not open the door!
5.3 PREPARING THE WASHING
Where possible, save electricity by washing full loads divided by type of fabric. Introduce loose washing and alternate large items with small ones. For the first few times, weigh the loads of washing and then rely on your judgement. Average weights of common garments are shown below:
5.4 LOADING THE WASHING
- Open the door and load the washing taking care to distribute it uniformly, loosely and not packed into the drum; alternate large items with small ones if possible.
- The washing machine described in this manual can be loaded with up to 5kg of washing. Heavier loads will lead to unsatisfactory washing results and may cause the machine to work incorrectly.
- To save energy, wash full loads divided by type of fabric, according to the quantities indicated in the "Programmes chart" supplied with this manual.
- Close the door by pressing it against the body of the appliance until you hear a click. Make sure no garments have got caught between the door and the rubber gasket.
Attention!
• If the door is not closed properly, a safety device prevents the washing machine from working.
- Do not use more than the recommended amount of detergent: too much may deteriorate washing results.
5.5 ADDING DETERGENT AND ADDITIVES
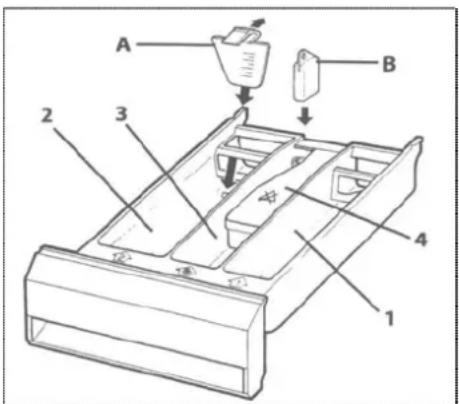
Follow the instructions shown in the "Programme Chart" provided together with the manual and add detergent and any additives to the relative compartment before starting the programme.
Pour the pre-wash powder detergent into the compartment marked "1".
Pour main wash detergent into compartment "2". Machine accessories include a red insert "A" that can be placed inside compartment "2" to allow liquid detergent to be used. The additives are automatically introduced into the tub during final rinsing.
Pour liquid additives such as starch and fabric softener into "3", marked with ⚙.
If bleach can be used with the machine (no cover marked with ⚙) add bleach to compartment “4” if you wish. The level of the liquids must not exceed the maximum limit, otherwise the trays will be emptied too soon.
Before pouring thick additives into the tray, dilute them with a little water to prevent them from obstructing the trap.
Only use foam-controlled detergent suitable for use in washing machines.
Determine the quantity of detergent according to the hardness of the water, and the type, quantity and dirtiness of the washing.
This will allow you to obtain the required effect using as little detergent as possible.
Detergent packs indicate the quantities to use according to 4 levels of hardness and for normally dirty loads of 4-5 kg.
Ask your local water board to tell you how hard your water is.
Water hardness
Hardness level French degree fH German degree dH
Normally dirty washing
- Choose a programme without prewash.
- Pour the total quantity of detergent indicated on the packs into compartment "2" of the detergent tray.
Very dirty washing
- Choose a programme with prewash.
- Add 14 of the recommended quantity of detergent into compartment “1” of the detergent tray and 34 of the detergent into compartment “2”.
Attention!
- If there are no dosage indications for delicate synthetics, add from 12 to 2/3 of the recommended quantity for resistant cottons.
- For the wool programme, only use neutral detergents for woollens.
- Base your doses according to the detergent manufacturer's recommendations.
5.7 DOSING LIQUID DETERGENTS
- Pour the recommended dose into the batcher supplied with the liquid detergent and place it inside the drum; otherwise, pour it into compartment "2" of the detergent tray after fitting the relative red insert "A" (see paragraph 5.5).
- The scale on the red insert will help you to use the right quantity of liquid detergent.
Attention!
- Liquid detergents can be used according to the manufacturer's recommended dose only for the main washing cycle, that is, in all programmes without prewash.
- When compartment "2" is used for powder detergent, the red insert "A" must be removed.
5.8 SCALE-REMOVERS
Scale-removers can be introduced into compartments "1" and "2" according to the manufacturer's indications. First, add the detergent and then the scale-remover.
5.9 SWITCHING ON THE MACHINE AND SELECTING THE WASHING PROGRAMME
To switch on the machine and select programmes, proceed as follows:
- Turn the programme knob in either direction.
-
Select the washing temperature, within the sectors marked on the front panel by the following words:
-
Cotton, coloureds
- Wool
- Synthetics, delicates
The washing machine has the following basic washing programmes which, by adjusting the temperature and using the various button functions, allow a wide range of programmes to be set for all requirements.
| Intensive washing programmefor resistant cotton, coloured or hemp fabrics. |  | ||
| Delicate washing programmesfor delicate artificial synthetic fibres, blends or linen fabrics.They prevent the formation of creases that are difficult to remove during ironing. |  | ||
| Wool programmeonly for garments marked “pure wool” washable, treated, shrink proof. Other types of wool should be hand washed or dry-cleaned. |  | ||
To select programmes according to the type of fabric, consult the “Programme chart” supplied together with this manual.
Display information
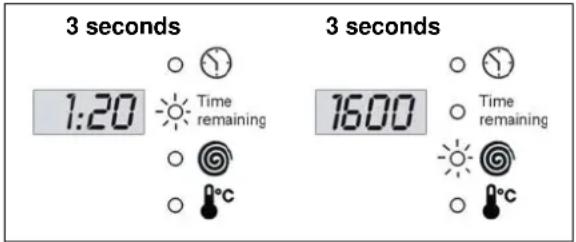
When the machine is switched on, the display visualises the duration (hours/minutes) and maximum spin speed envisaged for the programme. These two parameters are displayed alternatively for 3 seconds each, together with their relative LED's, until the selected programme starts.
Attention!
- The following partial washing programmes can be set using the programmes knob:
-Rinse with additive
-Drain and spin
-Fabric softener
These partial programmes are inside the Cotton, Synthetics and Wool sectors, except for the drain and spin programme (Drain I).
- If the indicated temperature shows 0^ , this means that the programme performs a cold wash cycle. The same cold wash is also performed by the Hand wash programme in the Wool sector.
• The fabric treatment labels show which washing temperature must be set. - If various garments in the same load require different washing temperatures, choose the lowest washing temperature of all.
- If the laundry is only slightly dirty and does not need the bleaching effect of high temperatures, a lower temperature can be chosen to save power. In spite of the low temperature and consequent saving of electricity, an automatic time control keeps the duration of the main washing unvaried compared with that of a high temperature programme. It is therefore possible to successfully wash normally dirty laundry at lower washing temperatures than the maximum temperatures shown on the fabric care labels.
5.10 MODIFYING STARTING PARAMETERS
5.10.1 SPIN SPEED
Press the select spin speed button (☑), the relative LED lights up and the display visualises the maximum speed envisaged for the selected washing programme.
Press the button repeatedly. Speed decreases by 100 rpm every time until the spin cycle reaches 0 rpm and is disabled.
5.10.2 OPTIONS
Use the options buttons (indicated in chapter 4 – Description of controls, letter H) to enable machine options. A selected option is highlighted by the option LED located above the button in question.
5.10.3 DELAYED START (ONLY FOR MODELS FEATURING THIS FUNCTION)
Press the delayed start button (☐). The relative LED located above the button lights up. The display visualises the time remaining (hours/minutes) before the selected washing programme starts: the display initially shows 0 hours 0 minutes for all programmes.
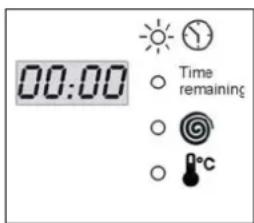
Press the button repeatedly. The Start delay increases by 30 minutes each time it is pressed for the first 12 hours. After that it increases to 60 minutes up to 24 hours.
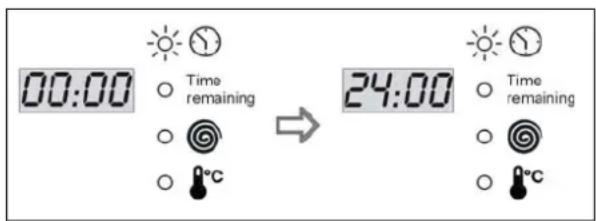
While selecting the delayed start time, you can reset the timer by pressing the button for at least 3 seconds.
5.11 STARTING THE WASHING PROGRAMME
- Before starting the selected programme, carefully close the door, open the water tap and add the detergent and additive
- Press the "Start-Pause" button. The LED located above the Start-Pause button remains lit throughout the cycle.
After starting, the display shows the time remaining until the end of the programme. The LED remains on throughout the cycle.
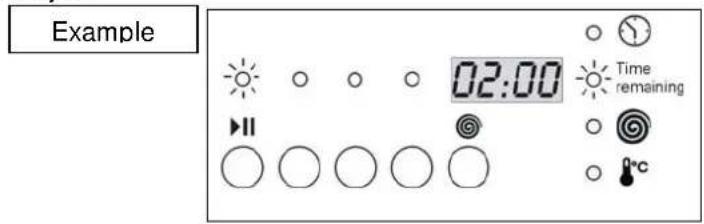
If delayed starting has been set (only for models featuring this option), the display visualises the time remaining before the cycle starts. When delayed starting is set, the relative LED flashes on and off.
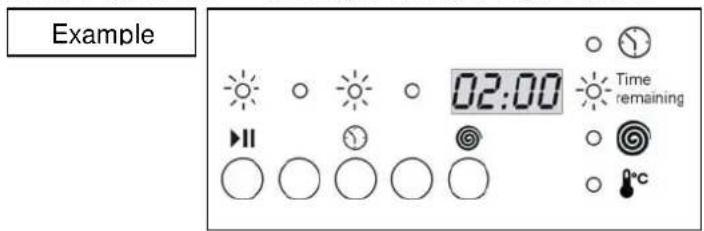
5.12 INTERRUPTING OR CHANGING THE WASHING PROGRAMME
The washing programme may be interrupted at any time while it is running:
- press "Start/Pause" for approximately 3 seconds: the display alternates between STOP (for 1 second) and three horizontal lines (for 1 second) and the Start/Pause LED flashes.

The programme can also be stopped by turning the programme/temperature selection knob while the cycle is running.
-
If you wish to change the washing programme, simply select the new programme by turning the programme knob without pausing the machine first. The new washing cycle will be performed starting from the beginning. If the tub is already full of water, the new programme will omit the filling phase.
-
To resume the cycle, press Start-Pause again.
5.13 HEATING PHASE
During the water heating phase of the washing cycle, the heating phase LED ( ^°C ) lights up. This lets you know when the washing machine is consuming most power.
5.14 END OF PROGRAMME
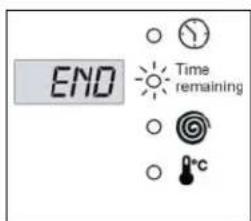
The washing programmes are automatically completed, the display shows END and the "Time remaining" LED lights up.
- Turn the programmes knob to OFF to switch off the machine.
- Open the door.
- Remove the washing from the drum.
- Leave the door ajar in order to allow the inside of the washing machine to dry.
- Turn off the water tap.
If the no-spin option was selected during the initial spin speed set up phase and the machine stops with the tub full (spin speed 0), STOP appears on the display at the end of the washing programme, alternating with 0000 (spin speed 0) and the spin LED lights up.
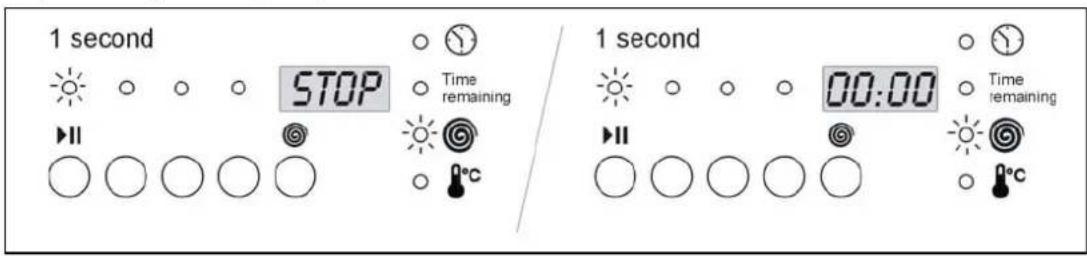
To continue draining and spinning, press the spin select button twice. The machine resumes the cycle by draining the water and spinning.
To select spin speed, press the button until the required speed is displayed. If you wish to drain the water in the tub without spinning, press the spin select button until 0000 appears on the display.
This indicates that the machine will drain the water without spinning.
5.15 END OF PROGRAMME BEEPER
When a washing cycle finishes, the message END appears on the display and a beepers sounds twice. To disable this signal, press the second and third button from the left simultaneously. The message OFF immediately appears on the display to indicate that the beeper has been disabled.
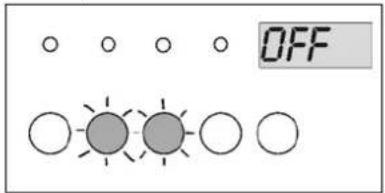
To enable the end of programme beeper, repeat the operation. This time, the message ON will appear on the display.
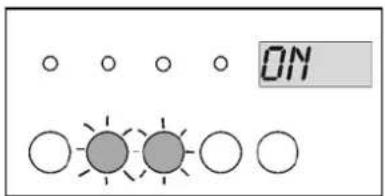
The appliance is supplied with the end of programme beeper enabled.
6. CLEANING AND MAINTENANCE
Important – Before cleaning or servicing the machine, remove the plug from the socket.
6.1 EXTERNAL CLEANING
- Regular and constant cleaning will keep your appliance looking like new.
- Clean the outer surfaces with soap and water and then dry thoroughly with a soft cloth.
- Clean parts in plastic with a damp cloth.
- Do not scratch with sharp objects and do not use solvents or abrasive products as these will damage the surface.
• For reasons of safety, never spray water onto the appliance.
6.2 CLEANING THE DRUM
- Remove any rust stains from the drum with a special cleaner for stainless steel or, for particularly stubborn stains, with extra fine abrasive paper.
- To remove scale from the washing machine, only use branded scale removers with anti-corrosion agents for washing machines.
- Follow the manufacturer's instructions and recommended quantities to the letter.
- After removing scale or rust from the drum, perform a few rinse cycles to eliminate acid residues as these may damage the machine. Never use detergents containing solvents. These may form vapours that may catch fire and explode.
Only clean the drain pump if it is obstructed by buttons, hairpins and the like and the water cannot drain. In this case, proceed as follows.
-
Remove the plug from the socket to disconnect the machine from the electrical power supply.
-
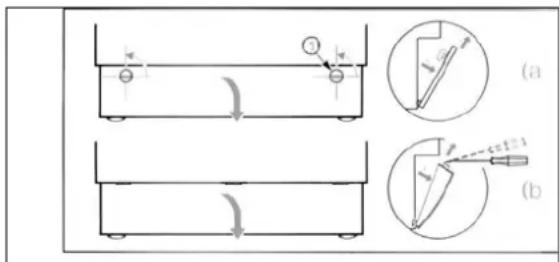
Depending on the model, proceed as follows: MODEL A – Use a coin to turn the plastic buttons fixing the cover to the base plate anti-clockwise. MODEL B – Insert a small screwdriver into the slots in the base plate cover, then gently prise up to release the upper part of the cover. Pull the cover slightly forwards and then up to remove it completely.
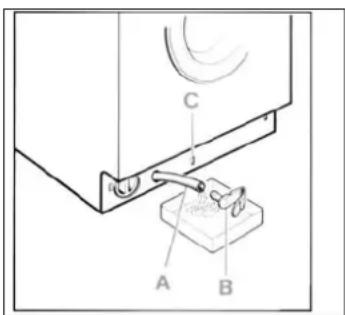
- Pull out the drain hose "A".
Attention: if the hose is hot it means the water is hot or boiling. Place a tray on the floor and remove the plug "B" to drain the water.
Depending on the quantity of water, it may be necessary to empty the tray several times.
When no more water comes out, push the hose back in and screw back the plug "B".
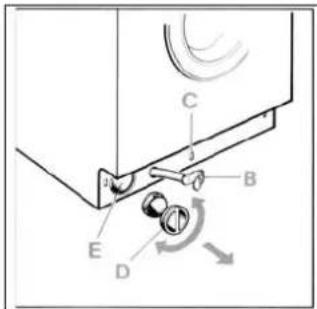
- Unscrew the cover of the pump "D" by turning it anti-clockwise.
Clean the pump body and remove any foreign bodies.
Check the inside "E" and make sure the impeller turns freely. If there are any foreign bodies, remove them.
- Screw the pump cover back on.
Fix the drain hose by snapping the plug into place «C».
Depending on the model, put back the cover as follows:
MODEL A – Insert the lower part of the cover first. Then secure it by turning the plastic buttons a quarter turn clockwise.
The slots in the buttons must be horizontal.
MODEL B – Insert the lower part of the cover first and then push it towards the base plate until it clicks into place.
6.4 CLEANING THE DETERGENT TRAY
Keep the detergent tray free from scale.
To simplify this operation, completely remove the detergent tray (pull it out as far as it will go, lift it slightly and then pull fairly vigorously).
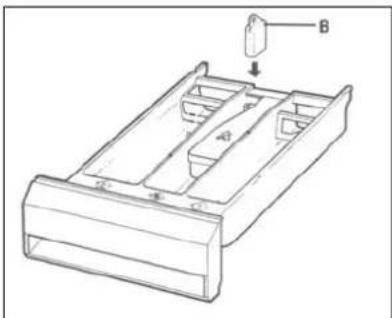
Remove the traps «B» (there are two traps if the machine is not fitted with a cover for the bleach compartment) and clean with hot water.
Put back the traps and remove any residues of detergent before putting the tray back.
natural_image
Technical line drawing of a mechanical component with labeled parts (A, B) and an arrow indicating direction (no text or symbols beyond labels)6.5 CLEANING THE WATER INLET FILTER
The machine is fitted with a filter for protecting the water inlet valves.
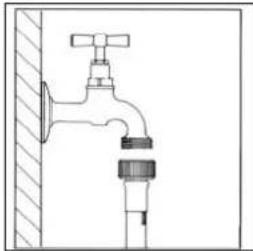
The filter is fitted the gas thread of the inlet hose connected to the tap
Clean the filter if no water or insufficient quantities of water enter the washing machine.
To do this, proceed as follows:
- Remove the plug from the socket to disconnect the machine from the electrical power supply.
- Turn off the water tap.
- Unscrew the inlet hose from the tap.
- Remove the filter from the inlet hose gas thread.
- Clean the filter with water and a brush.
- When screwing the inlet hose back on to the tap, make sure the filter is correctly positioned.
natural_image
Simple line drawing of a faucet with a valve and handle, mounted on a wall (no text or symbols)7. TROUBLESHOOTING
This product complies with current safety regulations governing electrical equipment. For safety reasons, all technical inspections or repairs must be performed by qualified technicians in order to prevent hazardous situations for users.
If the machine does not work, before calling the Service Centre and spending money unnecessarily, check that the operations indicated in this troubleshooting table have been performed.
| 1 The machine does not start | Check that:- the plug is correctly fitted into the socket- the door is securely closed- the “Start-Pause” button has been pressed. |
| 2 The tub does not fill with water | Check that:- the plug is correctly fitted into the socket- the door is securely closed- the water tap is open- the water inlet filters are not clogged. Clean them as indicated in paragraph 6.5. |
| 3 No water appears to be in the drum | No fault.The water level is lower than the glass of the door. |
| 4 The water does not drain | Check that:- the drain hose is not twisted- the drain pump is not clogged. Clean it as indicated in paragraph 6.3. |
| 5 The water does not drain after final rinsing in delicates and woollens washing programmes | This is envisaged by the washing programme (if the no-spin and stop with tub full [IMAGE] option has been selected) to prevent fabrics from creasing.To drain the water, proceed as described in the “End of programme” section, paragraph 5.14. |
| 6 The machine fills with water and drains continuously | Make sure the end of the drain hose is not too low. |
| 7 Strong vibrations during spinning | Check that:- the machine has been properly levelled as described in paragraph 3.2- the machine is not too close to walls or furniture- the internal moving assembly has been released as described in paragraph 3.1 |
| 8 Too much foam forms and escapes from the tray | Check that:- the detergent is suitable for automatic machines and is not for hand washing- no more than the quantities indicated in the manual are used |
| 9 Water on the floor | Check that:- the unions of the water inlet hose are not loose- the end of the drain hose has not moved out of place. |
| 10 Not all the fabric softener enters the machine or too much water remains in the compartment | Make sure that the traps in the detergent tray are correctly positioned and are not clogged. Clean them as indicated in paragraph 6.4. |
11 The machine does not spin The unbalanced load sensor has triggered because the washing is not uniformly distributed inside the drum. If the washing is wet at the end of the cycle, distribute it well inside the basket and repeat just the spin cycle.
12 Draining water from the drum In the event of a power failure or a fault in the appliance, the water inside the drum can be drained as described in paragraph 6.3
13 The washing has not been correctly spun Large items have rolled up and are not uniformly distributed inside the drum. Always wash large items together with small ones.
14 Residues of detergent on the washing Many phosphate-free detergents contain substances that are difficult to dissolve in water.
Select the Rinse programme or brush the washing.
ERROR SIGNALS
In the event of faults, the machine will display an error code.
| Error code Problem | |
| Door not closed properly. Close it. | |
| E1 | Aquastop. Contact the nearest Service Centre after disconnecting the machine from the electrical power supply and closing the water tap. |
| E5 | No water for washing. See point 2 on the troubleshooting table. |
| E6 | The water does not drain. See point 4 on the troubleshooting table. |
For all other error codes, contact the nearest Assistance Centre after disconnecting the power supply and closing the water tap.
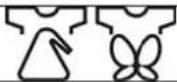
8. CONTROL PANEL SYMBOLS
| PROGRAMS | OPTIONS | OTHER SYMBOLS | ||||||
 | DRYING |  | WATER INCREASE | [FABRIC CONDITIONER] | ||||
 | HAND WASH |  | NO SPIN OR STOP WHITFULL TUB | OPEN DOOR | ||||
 | PRE-WASH |  | DELAY TIMER | START-PAUSE | ||||
 | RINSES |  | DELICATES | START | ||||
 |  | DRAIN AND SPIN |  | ECONOMY CYCLE | WASH | |||
| SECTION |  | QUICK WASH | END | |||||
 | COTTON ANDCOLOURED |  | EXTRA RINSE | HEATING | ||||
 | WOOL |  | SPIN | TIME REMAINING | ||||
 | DRYING |  | EASY-IRON | |||||
 | SINTHETICS ANDDELICATES |  | HALF LOAD | |||||
- GB
- Contents
- Warning!
- SAFETY WARNINGS
- Attention!
- Make sure all the water has drained away before you open the door.
- The water in the machine is not drinkable!
- Prolonged inactivity.
- This appliance is intended for use by adults.
- Keep children away from the appliance.
- Important!
- INSTALLATION INSTRUCTIONS
- UNPACKING
- REMOVING THE WOODEN BASE
- POSITIONING AND LEVELLING
- WATER SUPPLY CONNECTION
- DRAIN CONNECTION
- ELECTRICAL CONNECTION
- Attention
- DESCRIPTION OF CONTROLS
- CONTROL PANEL
- Description of controls
- A Open door button
- B ON-OFF and washing programme selection knob
- C Time remaining shown on display LED
- D Spin speed shown on display LED
- E Heating phase LED
- F Display
- G Select spin speed button or stop with tub full
- DETERGENT TRAY
- WASHING INSTRUCTIONS
- PREPARING THE WASHING
- OPENING THE DOOR
- PREPARING THE WASHING
- LOADING THE WASHING
- ADDING DETERGENT AND ADDITIVES
- Water hardness
- Normally dirty washing
- Very dirty washing
- DOSING LIQUID DETERGENTS
- SCALE-REMOVERS
- SWITCHING ON THE MACHINE AND SELECTING THE WASHING PROGRAMME
- Display information
- MODIFYING STARTING PARAMETERS
- SPIN SPEED
- OPTIONS
- DELAYED START (ONLY FOR MODELS FEATURING THIS FUNCTION)
- STARTING THE WASHING PROGRAMME
- INTERRUPTING OR CHANGING THE WASHING PROGRAMME
- HEATING PHASE
- END OF PROGRAMME
- END OF PROGRAMME BEEPER
- CLEANING AND MAINTENANCE
- EXTERNAL CLEANING
- CLEANING THE DRUM
- CLEANING THE DETERGENT TRAY
- CLEANING THE WATER INLET FILTER
- TROUBLESHOOTING
- ERROR SIGNALS
- CONTROL PANEL SYMBOLS
Brand : Caple
Model : WMi1012
Category : Washing machine