
DTT 166 TwinMaid - Washing machine Defy - Free user manual and instructions
Find the device manual for free DTT 166 TwinMaid Defy in PDF.


| Brand | Defy |
| Model | DTT 166 TwinMaid |
| Product Type | Twin Tub Washing Machine |
| Wash Capacity | 6.5 kg |
| Spin Capacity | 4.5 kg |
| Dimensions (H x W x D) | 880 x 455 x 830 mm |
| Weight | 35 kg |
| Power Supply | 230 V ~ 50 Hz |
| Wash Motor Power | 400 W |
| Spin Motor Power | 150 W |
| Water Consumption (approx.) | 150 L per wash |
| Spin Speed | 1400 rpm |
| Wash Timer | 0 - 15 minutes |
| Spin Timer | 0 - 5 minutes |
| Controls | Mechanical timer and selector dial |
| Drain Pump | Yes, integrated |
| Lint Filter | Yes, wash tub side |
| Safety Features | Lid safety switch, overload protection |
| Materials | Plastic body, stainless steel drum |
| Included Accessories | Drain hose, inlet hose, user manual |
| Energy Efficiency | Class D (estimated) |
| Noise Level (wash/spin) | 75 dB / 80 dB |
| Repair & Spares Availability | User-replaceable belts, pump, timer |
Frequently Asked Questions - DTT 166 TwinMaid Defy
User questions about DTT 166 TwinMaid Defy
0 question about this device. Answer the ones you know or ask your own.
Ask a new question about this device
Download the instructions for your Washing machine in PDF format for free! Find your manual DTT 166 TwinMaid - Defy and take your electronic device back in hand. On this page are published all the documents necessary for the use of your device. DTT 166 TwinMaid by Defy.
USER MANUAL DTT 166 TwinMaid Defy
OWNER'S MANUAL TWINMAID 800 DTT166

natural_image
White washing machine with three control knobs and a flat top (no visible text or symbols)
You can rely on Defy. To simplify
Please register your product at www.defy.co.za
INDEX
PAGE
| GET TO KNOW YOUR MACHINE | 3 |
| INSTALLATION | 4 |
| SAFETY PRECAUTIONS | 5 |
| WASHING | 6 / 7 |
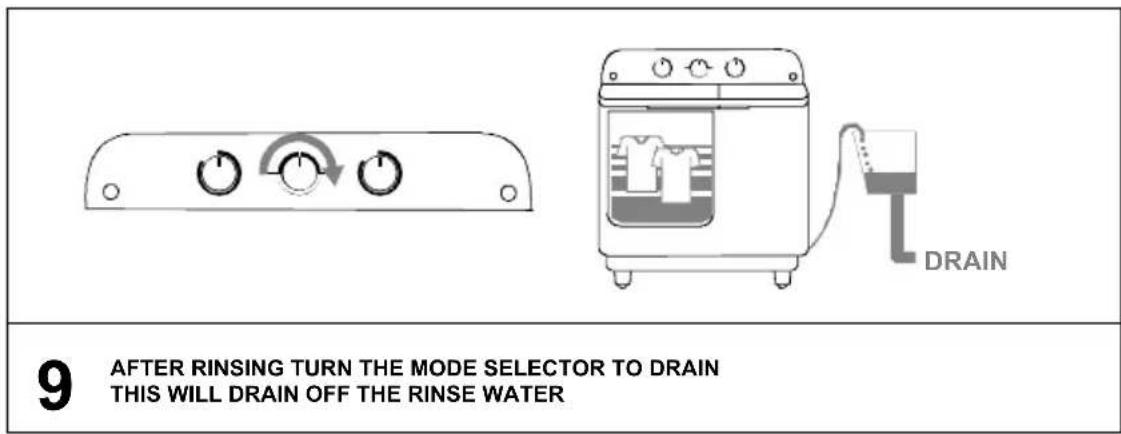
| DRAINING | 8 |
| RINSING | 9 / 11 |
| SPIN DRYING | 12 |
| AFTER USE | 13 |
| MAINTENANCE | 14 |
| CLEANING THE DRAIN FILTER | 15 |
| HELP | 16 |
| DEFY SERVICE CENTRES | 17 |
| WARRANTY | 18 |
| CIRCUIT DIAGRAM | 19 |
| SPECIFICATIONS | 19 |
| PURCHASE INFORMATION | 20 |
Get to know your Machine
Note: This machine is for domestic use only.


natural_image
Simple line drawing of a circular object with radial lines, resembling a stylized flower or gear (no text or symbols)SPIN TUB LID COVER

natural_image
Coiled black and silver hose with two connectors (no text or symbols visible)WATER SUPPLY HOSE

natural_image
Pure mechanical component diagram without any text, numbers, or symbolsDRAIN HOSE AND CLAMP
INSTALLATION

This appliance is not intended for use by persons (including children) with reduced physical, sensory or mental capabilities, or lack of experience and knowledge, unless they have been given supervision or instruction concerning use of the appliance by a person responsible for their safety.
Children should be supervised to ensure that they do not play with the appliance.



IM PORTANT
NEVER TRY TO TUR N A KNOB FURTHER THAN THE M ARKING ON THE D IAL
TURN ANTI CLOCKWISE TO RETURN THE KNO B TO "0"
WASHING
WASH TUB LID

natural_image
Line drawing of a washing machine with a scroll wheel and control panel (no text or symbols)1 REMOVE WASH TUB LID AND HANG IT ON THE SIDE OF THE MACHINE

natural_image
Simple diagram of a plug with a curved cable and an arrow, labeled 'ON' (no text or symbols beyond the label)2 SWITCH ON THE POWER AT THE WALL SOCKET

natural_image
Simple diagram of a device control panel with three circular buttons and an arrow indicating rotation (no text or symbols)3 TURN THE SELECTOR KNOB TO GENTLE OR NORMAL WASH

natural_image
Illustration of a washing machine with a piping bag and a side panel, showing fluid flow direction (no text or symbols)4 OPEN THE TAP AND FILL THE WASH TUB WITH WATER TO THE DESIRED LEVEL THEN CLOSE THE TAP
natural_image
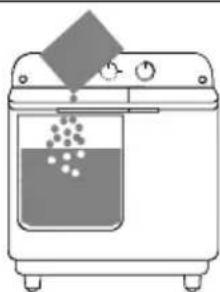
Simple line drawing of a washing machine with a tray and liquid container (no text or symbols)5 ADD SOAP POWDER AS DIRECTED. USE ONLY DETERGENT DESIGNED FOR TWIN TUB WASHING MACHINES.

natural_image
Line drawing of a washing machine with a bag partially inserted into the air (no text or symbols)6 PLACE THE WASHING IN THE TUB ONE ARTICLE AT A TIME
WASHING CONTINUED
7

natural_image
Pure electrical switch panel diagram without any text or symbolsTURN THE WASH TIMER KNOB TO THE DESIRED TIME
| WASHFABRICTIMEMAX. DRY LOAD | |||
| GENTLE | SYNTHETICS, WOOL, SILK | 2 TO 5 MINUTES | 2 . 0 kg |
| NORMAL | COTTON, LINEN | 5 TO 10 MINUTES | 3 . 5 kg |
| NORMAL | VERY DIRTY WASHING | 9 TO 15 MINUTES | 5 . 0 kg |


DRAINING

natural_image
Simple diagram of three circular switches with one clockwise and one clockwise, no text or symbols present.10
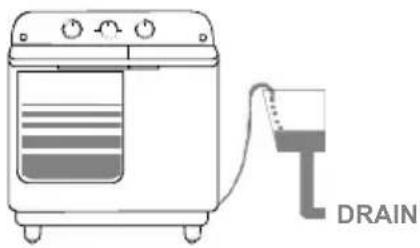
IF REQUIRED, ANOTHER LOAD MAY BE WASHED IN THE SAME SOAPY WATER.. IF NOT, THE MODE SELECTOR KNOB SHOULD BE TURNED TO DRAIN
natural_image
Line drawing of a washing machine connected to a drain component (no text or symbols on the device itself)11 THE SOAPY WATER WILL DRAIN FROM THE MACHINE
IMPORTANT

12
AFTER ALL THE WATER HAS DRAINED. THE SELECTOR MUST BE RETURNED TO THE WASH / RINSE MODE FAILURE TO DO SO WILL ALLOW THE PUMP TO CONTINUE RUNNING AND MAY CREATE AN AIR LOCK WHICH WILL PROHIBIT EFFECTIVE DRAINING.
IF THE DRAIN MODE HAS BEEN SELECTED AND THE MACHINE DOES NOT DRAIN, IT IS PROBABLE THAT AN AIR LOCK HAS OCCURRED. TO CLEAR THE AIR LOCK, THE SELECTOR SHOULD BE TURNED TO THE WASH MODE FOR ABOUT 5 SECONDS BEFORE RETURNING IT TO THE DRAIN POSITION.
WARNING

natural_image
Simple diagram showing a vertical line inside a circle with an arrow indicating direction (no text or symbols)IMPORTANT
NEVER TURN A KNOB
FURTHER THAN THE MARKING ON THE DIAL
TURN ANTI CLOCKWISE TO RETURN TO "0"
RINSING
natural_image
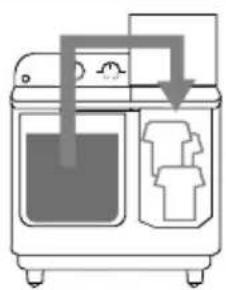
Diagram of a washing machine with internal components and airflow arrows (no text or symbols)1 PLACE THE WET WASHING IN THE SPIN DRUM, DISTRIBUTING IT EVENLY
2
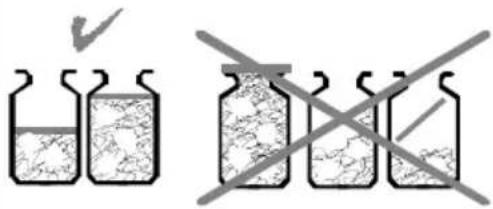
PUSH THE WASHING DOWN GENTLY INTO THE SPIN DRUM AND PLACE THE DISC COVER IN THE DRUM SO THAT IT COMPLETELY COVERS THE WASH LOAD
natural_image
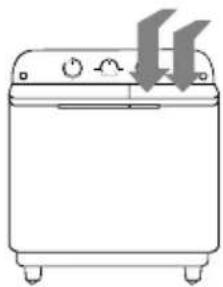
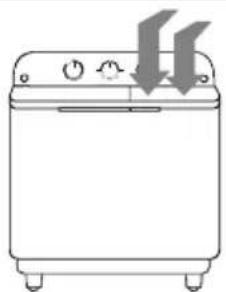
Line drawing of a kitchen appliance with a downward arrow indicating airflow or cooling (no text or symbols)3 CLOSE BOTH THE INNER AND OUTER LIDS OF THE SPIN TUB

natural_image
Simple diagram of a device control panel with three rotary buttons and a curved arrow indicating rotation (no text or symbols)4 TURN THE SPIN TIMER KNOB TO APPROXIMATELY 2 MINUTES

natural_image
Line drawing of a washing machine with internal compartments and a handle (no text or symbols)5 REMOVE THE WASH LOAD FROM THE SPIN DRUM AND PLACE IT IN THE EMPTY WASH TUB

natural_image
Line drawing of a washing machine with a piping bag and a side panel showing liquid (no text or symbols)5 OPEN THE TAP FILL THE WASH TUB WITH WATER TO THE DESIRED LEVEL THEN CLOSE THE TAP
RINSING CONTINUED



RINSING OPTION
IT IS POSSIBLE TO RINSE LAUNDRY BY ADDING CLEAN WATER TO THE SPIN TUB WHILE SPINNING

natural_image
Diagram of a washing machine with internal components and directional arrows indicating flow (no text or labels)1 PLACE THE WET WASHING IN THE SPIN DRUM, DISTRIBUTING IT EVENLY
2
PUSH THE WASHING DOWN GENTLY INTO THE SPIN DRUM AND PLACE THE DISC COVER IN THE DRUM SO THAT IT COMPLETELY COVERS THE WASH LOAD
natural_image
Line drawing of a washing machine with two downward arrows indicating airflow or cooling (no text or symbols)3 CLOSE BOTH THE INNER AND OUTER LIDS OF THE SPIN TUB
natural_image
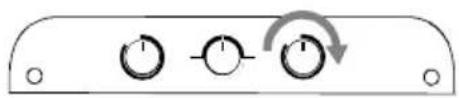
Simple diagram of three circular switches with one clockwise and one clockwise, no text or symbols present4
TURN THE SPIN TIMER KNOB TO APPROXIMATELY 2 MINUTES
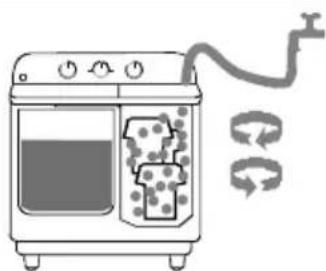
natural_image
Illustration of a washing machine with water bottles and a piping bag, accompanied by three circular arrows indicating flow or circulation (no text or symbols)5 OPEN THE TAP ADD WATER TO THE SPIN TUB WHILE SPINNING

natural_image
Line drawing of a washing machine with a downward arrow indicating flow or process (no text or symbols)6
CLOSE THE TAP. COMPLETE THE SPIN CYCLE. REMOVE THE WASHING FROM THE SPIN TUB AND DRAIN THE WATER FROM THE WASH TUB.
SPIN DRYING
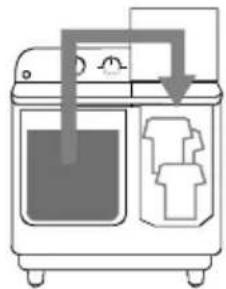
natural_image
Diagram of a washing machine with internal compartments and arrows indicating flow (no text or symbols)1
PLACE THE WET WASHING IN THE SPIN DRUM, DISTRIBUTING IT EVENLY


2
PUSH THE WASHING DOWN GENTLY INTO THE SPIN DRUM AND PLACE THE DISC COVER IN THE DRUM SO THAT IT COMPLETELY COVERS THE WASH LOAD
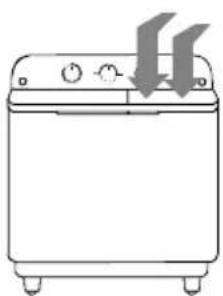
natural_image
Line drawing of a washing machine with two downward arrows indicating airflow or cooling (no text or symbols)3
CLOSE BOTH THE INNER AND OUTER LIDS OF THE SPIN TUB

natural_image
Front view of a device control panel with three rotary buttons and a curved arrow indicating rotation (no text or symbols)4
TURN THE SPIN TIMER KOB TO THE DESIRED SPIN TIME
FURTHER THAN THE MARKING ON THE DIAL TURN ANTI CLOCKWISE TO RETURN TO "0"
NOTE: THE SPIN MOTOR MUST COOL DOWN FOR 20 MINUTES AFTER 4 CONSECUTIVE SPIN CYCLES.

NEVER TOUCH THE ELECTRICAL PLUG OR SOCKET WITH WET HANDS
1 SWITCH THE POWER OFF AT THE WALL SOCKET AND REMOVE THE PLUG FROM THE SOCKET.
2 DRY THE CABINET, THE CONTROL PANEL AND INSIDE THE TUBS WITH A SOFT, LINT FREE CLOTH.
3 PLACE THE WASH TUB LID IN POSITION OVER THE WASH TUB.
4 IF YOU WISH TO MOVE THE MACHINE, FIRST UNCOUPLE THE INLET HOSE FROM BOTH THE TAP AND THE MACHINE.
5 REMOVE THE OUTLET HOSE FROM THE DRAIN BUT DO NOT DETACH THE OUTLET HOSE FROM THE MACHINE.
MAINTENANCE
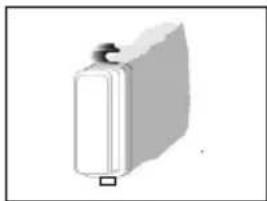
natural_image
Simple 3D illustration of a rectangular object with a protruding knob (no text or symbols)CLEANING THE FILTER
PERIODICALLY, THE FILTER BAG REQUIRES CLEANING. CAREFULLY PULL THE FILTER OUT. RINSE CLEAN UNDER RUNNING WATER AND REPLACE.

natural_image
Diagram showing a mechanical device interacting with a circular base, with an upward arrow indicating motion (no text or symbols)BLOCKED PULSATOR
HOLD THE PULSATOR AND LOOSEN THE PHILIPS SCREW LIFT OFF THE PULSATOR AND REMOVE THE BLOCKAGE. REPLACE THE PULSATOR, TIGHTEN THE SCREW AND REPLACE THE LID

natural_image
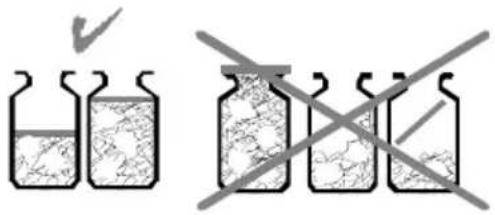
Illustration of three spray bottles and a container with a crossed-out X symbol (no text or labels)CLEANING THE CABINET
WIPE THE CABINET WITH A DAMP SOAPY CLOTH. RINSE AND WIPE DRY. DO NOT USE HOUSEHOLD CLEANERS, ABRASIVES OR VOLATILE LIQUID CLEANERS
natural_image
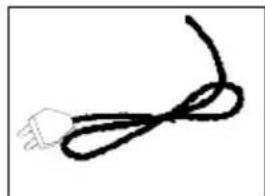
Simple line drawing of a hand holding a rope or tied bundle (no text or symbols)IMPORTANT: IF THE POWER CORD SHOULD EVER NEED REPLACING, USE ONLY A GENUINE REPLACEMENT PART AVAILABLE FROM DEFY SERVICE CENTRES
Cleaning the drain filter
Regularly clean the drain filter located at the rear of the machine.

natural_image
Simple line drawing of a mechanical component with a central circular feature and a pointer (no text or symbols)Place a shallow container under the drain-filter to collect any residual water spillage.
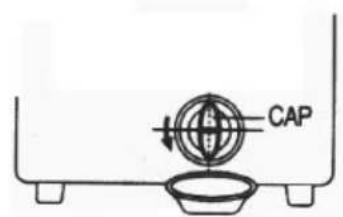
Turn the filter cap in an anticlockwise direction.

Pull the filter assembly out.
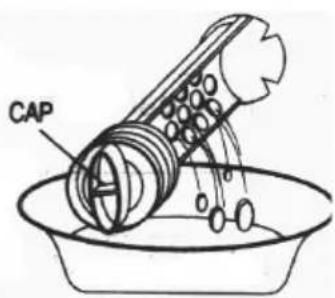
Clean the drain filter.

Re-fit the filter along the guides ensuring that the groove in the filter aligns with the guide rib.

Tighten the cap by turning it in a clockwise direction.
HELP
IF YOUR MACHINE WILL NOT WORK,
CHECK THE FOLLOWING BEFORE CALLING A SERVICE TECHNICIAN

1 IS THE PLUG IN THE WALL SOCKET AND HAS THE POWER BEEN SWITCHED ON?
2 HAS A HOUSE FUSE BLOWN OR HAS A CIRCUIT BREAKER TRIPPED?
3 ARE THE CONTROL KNOBS IN THE CORRECT POSITION?
4 HAS THE WATER TAP BEEN TURNED OPEN?
5 HAS A HOSE BEEN KINKED, TWISTED OR BENT?
6 IS THE PULSATOR BLOCKED?
7 IS THE DRAIN OUTLET BLOCKED OR HAS AN AIR LOCK DEVELOPED see page 8
8 CHECK FOR CLOTHES ENTANGLED ROUND THE SPIN DRUM.
9 HAS THE SPIN TUB LID BEEN CLOSED PROPERLY?
IF YOU HAVE FOLLOWED THE INSTRUCTIONS AND STILL HAVE A PROBLEM, CONTACT THE NEAREST DEFY SERVICE CENTRE.
THEY WILL DE ABLE TO HELP OR SEND A FACTORY TRAINED TECHNICIAN TO ASSIST YOU.
SERVICE CENTRES
If you have followed the instructions and still have a problem, contact the nearest Defy Service Centre. They will be able to advise you on any aspect of the product or send a qualified technician to repair it.
BLOEMFONTEIN
160 Long Street, Hilton, Bloemfontein 9301
Tel: 051 400 3900
Bloemfontein.Service@defy.co.za
CAPE TOWN
5A Marconi Rd. Montague Gardens, 7441
Tel: 021 526 3000
CapeTown.Service@defy.co.za
DURBAN
35 Intersite Avenue, Umgeni Business Park,
Durban, 4051
Tel: 031 268 3300
Durban.Service@defy.co.za
EAST LONDON
16 Bowls Rd. Arcadia, East London, 5201
Tel: 043 743 7100
EastLondon.Service@defy.co.za
JOHANNESBURG
Cnr. Mimetes & Kruger Sts. Denver ext.12
Johannesburg, 2094
Tel: 011 621 0200 or 011 621 0300
Gauteng.Service@defy.co.za
POLOKWANE
87 Nelson Mandela Drive, Superbia 0699
Tel: 0152 92 1166 / 7 / 8 / 9
Polokwane.Service@defy.co.za
PORT ELIZABETH
112 Patterson Road, North End, Port Elizabeth 6001
Tel: 041 401 6400
PortElizabeth.Service@defy.co.za
PRETORIA
Block A1 Old Mutual Industrial Park,
Cnr. D.F.Malan Drive & Moot Str. Hermanstad, 0082
Tel: 012 377 8300
Pretoria.Service@defy.co.za
ZAMBIA: SOUTHGATE INVESTMENTS LTD
Plot 1606, Sheki Sheki Road
P.O. Box 33681
Lusaka, 10101, Zambia
Tel: +260 0211 242332/3
Fax: +260 0211 242933
sgiservicecentre@microlink.zm
NAMIBIA: ATLANTIC DISTRIBUTORS (PTY) LTD
10 Tienie Louw Street, Northern Industrial Area
P.O. Box 21158, Windhoek, Namibia
Tel: (061) 216162
Fax: (061) 216134
atlantic@mweb.com.na
ZIMBABWE: TRADECOMAFRICA
Trade Com Africa, 183 Loreley Crescent
Msasa, Harare, Zimbabwe
Tel: +263 4 486165/6
Cell: +263 772 469010
Cell: +263 772 469011
BOTSWANA: RAY MORGAN AGENCIES
RMA Service Centre, Plot 48, East Gate
Gaborone International Commerce Park
Kgale View, Gaborone
Botswana
Tel: +267 390 3996 / 390 3912
Fax: +267 318 7376
Cell: +267 7134 6539
service@rma.co.bw; raja@rma.co.bw
SWAZILAND: LYNDS DISTRIBUTORS
P.O Box 716, Mbabane, Swaziland, H100
Tel: (00268) 2515 4310/8
Fax: (00268) 2518 4318
MOZAMBIQUE: COOL WORLD. LDA
This certificate is issued by DEFY APPLIANCES LIMITED manufacturers of Defy and Ocean products, hereinafter the Company, to the original purchaser only, of the appliance described on the certificate and shall constitute the only warranty given in respect of this appliance.
The Company warrants to the original purchaser that for a period of TWO YEARS from date of purchase the appliance is free from defect under normal domestic use, both in workmanship and material, subject to the following conditions.
- Repair or replacement of any part of this appliance, found by the Company to be defective, shall be at the election of the Company. The Company reserves the right to effect such service through any of its Service Divisions or Authorised Service Dealers. The cost of such service shall be borne by the Company in full, provided that the appliance is located no further than 50 km. from a Company Service Centre or an Authorised Service Dealer. Where the appliance is located beyond the 50 km. radius, the purchaser shall be liable for the standard travelling charges, as determined by the Company.
CARRY IN SERVICE Microwave ovens, Compact cookers and small appliances are repaired in our service centres and are not collected from the customers home. Faulty units should be delivered to the purchasing dealer or to the nearest Company Service Centre for warranty repairs. - Vitreous enamelware, fuses and lamps are specifically excluded from these warranties. It is an express condition of these warranties that the purchaser takes due care and attention in the use and maintenance of the appliance. Abuse, misuse in conflict with operating instructions, connection to incorrect voltages and subjection to commercial use shall release the Company from its obligations.
- This warranty shall become void and cease to operate if the appliance is dismantled by, or any repairs to the appliance are effected by any persons not duly authorised by the Company, or if substitute parts not approved by the Company are used in the appliance, or if the serial number of the appliance is removed.
- The Company shall not be responsible for damages resulting from fire, flood, civil disturbances or any Act of God. The Company shall not, in terms of these warranties be responsible nor held liable for any consequential loss or damage of any kind caused by or due to the failure or malfunction of the appliance.
- The Company shall not be responsible for transportation or other costs other than those incurred within the provisions of Point 1 of this Certificate.
- These warranties shall not apply to the appliance if it is purchased or used beyond the borders of the Republic of South Africa, Namibia, Botswana, Swaziland and Lesotho.
- Where service is requested under warranty and no fault or defect can be found by the Company, all costs incurred will be for the purchaser's account.
- This Certificate as well as your invoice will serve as proof of purchase. For the purpose of warranty, it will be essential to produce this Certificate and invoice. Failure to do so, will render the purchaser liable for service costs.
KEEP THIS CERTIFICATE AND SALES INVOICE AS PROOF OF PURCHASE FOR WARRANTY PURPOSES.
Circuit diagram

flowchart
graph TD
    A["SPIN TIMER"] --> B["ORANGE"]
    B --> C["PURPLE"]
    C --> D["PURPLE"]
    D --> E["C2"]
    E --> F["GREEN"]
    F --> G["C1"]
    G --> H["WASH MOTOR"]
    H --> I["BLUE"]
    J["FUSE (5A)"] --> K["BROWN"]
    K --> L["PINK"]
    L --> M["SELECT. SWITCH"]
    M --> N["GENTLE"]
    N --> O["NORMAL"]
    O --> P["WASH TIMER"]
    P --> Q["BLACK / WHITE"]
    Q --> R["BLUE"]
    S["BROWN"] --> T["BROWN"]
    U["BROWN"] --> V["BROWN"]
    W["BROWN"] --> X["BROWN"]
    Y["BROWN"] --> Z["BROWN"]
    AA["BLUE"] --> AB["BLUE"]
    AC["WHITE"] --> AD["BLACK"]
    AE["GREEN"] --> AF["YELLOW"]
    AG["SPIN MOTOR"] --> AH["M"]
    AI["BLUE"] --> AJ["BLUE"]
NOTE
C1: 10uF AC450V 50 Hz C2: 5uF AC450V 50 Hz
Specifications
POWER SOURCE: AC 230 V
FREQUENCY: 50Hz
POWER CONSUMPTION: WASH MOTOR - 280W
SPINDRYER MOTOR - 180W
PUMP - 30W
EXTERNAL DIMENSIONS: HEIGHT 991mm
WIDTH 819mm
DEPTH 482mm
NETT WEIGHT: 25 Kg
WATER CAPACITY: High 60 litres
Med. 54 litres
Low 48 litres
The Manufacturer strives for continuous improvements. The content of this book is therefore subject to change without notice.
Please read these instructions carefully before installing and operating the washing machine Record in the space below the listed information for future reference. The Serial number may be found on the back of the machine
SERIAL No....
DATE OF PURCHASE......
PURCHASED FROM......

- OWNER'S MANUAL TWINMAID 800 DTT166
- INDEX
- PAGE
- Get to know your Machine
- WASHING
- WASHING CONTINUED
- DRAINING
- 10
- IMPORTANT
- 12
- WARNING
- RINSING
- RINSING CONTINUED
- RINSING OPTION
- SPIN DRYING
- NEVER TOUCH THE ELECTRICAL PLUG OR SOCKET WITH WET HANDS
- MAINTENANCE
- Cleaning the drain filter
- HELP
- SERVICE CENTRES
- BLOEMFONTEIN
- CAPE TOWN
- DURBAN
- EAST LONDON
- JOHANNESBURG
- POLOKWANE
- PORT ELIZABETH
- PRETORIA
- ZAMBIA: SOUTHGATE INVESTMENTS LTD
- NAMIBIA: ATLANTIC DISTRIBUTORS (PTY) LTD
- ZIMBABWE: TRADECOMAFRICA
- BOTSWANA: RAY MORGAN AGENCIES
- SWAZILAND: LYNDS DISTRIBUTORS
- MOZAMBIQUE: COOL WORLD. LDA
- KEEP THIS CERTIFICATE AND SALES INVOICE AS PROOF OF PURCHASE FOR WARRANTY PURPOSES.
- Specifications
Brand : Defy
Model : DTT 166 TwinMaid
Category : Washing machine