
Laundromaid Electrologic 850 - Washing machine Defy - Free user manual and instructions
Find the device manual for free Laundromaid Electrologic 850 Defy in PDF.


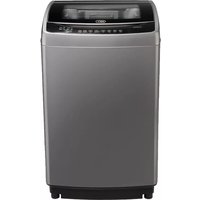
| Product type | Top-loading washing machine |
| Brand | Defy |
| Model | Laundromaid Electrologic 850 |
| Dimensions (H x W x D) | 850 mm x 600 mm x 600 mm |
| Weight | 50 kg |
| Power supply | 220-240 V, 50 Hz |
| Power consumption | 2000 W |
| Capacity | 7 kg |
| Spin speed | Up to 850 rpm |
| Controls | Electronic with LED display |
| Wash programs | Cotton, Synthetics, Delicates, Quick, Rinse & Spin, Soak |
| Water level | Adjustable automatic |
| Drum material | Stainless steel |
| Maintenance | Clean lint filter monthly; drain pump filter accessible |
| Safety features | Child lock, overflow protection, unbalanced load detection |
| Spare parts availability | Through Defy authorized service centers |
| Repairability | Standard tools required; user replaceable belts and filters |
Frequently Asked Questions - Laundromaid Electrologic 850 Defy
User questions about Laundromaid Electrologic 850 Defy
0 question about this device. Answer the ones you know or ask your own.
Ask a new question about this device
Download the instructions for your Washing machine in PDF format for free! Find your manual Laundromaid Electrologic 850 - Defy and take your electronic device back in hand. On this page are published all the documents necessary for the use of your device. Laundromaid Electrologic 850 by Defy.
USER MANUAL Laundromaid Electrologic 850 Defy
2 Features
2 Accessories
3 Safety Precautions
4 Installation
6 Electrical Installation
6 Loading the Machine
7 Functions of the Controls
8 Programme Selections
9 Time Delayed Start
9 Customising Programmes.
11 Operating Procedure
12 Maintenance
13 Technical Specification
14 Trouble Shooting
CONGRATULATIONS
You are now the proud owner of one of the finest and most modern washing machines that today's technology can produce. You and your machine are going to make a great team together. But first it will pay if you really get to know each other. This book will tell you all you need to know about your machine, what it will do and how to do it. Please read all the instructions carefully before operating the machine.
FEATURES

ACCESSORIES
BASE COVER
DRAIN HOSE
DRAIN HOSE CLAMP
WATER TAP ADAPTOR
INLET HOSE
INLET ADAPTOR




SAFETY PRECAUTIONS


Do not reach inside the tub while the machine is working. Wait until all motion stops.
Before washing, check all clothes for loose buttons and tears.
Check pockets for coins, pins or other small articles.
Close zips and fasteners.
Wash small articles inside a pillow slip.

Do not wash clothes soaked in petrol, thinners, vegetable oil or any other flammable liquids. Nor should any of these liquids be added to the wash water as they constitute a fire hazard.
Only use the machine for washing fabrics. Do not attempt to wash plastic leather or fibreglass. Sort and separate clothes by fabric, colour and degree of dirt.

Avoid spraying water on to the control panel and back of the machine.
Do not use detergents which are not specifically designed for top loading automatic washing machines.
Do not allow children to play with or crawl inside the machine.
Supervise them closely when the washer is in use.

natural_image
Illustration of a hand holding a wrench above a faucet with falling water (no text or symbols)Always unplug the machine from the wall socket when it requires cleaning or service. Only permit qualified persons to repair or install parts in the washer.
Do not use water which is hotter than 65 degrees Celsius as this may deform plastic parts of the machine.
INSTALLATION
UNPACKING
- Remove all packaging and dispose of it in a responsible manner.
- Open the wash-tub lid and remove all the accessories stored in the drum.
- Do not attempt to operate the machine while any of the packaging is still in place.
POSITIONING
- The machine should be installed in a well ventilated place, away from direct sunlight.
- Hot and cold water taps should be located within 1 metre of the inlet valves.
- Positioned the machine on a flat and stable uncarpeted floor capable of supporting the fully loaded washer.
- An adjustable levelling foot is located at the right front of the machine and may be turned in or out to achieve stability. An unstable machine will vibrate and generate excessive noise.
DRAIN HOSE
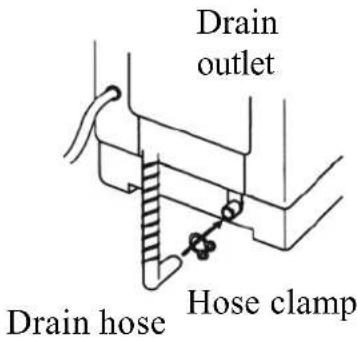
- Connect the drain hose to the drain outlet at the rear of the machine and secure it with the hose clamp supplied.
- Hook the outlet end of the drain hose over the lip of a sink or outlet pipe.
SINK OR LAUNDRY TUB DRAIN
- The top lip of the sink must be at least 860mm (A) above floor level and not higher than 1300mm.

natural_image
Line drawing of a square basin with a faucet and pipe, labeled A (no text or symbols on the diagram itself)PIPE DRAIN
- The minimum inside diameter of the pipe drain should be 30mm and the pipe should be able to drain 30 litres per minute.
- The top lip of the pipe should be at least 860mm (B) above floor level and not higher than 1300mm.

natural_image
Simple line drawing of a cabinet with a pipe and base, no text or symbols presentINSTALLATION - CONTINUED
INLET HOSES
- Connect the respective inlet hoses to the hot and cold water taps and to the machine's inlet fittings. (see sketches below). The hot water inlet is on the left and the cold water inlet on the right.
CONVENTIONAL TAPS
1
Pull down the collar of the inlet valve to separate it from the water tap adaptor.
2
Loosen the four screws in the water tap adaptor.
3
Fit the tap adaptor to the tap so that the rubber seal fits snugly. Then tighten the four screws evenly.

natural_image
Mechanical assembly diagram showing a component being lowered into a housing (no text or symbols present)4
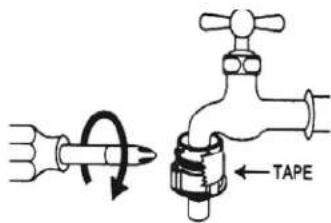
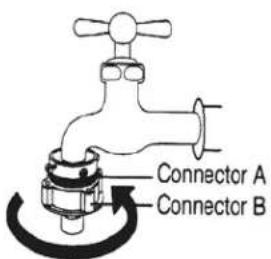
Remove the tape and screw (B) into (A).

natural_image
Diagram of a mechanical component with a rotating shaft and threaded end (no text or symbols)5
Connect the inlet hose to the water tap adaptor.
6
Attach the other end of the hose to the machine inlet by turning it clockwise until tight.

natural_image
Diagram of a faucet with a valve and handle, showing internal components and an upward arrow (no text or symbols)
natural_image
Diagram of a pipe connection with a black arrow indicating direction (no text or symbols)FOR THREADED TAPS

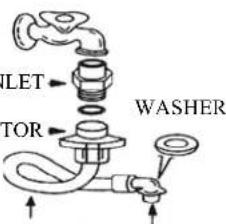
CONNECTOR
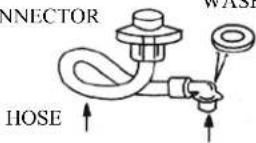
CONNECTOR INLET
CONNECTOR
HOSE

natural_image
Illustration of a girl washing dishes at a sink (no text or symbols)Open the water taps and check for any leaks. Tighten fittings if necessary.
ELECTRICAL INSTALLATION
- The washing machine is designed to operate on a 230 Volt, 50 Hz, 15 Amp, AC power supply.
- The machine should be connected to an earthed 3 pin wall socket.
- If the power-cord should ever need replacing, use only a genuine cord available from the nearest Defy Service Centre.
The appliance must be earthed and the manufacturer and seller do not accept responsibility for any damage due to incorrect electrical connection.
LOADING THE MACHINE
PREPARATION
- Close all zippers, snaps and hooks to prevent them from snagging other articles.
- Remove pins, and other hard items to prevent them from scratching the machine.
• Empty all pockets and turn them inside out. - Turn down cuffs and turn synthetic knits inside out.
- Tie strings and sashes so they will not tangle.
- Treat spots and stains before washing.
SORTING
- Mix large and small items in each load.
- Separate heavily soiled items from lightly soiled ones.
- Separate dark colours from light colours.
- Separate colourfast items from non-colourfast ones.
- Separate robust fabrics from delicate.
- Separate whites from colours.
LOADING
- Lift and fold the lid.
- Arrange the articles to be washed loosely round the perimeter of the tub.
- Load evenly as an off balance load may cause unnecessary vibrations.
- Use a large load programme when washing permanent press garments. These items need more space to move than heavy items such as jeans and towels.
- Do not overload the machine as this will result in poor cleaning, increased creasing and excessive lint formation.
FUNCTIONS OF THE CONTROLS


Press this pad to turn the power on or off.

Press this pad to select the water temperature. Repeated pressing will highlight COLD → COLD + HOT → HOT.

Press this pad to select the water level. Repeated pressing will highlight MEDIUM → HIGH → SMALL → LOW.

Press this pad to engage the time delay function.(2—48 hours) The wash will be completed at the end of the selected time.

Press this pad to select a partial wash cycle or any combination of: WASH, RINSE, SPIN.

Press this pad to change the WASH TIME, RISE TIME, or SPIN TIME. The pad is also used for selecting SPIN ONLY.

Press this pad to select the required wash cycle. FUZZY→BLANKET→ECONOMY→WOOL→SOAK.

Press this pad to commence operation. Pressing it a second time will cause the machine to pause, during which time any settings may be altered. Pressing it again will cause the machine to resume the wash cycle at the new settings.
NOTE:
Always refer to garment care labels for the manufacturer's recommendations.
PROGRAMME SELECTION
FUZZY LOGIC PROGRAMME
This machine has Fuzzy Logic sensors. These enable it to evaluate each load placed in the drum and to select and modify a wash programme to suit the load. Do not use the FUZZY programme for woollen or delicate garments.
To select Fuzzy, simply press the POWER On pad and then the START / HOLD pad.

HEAVY PROGRAMME
Use this programme for washing blankets, curtains and small rugs.

flowchart
graph LR
    A["Start"] --> B["Cycle"]
    B --> C["Select water level and temp."]
    C --> D["START/HOLD"]
ECONOMY PROGRAMME
This programme saves water and is ideal for washing lightly soiled clothes.

flowchart
graph LR
    A["Start"] --> B["Cycle"]
    B --> C["Select water level and temp."]
    C --> D["START/HOLD"]
WOOL PROGRAMME
Wash 1.5 kg maximum. Do not wash chamois or leather.

flowchart
graph LR
    A["Hand with circular icon"] --> B["Cycle"]
    B --> C["START HOLD"]
    style A fill:#f9f,stroke:#333
    style B fill:#ccf,stroke:#333
    style C fill:#cfc,stroke:#333
    note right of B: Select WOOL.
After the detergent has dissolved, a buzzer will sound. Put the clothes into the tub after the buzzer has sounded. Close the lid and push the start / hold pad.
SOAK PROGRAMME
Use this programme for blue jeans, overalls and heavy duty wear.

flowchart
graph LR
    A["Start"] --> B["Select SOAK."]
    B --> C["Select water level and temp."]
    C --> D["START HOLD"]
TIME DELAYED START
The wash cycle completion time may be delayed by 2 to 48 hours. This feature is particularly useful when you are at work and only want the machine to finish washing just before you arrive home.
To cancel the “time Delayed Start” press the power button. Wait five seconds before pressing the power button once more to resume.
EXAMPLE: To set a completion time 8 hours from the present, proceed as follows:

flowchart
graph LR
    A["MODE"] --> B["REMAIN"]
    B --> C["DELAY"]
    C --> D["REMAIN 8"]
    D --> E["START HOLD"]
    style A fill:#f9f,stroke:#333
    style B fill:#ccf,stroke:#333
    style C fill:#cfc,stroke:#333
    style D fill:#fcc,stroke:#333
    style E fill:#cff,stroke:#333
CUSTOMISING PROGRAMMES
 | Press the POWER ON pad.SELECTING THE WASH TIMEPress the Mode pad and the WASH light will illuminate.Repeatedly press the CONTROL pad to select 14, 18, 0, 6 or 10 minutes.If you do not want a wash cycle, select the time at 0 minutes.SELECTING THE NUMBER OF RINSESPress the Mode pad and the RINSE light will illuminate.Repeatedly press the CONTROL pad to select 2, 3, 4, 0, or 1 rinse.If you do not want a rinse cycle, select the time at 0 rinse.SELECTING THE SPIN TIMEPress the Mode pad and the SPIN light will illuminate.Repeatedly press the CONTROL pad to select 5, 7, 9, 0, 1 or 3 minutes.If you do not want a spin cycle, select the time at 0.Press the START / HOLD pad. |
CONVENIENT SPIN ONLY SELECTION
Press the POWER ON pad.
Press the CONTROL pad.
Press the START HOLD pad.

flowchart
graph LR
    A["1"] --> B["CONTROL\nSPIN ONLY"]
    B --> C["START/HOLD"]
BEFORE ANY OF THE WASH OPTIONS ARE SELECTED YOU MUST FIRST:
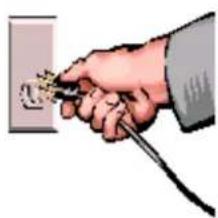
- Insert the power plug into an earthed wall socket and switch on.
- Open the hot and cold water taps.
- Load the washing into the machine. (see Loading)
- Add detergent and if necessary softener and bleach. (See Adding detergents)
- Close the lid.
• NOTE: DO NOT OPEN THE HOT WATER TAP BY ITSELF. - IT IS ESSENTIAL TO OPEN THE COLD WATER TAP FOR ALL PROGRAMMES. THE MACHINE RINSES IN COLD WATER EVEN WHEN USING A HOT WASH.
natural_image
Hand holding a power plug inserted into an electrical outlet (no text or symbols visible)


OPERATING PROCEDURE
LOADING DETERGENT
- Only use detergents specifically designed for top loading automatic washing machines.
• Gently pull the detergent drawer open. - Pour the detergent, the quantity of which is dependent on the wash load, into the detergent drawer and close the drawer.
ADDING BLEACH
- If desired, liquid chlorine bleach may be added to the bleach inlet as marked on the machine.
- Do not allow bleach to spill onto clothing in the tub as undiluted bleach will damage the fabrics.
- The machine will automatically dispense the bleach at the appropriate time during the wash cycle.

natural_image
Illustration showing a hand pouring liquid from a container into a beaker with floating objects (no text or symbols)ADDING SOFTENER
- If desired liquid fabric softener may be added to the softener dispense located on the rim of the tub.
- Pour an amount of softener, as recommended by the manufacturer, into the dispenser.
- Avoid spilling the softener on fabrics in the wash tub.

natural_image
Illustration of a hand pouring liquid into a mechanical component (no text or symbols)- The machine will automatically dispense the softener at the appropriate time during the final rinse.
STARTING THE MACHINE
- Close the lid.
- Press the POWER ON pad.
- Select the desired wash cycle (either fully automatic FUZZY or any of the pre-programmed washes BLANKET, ECONOMY, WOOL, SOAK or any customised programme).
- Press the START / HOLD pad.
- The machine will complete the selected programme.
MAINTENANCE
CLEANING THE EXTERIOR
- Wipe up any detergent, bleach and other spills as they occur with a soft damp cloth.
• Periodically clean the cabinet with a damp warm soapy cloth, rinse and dry.
CLEANING THE interior
- Clean the interior with 250ml of chlorine bleach mixed with 500ml of detergent.
- Run the washer through a complete cycle.
- Repeat the process if necessary.
CARE
- Do not put sharp metal objects in the washer.
- Check all pockets for pins, paper clips coins, bolts, screws and such.
- Do not lay these items on top of the washer after emptying the pockets.
HOLIDAY CARE
- If the washer will not be used for an extended period it is advisable to:
- Remove the electric plug from the wall socket.
• Turn off the water supply to the washer.
CLEANING THE LINT FILTER
1

natural_image
Illustration of a hand holding a small object with an arrow indicating upward motion (no text or symbols)2
3

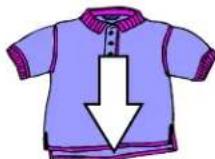
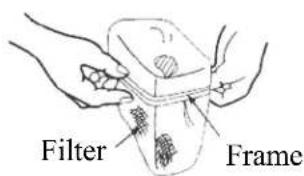
Pull the filter frame upwards. Turn the filter inside out and remove any lint and dirt under running water.
Re-shape the filter mesh and fit the filter frame back in it's slot.
CLEANING THE WATER INLET FILTER
• Periodically clean the water inlet filter.
- Remove the power plug from the wall socket.
- Turn off the water taps.
- Separate the inlet hose and remove the mesh filter.
• Clean the filter with an old toothbrush and re-fit.

natural_image
Illustration of a hand holding a tool above a toothbrush, with no visible text or symbols.MAINTENANCE CONTINUED
CLEANING THE DRAIN FILTER

natural_image
Simple line drawing of a kitchen sink with a circular vent and a bowl (no text or symbols)Place a shallow container under the drain-filter to collect any residual water spillage.

Turn the filter cap in an anticlockwise direction.
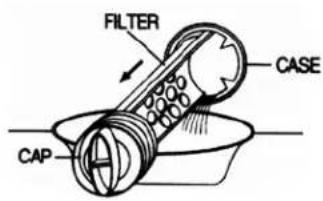
Pull the filter assembly out.

Clean the drain filter.

Re-fit the filter along the guides ensuring that the groove in the filter aligns with the guide rib.

Tighten the cap by turning it in a clockwise direction.
TECHNICAL SPECIFICATIONS
Dry weight capacity 8.5 kg.
Power source AC 220-240V / 50 Hz
Power consumption 430 W
Dimensions ( W x H x D ) in mm. 598 x 956 x 643
Unit weight 43kg
Standard water consumption 207 litres
Water level for High, Medium, Low, Small 88, 75, 61, 48 litres
Wash mode Double action type Air bubble + Pulsator.
TROUBLE SHOOTING
Most problems are easily solved if the cause is known.
BEFORE CALLING A SERVICE TECHNICIAN PLEASE CHECK THE FOLLOWING:
PROBLEM CHECK
The machine will not operate at all.
Is there a power failure?
Has the power pad been pressed?
Has the start / hold pad been pressed?
Is there water in the tub?
There is a restricted or no water supply.
If the water flow has not stopped after 20 minutes the fault code IE will be displayed and a buzzer will sound to indicate a problem.
See if the tap is open?
Are the water pipes frozen?
Has the water supply been cut off?
Is the inlet filter blocked?
The machine will not drain.
If draining is not completed in a specified time limit the fault code OE will be displayed and a buzzer will sound to indicate a problem.
Is the drain hose blocked or frozen?
Is the drain hose kinked or deformed?
Is the end of the drain hose immersed in water?
Is there excessive dirt in the drain filter?
The machine will not spin.
If the load is unbalanced the spin cycle will be interrupted and the machine will stop. The unbalanced condition may be corrected by re-filling the tub, rinsing and then draining. If the unbalanced condition remains, the fault code UE will be displayed and a buzzer will sound indicating a problem.
Is the wash load located all to one side?
Has the machine been installed on an uneven floor?
Is the lid open? The fault code LE will be displayed if this is the case.
The Manufacturer strives for continuous improvements. For this reason, the text and illustrations in this book are subject to change without notice.

- CONGRATULATIONS
- FEATURES
- ACCESSORIES
- SAFETY PRECAUTIONS
- INSTALLATION
- UNPACKING
- POSITIONING
- DRAIN HOSE
- SINK OR LAUNDRY TUB DRAIN
- PIPE DRAIN
- INSTALLATION - CONTINUED
- INLET HOSES
- CONVENTIONAL TAPS
- FOR THREADED TAPS
- ELECTRICAL INSTALLATION
- LOADING THE MACHINE
- PREPARATION
- SORTING
- LOADING
- FUNCTIONS OF THE CONTROLS
- NOTE:
- PROGRAMME SELECTION
- FUZZY LOGIC PROGRAMME
- HEAVY PROGRAMME
- ECONOMY PROGRAMME
- WOOL PROGRAMME
- SOAK PROGRAMME
- TIME DELAYED START
- CUSTOMISING PROGRAMMES
- CONVENIENT SPIN ONLY SELECTION
- BEFORE ANY OF THE WASH OPTIONS ARE SELECTED YOU MUST FIRST:
- OPERATING PROCEDURE
- LOADING DETERGENT
- ADDING BLEACH
- ADDING SOFTENER
- STARTING THE MACHINE
- MAINTENANCE
- CLEANING THE EXTERIOR
- CLEANING THE interior
- CARE
- HOLIDAY CARE
- CLEANING THE LINT FILTER
- CLEANING THE WATER INLET FILTER
- MAINTENANCE CONTINUED
- CLEANING THE DRAIN FILTER
- TECHNICAL SPECIFICATIONS
- TROUBLE SHOOTING
- BEFORE CALLING A SERVICE TECHNICIAN PLEASE CHECK THE FOLLOWING:
- PROBLEM CHECK
- There is a restricted or no water supply.
- The machine will not drain.
- The machine will not spin.
Brand : Defy
Model : Laundromaid Electrologic 850
Category : Washing machine