
OOR-009TT - Heating ORION - Free user manual and instructions
Find the device manual for free OOR-009TT ORION in PDF.


| Product Type | Electric Heater |
| Brand | Orion |
| Model | OOR-009TT |
| Power Source | 220-240V, 50Hz |
| Power Output | 1500W |
| Dimensions (HxWxD) | 40 x 30 x 20 cm |
| Weight | 2.0 kg |
| Heating Technology | Fan-forced ceramic |
| Temperature Control | Adjustable thermostat |
| Safety Features | Overheat protection, tip-over switch |
| Clean dust from grille with dry cloth | |
| Spare Parts Availability | Contact Orion customer service |
| Reparability | Repair by qualified technician recommended |
| Certifications | CE, RoHS |
Frequently Asked Questions - OOR-009TT ORION
User questions about OOR-009TT ORION
0 question about this device. Answer the ones you know or ask your own.
Ask a new question about this device
Download the instructions for your Heating in PDF format for free! Find your manual OOR-009TT - ORION and take your electronic device back in hand. On this page are published all the documents necessary for the use of your device. OOR-009TT by ORION.
USER MANUAL OOR-009TT ORION
natural_image
Exterior view of a silver portable solar water heater with cooling fans and control knobs (no text or symbols visible)Dear customers! Thank you for purchasing ORION products. Before operation, please read this instruction manual. Save it for future reference.
IMPORTANT SAFETY INSTRUCTIONS
-
This appliance is not intended for use by persons (including children) with reduced physical, sensory or mental capabilities, or lack of experience and knowledge, unless they have been given supervision or instruction concerning use of the appliance by a person responsible for their safety.
-
Children should be supervised to ensure that they do not play with the appliance.
-
Connect the appliance to single phase AC supply of the voltage specified on the rating plate.
-
In order to avoid overheating, do not cover the heater.
-
Never leave the heater unattended while it is in use. Always turn the product to the OFF position and unplug it from the electrical outlet when not in use.
-
Extreme caution is necessary when any heater is used by or near children, invalids or elderly persons and whenever the heater is left operating and unattended.
-
The heater must not be located immediately below an electrical socket-outlet.
-
Do not run cord under carpeting and do not cover cord with throw rugs, runners or the like. Arrange the cord away from traffic area and where it will not be tripped over.
-
Do not operate the heater with a damaged cord or plug, or after the heater malfunctions, has been dropped, or damaged in any manner.
-
If the supply cord is damaged, it must be replaced by the manufacturer or its service agent or a similarly qualified person to avoid a hazard.
-
Avoid the use of an extension cord which may overheat and cause a risk of fire.
-
Use the heater in a well-ventilated area. Do not insert or allow objects to enter any ventilation or exhaust opening.
-
To prevent a possible fire, do not block air intakes or exhaust openings in any manner.
-
Do not use on soft surfaces, like on a bed, where openings may become blocked. Use the heater on flat, dry surfaces only.
-
Do not place this heater near flammable materials, surfaces or substances, as there may be a risk of fire.
-
Keep the above flammable materials, surfaces or substances at least 1m from the front of the product and keep them away from the sides and the rear.
-
Do not use the heater in any areas where petrol, paint or other flammable liquids are stored e.g. garages or workshops as hot, arcing or sparking parts inside the heater.
-
Don't use this heater in the immediate surroundings of a bath, a shower or a swimming pool. Never locate the heater where it may fall into bathtub or other water containers.
-
This heater is hot when in use. To avoid burns and personal injury, do not let bare skin touch hot surfaces. If provided, use handles when moving the product.
-
Be sure that no other appliances are in use on the same electrical circuit as your product is as an overload can occur.
-
This heater is filled with precise quantity of special oil.
-
Repair requiring opening of the oil container is only to be made by the manufacturer or his service agents who should be contacted if there is an oil leakage.
-
Regulations concerning the disposal of oil when scrapping the appliance have to be followed.
-
The heater should not be used in a room, of which the floor area is less than 5 M ^2 .
-
The cord shouldn't be placed nearby hot surfaces of the appliance.
-
Save this instruction manual for future reference.
http://www.oricon.eu
ORION
CHARACTERISTICS
- Oil filled radiator ORION OOR-009TT
- 9 sections
- 24H timer
- "Turbo" mode: 400W
- Three heating modes: 800W/1200W/2000W
- Adjustable thermostat
- Overheat protection
- Power indicator light
- Built-in handle
- Cord storage
- Cord length: 1,45m
- Nominal voltage/frequency: AC230V\~50Hz
- Nominal power: 2400W
- Nominal current: 10A
– Electrick shock protection class: I - Himidity protection degree: IP20
- Product size (with wheels): 40.5x24x62.5cm
- Product size (without wheels): 40.5x15x58cm
- Net/gross weight: 8,5kg/9,4kg
- Body color: black
- Mount: stand mounted
Note: subject to change without notice
DETAILS
- Thermostat knob
- Power switch
- Timer
- Fan switch


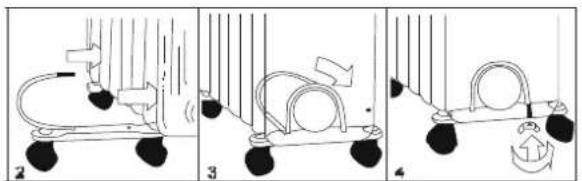
- Place the radiator body upside-down on a scratch-free location, make sure it is stable and will not fall.
- Screw off the wing nuts from the U-shaped bolt provided, attach the U-shaped bolt to the U-facing flange between first and second fins (near the front cover).
- To attach the castor mounting plate to the radiator body, you should insert the threaded ends of the U bolt in the holes on the castor mounting plate.
- Screw the wing nuts back to the U bolt and fasten the wing nut properly.
- Screw off spherical nut from the castor, align the shaft to the hole of the castor mounting plate, insert in, and screw on the spherical nut.
- Repeat 2, 3, 4 and 5 on the rear of radiator for mounting of the rear castors.
Note: do not over tighten, which may cause the damage of radiator flange. Note: the rear castors must be mounted between the end two fins.
INSTRUCTIONS FOR USE
- Before using the heater, make sure that it is on a flat and stable surface, damage may occur if it is placed on an incline or decline.
- Set all the controls to OFF position and insert the plug into a socket-outlet with well grounded. Be sure that plug fits firmly.
- Rotate the thermostat knob clockwise to MAX position and switch the heater on as follow: the switch I for low heat, the switch II for medium heat and both switches on for high heat
- When your room reaches the desired temperature, now slowly rotate the thermostat knob counter clockwise until the pilot light goes out. The thermostat can now be left at this setting. As soon as the room temperature has dropped below the set temperature, the unit will switch it self on automatically until the set temperature has been reached again. In this way the room temperature remains constant with the most economical use of electricity.
- If you want to change the room temperature setting, rotate the thermostat knob clockwise to raise the temperature, or counter clockwise to lower it.
- This heater includes an overheat protection system that shuts off the heater when parts of the heater are getting excessively hot.
- To completely shut the heater off, turn all the controls to OFF, and remove plug from the socket-outlet.
USE OF TIMER
-
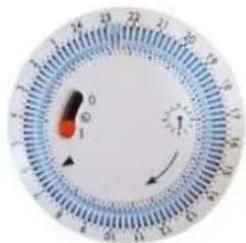
Regulate the time of timer according to the clock by turn it Clockwise(DO NOTRURN IT COUNTER CLOCKWISE)
-
The timer has a small swich, the function is as follow: != Unit is always On; = Timer function is ON
-
Set the timer to position. There are 96 small plastic pins on the timer, each correspond to 15 minutes interval. Push ourward the pins corresponding to the time you want the heater to turn ON and push inward the pins corresponding to the time you want the heater to turn OFF.
natural_image
Circular device dial with needle, pointer, and scale markings (no readable text or symbols)CAUTION:
A. Do not use the timer function unattended.
B. The heater will not operate if timer is set to the ⏻ position and the pins are not activated according to the times required.
C. If the heater looses its electricity supply, e.g. Switched off at the mains socket or in the even of a power failure, the time should be reset after the power on again.
D. The pilot light will be on when the timer is set to ON position or the timing function is activated.
USE OF FAN HEATER
If you want to fasten the speed of heating efficiency when you turn on the unit power, you can just push the fan heater switch "ON", the room temperature will be raised in high speed. Push the fan heater switch "OFF", the fan heater power will be off immediately.
MAINTENANCE
- Always remove the plug from the socket-outlet and allow the radiator to cool down before clean it.
- Wipe radiator with a soft damp (not wet) cloth.
- To store away the heater, wind the cable round bobbin and store the heater in a clean dry place.
- In case of malfunction or doubt, do not try to repair the radiator yourself, it may result in a fire hazard or electric shock.
WARNING:
Do not immerse the heater in water.
Do not use any cleaning chemicals such as detergents and abrasives.
Do not allow the interior to get wet as this could create a hazard.
PACKAGE CONTENTS
- Oil filled radiator 1pc.
- Wheels 4 pcs.
- Mount set for wheels
- Instruction manual
- Warranty card
Note: DOES NOT CONTAIN HAZARDOUS SUBSTANCES
Subject to change without notice
Extra information you can find on ORION company web-site www.orion.ua
If you have any questions or suggestions, contact us by E-mail support@orion.ua
Manufacturer: Orion China Ltd., 1733 Lianhua St., apt. 506-509, Shanghai, People's Republic of China, 201103
Made to order: Orion Electronics Ltd. (Hungary)



Brand : ORION
Model : OOR-009TT
Category : Heating