
PA286A - Computer accessory HP - Free user manual and instructions
Find the device manual for free PA286A HP in PDF.


| Product Type | USB-C Docking Station |
| Brand | HP |
| Model | PA286A |
| Dimensions (W x D x H) | 10.5 x 10.5 x 3.2 cm |
| Weight | Approx. 200 g |
| Power Supply | External AC adapter, 90 W, 100-240 V |
| Host Connection | USB-C (upstream) |
| Video Ports | 1x HDMI, 1x VGA |
| USB Ports | 3x USB 3.0 Type-A, 1x USB-C (data) |
| Ethernet | 1x Gigabit RJ-45 |
| Audio | 1x 3.5 mm headset combo jack |
| Compatible Operating Systems | Windows 10, Windows 11, macOS 10.15+ |
| Maximum Resolution | 4K @ 30 Hz (HDMI) |
| Supported USB Power Delivery | Up to 65 W to host laptop |
| LED Indicators | Power, Ethernet, USB connection |
| Housing Material | Plastic with metal accents |
| Operating Temperature | 0°C to 40°C |
| Storage Temperature | -20°C to 60°C |
| Cleaning Instructions | Wipe with a dry, lint-free cloth |
| Safety Precautions | Do not expose to liquids; use in well-ventilated area |
| Spare Parts Available | Power adapter, USB-C cable |
| Warranty | 1 year limited |
| Package Contents | Docking station, power adapter, USB-C cable, quick start guide |
Frequently Asked Questions - PA286A HP
User questions about PA286A HP
0 question about this device. Answer the ones you know or ask your own.
Ask a new question about this device
Download the instructions for your Computer accessory in PDF format for free! Find your manual PA286A - HP and take your electronic device back in hand. On this page are published all the documents necessary for the use of your device. PA286A by HP.
USER MANUAL PA286A HP
This guide provides information on installing and operating the HP Docking Station and on using it with your computer, as well as tips on solving common problems.
© Copyright 2004, 2005 Hewlett-Packard Development Company, L.P.
Microsoft is a U.S. registered trademark of Microsoft Corporation.
The information contained herein is subject to change without notice. The only warranties for HP products and services are set forth in the express warranty statements accompanying such products and services. Nothing herein should be construed as constituting an additional warranty. HP shall not be liable for technical or editorial errors or omissions contained herein.
Reference Guide
HP Docking Station
Second Edition January 2005
First Edition September 2004
Document Part Number: 367055-002
Contents
1 Getting Started
Identifying Top Components 1-1
Identifying Left-Side Components.... 1-3
Identifying Right-Side Components 1-4
Identifying Rear Components 1-5
Getting More Information 1–7
2 Docking and Undocking
Connecting to AC Power 2-1
Docking the Computer 2-3
Undocking the Computer 2-5
3 Using the Docking Station
Turning the Computer On and Off. 3-1
Installing the HP/Kensington Cable Lock .... 3–2
A Troubleshooting
Solving Common Problems ..... A-2
Getting Started
Identifying Top Components
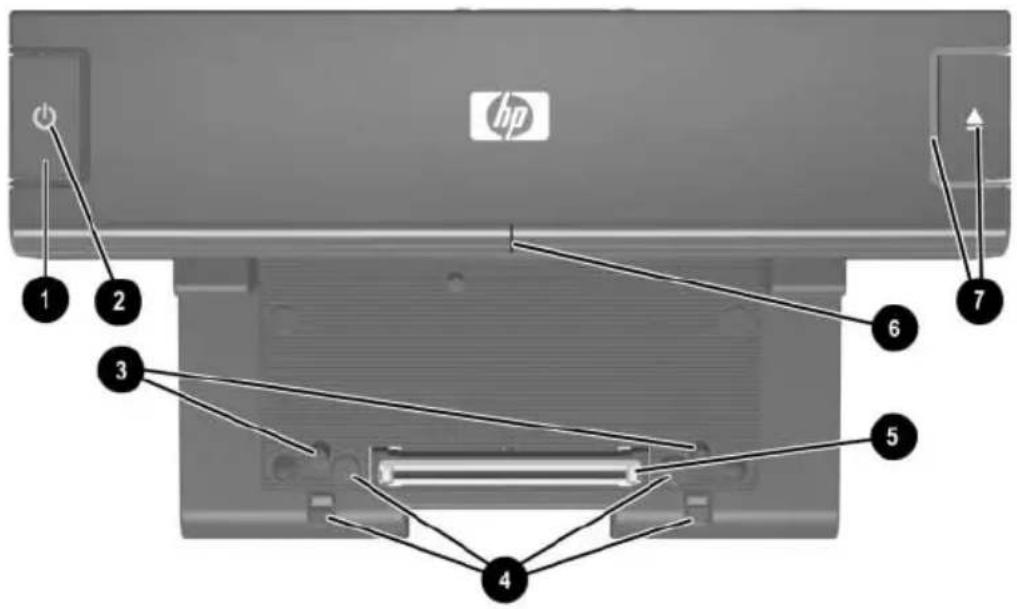
Component Description
① Power button Turns on power to the computer.
② Power light Indicates the state of the computer and is turned on when the computer is turned on.
③ Docking posts (2) Align and secure the computer for proper connection to the HP Docking Station.
(Continued)
| Component Description | ||
| 4 | Computer eject mechanisms (4) | Disconnect the computer from the docking station when you press the eject button. |
| 5 | Docking connector Connects the computer to the docking station. | |
| 6 | Visual alignment indicator Helps you correctly align the computer when connecting it to the docking station. | |
| 7 | Computer eject button and docking light | Ejects the computer from the docking station. Docking light is turned on when the computer is properly aligned.Refer to Chapter 2, “Docking and Undoing,” for details. |
Identifying Left-Side Components
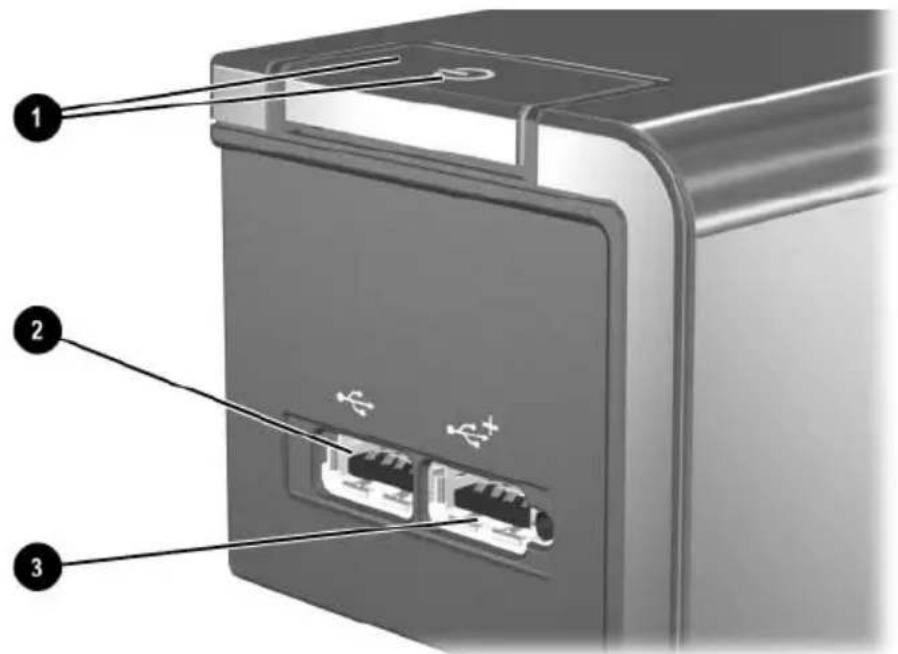
| Component Description | ||
| 1 | Power button and power light | Turns on power to the computer. The light indicates the state of the computer, and is turned on when the computer is turned on. |
| 2 | USB 2.0 port Allows you to connect USB devices. | |
| 3 | Powered USB 2.0 port Allows you to connect select USB devices, such as the HP External MultiBay II. | |
Identifying Right-Side Components
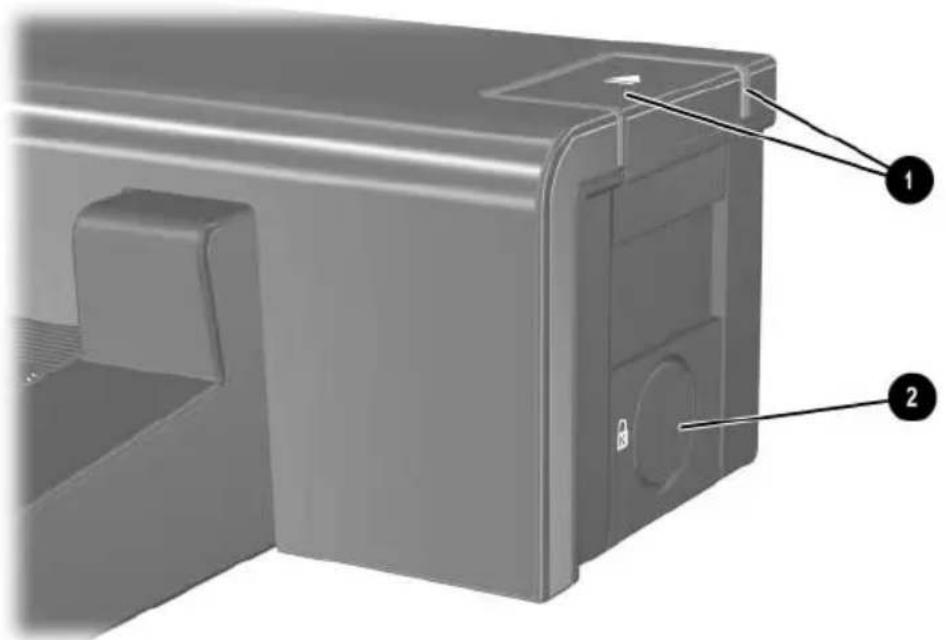
| Component Description | |
| 1 Computer eject button and docking light | Ejects the computer from the docking station. Docking light is turned on when the computer is properly aligned.[IMAGE] Refer to Chapter 2, “Docking and Undocking,” for details. |
| 2 Integrated cable lock slot Supports the HP/Kensington Cable Lock, which secures the docking station and a connected computer. | |
Identifying Rear Components
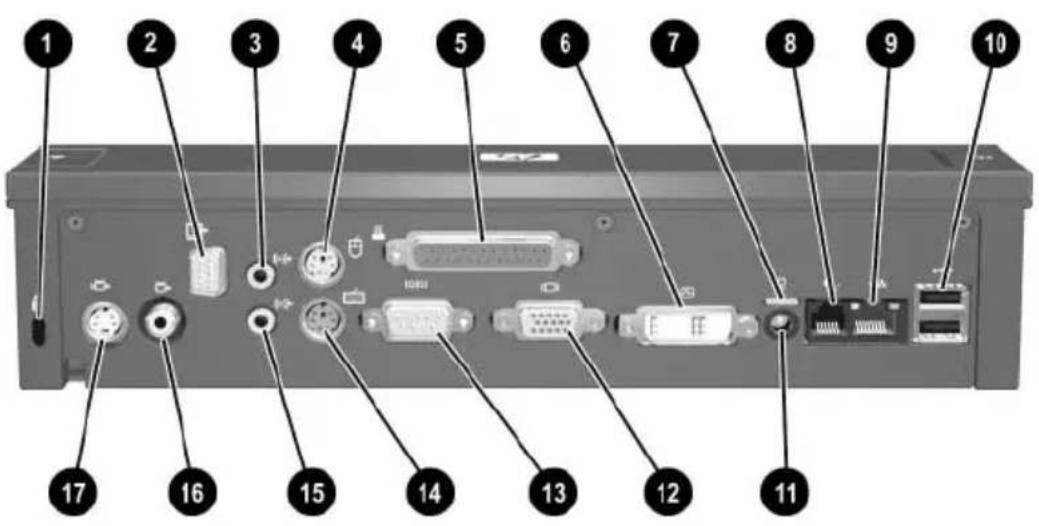
| Component Description | |
| 1 | Security cable slot Connects an optional security cable lock. |
| 2 | Monitor stand port Connects an optional HP Monitor Stand to the docking station. |
| 3 | Audio-out (headphone) jack Connects an audio output device such as headphones or speakers. |
| 4 | Mouse connector Connects a PS/2 mouse. |
| 5 | Parallel port Connects a parallel device such as a printer. |
| 6 | Digital video (DVI) port Connects a DVI device such as a flat panel monitor. |
| 7 | Power light Is turned on when the docking station is connected to AC power. |
(Continued)
| Component Description | |
| 8 | RJ-11 (modem) jack Connects a telephone cable. |
| 9 | RJ-45 (network) jack Connects a network cable. |
| 10 | USB 2.0 ports (2) Connect USB devices. |
| 11 | Power connector Connects the docking station to the AC adapter. |
| 12 | External monitor port Connects a VGA monitor. |
| 13 | Serial port Connects a serial device such as a mouse. |
| 14 | Keyboard connector Connects a PS/2 keyboard. |
| 15 | Audio-in (microphone) jack Connects home audio equipment such as CD and MP3 players. |
| 16 | Composite video port Connects a composite video device such as a TV. |
| 17 | S-Video jack Connects an S-Video device such as a TV, VCR, or camcorder. |
Getting More Information

WARNING: To reduce the risk of serious injury, read the Safety and Comfort Guide. It describes proper workstation setup, and proper posture, health, and work habits for notebook users. The Safety and Comfort Guide also provides important electrical and mechanical safety information. This guide is available on the Web at http://www.hp.com/ergo, on the notebook hard drive, and through the Help and Support Center at Start > Help and Support.
■ The Notebook Documentation CD, included with the computer, contains comprehensive information about your computer, as well as governmental agency and safety information about the use of your computer.
■ The Accessory Documentation CD, included with the docking station, contains governmental agency and safety information about the use of this device.
■ The HP Web site http://www.hp.com provides product news and software updates.
Docking and Undocking
Connecting to AC Power
Connect the docking station to AC power at all times.

WARNING: To reduce the risk of electric shock or damage to your equipment:
Plug the power cord into an AC outlet that is easily accessible at all times.
■Disconnect the power from the product by unplugging the power cord from the AC outlet.
If provided with a 3-pin attachment plug on your power cord, plug the cord into a grounded (earthed) 3-pin outlet. Do not disable the power cord grounding pin; for example, by attaching a 2-pin adapter. The grounding pin is an important safety feature.
■Do not place anything on power cords or cables. Arrange them so that no one can accidentally step on or trip over them.
- Do not pull on a cord or cable. When unplugging a cord from the AC outlet, grasp the cord by the plug.

WARNING: To reduce the risk of electric shock, fire, or damage to the equipment, do not attempt to operate the computer and docking station with a voltage converter kit sold for appliances. Use only the power cord included with the docking station.
- Insert the AC adapter ① into the power connector on the docking station.
- Insert one end of the power cord ② into the AC adapter.
- Insert the other end of the power cord ③ into an AC outlet.

The docking station requires AC power for full functionality of all ports.
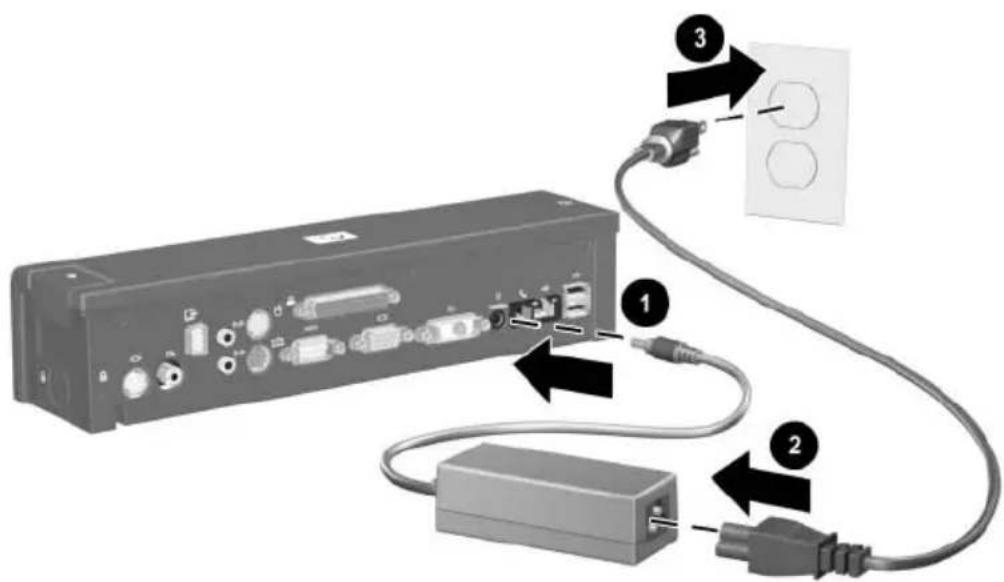

The light above the power connector is turned on when the docking station is connected to AC power.
Docking the Computer
-
Close the computer. If you close the computer when the power is on, the computer may enter standby mode. To resume operation after docking, open the computer, and then press the power button.
-
Angle the front of the computer downward.
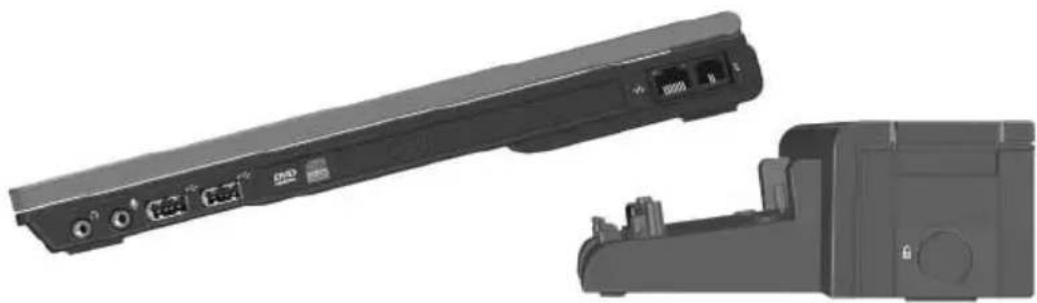
natural_image
Exterior and interior views of a device chassis showing front panel, rear panel, and internal components (no text or symbols visible)- Line up the visual alignment indicator on the computer with the indicator on the docking station.
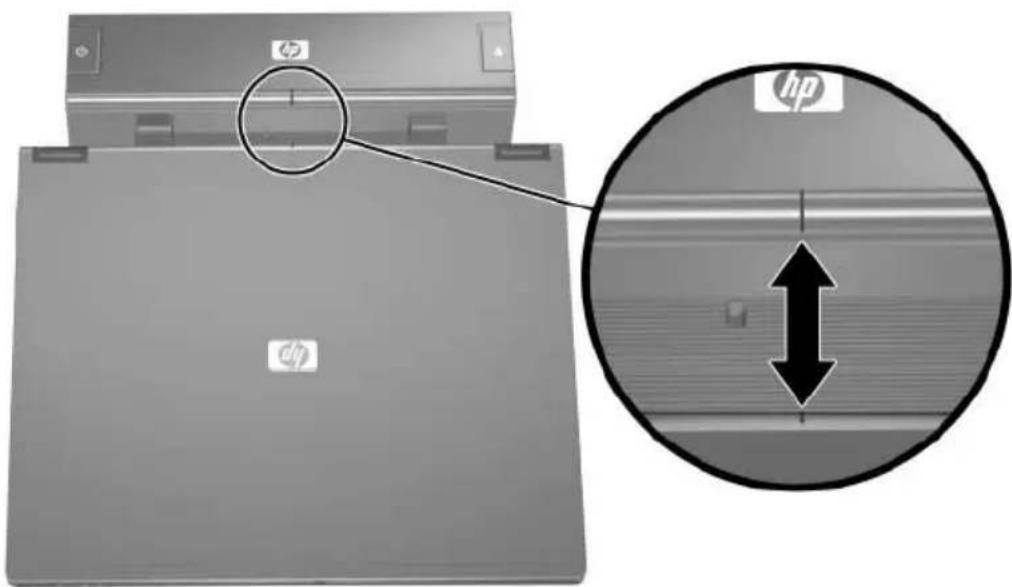
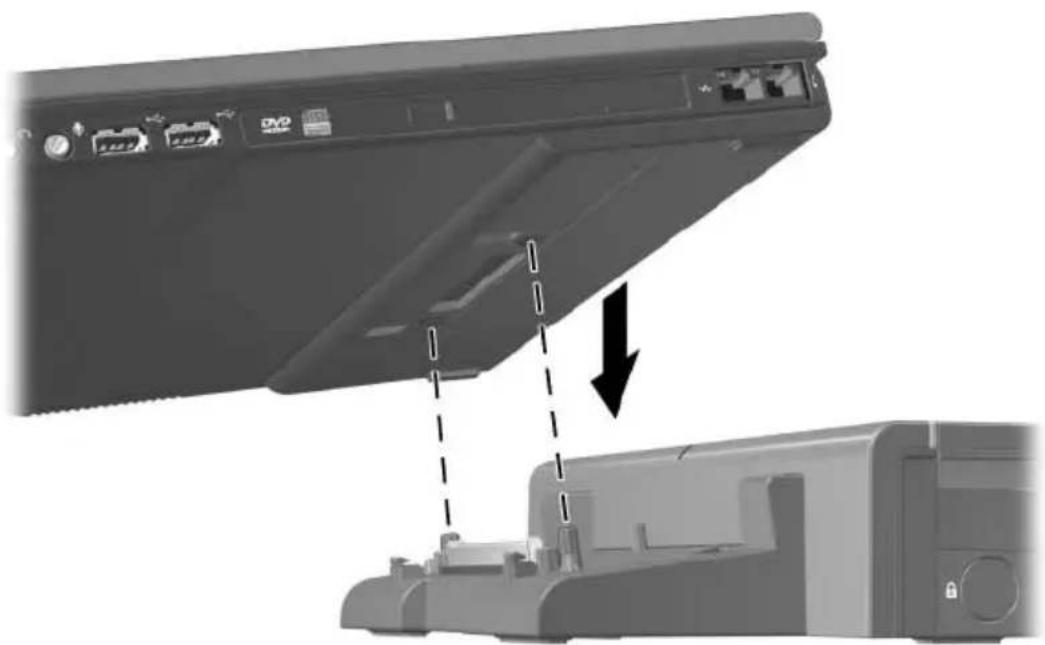
- Align the posts on the docking station with the receptors on the bottom of the computer, and then gently press the computer down onto the docking station until you hear a click. When the computer is properly aligned, the docking station docking light is turned on.

Make sure the computer is properly aligned and seated, and fully docked. For help with most common docking problems, refer to Appendix A, “Troubleshooting.”
natural_image
Diagram of a computer monitor rear panel showing internal components and a close-up of the base case with a dashed arrow indicating assembly or disassembly (no text or symbols present)
The docking light will not be turned on when you dock the computer unless the AC adapter is connected to the docking station.
Undocking the Computer
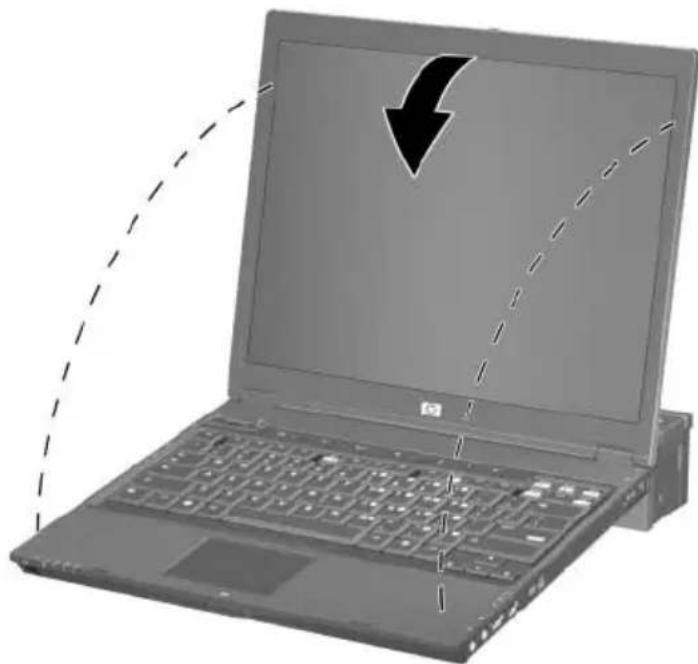
- Close the computer. If you close the computer when the power is on, the computer may enter standby mode. To resume operation after undocking, open the computer, and then press the power button.
natural_image
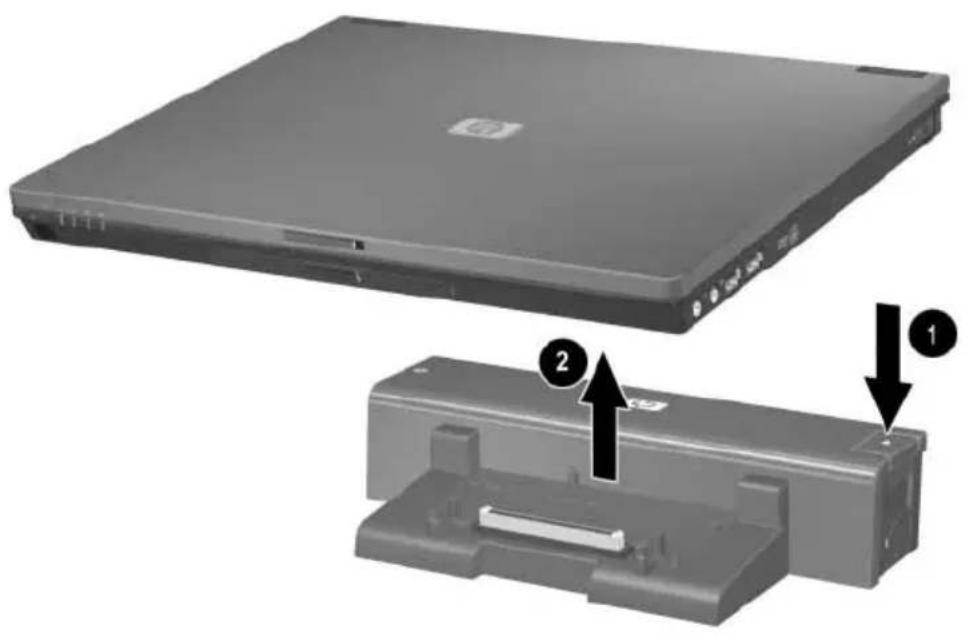
Illustration of a laptop with a downward arrow pointing to its screen, connected by dashed lines (no text or symbols)- Press the eject button ①. The computer disconnects from the docking station.
- Lift up the computer ②.
natural_image
Two views of a laptop computer case showing front and side views with numbered annotations (1 and 2), no visible text or symbols on the device itself.Using the Docking Station
Turning the Computer On and Off
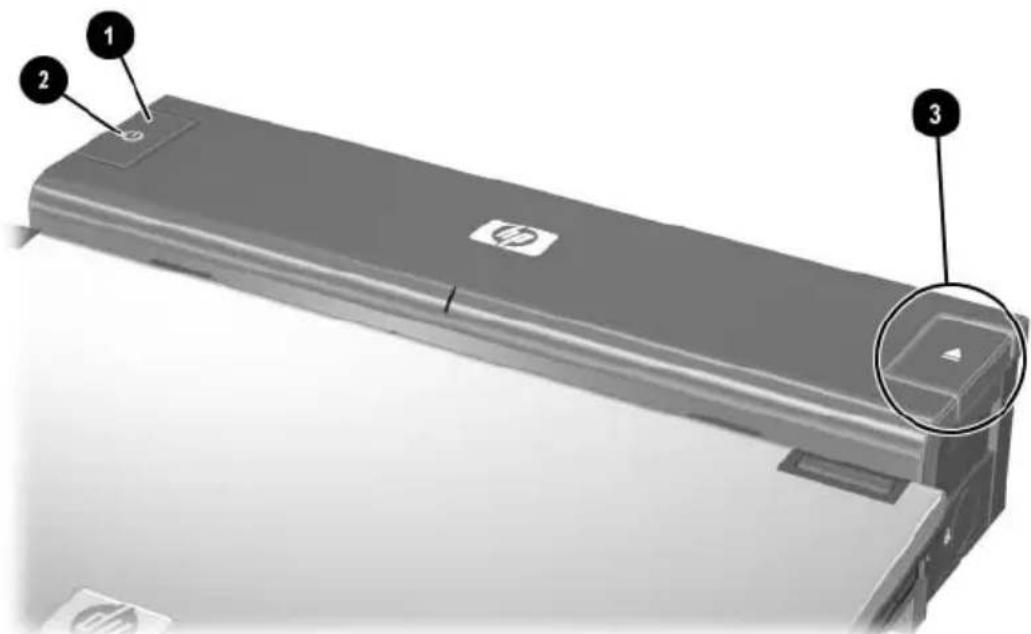
When you connect a computer to the docking station, you can turn the computer on and off using either the computer power button or the docking station power button ①. When you turn on the system, the power button light is turned on ②. When you properly align the computer to the docking station, the docking light ③ is turned on.

The docking light will not be turned on when you dock the computer unless the AC adapter is connected to the docking station. For help with most common docking problems, refer to Appendix A, “Troubleshooting.”
Installing the HP/Kensington Cable Lock

Security solutions are designed to act as deterrents. These deterrents may not prevent a product from being mishandled or stolen.
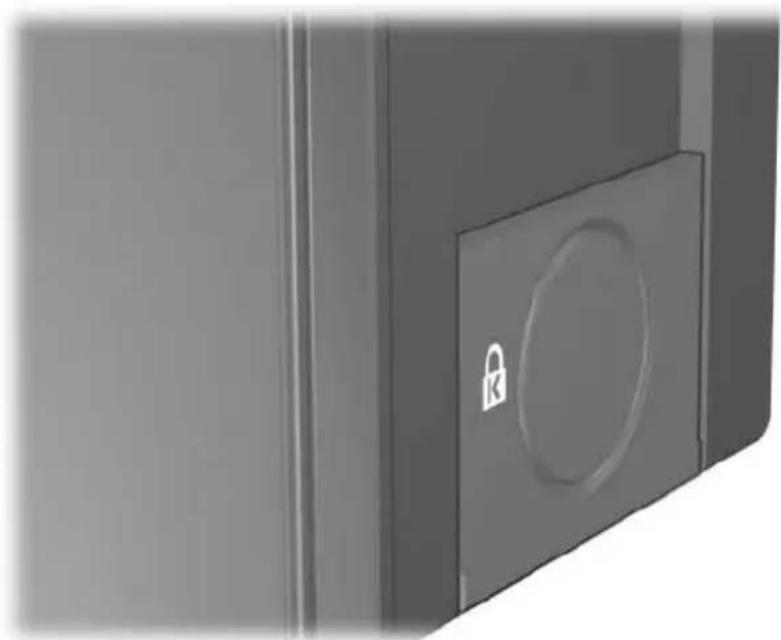
The HP/Kensington Cable Lock (purchased separately) allows you to secure the docking station and a docked computer. Install the cable lock into the integrated cable lock slot on the right side of the docking station, as shown in the following illustrations.
natural_image
Close-up of a black door with a circular lock icon on the front panel (no text or symbols visible)To install the cable lock:
- Loop the cable around a stationary object.
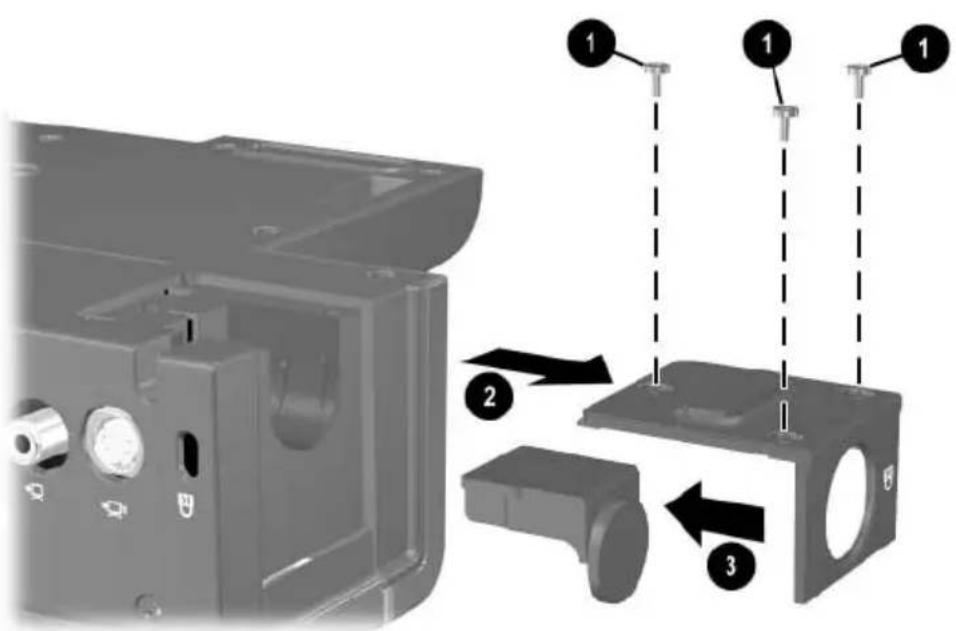
- Turn the docking station upside down, and then remove the screws from the cable lock bezel ①.
- Remove the bezel from the docking station ②, and then remove the bezel blank from the cable lock bezel ③.
-
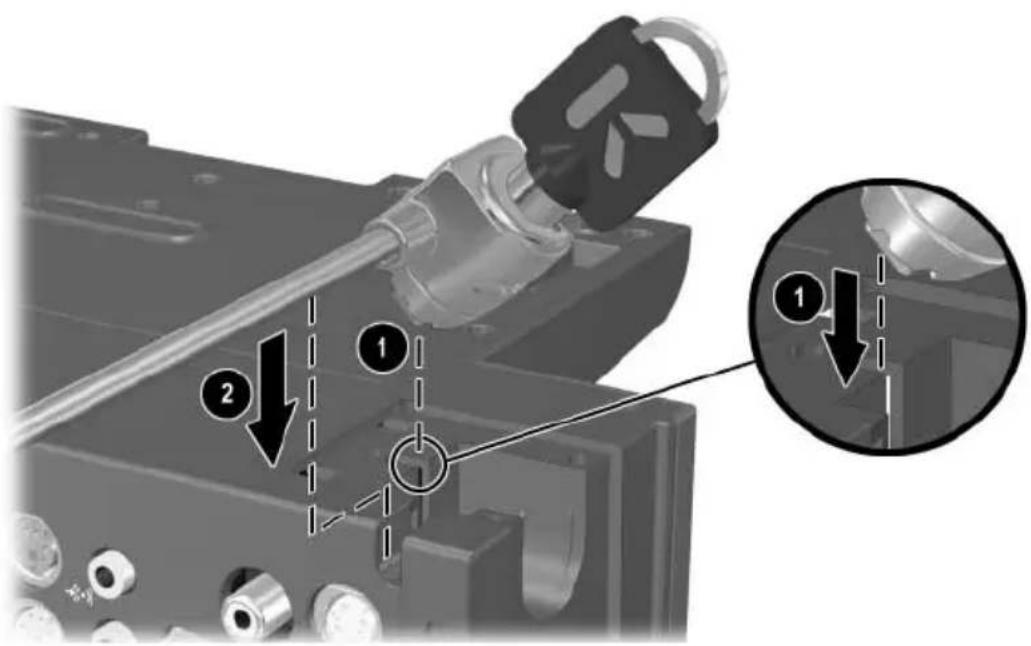
With the lock and key in the unlocked position and with the T-bar on the back of the lock in the vertical position, insert the lock into the center groove in the cable lock slot in the docking station ①.
-
Insert the cable into the recessed cable channel in the base of the docking station ②.
-
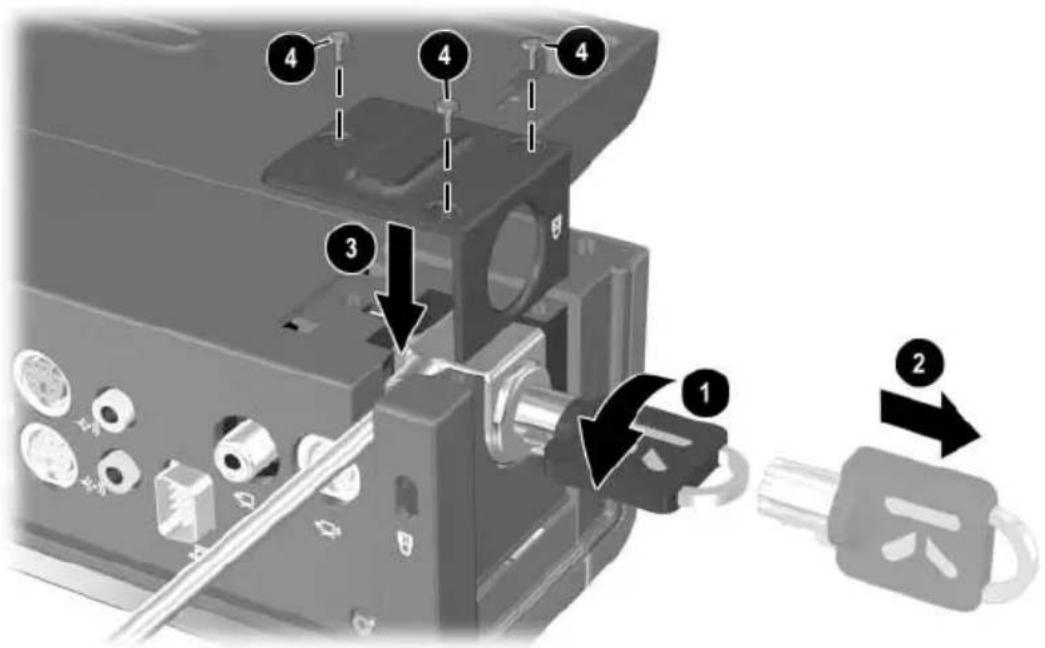
Turn the key counterclockwise to lock ①.
-
Remove the key from the lock ②.
-
Reinsert the cable lock bezel onto the docking station ③.
-
Replace the screws to secure the bezel ④.
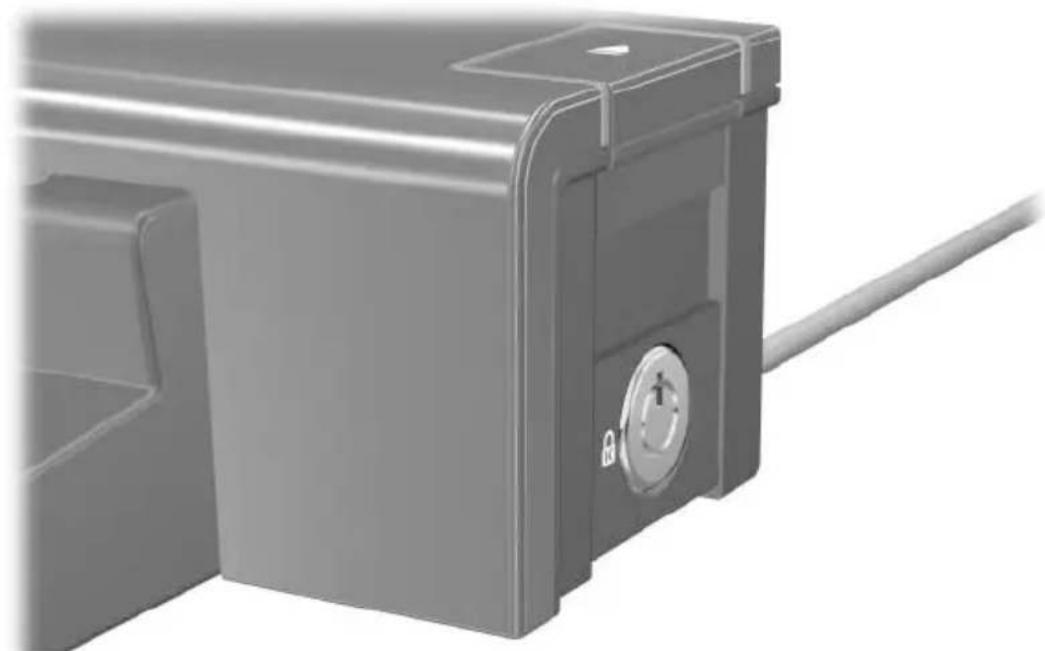
The following illustration shows a docking station with the HP/Kensington Cable Lock installed.
natural_image
Close-up of a metallic mechanical component with a circular dial and a diagonal line extending from it (no visible text or symbols)Troubleshooting
This section provides three methods for resolving issues you may encounter when using your docking station. Use the methods in the following order:
■ Refer to the “Solving Common Problems” section.
■Access the Help and Support Center on your computer by selecting Start > Help and Support. In addition to providing information about your operating system, the Help and Support Center provides a searchable database of help topics, updated regularly by HP and Microsoft. Type in the name of your accessory—for example, docking station—to search for relevant topics in the HP Knowledge Base and Microsoft® Knowledge Base. Also, see the Help and Support Guide and Troubleshooting guide included with your computer.
■ Visit the HP Web site at http://www.hp.com. Then select your country or region.
Solving Common Problems
Docking Problems
| Problem Possible Cause Solution | ||
| The computer is not properly connected to the docking station. | The computer may be properly aligned, but is not fully seated or docked in the docking station. | Lift the computer away from the docking station. Then realign the computer visual alignment indicator with the indicator on the docking station, and reconnect the computer. Ensure that the computer is properly aligned and seated, and fully docked by gently pressing down on the computer until you hear a click. If accessories are attached, they should now work properly. |
| The computer is turned on and properly docked, but the power light and docking light are not on. | Power cord is not plugged into either the docking station or the AC outlet. | Properly plug in power cord. |
| Some of the ports or connectors do not work, even though the docking light is turned on. | The computer may be properly aligned, but is not fully seated or docked in the docking station. | Lift the computer away from the docking station. Then realign the computer visual alignment indicator with the indicator on the docking station, and reconnect the computer. Ensure that the computer is properly aligned and seated, and fully docked by gently pressing down on the computer until you hear a click. If accessories are attached, they should now work properly. |
Undocking Problems
| Problem Possible Cause Solution | ||
| The computer will not disconnect from the docking station. | The connectors are jammed. | Press the eject button all the way in. If the computer does not disconnect, repeat this procedure to disconnect the computer. |
| Applying excessive force may damage connector pins. | ||
| The HP/Kensington Cable Lock is in the locked position. | Unlock the lock and then disconnect the computer. | |
External Device Problems
| Problem Possible Cause Solution | ||
| A new device is not recognized as part of the system. | The computer may be properly aligned, but is not fully seated or docked in the docking station. | Lift the computer away from the docking station. Then realign the computer visual alignment indicator with the indicator on the docking station, and reconnect the computer. Ensure that the computer is properly aligned and seated, and fully docked by gently pressing down on the computer until you hear a click. If accessories are attached, they should now be recognized by the system. |
| The device cable or power cord is loose. | ■Ensure that all cables are securely connected to the device and the docking station.■Ensure that all power cords are securely connected to the device or docking station and to an AC outlet. | |
| The device was connected while the system was on. | Turn off the computer, turn on the device (if applicable), and then restart the computer. | |
| Cabling is incorrect. Ensure that the device cable is in the correct connector on the docking station. | ||
| You may need to install device drivers on the computer. | Install drivers according to the device manufacturer's instructions. | |
- Contents
- Getting Started
- Docking and Undocking
- Using the Docking Station
- A Troubleshooting
- Getting Started
- Identifying Top Components
- Component Description
- Identifying Left-Side Components
- Identifying Right-Side Components
- Identifying Rear Components
- Getting More Information
- Docking and Undocking
- Connecting to AC Power
- Docking the Computer
- Undocking the Computer
- Using the Docking Station
- Turning the Computer On and Off
- Installing the HP/Kensington Cable Lock
- Troubleshooting
- Solving Common Problems
Brand : HP
Model : PA286A
Category : Computer accessory