
Spark - Electric scooter RAZOR - Free user manual and instructions
Find the device manual for free Spark RAZOR in PDF.


| Product Type | Electric Scooter (Kick scooter with spark feature) |
| Brand | Razor |
| Model | Spark |
| Recommended Age | 8 years and older |
| Maximum Rider Weight | 143 lb (65 kg) |
| Power Source | Manual (foot-powered); Spark 2.0 includes LED lights powered by 2 x CR2032 lithium batteries |
| Main Feature | Spark Bar creates sparks when pressed against hard surfaces; folding frame; adjustable handlebar height |
| Brake Type | Rear fender brake (foot-operated) |
| Wheel Type | Urethane wheels; some models have lighted wheels |
| Deck Material | Aluminum (typical) |
| Folding Mechanism | Yes, with joint release lever |
| Handlebar Adjustment | Yes, telescoping T-bar with quick-release lever and push button |
| Spark Cartridge | Replaceable; creates sparks when in contact with pavement |
| Battery Type (Lights) | 2 x CR2032 lithium batteries (Spark 2.0 only) |
| LED Lights | Deck lights (Spark 2.0 only); Lighted wheels (Spark 2.0, Spark DLX, Spark 2.0+ only) |
| Intended Use | Outdoor, solid clean dry surfaces; avoid traffic and pedestrians |
| Required Safety Gear | Helmet, knee pads, elbow pads, closed-toe shoes |
| Warranty | 6 months limited warranty against manufacturing defects |
| Product ID Code Location | Side of deck plate and box (UPC) |
| Customer Service | www.razor.com; US: 1-866-467-2967 |
Frequently Asked Questions - Spark RAZOR
User questions about Spark RAZOR
0 question about this device. Answer the ones you know or ask your own.
Ask a new question about this device
Download the instructions for your Electric scooter in PDF format for free! Find your manual Spark - RAZOR and take your electronic device back in hand. On this page are published all the documents necessary for the use of your device. Spark by RAZOR.
USER MANUAL Spark RAZOR
natural_image
Four identical electric scooters with black wheels, arranged in a row (no visible text or symbols)OWNER'S MANUAL
Read and understand this entire manual before allowing child to use this product! For assistance contact Razor. DO NOT RETURN TO STORE.
NOTE: Manual illustrations are for demonstration purposes only. Illustrations may not reflect exact appearance of actual product. Specifications subject to change without notice.
Please have your product along with the 22 character product I.D. code with you before contacting Razor for warranty assistance and/or replacement parts.
Product I.D. Code: ____ - ____ - ____
CONTENTS
Safety Warnings .... 1
Before You Begin....2
Assembly and Set-up 3-4
Pre-Ride Checklist and Usage....5
Repair and Maintenance....6-7
Spark Scooter Parts List....8
Warranty and Contact Information 10
SAFETY WARNINGS

AN IMPORTANT MESSAGE TO PARENTS: This manual contains
important information. For your child's safety, it is your responsibility to review this information with your child and make sure that your child understands all warnings, cautions, instructions and safety topics. All children and preteens should ride with adult guidance at all times. Razor USA recommends that you periodically review and reinforce the information in this manual with younger riders, and that you are required to inspect and maintain your child's scooter to ensure their safety. A parent's decision to allow his or her child to ride this product should be based on the child's maturity and ability.

GENERAL WARNING: Scooter riding can be a hazardous activity.
Scooters can and are intended to move and it is therefore possible to get into dangerous situations and/or lose control and/or fall. If such things occur you can be seriously injured or die. LIKE ANY OTHER MOVING PRODUCT, USING A SCOOTER CAN BE A DANGEROUS ACTIVITY AND MAY RESULT IN INJURY OR DEATH EVEN WHEN USED WITH PROPER SAFETY PRECAUTIONS. USE AT YOUR OWN RISK AND USE COMMON SENSE.
- Not for children under 8 YEARS of age. Use only under close adult supervision.
- Do not exceed 143 lb (65 kg) total weight on the Spark™ scooter. Rider weight does not necessarily mean a child's size is appropriate to fit or maintain control of the scooter.
- Adults must assist children in the initial adjustment procedures to unfold scooter, adjust handlebar and steering height, and finally to fold scooter.
- Always wear safety equipment such as a helmet, knee pads, elbow pads and shoes. Always wear a helmet when riding your scooter and keep chinstrap securely buckled.
- Check and secure all fasteners before every ride and replace worn or broken parts immediately.
- For outdoor use only on solid, clean, dry, hardened surfaces. Always ride away from motor vehicles and pedestrians.
- Avoid sharp bumps, drainage grates, and sudden surface changes that may cause your scooter to suddenly stop.
- Avoid streets and surfaces with water, sand, gravel, dirt, leaves and other debris. Wet weather impairs traction, braking and visibility.
- Avoid excessive speed associated with downhill rides.
• Always obey all local traffic and scooter riding laws and regulations. - Before riding, parents must review all warnings and instructions with each rider.
- Observe all other Spark™ scooter safety warnings and instructions as provided elsewhere in this manual.

WARNING: SPARKS CAN INDUCE FIRE
To reduce the risk of SERIOUS INJURY or FIRE:
PARENTS and RIDERS: Make sure riders understand that sparks can start a fire. Keep sparks away from flammable or combustible substances. Use only under close adult supervision.
BE RESPONSIBLE: Safety is important. Parents must review the following warnings and instructions with each rider:
- For outdoor use only on solid, clean, dry hardened surfaces. Keep sparks away from substances that can catch fire, such as dry vegetation, paper, chemicals or gasoline. Sparks can induce fire.
- Do not use in any area prone to wildfires or posted by fire authorities as a Fire Hazard Zone.
- Never use your scooter to try to start a fire. Your Spark™ scooter emits localized sparks when the Spark Bar on a moving scooter comes in contact with hardened outdoor surfaces like asphalt or concrete. Be responsible.
- Do not ride at night or when visibility is impaired.
- Keep sparks away from eyes, hair, exposed skin and clothing. Sparks can burn.
- Spark Bar and brake get hot during use. Do not touch after use.
PROPER RIDING ATTIRE
Always ensure child is wearing proper protective equipment, such as an approved safety helmet. A helmet may be legally required by local law or regulation in your area. A child should always wear shoes and keep shoelaces tied and out of the way of the wheels. Never ride barefooted or in sandals. Knee pads and elbow pads are recommended.

WARNING: ALWAYS INSPECT SCOOTER PRIOR TO RIDING. Properly
inspecting and maintaining your scooter can reduce the risk of injury. Always inspect your scooter before riding and regularly maintain it.

WARNING: CHECK LOCAL LAWS REGARDING SCOOTER USE. Check
local laws and regulations to see where and how you may use your Razor scooter legally. In many states and local areas scooter riders are required BY LAW to wear a helmet. Check local laws and regulations regarding laws governing helmet use and scooter operation in your area, including laws or regulations designating High Fire Hazard areas.

WARNING: Batteries (Spark 2.0 only)
- Lithium batteries included for lights - adult attention for changing and disposal.
- Batteries should only be replaced by an adult.
- Loose batteries could present a choking hazard and should be kept away from small children.
- Dispose of batteries properly.
FAILURE TO USE COMMON SENSE AND HEED THE ABOVE WARNINGS FURTHER INCREASES SUCH RISKS OF SERIOUS INJURY. USE AT YOUR OWN RISK AND WITH APPROPRIATE AND SERIOUS ATTENTION TO SAFE OPERATION. USE CAUTION.
BEFORE YOU BEGIN
Remove contents from box. Remove the packing material used to protect the components from damage during shipping. Inspect the contents of the box for scratches in the paint and dents that may have occurred during shipping. Because your scooter is assembled and packed at the factory, there should not be any problems, even if the box has a few scars or dents.

WARNING:
DO NOT USE NON-RAZOR PRODUCTS WITH YOUR SCOOTER. Razor scooters have been built to certain Razor design specifications. The original equipment supplied at the time of sale was selected on the basis of its compatibility with the frame, fork and all other parts. Certain aftermarket products may not be compatible and will void the warranty.
Product ID Locations:
- Side of deck plate
- Box - side of UPC (not shown)
Box Contents:
- Scooter
- Two (2) Lithium batteries (Spark 2.0 only)
- Owner's manual
Need Help? Visit our web site for replacement parts, product support, a list of authorized service centers in the US and customer service contact information at www.razor.com. Please have the product I.D. code (located on the white label of your product) available for better assistance. Additional Customer Service contact information is listed at the back of this manual.
ASSEMBLY AND SET-UP
□ Folding and Unfolding the Scooter

natural_image
Illustration of hands using a mechanical tool to adjust a wheel component (no text or symbols visible)
natural_image
Line drawing of a bicycle wheel assembly with hand operating controls (no text or symbols)1 To release the folding mechanism, place the scooter on the ground and place one foot on the deck plate. Push the joint release lever down (to raise) or up (to lower) the T-bar until it is securely locked in the desired upright or folded position for riding or storage.
Note: The joint release lever is spring-loaded and will automatically lock in the upright position when fully upright or folded position when fully lowered.
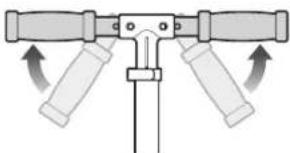
□ Assembling the Handlebars
natural_image
Diagram of a mechanical or electrical component with two arms and directional arrows indicating rotation (no text or symbols)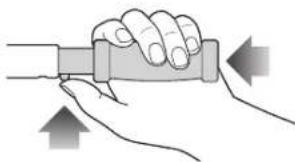
natural_image
Illustration of a hand gripping a cylindrical object with directional arrows indicating movement (no text or symbols)1 Raise handlebars up so they are level with the T-bar.
2 Secure the handlebars into the T-bar by depressing the spring-loaded buttons and inserting the handlebars into the T-bar.


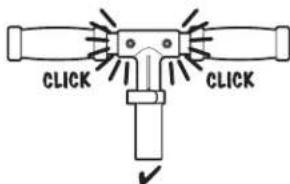
3 Make certain BOTH handlebars are properly locked onto the T-bar.

WARNING:
Keep fingers clear of the folding mechanism when folding or unfolding the scooter. Make sure others are standing clear.

WARNING: Failure to properly engage the spring-loaded tons may cause the handlebars dislodge while riding and may lose rider to lose control and. When correctly engaged, the handlebars will not rotate nor move away, and the spring-loaded tons will be clearly visible in the eyes on the T-bar.

WARNING: Check needlebar grips and end caps ularly for wear or damage designed to aid in gripping dellebars and to provide some tection against possible impact. place immediately if worn, torn, maged or missing.
Need Help? Visit our web site for replacement parts, product support, a list of authorized service centers in the US and customer service contact information at www.razor.com. Please have the product I.D. code (located on the white label of your product) available for better assistance. Additional Customer Service contact information is listed at the back of this manual.
ASSEMBLY AND SET-UP
□ Adjusting the Handlebar Height

natural_image
Mechanical diagram showing a lever mechanism with rotational motion indicated by an arrow (no text or symbols present)1 To adjust the height of the handlebars, open the quick-release lever and slide the T-bar to the desired position. Close the quick release lever to lock into place. When the T-bar is raised to the maximum height, depress the push button located directly below the quick release lever to unlock the T-bar.
natural_image
Mechanical diagram showing a rotating clamp or bracket with rotational arrows indicating motion (no text or symbols)Note: The tension of the quick-release lever can be adjusted by manually tightening or loosening the Allen bolt. Be careful not to over-tighten. You should always be able to open and close the quick-release lever by hand and the T-bar should slide freely when the quick-release is open. Unless T-bar is fully extended.
Collar Clamp
Tools required: 5 mm Allen wrench

natural_image
Mechanical diagram showing a clamp securing a ring with a tool (no text or symbols present)
natural_image
Diagram of a mechanical component with a central shaft and two arms, enclosed in a circle (no text or symbols)
natural_image
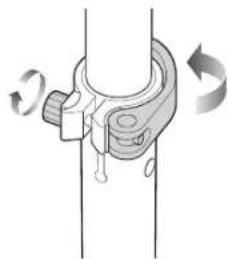
Diagram of a mechanical component with a circular outline and a downward arrow, no text or symbols present.Using a 5 mm Allen wrench, check that the collar clamp bolt(s) are tightened securely. This item is tightened and quality inspected at the factory however there is a slight chance that the effects of shipping or handling may have caused the bolt(s) to loosen.
☐ Activating the Batteries (Spark 2.0 only)

natural_image
Technical line drawing of a mechanical device with a wheel and attached bracket (no text or symbols)1 To activate the batteries, locate the battery compartment underneath the front of the deck and pull tab out from battery cover.
WARNING: Failure to properly secure the quick-release lever may cause the T-bar to telescope up or down while riding and may cause you to lose control and fall.
WARNING:
Failure to properly install and/or tighten the collar clamp may cause the rider to lose control and fall. If you are having diffi culty understanding these instructions, please contact Razor Customer Service for assistance.
Need Help? Visit our web site for replacement parts, product support, a list of authorized service centers in the US and customer service contact information at www.razor.com. Please have the product I.D. code (located on the white label of your product) available for better assistance. Additional Customer Service contact information is listed at the back of this manual.
PRE-RIDE CHECKLIST

Loose Parts
Check and secure all fasteners before every ride. Make sure the collar clamp, quick release lever, and handlebar spring buttons are locked properly in place before riding.

Replacement Parts
Replace worn or broken parts immediately.
Call 1-866-467-2967 for parts or visit shop.razor.com.

Safety Gear
Always wear proper protective equipment, such as an approved safety helmet, elbow pads and kneepads. Always wear shoes (lace-up with rubber soles) and keep shoelaces tied and out of the way of the wheels. Never ride barefooted or in sandals.

Be Careful!
You will see people on TV and maybe even people you know doing tricks and stunts. These are people who have been practicing on scooters for a very long time. Don't try something until you are ready. Avoid steep inclines and don't ride too fast — you can lose control and fall. Skateboard parks are not designed for scooters. Never ride in traffic or on the street and watch your surroundings for pedestrians, skaters, skate boards, electric products, bikes, children or animals who may enter your path and respect the rights and property of others.
Maintain a hold on the handlebars at all times.
USAGE
How to Ride
Place one foot on the baseboard, push forward with the other foot. Steer with both hands on the handlebars. For enhanced cornering, lean slightly into the direction of the turn.

natural_image
Illustration of a person's legs and feet using a scooter, with a magnified inset showing virus particles (no text or symbols)To activate the sparks place ball of foot on the Spark Bar and gradually apply pressure while riding. Only use enough pressure to cause sparking action.
Note:
• LED deck lights apply to Spark 2.0 only.
- Lighted wheels light up when wheels are in motion. (Spark 2.0, Spark DLX, and Spark ^+ only)

WARNING: Applying too pressure on the Spark Bar cause loss of control.
NOTE: Using any other part of the foot or full foot may activate the brake and prevent sparking action.
NOTE: Sparks and Spark Cartridge life will vary based on the amount of pressure applied to the Spark Bar, the length of time pressure is applied and the smoothness of the riding surface.
□ How to Stop
For controlled stops, apply the brake by placing the heel of the foot on the brake. Razor recommends that you practice applying the brake at various speeds and in an open area free from obstructions before riding your Razor scooter around others.

natural_image
Line drawing of a person's legs and feet using a bicycle pedal (no text or symbols)Need Help? Visit our web site for replacement parts, product support, a list of authorized service centers in the US and customer service contact information at www.razor.com. Please have the product I.D. code (located on the white label of your product) available for better assistance. Additional Customer Service contact information is listed at the back of this manual.
REPAIR AND MAINTENANCE
□ Replacing the Spark Cartridge
Friction during sparking will eventually wear out the replaceable cartridge and cause the scooter to stop making sparks. Worn out cartridges should be replaced to avoid damaging the Spark Bar.

natural_image
Illustration of a hand using a tool to adjust or install a component (no text or symbols visible)1 Using your thumbs, press tabs on both sides of the cartridge to release from the bracket. Slide cartridge away from you and remove from bracket.
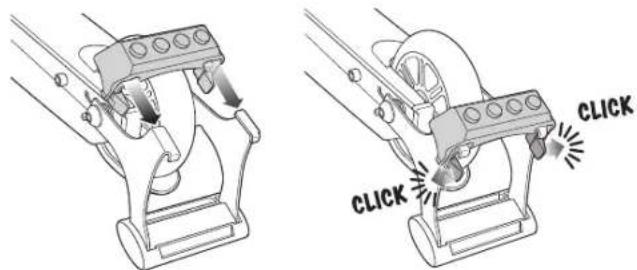
2 Place a new cartridge in back of the bracket making sure to align the slots on the cartridge with the two legs of the bracket. Slide cartridge forward until you hear a click and the thumb tabs are locked in place.
☐ Replacing the Batteries (Spark 2.0 only)
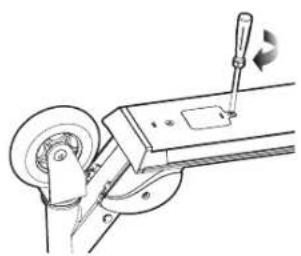
Tools required: Phillips screwdriver, Two (2) CR2032 Lithium batteries
natural_image
Technical line drawing of a mechanical device with a screwdriver and wheel (no text or symbols)1 Using a Phillips screwdriver, loosen the screw on the battery compartment and remove cover.
natural_image
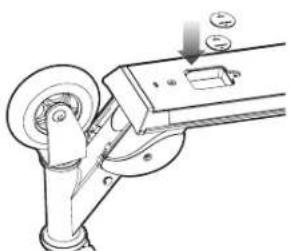
Technical line drawing of a mechanical device with a wheel and adjustment knob (no text or symbols)2 Discard old batteries and replace with two (2) CR2032 Lithium batteries.

natural_image
Technical line drawing of a mechanical device with a knob and scroll wheel (no text or symbols)3 Replace cover and secure with screw
Note: Make sure to install BOTH batteries positive (+) side up.
WARNING: Do not attempt to replace cartridge immediately after riding as cartridge will be hot. Handle only when cool.
WARNING: Keep fingers clear of Spark Bar hinge and fender brake.
WARNING:
- Lithium batteries included for lights - adult attention for changing and disposal.
- Batteries should only be replaced by an adult.
- Loose batteries could present a choking hazard and should be kept away from small children.
- Dispose of batteries properly.
REPAIR AND MAINTENANCE
□ Wheels and Bearings
Under normal circumstances and conditions, Razor wheels and wheel bearings are maintenance free. Nonetheless, it is the responsibility of the owner or guardian to periodically inspect the wheels for wear and tear, the axle for proper tightness, and bearings for side-to-side play, and loose parts. When a wheel or wheel bearing develops play, this is an indication of excess wear and replacement is necessary. Replace immediately with only genuine Razor wheels. Worn wheels/bearings are considered normal wear-and-tear and are not covered by the Razor Warranty. Wheels other than genuine Razor wheels may not be compatible with your Razor scooter. The use of anything other than genuine Razor replacement parts may affect your safety and will void your warranty.
□ Cleaning Your Scooter
Wipe with a damp cloth to remove dirt and dust. Do not use industrial cleaners or solvents as they may damage the surfaces. Do not use alcohol, alcohol-based or ammonia-based cleaners as they may damage or dissolve the plastic components or soften the decals or decal adhesive.
WARNING: Wheelies and other stunt-type riding reduces your ability to maneuver and control your scooter. Take the necessary precautions, such as wearing appropriate protective gear and practice in a area safe for stunt riding and free from obstructions.
Need Help? Visit our web site for replacement parts, product support, a list of authorized service centers in the US and customer service contact information at www.razor.com. Please have the product I.D. code (located on the white label of your product) available for better assistance. Additional Customer Service contact information is listed at the back of this manual.
SPARK SCOOTER PARTS LIST
Keep your Spark scooter running for years with genuine Razor parts. Visit our web site or e-mail us for more information on spare part availability. (Specifications subject to change without notice.)
- Grips
- Handlebars
- T-Bar
- Quick-Release Lever
- Extension Tube
- Collar Clamp
- Headset (Upper/Lower)
-
Fork
-
Axle Bolts
- Urethane Wheel (Front/Rear) (Lighted Wheels for Spark DLX, Spark 2.0 and Spark' only)
- Folding Mechanism/Joint Release Lever
- Spark Bar with Cartridge
- Brake

Need Help? Visit our web site for replacement parts, product support, a list of authorized service centers in the US and customer service contact information at www.razor.com. Please have the product I.D. code (located on the white label of your product) available for better assistance. Additional Customer Service contact information is listed at the back of this manual.
WARRANTY
Razor Limited Warranty
The manufacturer warranties this product to be free of manufacturing defects for a period of 6 months from date of purchase. This Limited Warranty does not cover normal wear and tear, or any damage, failure or loss caused by improper assembly, maintenance, or storage.
This Limited Warranty will be void if the product is ever:
• used in a manner other than for recreation;
- modified in any way;
- rented.
The manufacturer is not liable for incidental or consequential loss or damage due directly or indirectly to the use of this product.
Razor does not offer an extended warranty. If you have purchased an extended warranty, it must be honored by the store at which it was purchased.
For your records, save your original sales receipt with this manual.
CUSTOMER SERVICE CONTACT INFORMATION
Need Help? Visit our web site for replacement parts, product support, a list of authorized service centers in the US and customer service contact information at www.razor.com. Please have the product I.D. code (located on the white label of your product) available for better assistance. Additional Customer Service contact information is listed below:
UNITED STATES
Razor USA LLC
P.O. Box 3610
Cerritos, CA 90703
USA
+1 866 467 2967
Monday - Friday
8:00 AM - 5:00 PM Pacific Time
EUROPE
Razor USA (Europe)
Handelsweg 2
2742 RD Waddinxveen
Netherlands
+44 (0) 120 267 2702
ASIA
Razor USA (Asia)
P.O. Box 3610
Cerritos, CA 90703
USA
+81 50 7579 6622
info@razor-asia.com
DISTRIBUTED IN THE UK BY:
Re:creation Limited
2 Meadows Business Park
Station Approach, Blackwater
Camberley, Surrey GU17 9AB
United Kingdom
+44 (0) 118 973 6222 Tel
+44 (0) 118 973 6220 Fax
sales@recreationltd.co.uk
DISTRIBUTED IN AUSTRALIA BY:
Funtastic Limited
Level 2, Tower 2, Chadstone Place
1341 Dandenong Road
Chadstone VIC 3148
Australia
+1 800 244 543
U.S. Patent No. 8,146,947 B2 and US D606,610 S.
Printed in China for:
Hazor USA LLC
PO Box 3610 Corrston, CAP
Cenitos, CA 90703
Copyright © 2003-2014 Razor USA, LLC. All rights reserved. RAZOR and the Razor logo design are among the registered trademarks of Razor USA LLC in the United States and/or select foreign countries. Spark™ is a trademark of Razor USA LLC.
US_141117



- OWNER'S MANUAL
- CONTENTS
- SAFETY WARNINGS
- AN IMPORTANT MESSAGE TO PARENTS: This manual contains
- GENERAL WARNING: Scooter riding can be a hazardous activity.
- WARNING: SPARKS CAN INDUCE FIRE
- PROPER RIDING ATTIRE
- WARNING: ALWAYS INSPECT SCOOTER PRIOR TO RIDING. Properly
- WARNING: CHECK LOCAL LAWS REGARDING SCOOTER USE. Check
- WARNING: Batteries (Spark 2.0 only)
- BEFORE YOU BEGIN
- WARNING:
- Product ID Locations:
- Box Contents:
- ASSEMBLY AND SET-UP
- □ Folding and Unfolding the Scooter
- □ Assembling the Handlebars
- □ Adjusting the Handlebar Height
- Collar Clamp
- ☐ Activating the Batteries (Spark 2.0 only)
- PRE-RIDE CHECKLIST
- Loose Parts
- Replacement Parts
- Safety Gear
- Be Careful!
- USAGE
- How to Ride
- Note:
- □ How to Stop
- REPAIR AND MAINTENANCE
- □ Replacing the Spark Cartridge
- ☐ Replacing the Batteries (Spark 2.0 only)
- □ Wheels and Bearings
- □ Cleaning Your Scooter
- SPARK SCOOTER PARTS LIST
- WARRANTY
- Razor Limited Warranty
- CUSTOMER SERVICE CONTACT INFORMATION
- UNITED STATES
- EUROPE
- ASIA
- DISTRIBUTED IN THE UK BY:
- DISTRIBUTED IN AUSTRALIA BY:
Brand : RAZOR
Model : Spark
Category : Electric scooter