
RCP 5 - Remote control HARMAN KARDON - Free user manual and instructions
Find the device manual for free RCP 5 HARMAN KARDON in PDF.


| Product Type | Remote Control |
| Brand | Harman Kardon |
| Model | RCP 5 |
| Dimensions (approx.) | 20 x 5 x 2 cm |
| Weight (approx.) | 150 g |
| Power Source | 2 x AA batteries |
| Control Type | Infrared (IR) |
| Range (approx.) | 7 meters |
| Compatible Devices | Harman Kardon audio/video systems |
| Key Functions | Volume, channel, power, input selection, mute, navigation |
| Button Count | 30+ (typical) |
| Cleaning Instructions | Wipe with a soft, dry cloth |
| Safety Precautions | Keep away from moisture and heat sources |
| Spare Parts Available | Replacement batteries (standard) |
| Repairability | Not user-serviceable; contact authorized service |
| Manual Format | PDF (24 pages) |
Frequently Asked Questions - RCP 5 HARMAN KARDON
User questions about RCP 5 HARMAN KARDON
0 question about this device. Answer the ones you know or ask your own.
Ask a new question about this device
Download the instructions for your Remote control in PDF format for free! Find your manual RCP 5 - HARMAN KARDON and take your electronic device back in hand. On this page are published all the documents necessary for the use of your device. RCP 5 by HARMAN KARDON.
USER MANUAL RCP 5 HARMAN KARDON
Designed to Entertain.™
RCP 5
SYSTEM REMOTE
OWNER'S MANUAL
(FOR USE WITH CP 55 SYSTEM)

natural_image
Abstract 3D rendering of a stylized blue ring with white inner segments, no text or symbols presentTABLE OF CONTENTS
3 INTRODUCTION AND FEATURES
4 REMOTE CONTROL FUNCTIONS
8 BATTERIES
9 PROGRAMMING SOURCES
11 USING EzSET
12 ADVANCED FUNCTIONS
12 Punch-Through Programming
12 Macros
13 Resetting the Remote
14 APPENDIX
15 Remote Control Function List
17 Remote Control Product Codes
17 TV
18 VCR
19 CD
19 DVD
20 SAT
20 TAPE
20 CBL
INTRODUCTION AND FEATURES
Please register your product on our Web site at www.harmankardon.com.
Note: You'll need the product's serial number. At the same time, you can choose to be notified about our new products and/or special promotions.
WWW.HARMANKARDON.COM
Thank you for choosing Harman Kardon®!
Your CP Series system combines the superior performance and practical flexibility of high-quality separate audio/video components with the convenience of a complete system in one carton. You will need to provide a video display or television, but you may also add almost any source device, ranging from a cassette deck or VCR all the way up to the latest high-definition digital cable or satellite television set-top box (or even products that may be released in the future).
The single RCP 5 remote replaces the original remotes supplied with the AVR 146 receiver and DVD 38 DVD player. Although the RCP 5 operates both products, along with a host of other products you may have added to your system, this manual describes a few differences from the original remotes. The most significant is the addition of EzSet ^® an automatic speaker-level calibration process that enables the receiver to perform properly without your having to supply additional metering devices or perform a tedious calibration procedure.
IMPORTANT NOTE: The instructions in this manual on running the EzSet procedure take the place of Step Four of the Initial Setup process described in the AVR 146 manual. Although you may still calibrate the speakers manually if you so desire, we strongly recommend that you first use the more convenient and simpler EzSet process.
To obtain the maximum enjoyment from your new home theater system, we urge you to read this manual, as well as the manuals included with the system components, and refer back to it as you become more familiar with its features and their operation. If you have any questions about this product, its installation or its operation, please contact your retailer or custom installer, or visit our Web site at www.harmankardon.com.
REMOTE CONTROL FUNCTIONS
The RCP 5 remote is capable of controlling 11 devices, including the AVR 146 and the DVD 38 included in the CP 55 system. During the installation process, you may program the codes for each of your source components into the remote. Each time you wish to use the codes for any component, first press that component's selector. This changes the button functions to the appropriate codes for that product.
NOTE: Several of the Input Selectors are shared between two devices. The selector button will light in red when the remote is in the device mode printed on the button, and it will light in green for the device mode printed above the button. To switch between the two device modes, press the selector twice quickly in succession. The selector will remain in the last-selected mode until the next time you press it twice quickly.
For example, the first time you press the DVD Button, the button will light in red, indicating that the remote is in DVD mode. If you press another selector, such as the VID3 Selector, and then press the DVD Button again, the DVD Button will remain red, indicating the remote is still in DVD mode. Now press the DVD Button twice quickly. At the first press the Button will light in red, indicating that the remote is in DVD mode. On the second press the button will turn green, indicating that the remote is now in CD mode. If you press a different selector and return to the DVD/CD Selector, you will observe that the remote is still in CD mode.
Each Input Selector has been preprogrammed to control certain types of components, with only the codes specific to each brand and model changing, depending on which product code is programmed. The device types programmed into each selector (except HDMI 1 and 2) may not be changed.
DVD: Controls DVD players and recorders. The DVD Button functions are labeled in blue on the remote.
CD: Controls CD players and recorders.
Tape: Controls cassette decks.
The Bridge/DMP: Controls an iPod docked in The Bridge.
Video 1: Controls VCRs, TiVo® and PVRs.
Video 2: Controls cable and satellite television set-top boxes.
Video 3: Controls televisions and other video displays.
HDMI 1 and 2: Each code set controls a source device (such as a VCR/PVR, DVD player or cable/satellite set-top box) connected to one of these two inputs.
For example, if you have inserted a disc in your CD player and you would like to skip ahead three tracks, but you then find that the volume is too loud, you would follow this procedure:
- Press the CD Input Selector to switch to the codes that control your CD player. If the remote is in DVD mode, press the selector twice quickly to switch to CD mode, indicated by the selector turning green.
-
Press the Play Button (in the Transport Controls section) if the disc is not already playing.
-
Press the Skip Up Button three times to advance three tracks.
-
Press the AVR Button to access the volume controls.
-
Press the Volume Down Button until the volume level is satisfactory.
Any given button may have different functions, depending on which component is being controlled. The buttons are labeled with some of these functions, with the receiver's functions shown in white or gray, and the DVD player's functions shown in blue. For example, the Sleep and DSP Surround Buttons are labeled for use as Channel Up/Down Buttons when controlling a television or cable box. See Table A1 in the Appendix for listings of the different functions for each type of component.
NOTE: Although we have described the applicable DVD functions in this section, we strongly recommend that you review the DVD 38 manual for more information about using these functions.
IR Transmitter Lens: As buttons are pressed on the remote, infrared codes are emitted through this lens. Make sure it is pointing toward the component being operated.
EzSet® Microphone: This microphone "hears" the test tone used during the EzSet level-setting procedure. Make sure it is pointing toward the receiver when running EzSet.
Power On Button: Press this button to turn on the AVR or another device. The Master Power Switch on the AVR 146's front panel must be switched on first.
Mute Button: Press this button to mute the AVR 146's speaker and headphone outputs temporarily. To turn off muting, press this button or adjust the volume. Muting is also canceled when the receiver is turned off.
Program/EzSet Indicator: This LED lights up or flashes in one of three colors as the remote is programmed with codes, and during the EzSet procedure.
Power Off Button: Press this button to turn off the AVR 146 or another device.
AVR Selector: Press this button to switch the remote to the codes that operate the receiver.
Input Selectors: Press one of these buttons to select a source device, which is a component where a playback signal originates (e.g., DVD, CD, cable TV, satellite or HDTV tuner). This will also turn on the receiver (if it is not already on) and switch the remote's mode to operate the source device.
AM/FM Button: Press this button to select the tuner as the source, or to switch between the AM and FM bands.
6-Channel Input Selector: Press this button to select the 6-Channel Inputs as the audio source. The receiver will use the video input and remote control codes for the last-selected video source.
EzSet (SPL) Button: Press this button to run the EzSet output-level calibration procedure. Make sure to point the remote toward the receiver during EzSet.
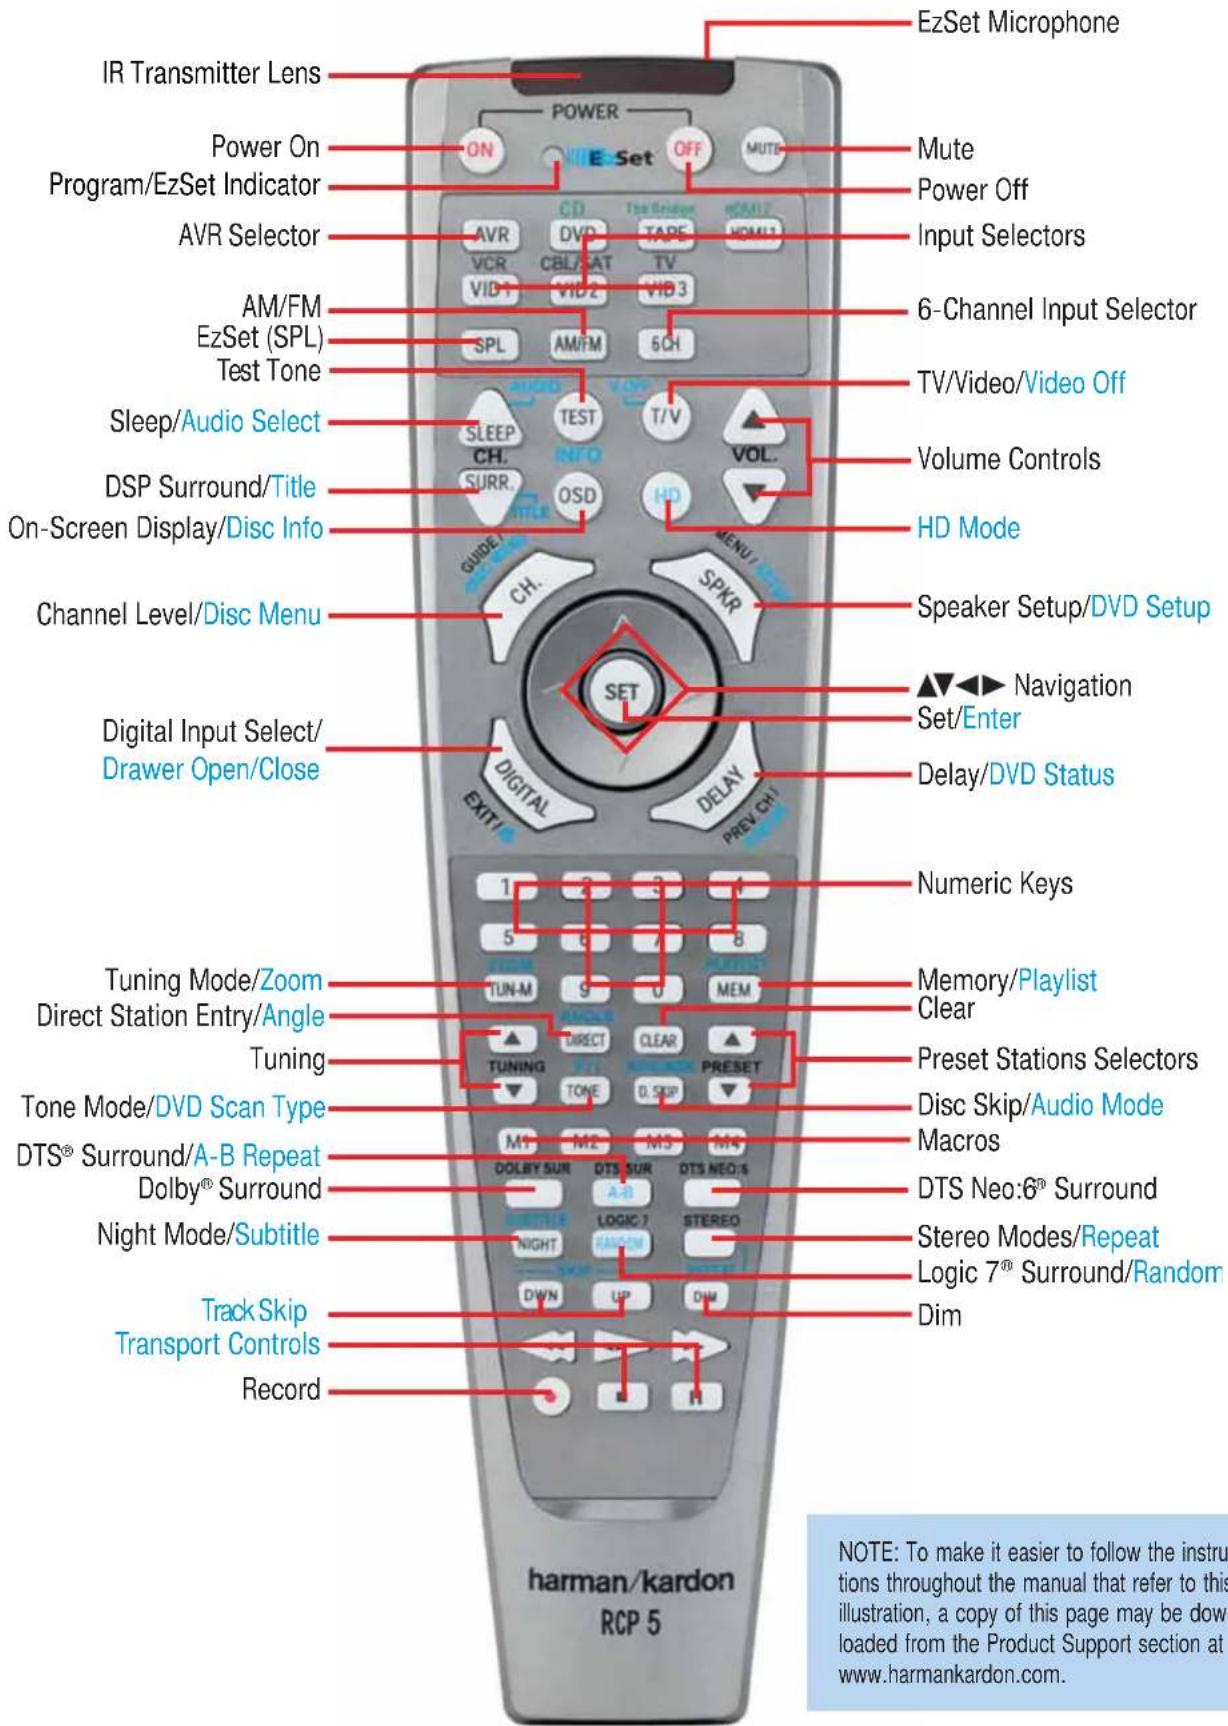
NOTE: To make it easier to follow the instructions throughout the manual that refer to this illustration, a copy of this page may be downloaded from the Product Support section at www.harmankardon.com.
REMOTE CONTROL FUNCTIONS
Test Tone: Press this button to activate the test tone for manual output-level calibration.
TV/Video/Video Off: This button has no effect on the receiver, but is used to switch video inputs on some video source components.
When the DVD player has been selected (by pressing the DVD Input Selector), pressing this button disables the DVD 38's video output to avoid "burning in" menus or still images on sensitive video displays. This feature is particularly useful when listening to CDs or other audio-only presentations.
Sleep/Audio Select Button: Press this button to activate the sleep timer, which shuts off the receiver after a programmed period of up to 90 minutes.
When the DVD player has been selected, this button may be used to select another audio format or language, if one is available on the disc.
Volume Controls: Press these buttons to raise or lower the volume, which will be shown in decibels (dB) in the Message Display.
DSP Surround/Title: Press this button to select a DSP Surround mode (Hall 1, Hall 2, Theater).
When the DVD player has been selected, this button serves the Title function. When a DVD is playing, press this button to go back to the main title menu for the disc. If you are playing a DVD-Audio disc that contains other formats the DVD 38 is capable of playing, such as linear PCM or Dolby® Digital 5.1, pressing this button may enable you to switch playback from one audio format to another.
On-Screen Display (OSD)/Disc Info: Press this button to activate the AVR 146's on-screen menu system.
When the DVD player has been selected, this button serves the Disc Info function. Press it once to access the Player Information menu for information on the current disc and the playback mode settings. This function is different from the Disc Menu and DVD Setup functions.
HD Mode: This button has no effect on the AVR, but when the DVD player has been selected, this button serves the HD Mode function, which is available when the DVD 38's HDMI™ output is used. Pressing this button enables you to select a lower resolution than the maximum your video display is capable of handling, as determined by the "handshake" procedure between the DVD 38 and AVR 146 and your video display. See the AVR 146 and DVD 38 owner's manuals for more information on HDMI and the HD Mode Selector.
Channel Level/Disc Menu: Press this button to set the output levels for each channel so that all speakers sound equally loud at the listening position. Usually this is done while playing an audio selection, such as a favorite CD, after you have calibrated the levels using EzSet.
When the DVD player has been selected, this button serves the Disc Menu function. While a disc is playing, press this button to view the disc's menu. This function is different from the Disc Info and DVD Setup functions.
Speaker Setup/DVD Setup: Press this button to configure speaker sizes, that is, the frequency-range capability of each speaker.
Usually this is done using the on-screen menu system, as described in the Initial Setup section of the AVR 146 owner's guide.
When the DVD player has been selected, this button serves the DVD Setup function. Press it to use the DVD 38's on-screen menu system to adjust the player's configuration settings. This function is different from the Disc Info and Disc Menu functions.
Navigation and Set/Enter Buttons: These buttons are used together to make selections within the AVR 146's or DVD 38's on-screen menu system, or when accessing the AVR functions of the four buttons surrounding this area of the remote – Channel Level, Speaker Setup, Digital Input or Delay.
Digital Input Select/Drawer Open/Close: Press this button to select the specific digital audio input (or analog audio input) you used for the current source.
When the DVD player has been selected, this button is used to open or close the disc drawer.
Delay/DVD Status: Press this button to set delay times that compensate for placing the speakers at different distances from the listening position, or to resolve a "lip sync" issue that may be caused by digital video processing. This may also be done using the on-screen menu system, as described in the Initial Setup section of the AVR 146 owner's guide.
When the DVD player has been selected, this button serves the DVD Status function. Press it while a DVD is playing to view the on-screen Status Bar, which will display the current title and chapter, the Play Mode icon and the elapsed time, in addition to a "temperature bar" display of the time elapsed. The Status Bar may be navigated as described in the DVD 38 manual.
Numeric Keys: Use these buttons to enter radio station frequencies or to select station presets. Press the Direct Button before entering the station frequency. In DVD mode, these buttons serve a variety of functions, including password entry and chapter/track selection. See the DVD 38 owner's manual for more information.
Tuning Mode/Zoom: When listening to AM or FM radio, this button toggles between Manual (one frequency step at a time) and Automatic (seeks frequencies with acceptable signal strength) Tuning modes. It also toggles between Stereo and Mono modes when an FM station is tuned.
When the DVD player has been selected, this button performs the Zoom function. Press it to zoom in on a DVD, VCD or JPEG image. The image may be enlarged by a factor of x2, x3, x4 or x5. Once the on-screen indication of the zoom ratio disappears from the screen, you may use the Navigation Buttons to explore the picture.
Memory/Playlist: After you have tuned a particular radio station, press this button, then a Numeric Key, to save that station as a radio preset.
When the DVD player has been selected, this button performs the Playlist function, which enables you to change the order in which tracks or chapters are played.
REMOTE CONTROL FUNCTIONS
Tuning: Press these buttons to tune a radio station. Depending on whether the tuning mode has been set to Manual or Automatic, each press will either change one frequency step at a time, or seek the next frequency with acceptable signal strength.
Direct Station Entry/Angle: Press this button before using the Numeric Keys to directly enter a radio station frequency.
When the DVD player has been selected, this button is used for the Angle function. Press it during passages on a DVD where the director has programmed multiple camera angles to view the alternate perspectives. When a JPEG file is on-screen, each press of this button rotates the image by 90 degrees clockwise.
Clear: Press this Button to clear a radio station frequency you have started to enter.
When the DVD player has been selected, this button may be used to clear any on-screen displays from view. In addition, press and hold it for five seconds to reset all user settings on the DVD 38 to their factory defaults.
Preset Stations Selector: Press these buttons to select a preset radio station.
Tone Mode/DVD Scan Type: Press this button to access the tone controls (bass and treble). Use the Navigation Buttons to make your selections.
When the DVD player has been selected, this button adjusts the Video Scan Type setting for the component video outputs. Each press toggles between progressive and interlaced scanning. This button is useful if you inadvertently set the scan type to progressive when your video display or television is not capable of displaying progressively scanned video. Although your video display may be distorted, you may restore interlaced scanning by pressing this button.
Disc Skip/Audio Mode: This button has no effect on the AVR 146, but is used with some optical disc changers to skip to the next disc. When the DVD 38 is in use, this button adjusts the Bass Management setting, which is also found in the Audio Setup menu. The Audio Mode setting affects the configuration of the DVD 38's 2- and 6-Channel Analog Audio Outputs. Stop playback of the current disc to use this selector.
Macros: These buttons may be programmed to execute long command sequences with a single button press. They are useful for programming the command to turn on or off all of your components, or for accessing specialized functions for a different component than the one you are currently operating.
Dolby ^® Surround Mode Selector: The first press of this button will select the last-used Dolby Surround mode, and each additional press will cycle through the variants that are currently available. Not all modes are available with all sources; see the AVR 146 manual for more information.
DTS® Surround Mode Selector/A-B Repeat: The first press of this button will select the last-used DTS Digital mode if DTS processing is available, and each additional press will toggle between the 2.0 and 5.1 variants. See the AVR 146 manual for more information.
When the DVD player has been selected, this button serves the A-B Repeat function. The first press while a disc is playing selects the beginning of the passage you wish to repeat, and the second press selects the end of the passage. The selected passage will play continuously until the A-B Button is pressed a third time, or play is stopped.
DTS Neo:6 ^® Surround Mode Selector: The first press of this button will select the last-used DTS Neo:6 Surround mode if it is available, and each additional press will cycle through the variants that are currently available. See the AVR 146 manual for more information.
Logic 7® Surround Mode Selector/Random: The first press of this button will select the last-used Logic 7 Surround mode if it is available, and each additional press will cycle through the Cinema, Music and Enhance modes. See the AVR 146 manual for more information.
When the DVD player has been selected, this button serves the Random function. When a CD is playing and no playlist is active, each press of this button turns random track selection on or off.
Night Mode/Subtitle: Press this button to activate Night mode with specially encoded Dolby Digital discs or broadcasts. Night mode compresses the audio so that louder passages are reduced in volume to avoid disturbing others, while dialogue remains intelligible.
When the DVD player has been selected, this button performs the Subtitle function. Press it to select a subtitle language or to turn subtitles off.
NOTE: Due to the variations in how DVD discs are authored, the subtitle languages displayed by the DVD 38 may not accurately reflect the actual languages available on the disc. It is recommended that subtitles be selected using the disc's menu.
Stereo Modes/Repeat: The first press of this button will select the last-used Stereo mode, which may be Surround Off or Two-Channel Processing. Each additional press will toggle between Surround Off, 5-Channel Stereo and 7-Channel Stereo. When an analog audio source is in use and the AVR 146's Tone Mode control has been set to Out, you may also select Analog Bypass mode, which passes the analog input signal to the volume control, bypassing digital signal processing. See the AVR 146 manual for more information.
When the DVD player has been selected, each press of this button cycles through the available Repeat modes, excluding A-B Repeat.
Track Skip: These buttons have no effect on the receiver, but are used with the DVD 38 and many other source components to change tracks or chapters.
Dim: Press this button to partially or fully dim the AVR 146's front-panel display.
Transport Controls: These buttons have no effect on the receiver but are used to control the DVD 38 and many other source components. By default, when the remote is operating the receiver, these buttons will control the DVD 38.
Record: This button has no function on the AVR 146 or DVD 38. It is used with many audio and video recorders.
BATTERIES
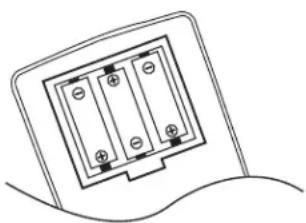
The RCP 5 remote control uses three AAA batteries, which are included.
To remove the battery cover located on the back of the remote, firmly press the ridged depression and slide the cover toward the top of the remote.
Insert the batteries as shown in Figure 1, making sure to observe the correct polarity.
natural_image
Simple line drawing of a two-pin electrical socket with no text or symbolsFigure 1 — Remote Battery Compartment
When using the remote, remember to point the lens toward the front panel of the AVR 146 or DVD 38. Make sure no objects, such as furniture, are blocking the remote's path. Bright lights, fluorescent lights and plasma video displays may interfere with the remote's functioning. The remote has a range of about 20 feet, depending on the lighting conditions. It may be used at an angle of up to 30 degrees to either side of the component.
If the remote seems to operate intermittently, or if pressing a button on the remote does not cause the AVR Selector or one of the Input Selectors to light up, then make sure the batteries have been inserted correctly, or replace all three batteries with fresh ones.
PROGRAMMING SOURCES
Programming Sources
The RCP 5 remote is capable of controlling not only the receiver and DVD player included in your CP system, but it may also be programmed to control many brands and models of VCRs, CD players, cable boxes, satellite receivers, cassette decks and TVs, as well as an iPod (not included) docked in Harman Kardon's optional The Bridge.
It may help to think of the remote as a book with pages. Each page represents the button functions for a different device. In order to access the functions for a particular device, you first need to turn to that page, that is, switch the remote to that device mode. This is done by pressing the AVR Button to access the codes that control the receiver, or the Input Selectors to access the codes for the devices programmed into the remote.
You may have noticed that three of the Input Selectors look different from the others (see Figure 2). For the DVD/CD, TAPE/The Bridge and HDMI 1/HDMI 2 Selectors, there is a primary source, whose name is printed on the button, and a secondary source, whose name is printed above the button.
When the remote is in the device mode for the primary source (e.g., DVD) pressing the device selector will cause it to light in red. When the remote is in the secondary source's device mode, the selector will light in green when pressed.
To switch between the primary and secondary device modes, press the selector twice quickly in succession. The selector will retain this selection until the next time you toggle between the primary and secondary device modes. That is, if you press the DVD/CD Selector twice quickly so that the CD source is activated, then press another source selector, such as Video 1, the next time you press the DVD/CD Selector, the remote will return to the CD device mode.
The RCP 5 remote is factory-programmed to control the AVR 146, the DVD 38 and an iPod docked in The Bridge. If you have other source devices in your system, such as a VCR, or a cable or satellite television set-top box, follow these steps to program the correct codes into the remote:
-
Using the codes in Tables A2–A9 of the Appendix, look up the product type (e.g., cable TV box) and the brand name of your source. The number(s) listed are potential candidates for the correct code set for your particular device.
-
Turn on your source device.
-
This step places the remote in Program mode and varies slightly, depending on which Input Selector is being programmed. Refer to Figure 2.
a) DVD, Tape, Video 1, Video 2 and Video 3 Sources: Press and hold the Input Selector until the Program Indicator LED starts to flash, then release it. Follow the directions in Step 4.
b) CD Source: Press the DVD/CD Input Selector twice quickly so that it turns green, then hold it until the selector relights and the Program LED flashes. Follow the directions in Step 4.
c) HDMI 1 Source: Press and hold the Input Selector until the selector relights and the Program Indicator flashes, then release it. Next, press the Input Selector that corresponds to the device type you want to program into the HDMI 1 mode, i.e., DVD, VCR or CBL/SAT. Then follow the directions in Step 4.
d) HDMI 2 Source: Press and release the Input Selector once, then quickly press the Input Selector again so that it turns green, then release it. Now press and hold the Input Selector until the selector relights and the Program Indicator flashes, then release it. Next, press the Input Selector that corresponds to the device type you want to program into the HDMI 2 mode, i.e., DVD, VCR or CBL/SAT. Then follow the directions in Step 4.
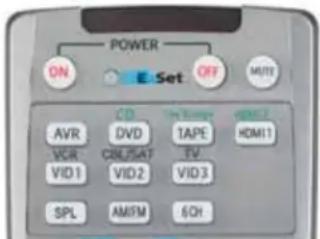
Figure 2 – Input Selectors
- Enter a code from Step 1 above.
a) If the device turns off, then press the Input Selector again to accept the code; the selector will flash. The remote will exit the Program mode.
b) If the device does not turn off, try entering another code. If you run out of codes, you may search through all of the codes in the remote's library for that product type by pressing the ▲ or ▼ Button repeatedly until the device turns off. When the device turns off, enter the code by pressing the Input Selector, which will flash. The remote then exits Program mode.
NOTE: When you enter a valid three-digit code, the Program Indicator LED will change color to green. However, entering an invalid code changes the color of the LED to red.
- Once you have accepted a code, it's a good idea to try using some other functions to control the device. Sometimes manufacturers use the same power code for several different models, while other codes will vary. You may wish to repeat this process until you've programmed a satisfactory code set that operates most of the functions you frequently use.
- You may find out which code number you have programmed by pressing and holding the Input Selector to enter Program mode. Then press the Set Button, and the LED will flash in the code sequence. One flash represents "1", two flashes for "2" and so forth. A series of many fast flashes represents "0". Record the codes programmed for each device in Table 1.
PROGRAMMING SOURCES
Table 1 – Remote Control Codes
| Source Input Product Type Remote Control Code(circle one) |
| Video 1 VCR, PVR |
| Video 2 Cable, Satellite |
| Video 3 TV |
| HDMI 1 DVD, VCR/PVR, Cable, Satellite |
| HDMI 2 DVD, VCR/PVR, Cable, Satellite |
| DVD* DVD |
| CD CD, CD-R |
| Tape Cassette |
* Do not reprogram the DVD Source selector unless you are replacing the DVD player included in the CP 55 system with another product.
If you are unable to locate a code set that correctly operates your source device, it will not be possible to use the RCP 5 remote to control that device. However, you may still connect the source to the AVR 146 and operate it using the device's original remote control.
Most of the button labels on the remote describe the button's function when used to control the AVR 146 (white or gray labels) or DVD 38 (blue labels). However, the button may perform a very different function when used to control another device. Refer to the Remote Control Function List, Table A1 in the Appendix, for a list of each button's functions with the various product types.
If you wish, you may program macros, which are preprogrammed code sequences that execute many code commands with a single button press. You may also program "punch-through" codes, which allow the remote to operate the volume, channel or transport controls of another device without having to switch the remote's device mode. See page 12 for instructions on these advanced programming functions.
NOTE: The RCP 5 remote is preprogrammed to operate the transport controls of the DVD 38 when the AVR or VID2 or VID3 device is selected. You may change this punch-through programming at any time, as explained in the Advanced Functions section.
Using EzSet
This section replaces Step Four in the Initial Setup section of the AVR 146 owner's guide.
An essential step in setting up your multichannel audio/video receiver is calibrating the channel output levels so that they all sound equally loud at the listening position. This sets a baseline, enabling the director to create a desired mood by moving the dialogue, action and ambient sounds around the soundstage, resulting in a more realistic presentation.
EzSet takes the guesswork out of the manual process described in the AVR 146 owner's guide, replacing multiple steps with a simple button press.
By now you should have connected all of your speakers and sources and your video display. You should have turned on the receiver and used the Manual Setup menus to program each of your speakers as Large or Small.
Sit in the listening position with the remote control, and make sure to eliminate external noises for the few minutes needed to run the EzSet procedure.
Use the volume control buttons on the remote to adjust the volume to -15dB.
Point the remote at the receiver. Press and hold the SPL Button until the LED remains steadily lit, then press the "5" key. See Figure 3. The procedure works best if you hold the remote at about ear level, pointed toward the receiver. Try not to tilt the remote out of line with the AVR's front panel.
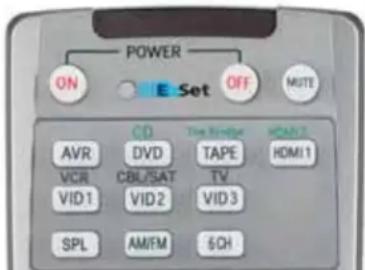
Figure 3 — EzSet (SPL) Button
The receiver will generate a loud test tone, which sounds like static. In fact, it's a tone that simultaneously uses all frequencies from 20Hz to 20kHz.
The tone should be heard first through the front left speaker. It will circulate to the other speakers in this order: front left, center, front right, surround right, surround left. The tone pauses for a few moments at each speaker position, while a microphone built into the remote measures the loudness (sound pressure level) of the tone. The remote contains programming that compares the loudness of the tone at each position to a reference and sends commands to the receiver to adjust the output level for that channel until the tone matches the reference.
A tri-color LED on the remote indicates EzSet's findings. The LED turns red if the channel's level is too high, amber if the level is too low, and green when the level is correct.
The result is that each speaker will be heard equally loudly at the listening position. This is important for movie directors, who adjust the loudness of each channel in the recording to produce a desired sound presentation. Usually, the director reduces the loudness of, or even the presence of information in the surround channels so as not to distract the viewer from the main action taking place on screen. If the test tone sounds as loud in the rear speakers as it does coming from the other speakers, then the receiver is performing correctly.
As the tone circulates to each speaker position, the semi-OSD system and the front panel will display a message reporting which channel the tone is being sent to. Make sure that the message matches the speaker you are actually hearing the tone from, and that you are hearing a tone from each speaker. If that isn't the case, press the Test Buttontwice to stop EzSet, and turn off the receiver and unplug it. Then check your speaker-wire connections.
The semi-OSD system and front panel will also display the level adjustments being made. The levels may vary from -10dB to +10dB. If you notice that the levels for all speakers are being adjusted very far in either direction, then stop EzSet by pressing the Test Button twice, and adjust the master volume level higher to compensate for EzSet pushing each speaker close to +10dB, or lower to compensate for EzSet lowering each speaker close to -10dB.
As the levels are being adjusted, the LED on the remote will change until it is green for all channels.
The tone will circulate a second time, and then the procedure will end.
NOTE: In order to optimize performance for each of the many surround modes and their variants, the AVR 146 is able to associate a different set of output level settings with each mode. While this results in extremely realistic reproduction of surround sound presentations, it does require that you determine the correct settings for each surround mode.
The first time you turn on the AVR, it will default to the Logic 7 Music mode. Harman Kardon recommends that at initial setup you use the default Logic 7 mode, and then copy down the settings produced by EzSet. Change the surround mode either by using the on-screen Surround Setup menu, or by pressing the desired surround mode group button on the remote, and reenter the same settings for each new mode, selecting all modes you are likely to use.
If you prefer, you may run EzSet for the major surround modes, such as Logic 7 (select either Cinema or Music), Dolby (select Dolby Pro Logic® II Movie) and DTS (select DTS Neo:6). Then you may copy the resulting level settings for the other mode variants within each group.
Advanced users may rerun EzSet for each mode individually.
ADVANCED FUNCTIONS
The RCP 5 remote control not only operates the AVR 146 and DVD 38, but it also serves as a universal remote that may be programmed to operate many of your other home theater components. The punch-through and macro features add even more flexibility and versatility.
Punch-Through Programming
The RCP 5 remote allows you to select one component for the remote to operate, while simultaneously setting certain groups of controls to operate another component. For example, while using the AVR to control surround modes and other audio functions, you may wish to operate the transport controls of your DVD player. Or while using the remote to control video functions on your TV, you may wish to use your cable box to change channels and the AVR to control the volume.
All of this is possible using punch-through programming.
NOTE: It is not necessary to program the remote to control your DVD player's transport controls while the AVR or a device connected to the VID2 or VID3 inputs is in use, as the remote is preprogrammed at the factory with this function.
To program punch-through control while operating any device:
-
Press and hold the Input Selector (or AVR Selector) for the main device the remote will be operating until the Input Selector lights, the Program Indicator LED flashes and the remote enters Program mode.
-
Select the type of punch-through programming:
a) To program volume control punch-through, press the Volume Up Button.
b) To program channel control punch-through, press the Volume Down Button.
NOTE: Do not program channel-control punch-through for the AVR. Doing so will override the Sleep command, which is not accessible in any other way, and the DSP Surround Mode Selector. If you have inadvertently done so, repeat Steps 1 through 3, but press the AVR Selector in both Steps 1 and 3.
c) To program Transport Control punch-through, press the Play Button.
- Press the Input Selector (or AVR Selector) for the device whose volume, channel or transport controls you would like to be active while operating the device you selected in the first step. The LED will flash green to confirm the programming.
For example, if you wish to watch your TV (programmed into the Video 3 button) while changing channels using your cable box (Video 2), you would first press the Video 3 Button until the LED flashed. You would then press the Volume Down Button, followed by the Video 2 Button.
To undo punch-through programming, follow the same steps as above, but press the same Input (or AVR) Selector in Steps 1 and 3.
NOTE: As mentioned earlier, the AVR, VID2 and VID3 devices are factory-programmed with transport-control punch-through to operate the DVD player. You may reprogram these selectors following the instructions in Steps 1 through 3 to operate another device, such as a CD player.
If you wish to reprogram these selectors to have no transport-control punch-through, follow the same procedure as for programming punch-through, but in Step 3 press either of the other two of these three selectors. For example, to remove transport-control punch-through from the VID2 device, follow the instructions in Steps 1 through 3, but press either the AVR or VID3 Button in Step 3.
Macros
Macros are used to program sequences of up to 19 commands that are executed with a single button press. Macros are well suited for Power On and Off commands, to send out a favorite multidigit channel number with one button press, or to have the ability to send out a code sequence to control another device while the remote is operating one device but with more flexibility than the built-in punch-through controls.
Some commands may not be programmed into macros: Mute, Dim, Channel Up/Down and any of the Surround Mode commands.
NOTE: Use caution when programming complicated macros. It isn't possible to program a pause or delay before sending commands after powering on, and the component may not be ready to respond to commands instantaneously after powering on.
To program, or "record," a macro, follow these steps:
- Simultaneously press one of the four Macro Buttons or the Power On Button and the Mute Button at the same time to enter Program mode.
- Press the Input (or AVR) Selector for each device before you enter commands to be transmitted to that device. This step counts as one of the 19 commands allowed for each macro.
NOTE: Even if you previously switched one of the dual-source Input Selectors (DVD/CD, TAPE/THE BRIDGE, HDMI 1/HDMI 2) to the primary or secondary source prior to programming the macro, the remote always requires you to press any of these selectors once to program the macro to select the primary source and twice for the secondary source.
- For the Power On command, do not press the Power On Button. Press the Mute Button instead.
- Press the Power Off Button to program the Power Off command.
- Press the Sleep Button to end the programming process.
ADVANCED FUNCTIONS
It isn't possible to "edit" a command within a macro. However, you may erase the macro as follows:
- Simultaneously press and hold the Mute Button and the Macro Button containing the macro until the Program LED flashes.
- Press the Surround Button to erase the macro.
Here are two macros that you may find useful when listening to an iPod docked in The Bridge:
The purpose of the first macro is to access the DMP SETTING menu while listening to The Bridge with one button press:
- Simultaneously press and hold the M1(or other unused) Macro Button and the Mute Button until the Program LED flashes.
- Press the AVR Button (the first command switches the remote to AVR mode).
- Press the OSD Button (the second command activates the on-screen menu system).
- Press the Set Button (the third command selects the INPUT SETUP menu; this macro assumes the current source is The Bridge).
- Press the ▼ Button three times (the fourth, fifth and sixth commands navigate to the GO TO DMP SETTING line).
- Press the Set Button again (the seventh command selects the DMP SETTING menu).
- Press the Sleep Button to end the programming process. You have now programmed the first macro, which will display the DMP SETTING menu after you have selected The Bridge as your source input.
After you have made your selections in the DMP SETTING menu, such as turning on Repeat Playback or Shuffle mode, the second macro enables you to exit the on-screen menu system and return the remote to The Bridge mode, again with just one button press.
- Simultaneously press and hold the M2 (or other unused) Macro Button and the Mute Button until the Program LED flashes.
- Press the OSD Button (the first command exits the on-screen menu system; this macro assumes that you have not let the OSD time out).
- Press the Tape/The Bridge Input Selector twice (the second and third commands switch the selector to The Bridge mode and select The Bridge as the source). This step is required even if you already switched the selector's mode before programming the macro.
- Press the Sleep Button to end the programming process. You have now programmed the second macro, which may be used after running the first macro to exit the OSD system quickly and return the remote's operation to The Bridge.
Resetting the Remote
To reset the remote to its factory defaults, simultaneously press and hold any Input Selector and the "0" Numeric Key. When the LED flashes amber, enter the code "333". When the green LED goes out, the remote will have been fully reset.
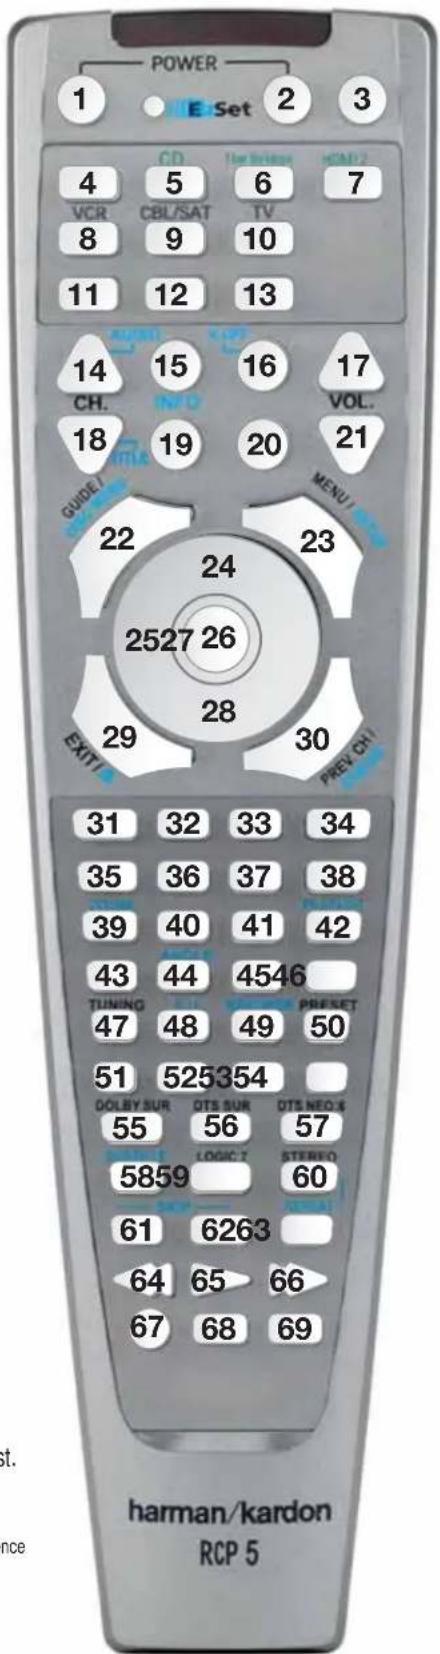
Refer to the numbered buttons in this drawing when using the Function List.
Figure 4 – Remote Control Function List Reference
Table A1 – Remote Control Function List
| No. | Button Name | AVR Function | DVD | CD/CD-R | Tape | VCR (VID1) | TiVo (VID1) | CBL (VID2) | SAT (VID2) | TV (VID3) | *Bridge (DMP) | HDMI 1/2 |
| 1 | Power On | Power On | Power On | Power On | Power On | Power On/Off | Power On | Power On | Power On | Power On | ||
| 2 | Power Off | Power Off | Power Off | Power Off | Power Off | TV Power | Power Off | Power Off | Power Off | Power Off | ||
| 3 | Mute | Mute | Mute (AVR) | Mute (AVR) | Mute (AVR) | Mute | Mute | Mute | Mute | Mute | Mute | |
| 4 | AVR | AVR Select | AVR Select | AVR Select | AVR Select | AVR Select | AVR Select | AVR Select | AVR Select | AVR Select | AVR Select | AVR Select |
| 5 | DVD/CD | DVD Input Select | DVD Select | DVD Select | DVD Select | DVD Select | DVD Select | DVD Select | DVD Select | DVD Select | DVD Select | DVD Input Select |
| CD Input Select | CD Select | CD Select | CD Select | CD Select | CD Select | CD Select | CD Select | CD Select | CD Select | CD Input Select | ||
| 6 | Tape/ *Bridge* | Tape Select | Tape Select | Tape Select | Tape Select | Tape Select | Tape Select | Tape Select | Tape Select | Tape Select | Tape Select | Tape Select |
| The Bridge (DMP) Select | The Bridge (DMP) Select | The Bridge (DMP) Select | The Bridge (DMP) Select | The Bridge (DMP) Select | The Bridge (DMP) Select | The Bridge (DMP) Select | The Bridge (DMP) Select | The Bridge (DMP) Select | The Bridge (DMP) Select | The Bridge (DMP) Select | ||
| 7 | HDMI 1/ HDMI 2 | HDMI 1 Select | HDMI 1 Select | HDMI 1 Select | HDMI 1 Select | HDMI 1 Select | HDMI 1 Select | HDMI 1 Select | HDMI 1 Select | HDMI 1 Select | HDMI 1 Select | HDMI 1 Select |
| HDMI 2 Select | HDMI 2 Select | HDMI 2 Select | HDMI 2 Select | HDMI 2 Select | HDMI 2 Select | HDMI 2 Select | HDMI 2 Select | HDMI 2 Select | HDMI 2 Select | HDMI 2 Select | ||
| 8 | VID 1 (VCR) | Video 1 Select | VCR Select | VCR Select | VCR Select | VCR Select | VCR Select | VCR Select | VCR Select | VCR Select | VCR Select | VCR Select |
| 9 | VID 2 (CBL/SAT) | Video 2 Select | CBL/SAT Select | CBL/SAT Select | CBL/SAT Select | CBL/SAT Select | CBL/SAT Select | CBL Select | SAT Select | CBL/SAT Select | CBL/SAT Select | CBL/SAT Select |
| 10 | VID 3 (TV) | Video 3 Select | TV Select | TV Select | TV Select | TV Select | TV Select | TV Select | TV Select | TV Select | TV Select | TV Select |
| 11 | SPL | EzSet | ||||||||||
| 12 | AM/FM | Tuner Select | Tuner Select | Tuner Select | Tuner Select | Tuner Select | Tuner Select | Tuner Select | Tuner Select | Tuner Select | Tuner Select | Tuner Select |
| 13 | 6CH | 6 Ch. Input Select | 6 Ch. Input Select | 6 Ch. Input Select | 6 Ch. Input Select | 6 Ch. Input Select | 6 Ch. Input Select | 6 Ch. Input Select | 6 Ch. Input Select | 6 Ch. Input Select | 6 Ch. Input Select | 6 Ch. Input Select |
| 14 | Sleep/Audio | Sleep | Audio | Channel + | Channel + | Channel + | Channel + | Channel + | Channel + | |||
| 15 | Test Tone | Test Tone | ||||||||||
| 16 | T/V/V.Off | V. OFF or TV/DVD | Input Select | TV/VCR | TV Input | TV/CBL | TV/SAT | TV/VCR | TV/Video | |||
| 17 | Vol Up | Volume Up* | Volume Up | Volume Up | Volume Up | Volume Up | ||||||
| 18 | Surr/Title | DSP Surround Mode Select | Title or Disc Menu* | CDR Select | Channel - | Channel - | Channel - | Channel - | Channel - | Channel - | ||
| 19 | OSD/Info | OSD | Disc Info | Program | OSD | Live TV | OSD | OSD | OSD | OSD | ||
| 20 | HD | HD Mode | ||||||||||
| 21 | Vol Down | Volume Down | Volume Down | Volume Down | Volume Down | Volume Down | Volume Down | |||||
| 22 | CH./Disc Menu | Channel Trim | Disc Menu or Title | Continuous Play | Guide | Info | Guide | |||||
| 23 | Speaker/Setup | Speaker Setup | Setup or Menu* | Intro Scan | Menu | Menu | Menu | Menu | Menu | Menu | Menu | |
| 24 | ▲ | Move/Adjust Up | Up | Up | Up | Up | Up | Up | Up | |||
| 25 | ◀ | Move/Adjust Left | Left | Left | Left | Left | Left | Left | Scroll - | Left | ||
| 26 | Set | Set | Enter | Enter | Select | Enter | Enter | Enter | Select | Set/Enter | ||
| 27 | ▶ | Move/Adjust Right | Right | Right | Right | Right | Right | Right | Scroll + | Right | ||
| 28 | ▼ | Move/Adjust Down | Down | Down | Down | Down | Down | Down | Down | |||
| 29 | Digital/Open/Close | Digital Input Select | Open/Close | Return/Exit | ||||||||
| 30 | Delay/Status | Delay Adjust | Status or Return* | Open/Close | Prev Channel | Prev Channel | Prev Channel | Prev Channel | ||||
| 31 | 1 | 1 | 1 | 1 | 1 | 1 | 1 | 1 | 1 | 1 | ||
| 32 | 2 | 2 | 2 | 2 | 2 | 2 | 2 | 2 | 2 | 2 | ||
| 33 | 3 | 3 | 3 | 3 | 3 | 3 | 3 | 3 | 3 | 3 | ||
| 34 | 4 | 4 | 4 | 4 | 4 | 4 | 4 | 4 | 4 | 4 | ||
| 35 | 5 | 5 | 5 | 5 | 5 | 5 | 5 | 5 | 5 | 5 | ||
| 36 | 6 | 6 | 6 | 6 | 6 | 6 | 6 | 6 | 6 | 6 | ||
| 37 | 7 | 7 | 7 | 7 | 7 | 7 | 7 | 7 | 7 | 7 | ||
| 38 | 8 | 8 | 8 | 8 | 8 | 8 | 8 | 8 | 8 | 8 | ||
| No. | Button Name | AVR Function | DVD | CD/CD-R | Tape | VCR (VID1) | TiVo (VID1) | CBL (VID2) | SAT (VID2) | TV (VID3) | "Bridge = (DMP) | HDMI 1/2 |
| 39 T | Tun-M/Zoom | Tuning Mode | Zoom or Chapter+* | Repeat | ||||||||
| 40 | 9 | 9 | 9 | 9 | 9 | 9 | 9 | 9 | 9 | 9 | ||
| 41 | 0 | 0 | 0 | 0 | 0 | 0 | 0 | 0 | 0 | 0 | ||
| 42 | Memory/Playlist | Memory | Playlist or Audio* | Time | ||||||||
| 43 | Tuning Up | Tuning Up | Next Chapter* | Track Direct | Cancel | Cancel | Sleep | |||||
| 44 | Direct/Angle | Direct Tuner Entry | Angle | Random Play | FAV/Angle | FAV | Angle/FAV | |||||
| 45 | Clear | Clear | Clear | Clear | Clear | Clear | Next | |||||
| 46 | Preset Up | Preset Tune Up | Slow Forward* | +10 | Alt | |||||||
| 47 | Tuning Down | Tuning Down | Prev Chapter* | Track Increment | ||||||||
| 48 | Tone/P/I | Tone Mode | P/I | Program | Tone Mode | Tone Mode | Tone Mode | Tone Mode | ||||
| 49 | D. Skip/Audio Mode | Disc Skip (DVD) | Audio Mode or Disc Skip* | Disc Skip | Skip | |||||||
| 50 | Preset Down | Preset Down | Slow Rev* | |||||||||
| 51 | M1 | Macro 1 | Macro 1 | Macro 1 | Macro 1 | Macro 1 | Macro 1 | Macro 1 | Macro 1 | Macro 1 | Macro 1 | Macro 1 |
| 52 | M2 | Macro 2 | Macro 2 | Macro 2 | Macro 2 | Macro 2 | Macro 2 | Macro 2 | Macro 2 | Macro 2 | Macro 2 | Macro 2 |
| 53 | M3 | Macro 3 | Macro 3 | Macro 3 | Macro 3 | Macro 3 | Macro 3 | Macro 3 | Macro 3 | Macro 3 | Macro 3 | Macro 3 |
| 54 | M4 | Macro 4 | Macro 4 | Macro 4 | Macro 4 | Macro 4 | Macro 4 | Macro 4 | Macro 4 | Macro 4 | Macro 4 | Macro 4 |
| 55 | Dolby Surround | Dolby Modes | ||||||||||
| 56 | DTS/A-B | DTS Digital Modes | A-B Repeat | |||||||||
| 57 | DTS Neo:6 DTS Neo:6 Select | |||||||||||
| 58 | Night/Subtitle | Night Mode Select | Subtitle On/Off | CDP Select | ||||||||
| 59 | Logic 7/Random | Logic 7 Select | Random | |||||||||
| 60 | Stereo/Repeat | Stereo Mode Select | Repeat | |||||||||
| 61 | Skip Down | Skip - (DVD) | Step - | Skip - | Scan - | Thumbs Down | Skip - (DVD) | Skip - (DVD) | Skip - (DVD) | |||
| 62 | Skip Up | Skip + (DVD) | Step + | Skip + | Scan + | Thumbs Up | Skip + (DVD) | Skip + (DVD) | Skip + (DVD) | |||
| 63 | Dim | Dimmer | Dimmer | |||||||||
| 64 | Rewind (◀◀) | R. Search (DVD) | R. Search/Slow | R. Search | Rewind | Rewind | R. Search | R. Search (DVD) | R. Search (DVD) | R. Search (DVD) | Skip-/R. Search | R. Search |
| 65 | Play (◀◀) | Play (DVD) | Play | Play | R. Play/F. Play | Play | Play | Play (DVD) | Play (DVD) | Play (DVD) | Play | Play |
| 66 | Fast-Forward (▶▶) | F. Search (DVD) | F. Search/Slow | F. Search | Fast Fwd | Fast Fwd | F. Search | F. Search (DVD) | F. Search (DVD) | F. Search (DVD) | Skip+/F. Search | F. Search |
| 67 | Record | Record | Record/Pause | Record | Record | Record | ||||||
| 68 | Stop | Stop (DVD) | Stop | Stop | Stop | Stop | Slow | Stop (DVD) | Stop (DVD) | Stop (DVD) | Stop | |
| 69 | Pause | Pause (DVD) | Pause | Pause | Pause | Pause | Pause (DVD) | Pause (DVD) | Pause (DVD) | Pause | Pause | |
* This command is not available when the DVD 38 (product code 007) has been programmed into the remote's DVD mode.
NOTE: When any of the transport controls are pressed while the remote is in AVR, Video 2 or Video 3 mode, the remote will automatically switch to DVD mode and the command will be applied to the DVD player. If you then press a button native to the original mode, e.g., Volume Down for the AVR, the remote will revert to the original mode. See Punch-Through Programming, as described in the Advanced Functions section, for more information.
Refer to Tables A2 through A9 when programming the codes for your components into the remote.
Table A2 – Remote Control Product Codes – TV
TV Manufacturer/Brand Setup Code Number
| AIWA 027 | |
| A MARK 122 132 | |
| ADMIRAL 192 | |
| AKAI 123 160 | |
| AMPRO 164 | |
| ANAM 045 106 109 112 | 22 |
| AOC 122 123 128 | |
| BLAUPUNKT 084 | |
| BROKSONIC 205 206 | |
| CANDLE 123 128 | |
| CAPEHART 059 | |
| CENTURION 123 171 | |
| CENTRONIC 045 | |
| CITIZEN 045 123 128 132 | |
| CLASSIC 045 | |
| CONCERTO 128 | |
| CONTEC | 045 |
| CORANDO | 172 |
| CORONADO | 132 |
| CRAIG | 045 157 158 159 |
| CROWN | 045 132 |
| CURTIS MATHES | 123 128 132 |
| CXC | 045 |
| DAEWOO 045 087 102 105 | 106 108 111 114 116 119 |
| 127 128 132 | |
| DAYTRON | 128 132 |
| DIGILINK | 200 |
| DYNASTY | 045 |
| DYNATECH | 063 |
| ELECTROHOME | 115 132 |
| EMERSON | 045 123 128 132 139 157 158 159 162 205 |
| FUNAI | 045 |
| FUTURETECH | 045 |
| GE | 029 087 121 123 128 133 145 159 163 |
| GOLDSTAR/LG | 101 110 122 128 132 |
| GRUNDIG 193 | |
| HALL MARK 128 | |
| HARMAN KARDON | 201 |
| HITACHI | 123 128 132 147 |
| INFINITY | 148 |
| INKEL | 120 |
| JBL | 148 |
| JC PENNEY 115 123 128 | 132 145 |
| JENSEN | 019 |
| JVC | 079 087 134 |
| KAWASHO | 173 |
| KEC | 045 |
| KENWOOD | 123 204 |
| KMC 132 | |
| KTV | 045 123 132 162 |
| LLOYTRON 172 173 |
TV Manufacturer/Brand Setup Code Number
| LODGENET 069 | |
| LOGIK 069 | |
| LUXMAN 128 | |
| LXI | 077 145 148 |
| MAGNAVOX | 030 123 128 132 145 148 |
| MARANTZ | 115 123 148 |
| MATSUI 148 | |
| MEMOREX | 069 128 |
| METZ | 084 |
| MGA | 115 123 128 |
| MINERVA | 084 |
| MITSUBISHI | 077 115 123 128 160 167 168 |
| MTC 175 176 | |
| NATIONAL | 148 177 179 180 181 182 |
| NEC | 115 121 123 125 |
| NIKEI | 045 |
| ONKING | 045 |
| ONWA | 045 |
| OPTONICA | 077 |
| ORION | 207 208 209 210 211 |
| PANASONIC | 087 148 169 |
| PHILCO 045 115 123 128 | 132 148 |
| PHILIPS | 033 034 035 036 123 128 132 145 148 |
| PIONEER 024 123 128 | |
| PORTLAND | 128 132 |
| PROSCAN | 133 |
| PROTON | 059 122 128 132 165 |
| QUASAR | 032 087 |
| RADIO SHACK | 045 128 132 180 196 197 |
| RCA | 021 115 123 128 133 145 161 163 |
| REALISTIC | 045 167 196 |
| RUNCO | 152 153 |
| SAA | 183 |
| SAMPO 059 123 128 | |
| SAMSUNG | 020 022 124 128 132 145 |
| SANYO | 026 054 |
| SCOTT | 045 128 132 |
| SEARS | 128 132 145 |
| SHARP | 077 128 132 |
| SIEMENS | 084 |
| SIGNATURE 069 | |
| SONY | 028 031 117 130 136 194 212 |
| SOUNDESIGN | 045 128 |
| SPECTRICON | 122 |
| SSS | 045 |
| SYLVANIA | 025 123 128 145 148 |
| SYMPHONIC 184 | |
| TANDY | 077 |
| TATUNG | 063 |
| TECHNICS | 181 |
| TECHWOOD | 128 |
| TV Manufacturer/Brand | Setup Code Number |
| TEKNIKA | 045 069 115 123 128 132 |
| TELERENT | 069 |
| TERA 156 | |
| THOMSON | 190 191 |
| TMK | 128 |
| TOSHIBA | 063 129 202 |
| TOTEVISION | 132 |
| VIDEO CONCEPTS 160 | |
| VIDTECH | 128 |
| WARDS | 069 128 132 148 |
| YAMAHA | 123 128 |
| YORK | 128 |
| YUPITERU | 045 |
| ZENITH | 069 090 |
| ZONDA | 122 |
Table A3 – Remote Control Product Codes – VCR
| VCR Manufacturer/Brand Setup Code Number | |
| AIWA 040 | |
| AKAI 048 108 109 126 | |
| AMPRO 076 | |
| ASA 134 | |
| AUDIO DYNAMICS 018 048 | |
| BROKSONIC 110 147 | |
| CANDLE 134 135 | |
| CANON 135 140 | |
| CAPEHART 094 | |
| CITIZEN 134 | |
| CRAIG 045 116 | |
| DAEWOO 017 094 104 | |
| DAYTRON 094 | |
| DBX 018 048 | |
| DYNATECH 040 | |
| EMERSON | 013 040 042 110 112 |
| FISHER | 017 |
| FUNAI | 040 |
| GE | 076 095 124 |
| GO VIDEO 113 | |
| GOLDSTAR/LG | 018 107 |
| HARMAN KARDON | 002 003 018 049 |
| HITACHI | 040 048 |
| JC PENNEY | 018 045 |
| JENSEN | 048 |
| JVC | 018 048 111 132 |
| KENWOOD | 020 048 |
| LLOYD | 040 |
| LXI | 020 040 |
| MAGIN | 045 |
| MAGNAVOX | 040 |
Table A3 (continued)
| VCR Manufacturer/Brand | Setup Code Number |
| MARANTZ | 018 |
| MEMOREX | 017 020 040 052 053 054 076 |
| MGA | 049 |
| MITSUBISHI | 049 131 |
| MULTITECH | 040 |
| NAD | 139 |
| NATIONAL | 140 |
| NEC 018 048 | |
| NORDMENDE | 048 |
| OPTIMUS 159 | |
| ORION | 147 |
| PANASONIC | 125 150 167 172 |
| PHILCO 040 | |
| PHILPS | 040 075 |
| PORTLAND | 094 |
| PULSAR 076 | |
| QUASAR | 001 125 |
| RADIO SHACK | 055 134 140 142 158 159 |
| RCA 095 124 125 157 172 | |
| REALISTIC | 017 020 040 045 159 |
| SALORA | 020 |
| SAMSUNG | 045 051 095 105 109 |
| SANSUI 048 116 147 | |
| SANYO | 017 020 |
| SCOTT | 110 112 |
| SEARS | 017 020 |
| SHARP | 129 156 |
| SONY | 080 129 |
| SOUNDESIGN | 040 |
| SYLVANIA | 040 |
| SYMPHONIC | 040 |
| TANDY | 017 040 |
| TASHICO | 134 |
| TATUNG | 048 |
| TEAC 040 048 | |
| TEKNIKA | 040 |
| THOMAS | 040 |
| TiVo | 004 005 006 007 008 009 010 012 |
| TMK | 013 |
| TOSHIBA | 112 155 |
| TOTEVISION | 045 |
| UNITECH | 045 |
| VECTOR RESEARCH | 018 |
| VIDEO CONCEPTS 018 040 | |
| VIDEOSONIC | 045 |
| WARDS | 040 045 112 |
| YAMAHA | 018 040 048 |
| ZENITH | 040 050 076 083 |
Table A4 — Remote Control Product Codes — CD
CD Manufacturer/Brand Setup Code Number
| ADCOM 063 069 | |
| AIWA 072 111 118 156 170 | |
| AKAI 050 177 184 | |
| AUDIO TECHNICA 053 | |
| AUDIOACCESS 125 | |
| AUDIOFILE 211 | |
| BSR 044 | |
| CALIFORNIA AUDIO 109 | |
| CAPETRON/C 070 | |
| CARRERA 087 | |
| CARVER 136 140 141 143 | 144 145 185 186 |
| CASIO 117 166 | |
| CLARINETTE 166 | |
| DENON 187 188 213 | |
| EMERSON | 052 093 108 |
| FISHER 055 095 | |
| FRABA | 117 |
| FUNAI | 126 |
| GE | 164 |
| GENEXXA | 108 |
| GOLDSTAR/LG 016 087 | |
| HAITAI 099 214 | |
| HARMAN KARDON | 001 002 025 054 190 |
| HITACHI | 093 |
| INKEL | 216 |
| JC PENNEY | 098 147 |
| JENSEN | 153 |
| JVC | 176 195 196 |
| KENWOOD | 030 062 078 079 148 151 176 178 181 |
| LOTTE | 108 |
| LUXMAN | 077 102 |
| LXI | 164 |
| MAGNAVOX | 039 113 |
| MARANTZ | 058 084 191 192 193 |
| MCINTOSH | 194 |
| MCS | 080 098 |
| MITSUMI | 152 |
| MODULAIRE | 166 |
| NAD | 013 074 197 198 |
| NAKAMICHI | 199 200 201 |
| NEC | 069 |
| NIKKO 053 055 | |
| ONKYO 037 038 045 046 | 171 175 202 203 |
| OPTIMUS | 065 089 091 092 099 104 212 |
| PANASONIC | 075 109 119 158 183 204 |
| PHILIPS 039 138 149 209 | |
| PIONEER | 071 094 100 112 123 131 161 162 215 |
| PROTON | 210 |
| QUASAR | 109 |
| RADIO SHACK | 126 166 213 |
| RCA 024 081 093 150 | |
Table A4 (continued)
CD Manufacturer/Brand Setup Code Number
| RCX 169 | |
| REALISTIC | 058 093 095 104 105 108 164 166 |
| SANSUI | 047 081 134 157 172 |
| SANYO | 033 082 095 |
| SCOTT | 108 |
| SHARP | 058 105 114 151 159 167 180 181 |
| SHERWOOD | 003 041 058 105 133 |
| SONY | 103 115 116 118 132 139 163 205 206 207208 212 217 |
| SOUNDSTREAM | 124 |
| SYMPHONIC 059 110 | |
| TAEKWANG | 177 |
| TEAC 011 058 085 086 106 107 110 121 137 146154 | |
| THETA DIGITAL | 039 |
| TOSHIBA | 013 074 097 151 155 173 |
| VECTOR RESEARCH | 087 |
| VICTOR | 120 130 |
| WARDS 095 | |
| YAMAHA | 019 031 053 061 135 169 |
| YORK | 166 |
Table A5 – Remote Control Product Codes – DVD
| DVD Manufacturer/Brand | Setup Code Number |
| APEX DIGITAL | 061 |
| DENON 019 051 | |
| GE | 003 004 |
| GOLDSTAR/LG 005 055 064 | 066 |
| HARMAN KARDON | 001 002 007(Default) 068 |
| JVC | 006 |
| MAGNAVOX | 056 |
| MARANTZ | 059 |
| MITSUBISHI | 023 |
| NAD | 062 |
| ONKYO 009 048 | |
| PANASONIC | 024 030 044 |
| PHILIPS 056 | |
| PIONEER | 041 065 |
| PROCEED 060 | |
| PROSCAN | 003 004 |
| RCA 003 004 | |
| SAMSUNG 053 054 | |
| SHARP | 028 |
| SONY | 043 045 |
| THOMSON | 003 004 |
| TOSHIBA | 009 058 067 |
| YAMAHA | 030 063 |
| ZENITH 005 055 064 |
Table A6 – Remote Control Product Codes – SAT
SAT Manufacturer/Brand Setup Code Number
| ALPHASTAR 472 | |
| ALPHASTAR DBS 450 | |
| ALPHASTAR DSR 442 | |
| BIRDVIEW 425 | |
| CHANNEL MASTER 320 321 325 361 | |
| CHAPARRAL 315 316 451 | |
| CITOH 360 | |
| DRAKE 313 317 318 413 481 | |
| DX ANTENNA 331 352 379 483 | |
| ECHOSTAR 395 397 452 453 463 477 478 484 485 | |
| ELECTRO HOME 392 | |
| FUJITSU 324 329 334 | |
| GENERAL INSTRUMENT | 303 311 323 365 403 454 468 474 |
| HITACHI DBS | 455 |
| HOUSTON TRACKER | 463 |
| HUGHES | 437 489 |
| JANIEL | 366 |
| JERROLD | 454 468 484 |
| KATHREIN 410 | |
| LEGEND | 453 |
| MACOM | 317 365 369 370 371 |
| MAGNAVOX | 461 473 |
| MEMOREX | 453 |
| NEXTWAVE 423 | |
| NORSAT 373 | |
| OPTIMUS | 466 |
| PACE DSS | 487 |
| PANASONIC | 366 469 |
| PANASONIC DBS | 457 |
| PANSAT | 420 |
| PERSONAL CABLE 418 | |
| PHILIPS | 375 |
| PICO | 407 |
| PRESIDENT | 381 404 |
| PRIMESTAR | 412 454 468 475 |
| RCA | 301 439 465 490 |
| RCA DSS | 458 |
| REALISTIC | 349 480 |
| SAMSUNG | 442 |
| SATELLITE SERVICE CO | 335 388 |
| SCIENTIFIC ATLANTA | 339 |
| SONY | 405 |
| STAR CHOICE DBS | 459 |
| STARCAST | 347 |
| SUPER GUIDE | 327 423 |
| TEECOM | 330 333 390 391 393 409 |
| TOSHIBA | 302 426 460 461 462 |
| UNIDEN | 323 332 348 349 350 351 354 355 381 383 |
| 389 403 466 479 480 | |
| ZENITH | 384 385 387 394 419 488 |
Table A7 – Remote Control Product Code – TAPE
TAPE Manufacturer/Brand|Setup Code Number
| HARMAN KARDON 001 |
Table A8 – Remote Control Product Codes – CBL
| CBL Manufacturer/Brand | Setup Code Number |
| ABC | 001 011 |
| ALLEGRO | 111 |
| AMERICAST | 212 |
| ARCHER | 112 |
| BELCOR 113 | |
| CABLE STAR | 033 113 |
| CITIZEN | 111 |
| COLOUR VOICE | 085 090 |
| DIGI | 114 |
| EAGLE | 186 |
| EASTERN | 066 070 |
| ELECTRICORD | 039 |
| EMERSON | 112 |
| FOCUS | 116 |
| G.I. | 001 011 017 096 097 |
| GC ELECTRONICS | 113 |
| GEMINI | 032 060 |
| GENERAL | 210 |
| GENERAL INSTRUMENT | 210 |
| GOODMIND | 112 |
| HAMLIN | 056 099 100 101 117 175 208 |
| HITACHI | 001 188 |
| JASCO | 111 |
| JERROLD | 001 002 011 017 073 096 097 162 188 210 |
| LINSAY | 118 |
| MACOM | 191 |
| MAGNAVOX | 017 019 068 |
| MOVIE TIME | 035 039 |
| NSC | 035 190 |
| OAK | 197 220 |
| PACE | 179 |
| PANASONIC | 053 176 177 189 214 |
| PANTHER | 114 |
| PHILIPS | 013 019 020 085 090 |
| PIONEER | 001 041 119 171 209 215 216 |
| POPULAR MECHANICS | 116 |
| PRELUDE | 120 |
| PRIMESTAR | 162 |
| RADIO SHACK | 111 112 213 |
| RCA | 053 214 |
| RECOTON 116 | |
| REGAL | 056 099 100 101 208 |
| REMBRANT | 032 |
| SAMSUNG | 003 072 186 |
| SCIENTIFIC ATLANTA 183 203 221 222 | |
| SEAM 121 | |
| SIGNATURE 001 188 | |
| SPRUCER 053 081 177 189 | |
| STARCOM 002 011 163 | |
| STARGATE 120 | |
| TANDY 024 | |
| TELECAPATION 028 | |
| TEXSCAN 036 | |
| TFC 122 | |
| TIMELESS | 123 |
| TOCOM | 170 205 |
| UNITED CABLE | 011 |
| UNIVERSAL 033 034 039 042 113 | |
| VIDEWAY 124 211 | |
| VIEWSTAR | 019 025 086 089 190 |
| ZENITH | 065 125 211 219 |
| ZENTEK | 116 |
Table A9 – Remote Control Product Codes – THE BRIDGE/DMP
| DMP Manufacturer/Brand | Setup Code Number |
| HARMAN KARDON | 001 |
| TEN TECHNOLOGIES 002 |
Harman Kardon, EzSet and Logic 7 are trademarks of Harman International Industries, Incorporated, registered in the United States and/or other countries.
Designed to Entertain is a trademark of Harman International Industries, Incorporated.
Dolby and Pro Logic are registered trademarks of Dolby Laboratories.
DTS, DTS Neo:6 and DTS-ES are registered trademarks of DTS, Inc.
HDMI (High-Definition Multimedia Interface) is a trademark of HDMI Licensing LLC.
iPod is a trademark of Apple Inc., registered in the U.S. and other countries.
TiVo is a registered trademark of TiVo Inc.
NOTES
NOTES
harman/kardon
H A Harman International Company
250 Crossways Park Drive, Woodbury, New York 11797
www.harmankardon.com
© 2007 Harman International Industries, Incorporated. All rights reserved.
Par No. COX1A1208Z
Brand : HARMAN KARDON
Model : RCP 5
Category : Remote control