
KDT-77 - Television SILVERCREST - Free user manual and instructions
Find the device manual for free KDT-77 SILVERCREST in PDF.


| Product Type | LED Television |
| Brand | SilverCrest |
| Model | KDT-77 |
| Screen Size | 32 inches (81 cm) |
| Resolution | 1366 x 768 (HD Ready) |
| Dimensions (with stand) | 73.2 x 47.5 x 18.5 cm |
| Weight (with stand) | 4.5 kg |
| Power Supply | AC 100-240V, 50/60Hz |
| Power Consumption (typical) | 50 W |
| Standby Consumption | < 0.5 W |
| Energy Class | A+ |
| HDMI Inputs | 2 |
| USB Ports | 1 (USB 2.0) |
| Other Connections | VGA, Audio In/Out, AV, CI Slot |
| Built-in Tuner | DVB-T/T2/C (digital terrestrial and cable) |
| Sound Output | 2 x 5 W |
| Operating System | Linux-based (proprietary) |
| Cleaning | Wipe with a soft, dry cloth; do not use liquid cleaners. |
| Safety Notes | Do not expose to rain or moisture; use only provided stand or wall mount; keep ventilation slots clear. |
| Spare Parts | Remote control (model RC-xxx) available from SilverCrest service. |
| Repairability | Repairs should be carried out by qualified personnel; only use approved spare parts. |
| Warranty | 1 year from date of purchase (proof required). |
Frequently Asked Questions - KDT-77 SILVERCREST
User questions about KDT-77 SILVERCREST
0 question about this device. Answer the ones you know or ask your own.
Ask a new question about this device
Download the instructions for your Television in PDF format for free! Find your manual KDT-77 - SILVERCREST and take your electronic device back in hand. On this page are published all the documents necessary for the use of your device. KDT-77 by SILVERCREST.
USER MANUAL KDT-77 SILVERCREST
Thank you for choosing our digital DVB-T/TV/DVD/Radio combination SilverCrest KDT-77. In order to fully benefit from all of the unit's features, we recommend that prior to using it for the first time you read the relevant instructions in this manual, even if you are familiar with operating electronic devices. Pay particular attention to chapter Important Safety Guidelines on page 4. Keep this manual for future reference. If you sell or pass on the device to a third party these instructions must also be supplied with it.
Copyright
The contents of this manual cannot be reproduced, copied or duplicated in electronic, mechanical, magnetic, optical, chemical, manual or any other format, without our permission, nor may they be stored in a search engine or translated into another language.
Dolby and the double D symbol are registered trademarks of Dolby Laboratories.
Declaration
The descriptions and properties in this manual are provided as general guidelines and do not represent any guarantee. In order to provide you with a product of the highest quality, we reserve the right to make improvements or changes without prior notification.
The German version will be the final point of reference should any differences in other language versions arise with regard to any of the product descriptions and user instructions.
Manufacturer details
JNC Datum Tech GmbH
Benzstraße 33
71083 Herrenberg
Germany
Table of Contents
Introduction ....1
Copyright ....1
Declaration....1
Manufacturer details ....1
Table of Contents ......2
Important Safety Guidelines....4
What is included....6
Unit overview 7
Front panel 7
Back panel 8
Display 8
Remote control 9
Installation 12
Connecting the TV antenna 12
Connecting the radio antennas 12
Connecting an external AV signal source 13
Connecting the power supply 13
Assembly 14
Basic functions....15
Switching on/off 15
Volume 15
Setting the time 15
Timer 16
Screen settings 17
Switching the screen on/off 17
Radio mode....18
FM / AM 18
Radio channel search 18
Save radio channels 18
Selecting a saved radio channel 18
TV mode 19
Selecting channels 19
TV SETUP 19
DVB-T mode....21
Selecting channels 21
Audio 21
Subtitle 21
EPG (electronic program guide) 21
Favourites 22
Teletext (TTX) 22
Television/Radio (TVR) 22
DVB-T menu 22
DVD playback 26
Insert/eject DVD 26
Menus 26
Playback / Pause / Stop 26
Skip forward / back 26
Quick motion 26
Slow motion 26
Subtitle 27
Language 27
Zoom 27
Repeat 27
Context menu 27
Info Display 28
DVD Setup 28
CD playback....31
Insert/eject music CD 31
Playback / Pause / Stop 31
Skip forward / back 31
Quick motion 31
Repeat 32
Info Display 32
Photo CD playback....33
Insert/eject photo CD 33
Selecting photos 33
Rotate / Flip 34
Zoom in / Zoom out 34
Repeat 34
AV playback....34
Technical data....35
Disposal 36
Batteries 36
Unit 36
Technical Support 37
How to show films in widescreen format 37
Television systems 37
Time zones 39
Trouble shooting 39
Important Safety Guidelines

Please read and adhere strictly to the following instructions
- Disconnecting from the AC power source: Even after turning off the POWER switch the unit remains connected to the mains. The unit also uses power when in standby mode. Unplug the unit completely from the power socket in order to switch it off completely. The unit should be installed in such a way as to allow unobstructed access to the power socket, in case it needs to be unplugged in an emergency. To avoid risk of fire, unplug the unit completely from the power socket if you do not intend to use it for an extended period of time, e.g. when going on holiday.
- Handle the power cable with care: Always hold the power cable at the plug. Do not pull on the cable itself and never touch the power cable with wet hands, as this can cause a short circuit or electric shock. Do not place the unit or furniture or anything similar on the power cable and ensure that it is not pinched. Never make a knot in the power cable or do not tie it to other cables. The power cable should be positioned out of the way so that nobody steps on it. A damaged power cable can cause a fire or electric shock. Check the power cable regularly. If it is damaged, contact your nearest authorised customer service or your dealer to get it replaced.
- Never open the casing surrounding the unit or the power adaptor; they do not contain any components to be maintained! Open casings represent a danger to life through electric shock.
- Keep electrical devices away from children! Never allow children to use electrical devices without supervision. Children are not always able to recognise possible dangers. Batteries/accumulators can be fatal if swallowed. Keep batteries out of the reach of small children. Seek medical attention immediately in the event of a battery being swallowed. Keep shrink-wrap packaging out of the reach of children also. There is a risk of suffocation.
- Install the unit according to the instructions on page 14. It is not designed for spaces where there is a high level of humidity (e.g. bathroom). Please ensure that
■ there is always adequate ventilation;
- the unit is kept away from direct heat sources (e.g. cooker, heating);
■ the unit is not in direct sunlight;
- the unit does not come into contact with water splashes or dripping water;
- the unit is not located in the immediate vicinity of magnetic fields (e.g. speakers);
- no open fire sources (e.g. burning candles, gas cooker) are located near or beneath the unit. Avoid having foreign objects being inserted into the unit.
- Unplug the unit from the power supply and disconnect the aerial when there is a risk of lightning.
- Protect the display and LCD screen from any exposure to impacts. This could cause damage to the glass in the display or the screen or the liquid can escape. If liquid gets into the eyes, onto the skin or clothes, rinse off immediately with water. If fluid gets in the eyes seek medical attention immediately.
- Do not turn up the volume too high. There is a risk of damage to your hearing.
-
Only use the power supply unit provided: MPA-690B-12.
-
This unit contains a laser system and is classified according to DIN EN 60825-1 as a “Class 1 Laser product” and indicated as such by a label on the casing. Never open the unit and do not attempt to repair the unit yourself. There is invisible laser radiation within the unit. Protect yourself against exposure to laser radiation.
- The unit and the remote control are magnetic. To avoid data loss on magnetic strip cards (EC cards, credit cards, telephone cards etc) or diskettes, keep these items away from the unit and the remote control.
- Risk of explosion through improper replacement of the batteries. See also Important information on battery use on page 11.
- Dispose of your batteries according to the regulations governing battery disposal (see page 36).
- Dispose of your unit in accordance with 2002/96/EC Directive (see page 36). Most importantly you should not dispose of the unit in the household waste.
natural_image
Symbol of a trash bin crossed with two crossed lines, enclosed in a circle (no text or numbers present)What is included
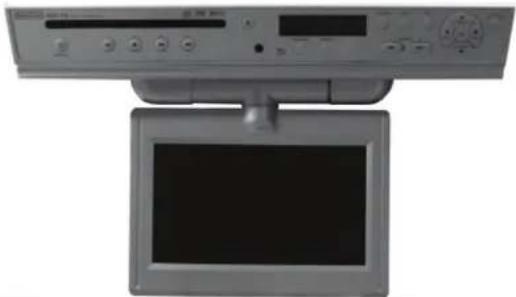 | 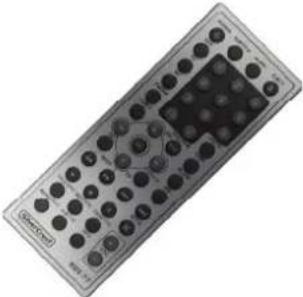 |
| 1. DVB-T/TV/DVD/Radio Combination | 2. Remote control |
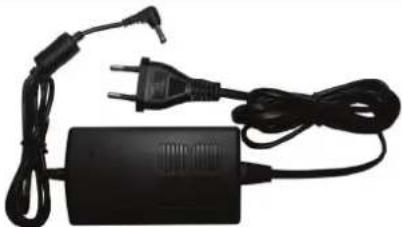 | 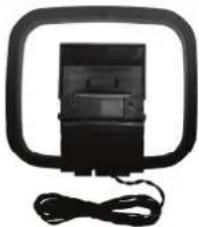 |
| 3. Power supply 4. AM antenna | |
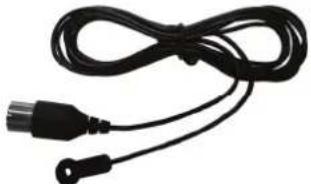 | 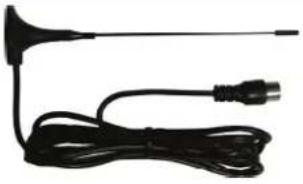 |
| 5. FM antenna 6. DVB-T antenna | |
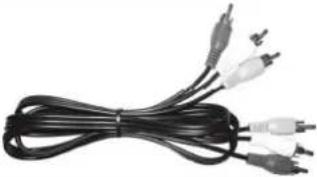 |  |
| 7. AV cable 8. Screws | |
 |  |
| 9. Mounting diagram 10. Manual |
Note:
We reserve the right to make design and technical data changes without notification.
Unit overview
Front panel
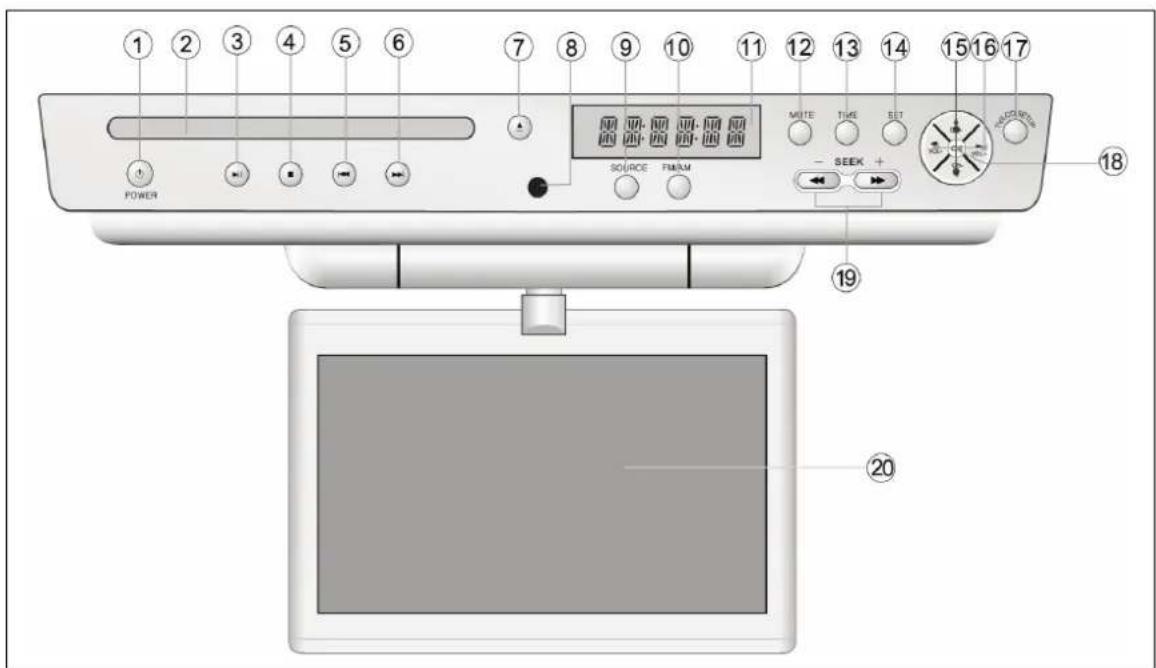
- POWER
- CD/DVD tray
- ▶Play/Pause
- Stop
- Skip back
- ▶ Skip forward
- ▲Eject
- Remote control sensor
- SOURCE
- FM / AM
- Display
- MUTE
- TIME
- SET
- ▲ (CH+), ▼ (CH-)
- ◀ (VOL-), ▶ (VOL+)
- TV/LCD SETUP
- OK
- ◀ (SEEK-), ▶ (SEEK+)
- LCD screen
Back panel
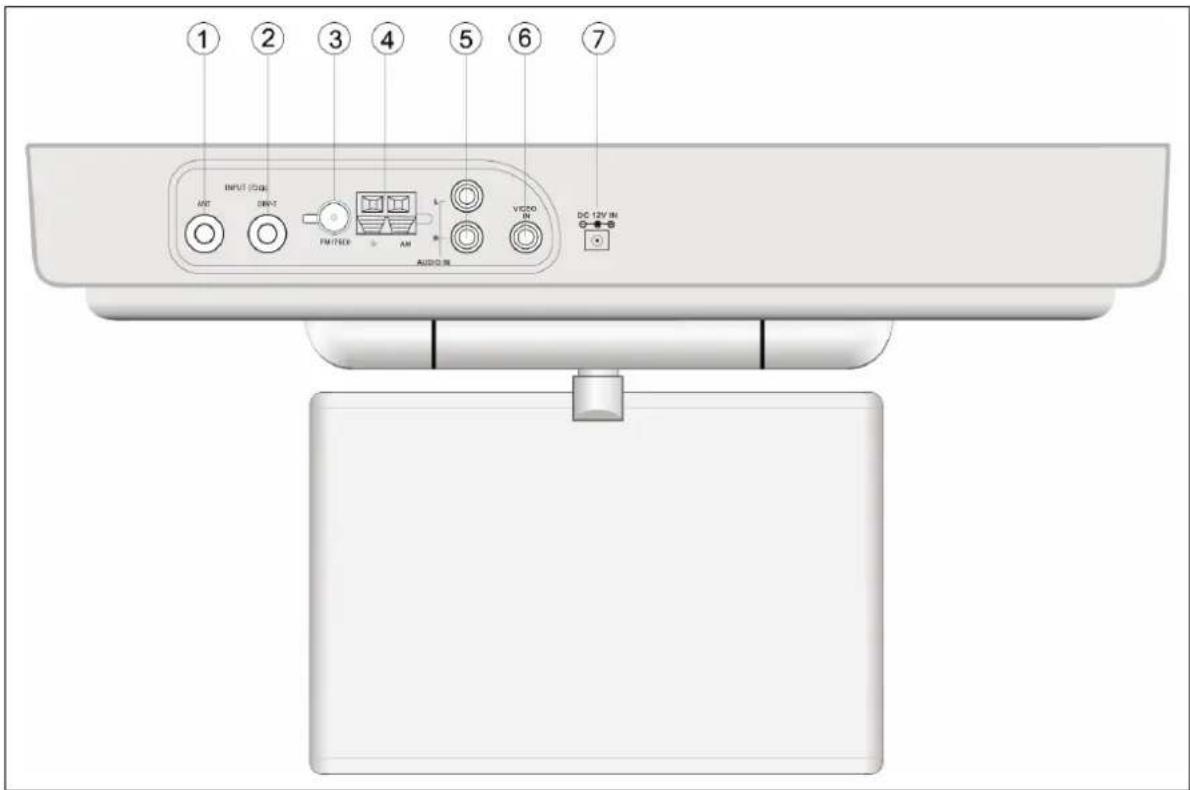
- TV antenna input
- DVB-T antenna input
- FM radio antenna input
-
AM radio antenna input
-
Stereo audio input (R/L)
- Video input
- 12V input (connection to power supply)
Display
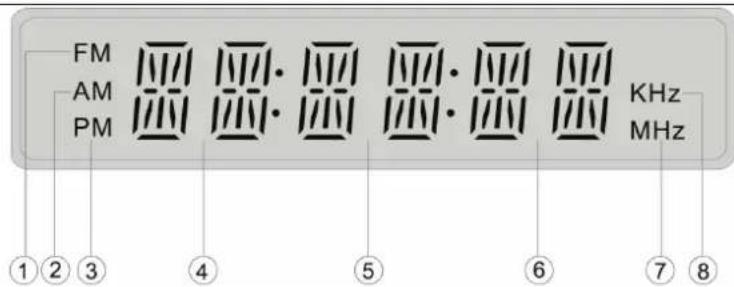
- FM radio display
- AM radio display
- AM/PM time display
-
Hour display
-
Minute display
- Second display
- FM frequency display
- AM frequency display
Remote control
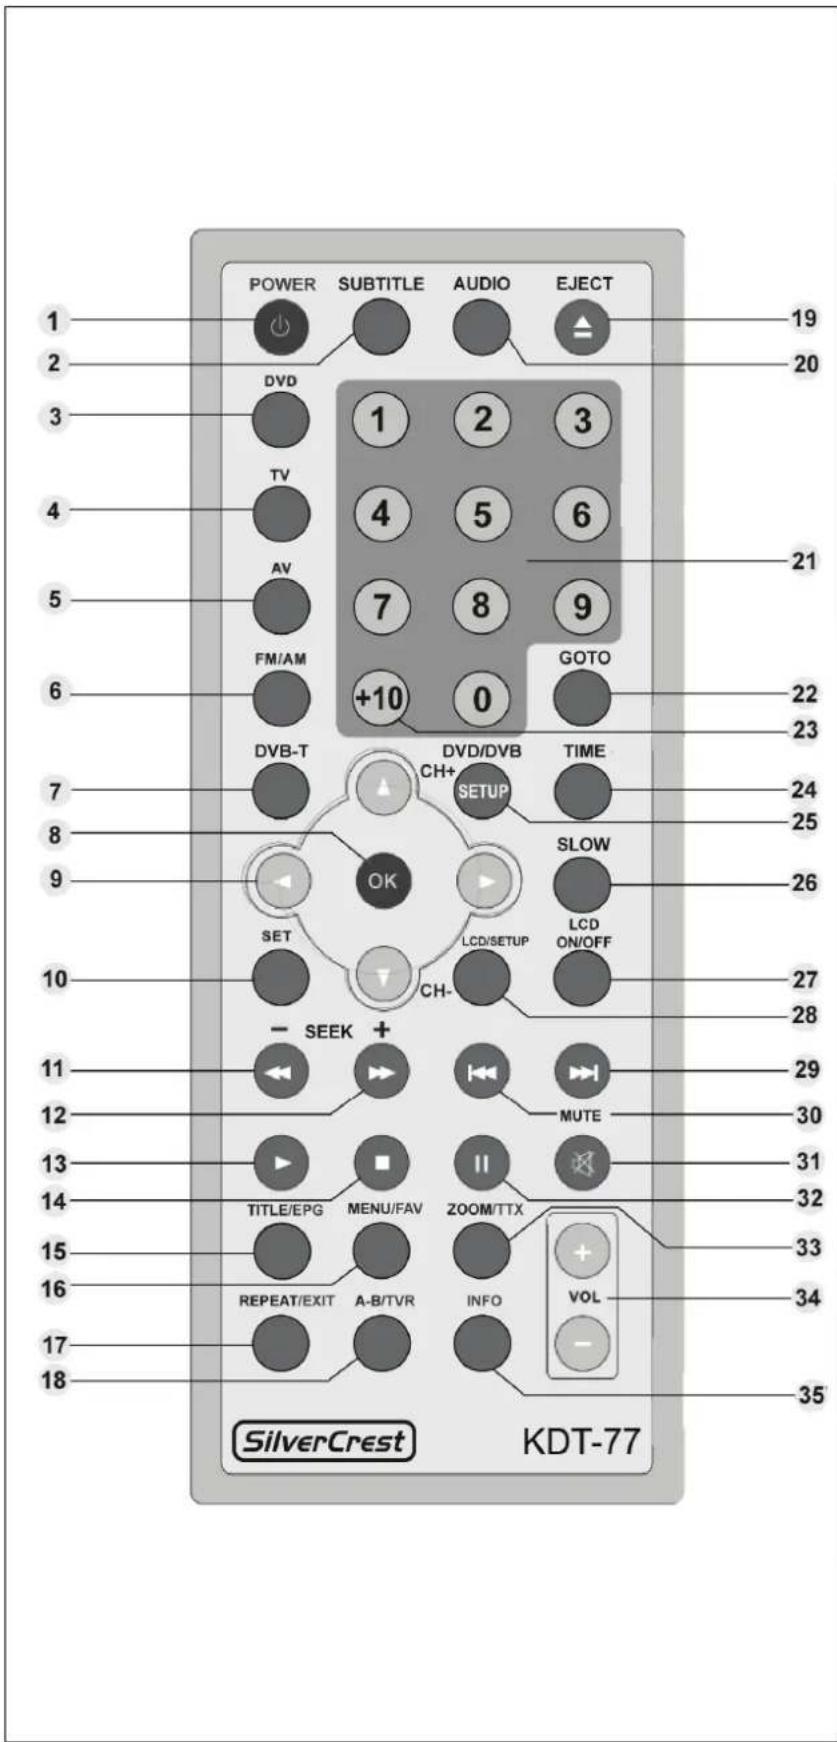
-
POWER
-
SUBTITLE
-
DVD
-
TV
-
AV
-
FM / AM
-
DVB-T
-
OK
-
◀ ▶
▲ (CH+) ▼ (CH-)
-
SET
-
← SEEK-
-
▶ SEEK+
-
▶ PLAY
-
■ STOP
-
TITLE/EPG
-
MENU/FAV
-
REPEAT/EXIT
-
A-B/TVR
-
EJECT
-
AUDIO
21.0 - 9
-
GOTO
-
+10
-
TIME
-
DVD/DVB SETUP
-
SLOW
-
LCD ON/OFF
-
LCD/SETUP
29.
30.
-
MUTE
-
II PAUSE
-
ZOOM/TTX
-
VOL+ VOL-
-
INFO
Warning:
The unit and the remote control are magnetic. To avoid data loss on magnetic strip cards (EC cards, credit cards, telephone cards etc) or diskettes, keep these items away from the unit and the remote control.
Using the remote control
Use the remote control at a maximum distance of 7m and at an angle not greater than 30^ from the remote control sensor.
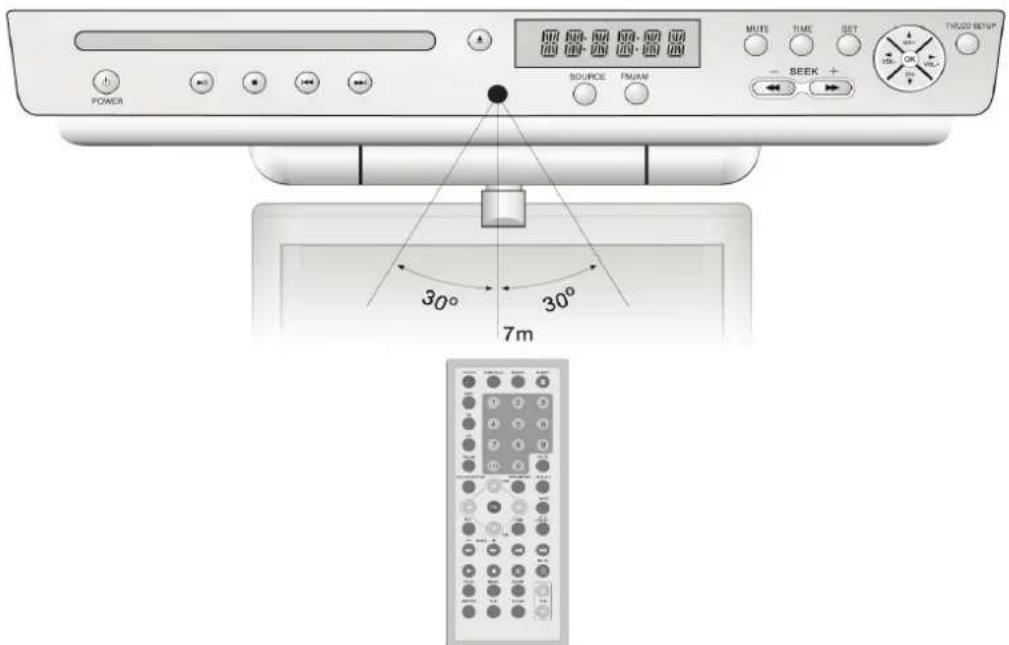
Replacing the battery
- Slide a fingernail under points a and b. Press on the small lock a (see arrow), then take out the battery holder b.
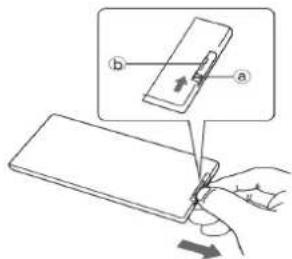
- Remove the used battery, then insert the new battery into the holder with the + side facing up.
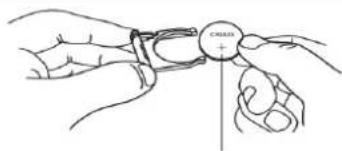
natural_image
Line drawing of hands holding a small mechanical component labeled 'COLDEN' (no text or symbols on the object itself)- Slide the battery holder back in the remote control in such a way that the + side of the battery is facing the bottom of the remote control.
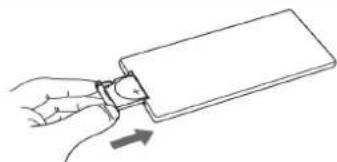
natural_image
Hand inserting a card into a rectangular device with an arrow indicating direction (no text or symbols)Please read the following information on the battery as well as the guidelines on disposal of batteries on page 36.
Important information on the battery:
- Always ensure that the battery is inserted in the device with the correct polarity. Only use replacement batteries of the same type or their equivalent. There is a risk of explosion if improper replacement batteries are used.
- Do no try to use any other type of battery. There is a risk of explosion.
- Batteries/accumulators can be fatal if swallowed. Keep batteries out of the reach of small children. Seek medical attention immediately in the event of a battery being swallowed.
- Do not expose batteries to heat or fire. Never short circuit the batteries, do not try to open them by force or to recharge them. Otherwise batteries can explode and cause serious injury.
- Never replace batteries in an environment where there is a potential risk of explosion. While the battery is being inserted or removed it can generate sparks, which could cause an explosion. Areas where there is a risk of explosion are often, but not always, clearly indicated. These include tank areas, such as below deck on ships, fuel transporters, fuel storage areas, areas where the atmosphere contains chemicals or particles, such as grain, dust or metal powder as well as all other areas where you are usually instructed to switch off your car engine.
- Please follow the guidelines on disposal of batteries on page 36.
Installation
First connect the radio and television antennas as well as the external AV signal source, if required, before connecting the unit to the power supply.
Connecting the TV antenna
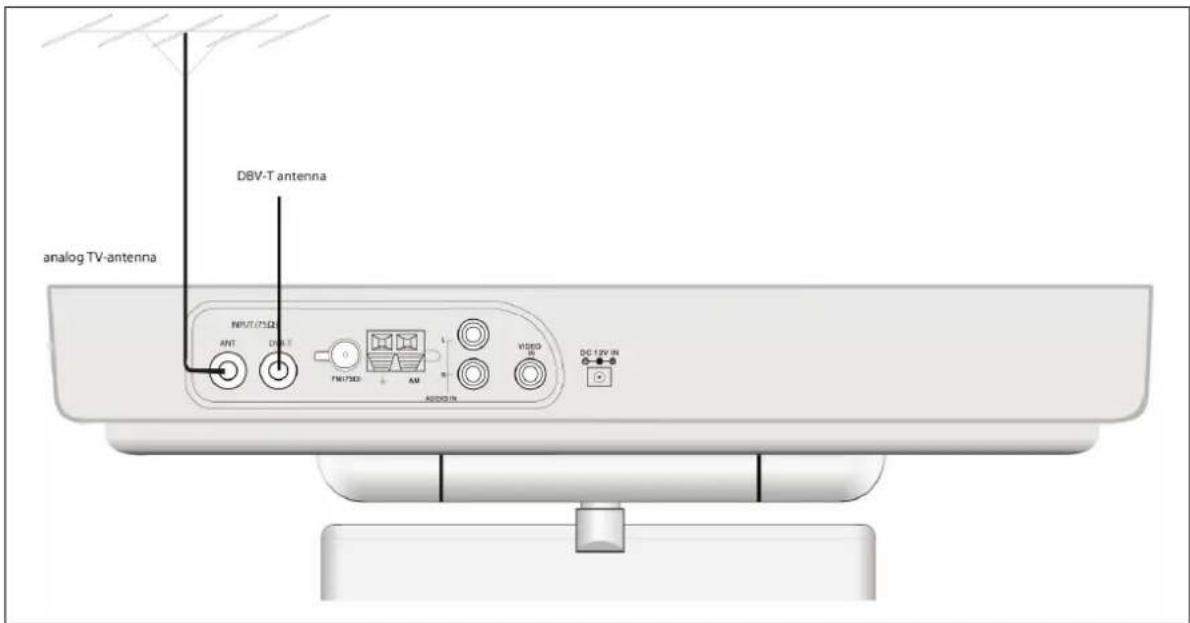
Connect the television antennas as shown in the above diagram.
Connecting the radio antennas
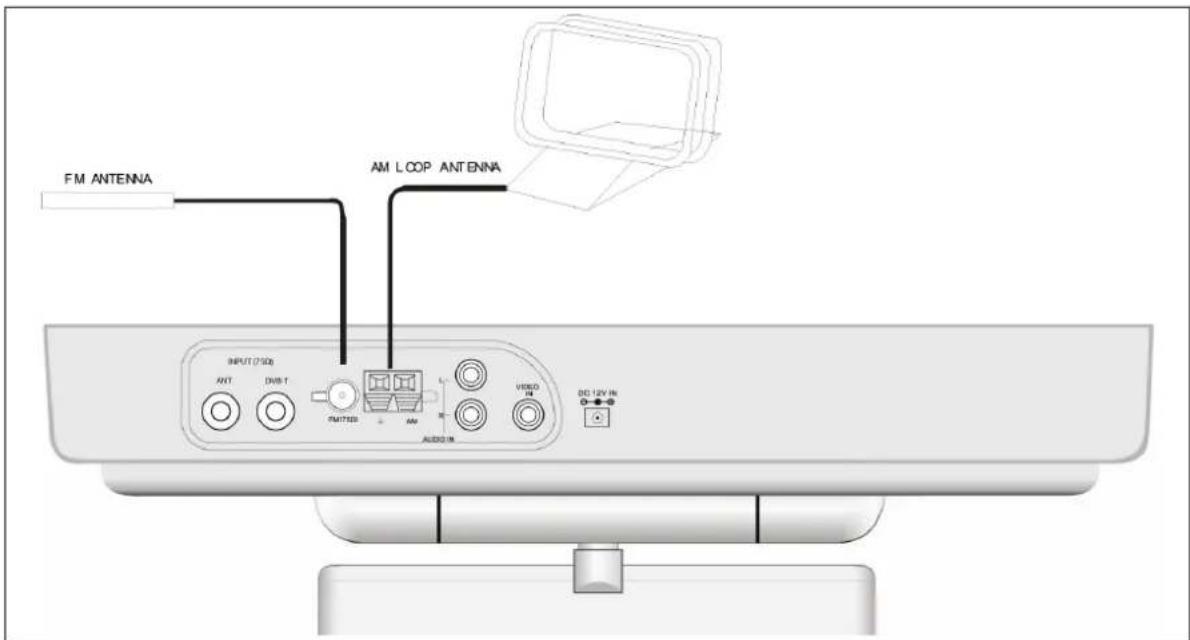
Connect the AM and FM radio antennas as shown in the above diagram. Extend the FM antenna fully.
Note:
If the radio reception is poor, you can also connect an external antenna with a 75Ω coaxial cable (not included).
Connecting an external AV signal source
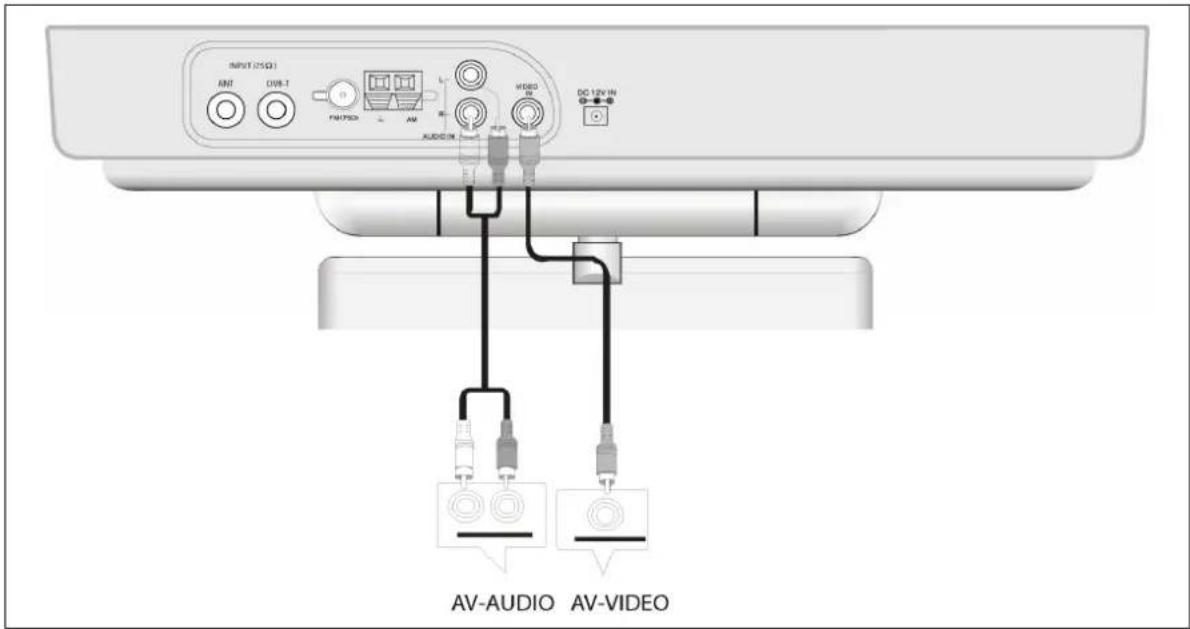
Connect the audio and video outputs of your external AV source with the AV cable provided as shown in the above diagram.
Connecting the power supply
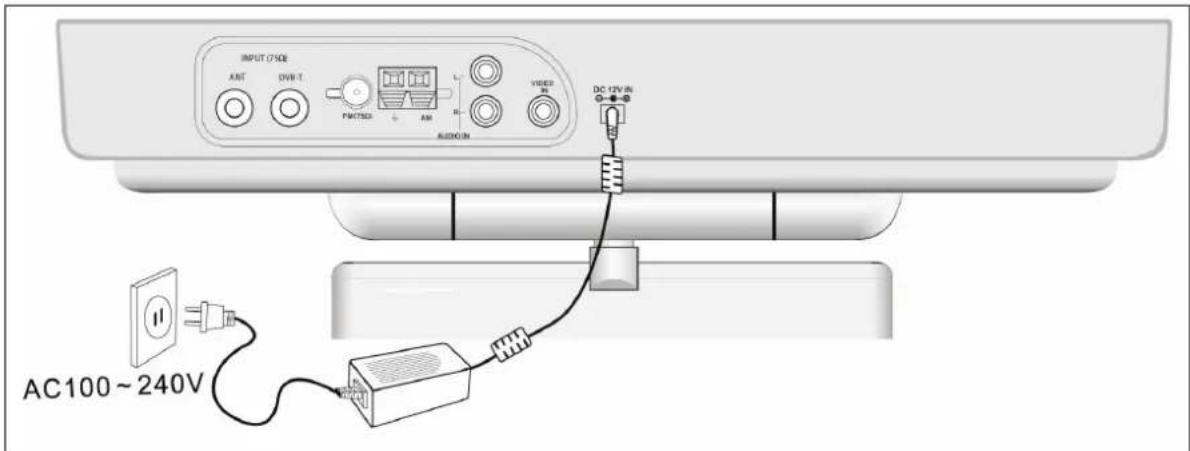
Connect the power supply as shown in the above diagram.
Warning:
Only use the power supply unit provided: MPA-690B-12.
Assembly
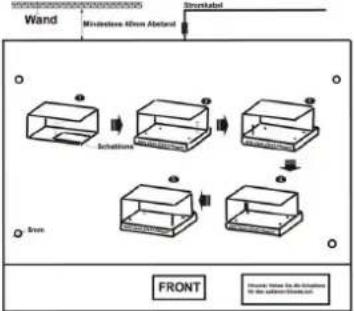
The best place to install the unit is under a hanging kitchen cupboard. You can use the mounting diagram supplied to determine where to drill the holes (5mm in diameter). The unit should be mounted using the screws provided.
Ensure that there is a gap of at least 40mm between the wall and the back of the unit and follow the safety guidelines on page 4.
Warning:
There is a risk of damage to the unit if the screws are not used properly. This can occur if you use screws that are too long or insert them at a depth greater than 20mm into the unit.
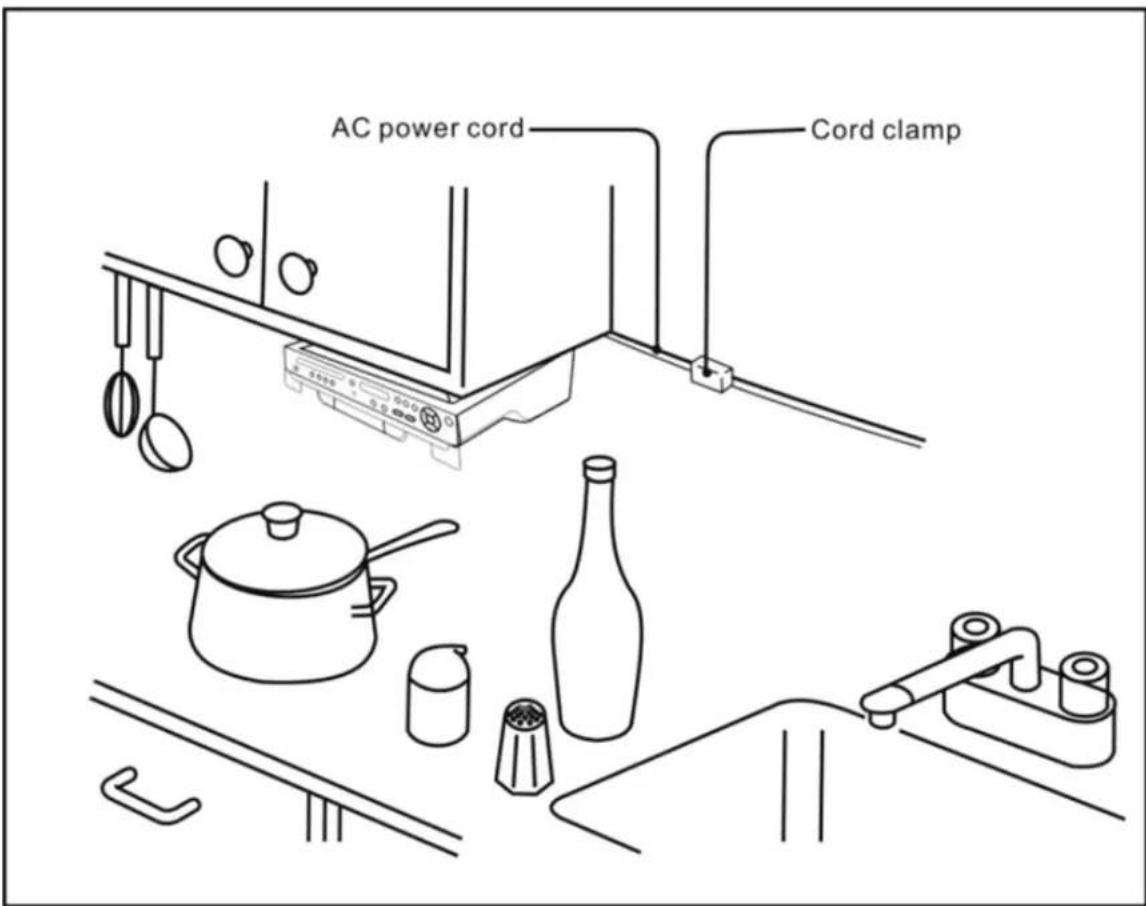
Warning:
Only technically experienced users should install the unit. If this is not the case installation should be carried out by a professional.
Basic functions
General Guideline:
If you press a button on the remote control that currently has no function associated with it, the symbol on the right will be displayed.

Switching on/off
First install your unit correctly as described on page 14 and connect the unit to the power supply (see page 13).
Press the POWER button on the unit or on the remote control to switch it on.
Press this button again to switch off the unit.
Disconnecting from the AC power source:
Even after turning off the POWER switch the unit remains connected to the AC power source. The unit also uses power when in standby mode. Unplug the unit completely from the power socket in order to switch it off completely. The unit should be installed in such a way as to allow unobstructed access to the power socket, in case it needs to be unplugged in an emergency. To avoid risk of fire, unplug the unit completely from the power socket if you do not intend to use it for an extended period of time, e.g. when going on holiday.
Volume
The VOL- button (on the remote control or the unit) lowers the volume. The VOL+ button raises the volume. The MUTE button allows you to cut the sound on your unit or switch sound back on.
You can choose volume levels from 0 (mute) to 25 (maximum). The selected volume will be faded in for a few seconds.
Setting the time
You can set the time of your unit in both on and off mode, by pressing once on the TIME button (on the remote control or the unit). Use the arrow buttons ◀ and ▶ to switch between setting the hour and minutes and use the CH+ and CH- buttons to set the value. Press TIME or OK again in order to confirm the value entered. You can cancel the process by pressing on any button other than TIME, OK, CH+, CH-, ◀ and ▶.
Note:
Time is displayed in AM/PM format. The following correlations apply:
| 12:00 AM = 00:00 |
| 12:01 AM = 00:01 |
| 01:00 AM = 01:00 |
| 11:59 AM = 11:59 |
| 12:00 PM = 12:00 |
| 12:01 PM = 12:01 |
| 01:00 PM = 13:00 |
| 11:59 PM = 23:59 |
Timer
You can use the timer function to switch your unit on or off automatically. To set the timer, the unit must be in DVD, TV, DVB-T or AV mode, as the screen is required. Press SET to access the timer menu. You can navigate between the following options using the ▲ and ▼ buttons. Press SET again to exit the menu.
| TIMER Set | |
| TIMER | OFF |
| POWER ON | 01:01pm |
| POWER OFF | __:_ pm |
| SIGNAL | UHF |
| CHANNEL | 007 |
| EXIT : SET | |
Timer
You can switch the Timer on or off here using the ◀ and ▶ buttons.
Power on
Enter the Power On time of the unit in AM/PM format here via the number buttons on the remote control. Use the ◀ and ▶ buttons to select either AM or PM.
If a time has already been set you can delete it by pressing a number button on the remote control. A deactivated Power On time is denoted by ____:____ ^am /pm
■ Power off
Enter the Power Off time of the unit in AM/PM. format here via the number buttons on the remote control. Use the ◀ and ▶ buttons to select either AM or PM.
If a time has already been set you can delete it by pressing a number button on the remote control. A deactivated Power Off time is denoted by ____:____ ^am /pm
■ Signal
You can use the ◀ and ▶ buttons to select the signal source (TV, FM radio and AM radio) to play back after the unit is automatically powered on.
- Channel
Use the number buttons on the remote control to select the TV channel or radio channel to be played. Please note that you have only 0 to 19 radio channel presets on the radio. For this reason you must enter one or two leading zeroes.
Screen settings
If the unit is in DVD, TV, DVB-T or AV mode you can use LCD/SETUP to access the screen settings menu and modify the following settings. Use ▲ and ▼ to choose the settings and exit the menu by LCD/SETUP or after 10 seconds of inactivity.
| PICTURE | |
| BRIGHTNESS | 10 |
| CONTRAST | 10 |
| COLOUR | 10 |
| LANGUAGE | ENGLISH |
| RESET | |
| ◀EXIT | |
- Brightness
Use the ◀ and ▶ buttons to set screen brightness to a value of between 0 and 20.
- Contrast
Use the ◀ and ▶ buttons to set screen contrast to a value of between 0 and 20.
- Colour
Use the ◀ and ▶ buttons to set colour to a value of between 0 and 20.
- Language
Use ◀ and ▶ to select a language for the menu. The languages available are: English, German, Spanish, Dutch, Norwegian, Portuguese and French.
- Reset
Confirm with ▶ or OK to reset the screen properties described above to their factory settings.
Switching the screen on/off
When your unit is in DVD, TV, DVB-T or AV mode the screen is automatically turned on. Use the LCD ON/OFF button on the remote control to turn the screen on or off.
Radio mode
Switch on the unit (see page 15) and select radio as signal source using FM/AM (on the remote control or the unit).
If your unit is powered off, you can also switch on the radio directly with the FM/AM button.
Note:
All antennas should be connected and installed as shown on page 12 to ensure a good quality reception.
FM / AM
Use the FM/AM button to switch between the frequency ranges FM (UKW, 87.5 MHz to 108.0 MHz) and AM (medium wave, 531 kHz to 1602 kHz)
Each frequency range selected will be briefly shown in the unit display.
Radio channel search
Hold the SEEK+ or SEEK- buttons (on the remote control or the unit) for approx. 2 seconds to automatically scan for radio channels.
To fine-tune the frequency press the SEEK+ or SEEK- buttons briefly.
Save radio channels
You can save up to 20 channels per frequency
To save the radio channels that you have tuned in, press SET (on the remote control or the unit) and select the channel number to assign the channel to using CH+ and CH-. You then have to confirm your choice within 10 seconds using the SET button. Use any button other than SET, CH+ and CH- to cancel the memory function.
Note:
The preset radio channels are numbered 0 to 19.
Selecting a saved radio channel
If you have already saved channels, you can navigate through these channels using CH+ and CH-.
Use 0 - 9 on the remote control to select a radio channel directly. If you want to select a two digit channel, first press 1 and then the second digit immediately afterwards.
TV mode
To activate analogue TV reception, switch on the unit and press the TV button on the remote control or the SOURCE button on the unit until TV appears in the display.
Selecting channels
You can either select saved channels directly via the number buttons on the remote control or switch between saved channels using the CH+ and CH- buttons.
TV SETUP
You must switch to the TV SETUP menu in order to access different settings, such as channel search. Set your unit to TV mode (TV button or SOURCE button on the unit) and press the LCD/SETUP button on your remote control. The menu that appears is described on page 17. Press ▶ to move to TV SETUP. Use the ▲ and ▼ buttons to navigate through the different SETUP options.
| TV SETTINGS | |
| SYSTEM | PAL B/G |
| CHANNEL | 001 |
| SKIP | ON |
| SWAP | --- |
| BLUE SCREEN | ON |
| FINE TUNING | |
| AUTO MEMORY | |
| ◀PICTURE | EXIT ▶ |
Press the LCD/SETUP button to exit the SETUP menu. The menu also closes automatically if you do not press a button for 10 seconds.
System
You can use the ◀ and ▶ buttons here to set up your analogue TV signal. PAL-B/G, PAL-D/K and PAL-I are supported.
Note:
Use the table on page 37 to establish the TV system for your country.
- Channel
To change the current channel, use the ◀ and ▶ buttons.
- Skip
If you activate the Skip function with the ▶ button, this channel will be skipped when you change channel using the CH+ and CH- buttons. You can deactivate this function with the ◀ button.
Swap
This function allows you to exchange the preset location of the channel that is displayed with that of another. Use this function to reorganise the channels preset order.
Enter the new preset number of the current channel via the number buttons on the remote control. Both channels then swap preset numbers.
■ Blue screen
If you activate this function a blue screen will be displayed instead of picture static, when no reception is available. Activate or deactivate this function using the ◀ and ▶ buttons.
- Fine tuning
You can fine tune the reception of the current channel using the ◀ and ▶ buttons.
■ Auto Memory
Start the automatic channel search using the OK button or ▶. All available channels are scanned and saved to memory starting with preset 001. The automatic channel search can last some time and can be cancelled by the ◀ button.
Warning:
If you run an automatic channel search you will lose all channels that you have saved up until then.
DVB-T mode
DVB-T is the abbreviation of Digital Video Broadcasting – terrestrial and denotes the terrestrial distribution of digital signals in the atmosphere. DVB-T is used as the standard for the transfer of digital television and radio by antenna in different European countries. In Great Britain the same technology is known as "Freeview". To activate digital reception, switch on the unit and press the DBV-T button on the remote control or the SOURCE button on the unit until DVB appears in the display.
Selecting channels
You can either select saved channels directly via the number buttons on the remote control or switch between saved channels using the CH+ and CH- buttons. In addition the unit offers you the option to save certain channels as favourites so as to have faster access to them. Read more about it in the section Favourites on page 22.
Audio
The AUDIO button is used to modify the settings of your speakers during playback. The following options are available: Stereo, left (the left channel on both speakers), right (the right channel on both speakers) and mono (both channels combined on both speakers).
Subtitle
During playback use the SUBTITLE button to display subtitles or change the subtitle language. Please note that not all programs have subtitling options.
EPG (electronic program guide)
The EPG Function (electronic program guide) can output and process program scheduling information from the DVB-T signal, allowing you to easily schedule your television viewing electronically.
Launch the electronic program guide with the TITLE/EPG button on your remote control. You can select a program with the ◀ and ▶ buttons and a program time with ▲ and ▼. Access details on the selected program using the INFO button. Press OK to begin the program displayed. Use REPEAT/EXIT to exit the EPG again.
If you want programs to begin automatically you need to switch to the extended electronic program guide. To do so either press TITLE/EPG once and then the button or switch to the extended electronic program guide via the DVB-T menu (description on page 22), EPG option. You can use the arrow buttons as usual to navigate in this view and book a program by pressing on OK. The booked program is then automatically started and ended at the times shown.
Favourites
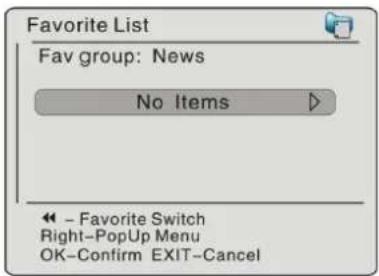
If you watch certain channels frequently you can save them in a favourites list, so that you have faster access to them. You can also sort your favourites into groups. To access the favourites list, press the MENU/FAV button on the remote control or select the option Favourites list in the DVB-T menu (Description on page 22) Use the ◀ button to swap between News, Movie, Music, Finance and Other favourites groups. Use the ▲ and ▼ buttons to switch between channels, confirm your selection with OK. You can edit the entries on your favourites list with ▶ - you have the option to delete or add programs. Exit the favourites list with REPEAT/EXIT.
Teletext (TTX)
You can also receive teletext where available for a channel via the ZOOM/TTX button. Use REPEAT/EXIT to exit teletext.
Television/Radio (TVR)
You can swap between digital television and digital radio using the A-B/TVR button.
DVB-T menu
Access the DVB-T menu via DVD/DVB SETUP. Use ▲ and ▼ to navigate, confirm your selection with OK and exit the DVB-T menu via REPEAT/EXIT.
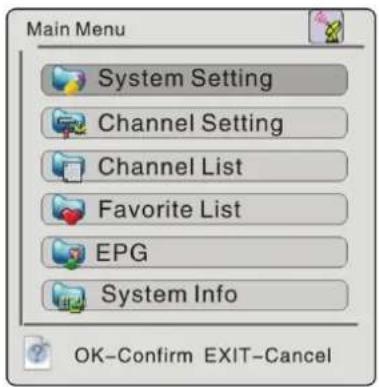
System Setting
You have the following four options in System Setting.
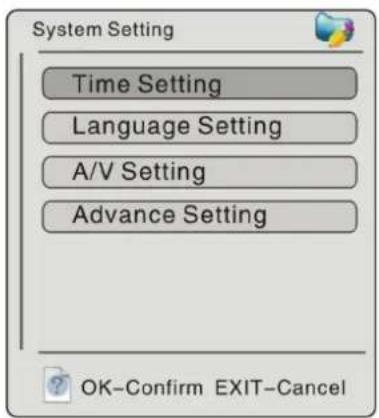
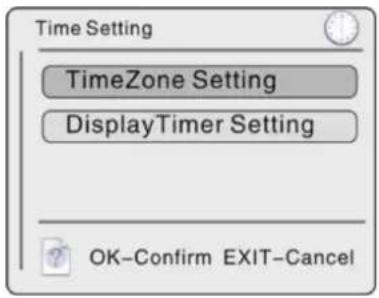
- Time setting.
- You can select your time zone in the time zone option – see also page 39 for more details.
- You can also set how long the program information should be displayed on the screen. The choices are 1 sec, 3 sec, 5 sec, 7 sec and 9 sec.
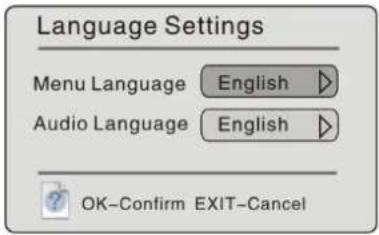
- Language setting
- This is where you can configure the menu language
- and your preferred language for digital television programs.
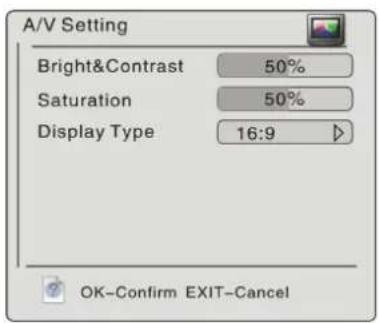
- A/V setting
- In the A/V setting menu you can change the brightness and contrast.
- You can also change the colour saturation.
- Your third setup option is to choose the display type: Normal/PS (pan & scan), Normal/LB (Letterbox) and Wide (Widescreen). See explanation on page 37.
Advanced Setup
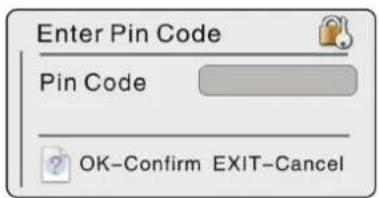
A PIN protects access to Advanced Settings as this is where you can set the movie rating for programs. You must enter this and confirm it with OK.
Note:
The default PIN at the time of delivery is 888888.
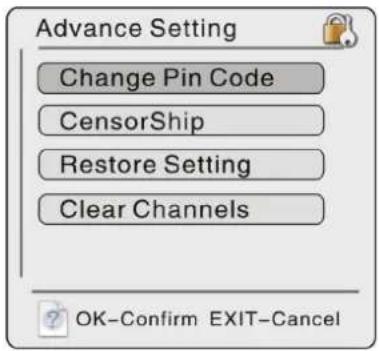
- You can change this PIN.
- You can set a movie rating for all channels. Age ratings of 8, 10, 12, 14, 16 and 18 years are available.
- You can restore the factory settings (including the PIN).
- You can delete channels that you have saved.
Warning:
If you run an automatic Delete Channel you will lose all channels that you have saved up until then.
Channel setting
You have the following two options in System Setting.
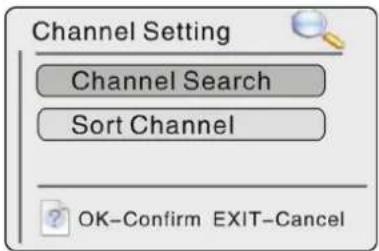
- Channel Search
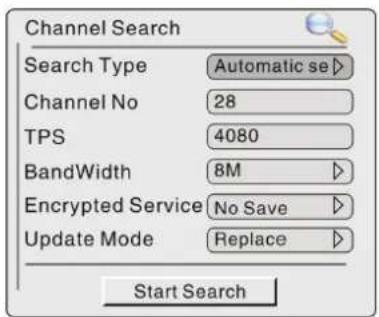
- Select the automatic Search, all channel numbers will be searched for channels. In a manual search you have to enter all the channel numbers to be searched.
- Enter the Search type FTA (free to air) to search only uncoded channels.
- If you know the values, you can input the TPS (Transmission Parameters Signalling) and bandwidth here for the search. This is not necessary for an automatic search.
- In Update Mode select Add so that all newly found channels will be added to those already saved. In the Update Mode New your already saved channels are overwritten.
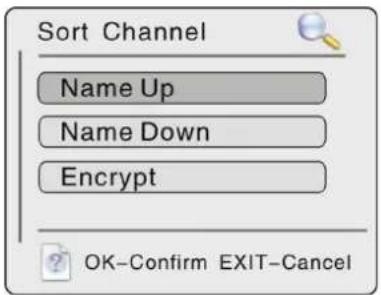
- Sort Channel
- You can sort your channels by name in descending order.
- You can sort your channels by name in ascending order.
- You can sort your channels by coded and uncoded channels.
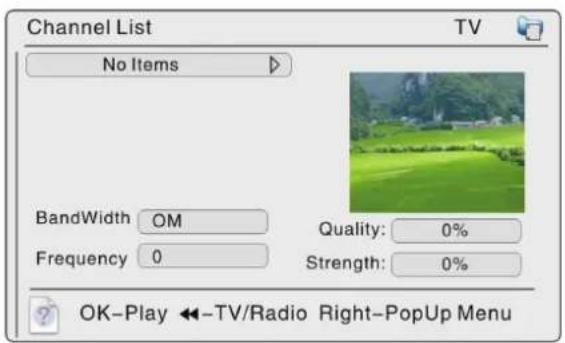
Channel table
The channel table provides you with an overview of your saved channels. Use the ◀ button to switch between radio and TV channels.
Favourites List
In the Favourites List you can easily manage the channels that you watch frequently. See how to setup or manage a favourites list on page 22.
EPG
How to use the electronic program guide (EPG) is described on page 21 .
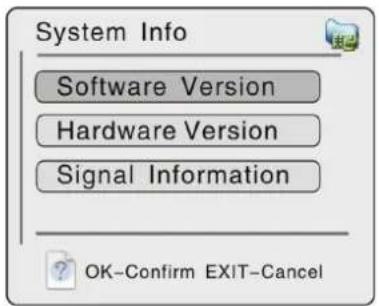
System Info
In the System Info menu you can get information on the version of your hardware and software as well as on the signal quality and strength.
DVD playback
Insert/eject DVD
Switch on the unit and activate it by pressing the DVD button on your remote control or by pressing SOURCE several times on the unit in DVD mode.
Slide the DVD into the CD/DVD tray, it closes automatically. DVD playback begins automatically. To eject the DVD press on the Eject button ▲ either on the remote control or on the unit.
Note:
- Only insert a DVD if DVD mode is activated. Otherwise the tray will not close automatically.
- Ensure that the tray is empty beforehand by pressing the ▲ Eject button.
Menus
You can access the main menu of the DVD at any time by pressing MENU. You can navigate with the arrow buttons and confirm your choice with the OK button.
Access the title menu of your DVD by pressing TITLE. There you can choose between the different titles on the DVD.
Note:
The TITLE button function can be different from DVD to DVD.
Playback / Pause / Stop
A DVD is automatically started once inserted, and the DVD's main menu is subsequently displayed. Start the main film on the DVD for example by navigating with the arrow buttons and confirming with OK.
Use the PAUSE button II to pause playback. Press PAUSE II repeatedly to display individual frames. Continue playback by pressing the Play button ▶.
Skip forward / back
You can skip forward or back a chapter with the ▶ and ◀ buttons (either on the remote control or on the unit).
Quick motion
You can activate quick motion in fast forward or rewind with the ▶ and ◀ buttons (on the remote or on the unit). Press it repeatedly to choose between 2x, 4x, 8x, 16x and 32x speeds. Press the Play ▶ button to revert to playback at normal speed.
Slow motion
Activate slow motion by pressing SLOW on the remote control. The following speeds are available in both directions: 1/2, 1/4, 1/8 and 1/16. Press SLOW repeatedly to select the appropriate speed. Press the Play ▶ button to revert to playback at normal speed.
Subtitle
If subtitles are available on your DVD, activate these with the SUBTITLE button. If you press it repeatedly all available subtitles will be displayed in sequence.
Note:
- Not all titles of a DVD contain subtitles.
- For some DVDs you have to activate subtitles via the DVD menu. The SUBTITLE button does not function in this case.
Language
You can choose between the different soundtracks (different languages or different sound formats such as Stereo, Dolby Digital or DTS for example) by using the AUDIO button on the remote control.
Note:
- Not all titles of a DVD contain different soundtracks.
- For some DVDs you have to activate soundtracks via the DVD menu. The AUDIO button may not function in this case.
Zoom
Use the ZOOM button to increase the image size up to three times (2x, 3x, 4x) or decrease it up to three times (1/2, 1/3, 1/4). Press the ZOOM button repeatedly to switch between the different sizes.
Repeat
You can repeat the current chapter, the current title or the entire DVD. Press the REPEAT button several times until you find the appropriate setting.
Use the Repeat A-B function to repeat a title section as many times as you like. Press the A-B button once during playback to select the beginning of the section to be repeated. Press A-B again during playback when you have reached the end of the section to be repeated. The selected section will then be repeated as many times as required. Press A-B once to end the repeat function and the title playback will continue normally.
Context menu
You can access a context menu during playback using the GOTO button. There you can select title and chapter, the soundtrack and the subtitle track, the camera angle, jump forward to particular frames or repeat playback.
Navigate between the individual options using the ▲ and ▼ buttons, confirm your selection with OK. Press GOTO to exit the context menu.
Info Display
Use the INFO button to display information permanently on the screen during playback of a DVD. The number of the current title and the total number of titles on the disk are displayed. Also the number of the current chapter and the total number of chapters of the current title. In addition you can select one of four different time displays: the lapsed or remaining playback time of the current title or the lapsed or remaining playback time of the chapter. Press the INFO button repeatedly to select the preferred display.
DVD Setup
Access the menu to modify DVD settings via the DVD/DVB Setup button. You can use the ◀ and ▶ buttons to choose between General Setup, Speaker Setup, Dolby Digital Setup and Video Setup. Confirm your selection with OK. The ▶ button extends a menu option so that you can make additional changes. Close the selected option with the ◀ button. Exit the menu by the DVD/DVB Setup button. You have the following setup options.
General Setup Page
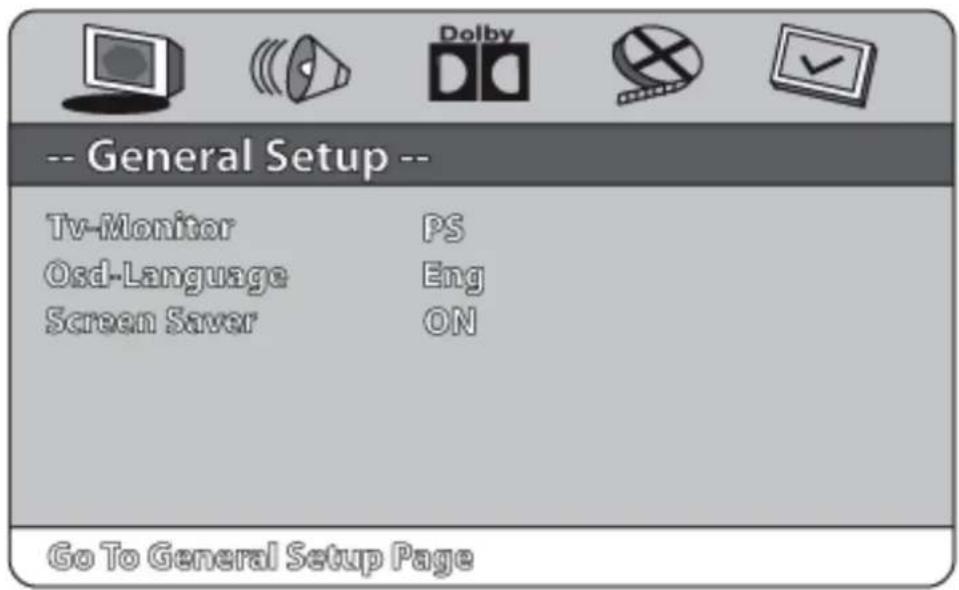
■ TV Display
You can select one of the different display types here: Normal/PS (pan & scan), Normal/LB (Letterbox) and Wide (Widescreen). See explanation on page 37.
- OSD Language
Select the language of the DVD setup menu. The available languages are English, German, Spanish, Dutch, Norwegian, Portuguese and French.
■ Screen saver
You can switch the screen saver on or off here.
Speaker Setup Page
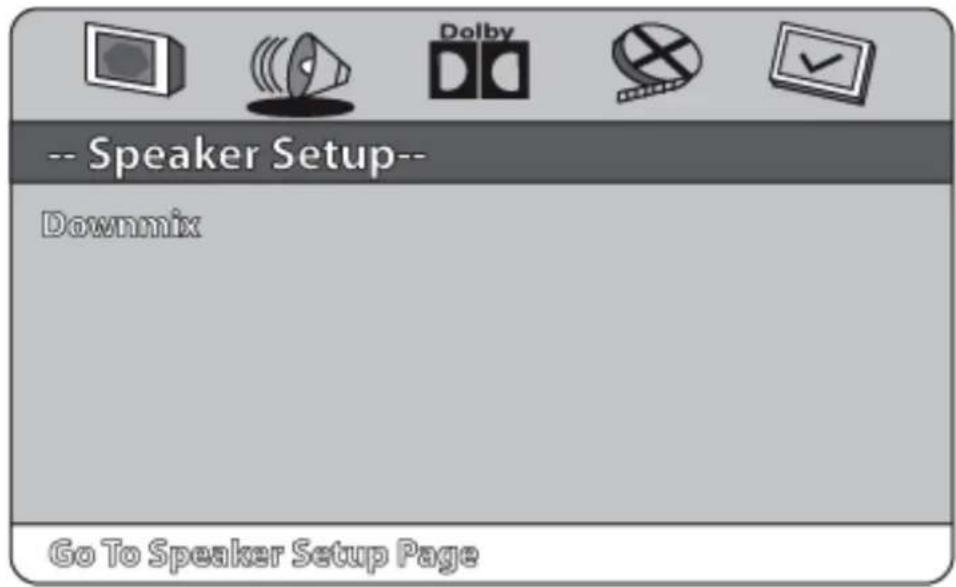
- Downmix
You can choose either Lt/Rt (mixed mono) or stereo.
Dolby Digital Setup
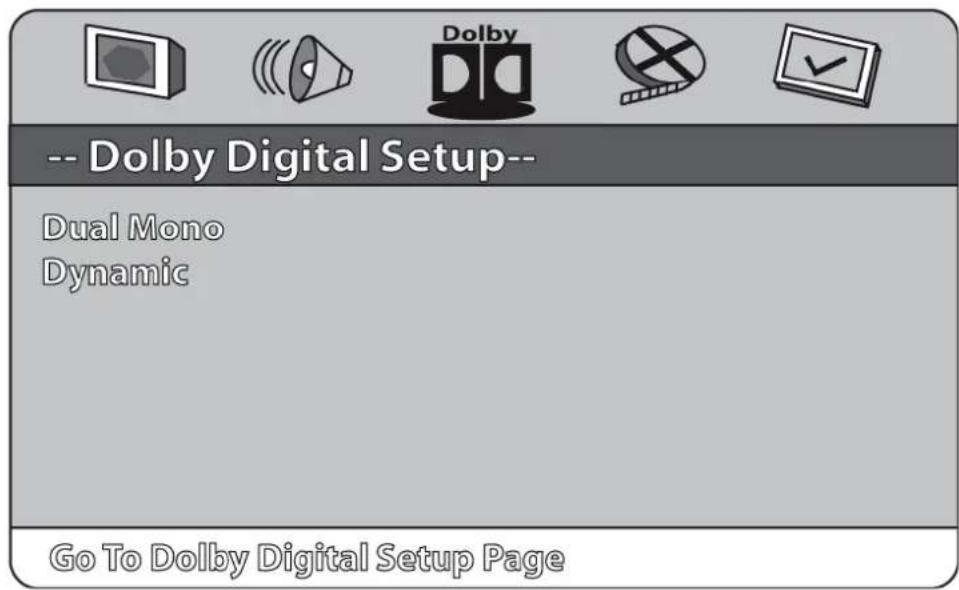
- Dual Mono
The following options are available: Stereo, L-Mono (the left channel on both speakers), R-Mono (the right channel on both speakers) and Mix-mono (both channels combined on both speakers).
- Dynamic
You can set the audio signal's dynamic range to your personal preference here.
Video Setup Page
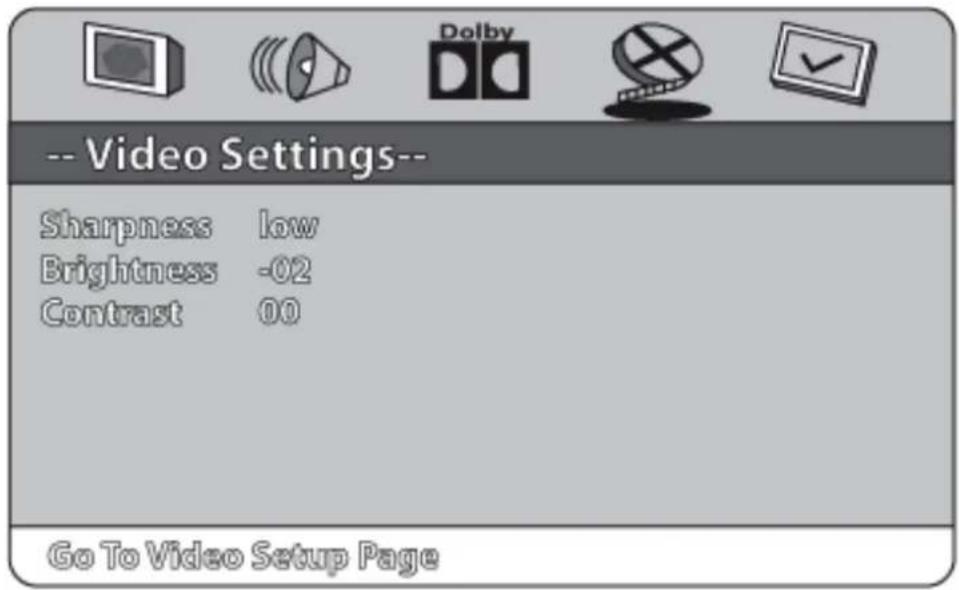
- Sharpness
Screen sharpness can be set to low, medium or high. - Brightness
Screen brightness can be set in a range from -20 to +20. - Contrast
Screen contrast can be set in a range from -20 to +20.
CD playback
The player supports music CDs.
Insert/eject music CD
Switch on the unit and activate it by pressing the DVD button on your remote control or by pressing SOURCE several times on the unit in DVD mode. Slide the CD into the CD/DVD tray, it closes automatically. CD playback begins automatically. To eject the CD press on the Eject button ▲either on the remote control or on the unit.
Note:
- Only insert a CD if DVD mode is activated. Otherwise the tray will not close automatically.
- Ensure that the tray is empty beforehand by pressing the ▲ Eject button.
Playback / Pause / Stop
Once you have inserted a music CD the first track is automatically played. Press PAUSE II to pause or restart playback. To end playback press STOP ■.
Skip forward / back
You can skip forward or back one track with the ▶ and ◀ buttons (either on the remote control or on the unit).
Use GOTO to select a particular location on a track.
- Disk goto
Press GOTO once and then enter the total time of the point where you wish to skip to. - Track goto
Press GOTO twice and then enter the time within the current track where you wish to skip to. This function only works while a track is being played. - Select track
Press GOTO three times (only twice if playback is stopped) and then enter the track number of where you wish to skip to. By repeatedly pressing the +10 button you can select two digit tracks.
Quick motion
You can activate quick motion in fast forward or rewind with the ▶ and ◀ buttons (on the remote or on the unit). Press it repeatedly to choose between 2x, 4x, 8x, 16x and 32x speeds. Press the Play ▶ button to revert to playback at normal speed.
Repeat
You can repeat the current track or the entire CD. Press the REPEAT button several times until you find the appropriate setting.
Use the Repeat A-B function to repeat a title section as many times as you like. Press the A-B button once during playback to select the beginning of the section to be repeated. Press A-B again during playback when you have reached the end of the section to be repeated. The selected section will then be repeated as many times as required. Press A-B once to end the repeat function and the title playback will continue normally.
Info Display
Use the INFO button to display information permanently on the screen during playback of a CD. The number of the current title and the total number of titles on the disk are displayed. In addition you can select one of four different time displays:
- the lapsed playback time of the current track,
- the remaining playback time of the current track,
- the lapsed playback time of the entire CD or
- the remaining playback time of the entire CD.
Press the INFO button repeatedly to select the preferred display.
Photo CD playback
The unit supports photo CD formats. Your images must be saved digitally on a CD or DVD.
Note:
Only images in JPG format are supported.
Insert/eject photo CD
Switch on the unit and activate it by pressing the DVD button on your remote control or by pressing SOURCE several times on the unit in DVD mode. Slide the photo CD into the CD/DVD tray, which then closes automatically. The photo selection menu is automatically displayed. To eject the CD press on the Eject button ▲ either on the remote control or on the unit.
Note:
- Only insert a CD if DVD mode is activated. Otherwise the tray will not close automatically.
- Ensure that the tray is empty beforehand by pressing the ▲ Eject button.
Selecting photos
When you insert a CD in the unit, the menu for selection of photos is automatically displayed. Otherwise you can access the menu at any time via MENU on the remote control.
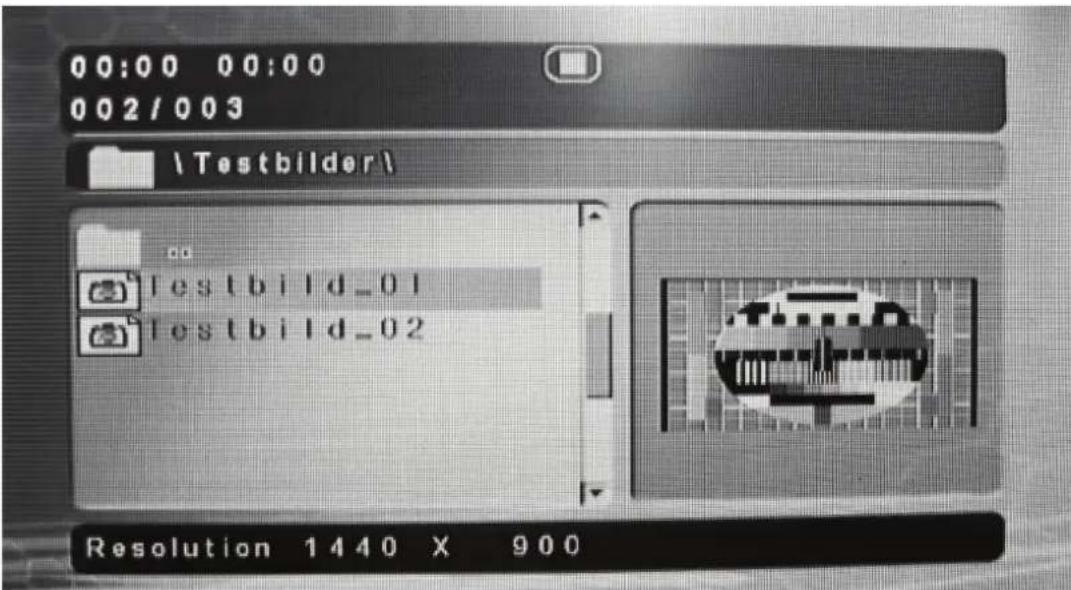
The menu displays the folder structure of your CD. Navigate with the arrow buttons ▲ and ▼. Switch to the selected folder using ▶ or OK, use ◀ or the two dots at the top to switch to a parent folder. When you have selected a photo, the photo resolution and after a short time a thumbnail preview are displayed. Press OK to launch the slide show starting with the current photo in full screen view.
Rotate / Flip
You can rotate the photo displayed clockwise during the slideshow by using ▶ . ◀ rotates the photo in an anti-clockwise direction. Use ▲ to flip the photo horizontally, and ▼ to flip it vertically.
Note:
Rotations or mirroring are not saved.
Zoom in / Zoom out
Press the ZOOM button on the remote control to zoom in or zoom out on a photo. The slide show will be paused and "Zoom 100%" appears on the screen. You can then set the zoom level by using ◀ and ▶. The following zoom levels are available: 50%, 75%, 100%, 125%, 150% and 200%.
Repeat
Press the REPEAT button several times to select whether the photos should be shown in order or in random sequence. You can also choose to repeat the slide show. If you do not repeat the slide show the unit reverts to a photo select menu once the last photo has been shown.
AV playback
In AV playback mode you can play from an external AV source (e.g. camcorder, video recorder). Switch on the unit and activate it by pressing the AV button on your remote control or by pressing SOURCE several times on the unit in AV mode. The picture and sound signal of the AV source will automatically be played. If no signal is received, a grey screen appears.
Note:
- For playback you must connect the AV device with the AV cable provided as described on page 13 and start playback on the AV device.
- The AV device is not part of the product scope.
Technical data
Screen size 17.78cm (7")
Screen aspect ratio 1:1.77
Video System PAL-B/G, PAL-D/K, PAL-I
Regional Code
2 (Europe, Greenland, South Africa,
Egypt and Middle East, Japan)
Preset Security PIN 888888
Laser wavelength 780/650nm
Frequency response 20Hz - 20kHz, ±2.5dB
Sound to Noise Ratio (SNR) ≥ 85dB
Channel separation ≥ 70dB (1kHz)
Dynamic range ≥ 80dB (1kHz)
AM 531 - 1602kHz
FM 87.5 - 108.0MHz
Power supply
AC 100 - 240V \~ 50 - 60Hz, 1.5A
DC 12V, 3.33A
Power consumption < 30W
Dimensions 360mm x 81mm x 284mm
Weight
Approx. 3kg
Note:
All details with regard to audio properties based on electrical measurements.
Disposal
Batteries
Please remember that as an end user, you are obliged to return used batteries to a retailer or to a returns depot that has been setup by public law waste disposal agents.
Unit
Please remember that your electronic entertainment equipment is subject to European Directive 2002/96/EC on the reduction of waste electrical and electronic equipment.
natural_image
Symbol of a trash bin crossed out by two crossed lines inside a circle (no text or numbers present)- It is not permitted to dispose of your unit in the household waste.
- Information guidelines on the disposal of old units are available from your local government, waste disposal administration and the shop where you bough this product.
- You can return your unit free of charge to the municipal collection depot.
■ Proper disposal of old equipment prevents environmental pollution and protects your health.
Technical Support
How to show films in widescreen format
Films that are made for cinema are in a format that is designed for a cinema screen. Most American films since 1955 have been made in widescreen format of 1.85:1 (for most European films the widescreen aspect ratio of 1.66:1 applies).
The aspect ratio of your screen is equal to 1.77:1. If you wish to show a widescreen film it is necessary to adapt the image. Please use the following steps or settings.
Pan&Scan process:
The picture is reduced in order to achieve fullscreen. This is done by panning the entire image and scanning it, effectively trimming the sides and focusing on the significant action on the screen. The width of the image is reduced, thereby losing a section.
Letterbox process: In Letterbox the picture is shown in its original view ratio. As no part of the image is cropped, this results in a black bar above and below the viewing field.
Widescreen process: In Widescreen an effort is made to view the entire image as it appeared originally in the cinema – although the proportions of the cinema screen and that of the television monitor differ greatly. In Widescreen the proportions of the film image are maintained (in most cases 1.85:1) with black bars being introduced above and below the image, which simulate the rectangular format of the cinema screen.
Television systems
The following table provides an overview of television systems in European countries, this list is not guaranteed to be exhaustive, nor does it claim to be totally accurate or up-to-date.
| Country Colour TV system | ||
| Albania | PAL | |
| Andorra | PAL | |
| Belgium | PAL | |
| Bosnia Herzegovina PAL B,H | ||
| Bulgaria | SECAM | |
| Denmark | PAL | |
| Germany | PAL | |
| Faeroe Islands PAL B,G | ||
| Finland | PAL | |
| France | SECAM | |
| Gibraltar | PAL | |
| Greece | SECAM | |
| Great Britain PAL I | ||
| Ireland | PAL | |
| Iceland | PAL | |
| Italy | PAL | |
| Yugoslavia PAL B,H | ||
| Canary Islands PAL B,G | ||
| Corsica | SECAM | |
| Latvia | SECAM | |
| Lithuania | SECAM | |
| Luxembourg | PAL/SECAM | |
| Malta | PAL | |
| Macedonia | PAL | |
| Moldavia | SECAM | |
| Monaco | SECAM/PAL | |
| Netherlands | PAL | B,G |
| Norway | PAL | B,G |
| Austria | PAL | B,G |
| Poland | SECAM | D,K |
| Portugal | PAL | B,G |
| Romania | PAL | D,K |
| Russia | SECAM | D,K |
| Sweden | PAL | B,G |
| Switzerland | PAL | B,G |
| Slovenia | PAL | B,H |
| Spain | PAL | B,G |
| Czech Republic | SECAM | D,K |
| Turkey | PAL | |
| Ukraine | SECAM | D,K |
| Hungary | SECAM | D,K |
| Belarus | SECAM | |
| Cyprus | PAL/SECAM | B/B,G |
Time zones
| GMT + 0 UK, Ireland, Portugal, Iceland | |
| GMT +1 | France, Germany, Netherlands, Belgium, Austria, Spain, Italy, Switzerland, Sweden, Norway, Denmark, Poland, Czech Republic, Hungary, Yugoslavia, Albania |
| GMT +2 Finland, Lithuania, Latvia, Belarus, Ukraine, Moldavia, Romania, Greece, Turkey | |
Trouble shooting
| Problem: Possible reason: Suggested solution: | ||
| No playback. | There is no disk Insert a disk. | |
| The disk is put in the wrong way around. | Insert the disk with the label facing upwards. | |
| The disk is dirty or scratched. | Clean the disk with a soft, damp cloth moving from the inside outwards. Never use a cleaning spray, cleaning fluid, thinner or similar solutions. | |
| The DVD has an incorrect Regional Code. | Use DVDs with Regional Code 2. | |
| Condensation has built up in the unit. | Leave the unit switched on for at least one hour and then retry.In future do not subject the unit to any extremes in temperature. | |
| No sound | Incorrect cabling. | Install your unit as per the instructions on page 12 . |
| The volume is set to low or mute. | Increase the volume (page 15). | |
| Sound settings on the DVD are incorrect. | Change to the sound menu on the DVD and correct the settings. | |
| The disk is dirty or scratched. | Clean the disk with a soft, damp cloth moving from the inside outwards. Never use a cleaning spray, cleaning fluid, thinner or similar solutions. | |
| The remote control does not work. | There is something in the way. | Ensure that you are using the remote control as described on page 10 . |
| The battery has been inserted incorrectly. | Check that the battery has been inserted as described on page 11 . Pay special attention to Important information on battery use on page 11. | |
| The battery is too low or empty. | Change the battery as described on page 11. Pay special attention to Important information on battery use on page 11. | |
- Copyright
- Declaration
- Manufacturer details
- Table of Contents
- Introduction ....1
- Copyright ....1
- Declaration....1
- Manufacturer details ....1
- Table of Contents ......2
- Important Safety Guidelines....4
- What is included....6
- Unit overview 7
- Installation 12
- Basic functions....15
- Radio mode....18
- TV mode 19
- DVB-T mode....21
- DVD playback 26
- CD playback....31
- Photo CD playback....33
- AV playback....34
- Technical data....35
- Disposal 36
- Technical Support 37
- Trouble shooting 39
- Important Safety Guidelines
- Please read and adhere strictly to the following instructions
- What is included
- Note:
- Unit overview
- Front panel
- Back panel
- Display
- Remote control
- Warning:
- Using the remote control
- Replacing the battery
- Important information on the battery:
- Installation
- Connecting the TV antenna
- Connecting the radio antennas
- Assembly
- Basic functions
- General Guideline:
- Switching on/off
- Disconnecting from the AC power source:
- Volume
- Setting the time
- Timer
- Screen settings
- Switching the screen on/off
- Radio mode
- FM / AM
- Radio channel search
- Save radio channels
- Selecting a saved radio channel
- TV mode
- Selecting channels
- TV SETUP
- System
- - Channel
- - Skip
- Swap
- DVB-T mode
- Audio
- Subtitle
- EPG (electronic program guide)
- Favourites
- Teletext (TTX)
- Television/Radio (TVR)
- DVB-T menu
- System Setting
- - Time setting.
- - Language setting
- - A/V setting
- Advanced Setup
- Channel setting
- - Channel Search
- - Sort Channel
- Channel table
- Favourites List
- EPG
- System Info
- DVD playback
- Insert/eject DVD
- Menus
- Playback / Pause / Stop
- Skip forward / back
- Quick motion
- Slow motion
- Language
- Zoom
- Repeat
- Context menu
- Info Display
- DVD Setup
- General Setup Page
- Speaker Setup Page
- Dolby Digital Setup
- Video Setup Page
- CD playback
- Insert/eject music CD
- Photo CD playback
- Insert/eject photo CD
- Selecting photos
- Rotate / Flip
- Zoom in / Zoom out
- AV playback
- Technical data
- Disposal
- Batteries
- Unit
- Technical Support
- How to show films in widescreen format
- Pan&Scan process:
- Television systems
Brand : SILVERCREST
Model : KDT-77
Category : Television