
LT2007 DVD - Television OPPO - Free user manual and instructions
Find the device manual for free LT2007 DVD OPPO in PDF.


| Product Type | Television with DVD Player |
| Brand | Oppo |
| Model | LT2007 DVD |
| Screen Size | 20 inches (diagonal) |
| Display Technology | LCD |
| Resolution | 720 x 576 pixels (SD) |
| Aspect Ratio | 16:9 |
| Power Supply | AC 100-240V, 50/60Hz |
| Power Consumption | 45W typical |
| Dimensions (with stand) | 480 x 360 x 180 mm |
| Weight | 5.5 kg |
| Inputs | RF Antenna, Composite AV, SCART |
| Outputs | Headphone jack, Audio out |
| Built-in DVD Player | Yes, supports DVD, CD, MP3 |
| Remote Control | Included |
| Additional Features | Sleep timer, child lock, multilingual OSD |
| Cleaning | Use soft dry cloth; avoid liquids |
| Safety | Keep away from heat sources; do not block ventilation |
| Spare Parts & Repairability | Remote control, stand; consult service center |
Frequently Asked Questions - LT2007 DVD OPPO
User questions about LT2007 DVD OPPO
0 question about this device. Answer the ones you know or ask your own.
Ask a new question about this device
Download the instructions for your Television in PDF format for free! Find your manual LT2007 DVD - OPPO and take your electronic device back in hand. On this page are published all the documents necessary for the use of your device. LT2007 DVD by OPPO.
USER MANUAL LT2007 DVD OPPO
TFT-LCD TV/DVD COMBO
USER MANUAL
LT-2007
natural_image
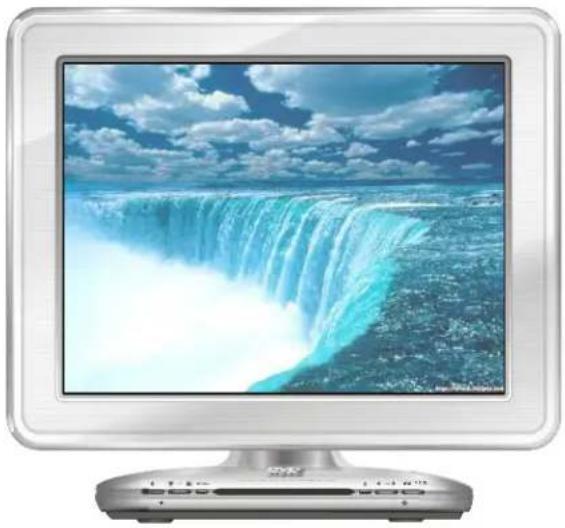
Modern CRT television displaying a vibrant waterfall under a cloudy sky (no text or symbols visible)

CAUTION:
TO PREVENT ELECTRICAL SHOCK. DO NOT REMOVE THIS COVER. NO USER-SERVICEABLE PARTS INSIDE. REFER SERVICING TO QUALIFIED SERVICE PERSONNEL.
WARNING:
TO PREVENT DAMAGE WHICH MAY RESULT IN FIRE OR SHOCK HAZARD. DO NOT EXPOSE THIS APPLIANCE TO RAIN OR MOISTURE.

The lightning flash with arrowhead symbol, within an equilateral triangle, is intended to alert the user to the presence of uninsulated "dangerous voltage" within the product's enclosure that may be of sufficient magnitude to constitute a risk of electric shock to persons

The exclamation point within an equilateral triangle is intended to alert the user to the presence of important operation and maintenance (servicing) instruction in the literature accompanying the appliance
WARNING: TO REDUCE THE RISK OF FIRE OR ELECTRIC SHOCK, DO NOT EXPOSE THIS APPLIANCE TO RAIN OR MOISTURE. DANGEROUS HIGH VOLTAGES ARE PRESENT INSIDE THE ENCLOSURE. DO NOT OPEN THE CABINET. REFER SERVICING TO QUALIFIED PERSONNEL ONLY.
WARNING: THE APPARATUS SHALL NOT BE EXPOSED TO DRIPPING OR SPLASHING AND THAT NO OBJECTS FILLED WITH LIQUIDS, SUCH AS VASES SHALL BE PLACED ON THE APPARATUS.

CAUTION: TO PREVENT ELECTRIC SHOCK, MATCH WIDE BLADE OF PLUG TO WIDE SLOT, FULLY INSERT.
CAUTION: THESE SERVICING INSTRUCTIONS ARE FOR USE BY QUALIFIED SERVICE PERSONNEL ONLY. TO REDUCE THE RISK OF ELECTRIC SHOCK DO NOT PERFORM ANY SERVICING OTHER THAN THAT CONTAINED IN THE OPERATING INSTRUCTIONS UNLESS YOU ARE QUALIFIED TO DO SO.
CAUTION: DANGER OF EXPLOSION IF BATTERY IS INCORRECTLY REPLACED. REPLACE ONLY WITH THE SAME OR EQUIVALENT TYPE.
Important Safety Instructions
1) Read these instructions.
2) Keep these instructions.
3) Heed all warnings.
4) Follow all instructions
5) Do not use this apparatus near water.
6) Clean only with dry cloth.
7) Do not block any ventilation openings. Install in accordance with the manufacturer's instructions.
8) Do not install near any heat sources such as radiators, heat registers, stoves, or other apparatus (including amplifiers) that produce heat.
9) Do not defeat the safety purpose of the polarized or grounding-type plug. A polarized plug has two blades with one wider than the other. A grounding type plug has two blades and a third grounding prong. The wide blade or the third prong are provided for your safety. If the provided plug does not fit into your outlet, consult an electrician for replacement of the obsolete outlet.
11) Only use attachments/accessories specified by the manufacturer.
10) Protect the power cord from being walked on or pinched particularly at plugs, convenience receptacles, and the point where they exit from the apparatus.
12) Use only with the cart, stand, tripod, bracket, or table specified by the manufacturer, or sold with the apparatus. When a cart is used, use caution when moving the cart/apparatus combination to avoid injury from tip-over.

13) Unplug this apparatus during lightning storms or when unused for long periods of time.
14) Refer all servicing to qualified service personnel. Servicing is required when the apparatus has been damaged in any way, such as power-supply cord or plug is damaged, liquid has been spilled or objects have fallen into the apparatus, the apparatus has been exposed to rain or moisture, does not operate normally, or has been dropped.
ADDITION SAFETY INSTRUCTIONS
1) Before connecting the AC power cord to the DC adapter outlet, make sure the voltage designation of the DC adapter corresponds to the local electrical supply. If you are unsure of your power supply, ask your local power company.
2) To avoid electric shock, never touch the inside. Only a qualified technician should open the case of the product.
3) Do not use this product if power cord is damaged. Do not hang an object on power cord and do not install the power cord the place people walk.
4) Please hold power plug when cutting off power. Do not hold power cord.
5) Please do not unplug the power plug when this unit is working well.
6) If this unit is damaged, do not service yourself and you should contact the professional maintenance personnel.
7) Please employ the equipped accessories to ensure its normal working and reduce incidents.
8) Please unplug power cord when not going to use for a long period.
9) High temperature will lead to abnormal working of this unit. Do not expose this unit to sunlight or near other heating objects.
10) To ensure the good ventilation around this product, please do not place this product on sofa, bed and rug. When installing this product on the wall or bookshelf, you need leave appropriate distance.
11) Do not expose this unit in rain or near humid places such as kitchen and swimming pool to avoid electric shock or fire. Prevent this unit from dripping or splashing. Do not place objects full of liquid such as case on the unit.
12) Do not place this product on unstable cart, stand, tripod, bracket and table. Do not clean the LCD screen with ethyl alcohol, toluene, ethyl lacid, methyl.
13) When smoke, abnormal smell or sounds appear inside, please cut off power immediately and contact dealer or service center.
14) Never insert anything metallic into the cabinet; otherwise it may create the danger of electric shock.
15) After the service and maintenance, please let service person do safety check to ensure the unit's normal working.
16) Socket is used as device for cutting off power, so make sure the socket easy to unplug. This product employs CLASS I electric construction, so the connected socket should be with secure grounding.
17) When replacing accessories, please ensure the maintenance person use the accessories and tools appointed by manufacturer.
CONTENT
LOCATION AND FUNCTION OF CONTROLS
Remote control 1
Front panel....3
INSTALLATION AND CONNECTION
Battery installation 4
Battery life 4
Power adaptor installation 4
Connecting figure 5
CHANGE SOURCE OPERATION
Change source operation 6
MENU SETUP
Picture 7
Sound 8
TV setting 9
Function 10
AV AND S-VIDEO SETUP
Video setting menu 13
YPBPR/CBCR SETUP
YPBPR/CBCR setup 14
VGA SETUP
Picture 15
Sound 16
Monitor setting 17
Function 18
DVD OPERATION
Brief introduction 19
Comparison between DVD and other discs 19
Function introduction 19
Features 20
Compatible disc types 21
Playback 22
Select TV system 22
Pause/step playback 23
Display 23
Volume control 24
DVD menu playback 24
Select track to play directly by number buttons 25
Select audio/language 25
Repeat playback 26
Repeat playback of selected segment 26
Select subtitle 26
Fast playback 27
Slow playback 27
Play from the desired position 27
Zooming the displayed frame 29
CONTENT
Change power-on logo freely 29
Memory 29
MPEG4 and JPEG file playing 30
DVD FUNCTION SETUP
General setup 33
Speaker setup 33
Audio setup 33
Initial setup 34
Usage of equipment and
5-1N-1 card reader 35
TROUBLE SHOOTING
Image trouble 37
Sound and TV trouble 37
DVD trouble shooting 38
SPECIFICATIONS
Specifications 39
DISPLAY MODE
Display mode 40
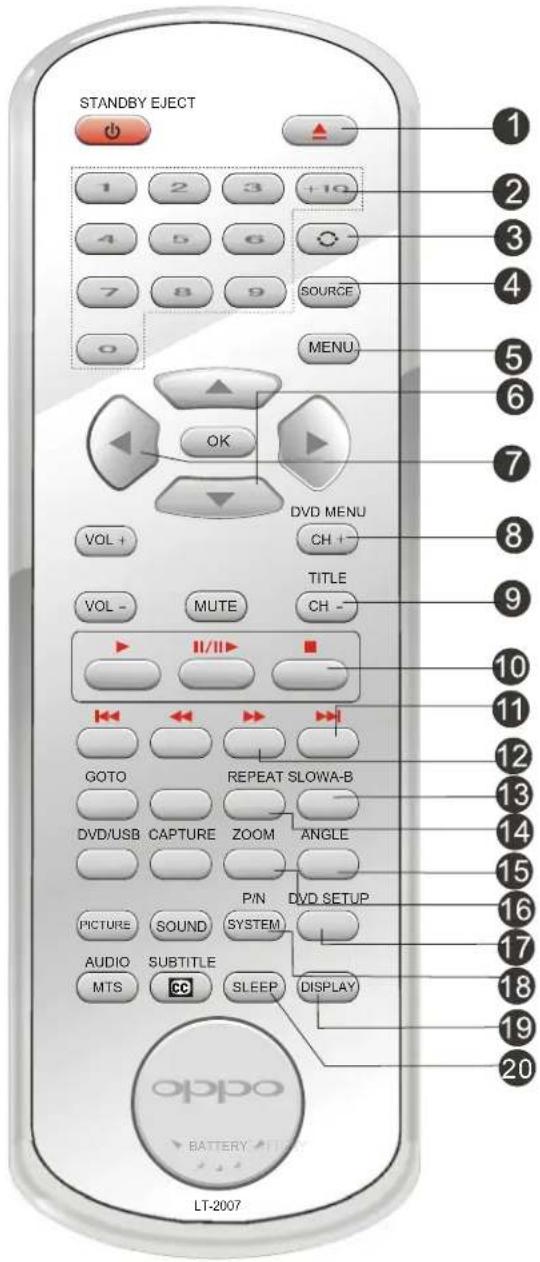
18 SYSTEM button
AV or S-VIDEO selectcolor system
DVD: Select the color system PAL or NTSC.
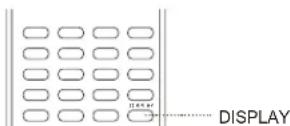
19 DISPLAYbutton
Display disc playing information or channel information.
20 SLEEP
Change sleep time between: OFF, 10MIN, 20MIN, 30MIN, 60MIN, 90MIN, 120MIN.
Remote Control
① EJECT button
Disc In/Out in DVD mode.
Quickly change to DVD mode.
② Number buttons
Select program number
③ RETURN button
Return to the previous channel in TV mode /menu in DVD mode.
4 SOURCE button
Switch signal sources: TV, DVD, AV,
S-VIDEO, YPBPR/CBCR, VGA.
5 MENU button
Enter and exit the menu, which is different in different signal modes
6 Up/Down cursor(menu select button)
Select upward/downward in the menu, and increase or decrease channel number in TV mode
7 Left/Right cursor(menu adjustment button)
Move leftward/rightward or adjust the selected item in the menu, and Increase or decrease volume.
8 CH+/ DVD MENU button
Increase channel number/Enterthe DVD menu.
9 CH-/TITLE button
Decrease channel number/DVD titles.
10 Stop button
Stop playing in DVD
11 NEXT button
Select the next chapter or track in DVD.
12 FF button
Fast forward playback in DVD mode
13 SLOW
Playing the DVD at a low speed.
14 REPEAT button
Repeat playback in DVD
15 ANGLE button
Enjoy DVD from different angles
16 ZOOM button
Zoom in orout the playing picture in DVD mode.
17 DVD SETUP button
Enter DVD function setup menu
20 POWER/STANDBY button
Switch in standby mode and power-on mode.
21 OK button
Confirm the functions
22 VOL+/- button
Increase or decrease volume
23 MUTE button
Switch in mute on/off
Press MUTE button to mute and open CC mode, and the indication, symbol ✗ appears on the screen. Press this button again to cancel mute.
24 Play button
Play normally
25 Pause/Step button
Pause playing/Step playback in DVD mode
26 PREVIOUS button
Select the previous chapter or track
27 FB button
Fast backward playback in DVD mode.
28 GOTO button
Play from the selected time point in DVD mode.
29 A-B button
Segment repeat
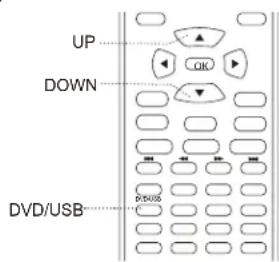
30 DVD/USB button
Switch in DVD and USB or card reader
31 CAPTURE button
Capture the currently played image and set it as the power-on logo in DVD mode.
32 PICTURE button
Switch different picture modes: Standard, Dynamic, Soft and User.
33 SOUND button
Select sound field modes: Music, Film, News and User.
34 MTS/AUDIO button
TV: You can change sound mode as MONO, SAP and STEREO of you television sound system supplied. /DVD: Switch the output language or channel
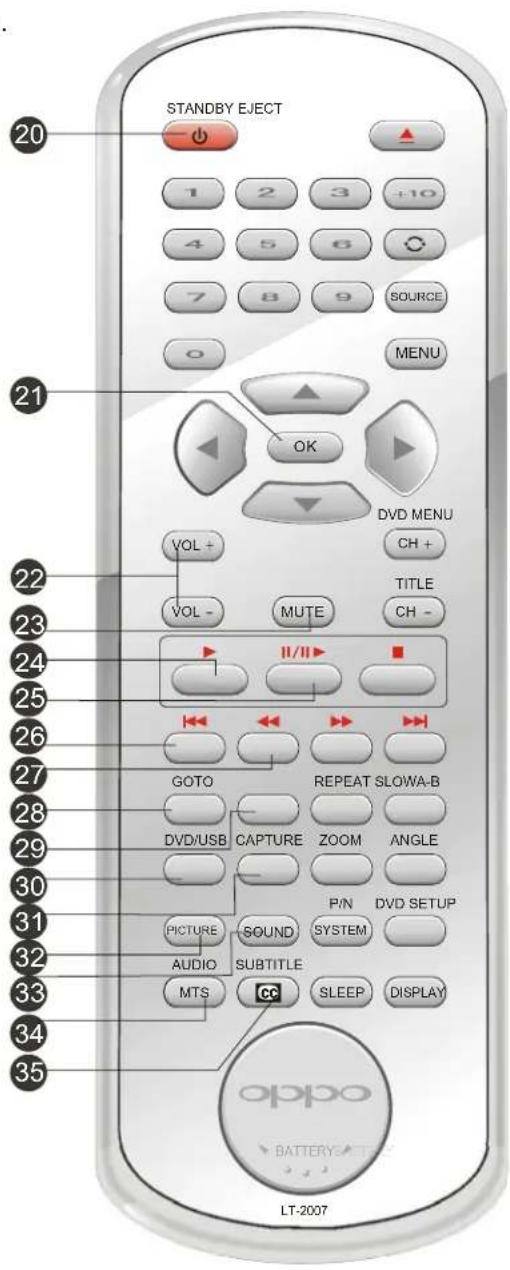
35 CC/SUBTITLE button
Open or close the CC/Select subtitle language, in DVD.
FRONT PANEL
Through adjusting the front panel, you may realize the basic control of the unit.
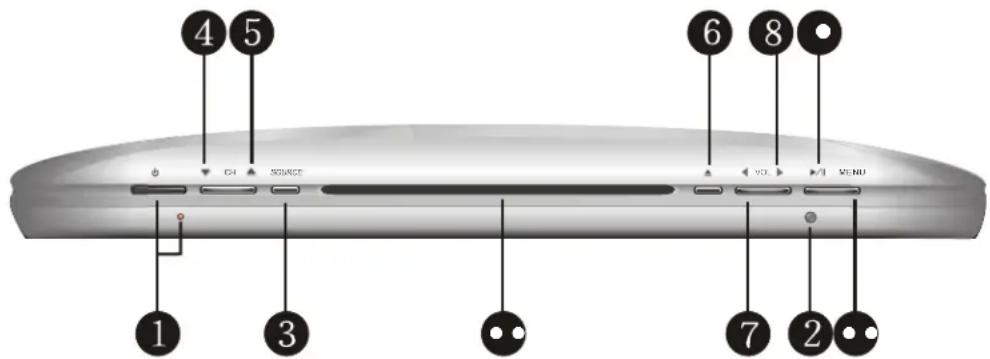
The functions of front panel buttons are as follows:
| S.N. | Item | Description |
| 1 | POWER/STANDBY | When no signal input within 2 minutes in VGA mode, this unit automatically enters standby mode.when no signals input within 5 minutes in other modes,this unit automatically enters standby mode, meanwhile the power indicator light becomes red.Press [POWER] button and this unit enters working mode. |
| 2 | IR sensor window | |
| 3 | SOURCE | SOURCE MENU, select in TV, DVD, AV, S-VIDEO, YPBPR/CBCR, VGA |
| 4 | CH▼ | Decrease the channel number in TV mode; select menu item downward when menu displays. |
| 5 | CH▲ | Increase the channel number in TV mode; select menu item upward when menu displays. |
| 6 | OPEN/CLOSE | Disc In/Out; quickly change to DVD mode. |
| 7 | VOL◀ | Decrease the menu adjustment item value or confirm the functions and decrease the volume. |
| 8 | VOL▶ | Increase the menu adjustment item value or confirm the functions and increase the volume. |
| 9 | PAUSE/PLAY | Pause or play |
| 10 | MENU | Enter and exit the menu. |
| 11 | DOOR | Disc In/Out door |
BATTERY INSTALLTION
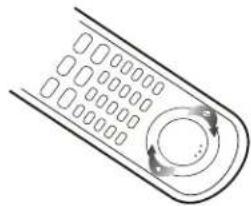
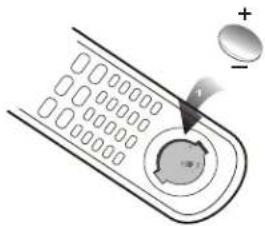
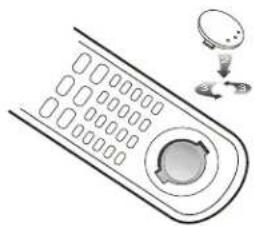
When installing battery, please make the two polarities of battery accord with the two polarities inside the battery case (positive upward, negative downward), as the following figure:
① Take down battery case cover
natural_image
Line drawing of a remote control with circular buttons and directional arrows (no text or symbols)② Install battery
natural_image
Illustration of a remote control with a circular dial and an arrow pointing to it, no text or symbols present.③ Close battery case cover
natural_image
Illustration of a remote control with a circular button and a small sphere nearby (no text or symbols)BATTERY LIFE
● Generally speaking, the battery can be used for one year. But the detailed battery life and usage times are related to the remote control operation.
- If the remote control is still invalid when near to the unit, please replace the battery.
- Please use CR2025 battery.
NOTE:
- Do not use rechargeable battery.
- Do not charge the battery, short-circuit, disassemble, heat or throw it into fire.
Take care not to fall and beat the remote control, which will damage the remote control or cause function trouble. - If the battery of remote control will not be used for a long time, please take if out.
CAUTION
Please put the battery away from children. If swallow it by error, please contact the local doctor immediately.
POWER ADAPTOR INSTALLATION
- Please confirm whether accessories have power adaptor.
- Please make sure to use power adaptor in specification range, otherwise it will cause trouble.
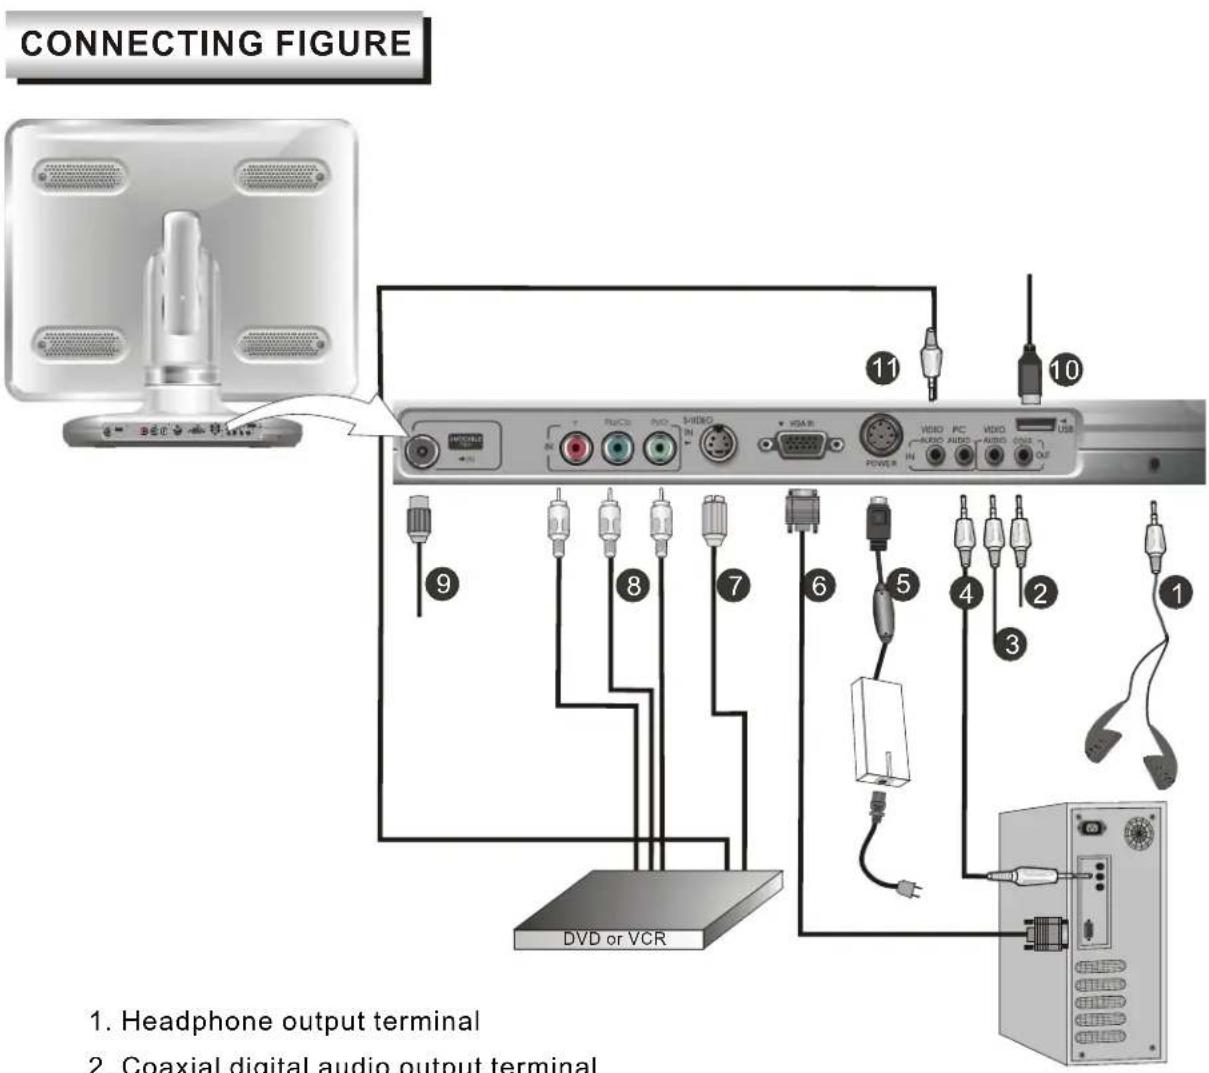
- Headphone output terminal
- Coaxial digital audio output terminal
- AV signal output terminal
- PC sound source input terminal
- 5V, 12V DC power input terminal
- VGA signal input terminal
- S-video signal input terminal
- YPb/CbPr/Cr connecting terminal
- TV signal input terminal
- USB jack
- AV input terminal
NOTE
After well connecting all cords, you may plug power cord.
CHANGE SOURCE OPERATION
This product change source by Source Menu. Press [SOURCE] button or [SOURCE] key to display the menu as follows:
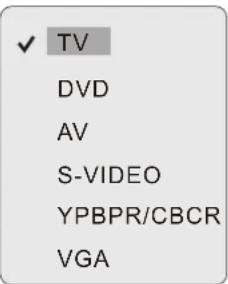
The current source item is highlighted. Through press [▲/▼/ SOURCE] button on the remote control or [▲/▼/ SOURCE] key, you select source item which you want to change to, then press [◀/▶ /OK] button or [◀/▶ ] key or wait a few seconds to confirm your choice that change to highlighted source item.
If your TV type is "AIR TV" this product can store up to 68-channel programs (2 69), else if your TV type is the others type this product can store up to 125-channel programs (1\~125). You can select your favorite channel through [CH+/-] or number buttons, and you can scan and store all of the channels through auto scan.
In TV mode, press [MENU] button on the remote control, or [MENU] key on the front panel the menu will show as follows:
- Through pressing [▲/▼] button on the remote control, you can select menu sections(menu sections consist of "PICTURE", "SOUND", "TV SETTING", "FUNCTION"). Press [OK]or [▶] button to enter this menu section.
- Press [▲/▼] button on the remote control to select the item, and then press [◄/►] button to adjust parameter value. Press [MENU] button to return to menu section.
PICTURE
Select "☐" and menu will show as follows:
Press [▲/▼] button to select items and [◀/▶] button to adjust.
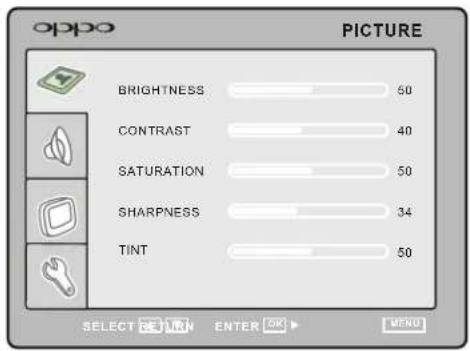
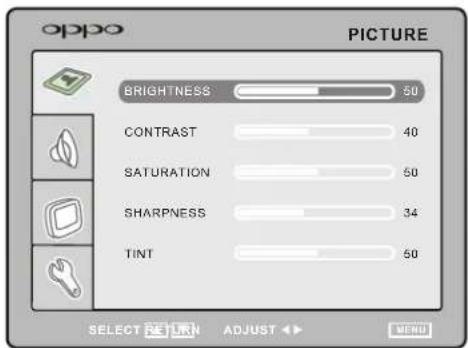
| Item | Description |
| BRIGHTNESS | To adjust brightness |
| CONTRAST | To adjust contrast |
| SATURATION | To adjust color saturation |
| SHARPNESS | To adjust picture sharpness |
| TINT | To adjust picture tint, only valid in N 3.58/N 4.43 and display mode with V-scanning frequency equal to 60Hz. |
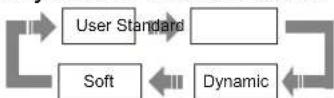
- There are four modes in picture mode: User, Standard, Dynamic and Soft. You can press [PICTURE] button to select any one of these modes.
SOUND
- Select " and menu will show as follows:
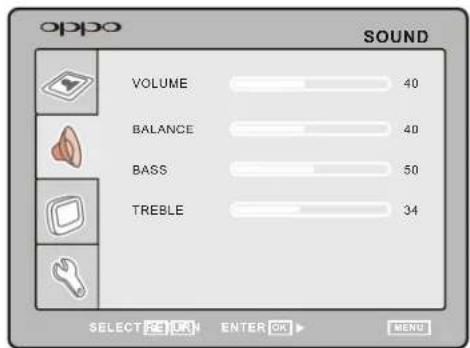
- Press [▲/▼] button to select item and press [-/▶] button to adjust. The following is sound item description.
| Item | Description |
| VOLUME | To adjust volume |
| BALANCE | To adjust balance of left and right channels |
| BASS | To adjust bass |
| TREBLE | To adjust treble |
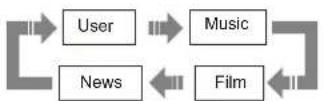
- There are four modes in sound mode: User, Music, Film, News. User may press [SOUND] button to select any one of these modes, the adjusted value is saved in User mode.
TV SETTING
- Select " ☐ " and tuning menu will show as follow:
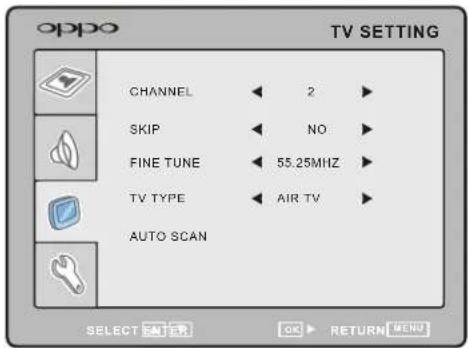
- Press [▲/▼] button to select item and press [-/▶] button to adjust or activate.
| Item | Description |
| CHANNEL | To change the current channel number. |
| SKIP | To select"YES"or"NO", You can select "YES" to make current channel unaccessible while using [CH+/-] button to browse channels. |
| FINE TUNE | To adjust the channel frequency accurately to make the sound and picture effect better. |
| TV TYPE | To select the TV type between: AIR TV, STD CABLE, IRC CABLE, HRC CABLE. |
| AUTO SCAN | Press [OK] or [◀/▶] button of remote control or [1/▶] key to search programs and store all of them automatically. |
NOTE
During the searching, you can press [MENU] button to stop.
FUNCTION
You can setup some system configuration here.
Press [▲/▼] to select " 🔊" item and press [▶] button to enter the following section:
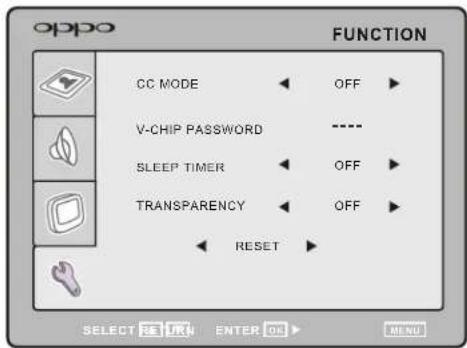
- Press [▲/▼] button to select item and press [-/▶] button to adjust or activate.
| Item | Description |
| CCD MODE | To select CCD mode you need between: OFF, CC1, CC2, CC3, CC4, TEXT1 TEXT2, TEXT3, TEXT4. |
| V-CHIP PASSWORD | Input the password to enter the V-Chip setting, the initial password is 0000 You can press[◀]to modify the password. |
| SLEEP TIMER | Can be changed sleep time between:"OFF", "10MIN", "20MIN", "30MIN", "60MIN", "90MIN", "120MIN".If the sleep time is counted down at the last one minute, you can cangle sleep by pressing SLEEP button. |
| TRANSPARENCY | To change transparency of OSD, it can be change from OFF to LEVEL6, 7 levels in total. |
| RESET | To reset all value to default. |
If you select V-CHIP PASSWORD and input the password the PARENTAL CONTROL shows follow.
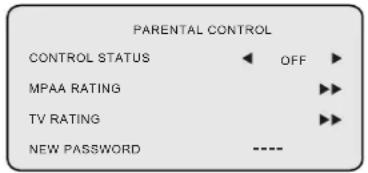
- Press [▲/▼] button to select item and press [◀/▶] button to enter submenu.
| Item | Description |
| V-CHIP BLOCK | Select the V-Chip ON or OFF |
| MPAA RATING | Enter the MPAA RATING submenu. |
| TV RATING | Enter the TV RATING submenu. |
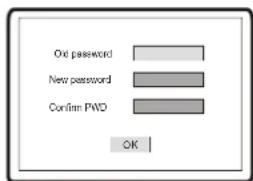
| NEW PASSWORD | To change the password. |
- When you select MPAA RATING and press [OK] or [▶], you can enter MPAA RATING submenu as follow:
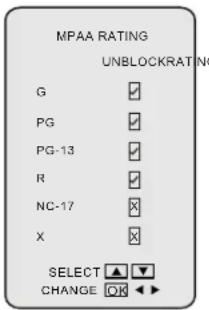
You can press [▲/▼] to select MPAA RATING and press[/▶] or [OK] to setting the rating is on or off, the rating is follow:
- Rated G - General Audiences. All ages admitted.
- Rated PG - Parental Guidance suggested. Some material may not be suitable for children.
- Rated PG-13 – Parent strongly cautioned. Some material may be inappropriate for children under 13.
Rated R - Restricted. Under 17 requires accompanying parent or adult guardian. - Rated NC-17 - No one 17 and under admitted..
● Rated X -Children under the age of 17 not admitted
- When you select TV RATING and press[◄/►], you can enter TV RATING submenu as follow:
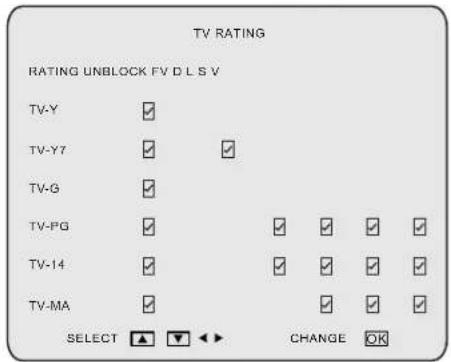
You can press [▲/▼] or [◄/►] to select the TV RATING and press [OK] to setting the TV rating as follow:
- TV-Y :All Children -- This program is de+signed to be appropriate for all children.
- TV-Y7:Directed to Older Children-- This program is designed for children age 7 and above. Note: For those programs where fantasy violence may be more intense or more combative than other programs in this category, such programs will be designated TV-Y7-FV.
- TV-G :General Audience -- Most parents would find this program suitable for all ages.)
- TV-PG :Parental Guidance Suggested -- This program contains material that parents may find unsuitable for younger children. The theme itself may call for parental guidance and/or the program contains one or more of the following: moderate violence (V), some sexual situations (S), infrequent coarse language (L), or some suggestive dialogue (D).
- TV-14: Parents Strongly Cautioned -- This program contains some material that many parents would find unsuitable for children under 14 years of age. This program contains one or more of the following: intense violence (V), intense sexual situations (S), strong coarse language (L), or intensely suggestive dialogue (D).
- TV-MA :Mature Audience Only -- This program is specifically designed to be viewed by adults and therefore may be unsuitable for children under 17.) This program contains one or more of the following: graphic violence (V), explicit sexual activity (S), or crude indecent language (L).
- If you want to change the password you should select NEW PASSWORD, and input a new password, then product shows follow:
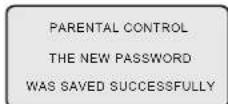
- If a program is blocked, then the picture will be changed by blue screen, the sound will be mute at the same time. And a moving menu shows as follow:

VIDEO SETTING MENU
When in AV or S-VIDEO input mode, there are 4 color system modes for selection: "Auto", "PAL", "N 3.58", "N 4.43". Select the right system for your video program. If you do not know which mode your video playback devices and video media is using, you should select the "auto" mode or you should check and confirm this with your supplier.
The menu setup of AV and S-VIDEO modes is much the same as that of TV mode, the difference is follow:
- The "section is invalid in AV and S-VIDEO."
- The CC mode is invalid S-VIDEO.
In order to make this manual pithy and concise, it is not repeated here. You can find it in preceding pages.
NOTE
If no signal input in TV, AV, S-VIDEO and YPBPR/CBCR the screen will show like the following figure.
This unit will go into standby mode automatically with no signal input for more than 5 minutes.
AV
NO SIGNAL
4:50
When this unit works in YPBPR/CBCR mode, the menu is follow:
- The " [icon] " (PICTURT setting) is as same as the TV mode, please refer to page7 .
- The others is as same as the VGA mode, please refer to page 15-18.
When this unitworks in VGAmode, the following setup can be done.
Press [MENU] button to enter menu section. Press [▲/▼] button to select sections and then press [▶] button or [OK] button to enter.

Press [▲/▼] button to select "", and press [▶ /OK] button to enter.
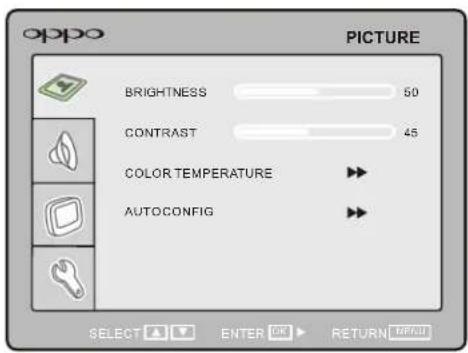
Press [◀/▶] button to adjust value of item.
| Item | Description |
| BRIGHTNESS | To adjust brightness of picture. |
| CONTRAST | To adjust contrast of picture. |
| COLOR TEMPERATURE | Enter sub menuto adjust color temperature of picture. Press [◀/▶]/[OK] button to enter. |
| AUTOCONFIG | Auto confing horizontal/vertical position, phase and frequency, brightness and contrast.Press [◀/▶]/[OK] button to activate. |
Here shows the color temperature submenu.
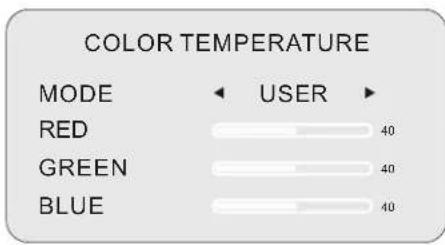
Press [▲/▼] button to select item and press [◀/▶] button to change and adjust value of item.
| Item | Description |
| MODE | Select color temperature mode :"User", "C6500", "C8700", "C9300". |
| RED | Adjust red value of color temperature |
| GREEN | Adjust green value of color temperature |
| BLUE | Adjust blue value of color temperature |
SOUND
Press [▲/▼] button to select " 🔊" and press [▶/OK] button to enter, The setting is as same as TV mode, see page8.
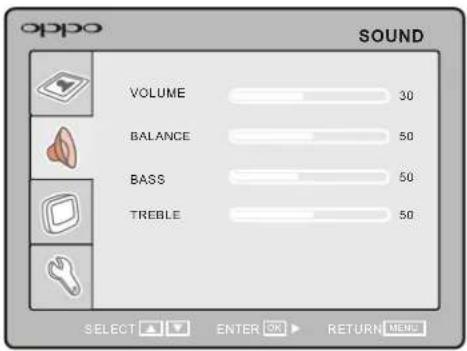
MONITOR SETTING
Press [▲/▼] button to select " □ " and press [ ▶ /OK] button to enter.
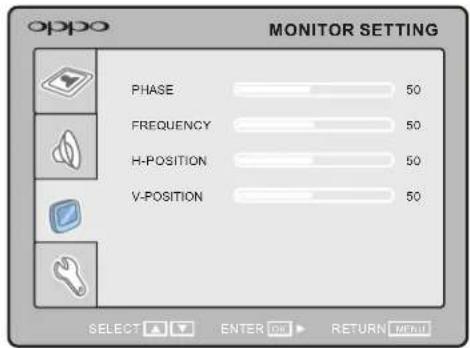
Press [▲/▼] button to select item and press [◀/▶] button to adjust value of item.
| Item | Description |
| PHASE | To adjust phase. |
| FREQUENCY | To adjust frequency |
| H-POSITION | To adjust screen horizontal position |
| V-POSITION | To adjust screen vertical position |
NOTE
- If you use this unit as a PC-monitor, and when your PC goes into standby mode, the screen will show as dexter. This unit will go into sleep mode with no signal input in 2 minutes. In this mode, the indicator will turn red, and the screen is turned off. You can wake it up by waking up you PC.
- If this product is not connected to any input device, the screen will show as dexter. This unit will go into standby mode in 2 minutes.
VGA
NO SIGNAL
1:50
VGA
CABLE NOT
CONNECTED
1:50
FUNCTION
Press [▲/▼] button to select " ", and press [ ▶/OK] button to enter.
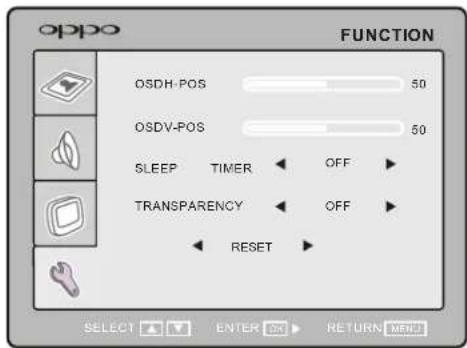
Press [◀/▶] button to adjust value of item.
| Item | Description |
| OSDH-POS | To adjust the horizontal position of OSD |
| OSDV-POS | To adjust the vertical position of OSD |
| SLEEP TIMER | Select sleep time between:OFF,10MIN,20MIN,30MIN,60MIN,90MIN,120MINIf the sleep time is counted down at the last one minute, you can cancle sleep by pressing SLEEP button. |
| TRANSPARENCY | To adjust transparency of OSD. it can be change from OFF to LEVEL6, 7 levels in total. |
| RESET | Reset all value that related to picture and sound to default . |
DVD OPERATION
Press [MENU] button to enter main menu section, menu pages of DVD mode are same as ones of VGA mode.
BriefIntroduction
DVD provides brand-new AV effect for consumers with its extraordinarily large capacity and outstanding audio-video effects. Its capacity is as high as 4.7-17 GB (approximately 7-26 times the CD capacity) and horizontal resolution of picture is above 500-line.
ComparisonBetweenDVDandOtherDiscs
| DVD | LD | SVCD | VCD | CD | CDROM | ||||
| Recording Method | Digital/MPEG2 | Analog | Digital/MPEG2 | Digital/MPEG1 | Digital | Digital | |||
| Capacity | Single-sided 1layer 4.7G | Single-sided 2layers 8.5G | Double-sided 1layer 9.4G | Double-sided 2layers 17G | 650MB | 650MB | 650MB | 650MB | |
| Playback Time | 133min | 242min | 266min | 484min | 1 s ide 60min.2 s ides120min. | 45min | 74min | 74min | |
| DiscDiameter | 12CM/8CM | 30CM/20CM | 12CM/8CM | 12CM/8CM | 12CM/8CM | 12CM/8CM | |||
| Horizontal Resolution | 500lines or more | 430lines or more | 350 lines or more | 250 lines or more | |||||
| Aspect Ratio | Multiple | One | |||||||
| Subtitle | 32 types | Max. 16types | |||||||
| Audio | Linear PCM | Linear PCM FM modulation | Linear PCM | ||||||
| Sound Quality | 48kHz、96kHz/16、20、24bit | 44.1kHz/16bit | 44.1kHz | 44.1kHz/16bit | |||||
Function Introduction
● Multiple languages and subtitles
DVD disc can support as many as 8 dubbing languages and 32 subtitle languages.
● Multiple angles
DVD disc may support as many as 9 camera angles.
● Multiple story plots
User can select to play the desired plots (the beginning, development or ending) of the same disc.
● Multiple aspect ratios
Multiple aspect ratios support various TV screens.
| Disc Pictures | TV Screen | ||
| 4:3 | 16:9 | ||
| Pan-Scan | Letterbox | ||
4:3 |  | 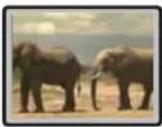 | 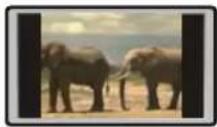 |
16:9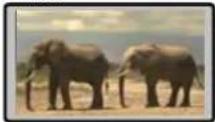 | 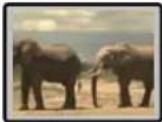 | 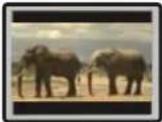 | 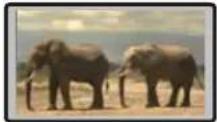 |
Features
This player employs the new generation MTK decode chip with more convenient system and more stable operation. Super error correction slot-in loader with twin laser with good shockproof performance.
Brand-newAV Effects
① Compatible with MPEG 4 format discs to produce wonderful pictures.
② 108MHz/12bit video DAC with more vivid and brilliant pictures.
3 Progressive-scan video outputs to eliminate the flickers hardly overcome by interlacing scan and therefore your eyesight will be well-protected. At the same time, the pictures definition is sharply enhanced and the pictures will be finer, smoother and stabler.
4 Coaxial digital output terminal.
■ High Quality Digital Audio
① Coaxial digital audio output should be connected to power amplifier with DOLBY DIGITAL/DTS decoder.
② PCM Digital audio outputs to satisfy the fans' acoustic requirements.
■ ConvenientFunctions
① The novel MP3 playback window GUI provides you a new way to appreciate Mp3 music.
② Direct entry into desired scenes (title/chapter/time/track search).
DVD OPERATION
③ Multi-level zoom in/out playback function to provide you with brand-new enjoying way.
4 Multiple aspect ratios to fit TV sets of various screen ratios.
⑤ Parental lock function to prevent children from watching unsuitable discs.
6 Multiple dubbing languages and subtitle languages bring you the best entertainment status all the time.
■ Super compatible with CD, HDCD, KODAK PICTURE CD etc.
NOTE: * Some discs labelled with MPEG4 on the market actually are *.rm/*.ra/*.ram/*.rmm and others which are not compatible. Please take care when buying discs.
Compatible Disc Types
| Types | Sizes | Recorded Contents |
 | 12cm or8cm | DVD: Compressed digital audio + compressed digital video (dynamic picture) |
 | 12cm | MPEG4: Compressed digital audio + compressed digital video (dynamic picture) |
 | 12cm or8cm | CD-DA: Digital audio |
NOTES
- Issues related to
These icons on the top banner indicate the disc types that the function described in the section applies to.

Applies to DVD disc

Applies to CD disc

Applies to MPEG4 disc
PLAYBACK
-
Power on and switch signal source to DVD mode and the unit begins to work.
-
Place the disc (with label side facing users) to the door and the unit will draw in the disc automatically.
- The unit begins to read disc information.
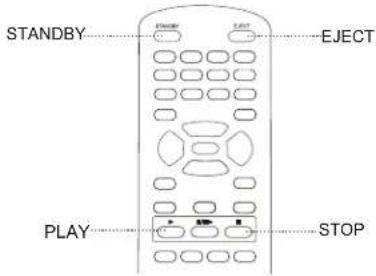
-
Press [PLAY] button to begin playing disc.
-
Press [STOP] button to stop playing.
-
When the unit is playing a disc, press [STOP] button the first time and the unit enters pre-stop state, while press [STOP] button again and the unit enters stop state.
- At the pre-stop state, if you press [PLAY] or [OK] button, the unit will continue to play from the stopped point.
- At the stop state, if you press [PLAY] or [OK] button, the unit will play from the beginning point of the disc.
-
Press [STOP] button when playing MPEG4 discs and the unit enters stop state directly.
-
Press [EJECT] button to take out disc or quickly change to DVD mode from one of other modes.
-
When finishing playing, switch signal source to other working state and press [STANDBY] button to make the unit enter standby state. Please pull out the power plug from power socket when not using the unit for a long time.
SELECTTVSYSTEM
- According the connected TV set's color system, set the system of this unit to match to the TV set.
- If the TV system is PAL, press [P/N] button to select "PAL" system and TV screen
displays:

- If the TV system is NTSC, press [P/N] button to select "NTSC"s ystem and TV screen
displays:

- When using multi-system TV set, press [SYSTEM] button to select "Auto"s ystem and TV
screen displays:

NOTES
- The system cannot be switched when playing a disc and it can be switched in stop mode or no disc inside.
● Part of functions of some discs cannot be well performed in a certain system when playing in different systems. - It is recommended that you set the system of TV set and this unit to "NTSC".
- EJECT button is effective only when selecting DVD signal source. In other signal sources, such as TV, AV, etc, this button is invalid.
PAUSE/STEP PLAYBACK

- Press [PAUSE/STEP] button in playing state.
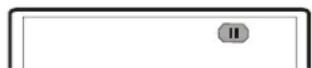
- Pause and TV screen displays:
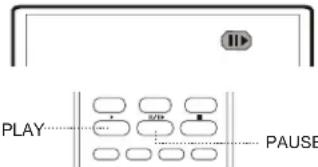
- Press [PAUSE/STEP] button in pause mode to enter step playback function. Each press moves one frame forward and TV screen displays:
- No step playback function when playing CD.
- Press [PLAY] button to resume playback.
DISPLAY

-
Press [DISPLAY] button.
-
When operating this unit, disc information and function operation hint will display on TV screen.
- Press [DISPLAY] button and the related disc circularly changes as the following:
DVD disc:
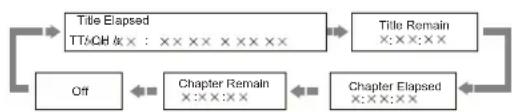
flowchart
graph LR
    A["Title Elapsed TTs:OH /x : ×××× ××××"] --> B["Title Remain x:××:××"]
    C["Chapter Remain x:××:××"] --> D["Chapter Elapsed x:××:××"]
    E["Off"] --> A
    E --> C
CD disc:
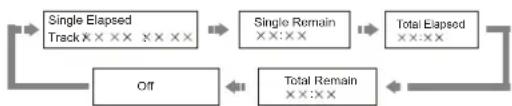
flowchart
graph LR
    A["Single Elapsed Track X X X X X X X"] --> B["Single Remain X X:XX"]
    B --> C["Total Elapsed X X:XX"]
    C --> D["Total Remain X X:XX"]
    D --> E["Off"]
    E --> A
VOLUME CONTROL
- Press [VOL+/VOL-] buttons to adjust volume.
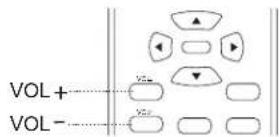
- Press [VOL+/VOL-] buttons on the remote control of this unit.
- Press [VOL+] button to increase volume; press [VOL-] button to decrease volume; the maximum volume is 100.
DVD MENU PLAYBACK

- Some DVD discs are made with title menu or chapter menu.
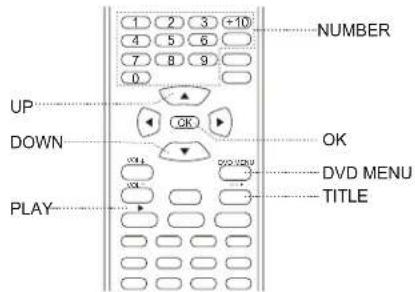
- After pressing [DVD MENU] button, TV screen displays menu for selection. Operate according to menu indication and press number buttons to select.
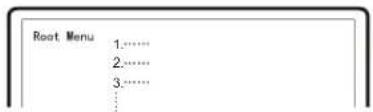
- Or press [▲/▼] button and [◀/▶] button to select the desired track, and then press [PLAY] or [OK] button.
NOTE
- Press [TITLE] button once to return to title menu; press [DVD MENU] button once to return to main menu; the return location varies with discs.
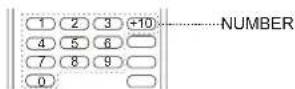
SELECT TRACK TO PLAY DIRECTLY BY NUMBER BUTTONS
-
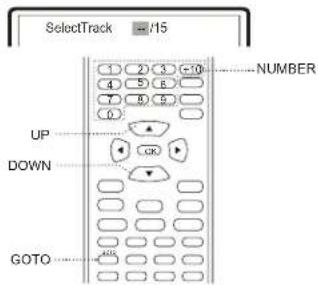
Insert disc, after disc reading and normal playback, press number buttons to select track to play directly.
-
If track number is less than 10, press number buttons 1 to 9 to directly select. For instance, select the seventh track: ⑦
- If track number is more than or equal to 10, press [-/- -] button and then number buttons 0 to 9. For instance, select the 16th track 1 + 6
- If track number is more than or equal to 20, press [-/- -] button twice and then number buttons
0 to 9. The rest can be performed by analog.
SELECT AUDIO/LANGUAGE

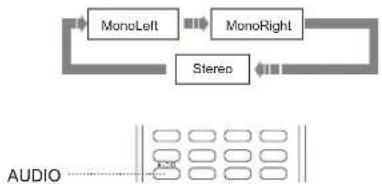
- Press [AUDIO] button.
- As for DVD with multiple languages, you may select the desired language when playing.

- As for CD disc with multiple channels, you may select audio output from left or right channel or select stereo audio output.
CD disc:
flowchart
graph TD
    A["MonoLeft"] --> B["MonoRight"]
    B --> C["Stereo"]
    C --> D["AUDIO"]
NOTE
Language type varies with disc recording.
- When playing some DVD discs, pressing [AUDIO] button to switch language may result in playing the track from its beginning.
REPEAT PLAYBACK
- The repeat playback function enables a certain title/chapter/track/disc repeated.
- Press [REPEAT] button. Each press of REPEAT button may realize different repeat functions.
DVD DISC:

REPEAT PLAYBACK OF SELECTED SEGMENT
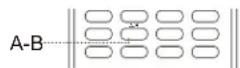
- When playing disc, you may press [A-B] button to play your desired segment content repeatedly.
- In normal playback, press [A-B] button at the beginning point (point A) of the segment that you desire to play repeatedly.
TV screen displays:
- In normal playback, press [A-B] button at the ending point (point B) of the segment that you desire to play repeatedly.
TV screen displays:
- The unit automatically returns to point A and begins to play the selected segment (A-B).
- Press [A-B] button for the third time.
- The unit restores to normal playback.
NOTE
- The A-B repeat function may be invalid to some discs. In menu playback mode, the segment can only be selected in the track.
SELECT SUBTITLE

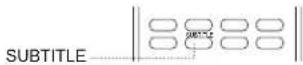
- Press [SUBTITLE] button.
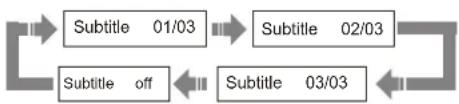
- When playing DVD discs recorded with subtitles of several languages, you may select subtitle of different languages. Each press of [SUBTITLE] button switches one subtitle language, and TV
screen displays:
flowchart
graph LR
    A["Subtitle 01/03"] --> B["Subtitle 02/03"]
    B --> C["Subtitle 03/03"]
    C --> D["Subtitle off"]
    D --> A
- The number of switchable subtitle language depends on discs. DVD disc may select 32 kinds of subtitle at most.
FAST PLAYBACK

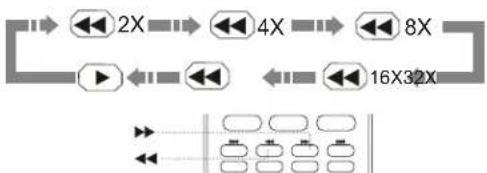
- When playing discs, you may select fast forward or fast backward playback to search a certain point.
- Press [▶] button and the unit begins fast forward playback.
- Press [▶] button each time and the disc playback speed switches in the following sequence
circularly:

flowchart
graph LR
    A["Input"] --> B["2X"]
    B --> C["4X"]
    C --> D["8X"]
    D --> E["Output"]
    B <--> F["Output"]
    C <--> G["Output"]
    E <--> H["Output"]
- Press [◀] button and the unit begins fast backward playback.
- Press [◀] button each time and the disc playback speed switches in the following sequence
circularly:
flowchart
graph LR
    A["2X"] --> B["4X"]
    B --> C["8X"]
    D["16X"] --> E["32X"]
SLOW PLAYBACK

- You may enjoy slow playback according to the following step.
- Press SLOW button to turn to slow playback mode, the following displays on TV screen.
■ Play DVD disc

flowchart
graph LR
    A["1/2"] --> B["1/4"]
    B --> C["1/8"]
    C --> D["1/16"]
    D --> E["1/2"]
    E --> F["1/4"]
    F --> G["1/8"]
    G --> H["1/16"]
    H --> I["1/2"]
- Press PLAY button in slow playback status resumes normal playback.
PLAY FROM THE DESIRED POSITION

■ Play DVD disc
- Inputting a certain time, title number or chapter number directly may search in the disc fast and then play forward from this position.
- Search title and chapter. For instance, search the 2nd chapter in title 6.
- Press [GOTO] button and TV screen displays:

- Press [◀/▶] button to move cursor and lighten the title number, shown in the figure:

- Then press number button 6 to select Title 6, shown in the figure:

- Finally press number button 2 to select Chapter 2, shown in the figure:

2. Search title time
- Press [GOTO] button until TV screen displays the following figure. Then press number buttons to input hour, minute and second.

3. Search chapter time
- Press [GOTO] button until TV screen displays the following figure. Then press number buttons to input hour, minute and second.

■ Play MPEG4 disc
1. Selecttrack
- Press [GOTO] button until TV screen displays the following figure. Then press number buttons to input the track.

2. Search track time
- Press [GOTO] button until TV screen displays the following figure. Then press number buttons to input hour, minute and second.

Play CD discs
1. Search disc time
- Press [GOTO] button until TV screen displays the following figure. Then press number buttons to input minute and second.

2. Search track time
- Press [GOTO] button until TV screen displays the following figure. Then press number buttons to input minute and second.

3. Select the track
DVD OPERATION
- Press [GOTO] button until TV screen displays the following figure. Press number buttons to input track.
ZOOMING THE DISPLAYED FRAME
- Zoom in/out the player frame.
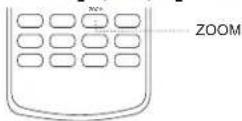
- When playing a disc, press the [ZOOM] button can open the zoom in/out function, and the TV screen displays( take X2 mode as an example):
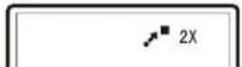
- The frame is magnified to 2 times of the normal size.
-
Press the [ZOOM] button continually, all the magnified/ minified modes display on the screen in turn. The magnified/ minified modes includes: X2, X3, X4, X1/2, X1/3, X1/4.
-
When the mode is on X1/4, press [ZOOM] button to close the zoom in/out function, and the frame restores normal size.
-
When the frame is magnified, press the [▲/▼ ◀/▶] buttons to move the frame.
CHANGE POWER-ON LOGO FREELY
In normal playback, press the CAPTURE button to set the currently played image as the power-on logo.
NOTE
IWhen playing some discs, the power-on logo caused by pressing the CAPTURE button probably has blurred images.
IPlease be more patient in the operation of changing the screen logo.
IThe operation of changing the screen logo is invalid when the image is in zoom in/out status.
MEMORY

-
This player can save the currently played time point automatically, when you change it out of DVD or to standby mode.
-
During next time disc reading, when the player recognises the disc is the one saved last time, it will skips to the time point saved last time to play. If you want to play the disc from the beginning, please press [STOP] button two times and press [PLAY] button, then, the player will play from the beginning of the disc.
NOTE
- IThis player may save one DVD disc. When saving new discs, the former saved disc information will be cleared.
- If the power is cut off unexpectedly, the disc may not be remembered.
MPEG4, AND JPEG FILE PLAYING
MPEG4 is the audio standard published by MPEG(Moving Pictures Experts Group) in November, 1998. As the discrepant parts between frames of picture are only processed and the same parts are deleted, the data number are greatly decreased. The most distinct feature of MPEG4 is the high compression and clear imaging. Furthermore, MPEG4 provides elastic specifications to adjust the stream according to the used requirements. The larger stream can be used when collecting private films; and the small stream can be used in network transferring, which make MPEG4 use widely.
JPEG(Joint Photographic Experts Group) is the most widely used picture compression and storage format today. Utilizing high efficiency compression algorithm, JPEG compresses the original picture 15 to 20 times with excellent picture quality. JPEG is featuring small size data, convenient application and supported by most picture processing software, so it is very fit to store photos.
The strong decoding capability of this unit can decode and play the files with the above formats. In the course of playing, an operation menu will appear and its construction is shown as follows.
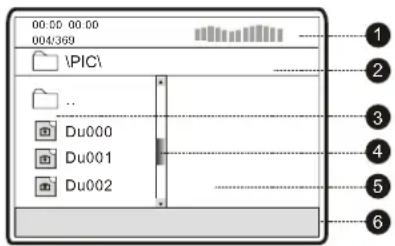
① State window
Display the current state
information.
② DIR window
Display the current path.
③ File window
Display the current path's file.
④ Scroll bar window
Indicate the current file's position.
5 Preview window JPEG image preview.
⑥ Information window Display the current operation prompts.
The state information in state window is as follows:
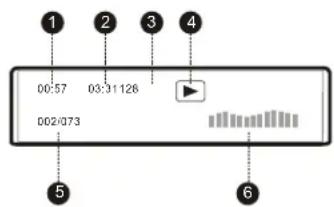
① Elapsed playback time of the current Music file
② Total playback time of the current Music file
③ The audio bit rate of the current Music file
④ Current playback mode indicator
⑤ Track indicator
⑥ Dynamic frequency spectrum indicator
1. Play MPEG4 file
After you put an MPEG4 format file into the unit, it will search disc information and display the operation menu as figure A (The displayed content varies with disc.).
A:
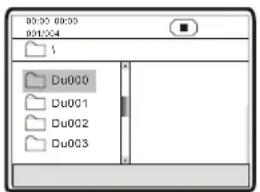
B:
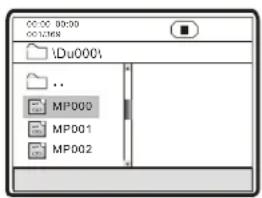
- Press [▲/▼] button to select the directory you desired and press [OK] button to confirm.
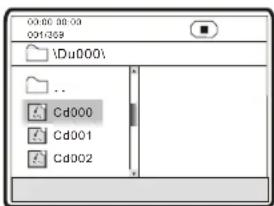
For instance, you select the directory Du000 in Figure A, press [OK] button and TV screen displays as in Figure B. The window returns to the previous directory when you select[ 📄.] orpress [ ↩ button. - In Figure B, press [▲/▼] button to select the MPEG4 format file you desired and press [OK] button to confirm. The unit begins to play MPEG4 format movie.
2. Play music file
After you put an music file into the unit, it will search disc information and display the operation menu as in the following figure. The operation method is the same as that of MPEG4.
3. Play JPEG file
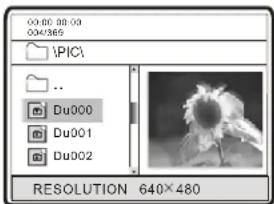
After you put an music file into the unit, it will search disc information and display the operation menu as in the following figure. The operation method is the same as that of music file, but the difference is that after selecting JPEG file, the preview window will appear this file's preview image to facilitate you to select. After you select the JPEG file you desired and press [OK] button to confirm, the picture will display in full screen.
4. Play music+JPEG file
If a disc is composed with both music and JPEG files, you may enjoy both of them simultaneously. First, you may play songs by the above-mentioned method; then enter the directory with JPEG file and enjoy JPEG picture by the above-mentioned method.
■ Other basic operation methods
-
Press [◀], [▶] button may turn to the next or last page.
■ Other functions of JPEG file -
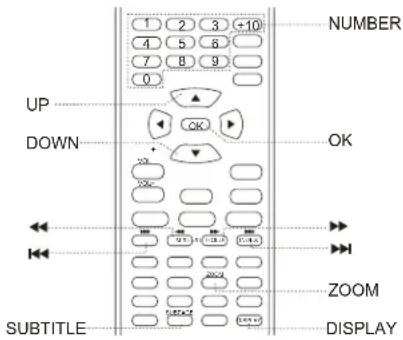
When playing JPEG file, pressing [SUBTITLE] button may switch different JPEG display modes which have 16 kinds for selection.
- When playing JPEG file, press [ZOOM] button to enter zoom in/out, and press it again to stop this function.
- When in zoom in/out, pressing [▶] button may magnify the picture and it can magnify the frame twice at most as the original one. Pressing [◀] button may minify the picture and it can minify the frame half at most as the original one.
- When playing JPEG file, pressing [■] button may realize preview playback function. At the same time, all JPEG files are displayed on TV screen. One frame can display up to 12 pictures at most. The rest ones are shown on the next frame. Pressing [▶] button may enter the next frame and [◀] button may enter the previous frame. You may press number buttons or [▲/▼] button to select the picture you desired and press [OK] button to confirm.
- When in preview playback, pressing [DVD MENU] button may exit preview playback function.
- When playing JPEG file, pressing [▲/▼] button may realize picture rotation button.
NOTE
When buttons are invalid, TV screen displays:
- Please press effective button again.
GENERALSETUP
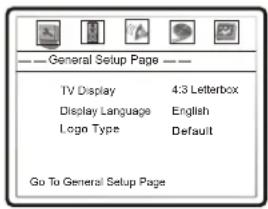
- TV display: this item is used to set the output picture ratio of this unit.
- Optional settings: 4:3/Pan-Scan, 4:3/Letterbox, 16:9 wide; Default: 4:3/Letterbox
- Display language: this item is used to set the information language displayed in the course of playback.
- Optional settings: English; Default: English
- Logo Type: This item is used to setup the sort of Power-on Logo
- Optional settings: Default, Captured; Default: Default
NOTE
The Screen Logo refers that use the image selected by pressing the CAPTURE button as the power-on logo. In the operation of changing screen, if the power-on logo has not set in Screen Logo, the unit will automatically set the power-on logo as Screen Logo.
SPEAKER SETUP
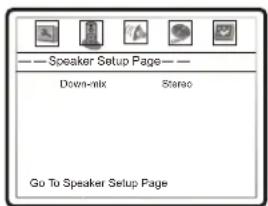
Downmix mode: this item is used to set this unit's DOWNMIX mode to change multi-channel audio into 2-channel audio output.
- Optional settings: Left/Right, Stereo Default: Stereo
AUDIO SETUP
When adjusting some audio setup items, some other audio setup items may be caused to change. This is because these audio setup items cannot be adjusted at the same time, but not the unit trouble.
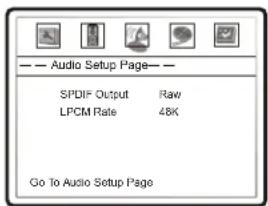
- SPDIF output: this item is used to set the bit stream type of the digital output.
- Optional settings: Raw, PCM; Default: Raw
- LPCM output: this item is used to set the output frequency of LPCM audio data to fit for different power amplifiers.
- Optional settings: 48K, 96K, 192K Default: 48K The output frequency is related to the actual signal frequency. The signal of 48K cannot output that of 96K.
INITIALSETUP
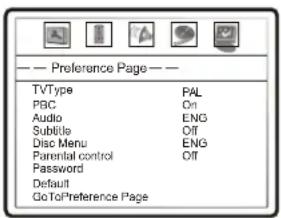
- TV system: this item is used to set the unit's video output system.
- Optional settings: Auto, PAL, NTSC; Default: NTSC
- PBC: this item is used to set PBC state.
- When playing some discs, if PBC is set On, this unit enters PBC playback mode; if PBC is set Off, the unit plays the disc according to track sequence.
- Optional settings: On, Off; Default: On
-
Audio: this item is used to set the preference audio language when playing.
-
Subtitle: this item is used to set the preference subtitle language when playing.
-
Disc menu language: this item is used to set the preference disc menu language when playing.
- Default of audio and disc menu language: English
- Default of subtitle language: OFF
NOTE
- Audio, subtitle and disc menu language are only effective to DVD disc.
- If the disc is not recorded with the language you appointed, the unit will apply the language that the disc appointed to play.
-
Select other languages: press [▲/▼] button to move cursor to "OTHER" item, press [OK] button and then number buttons to input the language code you desired. After input finishes, press [OK] button again.
-
Parental: this item is used to set the parental control ratings to prevent children from watching the restricted contents. (In case the disc supports this function)
- Optional settings: KID SAFE, G, PG, PG 13, PGR, R, NC17, ADULT, Off; Default: Off
NOTE
- When changing the parental control ratings, a password is needed. Please refer to the following password item for details.
- Password: this item is used to set a four digital password to enable you to change the parental control ratings.
Default:0000
- Default: this item is used to restore all settings to the default value except "Parental control" and "Password" in the setup menu.
USAGE OF USB EQUIPMENT AND 5-IN-1 CARD READER
USB refers to Universal Serial Bus. Most of USB devices on the market are USB1.1 or USB2.0. There are some types USB 1.1 devices:
Monitors、Communication devices、Audio、Human input、Mass storage.
Most FLASH MEMORY, Mp3 Player, USB HDD ect. belong to Mass storage Class. Mass storage Class include 2 transport manners:
- USB 1.1 Mass Storage Class Control/Bulk/Interrupt (CBI) Transport
- USB 1.1 Mass Storage Class Bulk-Only Transport
This unit support USB 1.1 Mass Storage Class Bulk-Only Transport, we are not sure that other USB devices can be supported! So please find out about the features of USB equipments before buy.
When use USB 1.1 Mass Storage Class Bulk-Only Transport devices, please notice the file operation system support Windows FAT, not support NTFS ect. file system.
The equipped 5-IN-1 CARD READER of this unit can support SD Card (Secure Digital Card), MMC (Multi Media Card), MS (Memory Stick), SM (Smart Media) and CF (Compact Flash).
1. Play USB Equipment:
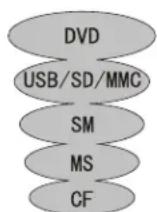
Please insert USB equipment into the USB port of this unit firstly, then press [CARD/DISC] button, a selection menu appears on screen. You may press [CARD/DISC] button or up/down direction button to select. If the cursor stops in "SM/USB" item, you may press [OK] or [PLAY] button to confirm. After correctly reading USB equipment data, the screen will display an operation menu. Please refer to the part of "MPEG4 and JPEG FILE PLAYING" in page 30 for details.
2. Play SD, MMC, MS, SM, CF
Please insert the FLASH card that is supported by 5-IN-1 CARD READER into the matched port of 5-IN-1 CARD READER, and connect the 5-IN-1 CARD READER with the USB port of this unit by equipped USB cord, then press [CARD/DISC] button and a selection menu appears on screen. You may press [CARD/DISC] button or up/down direction button to select. If the cursor stops in the item that directs your inserted FLASH card, you may press [OK] or [PLAY] button to confirm. After correctly reading card reader equipment data, the screen will display an operation menu. Please refer to the part of "MPEG4 and JPEG FILE PLAYBACK" in page 30 for details.
After pressing [CARD/DISC] button to display the selection menu, if you do not want to switch equipment, please move the cursor to the original one, and then press [OK] or [PLAY] button, or wait until the menu disappears automatically.
If you want to use DVD function, please select "DVD" through the above-mentioned operation steps to exit USB and card reader functions.
NOTE
- This player can play MPEG4 and JPEG files in SD, MMC, SM, MS, CF cards and USB equipment.
- When reading MPEG flies with large rate in USB equipment and FLASH card, pause may appear.
- If USB equipment and FLASH card have no files that be supported by this player, the screen appears "Empty Device". If USB equipment and FLASH card have troubles, or the operation is improper, the screen appears "Device Error". Please check USB equipment and FLASH card, or insert and unplug them again.
- If USB equipment and FLASH card unsupported by this player have been used, this player probably cannot work normally. Please switch off power, take out USB equipment and FLASH card, and then restart to switch on the power.
- This unit does not support USB OTG data exchange technology, and not support digital device that performs data exchange through USB OTG data exchange technology.
- Selection menu appears like this:
- All function of USB equipment and cards are effective in DVD model.
Please check for causes of problems in accordance with the following chart before contacting any maintenance personnel.
IMAGE TROUBLE
| Symptom | Causes and Correction |
| Black screen, power indicator light off | ◆ Check whether power cord well connected, whether this unit power on |
| ◆ Check whether the signal cord of input device well connected◆ Check whether input device power on | |
| Image display flicker, unstable | ◆ Check whether the input device signal in this unit's specification |
| ◆ Check computer output mode: control panel-display-setup◆ If the setup does not accord with this unit's specification, please change the display setup | |
| ◆ Hor scanning frequency: 30kHz~48kHz◆ Ver scanning frequency: 50 Hz~75Hz◆ Max display mode: 20":800X600@75 Hz |
SOUND AND TV TROUBLE
| Symptom | Causes and Correction |
| Cannot power on | ◆ Please make sure the well connecting of power cord |
| No sound | ◆ Please make sure the well connecting of audio cord |
| ◆ Check volume | |
| Volume too low | ◆ Check volume |
| ◆ If volume is still too low when adjusting volume to maximum, please check whether the input device is well set | |
| Snowy picture | ◆ Input antenna damaged or not well connected |
| Remote control failure | ◆ Check whether remote control battery used up◆ Whether battery installation is correct◆ Whether obstacles exists between remote control and the unit's receiving window◆ Check whether receiving window has strong light |
DVD TROUBLESHOOTING
| Symptom | Causes | Correction |
| Not play | 1. Condensation on laser head2. Disc not properly loaded3. Disc not compatible with the unit | 1. Switch on power and wait for 1 to 2 hours2. Make sure label side of the disc facing up3. Confirm whether this unit compatible with the placed disc |
| Sound distortion | 1. Too large volume of connected device2. Sound field mode not suitable for disc | 1. Adjust the device volume2. Adjust appropriate sound field |
| No sound | 1. Disc warped or dirty2. The unit in mute state | 1. Clean the disc2. Press MUTE button to cancel it. |
| No image | 1. TV not set for proper system | 1. Reset AV/TV state of TV |
| No color | 1. TV system not right2. TV color not well adjusted | 1. Press P/N button on remote control to set2. Reset the TV color |
| No disc reading | 1. Disc warped or dirty2. Disc not correctly placed3. Condensation on laser head | 1. Clean the disc2. Reload a disc with label side facing up3. Witch on power, unload disc and leave it for about 1 hour |
| Temporary function failure | 1. Mal-fabricated disc used2. Wrong buttons pressed3. Static leakage into the unit from outside | 1. Wait for 5 to 10 seconds to restore to normality automatically2. Operate again3. Power off for 1 to 2 minutes to power on again |
| No subtitle | 1. No subtitle made in disc2. The unit subtitle is turned off | 1. Disc problem2. Press SUBTITLE button to select it |
| Image rolling | 1. System setup not suitable for disc | 1. Adjust system |
- If the above methods still cannot solve the problems or the troubles are special, please contact the local maintenance personnel.
| ◆ LCD screen | SizeDisplay proportionTypePixel distanceView angle | 20.1" (diagonal)408 (H)X306 (V)TFT color0.51 (H)X0.51( V)80/80/80/80 |
| ◆ Frequency | Hor scanning frequencyVer scanning frequencyDisplay color | 30kHz~48kHz50 Hz~75 Hz16.7M color ) |
| ◆ Display mode | Recommended modeMax mode | 800X60060 Hz@800X60075 Hz@ |
| Input signal | Synchronous signalVideo signal | H/V separation, TTL positive/negative;H/V composite, TTL positive/negativeGreen synchronous, 0.3Vpp,negative0.7 Vp_p@75ohm |
| TV/Video | Image systemAudio systemVideo form | PAL/SECLAM/NTSC(In video mode)DK/I/BG/LCVBSS-VHS, RGB |
| Power Supply | InputOutput | ~ 100V-240V (50/60 Hz)=12V/4A; 5V/1.5A |
| Power | NormalStandby mode | 55WLess than 3W |
| Unit/net weight (WXHXT) | 517mmX500mmX202mm/12.0kg | |
| Environmental factor | Working temperatureWorking humidityStoring temperatureStoring humidity | 5°35 °C1080%-20°45 °C5%~9 5 % |
| Audio parameter | Input left channelInput right channelOutput left channelOutput right channelFrequency response | RCA white (L), 0.5±0.3 VrmsRCA red (R), 0.5±0.3 VrmsRCA white (L), 0.5±0.3 VrmsRCA red (R), 0.5±0.3 VrmsTV signal: 100 Hz~12 kHz(-3dB)AV: 100 Hz~15 kHz (-3dB) |
| DVD | Disc type | DVD VIDEOMPEG4 *; SVCD**VCD1.0, 1.1, 2.0version; CD-DA; Mp3 |
| Output | Analog audio output, digital audio outputCoaxial output, composite video output | |
Hint: the items with "◆" symbol are related to LCD screen. Specifications and design are subject to change without notice.
* Some discs labelled with MPEG 4 on the market actually are *.rm/* .ram/* .rmm and others which are not compatible. Please take care when buying discs.
** This unit cannot play some SVCD discs with VCD format.
- Because of disc quality and format difference, we cannot make sure smoothly read all discs; some functions cannot be fulfilled for the disc speciality, but not machine trouble.
| SUPPORTED INPUT MODE | ||||
| Resolution | Hor scanning frequency (KHz) | Ver scanning frequency (Hz) | Pixel frequency (MHz) | Format |
| 640×350 | 31.5 70.0 | 25.17 | DOS | |
| 720×400 | 31.5 70.0 | 28.32 | DOS | |
| 640×480 | 31.5 60.0 | 25.18 | DOS | |
| 640×480 | 37.9 72.0 | 31.50 | VESA | |
| 640×480 | 37.5 75.0 | 31.50 | VESA | |
| 800×600 | 35.1 56.2 | 36.00 | VESA | |
| 800×600 | 37.9 60.0 | 40.00 | VESA | |
| 800×600 | 48.1 72.0 | 50.00 | VESA | |
| 800×600 | 46.9 75.0 | 49.50 | VESA | |
- This product does not support the display mode not listed above. In order to achieve the best display effect, please select the above-listed 9 display modes input signal.
- Because of the difference of display card output signal (especially non-standard signal output), the display image may appear little disturbance which can be adjusted through auto config in the menu by users.
- To prolong this unit's service life, you are suggested to use power management function of computer.
NOTE
- Specifications and design are subject to change without notice.
● As for weight and size, please take actual object as standard.
CREDITS
This product incorporates copyright protection technology that is protected by method claims of certain U.S. patents and other intellectual property rights owned by Macrovision Corporation and other rights owners. Use of this copyright protection technology must be authorized by Macrovision Corporation, and is intended for home and other limited viewing uses only unless otherwise authorized by Macrovision Corporation. Reverse engineering or disassembly is prohibited.
ACCESSORIES
Please check the following accessories.
 | 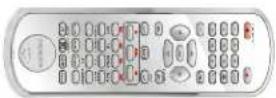  |
| User manual | Remote control and battery |
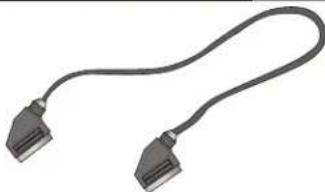 |  |
| Scart cable (optional) | Power adaptor |
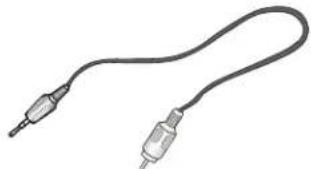 | 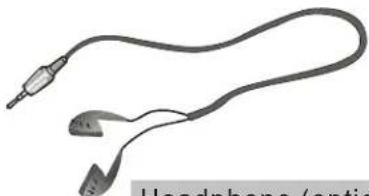 |
| Audio cord | Headphone (optional) |
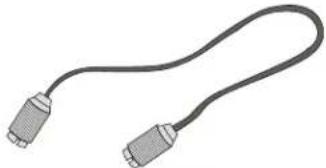 | 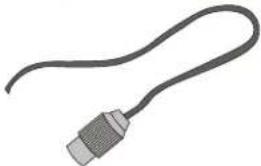 |
| S-Video cord (optional) | Antenna connector(optional) |
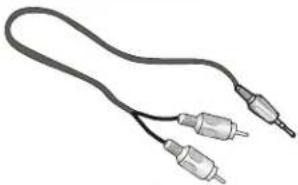 | 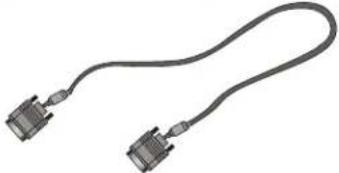 |
| Audio cord(optional) | VGA signalcord |
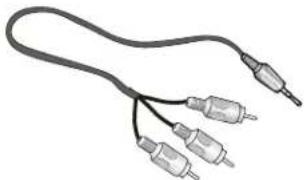 | 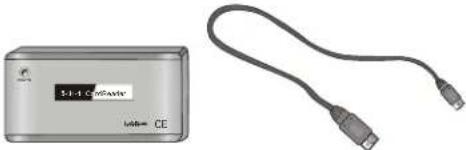 |
| AV cord | Card reader and USB cord |
- TFT-LCD TV/DVD COMBO
- USER MANUAL
- LT-2007
- CAUTION:
- WARNING:
- Important Safety Instructions
- ADDITION SAFETY INSTRUCTIONS
- CONTENT
- LOCATION AND FUNCTION OF CONTROLS
- INSTALLATION AND CONNECTION
- CHANGE SOURCE OPERATION
- MENU SETUP
- AV AND S-VIDEO SETUP
- YPBPR/CBCR SETUP
- VGA SETUP
- DVD OPERATION
- DVD FUNCTION SETUP
- TROUBLE SHOOTING
- SPECIFICATIONS
- DISPLAY MODE
- SYSTEM button
- DISPLAYbutton
- SLEEP
- Remote Control
- ① EJECT button
- ② Number buttons
- ③ RETURN button
- SOURCE button
- MENU button
- Up/Down cursor(menu select button)
- Left/Right cursor(menu adjustment button)
- CH+/ DVD MENU button
- CH-/TITLE button
- Stop button
- NEXT button
- FF button
- SLOW
- REPEAT button
- ANGLE button
- ZOOM button
- DVD SETUP button
- POWER/STANDBY button
- OK button
- VOL+/- button
- MUTE button
- Play button
- Pause/Step button
- PREVIOUS button
- FB button
- GOTO button
- A-B button
- DVD/USB button
- CAPTURE button
- PICTURE button
- SOUND button
- MTS/AUDIO button
- CC/SUBTITLE button
- FRONT PANEL
- BATTERY INSTALLTION
- BATTERY LIFE
- NOTE:
- CAUTION
- POWER ADAPTOR INSTALLATION
- NOTE
- PICTURE
- SOUND
- TV SETTING
- FUNCTION
- VIDEO SETTING MENU
- MONITOR SETTING
- BriefIntroduction
- Function Introduction
- Features
- Brand-newAV Effects
- ■ High Quality Digital Audio
- ■ ConvenientFunctions
- NOTES
- PLAYBACK
- SELECTTVSYSTEM
- PAUSE/STEP PLAYBACK
- DISPLAY
- VOLUME CONTROL
- DVD MENU PLAYBACK
- SELECT TRACK TO PLAY DIRECTLY BY NUMBER BUTTONS
- SELECT AUDIO/LANGUAGE
- REPEAT PLAYBACK
- REPEAT PLAYBACK OF SELECTED SEGMENT
- SELECT SUBTITLE
- FAST PLAYBACK
- SLOW PLAYBACK
- PLAY FROM THE DESIRED POSITION
- Search title time
- Search chapter time
- Selecttrack
- Search track time
- Search disc time
- Select the track
- ZOOMING THE DISPLAYED FRAME
- CHANGE POWER-ON LOGO FREELY
- MEMORY
- MPEG4, AND JPEG FILE PLAYING
- Play MPEG4 file
- Play music file
- Play JPEG file
- Play music+JPEG file
- GENERALSETUP
- SPEAKER SETUP
- AUDIO SETUP
- INITIALSETUP
- USAGE OF USB EQUIPMENT AND 5-IN-1 CARD READER
- Play USB Equipment:
- Play SD, MMC, MS, SM, CF
- CREDITS
- ACCESSORIES
Brand : OPPO
Model : LT2007 DVD
Category : Television