
DMX-20 - Hi-Fi System PURE - Free user manual and instructions
Find the device manual for free DMX-20 PURE in PDF.


| Product Type | Hi-Fi System |
| Brand | PURE |
| Model | DMX-20 |
| Dimensions (approx.) | 300 x 200 x 150 mm |
| Weight (approx.) | 3 kg |
| Power Supply | AC 100-240V, 50/60Hz |
| Power Consumption | 30 W (typical) |
| Audio Output Power | 2 x 10 W RMS |
| Supported Media | CD, CD-R/RW, MP3 CD |
| Radio Tuner | FM with RDS |
| Bluetooth | Yes (A2DP, AVRCP) |
| USB Playback | Yes (MP3, WMA) |
| Audio Input | 3.5mm AUX |
| Headphone Output | 3.5mm |
| Display | LCD with backlight |
| Remote Control | Included |
| Cleaning Instructions | Wipe with a soft dry cloth. Do not use solvents. |
| Safety Precautions | Do not expose to water or extreme temperatures. Unplug when not in use. |
| Spare Parts Availability | Contact PURE customer support for replacement parts. |
| Repairability | User-replaceable fuse. Other repairs by qualified personnel. |
Frequently Asked Questions - DMX-20 PURE
User questions about DMX-20 PURE
0 question about this device. Answer the ones you know or ask your own.
Ask a new question about this device
Download the instructions for your Hi-Fi System in PDF format for free! Find your manual DMX-20 - PURE and take your electronic device back in hand. On this page are published all the documents necessary for the use of your device. DMX-20 by PURE.
USER MANUAL DMX-20 PURE
natural_image
Line drawing of a three Pure audio workstation with a DMX-20 control panel and remote control (no text or symbols on main components)Owner's manual
Safetyinstructions
Keep the radio away from heat sources. Ensure that the unit is not placed in such a way as to interfere with proper ventilation. Do not use the radio near water. Avoid objects or liquids getting into the radio. Do not place any objects containing liquids on the unit, such as vases. When plugged in, DMX-20 remains connected to mains power, even in standby with the display backlight off. Ensure that the mains plug is readily accessible in case isolation from the mains is required. Ensure batteries are not exposed to excessive heat such as direct sunlight, fire etc. and dispose of responsibly. Do not remove screws from or open the radio casing. Damage to hearing can occur with consistent exposure to high volume when using headphones. The marking label is located on the base of the unit
DMX-20, PURE, the PURE logo, PURE Digital, the PURE Digital logo, EcoPlus, the EcoPlus logo, Imagination Technologies, and the Imagination Technologies logo are trademarks or registered trademarks of Imagination Technologies Limited. All other product names are trademarks of their respective companies. Version 2 December 2007.
Warenzeichen
Overview of the controls and connectors ....2
Getting started 4
Using DAB & FM radio ....5
Changing stations 5
Setting and selecting presets ....5
Changing the information shown on screen 5
Playing a CD 6
Selecting tracks ....6
Skipping tracks 6
Rewinding / fast-forwarding tracks ....6
Setting the timer/alarm 8
Setting up a timer/alarm 8
Using the sleep timer 8
Setting the clock....8
Setup options ......9
DAB options....9
FM options....9
General options 9
Hints and Tips 10
Technical Specifications ....10
Disposal of Waste Electrical & Electronic Equipment

This symbol on the product or on its packaging indicates that this product should not be treated as household waste. Instead it should be handed over to a suitable collection point for the recycling of electrical and electronic equipment. By ensuring this product is disposed of correctly, you will help prevent potential negative consequences for the environment and human health, which could otherwise be caused by inappropriate waste handling of this product. The recycling of materials will help to conserve natural resources. For more detailed information about recycling of this product, please contact your local council office, your household waste disposal service or the shop where you purchased the product.
Overview of the controls and connectors
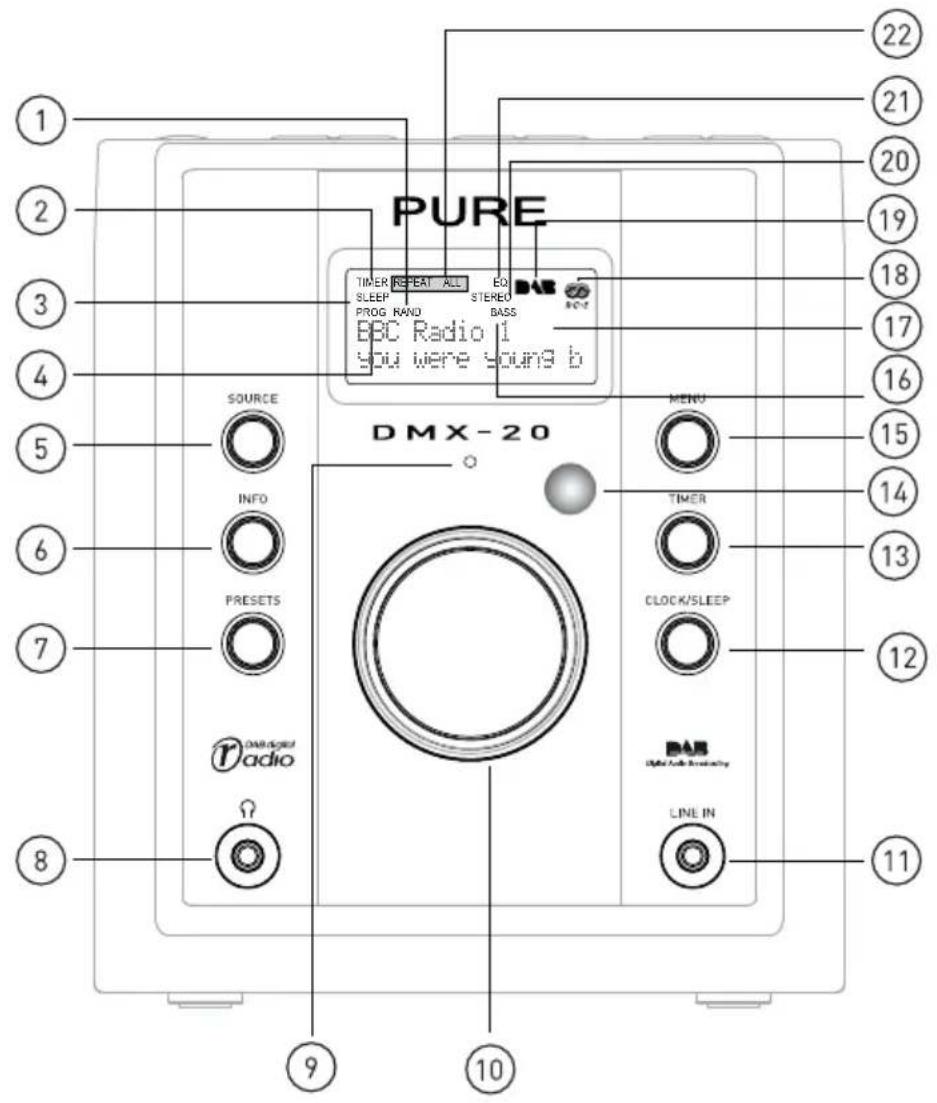
- Random CD play order selected
- Timer/ alarm set.
- Sleep timer set.
- Flashes when setting a CD playlist. Displayed if a CD playlist is in use
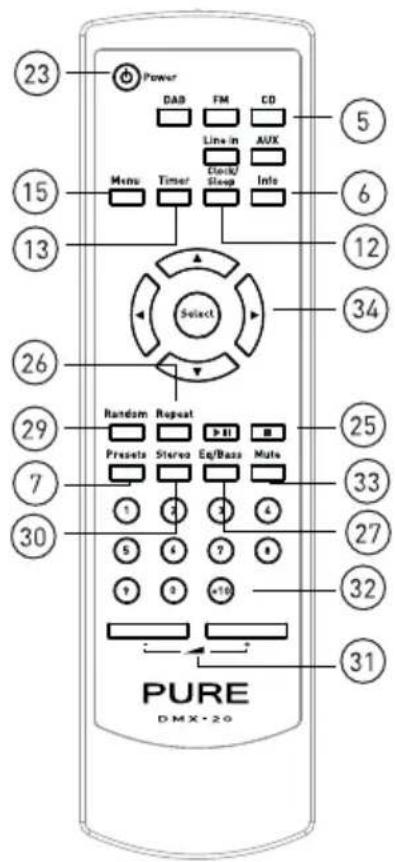
- Switch between DAB, FM, CD, LINE IN or AUX IN. Also switches unit on from standby.
- Changes the information shown on the display.
- Set and select preset radio stations. Set up a CD playlist.
- 3.5 mm headphone socket (mutes speakers)
- Standby indicator LED. On when unit in standby.
- Turn to adjust volume by default. Push to view station list in DAB, frequency in FM and track list in CD. Turn to adjust and push to select stations/tracks/values in menus.
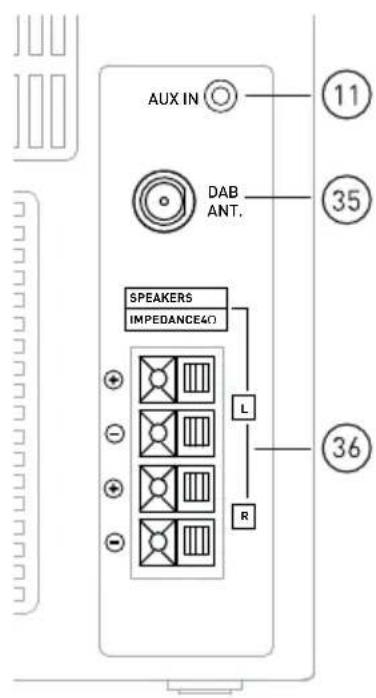
- Analogue stereo input from auxiliary device such as iPod, MiniDisc etc.
- Press to display/illuminate the clock.
Hold down then press and repeat to set a sleep timer.
Hold down in standby to set the clock. - Press to switch alarm or timer on while your unit is switched on or in standby. Hold to adjust the alarm or timer while your unit is switched on or in standby.
- Receives signal from remote control.
- Access setup options. In DAB: hold down for 7 seconds to reset your unit.
- Bass boost indicator.
- DAB and FM (RDS) station name and scrolling text.
- RDS data available for current FM station.
- DAB radio selected.
- FM stereo.
- Equalizer setting active.
-
CD repeat mode.
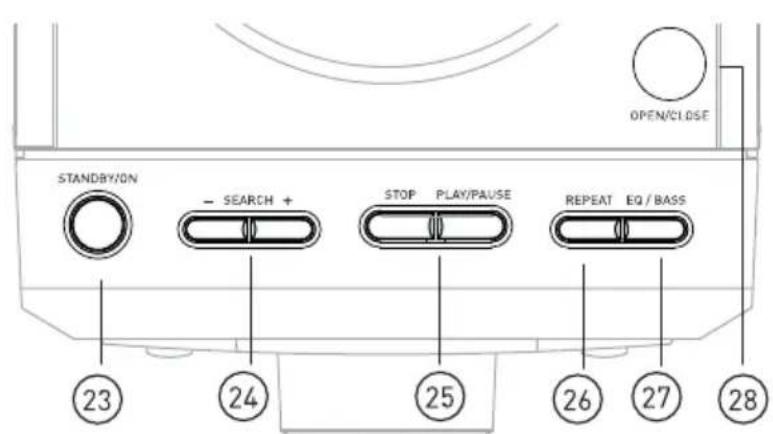
-
Switches unit between STANDBY and ON.
- CD – Press for Previous/ Next track, hold for Rewind/ Fast forward. FM – Press to step down/ up frequency list, hold and release to scan to next station.
- Play/Pause and Stop CD
- Press and repeat to choose repeat playback of current track (REPEAT) or all tracks (REPEAT ALL) on CD.
- Press to select eq and press again to change equaliser setting. Press and hold to switch bass on and off.
- Open/ Close CD door.
- Select Random play order (RAND) for CD.
- Toggle between Stereo and Mono in FM.
- Volume control.
- Press number to recall a preset station. Press +10 first for double digit presets. Press to quickly access CD tracks.
- Mutes speakers/ headphones.
- Navigate menus and track/ station lists and adjust values. CD – Left/ right to track skip Press Select to view frequency in FM and select options in menus. FM – hold and release left/ right to seek, press left/ right to step through frequency range.
- F-type connector for DAB/FM aerial.
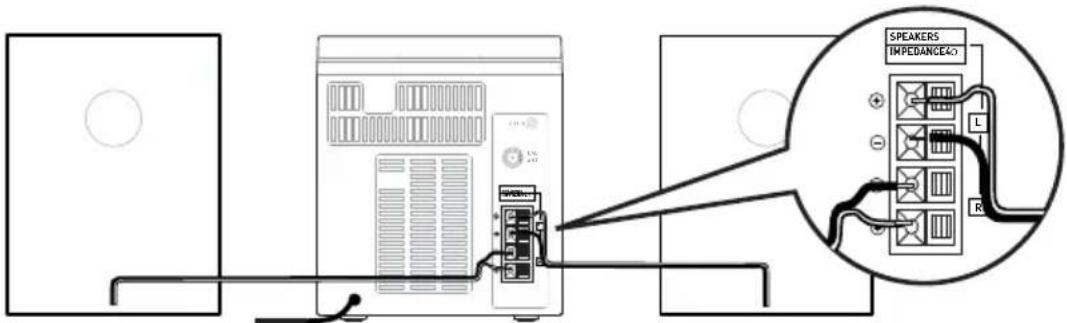
- Spring loaded speaker connectors.
Getting started
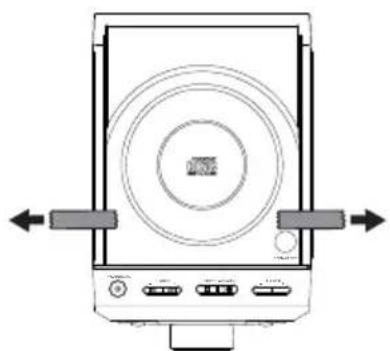
- Remove the adhesive tape securing the CD door and remove the CD mechanism transit card from inside the CD compartment.
natural_image
Diagram of a portable electronic device with circular top and front panel, showing ports and arrows indicating orientation (no text or symbols)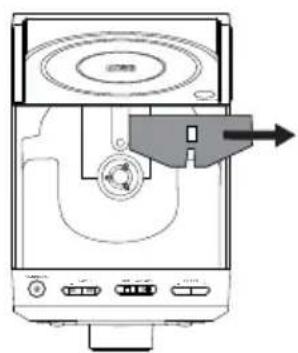
natural_image
Diagram of a microwave oven with control panel and indicator lights (no text or symbols)- Insert the remote batteries.
- Connect the speakers.
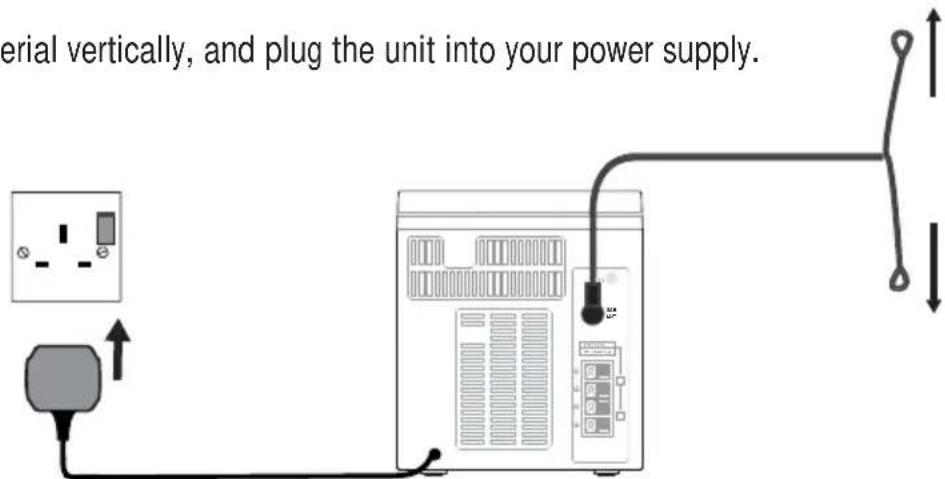
- Extend the aerial vertically, and plug the unit into your power supply.
- Press the STANDBY/ON button, if necessary, to switch the unit on. An autotune finds the DAB stations available in your area and selects one.
- Push and turn the large dial to see all the available stations. Push again to change to another station.
- Push the Source button to listen to FM, CD, LINE IN (front connector) or AUX IN (rear connector).
Using DAB & FM radio
Changing stations
DAB
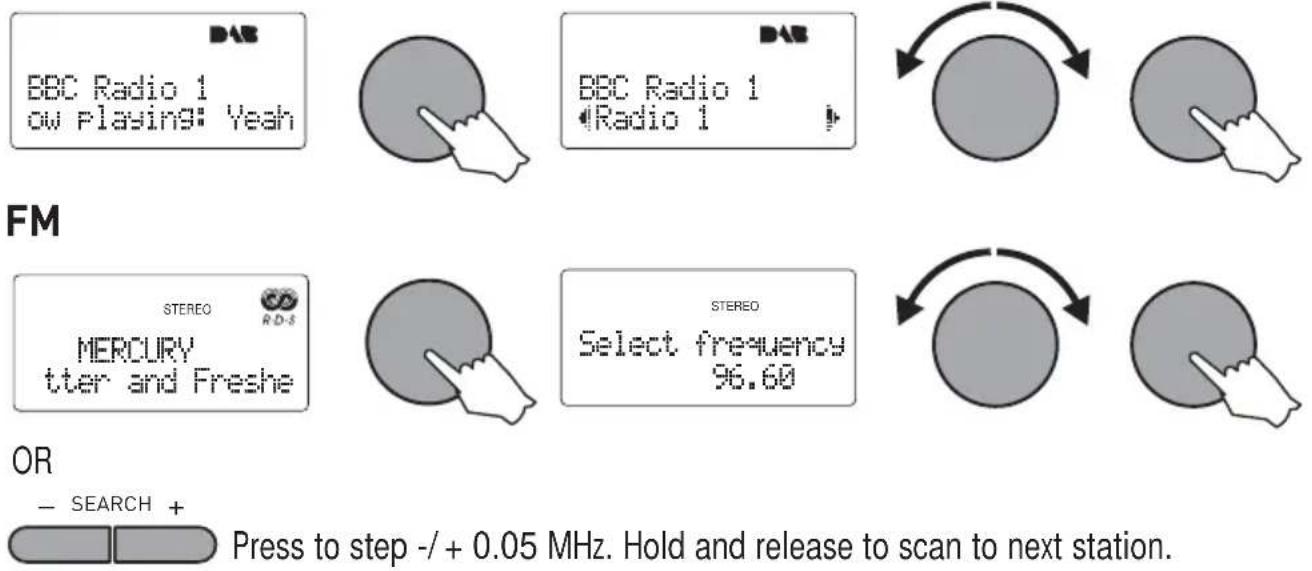
Setting and selecting presets
Store up to 10 DAB and 20 FM radio stations as presets for easy access.
To set a preset
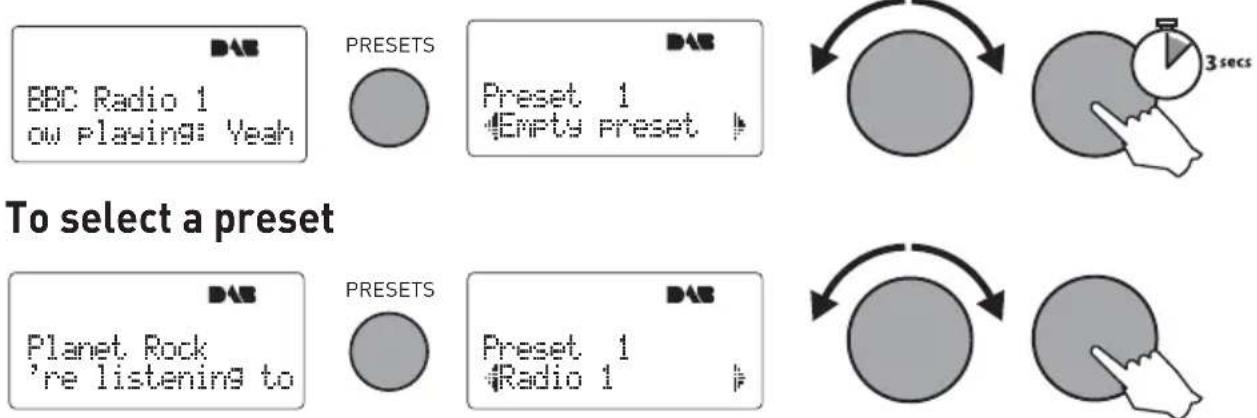

Changing the information shown on screen
Press the INFO button, and repeat, to change the information shown on screen.
- Scrolling text broadcast by DAB stations and FM (RDS) stations.
- Content being broadcast e.g. Pop music.
- DAB Multiplex in which the current station is broadcast.
- Time and date updated regularly by the most recent DAB station.
-
Frequency for the current station.
-
DAB signal data rate and a stereo or mono indicator.
- DAB signal quality; 85 to 100 Good, 70 to 84 OK, 0 to 69 poor.
- DAB signal strength meter
- DAB double height station name
Note The INFO button only works in FM if the station has RDS data.
Playing a CD
DMX-20 can play ordinary audio CDs, CD-R and CD-RW discs.
natural_image
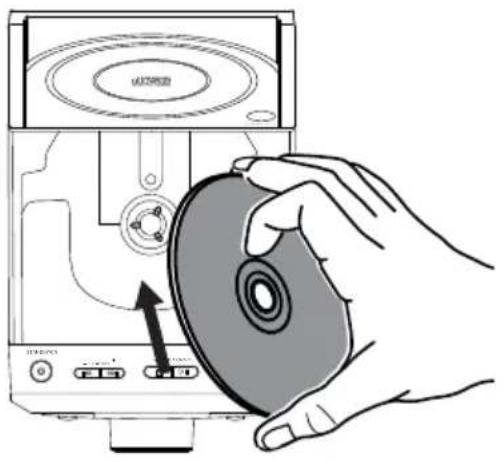
Illustration of a hand holding a CD inside a computer case, with an arrow indicating the disc's direction (no text or symbols present)To load a CD, open the door and push the CD gently onto the centre spindle.
Selecting tracks
Push the dial to access the track list. Turn the dial to select a track number and push the dial or press the play button to begin playing.

flowchart
graph LR
    A["OR"] --> B["Track [01"] SELECT or PLAY]
    B --> C["Play/PAUSE"]
    C --> D["→"]
    D --> E["State Transition"]
Press a numbered button on the remote to quickly access tracks (press +10 first for double digit tracks).
Skipping tracks
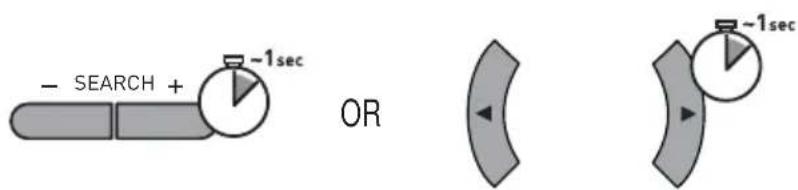
Press the skip/ search buttons or use the left and right arrows on the remote.
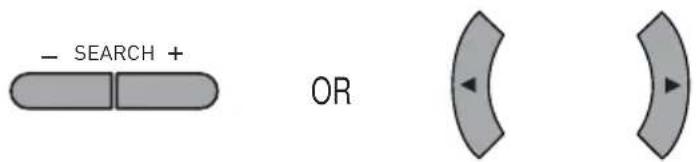
Rewinding / fast-forwarding tracks
Press and hold the skip/search buttons to rewind or fast-forward the current track.
Setting up a playlist
You can set up a playlist to play up to 30 CD tracks in a particular order.
A playlist remains available only for as long as the current CD is inserted. You can only set a playlist when the current track is stopped.
To set a playlist
- Press the PRESETS button. Turn the Select dial and push to select tracks to add to the playlist from the current CD.

flowchart
graph LR
    A["PRESETS"] --> B["PROG 01 Track [01"]]
    B --> C["PROG 02 Track [04"]]
    C --> D["Arrow to intermediate node"]
    D --> E["Arrow to final node"]
- When you have finished selecting tracks, press the PRESETS button to store the playlist. To start playing the playlist push the dial or press the PLAY/ PAUSE button.

To clear a playlist


Changing the information on screen
Press the INFO button, and repeat, to change the information shown on screen when playing a CD.
While playing shows:
- Track, time into track and play status.
- Track time remaining.
- Total CD time played.
- Total CD time remaining.
While stopped - shows Number of tracks, total play time and track list.
Setting the timer/alarm
The timer switches your DMX-20 on (if in standby) at a specified time and tunes to a radio station or sounds a tone alarm for the period you set.
Setting up a timer/alarm

flowchart
graph LR
    A["TIMER 3secs"] --> B["Check/Set timer DAB"]
    B --> C["State: 🐃→"]
    C --> D["State: 🐃→"]
    D --> E["..."]
    E --> F["TIMER BBC Radio 1 ow playing: Yeah"]
Select the type of alarm (DAB, FM or Alarm tone), volume, start time, end time and repeat. The TIMER symbol is displayed when the timer or alarm is set. If you want the alarm to repeat at the same time each day change the repeat setting to 'Everyday'.
Switching a timer/alarm on/off

Cancelling a timer/alarm

Using the sleep timer
The sleep timer switches your radio into standby after a number of minutes. The SLEEP symbol is displayed when the timer or alarm is set.

Setting the clock
flowchart
graph TD
    A["STANDBY/ON"] --> B["10:20"]
    B --> C["CLOCK/SLEEP 3secs"]
    C --> D["Clock setting DAB sync off"]
    E["Clock setting 24Hour"] --> F["10:34"]
    F --> G["Clock setting"]
    G --> H["..."]
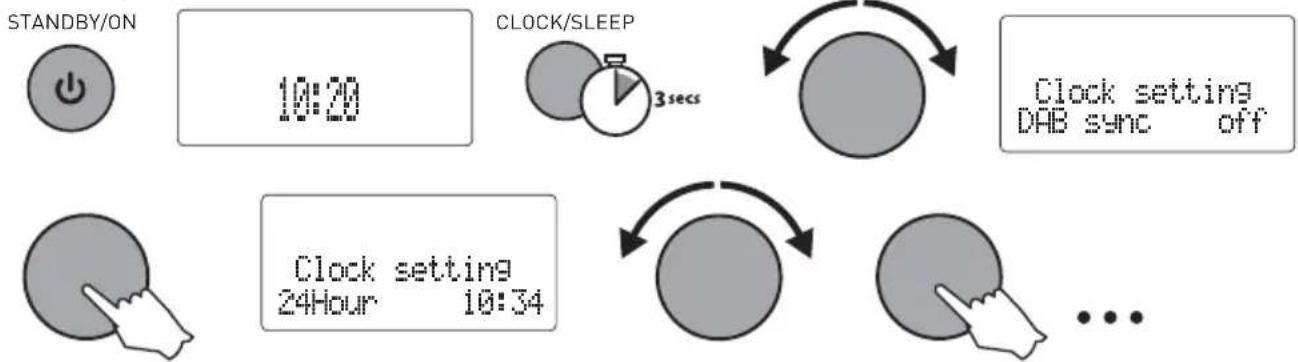
The clock is normally set and updated from the DAB signal while the unit is switched on (not updated in standby). If you have poor DAB reception or want to manually adjust the time you can switch this option off and set the clock yourself.
Setup options
Press the MENU button to access the following setup options.
DAB options
Autotune
Scans all DAB Band III frequencies for stations and adds any new ones to the station list. To stop an Autotune press Menu or push the dial.
Station order
Alphanumeric Lists all stations in alphanumeric order.
Active station Lists active stations first on the station list.
Multiplex Lists stations in groups according to their multiplex.
Trim stn. list Removes inactive stations from the station list.
Fav station Lists the ten most listened to stations first on the station list. Your favourite stations are displayed with a ♥next to their names.
♥ → presets Available only when Fav station order (above) has been selected. Stores your ten favourite stations as presets.
Manual tune
Shows DAB signal level which can help you find the best position for your radio.
- Turn the dial to scroll through different channels and push to choose one (UK stations are in the range 11B to 12D). You see a signal level display. The empty block indicates the minimum required level for reception and the filled blocks indicate the current level.
- Move your aerial/unit and to try to raise the current level to the empty block or beyond. Once you have a good signal the display will show the multiplex name and add the stations to the station list.
- Push the MENU button to exit or use the dial to change channel.
DRC value
DRC (Dynamic Range Control) value makes the quieter sounds in a DAB broadcast easier to hear at low volume or in a noisy environment. Check with the broadcasters to find out if they use DRC.
DRC full Applies the DRC level as sent with the broadcast.
DRC half DRC level is set to half that sent with the broadcast.
DRC off Any DRC level broadcast will be ignored.
FM options
FM stereo mode
Choose from Stereo or Mono - mono may improve audio clarity where stereo signals are weak.
General options
EQ settings
Apply one of five equalisation presets (FLAT (Off), POP, CLASSIC, ROCK or JAZZ) to the audio.
Bass
Set the bass boost on or off.
Hints and Tips
(<</>) Secondary DAB services
Secondary services accompany some stations, providing extra information or alternative content and may only be broadcast at certain times. If a station has secondary services available, the station shows ‘>>’ next to its name in the station list and the secondary service appears next to the station in the list. A secondary service has a ‘<<’ before its name in the station list.
(?) Inactive or unavailable DAB stations
Inactive or unavailable stations are those which appear on the station list but are not currently available. Inactive stations have a ‘?’ before their name on the station list. If you select a station which has this symbol, your radio tries to tune in or returns to the previous station.
Display says 'No stations available'
Check that your aerial is fully extended. Use Autotune to search for stations. Try adjusting your aerial or radio position.
Clock hasn't adjusted for summer/winter daylight saving
Switch the unit on to DAB to acquire the time from the DAB signal – there may be a delay in broadcasters updating the time signal. Check that DAB sync is turned on.
Resetting your radio
Resetting your radio removes all presets, stored stations and favourite station settings and resets all options to defaults. To reset:
-
Switch to DAB radio.
-
Press and hold the MENU button for seven seconds.
Technical Specifications
Tuner Stereo digital radio with full Band III and FM reception. ETS 300 410
compliant and capable of decoding all DAB transmission modes 1-4 up to and including 192 kbps. Supports FM RDS and RadioText.
Frequency range DAB - Band III (174-240 MHz), FM - 87.5-108 MHz
CD player CD-R and CD-RW playback compatible. Support for 30 audio track playlist. Multiple playback modes (repeat, random, etc.).
Speakers 4 Ohms (nominal) impedance. 2 x 5W RMS power handling. Rosewood effect cabinet finish. Fixed grilles.
Input connectors Two 3.5mm line-inputs for auxiliary devices.
Output connectors 3.5 mm stereo socket for headphones.
Remote control Infrared remote control.
Aerial Removable wire dipole DAB/FM aerial.
Mains power supply 240V internal power supply with fused UK mains lead.
Power consumption 0.99W in standby; 12.40W when active.
Approvals CE marked. Compliant with the EMC and Low Voltage Directives (89/336/EEC and 73/23/EEC).
Dimensions (mm) Unit - 140 wide x 150 high (280 with CD compartment open) x 230 deep (including controls). Speakers - 130 wide x 165 high x 115 deep.

Components are selected to minimise environmental impact
Warranty information
Imagination Technologies Ltd. warrants to the end user that this product will be free from defects in materials and workmanship in the course of normal use for a period of two years from the date of purchase. This guarantee covers breakdowns due to manufacturing or design faults; it does not apply in cases such as accidental damage, however caused, wear and tear, negligence, adjustment, modification or repair not authorised by us. Please return your warranty card or visit w com/register to register your product with us. Should you have a problem with your unit please contact your supplier or contact PURE Support at the address shown on the rear of this manual.
Imagination Technologies Limited makes no representation or warranties with respect to the content of this document and specifically disclaims any implied warranties of merchantability or fitness for any particular purpose. Further, Imagination Technologies Limited reserves the right to revise this publication and to make changes in it from time to time without obligation of Imag Technologies Limited to notify any person or organization of such revisions or changes.
Ausschlusshinweis
Copyright 2007 by Imagination Technologies Limited. All rights reserved. No part of this publication may be copied or distributed, transmitted, transcribed, stored in a retrieval system, or translated into any human or computer language, in any form or by a means, electronic, mechanical, magnetic, manual or otherwise, or disclosed to third parties without the express written permission
Copyright
Imagination Technologies Ltd.
Home Park Estate
Kings Langley
Herts, WD4 8DH
UK
+44 (0)1923 277477 support
+44 (0)1923 277488 sales
昌 +44 (0)1923 270188
support@pure.com
sales@pure.com
PURE Digital
Karl-Marx Strasse 6
64589 Stockstadt/ Rhein
GERMANY
+49 (0)6158 878872 sales
+49 (0)6158 878874
sales_gmbh@pure.com
DMX-20 is a member of the PURE EcoPlus™ product family. All EcoPlus products are designed and manufactured to minimise their environmental impact.

- This manual and the accompanying warranty card are printed on 100% recycled paper using soya-based ink.
- The retail carton protecting your product is printed on at least 70% recycled card and sized for maximum transport efficiency.
For more information please visit www.pure.com/ecoplus
- Safetyinstructions
- Warenzeichen
- Overview of the controls and connectors ....2
- Getting started 4
- Using DAB & FM radio ....5
- Playing a CD 6
- Setting the timer/alarm 8
- Setup options ......9
- Hints and Tips 10
- Technical Specifications ....10
- Disposal of Waste Electrical & Electronic Equipment
- Overview of the controls and connectors
- Getting started
- Using DAB & FM radio
- Changing stations
- Setting and selecting presets
- Changing the information shown on screen
- Playing a CD
- Selecting tracks
- Skipping tracks
- Rewinding / fast-forwarding tracks
- Setting up a playlist
- To set a playlist
- To clear a playlist
- Changing the information on screen
- Setting the timer/alarm
- Setting up a timer/alarm
- Switching a timer/alarm on/off
- Cancelling a timer/alarm
- Using the sleep timer
- Setting the clock
- Setup options
- DAB options
- Autotune
- Station order
- Manual tune
- DRC value
- FM options
- FM stereo mode
- General options
- EQ settings
- Bass
- Hints and Tips
- Technical Specifications
- Warranty information
- Ausschlusshinweis
- Copyright
Brand : PURE
Model : DMX-20
Category : Hi-Fi System