
Naga 2014 Limited Edition - Mouse RAZER - Free user manual and instructions
Find the device manual for free Naga 2014 Limited Edition RAZER in PDF.


| Product Type | Wired Gaming Mouse |
| Brand | Razer |
| Model | Naga 2014 Limited Edition |
| Color | Black with green accents |
| Dimensions (L x W x H) | 119 mm x 75 mm x 43 mm |
| Weight (without cable) | 135 g |
| Cable Length | 2.1 m braided fiber |
| Sensor Type | Razer 4G Laser Sensor |
| DPI Range | Adjustable up to 8200 DPI |
| Button Count | 19 programmable buttons (including thumb grid) |
| Scroll Wheel | Razer Synapse enabled, tilt click |
| Backlight | Razer Chroma customizable lighting |
| Onboard Memory | Yes, for profile storage |
| Interface | USB 2.0 |
| Polling Rate | 1000 Hz Ultrapolling |
| Power Source | USB bus powered |
| Software | Razer Synapse 2.0 (compatible with Synapse 3) |
| Compatibility | Windows 7/8/10 |
| Maintenance | Clean with dry cloth; avoid liquids |
| Safety | Use with low-voltage USB port; avoid overheating |
| Spare Parts | Replacement mouse feet available; cable not user-replaceable |
| Warranty | Limited 2-year manufacturer warranty |
Frequently Asked Questions - Naga 2014 Limited Edition RAZER
User questions about Naga 2014 Limited Edition RAZER
0 question about this device. Answer the ones you know or ask your own.
Ask a new question about this device
Download the instructions for your Mouse in PDF format for free! Find your manual Naga 2014 Limited Edition - RAZER and take your electronic device back in hand. On this page are published all the documents necessary for the use of your device. Naga 2014 Limited Edition by RAZER.
USER MANUAL Naga 2014 Limited Edition RAZER
The Razer Naga is synonymous with Massively Multiplayer Online Role Playing Games since its inception in 2009, due to its unique 12 button thumb grid. This incarnation of the Razer Naga is the product of 4 years of research work in ergonomics, as well as incorporating feedback from gamers worldwide who have been supporters of the original Razer Naga. The end product is a gaming mouse with redefined ergonomics and new features for the most IMBA MMO play ever.
The Razer Naga's iconic 12 button thumb grid is now outfitted with mechanical switches. These switches provide a tactile and audible click, allowing for more accurate actuation of keys. With a new button design to accentuate blind-find, executing all the right skills has never been easier.
At Razer, we don't just stop at hardware, and have developed an all-new in-game configurator for the Razer Naga with Razer Synapse. With this configurator, gamers can call up an overlay that allows them to change their key bindings or macros instantly, without exiting their game. Never forget what key is bound to which button with a custom action bar that can be displayed on the screen as a visual representation of the Razer Naga's thumb grid.
The Razer Naga's ergonomics have been further refined with an all new chassis design for extreme comfort over long hours of gaming. This aims to specifically reduce wrist and hand strain over extended usage by molding to the natural curvature of the palm. It also aims to reduce the contact between the hand and the mousing surface, providing better glide.
TABLE OF CONTENTS
- PACKAGE CONTENTS / SYSTEM REQUIREMENTS.... 3
- REGISTRATION / TECHNICAL SUPPORT 3
- TECHNICAL SPECIFICATIONS .... 4
- DEVICE LAYOUT.... 5
- USING YOUR RAZER NAGA.... 6
- INSTALLING YOUR RAZER NAGA....7
- CONFIGURING YOUR RAZER NAGA USING RAZER SYNAPSE....8
- CONFIGURING YOUR RAZER NAGA USING THE IN-GAME CONFIGURATOR .. 35
- SAFETY AND MAINTENANCE....52
- LEGALESE....54
1. PACKAGE CONTENTS / SYSTEM REQUIREMENTS
PACKAGE CONTENTS
• Razer Naga Expert MMO Gaming Mouse
- Quick Start Guide
SYSTEM REQUIREMENTS
• PC or Mac with a free USB port
- Windows® 8 / Windows® 7 / Windows Vista® / Windows® XP (32-bit) / Mac OS X (10.7-10.9)
- In-game configurator support compatible with Windows® 8 / Windows® 7 / Windows Vista® only
- Internet connection (for driver installation)
• 100MB of free hard disk space
2. REGISTRATION / TECHNICAL SUPPORT
REGISTRATION
Sign up now for a Razer Synapse account to get real-time information on your product's warranty status. To learn more about Razer Synapse and all its features, visit www.razerzone.com/synapse. If you are already a Razer Synapse user, register your product by clicking on your email address at the Razer Synapse application and select Warranty Status from the dropdown list. To register your product online, visit www.razerzone.com/registration. Please note that you will not be able to view your warranty status if you register via the website.
TECHNICAL SUPPORT
What you'll get:
- 2 years limited manufacturer's warranty
• Free online technical support at www.razersupport.com
3. TECHNICAL SPECIFICATIONS
• Total of 19 MMO optimized programmable buttons
• 12 button mechanical thumb grid
- Tilt click scroll wheel
• 8200dpi 4G Laser Sensor
- Razer Synapse enabled
- Green LED backlighting
• 1000Hz Ultrapolling
• 200 inches per second / 50G max tracking speed
• Zero-acoustic Ultraslick mouse feet
- 7 foot / 2.1m braided fiber cable
- Approximate size: 119mm/4.68" (Length) x 75mm/2.95" (Width) x 43mm/1.69" (Height)
- Approximate weight: 105g/0.23lb without cable, 135g/0.30lb with cable,
- DEVICE LAYOUT

RAZER NAGA 2014

RAZER NAGA 2014 (Left-Handed Edition)
A. Left Mouse Button
B. Right Mouse Button
C. Scroll Wheel
D. Mouse Button 5
E. Mouse Button 4
F. Left Tilt-Click - Repeat Scroll Down
G. Right Tilt-Click – Repeat Scroll Up
H. 12 programmable mechanical thumb grid buttons
I. 8200DPI 4G Laser Sensor
J. Ultraslick Mouse Feet
The 12 button thumb grid works the same as a keyboard's numerical keys. These buttons allow you to replicate the action bar of most games onto the thumb grid buttons.
6. INSTALLING YOUR RAZER NAGA
![graph LR A["Laptop"] -->|Data Link| B["Server"] B -->|USB Cable| C["USB Port"] C --> D["Computer"]](/content/2026/05/961480/images/e8761036c1e42208ba9527233698be01cbf547b55126825d2ea465b4a6ec22c5.jpg)
Step 1: Connect your Razer device to the USB port of your computer.
Step 2: Install Razer Synapse when prompted* or download the installer from www.razerzone.com/synapse.
Step 3: Register for a RazerID or login to Synapse with an existing account.
*Applicable for Windows 8 or later.
7. CONFIGURING YOUR RAZER NAGA
Disclaimer: The features listed here require you to log in to Razer Synapse. These features are also subject to change based on the current software version and your Operating System.
MOUSE TAB
The Mouse Tab is your default tab when you first install Razer Synapse. This tab allows you to customize your device's profiles, button assignments, performance, lighting and surface calibration settings.

PROFILE
A Profile is a convenient way of saving all of the changes you have made on your device. A single Profile can store numerous settings such as button assignments and sensitivity adjustments.

You can create a new profile by clicking the button or delete the current profile by clicking the button. The button allows you to Copy, Import, and Export profiles.
Your current profile by default is named "Profile" however; you can rename it by typing on the text field below PROFILE NAME.
Each profile can be set to automatically activate when you run a program or application through the use of the LINK APPLICATION option.
CUSTOMIZE TAB
The Customize Tab is where you can modify the basic functionalities of your device such as button assignments to suit your gaming needs. The changes made in this tab are automatically saved to your current profile.
Top View
The Top View is where you can customize the mouse buttons and the scroll wheel.

Side View
The Side View is where you can customize the 12-button thumb grid.

You can save up to 8 sets of KEYMAP configurations, allowing you to easily set up and switch between customized key mappings for different games.
KEY ASSIGNMENT MENU
Initially, each of the mouse buttons is set to Default. However, you may change the function of these buttons by clicking the desired button to access the Key Assignment Menu.
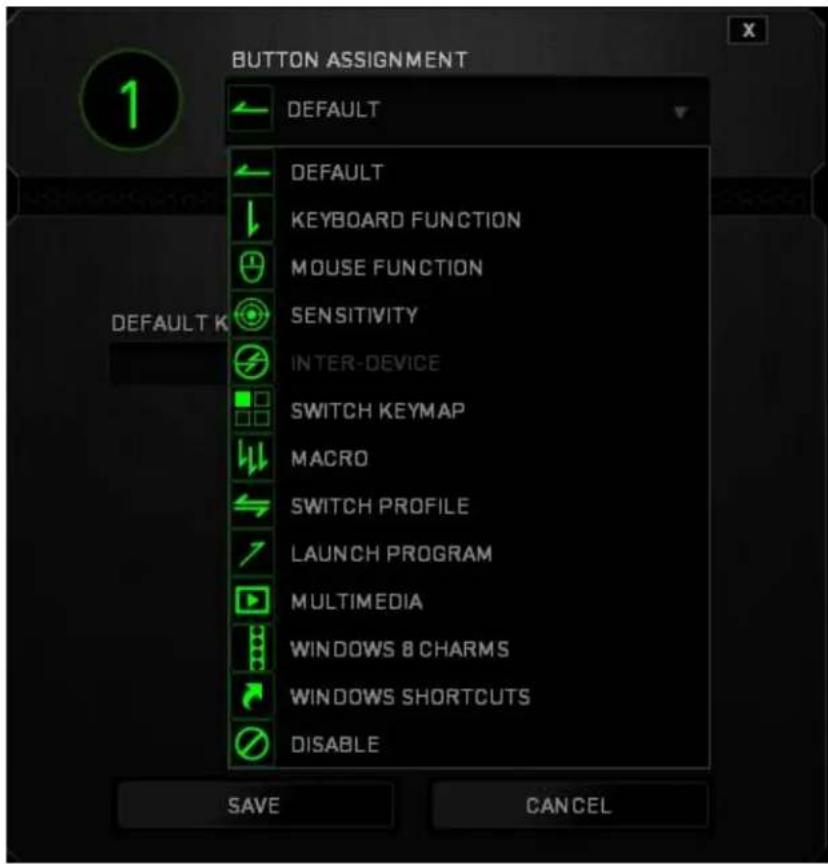
Listed below are the customization options and their descriptions.

Default
This option enables you to return the key to its original function. To choose the DEFAULT, simple select it from the Key Assignment Menu.

Keyboard Function
This option enables you to change the mouse buttons into keyboard functions. To choose a keyboard function, select KEYBOARD FUNCTION from the Key Assignment Menu and enter the key you wish to use on the given field below. You may also include modifier keys such as Ctrl, Shift, Alt or any of those combinations.
12 | for gamers by gamers"

Mouse Function
This option allows you to change the mouse buttons into other mouse functions. To choose a mouse function, select MOUSE FUNCTION from the Key Assignment Menu and an ASSIGN BUTTON submenu will appear.
Listed below are the functions which you can choose from the Assign Button submenu:
Left Click - Performs a left mouse click using the assigned button.
Right Click - Performs a right mouse click using the assigned button.
Scroll Click - Activates the universal scrolling function.
Double Click - Performs a double left click using the assigned button.
| Mouse Button 4 | - Performs a “Backward” command for most internet browsers. |
| Mouse Button 5 | - Performs a “Forward” command for most internet browsers. |
| Scroll Up | - Performs a “Scroll Up” command using the assigned button. |
| Scroll Down | - Performs a “Scroll Down” command using the assigned button. |
| Scroll Left | - Performs a “Scroll Left” command using the assigned button. |
| Scroll Right | - Performs a “Scroll Right” command using the assigned button. |
Sensitivity refers to how fast the mouse pointer can travel across the screen. When you select the Sensitivity function from the dropdown menu, a sub-menu will appear which gives you access to the following options:
Sensitivity Stage Up - Increase the current sensitivity by one stage. See the
PERFORMANCE TAB to learn more about sensitivity stages.
Sensitivity Stage Down - Decrease the current sensitivity by one stage. See the PERFORMANCE TAB to learn more about sensitivity stages.
Sensitivity Clutch - Change to a predefined sensitivity as long as the designated button is pressed. Releasing the button will return it to the previous sensitivity.
On-The-Fly Sensitivity - Readily adjust the current sensitivity using the assigned button. If On-The-Fly Sensitivity has been set, pressing the designated button and moving the scroll wheel will produce a bar on your screen which would indicate your current sensitivity level.
Cycle Up Sensitivity Stages - Increase the current sensitivity stage by one and once it reaches the highest sensitivity stage, it will return to stage 1 when the button is pressed again. See the PERFORMANCE TAB to learn more about sensitivity stages.
Cycle Down Sensitivity Stages - Decrease the current sensitivity stage by one and once it reaches stage 1, it will return to the highest sensitivity stage when the button is pressed again. See the PERFORMANCE TAB to learn more about sensitivity stages.

Macro
A Macro is a prerecorded sequence of keystrokes and button presses that is executed with precise timing. By assigning a Macro to a button, you can execute complex combinations with ease. The ASSIGN MACRO allows you to choose which recorded Macro to use while the PLAYBACK OPTION enables you to choose the behavior of the Macro. See the MACROS TAB to learn more about creating Macro commands.

Switch Profile
The Switch Profile enables you to change profiles on the fly and immediately load all your pre-configured settings. When you select Switch Profile from the Key Assignment Menu, a sub-menu will appear that will allow you to choose which profile to use. An on-screen display will automatically appear whenever you switch profiles.

Quick Launch
The Quick Launch allows you to run a program or application using the assigned button. When you select Quick Launch from the dropdown menu, a button will appear which allows you to search for the specific program or application you want to use.

Inter-device
Inter-device allows you to change the functionality of other Razer Synapse-enabled devices. Some of these functionalities are device-specific such as using your Razer gaming keyboard to change the Sensitivity Stage of your Razer gaming mouse. When you select Inter-device from the Button Assignment Menu, a sub-menu will appear.
DEVICE TO LINK allows you to choose which currently connected Razer device can be linked while FUNCTION allows you to choose which functionality you want to use for the linked device.

Switch Keymap
The Switch Keymap allows you to easily swap key assignments with a press of a key. When you select Switch Keymap from the Key Assignment Menu, a submenu will appear wherein you can choose which keymap to use.

Multimedia Function
This option allows you to bind multimedia playback controls to your device. After selecting Multimedia Function, a submenu will appear. Listed below are the multimedia playback controls you can choose from the submenu:
Volume Down - Decreases the audio output.
Volume Up - Increases the audio output.
Mute Volume - Mutes the audio.
Mic Volume Up - Increases the microphone volume.
Mic Volume Down - Decreases the microphone volume.
Mute Mic - Mutes the microphone.
Mute All - Mute both microphone and audio output.
Play / Pause - Play, pause, or resume playback of the current media.
Previous Track - Play the previous track.
Next Track - Play the next track.

Windows 8 Charms
This option enables you to assign the key into an Operating System shortcut command. For more information please visit: http://windows.microsoft.com/en-sg/windows-8/getting-around-tutorial.

Windows Shortcut
This option enables you to assign the key into an Operating System shortcut command. For more information please visit: http://support.microsoft.com/kb/126449.

Disable
This option renders the assigned button unusable. Use Disable when you have no need for a button or if a particular button interferes with your gaming.
PERFORMANCE TAB
The Performance Tab allows you to enhance the speed and precision of your mouse pointer. Similar to the Customize Tab, the changes made here are automatically saved to your current profile.
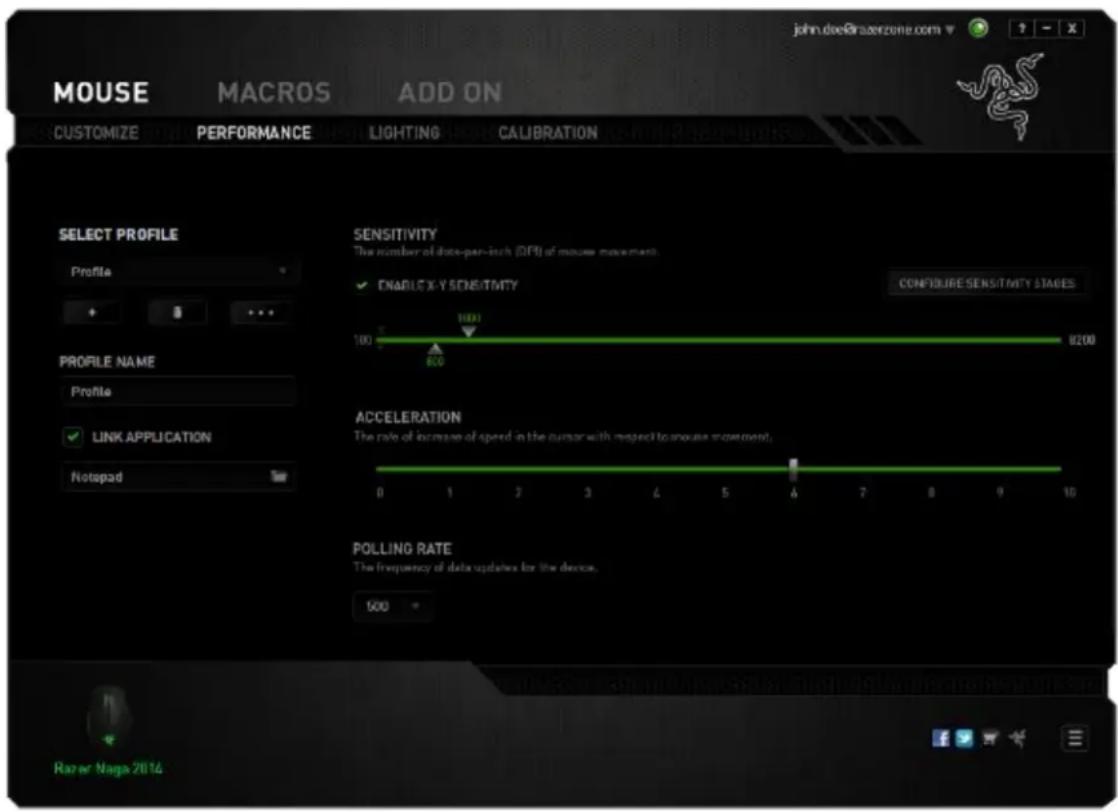
Listed below are the performance options and their descriptions.
Sensitivity
Sensitivity pertains to how much effort is needed to move the mouse pointer in any direction. The higher the sensitivity, the more responsive the mouse will be. (Recommended setting: 1600 – 1800)
Enable X-Y Sensitivity
By default, the X-axis (horizontal) and Y-axis (vertical) use the same sensitivity values. However, you may set different sensitivity values to each of the axes by selecting the "Enable X-Y Sensitivity" option.
Configure Sensitivity Stages
A sensitivity stage is a preset sensitivity value. You can create up to 5 different sensitivity stages which you can cycle through using the sensitivity stage up/down buttons. You may use the “Enable X-Y Sensitivity” concurrently with this option. Note that whenever you configure a sensitivity stage, your current sensitivity will match that setting.
Acceleration
Acceleration increases the cursor's movement speed depending on how quickly you move the mouse. The higher the value, the faster the mouse accelerates. (Recommended settings: Windows 0, Mac 5)
Polling Rate
The higher the polling rate, the more often the computer receives information about the status of your mouse, thus increasing the mouse pointer's reaction time. You can switch between 125Hz (8ms), 500Hz (2ms) and 1000Hz (1ms) by selecting your desired polling rate on the dropdown menu. (Recommended setting: 500Hz – 1000Hz)
LIGHTING TAB
The Lighting Tab allows you to configure the LEDs of your Razer Naga. Simply toggle the ON or OFF options to enable or disable the Scroll Wheel, Thumb Grid and Logo lighting. Similar to the previous tabs, the changes made here are also automatically saved to your current profile.

CALIBRATION TAB
The Calibration Tab allows you to optimize your Razer Precision Sensor to any mousing surface for better tracking. To use this feature, you must select the ON option under SURFACE CALIBRATION.

The LIFTOFF RANGE allows you to set the distance in which the sensor stops tracking as it is being lifted away from its mousing surface. To use this feature, you must first activate SURFACE CALIBRATION then choose an appropriate mousing surface.
Razer Mouse Mats
The Razer Naga is ‘tuned’ or optimized especially for Razer mouse mats. This means that the sensor has been tested extensively to confirm that the Razer Naga reads and tracks best when paired with Razer mouse mats.
SELECT A MAT
If you are using a Razer mouse mat, click the
the Razer Mats submenu. This menu showcases an extensive list of Razer-branded mouse mats. Select the appropriate mouse mat from the list; then choose between SPEED or CONTROL if applicable.

If you wish to learn more about a particular mouse mat or if you wish to purchase a Razer mouse mat, you may do so by clicking the _FIND OUT MORE _BUTTON_
First Time Calibration
If you are calibrating your Razer Naga for the first time, you will be required to perform a manual tuning via the Razer Synapse interface to initialize your mouse for all Razer mouse mats. This is only required once unless the mouse has been reset to factory default configuration. Click CALIBRATE to begin the process.
Manual tuning requires that you move your mouse slowly along the mouse mat for at least 3 seconds. At any point during this process, you should not:
- Reposition the mouse
- Lift the mouse off the mouse mat
- Stop moving the mouse

Click CALIBRATE to begin the process.
When Razer Synapse is done reading data from your mouse movement, it will begin calculating and tuning the mouse accordingly. Please wait while this is in process.

The calibration is complete when the DONE button lights up. Click DONE to save the calibration and return to the Razer mouse mat selection screen.
Other Mousing Surfaces
If you are using a non-Razer mouse mat or a non-standard mousing surface, select OTHERS then click the button to access the manual calibration submenu.
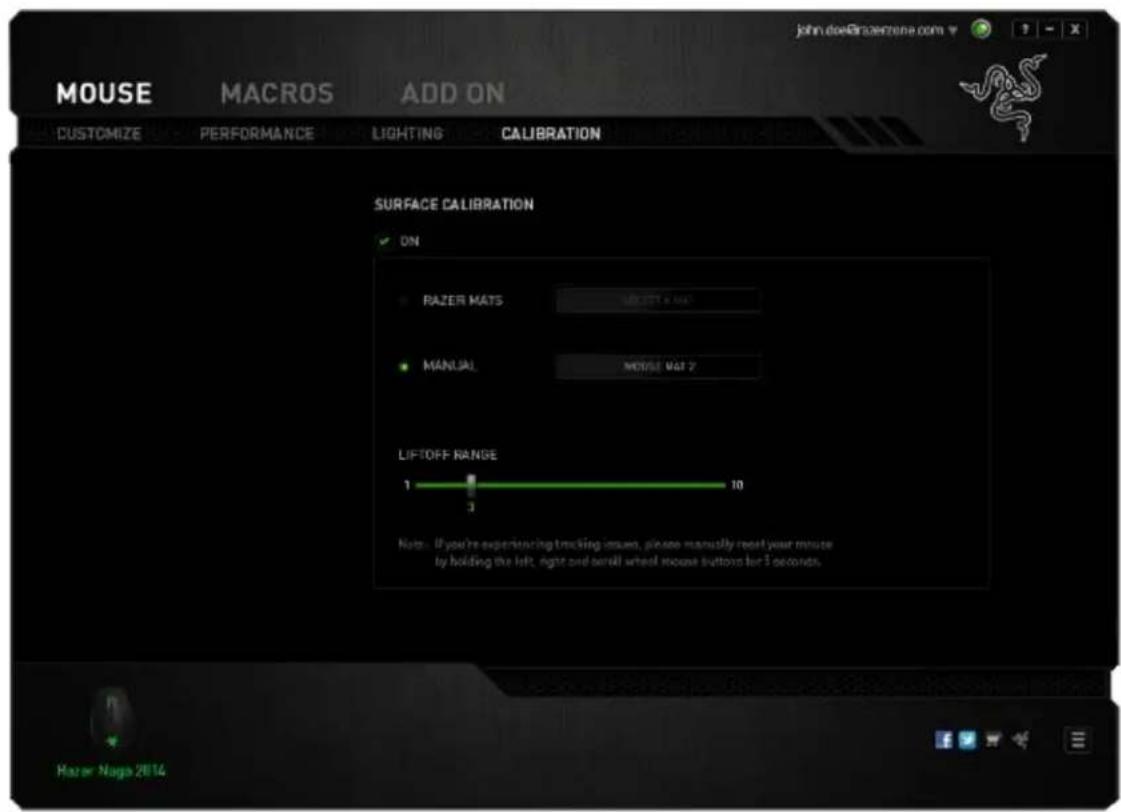
This submenu enables you to manually adjust the Razer Precision Sensor to suit any mousing surface.
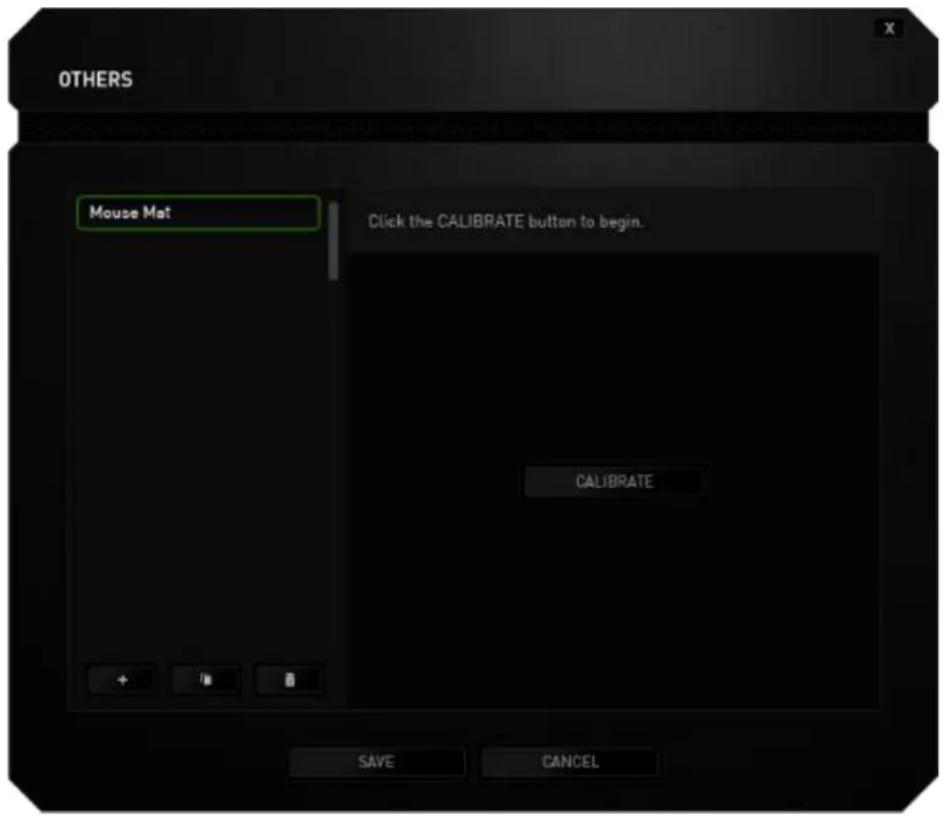
To begin calibrating the sensor, click the button. After clicking the button, Razer Synapse will begin tuning the sensor. Please avoid moving the Razer Naga during this time.
Once the Razer Precision Sensor is ready, click the left mouse button to start the process. Move the mouse across your entire mousing surface in a zigzag pattern as shown on the screen guide.
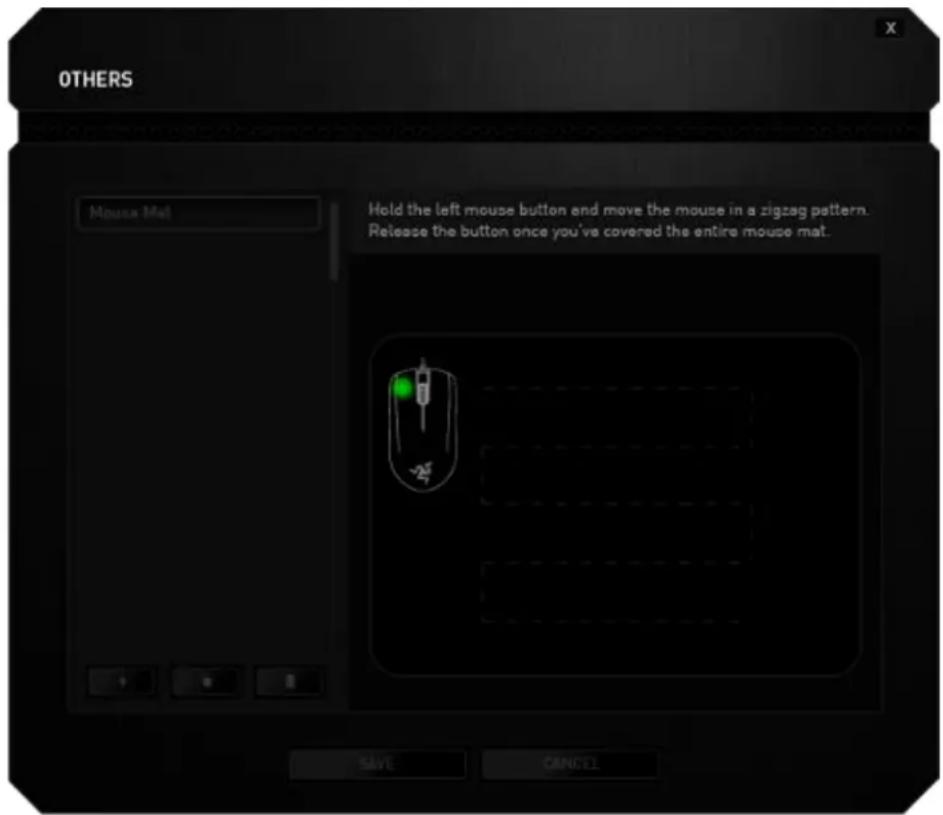
When you have moved through your entire mousing surface, click the left mouse button. This will bring you back to the manual calibration submenu which contains new information regarding your mousing surface.
There are also other options available in this section such as adding a new mouse mat setting by clicking the + button, deleting the currently selected mouse mat setting by clicking the button or duplicating the currently selected mouse mat setting by clicking the button.
MACROS TAB
The Macros Tab allows you to create a series of precise keystrokes and button presses. This tab also allows you to have numerous macros and extremely long macro commands at your disposal.
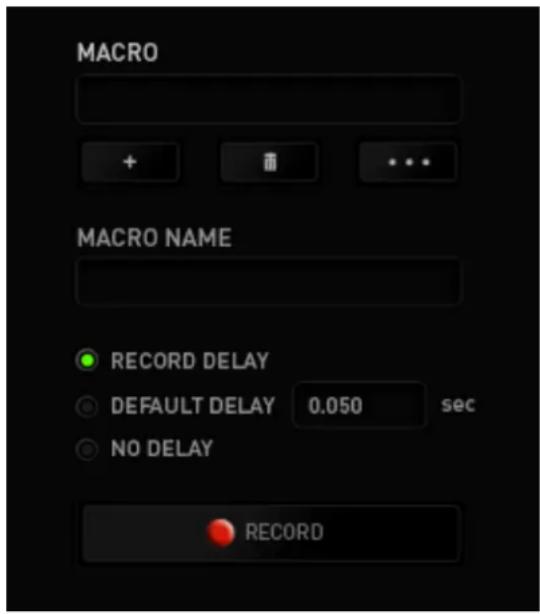
The Macro section works similarly to Profile wherein you can rename a macro by typing on the field below MACRO NAME. There are also other options available in the
macro section such as creating a new macro by clicking the button and
deleting the current macro by clicking the button. The button you to Copy, Import, and Export macros.


To create a macro command, simply click the button overall your keystrokes and button presses will automatically register on the macro screen. When
you are done recording your macro commands, click on the button to send the session.
The Macro section allows you to input the delay in-between commands. In RECORD DELAY the delay in-between commands are registered as how it is entered. The DEFAULT DELAY uses a predefined time (expressed in seconds) as the delay. And NO DELAY omits all the pauses in-between keystrokes and button presses.

Note: You may use up to three decimal places when inserting values on the seconds (sec) field.
Once you have recorded a macro, you may edit the commands you have entered by selecting each command on the macro screen. Each keystroke or button press is arranged sequentially with the first command shown at the top of the screen.

The button allows you to edit a particular command and the button enables you to delete a command. The and buttons gives you the option to move the command up or down.
The INSERT allows you to put in additional keystrokes, button presses or time delays either before or after the selected command.
Once you have pressed the INSERT button, a new display window will appear beside the list of macro commands. The dropdown menu on this window allows you to choose a keystroke or a delay to be added in before or after the highlighted macro command.


You may add in a new set of macro commands by clicking the button on the keystroke menu; or input time delays on the duration field using the delay menu.

ADD ON TAB
The Add On Tab expands your device's usability by adding game-specific settings such as a custom interface. To start using Razer Add Ons, first you must enable the Use Razer Naga Add On option.
Disclaimer: The In-Game Configurator addon is only compatible with Windows® 8 / Windows® 7 / Windows Vista®
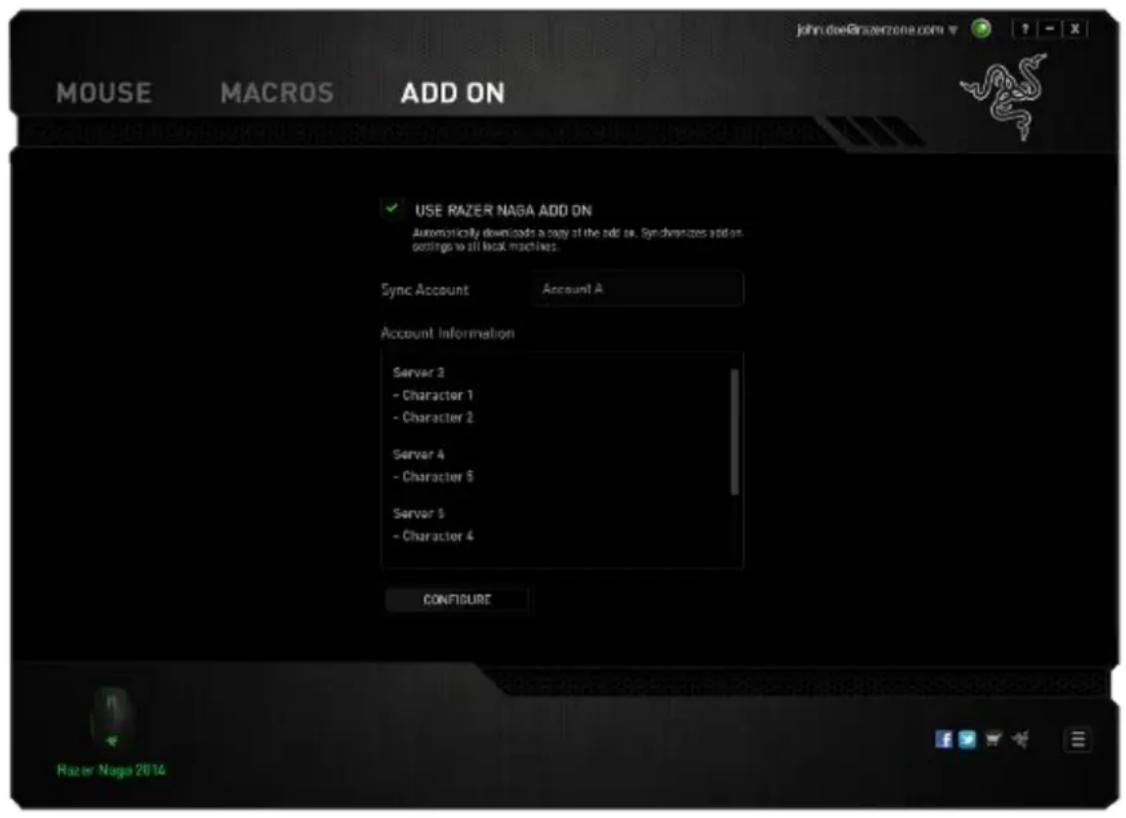
Next, search for the game program or game application using the button. Finally, select your user account for the game by choosing it on the dropdown menu beside Sync Account.
The Account Information screen will show you all the relevant information regarding your user account.
8. CONFIGURING YOUR RAZER NAGA USING THE IN-GAME CONFIGURATOR
Disclaimer: The Razer Naga In-Game Configurator is a game addon that can be enabled via Razer Synapse. This addon will be overlayed on your game screen by default when enabled and will only remain active if Razer Synapse is active. These features are subject to change based on the current software version and your Operating System. This configurator presents a sub-set of settings available for the device. For the full set of options, please configure your device via Razer Synapse.
The In-Game Configurator addon is only compatible with Windows® 8 / Windows® 7 / Windows Vista®
CAUTION: Uninstalling Razer Core will disable the In-Game Configurator.
LAUNCHING THE IN-GAME CONFIGURATOR
The in-game configurator can be launched on all supported games by either:
• Using the short-cut key combination
- Clicking the left tilt click (default)

You can assign a different mouse button for this action using the Razer Synapse mouse button assignment function.
MOUSE TAB
The Mouse Tab is your default tab when you first launch the Razer Naga In-Game Configurator. This tab allows you to customize your device's profiles, button assignments and performance.

PROFILE
A Profile is a convenient way of organizing all your custom settings and you can have an infinite number of profiles at your disposal. Any changes made within each tab are automatically saved to the current profile and stored into the cloud servers.

You can create a new profile by clicking the button and selecting "Add New Profile". Change your active profile by selecting the appropriate profile from the list.
KEYMAP
A Keymap is a convenient way of organizing all your custom key mappings and you can have an infinite number of keymaps at your disposal. Any changes made to a key mapping on each of your mouse buttons are automatically saved to the current keymap and stored into the cloud servers.

You can switch between keymaps by clicking th

Change your active keymap by selecting the appropriate keymap from the list or by using the button assigned to the SWITCH KEYMAP function if configured. Up to 8 Keymaps sets can be saved.
CUSTOMIZE TAB
The Customize Tab is where you can modify the basic functionalities of your device such as button assignments to suit your gaming needs. The changes made in this tab are automatically saved to your current profile.
Top View
The Top View is where you can customize the basic mouse buttons and the mouse wheel.

Thumb Grid View
The side views allow you to customize the side buttons of your mouse.

BUTTON ASSIGNMENT MENU
Initially, each of the mouse buttons is set to DEFAULT. However, you may change the function of these buttons by clicking the desired button to access the BUTTON ASSIGNMENT Menu.
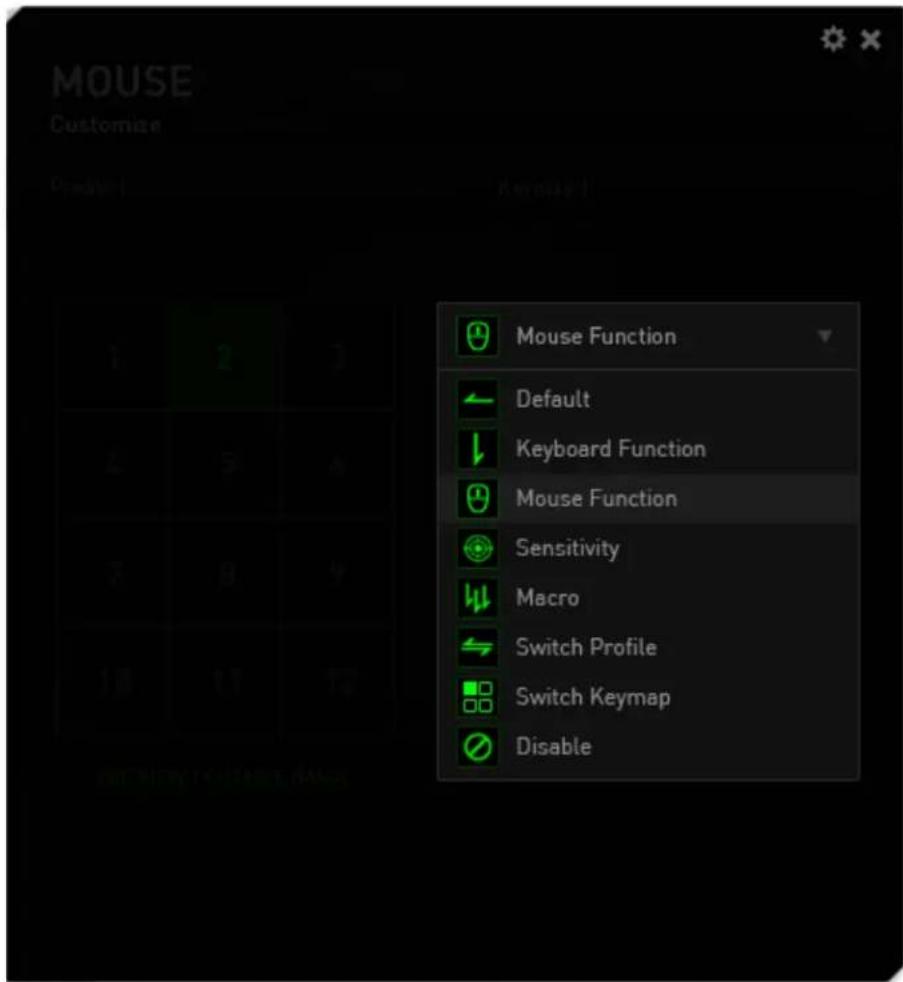
Listed below are the customization options and their descriptions.

Default
This option enables you to return the key to its original function. To choose the DEFAULT, simply select it from the BUTTON ASSIGNMENT Menu.

Keyboard Function
This option enables you to change the mouse buttons into keyboard functions. To choose a keyboard function, select KEYBOARD FUNCTION from the BUTTON ASSIGNMENT Menu and enter the Key you wish to use on the given field below. You may also include modifier keys such as Ctrl, Shift, Alt or any of these combinations.

Mouse Function
This option allows you to change the mouse buttons into other mouse functions. To choose a mouse function, select MOUSE FUNCTION from the BUTTON ASSIGNMENT Menu and an ASSIGN BUTTON submenu will appear.
Listed below are the functions which you can choose from the Assign Button submenu:
Left Click - Performs a left mouse click using the assigned button.
Right Click - Performs a right mouse click using the assigned button.
Scroll Click - Activates the universal scrolling function.
Double Click - Performs a double left click using the assigned button.
Mouse Button 4 - Performs a "Backward" command for most internet browsers.
Mouse Button 5 - Performs a "Forward" command for most internet browsers.
Scroll Up - Performs a "Scroll Up" command using the assigned button.
Scroll Down - Performs a "Scroll Down" command using the assigned button.
Scroll Left - Performs a "Scroll Left" command using the assigned button.
Scroll Right - Performs a "Scroll Right" command using the assigned button.
Sensitivity refers to how fast the mouse pointer can travel across the screen. When you select the Sensitivity function from the BUTTON ASSIGNMENT Menu, a sub-menu will appear which gives you access to the following options:
Sensitivity Clutch - Change to a predefined sensitivity as long as the designated button is pressed. Releasing the button will return it to the previous sensitivity.
Sensitivity Stage Up - Increase the current sensitivity by one stage. See the PERFORMANCE TAB to learn more about sensitivity stages.
Sensitivity Stage Down - Decrease the current sensitivity by one stage. See the PERFORMANCE TAB to learn more about sensitivity stages.
On-The-Fly Sensitivity - Readily adjust the current sensitivity using the assigned button. If On-The-Fly Sensitivity has been set, pressing the designated button and moving the scroll wheel will produce a bar on your screen which would indicate your current sensitivity level.
Cycle Up Sensitivity Stages - Increase the current sensitivity stage by one and once it reaches the highest sensitivity stage, it will return to stage 1 when the button is pressed again. See the PERFORMANCE TAB to learn more about sensitivity stages.
Cycle Down Sensitivity Stages - Decrease the current sensitivity stage by one and once it reaches stage 1, it will return to the highest sensitivity stage when the button is pressed again. See the PERFORMANCE TAB to learn more about sensitivity stages.

Macro
A Macro is a prerecorded sequence of keystrokes and button presses that is executed with precise timing. By assigning a Macro to a button, you can execute complex combinations with ease. The ASSIGN MACRO allows you to choose which recorded Macro to use while the PLAYBACK OPTION enables you to choose the behavior of the Macro. See the MACROS TAB to learn more about creating Macro commands.

Switch Profile
The Switch Profile enables you to change profiles on the fly and immediately load all your pre-configured settings. When you select Switch Profile from the BUTTON ASSIGNMENT Menu, a sub-menu will appear that will allow you to choose which profile to use. An on-screen display will automatically appear whenever you switch profiles.

Switch Keymap
The Switch Keymap allows you to easily swap key assignments with a press of a key. When you select Switch Keymap from the Key Assignment Menu, a submenu will appear wherein you can choose which keymap to use.

Disable
This option renders the assigned button unusable. Use Disable when you have no need for a button or if a particular button interferes with your gaming.
PERFORMANCE TAB
The Performance Tab allows you to enhance the speed and precision of your mouse pointer. Similar to the Customize Tab, the changes made here are automatically saved to your current profile.

Listed below are the performance options and their descriptions.
Sensitivity
Sensitivity pertains to how much effort is needed to move the mouse pointer in any direction. The higher the sensitivity, the more responsive the mouse will be.
(Recommended setting: 1600 – 1800)
Enable X-Y Sensitivity
By default, the X-axis (horizontal) and Y-axis (vertical) use the same sensitivity values. However, you may set different sensitivity values to each of the axes by selecting the "Enable X-Y Sensitivity" option.
Acceleration
Acceleration increases the cursor's movement speed depending on how quickly you move the mouse. The higher the value, the faster the mouse accelerates. (Recommended settings: Windows 0, Mac 5)
Polling Rate
The higher the polling rate, the more often the computer receives information about the status of your mouse, thus increasing the mouse pointer's reaction time. You can switch between 125Hz (8ms), 500Hz (2ms) and 1000Hz (1ms) by selecting your desired polling rate on the dropdown menu. (Recommended setting: 500Hz – 1000Hz)
MACROS TAB
The Macros Tab allows you to create a series of precise keystrokes and button presses. This tab also allows you to have numerous macros and extremely long macro commands at your disposal.

You can create a new macro by clicking the button or select an existing macro to edit from the drop down list.
To create a macro command, simply click the button press in all your keystrokes and button presses will automatically register on the macro screen. When
you are done recording your macro commands, click on the button to send the session.

IN-GAME DISPLAY SETTINGS
Here you can configure various overlay settings and even change display icons for each mouse button on the 12-button thumb grid when shown in game.
Note: Overlay is not supported for Windows XP systems.
Overlay Settings
Adjust the transparency level of the configurator when displayed in game using the OVERLAY TRANSPARENCY slider.
Select "SHOW OVERLAY" to enable the display of the 12-button thumb grid on your game screen.

12-button Thumb Grid Display Images
You can assign an image to each button on the 12-button thumb grid that is displayed on your game screen if grid overlay is enabled.
Head to the Customize tab and switch to the Thumb Grid View.

Select the button to change image for. Then, click the CHANGE IMAGE link.

Click to select the image file you wish to use. Click to remove the currently selected image or click to drop the image.
9. SAFETY AND MAINTENANCE
SAFETY GUIDELINES
In order to achieve maximum safety while using your Razer Naga, we suggest that you adopt the following guidelines:
- Avoid looking directly at the tracking beam of your mouse or pointing the beam in anyone else's eye. Note that the tracking beam is NOT visible to the naked human eye and is set on an Always-On mode.
- Should you have trouble operating the device properly and troubleshooting does not work, unplug the device and contact the Razer hotline or go to www.razersupport.com for support. Do not attempt to service or fix the device yourself at any time.
- Do not take apart the device (doing so will void your warranty) and do not attempt to operate it under abnormal current loads.
- Keep the device away from liquid, humidity or moisture. Operate the device only within the specific temperature range of 0° C ( 32° F) to 40° C ( 104° F). Should the temperature exceed this range, unplug and switch off the device in order to let the temperature stabilize to an optimal level.
COMFORT
Here are some tips to ensure that you are comfortable while using your device. Research has shown that long periods of repetitive motion, improper positioning of your computer peripherals, incorrect body position, and poor habits may be associated with physical discomfort and injury to nerves, tendons, and muscles. Below are some guidelines to avoid injury and ensure optimum comfort while using your Razer Naga.
- Position your keyboard and monitor directly in front of you with your mouse next to it. Place your elbows next to your side, not too far away and your mouse within easy reach.
- Adjust the height of your chair and table so that the keyboard and mouse are at or below elbow height.
- Keep your feet well supported, posture straight and your shoulders relaxed.
- During gameplay, relax your wrist and keep it straight. If you do the same tasks with your hands repeatedly, try not to bend, extend or twist your hands for long periods.
- Do not rest your wrists on hard surfaces for long periods. Use a wrist rest to support your wrist while gaming.
- Customize the buttons on your mouse to suit your style of gaming in order to minimize repetitive or awkward motions while gaming.
- Make sure that your mouse fits comfortably in your hands.
- Do not sit in the same position all day. Get up, step away from your desk and do exercises to stretch your arms, shoulders, neck and legs.
- If you should experience any physical discomfort while using your mouse, such as pain, numbness, or tingling in your hands, wrists, elbows, shoulders, neck or back, please consult a qualified medical doctor immediately.
MAINTENANCE AND USE
The Razer Naga requires minimum maintenance to keep it in optimum condition. Once a month we recommend you unplug the device from the USB port and clean it using a soft cloth or cotton swab with a bit of warm water to prevent dirt buildup. Do not use soap or harsh cleaning agents.
To get the ultimate experience in movement and control, we highly recommend a premium mousing surface from Razer. Some surfaces will cause undue wear on the feet requiring constant care and eventual replacement.
Do note that the sensor of the Razer Naga is ‘tuned’ or optimized especially for the Razer mousing surfaces. This means that the sensor has been tested extensively to confirm that the Razer Naga reads and tracks best on Razer mousing surfaces.
10. LEGALESE
COPYRIGHT AND INTELLECTUAL PROPERTY INFORMATION
Copyright © 2009-2013 Razer Inc. All rights reserved. Razer, For Gamers By Gamers, and the triple-headed snake logo are trademarks or registered trademarks of Razer Inc. and/or affiliated companies in the United States or other countries. Windows and the Windows logo are trademarks of the Microsoft group of companies. Mac OS, Mac and the Mac logo are trademarks or registered trademarks of Apple. All other trademarks are the property of their respective owners.
Razer Inc. (“Razer”) may have copyright, trademarks, trade secrets, patents, patent applications, or other intellectual property rights (whether registered or unregistered) concerning the product in this Master Guide. Furnishing of this Master Guide does not give you a license to any such copyright, trademark, patent or other intellectual property right. The Razer Naga (the “Product”) may differ from pictures whether on packaging or otherwise. Razer assumes no responsibility for such differences or for any errors that may appear. Information contained herein is subject to change without notice.
LIMITED PRODUCT WARRANTY
For the latest and current terms of the Limited Product Warranty, please visit www.razerzone.com/warranty.
LIMITATION OF LIABILITY
Razer shall in no event be liable for any lost profits, loss of information or data, special, incidental, indirect, punitive or consequential or incidental damages, arising in any way out of distribution of, sale of, resale of, use of, or inability to use the Product. In no event shall Razer's liability exceed the retail purchase price of the Product.
COSTS OF PROCUREMENT
For the avoidance of doubt, in no event will Razer be liable for any costs of procurement unless it has been advised of the possibility of such damages, and in no case shall Razer be liable for any costs of procurement liability exceeding the retail purchase price of the Product.
GENERAL
These terms shall be governed by and construed under the laws of the jurisdiction in which the Product was purchased. If any term herein is held to be invalid or unenforceable, then such term (in so far as it is invalid or unenforceable) shall be given no effect and deemed to be excluded without invalidating any of the remaining terms. Razer reserves the right to amend any term at any time without notice.

- TABLE OF CONTENTS
- PACKAGE CONTENTS / SYSTEM REQUIREMENTS
- PACKAGE CONTENTS
- SYSTEM REQUIREMENTS
- REGISTRATION / TECHNICAL SUPPORT
- REGISTRATION
- TECHNICAL SUPPORT
- TECHNICAL SPECIFICATIONS
- INSTALLING YOUR RAZER NAGA
- CONFIGURING YOUR RAZER NAGA
- MOUSE TAB
- PROFILE
- CUSTOMIZE TAB
- TOP VIEW
- SIDE VIEW
- KEY ASSIGNMENT MENU
- DEFAULT
- KEYBOARD FUNCTION
- MOUSE FUNCTION
- MACRO
- SWITCH PROFILE
- QUICK LAUNCH
- INTER-DEVICE
- SWITCH KEYMAP
- MULTIMEDIA FUNCTION
- WINDOWS 8 CHARMS
- WINDOWS SHORTCUT
- DISABLE
- PERFORMANCE TAB
- SENSITIVITY
- ENABLE X-Y SENSITIVITY
- CONFIGURE SENSITIVITY STAGES
- ACCELERATION
- POLLING RATE
- LIGHTING TAB
- CALIBRATION TAB
- RAZER MOUSE MATS
- FIRST TIME CALIBRATION
- OTHER MOUSING SURFACES
- MACROS TAB
- ADD ON TAB
- CONFIGURING YOUR RAZER NAGA USING THE IN-GAME CONFIGURATOR
- LAUNCHING THE IN-GAME CONFIGURATOR
- KEYMAP
- THUMB GRID VIEW
- BUTTON ASSIGNMENT MENU
- IN-GAME DISPLAY SETTINGS
- OVERLAY SETTINGS
- 12-BUTTON THUMB GRID DISPLAY IMAGES
- SAFETY AND MAINTENANCE
- SAFETY GUIDELINES
- COMFORT
- MAINTENANCE AND USE
- LEGALESE
- COPYRIGHT AND INTELLECTUAL PROPERTY INFORMATION
- LIMITED PRODUCT WARRANTY
- LIMITATION OF LIABILITY
- COSTS OF PROCUREMENT
- GENERAL
Brand : RAZER
Model : Naga 2014 Limited Edition
Category : Mouse