
ARK-3510 - Desktop computer Advantech - Free user manual and instructions
Find the device manual for free ARK-3510 Advantech in PDF.


| Product Type | Fanless Embedded Box PC |
| Brand / Model | Advantech ARK-3510 |
| Dimensions | 290 x 90 x 232 mm (11.4 x 3.54 x 9.13 in) |
| Weight | 4.63 kg (10.19 lb) |
| Power Supply | DC 12V, 7A (84W) with optional wide-input 9-34VDC |
| Processor | Intel 3rd Gen Core i7-3610QE / i5-3610ME / i3-3120ME / Celeron 1020E (up to 45W) |
| Chipset | Intel QM77 |
| Memory | 2 x 204-pin SODIMM, DDR3/DDR3L 1600MHz up to 16GB |
| Storage Options | 2 x 2.5" removable SATA HDD/SSD bays (9.5mm height), 1 x CFast, 2 x mSATA (via MiniPCIe, BIOS selectable) |
| Display Outputs | 1 x DVI-I (VGA + DVI), 1 x DisplayPort, 1 x HDMI — supports triple independent display (DVI-D + HDMI + DP) |
| Ethernet | 2 x Gigabit LAN (Intel 82579LM and Intel I-210IT) |
| USB Ports | 4 x USB 3.0, 2 x USB 2.0 |
| Serial Ports | 4 x COM: 2 x RS-232 (COM1, COM2), 2 x RS-232/422/485 (COM3, COM4) |
| Audio | HD Audio: Line-out, Mic-in (Realtek ALC892) |
| Expansion Slots | 2 x full-size Mini-PCIe (with SIM holders, supports mSATA) |
| Operating Temperature | -10°C to 60°C (with SSD), 0°C to 50°C (with HDD), airflow required |
| Storage Temperature | -40°C to 85°C |
| Vibration / Shock (Operation) | 3Grms (5-500 Hz) / 50G (11 ms) with SSD |
| Certifications | CE, FCC Class A, UL, CCC, BSMI |
| Warranty | 2 years limited |
| Included Accessories | Driver CD, DVI-I to VGA adaptor, CPU thermal grease pad, registration card, China RoHS document |
| Software Support | Advantech iManager (WDT, HW monitor) and SUSIAccess (remote management) |
| BIOS | AMI 64-Mbit SPI Flash BIOS |
| Cooling | Fanless design with heatsink and thermal pads |
| Power Consumption | Minimum DC 12V, 7A (84W) |
Frequently Asked Questions - ARK-3510 Advantech
User questions about ARK-3510 Advantech
0 question about this device. Answer the ones you know or ask your own.
Ask a new question about this device
Download the instructions for your Desktop computer in PDF format for free! Find your manual ARK-3510 - Advantech and take your electronic device back in hand. On this page are published all the documents necessary for the use of your device. ARK-3510 by Advantech.
USER MANUAL ARK-3510 Advantech
natural_image
Illustration of four electronic circuit boards with white outlines on a purple background (no text or symbols)ARK-3510
Fanless Embedded Box PC
Attention!
Please note:
This package contains a hard-copy user manual in Chinese for China CCC certification purposes, and there is an English user manual included as a PDF file on the CD. Please disregard the Chinese hard copy user manual if the product is not to be sold and/or installed in China.
Copyright
The documentation and the software included with this product are copyrighted 2010 by Advantech Co., Ltd. All rights are reserved. Advantech Co., Ltd. reserves the right to make improvements in the products described in this manual at any time without notice.
No part of this manual may be reproduced, copied, translated or transmitted in any form or by any means without the prior written permission of Advantech Co., Ltd. Information provided in this manual is intended to be accurate and reliable. However, Advantech Co., Ltd. assumes no responsibility for its use, nor for any infringements of the rights of third parties, which may result from its use.
Acknowledgements
Award is a trademark of Award Software International, Inc.
VIA is a trademark of VIA Technologies, Inc.
IBM, PC/AT, PS/2 and VGA are trademarks of International Business Machines Corporation.
Intel® and Pentium® are trademarks of Intel Corporation.
Microsoft Windows® is a registered trademark of Microsoft Corp.
RTL is a trademark of Realtek Semi-Conductor Co., Ltd.
ESS is a trademark of ESS Technology, Inc.
UMC is a trademark of United Microelectronics Corporation.
SMI is a trademark of Silicon Motion, Inc.
Creative is a trademark of Creative Technology LTD.
CHRONTEL is a trademark of Chrontel Inc.
All other product names or trademarks are properties of their respective owners.
For more information about this and other Advantech products, please visit our website at:
http://www.advantech.com/
http://www.advantech.com/ePlatform/
For technical support and service, please visit our support website at:
http://support.advantech.com.tw/support/
Part No. 2006351000 Edition 1
Printed in China November 2013
Product Warranty (2 years)
Advantech warrants to you, the original purchaser, that each of its products will be free from defects in materials and workmanship for two years from the date of purchase.
This warranty does not apply to any products which have been repaired or altered by persons other than repair personnel authorized by Advantech, or which have been subject to misuse, abuse, accident or improper installation. Advantech assumes no liability under the terms of this warranty as a consequence of such events.
Because of Advantech's high quality-control standards and rigorous testing, most of our customers never need to use our repair service. If an Advantech product is defective, it will be repaired or replaced at no charge during the warranty period. For out-of-warranty repairs, you will be billed according to the cost of replacement materials, service time and freight. Please consult your dealer for more details.
If you think you have a defective product, follow these steps:
- Collect all the information about the problem encountered. (For example, CPU speed, Advantech products used, other hardware and software used, etc.) Note anything abnormal and list any onscreen messages you get when the problem occurs.
- Call your dealer and describe the problem. Please have your manual, product, and any helpful information readily available.
- If your product is diagnosed as defective, obtain an RMA (return merchandise authorization) number from your dealer. This allows us to process your return more quickly.
- Carefully pack the defective product, a fully-completed Repair and Replacement Order Card and a photocopy proof of purchase date (such as your sales receipt) in a shippable container. A product returned without proof of the purchase date is not eligible for warranty service.
- Write the RMA number visibly on the outside of the package and ship it prepaid to your dealer.
Declaration of Conformity
FCC Class A
Note: This equipment has been tested and found to comply with the limits for a Class A digital device, pursuant to part 15 of the FCC Rules. These limits are designed to provide reasonable protection against harmful interference when the equipment is operated in a commercial environment. This equipment generates, uses, and can radiate radio frequency energy and, if not installed and used in accordance with the instruction manual, may cause harmful interference to radio communications. Operation of this equipment in a residential area is likely to cause harmful interference in which case the user will be required to correct the interference at his own expense.
Technical Support and Assistance
- Visit the Advantech web site at www.advantech.com/support where you can find the latest information about the product.
- Contact your distributor, sales representative, or Advantech's customer service center for technical support if you need additional assistance. Please have the following information ready before you call:
– Product name and serial number
– Description of your peripheral attachments
– Description of your software (operating system, version, application software, etc.)
– A complete description of the problem
– The exact wording of any error messages
Warnings, Cautions and Notes
Warning! Warnings indicate conditions, which if not observed, can cause personal injury!

Caution! Cautions are included to help you avoid damaging hardware or losing data. e.g.

There is a danger of a new battery exploding if it is incorrectly installed. Do not attempt to recharge, force open, or heat the battery. Replace the battery only with the same or equivalent type recommended by the manufacturer. Discard used batteries according to the manufacturer's instructions.
Note! Notes provide optional additional information.

Packing List
Before installation, please ensure the following items have been shipped:
1 x ARK-3510 unit
1 x Driver/Utility CD
■ 1 x Registration and 2 years Warranty card
1 x China RoHS
■ 1 x DVI-I to VGA adaptor
■ 1 x CPU thermal grease pad
Ordering Information
Model Number Description
| ARK-3510L-00A1E | Intel 3rd Gen. Core i High Performance Fanless Embedded Box PC with 2 x 2.5" removable drive bay |
Optional Accessories
For ARK-3510L
| Part Number Description |
| 1757004519-01 ADAPTER 100-240V 84W 12V 7A W/PFC 9NA0840448 FSP |
| 1702002600 Power cable 3-pin 180 cm, USA type |
| 1702031801 Power cable 3-pin 180 cm, UK type |
| 1702002605 Power cable 3-pin 180 cm, Europe type |
| 1700000237 Power cable 3-pin 180 cm, PSE |
Safety Instructions
- Please read these safety instructions carefully.
- Please keep this User's Manual for later reference.
- Please disconnect this equipment from AC outlet before cleaning. Use a damp cloth. Don't use liquid or sprayed detergent for cleaning. Use moisture sheet or clothe for cleaning.
-
For pluggable equipment, the socket-outlet shall near the equipment and shall be easily accessible.
-
Please keep this equipment from humidity.
-
Lay this equipment on a reliable surface when install. A drop or fall could cause injury.
-
The openings on the enclosure are for air convection hence protecting the equipment from overheating. DO NOT COVER THE OPENINGS.
-
Make sure the voltage of the power source when connecting the equipment to the power outlet.
-
Place the power cord such a way that people cannot step on it. Do not place anything over the power cord.
-
All cautions and warnings on the equipment should be noted.
-
If the equipment is not used for long time, disconnect the equipment from mains to avoid being damaged by transient over-voltage.
-
Never pour any liquid into ventilation openings; this could cause fire or electrical shock.
-
Never open the equipment. For safety reasons, only qualified service personnel should open the equipment.
-
If one of the following situations arises, get the equipment checked by service personnel:
■ The power cord or plug is damaged.
- Liquid has penetrated into the equipment.
■ The equipment has been exposed to moisture.
The equipment does not work well, or you cannot get it to work according to the user's manual.
■ The equipment has been dropped and damaged.
■ The equipment has obvious signs of breakage.
-
Do not leave this equipment in an environment where the storage temperature may go below -40^ C ( -40^ F) or above 85^ C ( 185^ F). This could damage the equipment. the equipment should be in a controlled environment.
-
Caution: Danger of explosion if battery is incorrectly replaced. Replace only with the same or equivalent type recommended by the manufacturer, discard used batteries according to the manufacturer's instructions.
-
The sound pressure level at the operator's position according to IEC 704-1:1982 is no more than 70 dB (A).
-
RESTRICTED ACCESS AREA: The equipment should only be installed in a Restricted Access Area.
-
DISCLAIMER: This set of instructions is given according to IEC 704-1. Advantech disclaims all responsibility for the accuracy of any statements contained herein.
Contents
Chapter 1 General Introduction ......1
1.1 Introduction 2
1.2 Product Features.... 3
1.2.1 General 3
1.2.2 Display 3
1.2.3 Ethernet 3
1.3 Chipset 4
1.3.1 Functional Specification 4
1.3.2 iManager 5
1.4 Mechanical Specifications....6
1.4.1 Dimensions 6
Figure 1.1 ARK-3510 Mechanical dimension drawing....6
1.4.2 Weight....6
1.5 Power Requirement 6
1.5.1 System Power....6
1.5.2 RTC Battery 6
1.6 Environment Specification....7
1.6.1 Operating Temperature....7
1.6.2 Relative Humidity 7
1.6.3 Storage Temperature....7
1.6.4 Vibration during Operation 7
1.6.5 Shock during Operation 7
1.6.6 Safety....7
1.6.7 EMC 7
Chapter 2 Hardware Configuration......9
2.1 Introduction 10
2.2 Jumpers 10
2.2.1 Jumper Description 10
2.2.2 Jumper List 10
Table 2.1: Jumper List of Main Board.... 10
2.2.3 Jumper Location 11
Figure 2.1 Jumper Layout.... 11
2.2.4 Jumper Setting.... 11
2.3 Switch.... 14
2.3.1 Switch List.... 14
Table 2.2: Jumper List of Main Boar.... 14
2.4 Connectors.... 16
2.4.1 ARK-3510 External I/O Location.... 16
Figure 2.2 ARK-3510L Front IO connectors drawing.... 16
Figure 2.3 ARK-3510L Rear IO connectors drawing ..... 16
2.4.2 ARK-3510 Front I/O connectors.... 16
Figure 2.4 Audio connector.... 16
Table 2.3: Audio Connector Pin Assignments ..... 16
Figure 2.5 USB2.0 connector 17
Table 2.4: USB 2.0 Connector.... 17
Figure 2.6 COM connector 17
Table 2.5: COM Connector Pin Assignments.... 17
2.4.3 ARK-3510 Rear I/O connectors 18
Figure 2.7 Power ON/OFF Button 18
Figure 2.8 Reset Button.... 18
Figure 2.9 LED Indicators 18
Figure 2.10DisplayPort connector 19
Table 2.6: DisplayPort Connector pin assignments ..... 19
Figure 2.11DVI-I Connector.... 19
Table 2.7: DVI-I Connector pin assignments.... 19
Figure 2.12HDMI receptacle connector.... 20
Table 2.8: HDMI Connector pin assignments.... 20
Figure 2.13USB3.0 Connector 20
Table 2.9: USB 3.0 Connector 21
Figure 2.14Ethernet connector 21
Table 2.10: Ethernet Connector Pin Assignments ..... 21
2.5 Installation.... 22
2.5.1 CPU / Memory Installation 22
2.5.2 CFast / SIM Installation.... 23
2.5.3 HDD/SSD Installation 23
2.5.4 MiniPCIe module / Internal SIM holder Installation.... 24
2.5.5 CPU thermal Grease Pad 26
2.5.6 Memory thermal Pad 27
2.5.7 Wide operating temperature support 27
Chapter 3 BIOS Settings....29
Figure 3.1 Setup program initial screen.... 30
3.1 Entering Setup 30
3.2 Main Setup.... 30
Figure 3.2 Main setup screen .... 31
3.2.1 System time / System date 31
3.3 Advanced BIOS Features Setup.... 31 Figure 3.3 Advanced BIOS features setup screen .... 32
3.3.1 ACPI Settings 32
Figure 3.4 ACPI Setting.... 32
3.3.2 CPU Configuration.... 33
Figure 3.5 CPU Configuration 33
3.3.3 SATA Configuration 34
Figure 3.6 SATA Configuration: IDE Mode (Default).... 34
Figure 3.7 SATA Configuration: AHCI Mode 34
Figure 3.8 SATA Configuration: RAID Mode 35
3.3.4 PCH-FW Configuration 35
Figure 3.9 PCH-FW Configuration.... 35
3.3.5 AMT Configuration.... 36
Figure 3.10AMT Configuration 36
3.3.6 USB Configuration 37
Figure 3.11USB Configuration.... 37
3.3.7 SMART Settings 38
Figure 3.12 SMART Settings.... 38
3.3.8 IT8760 Super IO Configuration 39
Figure 3.13 Super IO Configuration.... 39
3.3.9 Platform Misc Configuration.... 40
Figure 3.14Platform Misc Configuration 40
3.3.10 Embedded Controller Configuration 41
Figure 3.15Embedded Controller Configuration 41
3.3.11 Serial Port Console Redirection.... 42
Figure 3.16 Serial Port Console Redirection 42
3.3.12 CPU PPM Configuration 43
Figure 3.17CPU PPM Configuration.... 43
3.4 Chipset 44
Figure 3.18 Chipset Setup.... 44
3.4.1 PCH-IO Configuration.... 44
Figure 3.19PCH-IO Configuration 44
3.4.2 System Agent (SA) Configuration.... 45
Figure 3.20System Agent (SA) Configuration 45
Figure 3.21 Intel IGFX Configuration 46
Figure 3.22LCD Control.... 47
3.5 Boot Settings....48
Figure 3.23Boot Setup Utility 48
3.6 Security Setup.... 49
Figure 3.24Password Configuration 49
3.7 Save & Exit....50
Figure 3.25Save & Exit 50
Appendix A Watchdog Timer Sample Code......53
A.1 EC Watchdog Timer sample code 54
Chapter 1
General Introduction
This chapter gives background information on ARK-2150 series.
1.1 Introduction
ARK-3510 is an intelligent, fanless embedded system powered by Intel 3rd Gen. Core i rPGA high performance processor with multiple I/O interface and 2 removable 2.5" HDD drive bays.
ARK-3510 offers 1 x DVI-I, 1 x DisplayPort, 1 x HDMI interface which can support independent Tri-display, 4 x USB 3.0 ports, 2 x USB 2.0 ports, 2 x Giga LAN ports, audio function, 4 x COM ports, 2 x Mini PCI sockets with SIM holders; all packed into a rugged unit and powered by an Intel® 3rd generation rPGA Core™ i7/i5/i3 processor (supporting up to 45W). The ARK-3510 IPC supports 2 x 2.5" removable SATA HDD driver bays, 1 x CFast card, and 2 x mSATA (miniPCIe slots, switch by BIOS) for storage options.
Multi-functional Design
ARK-3510 offers 1 x DVI-I, 1 x DisplayPort, 1 x HDMI interface which can support independent Tri-display, 4 x USB 3.0 ports, 2 x USB 2.0 ports, 2 x GigaLAN ports, Audio function, 4 x COM ports, and 2 x Mini PCI sockets with SIM holders; all packed into a rugged unit and powered by an Intel® 3 generation rPGA Core™ i7/i5/i3 processor (supporting up to 45W). The ARK-3510 IPC supports 2 x 2.5" removable SATA HDD driver bays, and 1 x CFast card, and 2 x mSATA (miniPCIe slots, switch by BIOS) for storage options.
Flexible Design
ARK-3510 is a rugged high performance fanless embedded box PC which can support wide-temperature ranges from -10\~60C (with SSD), it supports 12 VDC for the standard model, but we reserve a wide-input power module as an optional item which can support a wider range of power from 9-34VDC. We also reserve a special design for easily customized I/O support, ARK-3510 can use any standard MIOe-2XX series modules as an option for additional and flexible I/O port support. ARK-3510 is a flexible model which can work in different environments and applications with multiple I/O and high performance support.
Built in Intelligent Management Tools - Advantech iManager & SUSIAccess
Advantech iManager provides a valuable suite of programmable APIs such as multi-level watchdog, hardware monitor, system restore, and other user-friendly interface. iManager is an intelligent self-management cross platform tool that monitors system status for problems and takes action if anything is abnormal. iManager offers a boot up guarantee in critical, low temperature environments so systems can automatically recover when voltages dip. iManager makes the whole system more reliable and more intelligent. ARK-3510 also supports Advantech's own SUSIAccess, which provides easy remote management so users can monitor, configure, and control a large number of terminals to make maintenance and system recovery simpler.
1.2 Product Features
1.2.1 General
CPU: Support Intel 3rd Gen. Core i3/i5/i7 and Celeron rPGA processor (up to 45W)
■ System Chipset: Intel QM77 I/O Controller
BIOS: AMI 64-Mbit SPI Flash BIOS
■ System Memory: DDR3 1600MHz or DDR3L 1600MHz up to 16GB
- Watchdog Timer: Single chip Watchdog 255-level interval timer, setup by software
I/O Interface:
- 2 x RS232, 2 x RS232/422/485
USB:
- 4 x USB 3.0 and 2 x USB 2.0 compliant ports
■ Audio: High Definition Audio (HD), Line out, Mic-in
■ Storage: 2 x 2.5" removable HDD drive bays (9.5mm height), 1 x CFast card, and 2 x mSATA
■ Expansion Interface: Supports 2 x full-size Mini-PCIe (supports mSATA and with SIM holders)
■ Software API: Advantech iManager and SUSIAccess - Remote Device Management technology
1.2.2 Display
■ Controller: Intel HD Graphics 4000
Resolution:
– VGA: VGA Integrated in DVI-I port
- DVI-I: 1920 x 1200 @ 60Hz
– HDMI: Support HDMI 1.4, 1920 x 1200 @ 60Hz
- Display Port: 2560 x 1600 @ 60Hz (Video only, and only support with 3rd gen. processor)
Dual Display:
- VGA+DVI, VGA+HDMI, VGA + DP, DVI + HDMI, DVI + DP, HDMI + DP
- Triple Display:
- DVI-D + HDMI + DP
1.2.3 Ethernet
Chipset:
- LAN1 Intel 82579LM,
- LAN2 Intel I-210IT
■ Speed: 1000 Mbps
Interface: 2 x RJ45
Standard: Compliant with IEEE 802.3, IEEE 802.3u, IEEE 802.3x, IEEE 802.3y, IEEE 802.ab.
1.3 Chipset
1.3.1 Functional Specification
1.3.1.1 Processor
| Processor | Support rPGA processor (up to 45W):■ Intel Core i7-3610QE 2.3GHz with 6M L3 cache■ Intel Core i5-3610ME 2.7GHz with 3M L3 cache■ Intel Core i3-3120ME 2.4GHz with 3M L3 cache■ Intel Celeron 1020E 2.2GHz with 2M L3 cache |
| Memory | Supports DDR3 1600 MHz or DDRL3 1600MHz up to 16 GB2 x 204-pin SODIMM socket type |
1.3.1.2 Chipset
| Internal Graphics Features | ■ DirectX 11 and OpenGL 3.0■ Display Part 1.1, HDMI 1.3a■ Supports HDCP 1.3■ Intel Display Power saving technology 6.0■ SGXS45 Power VR Core 400/640 MHz |
| Video Accelerator | ■ HW accelerated Media Decode: AVC/H.264, VC-1, MPEG-2■ HW accelerated Media Encode: AVC/H.264, MPEG-2 |
| SATA Interface | Intel QM77 chip supports:■ Supports several optional sections of Serial ATA III■ Supports SATA transfers to 600 Mbytes/sec.■ Integrated AHCI controller■ Supports mSATA socket |
| USB Interface | Intel QM77 chip supports:■ xHCI Host Controller, supporting SuperSpeed USB 3.0 ports■ Two EHCI Host Controllers, supporting HighSpeed USB 2.0 ports■ Supports wake-up from sleeping states S1-S4■ Supports legacy Keyboard/Mouse software■ Maximum 500mA for each USB port |
| Power Management | Intel QM77 chip supports:■ Supports ACPI 4.0a■ ACPI-defined power states (processor driven C states)■ ACPI Power Management Timer■ SMI# generation |
| BIOS | Intel QM77 chip supports:■ AMI 64-Mbit EFI Flash BIOS via SPI |
1.3.1.3 Others
| Serial ports | ITE 8760E & SMSC SCH3106 supports:■ Up to 4 serial ports.■ Supports IRQ Sharing among serial ports under Microsoft Windows OSARK-3510L■ COM1, COM2 : RS-232■ COM3, COM4 : RS-232/422/485 |
| Ethernet | LAN1 Intel 82579LM, LAN2 Intel I-210IT■ Compliant with IEEE 802.3, IEEE 802.3u, IEEE 802.3x, IEEE 802.3y, IEEE 802.ab.■ Support 10/100/1000 Mbps.LAN Connectors: Phone Jack RJ45 8P 90D(F) |
| Audio | Audio Codec: Realtek ALC892:■ Compliant with HD Audio specifications■ Supports 16/20/24-bit DAC and 16/20/24-bit ADC resolution■ Supports: Speak-out, Mic-inAudio Connectors: Ear Phone Jack * 2 |
| Battery backup | ■ BATTERY 3V/210 mAh with WIRE x 1 |
1.3.2 iManager
| iManager |
| Sequence control Supported |
| DIO 8-bit programmable DIO |
| Watchdog timer Multi Level WDT (set by Advantech iManager) Programmable 1-255 sec / min |
| Hardware monitor CPU Temperature / input Current / input Voltage |
| Power saving Deep sleep S5 mode / Smart Fan / Back light control |
| System information Running HR / Boot record |
1.4 Mechanical Specifications
1.4.1 Dimensions
290[11.4] × 90[3.54] × 232[9.13] (Unit: mm [Inch])
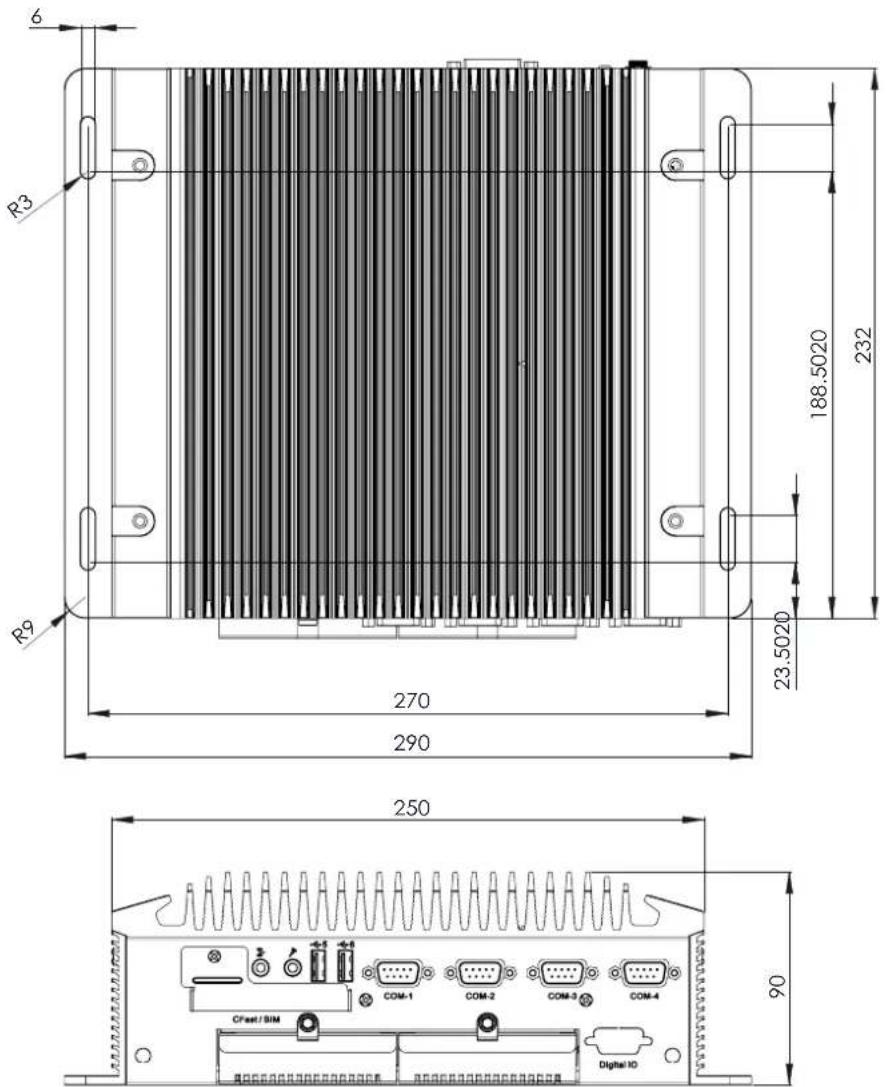
Figure 1.1 ARK-3510 Mechanical dimension drawing
1.4.2 Weight
4.63kg (10.19lb)
1.5 Power Requirement
1.5.1 System Power
■ Minimum power input:
- ARK-3510L: DC12V, 7A
1.5.2 RTC Battery
Lithium 3 V/210 mAH
1.6 Environment Specification
1.6.1 Operating Temperature
With Industrial Grade SSD/Cfast: -10 \~ 60° C (-14\~140° F), with air flow, speed=0.7 m/sec
■ With 2.5-inch hard disk 0 to 50°C (32\~122°F), with air flow, speed=0.7 m/sec
1.6.2 Relative Humidity
■ 95% @ 40° C (non-condensing)
1.6.3 Storage Temperature
-40 \~ 85° C (-40 \~ 185° F)
1.6.4 Vibration during Operation
- When system is equipped with SSD/mSATA: 3Grms, IEC 60068-2-64, random, 5 \~ 500 Hz, 1hr/axis, x,y,z 3 axes.
1.6.5 Shock during Operation
■ When system is equipped with SSD/mSATA: 50G, IEC 60068-2-27, half sine, 11 ms duration.
1.6.6 Safety
UL, CCC, BSMI
1.6.7 EMC
CE, FCC, CCC, BSMI
Chapter 2
Hardware
Configuration
2.1 Introduction
The following sections show the internal jumpers setting and the external connectors pin assignment for application.
2.2 Jumpers
2.2.1 Jumper Description
You may configure ARK-3510 to match the needs of your application by setting jumpers. A jumper is a metal bridge used to close an electric circuit. It consists of two metal pins and a small metal clip (often protected by a plastic cover) that slides over the pins to connect them. To close a jumper, you connect the pins with the clip. To open a jumper, you remove the clip. Sometimes a jumper will have three pins, labeled 1, 2 and 3. In this case you would connect either pins 1 and 2, or 2 and 3.
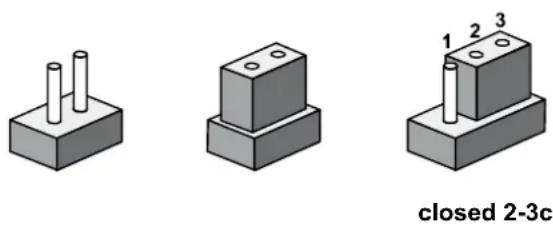
closed 2-3cl
The jumper settings are schematically depicted in this manual as follows.
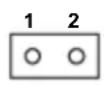
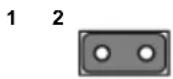
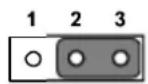
closed 2-3clc
A pair of needle-nose pliers may be helpful when working with jumpers. If you have any doubts about the best hardware configuration for your application, contact your local distributor or sales representative before you make any changes. Generally, you simply need a standard cable to make most connections.
2.2.2 Jumper List
Table 2.1: Jumper List of Main Board
| J1 DDR3/DDR3L Setting |
| J2 Auto Power On Setting |
| J3 COM4 RS232/422/485 Setting |
| J4 COM3 RS232/422/485 Setting |
| J5 COM4 RS232/422/485 Setting |
| J6 COM3 RS232/422/485 Setting |
| J7 COM4 RS232/422/485 Setting |
| J8 COM3 RS232/422/485 Setting |
| J9 Clear CMOS |
2.2.3 Jumper Location
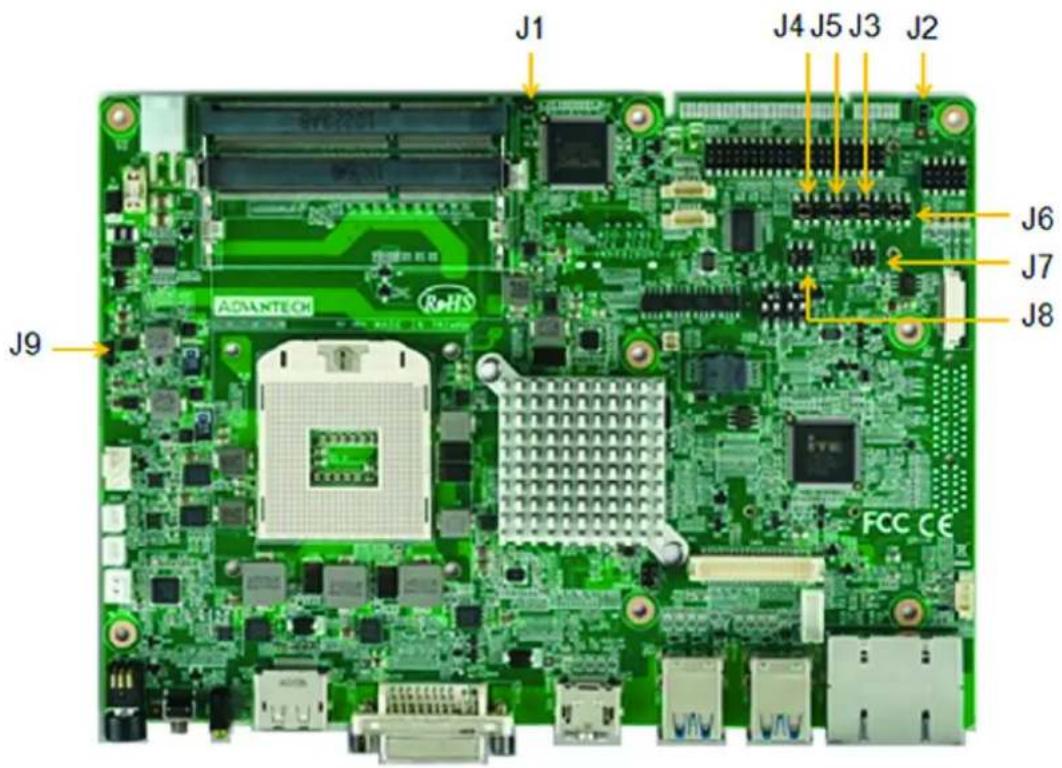
Figure 2.1 Jumper Layout
2.2.4 Jumper Setting
At Mother Board
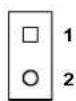
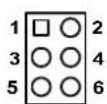
2.2.4.1 DDR3/DDR3L setting (J1)
| J1 DDR3/DDR3L Setting | |
| Part Number | 1653002101 |
| Footprint HD_2x1P_79_D | |
| Description | |
| Setting Function | |
| NC DDR3 Memory module (Default) | |
| (1-2) DDR3L Memory module | |
2.2.4.2 Auto Power On Setting (J2)
| J2 Auto Power On Setting | |
| Part Number | 1653002101 |
| Footprint HD_2x1P_79_D | |
| Description | |
| Setting Function | |
NC Power Button for Power On (Default)
(1-2) Auto Power On

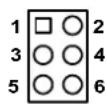
2.2.4.3 COM4 RS232/422/485 setting (J3)
* Please check J5/J7 for COM4 RS232/422/485 setting as well
J3 COM4 RS232/422/485 Setting
Part Number 1653003260
Footprint HD_3x2P_79
Description
Setting Function
(1-3)*(2-4) COM4 RS232 (Default)
(3-5)*(4-6) COM4 RS422/485
2.2.4.4 COM3 RS232/422/485 setting (J4)
* Please check J6/J8 for COM3 RS232/422/485 setting as well
J4 COM3 RS232/422/485 Setting
Part Number 1653003260
Footprint HD_3x2P_79
Description
Setting Function
(1-3)*(2-4) COM3 RS232 (Default)
(3-5)*(4-6) COM3 RS422/485
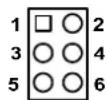
2.2.4.5 COM4 RS232/422/485 setting (J5)
* Please check J3/J7 for COM4 RS232/422/485 setting as well
J5 COM4 RS232/422/485 Setting
Part Number 1653003260
Footprint HD_3x2P_79
Description
Setting Function
(1-3)*(2-4) COM4 RS232 (Default)
(3-5)*(4-6) COM4 RS422/485
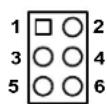
2.2.4.6 COM3 RS232/422/485 setting (J6)
* Please check J4/J8 for COM3 RS232/422/485 setting as well
| J6 COM3 RS232/422/485 Setting | |
| Part Number | 1653003260 |
| Footprint HD_3x2P_79 | |
| Description | |
| Setting Function | |
| (1-3)*(2-4) COM3 RS232 (Default) | |
| (3-5)*(4-6) COM3 RS422/485 | |
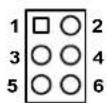
2.2.4.7 COM4 RS232/422/485 setting (J7)
* Please check J3/J5 for COM4 RS232/422/485 setting as well
| J7 COM4 RS232/422/485 Setting | |
| Part Number | 1653003260 |
| Footprint HD_3x2P_79 | |
| Description | |
| Setting Function | |
| (1-2) COM4 RS232 (Default) | |
| (3-4) COM4 RS485 | |
| (5-6) COM4 RS422 | |
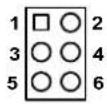
2.2.4.8 COM3 RS232/422/485 setting (J8)
* Please check J4/J6 for COM3 RS232/422/485 setting as well
| J8 COM3 RS232/422/485 Setting | |
| Part Number | 1653003260 |
| Footprint HD_3x2P_79 | |
| Description | |
| Setting Function | |
| (1-2) COM3 RS232 (Default) | |
| (3-4) COM3 RS485 | |
| (5-6) COM3 RS422 | |
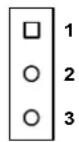
2.2.4.9 Clear CMOS (J9)
| J9 Clear CMOS | |
| Part Number | 1653003101 |
Footprint HD_3x1P_79_D
Description
Setting Function
(1-2) Normal (Default)
(2-3) Clear CMOS
2.3 Switch
2.3.1 Switch List
Table 2.2: Jumper List of Main Boar
| SW1 COM4 RS485 Termination PU/PD |
| SW2 COM3 RS485 Termination PU/PD |
| SW5 PCIe/mSATA selection |
| SW6 PCIe/mSATA selection |
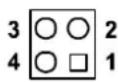
2.3.1.1 COM4 RS485 Termination PU/PD
SW1 COM4 RS485 Termination PU/PD
| Part Number | 1600003089-01 |
| Footprint SW_2x2P_100_198x378 | |
| Description | |
| Setting Function | |
| (OFF)1*(OFF)2 NO TERMINATION (Defa | |
| (OFF)1*(ON)3 TERMINATION PU | |
| (OFF)2*(ON)4 TERMINATION PD | |
SW1
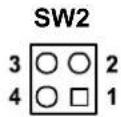
2.3.1.2 COM3 RS485 Termination PU/PD
SW2 COM3 RS485 Termination PU/PD
| Part Number | 1600003089-01 |
| Footprint SW_2x2P_100_198x378 | |
| Description | |
| Setting Function | |
| (OFF)1*(OFF)2 NO TERMINATION (Defa | |
| (OFF)1*(ON)3 TERMINATION PU | |
| (OFF)2*(ON)4 TERMINATION PD | |
2.3.1.3 PCIE/mSATA Selection
SW5 PCIE/mSATA Selection
| Part Number | 1600003089-01 |
| Footprint SW_2x2P_100_198x378 | |
| Description | |
| Setting Function | |
| (OFF)1*(ON)3 AUTO-DETECTION (Defa) | |
| (OFF)1*(OFF)2 PCIE CARD | |
| (OFF)2*(ON)4 mSATA | |
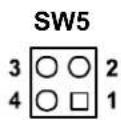
2.3.1.4 PCIE/mSATA Selection
SW6 PCIE/mSATA Selection
| Part Number | 1600003089-01 |
| Footprint SW_2x2P_100_198x378 | |
| Description | |
| Setting Function | |
| (OFF)1*(ON)3 AUTO-DETECTION (Defa | |
| (OFF)1*(OFF)2 PCIE CARD | |
| (OFF)2*(ON)4 mSATA | |
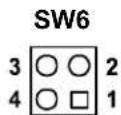
2.4 Connectors
2.4.1 ARK-3510 External I/O Location
ARK-3510L:
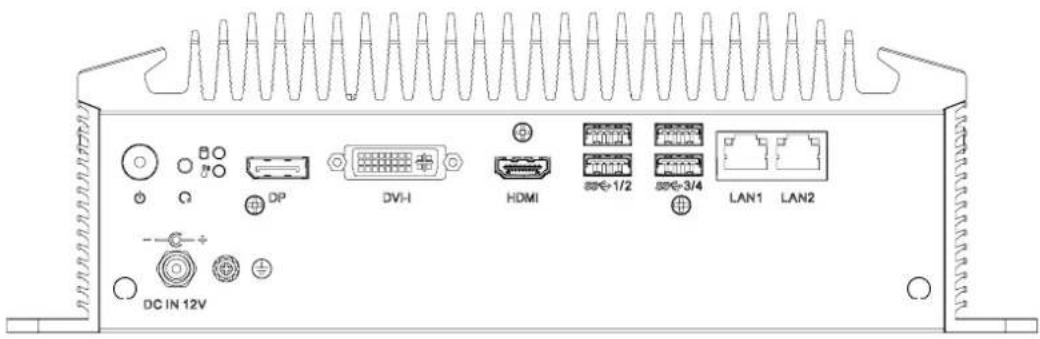
Figure 2.2 ARK-3510L Front IO connectors drawing
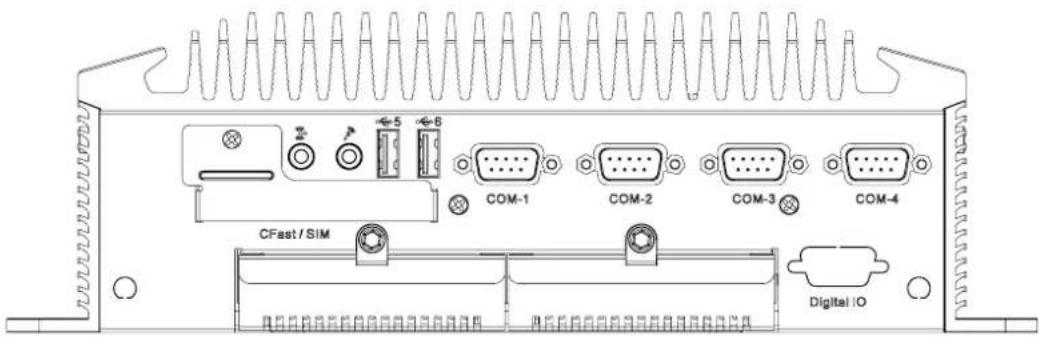
Figure 2.3 ARK-3510L Rear IO connectors drawing
2.4.2 ARK-3510 Front I/O connectors
2.4.2.1 Audio Connector
ARK-3510 offers stereo audio ports by three phone jack connectors of Line_Out, Line_In, Mic_In. The audio chip is controlled by ALC892, and it's compliant with Azalea standard.
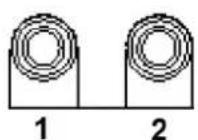
Figure 2.4 Audio connector
Table 2.3: Audio Connector Pin Assignments
| Pin Audio Signal Name |
| 1 Line out |
| 2 Mic in |
2.4.2.2 USB2.0 Connector
ARK-3510 provides up to four USB2.0 interface connectors, which give complete Plug & Play and hot swapping for up to 127 external devices. The USB interface
complies with USB UHCI, Rev. 2.0 compliant. The USB interface can be disabled in the system BIOS setup. Please refer to Table. 2.7 for its pin assignments. The USB connectors are used to connect any device that conforms to the USB interface. Most digital devices conform to this standard. The USB interface supports Plug and Play.
* Support power on/off switch in suspend mode (By BIOS setting, please refer to BIOS setting chapter 3.3.10)
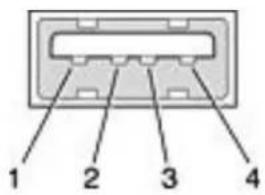
Figure 2.5 USB2.0 connector
Table 2.4: USB 2.0 Connector
Pin Signal Name Pin Signal Name
| 1 +5V 2 USB_data- |
| 3 USB_data+ 4 GND |
2.4.2.3 COM Connector
ARK-3510 provides up to four D-sub 9-pin connectors, which offers RS-232/422/485 serial communication interface ports. Default setting is RS-232, if you want to use RS-422/485, you just need to change BIOS setting. The BIOS setting of RS-232/422/485 can be found in Chapter 3.3.8 & 3.3.9.
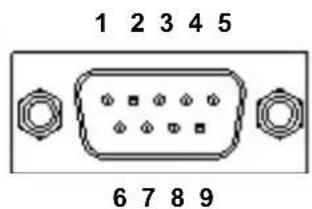
Figure 2.6 COM connector
Table 2.5: COM Connector Pin Assignments
| RS-232 RS-422 RS-485 | |||
| Pin | Signal Name | Signal Name | Signal Name |
| 1 | DCD | Tx- | DATA- |
| 2 | RxD | Tx+ | DATA+ |
| 3 | TxD | Rx+ | NC |
| 4 | DTR | Rx- | NC |
| 5 | GND | GND | GND |
| 6 | DSR | NC | NC |
| 7 | RTS | NC | NC |
| 8 | CTS | NC | NC |
| 9 | RI | NC | NC |
Note! NC represents "No Connection".

2.4.3 ARK-3510 Rear I/O connectors
2.4.3.1 Power On/Off Button
ARK-3510 has a Power On/Off button with LED indicators on the front side that show On status (Green LED) and Off/Suspend status (Orange LED). The Power button supports dual functions: Soft Power -On/Off (Instant off or Delay 4 Seconds then off), and Suspend.

Figure 2.7 Power ON/OFF Button
2.4.3.2 Reset Button
ARK-3510 has a Reset button on the front panel. Press the button to activate the reset function.
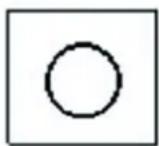
Figure 2.8 Reset Button
2.4.3.3 LED Indicators
There are two LEDs on the front panel that indicate system status: The thermal LED is for system thermal alarm status; and HDD LED is for HDD and compact flash disk status.
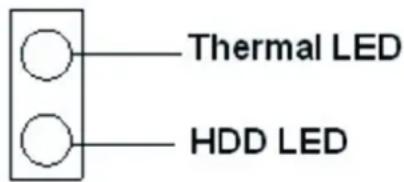
Figure 2.9 LED Indicators
2.4.3.4 DisplayPort Connector
An integrated, 20-pin receptacle connector DisplayPort Interface is provided. The DisplayPort link supports resolutions up to 2560 x 1600@60Hz. This port is transferred by Intel eDP, there is no audio and hot plug support. And this DisplayPort is supported by 3rd Gen Intel Core I processor only.
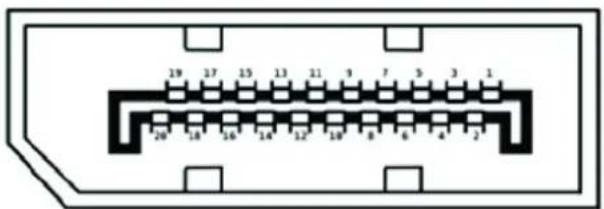
Figure 2.10 DisplayPort connector
Table 2.6: DisplayPort Connector pin assignments
| Pin Signal Name Pin Signal Name | |
| 1 ML_Lane 0 (p) 2 GND | |
| 3 ML_Lane 0 (n) 4 ML_Lane 1 (p) | |
| 5 GND 6 ML_Lane 1 (n) | |
| 7 ML_Lane 2 (p) 8 GND | |
| 9 ML_Lane 2 (n) 10 ML_Lane 3 (p) | |
| 11 GND 12 ML_Lane 3 (n) | |
| 13 CONFIG1 14 CONFIG2 | |
| 15 AUX CH (p) | 16 GND |
| 17 AUX CH (n) | 18 Hot Plug |
| 19 Return | 20 DP_PWR |
2.4.3.5 Digital Visual Interface Connector (DVI-I)
The ARK-3510 offers an integrated D-sub 24-pin female DVI-I Digital Visual Interface connector; it carries integrated analog and digital video signals. This supports high-speed, high-resolution digital displays and traditional analog displays.
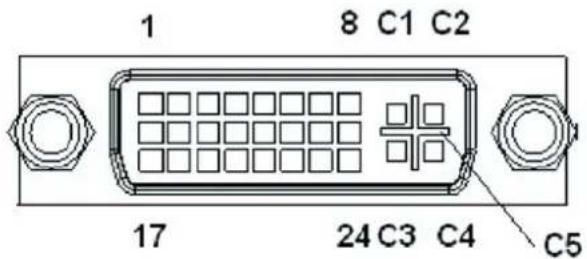
Figure 2.11 DVI-I Connector
Table 2.7: DVI-I Connector pin assignments
| Pin | Signal Name | Pin | Signal Name |
| 1 | TMDS Data 2- | 2 | TMDS Data 2+ |
| 3 | TMDS Data 2/4 shield | 4 | TMDS Data 4- |
| 5 TMDS Data 4+ | 6 | DDC clock | |
| 7 | DDC data | 8 | Analog vertical sync |
| 9 TMDS Data 1- | 10 | TMDS Data 1+ | |
| 11 | TMDS Data 1/3 shield | 12 | TMDS Data 3- |
| 13 | TMDS Data 3+ | 14 | +5V |
| 15 | GND | 16 | Hot plug detect |
Table 2.7: DVI-I Connector pin assignments
| 17 TMDS Data 0- 18 TMDS Data 0+ |
| 19 TMDS Data 0/5 shield 20 TMDS Data 5- |
| 21 TMDS Data 5+ 22 TMDS clock shield |
| 23 TMDS clock+ 24 TMDS clock- |
| C1 Analog red C2 Analog green |
| C3 Analog blue C4 Analog horizontal sync |
| C5 Analog GND |
2.4.3.6 HDMI Connector
An integrated, 19-pin receptacle connector HDMI Type A Interface is provided. The HDMI link supports resolutions up to 2560x1600@60Hz.
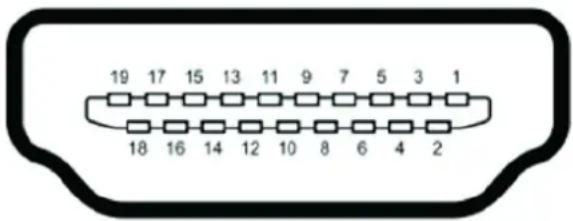
Figure 2.12 HDMI receptacle connector
Table 2.8: HDMI Connector pin assignments
| Pin | Signal Name | Pin | Signal Name | |
| 1 | TMDS Data 2+ | 2 | TMDS Data 2 shield | |
| 3 | TMDS Data 2- | 4 | TMDS Data 1+ | |
| 5 | TMDS Data 1 shield | 6 | TMDS Data 1- | |
| 7 | TMDS Data 0+ | 8 | TMDS Data 0 shield | |
| 9 | TMDS Data 0- | 10 | TMDS clock+ | |
| 11 | TMDS clock shield | 12 | TMDS ckock- | |
| 13 | CEC | 14 | Reserved | |
| 15 | SCL | 16 | SDA | |
| 17 | DDC/CEC Ground | 18 | +5V | |
| 19 | Hot Plug Detect | |||
2.4.3.7 USB3.0 Connector
The USB port USB port 1, 2, 3, 4 of ARK-3510 supports USB 3.0 interface, which gives complete Plug & Play and hot swapping for up to 127 external devices. The USB interface complies with USB UHCI, Rev. 3.0 compliant. Please refer to Table. 2.7 for its pin assignments. USB 3.0 connectors contain legacy pins to interface to USB 2.0 devices, and a new set of pins for USB 3.0 connectivity (both sets reside in the same connector).
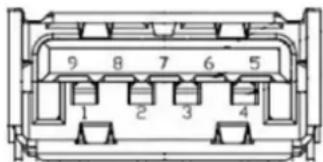
Figure 2.13 USB3.0 Connector
Table 2.9: USB 3.0 Connector
| Pin Signal Name Pin Signal Name |
| 1 +5V 2 USB_data- |
| 3 USB_data+ 4 GND |
| 5 SSRX- 6 SSRX+ |
| 7 GND 8 SSTX- |
| 9 SSTX+ |
2.4.3.8 Ethernet Connector (LAN)
ARK-3510 is equipped with up to four Ethernet controllers that are fully compliant with IEEE 802.3u 10/100/1000 Mbps CSMA/CD standards. The Ethernet port provides a standard RJ-45 jack connector with LED indicators on the front side to show its Active/Link status (Green LED) and Speed status (Yellow LED).
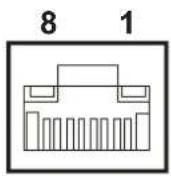
Figure 2.14 Ethernet connector
Table 2.10: Ethernet Connector Pin Assignments
| Pin | 10/100/1000BaseT Signal Name |
| 1 | TX+ |
| 2 | TX- |
| 3 | RX+ |
| 4 | MDI2+ |
| 5 | MDI2- |
| 6 | RX- |
| 7 | MDI3+ |
| 8 | MDI3- |
2.5 Installation
2.5.1 CPU / Memory Installation
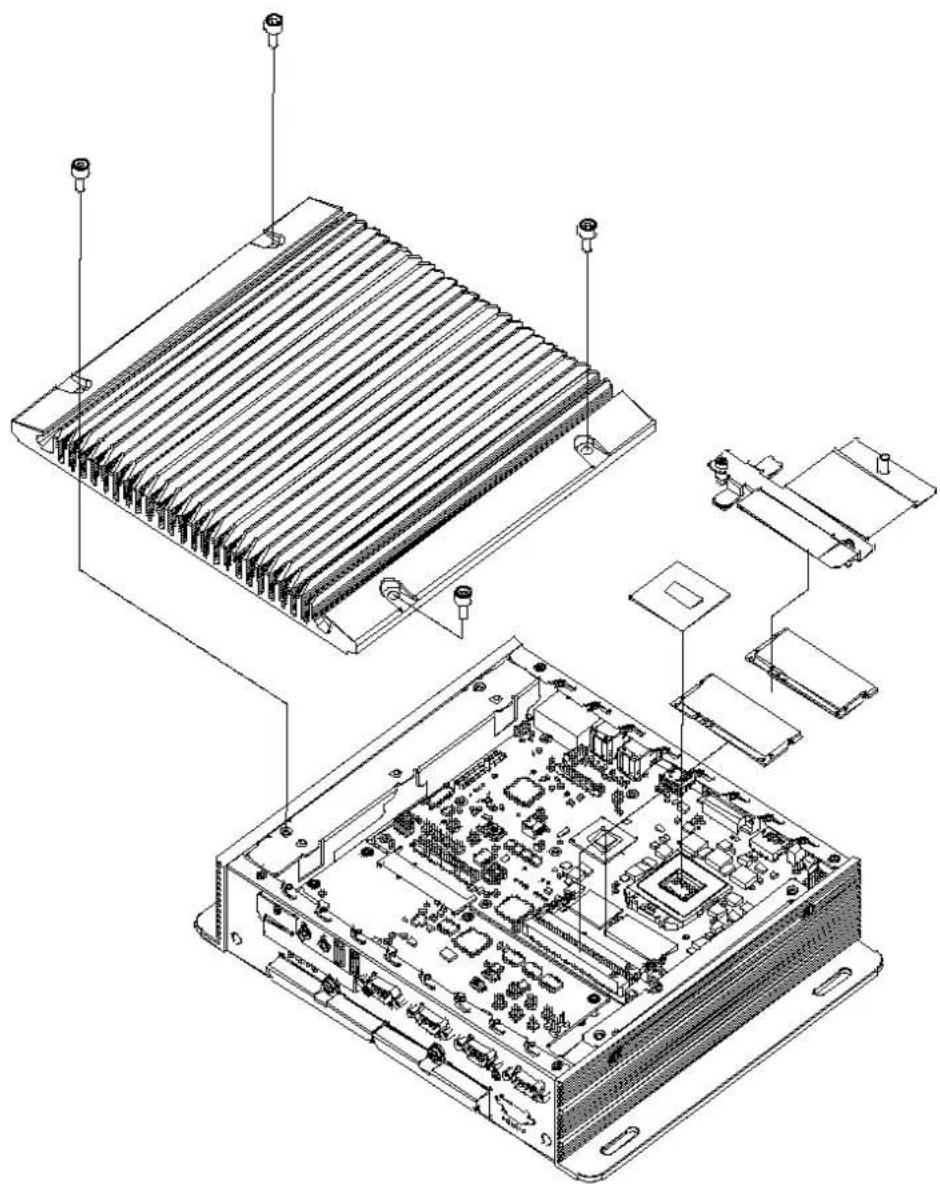
natural_image
Exploded view diagram of an electronic device showing internal components and connections (no text or labels)- Unscrew the 4 screws on the top cover, and remove the top cover
- Install the CPU on the socket, and screw to the lock on the socket
- Unscrew 2 screws on memory bracket
- Install the memory into the system.
- Screw the 2 screws back onto the memory bracket with the M/B
- Recover the top chassis
2.5.2 CFast / SIM Installation
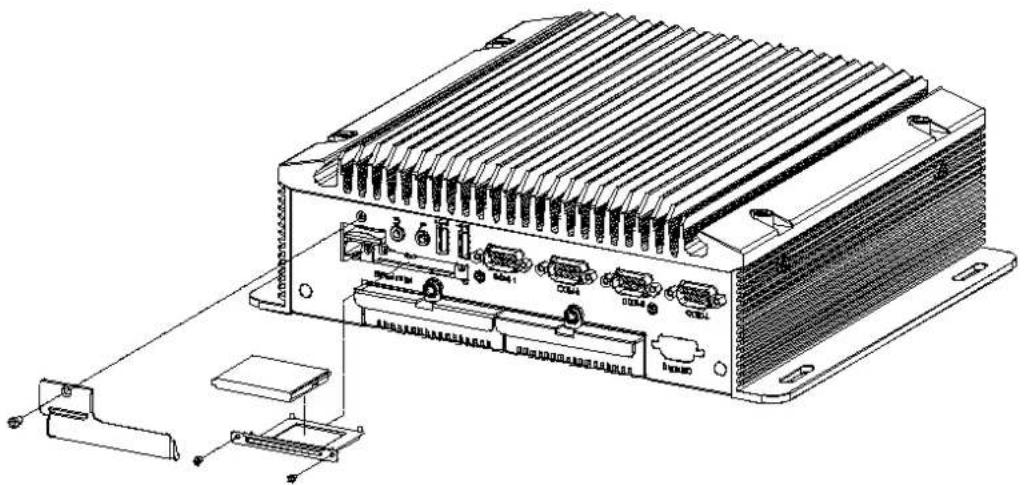
natural_image
Technical line drawing of an electronic device chassis with ports and connectors (no text or symbols)- Unscrew the 1 screw on the cover of front panel
- Unscrew the 2 screws on the CFast bracket
- Pull the bracket out and remover the dummy card.
- Put the CFast card on the bracket, and push the bracket back to the system
- Screw the 2 screws back to the CFast bracket with the system
- Push the SIM card in the SIM holder (Link to miniPCIe CN38 slot)
- Screw the cover back to the front panel.
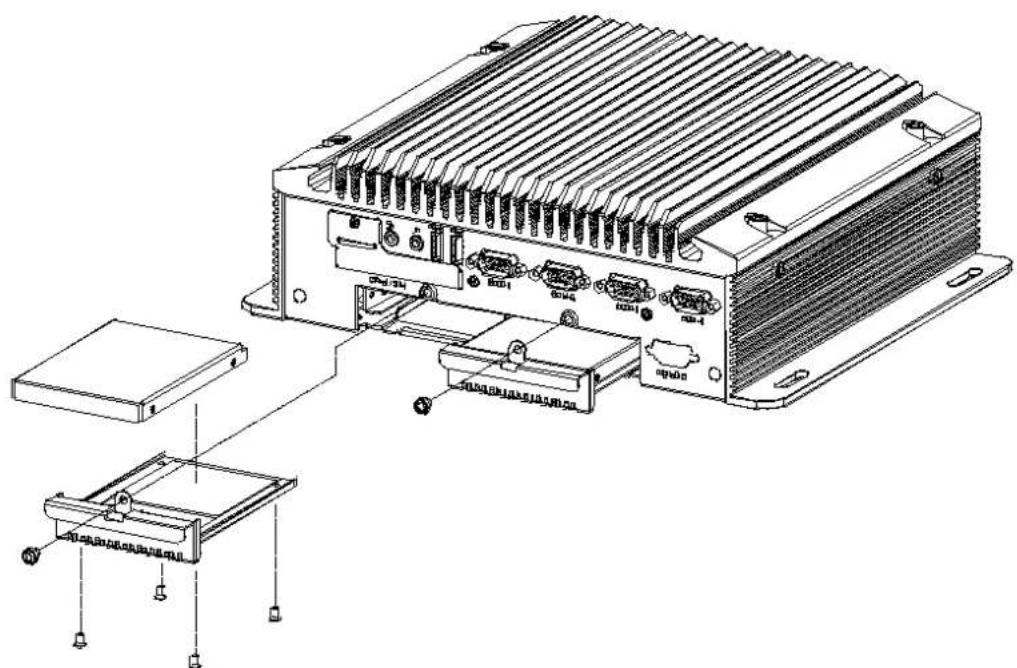
2.5.3 HDD/SSD Installation
natural_image
Technical line drawing of an electronic device chassis with labeled ports and components (no readable text or symbols)- Unscrew 1 screw on the removable drive bay
- Pull the removable drive bay out
- Put the HDD thermal pad on the drive bay and screw the HDD/SSD on the removable drive bay through 4 screws on the heatsink bottom
- Push the removable drive bay back to the system
- Screw 1 screw on the removable bay with the front panel
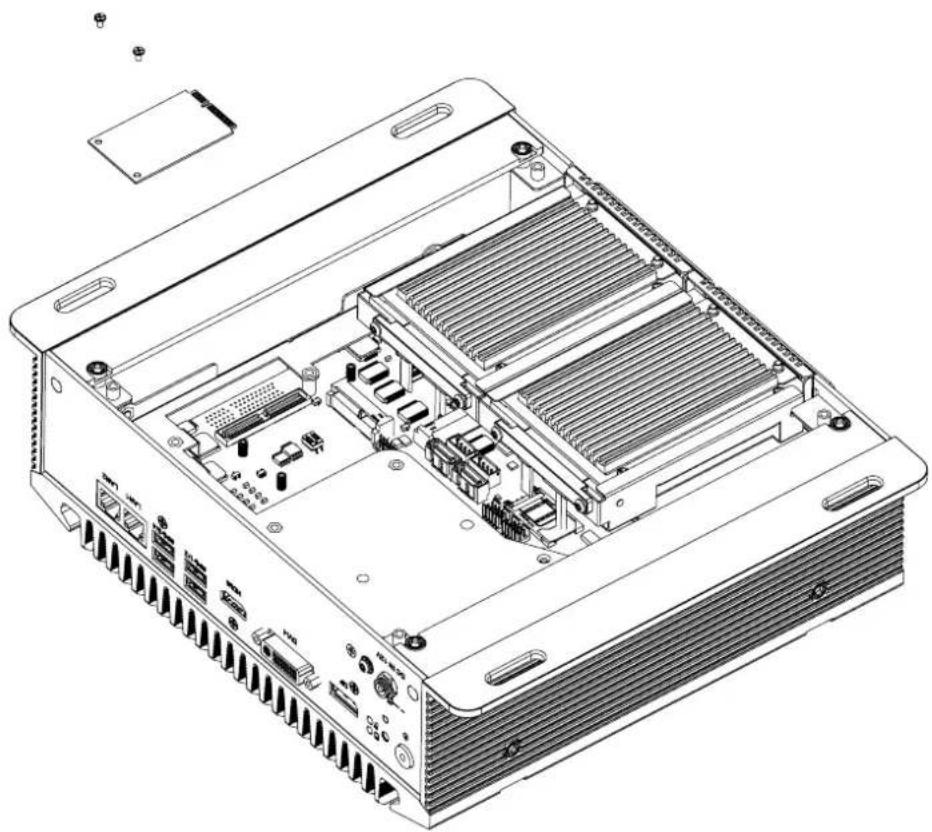
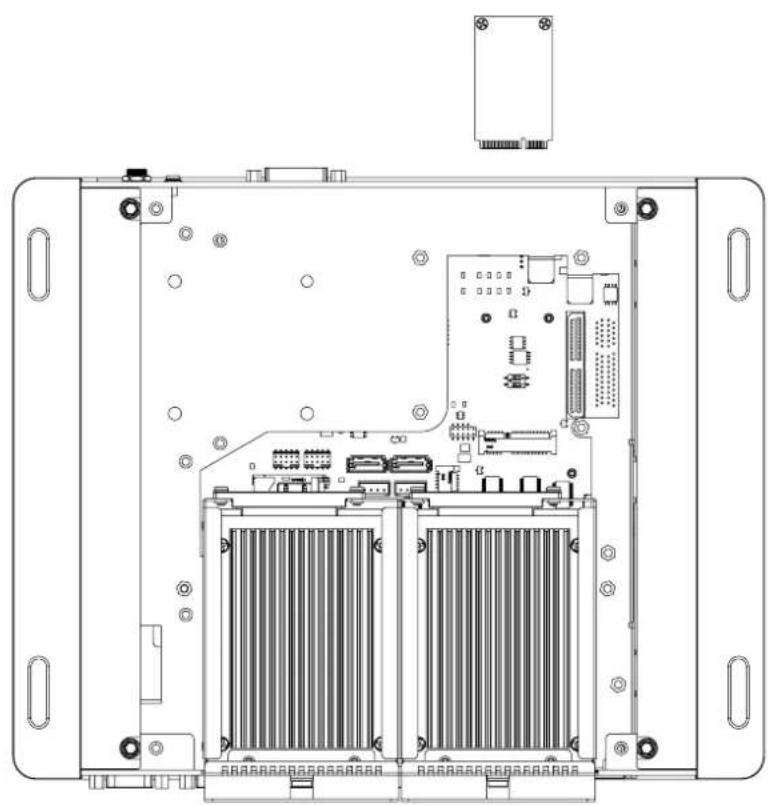
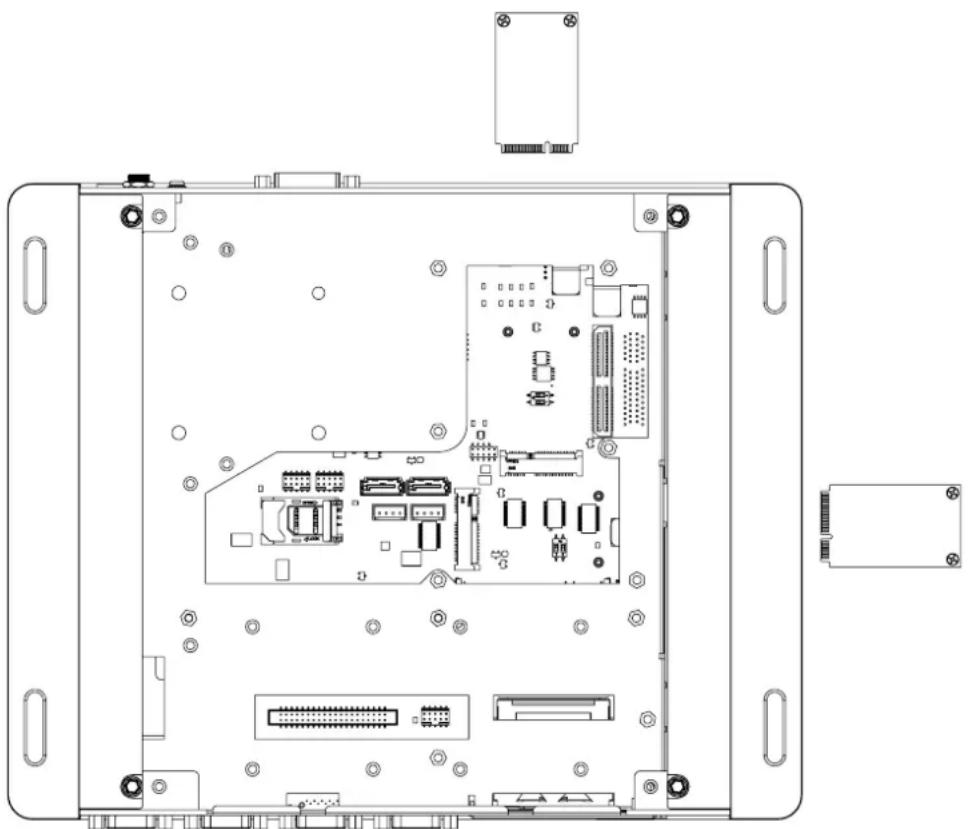
2.5.4 MiniPCIe module / Internal SIM holder Installation
natural_image
Technical line drawing of an internal server rack with visible ports and connectors (no text or labels)-
Unscrew 4 screws on the bottom cover, and remove the bottom cover.
-
Install the miniPCIe module (CN38) and screw 2 screws on the module. (This module is connected to front panel SIM holder).
natural_image
Technical line drawing of an electronic device chassis showing internal components and mounting points (no text or symbols)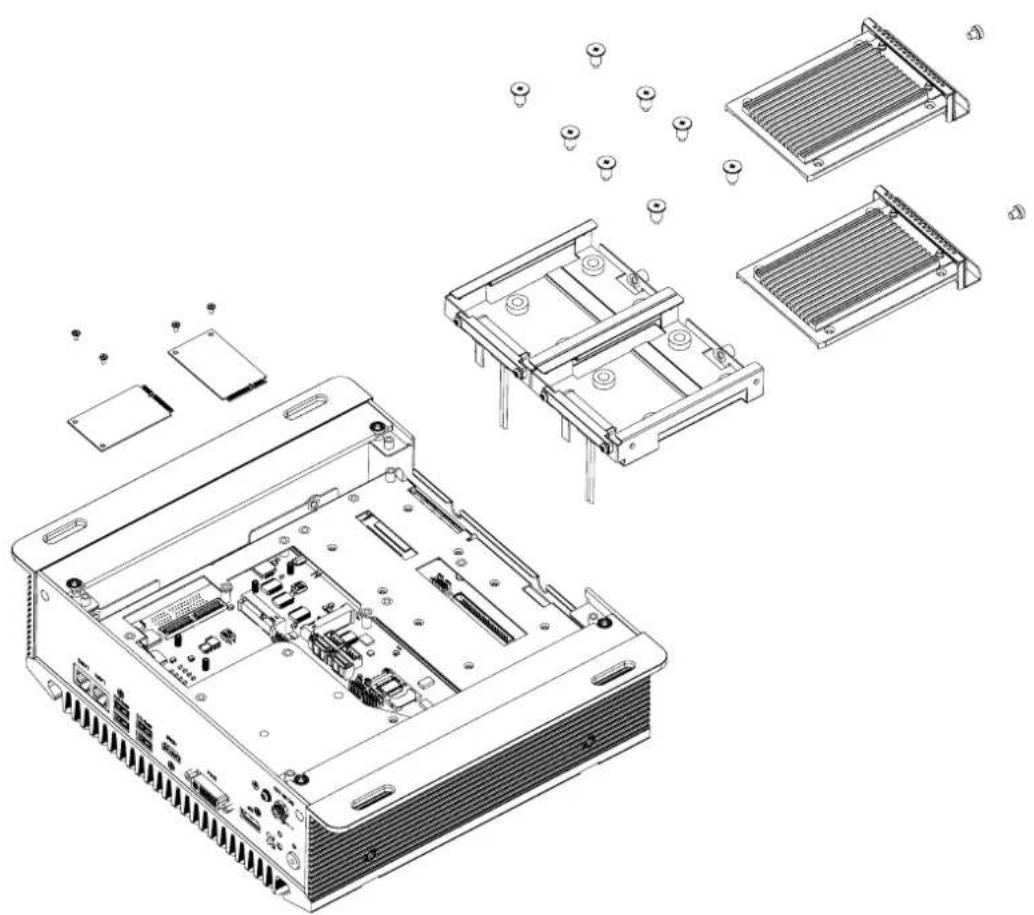
natural_image
Exploded view diagram of an electronic device showing internal components and external housing (no text or labels)- Unscrew 1 screw on the removable drive bay.
- Pull the removable drive bay out.
- Unscrew 4 screws on the bottom cover, and remove the bottom cover.
- Unscrew 8 screws on the HDD bracket and remove the HDD bracket.
- Install the miniPCIe module and screw the 2 screws on the module (CN29) which is under the HDD bracket. (This module is connected to the internal SIM holder CN36 SIM1)
- Install the SIM card in the internal SIM holder (CN36 SIM1)
natural_image
Technical line drawing of an internal electronic device casing with visible circuit boards and connectors (no text or symbols)- Screw the 8 screws on HDD bracket
- Screw the 4 screws on the bottom cover
- Push back the removable drive bays, and screw the 2 screws on the front panel.
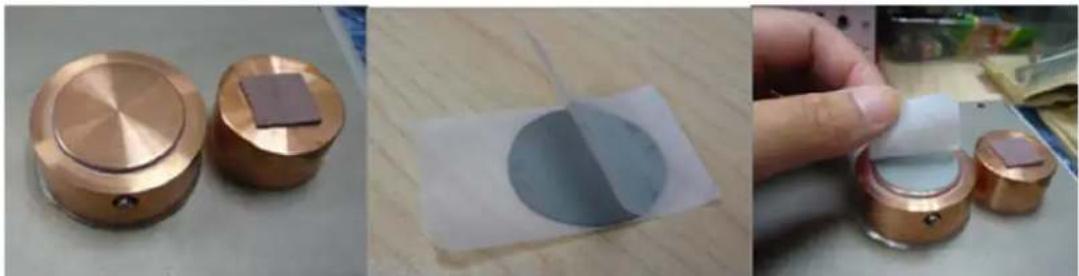
2.5.5 CPU thermal Grease Pad
CPU thermal grease pad is one of the key components of ARK-3510 thermal design. Always use the grease pad provided by Advantech. The P/N of the grease pad is:
Part Number Description
1990020828N001 Thermal-Pad D27*0.25 K=3 TP HW-PCM45Fφ27*0.25
To ensure the best thermal performance, it is recommended to replace the thermal grease for CPU thermal pole each time the top cover is opened.
- To replace the thermal grease, clean up the CPU thermal pole by using paper tissue or soft cloth. DO NOT USE any kind of solvent to clean the thermal pole as this may damage the thermal grease inside the thermal pole.
- Gently remove one of the protective papers on the grease pad and apply the grease to the CPU thermal pole. Press onto the grease pad for 30 seconds, then remove the protective paper gently from the grease pad.
natural_image
Three-panel image showing copper-colored circular components with a square patch, a close-up of a circular sample, and a hand holding a transparent object (no visible text or symbols)2.5.6 Memory thermal Pad
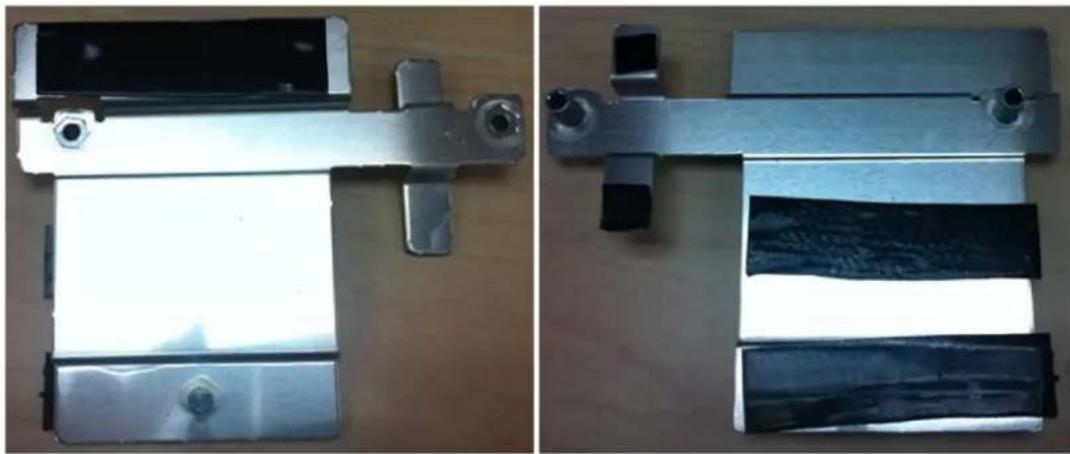
The memory thermal pad is one of the key components of ARK-3510's thermal design. Always use the thermal pad provided by Advantech. The P/N of the thermal pad is:
Part Number Description
1990018953T001 Thermal-Pad 59X16X1.0mm K=1.2 TP Fujipoly XR-HI
To ensure the best thermal performance, please always make sure the memory thermal pad is well taped between the memory bracket and memory module. And please make sure the memory thermal is well taped between the memory bracket and top cover as well.
And we suggest you to choose the I-grade memory module if you will use the unit in high temperature operating environments.
natural_image
Two views of a metallic mechanical bracket with black and white bands, mounted on a wooden surface (no text or symbols visible)2.5.7 Wide operating temperature support
To make sure the system works well, please ensure your peripherals are i-grade which can support wide temperature operation (<0C, or >40C).
Chapter 3
BIOS Settings
AMIBIOS has been integrated into many motherboards for over a decade. With the AMIBIOS Setup program, users can modify BIOS settings and control various system features. This chapter describes the basic navigation of the ARK-3510 BIOS setup screens.
![Aptio Setup Utility - Copyright (C) 2012 American Megatrends, Inc. Main Advanced Chipset Boot Security Save & Exit BIOS Information BIOS Vendor American Megatrends Core Version 4.6.5.3 0.24 x64 Compliance UEFI 2.3; PI 1.2 Project Version ARK HOOEX006 Build Date and Time 10/02/2013 15:18:10 Memory Information Total Memory 8192 MB (DDR3) System Date [Thu 10/03/2013] System Time [12:00:26] Access Level Administrator Set the Date. Use Tab to switch between Date elements. +: Select Screen +: Select Item Enter: Select +/-: Change Opt. F1: General Help F2: Previous Values F3: Optimized Defaults F4: Save & Exit ESC: Exit Version 2.15.1229, Copyright (C) 2012 American Megatrends, Inc.](/content/2026/05/961465/images/46f651770085936823903daf2b1dbbcba37a28cf93669114c274702374fe2037.jpg)
Figure 3.1 Setup program initial screen
AMI's BIOS ROM has a built-in Setup program that allows users to modify the basic system configuration. This information is stored in flash ROM so it retains the Setup information when the power is turned off.
3.1 Entering Setup
Turn on the computer and then press to enter Setup menu.
3.2 Main Setup
When users first enter the BIOS Setup Utility, users will enter the Main setup screen. Users can always return to the Main setup screen by selecting the Main tab. There are two Main Setup options. They are described in this section. The Main BIOS Setup screen is shown below.
![Aptio Setup Utility - Copyright (C) 2012 American Megatrends, Inc. Main Advanced Chipset Boot Security Save & Exit BIOS Information BIOS Vendor American Megatrends Core Version 4.6.5.3 0.24 x64 Compliancy UEFI 2.3: PI 1.2 Project Version ARK HOOEX006 Build Date and Time 10/02/2013 15:18:10 Memory Information Total Memory 8192 MB (DDR3) System Date [Thu 10/03/2013] System Time [12:00:28] Access Level Administrator Set the Date. Use Tab to switch between Date elements. +: Select Screen ↑↓: Select Item Enter: Select +/-: Change Opt. F1: General Help F2: Previous Values F3: Optimized Defaults F4: Save & Exit ESC: Exit Version 2.15.1229. Copyright (C) 2012 American Megatrends, Inc.](/content/2026/05/961465/images/de223d506d109859a16bfe79856d2418cbcff9076bf34c14a0867df16728e834.jpg)
Figure 3.2 Main setup screen
The Main BIOS setup screen has two main frames. The left frame displays all the options that can be configured. Grayed-out options cannot be configured; options in blue can. The right frame displays the key legend.
Above the key legend is an area reserved for a text message. When an option is selected in the left frame, it is highlighted in white. Often a text message will accompany it.
3.2.1 System time / System date
Use this option to change the system time and date. Highlight System Time or System Date using the
3.3 Advanced BIOS Features Setup
Select the Advanced tab from the ARK-3510 setup screen to enter the Advanced BIOS Setup screen. Users can select any item in the left frame of the screen, such as CPU Configuration, to go to the sub menu for that item. Users can display an Advanced BIOS Setup option by highlighting it using the
![Aptio Setup Utility - Copyright (C) 2012 American Megatrends, Inc. Main Advanced Chipset Boot Security Save & Exit Legacy OpROM Support Launch PXE OpROM policy [Do not launch] Launch Storage OpROM policy [Legacy only] ▶ ACPI Settings ▶ CPU Configuration ▶ SATA Configuration ▶ PCH-FM Configuration ▶ AMT Configuration ▶ USB Configuration ▶ SMART Settings ▶ Embedded Controller Configuration ▶ Super IO Configuration ▶ SCH3106 Second Super IO Configuration ▶ Platform Misc Configuration ▶ Serial Port Console Redirection ▶ CPU PPM Configuration Controls the execution of UEFI and Legacy PXE OpROM +: Select Screen ↑↓: Select Item Enter: Select +/-: Change Opt. F1: General Help F2: Previous Values F3: Optimized Defaults F4: Save & Exit ESC: Exit Version 2.15.1229, Copyright (C) 2012 American Megatrends, Inc.](/content/2026/05/961465/images/510b376aa9312e45f73bd6596ba07fc4bd6d9e545beef7e0a8ec583312c3f779.jpg)
Figure 3.3 Advanced BIOS features setup screen
3.3.1 ACPI Settings
![Aptio Setup Utility - Copyright (C) 2012 American Megatrends, Inc. Advanced ACPI Settings Enable ACPI Auto Configuration [Enabled] Enables or Disables BIOS ACPI Auto Configuration. +: Select Screen +: Select Item Enter: Select +/-: Change Opt. F1: General Help F2: Previous Values F3: Optimized Defaults F4: Save & Exit ESC: Exit Version 2.15.1229. Copyright (C) 2012 American Megatrends, Inc.](/content/2026/05/961465/images/756a1dc25d91cb4f6051b2e1507c3b50ca93f4ac244b0e4b60a65e8d9380985c.jpg)
Figure 3.4 ACPI Setting
Enable ACPI Auto Configuration
This item allows users to enable or disable BIOS ACPI auto configuration.
Enable Hibernation
This item allows users to enable or disable hibernation.
ACPI Sleep State
This item allows users to set the ACPI sleep state.
Lock Legacy Resources
This item allows users to lock legacy devices' resources.
S3 Video Repost
This item allows users to enable or disable VBIOS run after S3 resume.
3.3.2 CPU Configuration
![Optio Setup Utility - Copyright (C) 2012 American Megatrends, Inc. Advanced Intel(R) Core(TM) IS-3610ME CPU @ 2.70GHz CPU Signature 306a9 Microcode Patch 17 Max CPU Speed 2700 MHz Min CPU Speed 1200 MHz CPU Speed 2700 MHz Processor Cores 2 Intel HT Technology Supported Intel VT-x Technology Supported Intel SMX Technology Supported 64-bit Supported L1 Data Cache 32 kB x 2 L1 Code Cache 32 kB x 2 L2 Cache 256 kB x 2 L3 Cache 3072 kB Hyper-threading [Enabled] Active Processor Cores [All] Limit CPUID Maximum [Disabled] Execute Disable Bit [Enabled] Intel Virtualization Technology [Disabled] Hardware Prefetcher [Enabled] Adjacent Cache Line Prefetch [Enabled] Enabled for Windows XP and Linux (OS optimized for Hyper-Threading Technology) and Disabled for other OS (OS not optimized for Hyper-Threading Technology). When Disabled only one thread per enabled core is enabled. ++: Select Screen ↑↓: Select Item Enter: Select +/-: Change Opt. F1: General Help F2: Previous Values F3: Optimized Defaults F4: Save & Exit ESC: Exit Version 2.15.1229. Copyright (C) 2012 American Megatrends, Inc.](/content/2026/05/961465/images/3a548a48e25eed87aac17a61519da6fa356c0cb460d9eed7f7608d9e190fc448.jpg)
Figure 3.5 CPU Configuration
Hyper Threading Technology
This item allows users to enable or disable Intel® Hyper Threading technology.
Active Processor Cores
This item allows users to set how many processor cores should be active.
Limit CPUID Maximum
This item allows users to limit the maximum value of CPUID.
Execute Disable Bit
This item allows users to enable or disable the No-Execution page protection technology.
Intel Virtualization Technology
This item allows users to enable or disable the intel virtualization technology.
Hardware Prefetcher
This item allows users to enable or disable the hardware prefetcher feature.
Adjacent Cache Line Prefetch
This item allows users to enable or disable the adjacent cache line prefetch feature.
3.3.3 SATA Configuration
![Aptio Setup Utility - Copyright (C) 2012 American Megatrends, Inc. Advanced SATA Controller(s) [SATA Mode Selection] [Enabled] [IDE] Enable or disable SATA Device. Serial ATA Port 0 Empty Software Preserve Unknown Serial ATA Port 1 Empty Software Preserve Unknown Serial ATA Port 2 Empty Software Preserve Unknown Serial ATA Port 3 Empty Software Preserve Unknown Serial ATA Port 4 Empty Software Preserve Unknown +: Select Screen ↑↓: Select Item Enter: Select +/-: Change Opt. F1: General Help F2: Previous Values F3: Optimized Defaults F4: Save & Exit ESC: Exit Version 2.15.1229. Copyright (C) 2012 American Megatrends, Inc.](/content/2026/05/961465/images/0360b17e56a6793012deaad1095145119125f7a69263710e54823028669203cb.jpg)
Figure 3.6 SATA Configuration: IDE Mode (Default)
SATA Controller(s)
This item allows users to enable or disable the SATA controller(s).
SATA Mode Selection
This item allows users to select mode of SATA controller(s).
![Aptio Setup Utility - Copyright (C) 2012 American Megatrends, Inc. Advanced SATA Controller(s) [SATA Mode Selection Aggressive LPM Support SATA Controller Speed Serial ATA Port 0 Software Preserve Port 0 Hot Plug External SATA SATA Device Type Spin Up Device Serial ATA Port 1 Software Preserve Port 1 Hot Plug External SATA SATA Device Type Spin Up Device Serial ATA Port 2 Software Preserve Port 2 Hot Plug External SATA Spin Up Device [Enabled] [AMCI] [Enabled] [Gen3] Empty Unknown [Enabled] [Disabled] [Disabled] [Hard Disk Driver] [Disabled] SQF-S25S4-16G- (16.0GB) SUPPORTED [Enabled] [Disabled] [Disabled] [Hard Disk Driver] [Disabled] Empty Unknown [Enabled] [Disabled] [Disabled] [Determines how SATA controller(s) operate. +: Select Screen T#: Select Item Enter: Select +/-: Change Opt. F1: General Help F2: Previous Values F3: Optimized Defaults F4: Save & Exit ESC: Exit Version 2.15.1229. Copyright (C) 2012 American Megatrends, Inc.](/content/2026/05/961465/images/b64fb5c4fcc12e8a1d505aec31ad12ac8a0f3c2616cfbb3ac574a2b62c054887.jpg)
Figure 3.7 SATA Configuration: AHCI Mode
![Aptio Setup Utility - Copyright (C) 2012 American Megatrends, Inc. Advanced SATA Controller(s) SATA Mode Selection Aggressive LPH Support SATA Controller Speed Alternate ID Serial ATA Port 0 Software Preserve Port 0 Hot Plug External SATA SATA Device Type Spin Up Device Serial ATA Port 1 Software Preserve Port 1 Hot Plug External SATA SATA Device Type Spin Up Device Serial ATA Port 2 Software Preserve Port 2 Hot Plug External SATA [Enabled] [RAID] [Enabled] [Gen3] [Disabled] Empty Unknown [Enabled] [Disabled] [Disabled] [Hard Disk Driver] [Disabled] SQF-S2554-16G- (16.0GB) SUPPORTED [Enabled] [Disabled] [Disabled] [Hard Disk Driver] [Disabled] Empty Unknown [Enabled] [Disabled] [Disabled] Determines how SATA controller(s) operate. +: Select Screen +: Select Item Enter: Select +/-: Change Opt. F1: General Help F2: Previous Values F3: Optimized Defaults F4: Save & Exit ESC: Exit Version 2.15.1229, Copyright (C) 2012 American Megatrends, Inc.](/content/2026/05/961465/images/da00cac016b16e9a4243ea8028f336b7a8dc9f8c156811915085ab8c35dd5b70.jpg)
Figure 3.8 SATA Configuration: RAID Mode
RAID Mode Selection
This item allows users to select mode of RAID function (Support 0, 1, 5, 10).
3.3.4 PCH-FW Configuration
![Aptio Setup Utility - Copyright (C) 2012 American Megatrends, Inc. Advanced ME FW Version 8.0.13.1502 ME Firmware Mode Normal Mode ME Firmware Type Full Sku Firmware ME Firmware SKU SMB MDES BIOS Status Code [Disabled] ► Firmware Update Configuration Enable/Disable MDES BIOS Status Code. ++: Select Screen T1: Select Item Enter: Select +/-: Change Opt. F1: General Help F2: Previous Values F3: Optimized Defaults F4: Save & Exit ESC: Exit Version 2.15.1229. Copyright (C) 2012 American Megatrends, Inc.](/content/2026/05/961465/images/9b21c437596a4fded07f73dff5e494267b1e9bcfdb4a9caf6029b255418d86b5.jpg)
Figure 3.9 PCH-FW Configuration
MDES BIOS Status Code
This item allows users to enable or disable MDES BIOS Status Code function.
Firmware Update Configuration
This item allows users to enable or disable ME FW image re-flash function.
3.3.5 AMT Configuration
| Intel AMT [Enabled] BIOS Hotkey Pressed [Disabled] MEBx Selection Screen [Disabled] Hide Un-Configure ME Confirmation [Disabled] MEBx Debug Message Output [Disabled] Un-Configure ME [Disabled] Amt Wait Timer 0 Disable ME [Disabled] ASF [Enabled] Activate Remote Assistance Process [Disabled] USB Configure [Enabled] PET Progress [Enabled] AMT CIRA Timeout 0 WatchDog [Disabled] OS Timer 0 BIOS Timer 0 | Enable/Disable Intel (R) Active Management Technology BIOS Extension. Note: iAMT H/H is always enabled. This option just controls the BIOS extension execution. If enabled, this requires additional firmware in the SPI device |
| +: Select Screen +/-: Select Item Enter: Select +/-: Change Opt. F1: General Help F2: Previous Values F3: Optimized Defaults F4: Save & Exit ESC: Exit | |
| Version 2.15.1229. Copyright (C) 2012 American Megatrends, Inc. | |
Figure 3.10 AMT Configuration
Intel AMT
This item allows users to enable or disable Intel AMT BIOS extension.
BIOS Hotkey Pressed
This item allows users to enable or disable BIOS hotkey press.
MEBx Selection Screen
This item allows users to enable or disable MEBx selection screen.
Hide Un-Configuration ME Confirmation
This item allows users to hide un-configure ME without password confirmation prompt.
MEBx Debug Message Output
This item allows users to enable or disable MEBx debug message.
Un-Configure ME
This item allows users to un-configure ME without password.
Amt Wait Timer
Set timer to wait before sending ASF_GET_BOOT_OPTIONS.
Disable ME
This item allows users to enable or disable Intel ME.
ASF
This item allows users to enable or disable Alert Specification Format.
Activate Remote Assistance Process
This item allows users to enable or disable trigger CIRA boot.
USB Configure
This item allows users to enable or disable USB configure function.
PET Progress
This item allows users to enable or disable PET events progress to receive PET events or not.
AMT CIRA Timeout
OEM defined timeout for MPS connection to be established.
WatchDog
This item allows users to enable or disable WatchDog Timer.
OS Timer
Set OS watchdog timer.
BIOS Timer
Set BIOS watchdog timer.
3.3.6 USB Configuration
![Aptio Setup Utility - Copyright (C) 2012 American Megatrends, Inc. Advanced USB Configuration USB Devices: 2 Keyboards, 2 Hubs Legacy USB Support [Enabled] USB3.0 Support [Enabled] XHCI Hand-off [Enabled] EHCI Hand-off [Disabled] USB hardware delays and time-outs: USB transfer time-out [20 sec] Device reset time-out [20 sec] Device power-up delay [Auto] Enables Legacy USB support. AUTO option disables legacy support if no USB devices are connected. DISABLE option will keep USB devices available only for EFI applications. +: Select Screen +/-: Select Item Enter: Select +/-: Change Opt. F1: General Help F2: Previous Values F3: Optimized Defaults F4: Save & Exit ESC: Exit Version 2.15.1229. Copyright (C) 2012 American Megatrends, Inc.](/content/2026/05/961465/images/747dfc18bd6c9207bcf4f8d277aab14ca32bf32384e14698027ab9835faec22c.jpg)
Figure 3.11 USB Configuration
Legacy USB Support
Enable the support for legacy USB. Auto option disables legacy support if no USB devices are connected.
USB3.0 Support
This item allows users to enable or disable USB3.0 support.
XHCI Hand-Off
This is a workaround for the OS without XHCI hand-off support. The XHCI ownership change should claim by XHCI driver.
EHCI Hand-Off
This is a workaround for the OS without EHCl hand-off support. The EHCl ownership change should claim by EHCl driver.
USB transfer time-out
Set the time-out value for Control, Bulk, and Interrupt transfers.
Device reset time-out
Set USB mass storage device Start Unit command time-out value.
Device power-up delay
Set the maximum time of the device will take before it properly reports itself to the Host Controller. 'Auto' uses default value: for a Root port it is 100 ms, for a Hub port the delay is taken from Hub descriptor.
2.0 Flash Disk 5.00
This is a Mass storage device emulation type.
3.3.7 SMART Settings
![Aptio Setup Utility - Copyright (C) 2012 American Megatrends, Inc. Advanced SMART Settings SMART Self Test [Disabled] Run SMART Self Test on all HDDs during POST. +: Select Screen ↑↓: Select Item Enter: Select +/-: Change Opt. F1: General Help F2: Previous Values F3: Optimized Defaults F4: Save & Exit ESC: Exit Version 2.15.1229. Copyright (C) 2012 American Megatrends, Inc.](/content/2026/05/961465/images/416e658c1b60c2e5793a4922251e557fc023667baa555777c9f4ac541a37ba23.jpg)
Figure 3.12 SMART Settings
SMART Self Test
This item allows users to enable or disable SMART Self Test.
3.3.8 IT8760 Super IO Configuration
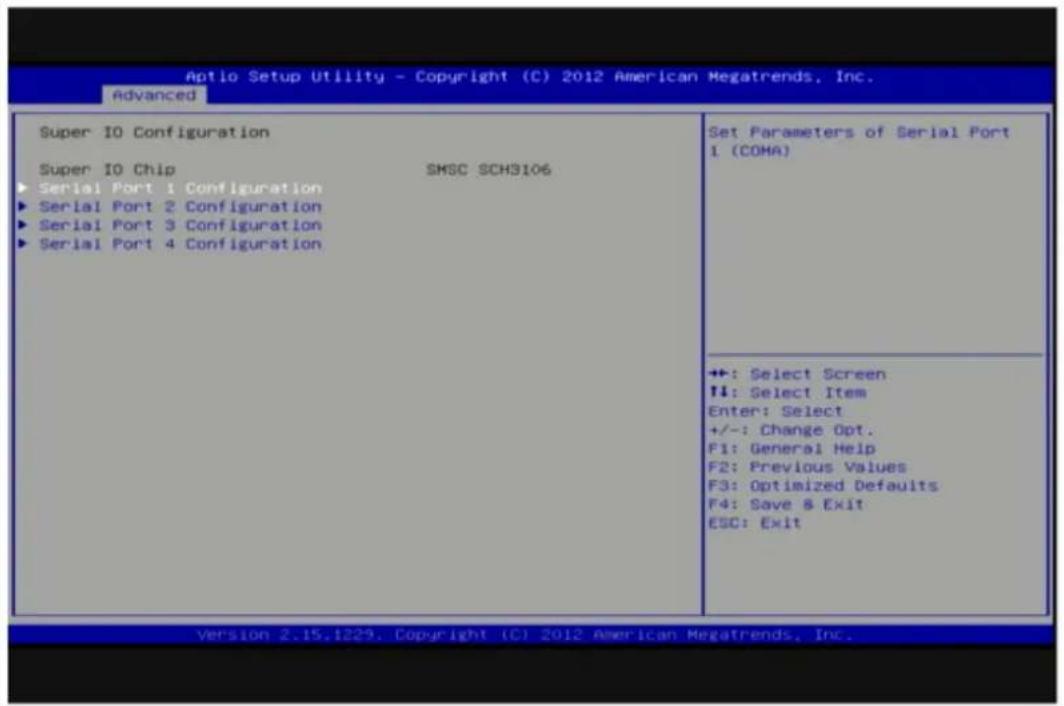
Figure 3.13 Super IO Configuration
3.3.8.1 Serial Port 1 Configuration
Serial Port
This item allows users to enable or disable COM1.
Change Settings
This item allows users to select super I/O device.
3.3.8.2 Serial Port 2 Configuration
Serial Port
This item allows users to enable or disable COM2.
Change Settings
This item allows users to select super I/O device.
3.3.8.3 Serial Port 3 Configuration
Serial Port
This item allows users to enable or disable COM3.
Change Settings
This item allows users to select super I/O device.
Device Mode
This item allows users to select Serial Port mode.
Serial interface
This item allows users to select RS-232/422/485. Default by RS-232.
3.3.8.4 Serial Port 4 Configuration
Serial Port
This item allows users to enable or disable COM4.
Change Settings
This item allows users to select super I/O device
Device Mode
This item allows users to select Serial Port mode.
Serial interface
This item allows users to select RS-232/422/485. Default by RS-232.
3.3.9 Platform Misc Configuration
![Aptio Setup Utility - Copyright (C) 2012 American Megatrends, Inc. Advanced Native PCIE Enable [Disabled] PCI Express Native Support Enable/Disable. This feature is only available in Vista. ++: Select Screen ↑↓: Select Item Enter: Select +/-: Change Opt. F1: General Help F2: Previous Values F3: Optimized Defaults F4: Save & Exit ESC: Exit Version 2.15.1229, Copyright (C) 2012 American Megatrends, Inc.](/content/2026/05/961465/images/a1d88f682124f8e3a02b51df3e09740e0292bcc7d5364f3bfbe28de6e2140261.jpg)
Figure 3.14 Platform Misc Configuration
Native PCIE Enable
This item allows users to enable or disable native PCIE support feature.
3.3.10 Embedded Controller Configuration
![Aptio Setup Utility - Copyright (C) 2012 American Megatrends, Inc. Advanced EC Firmware Version I1864X0004 EC iManager HatchDog IRQ [IRQ?] EC Power Saving Mode [Normal] EC Hardware Monitor CPU Temperature : +47°C/ +116°F VBAT : +2.284 V +VSSB : +5.102 V +Vin : N/A Vcore : +1.102 V Current : +1.231 A EC iManager Smart FAN [Enabled] Backlight Enable Polarity [DC mode] EC Watch Dog Function [Disable] USB SUS Power Support [Enabled] Select Irq Number eBrain WatchDog +: Select Screen ↑: Select Item Enter: Select +/-: Change Opt. F1: General Help F2: Previous Values F3: Optimized Defaults F4: Save & Exit ESC: Exit Version 2.15.1229, Copyright (C) 2012 American Megatrends, Inc.](/content/2026/05/961465/images/2be1135e7a24a88f590379a9d55b7664747c8f579e06201cb6a41667b457dad2.jpg)
Figure 3.15 Embedded Controller Configuration
Power Saving Mode
This item allows users to select ITE8518 power saving mode.
H/W Monitor
This item is show CPU temperature and VBAT / +5V / +12V / +Vcore voltage information.
Backlight Enable Polarity
This item allows users to set backlight Function.
EC Watch Dog Function
This item allows users to set EC Watch Dog Function.
USB SUS Power Support
This item allows users to set the standby power for USB5, USB6 under SUS mode.
3.3.11 Serial Port Console Redirection
![Aptio Setup Utility - Copyright (C) 2012 American Megatrends, Inc. Advanced COM1 Console Redirection [Disabled] Console Redirection Settings COM2 Console Redirection [Disabled] Console Redirection Settings COM3 Console Redirection [Disabled] Console Redirection Settings COM4 Console Redirection [Disabled] Console Redirection Settings COM5 Console Redirection [Disabled] Console Redirection Settings COM6 Console Redirection [Disabled] Console Redirection Settings Console Redirection Enable or Disable. +: Select Screen ↑: Select Item Enter: Select +/-: Change Opt. F1: General Help F2: Previous Values F3: Optimized Defaults F4: Save & Exit ESC: Exit Version 2.15.1229, Copyright (C) 2012 American Megatrends, Inc.](/content/2026/05/961465/images/ca459f40b10d38a690bf03ae2a606f3cb19cd065908df219546bf4a867203f76.jpg)
Figure 3.16 Serial Port Console Redirection
Console Redirection
This item allows users to enable or disable console redirection for Microsoft Windows Emergency Management Services (EMS).
Console Redirection
This item allows users to configuration console redirection detail settings.
3.3.12 CPU PPM Configuration
![Aptio Setup Utility - Copyright (C) 2012 American Megatrends, Inc. Advanced CPU PPM Configuration EIST [Enabled] CPU C3 Report [Enabled] CPU C6 report [Enabled] CPU C7 report [Enabled] Config TDP LOCK [Disabled] ACPI T State [Disabled] Enable/Disable Intel SpeedStep +: Select Screen ↑↓: Select Item Enter: Select +/-: Change Opt. F1: General Help F2: Previous Values F3: Optimized Defaults F4: Save & Exit ESC: Exit Version 2.15.1229, Copyright (C) 2012 American Megatrends, Inc.](/content/2026/05/961465/images/08a7fc0ce7f95dc2799bb7fb09971435d1a940716fdd5d56de308473f7d65a45.jpg)
Figure 3.17 CPU PPM Configuration
EIST
CPU runs at its default speed if disabled; CPU speed is controlled by the operating system if enabled.
CPU C3/C6/C7 Report
This item allows users to enable or disable CPU C-state support.
Config TDP LOCK
This item allows users to enable or disable Config TDP LOCK.
ACPI T State
This item allows users to enable or disable ACPI T State.
3.4 Chipset
Select the Chipset tab from the ARK-3510 setup screen to enter the Chipset BIOS Setup screen. You can display a Chipset BIOS Setup option by highlighting it using the
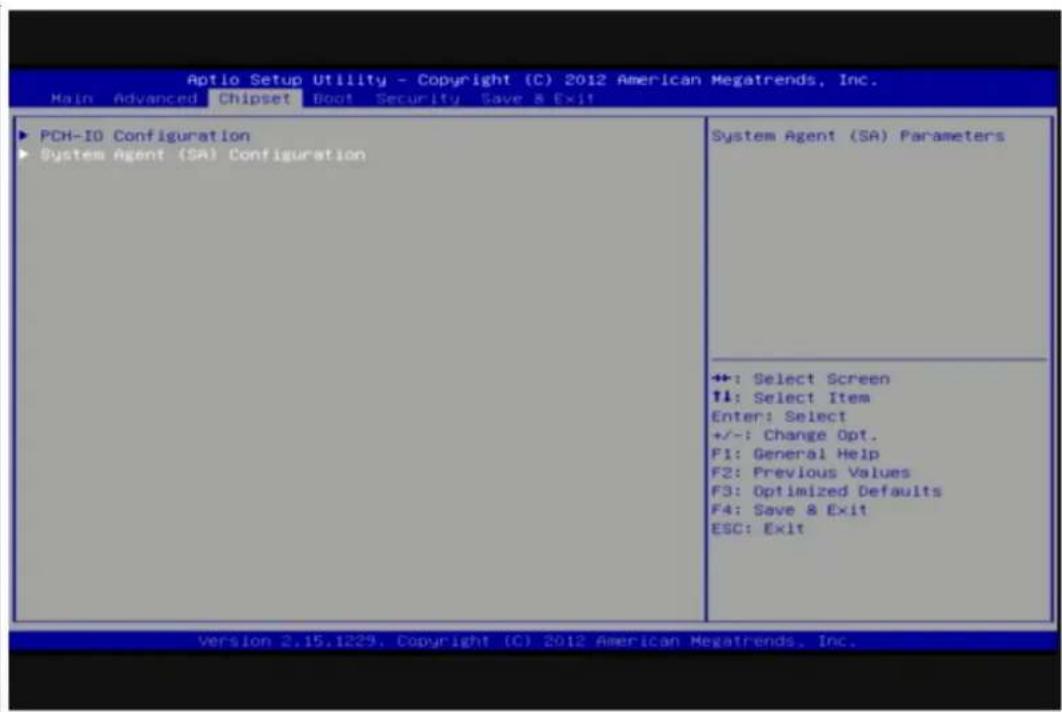
Figure 3.18 Chipset Setup
3.4.1 PCH-IO Configuration
![Aptio Setup Utility - Copyright (C) 2012 American Megatrends, Inc. Chipset Intel PCH RC Version 1.7.0.0 Intel PCH SKU Name QM77 Intel PCH Rev ID 04/C1 PCI Express Configuration USB Configuration PCH Azalia Configuration LAN1 Control [Enabled] Wake on LAN [Enabled] LAN2 Control [Enabled] PCIE WAKE from SS [Enabled] High Precision Event Timer Configuration High Precision Timer [Enabled] SLP_S4 Assertion Width [4-5 Seconds] Restore AC Power Loss [Power Off] PCI Express Configuration settings ++: Select Screen ↑↓: Select Item Enter: Select +/-: Change Opt. F1: General Help F2: Previous Values F3: Optimized Defaults F4: Save & Exit ESC: Exit Version 2.15.1229. Copyright (C) 2012 American Megatrends, Inc.](/content/2026/05/961465/images/1a300bc523028ec355160264db11ccc444b4249d9acd01bf79f22bd30587d4bc.jpg)
Figure 3.19 PCH-IO Configuration
PCI Express Configuration
This item allows users to configuration PCIE1\~PCIE8 root port detail settings.
USB Configuration
This item allows users to configuration detail of USB functions.
PCH Azalia Configuration
This item allows users to configuration detail of azalia functions.
PCH LAN controller
Enables or disables the PCH LAN controller.
PCIE Wake from S5
PCIE wake Enables or disables from S5 state.
High Precision Timer
Enables or disables the high precision timer.
SLP\_S4 Assertion Width
This item allows users to set a delay of sorts.
Restore AC Power Loss
This item allows users to select off, on and last state.
3.4.2 System Agent (SA) Configuration
![Aptio Setup Utility - Copyright (C) 2012 American Megatrends, Inc. Chipset System Agent Bridge Name IvyBridge System Agent RC Version 1.7.0.0 VT-d Capability Supported VT-d [Enabled] DOR Selection [Auto] ▶ Graphics Configuration Check to enable VT-d function on MCH. ++: Select Screen ↑↓: Select Item Enter: Select +/-: Change Opt. F1: General Help F2: Previous Values F3: Optimized Defaults F4: Save & Exit ESC: Exit Version 2.15.1229. Copyright (C) 2012 American Megatrends, Inc.](/content/2026/05/961465/images/2f95c846d4a3c4ac52fd76371fd94d430b96aa14ec88961e7866e5b308d28935.jpg)
Figure 3.20 System Agent (SA) Configuration
3.4.2.1 Intel IGFX Configuration
![Aptio Setup Utility - Copyright (C) 2012 American Megatrends, Inc. Chipset Graphics Configuration IGFX VBIOS Version 2132 IGfx Frequency 350 MHz GTT Size [2MB] Aperture Size [256MB] DVMT Pre-Allocated [64M] DVMT Total Gfx Mem [256M] Gfx Low Power Mode [Enabled] Graphics Performance Analyzers [Disabled] LCD Control LCD Control +: Select Screen ↑: Select Item Enter: Select +/-: Change Opt. F1: General Help F2: Previous Values F3: Optimized Defaults F4: Save & Exit ESC: Exit Version 2.15.1229, Copyright (C) 2012 American Megatrends, Inc.](/content/2026/05/961465/images/6c800984c88ad49f9afead3031cfa1f70db02e6c24c0706154523d92d6fa8ae7.jpg)
Figure 3.21 Intel IGFX Configuration
GTT Size
This item allows users to select GTT size.
Aperture Size
This item allows users to select aperture size.
DVMT Pre-Allocated
This item allows users to select DVMT pre-allocated memory size.
DVMT Total Gfx Mem
This item allows users to select DVMT total memory size.
Gfx Low Power Mode
This item allows users to enable or disable IGD low power mode.
Graphics Performance Analyzers
This item allows users to enable or disable Graphics Performance Analyzers
![Optio Setup Utility - Copyright (C) 2012 American Megatrends, Inc. Chipset LCD Control Primary IGFX Boot Display [DP] Secondary IGFX Boot Display [HDMI] Activate DP [DP on Port-A] Activate DP — No DP DP on Port-A Select the Active DP Configuration. No DP:VBIOS does not enable DP. DP Port:DP Driven by Int-DisplayPort encoder from Port-A. +: Select Screen ↓: Select Item Enter: Select +/-: Change Opt. F1: General Help F2: Previous Values F3: Optimized Defaults F4: Save & Exit ESC: Exit Version 2.15.1229. Copyright (C) 2012 American Megatrends, Inc.](/content/2026/05/961465/images/cbc8d9a57412ccafb8942582b042bfdef11a30d2b30193ee48e10c7b255f5384.jpg)
Figure 3.22 LCD Control
Primary IGFX Boot Display
Select boot display device at post stage.
Secondary IGFX Boot Display
Select boot display device at post stage.
Active DP
Select DP display device at post stage.
3.5 Boot Settings
![Aptio Setup Utility - Copyright (C) 2012 American Megatrends, Inc. Main Advanced Chipset Boot Security Save & Exit Boot Configuration Setup Prompt Timeout ! Bootup NumLock State [On] Quiet Boot [Disabled] CSM16 Module Version 07.68 Option ROM Messages [Force BIDS] INT19 Trap Response [Immediate] Boot Option Priorities Number of seconds to wait for setup activation key. 6553S(0xFFFF) means indefinite waiting. +: Select Screen ↑↓: Select Item Enter: Select +/-: Change Opt. F1: General Help F2: Previous Values F3: Optimized Defaults F4: Save & Exit ESC: Exit Version 2.15.1229. Copyright (C) 2012 American Megatrends, Inc.](/content/2026/05/961465/images/7d6337e21ebf63ba3cdedc6e00ff7795101e1fc9ac677a65752d9de278ee098f.jpg)
Figure 3.23 Boot Setup Utility
Setup Prompt Timeout
This item allows users to select the number of seconds to wait for setup activation key.
Bootup NumLock State
Select the Power-on state for Numlock.
Quiet Boot
If this option is set to Disabled, the BIOS displays normal POST messages. If Enabled, an OEM Logo is shown instead of POST messages.
Option ROM Message
Set display mode for option ROM.
INT19 Trap Response
This item allows option ROMs to trap interrupt 19.
3.6 Security Setup
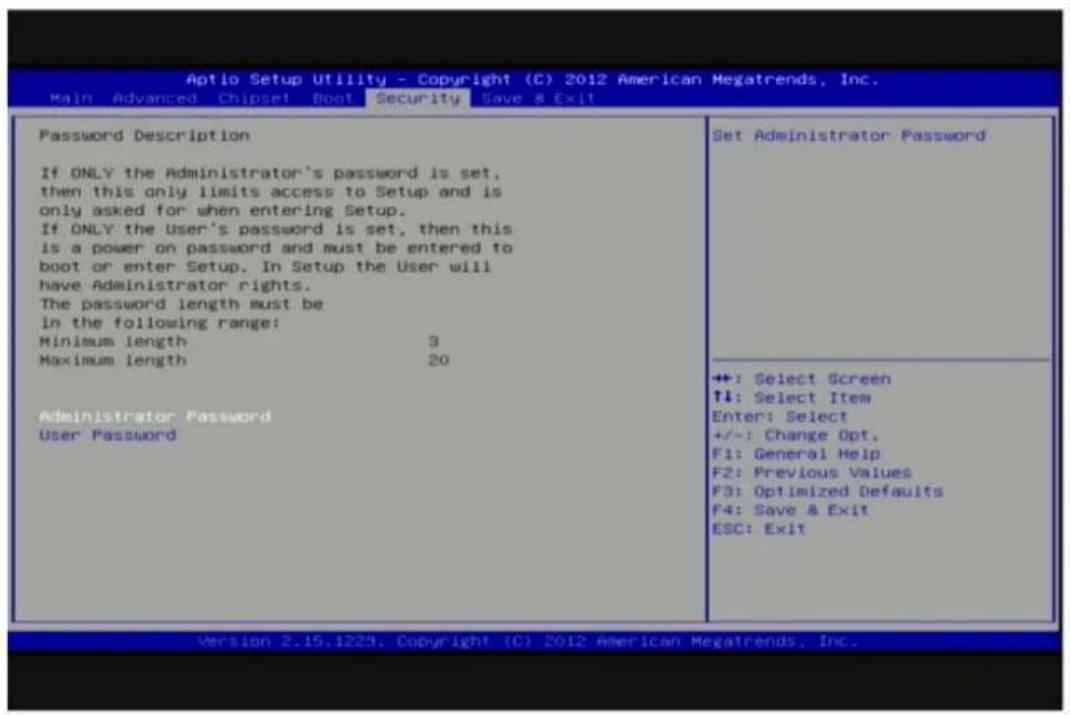
Figure 3.24 Password Configuration
Select Security Setup from the ARK-3510 Setup main BIOS setup menu. All Security Setup options, such as password protection is described in this section. To access the sub menu for the following items, select the item and press
Change Administrator / User Password: Select this option and press
3.7 Save & Exit
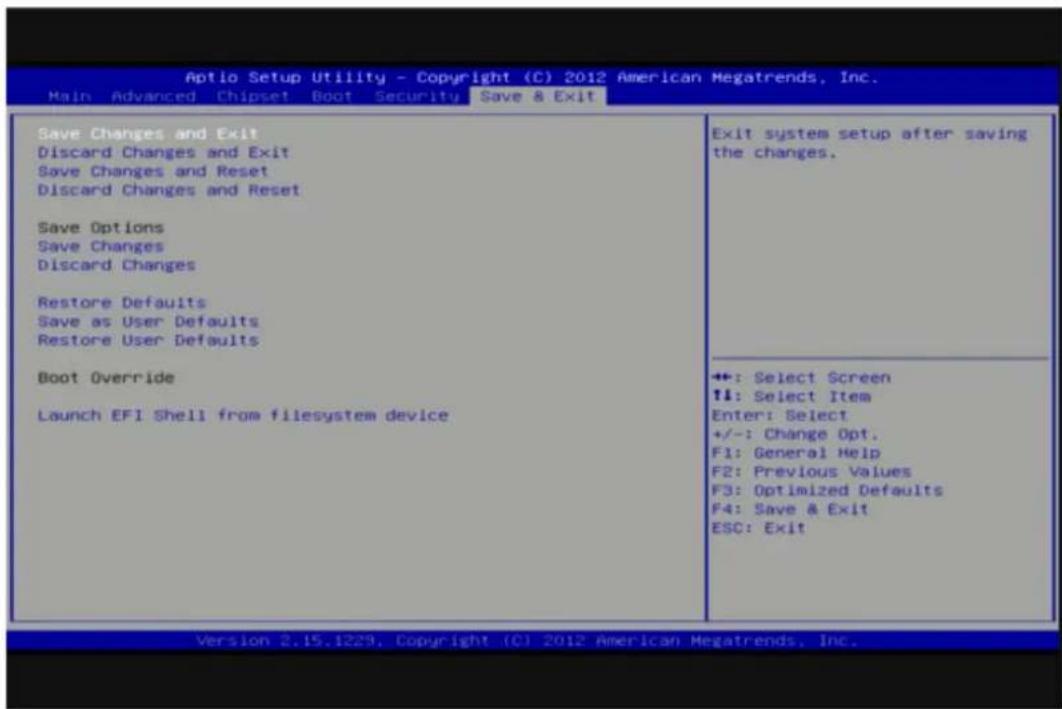
Figure 3.25 Save & Exit
Save Changes and Exit
When users have completed system configuration, select this option to save changes, exit BIOS setup menu and reboot the computer if necessary to take effect all system configuration parameters.
Discard Changes and Exit
Select this option to quit Setup without making any permanent changes to the system configuration.
Save Changes and Reset
When users have completed system configuration, select this option to save changes, exit BIOS setup menu and reboot the computer to take effect all system configuration parameters.
Discard Changes and Reset
Select this option to quit Setup without making any permanent changes to the system configuration and reboot the computer.
Save Changes
When users have completed system configuration, select this option to save changes without exit BIOS setup menu.
Discard Changes
Select this option to discard any current changes and load previous system configuration.
Restore Defaults
The ARK-3510 automatically configures all setup items to optimal settings when users select this option. Optimal Defaults are designed for maximum system performance, but may not work best for all computer applications. In particular, do not use the Optimal Defaults if the user's computer is experiencing system configuration problems.
Save User Defaults
When users have completed system configuration, select this option to save changes as user defaults without exit BIOS setup menu.
The users can select this option to restore user defaults.
Appendix A
Watchdog Timer Sample Code
A.1 EC Watchdog Timer sample code
EC_Command_Port = 0x29Ah
EC_Data_Port = 0x299h
Write EC HW ram = 0x89
Watch dog event flag = 0x57
Watchdog reset delay time = 0x5E
Reset event = 0x04
Start WDT function = 0x28
.model small
.486p
.stack 256
.data
.code
org 100h
.STARTup
mov dx, EC_Command_Port
mov al,89h ; Write EC HW ram.
out dx, al
mov dx, EC_Command_Port
mov al, 5Fh ; Watchdog reset delay time low byte (5Eh is high byte) index.
out dx, al
mov dx, EC_Data_Port
mov al, 30h ;Set 3 seconds delay time.
out dx, al
mov dx, EC_Command_Port
mov al,89h ; Write EC HW ram.
out dx, al
mov dx, EC_Command_Port
mov al, 57h ; Watch dog event flag.
out dx, al
mov dx, EC_Data_Port
mov al, 04h ; Reset event.
out dx, al
mov dx, EC_Command_Port
mov al,28h ; start WDT function.
out dx, al
.exit
END
ADVANTECH
Enabling an Intelligent Planet
www.advantech.com
Please verify specifications before quoting. This guide is intended for reference purposes only.
All product specifications are subject to change without notice.
No part of this publication may be reproduced in any form or by any means, electronic, photocopying, recording or otherwise, without prior written permission of the publisher.
All brand and product names are trademarks or registered trademarks of their respective companies.
© Advantech Co., Ltd. 2013
- ARK-3510
- Fanless Embedded Box PC
- Attention!
- Copyright
- Acknowledgements
- Product Warranty (2 years)
- Declaration of Conformity
- FCC Class A
- Technical Support and Assistance
- Warnings, Cautions and Notes
- Packing List
- Ordering Information
- Optional Accessories
- Safety Instructions
- Contents
- Chapter 1 General Introduction ......1
- Chapter 2 Hardware Configuration......9
- Chapter 3 BIOS Settings....29
- Appendix A Watchdog Timer Sample Code......53
- Chapter 1
- General Introduction
- Introduction
- Multi-functional Design
- Flexible Design
- Built in Intelligent Management Tools - Advantech iManager & SUSIAccess
- Product Features
- General
- Display
- Ethernet
- Chipset
- Functional Specification
- Processor
- Chipset
- Others
- iManager
- Mechanical Specifications
- Dimensions
- Weight
- Power Requirement
- System Power
- RTC Battery
- Environment Specification
- Operating Temperature
- Relative Humidity
- Storage Temperature
- Vibration during Operation
- Shock during Operation
- Safety
- EMC
- Chapter 2
- Introduction
- Jumpers
- Jumper Description
- Jumper List
- Jumper Location
- Jumper Setting
- DDR3/DDR3L setting (J1)
- Auto Power On Setting (J2)
- COM4 RS232/422/485 setting (J3)
- COM3 RS232/422/485 setting (J4)
- COM4 RS232/422/485 setting (J5)
- COM3 RS232/422/485 setting (J6)
- COM4 RS232/422/485 setting (J7)
- COM3 RS232/422/485 setting (J8)
- Clear CMOS (J9)
- Switch
- Switch List
- COM4 RS485 Termination PU/PD
- COM3 RS485 Termination PU/PD
- PCIE/mSATA Selection
- PCIE/mSATA Selection
- Connectors
- ARK-3510 External I/O Location
- ARK-3510 Front I/O connectors
- Audio Connector
- USB2.0 Connector
- COM Connector
- ARK-3510 Rear I/O connectors
- Power On/Off Button
- Reset Button
- LED Indicators
- DisplayPort Connector
- Digital Visual Interface Connector (DVI-I)
- HDMI Connector
- USB3.0 Connector
- Ethernet Connector (LAN)
- Installation
- CPU / Memory Installation
- CFast / SIM Installation
- HDD/SSD Installation
- MiniPCIe module / Internal SIM holder Installation
- CPU thermal Grease Pad
- Part Number Description
- Memory thermal Pad
- Wide operating temperature support
- Chapter 3
- Entering Setup
- Main Setup
- System time / System date
- Advanced BIOS Features Setup
- ACPI Settings
- Enable ACPI Auto Configuration
- Enable Hibernation
- ACPI Sleep State
- Lock Legacy Resources
- S3 Video Repost
- CPU Configuration
- Hyper Threading Technology
- Active Processor Cores
- Limit CPUID Maximum
- Execute Disable Bit
- Intel Virtualization Technology
- Hardware Prefetcher
- Adjacent Cache Line Prefetch
- SATA Configuration
- SATA Controller(s)
- SATA Mode Selection
- RAID Mode Selection
- PCH-FW Configuration
- MDES BIOS Status Code
- Firmware Update Configuration
- AMT Configuration
- Intel AMT
- BIOS Hotkey Pressed
- MEBx Selection Screen
- Hide Un-Configuration ME Confirmation
- MEBx Debug Message Output
- Un-Configure ME
- Amt Wait Timer
- Disable ME
- ASF
- Activate Remote Assistance Process
- USB Configure
- PET Progress
- AMT CIRA Timeout
- WatchDog
- OS Timer
- BIOS Timer
- USB Configuration
- Legacy USB Support
- USB3.0 Support
- XHCI Hand-Off
- EHCI Hand-Off
- USB transfer time-out
- Device reset time-out
- Device power-up delay
- Flash Disk 5.00
- SMART Settings
- SMART Self Test
- IT8760 Super IO Configuration
- Serial Port 1 Configuration
- Serial Port
- Change Settings
- Serial Port 2 Configuration
- Serial Port 3 Configuration
- Device Mode
- Serial interface
- Serial Port 4 Configuration
- Platform Misc Configuration
- Native PCIE Enable
- Embedded Controller Configuration
- Power Saving Mode
- H/W Monitor
- Backlight Enable Polarity
- EC Watch Dog Function
- USB SUS Power Support
- Serial Port Console Redirection
- Console Redirection
- CPU PPM Configuration
- EIST
- CPU C3/C6/C7 Report
- Config TDP LOCK
- ACPI T State
- Chipset
- PCH-IO Configuration
- PCI Express Configuration
- USB Configuration
- PCH Azalia Configuration
- PCH LAN controller
- PCIE Wake from S5
- High Precision Timer
- SLP\_S4 Assertion Width
- Restore AC Power Loss
- System Agent (SA) Configuration
- Intel IGFX Configuration
- GTT Size
- Aperture Size
- DVMT Pre-Allocated
- DVMT Total Gfx Mem
- Gfx Low Power Mode
- Graphics Performance Analyzers
- Primary IGFX Boot Display
- Secondary IGFX Boot Display
- Active DP
- Boot Settings
- Setup Prompt Timeout
- Bootup NumLock State
- Quiet Boot
- Option ROM Message
- INT19 Trap Response
- Security Setup
- Save & Exit
- Save Changes and Exit
- Discard Changes and Exit
- Save Changes and Reset
- Discard Changes and Reset
- Save Changes
- Discard Changes
- Restore Defaults
- Save User Defaults
- Appendix A
- A.1 EC Watchdog Timer sample code
- ADVANTECH
- www.advantech.com
Brand : Advantech
Model : ARK-3510
Category : Desktop computer