
S3031A - Soundbar Cello - Free user manual and instructions
Find the device manual for free S3031A Cello in PDF.


| Product Type | Soundbar |
| Brand | Cello |
| Model | S3031A |
| Dimensions (W x H x D) | Approx. 90 x 6 x 8 cm |
| Weight | Approx. 2.5 kg |
| Power Consumption | 30 W |
| Standby Power Consumption | < 1 W |
| Audio Channels | 2.0 |
| Total Output Power | 40 W |
| Speaker Drivers | 2 x full-range drivers |
| Frequency Response | 80 Hz - 20 kHz |
| Impedance | 4 Ω |
| Connectivity | Bluetooth 5.0, Optical, AUX, USB |
| Bluetooth Range | 10 m |
| Input Voltage | 100-240 V AC, 50/60 Hz |
| Wall Mountable | Yes (brackets included) |
| Remote Control | Included (battery type: CR2032) |
| Standby Mode | Automatic after 10 minutes of inactivity |
| Cleaning Instructions | Wipe with a dry, soft cloth. Do not use solvents. |
| Safety Features | Overheat protection, short circuit protection |
| Repairability | Spare parts available from Cello authorized service centers |
Frequently Asked Questions - S3031A Cello
User questions about S3031A Cello
0 question about this device. Answer the ones you know or ask your own.
Ask a new question about this device
Download the instructions for your Soundbar in PDF format for free! Find your manual S3031A - Cello and take your electronic device back in hand. On this page are published all the documents necessary for the use of your device. S3031A by Cello.
USER MANUAL S3031A Cello
IMPORTANT SAFETY INSTRUCTIONS....3
PRECAUTIONS 4
Functions & Controls......4
Whats inside the box : 4
Overview of controls - Unit 5
Overview of controls - Remote control....6
User Instructions....6
Connections 6
Getting started 7
General operation....8
Adjusting the sound 8
Play audio through Bluetooth....8
Adjusting the display brightness 9
Wall mounting the Sound bar....9
Care & Maintenance ....10
Troubleshooting....11
SPECIFICATIONS....11
IMPORTANT SAFETY INSTRUCTIONS
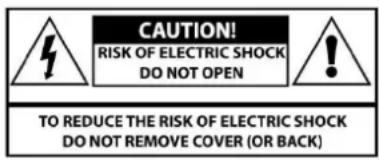

This symbol indicates that there are important operating and maintenance instructions in the literature accompanying this unit.
This symbol indicates that dangerous voltage constituting a risk of electric shock is present within this unit.
- All the safety and operating instructions should be read before operating this product and retained for further reference.
● All warnings on the appliance and in the operating instructions should be adhered to. - Do not use this apparatus near water or moisture.
- Clean the apparatus only with a slightly damp cloth.
- Do not block any ventilation openings. Install in accordance with the manufacturer's instruction.
- Do not install near any heat source, such as radiator, heat registers, stoves or any other sources of heat.
- Protect the power cord from being walked on or pinched particularly at the plugs, convenience receptacle and at the point where they exit from the apparatus.
- Only use attachments/accessories specified by manufacturer.
● Unplug the apparatus during lightning storms or when unused for long periods of time. - Refer all servicing to qualified personnel. Servicing is required when the apparatus has been damaged in any way, such as power supply cord or plug is damaged, liquid has been spilled or objects have fallen into the apparatus has been exposed to rain or moisture, does not operate normally, or has been dropped.
- WARNING: To reduce the risk of fire or electric shock, do not expose this apparatus to rain or moisture. The apparatus shall not be exposed to dripping or splashing and that objects with liquids, such as vases, shall not be placed on the apparatus. No naked fame source such as candles should be placed on the product.
● WARNING: The battery or battery pack shall not be exposed to excessive heat such as sunshine, fire or the like. - CAUTION: Changes or modifications not expressly approved by the manufacturer could avoid the user's authority to operate this device.
- CAUTION: Usage of controls or adjustment or performance of products other than those specified herein may result in hazardous exposure.
ELECTRICAL INFORMATION
Use this appliance only with the supplied AC adapter. Using non-approved power supplies will void the warranty.
Mains Supply: The mains operating voltage of this unit is marked on a rating plate on the AC adapter.
The means of disconnecting this appliance from the mains supply is the AC Adapter/mains plug. This should be unobstructed and readily operable at all times.
PRECAUTIONS
Security
● Before operation, check if the voltage of this product is in line with the local voltage.
- Hold the plug to disconnect it from the mains outlet. Do not pull the power cord.
- Disconnect the plug as soon as liquid or objects enter this product. Discontinue use of this product until it has been tested and verified by a qualified service technician.
Location
- Place this product on dry stable surface away from heat and damp and where it is unlikely to fall or be knocked over.
● Never put this product in direct sunlight or near heat sources.
● There are two rubber pads on the back of the SoundBar. These are provided to ensure these is - Space behind the SoundBar for the rear-mounted acoustic ports to operate correctly. Do not remove the rubber pads.
- If you are using the SoundBar for TV sound, place it certainly under or above the TV screen. Do not stand a TV on it.
Functions & Controls
The carton should contain:
- 1 x Sound bar
- 1 x Remote control
• 1 x Audio cable (3.5mm-3.5mm)
• 1 x Audio cable (Coaxial)
Overview of controls - Unit
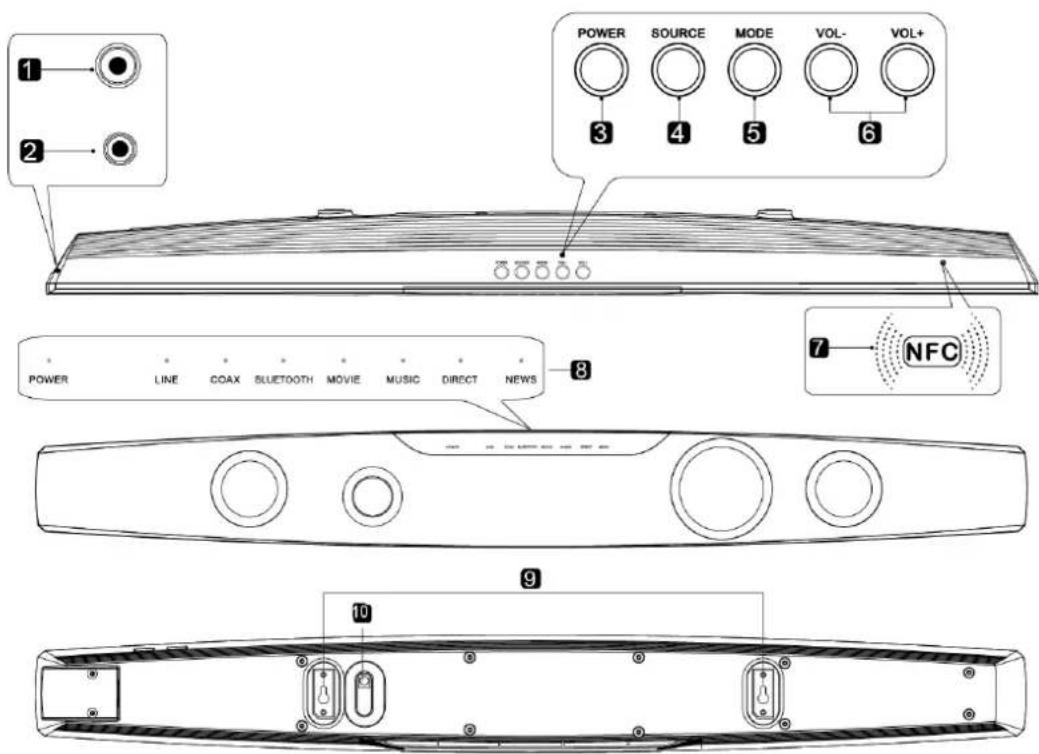
- COAX-- Connect the digital audio output from a TV, DVD or Blu-ray player
- LINE-- Connect to an analog (Headphone) audio output on the TV or an analog device
- POWER -- Switch the Soundbar on or off (to standby).
- SOURCE -- Select the audio source among LINE /COAXIAL/BLUETOOTH.
- MODE -- Select the sound mode among Movie/Music/Direct/News.
- VOLUME -/+ -- Increase or decrease the output volume
- NFC-- NFC function make the speaker connect with mobile phone more quickly
- DISPLAY-- Indicates the current status of the unit.
- WALL-MOUNT BRACKETS -- Use these brackets to fix the Sound bar to a wall
- DC 18V 2A -- Connect to the power supply.
Overview of controls - Remote control

- Power Button: Switch the Soundbar on or off (to standby).
- Source Buttons : Select an audio source from LINE, COAX, BLUETOOTH inputs
- VOL +/- : Increase or decrease the volume output.
- SOUND EQ MODES: Press repeatedly to cycle through the available sound
Audio modes: MOVIE, MUSIC, DIRECT or NEWS.
15: PREVIOUS : Skip to the previous audio file
PLAY/PAUSE: Start or pause/ play
NEXT: Skip to the next audio file
16: DIMMER : Adjust the display brightness
17: MUTE: Press to mute or restore volume
18: PAIR: Press to disable the current Bluetooth connection.
19: BASS: Increase or decrease bass output.
User Instructions
Connections
Connect the digital audio output from a TV, DVD or Blu-ray player.
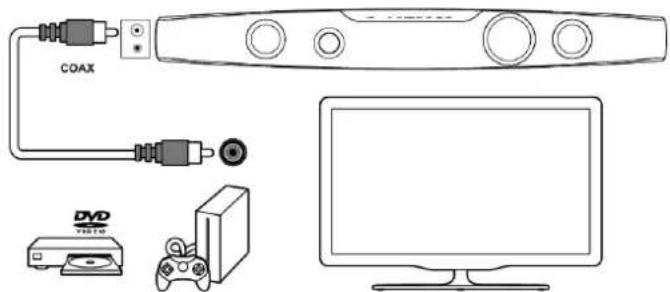
- Connect one end of the coaxial cable (supplied) to the TV, DVD or Blu-ray COAXIAL audio output RCA socket.
- Connect the other end to the COAX input on the right side of the Sound bar
NOTE: You may need to activate PCM (Downmix) on your source device (TV, DVD, or Blu-ray player)
Connection to an audio device such as an MP3 player, using the supplied 3.5mm audio cable.

- Connect one end of the 3.5mm audio cable (supplied) to the headphone output of your MP3 player or TV.
- Connect the other end to the AUX input (3.5mm socket) on the right side of the Sound bar
Getting started
Connecting mains power
- Connect the attached mains plug to a mains power supply socket.

- Switch the power socket ON.
Installing batteries in the remote
The first time you operate the remote control, please pull out the safety strip to activate the battery.

- To replace the battery open the battery compartment.

natural_image
Line drawing of a device with a scroll wheel and arrow indicating direction (no text or symbols)- Insert one CR2025 battery, with the polarity (+/-) as indicated.
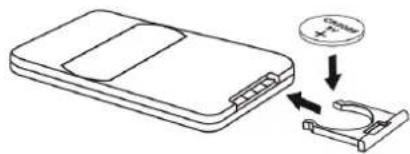
- Close the battery compartment.
Notes:
- Remove the batteries from the remote control when not in use for a long period of time.
- Do not install new batteries with used ones and do not mix different types of batteries.
- Dispose of batteries in accordance with local regulations.
General operation
- Ensure the sound bar is powered ON. If not, press the STANDBY button on the sound bar (3) or remote (11).
- Press SOURCE button (4 Unit or 12 remote) repeatedly to choose the correct audio inputs. The source chosen will appear on the display. For example:

Adjusting the sound
Volume controls
- To increase the volume level press the VOL+ button (6 Unit or 13 Remote) repeatedly or press and hold for fast adjustment.
- To decrease the volume level press the VOL-button (6 Unit or 13 Remote) repeatedly or press and hold for fast adjustment.
Sound effect presets
- During playback, pressing SOUND EQ button (14 Remote) repeatedly cycles through the 4 available sound modes:
- DIRECT, MOVIE, MUSIC or NEWS.
- As you select a sound mode the corresponding name appears on the display to indicate that sound mode is active.
Bass level adjustment
To increase or decrease the bass level, press the BASS button (19 Remote) repeatedly.
Play audio through Bluetooth
- Press SOURCE button (4 Unit or 12 Remote) repeatedly to choose Bluetooth mode. You will see the Bluetooth LED light on the display.
-
Press the PAIR button (18 Remote) the Bluetooth LED will flash rapidly. The unit will starts searching for the last Bluetooth connection.
-
Turn on Bluetooth function on your device, search for and select BT Soundbar
If connection is successful, the unit beeps and the LED light up stably.
If the pairing can not be completed within one minute, the LED flashes slowly.
- Select and play audio files or music on your Bluetooth device.
- During play, if a call is incoming, music play is paused. Play resumes when the call ends.
- You can also operate the playback using the remote control.
To play, press ▶ on the remote control. To pause/resume play, press ▶ again.
To select music tracks back/forward, press / keys.
- To disable the current connected Bluetooth device, press PAIR (18 Remote) button
The Bluetooth LED will flash slowly. You can now try to connect your sound bar with another Bluetooth device.
- To exit Bluetooth, select another source.
Note:
- The operation range between the sound bar and a Bluetooth device is approximately 10 meters (30 ft).
- The music streaming may be interrupted by obstacles between the device and the sound bar, such as wall, metal casing that covers the device, or another device nearby that operates in the same frequency.
- The manufacturer does not guarantee 100% compatibility with all Bluetooth devices.
Adjusting the display brightness
Press the DIMMER button (16) repeatedly to cycle through the 3 brightness states.
Wall mounting the Sound bar
- Align the Sound bar in the chosen location. Use a pencil to mark the drilling positions 340mm apart.

- Drill holes as marked in step 1.

- Insert 2 screws (not supplied) into the holes and tighten. Take care to leave 5mm between the screw heads and the wall.
NOTE: You will need to ensure the screws are long enough to sufficiently grip the wall while allowing 5mm between screw head and the wall.
- Hook the Sound bar onto the screw heads. For secure mounting ensure the screw heads slide firmly into the narrow part of the brackets.

Care & Maintenance
Important: Always unplug the appliance from the power socket during cleaning and maintenance.
- Ensure the unit is switched off and unplugged from any electrical socket
- Wipe the case with a slightly moist lint free cloth
- Do not use any cleaning fluids containing alcohol, ammonia or abrasives
- Do not spray an aerosol at or near the object
- Do not allow liquids to spill or objects to drop into any openings
- Do not insert sharp items into speaker grills or any other openings
• Always use the original packaging if it is necessary to transport the unit at any time
If the unit is used in a dusty environment, it may be necessary to have the unit serviced at your local dealer periodically. It is not advisable to allow large deposits of dust to accumulate within the unit as it may prevent adequate cooling. Similarly dust deposits which become damp can sometimes lead to electrical problems which may cause severe damage to the delicate electronics within this unit.
Troubleshooting
If the problem persists, contact the retailer if the soundbar is still under guarantee.
| PROBLEM | POSSIBLE SOLUTION |
| No Power | ·Ensure the mains plug is connected to a power supply, and is switched ON.·Make sure there is power to the mains socket. |
| No Sound | ·Make sure if playing from the AUX input, the external source has the volume turned up and is playing a track.·Make sure the volume is turned up.·If using the digital coaxial cable connection ensure the source DIGITAL output is set to PCM, LPCM, PCM 2Ch stereo or PCM downmix. |
| No response from the unit | ·Unplug the power cable for 1 minute then plug back in again. |
| Remote control does not work | ·Reduce the distance between the remote and main unit·Check the batteries are installed correctly.·Replace the batteries·Point the remote directly at the Sound bar |
SPECIFICATIONS
| NAME | UNITS |
| Amplifier Power Output | 2 x 15 W + 30 W (Subwoofer) @ 1% THD |
| Frequency Response | 20Hz – 20 KHz (+/-) 3dB |
| Input sensitivity (mV) | 500 mV rms |
| Inputs | SPDIF Coaxial (rear), 3.5 mm Mini-jack |
| Voltage | 110 – 240 V~, 50/60 Hz |
| Standby Power Consumption | Less than 0.5 W |
| Full range Speaker Drivers | Impedance: 8 Ohm52mm (2")Frequency Response: 160 Hz – 20 KHz |
| Subwoofer | Impedance: 4 Ohm78mm (3")Frequency Response: 55 – 160 Hz |
| Storage Temperature | 32F – 140F |
| Operating Temperature | 41F – 95F |
| Compliances | FCC |
- IMPORTANT SAFETY INSTRUCTIONS
- ELECTRICAL INFORMATION
- PRECAUTIONS
- Security
- Location
- Functions & Controls
- The carton should contain:
- Overview of controls - Unit
- Overview of controls - Remote control
- User Instructions
- Connections
- Getting started
- Connecting mains power
- Installing batteries in the remote
- General operation
- Adjusting the sound
- Volume controls
- Sound effect presets
- Bass level adjustment
- Play audio through Bluetooth
- Note:
- Adjusting the display brightness
- Wall mounting the Sound bar
- Care & Maintenance
- Troubleshooting
- SPECIFICATIONS
Brand : Cello
Model : S3031A
Category : Soundbar