
P38 - Receiver ARCAM - Free user manual and instructions
Find the device manual for free P38 ARCAM in PDF.


| Product Type | Stereo Receiver |
| Power Output (8 ohms) | 100W per channel |
| Power Output (4 ohms) | 180W per channel |
| Frequency Response | 20Hz - 20kHz ±0.2dB |
| Total Harmonic Distortion | <0.02% |
| Input Sensitivity (Line) | 200mV |
| Input Impedance | 47k ohms |
| Signal-to-Noise Ratio | 100dB |
| Audio Inputs | 6x RCA, 1x Phono (MM), 1x Tape loop |
| Audio Outputs | Pre-out, Rec out, 2x Speaker terminals (A/B), Headphone |
| Dimensions (W x H x D) | 430 x 120 x 330 mm (16.9 x 4.7 x 13.0 in) |
| Weight | 12.5 kg (27.6 lbs) |
| Power Consumption | 400W (max), <2W standby |
| Power Supply | 230V AC, 50/60Hz |
| Remote Control | Included (CR-389) |
| Speaker Impedance | 4-8 ohms |
| Damping Factor | >40 (8 ohms, 50Hz) |
| Phono Stage | Built-in MM cartridge compatible |
| Tone Controls | Bass, Treble, Balance |
| Protection Features | Short circuit, overcurrent, DC offset, thermal |
| Maintenance & Cleaning | Wipe with dry cloth; avoid solvents |
| Repairability & Spare Parts | Contact authorized service center for parts |
Frequently Asked Questions - P38 ARCAM
User questions about P38 ARCAM
0 question about this device. Answer the ones you know or ask your own.
Ask a new question about this device
Download the instructions for your Receiver in PDF format for free! Find your manual P38 - ARCAM and take your electronic device back in hand. On this page are published all the documents necessary for the use of your device. P38 by ARCAM.
USER MANUAL P38 ARCAM
HANDBOOK Integrated and power amplifiers



CAUTION
RISK OF ELECTRIC SHOCK DO NOT OPEN
ATTENTION
E DE CHOC ELECT NE PAS OUVER

CAUTION: To reduce the risk of electric shock, do not remove cover (or back). No user serviceable parts inside. Refer servicing to qualified service personnel.

WARNING: To reduce the risk of fire or electric shock, do not expose this apparatus to rain or moisture.
The lightning flash with an arrowhead symbol within an equilateral triangle, is intended to alert the user to the presence of uninsulated 'dangerous voltage' within the products enclosure that may be of sufficient magnitude to constitute a risk of electric shock to persons.
The exclamation point within an equilateral triangle is intended to alert the user to the presence of important operating and maintenance (servicing) instructions in the literature accompanying the product.
CAUTION: In Canada and the USA, to prevent electric shock, match the wide blade of the plug to the wide slot in the socket and insert the plug fully into the socket.
Class I product
This equipment is a Class I electrical appliance. It requires safety connection to electrical earth ('ground' in the U.S.).
MANY OF THESE ITEMS ARE COMMON SENSE PRECAUTIONS BUT, FOR YOUR OWN SAFETY AND TO ENSURE THAT YOU DO NOT DAMAGE THE UNIT, WE RECOMMEND THAT YOU READ THEM.
Important safety instructions
This product is designed and manufactured to meet strict quality and safety standards. However, you should be aware of the following installation and operation precautions.
1. Take heed of warnings and instructions
You should read all the safety and operating instructions before operating this equipment. Retain this handbook for future reference and adhere to all warnings in the handbook or on the equipment.
2. Water and moisture
The presence of electricity near water can be dangerous. Do not use the equipment near water – for example next to a bathtub, washbowl, kitchen sink, in a wet basement or near a swimming pool, etc.
3. Object or liquid entry
Take care that objects do not fall and liquids are not spilled into the enclosure through any openings. Liquid-filled objects such as vases should not be placed on the equipment.
4. Placing the equipment
Only use a rack or shelf that is stable and strong enough to support the weight of this equipment.
5. Ventilation
Do not place the equipment on a bed, sofa, rug or similar soft surface, or in an enclosed bookcase or cabinet, since ventilation may be impeded.
5. Heat
Locate the equipment away from naked flames or heat-producing appliances such as radiators, stoves or other appliances that produce heat.
6. Climate
The equipment has been designed for use in moderate climates and in domestic situations.
8. Cleaning
Unplug the unit from the mains supply before cleaning. The case should normally only require a wipe with a soft, lint-free cloth. Do not use chemical solvents for cleaning.
We do not advise the use of furniture cleaning sprays or polishes as they can cause permanent white marks.
9. Power sources
Only connect the equipment to a power supply of the type described in the operating instructions or as marked on the equipment.
The primary method of isolating the equipment from the mains supply is to remove the mains plug. The equipment must be installed in a manner that makes disconnection possible.
10. Power-cord protection
Power supply cords should be routed so that they are not likely to be walked on or pinched by items placed upon or against them. Pay particular attention to the point where they exit from the equipment.
11. Power lines
Locate any outdoor antenna/aerial away from power lines.
12. Non-use periods
If the equipment is not being used for an extended period, we recommend that you unplug the power cord of the equipment from the outlet, to save power.
13. Abnormal smell
If an abnormal smell or smoke is detected from the equipment, turn the power off immediately and unplug the equipment from the wall outlet. Contact your dealer and do not reconnect the equipment.
14. Servicing
You should not attempt to service the equipment. Contact your dealer to arrange servicing.
15. Damage requiring service
The equipment should be serviced by qualified service personnel when:
A. the power-supply cord or the plug has been damaged, or
B. objects have fallen, or liquid has spilled into the equipment, or
C. the equipment has been exposed to rain, or
D. the equipment does not appear to operate normally or exhibits a marked change in performance, or
E. the equipment has been dropped or the enclosure damaged.
Safety compliance
This equipment has been designed to meet the IBC/EN 60065 international electrical safety standard.
This device complies with Part 15 of the FCC Rules. Operation is subject to the following two conditions: (1) This device may not cause harmful interference, and
(2) this device must accept any interference received, including interference that may cause undesired operation.
Contents
safety guidelines ......E-2
Important safety instructions....E-2
Safety compliance E-2
welcome E-3
overview E-4
Placing the unit E-5
Power E-5
Interconnect cables....E-5
A38 connections ......E-6
Audio inputs E-7
Recording loops E-7
Phono input E-7
Pre-/power-amplifier connections ...... E-7
Controlling A\$8 from a second room...... E-7
loudspeakers ......E-8
Connecting loudspeakers to the A38/P38 ..E-8
Single wiring E-9
BI-Wiring E-9
BI-amping E-9
A38 operation E-10
Switching the A38 on E-10
Changing the volume E-10
Selecting an audio source ....E-10
Recording an audio source ....E-10
A38 setup....E-11
Configuring your A38 amplifier ....E-11
remote control E-12
The CR90 Universal remote controller .....E-12
Source keys.....E-12
Amp commands ......E-13
P38connections....E-14
Connecting to loudspeakers....E-14
Other connections.....E-14
Remote switching E-15
specifications E-16
Troubleshooting E-17
Remote-control codes....E-17
product guarantee ....E-18
Thank you and congratulations for purchasing your Arcam FMJ Amplifier.
Arcam has been producing specialist audio products of remarkable quality for over three decades and the new A38 and P38 amplifiers are the latest in a long line of award winning HiFi. The design of the FMJ range draws upon all of Arcam's experience as one of the UK's most respected audio companies, to produce Arcam's best preforming Stereo amplifiers yet; designed and built to give you years of listening enjoyment.
This handbook is intended to give you a detailed guide to using both the A38 Integrated Amplifier and P38 Power Amplifier systems. It starts by giving advice on installation, moves on to describe how to use the product and finishes with additional information on the more advanced features. Use the contents list shown on this page to guide you to the section of interest.
We hope that your FMJ Amplifier will give you years of trouble-free operation. In the unlikely event of any fault, or if you simply require further information about Arcam products, our network of dealers will be happy to help you. Further information can also be found on the Arcam website at www.arcam.co.uk.
The FMJ development team


Arcam's A38 Integrated Amplifier – and its companion P38 Power Amplifier – provide class-leading sound quality.
The A38 features a number of new technologies which practically eliminate thermal modulation of audio signals, ensuring truly dynamic and thrilling reproduction. New output devices and dramatically improved thermal coupling results in much improved linearity.
A massive torrid-based power supply delivers effortless power with low noise. A new pre-amplifier design,
with sealed reed relays from Arcam's range-topping C31, deliver a wonderfully transparent signal to each power amplifier. A completely new volume control gives unprecedented linearity and noise performance, allowing fine details to be reproduced in startling clarity.
The CR90 remote control supplied with the A38 is an eight-page 'universal' learning remote control which is simple to use, and once set up is able to control a complete system. It can be programmed using a vast internal code library to control CD players, tuners, TVs and other devices.
The A38 Integrated Amplifier and P38 Power Amplifier are designed to produce a level of performance that will truly bring music and movies to life.
Placing the unit
Place the amplifier on a level, firm surface, avoiding direct sunlight and sources of heat or damp.
- Do not place the A38 on top of a power amplifier or other source of heat.
Do not place the amplifier in an enclosed space such as a bookcase or closed cabinet unless there is good provision for ventilation. The A38 and P38 are designed to run warm during normal operation.
Do not place any other component or item on top of the amplifier as this may obstruct airflow around the heat-sink, causing the amplifier to run hot. (The unit placed on top of the amplifier would become hot, too.)
■ Make sure the remote-control receiver to the left of the front panel display is unobstructed, otherwise this will impair the use of the remote-control. If line-of-sight is impractical, a remote-control repeater can be used with the rear panel connector (see page 7).
Do not place your record deck on top of this unit. Record decks are very sensitive to the noise generated by mains power supplies which will be heard as a background 'hum' if the record deck is too close.
Power
The amplifier is supplied with a moulded mains plug already fitted to the lead. Check that the plug supplied fits your supply – should you require a new mains lead, please contact your Arcam dealer.
If your mains supply voltage or mains plug is different, please contact your Arcam dealer immediately
Push the IEC plug end of the power cable into the socket on the back of the amplifier, making sure that it is pushed in firmly. Plug the other end of the cable into your mains socket and, if necessary, switch the socket on.
Stand-by power
For remote stand-by operation, the amplifier's control power-supply is kept powered on all the time the unit is connected to the mains supply. The front-panel power-switch powers all other circuitry down and power consumption in this mode is less than 2W.
This means that even though the power-switch is off, it may be possible to hear a slight residual hum coming from the mains transformer inside the amplifier. This is perfectly normal. However, if the unit is to be left unused for an extended period, we recommend that you disconnect it from the mains supply.
Interconnect cables
We recommend the use of high quality screened cables that are designed for the particular application. Other cables will have different impedance characteristics that will degrade the performance of your system (for example, do not use cabling intended for video use to carry audio signals). All cables should be kept as short as is practically possible.
It is good practice when connecting your equipment to make sure that the mains power-supply cabling is kept as far away as possible from your audio cables. Failure to do so may result in unwanted noise in the audio signals.
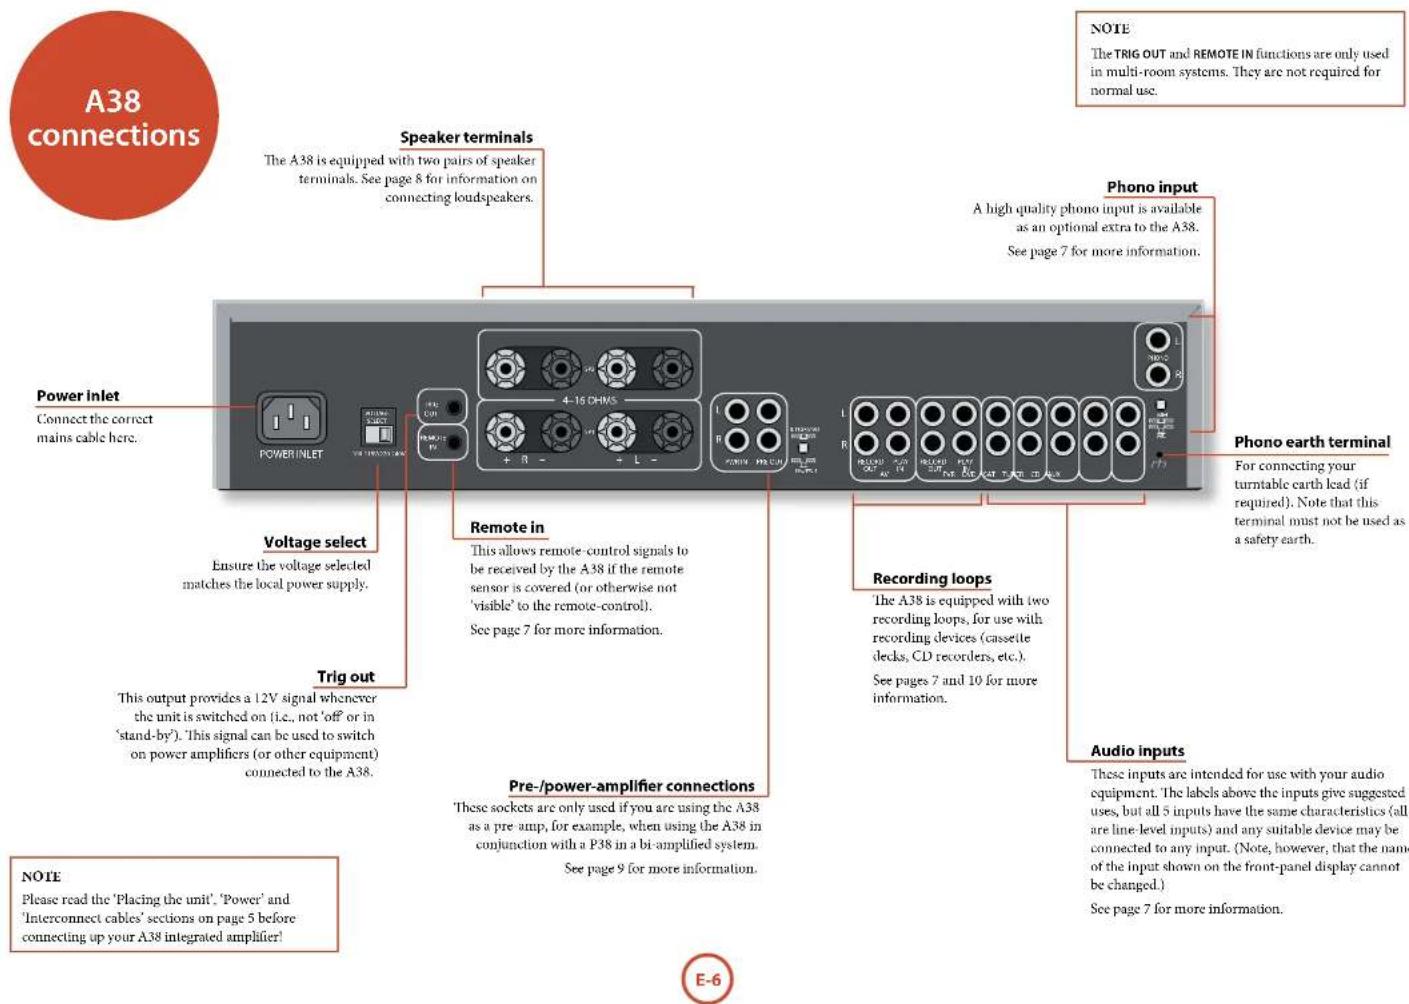
Audio inputs
Although the inputs are labelled for specific devices, all have the same characteristics and each may be used with any line-level product. The exception is the optional Phono input (see page 16 for specification).
dVd
Intended for the analogue outputs from a DVD-player.
AV
Intended for the analogue outputs from general audiovisual equipment, such as a VCR, digital TV/satellite receiver, or Nicam tuner.
tunEr
Intended for the analogue outputs from a radio tuner.
cd
Intended for the analogue outputs from a CD player.
AuX
This is intended for general use. Connect the analogue audio outputs of any unit with a line-level output (such as a games console or set-top box).
Recording loops
The A38 is equipped with two recording loops, for use with recording devices (such as cassette decks, CD recorders, DAT recorders, VCR, PVR etc.).
AV rEcord out
Connect these output sockets to the input sockets of your recording device (usually labelled rEcord or In).
AV PLAy In
Connect the output sockets of your recording device (usually labelled PLA or out) to these inputs.
If you do not have a recording device, you can use this input for other (line-level) equipment, such as a 'TV, DVD, CD player, radio tuner, PVR, etc.
PVr rEcord out
These output sockets can be connected to the input sockets of a second recording device.
PVr PLAy In
Connect the output sockets of your second recording device to these inputs. Alternatively, this input may be used for other (line-level) equipment such as a games console, set-top box, etc.
AV Dubbing
You can perform tape dubbing from PVr to AV, but not from AV to PVr.
For example, to copy from a cassette recorder connected to the PVR socket, to a cassette recorder connected to the AV socket, first use the rRecord button to select 'Record PVR'. This routes the PVR signal to the AV output.
Phono input
As standard, no phone input is fitted to the A38.
The phono module (or an external phono amplifier) is required if you wish to connect a record player to the A38. This is because the low-voltage output of a record player requires a pre-amplification stage before the signal can be used.
A very high quality phono input is available as an optional extra: please consult your dealer for price and availability.
The Arcam phono module is compatible with moving-magnet cartridges (MM) and moving-coil cartridges (MC). Once the module is fitted, you should select MM or MC via the recessed MM/Mc back panel switch (push the switch in for MC).
If you have already an external phono amplifier that you wish to use, connect this to one of the line-level inputs, such as the AuX input.
Pre-/power-amplifier connections
PrE out
To use your A38 as a dedicated pre-amplifier, or as part of a bi-amp'ed system, connect thePrE out sockets to the input sockets of your power amplifier.
Pwr In
To use your A38 as a power-amplifier, connect the output of your pre-amplifier to the Pwr in sockets.
If you wish to use your A38 as a dedicated pre- or power-amplifier (but not in the case of a bi-amp'ed system), press the PrE/Pwr switch in on the rear panel. This separates internally the connection between the pre- and power-amp. stages of the A38.
When used as a power amplifier, your A38 has exactly the same specification and performance as a P38, described later in this handbook.
Controlling A38 from a second room
The A38 will require a remote pick-up device with a 12V external power supply (such as a Xantech Dinky Link) located in Zone 2, together with a power amplifier (such as an Arcam A38 or P38) to complete the system.
The diagram below shows the wiring scheme, which will also apply to other IR pick-up devices commonly available.
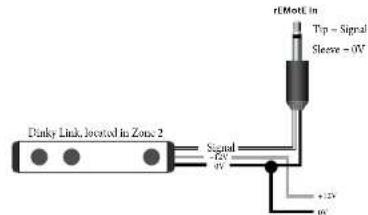
The A38 can also provide a +12V trigger output to control devices such as the power amplifier in Zone 2. The +12V trigger is active when the unit is 'On'.

Connecting loudspeakers to the A38/P38
Single wiring
Single wiring is the conventional wiring method of running a single cable per channel between the amplifier and the speaker; this is the easiest technique.
Bi-wiring
Bi-wiring is running two separate cables between the amplifier and each speaker, with one cable carrying the low-frequency information, the other the higher-frequency signals.
Bi-wiring can improve the sound of your system because the separation of high- and low-frequency signal currents into different speaker cables avoids distortions caused by the different currents interacting with one-another within a single cable, as occurs in single-wired systems.
The A38 and P38 are designed to allow easy bi-wiring, but you will need to connect to loudspeakers that provide separate terminals for the two cables. Each speaker must have two pairs of terminals; one pair labelled HF or 'High Frequency', the other pair labelled LF or 'Low Frequency'.
Bi-amping
Bi-amping is the separation of the amplification of low- and high-frequency signals over two amplifiers.
Bi-amping requires the use of two amplifiers per channel. Normally, your A38 is used to drive the high-frequency (treble) speakers, with the P38 used for the lower (bass) frequencies.
Notes on making speaker connections
- Do not make any connections to any amplifier while it is switched on. We recommend that your amplifier is completely disconnected from the mains supply before starting.
Before switching your amplifier(s) on for the first time after connecting to speakers, please check all connections thoroughly. Ensure that bare wires or cables are not touching each other or the amplifier's chassis (which could cause short circuits), and that you have connected positive (+) to positive and negative (-) to negative. Be sure to check the wiring for both the amplifier and the speaker.
■ After making connections: switch the amplifier(s) on, select a source signal, then gradually increase the volume to the required listening level.
If you are unsure as to how your system should be connected, or need advice on bi-wiring or bi-amping, please contact your Arcam dealer who will be happy to help you.
Single wiring
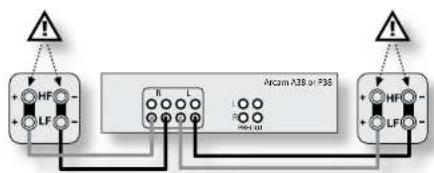
Both the A38 and P38 are designed for bi-wiring, which is why there are duplicate speaker terminals on the back. For single wiring, we recommend that you use the lower set of speaker terminals on your amplifier. If each speaker has more than one pair of connecting terminals, use the terminals labelled Lt or 'Low Frequency' for each speaker.
Connect the positive terminal of the right speaker connection on the amplifier (coloured red and labelled +r) to the positive terminal of your right speaker. Similarly, connect the negative terminal of the amplifier (coloured black and labelled with r-) to the negative terminal of your speaker. Repeat the process for the left speaker, using the amplifier terminals labelled +L and L-.
If your speakers support bi-wiring, then there is a strip of conductive metal on the speakers connecting the low-frequency terminals to those for the higher-frequencies; this mUST NOT be REmOVED in a single-wired system.
flowchart
graph TD
    A["HF"] --> B["A38 or F38"]
    C["LF"] --> B
    D["..."] --> B
    E["..."] --> B
    B --> F["HF"]
    B --> G["LF"]
    style A fill:#f9f,stroke:#333
    style C fill:#f9f,stroke:#333
    style D fill:#f9f,stroke:#333
    style E fill:#f9f,stroke:#333
An A38 or P38 connected to speakers using single wiring

Bi-wiring
Bi-wiring is performed in the same way as single wiring except that, for each speaker, a pair of cables are used to connect the amplifier to each speaker.
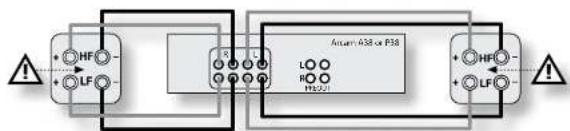
Follow the instructions given for single wiring; then perform the same actions, this time connecting the upper set of speaker terminals on your amplifier to the terminals labelled M or 'High Frequency' for each speaker. Please refer to the illustration.
Speakers that support bi-wiring have a strip of metal on the speakers connecting the low-frequency terminals to those for the higher-frequencies; this mUST bE REmOVED in a bi-wired system.
flowchart
graph LR
    A["HF"] --> B["Anam 438 or P38"]
    C["LF"] --> B
    D["LO"] --> B
    E["H3021"] --> B
    F["HF"] --> G["Anam 438 or P38"]
    H["LF"] --> G
    I["..."] --> B
    J["..."] --> G
An A38 or P38 connected to speakers using bi-wiring
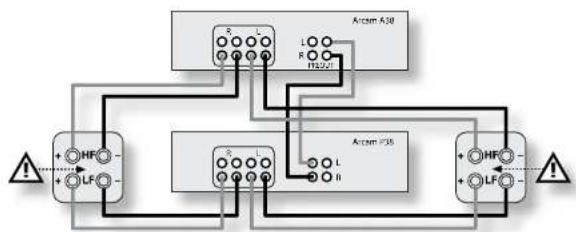
Bi-amping
Bi-amping requires the use of two amplifiers per channel. Normally, your A38 is used to drive the high-frequency (treble) speakers, while a power-amplifier (such as a P38) is used for the lower (bass) frequencies.
Connect your A38 to the speakers as described for single wiring, with the exception that the A38 should be connected to the speaker terminals labelled by or 'High Frequency'. Then connect the power amplifier (P38, for example) to the Li or 'Low Frequency' terminals, as in the diagram. A pair of audio interconnected cables are also required to connect the pre-amp outputs of the A38 to the power amp inputs of the P38.
Note that the strip of metal on the speakers connecting the lower terminals to the upper terminals mUST be REmOVED. Failure to do so will result in damage to both amplifiers, which will not normally be covered under warranty.
flowchart
graph TD
    A["HF"] --> B["R"]
    A --> C["L"]
    D["LF"] --> E["R"]
    D --> F["L"]
    G["HF"] --> H["R"]
    G --> I["L"]
    J["LF"] --> K["R"]
    J --> L["L"]
    M["HF"] --> N["R"]
    M --> O["L"]
    P["LF"] --> Q["R"]
    P --> R["L"]
    S["HF"] --> T["R"]
    S --> U["L"]
    V["LF"] --> W["R"]
    V --> X["L"]
    Y["HF"] --> Z["R"]
    Y --> AA["L"]
    AB["HF"] --> AC["R"]
    AB --> AD["L"]
    AE["LF"] --> AF["R"]
    AE --> AG["L"]
An A38 and P38 connected to speakers using bl-amping
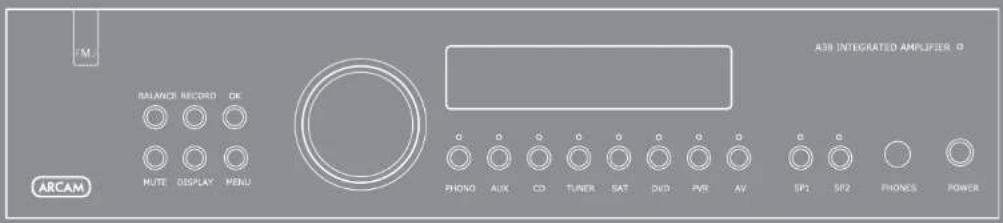
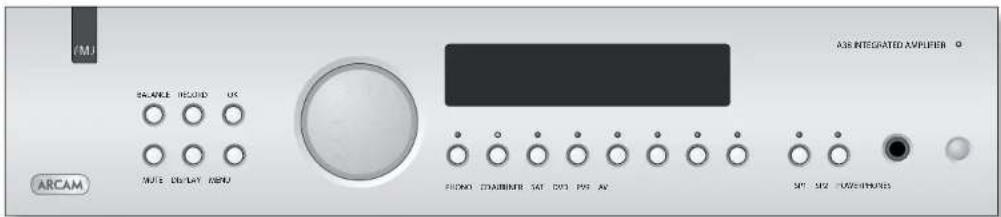
Switching the A38 on
The POWER button switches the unit on and off; alternatively, the unit can be switched in and out of stand-by mode by pressing the ⏻ button on the remote control handset.
The power light (next to the 'A38 Integrated Amplifier' text) indicates the state of the amplifier:
-
A red light means that the amplifier is in stand-by mode;
-
When you switch your amplifier on, the power light glows amber for a few seconds; during this time the outputs are muted;
-
The light changes to green when the amplifier is ready for use.
The power light may flash if a fault has occurred – the fault type is shown on the display. See page 17, 'Troubleshooting', for help in resolving fault situations. If the fault cannot be cleared, unplug your amplifier and contact your Arcam dealer.
Changing the volume
Use the control knob to change the volume. Turn the knob clockwise to increase the volume, anti-clockwise to reduce it.
The output of the A38 can be muted by pressing MUTE. Press MUTE for a second time (or change the volume) to cancel the mute.
SP1 and SP2
These buttons allow you to switch the main speakers (connected to the lower set of speaker terminals) and secondary speakers (connected to the upper set of speaker terminals) on and off.
The light above each button glows if the corresponding speakers are currently selected. If you have connected the A38 to the speakers using the single-wired configuration described on page 9, then the SP1 light should be illuminated; if you have used the bi-wiring configuration described on page 9, both SP1 and SP2 must be switched on. Note that when both lights are out then the amplifier will appear not to work, as all speakers are switched off.
When listening to 'loud' inputs, such as CDs, the amplifier may reach its full power before the display reads Maximum, in contrast, lower-level inputs, such as tuners, will sound quieter for the same volume level shown. To compensate for this, the input levels of each source may be adjusted. This can be done using the A38 setup menu (see page 11).
Selecting an audio source
A source-selection button is used to select the source that is connected to the input corresponding to the button. A light above the relevant button indicates which input is selected and this information is also shown on the display.
Listening using headphones
The headphones socket (PHONES) accepts headphones with an impedance rating between 8Ω and 2kΩ, fitted with a 6.5mm stereo jack plug.
The pre-amp, outputs and speakers are muted when headphones are plugged in. The headphones socket is always active, unless the volume has been muted.
Balance
In addition to the A38 setup menu (see page 11), you can also control left-right stereo balance directly from the BALANCE button on the front-panel.
Display
The DISPLAY front panel button changes the display brightness. There are three brightness levels: 'on', 'dimmed' and 'off'. If the A38 is switched off while the display is set to 'off', the display is set to 'dimmed' when the A38 is switched on again.
Recording an audio source
The A38 allows listening to and recording from the same source, or listening to one source whilst recording another. The signal to be recorded is sent to both the AV and PVR output sockets.
Selecting the source for recording
The recording outputs can be configured in two ways:
- To allow recording of the source being listened to;
- To allow recording of a particular (specified) source, regardless of what is being listened to.
To record the source being listened to, press the RECORD button repeatedly until the display shows 'Record source'. After a few seconds, the display reverts to showing the volume level, and you are ready to record. In this configuration, selecting a different input changes the source that is routed to the recording outputs.
To record one source whilst listening to another, press RECORD until the display shows 'Record' followed by the name of an input (e.g., Flux, CD, Tuner, etc.). Now press the source-selector button on the front-panel for the source you wish to record. Your selection is shown on the display for a few seconds, after which the display reverts to showing the volume level. You are now ready to record.
Pressing a different source selection button changes the source that you are listening to, but does not alter the source that is routed to the recording outputs.
A38 setup
Configuring your A38 amplifier
Adjusting listening settings
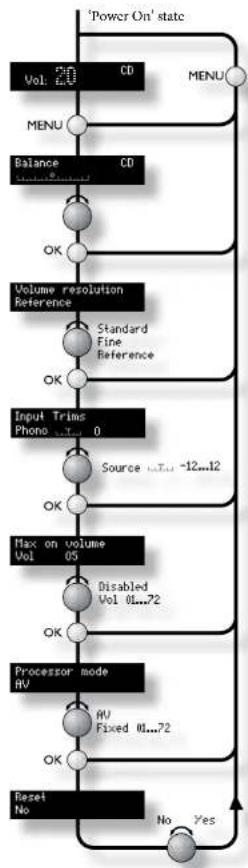
The A38 allows you to customise various features of the amplifier to fit your system. Use this diagram to help you navigate through the available configuration options.
In the diagram, the control knob is shown as . Normally, the display shows the current volume and the control knob is used to adjust this.
Press MENU once to enter the setup menu, then press OK repeatedly to cycle through the menu items. When
you have found the setting that you wish to adjust (as shown on the front panel display), you can change the setting using the control knob. Press MENU to store the change and return to volume display mode - or press OK again to move to the next setting.
Note that the menu will time-out after a short period without pressing a button, with the display reverting to the current volume.
The following items can be adjusted from the setup menu:
| Balance | This allows you to adjust the output balance between left and right channels. The display is also available directly by pressing the front panel DISPLAY button. |
| Volume resolution | There are three volume-display options to chose from: 'Standard', 'Fine' or 'Reference'. Standard and Fine represent different levels of volume-control sensitivity, the Reference setting gives absolute increments in 0.5dB steps. |
| Input trims | Input trims are used to compensate for variations in output levels of different source equipment. If, for example, your CD player is louder at a given volume display value than other inputs, you can attenuate it by using this setting so that it matches your other components.Use the source-select buttons to select the input you wish to adjust, then the control knob to set (increase or decrease) the input volume for that source. |
| Max on volume | This can be used to limit the maximum volume the amplifier operates at when it is first switched on: the A38 comes on at the (reduced)'Max. On Volume' level if the last-used volume exceeds this value.If this item is set to 'Disabled', the A38 always comes on at the last used volume, even if this is very loud. |
| Processor mode | Processor mode enables you to fix the gain (volume setting) of your A38. The A38 (in combination with a power amp.) can then be used to drive the front left and right speakers of a surround-sound system, when fed from a separate processor. The volume of the entire system can then be controlled using the processor.Feed the sound from the processor into the AV input, then set the gain of the A38 to match the amplifiers that drive your other loudspeakers. |
| Reset | Confirming 'Yes' restores all amplifier settings to their factory defaults. |
flowchart
graph TD
    A["'Power On' state"] --> B["Vol: CD"]
    B --> C["MENU"]
    C --> D["Balance: CD"]
    D --> E["OK"]
    E --> F["Volume resolution Reference"]
    F --> G["Standard Fine Reference"]
    G --> H["OK"]
    H --> I["Input Trims Phone: 0"]
    I --> J["Source: -12...12"]
    J --> K["OK"]
    K --> L["Max on volume Vol: 05"]
    L --> M["Disabled Vol: 0...72"]
    M --> N["OK"]
    N --> O["Processor mode RV"]
    O --> P["RV Fixed: 0...72"]
    P --> Q["OK"]
    Q --> R["Reset No"]
    R --> S["No Yes"]

The CR90 Universal remote controller
This section refers only to the A38. Please note that the P38 Power Amplifier can only be controlled indirectly through a pre-amp.
The CR90 is a sophisticated 'universal' remote control that can control up to eight devices. It's pre-programmed for use with the A38 and many other Arcam products (FM/DAR tuners, CD-players and DVD-players).
With its extensive built-in library of codes, it can also be used with thousands of other audio-visual components - TVs, satellite and set-top boxes, PVRs and third-party CD players. See the final section of the CR90 Handbook for a list of these.
The CR90 is a 'learning' remote, so you can teach it almost any function from an old single-device remote. You can also program the CR90 to issue a sequence of commands ('macros') from a single button press - see the CR90 Handbook for details
As the CR90 is a system remote controller, some of the keys are not used with the A38. For instance, the PVR and CD keys can still be programmed to control products, so if you have a PVR connected directly to your TV or SAT box, you can use the CR90 to control it as part of your system.
Source keys
As the CR90 can control your A38 as well as a range of other equipment, many of the buttons have more than one function depending on the 'device mode' or 'page' selected.
The device selection keys: DVD, SAT, AV (TV), TUN, AMP and AUX, both select the source and configure the CR90 to control the particular source.
In other words, the buttons are often 'context sensitive' so you'll have to tell it what sort of device you wish to control (press the AV button for a video display, for example) before you can control it.
Select the source key first
Remember to select a source key before pressing command buttons – commands vary depending on the source selected!
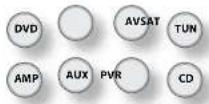
| DVD | DVD player |
| SAT | Satellite set-top box |
| AV | Audio-visual sound input (use with TV) |
| TUN | DAB, FM or AM tuner |
| AMP | Controls the Amplifier features of the A38 (and indirectly, of a P38 connected to the A38) |
| AUX | Auxiliary input, or an iPod via an rDock or rLead |
| PVR | Personal Video Recorder |
| CD | Compact Disc player |
Inserting batteries into the remote control
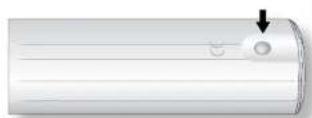
1. Open the battery compartment by pressing the button on the back of the handset.
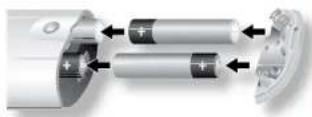
2. Insert four 'AAA' batteries into the battery compartment - two facing the top of the unit, and two facing the end, as in the diagram.
3. Lower the end cap onto the plastic locating plate in the handset. This acts as a hinge, and you can now push the end cap firmly into its locked position with a click.
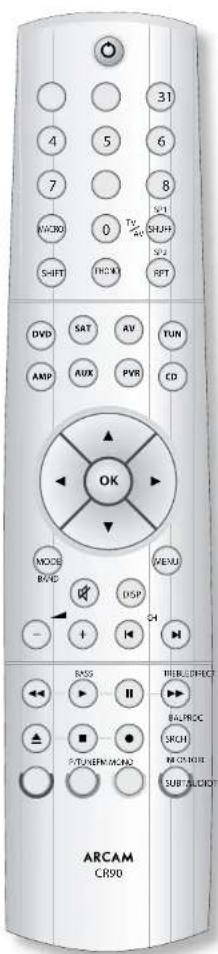

Amp commands
| PowEr - Switches A38 between stand-by and on | |
| 1-9 | Some number keys can be used for source selection:1 DVD input2 Not used for A383 AV (television sound input)4 AUX Auxiliary line input5 Not used for A386 SAT Satellite decoder input7 TUN DAB/FM/AM tuner input8 CD input9 Not used for A38 |
| shift | Modifies many keys (see individual key descriptions, below) |
| Navigate the menus on Arcam surround amplifiers. oK confirms a selection. shift +to Power on shift +to Power off | |
| oK | Confirms a setting (equivalent to 'Enter' or 'Select' on some remote controls) |
| ModE | Cycles through Display modes on the front panel |
| MEnu | Displays the Amplifier menu on the front panel |
| disp | Cycles through Display panel brightness options (dim to bright, off) |
| Press once to mute the speaker and pre amp outputs. Press for a second time (or change the volume) to unmute the unit. | |
| Decrecase (-) and increase (+) amplifier volume |



Connecting to loudspeakers
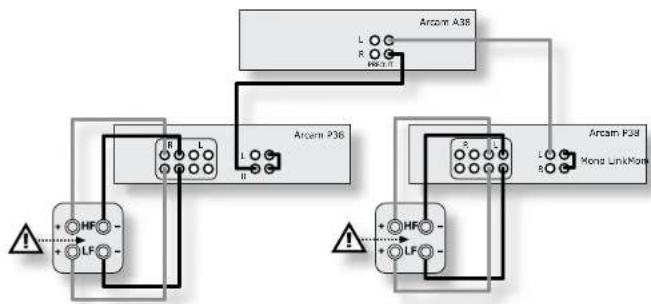
The P38 amplifier may be connected by simple wiring, bi-wiring or bi-amping – see page 9 for details. In addition, see the following section on the Mono Link (and the diagram below) for another way of bi-amping loudspeakers using a pair of P38s.
flowchart
graph TD
    A["Arcam A38"] --> B["ARCAM P36"]
    B --> C["ARCAM F38"]
    C --> D["HL"]
    C --> E["RF"]
    B --> F["HF"]
    B --> G["LF"]
    style A fill:#f9f,stroke:#333
    style B fill:#ccf,stroke:#333
    style C fill:#cfc,stroke:#333
    style D fill:#fcc,stroke:#333
    style E fill:#cff,stroke:#333
Using a pair of P38s with the Mono Link to bi-amplify a pair of speakers
Other connections
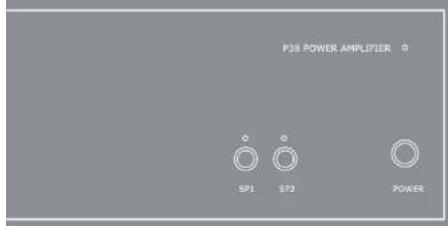
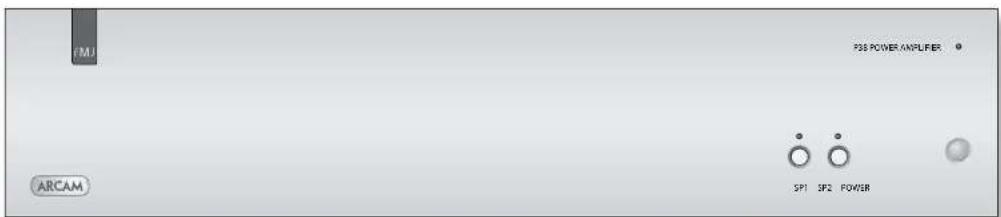
The P38 amplifier provides the following connections:
AUDIO IN
Connect the output sockets of your pre-amp. (or the PRE OUT sockets of an integrated amplifier, such as the A38) to one of these inputs.
Mono Link
The P38 can be adapted to provide two mono loudspeaker outputs from a single input. Using a pair of P38s (i.e. one power amplifier per loudspeaker) enables you to bi-amplify a pair of compatible loudspeakers, reducing the amount of cross-talk between channels compared with using the P38 in a more conventional stereo configuration.
- Connect the RIGHT channel from your pre-amp (or PRE OUT R from an A38) to the socket labelled AUDIO IN R on your first P38.
- Pull out the link supplied on the back panel (labelled 'link'), and use it to connect the left and right AUDIO OUT sockets together.
- Repeat steps 1 and 2 on your second P38, but this time connect the LEFT channel from your pre-amp (or PRE OUT L from an A38) to the socket labelled AUDIO IN L.
- Follow the diagram (left) for bi-wiring each speaker, using the SP2 connections of the P38 for the high-frequency speaker and the SP1 connections for the low-frequencies in each case.
Daisy chaining more amplifiers
The P38 can be connected to further power amplifiers to drive more speakers (e.g., those in other rooms, tri-amplified speakers, etc). This technique is called 'Daisy chaining'.
Connect the AUDIO OUT sockets on the P38 to the pre-amp input of the next amplifier in series, left to left, right to right.
Note that daisy-chaining cannot be used if the Mono Link (previously described) is in use.

Remote switching
By making a connection from the triG out socket of the A38 Integrated Amplifier to the rEMoTE In socket of your P38, you can use the A38 to switch the power amplifier on and off.
If configured in this way, the front panelPowEr button of the A38 (or the ⏻ button on the remote control) switches both amplifiers on and off together. This facility allows you to position your power amplifier in a remote location (such as close to the speaker it is amplifying), yet still control it.
The connecting cable to use is a 3.5mm jack lead. It is possible to remotely switch several power amplifiers from an A38 by 'daisy chaining' from the trtG out of one power amplifier into the rEMoE In of the next.

| A38 P38 | ||
| Continuous power output (20Hz—20kHz at 0.5% THD), per channel | ||
| Both channels, 8Ω, 20Hz—20kHz 100W 100W | ||
| Single channel, 8Ω, 20Hz—20kHz 150W 150W | ||
| Both channels, 4Ω, 20Hz—20kHz 140W 140W | ||
| Single channel, 4Ω, at 1kHz 200W 200W | ||
| Harmonic distortion, 80% power, 8Ω at 1kHz 0.005% 0.005% | ||
| Inputs | ||
| Phono input (optional module): | ||
| Input sensitivity 2.7mV (MM); 270μV (MC) | ||
| Input impedance 47k | Ω (MM); 300Ω (MC) | |
| Signal/noise ratio (CCIR) -79dB (MM); -73dB (MC) | ||
| Overload margin 35dB | ||
| Line inputs: | ||
| Nominal sensitivity 250mV—2V 800mV (pre-amp. in) | ||
| Input impedance 10k | Ω 10kΩ | |
| THD-n (1kHz, 0dB signal, measured 20Hz to 20kHz unweighted) | -104dB | -104dB |
| Power amplifier input | ||
| Nominal sensitivity | 800mV | 800mV |
| Input impedance | 22kΩ 22kΩ | |
| Gain | 31.5dB | 31.5dB |
| Preamplifier output | ||
| Nominal output level | 700mV | |
| Maximum output level | 2.6V RMS | |
| Output impedance | <50Ω | |
| Headphone output | ||
| Maximum output level into 600Ω | 1.6V rms | |
| Output impedance | 4.7Ω | |
| General | ||
| Mains voltage | 115V or 230V 115V or 230V | |
| Power consumption (maximum) | 800VA | 800VA |
| Power consumption (standby) | 2VA | 2VA |
| Dimensions W x D x H (including feet) | 430 x 370 x 110mm | 430 x 350 x 110mm |
| Weight (nct) | 9.3kg 9.5kg | |
| Weight (packed) | 12.2kg | 12.5kg |
| Supplied accessories | mains leadCR90 remote control4 x AAA batteries | mains lead |
| E&OE | ||
| NOTE: All specification values are typical unless otherwise stated. | ||
Continual improvement policy
Arcam has a policy of continual improvement for its products. This means that designs and specifications are subject to change without notice.
Troubleshooting
If you are having trouble with your amplifier, check the following items.
No sound
Check the following:
■ Both the A38 and (if applicable) P38 power-amplifiers are switched on.
■ The amplifier is not muted (indicated on the A38 by muted being shown on the front-panel).
■ The selected source is generating audio (e.g., if CD is selected, then the CD is playing).
The AV input is not selected on the A38 (indicated by the light above the AV button being illuminated), instead of the expected source. In this case, press AV again to de-select the AV input.
The speaker outputs are enabled on the A38/P38, as indicated by the lights above the SP1 and/or SP2 buttons (as appropriate) being illuminated.
Sound cuts-out unexpectedly
If the temperature of the internal heatsink rises above a safe level, then a thermal cut-out inside the amplifier operates to protect the unit. During this time, the power indicator on the front panel flashes and the protection system temporarily removes power to the speakers. The system will reset itself as the heatsink cools down.
■ With two pairs of low-impedance speakers connected (6Ω or less), overloads are more likely. Overloading the amplifier may cause it to shut down because of overheating.
Note that, due to the high output voltage from a CD player, it is possible to drive your amplifier at full power even though the volume is not set at maximum. See page 11 to adjust the input trim of a CD player or other input device.
Amplifier does not switch back on
Both the amplifiers detailed in this handbook have a protection mechanism which is activated if you switch the unit on immediately after turning it off. If this mechanism activates, wait 30 seconds before switching the unit on again.
Remote-control codes
The following tables give the infrared commands accepted by the A38.
Power commands Menu navigation commands
| Command Decimal Code | Command Decimal Code |
| Power toggle 16-12 | |
| Power-on 16-123 | |
| Power-off 16-124 |
Source selection commands
| Command Decimal Code | |
| SAT select 16-0 | |
| PHONO select 16-1 Command Decimal Code | |
| AV select | 16-2 |
| TUNER select | 16-3 |
| DVD select 16-4 Volume control commands | |
| PVR select 16-6 Mule | 16-13 |
| CD select | 16-7 Volume up 16-16 |
| AUX select | 16-8 Volume down |
| UP | 16-32 |
| DOWN | 16-33 |
| SELECT | 16-37 |
| ENTER | 16-87 |
Display control commands
| Display | 16-59 |
| 16-17 |
The following tables give commands accepted by the P38.
Power commands
| Command | Decimal Code |
| Power toggle | 16-12 |
| Power-on 16-123 | Speaker 2 |
| Power-off 16-124 | Speaker 1 |
Speaker control commands
| Command | Decimal Code | |
| toggle on | Speaker 1 toggle | 16-35 |
| 16-39 | ||
| 16-43 | ||
| Speaker 1 off | 16-44 | |
| Speaker 2 on | 16-45 | |
| Speaker 2 off | 16-46 |
Note that the A38 also responds to code 20-53 (the PLAY command for an Arcam CD player). The A38 switches automatically to CD input on receiving this command.

Worldwide Guarantee
This entitles you to have the unit repaired free of charge, during the first two years after purchase, at any authorised Arcam distributor provided that it was originally purchased from an authorised Arcam dealer or distributor. The manufacturer can take no responsibility for defects arising from accident, misuse, abuse, wear and tear, neglect or through unauthorized adjustment and/or repair, neither can they accept responsibility for damage or loss occurring during transit to or from the person claiming under the guarantee.
The warranty covers:
Parts and labour costs for two years from the purchase date. After two years you must pay for both parts and labour costs. The warranty does not cover transportation costs at any time.
Claims under guarantee
This equipment should be packed in the original packing and returned to the dealer from whom it was purchased, or failing this, directly to the Arcam distributor in the country of residence.
It should be sent carriage prepaid by a reputable carrier – not by post. No responsibility can be accepted for the unit whilst in transit to the dealer or distributor and customers are therefore advised to insure the unit against loss or damage whilst in transit.
For further details contact Arcam at:
Arcam Customer Support Department,
Pembroke Avenue, Waterbeach, CAMBRIDGE, CB25 9QR, England
or via www.arcam.co.uk.
Problems?
If your Arcam dealer is unable to answer any query regarding this or any other Arcam product please contact Arcam Customer Support at the above address and we will do our best to help you.
On-line registration
You can register your product on-line at www.arcam.co.uk.
- HANDBOOK Integrated and power amplifiers
- Class I product
- Important safety instructions
- Take heed of warnings and instructions
- Water and moisture
- Object or liquid entry
- Placing the equipment
- Ventilation
- Heat
- Climate
- Cleaning
- Power sources
- Power-cord protection
- Power lines
- Non-use periods
- Abnormal smell
- Servicing
- Damage requiring service
- Safety compliance
- Contents
- Placing the unit
- Power
- Stand-by power
- Interconnect cables
- Audio inputs
- dVd
- AV
- tunEr
- cd
- AuX
- Recording loops
- AV rEcord out
- AV PLAy In
- PVr rEcord out
- PVr PLAy In
- AV Dubbing
- Phono input
- Pre-/power-amplifier connections
- PrE out
- Pwr In
- Controlling A38 from a second room
- Connecting loudspeakers to the A38/P38
- Single wiring
- Bi-wiring
- Bi-amping
- Notes on making speaker connections
- Switching the A38 on
- Changing the volume
- SP1 and SP2
- Selecting an audio source
- Listening using headphones
- Balance
- Display
- Recording an audio source
- Selecting the source for recording
- A38 setup
- Configuring your A38 amplifier
- Adjusting listening settings
- The CR90 Universal remote controller
- Source keys
- Select the source key first
- Amp commands
- Connecting to loudspeakers
- Other connections
- AUDIO IN
- Mono Link
- Daisy chaining more amplifiers
- Remote switching
- Continual improvement policy
- Troubleshooting
- No sound
- Sound cuts-out unexpectedly
- Amplifier does not switch back on
- Remote-control codes
- Worldwide Guarantee
- The warranty covers:
- Claims under guarantee
- Problems?
- On-line registration
Brand : ARCAM
Model : P38
Category : Receiver