
3DV5 - Camcorder VIEWSONIC - Free user manual and instructions
Find the device manual for free 3DV5 VIEWSONIC in PDF.


| Product Type | Camcorder |
| Brand | Viewsonic |
| Model | 3DV5 |
| Dimensions (W x H x D) | Approx. 120 x 70 x 90 mm |
| Weight | Approx. 350 g (without battery) |
| Power Source | Rechargeable lithium-ion battery (7.4V, 1200 mAh) |
| Charging | USB-C or AC adapter |
| Recording Media | SD/SDHC/SDXC card (up to 128 GB) |
| Video Resolution | Full HD 1080p at 30 fps |
| Lens | Fixed lens, f/2.8, 3x digital zoom |
| Display | 2.7-inch LCD screen (270° rotation) |
| Image Stabilization | Electronic image stabilization |
| Microphone | Built-in stereo microphone |
| Connectivity | HDMI, USB, AV out |
| Maintenance & Cleaning | Use soft dry cloth; avoid liquids; clean lens with lens cleaning kit |
| Safety Precautions | Avoid extreme temperatures; do not disassemble; keep away from water |
| Spare Parts Availability | Battery, charger, USB cable, AC adapter available online |
| Repairability Index | 7/10 (user replaceable battery and memory card) |
| Warranty | 1 year limited warranty |
| General Information | User manual available in PDF; AI support available on notice-facile.com |
Frequently Asked Questions - 3DV5 VIEWSONIC
User questions about 3DV5 VIEWSONIC
0 question about this device. Answer the ones you know or ask your own.
Ask a new question about this device
Download the instructions for your Camcorder in PDF format for free! Find your manual 3DV5 - VIEWSONIC and take your electronic device back in hand. On this page are published all the documents necessary for the use of your device. 3DV5 by VIEWSONIC.
USER MANUAL 3DV5 VIEWSONIC
This device complies with part 15 of FCC Rules. Operation is subject to the following two conditions: (1) this device may not cause harmful interference, and (2) this device must accept any interference received, including interference that may cause undesired operation.
This equipment has been tested and found to comply with the limits for a Class B digital device, pursuant to part 15 of the FCC Rules. These limits are designed to provide reasonable protection against harmful interference in a residential installation. This equipment generates, uses, and can radiate radio frequency energy, and if not installed and used in accordance with the instructions, may cause harmful interference to radio communications. However, there is no guarantee that interference will not occur in a particular installation. If this equipment does cause harmful interference to radio or television reception, which can be determined by turning the equipment off and on, the user is encouraged to try to correct the interference by one or more of the following measures:
- Reorient or relocate the receiving antenna.
- Increase the separation between the equipment and receiver.
- Connect the equipment into an outlet on a circuit different from that to which the receiver is connected.
- Consult the dealer or an experienced radio/TV technician for help.
Warning: You are cautioned that changes or modifications not expressly approved by the party responsible for compliance could void your authority to operate the equipment.
For Canada
CE Conformity for European Countries

The device complies with the EMC Directive 2004/108/EC and Low Voltage Directive 2006/95/EC.
Following information is only for EU-member states:
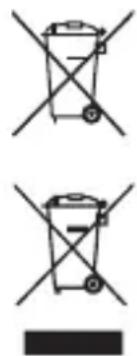
The mark is in compliance with the Waste Electrical and Electronic Equipment Directive 2002/96/EC (WEEE).
The mark indicates the requirement NOT to dispose the equipment including any spent or discarded batteries or accumulators as unsorted municipal waste, but use the return and collection systems available.
If the batteries, accumulators and button cells included with this equipment, display the chemical symbol Hg, Cd, or Pb, then it means that the battery has a heavy metal content of more than 0.0005% Mercury or more than, 0.002% Cadmium, or more than 0.004% Lead.
natural_image
Two identical line diagrams of a trash bin with no text or symbols, each containing a cross symbol (no text or labels present)Important Safety Instructions
-
Read these instructions completely before using the equipment.
-
Keep these instructions in a safe place.
-
Heed all warnings.
-
Follow all instructions.
-
Do not use this equipment near water. Warning: To reduce the risk of fire or electric shock, do not expose this apparatus to rain or moisture.
-
Clean with a soft, dry cloth.
-
Do not block any ventilation openings. Install the unit in accordance with the manufacturer's instructions.
-
Do not install near any heat sources such as radiators, heat registers, stoves, or other devices (including amplifiers) that produce heat.
-
Do not defeat the safety purpose of the polarized or grounding-type plug. A polarized plug has two blades with one wider than the other. A grounding type plug has two blades and a third grounding prong. The wide blade and the third prong are provided for your safety. If the provided plug does not fit into your outlet, consult an electrician for replacement of the obsolete outlet.
-
Protect the power cord from being walked on or pinched particularly at plugs. Convenience receptacles and the point where they exit from the unit. Be sure that the power outlet is located near the unit so that it is easily accessible.
-
Only use attachments/accessories specified by the manufacturer.
-
Use only with the cart, stand, tripod, bracket, or table specified by the manufacturer, or sold with the unit. When a cart is used, use caution when moving the cart/unit combination to avoid injury from tipping over.
-
Unplug this unit when unused for long periods of time.
-
Refer all servicing to qualified service personnel. Servicing is required when the unit has been damaged in any way, such as: if the power-supply cord or plug is damaged, if liquid is spilled onto or objects fall into the unit, if the unit is exposed to rain or moisture, or if the unit does not operate normally or has been dropped.
-
Caution: There is a risk of explosion if the battery is replaced by an incorrect type. Dispose of used batteries according to the instructions.
-
Only use battery packs approved by the manufacturer or else damage may occur.

Declaration of RoHS Compliance
This product has been designed and manufactured in compliance with Directive 2002/95/EC of the European Parliament and the Council on restriction of the use of certain hazardous substances in electrical and electronic equipment (RoHS Directive) and is deemed to comply with the maximum concentration values issued by the European Technical Adaptation Committee (TAC) as shown below:
| Substance | Proposed Maximum Concentration | Actual Concentration |
| Lead (Pb) 0.1% < 0.1% | ||
| Mercury (Hg) 0.1% < 0.1% | ||
| Cadmium (Cd) 0.01% < 0.01% | ||
| Hexavalent Chromium ( Cr^6+ ) 0.1% < 0.1% | ||
| Polybrominated biphenyls (PBB) | 0.1% < 0.1% | |
| Polybrominated diphenyl ethers (PBDE) | 0.1% < 0.1% |
Certain components of products as stated above are exempted under the Annex of the RoHS Directives as noted below:
Examples of exempted components are:
- Mercury in compact fluorescent lamps not exceeding 5 mg per lamp and in other lamps not specifically mentioned in the Annex of RoHS Directive.
- Lead in glass of cathode ray tubes, electronic components, fluorescent tubes, and electronic ceramic parts (e.g. piezoelectronic devices).
- Lead in high temperature type solders (i.e. lead-based alloys containing 85% by weight or more lead).
- Lead as an allotting element in steel containing up to 0.35% lead by weight, aluminium containing up to 0.4% lead by weight and as a cooper alloy containing up to 4% lead by weight.
Copyright Information
Copyright © ViewSonic® Corporation, 2010. All rights reserved.
ViewSonic, the three birds logo, OnView, ViewMatch, and ViewMeter are registered trademarks of ViewSonic Corporation.
Disclaimer: ViewSonic Corporation shall not be liable for technical or editorial errors or omissions contained herein; nor for incidental or consequential damages resulting from furnishing this material, or the performance or use of this product.
In the interest of continuing product improvement, ViewSonic Corporation reserves the right to change product specifications without notice. Information in this document may change without notice.
No part of this document may be copied, reproduced, or transmitted by any means, for any purpose without prior written permission from ViewSonic Corporation.
Product Registration
To meet your future needs, and to receive any additional product information as it becomes available, please register your product on the Internet at: www.viewsonic.com. The ViewSonic® Wizard CD-ROM also provides an opportunity for you to print the registration form, which you may mail or fax to ViewSonic.
For Your Records
| Product Name: | 3DV5ViewSonic 3D Camcorder |
| Model Number: | VS13782 |
| Document Number: | 3DV5_UG_ENG Rev. 1A 09-03-10 |
| Serial Number: | |
| Purchase Date: |
Product disposal at end of product life
ViewSonic respects the environment and is committed to working and living green. Thank you for being part of Smarter, Greener Computing. Please visit ViewSonic website to learn more.
USA & Canada: http://www.viewsonic.com/company/green/recycle-program/
Europe: http://www.viewsoniceurope.com/uk/support/recycling-information/
Taiwan: http://recycle.epa.gov.tw/recycle/index2.aspx
Getting Started
Product overview
natural_image
Technical line drawing of a cylindrical mechanical component with internal components and mounting bracket (no text or symbols)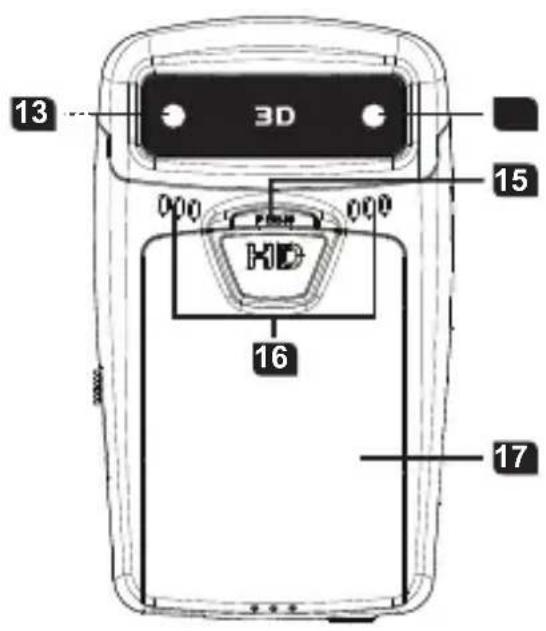
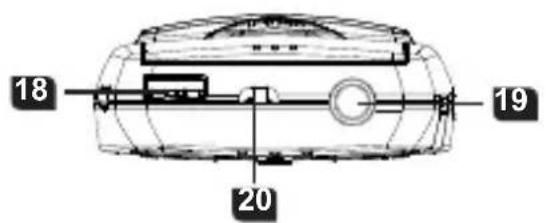
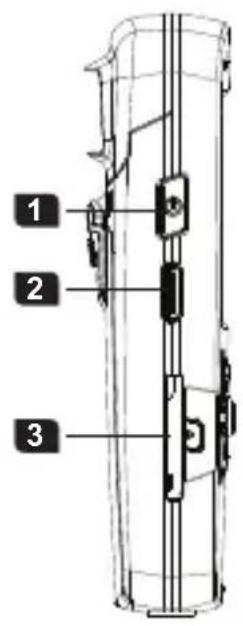
1 Power button - Press to turn on; long-press to turn off
2 HDMI port
3 SD/SDHC card slot
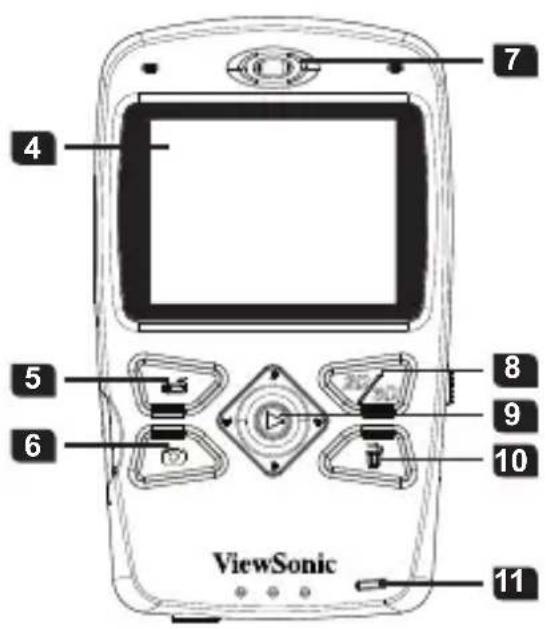
4 2D/3D display
5 Record button
6 Shutter button
7 Speaker
8 2D/3D button - Switch between 2D/3D mode
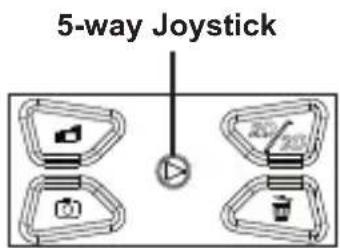
9 5-way joystick - 5-way: up/down/left/right/ enter Enter: OK or Playback
10 Delete button
11 Battery charge LED indicator
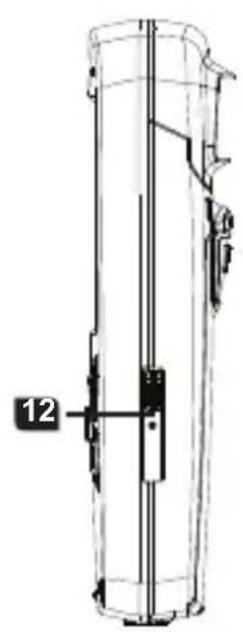
12 USB switch - Slide downwards to use the USB connector
13 Right lens - For 2D and 3D capture
14 Left lens - For 3D capture
15 Push button - For releasing the battery cover
16 Microphones
17 Battery cover
18 USB connector
19 Tripod socket
20 Hang strap holder
Loading the battery
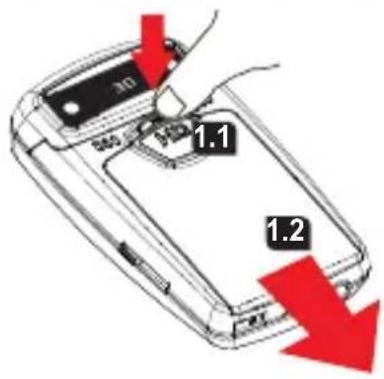
1 Press the "PUSH" button, and then pull the battery cover downwards to remove it.
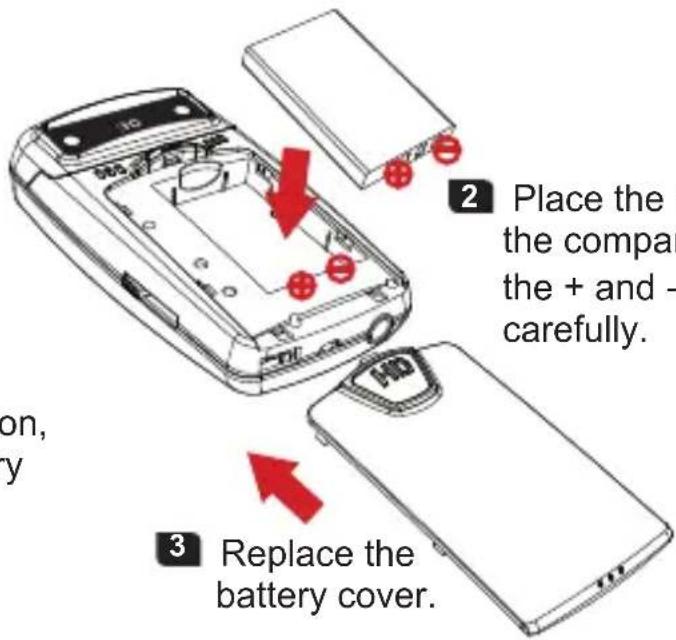
2 Place the battery into the compartment. Align the + and - metallic ends carefully.
3 Replace the battery cover.
Note that the + and - metallic contacts must be aligned with the corresponding contacts in the compartment.
Charging the battery
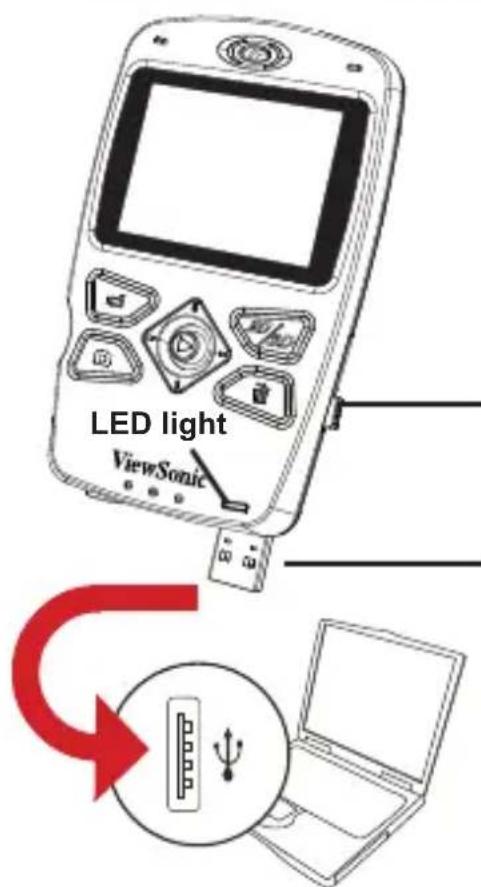
Before charge:
Power off the unit first and make sure the Li-ion battery is installed.
① Make sure your PC is powered on during the charge.
① It is recommended to charge the battery for at least 8 hours before the first time usage.
1 Slide the USB switch downwards to reveal the USB connector.
2 Connect the USB connector to a USB port of a powered PC and the charge will begin. Use an extension cable if necessary.
The LED light turns amber when the charge is in progress. After the charge is complete, the LED light will turn green.
Powering on or off / Using a memory card
Press the power button to power on the unit. Press and hold down for 2 seconds to turn off the unit.
Insert a SD/SDHC card (sold separately) into the slot until it clicks into place. To remove the card, push the card to release it and then pull it out gently.
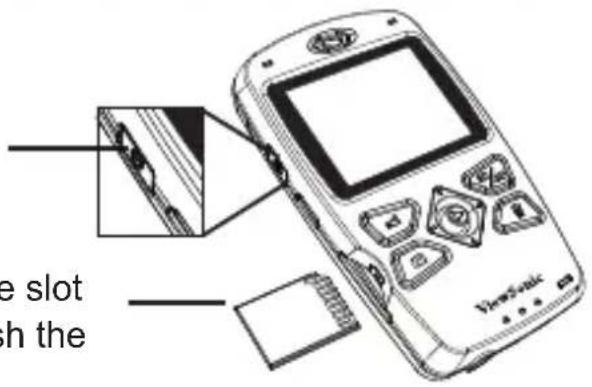
If the unit cannot be powered on, please check the followings:
1) The battery is correctly loaded;
2) The loaded battery has enough power.
Setting language
1 Push the Joystick to the right (→) to bring up menu.
2 Select the "Language" item and Press OK ( )
3 Move the Joystick up/down (H) to select your local language. Press the OK button ( ) to confirm.
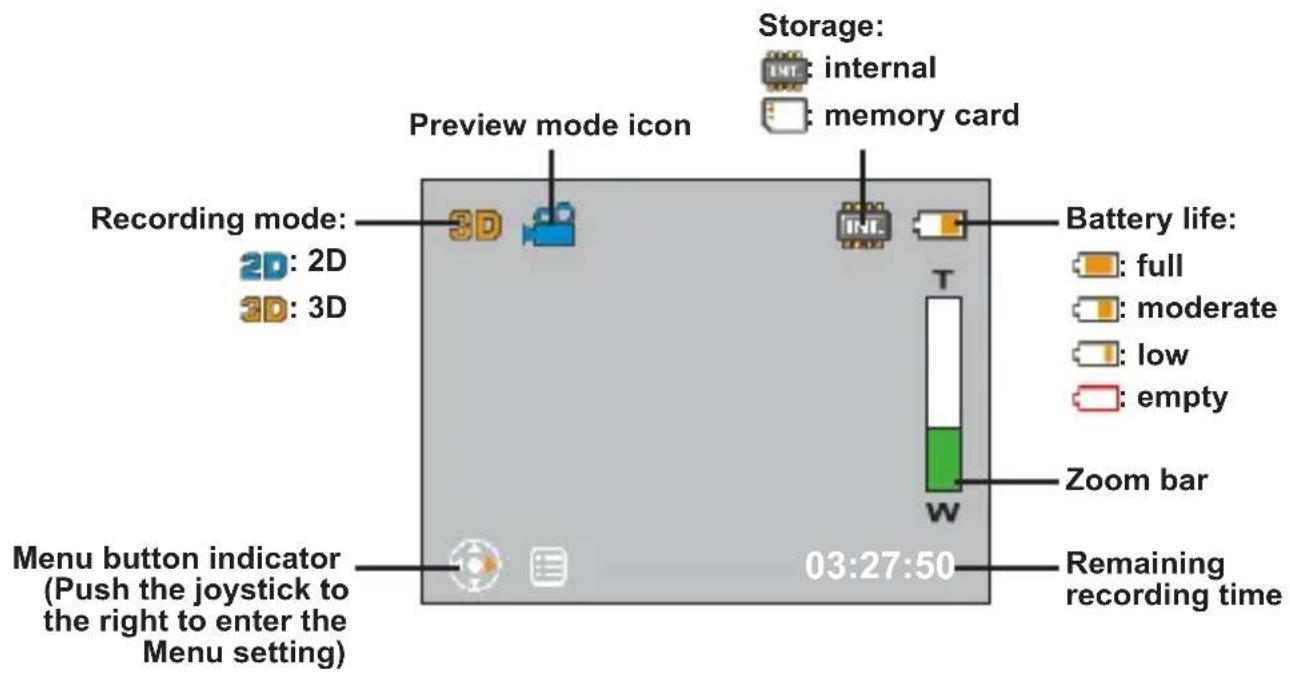
Reading screen icons
ViewSonic 3 3DV5
Basic Operations
i
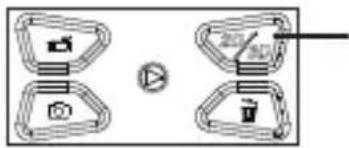
Press this button to shift between 2D/3D mode. Pressing this button in preview will determine whether the recorded file is 2D or 3D. Pressing this button in playback will let you see the 2D or 3D files stored in your camcorder or memory card. Note that 3D files cannot be recorded/viewed/deleted in 2D mode, and vice versa.
When recording or shooting in 2D mode, only the right lens is used for capturing image.
This product utilizes the “Parallax Barrier” 3D technology. The parallax barrier is a special layer placed in front of the LCD screen. In 3D mode, it allows each of your eye to see a different set of pixels on the screen (hence the 3D effect), and as a result the brightness of the screen will also seem to be halved in 3D mode.
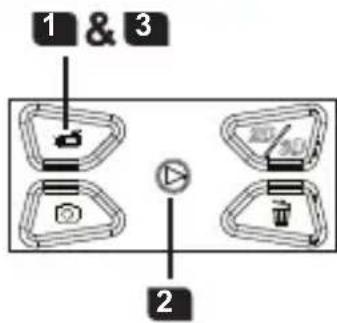
Recording a video clip
1 Press the Record button ( ) to start the recording.
2 During recording, you can move the Joystick up/down ( ) to zoom in/out the image. You can also press the OK button ( ) to pause or resume the recording.
3 Press the Record button ( ) again to stop the recording.
When recording in a dim environment, please use extra light source to illuminate the subject.
Taking a photo
1 Move the Joystick up/down (H) to zoom in/out the image until a proper scene is set.
2 Press the Shutter button ( ) to take a photo.
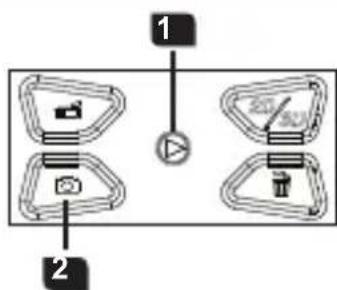
Blurred photos may occur due to hand shake. To avoid blurred photos, please hold the camcorder steady when taking photos or use a tripod to eliminate shaking.
Playback
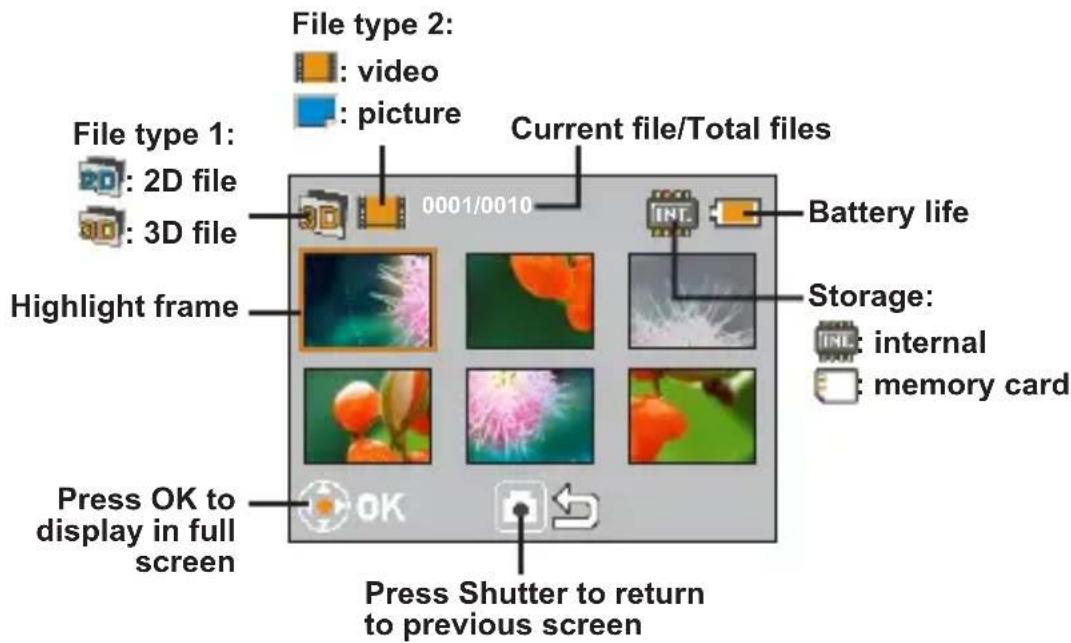
1 Press the OK button (☐) to enter Playback preview mode.
i Press the 2D/3D button ( ) to switch between 2D or 3D files.
2 Use the Joystick ( ✉) to navigate through your recordings and select a file. Press OK ( ✉) to view the file in full screen. When a file is viewed in full screen and is not playing or being zoomed and locked, you can move the Joystick left/right ( ✉) to shift between the previous or next file.
3-1 When playing a video, you can move the Joystick left/right ( ⇧) to fast rewind or fast forward, or press the OK button ( ⏻ ) to pause or resume the playback. You can also move the Joystick up/down ( ⏽ ) to bring up volume control and then left/right ( ⇧) to adjust volume.
3-2 When viewing a photo, you can move the Joystick up/down ( ) to zoom in/out. Press the OK button ( ▶ ) to lock ratio and use the Joystick ( ) to browse the photo. To exit the zoomed condition, press OK ( ▶ ) and use the Joystick ( ) to zoom out the image until back to normal ratio, or simply press the Shutter ( ▶ ) button.
4 To exit Playback mode, press the Shutter ( ) button.
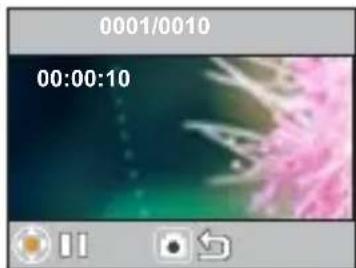
Full screen playback
Deleting files
1 Press the OK button ( ) to enter Playback mode and use the Joystick ( ) to select a file.
2 Press the Delete button ( ) and 3 options will be available:
| Option Description | |
| Yes Delete the selected file | |
| No Exit menu without deleting the file | |
| All | Delete all video and image files in the same folder (3D or 2D) |
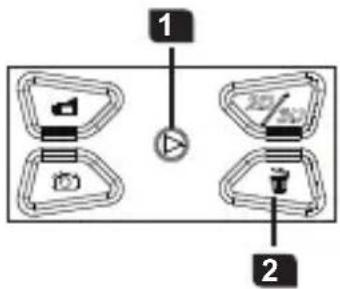
Menu operations
1 Push the Joystick to the right (→) to bring up menu.
2 Move the Joystick up/down (H) to select a menu item and Press OK (▶) to enter.
3 Move the Joystick up/down (H) to select your desired option and press OK (i) to confirm.
4 To exit menu, push the Joystick to the left (⇐).
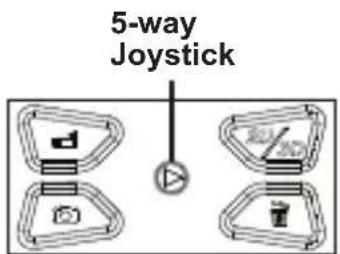
Menu items
| Menu items Description | |
| Language Select the language for the Camcorder. | |
| Date & Time | To setup the date and time, move the Joystick up/down ( ) to adjust value; left/right ( ) to shift between fields. Press OK ( ) to save the changes. |
| Date Stamp | Print a date and time mark on each photo (photo only). |
| Icon Enable or disable the icons shown on the display. | |
| Flicker | Set flicker frequency to 50Hz or 60Hz. See the “Flicker table” for more details. |
* Flicker table:
| Region | England | Germany | Italy | Spain | Netherlands | Russia | ||
| Setting | 50Hz | 50Hz | 50Hz | 50Hz | 50Hz | |||
| Region | Portugal | America | Taiwan | China Japan | Korea Thailand | |||
| Setting | 50Hz | 60Hz | 60Hz | 50Hz | 50/60Hz | 60Hz | 50Hz | |
Note: The flicker setting is based on the frequency standard of your local power supply.
File management on PC
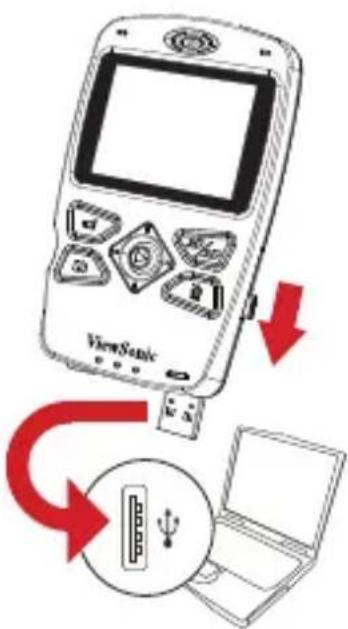
Connect the USB connector of the camcorder to your PC. Power on the camcorder and the LED will turn green. The camcorder is then treated as a removable disk on the PC, allowing you to have access to all files stored in the camcorder.
When you connect the camcorder to your PC for the first time, the installation of the bundled software will automatically start. Please follow the on-screen instructions to complete the software installation.
Copy your normal 2D files into the 2D (DCIM\101DIR2D) folder in your memory card. Do not store 2D files in the 3D (DCIM\100DIR3D) folder, otherwise they will not be detected and displayed.
Connecting to HDTV
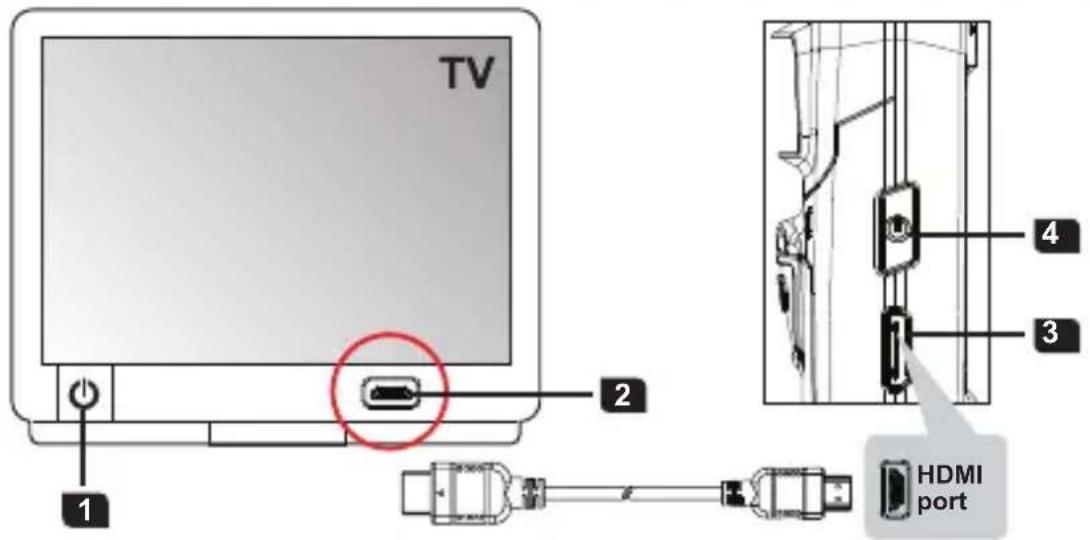
1 Turn on your HDTV.
2 Connect the HDMI-in connector (the larger end) of the HDMI cable to the HDTV.
3 Connect the other end of the HDMI cable to your camcorder.
4 Turn on the camcorder.
5 On your HDTV, select the HDMI input port where the HDMI cable is connected.
6 Switch your camcorder to Playback mode and start to play a le. For operation details please refer to the "Playback" section.
If your HDTV is 2D type, the 3D files output on your HDTV will be 2D "side-by-side" only.
If you want to experience 3D effect on your 2D HDTV, you need to convert the 3D files into red/cyan format files by installing and using the bundled software (TotalMedia HD Cam) and copy the converted files into the “DCIM\101DIR2D” folder in the memory card. Then output the playback to your HDTV and wear the red/cyan glasses to watch it. For more information please refer to the “Software Addendum” included in the package.
Using Software
Installing software on your PC
1 Connect the camcorder to your PC and power on the camcorder.
2 The installation wizard starts. Please wait for the installation wizard to complete the software installation.
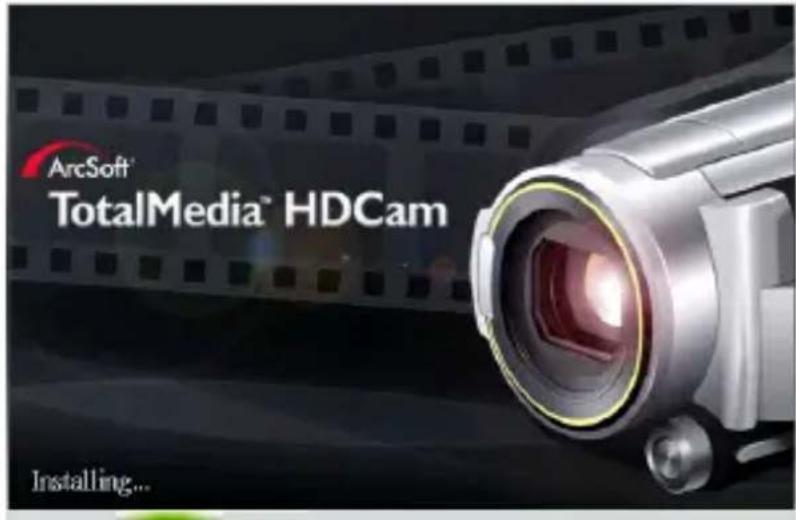
After installation, the software installation wizard will not appear the next time you connect the camcorder to your PC.
Playing 3D files on your PC
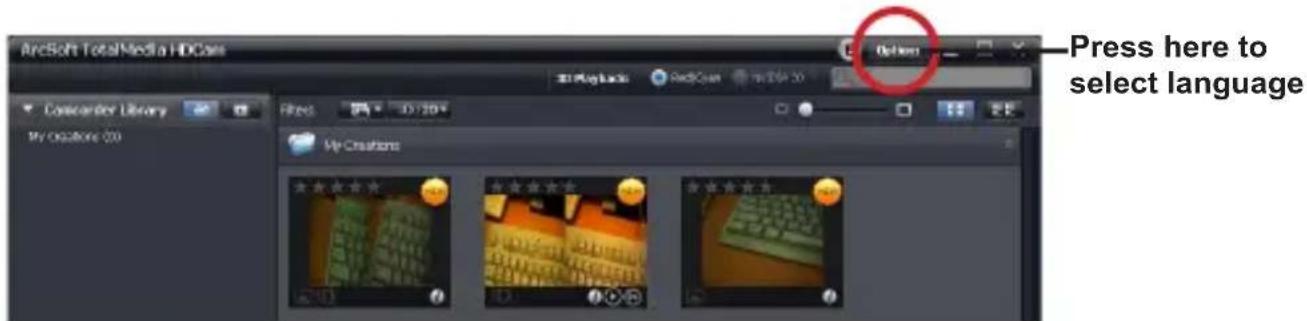
1 Start the TotalMedia HDCam program and enter the main screen.
i Select language for the program:
1) Click on "Options" and then select the "Preferences" item.
2) In the pop-up menu, pull down the language menu and select your local language.
3) Click on "OK" and re-start the program for the change to take effect.
2 Connect the camcorder to your PC and power on the camcorder. The program will automatically read and display files stored in the camcorder.
Reading files
3 Set the format that you would like to play. If your PC supports the "Nvidia 3D" technology, you can set the option to "Nvidia 3D". Otherwise you could set to "Red/Cyan".
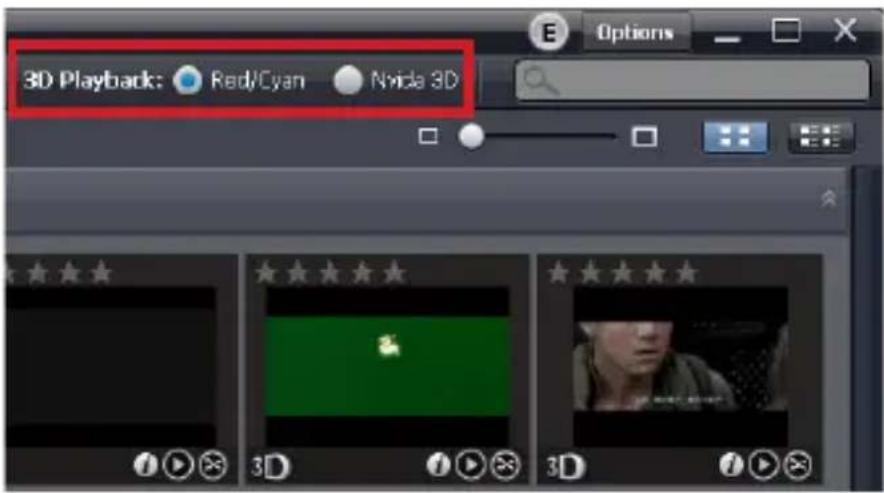
4 Double-click on a desired file to start playing. You need to wear a pair of 3D glasses (red/cyan or shutter glasses that come with the "Nvidia 3D Kit") to watch the 3D file.
Uploading videos to Youtube / Facebook
1 Select a video file that you want to upload and press the YouTube button on the bottom of the software interface. Click on "Next" and the login window will appear.
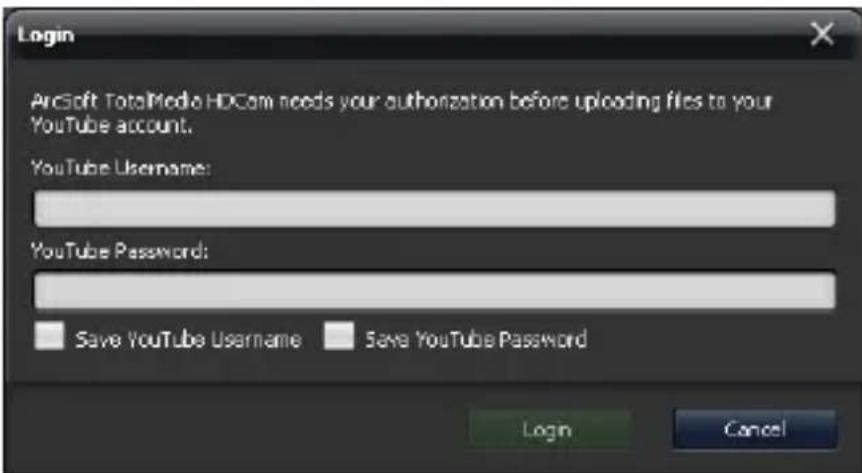
Login to Youtube
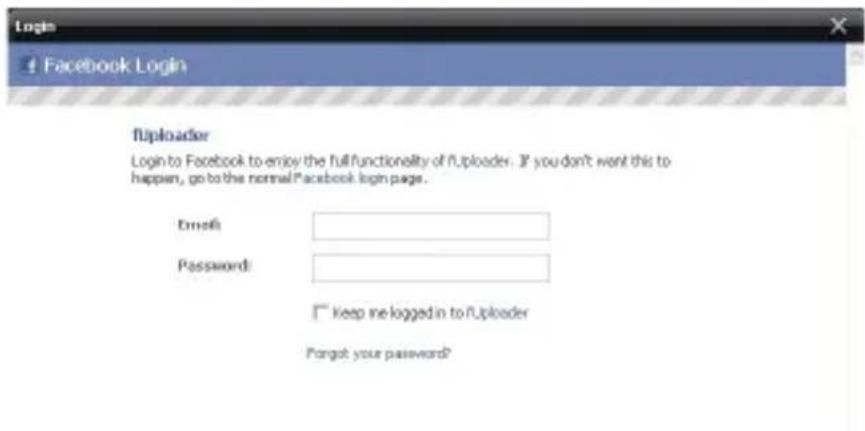
Login to Facebook
2 Enter your account and password, and the video file will be uploaded.
3D videos uploaded to Youtube can be viewed wearing the red/cyan glasses.
If you want to watch your 3D videos in action on Facebook, you need to convert your 3D files first. Please refer to the “Converting 3D files into 2D red/cyan” section for more information.
Converting 3D files into 2D red/cyan
By converting 3D files into 2D red/cyan files, you can connect the 3D camcorder to a 2D TV with HDMI and watch 3D image with the red/cyan glasses.
In the case that the camcorder is protected for overwriting, please use a card reader for converting files.
1 Press the "Convert to Red/Cyan" button on the bottom of the software interface.
2 Drag the file(s) that you want to convert to the lower task bar. Then click on 'Next' and the conversion process will begin. Please save the files into folder: "DCIM\101DIR2D" of the memory card. The 3D photos will be renamed to PIRCXXXX; the 3D video will be renamed to VIRCXXXX (XXXX is the counting number).
DO NOT save the converted files into the “\DCIM\100DIR3D” folder, otherwise the files will not be played back correctly in red/cyan format.
3 Turn on the camcorder with the memory card inserted and connect to a 2D HDTV via the HDMI cable. Switch to 2D mode first and then enter playback mode by pressing the joystick ( ). The TV screen becomes dark for a few second before the thumbnails of the files appear on the display.
4 Put the red/cyan glasses on, browse the thumbnails in the index, and playback red/cyan converted files.
Facebook does not support 3D files. However, by converting 3D files into red/cyan files, you can upload the converted files to Facebook and watch them with the red/cyan glasses.
Battery life / Capacity table
| Battery Life Table | Still picture Video clip | |
| Number of shots Recording time (minute) | ||
| 1000 60 | ||
| * The unit is set to 3D mode. | ||
Note: This table is for your reference only. The actual battery life depends on your battery quality and recharge level.
| Capacity Table | Memory (SD/SDHC) | Video clip (min.) Still picture | |
| 2GB 50 1400 | |||
| 4GB 100 2800 | |||
| 8GB 200 5600 | |||
| 16GB 400 11200 | |||
Note: The actual value of capacity may vary (up to ± 30% ) depending on the color saturation and complexity of your subject and surroundings.
Troubleshooting
| Problem Possible cause Solution | ||
| I output 3D video/photo playback to my home HDTV. But the 3D effect does not work. | Your TV/display is 2D and therefore does not support the format of the 3D files. | Covert the 3D video/photo into red/cyan format. Then play and output the converted file on your 2D HDTV/display. You also need to wear the accessory red/cyan glasses. |
| I output 3D video/photo playback to my home 3D HDTV. But the 3D effect does not work. | The system of your 3D TV/display is not correctly set up to support the format of the 3D files. | Select “side-by-side” setting in your 3D HDTV/display to correctly display the 3D effect. |
| I play my 3D videos/photos on my 3D-featured PC/notebook. But the 3D effect does not work. | The PC/notebook does not support “side-by-side” 3D format or the system is not correctly set up. | 1) If your 3D PC/notebook is “Nvidia 3D” compatible, you can set the TotalMedia HDCam program to support “Nvidia 3D” directly.2) If your PC/notebook is not “Nvidia 3D” compatible, you may consider installing “Nvidia 3D kit” to support the effect.3) You can download and install the 3D freeware “Stereoscopic Player”, and set up the software to support “side-by-side” 3D effect. |
| Flash occurs when I wear my Shutter Glasses (that comes with 3D HDTV/display) to watch 3D files. | You are watching 3D files under 50Hz or 60Hz fluorescent light. | Turn off the fluorescent light to avoid interference and then watch the 3D files. |
Specifications
| Item Specification | |
| Image Sensor 5 Mega-pixels CMOS (2592 x 1944) x 2 | |
| Resolution | Camcorder: HD 720p 30f (1280 x 720)Camera: 5M |
| File Format MP4 (H.264), JPEG | |
| Video Frame Rate 30 frames per second | |
| Internal Memory Yes | |
| External Memory SD card slot (supports 256MB up to 32GB SDHC) | |
| LCD Display 2.4" 3D TFT supports 3D and 2D mode display | |
| 3D/2D capture Yes, switchable | |
| Lens Fixed focus lens x 2 | |
| Focus Range 1 m ~∞ | |
| Aperture Range F3.0 | |
| Shutter Speed 1 ~ 1/2000 sec. | |
| Digital Zoom 4X | |
| Night Shot Mode | Auto |
| White Balance Auto | |
| Exposure Control | Auto |
| Date Stamp | Yes |
| Microphone | Yes (Two) |
| Speaker | Yes |
| TV out | HDTV (HDMI output) |
| Auto Power-off | 3 minutes |
| Interface | USB 2.0 mass storage |
| Battery | NP60 Li-lon Rechargeable BatteryOperating condition:Temperature : 0~45 °CHumidity : 65+- 20% RH |
| Dimensions (LxWxH) | 120 x 72 x 29 mm |
Note: Specifications are subject to change without notice.
Customer Support
For technical support or product service, see the table below or contact your reseller.
Note : You will need the product serial number.
| Country/Region Website | T = TelephoneF = FAX | ||
| Australia/New Zealand | www.viewsonic.com.au | AUS= 1800 880 818NZ= 0800 008 822 | service@au.viewsonic.com |
| Canada www.viewsonic.com | T (Toll-Free)= 1-866-463-4775T (Toll)= 1-424-233-2533F= 1-909-468-3757 | service.ca@viewsonic.com | |
| Europe www.viewsoniceurope.com www.viewsoniceurope.com/uk/Support/Calldesk.htm | |||
| Hong Kong www.hk.viewsonic.com T= 852 3102 2900 service@hk.viewsonic.com | |||
| India www.in.viewsonic.com T= 1800 11 9999 service@in.viewsonic.com | |||
| Ireland (Eire) www.viewsoniceurope.com/uk/ | www.viewsoniceurope.com/uk/support/call-desk/ | service_ie@viewsoniceurope.com | |
| Korea www.kr.viewsonic.com T= 080 333 2131 service@kr.viewsonic.com | |||
| Latin America (Argentina) | www.viewsonic.com/la/ T= 0800-4441185 soporte@viewsonic.com | ||
| Latin America (Chile) www.viewsonic.com/la/ T= 1230-020-7975 soporte@viewsonic.com | |||
| Latin America (Columbia) | www.viewsonic.com/la/ T= 01800-9-157235 soporte@viewsonic.com | ||
| Latin America (Mexico) | www.viewsonic.com/la/ T= 001-8882328722 soporte@viewsonic.com | ||
| Renta y Datos, 29 SUR 721, COL. LA PAZ, 72160 PUEBLA, PUE. Tel: 01.222.891.55.77 CON 10 LINEASElectroser, Av Reforma No. 403Gx39 y 41, 97000 Mérida, Yucatán. Tel: 01.999.925.19.16Other places please refer to http://www.viewsonic.com/la/soporte/index.htm#Mexico | |||
| Latin America (Peru) | www.viewsonic.com/la/ | T= 0800-54565 | soporte@viewsonic.com |
| Macau | www.hk.viewsonic.com T= 853 2870 0303 service@hk.viewsonic.com | ||
| Middle East | ap.viewsonic.com/me/ | Contact your reseller | service@ap.viewsonic.com |
| Puerto Rico & Virgin Islands | www.viewsonic.com | T= 1-800-688-6688 (English)T= 1-866-379-1304 (Spanish)F= 1-909-468-3757 | service.us@viewsonic.comsoporte@viewsonic.com |
| Singapore/Malaysia/Thailand | www.ap.viewsonic.com T= 65 6461 6044 service@sg.viewsonic.com | ||
| South Africa | ap.viewsonic.com/za/ | Contact your reseller | service@ap.viewsonic.com |
| United Kingdom | www.viewsoniceurope.com/uk/ | www.viewsoniceurope.com/uk/support/call-desk/ | service_gb@viewsoniceurope.com |
| United States | www.viewsonic.com | T (Toll-Free)= 1-800-688-6688T (Toll)= 1-424-233-2530F= 1-909-468-3757 | service.us@viewsonic.com |
Limited Warranty ViewSonic® 3D Camcorder
What the warranty covers:
ViewSonic warrants its products to be free from defects in material and workmanship, under normal use, during the warranty period. If a product proves to be defective in material or workmanship during the warranty period, ViewSonic will, at its sole option, repair or replace the product with a like product. Replacement product or parts may include remanufactured or refurbished parts or components.
How long the warranty is effective:
ViewSonic 3D Camcorder are warranted for 1 year for labor from the date of the first customer purchase.
Who the warranty protects:
This warranty is valid only for the first consumer purchaser.
What the warranty does not cover:
- Any product on which the serial number has been defaced, modified or removed.
- Damage, deterioration or malfunction resulting from:
a. Accident, misuse, neglect, fire, water, lightning, or other acts of nature, unauthorized product modification, or failure to follow instructions supplied with the product.
b. Any damage of the product due to shipment.
c. Removal or installation of the product.
d. Causes external to the product, such as electrical power fluctuations or failure.
e. Use of supplies or parts not meeting ViewSonic's specifications.
f. Normal wear and tear.
g. Any other cause which does not relate to a product defect.
-
Any product exhibiting a condition commonly known as "image burn-in" which results when a static image is displayed on the product for an extended period of time.
-
Removal, installation, one way transportation, insurance, and set-up service charges.
How to get service:
- For information about receiving service under warranty, contact ViewSonic Customer Support (please refer to Customer Support page). You will need to provide your product's serial number.
- To obtain warranted service, you will be required to provide (a) the original dated sales slip, (b) your name, (c) your address, (d) a description of the problem, and (e) the serial number of the product.
- Take or ship the product freight prepaid in the original container to an authorized ViewSonic service center or ViewSonic.
- For additional information or the name of the nearest ViewSonic service center, contact ViewSonic.
Limitation of implied warranties:
There are no warranties, express or implied, which extend beyond the description contained herein including the implied warranty of merchantability and fitness for a particular purpose.
Exclusion of damages:
ViewSonic's liability is limited to the cost of repair or replacement of the product. ViewSonic shall not be liable for:
- Damage to other property caused by any defects in the product, damages based upon inconvenience, loss of use of the product, loss of time, loss of profits, loss of business opportunity, loss of goodwill, interference with business relationships, or other commercial loss, even if advised of the possibility of such damages.
- Any other damages, whether incidental, consequential or otherwise.
- Any claim against the customer by any other party.
- Repair or attempted repair by anyone not authorized by ViewSonic.
4.3: ViewSonic 3D Camcorder Warranty 3DC_LW01 Rev. 1A 08-05-08
- For Canada
- CE Conformity for European Countries
- Following information is only for EU-member states:
- Important Safety Instructions
- Declaration of RoHS Compliance
- Copyright Information
- Product Registration
- For Your Records
- Product disposal at end of product life
- Getting Started
- Product overview
- Loading the battery
- Charging the battery
- Before charge:
- Powering on or off / Using a memory card
- Setting language
- Reading screen icons
- Basic Operations
- Recording a video clip
- Taking a photo
- Playback
- Deleting files
- Menu operations
- Menu items
- File management on PC
- Connecting to HDTV
- Using Software
- Installing software on your PC
- Playing 3D files on your PC
- Uploading videos to Youtube / Facebook
- Converting 3D files into 2D red/cyan
- Customer Support
- Limited Warranty ViewSonic® 3D Camcorder
- What the warranty covers:
- How long the warranty is effective:
- Who the warranty protects:
- What the warranty does not cover:
- How to get service:
- Limitation of implied warranties:
- Exclusion of damages:
Brand : VIEWSONIC
Model : 3DV5
Category : Camcorder