
Mobile Security 8.0 - Antivirus KASPERSKY LAB - Free user manual and instructions
Find the device manual for free Mobile Security 8.0 KASPERSKY LAB in PDF.


| Product Type | Antivirus Software |
| Brand | Kaspersky Lab |
| Model | Mobile Security 8.0 |
| Version | 8.0 |
| Platform Compatibility | Android 4.1+ and iOS 9+ |
| License Type | 1-year subscription (per device) |
| Real-Time Protection | Yes |
| Virus Scanner | On-demand and scheduled scans (Quick, Full, Custom) |
| Anti-Phishing | Yes, blocks malicious links |
| Anti-Theft | Remote lock, wipe, locate, and siren |
| Web Security | Safe browsing protection |
| Privacy Protection | App lock, privacy cleaner |
| Call & Text Filtering | Block unwanted calls and texts |
| Parental Controls | Yes, monitor and restrict apps |
| Automatic Updates | Yes, virus definitions and software |
| Storage Requirement | Approximately 100 MB free space |
| RAM Usage | Low impact, ~50 MB on average |
| Installation Method | Download from Google Play or App Store |
| Languages Supported | English, French, German, Spanish, and more |
| Customer Support | Online knowledge base, email, and phone |
Frequently Asked Questions - Mobile Security 8.0 KASPERSKY LAB
User questions about Mobile Security 8.0 KASPERSKY LAB
0 question about this device. Answer the ones you know or ask your own.
Ask a new question about this device
Download the instructions for your Antivirus in PDF format for free! Find your manual Mobile Security 8.0 - KASPERSKY LAB and take your electronic device back in hand. On this page are published all the documents necessary for the use of your device. Mobile Security 8.0 by KASPERSKY LAB.
USER MANUAL Mobile Security 8.0 KASPERSKY LAB
natural_image
Abstract graphic with a white circular pattern on a green gradient background, no text or symbols present.Dear User!
Thank you for choosing our product. We hope that this documentation will help you in your work and will provide answers regarding this software product.
Note! This document is a property of Kaspersky Lab's and all rights to this document are reserved by the copyright laws of the Russian Federation and international treaties. Illegal reproduction and distribution of this document or parts hereof result in civil, administrative or criminal liability pursuant to the laws of the Russian Federation.
Any type of reproduction and distribution of any materials, including translation thereof, is allowed only by a written permission of Kaspersky Lab.
This document and graphic images related to it can be used exclusively for information, non-commercial or personal purposes.
This document can be amended without prior notification. For the latest version of this document refer to Kaspersky Lab's website at http://www.kaspersky.com/docs.
Kaspersky Lab does not assume any liability for the content, quality, relevancy or accuracy of the materials used in this document, the rights for which are held by any third parties and for the potential damages associated with the use of such documents.
This document includes registered and non-registered trademarks. All said trademarks are the property of their corresponding owners.
© Kaspersky Lab 1997-2009
+7 (495) 645-79-39,
Tel., fax: +7 (495) 797-87-00,
+7 (495) 956-70-00
http://www.kaspersky.com
http://support.kaspersky.com
Revision date: April 1, 2009
TABLE OF CONTENTS
KASPERSKY MOBILE SECURITY 8.0....7
Obtaining information about the application....8
Data sources for independent research 8
Contacting the Sales Department 9
Contacting the Technical Support Service 9
Discussion of Kaspersky Lab applications in web forum.... 10
Hardware and software requirements.... 10
Distribution kit 10
KASPERSKY MOBILE SECURITY FOR SYMBIAN OS 11
Installing Kaspersky Mobile Security.... 11
Getting started 13
Activating the program 13
Starting the program 14
Graphic interface.... 15
Secret code....16
Viewing information about the program.... 17
Real-Time Protection 17
About Real-Time Protection 18
Enabling and disabling the Real-Time Protection.... 18
Selecting objects to be scanned.... 19
Selecting actions for objects.... 20
Display of the protection icon 21
On-demand scan 23
About on-demand scan 23
Starting a scan manually....23
Configuring a scheduled scan.... 25
Selecting objects to be scanned.... 26
Selecting actions to be performed with objects 27
Configuring ROM scan....29
Configuring the scan of archives 30
Managing the backlight 31
Quarantine 32
About Quarantine 32
Viewing quarantined objects 33
Restoring objects from Quarantine.... 34
Deleting objects from Quarantine.... 34
Anti-Spam 36
About Anti-Spam 36
Anti-Spam modes.... 36
Creating a Black list 37
Creating a White List....41
Response to messages and calls from the phonebook contacts.... 45
Response to messages from non-numeric numbers.... 45
Selecting an action to be performed with incoming messages.... 47
Selecting an action to be performed with incoming calls.... 48
Parental control....48
About Parental control....49
Parental control modes 49
Creating a Black List 50
Creating a White List....54
Anti-Theft 58
About Anti-Theft 58
The SMS-Block function....58
Blocking the device 59
The SMS-Clean function 60
Deleting personal data 61
The SIM-Watch function....62
The SMS-Find function....63
Determining the device location 64
The Stealth SMS function....65
Firewall 67
About firewall....67
Selecting Firewall security level 67
Configuring notifications about connection attempts 68
Encryption....69
About Encryption....69
Data encryption 69
Data decryption....70
Information about encrypted data....71
Blocking access to encrypted data....72
Updating the program bases....73
About program bases update....73
Viewing bases information 73
Manual updating....74
Scheduled updating 74
Updating while roaming....75
Configuring connection settings 76
Program logs 77
About logs 77
Viewing Log records....78
Deleting Log records 78
Displaying the status window....78
Managing sound notification 79
Managing the license 80
Viewing the license information....80
Renewing the license 81
Uninstalling the program....82
KASPERSKY MOBILE SECURITY FOR MICROSOFT WINDOWS MOBILE 86
Installing Kaspersky Mobile Security....86
Getting started 88
Activating the program 88
Starting the program 89
Graphical user interface 90
Secret code 91
Viewing information about the program....92
Real-Time Protection 93
About Real-Time Protection 93
Enabling and disabling Real-Time Protection....93
Selecting an action to be performed with objects 94
On-demand scan 96
About on-demand scan 96
Starting a scan manually 96
Configuring a scheduled scan start 98
Selecting objects to be scanned....99
Selecting an action to be performed with objects 100
Quarantine 102
About Quarantine 102
Viewing quarantined objects 103
Restoring objects from Quarantine....103
Deleting objects from Quarantine.... 104
Anti-Spam 106
About Anti-Spam 106
Anti-Spam modes....106
Creating a Black List 107
Creating a White List.... 110
Response to messages and calls from the phonebook contacts.... 114
Response to messages from non-numeric numbers.... 115
Selecting an action to be performed with incoming messages.... 117
Selecting an action to be performed with incoming calls.... 118
Parental control....118
About Parental control.... 119
Parental control modes 119
Creating a Black List 120
Creating a White List.... 123
Anti-Theft 127
About Anti-Theft 127
The SMS-Block function.... 128
Blocking the device 128
The SMS-Clean function 129
Deleting personal data 130
The SIM-Watch function.... 131
The SMS-Find function.... 132
Determining the device location 133
The Stealth SMS function.... 134
Firewall 135
About firewall.... 135
Selecting the Firewall security level 136
Encryption....137
About Encryption.... 137
Data encryption 137
Data decryption....139
Blocking access to encrypted data.... 139
Updating the program bases.... 141
About updating of program bases 141
Viewing bases information 142
Manual updating.... 142
Scheduled udpating 143
Program logs 144
About logs 144
Viewing Log records.... 145
Deleting Log records 145
Managing the license.... 146
Viewing the license information.... 147
Renewing the license 147
Uninstalling the program....148
GLOSSARY 151
KASPERSKY LAB....154
CRYPTO EX LTD....156
INDEX 157
KASPERSKY MOBILE SECURITY 8.0
Kaspersky Mobile Security 8.0 is designed to ensure protection of mobile devices running Symbian OS and Microsoft Windows Mobile against malware programs, unsolicited calls and messages: The program offers the following functionality:
• Real-Time Protection of the file system of the device - interception and scan of:
- all incoming objects transmitted using wireless connections (IR port, Bluetooth), EMS and MMS messages, during synchronization with the personal computer and downloading files using a browser;
- files opened on the mobile device;
-
programs installed from the device's interface.
-
Scanning of the file system's objects on the mobile device or on the connected expansion cards by user's demand or according to the schedule.
- Reliable isolation of infected objects in the quarantine storage.
- Updating of Kaspersky Mobile Security bases used to scan for malware programs and delete dangerous objects.
- Blocking unwanted incoming and outgoing SMS messages and calls.
- Blocking access to or erasing user's data in case of unauthorized actions with the device, as, for instance, theft.
• Protection of the mobile device at the network level. - Protection with encryption of a folder (except system folders) in the device's memory or on the memory expansion card (through the encrypting functions embedded in the system).
- Receiving geographical coordinates of the device.
You can use the capabilities providing flexible control of the Kaspersky Mobile Security operation settings, viewing the current protection status and the event log in which the program's actions are recorded.
The program includes a menu system and supports an easy-to-use user's interface.
Once a malware program is detected, Kaspersky Mobile Security can disinfect the infected object detected (if disinfection is possible), delete it or place it into the Quarantine. In this case no copies of the object being deleted will be saved.
IN THIS SECTION
Obtaining information about the program 8
Hardware and software requirements....10
Distribution kit....10
OBTAINING INFORMATION ABOUT THE APPLICATION
If you have any questions regarding purchasing, installing or using Kaspersky Mobile Security, answers are readily available.
Kaspersky Lab provides various sources of information about the program. You can select the source that suits you best depending on the importance and urgency of your question.
IN THIS SECTION
Data sources for independent research....8
Contacting the Sales Department....9
Contacting the Technical Support service 9
Discussion of Kaspersky Lab applications in web forum 10
DATA SOURCES FOR INDEPENDENT RESEARCH
You can view the following sources of information about the program:
- program page at the web site of Kaspersky Lab;
- program page at the web site of the Technical Support Server (in the Knowledge Base);
• online help system; - documentation.
Application page at the web site of Kaspersky Lab.
http://www.kaspersky.com/kaspersky_mobile_security
Use this page to obtain general information about Kaspersky Mobile Security, its capabilities and features of operation. You can purchase Kaspersky Mobile Security or extend license required to use it at our E-Store.
Application page at the web site of the Technical Support Server (Knowledge Base)
http://support.kaspersky.com/desktop
This page contains articles published by experts from the Technical Support Service.
The articles contain useful information, guidelines and answers to frequent questions pertaining to the purchase, installation and use of Kaspersky Mobile Security. They are arranged in topics, such as "Work with key files", "Database updates" or "Troubleshooting". The articles can answer questions pertaining not only to Kaspersky Mobile Security, but also other products of Kaspersky Lab; they can contain general news from the Technical Support Service.
Online help system
If you have a question about a specific application window or a tab of Kaspersky Mobile Security, you can use the context help.
In order to open the context help, open the corresponding tab and select Help.
Documentation
The User Guide contains detailed information about the application's functions, how to work with them, includes advices and recommendations on its configuration.
Files containing the documents in PDF format are included into the product package of Kaspersky Mobile Security.
You can also download electronic files containing these documents from Kaspersky Lab's website.
CONTACTING THE SALES DEPARTMENT
If you have questions regarding selecting or purchasing Kaspersky Mobile Security or extending the period of its use, you can phone Sales Department specialists in our Central Office in Moscow at:
+7 (495) 797-87-00, +7 (495) 645-79-39, +7 (495) 956-70-00
The service is provided in Russian or English.
You can send your questions to the Sales Department to e-mail address sales@kaspersky.com.
CONTACTING THE TECHNICAL SUPPORT SERVICE
If you already purchased Kaspersky Mobile Security, you can obtain information about this application from the Technical Support service by phone or via Internet.
Experts from the Technical Support Service will answer your questions regarding the installation and use of the program, and if your device is infected, they will assist you in eliminating the consequences of malware activity.
Before contacting the Technical support service, please read the Support rules (http://support.kaspersky.com/support/rules).
E-mailing your question to the Technical Support Service
You can forward your question to the Technical Support Service specialists by filling out a Helpdesk web form at (http://support.kaspersky.com/helpdesk.html).
You can send your inquiry in the Russian, English, German, French or Spanish language.
In order to send an e-mail message with your question, you must indicate the Customer ID obtained during the registration at the Technical Support service website along with your password.
If you are not yet a registered user of Kaspersky Lab's applications, you can fill out a registration form at Helpdesk web form (https://support.kaspersky.com/personalcabinet/registration/form/). During registration enter the activation code for your application or the license key filename.
You will receive a Technical Support service specialist's response in your Personal Cabinet (https://support.kaspersky.com/PersonalCabinet) and at the e-mail address you specify in your inquiry.
Please describe your problem with all possible details in the help request web form. Specify in the mandatory fields:
- Prompt type. Select the topic which is the closest to the problem encountered, for example, "Product Installation/Removal Problem" or "Anti-Virus scan/virus removal problem". If you find no suitable section, select "General question".
• Application name and version number. -
Prompt text. Describe the problem you have encountered with as much detail as possible.
-
Customer ID and password. Enter the customer ID and password received during registration at the Technical Support Service web site.
- E-mail address. The experts from the Technical Support Service will send their reply to your inquiry to that address.
Technical support over the phone
If you have an urgent problem, you can call the Technical Support Service in your city. Before contacting your local (http://support.kaspersky.com/support/support_local) or international (http://support.kaspersky.com/support/international) technical support service, collect information (http://support.kaspersky.com/support/details) about your device and about the anti-virus application installed on it. This will enable our specialists to help you faster.
DISCUSSION OF KASPERSKY LAB APPLICATIONS IN WEB FORUM
If your question does not require an urgent answer, you can discuss it with Kaspersky Lab's specialists and other users of Kaspersky Lab's anti-virus applications in our forum located at Kaspersky Lab's web forum http://forum.kaspersky.com.
In the forum you can view existing discussions, leave your comments, create new topics, use search.
HARDWARE AND SOFTWARE REQUIREMENTS
Kaspersky Mobile Security 8.0 is designed for installation on mobile devices running one of the following operating systems:
• Symbian OS 9.1, 9.2 and 9.3 Series 60 UI.
• Microsoft Windows Mobile 5.0, 6.0, 6.1.
DISTRIBUTION KIT
You can purchase Kaspersky Mobile Security via Internet (the program distribution kit and documentation are provided in the electronic form). Kaspersky Mobile Security can be also purchased in mobile communication offices. For detailed information and the methods of purchase and the distribution kit, please contact our sales department at sales@kaspersky.com.
KASPERSKY MOBILE SECURITY FOR SYMBIAN OS
This section contains description of the operation of Kaspersky Mobile Security 8.0 for smartphones running Symbian version 9.1, 9.2 and 9.3 Series 60 UI.
IN THIS SECTION
Installing Kaspersky Mobile Security 11
Getting started....12
Real-Time Protection....16
On-demand scan....22
Quarantine....31
Anti-Spam....35
Parental control 48
Anti-Theft....58
Firewall....66
Encryption 69
Updating the program bases 73
Program logs 77
Displaying the status window 78
Managing sound notification....79
Managing the license....80
Uninstalling the program....82
INSTALLING KASPERSKY MOBILE SECURITY
In order to install Kaspersky Mobile Security, perform the following steps:
- Copy the program distribution package to your smartphone. You can do it using one of the following methods:
• from the download page of Kaspersky Lab's website;
• using program Nokia PC Suite;
• using a memory expansion card.
- Start the installation using one of the following methods:
• using program Nokia PC Suite;
- by starting the distribution package on the device.
- A prompt (see Figure below) will appear on the screen; select Yes to confirm the installation of the program.

Figure 1: Prompt to confirm the installation
- Review additional information about the program: name, version, certificates. Press Continue.
- If the operating system's and of Kaspersky Mobile Security's language versions do not match, a corresponding message will then be displayed on the screen. In order to proceed with the installation in English, press OK.
- Read the License Agreement (see the Figure below). If you agree to all terms of the agreement, press OK. If you do not agree with the terms of the License Agreement, press Cancel. Installation of Kaspersky Mobile Security will be terminated.
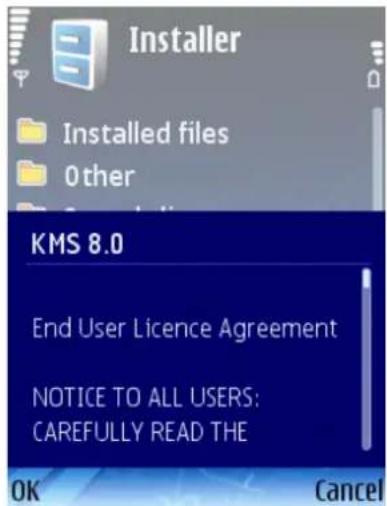
Figure 2: License Agreement
- Make sure that there is no other anti-virus software installed on the phone. Press OK. Kaspersky Mobile Security will then be installed on the device.
The installed Kaspersky Mobile Security is not intended for backup and restore.
GETTING STARTED
This section contains information on starting the program, what is required to activate it, how you should use the program interface and set up the secret code.
IN THIS SECTION
Activating the program....13
Starting the program....14
Graphic interface 15
Secret code 16
Viewing information about the program....17
ACTIVATING THE PROGRAM
To start using Kaspersky Mobile Security you must activate it first. The activation procedure involves entering the activation code and then receiving a key to be used by the program to determine your rights and the period during which you can use the program.
You can purchase the activation code at website http://www.kaspersky.com/globalstore or from Kaspersky Lab's distributors.
To activate Kaspersky Mobile Security on your smartphone, you must have an Internet connection configured.
Before activating the application, make sure that the devices' system date settings match the actual date and time.
In order to activate Kaspersky Mobile Security, perform the following actions:
- Open the device's main menu.
- Switch to the Applications menu.
- Select KMS 8.0 and start the program using the Open item from the Options menu.
- Select Enter code from the Options menu.
Kaspersky Mobile Security activation window will appear on the smartphone screen (see Figure below).

Figure 3: The program activation window
- Enter the code into the four fields. The activation code consists of Latin alphabet characters and digits (the code is case-insensitive). After you have entered the activation code, select Activate in the Options menu.
- When you request an access point, select the connection type to be used to connect to the server.
The program will send an http query to Kaspersky Lab's activation server and will then download and install the key file.
If the activation code you entered appears invalid for any reason, a corresponding message will be displayed on your smartphone's screen.
If the key file installation is successful, information about the license will be displayed on the screen. To start using the program press OK.
STARTING THE PROGRAM
In order to start Kaspersky Mobile Security, perform the following actions:
- Open the device's main menu.
- Switch to the Applications menu.
- Select KMS 8.0 and start the program using the Open item from the Options menu.
After the program is started a window with main components of Kaspersky Mobile Security (see Figure below) will be displayed on the screen.
• Real-Time Protection – Real-Time Protection status (see section "Real-Time Protection" on page 16).
- Last full scan – the date of the last anti-virus scan of the device (see section “On-demand scan” on page 22).
- Databases date – release date of the bases installed on the device (see section "Updating the program bases" on page 73).
- Anti-Spam – status of protection against unsolicited incoming messages and calls (see section "Anti-Spam" on page 35).
- Firewall – level of device protection against unwanted network activities (see section "Firewall" on page 66).

Figure 4: The program component status window
In order to switch to the program graphic interface, press OK.
GRAPHIC INTERFACE
The program components are grouped in logical groups and their settings are provided on seven tabs:
- Anti-Virus contains settings of the Real-Time Protection, on-demand protection, program bases update and quarantine as well as the settings of the schedule for the scan and update tasks.
• Anti-Theft contains settings used to block the device and erase information if the device is stolen or lost.
• Encryption contains settings used to protect information resident on the device using encryption. - Anti-Spam contains the settings used to filter unwanted incoming messages and calls.
- Parental control contains settings used to block unwanted outgoing calls and messages.
- Firewall contains all settings used for the operation of the network protection of the device.
• Information contains general settings used for the operation of the program, information about the program and the bases used. The tab also includes information about the license installed and the availability of its renewal.
To navigate from one tab to another, use the joystick of the device or select the Open tab item in the Options menu (see Figure below).
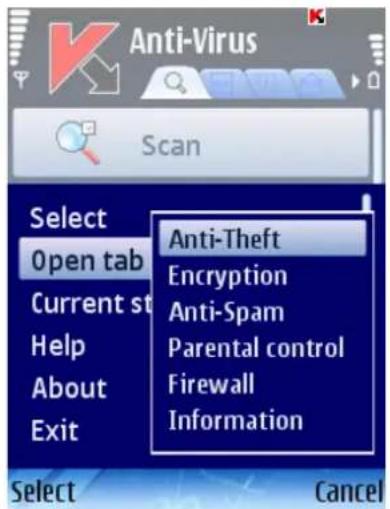
Figure 5: The Options menu
In order to return to the program components status window,
select the Current status item from the Options menu.
SECRET CODE
The secret code is used to prevent unauthorized access to the settings of Anti-Theft, Parental control and Encryption, during the creation of Stealth SMS, for removing the program and accessing the encrypted data.
You can set up the secret code using one of the following methods:
• In the settings of the Anti-Theft, Parental control or Encryption components.
• Using item Change code in menu Settings on the Information tab.
We recommend using a secret code consisting of at least 7 digits.
In order to set up the secret code on the Information tab, do the following:
- Select the Information tab.
- On the tab select Settings, then select Change code.
- In the Enter new code entry field enter digits which will constitute your code, press OK. Then enter this code again in the Confirm code field.
Also, if the code is not set up, you can enter it when you first access the settings of Anti-Theft, Encryption or Parental control. Also entry field Enter new code and Confirm code will be displayed
In order to change the secret code, do the following:
- Select the Information tab.
-
On the tab select Settings, then select Change code.
-
Enter the current code in the Enter code entry field. Then enter new code in the Enter new code field and enter it once again in the Confirm code entry field to confirm.
If you forgot the secret code, you will not be able to manage Kaspersky Mobile Security functions that require entering the code and to delete the program.
VIEWING INFORMATION ABOUT THE PROGRAM
You can view general information about the program, its version and copyright details.
In order to view the information about the program,
select Information on the About tab (see Figure below).

Figure 6: Viewing information about the program
REAL-TIME PROTECTION
This section contains information about Real-Time Protection of your device, how to enable it and configure its settings.
IN THIS SECTION
About Real-Time Protection ....18
Enabling and disabling the Real-Time Protection....18
Selecting objects to be scanned....19
Selecting actions for objects....20
Display of the protection icon 21
ABOUT REAL-TIME PROTECTION
Real-Time Protection is launched at the operation system startup, is permanently loaded in the device's RAM and monitors all opened, saved or run files. Files are scanned according to the following algorithm:
- The component intercepts each attempt of access to each file from the part of the user or a program.
- The file is scanned for the presence of malware object. Malicious objects are detected by comparison with program databases. The databases contain descriptions of all the malicious objects known to date and methods for neutralizing them.
After the analysis, Kaspersky Mobile Security may take the following courses of action: - If malicious code was detected in the file, Kaspersky Mobile Security blocks the file and performs an action in accordance with the settings.
- If no malicious code is discovered in the file, it will be immediately restored.
Information about the results of the scan is saved to the program log (see section "Program logs" on page 77).
ENABLING AND DISABLING THE REAL-TIME PROTECTION
The program allows managing the status of the Real-Time Protection of the device against malware objects.
In order to edit the values of the settings, use the device's joystick or select the Change item in the Options menu.
By default the program uses the values of the settings recommended by Kaspersky Lab's specialists. If you wish to restore the recommended values after you modified the settings, open the Settings window and select Restore from the Options menu.
To enable Real-Time Protection, perform the following actions (see Figure below):
- Select Settings in the Anti-Virus tab.
- Select Real-Time Protection in the Settings window.
- Select value On for the Protection setting.
- Press Back to save the changes.

Figure 7: Enabling Real-Time Protection
To disable Real-Time Protection, do the following:
- Select the Settings item in the Anti-Virus tab.
- Select Real-Time Protection in the Settings window.
- Select value Off for the Protection setting.
- Press Back to save the changes.
Kaspersky Lab's specialists strongly recommend that you should not disable protection because this may lead to infecting your device with viruses and data loss.
SELECTING OBJECTS TO BE SCANNED
You can select the type of objects to be scanned by Real-Time Protection.
In order to edit the values of the settings, use the device's joystick or select the Change item in the Options menu.
By default the program uses the values of the settings recommended by Kaspersky Lab's specialists. If you wish to restore the recommended values after you modified the settings, open the Settings window and select Restore from the Options menu.
To select the type of objects to be scanned, perform the following actions (see Figure below):
- Select Settings in the Anti-Virus tab.
-
Select Real-Time Protection in the Settings window.
-
Select the type of files to be scanned by Real-Time Protection using the Objects to be scanned settings:
• All files: scan files of all types.
- Executables only: scan only executable program files (for example *.exe, *.sis, *.mdl, *.app).
- Select OK to save changes.

Fugure 8: Selecting objects to be scanned
SELECTING ACTIONS FOR OBJECTS
You can configure the program's response when it detects a malware object.
In order to edit the values of the settings, use the device's joystick or select the Change item in the Options menu.
By default the program uses the values of the settings recommended by Kaspersky Lab's specialists. If you wish to restore the recommended values after you modified the settings, open the Settings window and select Restore from the Options menu.
To configure the program's response when it detects a malware object, perform the following actions (see Figure below):
-
Select Settings in the Anti-Virus tab.
-
Select Real-Time Protection in the Settings window.
-
Select the program's response when it detects an infected object for the Action setting.
- Log event: skip the malware object and record the information about its detection in the program log.
-
Delete: delete malware objects without notifying the user.
• Quarantine: quarantine malware objects. -
Select OK to save changes.

Figure 9: Configuring the program's response when it detects a malware object
DISPLAY OF THE PROTECTION ICON
The icon reflects the real-time protection status on the device screen. If the real-protection is enabled, the color icon will be displayed, otherwise the icon will be grey color.
You can configure the protection status icon display on the device screen.
In order to edit the values of the settings, use the device's joystick or select the Change item in the Options menu.
By default the program uses the values of the settings recommended by Kaspersky Lab's specialists. If you wish to restore the recommended values after you modified the settings, open the Settings window and select Restore from the Options menu.
To configure the protection status icon display, perform the following actions (see Figure below):
- Select Settings in the Anti-Virus tab.
- Select Real-Time Protection in the Settings window.
- Select Show protection icon. Configure the protection status icon display on the device screen:
• Always: the program icon to be displayed on the device screen.
• In menu only: the program icon in the device menu and Kaspersky Mobile Security menu.
- Never: the icon will not be displayed.
- Select OK to save changes.
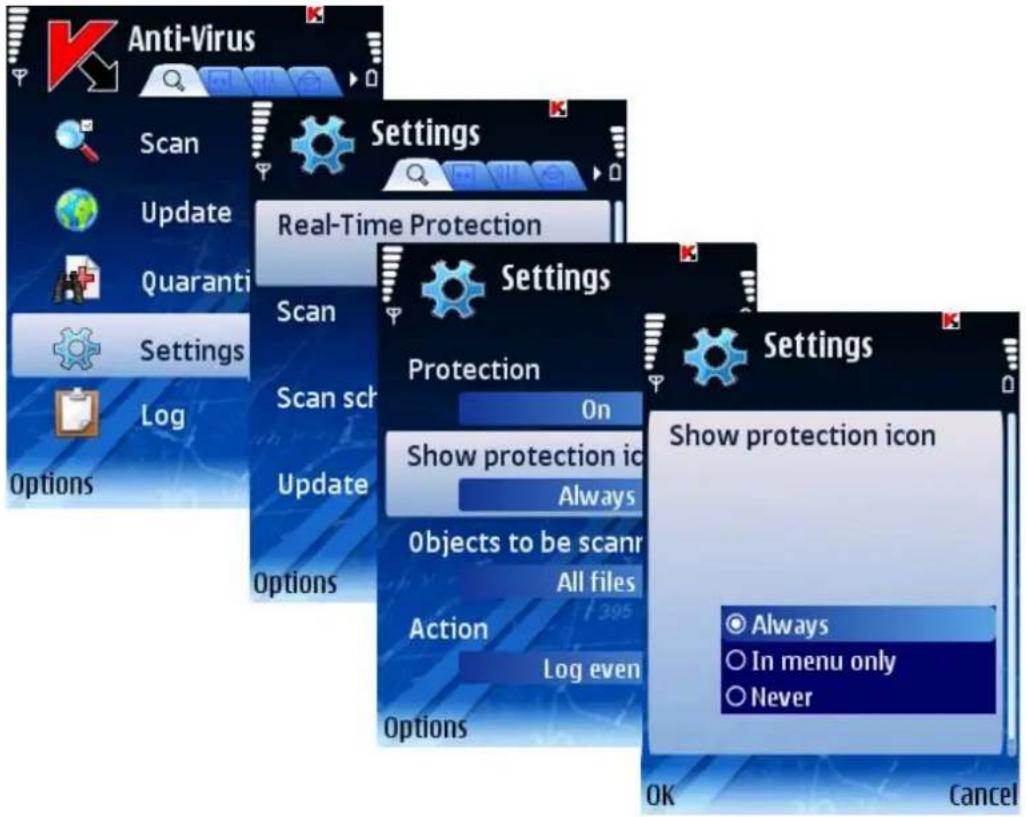
Figure 10: Configuring the protection status icon
ON-DEMAND SCAN
This section contains information about the Scan component, how to scan your device for viruses, configure the device scan settings and the automatic scheduled scan launch.
IN THIS SECTION
About on-demand scan 23
Starting a scan manually 23
Configuring a scheduled scan 25
Selecting objects to be scanned....26
Selecting actions to be performed with objects 27
Configuring ROM scan 29
Configuring the scan of archives 30
Managing the backlight....31
ABOUT ON-DEMAND SCAN
Kaspersky Mobile Security allows to perform a full or partial scan of the device's memory, storage cards, messages and of the system memory for the presence of malware objects.
The file is scanned for the presence of malware objects. Malicious objects are detected by comparison with the application databases. The databases contain descriptions of all the malicious objects known to date and methods for neutralizing them. If malicious code was detected in the file, Kaspersky Mobile Security blocks the file and performs an action in accordance with the settings.
A scan can be launched manually or according to the schedule.
Information about the results of the on-demand scan is saved to the program log (see section "Program logs" on page 77).
STARTING A SCAN MANUALLY
You can launch a manual scan at any time convenient to you, for example, when the device is not occupied with other tasks.
In order to start an anti-virus scan manually, perform the following actions:
-
Select Scan in the Anti-Virus tab.
-
In the Scan window (see Figure below) select the device scan scope:
• Full scan: scanning the entire memory of the device and the storage cards.
- Scan RAM: scanning of the processes running in the system memory and corresponding process files.
- Scan messages: scanning of all messages.
- Scan folder: selecting and scanning of a certain folder in the device's file system or on the connected storage card.
When Scan folder item is selected, a window displaying the device's file system will open. In order navigate through the file system use the joystick buttons. In order to scan a folder, select the folder you wish to scan and select Scan from the Options menu.
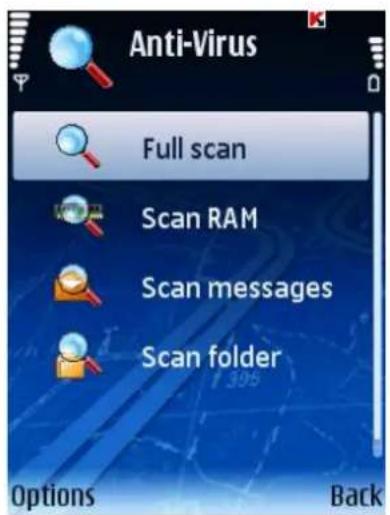
Figure 11: The Scan tab
Immediately after the scan is started, the scan process window will open in which its current status will be displayed: the number of scanned objects, the path to the object being scanned at the time and the percentage indicator of the progress (see Figure below).

Figure 12: The Scan window
When an infected object is detected, an action specified in the Action setting will be performed (see section "Selecting an action to be performed with objects" on page 27) in the scan settings.
A prompt for an action to be performed with an object (see Figure below) will be displayed by the program only if the Ask user value is assigned to the Action setting.

Figure 13: Message about a virus detected
Once the scan is complete the general statistics about detected and deleted malware objects will be displayed on the screen.
By default, during the scan the screen backlight goes off in order to save the battery charge. You can turn the backlight on using the Backlight setting in the Settings menu on the Information tab.
CONFIGURING A SCHEDULED SCAN
Kaspersky Mobile Security allows you to create a schedule for automatic device scan to be performed at a specified time. The scan is performed in the background mode. When detecting an infected object, an action selected in the Scan settings will be performed with such object.
By default scheduled scan is disabled.
To configure a scheduled scan, perform the following actions (see Figure below):
- Select the Settings item in the Anti-Virus tab.
- Select Scan schedule in the window that will open.
- Configure the Auto scan settings:
• Daily: perform the scan every day. Specify the Auto scan time in the entry field.
• Weekly: perform the scan once a week. Specify the Auto scan day and Auto scan time.
- Off: disable the scheduled scan launch.
- Press Back to save the changes.

Figure 14: Configuring a scheduled scan
SELECTING OBJECTS TO BE SCANNED
The program allows to determine the type of objects to be scanned for the presence of malicious code.
In order to edit the values of the settings, use the device's joystick or select the Change item in the Options menu.
By default the program uses the values of the settings recommended by Kaspersky Lab's specialists. If you wish to restore the recommended values after you modified the settings, open the Settings window and select Restore from the Options menu.
To select objects to be scanned, perform the following actions (see Figure below):
- Select Settings in the Anti-Virus tab.
- Select Scan in the window that will open.
-
Specify the value for the Objects to be scanned setting:
-
All files: scan all files.
-
Executables only: scan only executable program files (for example *.exe, *.sis, *.mdl, *.app).
-
Press OK to save the changes.
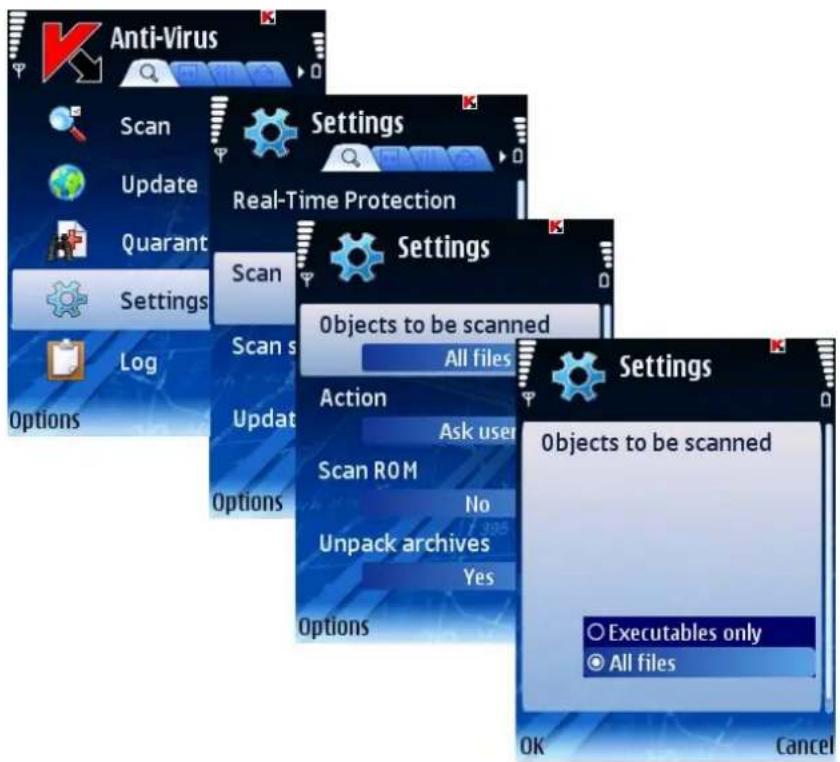
Figure 15: Selecting objects to be scanned
SELECTING ACTIONS TO BE PERFORMED WITH OBJECTS
You can configure the application's actions to be performed when the application detects a malicious object.
In order to edit the values of the settings, use the device's joystick or select the Change item in the Options menu.
By default the program uses the values of the settings recommended by Kaspersky Lab's specialists. If you wish to restore the recommended values after you modified the settings, open the Settings window and select Restore from the Options menu.
To configure the program's response, perform the following actions (see Figure below):
- Select Settings in the Anti-Virus tab.
- Select Scan in the Settings window (see Figure below).

Figure 16: Configuring actions to be performed with objects
-
Using the Action item, select the application's response when it detects a malware object (see Figure below):
-
Delete: delete detected malware objects without notifying the user.
• Quarantine: quarantine detected malicious objects. - Ask user: when an infected object is detected, display a notification with a prompt for action.
- Log event: skip a malware object and record the information about its detection in the program log.
- Try to disinfect – disinfect malware objects. If the disinfection is not possible, perform an action specified in the If disinfection fails item.

Figure 17: Selecting actions to be performed with objects
-
If you selected Try to disinfect as the application's response, use If disinfection fails (see Figure below) select an action to be performed by the application when it is impossible to disinfect the infected object:
-
Delete: delete malware objects without notifying the user.
• Quarantine: quarantine objects. - Ask user: prompt the user for action when an infected object is detected.
- Log event: record the information about the detection of the infected object in the program log.

Figure 18: Selecting the second action
- Press OK to save the changes.
CONFIGURING ROM SCAN
ROM contains system files required for loading the device's operating system. You can enable or disable the scan of ROM.
In order to edit the values of the settings, use the device's joystick or select the Change item in the Options menu.
By default the program uses the values of the settings recommended by Kaspersky Lab's specialists. If you wish to restore the recommended values after you modified the settings, open the Settings window and select Restore from the Options menu.
To enable the scan the device's ROM, perform the following actions (see Figure below):
- Select Settings in the Anti-Virus tab.
- Select the Scan in the Settings window.
- Select value Yes for the Scan ROM setting.
- Press Back to save the changes.

Figure 19: Enabling the scan of device's ROM
To disable the scan the device's ROM, perform the following actions:
- Select Settings in the Anti-Virus tab.
- Select the Scan in the Settings window.
- Select value No for the Scan ROM setting.
- Press Back to save the changes.
CONFIGURING THE SCAN OF ARCHIVES
You can enable or disable unpacking of archives to scan their content.
In order to edit the values of the settings, use the device's joystick or select the Change item in the Options menu.
By default the program uses the values of the settings recommended by Kaspersky Lab's specialists. If you wish to restore the recommended values after you modified the settings, open the Settings window and select Restore from the Options menu.
To enable unpacking of archives, perform the following actions (see Figure below):
- Select Settings in the Anti-Virus tab.
- Select the Scan in the Settings window.
- Select value Yes for the Unpack archives setting.
- Press Back to save the changes.

Figure 20: Configuring the scan of archives
The program allows configuring the use of the backlight while an anti-virus scan is in progress.
In order to edit the values of the settings, use the device's joystick or select the Change item in the Options menu.
By default the application uses the values of the settings recommended by Kaspersky Lab's specialists. If you wish to restore the recommended values after you modified the settings, open the Settings window and select Restore from the Options menu.
To configure backlight, perform the following actions (see Figure below):
-
Select the Settings item in the Information tab.
-
Select the required value for the Backlight item in the window that will open:
• If you wish the backlight to stay permanently on while an anti-virus scan is in progress, select the Yes value.
- If you wish the backlight to automatically go off, select the No value.
- Press Back to save the changes.

Figure 21: Managing the backlight
QUARANTINE
This section contains information about the Quarantine and managing quarantined infected objects.
IN THIS SECTION
About Quarantine .... 32
Viewing quarantined objects....33
Restoring objects from Quarantine....33
Deleting objects from Quarantine 34
ABOUT QUARANTINE
Quarantine is a special storage into which Kaspersky Mobile Security places potentially malicious objects detected during a scan or by Real-Time Protection.
Quarantined objects are stored in an archived form which rules out their activation and, thus, they do not impose any threat for the device. Objects can later be deleted or restored by the user.
VIEWING QUARANTINED OBJECTS
To view the list of quarantined objects,
select Quarantine on the Anti-Virus tab (see Figure below).

Figure22: The Anti-Virus tab
This will open the Quarantine window which contains a list of objects stored in the quarantine (see Figure below).
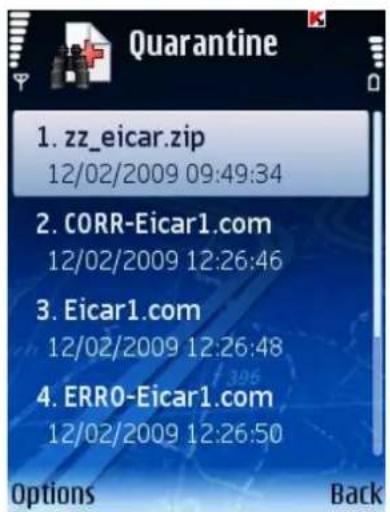
Figure 23: The Quarantine window
SEE ALSO
About Quarantine ....32
Restoring objects from Quarantine 34
Deleting objects from Quarantine 34
RESTORING OBJECTS FROM QUARANTINE
Select the Quarantine item in the Anti-Virus tab.
- Select the Quarantine item in the Anti-Virus tab.
- In the Quarantine window that will open select an object you wish to restore.
- Select Restore from the Options menu. The object selected will be restored from the quarantine into the original folder.
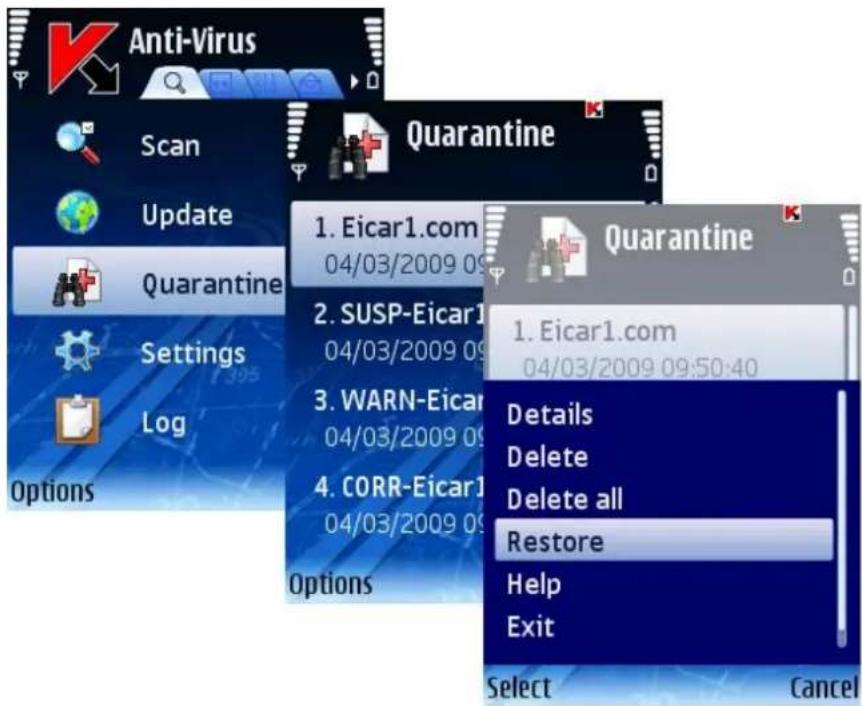
Figure 24: Restoring objects from Quarantine
DELETING OBJECTS FROM QUARANTINE
To delete a certain object from the Quarantine, perform the following actions (see Figure below):
- Select the Quarantine item in the Anti-Virus tab.
- In the Quarantine window that will open select an object you wish to delete.
- Select Delete from the Options menu. The selected object will be deleted.
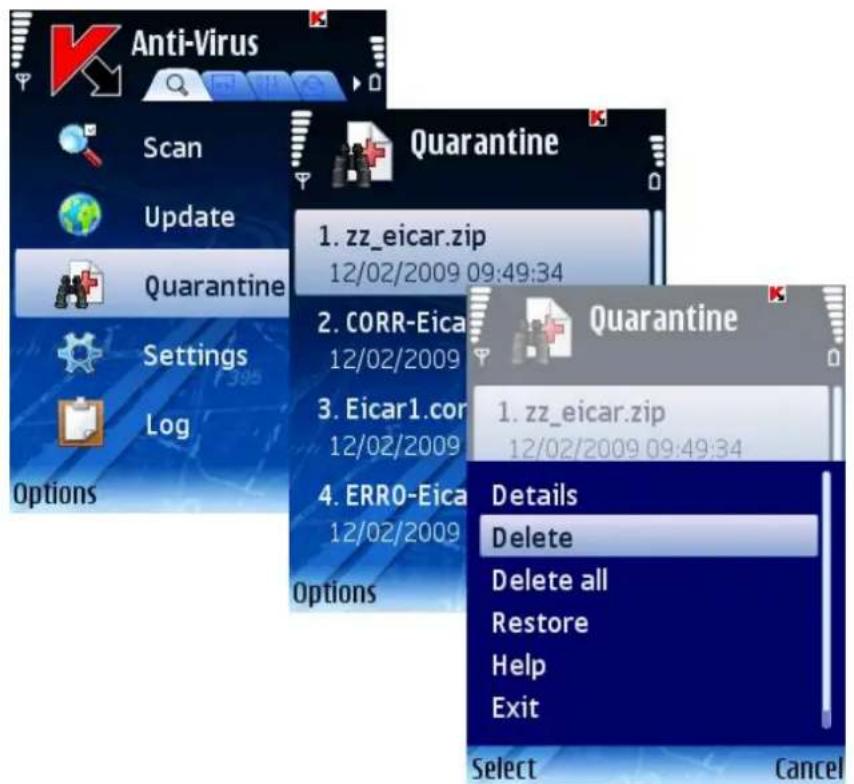
Figure 25: Deleting an object from quarantine
In order to delete all quarantined objects:
- Select the Quarantine item in the Anti-Virus tab.
- In the Options menu that will open, select Delete all. All quarantined objects will be deleted.
ANTI-SPAM
This section contains information about the Anti-Spam component as well as the description of how to compile the Black and White Lists, configure Anti-Spam modes and other Anti-Spam settings.
IN THIS SECTION
About Anti-Spam 36
Anti-Spam modes....36
Creating a Black List....37
Creating a White List 41
Response to messages and calls from the phonebook contacts....45
Response to messages from non-numeric numbers 45
Selecting an action to be performed with incoming messages....47
Selecting an action to be performed with incoming calls 48
ABOUT ANTI-SPAM
Anti-Spam component allows to protect device against receiving unwanted messages and calls. Such protection is based on filtering incoming SMS messages and calls using the Black and the White Lists. These lists contain phone and/or sample phrases characteristic of spam or non-spam SMS messages.
If at least one match of a phone number or a phrase from the White List is detected, no further check will be performed and the call or the message will be received by the device. An SMS message or a call from a phone number found in the Black List or an SMS message containing a text found in the Black List will be blocked.
Information about blocked SMS messages and calls is registered in the Log (see section "Program logs" on page 77).
ANTI-SPAM MODES
An Anti-Spam mode is a set of parameters on which protection of your device against spam messages and unwanted calls is based.
The following Anti-Spam modes are provided:
- Both lists - filtering of incoming SMS messages and calls using the Black and the White Lists. Once an SMS message or a call is received from a phone number not found in either of the lists, Anti-Spam will notify you and will suggest to block or allow receipt of such SMS message or a call and to add this phone number to the White or the Black List. This level is set by default.
- Black List – blocking of SMS messages and calls matching entries in the Black List. All other SMS messages and calls will be passed through.
- White List – passing through SMS messages and calls matching entries in the White List. All other SMS messages and calls will be blocked.
- Disable – no filtering of SMS messages and calls will be performed.
To select an Anti-Spam mode, perform the following actions (see Figure below):
- Open the Anti-Spam tab.
-
Select Settings and then - Anti-Spam from the menu.
-
In the window that will open, select the required mode and press OK to save the changes and close the window.

Figure 26: Selecting an Anti-Spam mode
CREATING A BLACK LIST
This list contains entries with phone numbers, SMS and calls from which will be blocked by Anti-Spam and the text which, if found in an SMS message received, will cause such message to be blocked.
Information about blocked SMS messages and calls will be registered in the Log (see section "Program logs" on page 77).
IN THIS SECTION
Adding a new entry....38
Editing an existing entry 39
Deleting an individual entry 40
Deleting all entries....40
ADDING A NEW ENTRY
To add an entry to the Anti-Spam Black List, perform the following actions (see Figure below):
- Select Black List in the Anti-Spam tab.
- Select Add entry from the Options menu.
- Set the following settings in the window that will open:
- Message type - action to be performed with a message and/or call:
- SMS only: block incoming SMS messages only.
- Calls only: block incoming calls only.
-
SMS and calls: block incoming calls and SMS messages.
-
Phone number – phone number for which the receipt of SMS message and/or calls will be blocked. The number should only be comprised of alphanumeric characters; it may begin with a digit, a letter, or be preceded with the "+" symbol. Additionally when entering a number, you can use masks "*" and "*" (where "*" represents a sequence of characters and "?" - any one character).
-
Text - text upon detection of which in the SMS message received, such message will be blocked. This setting is accessible only if value SMS only is selected.
-
Press Back to save the changes.

Figure 27: Adding a new entry
EDITING AN EXISTING ENTRY
To edit settings of an existing entry, perform the following actions (see Figure below):
- Select Black List in the Anti-Spam tab.
- Select Edit entry from the Options menu.
- Set the following entry settings in the window that will open:
- Message type - an action to be performed with a message and/or call:
- SMS only: block incoming SMS messages only.
- Calls only: block incoming calls only.
-
SMS and calls: block incoming calls and SMS messages.
-
Phone number – phone number for which the receipt of SMS message and/or calls will be blocked. The number should only be comprised of alphanumeric characters; it may begin with a digit, a letter, or be preceded with the "+" symbol. Additionally when entering a number, you can use masks "*" and "*" (where "*" represents a sequence of characters and "?" - any one character).
-
Text - text upon detection of which in the SMS message received, such message will be blocked. This setting is accessible only if value SMS only is selected.
-
Press Back to save the changes.

Figure 28: Editing an existing entry
DELETING AN INDIVIDUAL ENTRY
To delete an individual entry from the Black List, perform the following actions (see Figure below):
- Select Black List in the Anti-Spam tab.
- Select an entry in the list which you wish to delete.
- Select Delete entry from the Options menu.

Figure 29: Deleting an individual entry
DELETING ALL ENTRIES
To delete all entries, perform the following actions (see Figure below):
- Select Black List from the menu in the Anti-Spam tab.
- Select Delete all from the Options menu.
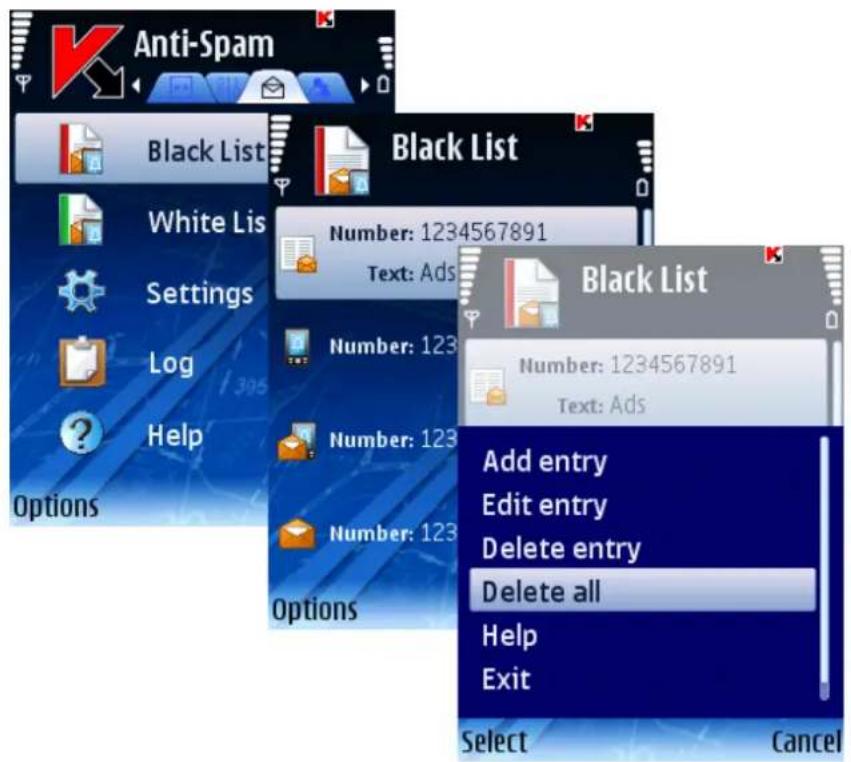
Figure 30: Deleting all entries
CREATING A WHITE LIST
The White List contains entries with phone numbers, SMS and calls from which will be passed through by Anti-Spam and text upon detection of which in a received SMS message it will be passed through.
IN THIS SECTION
Adding a new entry....41
Editing an existing entry 42
Deleting an individual entry 43
Deleting all entries....44
ADDING A NEW ENTRY
To add an entry to the Anti-Spam White List, perform the following actions (see Figure below):
-
Select White List in the Anti-Spam tab.
-
Select Add entry from the Options menu.
-
Set the following new entry settings in the window that will open:
- Message type - action to be performed with a message and/or call:
- SMS only: allow incoming SMS messages only.
- Calls only: allow incoming calls only.
- SMS and calls: allow incoming calls and SMS messages.
- Phone number – phone number for which the receipt of SMS message and/or calls will be allowed. The number should only be comprised of alphanumeric characters; it may begin with a digit, a letter, or be preceded with the "+" symbol. Additionally when entering a number, you can use masks "?" and "*" (where "*" represents a sequence of characters and "?" - any one character).
- Text - text upon detection of which in the SMS message received, such message will be passed through. This setting is accessible only if value SMS only is selected.
4. Press Back to save the changes.

Figure 31: Adding a new entry
EDITING AN EXISTING ENTRY
To edit settings of an existing entry, perform the following actions (see Figure below):
- Select White List in the Anti-Spam tab.
- Select Edit entry from the Options menu.
-
Set the following entry settings in the window that will open:
-
Message type - action to be performed with a message and/or call:
• SMS only: allow incoming SMS messages only. -
Calls only: allow incoming calls only.
- SMS and calls: allow incoming calls and SMS messages.
- Phone number – phone number for which the receipt of SMS message and/or calls will be allowed. The number should only be comprised of alphanumeric characters; it may begin with a digit, a letter, or be preceded with the "+" symbol. Additionally when entering a number, you can use masks "*" and "*" (where "*" represents a sequence of characters and "?" - any one character).
- Text - text upon detection of which in the SMS message received, such message will be passed through. This setting is accessible only if value SMS only is selected.
4. Press Back to save the changes.
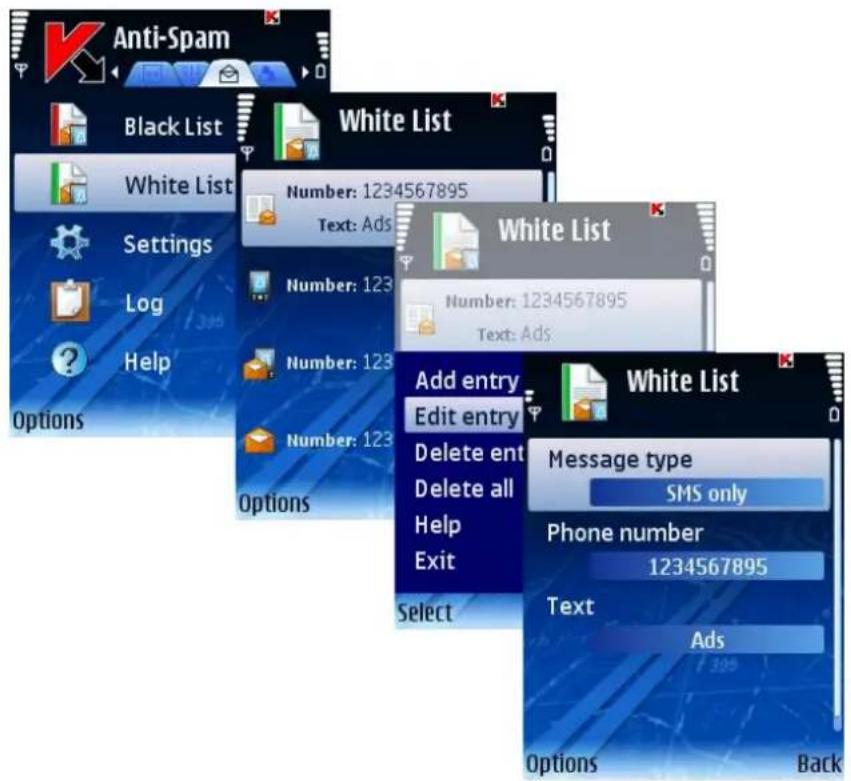
Figure 32: Editing an existing entry
DELETING AN INDIVIDUAL ENTRY
To delete an individual entry from the Black List, perform the following actions (see Figure below):
- Select White List from the menu in the Anti-Spam tab.
- Select an entry in the list which you wish to delete.
- Select Delete entry from the Options menu.

Figure 33: Deleting an individual entry
DELETING ALL ENTRIES
To delete all entries, perform the following actions (see Figure below):
- Select White List from the menu in the Anti-Spam tab.
- Select Delete all from the Options menu.

Figure 34: Deleting all entries
RESPONSE TO MESSAGES AND CALLS FROM THE PHONEBOOK CONTACTS
You can configure Anti-Spam response to SMS messages and calls from numbers found in the phone book irrespective of the settings of the Black and White Lists.
In order to edit the values of the settings, use the device's joystick or select the Change item in the Options menu.
By default the program uses the values of the settings recommended by Kaspersky Lab's specialists. If you wish to restore the recommended values after you modified the settings, open the Settings window and select Restore from the Options menu.
To configure the Anti-Spam response, perform the following actions (see Figure below):
-
Select Settings in the Anti-Spam tab.
-
Using the window that will open, select the value for setting Allow contacts:
-
If you wish Anti-Spam to allow receipt of SMS messages and calls from numbers found in the phonebook, select value Yes.
-
If you wish Anti-Spam to perform filtering based on whether the phone number is found in the White or Black List, select value No.
-
Press Back to save the changes.

Figure 35: Allowing contacts from the phonebook
RESPONSE TO MESSAGES FROM NON-NUMERIC NUMBERS
You can configure the program's response when SMS messages are received from non-numeric numbers (which includes only letters).
In order to edit the values of the settings, use the device's joystick or select the Change item in the Options menu.
By default the program uses the values of the settings recommended by Kaspersky Lab's specialists. If you wish to restore the recommended values after you modified the settings, open the Settings window and select Restore from the Options menu.
To configure the Anti-Spam response, perform the following actions (see Figure below):
-
Select Settings in the Anti-Spam tab.
-
Using the window that will open, select the value for setting Block non-numeric:
• To enable automatic deletion of messages from non-numeric numbers, select Yes.
- If you wish Anti-Spam to operate based on whether the phone number is found in the White or Black List, select value No.
- Press Back to save the changes.

Figure 36: Blocking messages and calls from non-numeric numbers
SELECTING AN ACTION TO BE PERFORMED WITH INCOMING MESSAGES
Anti-Spam suggests that you configure its response to SMS messages from phone numbers not found in either the Black or the White List. Such messages will be intercepted by Anti-Spam if the mode Both lists is set (see section "Anti-Spam modes" on page 36), and a notification will be displayed on the device's screen (see Figure below).
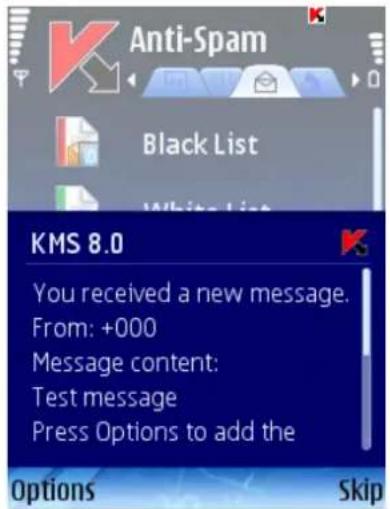
Figure 37: Anti-Spam warning
Using the Options menu items you can select one of the following actions to be performed with the message:
- Add to White List – allow receipt of messages and add the sender's phone number to the White List.
- Add to Black List – block messages and add the sender's phone number to the Black List.
- Skip – allow the receipt of the message. In this case the sender's phone number will not be added to either of the lists.
Information about blocked messages is saved to the program log (see section "Program logs" on page 77).
SELECTING AN ACTION TO BE PERFORMED WITH INCOMING CALLS
Anti-Spam suggests that you configure its response to calls from phone numbers not found in either the Black or the White List. After the call is complete, a notification will be displayed on the device's screen (see Figure below).

Figure 38: Selecting actions to be performed with incoming calls
Using the Options menu items, you can select one of the following actions for the number from which the call was received:
- Add to White List - add the caller's phone number to the White List.
- Add to Black List - add the caller's phone number to the Black List.
- Skip – do not add the caller's number to either list.
Information about the blocked calls is saved to the program log (see section "Program logs" on page 77).
PARENTAL CONTROL
This section contains information about the Parental control component as well as the description of how to compile the Black and White Lists, configure the component modes and other settings.
IN THIS SECTION
About Parental control....49
Parental control modes....49
Creating a Black List....50
Creating a White List 54
ABOUT PARENTAL CONTROL
The operation of the Parental control component is based on filtering of outgoing SMS messages and calls using the Black and the White Lists.
If at least one match is detected, the scan will be stopped. SMS messages and calls matching any entry in the Black List will be blocked and message and calls matching an entry in the White List will be allowed.
Parental control blocks SMS messages sent only using standard tools of the device.
When you access Parental control for the first time, you should set up a secret code (on page 16) (if it was not set up earlier). The secret code is used to prevent unauthorized access to the Parental control settings. The code will also be used to access the settings of the Encryption and Anti-Theft components.
Information about the component's operation will be saved to the program log (see section "Program logs" on page 77).
PARENTAL CONTROL MODES
A Parental control mode is a set of parameters on which protection of your device against spam messages and unwanted calls is based.
The following modes of Parental control are provided:
- Black List – blocking of SMS messages and/or calls only to numbers matching entries in the Black List. All other messages will be allowed.
- White List – allowing of SMS messages and/or calls only to numbers matching entries in the White List. All other messages will be blocked.
- Off – Parental control is turned off. No filtering of SMS messages and calls will be performed.
To select the Parental control mode, perform the following actions (see Figure below):
- Select the Parental control tab.
- Select Settings and then - Parental control from the menu.
- Select the mode you require and press OK to save changes.
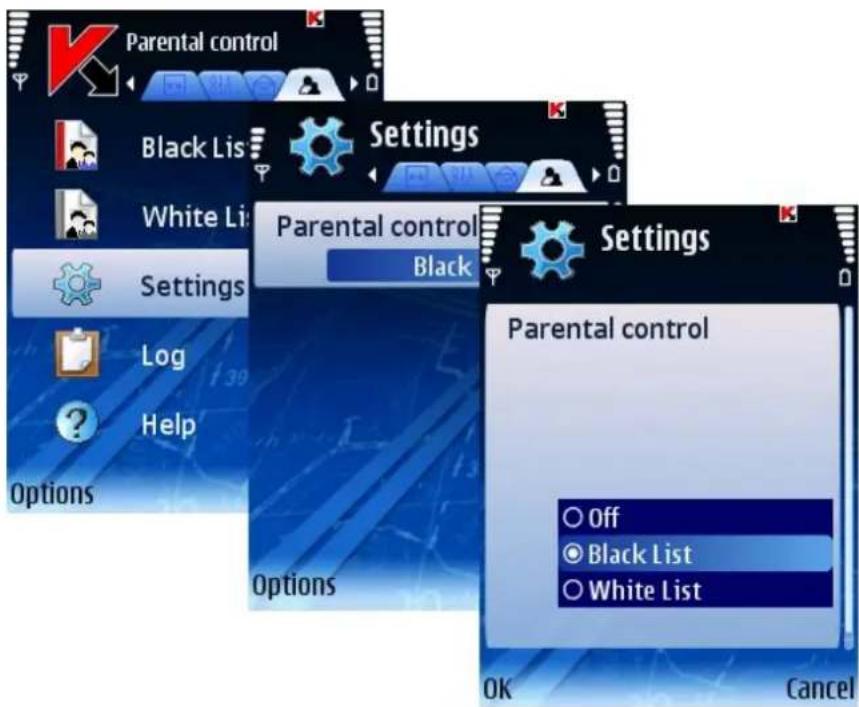
Figure 39: Modes of Parental control
CREATING A BLACK LIST
The Black List contains entries with phone numbers, SMS and calls to which will be blocked by Parental control.
Information about blocked SMS messages and calls will be saved in the Log section (see section "Program logs" on page 77).
IN THIS SECTION
Adding a new entry....50
Editing an existing entry ....51
Deleting an individual entry 52
Deleting all entries....53
ADDING A NEW ENTRY
To add an entry to the Parental control Black List, perform the following actions (see Figure below):
-
Select Black List in the Parental control tab.
-
Select Add entry from the Options menu.
-
Set the following new entry settings in the window that will open:
- Message type - action to be performed with a message and/or call:
- SMS only: block outgoing SMS messages only.
- Calls only: block outgoing calls only.
- SMS and calls: block outgoing calls and SMS messages.
- Phone number - phone number SMS message and/or outgoing calls to which will be blocked. This number may begin with a digit or with a "+" and must contain digits. Additionally when entering a number, you can use masks "*" and "*" (where "*" represents a sequence of characters and "?" - any one character).
- Press Back to save the changes.
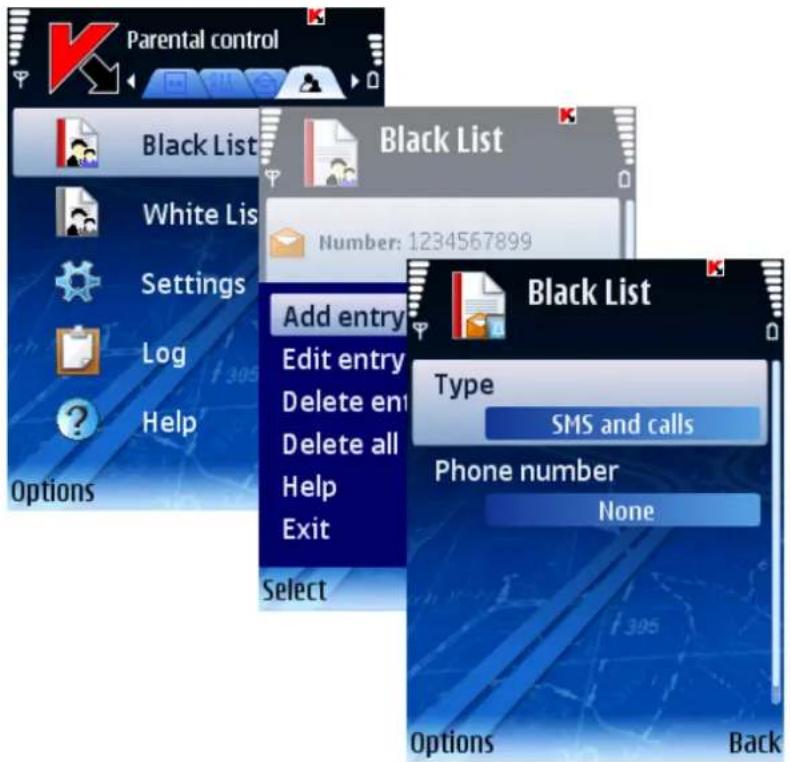
Figure 40: Adding a new entry
EDITING AN EXISTING ENTRY
To edit settings of an existing entry, perform the following actions (see Figure below):
- Select Black List from the menu in the Parental control tab.
- Select Edit entry from the Options menu.
- Set the following entry settings in the window that will open:
- Message type - action to be performed with a message and/or cal:
- SMS only: block outgoing SMS messages only.
- Calls only: block outgoing calls only.
- SMS and calls: block outgoing calls and SMS messages.
- Phone number - phone number SMS message and/or outgoing calls to which will be blocked. This number may begin with a digit or with a "+" and must contain digits. Additionally when entering a number, you can use masks "*" and "*" (where "*" represents a sequence of characters and "?" - any one character).
- Press Back to save the changes.

Figure 41: Editing an existing entry
DELETING AN INDIVIDUAL ENTRY
In order to delete an individual entry from the Black List:
- Select Black List from the menu in the Parental control tab.
- Select an entry you wish to delete.
- Select Delete entry from the Options menu.

Figure 42: Deleting an individual entry
DELETING ALL ENTRIES
To delete all entries, perform the following actions (see Figure below):
- Select Black List from the menu in the Parental control tab.
- Select Delete all from the Options menu.

Figure 43: Deleting all entries
CREATING A WHITE LIST
The White List contains entries with phone numbers, SMS and calls to which will be passed through by Parental control.
IN THIS SECTION
Adding a new entry....54
Editing an existing entry 55
Deleting an individual entry 56
Deleting all entries....57
ADDING A NEW ENTRY
To add an entry to the Parental control White List, perform the following actions (see Figure below):
- Select White List in the Parental control tab.
- Select Add entry from the Options menu.
- Set the following new record settings in the window that will open:
- Message type - action to be performed with a message and/or call:
- SMS only: allow outgoing SMS messages only.
- Calls only: allow outgoing calls only.
- SMS and calls: allow outgoing calls and SMS messages.
- Phone number - phone number SMS message and/or outgoing calls to which will be allowed. This number may begin with a digit or with a "+" and must contain digits. Additionally when entering a number, you can use masks "*" and "*" (where "*" represents a sequence of characters and "?" - any one character).
- Press Back to save the changes.

Figure 44: Adding a new entry
EDITING AN EXISTING ENTRY
To edit settings of an existing entry, perform the following actions (see Figure below):
- Select White List from the menu in the Parental control tab.
- Select Add entry from the Options menu.
- Set the following entry settings in the window that will open:
- Message type - action to be performed with a message and/or call:
• SMS only: allow outgoing SMS messages only.
- Calls only: allow outgoing calls only.
• SMS and calls: allow outgoing calls and SMS messages.
- Phone number - phone number SMS message and/or outgoing calls to which will be allowed. This number may begin with a digit or with a "+" and must contain digits. Additionally when entering a number, you can use masks "*" and "*" (where "*" represents a sequence of characters and "?" - any one character).
- Press Back to save the changes.

Figure 45: Editing an existing entry
DELETING AN INDIVIDUAL ENTRY
To delete an individual entry from the White List, perform the following actions (see Figure below):
- Select White List from the menu in the Parental control tab.
- Select an entry you wish to delete.
- Select Delete entry from the Options menu.
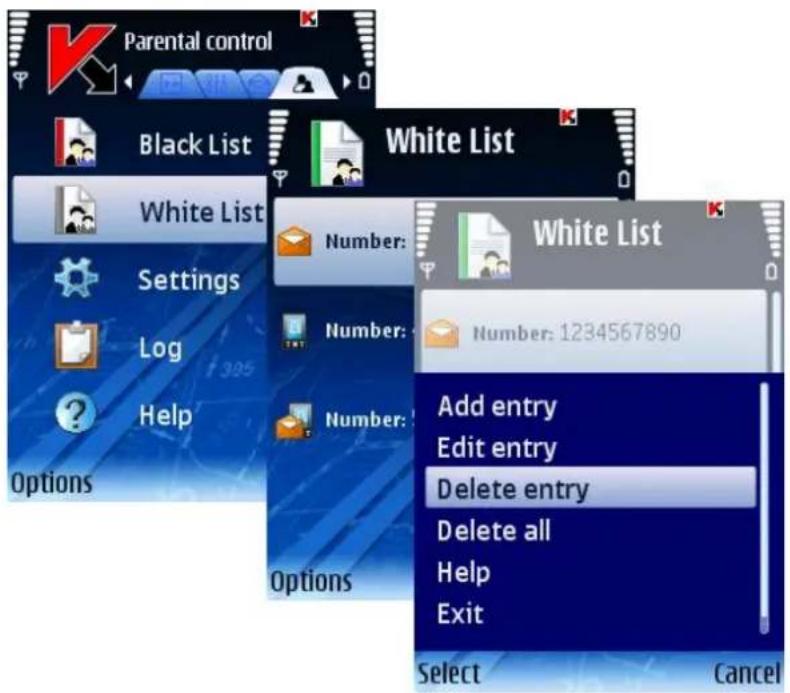
Figure 46: Deleting an individual entry
DELETING ALL ENTRIES
To delete all entries, perform the following actions (see Figure below):
- Select White List from the menu in the Parental control tab.
- Select Detele all from the Options menu.

Figure 47: Deleting all entries
ANTI-THEFT
This section contains information about the Anti-Theft component designed to protect information stored on the device in case the device is lost.
IN THIS SECTION
About Anti-Theft 58
The SMS-Block function....58
Blocking the device....59
The SMS-Clean function 60
Deleting personal data....61
The SIM-Watch function....62
The SMS-Find function....63
Determining the device location 64
The Stealth SMS function....65
ABOUT ANTI-THEFT
The Anti-Theftcomponent is designed to ensure protection of data stored on the mobile device against unauthorized access to it in case the device was lost or stolen.
This component includes the following functions:
- SMS-Block allows blocking the device at the user's discretion.
- SMS-Clean allows to erase user's personal data (all contacts, messages, gallery, calendar, log, network connection settings), data from the storage card and files from folder C:\Data.
- SIM-Watch allows to send to the specified phone number and/or to e-mail address the new phone number and to block the stolen device if the SIM card was replaced or the device was turned on without it.
- SMS-Find allows to determine the geographical coordinates of the device and to send them to the requesting devices or to a certain e-mail address using an SMS message. This function only works with devices with in-built GPS receiver.
- Stealth SMS allows to erase personal data from the device, block it and obtain its geographical coordinates using a special SMS message.
When you access Anti-Theft for the first time, you should set up a secret code (on page 16) (if it was not set up earlier). The secret code is used to prevent unauthorized access to the Anti-Theft settings. This code will also be used to access the settings of the Parental control and Encryption components and for creating a Slealth SMS.
Information about the component's operation will be saved to the program log (see section "Program logs" on page 77).
The SMS-Block function allows blocking the device if it is required. You can unblock the device only after you enter the secret code.
To enable the SMS-Block function, perform the following actions (see Figure below):
- Select Settings on the Anti-Theft tab.
- Select SMS-Block in the window that will open.
- Using the Change item in the Options menu, set value On.
- Press Back to save the changes.
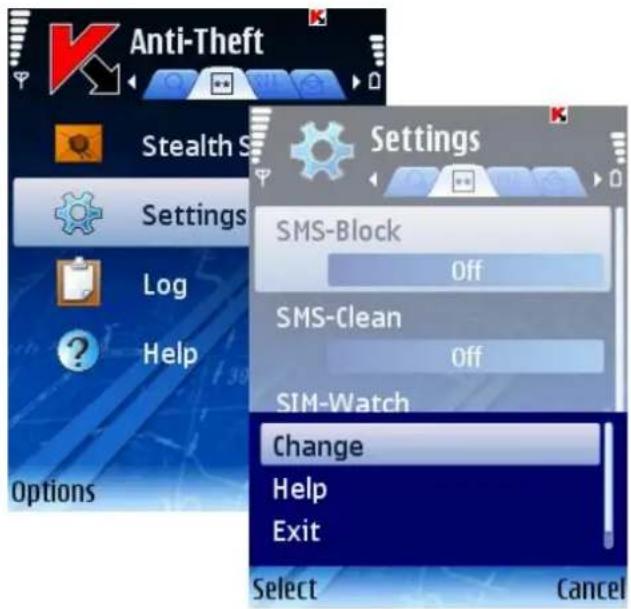
Figure 48: Enabling the SMS-Block function
BLOCKING THE DEVICE
You can block the device with the SMS-Block function using the following methods:
- by using the Stealth SMS function on another device with Kaspersky Mobile Security installed;
- by using the standard SMS feature on your phone.
To create an SMS message using Slealth SMS, perform the following actions (see Figure below).
- Select Stealth SMS in the Anti-Theft tab.
- Select SMS-Block and press Next.
- Enter the phone number of the device you wish to block. Press Next.
- Enter the secret code and press Send.

Figure 49: Blocking the device
To create an SMS message using your phone's standard functions for creating SMS messages:
send to the device you need to block an SMS message containing text block: (where is secret code set on the device to be blocked). The message is not case sensitive and spaces before or after the colon do not matter.
THE SMS-CLEAN FUNCTION
The SMS-Clean function allows to erase user's personal data (all contacts, messages, gallery, calendar, log, network connection settings), data from the storage card and files from folder C:\Data once the device receives a special SMS message.
To configure the operation of the SMS-Clean function, perform the following actions (see Figure below):
-
Select Settings on the Anti-Theft tab.
-
In the window that will open select SMS-Clean.
-
In the window that will open select data to be erased once the device receives a special SMS message.
• If you wish personal data to be deleted, select Delete data and set value to Yes.
Contacts will be deleted from the phonebook stored on the device and on the SIM card.
-
If you wish personal files (from folder C:\Data) to be deleted, select Delete data and set value to Yes.
• To erase data from all installed storage cards, select Delete card files and set the value to Yes. -
Press OK to save the changes.
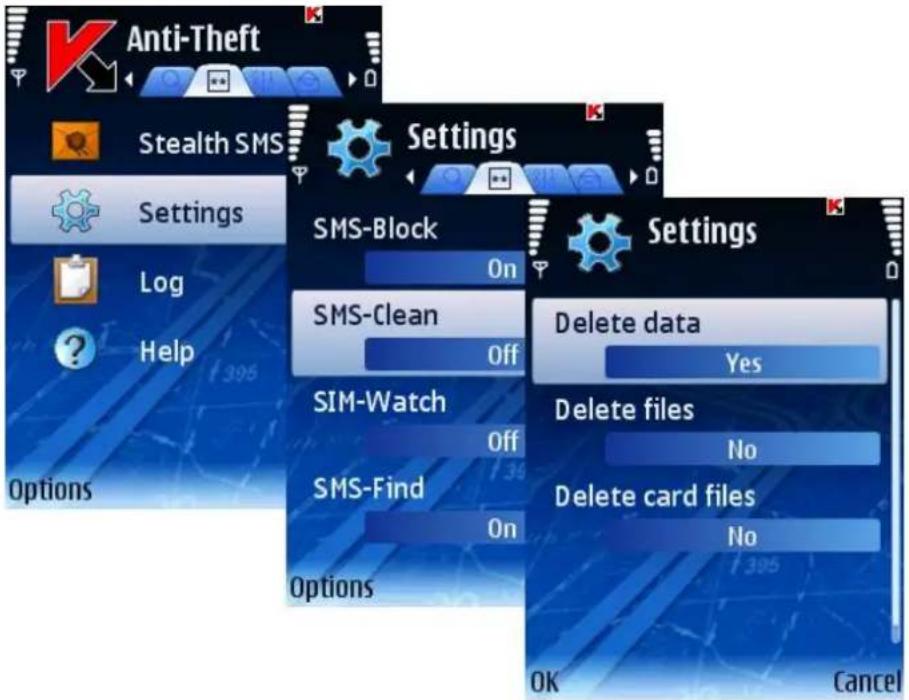
Figure 50: Configuring the SMS-Clean function
DELETING PERSONAL DATA
You can delete personal data from the device with the SMS-Clean function enabled using the following methods:
- by using the Stealth SMS function on another device with Kaspersky Mobile Security installed;
- by using your phone's standard functions for creating SMS messages.
To create an SMS message using Slealth SMS, perform the following actions (see Figure below).
- Select Stealth SMS in the Anti-Theft tab.
- Select SMS-Clean and press Next.
- Enter the phone number of the device on which data must be deleted. Press Next.
- Enter the secret code entered on the device receiving the message and press Send.
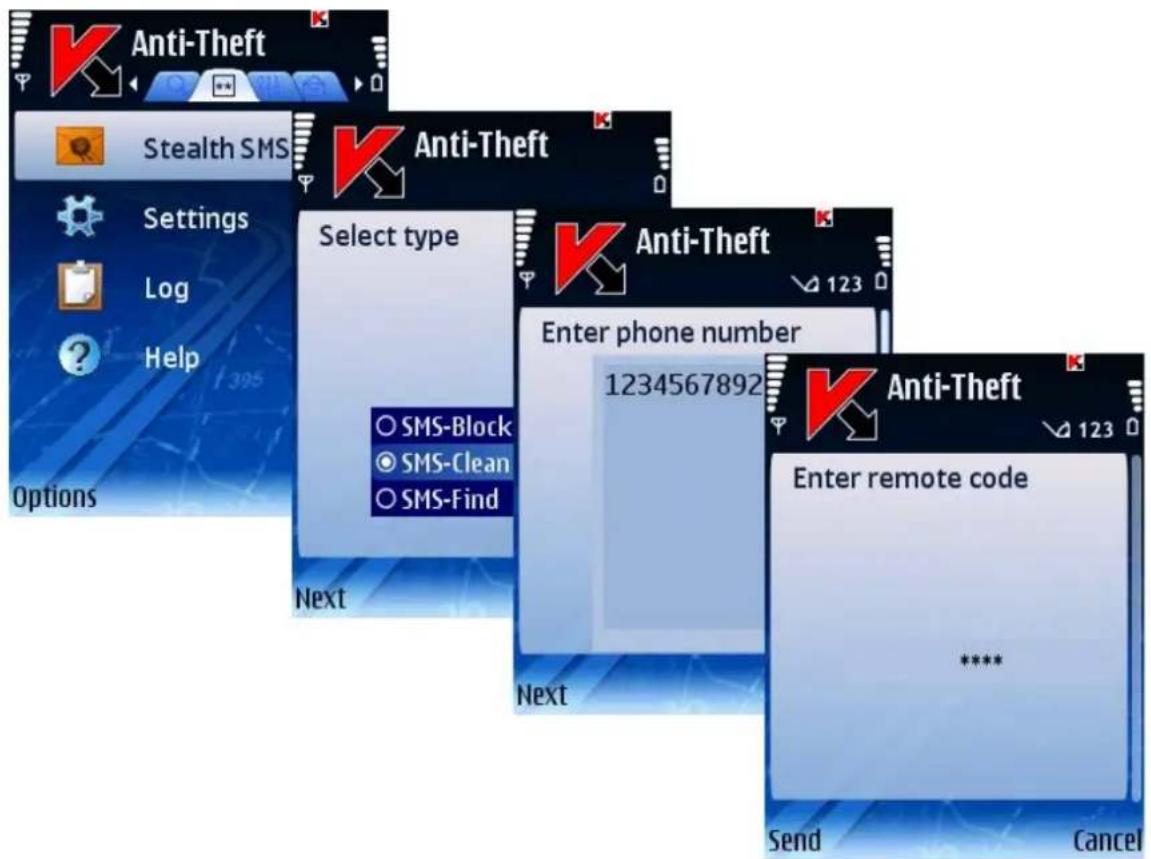
Figure 51: Deleting personal data
To create an SMS message using your phone's standard functions for creating SMS messages:
send to the device you need to block an SMS message containing text clean: (where is secret code set on the receiving device. The message is not case sensitive and spaces before or after the colon do not matter.
THE SIM-WATCH FUNCTION
SIM-Watch allows to send to the specified phone number and/or to e-mail address a new phone number and to block the stolen device if the SIM card was replaced in such stolen or lost device.
By default the SIM-Watch function is disabled.
To configure the operation of the SIM-Watch function, perform the following actions (see Figure below):
- Select Settings on the Anti-Theft tab.
-
Select SIM-Watch in the window that will open.
-
In the menu that will open (see Figure below) configure the settings to monitor the replacement of the SIM card on the device.
- In the Phone number field, enter the phone number to which a message from the new phone number will be sent in case the SIM card is replaced in your device. Such number may begin with a digit or with a "+" and must contain digits only.
- Using the E-mail address field enter the e-mail address on which you wish to receive an e-mail message about the new phone number.
-
In order to block the device once the SIM card is replaced or the device is turned on without it, set the value for the Block device item to Yes. You can unblock the device by entering the secret code. By default blocking of the device is disabled.
-
Press OK to save the changes you have made.

Figure 52: Configuring the SIM-Watch function
THE SMS-FIND FUNCTION
The SMS-Find function allows to determine the geographical coordinates of the device and to send them to the requesting devices and to a certain e-mail address using an SMS message.
This function only works with devices with in-built GPS receiver. If necessary the receiver will be activated automatically.
You can receive the coordinates only if the device is within the area reached by satellites. If the satellites are nor available at the moment of the inquiry, periodic attempts to find the satellites will be made until the device is restarted.
To enable the SMS-Find function, perform the following actions (see Figure below):
- Select Settings on the Anti-Theft tab.
- In the window that will open select SMS-Find.
- In the window that will open, specify the e-mail address (the E-mail address setting) if you wish to receive the device's coordinates by e-mail, in addition to the SMS message, and press OK.
- Select Yes in the window that will open.

Figure 53: Configuring the SMS-Find function
DETERMINING THE DEVICE LOCATION
You can receive the coordinates of the device with the SMS-Find function enabled using the following methods:
- by using the Stealth SMS function on another device with Kaspersky Mobile Security installed;
- by using your phone's standard functions for creating SMS messages.
To create an SMS message using Slealth SMS, perform the following actions (see Figure below):
- Select Stealth SMS in the Anti-Theft tab.
- Select SMS-Find and press Next.
- Enter the phone number of the device data on which must be deleted. Press Next.
- Enter the secret code entered on the device receiving the message and press Send.

Figure 54: Determining the location of the device
To create an SMS message the standard SMS feature on your phone:
send to the device you need to block an SMS message containing text find: (where is secret code set on the receiving device. The message is not case sensitive and spaces before or after the colon do not matter.
An SMS message with the device's coordinates will be sent to the phone number from which the request for coordinates was received and to the e-mail address if it was specified in the function's settings (see section "The SMS-Find Function" on page 63).
THE STEALTH SMS FUNCTION
The Stealth SMS function allows creating a special SMS message to block the device, erase personal data or receive coordinates and sending it to the lost device.
To create a Stealth SMS, perform the following actions (see Figure below):
-
Select Stealth SMS in the Anti-Theft tab.
-
Select the required function:
- SMS-Block (see section "The SMS-Block function" on page 58).
• SMS-Clean (see section "The SMS-Clean function" on page 60).
- SMS-Find (see section "The SMS-Find function" on page 63).
The function being used must be enabled on the receiving device.
Press Next.
- Enter the number of the device to which the message will be sent. Press Next.
- Enter secret code specified on the receiving SMS device and press Send.

Figure 55: Configuring the Stealth SMS function
FIREWALL
This section contains information about the Firewall component which monitors the network activity of the device and protection of the device on the network level.
IN THIS SECTION
About Firewall....67
Selecting firewall security level....67
Configuring notifications about connection attempts 68
ABOUT FIREWALL
Firewall allows the user to determine which of the network connections will be allowed and which connections will be blocked.
Information about the Firewall's operation will be saved to the program log (see section "Program logs" on page 77).
SELECTING FIREWALL SECURITY LEVEL
Operation of the Firewall component is based on the security levels. The security level set will determine which network protocols will be allowed to be used to transfer information and which of them will be blocked.
In order to edit the values of the settings, use the device's joystick or select the Change item in the Options menu.
By default the application uses the values of the settings recommended by Kaspersky Lab's specialists. If you wish to restore the recommended values after you modified the settings, open the Settings window and select Restore from the Options menu.
To select the Firewall security level, perform the following actions (see Figure below):
- Select Settings on the Firewall tab.
- Select the Firewall. In the window that will open select the required security level:
• High: block any network activity except updating of database and renewing the license.
- Medium: block all incoming connections, outgoing connections can only be established using SSH, HTTP, HTTPS, IMAP, SMTP, POP3 ports.
- Low: block only incoming connections.
- Off: allow any network activity.
- Select Back to save changes and return to the Settings window.

Figure 56: Configuring the Firewall security level
CONFIGURING NOTIFICATIONS ABOUT CONNECTION ATTEMPTS
You can configure the display of user notifications about connection attempts blocked at the selected Firewall security level;
- Select Settings on the Firewall tab.
- Set value On for the Notifications setting.

Figure 57: Configuring notifications about connection attempts
ENCRYPTION
This section contains information about the component that ensures data protection on the device using encryption.
IN THIS SECTION
About Encryption 69
Data encryption 69
Data decryption 70
Information about encrypted data....71
Blocking access to encrypted data 72
ABOUT ENCRYPTION
Encryption is designed to protect data in a certain folder against being viewed by unauthorized persons even if they have access to the device.
When you access Encryption for the first time you will have to set up a secret code (if it has not been set up earlier). The secret code is used to prevent unauthorized access to the Encryption settings and to the encrypted data. The code can also be used to access the Anti-Theft and Parental control settings.
The data in the folder will be encrypted once command Encrypt is executed and then data will be encrypted and decrypted "on the fly" at the moment there data is placed into the folder, extracted from it or accessed.
Information about the component's work will be entered into the program log (see section "Program logs" on page 77).
DATA ENCRYPTION
Using the Encryption component you can encrypt any non-system folder residing in the device memory or on the memory expansion card.
To protect a folder on the device using encryption, perform the following actions (see Figure below):
- Select Encrypt on the Encryption tab.
- In the window that will open select a folder that you wish to encrypt.
In order to move around the file system use the stylus or joystick buttons of your device: Up, Down – to move within the selected folder, Left, Right – to move one level up or down from the current folder.
To start the process of encryption of the selected folder, use Encrypt in the Options menu.
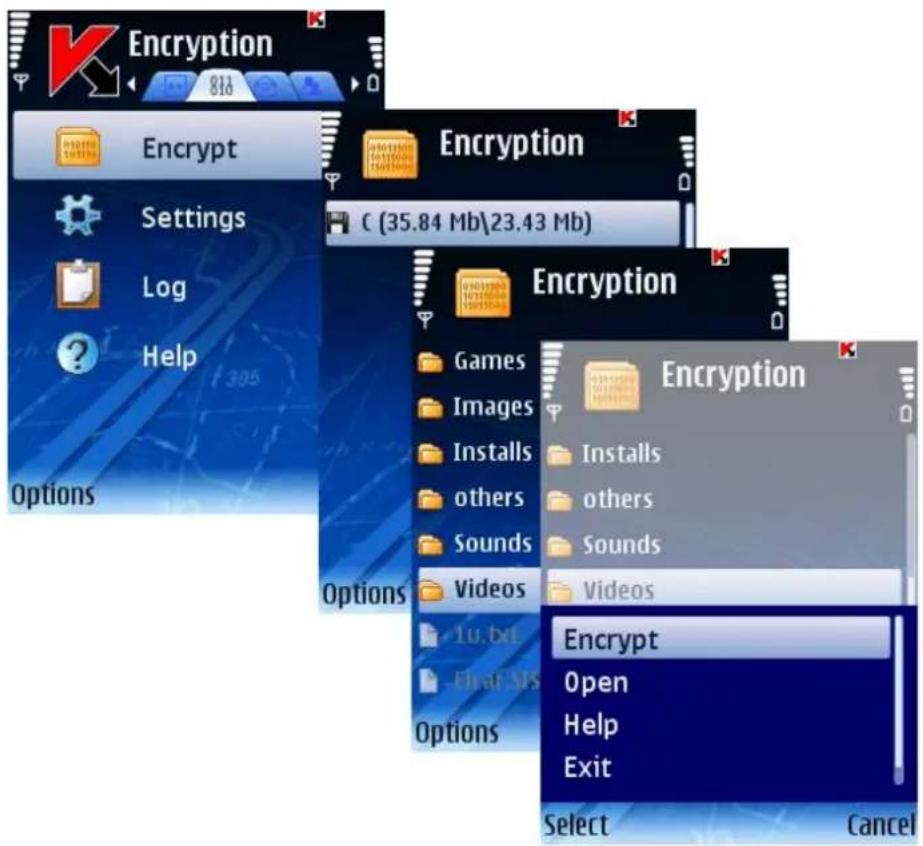
Figure 58: Data encryption
The data in the folder will be encrypted once the command is executed and then data will be encrypted and decrypted "on the fly" at the moment there data is placed into the folder, extracted from it or accessed.
You can encrypt only one folder using the Encryption function. If you wish to encrypt another folder, you have to decrypt the current encrypted folder. After encryption, the Encrypt item will turn into Decrypt and using it you can decrypt the encrypted data (see section "Data decryption" on page 70).
DATA DECRYPTION
You can completely decrypt data which was previously encrypted (see section "Data encryption" on page 69).
For full decryption of the folder encrypted earlier,
select Decrypt on the Encryption tab (see Figure below).
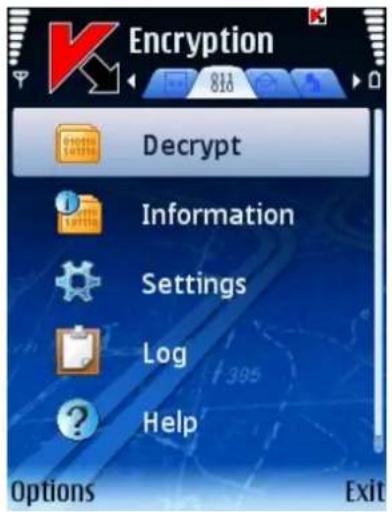
Figure 59: Data decryption
After decryption, the Decrypt item will turn into Encrypt and you can use it again to encrypt data (see section "Data encryption" on page 69).
INFORMATION ABOUT ENCRYPTED DATA
If encryption is enabled, you can check which folder is currently encrypted.
In order to view which folder is currently encrypted, perform the following actions (see Figure below):
- Open the Encryption tab.
- Select Information. The path to the encrypted folder will be displayed.

Figure 60: Information about encrypted data
BLOCKING ACCESS TO ENCRYPTED DATA
You can block access to encrypted data instantly or with a delay. After this you will have to enter your secret code to access the encrypted data.
To ensure data protection when the device is switched into the sleep mode, you can configure automatic blocking of data access.
The Block access setting determines the device's idle time after the backlight is turned off and the device is switched to the sleep mode, after which you will need to enter the secret code to access the encrypted data.
By default the access is blocked immediately after the backlight is turned off (value No delay is selected).
To enable delayed blocking, perform the following actions (see Figure below):
- Select Settings on the Encryption tab.
- Select Block access in the window that will open.
- Set up the time you wish: 1 minute, 5 minutes, 15 minutes or 1 hour.
- Press OK to save changes.

Figure 61: Blocking access to encrypted data
You can also instantly block access to the encrypted data and enable the prompt for the secret code.
For instant access blocking,
press buttons 0 and 1 at the same time.
UPDATING THE PROGRAM BASES
This section contains information about the Update component. Regular bases update is necessary to ensure reliable operation of Kaspersky Mobile Security.
IN THIS SECTION
About program bases update....73
Viewing bases information....73
Manual updating....73
Scheduled updating....74
Updating while roaming....75
Configuring connection settings 76
ABOUT PROGRAM BASES UPDATE
The search for malware programs is performed based on the program bases records which contain description of all currently known malware programs and methods for their treatment as well as description of other unwanted objects. It is extremely important to keep your bases up-to-date.
You can update bases manually or according to a schedule. Updates are performed from Kaspersky Lab's update servers via Internet, this requires an Internet connection.
To view detailed information about bases currently used select Databases info on the Information tab.
Information about the bases updates will be saved to the program log (see section "Program logs" on page 77).
VIEWING BASES INFORMATION
In order to view information about the installed bases (see Figure below),
select Databases info on the Information tab.

Figure 62: The Information tab
MANUAL UPDATING
You can start the updating process manually at any time convenient to you.
To start a manual update of anti-virus bases,
select Update on the Anti-Virus tab (see Figure below). The program will start the bases updating from the server using the connection selected during the activation of the program. If necessary you can change the access point in the update settings (see section "Configuring connection settings" on page 76).

Figure 63: Manual update
SCHEDULED UPDATING
Timely updates are a prerequisite of the effective device protection against malware objects. For your convenience you can configure automatic updates of bases at any time convenient to you.
To configure a schedule to automatic program bases update, perform the following actions (see Figure below):
-
Select Settings in the Anti-Virus tab.
-
In the window that will open select Update schedule and configure the settings of Auto update.
-
Off: do not perform scheduled updates.
• Daily: perform updates every day. Specify the update time in the corresponding field.
• Weekly: perform the update once a week. Specify the update date and time in the corresponding fields. -
Select Back to save changes and return to the Settings window.

Figure 64: Configuring scheduled updates
You can also configure the automatic update settings when your phone is in the roaming mode (see section "Updating while roaming" on page 75).
UPDATING WHILE ROAMING
You can configure automatic disabling of scheduled updating while your phone is in roaming mode. Manual updating will be available in the regular mode.
For automatic disabling of the scheduled updates while your phone is in roaming, perform the following actions (see Figure below):
- Select Settings in the Anti-Virus tab.
- Select Update schedule in the window that will open.
- Select value No for setting Allow in roaming.
- Select Back to save changes and return to the Settings window.

Figure 65: Configuring updates in roaming
CONFIGURING CONNECTION SETTINGS
To configure the connection settings, perform the following actions (see Figure below):
- Select Settings in the Anti-Virus tab.
- Select Update in the window that will open.
- Select the access point (Access point setting) which will be used to connect to the update server.
The access point will be configured using settings specified by the provider.
By default updates are performed from Kaspersky Lab's update server: http://ftp.kaspersky.com/index/mobile.xml.
- Press OK to save the changes.
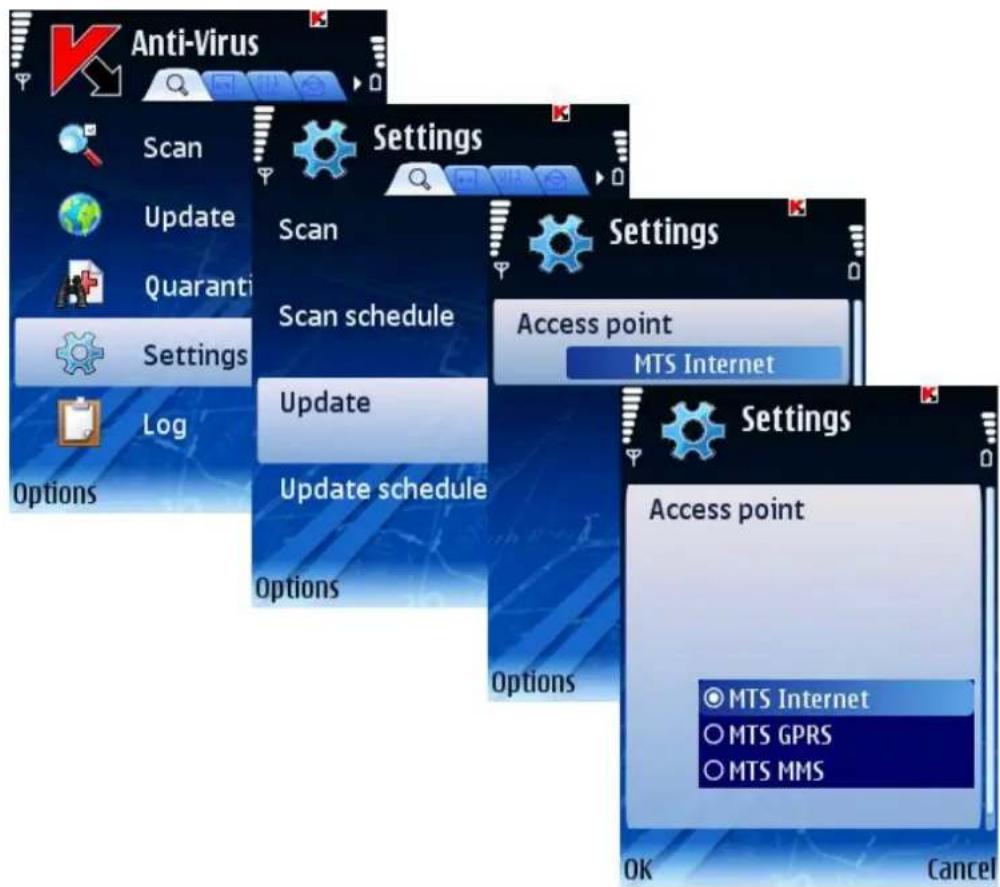
Figure 66: Configuring connection settings
After the update is complete, the connection open for the update will automatically close. If the connection had been established before the update was started, it will be used for further operation.
PROGRAM LOGS
This section contains information about the logs and managing of the information they contain.
IN THIS SECTION
About logs ....77
Viewing Log records....78
Deleting Log records 78
ABOUT LOGS
Logs store records about events that occurred during Kaspersky Mobile Security operation sorted by the time of the record starting with newest entries first.
VIEWING LOG RECORDS
To view all records stored in the Log, perform the following actions:
- Select the corresponding item in the Log menu on the tab of the component information about operation of which you wish to obtain (for example, Log item on the Anti-Virus tab).
- Use joystick buttons to navigate through the Log. Up, Down – to move through the messages of the selected component, Left, Right – to switch to the messages of other components.
To view more detailed information about a record in the log,
select a message and use the Details item from the Options menu.
DELETING LOG RECORDS
To delete all messages from the Log:
- Select the Log item from the menu on the tab of any component (for example, the Log item on the Anti-Virus tab).
- Select the Clear Log item from the Options menu. All records from the Log for every component will be deleted.
DISPLAYING THE STATUS WINDOW
You can enable or disable the display of the status window at the application startup.
In order to edit the values of the settings, use the device's joystick or select the Change item in the Options menu.
By default the program uses the values of the settings recommended by Kaspersky Lab's specialists. If you wish to restore the recommended values after you modified the settings, open the Settings window and select Restore from the Options menu.
To configure the display of the status window, perform the following actions (see Figure below):
- Select the Settings item in the Information tab.
- Select the required value for the Show status screen item in the window that will open:
- To display the status window at the program startup, select Yes.
- If you do not want the status window to be displayed, select the No value.
- Press Back to save the changes.

Figure 67: Configuring the status window display
You can configure the use of the sound notification in case of certain events (detection of an infected object, message about an application status, etc.) By default the playback of the sound signal in case of a virus detection depends on the device profile (the setting's value Profile dependent).
In order to edit the values of the settings, use the device's joystick or select the Change item in the Options menu.
By default the program uses the values of the settings recommended by Kaspersky Lab's specialists. If you wish to restore the recommended values after you modified the settings, open the Settings window and select Restore from the Options menu.
To configure sound notification, perform the following actions (see Figure below):
- Select the Settings item in the Information tab.
- Select Sound in the window that will open.
-
Set the required value:
-
If you wish the sound notification to be performed irrespective of the selected device profile, set the value to Enabled.
-
If you wish the playback of the sound signal in case of a virus detection to depend on the device profile set the value to Profile dependent.
• To disable the sound notification, set the value to Disabled. -
Select OK to save the changes.

Figure 68: Managing sound notification
MANAGING THE LICENSE
Kaspersky Mobile Security allows viewing information about the current license and renew it if necessary.
IN THIS SECTION
Viewing the license information....80
Renewing the license 81
VIEWING THE LICENSE INFORMATION
To view information about the license, perform the following actions (see Figure below):
- Select About license on the Information tab.
- Select License in the window that will open.

Figure 69: Viewing the license information
RENEWING THE LICENSE
To renew your license, perform the following actions (see Figure below):
- Select About license on the Information tab.
- Select Renew in the window that will open.
The code entry window will open on the smartphone's screen.
- Enter the code into the four fields. The activation code consists of Latin alphabet characters and digits (the code is case-insensitive). After you have entered the activation code, select Activate in the Options menu.
- When you request an access point, select the connection type to be used to connect to the server.
The program will send an http query to Kaspersky Lab's activation server and will then download and install the key.
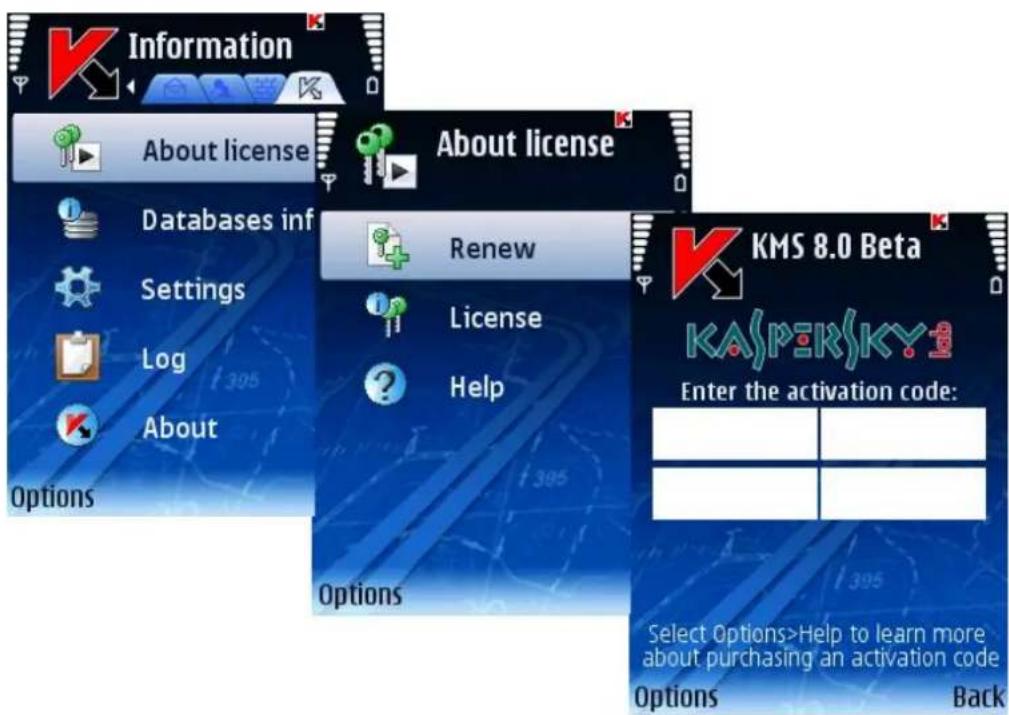
Figure 70: Renewing the license
If the activation code you entered appears invalid for any reason, a corresponding message will be displayed on your smartphone's screen.
If the key installation is successful, information about the license will be displayed on the screen. To proceed using the program press OK.
UNINSTALLING THE PROGRAM
In order to uninstall Kaspersky Mobile Security, perform the following actions:
- Make sure that there are no encrypted data (see section "Data encryption" on page 69).
- Close Kaspersky Mobile Security. To do this:
a. Press and hold the Menu button.
b. Select KMS 8.0 in the list of running programs.
c. Select Exit from the Options menu (see Figure below).

Figure 71: Exiting the program.
- Uninstall Kaspersky Mobile Security
a. Open the device's main menu.
b. Switch to the Tools menu and select App. mgr. (see Figure below).
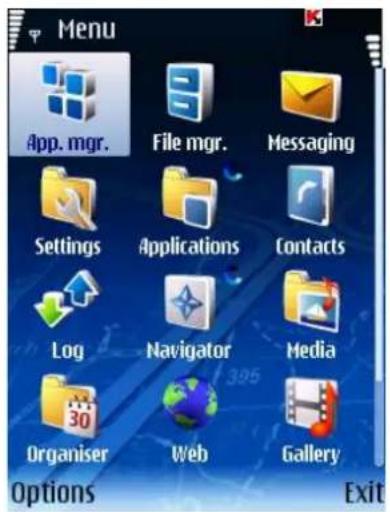
Figure 72: Starting the Application manager
c. Select KMS 8 in the list of programs and press the Options button (see Figure below).

Figure 73: Selecting the application
d. Select the Remove menu item(see Figure below).

Figure 74: Uninstalling the application
e. Press the Yes button in the prompt to confirm the program removal.
f. If you are prompted to enter the secret code, enter it.
g. If you wish to save the program settings, quarantined objects or Anti-Spam lists, check the corresponding fields next to the required settings (see Figure below).

Figure 75: The list of settings to be saved
h. Restart the phone to complete the program removal process.
KASPERSKY MOBILE SECURITY FOR MICROSOFT WINDOWS MOBILE
This section contains description of the operation of Kaspersky Mobile Security for mobile devices running one of the following operating systems:
• Microsoft Windows Mobile 5.0.
• Microsoft Windows Mobile 6.0, 6.1.
IN THIS SECTION
Installing Kaspersky Mobile Security 86
Getting started....87
Real-Time Protection....92
On-demand scan 95
Quarantine....102
Anti-Spam....105
Parental control 118
Anti-Theft 126
Firewall....135
Encryption 137
Updating program bases 141
Program logs 144
Managing the license....146
Uninstalling the program....148
INSTALLING KASPERSKY MOBILE SECURITY
In order to install Kaspersky Mobile Security, perform the following steps:
- Copy the cab archive with program installation package to your mobile device. You can do it using one of the following methods:
• from the download page of Kaspersky Lab's website;
• using Microsoft ActiveSync application;
• using a memory expansion card.
-
Run installation (open the cab archive with the distribution package on your mobile device).
-
Read the License Agreement (see the Figure below). If you agree to all the terms, press OK. Kaspersky Mobile Security will then be installed on the device. If you do not agree with the terms of the License Agreement, press Cancel.

Figure 76: License Agreement
- Select Kaspersky Mobile Security interface language (see the Figure below) and click OK.

Figure 77: Selecting the localization language for the program
- After the installation a message with a recommendation to reboot the device will be displayed. To reboot the device, press Reboot.
GETTING STARTED
This section contains information on starting the program, what is required to activate it, how you should use the program interface and set up the secret code.
IN THIS SECTION
Activating the program....88
Starting the program....89
Graphical user interface 90
Secret code 91
Viewing information about the program....92
ACTIVATING THE PROGRAM
To start using Kaspersky Mobile Security you must activate it first. The activation procedure involves entering the activate code and then receiving a key to be used by the program to determine your rights and the period during which you can use the program.
You can purchase the activation code at website http://www.kaspersky.com/globalstore of from Kaspersky Lab's distributors.
To activate Kaspersky Mobile Security on your smartphone, you must have an Internet connection configured.
Before activating the program, make sure that the devices' system date settings match the actual date and time.
In order to activate Kaspersky Mobile Security, perform the following actions:
- Select Programs from the Start menu.
- Select KMS8 and start the program using your stylus or the central button of your joystick.
- Select Enter code in the window that will open.
The Kaspersky Mobile Security activation window will open on the device's screen (see Figure below).
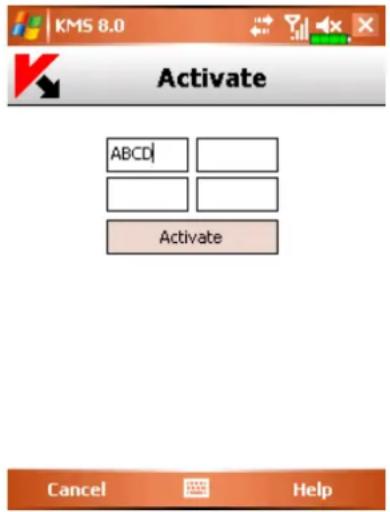
Figure 78: Entering the code
- Enter the code into the four fields. The activation code consists of Latin alphabet characters and digits (the code is case-insensitive). Press the Activate button after you have entered the activation code.
- The program will send an http query to Kaspersky Lab's activation server and will then download and install the key.
If the activation code you entered appears invalid for any reason, a corresponding message will be displayed on your smartphone's screen.
If the key installation is successful, an information message about the successful key installation and the license will be displayed on the screen. To start using the program press OK.
STARTING THE PROGRAM
In order to start Kaspersky Mobile Security, perform the following actions:
- Select Programs from the Start menu.
- Select KMS8 and start the program using your stylus or the central button of your joystick.
After the program is started a window with main components of Kaspersky Mobile Security (see Figure below) will be displayed on the screen.
• Real-Time Protection – Real-Time Protection status.
- Last scanned – date of the last anti-virus device scan.
- Databases date – release date of the bases installed on the device.
- Firewall – level of the device protection against unwanted network activity.
- Anti-Spam – status of the protection against unwanted incoming messages.

Figure 79: The program component status window
You can start a full scan of the device for malware objects using the Scan button or switch to selecting the tab using Menu.
GRAPHICAL USER INTERFACE
The program components are grouped logically and their settings are provided on seven tabs:
- The Anti-Virus tab contains settings of Real-Time Protection, on-demand scan, program and quarantine bases update as well as the settings used by scan and update tasks.
- The Anti-Theft tab contains the settings used to block the device and erase information from it in case the device is lost or stolen.
- The Encryption tab contains the settings used to protection information on the device using encryption.
- The Anti-Spam tab contains settings used for filtering unwanted incoming messages and calls.
- The Parental control tab contains settings used to block unwanted outgoing calls and messages.
• The Firewall contains tab contains settings used for the operation of the network protection of the device. - The Information tab contains general settings used for the operation of the program, information about the program and the bases used. The tab also includes information about the license installed and the availability of its renewal.
To navigate through the tabs, press the Menu button and select the required tab (see Figure below).

Figure 80: Program menu
To return to the program component status window,
select Protection status.
To exit the program,
select Exit.
SECRET CODE
The secret code is used to prevent unauthorized access to the settings of Anti-Theft, Parental control and Encryption, during the creation of Stealth SMS and for deleting the program and to access encrypted data.
You can set up the secret code using one of the following methods:
- When configuring the following component:
• Anti-Theft (on page 126).
• Parental control (on page 118).
- Encryption (on page 137).
• Using Change code on the Information tab.
We recommend using a secret code consisting of at least seven digits.
In order to set up the secret code on the Information tab, do the following:
- Select Change Code on the Information tab.
- In the Enter new code entry field enter digits which will constitute your code, press OK. Then enter this code again in the Confirm field.
Also, if the code is not set up, you can enter it when you first access the settings of Anti-Theft, Encryption or Parental control. Also entry field Enter new code and Confirm will be displayed.
In order to change the secret code, do the following:
- Select the Information tab.
-
On the tab select Settings, then select Change code.
-
Enter the current code in the Enter code entry field. Then enter new code in the Enter new code field and enter it once again in the Confirm entry field to confirm.
If you forgot the secret code, you will not be able to manage Kaspersky Mobile Security functions and to delete the application.
VIEWING INFORMATION ABOUT THE PROGRAM
You can view general information about the program, its version and copyright details.
In order to view the information about the program,
select Information on the About program tab (see Figure below).
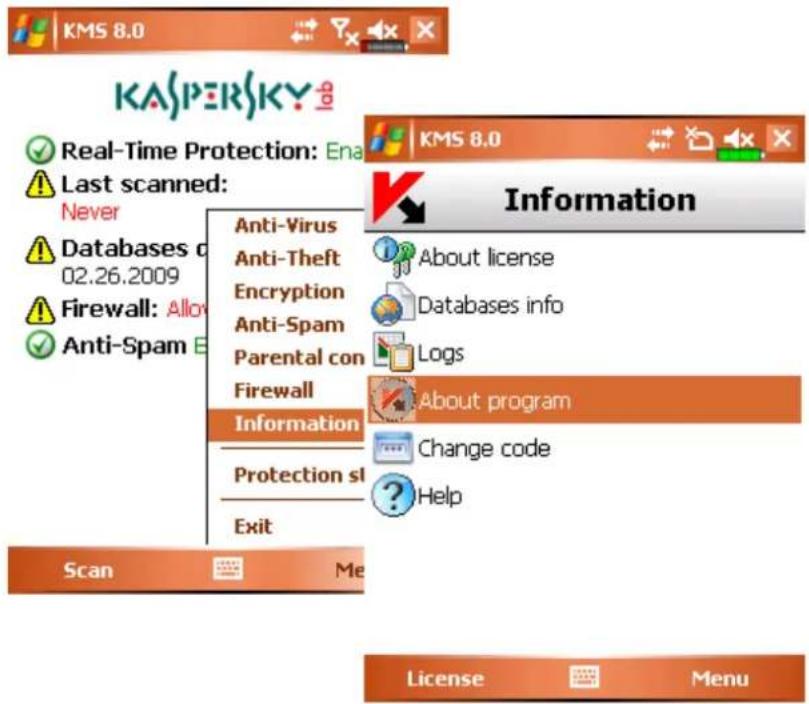
Figure 81: The Information tab
REAL-TIME PROTECTION
This section contains information about Real-Time Protection of your device, how to enable it and configure its settings.
IN THIS SECTION
About Real-Time Protection 93
Enabling and disabling Real-Time Protection....93
Selecting an action to be performed with objects 94
ABOUT REAL-TIME PROTECTION
Real-Time Protection loads when you start your operating system and runs in your device memory, scanning all files that are opened, saved, or executed. Files are scanned according to the following algorithm:
- The component intercepts each attempt of access to each file from the part of the user or a program.
- The file is scanned for the presence of malware object. Malicious objects are detected by comparison with program databases. The databases contain descriptions of all the malicious objects known to date and methods for neutralizing them.
After the analysis, Kaspersky Mobile Security may take the following courses of action:
- If malicious code was detected in the file, Kaspersky Mobile Security blocks the file and performs an action in accordance with the settings.
- If no malicious code is discovered in the file, it will be immediately restored.
Information about the results of the scan is saved to the program log (see section "Program logs" on page 144).
SEE ALSO
Program logs 144
ENABLING AND DISABLING REAL-TIME PROTECTION
The program allows managing the status of the Real-Time Protection of the device against malware objects.
To modify the values of the settings, use device's joystick or stylus.
By default the program uses the values of the settings recommended by Kaspersky Lab's specialists.
To enable Real-Time Protection, perform the following actions (see Figure below):
- Select the Settings item in the Anti-Virus tab.
-
Select the Protection Settings in the screen that will open.
-
Check the Enable Protection box next to the Real-Time Protection state box in the screen that will open.

Figure 82: Enabling Real-Time Protection
To disable Real-Time Protection, do the following:
- Select the Settings item in the Anti-Virus tab.
- Select the Protection Settings in the screen that will open.
- Uncheck the Enable Protection box next to the Real-Time Protection state box in the screen that will open.
Kaspersky Lab's specialists strongly recommend that you should not disable protection because this may lead to infecting your device with viruses and data loss.
SELECTING AN ACTION TO BE PERFORMED WITH OBJECTS
You can configure the program's actions to be performed when the program detects a malware object.
To modify the values of the settings, use device's joystick or stylus.
By default the program uses the values of the settings recommended by Kaspersky Lab's specialists.
To configure the program's response to a malware object, perform the following actions (see Figure below):
- Select the Settings item in the Anti-Virus tab.
- Select the Protection Settings in the screen that will open.
- Select the program's response when it detects an infected object for the If a virus detected setting.
• Quarantine: quarantine malware objects.
- Delete: delete malware objects without notifying the user.
- Log event: skip the malware object, record information about its detection into the program's log.
- Press OK to save the changes.

Figure 83: Selecting an action to be performed with the object
ON-DEMAND SCAN
This section contains information about the Scan component, how to scan your device for viruses, configure the device scan settings and the automatic scheduled scan launch.
IN THIS SECTION
About on-demand scan 96
Starting a scan manually 96
Configuring a scheduled scan start 98
Selecting objects to be scanned....99
Selecting an action to be performed with objects 100
ABOUT ON-DEMAND SCAN
Kaspersky Mobile Security allows to perform a full or partial memory scan of the device and system memory for the presence of malware objects.
The file is scanned for the presence of malware objects. Malicious objects are detected by comparison with application databases used by the program. The databases contain descriptions of all the malicious objects known to date and methods for neutralizing them. If malicious code was detected in the file, Kaspersky Mobile Security blocks the file and performs an action in accordance with the settings.
A scan can be launched manually or according to the schedule.
Information about the results of the on-demand scan is saved to the program log (see section "Program logs" on page 144).
STARTING A SCAN MANUALLY
You can launch an on-demand scan manually at any time convenient to you, for example, when the device's processor is not occupied performing other tasks.
To start an anti-virus scan, perform the following actions (see Figure below):
- Select Scan in the Anti-Virus tab.
- In the screen that will open select the device scan scope:
• Full scan – scanning the entire memory of the device and the storage cards.
• Memory scan – scanning of the processes running in the system memory and corresponding process files.
- Folder scan – selecting and scanning a certain folder in the device's file system or on the connected storage card for scanning.
When Folder scan is selected, a screen displaying the device's file system will open. In order to navigate through the file system use the joystick buttons. In order to scan a folder, select the folder you wish to scan and select Scan from Menu.

Figure 84: Launching a scan manually
After the scan is started, the scan process window (see Figure below) will open in which the current status of the task will be displayed: the number of scanned objects, the path to the object being scanned at the time.

Objects scanned: 23 \SDMMC \05-05-11-0400.bak

Figure 85: The Scan window
Once an infected object is detected (see Figure below) an action will be performed with this object in accordance with the scan setting (see section "Selecting an action to be performed with objects" on page 100).
A prompt for an action to be performed with an object (see Figure below) will be displayed by the program only if the Ask user value is assigned to the Action setting.

Object:
\My Documents\CORR-Eicar1.com
Infected with:
Eicar-test-file

Figure 86: Notification about virus detection
Once the scan is complete the general statistics about detected and deleted malware objects will be displayed on the screen.
CONFIGURING A SCHEDULED SCAN START
Kaspersky Mobile Security allows to create a schedule according to which the scan will be automatically started at the specified time. The scan is performed in the background mode. Once an infected object is detected, the program will perform an action selected in the scan settings (see section "Selecting an action to be performed with objects" on page 100).
By default scheduled scan is disabled.
To configure a scheduled scan, perform the following actions (see Figure below):
- Select the Settings item in the Anti-Virus tab.
- Select Scan schedule in the screen that will open.
- In the screen that will open create a scan launch schedule:
• Daily: perform the scan every day. Specify the Time in the entry field.
• Weekly: perform the scan once a week. Specify Day of week and Time.
- Off: disable the scheduled scan launch.
- Press OK to save the changes.

Figure 87: Configuring an automatic scan schedule
SELECTING OBJECTS TO BE SCANNED
The program allows to determine the type of objects to be scanned for the presence of malicious code.
To modify the values of the settings, use device's joystick or stylus.
By default the program uses the values of the settings recommended by Kaspersky Lab's specialists.
To select objects to be scanned, perform the following actions (see Figure below):
- Select the Settings item in the Anti-Virus tab.
- Select the Scan settings in the screen that will open.
- Configure the Objects to be scanned setting:
| IF YOU CHECK BOX... | DURING THE SCAN THE PROGRAM WILL BE PERFORMING THE FOLLOWING ACTIONS... |
| Archives | unpacking and scanning of the entire archive content; scanning all file types |
| Executables only | scanning only executable program files (for example *.exe, *.mdl, *.app); archives will not be unpacked |
| Archives and Executables only | scanning executable program files (for example *.exe, *.mdl, *.app); unpacking of archives and scanning of executable program files stored in the archives; |
Unpacking of the following types of archives is supported: *.zip, *.sis and *.cab.
4. Press OK to save the changes.

Figure 88: Selecting objects to scan
SELECTING AN ACTION TO BE PERFORMED WITH OBJECTS
You can configure the program's actions to be performed when the program detects a malware object.
To modify the values of the settings, use device's joystick or stylus.
By default the program uses the values of the settings recommended by Kaspersky Lab's specialists.
To configure the program's response to a malware object, perform the following actions (see Figure below):
- Select the Settings item in the Anti-Virus tab.
- Select the Scan settings in the screen that will open.
- If you wish the program to attempt to disinfect infected objects, check the Try to disinfect box next to the If a virus detected setting.
- Configure the program's response to malware objects in the Action item (if the Try to disinfect box was checked earlier, the title of the setting will be If disinfection fails and the setting will configure the action to be performed by the program if it is impossible to disinfect the object):
• Quarantine: quarantine objects.
- Ask user: prompt the user for action when an infected object is detected.
- Delete: delete malware objects without notifying the user.
- Log event: skip the malware object, record information about its detection into the program's log.
- Press OK to save the changes.

Figure 89: Selecting an action to be performed with the object
QUARANTINE
This section contains information about the Quarantine and managing quarantined infected objects.
IN THIS SECTION
About Quarantine 102
Viewing quarantined objects....103
Restoring objects from Quarantine....103
Deleting objects from Quarantine 104
ABOUT QUARANTINE
Quarantine is a special storage into which Kaspersky Mobile Security places objects suspected of being malware and detected during the scan or by the Real-Time Protection.
Quarantined objects are stored in the packed form which rules out their activation and, thus, they do not impose any threat for the device. Objects can later be deleted or restored by the user.
VIEWING QUARANTINED OBJECTS
To view the list of quarantined objects,
select the Quarantine item in the Anti-Virus tab. This will open the Quarantine screen (see Figure below) which contains a list of objects stored in the Quarantine (see Figure below).

Figure 90: Viewing quarantined objects
SEE ALSO
About Quarantine ....102
Restoring objects from Quarantine....103
Deleting objects from Quarantine 104
RESTORING OBJECTS FROM QUARANTINE
To restore objects from the Quarantine, perform the following actions (see Figure below):
- Select the Quarantine item in the Anti-Virus tab.
- In the Quarantine screen that will open select an object you wish to restore.
- Press Menu and select Restore. The object selected will be restored from the Quarantine into the original folder.

Figure 91: Restoring objects from Quarantine
DELETING OBJECTS FROM QUARANTINE
To delete objects from the Quarantine, perform the following actions (see Figure below):
- Select the Quarantine item in the Anti-Virus tab.
- In the Quarantine screen that will open select an object you wish to restore.
- Press Menu and select Delete. The selected object will be deleted from the Quarantine.

Figure 92: Deleting an object from Quarantine
To delete all objects from Quarantine perform the following:
- Select the Quarantine item in the Anti-Virus tab.
- Press Menu and select Delete all in the Quarantine screen. All objects will be deleted from the Quarantine.
ANTI-SPAM
This section contains information about the Anti-Spam component as well as the description of how to compile the Black and White Lists, configure Anti-Spam operation modes and other Anti-Spam settings.
IN THIS SECTION
About Anti-Spam 106
Anti-Spam modes....106
Creating a Black List....107
Creating a White List....110
Response to messages and calls from the phonebook contacts....114
Response to messages from non-numeric numbers 115
Selecting an action to be performed with incoming messages....117
Selecting an action to be performed with incoming calls 118
ABOUT ANTI-SPAM
Anti-Spam component allows to protect device against receiving unwanted messages and calls. Such protection is based on filtering incoming SMS messages and calls using the Black and the White Lists. These lists contain phone numbers and/or sample phrases characteristic of spam and non-spam SMS messages.
If at least one match of a phone number or a phrase from the White List is detected, no further check will be performed and the call or the message will be received by the device. An SMS message or a call from a phone number found in the Bblack List or an SMS message containing a text found in the Black List will be blocked.
ANTI-SPAM MODES
An Anti-Spam mode is a set of parameters on which protection of your device against spam messages and unwanted calls is based.
The following Anti-Spam modes are provided:
- Allow all – no filtering of SMS messages and calls will be performed.
- White List – passing through SMS messages and calls matching entries in the White List. All other SMS messages and calls will be blocked.
- Black List – blocking of SMS messages and calls matching entries in the Black List. All other SMS messages and calls will be passed through.
- Both lists - filtering of incoming SMS messages and calls using the Black and the White Lists. Once an SMS message or a call is received from a phone number not found in either of the lists, Anti-Spam will notify you and will suggest to block or allow receipt of such SMS message or a call and to add this phone number to the White or the Black List. This mode is selected by default.
To select an Anti-Spam operation mode, perform the following actions (see Figure below):
-
Select Settings in the Anti-Spam tab.
-
In the screen that will open select the mode you require and press Done to save changes.

Figure 93: Selecting the operation mode
CREATING A BLACK LIST
This list contains entries with phone numbers, SMS and calls from which will be blocked by Anti-Spam and the text which, if found in an SMS message received, will cause such message to be blocked.
Information about blocked SMS messages and calls will be registered in the log (see section "Program logs" on page 144).
IN THIS SECTION
Adding a new entry....107
Editing an existing entry 108
Deleting a entry 110
Adding a new entry
To add an entry to the Anti-Spam BlackList, perform the following actions (see Figure below):
-
Select Black List in the Anti-Spam tab.
-
Press Menu and select Add entry.
-
Set the following settings in the screen that will open:
- Phone number – phone number for which the receipt of SMS message and/or calls will be blocked. The number should only be comprised of alphanumeric characters; it may begin with a digit, a letter, or be preceded with the "+" symbol. Additionally when entering a number, you can use masks "*" and "?" (where «*» any number of characters and «?» any one character).
- Action – action to be performed with a message and/or call:
• Block all: block incoming calls and SMS messages.
• Block calls: block only incoming calls.
- Block messages: block only incoming SMS messages.
- Text - text upon detection of which in the SMS message received, such message will be blocked. The setting is available if value Block messages is selected for setting Action.
- Press Done to save the changes.
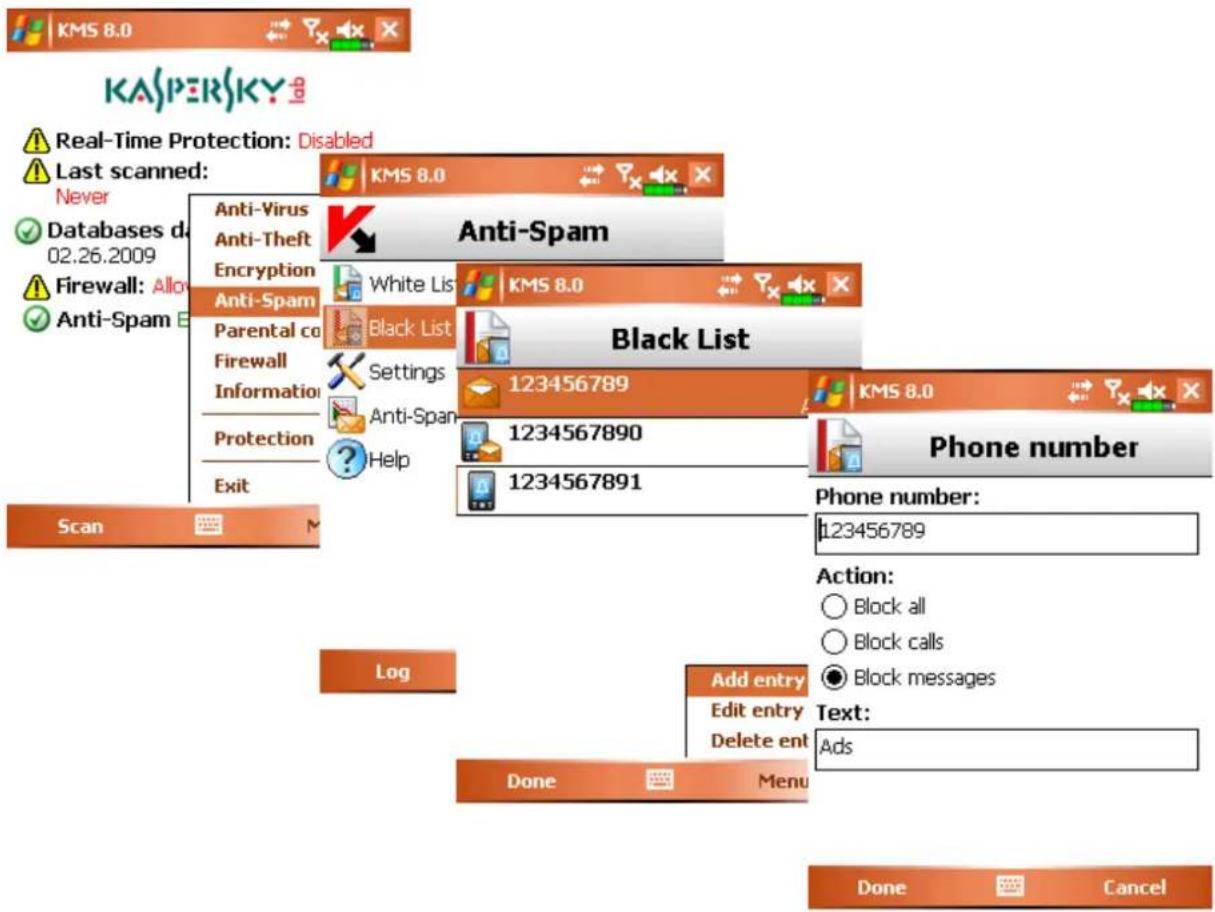
Figure 94: Adding a new entry
Editing an existing entry
To edit an entry in the Anti-Spam Black List, perform the following actions (see Figure below):
-
Select Black List in the Anti-Spam tab.
-
Select an entry you wish to edit from the list.
-
Press Menu and select Edit entry.
-
Edit the following settings in the screen that will open:
- Phone number – phone number for which the receipt of SMS message and/or calls will be blocked. The number should only be comprised of alphanumeric characters; it may begin with a digit, a letter, or be preceded with the "+" symbol. Additionally when entering a number, you can use masks "*" and "?" (where «*» any number of characters and «?» any one character).
- Action – action to be performed with a message and/or call:
• Block all: block incoming calls and SMS messages.
• Block calls: block only incoming calls.
- Block messages: block only incoming SMS messages.
- Text - text upon detection of which in the SMS message received, such message will be blocked. The setting is available if value Block messages is selected for setting Action.
5. Press Done to save the changes.

Figure 95: Editing an existing entry
Deleting an entry
To delete an entry from the Anti-Spam Black List, perform the following actions (see Figure below):
- Select Black List in the Anti-Spam tab.
- Select an entry you wish to delete from the list.
- Press Menu and select Delete entry.

Figure 96: Deleting an entry
CREATING A WHITE LIST
The White List contains entries with phone numbers, SMS and calls from which will be allowed by Anti-Spam and the text which, if found in an SMS message received, will cause such message to be passed through.
IN THIS SECTION
Adding a new entry....111
Editing an existing entry ....112
Deleting an entry 113
Adding a new entry
To add an entry to the Anti-Spam White List, perform the following actions (see Figure below):
- Select White List in the Anti-Spam tab.
-
Press Menu and select Add entry.
-
Set the following settings in the screen that will open:
-
Phone number – phone number for which the receipt of SMS message and/or calls will be allowed. The number should only be comprised of alphanumeric characters; it may begin with a digit, a letter, or be preceded with the "+" symbol. Additionally when entering a number, you can use masks "***" and "?" (where «*» any number of characters and «?» any one character).
-
Function – action to be performed with a message and/or call:
-
Allow all: allow only incoming calls and SMS messages.
- Allow calls: allow only incoming calls.
- Allow messages: allow only incoming SMS messages.
- Text - text upon detection of which in the SMS message received, such message will be passed through. The setting is available if value Allow messages is selected for setting Function.
- Press Done to save the changes.
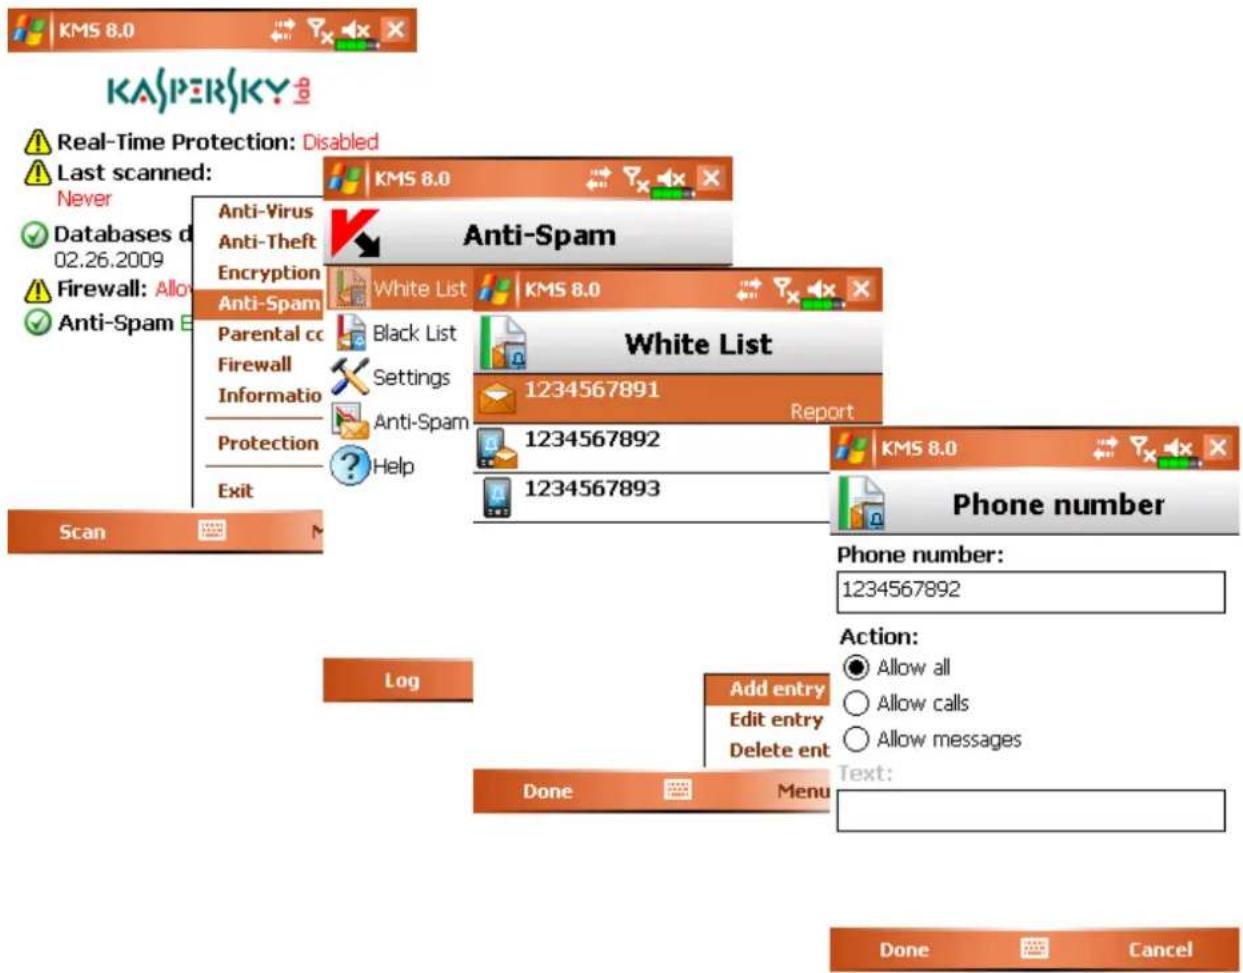
Figure 97: Adding a new entry
Editing an existing entry
To edit an entry in the Anti-Spam White List, perform the following actions (see Figure below):
- Select White List in the Anti-Spam tab.
- Select an entry you wish to edit from the list.
- Press Menu and select Edit entry.
-
Edit the following settings in the screen that will open:
-
Phone number – phone number for which the receipt of SMS message and/or calls will be allowed. The number should only be comprised of alphanumeric characters; it may begin with a digit, a letter, or be preceded with the "+" symbol. Additionally when entering a number, you can use masks "*" and "?" (where «*» any number of characters and «?» any one character).
• Function - action to be performed with a message and/or call: -
Allow all: allow only incoming calls and SMS messages.
- Allow calls: allow only incoming calls.
- Allow messages: allow only incoming SMS messages.
- Text - text upon detection of which in the SMS message received, such message will be passed through. The setting is available if value Allow messages is selected for setting Function.
5. Press Done to save the changes.

Figure 98: Editing an existing entry
DELETING AN ENTRY
To delete an entry from the Anti-Spam White List, perform the following actions (see Figure below):
- Select White List in the Anti-Spam tab.
- Select an entry you wish to delete from the list.
- Press Menu and select Delete entry.

Figure 99: Deleting an entry
RESPONSE TO MESSAGES AND CALLS FROM THE PHONEBOOK CONTACTS
You can configure Anti-Spam response to SMS messages and calls from numbers entered into the phonebook irrespective of the settings of the Black and White Lists.
To modify the values of the settings, use device's joystick or stylus.
By default the program uses the values of the settings recommended by Kaspersky Lab's specialists.
To configure the Anti-Spam response, perform the following actions (see Figure below):
-
Select Settings in the Anti-Spam tab.
-
In the screen that will open configure the Allow contacts setting:
-
If you wish Anti-Spam to allow receipt of SMS messages and calls from numbers found in the phonebook, check the Allow contacts box.
- If you wish Anti-Spam to perform filtering based on whether the phone number is found in the White or Black List, uncheck the Allow contacts box.
3. Press Done to save the changes.
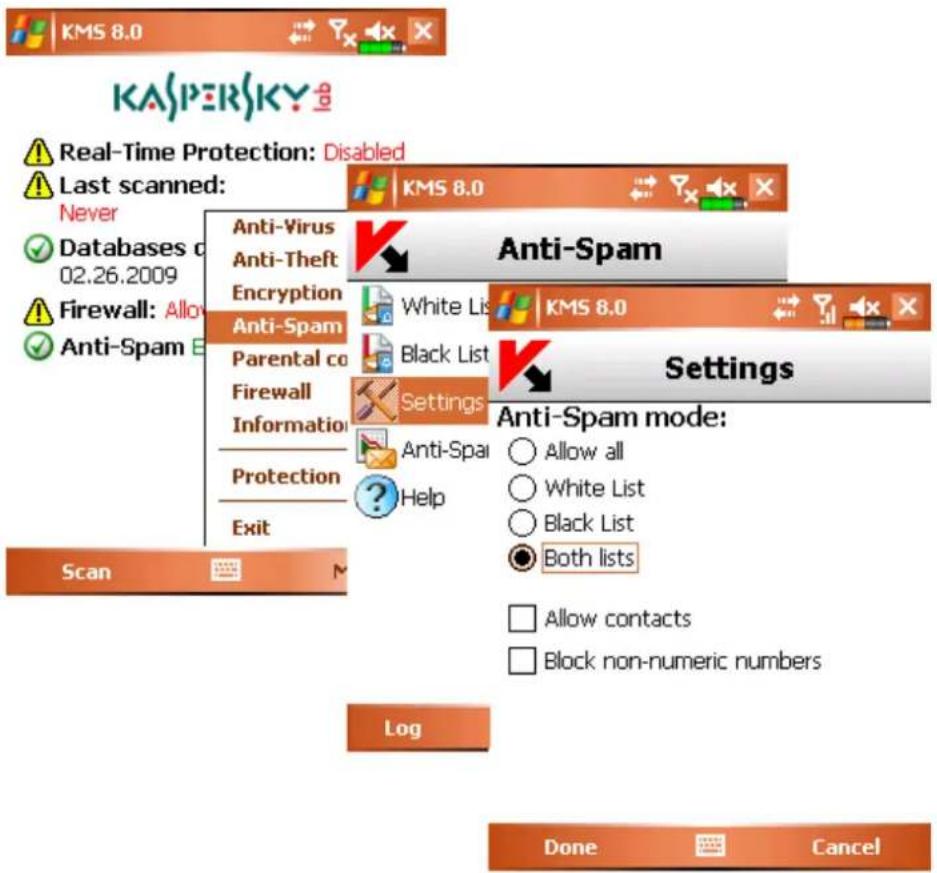
Figure 100: Allowing contacts from the phonebook
RESPONSE TO MESSAGES FROM NON-NUMERIC NUMBERS
You can configure the program's response when SMS messages are received from non-numeric numbers (which includes only letters).
To modify the values of the settings, use device's joystick or stylus.
By default the program uses the values of the settings recommended by Kaspersky Lab's specialists.
To configure the Anti-Spam response, perform the following actions (see Figure below):
- Select Settings in the Anti-Spam tab.
-
Configure the Block non-numeric numbers setting in the screen that will open:
-
To enable the mode of the automatic deletion of messages from non-numeric numbers, check the Block non-numeric box.
- If you wish Anti-Spam to operate based on whether the phone number is found in the White or Black List, uncheck the Block non-numeric numbers box.
3. Press Done to save the changes.

Figure 101: Blocking non-numeric numbers
SELECTING AN ACTION TO BE PERFORMED WITH INCOMING MESSAGES
Anti-Spam suggests that you configure its response to SMS messages from phone numbers not found in either Black or White List. Such messages will be intercepted by Anti-Spam if mode Both lists (see section "Anti-Spam modes" on page 106) is set and a notification will be displayed on the device screen (see Figure below).
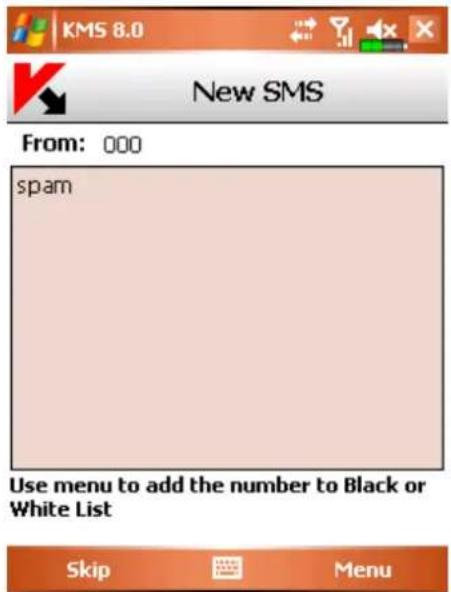
Figure 102: Selecting an action to be performed with an incoming message
Using the Menu items you can select one of the following actions to be performed with the message:
- Add to White List: allow receipt of messages and add the sender's phone number to the White List.
- Add to Black List: block messages and add the sender's phone number to the Black List.
- Skip: allow the receipt of the message. In this case the sender's phone number will not be added to either of the lists.
Information about blocked messages is saved to the program log (see section "Program logs" on page 144).
SELECTING AN ACTION TO BE PERFORMED WITH INCOMING CALLS
Anti-Spam suggests that you configure its response to calls from phone numbers not found in either Black or White List. After the call is complete, a notification will be displayed on the device's screen (see Figure below).

Figure 103: Selecting an action to be performed with an incoming call
Using the Menu items, you can select one of the following actions for the number from which the call was received:
- Add to the White List: add the caller's phone number to the White List.
- Add to the Black List: add the caller's phone number to the Black List.
- Skip: do not add the caller's number to either list.
Information about blocked calls is saved to the program log (see section "Program logs" on page 144).
PARENTAL CONTROL
This section contains information about the Parental control component as well as the description of how to compile the Black and White Lists, configure the component modes and other settings.
IN THIS SECTION
| About Parental control | 119 |
| Parental control modes | 119 |
| Creating a Black List | 120 |
| Creating a White List | 123 |
ABOUT PARENTAL CONTROL
The operation of the Parental control component is based on filtering of outgoing SMS messages and calls using the Black and the White Lists.
If at least one match is detected, the scan will be stopped. SMS messages and calls matching any entry in the Black List will be blocked and message and calls matching an entry in the White List will be allowed.
Parental control blocks SMS messages sent using the device's standard features only.
When you access Parental control for the first time you will have to set up a secret code (if it has not been set up earlier). The secret code is used to prevent unauthorized access to the Parental control settings. The code will also be used to access the settings of the Encryption and Anti-Theft components.
Information about the component's operation is saved to the program log (see section "Program logs" on page 144).
PARENTAL CONTROL MODES
A Parental control mode is a set of parameters on which protection of your device against spam messages and unwanted calls is based.
The following modes of Parental control are provided:
- Allow all: Parental control is disabled. No filtering of SMS messages and calls will be performed.
- White List only: allowing of SMS messages and/or calls only to numbers matching entries in the White List. All other messages and calls will be blocked.
- Black List only: blocking of SMS messages and/or calls only to numbers matching entries in the Black List. All other messages and calls will be allowed.
To select the Parental control mode, perform the following actions (see Figure below):
- Select the Settings item in the Parental control tab.
- In the screen that will open select the mode you require and press Done to save changes.

Figure 104: Selecting Parental control mode
CREATING A BLACK LIST
The Black List contains entries with phone numbers, SMS and calls to which will be blocked by Parental control.
Information about blocked SMS messages and calls will be registered in the Log (see section "Program logs" on page 144).
IN THIS SECTION
Adding a new entry....120
Editing an existing entry ....121
Deleting an entry 122
ADDING A NEW ENTRY
To add an entry to the Parental control Back List, perform the following actions (see Figure below):
- Select Black List in the Parental control tab.
- Press Menu and select Add entry.
-
Set the following settings in the screen that will open:
-
Phone number – phone number the sending of SMS message and/or calls from which will be blocked. Such number may begin with a digit, a letter or with a "+" and must contain digits. Additionally when entering a number, you can use masks "*" and "?" (where "*" any number of characters and "?" any one character).
- Action – action to be performed with a message and/or call:
• Block all: block outgoing calls and SMS messages.
• Block calls: block outgoing calls
• Block messages: block outgoing SMS messages.
- Press Done to save the changes.
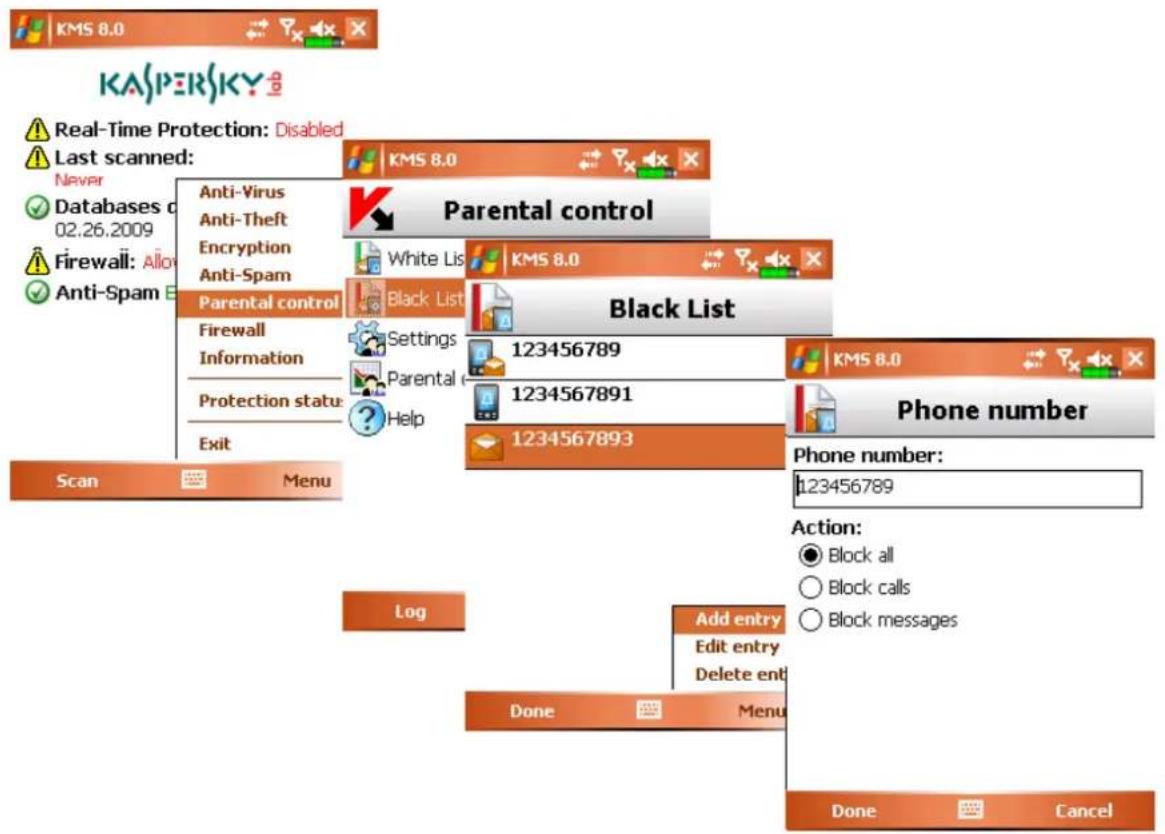
Figure 105: Adding a new entry
EDITING AN EXISTING ENTRY
To edit an entry in the Parental control Black List, perform the following actions (see Figure below):
- Select Black List in the Parental control tab.
- Select an entry you wish to edit from the list.
- Press Menu and select Edit entry.
- Edit the following settings in the screen that will open:
- Phone number – phone number the sending of SMS message and/or calls from which will be blocked. Such number may begin with a digit, a letter or with a "+" and must contain digits. Additionally when
entering a number, you can use masks "*" and "?" (where «*» any number of characters and «?» any one character).
- Action – action to be performed with a message and/or call:
- Block all: block outgoing calls and SMS messages.
• Block calls: block only outgoing calls - Block messages: block only outgoing SMS messages.
5. Press Done to save the changes.

Figure 106: Editing an existing entry
Deleting an entry
To delete an entry from the Parental control Black List, perform the following actions (see Figure below):
- Select Black List in the Parental control tab.
- Select an entry you wish to delete from the list.
- Press Menu and select Delete entry.
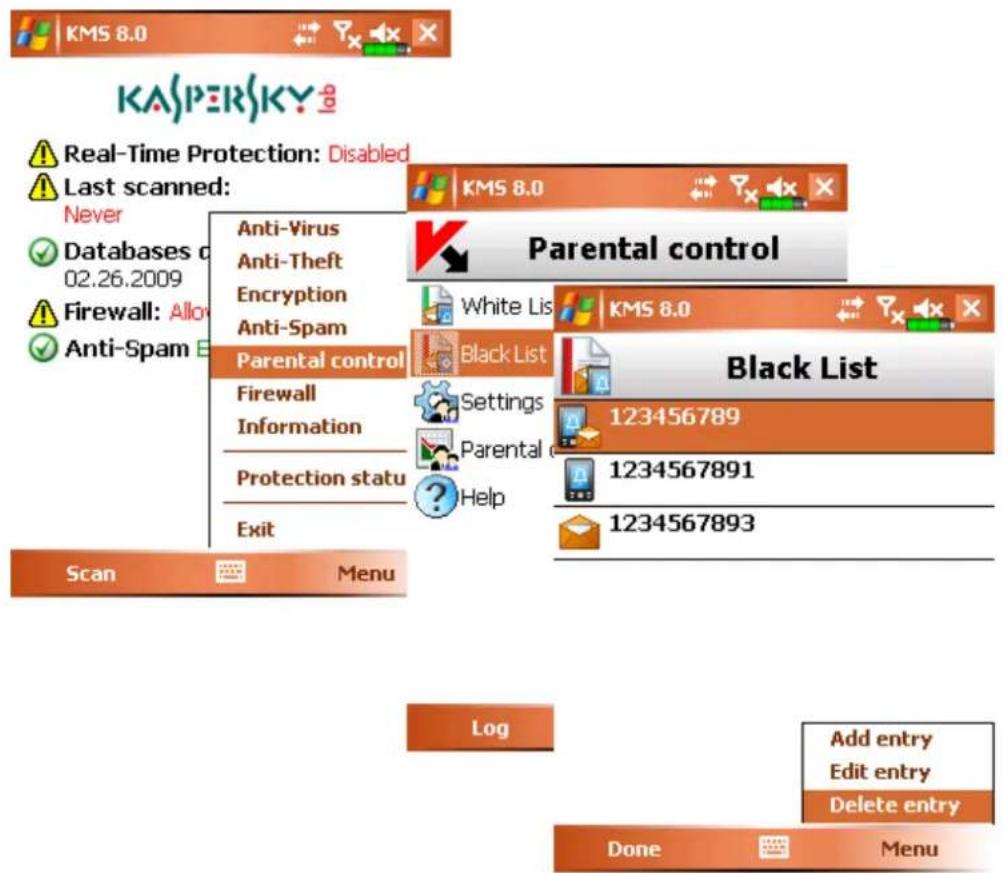
Figure 107: Deleting an entry
CREATING A WHITE LIST
The White List contains entries with phone numbers, SMS and calls to which will be passed through by Parental control.
IN THIS SECTION
Adding a new entry....123
Editing an existing entry 124
Deleting an entry 125
Adding a new entry
To add an entry to the Parental control White List, perform the following actions (see Figure below):
-
Select White List in the Parental control tab.
-
Press Menu and select Add entry.
-
Set the following settings in the screen that will open:
- Phone number – phone number the sending of SMS message and/or calls from which will be allowed. Such number may begin with a digit, a letter or with a "+" and must contain digits. Additionally when
entering a number, you can use masks "*" and "?" (where «*» any number of characters and «?» any one character).
- Action – action to be performed with a message and/or call:
- Allow all: allow outgoing calls and SMS messages.
- Allow calls: allow only outgoing calls.
- Allow messages: allow only outgoing SMS messages.
4. Press Done to save the changes.
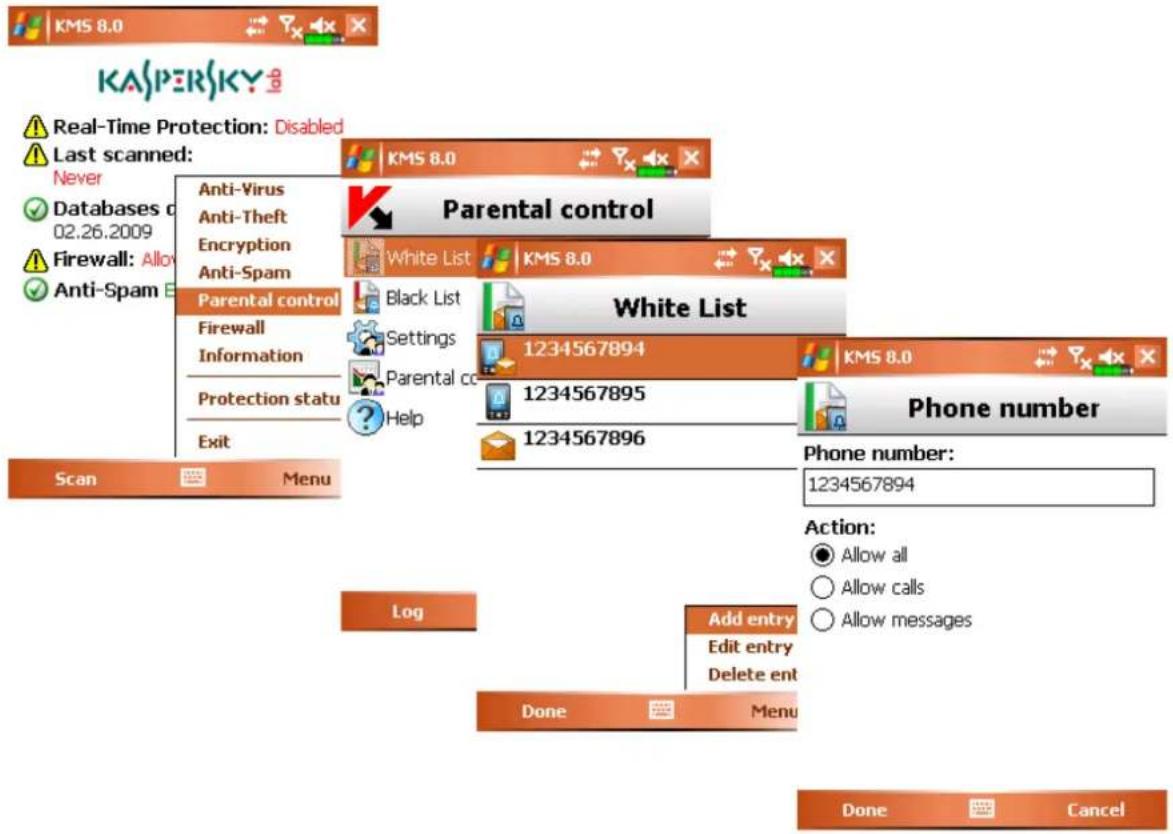
Figure 108: Adding a new entry
EDITING AN EXISTING ENTRY
To edit an entry in the Parental control White List, perform the following actions (see Figure below):
-
Select White List in the Parental control tab.
-
Select an entry you wish to edit from the list.
-
Press Menu and select Edit entry.
-
Edit the following settings in the screen that will open:
- Phone number – phone number the sending of SMS message and/or calls from which will be allowed. Such number may begin with a digit, a letter or with a "+" and must contain digits. Additionally when entering a number, you can use masks "*" and "?" (where «*» any number of characters and «?» any one character).
- Action – action to be performed with a message and/or call:
- Allow all: allow outgoing calls and SMS messages.
- Allow calls: allow only outgoing calls.
- Allow messages: allow only outgoing SMS messages.
5. Press Done to save the changes.
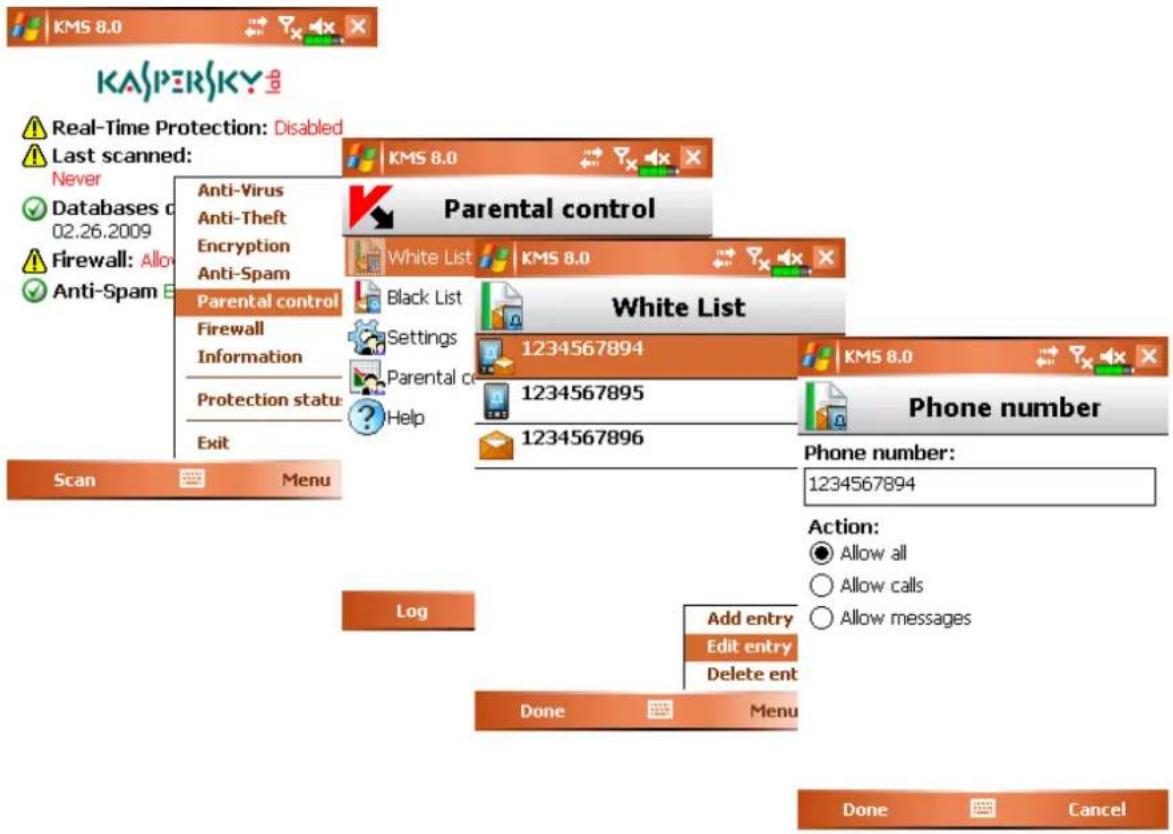
Figure 109: Editing an entry
Deleting an entry
To delete an entry from the Parental control White List, perform the following actions (see Figure below):
- Select White List in the Parental control tab.
- Select an entry you wish to delete from the list.
- Press Menu and select Delete entry.
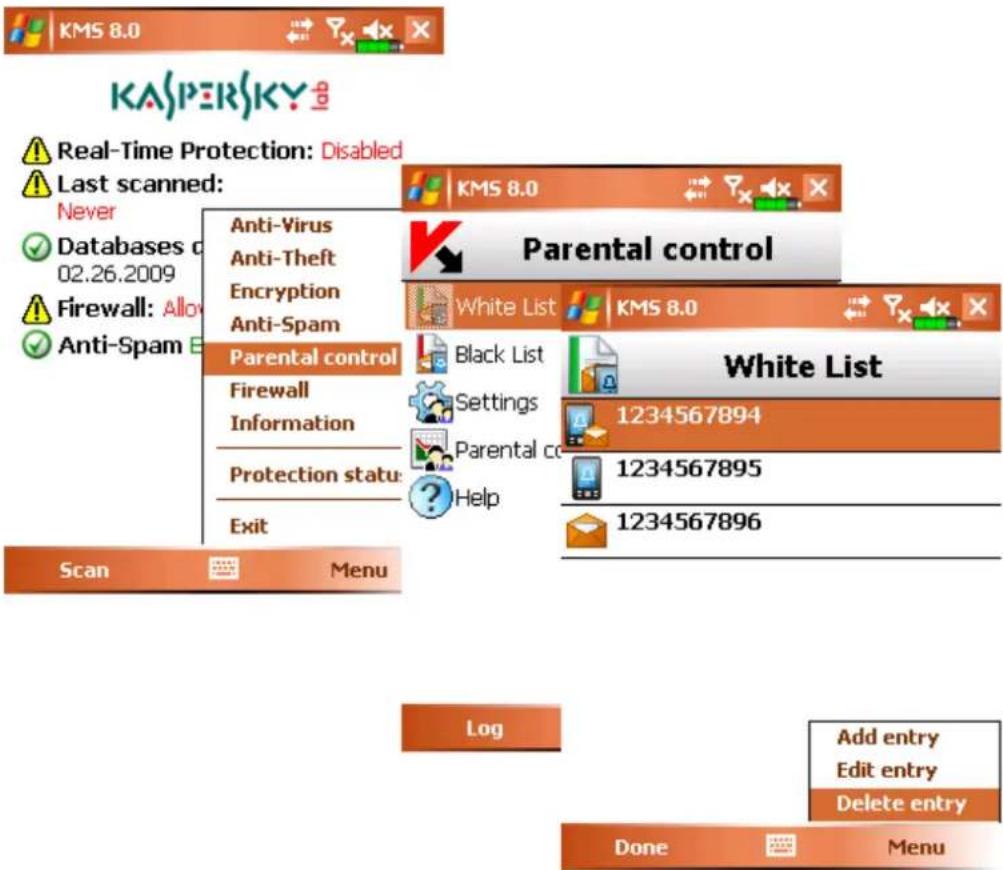
Figure 110: Deleting an entry
ANTI-THEFT
This section contains information about the Anti-Theft component designed to protect information stored on the device in case the device is lost.
IN THIS SECTION
About Anti-Theft 127
SMS-Block function 128
Blocking the device....128
SMS-Clean function....129
Deleting personal data....130
SIM-Watch function 131
SMS-Find function....132
Determining the device location 133
Stealth SMS function....134
ABOUT ANTI-THEFT
The Anti-Thief component is designed to ensure protection of data stored on the mobile device against unauthorized access to it in case the device was list or stolen.
This component includes the following functions:
- SMS-Block allows blocking the device at the user's discretion.
- SMS-Clean allows to erase user's personal data (all contacts, messages, gallery, calendar, log, network connection settings), data from the storage card and files from folder My Documents.
- SIM-Watch allows to send to the specified phone number and/or to e-mail address a new phone number and to block the stolen device if the SIM card was replaced or if the device is turned on without the SIM card.
- SMS-Find allows to determine the geographical coordinates of the device and to send them to the requesting devices or to a certain e-mail address using an SMS message. This function only works with devices with in-built GPS receiver.
- Stealth SMS allows to erase personal data from the device, block it and obtain its geographical coordinates using a special SMS message.
When you access the Anti-Theft for the first time you will have to set up a secret code (if it has not been set up earlier). The secret code is used to prevent unauthorized access to the Anti-Theft settings. This code will also be used to access the settings of the Parental control and Encryption components and for creating a Slealth SMS.
Information about the component's operation is saved to the program log (see section "Program logs" on page 144).
The SMS-Block function allows blocking the device if it is required. You can unblock the device only after you enter the secret code.
To enable the SMS-Block function, perform the following actions (see Figure below):
- Open the Anti-Theft tab
- Select SMS-Block in the screen that will open.
- Set the ON value using a stylus or the central button of the joystick.

Figure 111: Enabling the function
BLOCKING THE DEVICE
You can block the lost device with the SMS-Block function enabled using the following methods:
• using Stealth SMS on another device with Kaspersky Mobile Security installed;
• using your phone's standard functions for creating SMS messages.
To create an SMS message using Slealth SMS, perform the following actions (see Figure below).
- Select Stealth SMS in the Anti-Theft tab.
-
Configure the message parameters:
-
Enter the phone number of the device you wish to block in the Phone number field.
- For the Function setting, select the SMS-Block value (the function being used must be enabled on the device receiving the message).
- Enter secret code specified on the receiving SMS device in the field Remote code.
- Press Done to send the message.

Figure 112: Blocking the device
To create an SMS message using your phone's standard functions for creating SMS messages:
send to the device you need to block an SMS message containing text block: (where is secret code set on the device to be blocked). The message is not case sensitive and spaces before or after the colon do not matter.
THE SMS-CLEAN FUNCTION
The SMS-Clean function allows to erase user's personal data (all contacts, messages, gallery, calendar, log, network connection settings), data from the storage card and files from folder My Documents once the device receives a special SMS message.
To configure the settings of the SMS-Clean function, perform the following actions (see Figure below):
-
Open the Anti-Theft tab
-
Select SMS-Clean in the screen that will open.
-
In the screen that will open (see Figure below) select data to be erased once the device receives a special SMS message.
- If you wish only personal data to be deleted, check the Personal data box.
Contacts will be deleted from the phonebook stored on the device and on the SIM card.
• If you wish to delete personal files (data from My Documents folder), check the My Documents box.
- To delete data from all installed storage cards, check the Storage card files box.
4. Press Done to save the changes.

Figure 113: Enabling the function
DELETING PERSONAL DATA
You can delete personal data from the device with the SMS-Clean function enabled using the following methods:
• using Stealth SMS on another device with Kaspersky Mobile Security installed;
• using your phone's standard functions for creating SMS messages.
To create an SMS message using Slealth SMS, perform the following actions (see Figure below).
- Select Stealth SMS in the Anti-Theft tab.
-
Configure the message parameters:
-
Enter the phone number of the device data from which you wish to delete in the Phone number field.
- For the Function setting, select the SMS-Clean value (the function being used must be enabled on the device receiving the message).
- Enter secret code specified on the receiving SMS device in the field Remote code.
- Press Done to send the message.
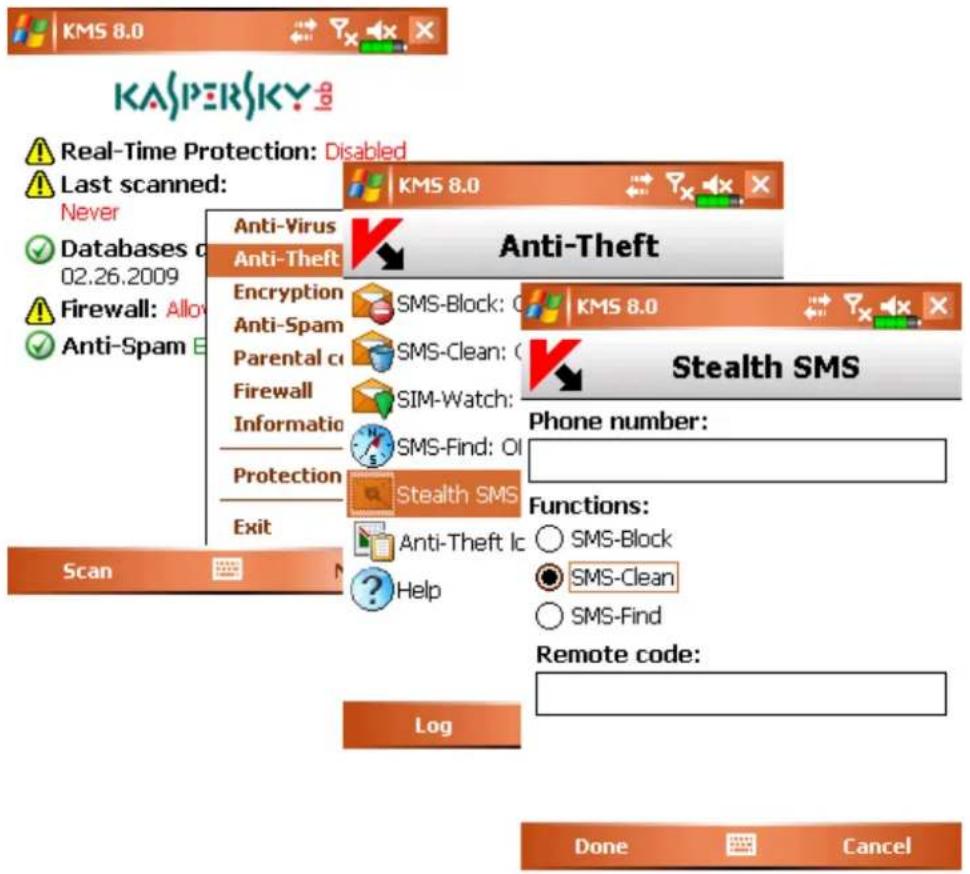
Figure 114: Deleting personal data
To create an SMS message using your phone's standard functions for creating SMS messages:
send to the device you need to block an SMS message containing text clean: (where is secret code set on the receiving device. The message is not case sensitive and spaces before or after the colon do not matter.
THE SIM-WATCH FUNCTION
SIM-Watch allows to send to the specified phone number and/or to e-mail address a new phone number and to block the stolen device if the SIM card was replaced in such stolen or lost device.
By default the SIM-Watch function is disabled.
To configure the settings of the SMS-Watch function, perform the following actions (see Figure below):
- Open the Anti-Theft tab
- Select SMS-Watch in the screen that will open.
- In the menu that will open configure the settings to monitor the replacement of the SIM card on the device.
- In the Phone number field, enter the phone number to which a message about your new phone number will be sent in case the SIM card is replaced in your device. Such number may begin with a digit or with a "+" and must contain digits only.
- Using the E-mail address specify the e-mail address on which you wish to receive an e-mail message about your new phone number.
-
To block the device once the SIM card was replaced on it or when the device is turned on without the SIM card, check the Block box. You can unblock the device only by entering the secret code. By default blocking of the device is disabled.
-
Press Done to save the changes you have made.

Figure 115: Enabling the function
THE SMS-FIND FUNCTION
The SMS-Find function allows to determine the geographical coordinates of the device and to send them to the requesting devices and to a certain e-mail address using an SMS message.
This function only works with devices with in-built GPS receiver. If necessary the receiver will be activated automatically.
You can receive the coordinates only if the device is within the area reached by satellites. If the satellites are nor available at the moment of the inquiry, periodic attempts to find the satellites will be made until the device is restarted.
To configure the operation of the SMS-Find function, perform the following actions (see Figure below):
- Open the Anti-Theft tab and select SMS-Find (the function being used must be enabled on the device receiving the message).
- In the screen that will open, specify the e-mail address (the E-mail address setting) if you wish to receive the device's coordinates by e-mail, in addition to the SMS message, and press Done.
- Select Done in the screen that will open.

Figure 116: Enabling the function
DETERMINING THE DEVICE LOCATION
You can receive the coordinates of the device with the SMS-Find function enabled using the following methods:
• using Stealth SMS on another device with Kaspersky Mobile Security installed;
• using your phone's standard functions for creating SMS messages.
To create an SMS message using Sleath SMS, perform the following actions (see Figure below).
- Select Stealth SMS in the Anti-Theft tab.
-
Configure the message parameters:
-
Enter the phone number of the device coordinates of which you wish to receive in the Phone number field.
- Set the SMS-Find value for the Functions setting.
-
Enter secret code specified on the receiving SMS device in the field Remote code.
-
Press Done to send the message.

Figure 117: Determine the location of the device
To create an SMS message using your phone's standard functions for creating SMS messages:
send to the device you need to block an SMS message containing text find: (where is secret code set on the receiving device. The message is not case sensitive and spaces before or after the colon do not matter.
THE STEALTH SMS FUNCTION
The Stealth SMS function allows creating a special SMS message to block the device, erase personal data or receive coordinates and sending it to the lost device.
To create an SMS message using Slealth SMS, perform the following actions (see Figure below).
- Select Stealth SMS in the Anti-Theft tab.
-
Configure the message parameters:
-
Enter the phone number of the device to which you wish to send a message in the Phone number field.
-
Set the required value for the Function setting:
-
SMS-Block (see section "The SMS-Block function" on page 128).
- SMS-Clean (see section "The SMS-Clean function" on page 129).
- SMS-Find (see section "The SMS-Find function" on page 131).
The function being used must be turned enabled on the device receiving the message.
- Enter secret code specified on the receiving SMS device in the field Remote code.
- Press Done to send the message.

Figure 118: Blocking the device
FIREWALL
This section contains information about the Firewall component which monitors the network activity of the device and protection of the device on the network level.
IN THIS SECTION
About Firewall....135
Selecting the Firewall security level....136
ABOUT FIREWALL
Firewall allows the user to determine which of the network connections will be allowed and which connections will be blocked.
Information about the firewall operation is saved to the program log (see section "Program logs" on page 144).
SELECTING THE FIREWALL SECURITY LEVEL
Operation of the Firewall component is based on the security levels. The security level set will determine which network protocols will be allowed to be used to transfer information and which of them will be blocked.
To modify the values of the settings, use device's joystick or stylus.
By default the program uses the values of the settings recommended by Kaspersky Lab's specialists.
To select the Firewall security level, perform the following actions (see Figure below):
- Select Settings on the Firewall tab.
-
In the screen that will open select the required security level:
-
Block all – block any network activity except updating of database and renewing the license.
- Maximum protection – block all incoming connections, outgoing connections can only be established using SSH, HTTP, HTTPS, IMAP, SMTP, POP3 ports.
- Minimum protection – block only incoming connections.
-
Allow all - allow any network activity.
-
Press Done to save the changes.

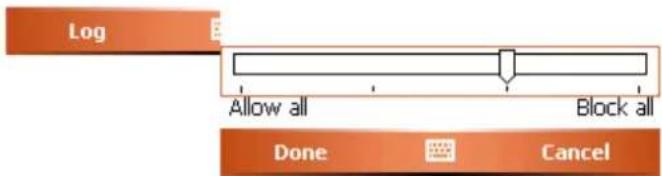
Figure 119: Selecting a security level
ENCRYPTION
This section contains information about the component that ensures data protection on the device using encryption.
IN THIS SECTION
About Encryption 137
Data encryption 137
Data decryption 138
Blocking access to encrypted data 139
ABOUT ENCRYPTION
Encryption is designed to protect data in a certain folder against being viewed by unauthorized persons even if they have access to the device.
When you access Encryption for the first time you will have to set up a secret code (if it has not been set up earlier). The secret code is used to prevent unauthorized access to the Encryption settings and to the encrypted data. The secret code can also be used to access the Anti-Theft and Parental control settings.
The data in the folder will be encrypted once command Encrypt is executed and then data will be encrypted and decrypted "on the fly" at the moment there data is placed into the folder, extracted from it or accessed.
Executable (.exe) files cannot be run from an encrypted folder.
Information about the component's work will be entered into the application log.
SEE ALSO
Secret code 91
Program logs 144
DATA ENCRYPTION
Using the Encryption component you can encrypt any non-system folder residing in the device memory or on the memory expansion card.
To protect a folder on the device using encryption, perform the following actions (see Figure below):
- Select Encrypt on the Encryption tab.
- In the screen that will open select a folder that you wish to encrypt.
In order to move around the file system use the stylus or the joystick buttons of your device: Up, Down – to move within the selected folder, Left, Right – to move one level up or down from the current folder. - Press Encrypt to start the encryption process.
The data in the folder will be encrypted once the command is executed and then data will be encrypted and decrypted "on the fly" at the moment there data is placed into the folder, extracted from it or accessed.

Figure 120: Selecting data for encryption
You can encrypt only one folder using the Encryption function. If you wish to encrypt another folder, you have to decrypt the current encrypted folder. After encryption, the Encrypt item will turn into Decrypt and using it you can decrypt the encrypted data (see section "Data decryption" on page 138).
DATA DECRYPTION
You can completely decrypt data which was previously encrypted (see section "Data encryption" on page 137).
For full decryption of the folder encrypted earlier,
select Decrypt on the Encryption tab (see Figure below).
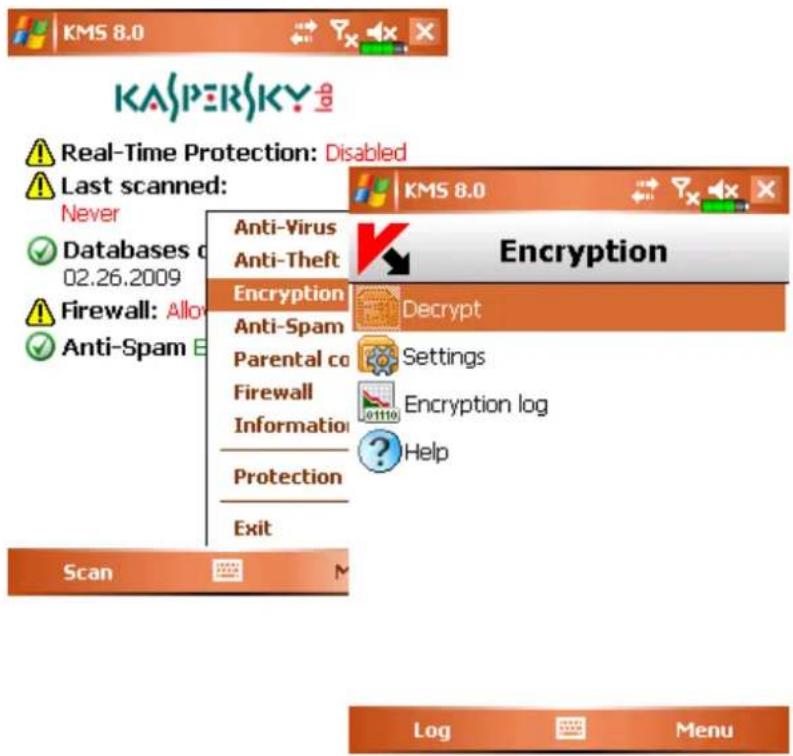
Figure 121: Data decryption
After decryption, the Decrypt item will turn into Encrypt and you can use it again to encrypt data (see section "Data encryption" on page 137).
BLOCKING ACCESS TO ENCRYPTED DATA
To ensure data protection when the device is switched into the sleep mode, you can configure functioning of the secret code.
You can configure an idle time delay for the secret code or to configure an immediate prompt for the secret code.
Idle time delay – device's idle time after the backlight is turned off and the device is switched to the sleep mode, after which you will need to enter the secret code to access the encrypted data.
By default the idle time delay is disabled (value No is set), therefore, immediately after the backlight is turned off, you need to enter the code to access the encrypted data.
To enable the idle time delay, perform the following actions (see Figure below):
-
Select Settings on the Encryption tab.
-
In the screen that will open, set the required delay for the Block access setting: 1 minute, 5 minutes, 15 minutes or 1 hour.
- Press Done to save the changes..

Figure 122: Blocking access to encrypted data
You can also momentarily block access to encrypted data and enable the prompt for the secret code.
For immediate prompt for the secret code,
press Kaspersky Mobile Security icon in the device notification area and select Lock data (see Figure below).

Figure 123: Icon shortcut menu
UPDATING THE PROGRAM BASES
This section contains information about the Updating component. Regular bases update is necessary to ensure reliable operation of Kaspersky Mobile Security.
IN THIS SECTION
About updating of program bases ....141
Viewing bases information....142
Manual updating....142
Scheduled updating....143
ABOUT UPDATING OF PROGRAM BASES
The search for malware programs is performed based on the program bases records which contain description of all currently known malware programs and methods for their treatment as well as description of other unwanted objects. It is extremely important to keep your bases up-to-date.
You can update bases manually or according to a schedule. Updates are performed via Internet from the Kaspersky Lab's update servers; this requires an Internet connection.
To view detailed information about bases currently used, select Databases info on the Information tab.
Information about the bases updates is saved to the program log (see section "Program logs" on page 144).
VIEWING BASES INFORMATION
In order to view information about the installed bases (see Figure below),
select Databases info on the Information tab.

Figure 124: The Information tab
MANUAL UPDATING
You can start the updating process manually at any time convenient to you.
To start a manual update of anti-virus bases,
select Update on the Anti-Virus tab (see Figure below). The program will start the bases update process from the server.

Figure 125: Manual update
SCHEDULED UDPATING
Timely updates are a prerequisite of the effective device protection against malware objects. For your convenience you can configure automatic updates of bases at any time convenient to you.
To configure a schedule to automatic application bases update, perform the following actions (see Figure below):
- Select the Settings item in the Anti-Virus tab.
- Select the Updaty schedule.
- Specify the frequency for the Auto update setting:
• Daily: the update to be launched every day. Additionally specify the Time of the update.
- Weekly: the update will be launched once a week. Additionally specify the Day of week and the Time of the update.
- Off: the update will be manually launched by the user.
- Press OK to save the changes.
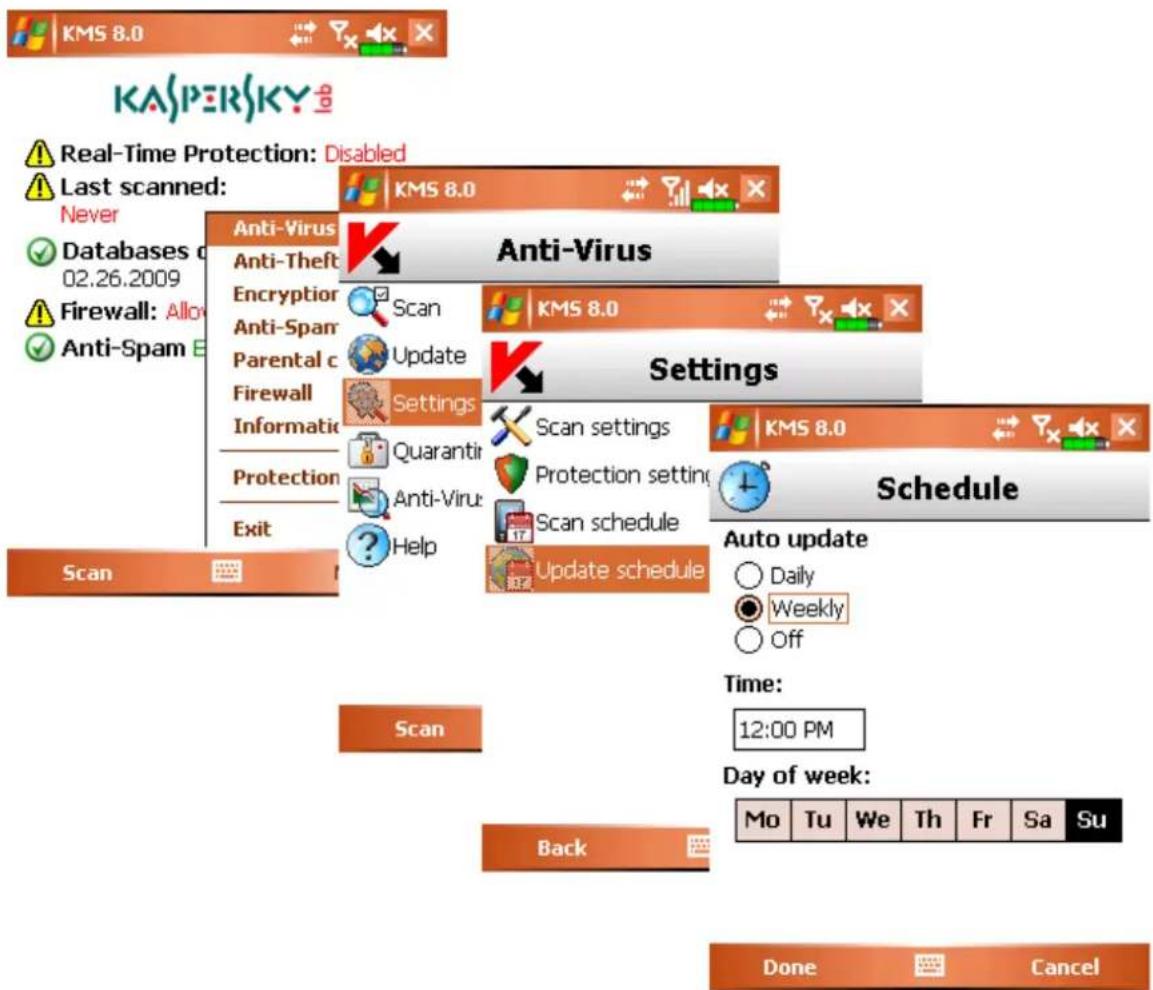
Figure 126: Configuring the update schedule
PROGRAM LOGS
This section contains information about the logs and managing of the information they contain.
IN THIS SECTION
About logs 144
Viewing Log records....145
Deleting Log records 145
ABOUT LOGS
Logs store records about events that occurred during Kaspersky Mobile Security operation sorted by the time of the record starting with newest entries.
VIEWING LOG RECORDS
To view all records stored in the log, perform the following actions (see Figure below):
- Select Logs on the Information tab.
- Select the component the log of which you wish to open.

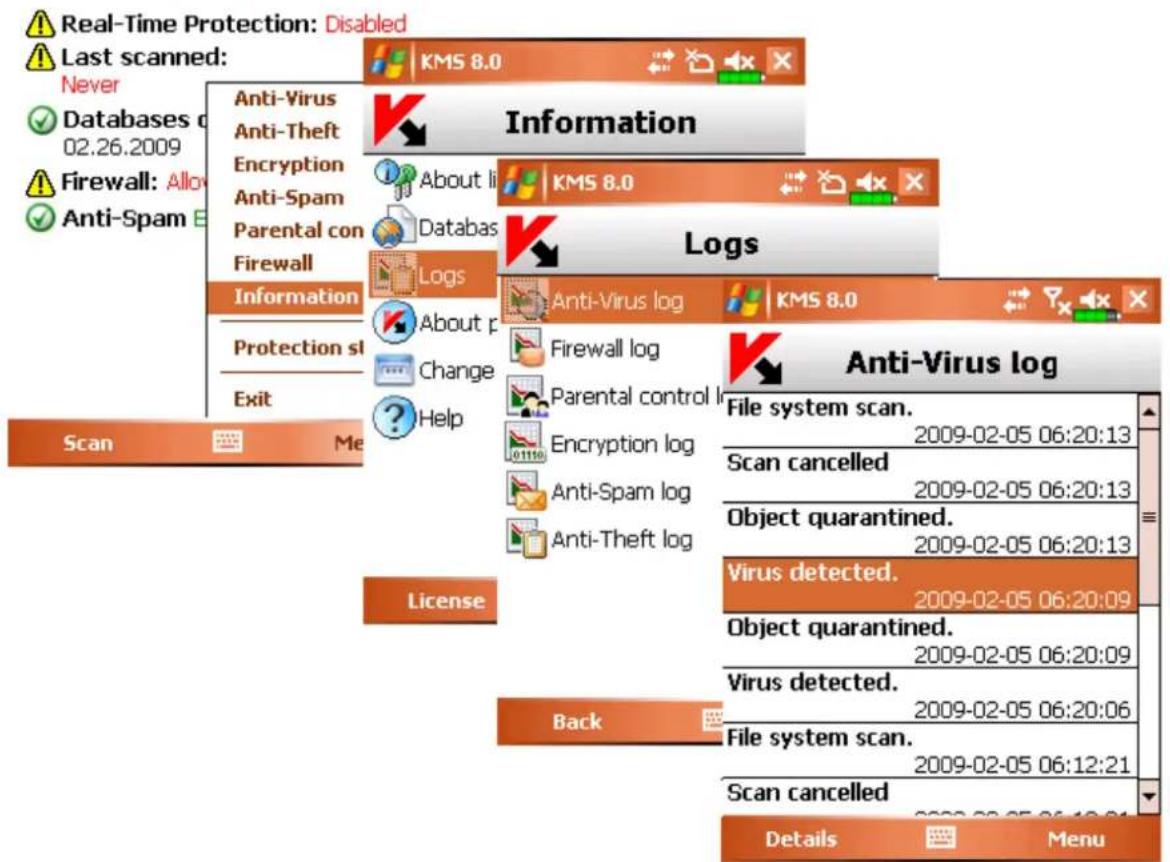
Figure 127: Viewing records in the logs
To view more detailed information about a record in the log
select the record and press Details.
DELETING LOG RECORDS
To delete all records from the log, perform the following actions (see Figure below):
- Select Logs on the Information tab.
-
Open a log of any component.
-
Press Menu and select Delete all. All records from the log for every component will be deleted.
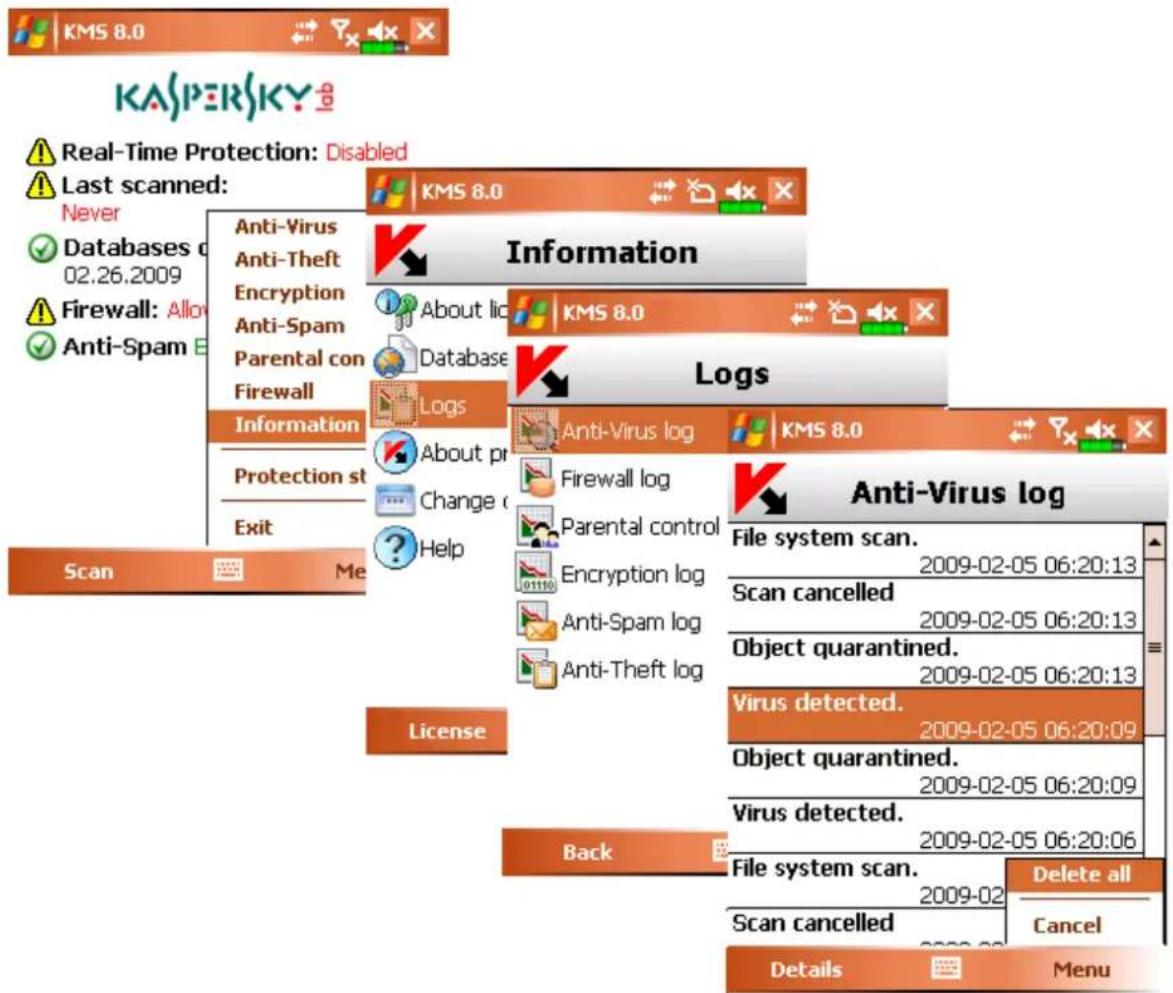
Figure 128: Deleting records
MANAGING THE LICENSE
Kaspersky Mobile Security allows viewing information about the current license and renew it if necessary.
IN THIS SECTION
Viewing the license information....147
Renewing the license 147
VIEWING THE LICENSE INFORMATION
In order to view information about the license:
select About license in the Information tab (see Figure below).

Figure 129: Viewing license information
RENEWING THE LICENSE
To renew your license, perform the following actions (see Figure below):
- Select About license on the Information tab.
- In the screen that will open select Activate from the Menu.
The code activation window will open on the smartphone's screen.
- Enter the activation code into the four fields. The activation code consists of Latin alphabet characters and digits (the code is case-insensitive). After you have entered the activation code, press Continue. The program will send an http query to Kaspersky Lab's activation server and will then download and install the key.
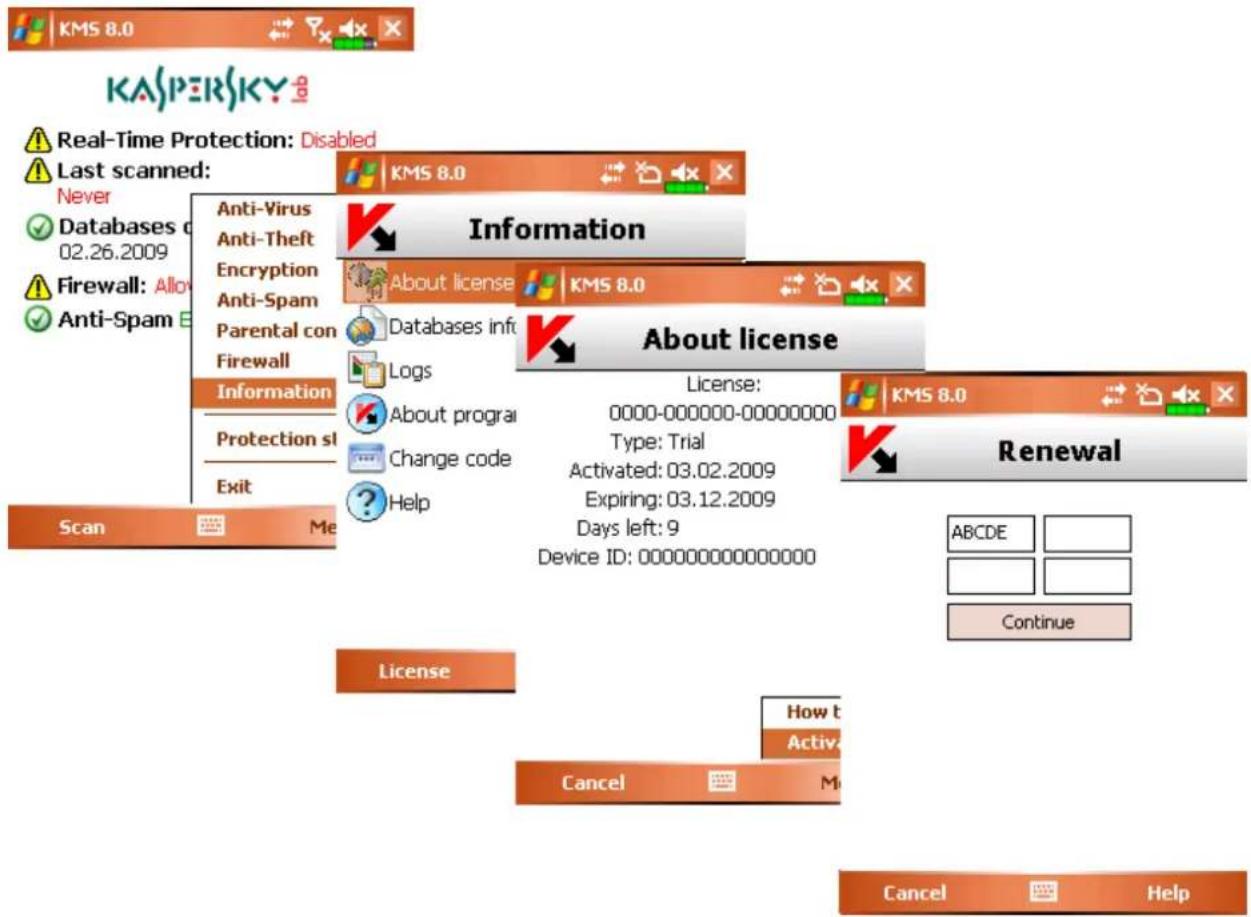
Figure 130: Renewing the license
If the activation code you entered appears invalid for any reason, a corresponding message will be displayed on your smartphone's screen.
If the key installation is successful, information about the license will be displayed on the screen. To continue using the application press Done.
UNINSTALLING THE PROGRAM
In order to uninstall Kaspersky Mobile Security, perform the following actions:
-
Make sure that there are no encrypted data (see section "Data encryption" on page 137).
-
Close Kaspersky Mobile Security. To do it, press Menu and select Exit (see Figure below).
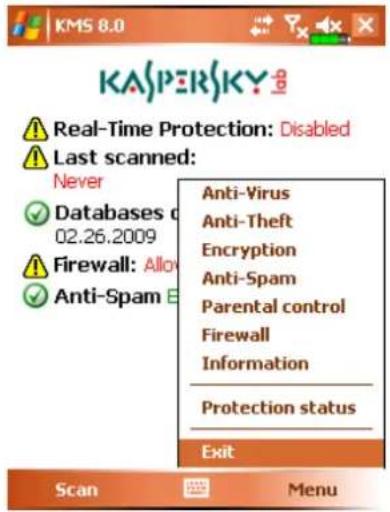
Figure 131: Closing the program
- Uninstall the program. To do this:
a. Press Start and select Settings.
b. Select Remove Programs on the System tab (see Figure below).
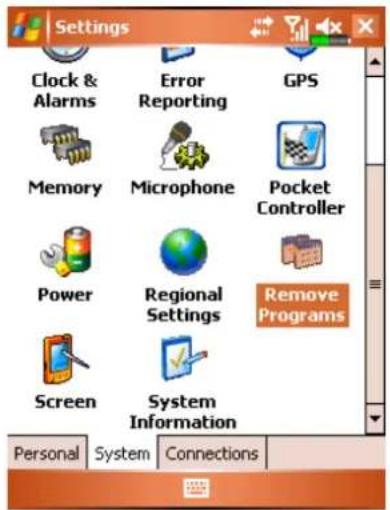
Figure 132: The System tab
c. Select Kaspersky Mobile Security in the list of installed programs and press the Remove button (see Figure below).
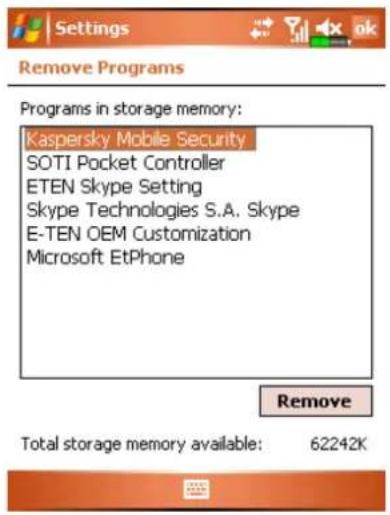
Figure 133: Selecting the program
d. Press Yes to confirm removal of the program.
e. Enter the secret code in the prompt displayed. Press OK.
f. If you wish to save the application settings and the quarantine objects press Keep (see Figure below). Press Delete to fully uninstall the program.

Figure 134: Removal of the program settings
- Restart the device to complete the removal.
GLOSSARY
A
ACTIVATING THE PROGRAM
The activation procedure involves entering the activate code and then receiving a key to be used by the program to determine your rights and the license period.
ARCHIVE
File "containing" one or several other objects which also can be archives.
B
BASES
Database maintained by the experts at Kaspersky Lab and containing detailed descriptions of all existing threats to computer security, methods of their detection and neutralization. The database is constantly updated at Kaspersky Lab as new threats emerge. To improve the quality of threat detection we recommend regular downloading of database updates from the update servers of Kaspersky Lab.
BLACK LIST
Entries in this list include:
- phone numbers incoming calls and SMS messages from which will be blocked by Anti-Spam and outgoing calls and SMS messages to which will be blocked by Parental control.
- text upon detection of which the incoming SMS message will be blocked.
BLOCKING AN OBJECT
Blocking access to an object by external programs. A blocked object cannot be read, executed, modified or deleted.
D
DELETION OF AN OBJECT
The object processing method involving its physical deletion from the location in which it was detected by the program (hard drive, folder, network resource). We recommend to apply this processing method to dangerous objects which, for any reason, cannot be disinfected.
DELETION OF AN SMS MESSAGE
A method of processing an SMS message containing SPAM features involving its physical deletion. We recommend to use this method with SMS messages definitely containing spam.
DISINFECTING OBJECTS
A method used for processing infected objects that results in complete or partial recovery of data or a decision is made that the objects cannot be disinfected. Disinfection of objects is performed based on the records of bases. Part of data can be lost during the disinfection process.
F
FILE MASK
Representation of file name and extension using wildcards. The two basic wildcards used in file masks are “*” and “?” (where “*” represents any number of characters and “?” stands for any single character). Using these wildcards, you can represent any file. Note that the file name and file extension are always separated by a period.
I
INFECTED OBJECT
Object containing malicious code: it was detected by the scan that a section of the object's code is fully identical to a section of the code of a known threat. Kaspersky Lab's experts do not recommend using such objects since they may cause your device to be infected.
L
LICENSE PERIOD
The time period during which you can use full functionality of a Kaspersky Lab application. Typically, validity period of a license is one calendar year since its installation. After license expiry the program functionality becomes limited: you cannot update the program database.
N
NON-NUMERIC NUMBER
A phone number that includes letters or consists only of letters.
0
ON-DEMAND SCAN
Kaspersky Lab's program operation mode initiated by the user and designed to scan and check any resident files.
P
PLACING OBJECTS INTO QUARANTINE
A method used to process a possibly infected object which blocks access to such object and moves the object from its original location to the Quarantine folder where the object is stored in the encrypted form which rules out a threat of infection.
Q
QUARANTINE
A certain folder into which all possibly infected objects detected during the device scan or by the Real-Time Protection are placed.
R
REAL-TIME PROTECTION
An program operation mode in which the object are scanned for malicious code in the real-time mode.
The program intercepts all attempts to open any object for reading, writing and execution and scans the object for the presence of threats. Objects that are not infected will be passed through to the user; objects containing threats or suspected of containing a threat will be processed in accordance with the task settings (disinfected, deleted, quarantined)
RESTORING
Relocation of the original object from Quarantine or Backup to its original folder where the object had been stored before it was quarantined or disinfected, or to a user-defined folder.
U
UPDATES
The procedure of replacement / addition of new files (databases or program components), downloaded from the update servers of Kaspersky Lab.
W
WHITE LIST
Entries in this list include:
- phone numbers incoming calls and SMS messages from which will be passed through by Anti-Spam and outgoing calls and SMS messages to which will be passed through by Parental control.
- text upon detection of which the incoming SMS message will be passed through.
KASPERSKY LAB
Kaspersky Lab was founded in 1997. Today it is the leading developer of a wide range of high-performance information security software products, including anti-virus, anti-spam and anti-hacking systems.
Kaspersky Lab is an international company. Headquartered in the Russian Federation, the company has offices in the United Kingdom, France, Germany, Japan, the Benelux countries, China, Poland, Romania and the USA (California). A new company department, the European Anti-Virus Research Centre, has recently been established in France. Kaspersky Lab's partner network includes over 500 companies worldwide.
Today, Kaspersky Lab employs more than 400 professionals, each of whom is proficient in anti-virus technologies. Nine of them hold M.B.A. degrees and fifteen hold Ph.Ds. The leading analysts at Kaspersky Lab are members of the Computer Anti-Virus Researchers Organization (CARO).
Kaspersky Lab offers best-of-breed security solutions, based on its unique experience and knowledge, gained in over 14 years of fighting computer viruses. A thorough analysis of computer virus activities enables the company's specialists to foresee trends in the development of malware and to provide our users with timely protection against new types of attacks. Resistance to future attacks is the basic policy implemented in all Kaspersky Lab's products. At all times, the company's products remain at least one step ahead of many other vendors in delivering extensive anti-virus coverage for home users and corporate customers alike.
Years of hard work have made the company one of the top anti-virus software developers. Kaspersky Lab was one of the first businesses of its kind to develop the highest standards for anti-virus defense. The company's flagship product, Kaspersky Anti-Virus ^® , reliably protects all types of computer systems against virus attacks including workstations, file servers, mail systems, firewalls, Internet gateways, and hand-held computers. Kaspersky Lab's customers benefit from a wide range of additional services that ensure both stable operation of the company's products, and compliance with specific business requirements. Many well-known manufacturers use the Kaspersky Anti-Virus kernel in their products, including: Nokia ICG (USA), Aladdin (Israel), Sybari (USA), G Data (Germany), Deerfield (USA), Alt-N (USA), Microworld (India), and BorderWare (Canada).
Kaspersky Lab's customers benefit from a wide range of additional services that ensure both stable operation of the company's products, and compliance with specific business requirements. We plan, install, and support corporate antivirus suites. Kaspersky Lab's anti-virus database is updated every hour. The company provides its customers with 24-hour technical support service in several languages.
If you have any questions, comments, or suggestions, please refer them to one of our distributors or directly to Kaspersky Lab. Detailed consultations are provided by phone or email. You will receive full answers to all of your questions.
| Address: | Russia, 123060, Moscow, 1-st Volokolamsky Proezd, 10, Building 1 |
| Phone, fax: | +7 (495) 797-87-00, +7 (495) 645-79-39, +7 (495) 956-70-00 |
| Helpdesk: | +7 (495) 797-87-07, +7 (495) 645-79-29 or +7 (495) 956-87-08. |
| Enterprise product user support: | +7 (495) 797-87-07, +7 (495) 645-79-29 or +7 (495) 956-87-08.(from 10:00 AM to 06:30 PM Moscow time)www.kaspersky.com/helpdesk.html |
| Support for corporate users: | Contact information will be provided when you purchase a corporate software product, depending on your support package. |
| Kaspersky Lab Online Forum: | http://forum.kaspersky.com |
| Anti-virus laboratory: | newvirus@kaspersky.com(only for sending new viruses in archives) |
| User documentation group | docfeedback@kaspersky.com(only for sending questions/comments about documentation and Help) |
| Sales Department: | +7 (495) 797-87-00, +7 (495) 645-79-39, +7 (495) 956-70-00sales@kaspersky.com |
| General inquiries: | +7 (495) 797-87-00, +7 (495) 645-79-39, +7 (495) 956-70-00info@kaspersky.com |
| WWW: | http://www.kaspersky.comhttp://www.viruslist.com |
CRYPTO EX LTD.
To create and verify digital signatures, Kaspersky Anti-Virus uses Crypto Ex Ltd's data security software library, Crypto C. CryptoEx Ltd is licensed by the Federal Agency for Government Communications and Information (Federal Security Service of Russian Federation) for development of the Crypto C data protection and authentication library.
CryptoEx Ltd corporate website http://www.cryptoex.ru
Exclusive rights to the data protection and authentication library belong to CryptoEx Ltd.
INDEX
A
Actions
On-demand scan 27,100
Real-Time Protection 20,94
Activating the program.... 13, 88
Adding
Anti-Spam Black List.... 38, 107
Anti-Spam White List 41, 111
Parental control Black List 50, 120
Parental control White List....54, 123
Allowing
incoming calls 41, 111
incoming SMS messages 41, 111
network connections 67, 136
outgoing calls....54, 123
outgoing SMS messages....54, 123
Anti-Spam
action to be performed with a call 48, 118
Action to be performed with a message.... 47, 117
Black List 37,107
modes 36,106
non-numeric numbers 45, 115
White List 41, 110
Anti-Spam Black List 37
Archives
On-demand scan 30,99
B
Backlight....31
Black List
Anti-Spam 107
Parental control....50,120
Blocking
device 59,128
encrypted data 72,139
incoming calls 37, 38, 107, 120
incoming SMS messages 37, 38, 107, 120
network connections 67,136
outgoing calls....50,120
outgoing SMS messages 50, 120
Blocking access to data....72, 139
C
Code
activation code....13, 88
secret code 16,91
D
Data
blocking with a code....72, 139
Decryption....70,139
deleting 61,130
Encryption....69, 137
Deleting
Anti-Spam Black List....40, 110
Anti-Spam White List 43,113
Log records.... 145
object from Quarantine 34,104
Parental control Black List 52, 122
Parental control White List 56, 125
personal data 61, 130
records from the Log....78
Determining the device location 64, 133
Disabling
Anti-Spam 36,106
Encryption 70,139
Firewall 67,136
Parental control....49, 119
Real-Time Protection 18,93
Display
Backlight 31
protection icon 21
E
Enabling
Anti-Spam 36,106
Encryption 69,137
Firewall 67,136
Parental control....49, 119
Real-Time Protection 18,93
Entry
Anti-Spam Black List.... 38
Anti-Spam White List 41
Parental control White List....54
PARENTAL CONTROL WHITE LIST 123
F
Firewall
security level 67,136
K
Kaspersky Lab....8
L
License
Activating the program....13, 88
information 80,147
renewal 81,147
Log
deleting records 145
Logs
deleging records 78
viewing records....78,145
M
Modes
Anti-Spam 36,106
Parental control....49, 119
N
Network
connection 76
0
On-demand scan
Actions to be performed with objects 27, 100
objects to be scanned....26,99
scheduled start 25,98
starting manually....23, 96
P
Parental control
Black List 50,120
modes 49,119
White List....54,123
Program status 78
Protection icon....21
Q
Quarantine
deleting an object....34, 104
restoring an object 34,103
viewing objects 33,103
R
Real-Time Protection
Actions to be performed with objects 20, 94
disabling....18,93
enabling 18,93
Objects to be scanned 19
RECORD
ANTI-SPAM BLACK LIST 107
ANTI-SPAM WHITE LIST.... 111
Renewing the license 81, 147
Restoring 152
S
Schedule
On-demand scan 25,98
Update 74,143
Secret code functioning 72, 139
SIM-Watch....62,131
SMS-Block 58,128
SMS-Clean 60,129
SMS-Find 63,132
Sound 79
Starting
On-demand scan 23,96
program 14,89
Update 74,142
Stealth SMS 65,134
U
Uninstalling
program 82,148
Update
roaming....75
scheduled start 74
starting manually....74,142
Updating
scheduled start 143
W
White List
Anti-Spam 41,110
Parental control....54, 123

- TABLE OF CONTENTS
- KASPERSKY MOBILE SECURITY 8.0....7
- KASPERSKY MOBILE SECURITY FOR SYMBIAN OS 11
- KASPERSKY MOBILE SECURITY 8.0
- IN THIS SECTION
- OBTAINING INFORMATION ABOUT THE APPLICATION
- DATA SOURCES FOR INDEPENDENT RESEARCH
- Application page at the web site of Kaspersky Lab.
- Application page at the web site of the Technical Support Server (Knowledge Base)
- Online help system
- Documentation
- CONTACTING THE SALES DEPARTMENT
- CONTACTING THE TECHNICAL SUPPORT SERVICE
- E-mailing your question to the Technical Support Service
- Technical support over the phone
- DISCUSSION OF KASPERSKY LAB APPLICATIONS IN WEB FORUM
- HARDWARE AND SOFTWARE REQUIREMENTS
- DISTRIBUTION KIT
- KASPERSKY MOBILE SECURITY FOR SYMBIAN OS
- INSTALLING KASPERSKY MOBILE SECURITY
- GETTING STARTED
- ACTIVATING THE PROGRAM
- STARTING THE PROGRAM
- GRAPHIC INTERFACE
- SECRET CODE
- VIEWING INFORMATION ABOUT THE PROGRAM
- REAL-TIME PROTECTION
- ABOUT REAL-TIME PROTECTION
- ENABLING AND DISABLING THE REAL-TIME PROTECTION
- SELECTING OBJECTS TO BE SCANNED
- SELECTING ACTIONS FOR OBJECTS
- DISPLAY OF THE PROTECTION ICON
- ON-DEMAND SCAN
- ABOUT ON-DEMAND SCAN
- STARTING A SCAN MANUALLY
- CONFIGURING A SCHEDULED SCAN
- SELECTING ACTIONS TO BE PERFORMED WITH OBJECTS
- CONFIGURING ROM SCAN
- CONFIGURING THE SCAN OF ARCHIVES
- QUARANTINE
- ABOUT QUARANTINE
- VIEWING QUARANTINED OBJECTS
- SEE ALSO
- RESTORING OBJECTS FROM QUARANTINE
- Select the Quarantine item in the Anti-Virus tab.
- DELETING OBJECTS FROM QUARANTINE
- ANTI-SPAM
- ABOUT ANTI-SPAM
- ANTI-SPAM MODES
- CREATING A BLACK LIST
- ADDING A NEW ENTRY
- EDITING AN EXISTING ENTRY
- DELETING AN INDIVIDUAL ENTRY
- DELETING ALL ENTRIES
- CREATING A WHITE LIST
- Press Back to save the changes.
- RESPONSE TO MESSAGES AND CALLS FROM THE PHONEBOOK CONTACTS
- RESPONSE TO MESSAGES FROM NON-NUMERIC NUMBERS
- SELECTING AN ACTION TO BE PERFORMED WITH INCOMING MESSAGES
- SELECTING AN ACTION TO BE PERFORMED WITH INCOMING CALLS
- PARENTAL CONTROL
- ABOUT PARENTAL CONTROL
- PARENTAL CONTROL MODES
- ANTI-THEFT
- ABOUT ANTI-THEFT
- BLOCKING THE DEVICE
- THE SMS-CLEAN FUNCTION
- DELETING PERSONAL DATA
- THE SIM-WATCH FUNCTION
- THE SMS-FIND FUNCTION
- DETERMINING THE DEVICE LOCATION
- THE STEALTH SMS FUNCTION
- FIREWALL
- ABOUT FIREWALL
- SELECTING FIREWALL SECURITY LEVEL
- CONFIGURING NOTIFICATIONS ABOUT CONNECTION ATTEMPTS
- ENCRYPTION
- ABOUT ENCRYPTION
- DATA ENCRYPTION
- DATA DECRYPTION
- INFORMATION ABOUT ENCRYPTED DATA
- BLOCKING ACCESS TO ENCRYPTED DATA
- UPDATING THE PROGRAM BASES
- ABOUT PROGRAM BASES UPDATE
- VIEWING BASES INFORMATION
- MANUAL UPDATING
- SCHEDULED UPDATING
- UPDATING WHILE ROAMING
- CONFIGURING CONNECTION SETTINGS
- PROGRAM LOGS
- ABOUT LOGS
- VIEWING LOG RECORDS
- DELETING LOG RECORDS
- DISPLAYING THE STATUS WINDOW
- MANAGING THE LICENSE
- VIEWING THE LICENSE INFORMATION
- RENEWING THE LICENSE
- UNINSTALLING THE PROGRAM
- KASPERSKY MOBILE SECURITY FOR MICROSOFT WINDOWS MOBILE
- GRAPHICAL USER INTERFACE
- ENABLING AND DISABLING REAL-TIME PROTECTION
- SELECTING AN ACTION TO BE PERFORMED WITH OBJECTS
- Object:
- Infected with:
- CONFIGURING A SCHEDULED SCAN START
- Press OK to save the changes.
- Press Done to save the changes.
- Deleting an entry
- Press Done to save the changes.
- Press Done to save the changes.
- SELECTING THE FIREWALL SECURITY LEVEL
- ABOUT UPDATING OF PROGRAM BASES
- SCHEDULED UDPATING
- GLOSSARY
- A
- ARCHIVE
- B
- BASES
- BLACK LIST
- BLOCKING AN OBJECT
- D
- DELETION OF AN OBJECT
- DELETION OF AN SMS MESSAGE
- DISINFECTING OBJECTS
- F
- FILE MASK
- I
- INFECTED OBJECT
- L
- LICENSE PERIOD
- N
- NON-NUMERIC NUMBER
- 0
- P
- PLACING OBJECTS INTO QUARANTINE
- Q
- R
- RESTORING
- U
- UPDATES
- W
- WHITE LIST
- KASPERSKY LAB
- CRYPTO EX LTD.
- INDEX
- Actions
- Adding
- Allowing
- Archives
- Blocking
- C
- Code
- Data
- Deleting
- E
- K
- M
- RECORD
- S
- Schedule
- Starting
- Uninstalling
- Update
- Updating
Brand : KASPERSKY LAB
Model : Mobile Security 8.0
Category : Antivirus