
19WLP530HID - Television BEKO - Free user manual and instructions
Find the device manual for free 19WLP530HID BEKO in PDF.


| Product Type | LED TV |
| Brand | Beko |
| Model | 19WLP530HID |
| Screen Size | 19 inches (approximately 48 cm diagonal) |
| Resolution | 1366 x 768 pixels (HD ready) |
| Display Technology | LED-backlit LCD |
| Dimensions (with stand) | Approximately 44.0 x 32.0 x 18.0 cm (W x H x D) |
| Weight (with stand) | Approximately 2.5 kg |
| Power Supply | AC 100-240V, 50/60Hz |
| Power Consumption (typical) | 30 W |
| Standby Power | Less than 0.5 W |
| Input Connectors | 1 x HDMI, 1 x VGA (PC), 1 x Composite (AV), 1 x USB (media playback), 1 x RF (antenna) |
| Output Connectors | 1 x Headphone jack (3.5 mm) |
| Sound Output | 2 x 3 W speakers |
| Tuner | Analog and DVB-T/T2 (terrestrial) |
| Remote Control | Included (batteries not included) |
| VESA Mount | 75 x 75 mm (screws not included) |
| Key Features | HD ready, USB Media Player, Sleep Timer, Parental Lock, Teletext |
| Cleaning Instructions | Unplug TV. Wipe screen with a soft, dry cloth. Do not use liquid cleaners or abrasive materials. |
| Safety Precautions | Keep away from heat sources. Ensure proper ventilation. Do not expose to rain or moisture. |
| Spare Parts Availability | Remote control, stand, power cord available from Beko authorized service centers. |
| Reparability | Repairs should be carried out by qualified personnel. User-replaceable parts: batteries in remote. |
Frequently Asked Questions - 19WLP530HID BEKO
User questions about 19WLP530HID BEKO
0 question about this device. Answer the ones you know or ask your own.
Ask a new question about this device
Download the instructions for your Television in PDF format for free! Find your manual 19WLP530HID - BEKO and take your electronic device back in hand. On this page are published all the documents necessary for the use of your device. 19WLP530HID by BEKO.
USER MANUAL 19WLP530HID BEKO
natural_image
Front view of a black-framed computer monitor with multiple vertical panels and a mesh grille (no visible text or symbols)



Operating Instructions
CONTENTS
Page
1 IMPORTANT INFORMATION ....1
1.1 Your New Television ....2
1.2 Important Safety Instructions....3
1.3 Electrical information ....5
2 GETTING STARTED 6
2.1 Powering on your TV and the initial use 6
2.2 Aerial Installation 6
2.3 Stand Removal 7
2.4 Remote Control Batteries ....7
2.5 TV Control Panel 8
2.6 Rear and Side External Connections ......9
2.7 Remote Control 10
2.8 Basic Television Controls 11
3 TUNING YOUR TELEVISION ....13
3.1 Turning on your television for the first time and tuning 13
3.2 Performing Digital channel settings....13
3.3 Performing Analog channel settings 14
3.4 Electronic TV Guide (EPG) 16
3.5 Program table 17
3.6 Signal Information ....19
3.7 CA Module (Conditional Access) 19
4 THE SETTINGS ON YOUR NEW TELEVISION ....20
4.1 Performing the Sound settings 20
4.2 Performing the Picture settings ....21
4.3 Performing the timer settings 24
4.4 Options menu settings 25
4.5 Parental Control 26
4.6 Other picture features 27
5 TELETEXT ....28
6 EXTERNAL EQUIPMENT CONNECTIONS ....30
6.1 Connecting an external device via Scart connection 30
6.2 Connecting external equipment via AV connection 30
6.3 Connecting an external device via YPBPR connection ....31
6.4 Connecting an external device via HDMI connection 31
6.5 PC connection 32
6.6 Inserting the CI (Common Interface) card 33
7 ADDITIONAL INFORMATION ....34
7.2 Technical Specifications Chart ....35
7.3 The Digital Switchover 36
7.4 UK Transmitter Stations (Analogue) 38
7.5 Your Television Guarantee ....39
INDEX 41
1 IMPORTANT INFORMATION
Congratulations on your choice of Television.
Should you need assistance with initial setting up or connectivity of your Television, or believe that you have a problem we would encourage you in the first instance to call our dedicated helpdesk before returning your product to your store as in many cases your problem may be resolved by advice received from our helpdesk.
Helpdesk: 0845 600 4911
LCD panels are produced with state-of-the-art technology. However, there may be missing or lit spots on the screen under certain circumstances. That does not mean that the product is faulty.
Cleaning the screen and cabinet...
After powering off, wipe the screen and the cabinet clean with a soft and dry cloth. We recommend that you do not use patented polishes or solvents on the screen or cabinet since they may cause damage.
Disposing of your TV at the end of service life...
The cold cathode fluorescent lamp found in your LCD screen contains a very small amount of mercury. Once your TV reaches the end of its useful life, please dispose of it in accordance with local government regulations or leave it at a recycling centre.
Superior features of your integrated digital television
This television can receive and process all analogue and digital broadcasts. This television set has an integrated digital and analogue receiver. The digital receiver unit processes the signals coming from digital transmitters and converts them into superior sound and image quality. TV Guide (valid for digital broadcasts only) informs you about changes in the program list briefly and provides program lists of all digital broadcasts for a number of forthcoming days. You can display detailed information about each program by pressing a single button if this feature is supported by the broadcaster. This television has a comprehensive and user friendly menu configuration.
Receiving digital broadcasting channels
You will need an outdoor or aerial to receive digital broadcastings. Contrary to the analog broadcastings, all digital broadcastings may not have their own transmission frequency. Instead, various digital broadcasting channels are gathered in regional or national groups called bouquets. You can find current transmission data from teletexts of various broadcasting enterprises or from TV guide or from the internet.
Note: HD Signals must be connected to the HDMI or component (YPbPr) inputs. See page 9 for external connections.
You should check your postcode to make sure that you are in a Freeview coverage area (www.freeview.co.uk).
Please refer to Section 7.3 for more information on the Digital Switchover.
1.1 Your New Television
Thank you for buying this HD ready television which is designed to give you many years of trouble free viewing. We recommend you take time to read this instruction booklet to ensure you are familiar with the many new features your television offers.
Note: LCD televisions are produced with state-of-the-art technology. However, there may be missing or lit spots on the screen under certain circumstances. This does not mean that the television is faulty.
HD & Digital Ready
Your television has Freeview integrated so you can immediately access many free digital channels. Cable or Satellite set top boxes can be connected via the SCART sockets or the HDMI connection which allows viewing of High Definition (HD) programs, games or DVD's.
Easy to Use
Many features make using your new television easy to use. In digital mode, there's a built in 8-Day Electronic Program Guide (EPG). Automatic channel tuning for Analogue and Digital stations makes installation quick and simple, whilst the on-screen menu system has been designed to be intuitive to use.
This Instruction Booklet features a full Index of topics at the rear which should be referred to when searching for instructions on specific features of the television.


* HDMI, the HDMI logo and High Definition Multimedia Interface are trademarks or registered trademarks of HDMI Licensing LLC.
1.2 Important Safety Instructions
1) Please READ the operating instructions before using the your TV for the first time.
2) Wipe the TV cabinet clean with a soft and dry cloth. Wipe dust from the screen gently with a soft cloth. Stubborn stains can be cleaned with a cloth slightly moistened with soap and lukewarm water. Never use solvents such as thinner or gasoline for cleaning. Unplug the AC power cable from the socket when cleaning the TV. Otherwise, there is the risk of electric shock.

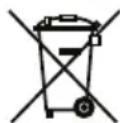
3) The cold cathode fluorescent lamp found in your LCD screen contains a very small amount of mercury. Once your TV reaches the end of its useful life, please dispose of it in accordance with local government regulations or leave it at a recycling centre.

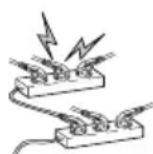
4) MAKE SURE that all power connections (extension cables and the connections between the TV components) have been made properly and in accordance with the manufacturer's instructions. Before making or changing the connections, power off the TV and unplug the mains connection plug.
5) If you have any doubts regarding the installation, operation or safety of the TV, please REFER to the retailer.
6) BE CAREFUL with glass panels and covers on the TV. The screen glass may break and cause serious injuries if something hits it.
7) To ensure adequate ventilation, please leave a clearance area of at least 10 cm around the television. This clearance prevents the TV from overheating and consequently causing damage.
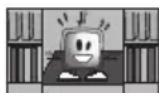
- Using the TV in dusty environments should also be avoided. - Never block the slots and openings by placing the TV on a bed, sofa, pillow or other similar surfaces.
- Never install the TV into closed places such as bookcases or cabinets unless adequate ventilation is provided.
- DO NOT COVER the ventilation openings of the TV with items such as newspapers, tablecloth, curtain, etc.

8) Your TV may be damaged if you place it under direct sunshine or close to a heater. Please abstain from using the product in very hot or humid locations or in places where the temperature is likely to decrease below 5°C (41°F). DO NOT PLACE on or near the TV any hot objects or items with open flame such as candles or any night lamps. The high temperature can melt plastic parts and cause a fire.

9) Never operate your TV close to water. Operating your TV, for example, near a bathtub, washbasin, kitchen washbasin, washing basin, wet basement and swimming pool can cause fire or electric shock.
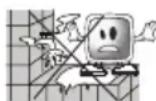
- Do not allow your TV to get wet. Never pour any liquids onto the TV. Do not operate your TV if any solid or liquid substance enters into it. This can cause electric shock and your TV may be damaged. Have it checked immediately by qualified personnel.

10) DO NOT USE headphones at extremely high volume levels since this may cause permanent loss of hearing.
11) Operate your TV only in the 230 V 50Hz voltage range. Use the mains lead supplied with the TV. If your TV is a grounded (Class I) product, then it must be connected to an earthed socket.
- The socket into which you plug in the AC mains lead must be within easy reach.
- Unplug the TV in order to disconnect it from mains power. The TV does not have a separate mains on/off switch


Note: Do not use defective sockets. Make sure that the plug is firmly inserted into the socket. If the plug remains loose, then it can cause fire due to arcing. Refer to an electrician to have your socket replaced.
12) Make sure that the mains lead is not stepped on and that there is no bending at the plug sections, plug heads and TV output point.
13) Use only the add-ons/accessories specified by the manufacturer.
14) Use only, brackets or stands specified by the manufacturer or sold along with the TV. Place your TV on a level surface.
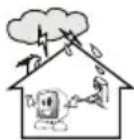
15) Unplug the mains lead during thunderstorms or when you will not use your TV for a long period of time.
16) Consult authorised service personnel for service requirements. Never attempt to repair the device yourself. Opening the cabinet can expose you to dangerous voltages or other hazardous situations. Service is required in situations such as damage to the power cable of the TV or its plug, water spills or substances falling into the TV, the TV is subjected to rain or moisture, it does not operate normally or it is dropped.
17) Do not dispose of the batteries in fire. Do not short circuit, dismantle or burn the batteries. There is the risk of explosion if the batteries are not replaced correctly. Replace only with the same or equivalent type batteries.
- Dispose of the exhausted batteries in accordance with the local laws and regulations in order to protect our environment.


18) For Stand fitting please refer to the loose leaf sheet inside the TV carton.
Note 1: This is a Class A product. During operation, the device can cause radio interference. In this case the user may have to remedy this. Please contact your specialist dealer.
Note 2: Electromagnetic fields can cause temporary performance degradation. This can be distinguished as noise in the image.

1.3 Electrical information
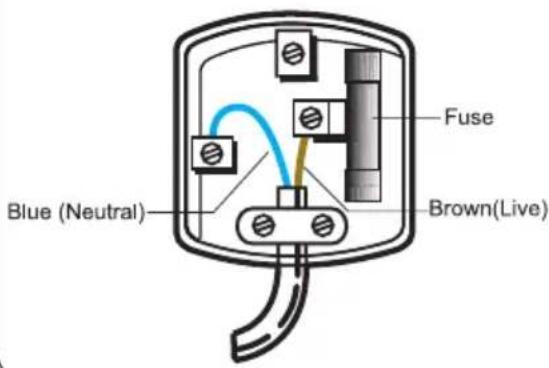
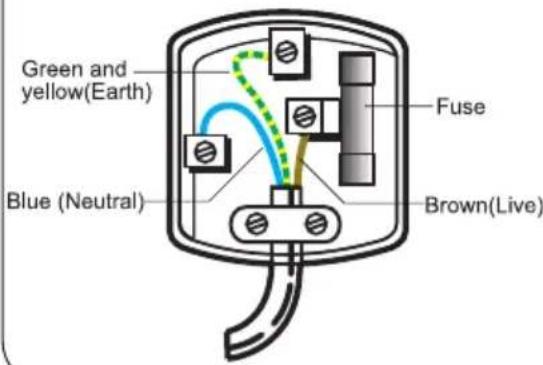
This LCD TV is fitted with a BS1363/A 13 amp plug. If it is not suitable for your supply sockets it must be removed and replaced with an appropriate plug. If the plug becomes damaged and/or needs to be replaced please follow the wiring instructions below. The plug removed must be disposed of immediately. It must not be plugged into a supply socket as this will be an electrical hazard. If the fuse needs to be replaced it must be of the same rating and ASTA approved to BS1362. If the plug is changed, a fuse of the appropriate rating must be fitted in the plug, adapter or at the distribution board. If the fuse in a moulded plug is replaced, the fuse cover must be refitted before the appliance can be used.
Wiring Instructions
The mains lead will be either 2-core or 3-core. Follow the appropriate wiring instructions given below. In both cases ensure that the outer sheath of the cable is firmly held by the cable clamp.
2- Core plug

WARNING: Do not connect either wire to the earth terminal.

This symbol indicates that this 2-core appliance is Class II and does not require an earth connection
The wire coloured blue must be connected to the terminal marked with the letter N or coloured black.
The wire coloured brown must be connected to the terminal marked with the letter L or coloured red.
3-Core plug

WARNING: This appliance must be earthed.
The wire coloured green and yellow must be connected to the terminal marked with the letter E, or by the earth symbol (⊥) or coloured green or green and yellow.
The wire coloured blue must be connected to the terminal marked with the letter N or coloured black. The wire coloured brown must be connected to the terminal marked with the letter L or coloured red.
2 GETTING STARTED
Remove your television carefully from its box. You can keep the packaging of your television to use in future.
Items supplied with your television:
• Operating Instructions and Quick Start Guide
- Mains Lead
- Remote control
- 2 batteries
- Stand Base: Attach stand base before connecting TV
Note: Scart, HDMI, VGA and PHONO cables are not supplied.
2.1 Powering on your TV and the initial use
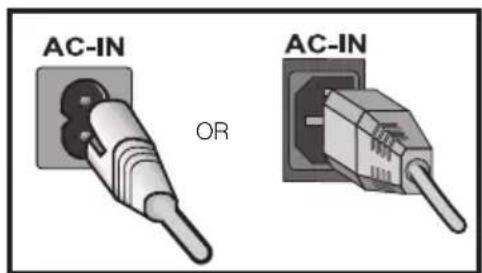
- Insert the mains lead into the AC-IN input located on the back panel of the LCD TV.
- Insert the mains lead plug supplied with the TV into the mains socket.
2.2 Aerial Installation
Install the aerial away from:
• Motorised vehicles
- Energy lines
- Telephone lines
- Metallic objects
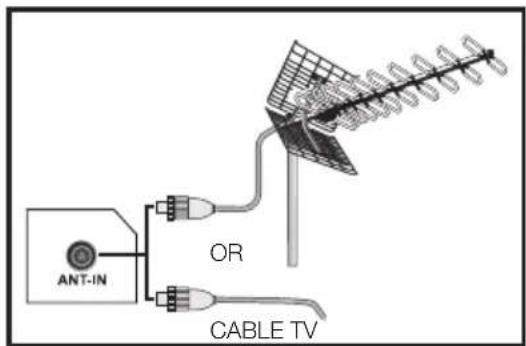
Do not make the aerial cable any longer than necessary. Ensure that the cable is not coiled and is not compressed e.g. by passing through a window or door.
Note: Over time the efficiency of your cable and aerial may be reduced by the effect of rain, wind, smoke and humidity.
If you use a 75 Ohm coaxial cable (round cable) as an aerial cable, connect the aerial plug directly to the aerial input (ANT) located at the rear of the TV.
2.3 Stand Removal

If you wish to remove the television stand, please follow these steps:
- Cover a table with a soft towel (or other protection to prevent damage to the TV or table).
- Carefully lay the TV front down on the table.
-
Position the TV table stand so that it hangs over the edge of the table.
-
Remove the screws that hold the stand to the TV or unclip stand base.
- Remove the stand.
- Attach any new brackets before lifting TV back up.
Note: Keep removed stand and screws safely for future use.
2.4 Remote Control Batteries
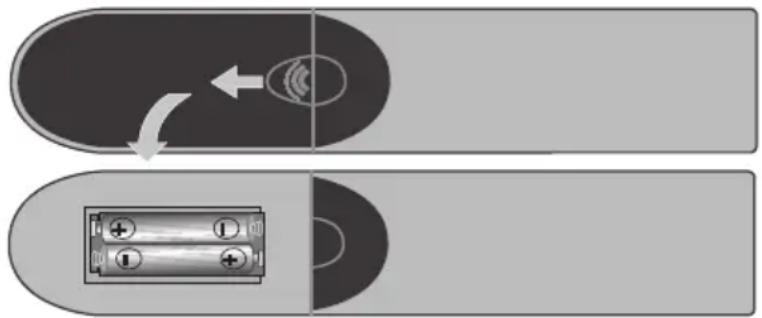
Open the lid of the battery compartment and make sure that you have placed the batteries in the correct direction. For this remote control, UM-4, IEC R03 or AAA 1.5V batteries are suitable.
natural_image
Diagram showing two electronic components: a battery with two positive charges and an ear-like sensor inside, and a curved arrow indicating rotation (no text or symbols)Do not throw your old batteries into the fire, discard them in a dedicated waste area for this purpose.
Do not mix used batteries with new ones or different types of batteries together.
The performance of the remote control is reduced at a distance of 8 metres from or at an angle of 30 degrees beyond the centre of the TV.
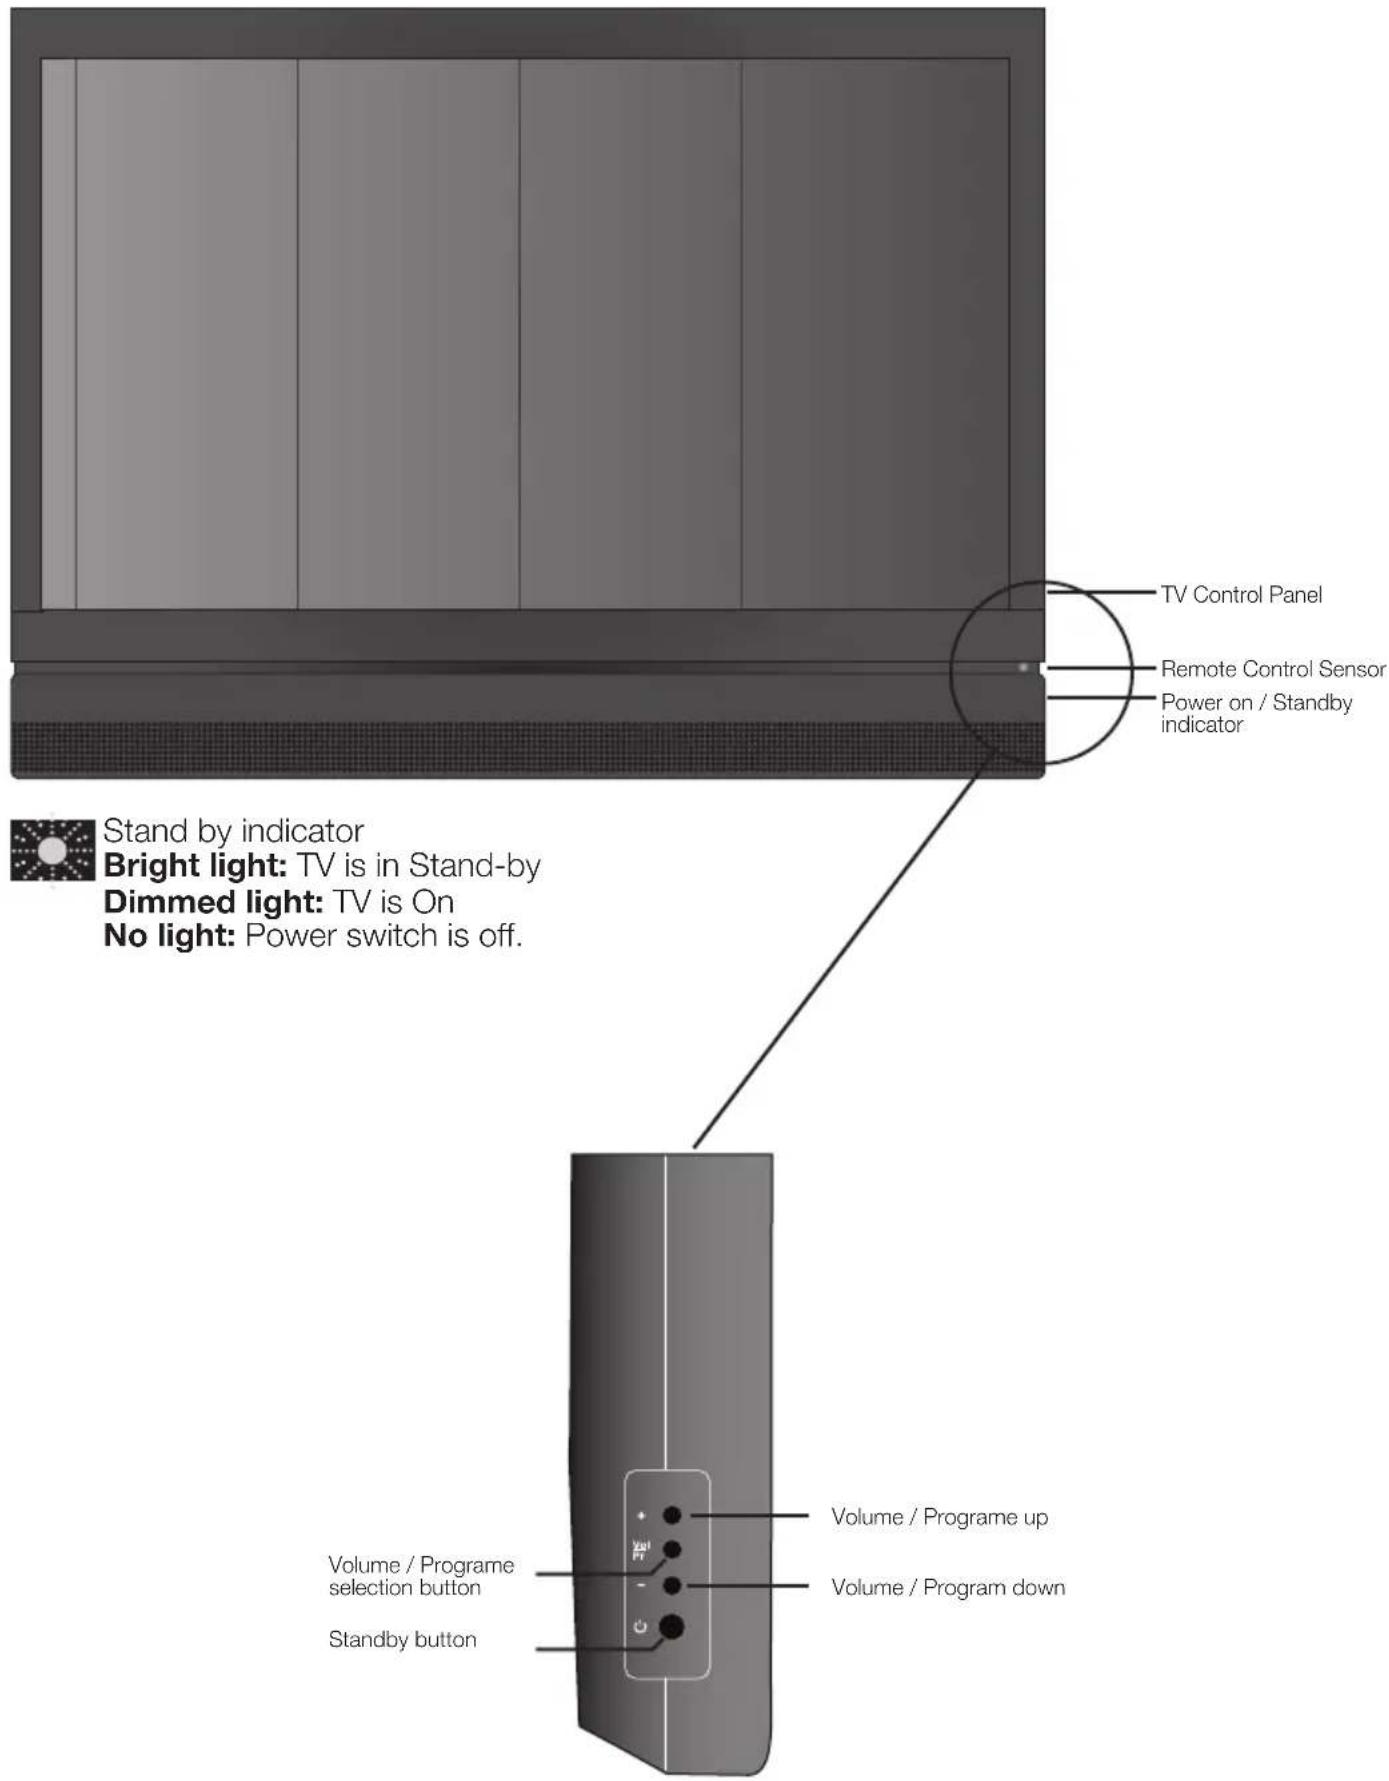
2.5 TV Control Panel
2.6 Rear and Side External Connections
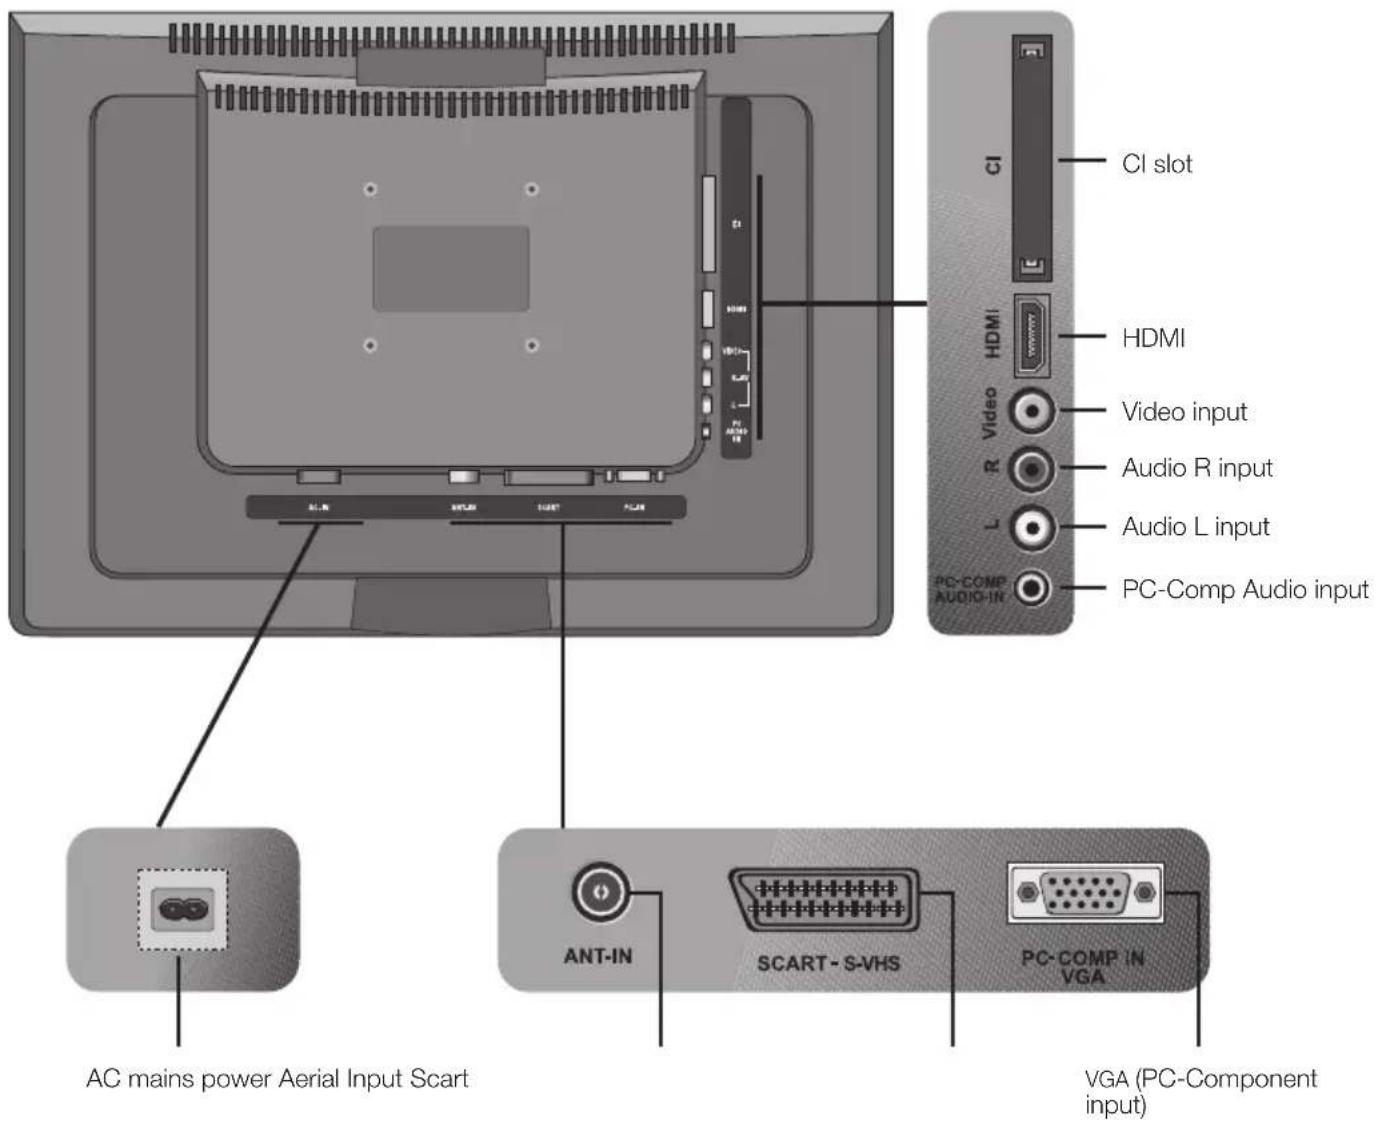
- Above drawing for external connections is representational. Their order and places on your TV may be different.
- Please see Technical Specifications Table on page 35 for the available external connections on your television.
2.7 Remote Control
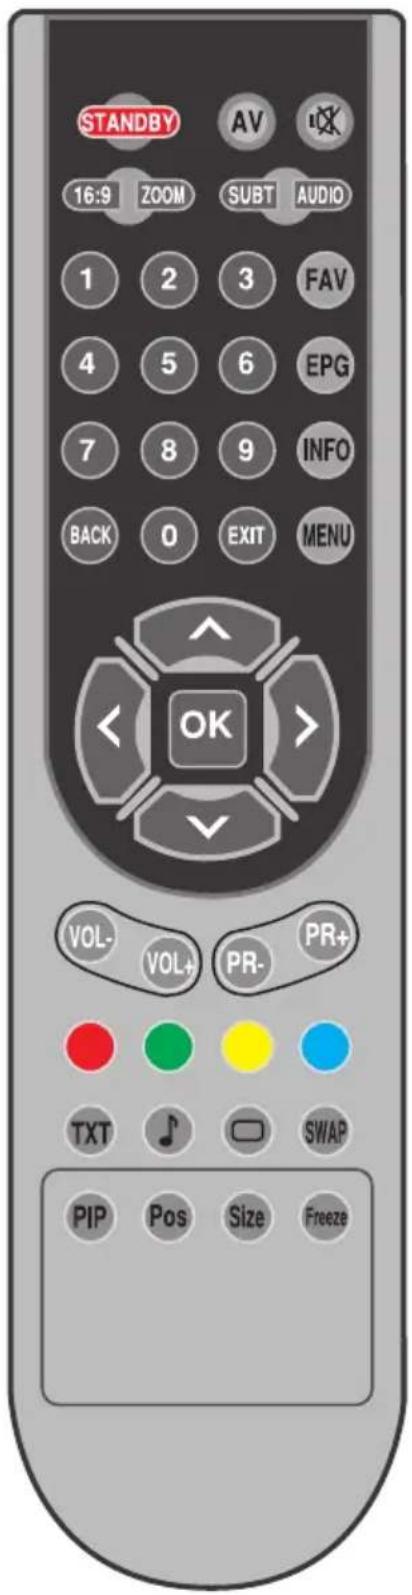
Note: When there is no menu open on the screen, up/down movement buttons have the same function with the PR+/PR-buttons and left/right movement buttons have the same function with the Vol+/Vol-buttons.
(A): Analog Mode Only
(D): Digital Mode Only.
 | Stand-by mode On/Off button |
| [HTEZ] | Temporary sound mute (Mute) button |
| [80Z4] | AV modes selection menu button |
| [AHKS] | Picture Format selection button Picture and Teletext (PAT) button |
| [HE34] | Zoom mode selection button (A) |
 | Subtitle On/Off selection button (D) Sub page button in Txt mode (Sub Page) |
| [YXXX] | These buttons have no function |
| [CDAB] | Numeric buttons |
 | Favourite channel selection button (D) Page Stop button in Txt mode (Hold) |
| [W5BD] | EPG selection button (D) Question/Answer button in Txt mode (Reveal) |
| [S4CA] | Information button Index page button in Txt mode |
| [KZCK] | MENU button |
| [SCGD] | Exit menu button |
| [20G4] | Return to previous menu button |
| [HACG] | Up movement button (Menu) Next page selection button in Txt mode |
 | Down movement button (Menu) Previous page selection button in Txt mode |
 | Left movement button (Menu) Change source in PIP mode button |
 | Right movement button (Menu) Change source in PIP mode button |
| [BHDA] | Menu selection confirm Program table selection button (D) |
 | Volume down button |
 | Volume up button |
 | Program forward selection button |
| [05WY] | Program backward selection button |
 | Red Teletext button MHEG display button |
 | Green Teletext button |
 | Yellow Teletext button |
 | Blue Teletext button |
 | Teletext/Mix selection button |
| [CRY4] | Equalizer selection button Teletext page enlarge button (Double) |
 | Picture Mode selection button Page update button in Txt mode (Update) |
| [2708] | Last viewed program selection button |
 | Freeze Picture button |
| [027K] | Time Display button |
 | These buttons have no function |
| [2760] | These buttons have no function |
2.8 Basic Television Controls
Before using your television, please refer to Section 3 for information on first time use and automatic tuning.
Note 1: The sequence of operation of the Remote Control keys is illustrated on the left side of the page for each function described in this section.
Note 2: The operations detailed in this section are described using the buttons of the Remote Control.
2.8.1 Temporary on/off (STAND-BY)

When you press the red STANDBY button located on your remote control while your television is switched on, the sound and the picture will go off. In the stand-by mode, the power indicator of your television will glow brighter. To switch your television back on, either press any numeric button or P+/P- buttons.

Caution! If you are not going to use your television for a long time, unplug the mains lead from the mains.

2.8.2 Digital TV, Analogue TV and AV Mode selection
Press the Source button on your remote control. AV menu will be displayed. Select DTV(Digital TV), ATV (Analogue TV) or desired AV mode from the Source menu with up/down movement buttons and confirm with OK button so that your television will switch to the source you have selected.
2.8.3 Channel Selection
You may select program number you would like by pressing the P+/P- buttons on your television and on your remote control. To select the programs that are above 9, you can use the Numerical buttons. You may enter the number of the program you would like to select using the numerical buttons. For example, to switch to the program number 12, press the numeric buttons 1 and 2 on your remote control. You can perform the program selection also from the Program Table and Channel List menus.
2.8.4 Temporary sound mute (MUTE)

To temporarily mute the sound of your television, press the MUTE button on your remote control. The MUTE symbol will appear on the screen. When you press the same button a second time, the sound will be restored. If you press the VOL+ button while in the Mute mode, the sound level is increased and the Mute function is aborted.

2.8.5 Returning to the Last Viewed Program (SWAP)

Allows you to switch between the current program you are watching and the source, or the last selected program and the source. For example, if you change the channel to Program 11 while you were watching Program 1, press SWAP button to switch back to Program 1. Press SWAP button to switch back to Program 11 again.
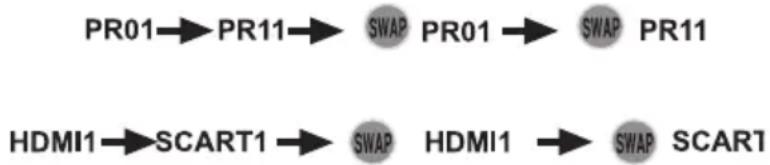
flowchart
graph LR
    A["PR01"] --> B["PR11"]
    B --> C["SWAP"]
    C --> D["PR01"]
    D --> E["SWAP"]
    E --> F["PR11"]
    G["HDMI1"] --> H["SCART1"]
    H --> I["SWAP"]
    I --> J["HDMI1"]
    J --> K["SWAP SCART"]
2.8.6 Main Menu

Press the MENU button. The Menu including all the setting menus will appear on the screen.
Navigate through the Menu titles with the Right/Left movement buttons and press the OK button to select the desired menu. If you want to exit the menu in any step, just press the EXIT button. Press BACK or MENU buttons to return to the previous Menu while you are in a sub menu.

natural_image
Illustration of a tablet with music player, gear, clock, and location map surrounding a shield icon (no text or symbols)3 TUNING YOUR TELEVISION
3.1 Turning on your television for the first time and tuning
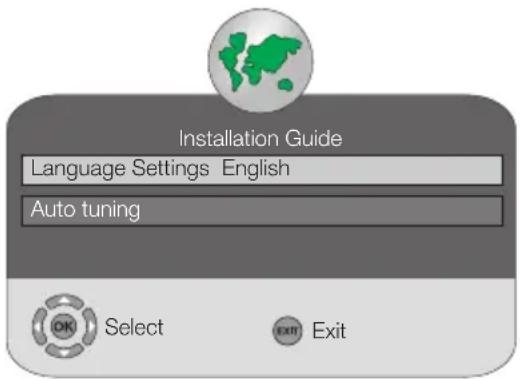
Installation Guide menu will be displayed on the screen when you turn on your television for the first time.
The TV is factory set for UK / English use. If no language settings are required simply Press the OK button twice to start TV channel tuning. Press Right/Left navigation / arrow buttons to select the desired menu language from the Language tab. Select Auto Tuning by pressing the down navigation button and confirm your selection with OK button or the
right navigation button. Country Selection menu will be displayed. Make the Country and Scan Type selections by pressing the Up/Down, Left/Right navigation buttons. If the aerial connections are correct, press OK button to start Auto Tuning.
Press EXIT button to cancel the Auto Tuning
3.2 Performing Digital channel settings
You can tune the Digital programs automatically or manually and store them in your television.
3.2.1 Automatic tuning of digital channels and storing in the memory
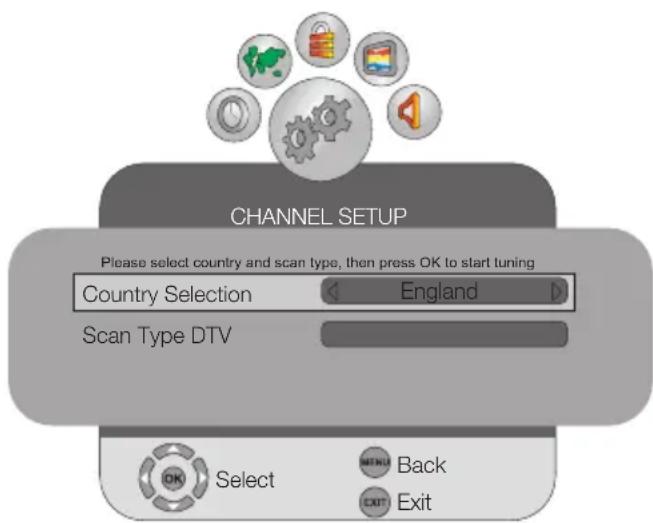
Press the MENU button on your remote control. Select CHANNEL SETUP by pressing the Right/Left movement button and confirm your selection with OK button. Select Auto Tuning tab by pressing the Up/Down movement buttons and press Right movement button or OK button to confirm. Country Selection menu will be displayed.
Scroll to the Country Selection tab by pressing the Up/Down movement buttons and press Right/Left movement buttons to select your country. Then, scroll to the Scan Type tab by pressing the Down movement button and select DTV option by pressing the Right/Left movement buttons. Press OK button to confirm your selections. Digital channels are searched and stored automatically. At the same moment, the progress of auto tuning and the channels stored in the memory are displayed in the menu.
Program Table menu is displayed at the end of the Auto Tuning.
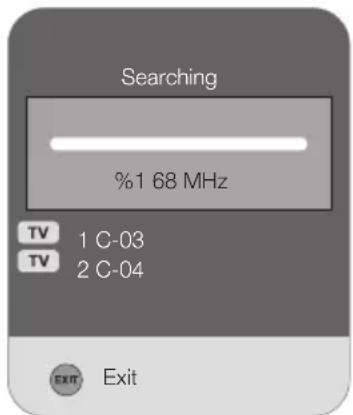
Note: If you wish to search the Digital and Analogue channels concurrently, choose Scan Type as Digital and Analog from the Auto Tuning menu.
3.2.2 Manual tuning of digital channels and storing in the memory
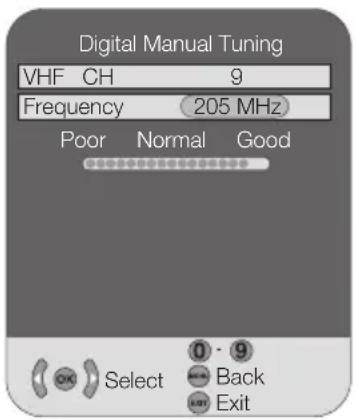
Press the MENU button on your remote control. Select CHANNEL SETUP by pressing the Right/Left movement button and confirm your selection with OK button. Select Digital Manual Tuning tab by pressing the Up/Down movement buttons and press Right movement button or OK button to confirm. Digital Manual Tuning menu will be displayed.
Enter the channel number from the Manual search menu using the numeric keys if you know the channel number; if you don't know the channel number, you can perform search by using right/left direction buttons. Channel will appear in the list and be stored in the memory when it is found. Press MENU button to return to the previous menu
from the manual search menu or press EXIT button to exit the menu.
3.3 Performing Analog channel settings
3.3.1 Automatic tuning of analog channels and storing in the memory
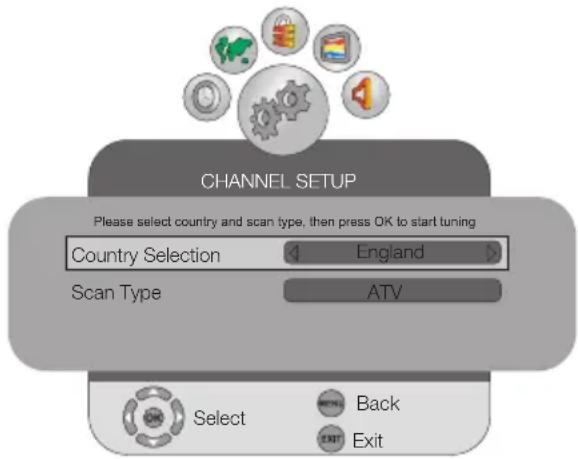
Press the MENU button on your remote control. Select CHANNEL SETUP by pressing the Right/Left movement button and confirm your selection with OK button. Select Auto Tuning tab by pressing the Up/Down movement buttons and press Right movement button or OK button to confirm. Country Selection menu will be displayed.
Scroll to the Country Selection tab by pressing the Up/Down movement buttons and press Right/Left movement buttons to select your country. Then, scroll to the
Scan Type tab by pressing the Down movement button and select ATV option by pressing the Right/Left movement buttons. Press OK button to confirm your selections. Analog channels are searched and stored automatically. At the same moment, the progress of auto tuning and the channels stored in the memory are displayed in the menu. Program Table menu is displayed at the end of the Auto Tuning.
ADDITIONAL INFORMATION
Please note that Encrypted channels may not be stored after scanning in the Digital TV channels. If this is the case then you will need to rescan the channels again but this time change the LIST SCRAMBLED CHANNELS from AUTO to ON:
1 Press Menu.
2 Select Features.
3 Select Digital Features.
4 Select User Interface Options.
5 List Scrambled Channels will show. Change "Auto" setting to "ON"
6 Press Exit button to exit the Menu.
You will need to rescan the digital TV channels:
1 Press Menu.
2 Select Setup.
3 Select Auto Tuning and press the OK button to start the channel scan and this time store the Scrambled channels.
3.3.2 Manual tuning of analog channels and storing in the memory
3.3.2.1 If you already know the channel number
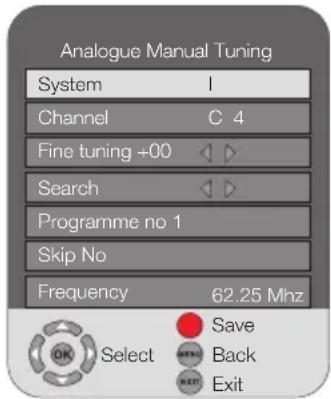
Select Analogue Manual Tuning by pressing the Up/Down movement buttons in the CHANNEL SETUP menu and confirm by pressing the OK button. Analogue Manual Tuning menu will be displayed.
Note: Select SYSTEM I for UK.
Select the system in which you would like to make the search from the System tab by pressing the Right/Left movement buttons and move to the Channel tab by pressing the down movement button. Press OK on your remote control to select "S" band or "C" band and enter the channel number with numeric buttons. Move onto the Program No tab and enter the channel number in which you would like to have the channel stored. If the broadcast viewed on the screen is of your desired quality, press the Red button on your remote control to store the action into memory. The channel will be stored according to the program number of your choice. You can tune and store in memory other channels the same way. In the event that you wish to exit the menu for any reason, simply press the EXIT button.
3.3.2.2 If you do not know the channel number
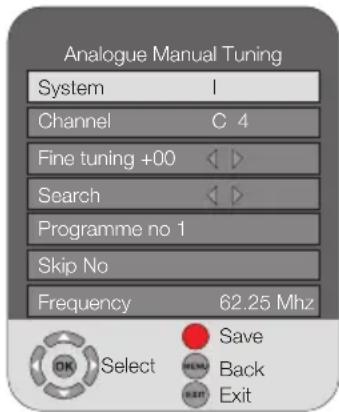
Select Analogue Manual Tuning by pressing the Up/Down movement buttons in the CHANNEL SETUP menu and confirm by pressing the OK button. Analogue Manual Tuning menu will be displayed.
Note: Select SYSTEM I for UK.
In the Program no tab, enter the channel number where you would like to store the searched channel. Select the system in which you would like to make the search from the System tab by pressing the Right/Left movement buttons and move to the Channel tab by pressing the down movement button. Press OK on your remote control to select "S" band or "C" band, scroll to the Search tab by pressing the down movement button and press Right/Left movement buttons to start the search. Press the Red button on your remote control to store the channel you found. The channel will be stored to the channel number of your choice.
3.3.2.3 Fine Tuning
If the channel you found is not of the desired quality and requires Fine Tuning, then select the Fine tuning tab by pressing the Down movement button in the Analogue Manual Tuning menu. Using the Left/Right movement buttons on your remote control, adjust the broadcast displayed on the screen to your desired quality. Under normal circumstances, you will not require to use the Fine Tune function. The AFC values of your television will automatically adjust and lock themselves to the channel. However, you might need it in case the television transmitters do not operate according to the standards. Press the Red button on your remote control to store the settings you made.
3.4 Electronic TV Guide (EPG)
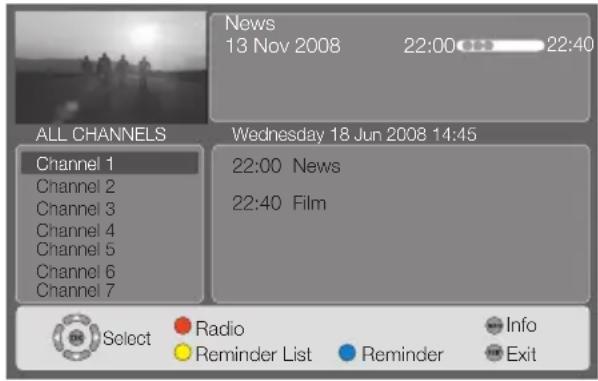
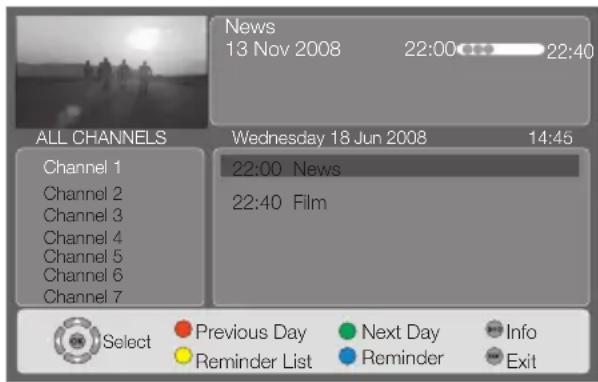
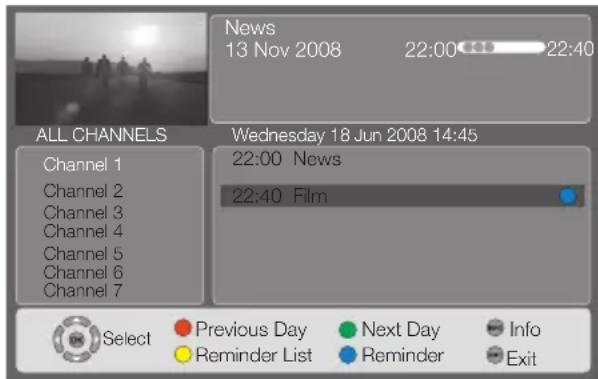
Electronic TV Guide is for Digital broadcasts only. The Electronic TV Guide gives general information about all of the programmes of the next 8 days. To display the Electronic TV Guide, press EPG button on the remote control and EPG will be displayed.
Important Note: Not all broadcasting enterprises supply a detailed TV guide. Most of the broadcasting enterprises provide daily programme information, but they do not give detailed explanations. Some broadcasting enterprises, on the other hand, do not give any programme information at all.
- You can use the RED button on your remote control to switch between TV and Radio channels in the EPG menu.
- In All Channels menu, press PR-/PR+ or Up/Down navigation buttons to select the channel you would like to view and press Right navigation button to move to the programme list section.
- Scroll down the programme list by pressing the Up/Down navigation buttons. To get further information about the programme press Info button and detailed information about the selected programme will be displayed.
- Press the GREEN button on your remote control to display the programme information of the next day and press
RED button to display the programme information of the previous day.
- You may add a Reminder for any programme that you would like to view. To do this, select the channel / programme you want to add a reminder from the EPG menu with the navigation buttons and press the BLUE button on your remote control. At the right hand side of the programme a BLUE symbol will be displayed which indicates that the reminder is added to the programme.
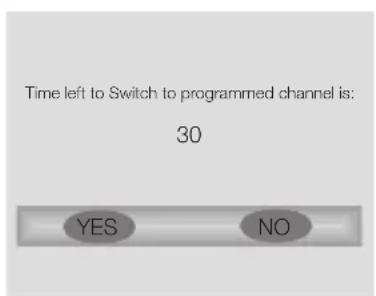
When the time of the relevant programme comes, a warning screen appears. It counts down for 30 seconds. During the countdown you may switch to channel in which the programme has started by selecting the YES option with
Right/Left buttons or cancel this action by selecting the NO option. If you do not perform any operation until end of the
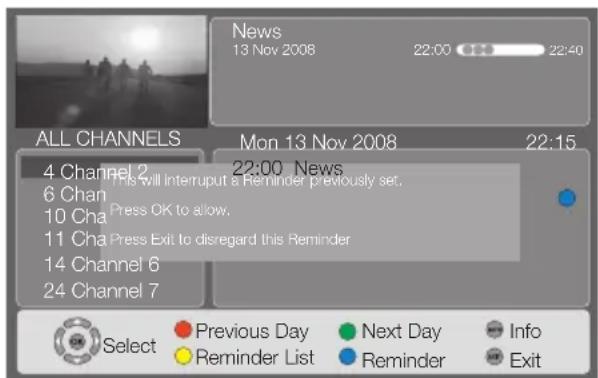
period, the TV will automatically switch to the channel that you set the reminder for.
-
You may delete the reminder that you have added directly by using BLUE button of your remote control in the EPG menu or delete from Reminder List menu by pressing YELLOW button.
-
If the time of the reminder you have set previously and the new one you will add overlap, a warning message will be displayed.
Press OK to store the new reminder or press EXIT to exit without storing.
3.5 Program table
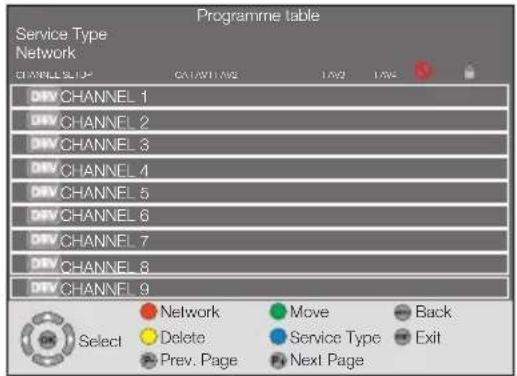
With the program table, you may list the television channels, delete channels, create favorites list, lock any channel you wish or change the names of the analog channels according to your personal choice. Select the Program Table tab by pressing the Down movement button in CHANNEL SETUP menu and confirm with the OK button. Program Table menu will be displayed.
3.5.1 Selecting the Service Type
You may select the service type by pressing the "BLUE" button on your remote control in the Program table menu. The service type you have selected appears on the upper left corner of the menu. Service types are in the form of "ALL TYPE" (all channels), "DTV (only Digital channels), ATV (only Analog channels) and Radio (only radio channels). Only those channels in the service type you select shall be displayed on the Program table menu.
3.5.2 Creating and selecting favorites list
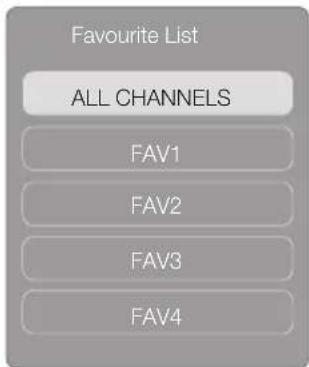
In your television you can create 4 favorite channel lists based on your personal preferences. To do this, select the channel you would like to add in the favorite list by using the Up/Down movement buttons while you are in the Program Table menu, then select the favorite list into which you would like to add the channel by using the Right/Left movement buttons and press the OK button. A "Heart" symbol will be displayed under the favorite list to which you have added the channel. You can add the channel you have selected into more than one favorite list. You can directly select the favorite channel list you created. To do this, press the FAV button on your remote control.
Favourite List menu will be displayed.
Select one of the ALL CHANNELS, FAV1, FAV2, FAV3, FAV4 lists by pressing the Up/Down movement buttons and press OK button to confirm.
3.5.3 Relocating a stored channel
Select the channel you want to relocate from the Program Table menu with Up/Down buttons and press the "GREEN" button on your remote control. Select the new channel number to which you would like to move the channel by pressing the Up/Down movement buttons and press the OK button. Your channel will be moved to its new location. You may perform this procedure for more than one channel. Press EXIT button to finish the setting process.
3.5.4 Deleting a stored channel
Warning: Deleting a channel will be permanent. Full channel scan will be necessary to restore the deleted channels.
Select the channel you want to delete from the Programme Table menu with Up/Down buttons and press the "YELLOW" button on your remote control. The tab of the channel to be deleted will become yellow. If you press the GREEN button, Warning! You are about to permanently delete a channel warning message is displayed. Select YES by pressing the right/left navigation buttons to delete the channel or select NO to cancel deleting. If you select the channel with YELLOW button and press the RED button, Warning! You are about to permanently delete all channel warning message is displayed. Select YES by pressing the right/left navigation buttons to delete all channels or select NO to cancel deleting. After setting is complete, press EXIT button to exit the menu.
Note: If the channel to be deleted is locked in the Blocked Programme menu, PIN code screen will be displayed when you want to delete this channel from the Programme Table menu. Enter the PIN code to delete the channel.
3.5.5 Locking a stored channel
For this feature, please see page. 26-27 4.5-Parental Control
3.5.6 Skipping a stored channel
In the event that you do not wish to see certain programs while navigating through the channels using the P+/P- buttons, then you can use this function. Select the program that will be hidden by pressing the Up/Down or Right/Left movement buttons, scroll to the Skip option and press OK button to confirm. SKIP will appear on the program to be skipped. You may perform this procedure for more than one program. To view the skipped program, directly enter the program number using the numeric buttons or select it from the Channel List menu. To cancel the program skipping process, select the "SKIP" option again. After setting is complete, press the EXIT button to exit the menu.
3.5.7 Renaming a stored analog channel
You can assign an analog program or programs of choice the names that have a maximum of eight characters. To do this, select the analog channel you want to rename from the Program Table menu with Up/Down movement buttons and press the RED button on your remote control. The colour of the tab where the channel name exist will change and a green box will appear around the initial letter of the channel name; choose the desired letter, number or sign using the Up/Down movement buttons. For the next character, press the Right movement button and then select the desired letter, number or sign again with the Up/Down movement buttons. After entering all the characters, store the name you have written in the memory by pressing the OK button. To write names for any of the other programs, simply repeat the above procedure. Press MENU button to return to the previous menu or press EXIT button to exit the menu after the setting is complete.
3.5.8 Channel List
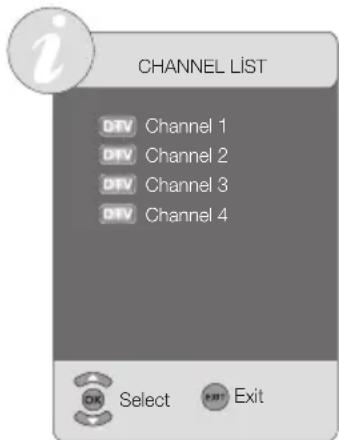
If you press OK button when no menu is open, Channel List menu will be displayed on the screen.
You can see all the channels of the current mode while you are in the Channel List menu, you can select the desired channel with Up/Down buttons and view it by pressing the OK button.
3.6 Signal Information
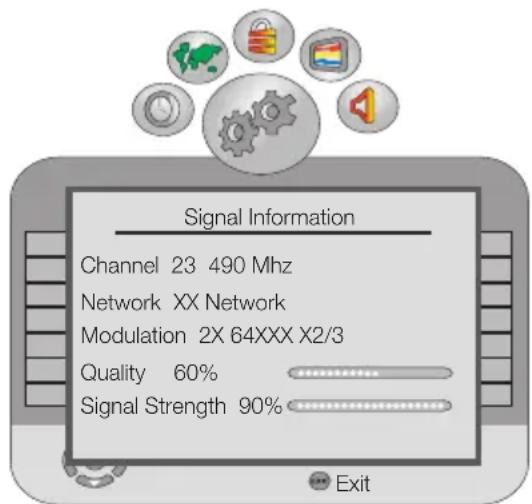
This menu gives information about Channel, Network, Modulation, Signal level and quality. Press MENU button to enter this menu. Select Channel Setup menu by pressing the Right/Left movement buttons. Select Signal Information tab by pressing the Down movement button and confirm with Right movement button or OK button. Signal Information menu will be displayed. Note: Signal Information menu will be active only for Digital broadcasts.
3.7 CA Module (Conditional Access)
In this menu, you can check the CA Module settings. If a CI module is inserted for a channel that has a scrambled broadcast, then a submenu for that module is opened and the information for that module is updated.
4 THE SETTINGS ON YOUR NEW TELEVISION
4.1 Performing the Sound settings
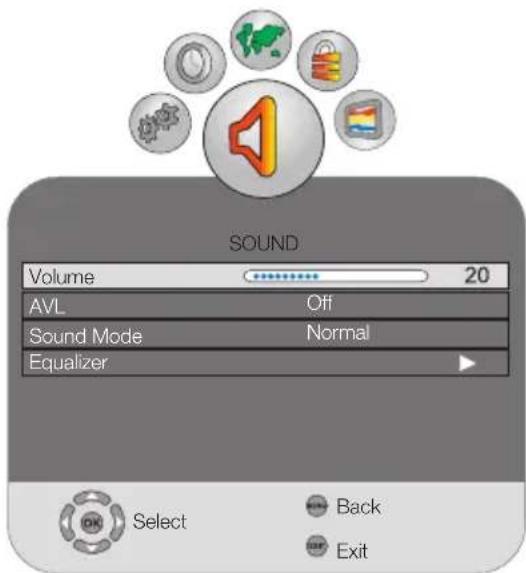
You may perform Volume settings by using the V+ or V- buttons on your television or the VOL+/VOL- buttons on your remote control. You can perform other Sound settings by entering the Sound menu. To do this, press the MENU button on your remote control, select SOUND menu by pressing the Right/Left movement buttons and press the OK button. In this menu, you can select one of the titles for which you would like to perform an operation.
4.1.1 AVL (Automatic Volume Limiting)
Television transmitters have different sound levels. This can be noticed from the different volume levels that can be heard while switching from one program to another. Using the Right/Left movement buttons, select ON. The AVL (Automatic Volume Limiting) function maintains the same sound level as you switch from program to program. Select Off to cancel it.
4.1.2 Sound Mode
If you would like to add some depth to the sound of the program you are watching, press Right/Left movement buttons to select Normal or Spatial, or SRS for products with the SRS (optional) feature.
4.1.3 Equalizer
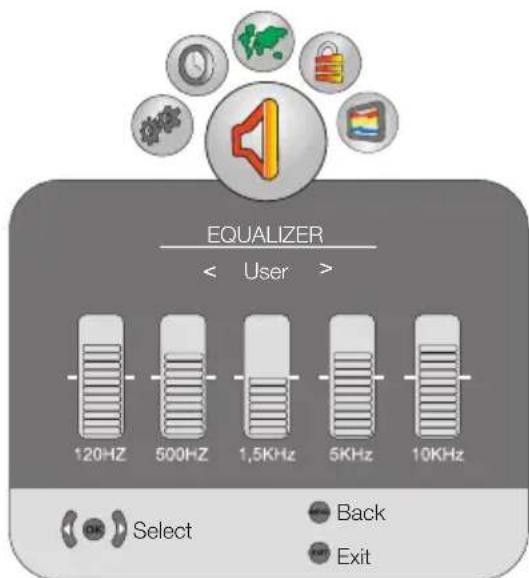
Select the EQUALIZER tab in the Sound menu and confirm with the OK button. The Equalizer menu is displayed. Using the Right/Left movement buttons, you may select either one of the preset Music, Sports, Cinema and Speech options which enhance the sound effect depending on the feature of the program you are watching or the User option which you can adjust as you desire. To adjust the User option, select User and press the OK button. You can adjust the frequency levels with the Up/Down movement buttons. You can select one of the 120Hz, 500Hz, 1.5kHz, 5kHz and 10kHz frequency bands with Right and Left movement buttons. Press the MENU button to store the settings and exit the user option.

Note 1: You can select the equalizer options directly by pressing the ( ) button on your remote control.
Note 2: The settings you have made in the Sound menu will be stored in the memory without requiring any other operations.
4.2 Performing the Picture settings
4.2.1 Picture Menu
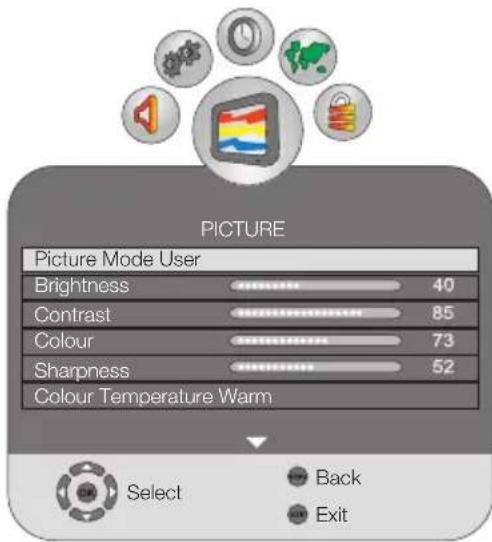
You can perform Picture settings by entering the Picture menu. To do this, press the MENU button on your remote control, select PICTURE menu by pressing the Right/Left movement buttons and press the OK button. In this menu, you can select one of the titles for which you would like to perform an operation.
You can select the desired setting by pressing the Up/Down movement buttons and adjust their levels with Right/Left movement buttons. You can adjust Picture Mode, Brightness, Contrast, Colour, Sharpness and Colour Temperature levels as you desire. You can adjust the DNR, MPEG NR, Vibrant Color, Perfect Clear, Dynamic Contrast, Dynamic Backlight and Backlight options as you desire
from the Advanced Picture Settings menu. The changes you have made in the PICTURE menu will be stored in the memory without requiring any other operation.
4.2.2 Picture Mode

You can select either one of the four non-adjustable settings in the memory or one of the user options by pressing the (☐) button on your remote control. Vivid, Natural, Cinema and Sports are default values; USER represents the values you stored in memory.
4.2.3 Colour Temperature
Colour intensity of the picture can be adjusted with this feature. Select Colour Temperature tab from the picture menu by pressing the Up/Down buttons to activate this feature and then select one of the Cool, Normal or Warm options by pressing the Right/Left buttons.
4.2.4 Tint
When NTSC video is input via Scart, you may make Hue settings. The tint option is not seen in the menu when you have not input this type of a video. When a NTSC video is connected via the Scart, this option becomes active and it is available in the menu.
4.2.5 Advanced Picture Features
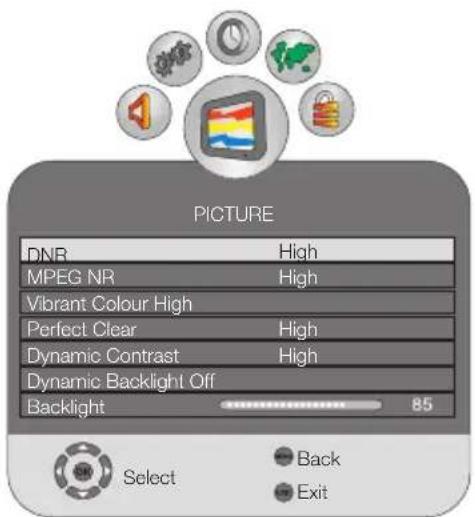
You can adjust advanced picture features of your television from the Advanced Picture Settings menu under Picture menu.
4.2.5.1 DNR (Noise reduction)
You may reduce interference and noise formed in the picture by using this feature. Select DNR tab with the Up/Down movement buttons to activate this feature and select one of the Off, Low, Normal, High or Auto options with Right/Left movement buttons.
Note: Noise reduction function is only effective in weak broadcasts.
4.2.5.2 MPEG NR
You can remove the artifacts that appear in the picture as square shaped blocks by using this feature. Select Mpeg NR tab with the Up/Down movement buttons to activate this feature and select one of the Off, Low, Mid or High options with Right/Left movement buttons.
4.2.5.3 Vibrant Colour
With this feature you can automatically adjust colour saturation according to the scene. To do this, select Vibrant Colour tab with the Up/Down movement buttons and select one of the Off, Low, Mid or High options with Right/Left movement buttons. With the 'High' option you can obtain the most saturated colours.
4.2.5.4 Perfect Clear
With this feature you can automatically adjust black level of the picture according to the scene. To do this, select Perfect Clear tab with the Up/Down movement buttons and select one of the Off, Low, Mid or High options with the Right/Left movement buttons.
4.2.5.5 Dynamic Contrast
This feature allows making brightness settings according to the picture. A brighter or dimmer picture can be sent to the screen according to the brightness level of the picture. Thus, a wider effect is obtained in terms of contrast. Select Dynamic Contrast tab with the Up/Down movement buttons to activate this feature and select one of the Off, Low, Mid or High options with Right/Left movement buttons.
4.2.5.6 Dynamic Backlight
With this feature you can automatically adjust backlight strength according to the average brightness in the scene. To do this, select Dynamic Backlight tab with the Up/Down movement buttons and select one of the Auto, Daylight, Night or Off options with Right/Left movement buttons. When the Dynamic Backlight is set to Off, Backlight option becomes active. Backlight option is not accessible when other options are selected.
4.2.5.7 Backlight
With this feature, you can adjust the intensity of light reflected to the LCD Panel. To do this, select Back Light tab with the Up/Down movement buttons and adjust the level as you desire with Right/Left movement buttons.
4.2.6 Picture Format
With this option, you can view the broadcast you watch in a format of your choice. You can view the broadcasts in Auto, 16:9, 4:3, Subtitle, Letterbox, Panorama or 14:9 formats. 16:9 or 4:3 formats can be selected in PC modes. In that case, the name of the selected picture format will be displayed in the centre of the screen.
4.2.6.1 Auto

natural_image
Illustration of a blue globe showing continents and oceans (no text or symbols)Some movie channels may broadcast in the 16:9 format. If you would like to see this format automatically, then select Auto. In that case, Auto appears on your screen.
4.2.6.2 16:9

natural_image
Illustration of a stylized globe showing continents and oceans (no text or symbols)Please use this setting for watching wide screen DVDs, wide screen video cassette or 16:9 formatted broadcasts. Since various screen formats such as 16:9, 14:9 and etc. are used, black stripes might be formed on the lower and upper parts of the screen.
4.2.6.3 14:9

natural_image
Illustration of a stylized globe showing continents and oceans (no text or symbols)This is a movie format.
4.2.6.4 4:3

natural_image
Illustration of a stylized globe showing continents and oceans (no text or symbols)Use this setting to watch the broadcasts in the 4:3 format.
4.2.6.5 Subtitle

natural_image
Blue globe illustration with 'SUBTITLE' text below (no other symbols or text)If the subtitles are transmitted in the "16:9 formatted" broadcast, then this setting will push the picture upwards in order to ensure the entire written text to be seen.
4.2.6.6 Letterbox

natural_image
Illustration of a blue globe showing continents and oceans (no text or symbols)While watching a "16:9 or Cinemascope formatted" film or video cassette, this setting will eliminate or minimize the black stripes on the background by zooming in the picture without diffusing it.
4.2.6.7 Panorama

natural_image
Illustration of a stylized globe showing continents and oceans (no text or symbols)This setting will enlarge the image to fit the screen by stretching the image horizontally while holding the correct proportions at the centre of the image. Some distortion may occur.
Note: Since the use of certain functions in order to change the picture sizes for collective projection or commercial purposes (modifying the height and width etc.) will be deemed an infringement of the picture's copyright, legal proceedings can be carried out as required under relevant laws.
4.2.6.8 Overscan: Off
When this mode is selected, high defined picture from the HDMI is not cropped and it is displayed in its original size. This is only active in HDMI mode and for resolutions at or above 720p.
4.3 Performing the timer settings
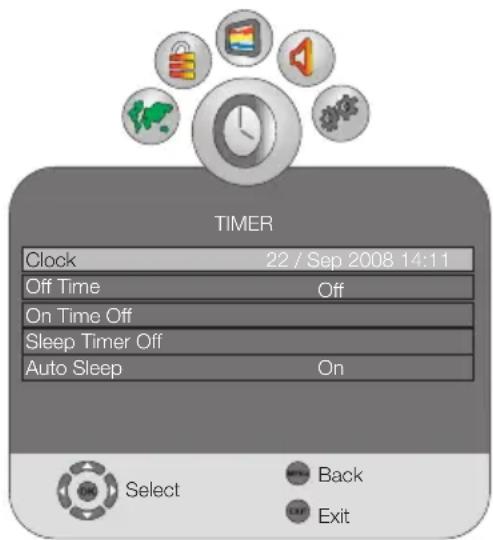
Your television is equipped with the feature of being able to be turned off and on at periods that you specify. Press the MENU button. Select TIMER menu by pressing the Right/Left movement buttons and press OK button. In this menu, you can select one of the titles for which you would like to perform an operation.
4.3.1 Clock
Time information is automatically obtained from EPG (Electronic Program Guide) in Digital channels, and from Teletext in Analogue channels.
4.3.2 Off Time
Select the Off Time tab by pressing the Up/Down movement button in TIMER menu and confirm your selection with the Right movement button or OK button. In this menu, you can set the off time for your television with weekly or daily periods.
4.3.3 On Time
Select the On Time tab by pressing the Up/Down movement button in TIMER menu and confirm your selection with the Right movement button or OK button. In the On Time menu, you can set the on time for your television with weekly or daily periods. In this menu, you select one of the TV, DTV or Radio modes, a specific channel and the volume that would become active when the TV is turned on.
4.3.4 Sleep Timer
Sleep Timer switches your television automatically to Standby Mode after the preset time has elapsed. You can adjust this time between 10 and 240 minutes with certain intervals. To do this, select the Off Time tab and press Right/Left movement buttons to select the desired time.
4.3.5 Auto Sleep
Auto Sleep option can be set to on or off. When the Auto Sleep function is set to Off, NO SIGNAL will appear on the screen when the TV does not receive any signal from any source and your television will not be turned off. When the Auto Sleep function is set to On, NO SIGNAL will appear on the screen if the TV does not receive any signal from any source and the countdown OSD of 5 minutes will appear. Television is turned off at the end of the time.
4.4 Options menu settings
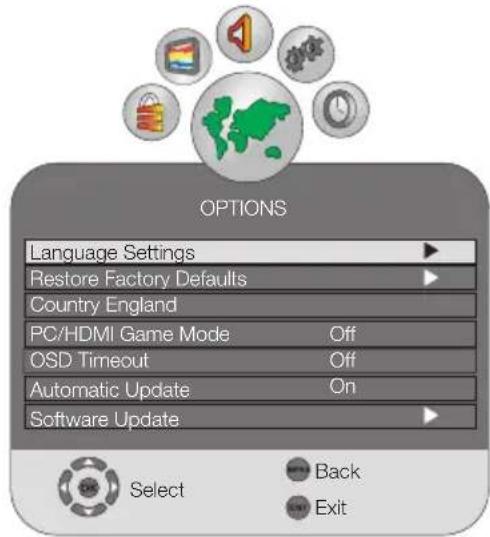
Press the MENU button on your remote control. Select OPTIONS by pressing the Up/Down movement buttons and press the OK button. You can select the titles for which you would like to perform an operation in this menu by using the Up/Down movement buttons.
4.4.1 Language Settings
Select Language Settings from the Options menu and press the OK button. The Language Settings menu is displayed. You can adjust the Menu language, Subtitle language from this menu. Subtitle languages can only be selected when they are supported by the broadcaster. Unless you make any selection, the language supported by the broadcaster will be selected automatically. You can select the Language Settings, Subtitle Languages tabs and set the desired values by pressing the Right/Left buttons.
4.4.2 Restore Factory Defaults
You can switch your television back to factory settings with this feature. Select Restore Factory Defaults tab and press the OK button. Confirmation screen will be displayed. In this screen, you can restore the factory settings of your television by selecting the Yes option with Right/Left buttons or cancel this action by selecting the No option.
4.4.3 Country
You can not access the Country option from the Options menu. The country selected during the initial use will automatically displayed in the menu.
4.4.4 PC/HDMI Game Mode
In the Options menu, you can set the Game Mode tab to On/Off by pressing the Right/Left buttons. When the Game Mode is set to On, display settings will return to the default values.
Game Mode becomes active only for PC, HDMI and YPBPR sources. When the Game Mode is set to ON for these sources, picture mode in the Picture menu will switch to the Game Mode. Only colour temperature and backlight settings can be changed in this mode. Game Mode provides a considerable increase in the picture quality when the TV is used as a monitor for game consoles and for displaying the text files. It is advised to turn this mode off when you would like to watch a movie from the above mentioned sources.
4.4.5 OSD Timeout
You can set the time during which the Menus will be displayed on the screen as 10, 15, 30, 60 seconds. If you select OFF, menu will be displayed continuously. Press EXIT to close the menu.
4.4.6- Automatic Update
If this function is set to On, your television will search for new software through OAD (Over Air Download) when it is in Stand-by mode and install new software if any are found. If new software is installed by this method, your television will inform you with a warning display when it is turned on for the first time after such installation.
4.4.7 Software Update
When a new software is found through OAD (On Air Download) from this menu, it will be installed automatically. Select Software Update tab and press the OK button. Your television will start to search for a new software and perform the software install process if a new software exists.
Note: Software Update tab is not displayed in the Analogue mode.
4.4.8 Decoder Setting
You can set the Decoder Setting tab to On/Off by pressing the Right/Left movement buttons. When it is set to ON, RF signal will be output from the SCART output. This option must be set to ON when a Decoder is connected to SCART. When this option is set to OFF, RF signal will not be output from the SCART output. This option appears in the menu when the Signal Source is set to SCART. It is not displayed in the menu in other options.
4.5 Parental Control
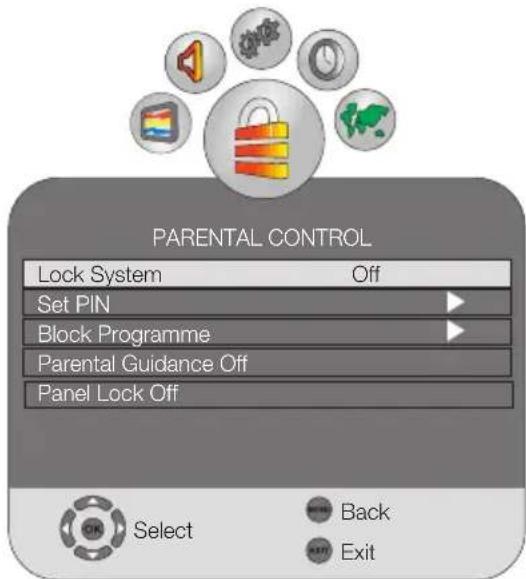
In the Parental Control menu, you can preclude channels that are not appropriate for children and set age restriction for programs being broadcasted. Password screen will be displayed when entering this menu. The menu will open only when the correct password is entered. The default password is set as 0000. You can change the password from the Set PIN menu as you wish.
4.5.1 Lock System
When the Lock System feature is set to On, a password is prompted if you want to enter in the Auto Tuning, Digital Manual Tuning, Analogue Manual Tuning submenus in the Channel Setup menu and the Program Table menu. These menus are not accessible unless the correct password is entered.
4.5.2 Set PIN
You can change your Parental Control password from this menu as you wish. To do this, select Set PIN tab and press OK button. Set PIN menu will be displayed. Once you enter your new password two consecutive times, your password will be changed.
4.5.3 Block Programme
With the Block Program feature, you can lock the desired channel and prevent it from being viewed unless the correct password is entered. To do this, select Block Programme tab from the Parental Control menu by pressing the UP/Down
movement buttons and confirm your selection with OK button. Block Programme menu will be displayed. Select the channel you want to block from the Block Programme menu with Up/Down buttons and confirm with the GREEN button on your remote control. A lock symbol will appear next to the channel name. When a blocked channel is selected, the password screen will be displayed and the channel will not appear until the correct password is entered. If you do not enter the password, CH BLOCKED will be displayed on the screen. There will also be a lock symbol next to the blocked channel in the Program Table. Repeat the same steps to remove the blocking.
4.5.4 Parental Guidance
If it is supported by the broadcaster, this feature allows you to enter an age restriction between 4 and 18 for the programs broadcasted. If the program to be broadcasted is over the age restriction you entered, the channel will not be displayed and a password screen will appear. To view the program, correct password must be entered. Enter an age limit between 8 and 18 from the Parental Guidance tab in order to activate this feature.
4.5.5 Panel Lock
If this feature is turned On, the control buttons on your LCD Television will be locked and will not function. When it is set to off, control buttons will become active.
4.6 Other picture features
4.6.1 Zoom

Press the ZOOM button on your remote control while watching a channel to activate this feature. The image is zoomed in 3 stages oriented to the centre.
Note 1: Zoom feature is aborted when the channel is changed.
Note 2: Zoom feature is not available in Digital Mode.
4.6.2 Freeze (Freeze picture)

You may freeze the program picture you are watching with this feature. For this, press the Timeshift button on your remote control. The program picture will freeze until the same button is pressed a second time. Freeze: On, Freeze: Off OSD will appear each time you press the Timeshift button.
4.6.3 Picture and Teletext (PAT)

With this feature, you can follow the teletext broadcasts simultaneously with the current program, provided that the current program contains teletext broadcast. For this purpose, when you press TXT and then 16:9 buttons in a channel with teletext broadcasting, the screen will be split into two with the left pane showing the currently watched program and the right pane will show the Teletext at the same time. In the event that you wish to exit the PAT mode for any reason, simply press the TXT button.
5 TELETEXT
Teletext means in short the transmission of various updated information along with the TV broadcast signal in the form of text and graphics. To be able to receive a quality teletext broadcast, a good antenna system and a broadcast signal that is not weak, with no reflections and interference from other channels are required. Even in a very clear reception, it is normal for some characters or tabs to be lost. Such conditions will automatically be improved in a short time under normal circumstances.
5.1 Entering the Teletext Mode
In order to switch your television to the teletext broadcast, please press the TXT button in a program that has a teletext broadcast. To switch back to the television broadcast, press the TXT button for two consecutive times. Once you have switched to the teletext broadcast, the initial page that appears will be the index page. 100 In this page, the titles of the topics in the teletext broadcast and the initial page numbers will appear.
5.2 Page Selection

To be able to view the page you would like on the screen, type in the number of that page using the numerical keys. You can see the number you have entered on the left side of the upper title tab. When you would like to turn the pages one by one, you can go to the next page pressing the Up/P+ button and to the previous page pressing the Down/P- button. Press the INFO button to return to the Index page.
5.3 Teletext image in the TV picture (MIX)

With this feature, you can watch the teletext information and the TV broadcast together. Thus, you can follow the teletext broadcast of the channel while you watch the TV broadcast. To do this, press TXT button two times consecutively in a channel with Teletext broadcast.
5.4 Page enlarge button (DOUBLE)

You can view the upper half of the teletext page in an enlarged format by pressing the DOUBLE button on your remote control. To be able to view the bottom half of the enlarged page, press the same button for the second time. Once you press the same button the third time, the page will be restored to its normal size.
5.5 Page Stop (STOP)

Some information is laid out by the broadcasting agency in multiple pages and it is broadcast in an automatic cycle mode. For example, on a text of four pages, the pages are indicated with the figures 01, 02, 03 and 04 on the bottom of the page. To view one of these pages for a longer time, press the STOP button. When you press the same button again, the cycle continues.
5.6 Subpage selection (SUB)

If the page of text you are viewing contains sub pages the page numbers starting from 01 appear on the screen. You can switch to the sub pages with the SUB button. In this case, subpage selection will appear next to the page number in the upper left corner in 0001 format; you can either directly enter the number of the subpage you want to display with number keys or select the subpages one by one by pressing the RED/GREEN buttons. You can exit the sub page by pressing the SUB button again.
5.7 Temporary TV Picture (UPDATE)

This button allows you to switch to the television picture while the page you want is being searched in the teletext broadcast eliminating the need to wait during the search. You may switch to the television picture by pressing the UPDATE button while Teletext is searching for your desired page. Once the page you want is found, the number of that page appears on the screen.
5.8 Question - Answer Button (REVEAL)

Sometimes, a teletext page contains a hidden answer such as a game or a riddle. Press the REVEAL button to disclose the hidden answer.
5.9 Clock

The Clock function of the SIZE button; press the SIZE button when you want to learn the time while watching any television channel. In that case, a clock will appear on the lower right corner of the screen. You can remove the time information from the screen by pressing the same button.
5.10 Fastext
The coloured buttons on the remote control are for the fastext feature. When you select any page, the titles on various subjects may appear on the screen in four different colours or inside coloured frames (red, green, yellow and blue). By pressing the button pertaining to the relevant colour on the remote control, you can access the subject of your choice without waiting.
Note: The fastext feature is not available for all teletext broadcasts. It is determined by the broadcasting agency whether it is to be broadcast or not.
6 EXTERNAL EQUIPMENT CONNECTIONS
Your TV is equipped with 6 inputs including aerial input, which allows for the external device connection. These inputs are:
1-Aerial input
2-SCART/S-VHS input
3-AV input
4-PC/Component input
5-HDMI input
6-CI slot input
You can connect your external device to your TV via these inputs. By pressing the AV button on your remote control, select the external source input to which you connected your device.
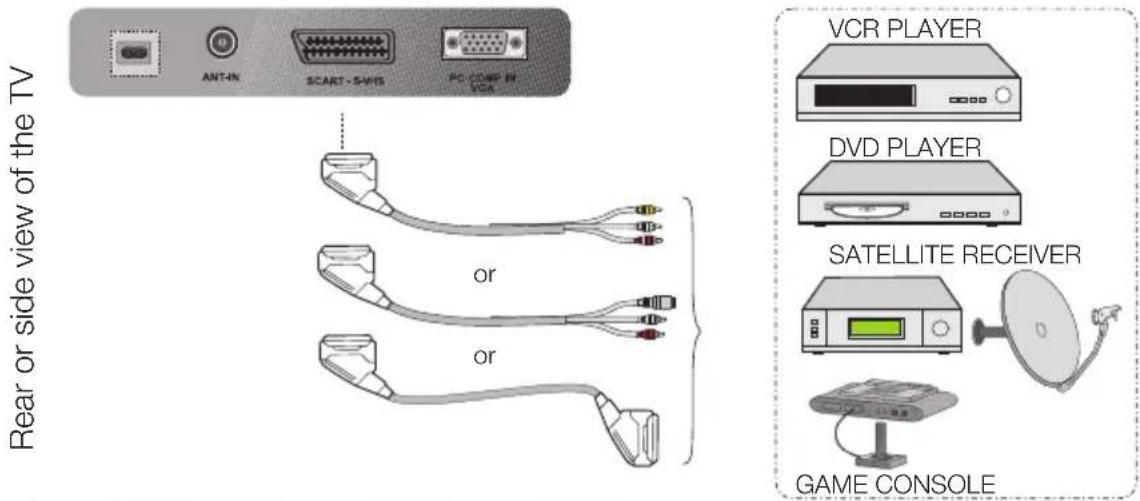
6.1 Connecting an external device via Scart connection
SCART : To watch the picture of the broadcast device connected to SCART, select Scart from the Source menu and press OK button. (You can watch via this Scart if the connected device has a RGB output).
S-Video: To watch the picture of the broadcast device connected using the SVHS input over the SCART input by scart converter, select SVHS option from the Source menu and press OK button. Your TV will switch to the selected source.
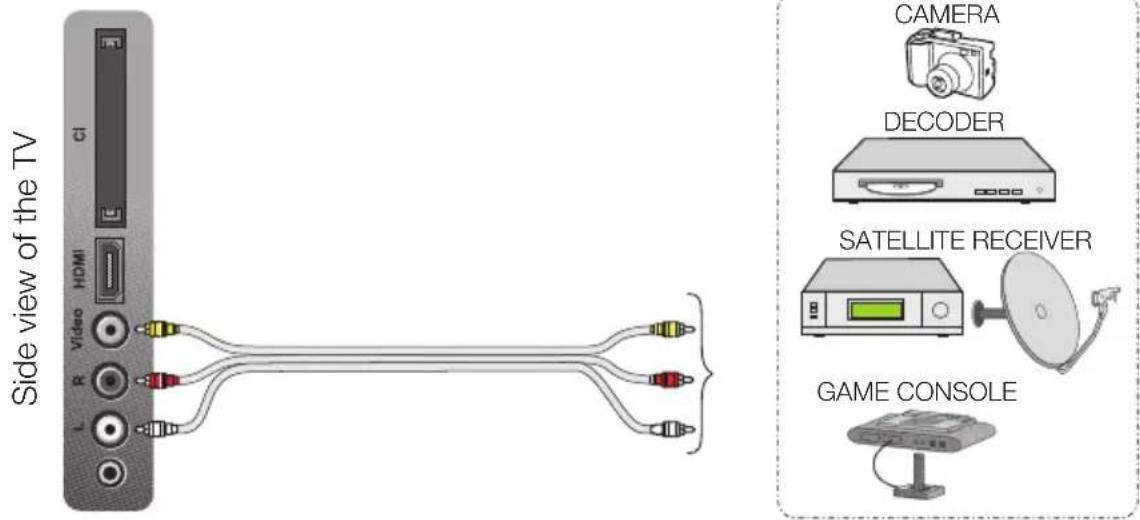
6.2 Connecting external equipment via AV connection
AV: To watch the picture of the broadcast device connected using the RCA (Phono) input, select AV option from the Source menu and press OK button. Your TV will switch to the selected source.
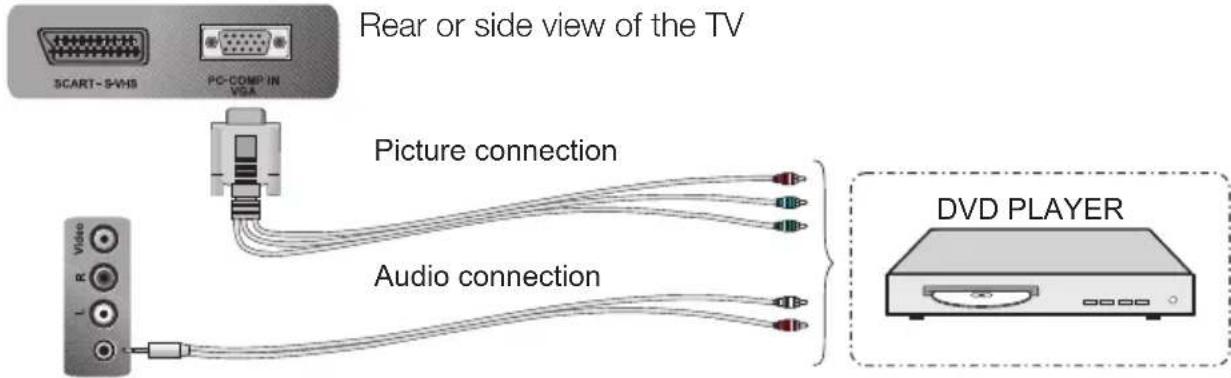
6.3 Connecting an external device via YPBPR connection
YPBPBR (Component Input): When a connection is made via the VGA socket with a VGA to YPBPR connector lead (not supplied), select YPBPR option from the Source menu and press the OK button to display the picture. Your TV will switch to the selected source.
6.4 Connecting an external device via HDMI connection
HDMI: When a connection is made via HDMI socket, select the HDMI input through which you have made the connection from the Source menu and press the OK button. Your TV will switch to the selected source.
Rear or side view of the TV
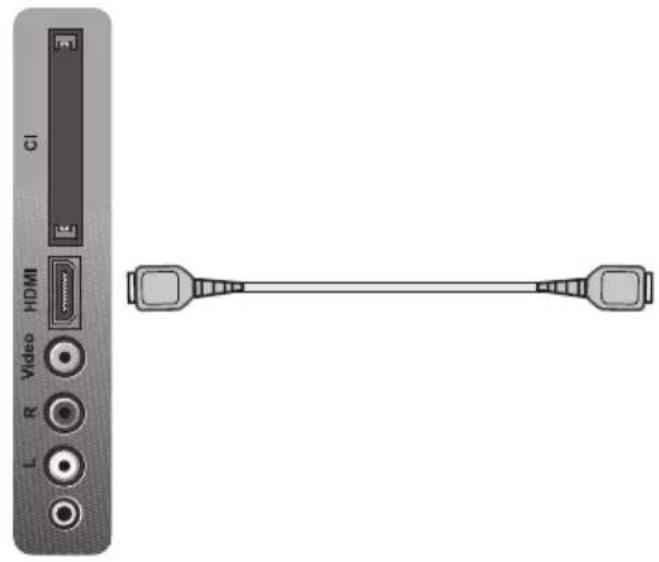
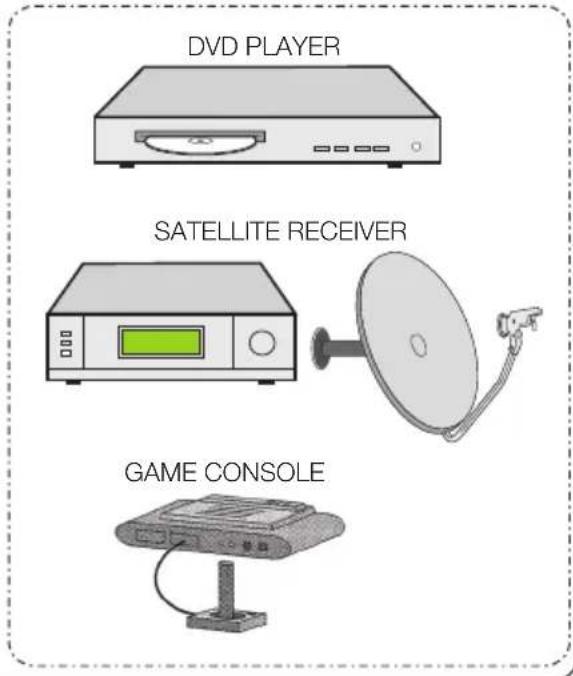
Connect to the HDMI input at the back of your TV by using the connector located on your PC or your digital video-transmission device with a suitable cable (not supplied with the TV).
Note1: To be able to watch an image in the HDMI mode, your computer must be equipped with a HDMI graphic card.
Note2: Please adjust the video card settings of your PC if the PICTURE does not fit to the screen when you transfer the picture to your television from a PC with a DVI to HDMI or HDMI to HDMI cable.
You may display the resolution information by pressing the INFO button.
6.4.1 HDCP
Your TV supports HDCP feature. To use this feature, you must set up a connection to your TV set's HDMI video port and select HDMI by pressing the SOURCE button on your remote control.
NOTE: In HDMI mode; some resolutions are supported when a DVI to HDMI converter cable from a PC is used. Only 16:9, 4:3, 14:9 (some definitions) are supported as picture format.
6.4.2 High Definition - HD-READY
Your television can receive high-definition signals (HDTV). You can connect the input sources (HDTV set-top box or HDTV DVD player) to the (HDMI) socket (digital HDTV signal). This ensures that you can view digital HDTV programs, even if they are copy-protected (HDCP High-Definition Copy Protection).
6.5 PC connection
6.5.1 PC Connection:
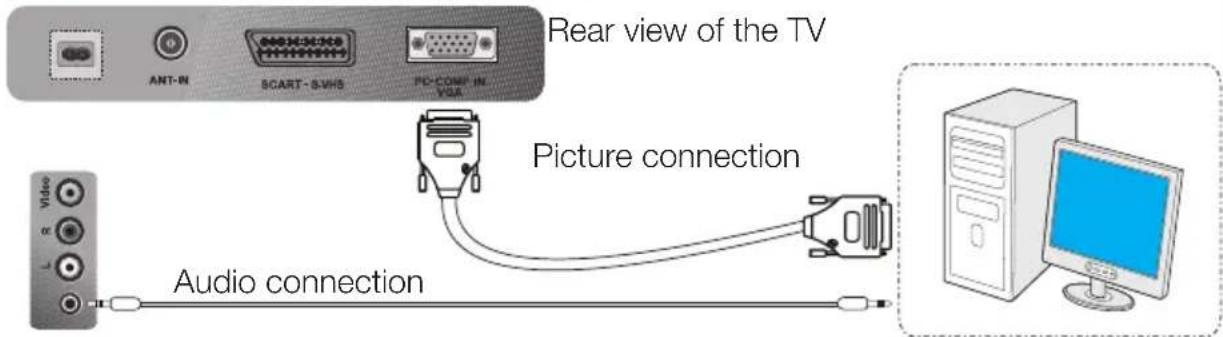
Connect the D-Sub15 connector to the PC-IN socket at the back of your television by using an appropriate cable (not supplied with your television). Again, by using an appropriate cable, connect the audio output of your PC to the PC AUDIO-IN at the back of your television to listen to sounds from your PC and you can adjust the volume level of your source by using VOL+/VOL- buttons.
6.5.2 Switching to the PC mode
For your LCD-TV to switch to the monitor (PC) mode, press the AV button on your remote control. SOURCE menu will be displayed. Select PC by pressing the Up/Down movement buttons and press the OK button.
6.5.3 PC Access Setting
Enter into the SETUP menu from the Main Menu by pressing the MENU button in the PC mode. In order to make the necessary settings in this menu, you can select the headings with the Up/Down buttons on your remote control to perform the following monitor-related settings.
6.5.4 Auto Position
The most suitable geometric settings in accordance with the entry mode are configured by this function. For this operation, just select the Autoposition tab and press OK button.
6.5.5 Horizontal Position:
Horizontal position setting.
6.5.6 Vertical Position:
Vertical position setting.
6.5.7 Size:
This is the pixel clock frequency. User can narrow down or enlarge the display by selecting a desired value.
6.5.8 Phase:
Using the Right/Left movement buttons, you can ensure that the colours and shapes are exactly consolidated on the PC image.
6.5.9 Picture Format
You can select the PC image to be displayed in 16:9 or 4:3 formats.
6.6 Inserting the CI (Common Interface) card
CI module and Smart card allows you to view some scrambled (paid) channels in Digital TV mode. When no CI module is inserted in your television, you can only view the current unscrambled digital/analog channels.
6.6.1 Inserting the CI Module and Smart card
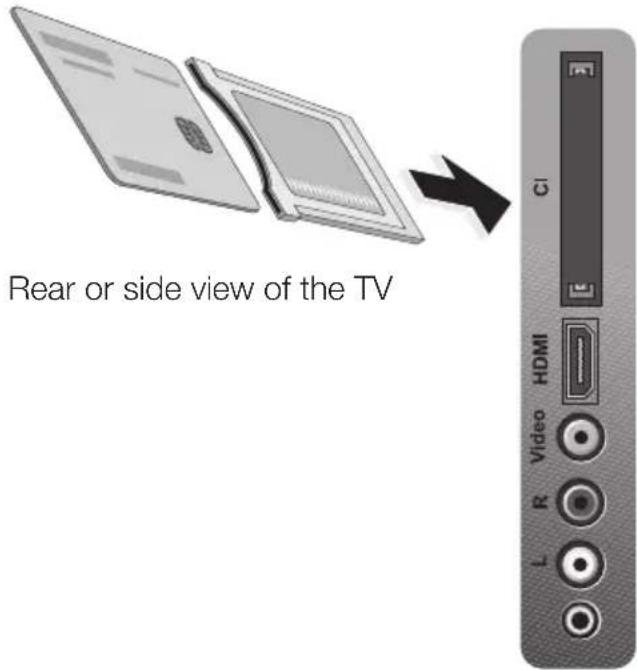
You can not use the smart card in your television independently. You will need a CAM module to use the smart card. Insert your smart card into the CAM module and then insert the CAM Module into the CI slot on your television. When you insert the module correctly, CA Module Inserted appears on the screen and the menu for this module is displayed.
6.6.2 Removing the CI Module and Smart card
When removing the Smart card, make sure that you pull the CAM module out completely with the card inserted. CA Module removed will appear on the screen.
7 ADDITIONAL INFORMATION
7.1 Troubleshooting
| Failure Possible cause Solution | ||
| The television does not function | Is the mains cable connected to the mains supply? | Check the mains cable. |
| Is the Power On/Off button on? Check if the On/Off button is on. | ||
| Poor picture quality | Is the aerial cable connected? Check the aerial cable. | |
| If you are using a satellite, is it well adjusted? | Have the dish adjusted. | |
| Aerial may be affected by two connected external devices. | Try disconnecting one of the devices. | |
| It may need fine tuning. Perform fine tuning. | ||
| Picture settings are not correct. | Adjust Brightness, Contrast and Colour. | |
| Shadow and reflection in the picture. | Channel setting | Perform automatic, manual channel setting or fine tuning. |
| Antenna Check aerial cable and system | ||
| No picture | Is there any damage to the aerial cable? | Check the aerial cable. |
| Are you sure you pressed the correct button on your remote control? | Press the PR+ or PR- button to turn on the TV. | |
| No colour. | Colour intensity level is at the lowest setting. | Increase the colour. |
| Broadcast system setting (if setting choice is available) | Select the broadcast system. | |
| Problem in channel broadcasting. Test with another channel. | ||
| No or defective teletext | Television channel (no teletext) or aerial system. | Test another channel for fine tuning and shadowy pictures |
| Very weak signal Check the antenna system. | ||
| No sound | Temporary sound mute may be on Try pressing the mute button | |
| Is the sound turned down? | Turn on the volume with Vol + button. | |
| Remote control does not work | Are the batteries correctly placed? Place the batteries correctly. | |
| Are batteries exhausted? | Replace the batteries with new ones. | |
| Is there any obstacle between the remote control and television? | If yes, remove it. | |
| Picture is not visible after turning on the TV | Child lock is active. Disable the child lock. | |
If your television does not work properly even though you tried the above mentioned solutions, try turning it on and off again. If you cannot start your television even though you have applied all noted methods, Never attempt to repair a faulty TV yourself call the Helpdesk: 0845 600 4911
7.2 Technical Specifications Chart
| SCREEN SIZE 19" | |
| Panel type | 19", 16:9 Active matrix TFT |
| Sound output 2x2.5 W | |
| Visible Screen Size 18.5 inches | |
| Power consumption 35 W | |
| Stand by power value <1 W | |
| SCART input Standard | |
| Audio/Video Phono input Standard | |
| HDMI input Standard | |
| VGA/Component YPbPr Standard | |
| PC Audio input Standard | |
| CI Slot Input Standard | |
| Dimensions (WxDxH) 450x542x130 | |
| Net Weight (Kg) 4,4 |
General technical specifications
Power supply AC: 220-240V \~ 50-60 Hz
Program memory: 100
RF Aerial input: 75 Ohm (Co-axial)
Loudspeaker impedance: 8 Ohm
Sound systems: Mono / Stereo
Batteries: 2xUM - 4, IEC R03 or AAA 1.5V
Channels received: VHF (Band I Channel 2-4)
VHF (Band III Channel 5-12)
UHF (Channel 21-69)
Design and specifications may be changed without prior notification.
7.3 The Digital Switchover
Keep this important information about how to re-tune your TV during the digital TV switchover
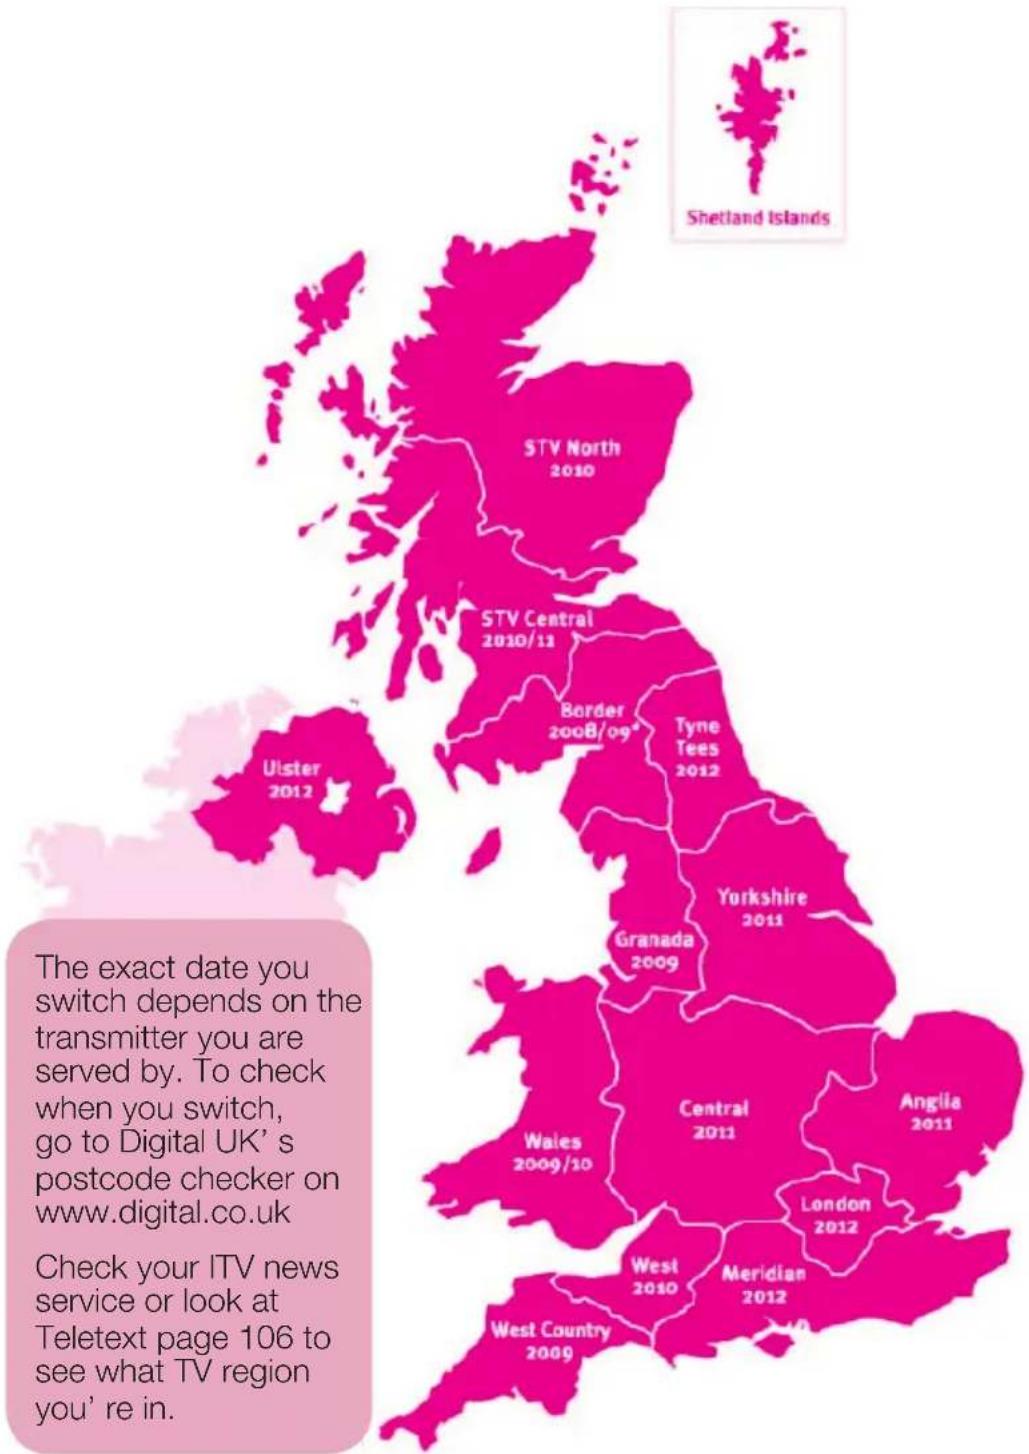
Television in the UK is going digital, bringing us all more choice and new services. Starting in late 2007 and ending in 2012, television services in the UK will go completely digital, TV region by TV region.
Please see overleaf to find out when your area switches to digital.
Digital UK is the independent, non-profit organisation leading the process of digital TV switchover in the UK. Digital UK provides impartial information on what people need to do to prepare for the move to digital, and when they need to do it.
How the switchover affects your TV equipment:
Your new TV has a digital tuner built in, which means it is ready to receive the Freeview signal by simply plugging it into your aerial socket (check if you can get digital TV through your aerial now, or whether you'll have to wait until switchover, at www.digitaluk.co.uk).
When the TV switchover happens in your area, there are at least two occasions when you will need to re-tune your TV in order to continue receiving your existing TV channels, and also to pick up new ones. Digital UK, the body leading the digital TV switchover, will advise you when you need to re-tune during the switchover.
If you choose to connect your TV to satellite or cable with a digital box then it will not be affected by switchover, and you won't need to re-tune.
How to re-tune:
To find out how to re-tune your TV, check your manufacturer's instructions for details. Or see below for a typical sequence:
- With your TV in digital TV mode, press 'Menu' on your remote control. (Some TVs will ask you for a code if you have not already changed it, the default code is usually 0000, or check your instructions book).
- From the Menu options on screen, select 'Install'. Select 'Auto Setup'* to re-tune your digital TV (not 'add channels'). You may have to wait a couple of minutes for the re-tune to complete. *Also sometimes referred to as 'Update', 'Rescan', 'Replace', 'Auto- Tuning', 'Channel Search', 'First Time Install', or 'Store Channels'.
- If you do not re-tune your channels when advised to do so by Digital UK, you may lose some or all of your channels until you do re-tune. You should re-tune your TV every few months to check for any new channels.
If you are missing any channels, it may be that they are not available in your area, or that your aerial needs upgrading.
If you have any questions, please contact your equipment supplier or call Digital UK on 0845 600 49 11 or visit www.digitaluk.co.uk.
When does switchover happen?
*Copeland switches on October 17, 2007
Visit us at digitaluk.co.uk call us on 0845 650 50 50
Calls charged at BT rate of 3p per minute daytime and 1p per minute evenings and weekends. Rates may vary for calls from non-BT lines.
7.4 UK Transmitter Stations (Analogue)
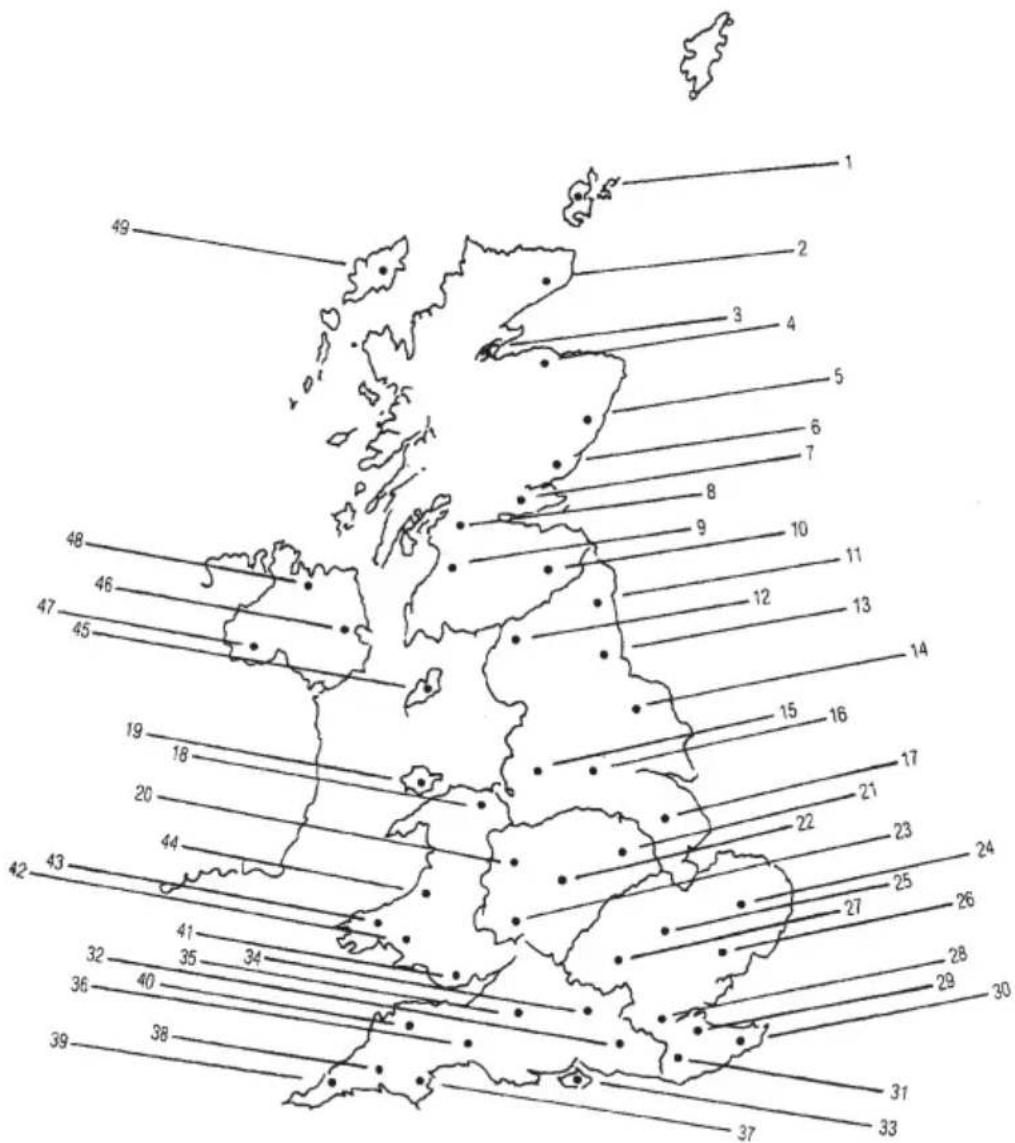
UHF CHANNELS STATIONS CT D
Regional Main stations BBCI BBC2 ITV CH4 CH5 Map
| North West | ||||
| Caldbeck | 30 34 28 32 56 12 | |||
| Winter Hill | 55 62 | 59 65 48 15 | ||
| Douglas (IOM) | 68 66 48 56 56 45 | |||
| North | ||||
| Belmont | 22 28 | 25 | 32 56 17 | |
| Emley Moor | 44 51 47 41 37 16 | |||
| North East | ||||
| Bilsdale West Moor | 33 26 29 23 35 14 | |||
| Chalton | 39 45 49 42 | 11 | ||
| Pontop Pike | 58 64 | 61 54 | 56/58 13 | |
| Midlands (West) | ||||
| Ridge Hill | 22 28 25 32 35 23 | |||
| Sutton Coldfield | 46 40 | 43 | 50 37 | 22 |
| The Wreckin | 26 33 23 29 25 20 | |||
| Mindlands (East) | ||||
| Waltham | 58 64 61 54 35 21 | |||
| South West | ||||
| Beacon Hill | 57 63 | 60 53 | 37 | |
| Caradon Hill | 22 28 25 32 | 38 | ||
| Huntshaw Cross | 55 62 59 65 67 40 | |||
| Redruth | 51 44 41 47 37 39 | |||
| Stockland Hill | 33 26 23 29 | 36 | ||
| Channel Islands | ||||
| Fremont Point | 51 44 | 41 | 47 | |
| West | ||||
| Mendip | 58 | 64 61 54 37 35 | ||
| South | ||||
| Hannington | 39 45 42 66 35 34 | |||
| Midhurst | 61 55 58 68 | 32 | ||
| Rowbridge | 31 24 27 21 | 33 | ||
BBCI BBC2 ITV CH4 CH5 Map
| Bluebell Hill | 40 46 43 65 | 29 | ||||
| Crystal Palace | 26 | 33 | 23 | 30 | 37 | 28 |
| Dover | 50 56 66 53 | 30 | ||||
| Oxford | 49 52 64 67 | 31 | ||||
| East | ||||||
| Sandy Heath | 31 27 | 24 21 | 39 | 25 | ||
| Sudbury | 51 | 44 | 41 | 47 | 35 | 26 |
| Tacolneston | 62 | 55 | 59 | 65 | 52 | 24 |
| Scotland | ||||||
| Angus | 57 63 60 53 37 6 | |||||
| Black Hill | 40 | 46 | 43 | 50 | 37 | 8 |
| Cragkelly | 31 | 27 | 24 | 21 | 48 | 7 |
| Darvel | 33 | 26 | 23 | 29 | 35 | 9 |
| Durris | 22 28 | 25 32 67 5 | ||||
| Eitshal (Lewis) | 33 26 23 29 | 49 | ||||
| Keeylang Hill | 40 46 43 50 | 1 | ||||
| Knock More | 33 26 23 29 | 4 | ||||
| Rosemarkie | 39 45 49 42 | 3 | ||||
| Rumster Forest | 31 27 24 21 | 2 | ||||
| Selkirk | 55 | 62 | 59 | 65 | 52 | 10 |
| Wales | ||||||
| Blaenplwyf | 31 27 24 21 56 44 | |||||
| Camel | 57 63 60 53 | 42 | ||||
| Uanddona | 57 63 60 53 | 19 | ||||
| Moel-y-Parc | 52 45 49 42 | 18 | ||||
| Presely | 46 40 43 50 37 43 | |||||
| Wenvoe | 44 51 41 47 | 41 | ||||
| N.IRELAND | ||||||
| Brougher Mountain | 22 | 28 | 25 | 32 | 37 | 47 |
| Divis | 31 27 24 21 31 46 | |||||
| Limavady | 55 62 59 65 | 48 |
7.5 Your Television Guarantee
Your new television is guaranteed against the cost of breakdown repairs for twelve months from the date of the original purchase.
7.5.1 What is covered?
- All repairs necessary as a result of faulty materials, defective components or manufacturing detect.
- The cost of all functional replacement parts, excluding remote control batteries
• The labour costs of a Beko approved repairer to carry out the repair - You may be offered a replacement instead of repair under guarantee. You dealer will advise you.
7.5.2 What is not covered?
• Transit or delivery damage
- Accidental damage
- Misuse, or abuse.
• Cabinet or appearance parts, including knobs and flaps
• Remote control batteries.
- Repairs or replacements required as a result of unauthorised repairs or inexpert installation that fails to meet the requirements contained in the user instruction book.
- Repairs or replacements to product installed or used on commercial or non-household premises.
7.5.3 Important notes.
• The product is guaranteed for domestic household use only.
- The guarantee will be void if the product is installed or used in commercial or non-household premises.
- The product must be correctly installed and operated in accordance with the instructions contained within the Operating Instructions Booklet provided with the product.
- The guarantee is given only within the boundaries of the United Kingdom and the Republic of Ireland.
• The guarantee is not transferable if the product is resold.
- Beko Plc disclaims any liability for incidental or consequential damages.
- The guarantee does not in anyway diminish your statutory or legal rights.
BEKO
HOW TO OBTAIN SERVICE
Congratulations on your choice of a Beko colour television. Your new television has been designed and manufactured to the highest quality standards to give you many years of use. To get the best out of it, please take a few moments to read the instruction book.
Your television is supplied with a full 12 months guarantee, covering parts and labour. Should you require service under guarantee, simply call the number below.
0845 600 4911
Our service receptionist will ask you for your product model number, your retailer's name, and the date of purchase when you call. It will assist you if you complete the box at the bottom of this page when you take delivery of your television so that the information is readily available should you need it. If it is necessary for an engineer to visit your home he will normally be there within 48hrs of receipt of your call (excluding Bank Holidays) or at your earliest convenience.
Before telephoning for service please check the trouble shooting guide in the instruction book as often minor problems are easily identified and resolved by following the instructions contained there in. Service visits where there is no fault with the product could incur a charge even through the product is under guarantee.
Service is also available on the above number after the guarantee period has expired. The cost of any repairs outside of the guarantee period is payable to the engineer at the time of visit.
Please complete the box below for ease of reference later.
Model Number Serial Number
Date of Purchase Place of Purchase
Please keep your purchase receipt. The engineer will need to see it should you require service under the 12-month Guarantee
INDEX
Symbols
1.5kHz 20
4:3....23
5kHz 20
10kHz 20
14:9....23
16:9....23
120Hz 20
500Hz 20
A
AC 35
Access 19
AC mains power 9
Additional Information 34
Advanced Picture 21
Aerial 6
Aerial input 35
Analog 14
Analog Channel 14
Analogue 38
Analogue TV 11
Answer Button 29
Aerial Input 30
Audio 9
Audio L input ....9
Audio R input ....9
Auto....22, 23
Automatic Tuning 13
Automatic Volume 20
Auto Position 32
Auto Sleep 24
AV 30
AV connection 30
AV input 30
AVL 20
AV Mode....10, 11
B
Backlight 22
Batteries....7,35
Block 26
Blue 10
C
Call 37
CA Module 19
Channel 11
Channel List 19
Channel Number 15
Channel Selection 11
Channels Received 35
Cl 33
CI Module 33
Cinema....20, 21
CI slot input 30
Clear 22
Clock....24, 29
Color....21, 22
Color Temperature 21
Common Interface 33
Conditional Access 19
Contrast 22
Control 8
Control Panel 8
Cool 21
Country 25
D
Date 40
Daylight 22
Design 35
Digital 13
Digital Channel 13
Digital Switchover 36
Digital TV....11, 33
Display 10
DNR 22
DOUBLE 28
DVD PLAYER....30, 31
Dynamic 22
Dynamic Backlight 22
Dynamic Contrast 22
E
Electrical Information ....5
EPG 16
Equalizer 20
Exit 10
External 30
F
Factory 25
Factory Defaults 25
Fastext 29
Favourite List 17
Fine Tuning 15
Format 22
Freeze....10, 27
Freeze Picture 27
G
GAME CONSOLE 30
Game Mode 25
Getting Started ....6
Green 10
Guarantee 39
H
HD 32
HDCP 31
HDMI 6
HDMI3 9
HDMI Connection 31
HDMI input 30
HD-READY 32
High....22, 32
High Definition 32
|
Important Notes ...... 39
Important Safety ....3
Inserting 33
L
Language 25
Language Settings 25
Letterbox 23
Locking 18
Lock System 26
Loudspeaker 35
Low 22
M
Manual Tuning 14
Memory 13
Menu....10, 12, 20
MIX 28
Model 40
MPEG NR 22
Music 20
Mute....10, 11
N
Natural 21
Night 22
Noise Reduction 22
Normal 21
Numeric 10
0
Off Time 24
On/Off....10, 11
On Time 24
Options 25
Options Menu 25
Other Picture 27
P
Page 28
Page Selection 28
Page Stop 28
Panel 8
Panel Lock 27
Panorama 23
Parental Control 26
Parental Guidance 27
Password 26
PAT 10
PC 32
PC Access 32
PC/Comp input 30
PC Connection 32
PC Mode 32
Perfect 22
Perfect Clear 22
Phase 33
PHONO 6
Picture 21
Picture Format....10, 22, 33
Picture Menu 21
Picture Mode 21
Picture Settings 21
PIN 26
PIP 10
Place 40
Power supply 35
Program 10
Program Memory 35
Program Table 17
Q
Question 29
R
Red 10
Relocating 17
Remote control ....6
Remote Control....8, 10
Removing 33
Renaming 18
REVEAL 29
RF 35
S
SATALLITE RECEIVER 30
Scart....6, 9, 30
Scart Connection 30
SCART/S-VHS input 30
Service 40
Service Type 17
Set PIN 26
Settings 13
Setup....13, 14
Signal....19, 24
Signal Information 19
Size 32
Skipping 18
Sleep 24
Sleep Timer 24
Smart card 33
Software 26
Software Update 26
Sound....10,20
Sound Menu 20
Sound Mode 20
Sound Settings 20
Sound Systems 35
Special 40
Special Note 40
Specifications 35
Speech 20
Sports....20, 21
Stand Removal 7
Stations 38
STOP 28
SUB 28
Subpage 28
Subpage selection 28
Subtitle....10, 23
Swap 11
T
Technical Specifications 35
Teletext 28
Teletext/Mix 10
Television Controls 11
Time 24
Timer 24
Timer Menu 24
Tint 21
Transmitter 38
Troubleshooting 34
Tuning 13
TV Guide 16
U
UPDATE 29
User 21
V
VCR PLAYER 30
Vertical Position 32
VGA 6
Vibrant Color 22
Video input 9
Vivid 21
Volume....10,20
W
Warm 21
What is covered? 39
What is not covered? 39
Wiring Instructions ....5
Y
Yellow 10
YPBPR 31
YPBPR Connection 31
Z
Zoom 27
- CONTENTS
- IMPORTANT INFORMATION ....1
- GETTING STARTED 6
- TUNING YOUR TELEVISION ....13
- THE SETTINGS ON YOUR NEW TELEVISION ....20
- TELETEXT ....28
- EXTERNAL EQUIPMENT CONNECTIONS ....30
- ADDITIONAL INFORMATION ....34
- INDEX 41
- IMPORTANT INFORMATION
- Cleaning the screen and cabinet...
- Disposing of your TV at the end of service life...
- Superior features of your integrated digital television
- Receiving digital broadcasting channels
- Your New Television
- HD & Digital Ready
- Easy to Use
- Important Safety Instructions
- Electrical information
- Wiring Instructions
- 2- Core plug
- 3-Core plug
- GETTING STARTED
- Powering on your TV and the initial use
- Aerial Installation
- Stand Removal
- Remote Control Batteries
- Remote Control
- Basic Television Controls
- Temporary on/off (STAND-BY)
- Digital TV, Analogue TV and AV Mode selection
- Channel Selection
- Temporary sound mute (MUTE)
- Returning to the Last Viewed Program (SWAP)
- Main Menu
- TUNING YOUR TELEVISION
- Turning on your television for the first time and tuning
- Performing Digital channel settings
- Automatic tuning of digital channels and storing in the memory
- Manual tuning of digital channels and storing in the memory
- Performing Analog channel settings
- Automatic tuning of analog channels and storing in the memory
- ADDITIONAL INFORMATION
- Manual tuning of analog channels and storing in the memory
- If you already know the channel number
- If you do not know the channel number
- Fine Tuning
- Electronic TV Guide (EPG)
- Program table
- Selecting the Service Type
- Creating and selecting favorites list
- Relocating a stored channel
- Deleting a stored channel
- Locking a stored channel
- Skipping a stored channel
- Renaming a stored analog channel
- Channel List
- Signal Information
- CA Module (Conditional Access)
- THE SETTINGS ON YOUR NEW TELEVISION
- Performing the Sound settings
- AVL (Automatic Volume Limiting)
- Sound Mode
- Equalizer
- Performing the Picture settings
- Picture Menu
- Picture Mode
- Colour Temperature
- Tint
- Advanced Picture Features
- DNR (Noise reduction)
- MPEG NR
- Vibrant Colour
- Perfect Clear
- Dynamic Contrast
- Dynamic Backlight
- Backlight
- Picture Format
- Auto
- 16:9
- 14:9
- 4:3
- Subtitle
- Letterbox
- Panorama
- Overscan: Off
- Performing the timer settings
- Clock
- Off Time
- On Time
- Sleep Timer
- Auto Sleep
- Options menu settings
- Language Settings
- Restore Factory Defaults
- Country
- PC/HDMI Game Mode
- OSD Timeout
- 4.4.6- Automatic Update
- Software Update
- Decoder Setting
- Parental Control
- Lock System
- Set PIN
- Block Programme
- Parental Guidance
- Panel Lock
- Other picture features
- Zoom
- Freeze (Freeze picture)
- Picture and Teletext (PAT)
- TELETEXT
- Entering the Teletext Mode
- Page Selection
- Teletext image in the TV picture (MIX)
- Page enlarge button (DOUBLE)
- Page Stop (STOP)
- Subpage selection (SUB)
- Temporary TV Picture (UPDATE)
- Question - Answer Button (REVEAL)
- Clock
- Fastext
- EXTERNAL EQUIPMENT CONNECTIONS
- Connecting an external device via Scart connection
- Connecting external equipment via AV connection
- Connecting an external device via YPBPR connection
- Connecting an external device via HDMI connection
- HDCP
- High Definition - HD-READY
- PC connection
- PC Connection:
- Switching to the PC mode
- PC Access Setting
- Auto Position
- Horizontal Position:
- Vertical Position:
- Size:
- Phase:
- Picture Format
- Inserting the CI (Common Interface) card
- Inserting the CI Module and Smart card
- Removing the CI Module and Smart card
- ADDITIONAL INFORMATION
- Troubleshooting
- Technical Specifications Chart
- General technical specifications
- The Digital Switchover
- Keep this important information about how to re-tune your TV during the digital TV switchover
- How the switchover affects your TV equipment:
- How to re-tune:
- When does switchover happen?
- Visit us at digitaluk.co.uk call us on 0845 650 50 50
- UK Transmitter Stations (Analogue)
- Your Television Guarantee
- What is covered?
- What is not covered?
- Important notes.
- BEKO
- HOW TO OBTAIN SERVICE
- 600 4911
- INDEX
- Symbols
- A
- B
- C
- D
- E
- F
- G
- H
- |
- L
- M
- N
- 0
- P
- Q
- R
- S
- T
- U
- V
- W
- Y
- Z
Brand : BEKO
Model : 19WLP530HID
Category : Television