
WF140 - Dishwasher CDA - Free user manual and instructions
Find the device manual for free WF140 CDA in PDF.


| Product Type | Freestanding Dishwasher |
| Brand | CDA |
| Model | WF140 |
| Color | White |
| Width | 59.6 cm |
| Height | 85.0 cm |
| Depth | 60.0 cm |
| Weight | 50 kg |
| Power Supply | 220-240 V ~ 50 Hz, 10 A |
| Total Power Consumption | 2000 W |
| Energy Efficiency Class | A+ |
| Annual Energy Consumption | 260 kWh |
| Water Consumption per Cycle | 10 L |
| Noise Level | 49 dB(A) re 1 pW |
| Number of Place Settings | 12 |
| Number of Programs | 6 |
| Programs | Eco, Intensive, Normal, Quick, Glass, Pre-rinse |
| Drying System | Condensation drying |
| Child Lock | Yes |
| Leak Protection | AquaStop system |
| Adjustable Racks | Upper basket height adjustable |
| Filter System | Self-cleaning filter |
| Spare Parts Availability | 7 years |
| Repair Index | 8.0/10 |
Frequently Asked Questions - WF140 CDA
User questions about WF140 CDA
0 question about this device. Answer the ones you know or ask your own.
Ask a new question about this device
Download the instructions for your Dishwasher in PDF format for free! Find your manual WF140 - CDA and take your electronic device back in hand. On this page are published all the documents necessary for the use of your device. WF140 by CDA.
USER MANUAL WF140 CDA
natural_image
Grid of grayscale rectangular blocks with varying shades of gray, no text or symbols presentWF140 Freestanding Dishwasher
Manual for Installation, Use and Maintenance
C|D|A|
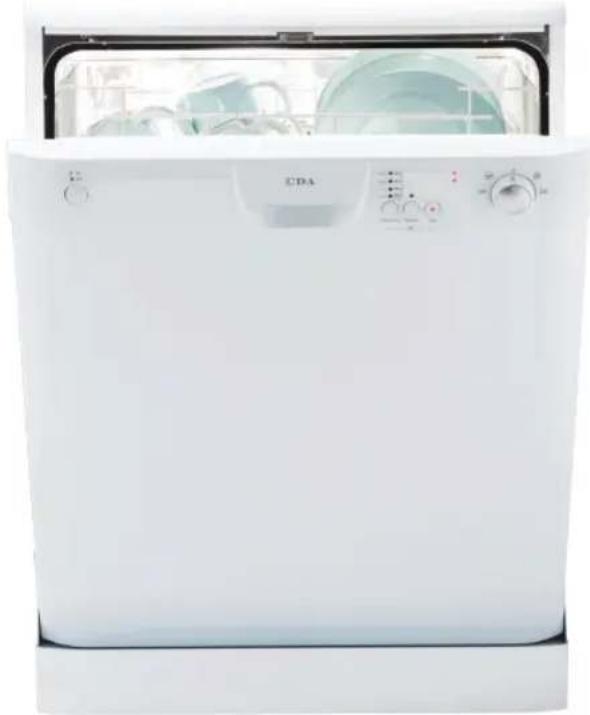
natural_image
Front view of a white CBA washing machine with open lid and control panel (no visible text or symbols)
Customer Care Department • The |CD|A|Group Ltd. • Harby Road • Langar • Nottinghamshire • NG13 9HY
T:01949 862 012 F:01949 862 003 E:service@cda.eu W:www.cda.eu

natural_image
Grid of grayscale rectangular blocks with varying shades of gray, no text or symbols presentImportant
The CDA Group Ltd cannot be held responsible for injuries or losses caused by incorrect use or installation of this product. Please note that CDA reserve the right to invalidate the guarantee supplied with this product following incorrect installation or misuse of the appliance.
This appliance is not designed to be used by people (including children) with reduced physical, sensorial or mental capacity, or who lack experience or knowledge about it, unless they have had supervision or instructions on how to use the appliance by someone who is responsible for their safety.
Under no circumstances should any external covers be removed for servicing or maintenance except by suitably qualified personnel.
Appliance information:
Please enter the details on the appliance rating plate below for reference, to assist CDA Customer Care in the event of a fault with your appliance and to register your appliance for guarantee purposes.
Appliance Model
Serial Number
This appliance has been designed for domestic use only. Commercial use will invalidate the warranty.
CE Declarations of Conformity:
This appliance has been designed, constructed and marketed in compliance with safety requirements of EEC Directives 2004/01/EC, 2006/95/EC, IEC436/DIN44990, EN 50242
IMPORTANT INFORMATION FOR CORRECT DISPOSAL OF THE PRODUCT IN ACCORDANCE WITH EC DIRECTIVE 2002/96/EC.
At the end of its working life, the product must be taken to a special local authority waste collection centre or to a dealer providing appliance recycling services.
Disposing of a household appliance separately avoids possible negative consequences for the environment and health. It also enables the constituent materials to be recovered, saving both energy and resources. As a reminder of the need to dispose of household appliances separately, the product is marked with a crossed-out
wheeled dustbin

Important
- Read the instructions prior to installation and use of the appliance.
- Do not lean or climb on the open dishwasher door to prevent damage.
- Close the dishwasher door after use to prevent accidents.
• Use only detergents, salt and rinse aid specifically designed for dishwashers. - Do not put solvents in the dishwasher detergent compartment to prevent risk of explosion
- Only put dishwasher safe items into the dishwasher. If in doubt, check with the manufacturer of the items.
• Take care when loading the dishwasher to observe the recommendations for best loading practice, and also to ensure that sharp objects such as knives are placed blade down to prevent accidents. - Do not open the dishwasher door when a programme is running. If it is necessary to do so, then open it only slightly to allow the dishwasher to pause the programme and prevent any water spilling out. Remember that the water in the dishwasher can be very hot when the programme is running.
- When the dishwasher is not in use, we recommend that you turn off the water supply at the supply tap and disconnect the main supply.
- If you are leaving the dishwasher for an extended period you should leave the door slightly open to prevent the formation of unpleasant smells.





Recommendations
• To reduce energy and water consumption, remove all dirt residues from the dishes prior to loading the dishw
- Only run the dishwasher only when fully loaded.
- Place hollow items (bowls, glasses and pans) face down in the basket.
Before first use
- Set the water softener level as required by the water hardness in the area.
- Add 2kg of salt into the salt compartment and then fill with water to the top of the salt compartment.
- Remove all the packaging materials from the interior of the dishwasher.
• Fill the rinse aid compartment. - Run a hot programme without any dishes in the dishwasher.
Control Panel

1 - Power button
2 - Programme Selection dial
3 - Delay Timer button
4- Prewash button
5- Start/Pause button
6 - Delay Timer/Progress indicator lights
7 - Rinse Aid warning light
8 - Salt warning light

natural_image
Grid of grayscale rectangular blocks with varying shades of gray, no text or symbols presentControl Panel
Starting a programme
- Press the Power button (1) to switch the dishwasher on.
• Turn the Programme Selection Dial (2) until the required programme is indicated.
• If required, press the Delay Timer button (3) repeatedly to set the programme.
• If required, press the Prewash button (4). - Ensure the dishwasher door is closed.
- Press the Start/Pause button (5) to begin the programme.
If possible, do not open the dishwasher door once the programme has started.
Using the delay timer
The dishwasher is equipped with a variable delay timer of three, six, nine or twelve hours' duration.
- To set the delay timer, press the Delay Timer button (3). This will switch on the delay timer for three hours, and the 3h light will illuminate.
- To change the duration, press the delay timer button again until the light next to the required time (6h, 9h or 12h) is illuminated.
• To cancel the timer, press the delay timer button again until none of the delay timer indicator lights are illuminated.
As the delay timer counts down, the delay timer indicator lights (6) will illuminate in turn, for example at six hours' delay the 6h light will illuminate, and at three hours' delay the 3h light will illuminate.
Using the prewash function
The dishwasher is equipped with a prewash function to rinse off residues prior to a full programme.
- To run a prewash programme on its own, first press the Power button, then press the Prewash button and then press the Start/Pause button.
- To run the extra-intensive programme, first press the Power button, then press the Prewash button, select the intensive programme with the Programme Selection dial and then press the Start/Pause button.
Progress Indicator lights
The progress indicator lights (6) illuminate in turn to show the progress of the programme. The light for end of programme will remain illuminated until the power is switched off.
Changing a programme in progress
- Press the Start/Pause button.
- Once the programme has stopped, turn the Programme Selection Dial to the required programme and press the Start/Pause button again.
Cancelling a programme in progress
- Press the Start/Pause button.
- Turn the Programme Selection dial to 0, then press the Start/Pause button again. The dishwasher will drain for approximately thirty seconds, and the end progress indicator light will illuminate once the programme is cancelled.
Switching the dishwasher off
- Once the end progress indicator light illuminates, the dishwasher can be switched off by pressing the Power button.
- Then turn off the water tap and remove the plug from the power socket.
Please note: The dishwasher will automatically continue on the programme it has started if the door is opened or in the event of a power cut.

natural_image
Grid of grayscale rectangular blocks with varying shades of gray, no text or symbols presentDetergent
To fill the detergent compartment
-
Push the latch to open the compartment.
-
Add the required amount of detergent. The main detergent compartment (b in figure 1) has lines to allow for specific amounts of detergent.
These are marked at either 15 cm ^3 or 25 cm ^3 , depending on how dirty the dishes are.
If your dishes are in need of an intensive wash, then add 5 cm ^3 of detergent into the prewash section of the compartment (a in figure 1).
- Then close the detergent compartment lid until the latch locks.
Please note: You should only use detergents designed specifically for use in dishwashers.
If using dishwasher tablets, always use the detergent compartment, do not put them in the main body of the dishwasher or in the cutlery basket. The solubility of dishwasher tablets can vary depending on the temperature and duration of the programme. As a result, it is recommended that powder detergents should be used in the shorter programmes to allow better performance.
CDA recommends the use of separate detergent, rinse aid and dishwasher salt rather than combination tablets as separates achieve better wash performance.
If you do use combination detergents, add salt and rinse aid to the dishwasher and then adjust the water hardness setting and rinse aid setting to the minimum. When you then use separate detergents again, you should fill the salt and rinse aid compartments, adjust the water hardness setting to the maximum and run an empty wash, then adjust the water hardness setting and the rinse aid setting to the appropriate level.
Salt
To ensure the best efficiency, the dishwasher needs soft water. Hard water means that lime residues remain on the dishes and the interior of the dishwasher, affecting performance. The softener system is designed to remove the ions that make the water hard to provide the best quality wash performance. This is achieved by using dishwasher salt.
To add dishwasher salt, follow the steps below:
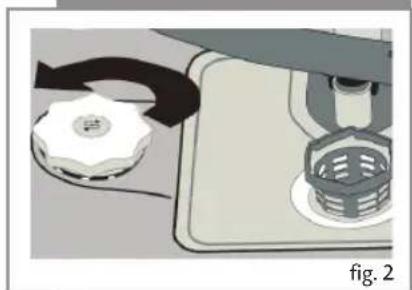
- Remove the lower dishwasher basket and then unscrew the salt compartment cap, as shown in figure 2.
- Fill the compartment with dishwasher salt (do not use table salt), carefully to prevent unnecessary spillage. Before first use, you should fill the compartment with 2kg of dishwasher salt and then fill up the salt compartment with water (up to the brim of the compartment) as shown in figure 3.
- Replace the cap and the lower basket.
When the salt warning light on the control panel illuminates, you should refill the salt compartment with salt only – do not add water to the salt compartment after the first use.
You should run a programme immediately after adding dishwasher salt, to prevent any damage to the dishwasher systems.

natural_image
Illustration of a kitchen appliance with a bowl and a tray, no visible text or symbols
natural_image
Illustration of a microscope capturing liquid into a container, labeled with number 3 and figure label (no text or symbols on the diagram itself)
natural_image
Grid of grayscale rectangular blocks with varying shades of gray, no text or symbols presentSoftener adjustment
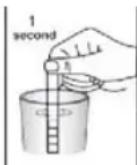
The efficiency of your dishwasher depends on the softness of the tap water. To ensure best efficiency, the dishwasher is equipped with a system that reduces the hardness in the mains water supply. The efficiency will increase when the system is correctly set. To find out the water hardness level of your water supply you can use the test strip supplied or alternatively contact your local water board.




Level 1 NoLime
Level 2 Verylowlimecontent
Level 3 Lowlimecontent
Level 4 Mediumlimecontent
Level 5 Limecontent
Level 6 HighLimecontent
- Open the testing strip.
- Run water through the tap for one minute.
- Hold the testing strip in water for one second.
- Shake the testing strip after taking it out of the water
- Wait for one minute
- Check the number of marks on the strip to see the level of water hardness.
If the hardness of the water you use is above 63dE or if you are using well water; you are recommended to use filter and water refinement devices.
Please note: The level of water hardness is preset to level 3.
| Water hardness level | British hardness dE | Hardness Level Indicator |
| 1 | 0-6 | Wash light is on |
| 2 | 7-14 | Rinse light is on |
| 3 | 15-21 | Dry light is on |
| 4 | 22-28 | End light is on |
| 5 | 29-39 | Wash and End lights are on |
| 6 | 40-63 | Rinse and End lights are on |
To adjust the water softener level
- Turn the programme selection dial to zero (reset) when the dishwasher is switched off.
- Press and hold in the start/pause button.
- Whilst holding in the start/pause button, switch on the dishwasher using the power on/off button.
- Release the start/pause button once the indicator lights have flashed.
The indicators will show the last selected water hardness setting. - To adjust to the level required, press the start/pause button until the indicators show the correct level.
- To save the set level, press the on/off button again.

natural_image
Grid of grayscale rectangular blocks with varying shades of gray, no text or symbols presentRinse Aid
To fill the rinse aid compartment
- Open the rinse aid compartment by turning and removing the cap as shown in figure 4.
- Fill the rinse aid compartment until the rinse aid indicator goes dark, as shown in figure 5 (where "a" indicates the compartment is empty, and "b" indicates the compartment is full).
- Replace the cap, ensuring the markers on the cap line up with the compartment prior to screwing the cap back in place.
Rinse Aid Adjustment
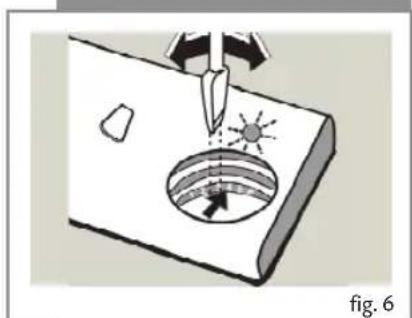
The level of rinse aid use is preset to 3. You can adjust the level of rinse aid use by adjusting as shown in figure 6.
If water stains form on the dishes after a wash, the level should be increased. If blue stains which can be wiped away are left on the dishes after a wah, the level should be decreased.
Please note: Rinse aid ensures better quality wash results and increased drying performance.
Always refill the rinse aid when the rinse aid indicator light on the control panel is illuminated.

natural_image
Illustration of a hand turning a circular component with an arrow indicating rotation (no text or symbols)
natural_image
Illustration of a hand holding a pen above a circular object with a sun symbol, no text or symbols present
natural_image
Grid of grayscale rectangular blocks with varying shades of gray, no text or symbols presentDishwasher Baskets
To adjust the height of the upper basket:
- Open the basket retaining clips, as shown in figure 7, but turning them to the side.
- Remove the upper basket, and relocate the alternate set of wheels on the runner, as shown in figure 8, pushing the basket back into place.
- Close the basket retaining clips.
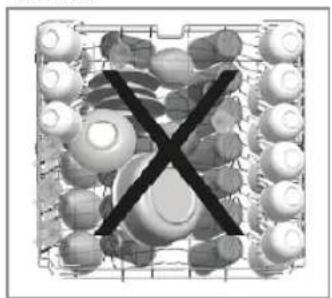
The images below are designed as guidance as to best practice for loading the dishwasher.
Upper basket

natural_image
Grid of industrial equipment units with circular components, no visible text or symbols
natural_image
Technical illustration of a mechanical assembly with wire framework and a central shaft (no text or symbols)
natural_image
Mechanical assembly diagram showing a lever system with pulleys and a cylindrical component (no text or symbols)Lower basket

natural_image
Cross-sectional diagram of a mechanical component with multiple cylindrical parts and internal cavities (no text or symbols)
natural_image
Illustration of a basket containing various cooking utensils (pops, kitchenware, etc.) with no visible text or symbols.Bad loads
natural_image
Black X symbol crossed over a grid of circular objects, no text or symbols present
natural_image
Technical diagram of a mechanical assembly with gears and a central shaft, no visible text or symbols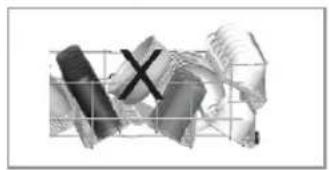
natural_image
Abstract 3D wireframe cube with intersecting black X marks (no text or symbols)
natural_image
3D wireframe model of a mechanical component with a central X mark (no text or symbols)
natural_image
Grid of grayscale rectangular blocks with varying shades of gray, no text or symbols presentStandard loading and Test Data
Capacity
• Upper and lower baskets: 12 place settings.
• The upper basket should be adjusted to high position.
• Cups should be placed on to the dish rack pins.
Detergent / Rinse aid
- 5 + 25cm^3 , in accordance with EN50242-DIN 44990 IEC 436 (international norms) / Rinse aid dosage adjustment: 4.
Programme test
- Eco 50^ , in accordance with EN 50242 (international norms.).

natural_image
Diagram of a mechanical assembly with gears and rollers, showing internal components and a magnified inset (no text or labels)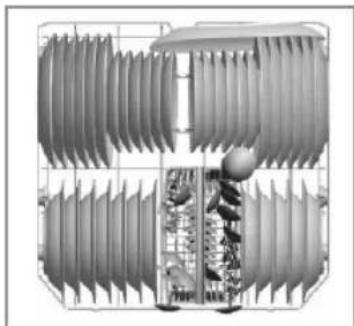
natural_image
3D technical illustration of a mechanical or electrical component with layered structure and internal components (no visible text or symbols)
natural_image
3D illustration of a woven basket with handle and side panel, no text or symbols present

natural_image
Grid of grayscale rectangular blocks with varying shades of gray, no text or symbols presentProgramme Listing
| Programme names and temperatures | Prewash No heat | Quick 40°wash | Eco 50° wash | *Super 50 min. 65° wash | Intensive 65° wash | Extra Intensive (Prewash and Intensive |
| Type of food waste | Pre-wash to rinse and loosen residue awaiting full load-then select a programme | Coffee, milk, tea, cold meats, vegetables, not kept for long | Coffee, milk, tea, cold meats, vegetables, not kept for long | Soups, sauses, pasta, eggs, pilaf, potatoe and oven dishes, fried foods | Soups, sauses, pasta, eggs, pilaf, potatoe and oven dishes, fried foods | Soups, sauses, pasta, eggs, pilaf, potatoe and oven dishes, fried foods |
| Level of soil | - Small Medium | Medium High High | ||||
| Detergent amount A: 25cm3/15cm3B: 5cm3 | - A A+B A+B A+B A+B | A+B | ||||
| Prewash | Prewash PrewashPrewash | |||||
| 50°wash prewash | ||||||
| 40°wash | 50° wash | 65° wash 65 | ° wash | 70° wash | ||
| Cold rinse | Cold rinse Cold rinse Cold rinse Cold rinse Cold rinse Cold rinse Cold rinse Cold rinse Cold rinse Cold rinse Cold rinse Cold rinse Cold rinse Cold rinse Cold rinse Cold rinse Cold rinse Cold rinse Cold rinse Cold rinse Cold rinse Cold rinse Cold rinse Cold rinse Cold rinse Cold rinse Cold rinse Cold rinse Cold rinse Cold rinse Cold rinse Cold rinse Cold rinse Cold rinse Cold rinse Cold rinse Cold rinse Cold rinse Cold rinse Cold rinse Cold rinse Cold rinse Cold rinse Cold rinse Cold rinse Cold rinse Cold rinse Cold rinse Cold rinse Cold rinse Cold rinse C | Hot rinse | Hot rinse | Hot rinse | ||
| Dry | Dry | Dry | ||||
| End | End | End | End | End | End | |
| Programme duration (mlns.) | 15 | 30 | 155 | 50 | 110 | 124 |
| Electricity consumption (kW hours) | 0.02 | 0.90 | 0.95 | 1.35 | 1.55 | 2.0 |
| Water consumption (litres) | 4.5 | 12.4 | 12.4 | 12.7 | 17.2 | 21.2 |
Warning: Short programmes do not include a drying stage.
The value and times provided in this table have been obtained under laboratory conditions according to relevant standards. This information can change depending on the condition of the dishwasher's use and environment (network tension, water pressure, water input temperature and environment temperature.)
*Super 50 min. 65°C with this programme, you can wash your dishes in A washing performance.

natural_image
Grid of grayscale rectangular blocks with varying shades of gray, no text or symbols presentCare and Maintenance
Before beginning any care or maintenance, you should always disconnect the appliance from the electricity supply, and also turn off the water supply.
Door seals
Wipe the dishwasher door seals regularly with a damp cloth to remove any residues.
Filters
You should clean the filters at least once a month.
- Remove the lower basket.
- Turn the microfilter anticlockwise and then lift it out as in figure 9.
- Remove the coarse filter from the microfilter (figure 10).
- Remove the base filter from the dishwasher compartment (figure 11).
You should clean and rinse the filters thoroughly before replacing all the sections in reverse order to that above. The microfilter should lock into place once it is secure as shown in figure 12.
Please note: Never run a programme without the filters in place. Incorrect fitting of the filters may reduce wash performance and potentially damage your appliance.
Spray arms
You should clean the spray arms at least once a month.
- Remove the lower basket
- Pull the lower spray arm upwards to remove it.
- To remove the upper spray arm, first remove the nut on the upper spray arm by turning it as in figure 9.
You should clean and rinse the spray arms thoroughly before replacing them. Ensure that the upper spray arm nut is securely tightened when refitting the upper spray arm.
Dishwasher interior
To deal with an accumulation of dirt, oil or limescale in the dishwasher, run an intensive programme with detergent when the dishwasher is empty. Alternatively, there are specialist dishwasher cleaners available that can be used.

fig 9

fig 10

fig 11

fig 12






Failure Codes and Troubleshooting
The programme indicators also serve as a diagnostic display to help in the event of a problem with the appliance.
| Error code | Error description | Advice | ||||
| Wash Rinse Dry End | Start/Pause | |||||
| Inadequate water supply | Make sure the water inlet tap is fully open. Close the water tap, separate the water inlet hose from the tap and clean the filter. Restart your machine and contact CDA service if the error continues. | |||||
 |  | Continual fill error | Close the tap and contact CDA service. | |||
 |  | The waste water in the machine cannot be discharged. | Drain hose is blocked. The filters of your machine might be blocked. Restart the dishwasher and cancel the programme. If the error continues contact CDA service. | |||
 |  |  | Heater error | Contact CDA service. | ||
 |  | Alarm is active against water overflow | Turn off the dishwasher and disconnect from the water supply. Contact CDA service. | |||
 |  |  |  | Faulty electronic card | Contact CDA service. | |
 |  | Overheating error (temperature in the machine is too high.) | Contact CDA service. | |||
 |  | Faulty heater sensor | Contact CDA service. | |||

natural_image
Abstract color swatches with grayscale shades, no text or symbols presentFailure Code and Troubleshooting
| Problem Possible cause | |
| The programme will not start | Check the plug, fuse and circuit breakers of the mains supplyThe water tap is turned offThe dishwasher door is not fully closedThe water inlet filter or the machine filters are blocked |
| Water remains inside the dishwasher at the end of the programme | The water drain hose is blocked or linkedThe filters are blocked |
| The dishwasher stops in the middle of a programme | Power failureWater inlet failureProgramme is on standby |
| Wash performance is of a low standard | Poor loading of dishes hinders wash performance.Insufficient detergent addedInappropriate wash programme selectedSpray arm blockedFilters clogged or incorrectly fittedWater drain pump blocked |
| White stains on the dishes | Insufficient detergent addedRinse aid setting is too lowInsufficient dishwasher salt addedWater softener setting is too lowSalt compartment cap not completely closed |
| The dishes are not completely dry at the end of the programme | A programme without a drying stage was selectedRinse aid setting is too lowDishes unloaded too soon (allow time for drying) |
| There are rust stains on the dishes | Different sets of cutlery should be kept separateToo much salt (Water softener setting is too high)Salt compartment cap not completely closedPoor appliance earth (check mains electrical supply) |
| The door is not opening or closing properly Door tension not correctly adjusted for the décor door | |

natural_image
Grid of grayscale rectangular blocks with varying shades of gray, no text or symbols presentElectrical information
Warning! This appliance must be earthed.

The mains lead of this appliance has been fitted with a BS 1363A 13 amp fused plug. To change a fuse in this type of plug, follow the steps below:
- Remove the fuse cover and fuse.
- Fit replacement 13A fuse, ASTA approved to BS 1362 type, into the fuse cover.
- Replace fuse cover.
Important: Do not use the appliance without the fuse cover in position.
How to connect an alternative plug
If the fitted plug is not suitable for your socket outlet, then it should be cut off and disposed of safely to avoid the risk of electric shock. A suitable alternative plug of at least 13 Amp rating to BS 1363 should be used.
As the colours of the wires in the mains lead of this appliance may not correspond with the coloured markings identifying the terminals in your plug, proceed as follows:-
- The wire which is coloured GREEN and YELLOW must be connected to the terminal which is marked with letter (E) or by the Earth symbol or coloured GREEN and YELLOW.
- The wire which is coloured BLUE must be connected to the terminal which is marked with the letter (N), or coloured BLACK or BLUE.
- The wire which is coloured BROWN must be connected to the terminal which is marked with the letter (L) or coloured RED or BROWN.
If in doubt regarding the electrical connection of this appliance, consult a qualified electrician. Do not shorten the supply cable, the appliance may require removing for servicing.
N.B. Ensure that the plug socket is situated in an easily accessible place.

natural_image
Grid of grayscale rectangular blocks with varying shades of gray, no text or symbols presentInstallation
- Do not install this appliance if it is damaged in any way. Installing a damaged appliance may invalidate the warranty.
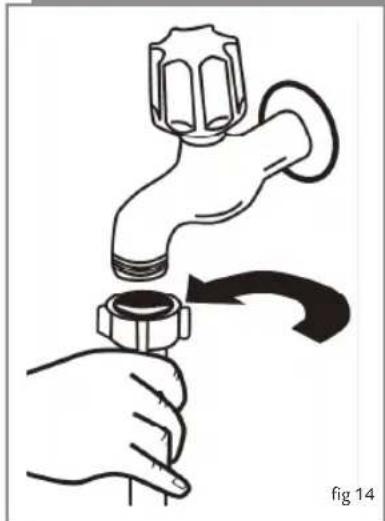
- The water supply tap should be located in an adjacent cupboard so that it can be accessed after installation.
- Ensure the appliance is level by adjusting the feet as necessary.
• Only use the water inlet supplied with the appliance.
• If the water pressure is above 10 bar, a pressure relief valve should be used.
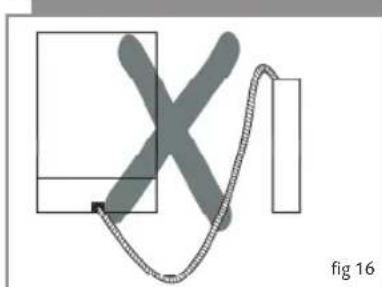
• After connecting the water supply, check to ensure there are no leaks. - The water outlet can either be connected to a water drain or to a sink outlet spigot. This connection should be at a minimum of 50 cm and a maximum of 110 cm from the floor. The drain hose should be no longer than 4m in length to ensure good performance from the dishwasher.
natural_image
Illustration of a hand holding a faucet with a valve, showing a curved arrow indicating rotation (no text or symbols)
natural_image
Diagram showing a curved line with a cross symbol, enclosed in a rectangle, with no readable text or symbols.


natural_image
Grid of grayscale rectangular blocks with varying shades of gray, no text or symbols present

|C|D|A|
To contact our Customer Care Department, or for Service, please contact us on the details below.
52094406-1
Customer Care Department • The |CD|A|Group Ltd. • Harby Road • Langar • Nottinghamshire • NG13 9HY
T:01949 862 012 F:01949 862 003 E:service@cda.eu W:www.cda.eu



- Important
- Appliance information:
- CE Declarations of Conformity:
- IMPORTANT INFORMATION FOR CORRECT DISPOSAL OF THE PRODUCT IN ACCORDANCE WITH EC DIRECTIVE 2002/96/EC.
- Recommendations
- Before first use
- Control Panel
- Starting a programme
- Using the delay timer
- Using the prewash function
- Progress Indicator lights
- Changing a programme in progress
- Cancelling a programme in progress
- Switching the dishwasher off
- Detergent
- Please note: You should only use detergents designed specifically for use in dishwashers.
- Salt
- Softener adjustment
- To adjust the water softener level
- Rinse Aid
- Rinse Aid Adjustment
- Dishwasher Baskets
- Standard loading and Test Data
- Capacity
- Detergent / Rinse aid
- Programme test
- Care and Maintenance
- Door seals
- Filters
- Spray arms
- Dishwasher interior
- Failure Codes and Troubleshooting
- Electrical information
- How to connect an alternative plug
- Installation
- |C|D|A|
Brand : CDA
Model : WF140
Category : Dishwasher