1517L iTouch - Monitor ELO - Free user manual and instructions
Find the device manual for free 1517L iTouch ELO in PDF.


| Product Type | Touchscreen Monitor |
| Brand | Elo |
| Model | 1517L iTouch |
| Screen Size | 15 inches |
| Resolution | 1024 x 768 (XGA) |
| Touch Technology | IntelliTouch (Surface Acoustic Wave) |
| Dimensions (without stand) | 33.5 cm x 26.5 cm x 4.5 cm |
| Weight | 3.5 kg |
| Power Supply | 12 V DC, 2 A |
| Power Consumption | 15 W (typical) |
| Interfaces | VGA, DVI, USB (touch), RS-232 |
| Main Functions | Touch display, LCD flat panel, Plug and Play |
| Cleaning and Maintenance | Clean with a soft, dry cloth. Do not use abrasive cleaners. |
| Safety Instructions | Use appropriate power supply, avoid moisture, do not open the casing. |
| Spare Parts and Repairability | Contact Elo technical support for spare parts. |
| General Information | Designed for commercial use, CE and FCC certified. |
| Operating Temperature | 0°C to 40°C |
Frequently Asked Questions - 1517L iTouch ELO
User questions about 1517L iTouch ELO
0 question about this device. Answer the ones you know or ask your own.
Ask a new question about this device
Download the instructions for your Monitor in PDF format for free! Find your manual 1517L iTouch - ELO and take your electronic device back in hand. On this page are published all the documents necessary for the use of your device. 1517L iTouch by ELO.
USER MANUAL 1517L iTouch ELO
natural_image
Illustration of a flat-screen computer monitor with a blank screen (no text or symbols)USER MANUAL
Elo Touch Solutions 1517L and 1717L Touchmonitors
SW601708 Rev A
Copyright © 2012 Elo Touch Solutions, Inc. All Rights Reserved.
No part of this publication may be reproduced, transmitted, transcribed, stored in a retrieval system, or translated into any language or computer language, in any form or by any means, including, but not limited to, electronic, magnetic, optical, chemical, manual, or otherwise without prior written permission of Elo Touch Solutions, Inc.
Disclaimer
The information in this document is subject to change without notice. Elo Touch Solutions, Inc. and its Affiliates (collectively "Elo") makes no representations or warranties with respect to the contents herein, and specifically disclaims any implied warranties of merchantability or fitness for a particular purpose. Elo reserves the right to revise this publication and to make changes from time to time in the content hereof without obligation of Elo to notify any person of such revisions or changes.
Trademark Acknowledgments
AccuTouch, CarrollTouch, Elo (logo), Elo Touch Solutions, Elo TouchSystems, IntelliTouch, iTouch, are trademarks of Elo and its Affiliates. Windows is a trademark of Microsoft Corporation.
Table of Contents
Chapter 1: Introduction......4
Chapter 2: Installation....5
Chapter 3: Mounting ....10
Chapter 4: Operation ....12
Chapter 5: Technical Support....16
Chapter 6: Safety & Maintenance....17
Chapter 7: Regulatory Information....19
Chapter 8: Warranty Information....23
Chapter 1: Introduction
Product Description
Your new touchmonitor combines the reliable performance of Elo Touch Solutions touch products with the latest developments in touch technology and display design. This combination of features creates a natural flow of information between a user and the touchmonitor.
This widescreen touchmonitor incorporates a 24-bit color, active matrix thin-film-transistor LCD panel to provide high quality display performance. Its LED backlight significantly reduces power consumption and eliminates mercury (compared to CCFL-backlit panels). Other features that enhance this LCD monitor's performance are Plug & Play compatibility, on-screen display (OSD) controls, and an optional magnetic strip reader (MSR).
Precautions
Follow all warnings, precautions and maintenance as recommended in this user manual to maximize the life of your unit and prevent risks to user safety. See the Safety & Maintenance chapter for more information.
This manual contains information that is important for the proper setup and maintenance of the unit. Before setting up and powering on your new touchmonitor, read through this manual, especially the Installation, Mounting, and Operation chapters.
Chapter 2: Installation
Unpacking the Touchmonitor
Open the carton and verify that the following items are present:
- Touchmonitor with protective sheet for its face
- Elo TouchTools CD & User Manuals CD
- Japanese language regulatory information pamphlet
- Quick Install Guide
• VGA cable - USB cable
- AC-DC power adaptor
- North American power cable
• European power cable
Connector Panel & Interfaces
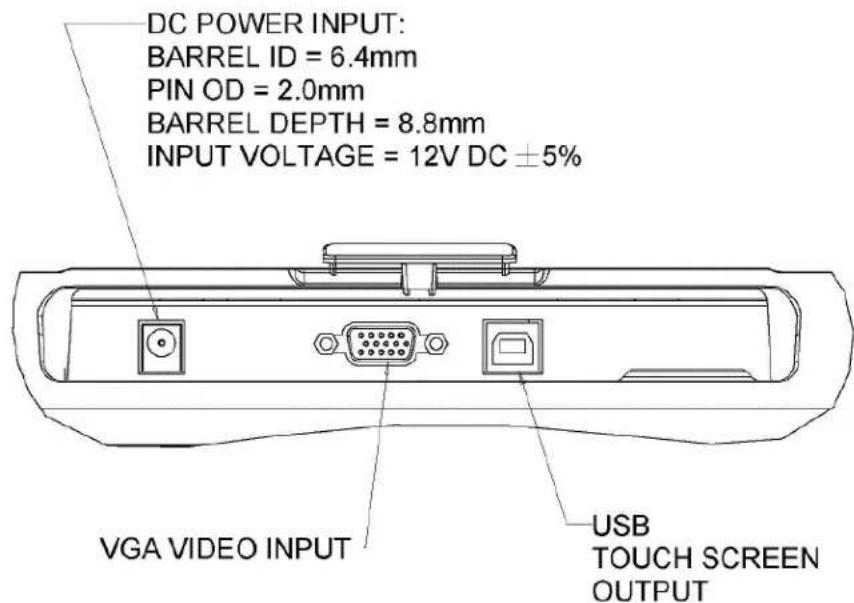
Touchmonitor Connections
- Connect the VGA video cables between the monitor's VGA input connectors and your VGA video source, respectively. Tighten the video cable's screws for best performance.
- Connect the USB touch cable between the monitor's USB connector and your PC's USB port.
- Connect the power adaptor's input connector to the AC power source. Connect the power adaptor's DC output connector to the monitor's input power jack.
- The touchmonitor ships in an OFF state. Press the power button to turn it on.
Installing the Touch Technology Software Drivers
Some software installation is required for your touchmonitor to work with your computer.
The drivers for the Windows 7, XP, Vista, WePOS, and 32-bit Server 2003 and 2008 operating systems are provided with your touchmonitor on a CD.
Visit www.elotouch.com for:
The most up-to-date touch driver versions
• Additional touch driver information
• Detailed touch driver installation guides
- Touch drivers for other operating systems
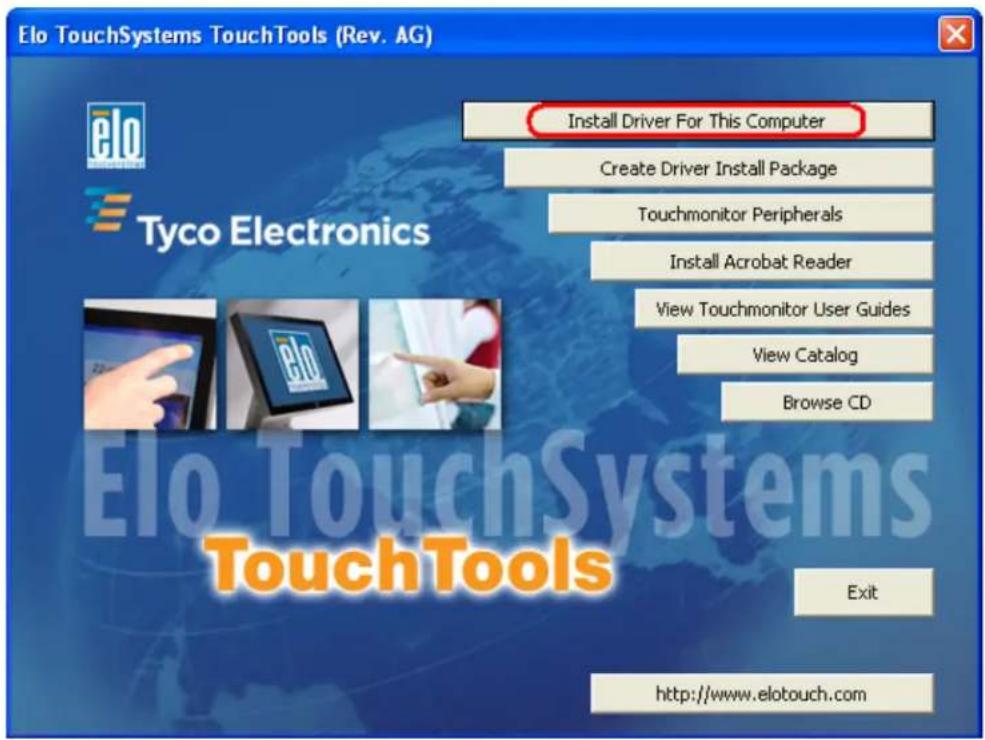
Insert the Elo TouchTools CD into your computer's CD-ROM drive. The CD should automatically run the Elo TouchTools application. Select "Install Driver for This computer":
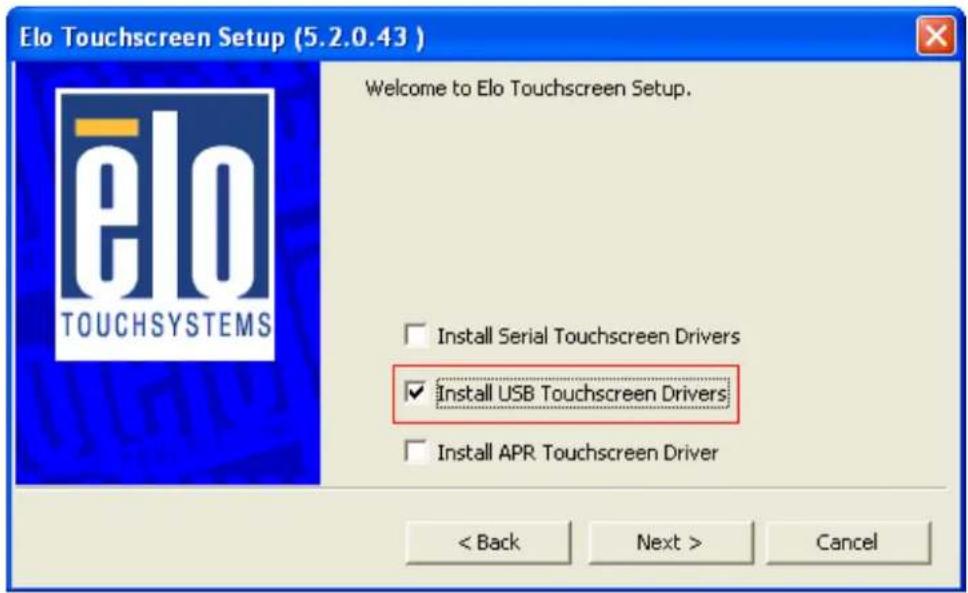
For Windows XP, Vista, Server 2003, Server 2008, and WEPOS installations, install the "USB Touchscreen Drivers" when prompted:
For Windows 7 installations, check the "Install driver" box under "Elo USB Interfaces – Other Touchscreens"
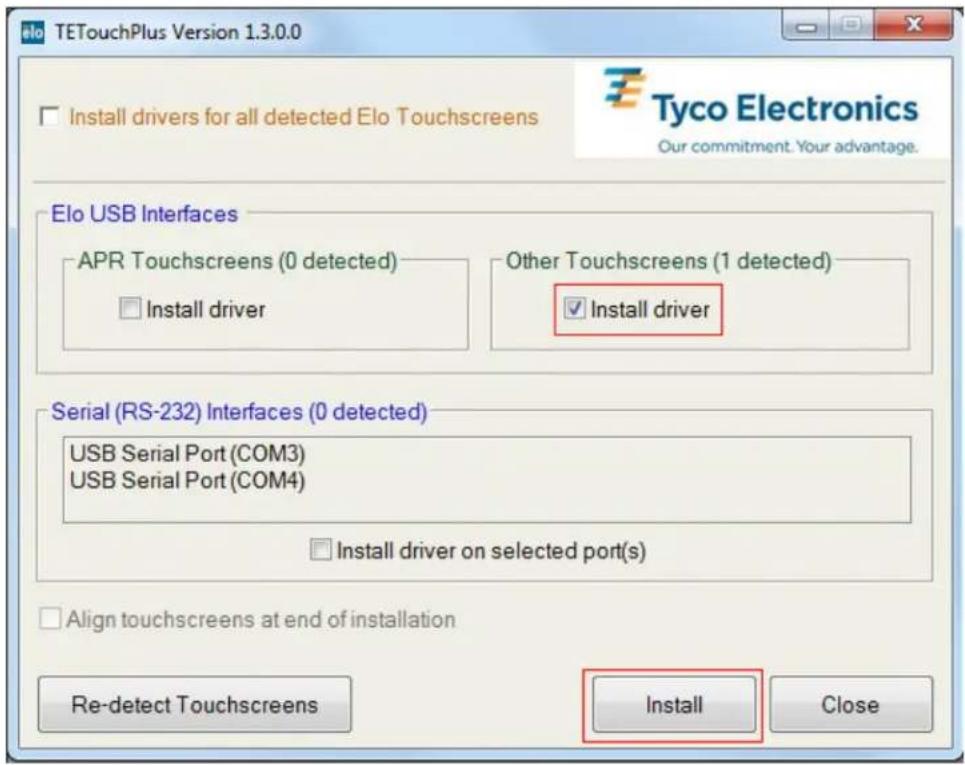
After accepting the end-user license agreement, the drivers will finish installing.
Reboot your computer after the install is complete.
Chapter 3: Mounting
General Mounting Information
The OSD text can be rotated through the OSD menu to better suit your mounting orientation.
Rear VESA Mount
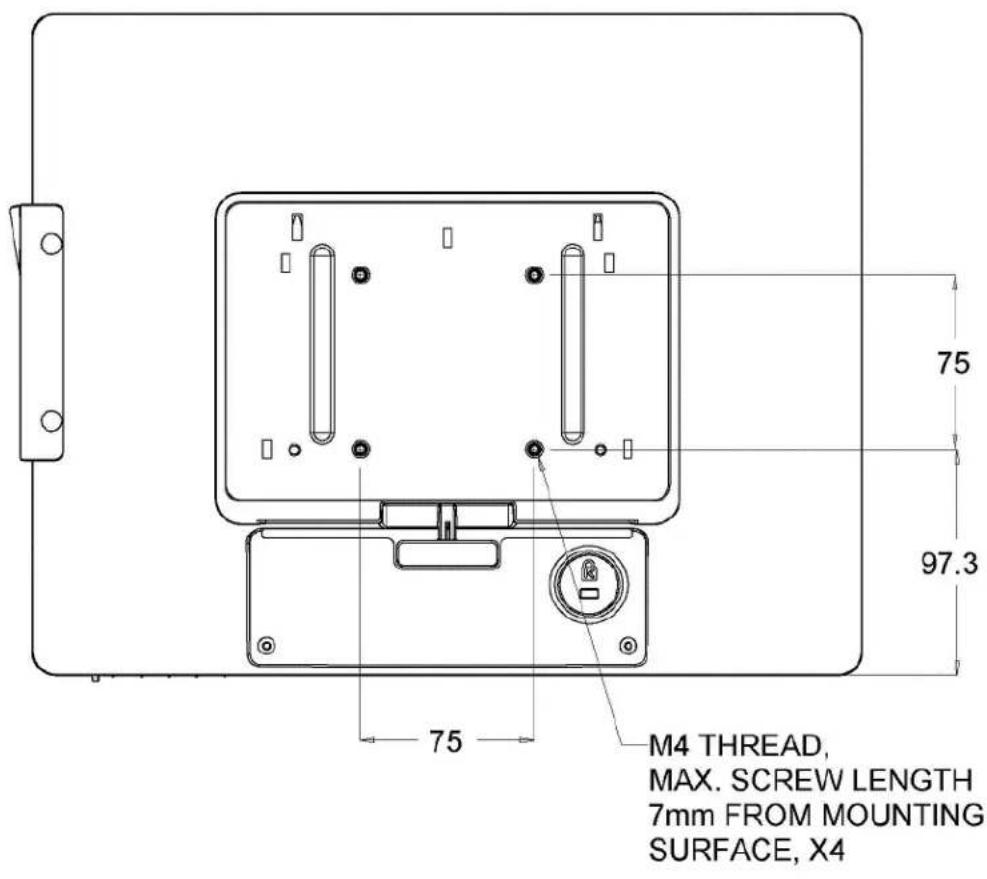
For the 15 inch touchmonitor, a four-hole 75x75mm mounting pattern for M4 screws is provided on the rear of the monitor. Remove the stand using a Phillips screwdriver to access this mounting interface. The VESA FDMI-compliant counting is coded: VESA MIS-B, 75, C.
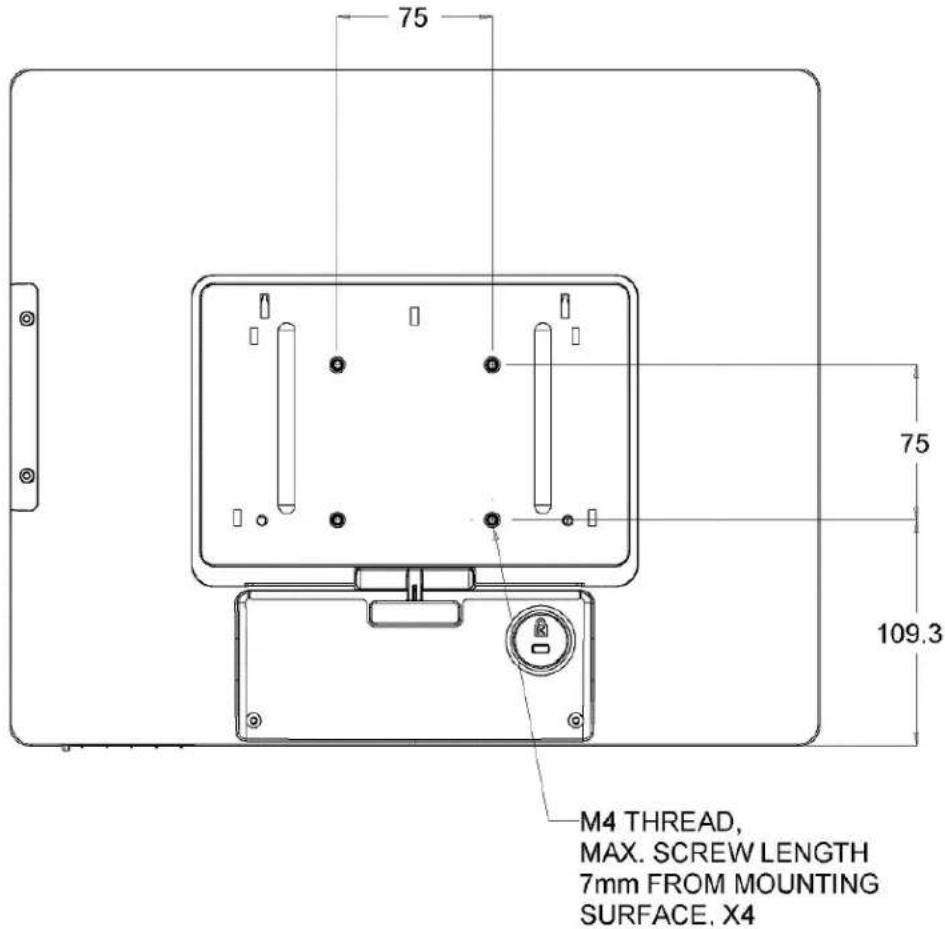
For the 17 inch touchmonitor, a four-hole 75x75mm mounting pattern for M4 screws is provided on the rear of the monitor. Remove the stand using a Phillips screwdriver to access this mounting interface. The VESA FDMI-compliant counting is coded: VESA MIS-B, 75, C.
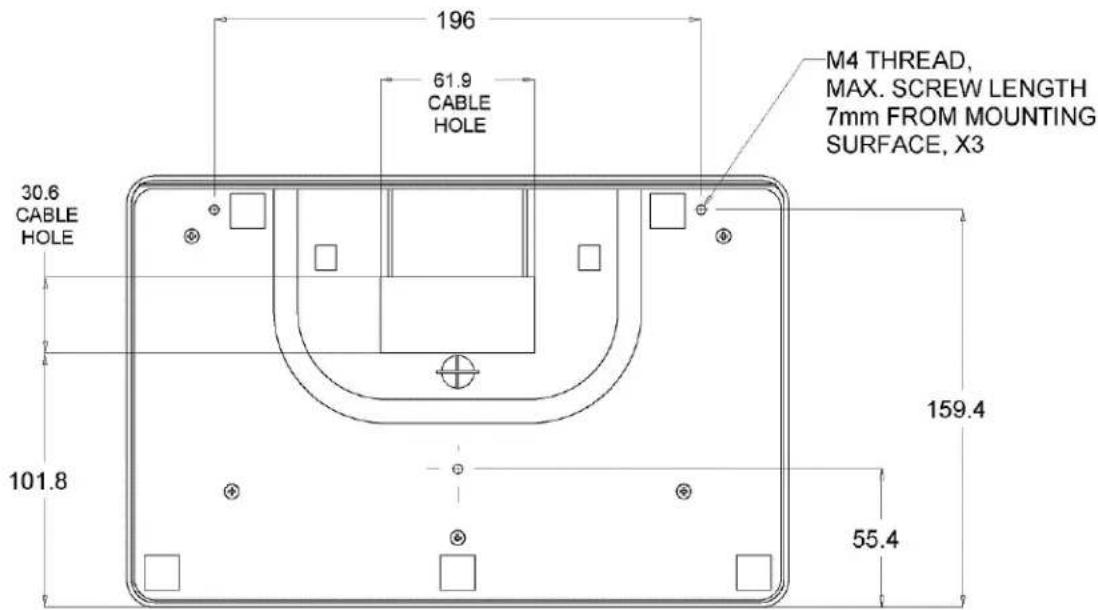
For the 15 inch touchmonitor, a threaded three-hole mounting pattern for M4 screws is provided on the bottom of stand base for mounting or securing.
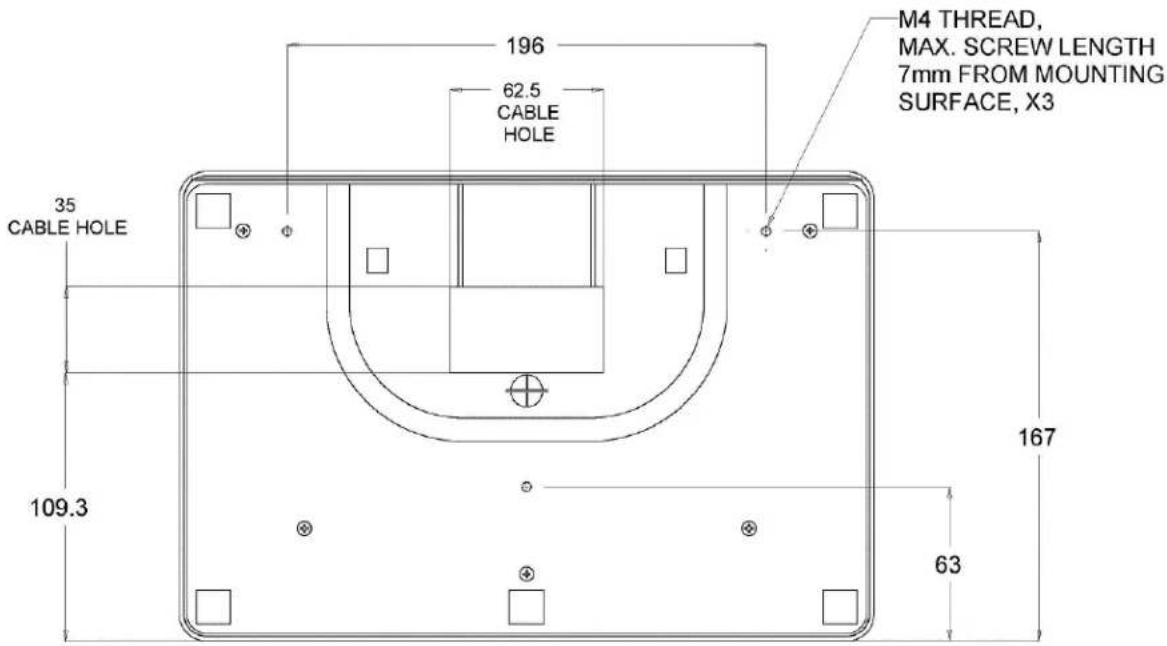
For the 17 inch touchmonitor, a threaded three-hole mounting pattern for M4 screws is provided on the bottom of stand base for mounting or securing.
Chapter 4: Operation
Power
To turn the touchmonitor on or off, press the touchmonitor power button once.
The Power Status LED on the bottom of the touchmonitor functions according to the following table:
| TouchMonitor/Computer Module status LED status | |
| OFF | OFF |
| SLEEP | PULSING |
| ON | ON |
The system consumes low power when in SLEEP and OFF modes. For detailed power consumption specifications, refer to technical specifications on the Elo website http://www.elotouch.com
Touching the screen will bring the attached host PC out of SLEEP mode (similar to moving the mouse or pressing a keyboard key).
To improve reliability and reduce wasteful power consumption, disconnect the power adapter when long periods of disuse are planned.
Touch
Your touchmonitor is factory-calibrated and should not need manual calibration (unless the input video is not fully scaled to the native resolution, or the touch experience needs to be calibrated to a specific user).
Video
A display's native resolution is its width and height measured in number of pixels. Generally, for best performance, an image displayed on this monitor will look best when your computer's output resolution matches this monitor's native resolution, which is 1024 x 768 for the 15 inch, and 1280 x 1024 for the 17 inch.
For computer output resolutions at non-native resolutions, the monitor will scale the video to its panel's native resolution. This involves stretching or compressing the input image as needed in the X- and Y-dimensions to fit the display's native resolution. An unavoidable byproduct of the scaling algorithms is a loss of fidelity when the computer's output video image is scaled by the monitor to fit the display. This loss of fidelity is most apparent when viewing feature-rich images at close distances (for example images containing small-font text).
Your touchmonitor will likely not require video adjustments. However, for analog VGA video, variations in video graphic card outputs may require user adjustments through the OSD to optimize the quality of the touchmonitor's displayed image. These adjustments are "remembered" by the touchmonitor. Also, to reduce the need for adjustments for different video mode timings, the monitor correctly scales and displays some of the video industry's most common video timing modes. Refer to the technical specifications for this monitor at http://www.elotouch.com for a list of these Preset Video Modes.
On-Screen Display (OSD)
Four OSD buttons are on the bottom of the monitor. These can be used to adjust various display parameters.
MENU


SELECT

The buttons and their functionality are:
| Button | Function when OSD is not displayed: | Function when OSD is displayed: |
| Menu | Display OSD main menu Return to previous OSD menu | |
| Display OSD Brightness submenu | Increase value of selected parameter / select previous menu item | |
| Display OSD Contrast submenu | Decrease value of selected parameter / select next menu item | |
| Select | Auto Adjust | Select parameter for adjustment / select submenu to enter |
Using the OSD buttons controls an on-screen graphical user interface which displays on top of your input video, allowing intuitive adjustment of the following display parameters:
| Parameter | Available Adjustment |
| Brightness | Increase/decrease monitor brightness.Default: maximum |
| Contrast | Increase/decrease monitor contrast.Default: best gray-shade performance |
| Clock | Allows fine adjustments of the panel's pixel dot clock. |
| Phase | Allows fine adjustments of the panel's pixel dot clock phase. |
| Auto Adjust | Automatically adjusts the system clock to the input analog VGA video signal, affecting the H-position, V-position, Clock, and Phase menu items. |
| H-position | Moves the image horizontally on the display in single-pixel increments.Default: centered. |
| V-position | Moves the image vertically on the display in single-pixel increments.Default: centered. |
| Aspect Ratio | Switches the scaling method between Full Scaling and Maintain Aspect Ratio.Default: Full ScalingFull Scaling – scales the X- and Y-dimensions of the input video (up or down as needed) to the display's native resolution.Fill To Aspect Ratio – Assuming a landscape orientation and an input video with aspect ratio smaller than 1024 x 768 for the 15 inch or 1280 x 1024 for the 17 inch, scales the Y-dimension of the input video (up or down as needed) to the display's Y-resolution, and scales the X-dimension to maintain the input video's aspect ratio (and fills the rest of the display with equal black bars on the left and right).The touchscreen may need recalibration when switching between Aspect Ratio options. |
| Sharpness | Adjusts sharpness of the displayed images.Default: no sharpness adjustmentOnly applicable at non-native input video resolutions |
| Color Temperature | Selects the display's color temperature. The available color temperatures are 9300K, 7500K, 6500K, 5500K, and User Defined. If the User Defined option is selected, the user can change the color temperature by changing individual R, G, and B gains on a scale from 0 to 100.Default: User Defined with R, G, and B all set to 100. |
| OSD Timeout | Adjusts how long a period of OSD button inactivity the touchmonitor will wait before closing the OSD. The adjustable range is between 5 and 60 seconds.Default: 15 seconds |
| OSD Language | Selects which language the OSD information is displayed in. The available languages are: English, French, Italian, German, Spanish, Simplified Chinese, Traditional Chinese, and Japanese.Default: English. |
| Recall Defaults | Selecting “Recall Defaults” restores all factory default settings for OSD-adjustable parameters (except OSD Language) and for Preset Video Mode timings. |
All touchmonitor adjustments made through the OSD are automatically memorized as soon as they are entered. This feature saves you from having to reset your choices every time the touchmonitor is unplugged or powered off and on. If there is a power failure, the touchmonitor settings will not default to the factory specifications.
OSD and Power Lockouts
Press and hold the "Menu" and "Up" buttons for two seconds to enable/disable the OSD Locking feature. When the OSD Locking is enabled, pressing any of the Menu, Up, Down, or Select keys will have no effect on the system.
Press and hold the “Menu” and “Down” buttons for two seconds to enable/disable the Power Locking feature. When the Power Locking is enabled, pressing the power switch will have no effect on the system.
Chapter 5: Technical Support
If you are experiencing trouble with your touchmonitor, refer to the following suggestions.
If the problem persists, please contact your local dealer or contact Elo Touch Solutions Customer Service.
Solutions to Common Problems
| Problem Suggested Troubleshooting | |
| The touchmonitor does not respond when turning on the system | Check that the DC power adaptor is properly connected.Verify the DC power adaptor is functioning. |
| Monitor display is dim | Use the OSD to increase the brightness.Use the OSD to increase the contrast. |
| Monitor display is blank | If the Power Status LED is blinking, the monitor or Computer Module may be in SLEEP mode. Press any key / move the mouse / touch the Touchscreen to see if the image reappears.Check that the signal source device is turned on.Check that there are no loose cable connections. |
| Monitor displays an “Out Of Range” message | Adjust your computer’s resolution/timing mode to be within the allowable timing ranges specified for your touchmonitor (see website for specifications) |
| Monitor display image looks strange | Adjust your computer’s resolution/timing mode to be within the allowable timing ranges specified for your touchmonitor (see website for specifications)Use the Auto Adjust function in the OSD |
| Touch functionality doesn’t work | Verify your PC has the latest Elo drivers installed.Perform the calibration routine provided with the latest Elo drivers. |
| The OSD buttons or power button does not respond when pressed | Check to see if the OSD lock or power lock functions are on |
Technical Assistance
Visit www.elotouch.com/products for technical specifications for this device
Visit www.elotouch.com/go/websupport for online self-help.
Visit www.elotouch.com/go/contactsupport for technical support.
See this user manual's last page for worldwide technical support phone numbers.
Chapter 6: Safety & Maintenance
Safety
To avoid risk of electric shock, follow all safety notices and do not disassemble the touchmonitor. They are not user-serviceable.
Ensure that your installation is equipped to maintain the specified environmental conditions listed in the Technical Specifications chapter.
Care and Handling
The following tips will help keep your touchmonitor functioning at an optimal level:
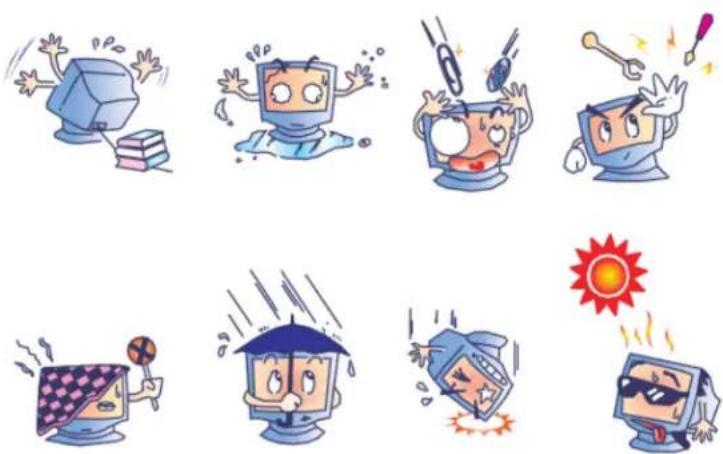
Disconnect the AC power cable before cleaning.
To clean the display unit cabinet, use a clean cloth lightly dampened with a mild detergent.
It is important that your unit remains dry. Do not get liquids on or inside the unit. If liquid does get inside, have a qualified service technician check it before you power it on again.
Do not wipe the screen with a cloth or sponge that could scratch the surface.
To clean the touchscreen, use window or glass cleaner applied to a clean cloth or sponge. Never apply the cleaner directly to the touchscreen. Do not use alcohol (methyl, ethyl or isopropyl), thinner, benzene, or other abrasive cleaners.
natural_image
Illustration of cartoon characters reacting to a stress or conflict, including a computer monitor, a phone, and a sun (no text or symbols present)
This product should not be disposed of with household waste. It should be deposited at a facility that enables recovery and recycling.
Chapter 7: Regulatory Information
I. Electrical Safety Information:
Compliance is required with respect to the voltage, frequency, and current requirements indicated on the manufacturer's label. Connection to a different power source than those specified herein will likely result in improper operation, damage to the equipment or pose a fire hazard if the limitations are not followed.
There are no operator serviceable parts inside this equipment. There are hazardous voltages generated by this equipment which constitute a safety hazard. Service should be provided only by a qualified service technician.
Contact a qualified electrician or the manufacturer if there are questions about the installation prior to connecting the equipment to mains power.
II. Emissions and Immunity Information
Notice to Users in the United States: This equipment has been tested and found to comply with the limits for a Class B digital device, pursuant to Part 15 of FCC Rules. These limits are designed to provide reasonable protection against harmful interference in a residential installation. This equipment generates, uses, and can radiate radio frequency energy, and if not installed and used in accordance with the instructions, may cause harmful interference to radio communications.
Notice to Users in Canada: This equipment complies with the Class B limits for radio noise emissions from digital apparatus as established by the Radio Interference Regulations of Industrial Canada.
Notice to Users in the European Union: Use only the provided power cords and interconnecting cabling provided with the equipment. Substitution of provided cords and cabling may compromise electrical safety or CE Mark Certification for emissions or immunity as required by the following standards:
This Information Technology Equipment (ITE) is required to have a CE Mark on the Manufacturer's label which means that the equipment has been tested to the following Directives and Standards: This equipment has been tested to the requirements for the CE Mark
as required by EMC Directive 2004/108/EC as indicated in European Standard EN 55022 Class B and the Low Voltage Directive 2006/95/EC as indicated in European Standard EN 60950.
General Information to all Users: This equipment generates, uses and can radiate radio frequency energy. If not installed and used according to this manual the equipment may cause interference with radio and television communications. There is, however, no guarantee that interference will not occur in any particular installation due to site-specific factors.
1) In order to meet emission and immunity requirements, the user must observe the following:
a) Use only the provided I/O cables to connect this digital device with any computer.
b) To ensure compliance, use only the provided manufacturer's approved line cord.
c) The user is cautioned that changes or modifications to the equipment not expressly approved by the party responsible for compliance could void the user's authority to operate the equipment.
2) If this equipment appears to cause interference with radio or television reception, or any other device:
a) Verify as an emission source by turning the equipment off and on.
If you determine that this equipment is causing the interference, try to correct the interference by using one or more of the following measures:
i) Move the digital device away from the affected receiver.
ii) Reposition (turn) the digital device with respect to the affected receiver.
iii) Reorient the affected receiver's antenna.
iv) Plug the digital device into a different AC outlet so the digital device and the receiver are on different branch circuits.
v) Disconnect and remove any I/O cables that the digital device does not use.(Unterminated I/O cables are a potential source of high RF emission levels.)
vi) Plug the digital device into only a grounded outlet receptacle. Do not use AC adapter plugs. (Removing or cutting the line cord ground may in crease RF emission levels and may also present a lethal shock hazard to the user.)
If you need additional help, consult your dealer, manufacturer, or an experienced radio or television technician.
III. Agency Certifications
The following certifications and marks have been issued or declared for this monitor:
Australia C-Tick
Japan VCCI
United States FCC,
Canada CUL, IC
Korea KCC
UL
China CCC
Mexico CoC
Europe CE
Taiwan BSMI
IV. China RoHS
In accordance to Chinese law (Administration on the Control of Pollution Caused by Electronic Information Products), the section below lists out the name and amount of the toxic and/or hazardous materials that this product may contain.
| Name | Toxic or Hazardous Substances and Elements Component | |||||
| Lead(Pb) | Mercury(Hg) | Cadmium(Cd) | Hexavalent Chromium (Cr6+) | Polybrominated Biphenyls (PBB) | Polybrominated Diphenyl Ethers (PBDE) | |
| Plastic Parts | O O O | O O O | ||||
| Metal Parts | X O O O | O O | ||||
| Wire and Cable Assembly | X | O | O | O | O | O |
| LCD Panel | X O O | O O O | ||||
| Touch Screen Panel | X | O | O | O | O | O |
| PCBA | X | O | O | O | O | O |
| Software (CD, etc.) | O | O | O | O | O | O |
| O: Indicates that this toxic or hazardous substance contained in all of the homogeneous materials for this component is below the limit requirement in SJ/T11363-2006.X: Indicates that this toxic or hazardous substance contained in at least one of the homogeneous materials used for this component is above the limit requirement in SJ/T11363-2006. For items marked with X, exemptions were taken according to EU RoHS. | ||||||
Explanation of Markings
(1). In accordance with the SJ/T11364-2006 requirement, the electronic information products are marked with the following pollution control logo. The Environment-Friendly Use Period for this product is 10 years. The product will not leak or mutate under normal operating conditions listed below, so that the use of this electronic information product will not result in any severe environmental pollution, any bodily injury, or damage to any assets.
Operating Temperature:0-40 / Humidity:20%-80% (non-condensing).
Storage Temperature:-20\~60 / Humidity:10%\~90% (non-condensing).

(2). It is encouraged and recommended that this product be recycled and reused according to local laws. The product should not be thrown away casually.

V. Power Adapter Specifications
Electrical Ratings:
Input: 100-240VAC, 50-60Hz
Output: 12VDC, minimum 3.33A, LPS
VI. Monitor Specifications
Electrical Ratings:
Input: 12VDC, 2.5A
Operating Conditions:
Temperature: 0°C - 40°C
Humidity: 20% to 80% (non-condensing)
Altitude: 0 to 3,048m
Storage Conditions:
Temperature: -20°C - 60°C
Humidity: 10% to 90% (non-condensing)
Altitude: 0 to 12,192m
Chapter 8: Warranty Information
Except as otherwise stated herein, or in an order acknowledgment delivered to Buyer, Seller warrants to Buyer that the Product shall be free of defects in materials and workmanship. The warranty for the TouchMonitors and their components is 3 (three) years.
Seller makes no warranty regarding the model life of components. Seller's suppliers may at any time and from time to time make changes in the components delivered as Products or components.
Buyer shall notify Seller in writing promptly (and in no case later than thirty days after discovery) of the failure of any Product to conform to the warranty set forth above; shall describe in commercially reasonable detail in such notice the symptoms associated with such failure; and shall provide to Seller the opportunity to inspect such Products as installed, if possible. The notice must be received by Seller during the Warranty Period for such product, unless otherwise directed in writing by the Seller. Within thirty days after submitting such notice, Buyer shall package the allegedly defective Product in its original shipping carton(s) or a functional equivalent and shall ship to Seller at Buyer's expense and risk.
Within a reasonable time after receipt of the allegedly defective Product and verification by Seller that the Product fails to meet the warranty set forth above, Seller shall correct such failure by, at Seller's options, either (i) modifying or repairing the Product or (ii) replacing the Product. Such modification, repair, or replacement and the return shipment of the Product with minimum insurance to Buyer shall be at Seller's expense. Buyer shall bear the risk of loss or damage in transit, and may insure the Product. Buyer shall reimburse Seller for transportation cost incurred for Product returned but not found by Seller to be defective. Modification or repair, of Products may, at Seller's option, take place either at Seller's facilities or at Buyer's premises. If Seller is unable to modify, repair, or replace a Product to conform to the warranty set forth above, then Seller shall, at Seller's option, either refund to Buyer or credit to Buyer's account the purchase price of the Product less depreciation calculated on a straight-line basis over Seller's stated Warranty Period.
These remedies shall be the buyer's exclusive remedies for breach of warranty. Except for the express warranty set forth above, seller grants no other warranties, express or implied by statute or otherwise, regarding the products, their fitness for any purpose, their quality, their merchantability, their non-infringement, or otherwise. No employee of Seller or any other party is authorized to make any warranty for the goods other than the warranty set forth herein. Seller's liability under the warranty shall be limited to a refund of the purchase price of the product. In no event shall Seller be liable for the cost of procurement or installation of substitute goods by Buyer or for any special, consequential, indirect, or incidental damages.
Buyer assumes the risk and agrees to indemnify Seller against and hold Seller harmless from all liability relating to (i) assessing the suitability for Buyer's intended use of the Products and of any system design or drawing and (ii) determining the compliance of Buyer's use of the Products with applicable laws, regulations, codes, and standards. Buyer retains and accepts full responsibility for all warranty and other claims relating to or arising from Buyer's products, which include or incorporate Products or components manufactured or supplied by Seller. Buyer is solely responsible for any and all representations and warranties regarding the Products made or authorized by Buyer. Buyer will indemnify Seller and hold Seller harmless from any liability, claims, loss, cost, or expenses (including reasonable attorney's fees) attributable to Buyer's products or representations or warranties concerning same.
Get the latest...
- Product Information
- Specifications
- News on upcoming events
- Press releases
- Software drivers
- TouchMonitorNewsletter
Getting in Touch with us
To find out more about the extensive range of Elo touch solutions, visit our website at www.elotouch.com, or simply call the office nearest you:
North America
Elo Touch Solutions
301 Constitution Drive
Menlo Park, CA 94025
Tel 800-ELO-TOUCH
Tel 1-650-361-4800
Fax 1-650-361-4722
customerservice@elotouch.com
Europe
Tel +32(0)(16)35-2100
Fax +32(0)(16)35-2101
elosales@elotouch.com
Asia-Pacific
Tel +81(45)478-2161
Fax +81(45)478-2180
www.tps.co.jp
Latin America
Tel 786-923-0251
Fax 305-931-0124
www.elotouch.com.ar
Copyright 2012 Elo Touch Solutions, Inc. All rights reserved.
- Elo Touch Solutions 1517L and 1717L Touchmonitors
- Disclaimer
- Trademark Acknowledgments
- Table of Contents
- Chapter 1: Introduction
- Product Description
- Precautions
- Chapter 2: Installation
- Unpacking the Touchmonitor
- Connector Panel & Interfaces
- Touchmonitor Connections
- Installing the Touch Technology Software Drivers
- Chapter 3: Mounting
- General Mounting Information
- Rear VESA Mount
- Chapter 4: Operation
- Power
- Touch
- Video
- On-Screen Display (OSD)
- OSD and Power Lockouts
- Chapter 5: Technical Support
- Technical Assistance
- Chapter 6: Safety & Maintenance
- Safety
- Care and Handling
- Chapter 7: Regulatory Information
- Electrical Safety Information:
- Emissions and Immunity Information
- Agency Certifications
- China RoHS
- Explanation of Markings
- Chapter 8: Warranty Information
- Getting in Touch with us
Brand : ELO
Model : 1517L iTouch
Category : Monitor