
Mini 300N - Network card / adapter MANHATTAN - Free user manual and instructions
Find the device manual for free Mini 300N MANHATTAN in PDF.


| Product Type | Wireless Network Adapter |
| Model | Mini 300N |
| Brand | Manhattan |
| Wireless Standard | IEEE 802.11b/g/n |
| Maximum Data Rate | 300 Mbps |
| Frequency Band | 2.4 GHz |
| Interface | USB 2.0 |
| Security Encryption | WEP, WPA, WPA2 |
| Dimensions (W x D x H) | Approx. 2.2 x 0.8 x 0.4 inches (56 x 20 x 10 mm) |
| Weight | 0.2 oz (6 g) |
| Power Source | USB bus-powered |
| Operating Temperature | 32°F to 104°F (0°C to 40°C) |
| Storage Temperature | -4°F to 158°F (-20°C to 70°C) |
| Operating Humidity | 10% to 90% non-condensing |
| Antenna Type | Internal |
| Compatible Operating Systems | Windows, macOS, Linux |
| Care Instructions | Clean with dry cloth; avoid liquids and extreme temperatures |
| Safety Precautions | Keep away from moisture; do not disassemble; use only with USB ports |
| Spare Parts / Repairability | Non-repairable; replacement recommended if defective |
| Package Contents | Wireless adapter, quick installation guide |
Frequently Asked Questions - Mini 300N MANHATTAN
User questions about Mini 300N MANHATTAN
0 question about this device. Answer the ones you know or ask your own.
Ask a new question about this device
Download the instructions for your Network card / adapter in PDF format for free! Find your manual Mini 300N - MANHATTAN and take your electronic device back in hand. On this page are published all the documents necessary for the use of your device. Mini 300N by MANHATTAN.
USER MANUAL Mini 300N MANHATTAN
WIRELESS N USB ADAPTER USER MANUAL

natural_image
Close-up of a white USB device with a logo (m) on its side, showing metallic port and internal slots (no text or symbols beyond the logo)manhattan® Life just got easier.™
INTRODUCTION
Thank you for purchasing this Manhattan™ Wireless N USB Adapter.
Because many netbooks and laptops (especially those more than a couple of years old) no longer feature the latest in wireless networking technology — offering Wireless G that maxes out at speeds of 54 Mbps, for example — this Wireless N Adapter is great for upgrading the wireless capabilities of your PC, with enhanced link speeds.* Accelerated speeds will enhance how you watch streaming media, play online games and experience the Internet. Meanwhile, improved range and signal fidelity mean you will encounter fewer “dead spots” in your home or office.**
Both of these adapters connect easily through an available USB port on your PC, and the included software walks you through the configuration process so you can take advantage of the many features, such as Wi-Fi Protected Setup (WPS) and WEP, WPA and WPA2 data encryption.
Manhattan is also proud to present these products with our Three-Year Warranty. For a complete list of country-specific warranties and their details, visit our website: manhattan-products.com/warranty.
Package Contents
- Wireless N USB Adapter
- Software CD with user manual
- Quick install guide
System Requirements
- Notebook or Desktop PC with Pentium 1 GHz-compatible processor or higher
• Windows XP/Vista or Windows 7/8
• Available Hi-Speed USB 2.0 type-A port
* Actual data throughput will vary. Network conditions and environmental factors — including volume of network traffic, building materials and construction, and network overhead — lower the actual data throughput rate.
** Environmental factors may adversely affect wireless signal range.
TABLE OF CONTENTS
1 Initial Setup....4
1.1 Installing the Driver and Utility.... 4
1.2 Connecting to a Wireless Access Point.... 7
1.2.1 Using the Manhattan Utility 7
1.2.2 Using the Windows AutoConfig (Zero Configuration) Tool....8
2 Configuration Utility.... 11
2.1 General 12
2.2 Profile.... 13
2.2.1 Configuring the Profile....13
2.3 Available Network 15
2.4 Status....16
2.5 Wi-Fi Protected Setup (WPS) 16
2.5.1 PIN Input Configuration.... 17
2.5.2 Pushbutton Configuration (PBC).... 18
2.6 Using the Wireless Adapter as as Access Point....20
2.6.1 Access Point Mode....20
2.6.2 Virtual Wi-Fi Mode 24
1 INITIAL SETUP
The following software installation procedure represents Windows 7. Instructions and screen images are similar for all current Windows operating systems.
NOTE: Before proceeding, uninstall any wireless adapter drivers or utilities that may have been previously loaded onto your PC.
1.1 Installing the Driver and Utility
-
With your PC on, insert the adapter into a USB 2.0 port.
-
The Welcome to the Found New Hardware Wizard screen will display automatically. Click Cancel to continue.
-
Insert the included installation CD in your CD/DVD drive and select "Install Driver."
-
When the Choose Setup Language screen displays, select a language and click Next to continue.


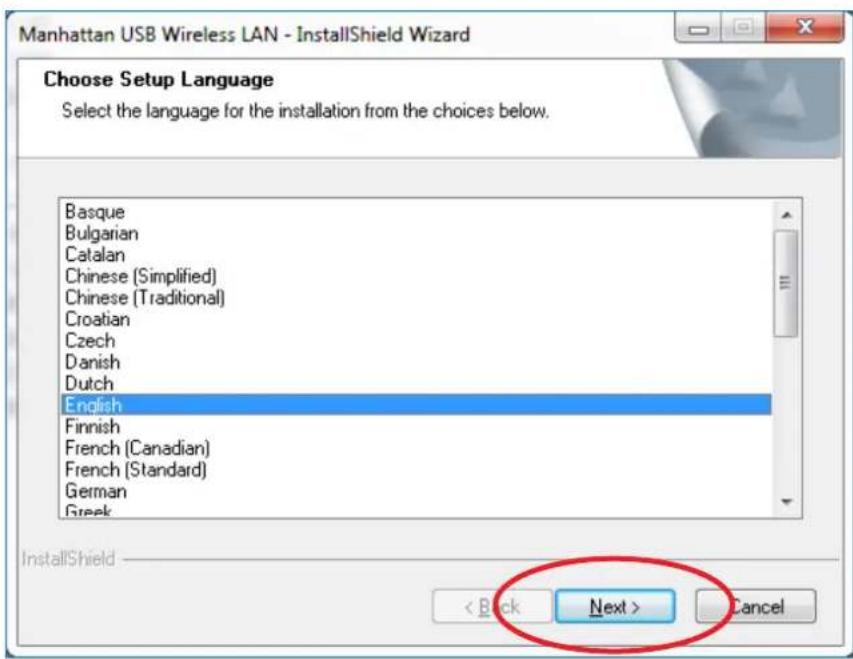
- Click Next again to begin the installation of the driver and utility. A Setup Status screen (below) will display to indicate the progress of the installation.


- A warning about an unverified publisher or missing logo testing may display. Select "Install this driver software anyway" (or "Continue Anyway" in XP) to proceed.

- When the Complete screen displays, select "Yes, I want to restart my computer now" and click Finish. The driver and utility are now installed.

1.2 Connecting to a Wireless Access Point
You have two options for connecting to a wireless access point (AP):
- To take advantage of all the extra features and functions available in the Manhattan configuration utility (which you just installed with the driver), follow the steps below in Section 1.2.1, then skip ahead to the Configuration chapter.
- If you prefer to simply connect to a wireless AP without considering additional settings, you can proceed to Section 1.2.2 and use the "WLAN AutoConfig" function (introduced in XP as "Zero Configuration") that's integrated into Windows operating systems.
1.2.1 Using the Manhattan Utility
- Double-click on the icon in the system tray or right-click the icon and select "Open configuration utility."

- When the Utility screen displays (the General screen should display initially), go to the "Available Network" tab and double-click on the wireless access point you want to connect to.
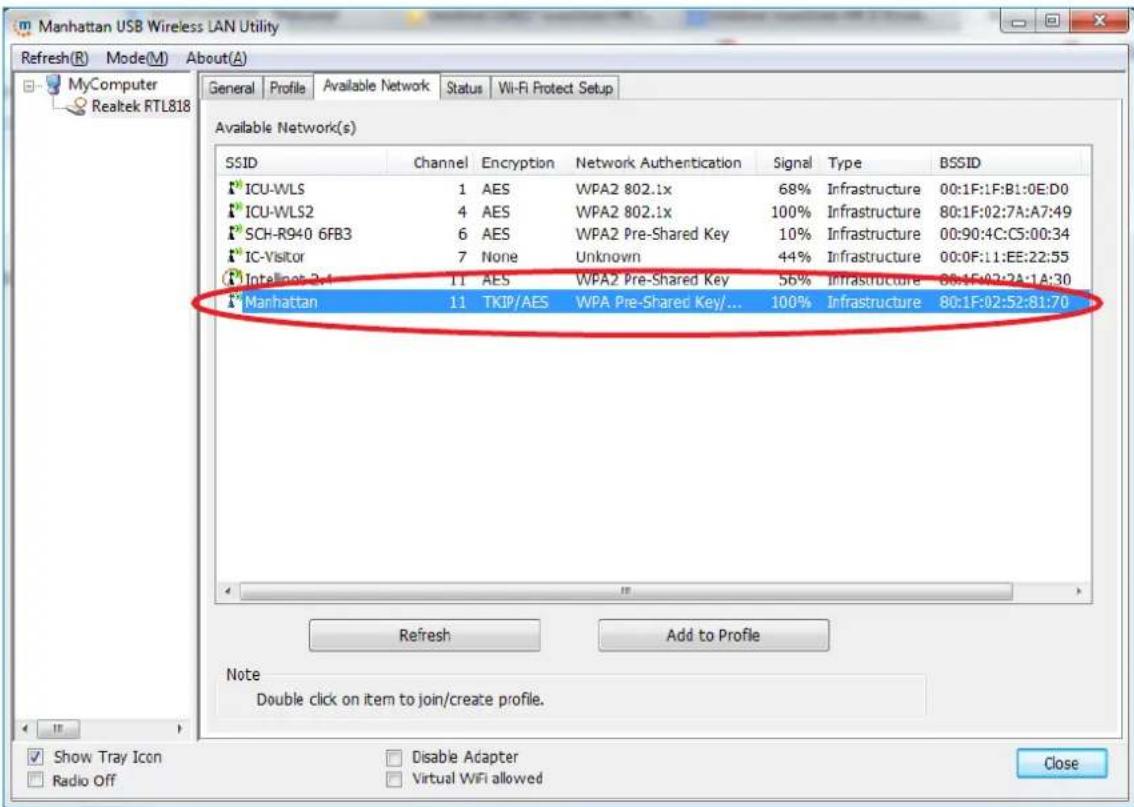
- Input the security setting required for the wireless network you are trying to connect to and click OK to start the network connection.

1.2.2 Using the Windows AutoConfig (Zero Configuration) Tool
As mentioned in Section 1.2, this option simply lets you connect to a wireless AP, allowing you to skip the advanced Configuration chapter entirely.
- On your desktop, click Start / Control Panel, then click Network and Internet.
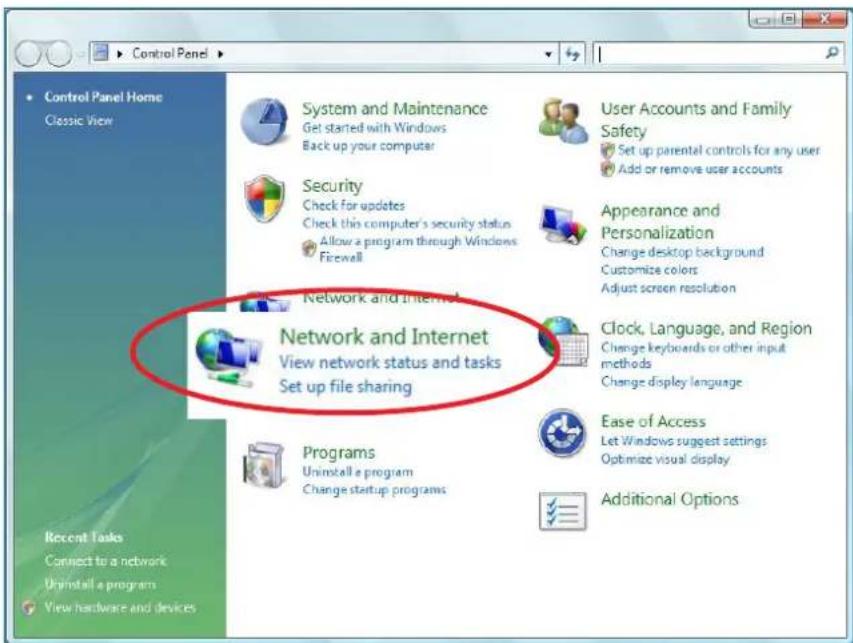
- Click Connect to a network under "Network and Sharing Center."

- Click the access point you want to use if it's shown, then click Connect.
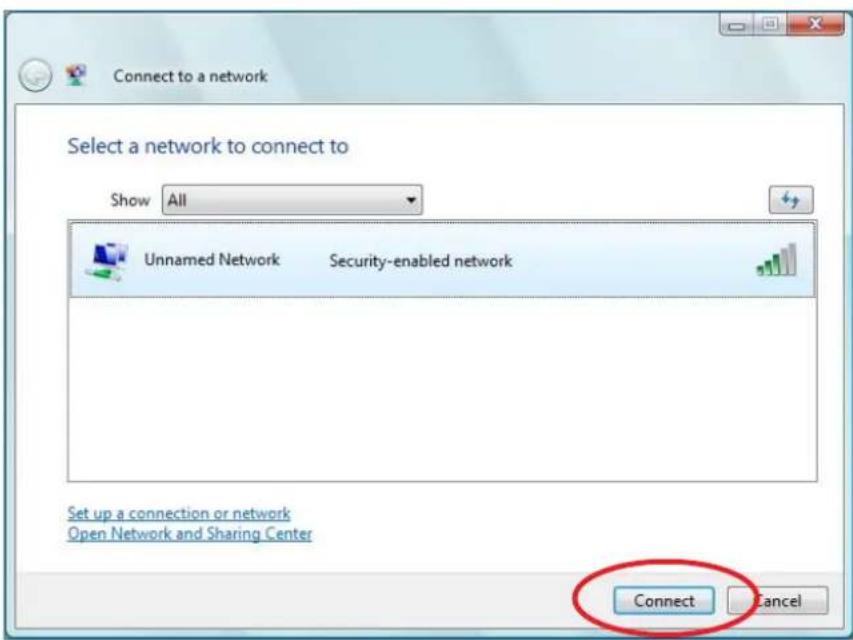
- If it's an unnamed access point — that is, if the SSID (service set identification) of this wireless access point is hidden — you'll be prompted to enter its name, which must be identical to the SSID setting of the wireless AP you're connecting to. Once you've typed your entry in the "Network Name" field, click Next.

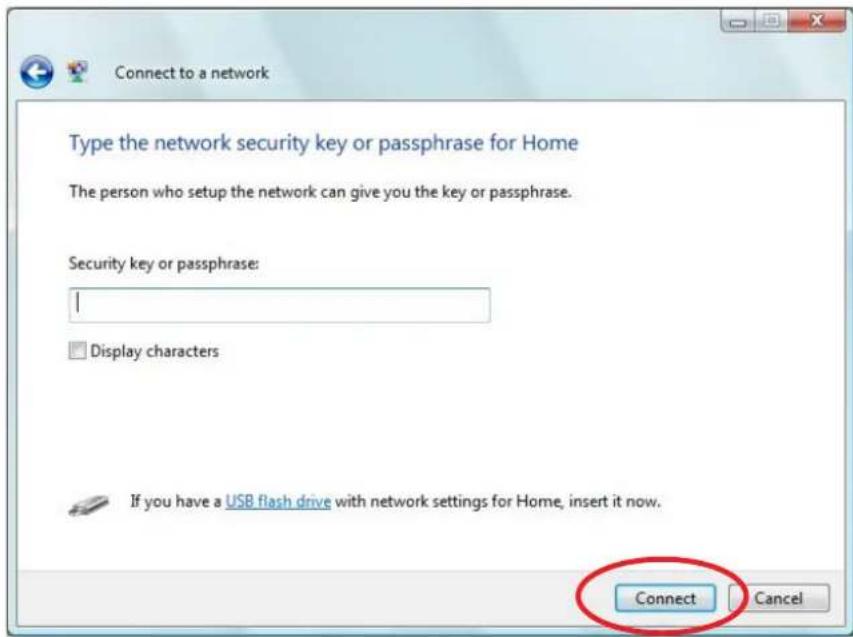
- If the access point is protected by an encryption method, you need to input its security or passphrase here. It must match the encryption setting on the access point. Once you've typed your entry in the "Security key or passphrase" field, click Connect.
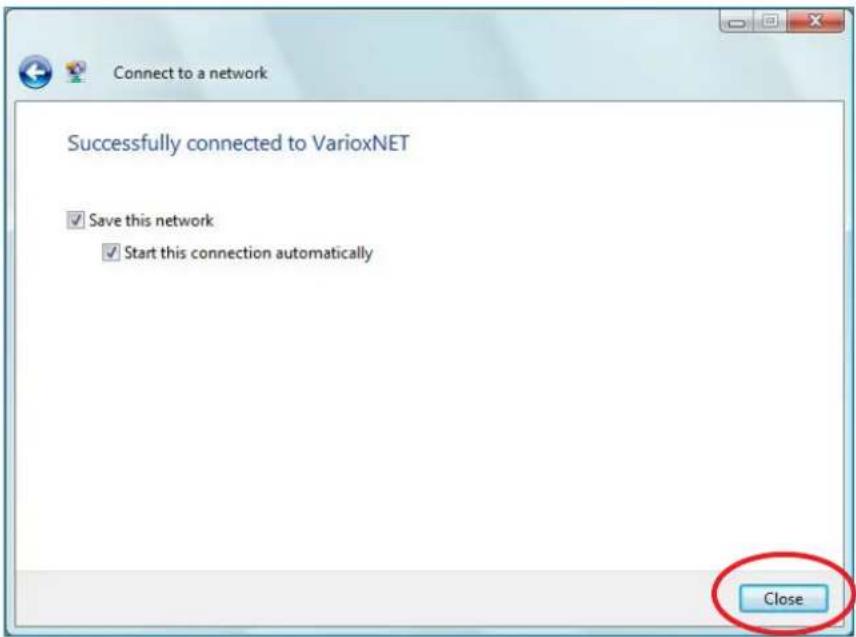
- If you can see the screen below, the connection between your computer and wireless access point has been successfully established. Click Close to start the network connection.
2 CONFIGURATION UTILITY
The Configuration Utility is a powerful application that helps you configure the adapter and monitor the link status and statistics during the communication
process. It appears as an icon either in the system tray or on the desktop in Windows.
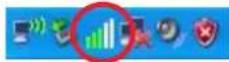
To view a pop-up menu of options for the utility, right-click on the icon.
- Select "Open Config Utility" to open the configuration utility.
- Select "About" to show utility information.
- Select "Hide" to hide the utility in the system tray.
- Select "Quit" to quit the utility in the system tray.
You can open it by double-clicking the icon.

2.1 General
The initial utility screen that displays is General. As all the configuration screens do (Profile, Available Network, etc.), this screen presents you with several navigation and reference options.

Refresh: Select to update the list of adapters in the network.
Mode: There are two modes: Station and Access Point. If "Station" is selected, the adapter works as a wireless adapter. If "Access Point" is selected, the adapter will works as a wireless AP.
About: Select to view information about this version of the utility.
Show Tray Icon: Check the box to display the icon in the system tray.
Radio Off: Check the box to turn off the radio of the adapter. If the radio is turned off, the adapter will not work.
Disable Adapter: Check the box to disable the adapter.
Virtual Wi-Fi allowed: Win7/8 users can activate this option to use the adapter's integrated Software AP function. After that, a new tab (Virtual Wi-Fi) will appear to the right of the Wi-Fi Protected Setup tab (see Section 2.5). NOTE: Users with older operating systems will see a Windows Zero Config box here, which can be selected to configure the adapter using Windows Zero Configuration.
2.2 Profile
This section is for managing the networks you connect to frequently.

Available Profile(s): This shows the preferred networks for the wireless connection. You can add, remove, edit and duplicate the preferred networks or set one of the networks as the default connection.
Add: Click to advance to the next screen and create a new profile.
Remove/Edit: Click to delete/edit the selected profiles.
Duplicate: Click to build up the new profile with the same settings as the current profile.
Set Default: Click to designate a profile as the default network for the connection from the Available Profile(s) list.
2.2.1 Configuring a Profile
A profile allows you to save the settings for different wireless networks; e.g., for your home or at work. There are two ways of adding a WLAN profile: The easier, thus typically preferred, method is described in Section 1.2 Connecting to a Wireless Access Point; the other way, as described here, allows you to create a profile manually, which means that you need to key in all values yourself. If you are not sure which values your wireless network uses, you should by all means proceed as outlined in Section 1.2 using the Available Networks screen.
On the profile tab, click Add.
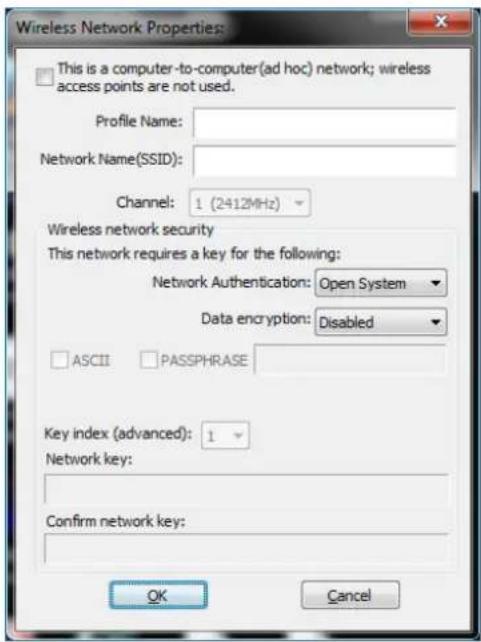
This is a computer-to-computer (ad hoc) network; wireless access points are not used: This option should not be activated in a standard home environment only if you indeed wish to create a wireless peer-to-peer network do you need to activate this option.
Profile Name: Enter a recognizable name so you can identify different networks.
Network Name (SSID): Every wireless network broadcasts an identification name, allowing wireless clients such as laptops, smartphones or tablet PCs to see which network they are connecting to. You need to type in the exact name of the wireless network you wish to connect to. If you connect to a wireless network as explained in Section 1.2, this step won't be necessary, as the utility will automatically fill in the correct value for you.
Channel: This option is only available when you activate the first option — “computer-to-computer (ad hoc)” — and is used to assign a channel to the wireless peer-to-peer connection.
Network Authentication: Wireless networks are typically protected to ensure that
only authorized users have access. There are different ways to go about securing the wireless network, and this adapter supports pretty much all of them. You need to select the correct authentication type for the wireless network you're trying to connect to.

If you don't know the authentication type, check with the administrator or owner of the network and ask for the security details. If you connect to a wireless network as explained in Section 1.2, this step won't be necessary, as the utility will automatically fill in the correct value for you.
Data Encryption: Options are "WEP," "TKIP" and "AES." Select the correct value for the wireless network you wish to connect to.
ASCII / Passphrase: These two options only apply to WEP encryption. To connect to a network that is protected by WEP encryption, you need to specify whether you type in the key in ASCII format or as a passphrase. When you select "Passphrase," the key length needs to be provided. Select 64 bits or 128 bits from the drop-down list.
Key Index: This option, too, is only active for WEP encryption. Normally there's no need to change it, but if the wireless network you want to connect uses a key other than key "1," then you can select the correct key number from the drop-down list.
Network Key: Enter the network security key for the wireless network you want to connect to.
Confirm Network Key: Re-enter the network security key. If you don't know the password for the wireless network, check with the administrator or owner of the wireless network and ask for the security details.
2.3 Available Network
When you open the Configuration Utility, the system will scan all the channels to find all the access points/stations within the accessible range of your adapter and automatically connect to the wireless network with the highest signal strength. On the Available Network screen, all the networks nearby will be listed, and you can change the connection to another network.

Available Network(s): This list shows all information of the available wireless networks within the range of your adapter (SSID, Channel, Encryption, etc.). To connect to any network on the list, select it and double-click.
Refresh: Click to update the Available Networks list. It's recommended that you refresh the list any time you change the connection network.
Add to Profile: Click to add the selected network to a profile, which stores the settings so that you can connect to the network quickly.
2.4 Status
This screen shows information about the manufacturer, driver version, settings of the wireless network the adapter is connecting to, linking time and link status. If you're unsure about the status of the adapter and the network you're connecting to, go to this screen for details.

2.5 Wi-Fi Protected Setup (WPS)
Wi-Fi Protected Setup (WPS, or Wi-Fi Simple Config) is a computing standard that attempts to allow the easy establishment of a secure wireless home network. This means that you can join a secured wireless network without entering a complicated password; instead, you simply push a button or enter a PIN code. WPS is still relatively new, and some wireless routers, especially older models, don't support it. If you're not sure whether or not your wireless router supports WPS, there's a simple way to find out. The housing of the router must have a WPS button (sometimes called N-connect). If there is no such button, you can
stop reading this section now because everything that follows would not be applicable to your network.

2.5.1 PIN Input Config (PIN)
The first method uses a PIN code to connect to the wireless network.
- Connect to your wireless router's configuration interface and open the section that allows you to set up WPS. (If you need to, refer to the user manual of your wireless router for instructions about how to do this.) The settings on this WPS screen of your wireless router typically included an option for PIN.
- Find the PIN code on your Manhattan wireless utility screen — circled in red in the example above — and enter that PIN code into the configuration of your wireless router. The example below is from a Manhattan wireless router.
Configure by Client PinCode:
59392422
Start PIN
-
Click Start PIN on the router's configuration interface. (Again, depending on which router you have, this may be called different things.)
-
Immediately after that, on the Manhattan wireless utility screen, click PIN Input Config (PIN). You'll be asked whether or not you want to specify an access point manually. Click No.

The wireless utility starts searching for wireless networks with a matching PIN code. This process may take several minutes, as indicated on the status bar.
If all goes well, you'll see the General tab of the Manhattan wireless utility indicating an active wireless connection.

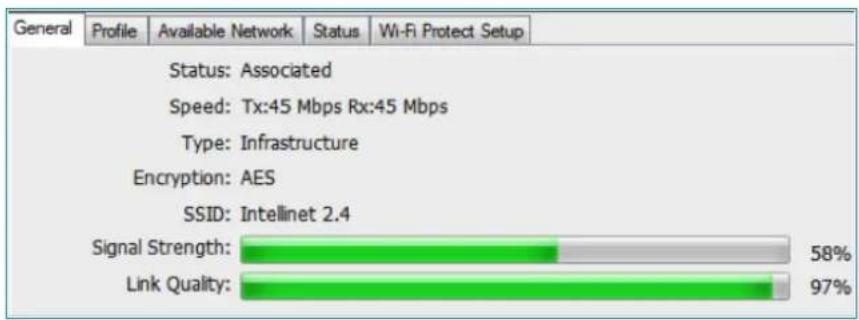
bar
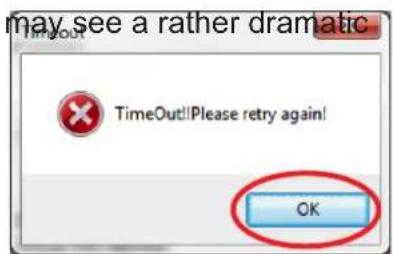
| Metric | Value (%) | |---|---| | Signal Strength: | 58 | | Link Quality: | 97 |If too much time elapses between Steps 3 and 4, you error message. If you see this, simply click OK and repeat Steps 3 and 4 — but this time, please don't take a coffee break between the two steps.
2.5.2 Push Button Config (PBC)
The PBC method connects the Manhattan wireless adapter to your wireless network with the push of a button. Simply speaking, you first press the WPS button on the router, then within 2 minutes you press the WPS button on the wireless adapter. The connection will then be established automatically, and no further interaction is necessary.
So, you may ask, if PBC involves pressing physical buttons, then why does the Manhattan wireless utility have an option for a push-button setup? The answer is simple. The same Manhattan WLAN utility is included with the PCI WLAN Card and the tiny Wireless 150N Micro Adapter. In the case of the PCI card, it is matter of convenience. The software push-button eliminates the need of getting down on your hands and knees and pushing the sometimes-hard-to-reach PBC button on the PCI adapter on the back of your computer underneath your desk. In case of the micro adapter it is a necessity. The adapter is so small that there is no room to place a physical button on the product, making a virtual button mandatory.
-
Press the WPS button (sometimes referred to as N-Connect) on the back of the router.
-
Click Push Button Config (PBC) on the Manhattan wireless utility screen (as highlighted in blue in Section 2.5). The utility will scan for any wireless network currently accepting new connections that have been initiated via PBC.
![Wi-Fi Protected Setup - PBC method If there is more than one AP on the PBC mode,there will be [Session Overlap].Please use PIN method or wait for a while and use PBC method again. Status : AP Sitesurvey ... Complete : Push Button Config (PBC) Cancel](/content/2026/05/959974/images/b77806e6b151f8aea13d7f89baf07de25aa2d9306d68a054c3375ae329ced0bb.jpg)
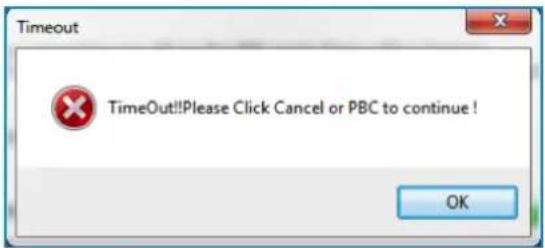
- If the utility can't find a wireless network that's accepting its connection attempts
within 2 minutes, this error will display. Click OK to get back to the previous window and repeat the procedure
- If all goes well, you'll see the General tab of the Manhattan wireless utility indicating an active wireless connection.

bar
| Metric | Value (%) | |---|---| | Signal Strength: | 58 | | Link Quality: | 97 |2.6 Using the Wireless Adapter as an Access Point
Your Manhattan wireless adapter supports three main operational modes: Station, Access Point and Virtual Wi-Fi (a combination of the first two modes). You can switch between the first two modes using the mode selector menu in the wireless utility.

- Station — This is the default mode. It allows your computer to connect to wireless networks using the Manhattan wireless adapter. NOTE: As this mode has already been detailed earlier, only Access Point and Virtual Wi-Fi modes are further explained below.
- Access Point — When this mode is enabled, your Manhattan wireless adapter turns into an access point for other wireless clients, even allowing them to connect to the Internet using your computer as a wireless router. When you operate the Manhattan wireless adapter in Access Point mode, the adapter cannot be used to connect to other wireless networks at the same time.
- Virtual Wi-Fi — This mode can only be activated if the adapter is operating in Station mode. Virtual Wi-Fi is available on Windows 7 and 8 systems, and it combines the features of the Station and Access Point modes.
| Acts as an access point and allowsCan use the WLAN adapter to other WLAN clients to connect to theMode connect to other wireless networks Internet through the adapter | ||
| Station Yes NoAccess Point NoVirtual Wi-Fi Yes | YesYes (mandatory WPA2-PSK encryption) | |
2.6.1 Access Point Mode
When you activate the Access Point (AP) mode, the interface of the Manhattan wireless utility will change and adapt to the new operational mode.

Click Config to begin (below). A new
window displays that allows you to configure the various options of the wireless network you are about to create.

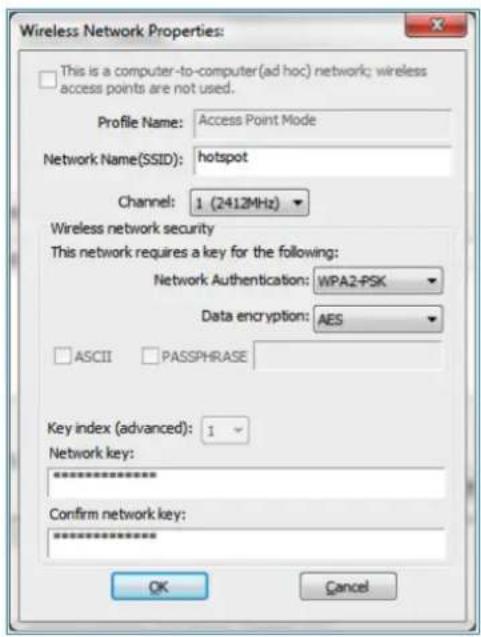
Network Name (SSID): Every wireless network broadcasts an identification name, allowing wireless clients such as laptops, smartphones or tablet PCs to see which network they are connecting to. Enter the name of the wireless network you wish to create.
Channel: Every wireless network operates on a specific channel. In the U.S., your wireless network can be set to channels 1–11; otherwise, you can use channels 1–13 (1–14 in Japan).
So, which cannel should you use? The answer depends on whether or not other wireless networks are around, and whether or not you, the owner of the wireless network, care about optimum performance. If no other wireless networks are in range, you can for example, leave the channel set to the use whatever channel you want; default setting ("1").
However, if other wireless networks are in range and you are indeed concerned about maximum performance, you should set your channel at least three channels apart from the other networks. For example, ____ if another wireless network is present at channel 2, you don't want to set your own
network to channel 1, 2, 3 or 4. Ideally, you set it as far away from the existing network as you can; for example, channel 11.
If you are unsure about whether other wireless networks are in range, or which channels they are using, you can use channel 1, the default setting.
You may not get the best possible performance, but it will work nonetheless.
Network Authentication: Select WPA2-PSK from the drop-down list. Older standards are no longer secure and should only be used if you have an older device that isn't able to use WPA2 encryption. Select "Open System" to create a wireless network that is open to everyone and unprotected.
Data Encryption: Select AES from the drop-down list as it is more secure than the older TKIP encryption.
Network Key: Enter the network security key for the wireless network you want to create.
Confirm Network Key: Re-enter the network security key.
Click OK to create the wireless network. (In the example here, it's "hotspot." Your computer will now start broadcasting the new wireless network. Other wireless clients will be able to see it and connect to it provided they use the correct security credentials. As soon as wireless clients connect to the newly created access point, the Manhattan wireless utility shows them in its Association Table (below).


The main configuration screen has two additional options as indicated by the red and blue arrows below.

IP Address: This is the IP address which your newly created access point uses. Normally there is no need to change this value.
Setting Internet Connection Sharing (ICS): To share an existing Internet connection among the wireless clients, activate this option. (Additional configuration options will appear on the screen.) If you're only allowing local network access, this option should remain disabled.
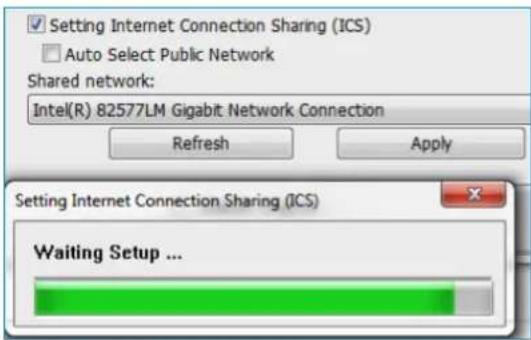
Shared network: In order to use ICS, your computer must have an active Internet connection. This can be a wired connection or another wireless connection. Select the correct network adapter here or, alternatively, let the utility sort this out for you by activating the "Auto Select Public Network" option. Click Apply to activate ICS.
2.6.2 Virtual Wi-Fi Mode
The setup of Virtual Wi-Fi is nearly identical to that of Access Point mode. The main differences are that a) you activate this mode while the wireless adapter is in Station mode; and b) that your wireless adapter operates as a wireless client and wireless AP at the same time.

- Activate Virtual Wi-Fi by enabling this option.
- When enabled, a new Virtual Wi-Fi tab appears.
- Activate the "Start Virtual Wi-Fi Soft AP" option.
- Click Config to set up the wireless network. Unlike Access Point mode, where you can choose the type of security you want to use, the Virtual Wi-Fi function defaults to WPA2-PSK AES. This cannot be changed (which is actually for your own benefit).
- The other options (IP address, ICS) are identical to the previously detailed Access Point mode.
manhattan® Life just got easier.™
- WIRELESS N USB ADAPTER USER MANUAL
- INTRODUCTION
- Package Contents
- System Requirements
- TABLE OF CONTENTS
- Initial Setup....4
- Configuration Utility.... 11
- INITIAL SETUP
- Installing the Driver and Utility
- Connecting to a Wireless Access Point
- Using the Manhattan Utility
- Using the Windows AutoConfig (Zero Configuration) Tool
- CONFIGURATION UTILITY
- General
- Profile
- Configuring a Profile
- Available Network
- Status
- Wi-Fi Protected Setup (WPS)
- PIN Input Config (PIN)
- Push Button Config (PBC)
- Using the Wireless Adapter as an Access Point
- Access Point Mode
- Virtual Wi-Fi Mode
- manhattan® Life just got easier.™
Brand : MANHATTAN
Model : Mini 300N
Category : Network card / adapter