Di628 - Dishwasher Caple - Free user manual and instructions
Find the device manual for free Di628 Caple in PDF.


| Product Type | Built-in Dishwasher |
| Brand | Caple |
| Model | Di628 |
| Energy Efficiency Class | A+ |
| Place Settings | 12 |
| Dimensions (H x W x D) | 850 x 600 x 600 mm |
| Net Weight | 45 kg |
| Noise Level | 44 dB(A) |
| Annual Water Consumption | 2660 L/year |
| Annual Energy Consumption | 266 kWh/year |
| Number of Programs | 6 |
| Programs | Eco, Intensive, Normal, Quick 45min, Rinse, Soak |
| Drying Performance | A |
| Power Supply | 220-240 V, 50 Hz, 10 A |
| Water Connection | Cold water only |
| Salt and Rinse Aid Indicator | Yes |
| Child Lock | Yes |
| Overflow Protection | Yes |
| Adjustable Upper Basket | Yes |
| Cutlery Basket | Removable and foldable |
| Interior Light | No |
| Delay Start | Yes, up to 24 hours |
Frequently Asked Questions - Di628 Caple
User questions about Di628 Caple
0 question about this device. Answer the ones you know or ask your own.
Ask a new question about this device
Download the instructions for your Dishwasher in PDF format for free! Find your manual Di628 - Caple and take your electronic device back in hand. On this page are published all the documents necessary for the use of your device. Di628 by Caple.
USER MANUAL Di628 Caple
Instruction manual for integrated dishwasher
Modelcode:Di628
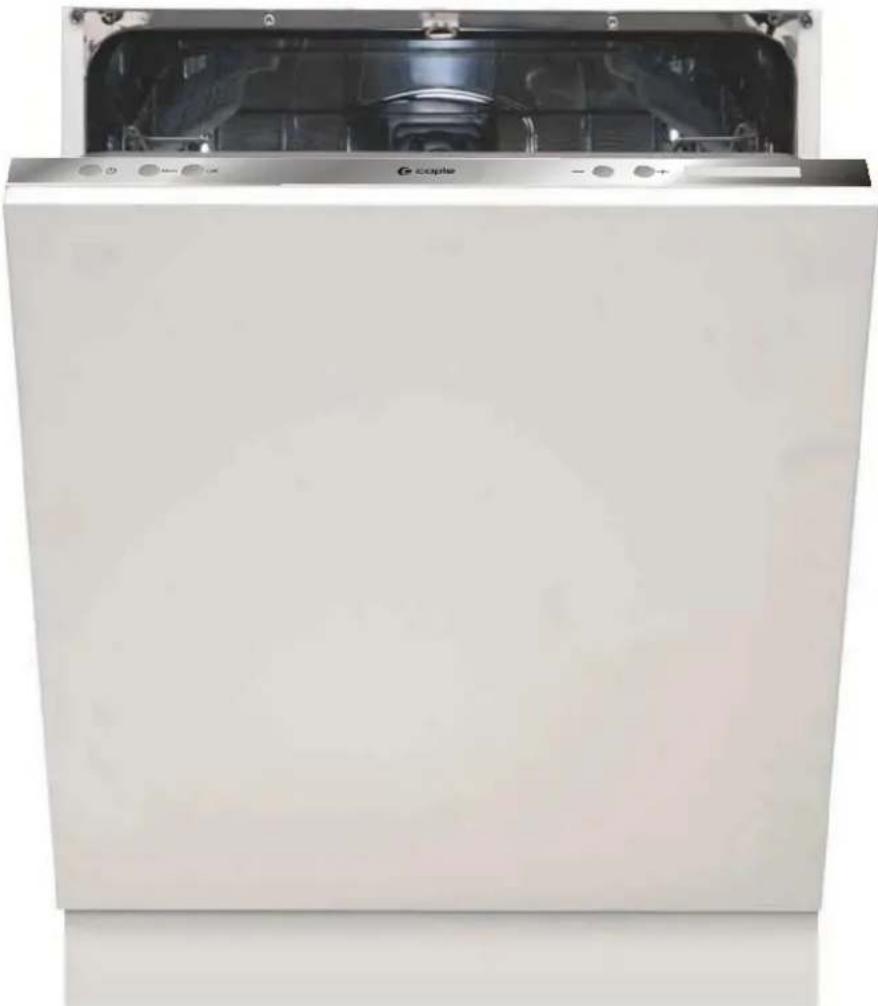
natural_image
Front view of a white disposable water washing machine (no visible text or labels)Quick operation guide
Fordetailedoperatingmethodreadthecorrespondingcontentontheinstructionmanual.
Switch on the appliance
Open the door, press the On/Off button to switch on the appliance.

With each wash cycle.
Compartment B:
Forprogrammeswithpre-washonly.
(Followtheuserinstructions!)
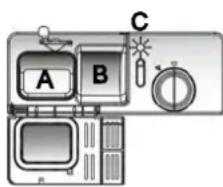

Checktherinseaidlevel
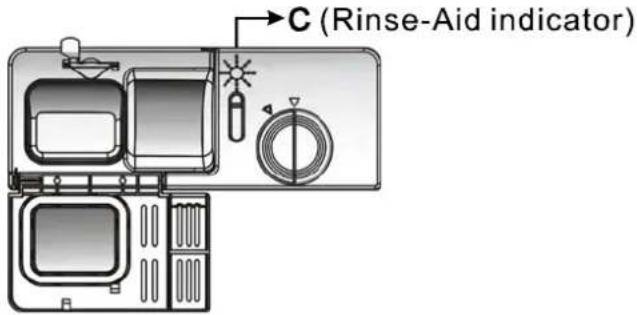
Mechanical indicator C.
Electricindicatoroncontrolpanel(ifprovided).

Checktheregeneration saltlevel
(Onmodelswithwatersoftenersystemonly.)
Electricindicatoroncontrolpanel(ifprovided).
Ifthereisnosaltwarninglightinthecontrolpanel
(forsomemodels),youcanestimatewhentofillthesaltinto
thesoftenerbythenumberofcyclesthedishwasherhasrun.
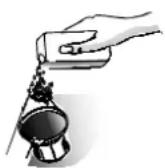

Loadthebaskets
Scrapeoffanylargeamountofleftoverfood. Softenremnantsofburntfoodinpans,
then load the baskets. Refer to the dishwasher loading instructions.

Selectaprogramme
Press the Menue Button, then press “+” or “-” Button select one programme, at last press
OK button( See the section entitled "Operation instruction")

Runningthedishwasher
Turnonthewatertap, closetedoor. Themachinewillstartworkingafterabout1

- Changingtheprogramme
- 1. A running cycle can only be modified if it has been running for a short time. Otherwise the detergent may have already been released and the water already drained. If this is the case, the detergent dispensermustberefilled.
-
Openthedoor, PresstheMenue button
-
Press "+" or - "button select a new programme.
-
Press OK button ,close the door Restart the dishwasher.

WARNING!
- Addforgottendishesinthe dishwasher.
- 1. Openthedooralittletostopthedishwasher.
- Afterthesprayarmsstopworking, you can open the door completely.
3.Addtheforgottendishes.
- Close the door, the dishwasher will start running again after 10 seconds.
Openthedoorcarefully. Hotsteammayescape when the door is opened!
- If the appliance is switched off during a wash cycle.
- If the appliance is switched off during a wash cycle, when switched
on again, please re-select the washing cycle and operate the dishwasher according to the original Power-onstate).

Switchofftheappliance
Whentheworkingcyclehasfinished,thebuzzerof the
dishwasherwillsound8times,dishwasherrevertingautomaticallyto
off-modeaftertheendoftheprogramme

Turnoffthewatertap,
Warning: wait a few minutes (about 15 minutes) before unloading the dishwasher to avoid handling the dishes and utensils while they are still hot and moresusceptibletobreak.
They will also dry better. Unload the appliance, starting from the lower basket.

Read this Manual
DearCustomer,
This appliance is intended to be used in household and similar applications such as:
-staff kitchen areas in shops, offices and other working environments;
-farmhouses;
-by clients in hotels, motels and other residential type environments:
-bed and breakfast type environments.
Please carefully read this manual before using the dishwasher, it will help you to use and maintain the dishwasher properly.
- Keep for future reference.
Passitonto any subsequent owner of the appliance.
This manual contains sections on safety Instructions, Operating Instructions, Installation Instructions and Troubleshooting Tips, etc.

Before Calling for Service
- Toreviewthesectionontroubleshootingtips will help you to solve some common problems by yourself.
If you can not solve the problems by yourself, please ask for the help of professional technicians.

NOTE:
The manufacturer, following a policy of constant product development may make modifications without giving prior notice.
1) Safety Information....1
2) Disposal....2
3) Operating Instructions....3
Controlpanel....3
Dishwasherfeatures....3
4) Prior using for the first time....4
A、Water softener....4
BLoadingthe salt into the softener....5
C、Fill the rinse aid dispenser....5
D、Function of detergent 6
5) Features....8
6) Loading the Dishwasher Basket......9
Before or after loading the dishwasher baskets .....9
Loading the upper basket....10
Loading the Lower basket....10
7) Starting a washing programme....11
Washcycletable....11
Turning on the appliance....11
Change the programme....12
Attheendofthewashcycle....12
8) Maintenance and cleaning....13
Filteringsystem....13
Caring for the dishwasher....14
9) Installation instruction....15
Installation preparation.... 15
Furniture door dimensions and installation.....16
Tension adjustment of the door spring....18
Connection of drain hoses.... 18
Dishwasher installation steps.... 19
Electrical connection....20
Coldwaterconnection....21
10) Troubleshooting Tips....22
Before calling for service....22
Errorcodes....23
Technical information....24
Loading the baskets according to En50242....26
1. IMPORTANT SAFETY INFORMATION READ ALL OF THE INSTRUCTIONS BEFORE USING
WARNING! When using your dishwasher, follow the precautions listed below:

GROUNDING INSTRUCTIONS
Thisappliancemustbegrounded. Intheeventofa malfunctionorbreakdown, groundingwillreduce theriskofanelectricshockbyprovidingapathof leastresistanceofelectriccurrent. Thisappliance isequippedwithacordhavinganequipment-groundingconductorandagroundingplug.
Theplugmustbepluggedintoanappropriateoutlet thatisinstalledandgroundedinaccordancewith alllocalcodesandordinances.
▲WARNING!
■ Improperconnectionoftheequipment-grounding conductorcanresultintheriskofanelectricshock.
■ Checkwithaqualifiedelectricianorservice representativeifyouareindoubtwhetherthe applianceisproperlygrounded.Donotmodifythe plugprovidedwiththeappliance;Ifitdoesnotfit the outlet.Haveaproperoutletinstalledbya qualifiedelectrician.

WARNING! PROPER USE
■ Donotabuse, siton, or standardthedo rackofthedishwasher.
■ Donottouchtheheatingelementduringor immediatelyafteruse.
(Thisinstructionisonlyapplicabletomachines withavisualheatingelement.)
■ Donotoperateyourdishwasherunlessall enclosurepanelsareproperly inplace.Open thedoorverycarefullyifthedishwasheris operating,thereisariskofwatersquirtingout.
■ Donotplaceanyheavyobjects on orstand the doorwhenitisopen. The appliance could tip forward.
■ When loading items to be washed:
1) Locate sharp items so that they are not likely to damage the door seal;
2) Warning: Knives and other utensils with sharp points must be loaded in the basket with their points down or placed in a horizontal position.
■ When using your dishwasher, you should prevent plastic items from coming into contact with the heating element.(This instruction is only applicable to machines with a visual heating element.)
- Check that the detergent compartment is empty after completion of the wash cycle.
■ Donotwashplasticitemsunlesstheyaremarked dishwashersafeortheequivalent.Forplasticitems notsomarked,checkthemanufacturer's recommendations.
■ Use only detergent and rinse additives designed for an automatic dishwasher.
■ Never use soap, laundry detergent, or hand washing detergent in your dishwasher. Keep these products out of the reach of children.
Keep children away from detergent and reinseaid, keep child away from the open door of the dishwasher, there could still be some detergent left inside.
This appliance is not intended for use by persons (including children with reduced physical, sensory or mental capabilities, or lack of experience and knowledge, unless they have been given supervision or instruction concerning use of the appliance by a person responsible for their safety.
■ Childrenshouldbesupervisedtoensurethattheydo notplaywiththeappliance.
■ Dishwasher detergents are strongly alkaline, they can be extremely dangerous if swallowed. Avoid contact with skin and eyes and keep children away from the dishwasher when the door is open.
■ The door should not be left open, since this could increase the risk of tripping.
If the supply cord is damaged, it must be replaced by the manufacturer or its service agent or a similarly qualified person in order to avoid a hazard.
■ Removethe doortothewashingcompartmentwhen removinganolddishwasherfromserviceordiscardingit.
■ Please dispose of packing materials properly.
■ Usethedishwasheronlyforitsintendedfunction.
■ During installation, the power supply must not be excessively or dangerously bent or flattened. Donottamperwithcontrols.
■ The appliance is to be connected to the water mains using new hose sets and that old hose-sets should not be reused.
■ The maximum number of place settings to be washed is 14.
■ The maximum permissible inlet water pressure is 1Mpa.
■ The minimum permissible inlet water pressure is 0.04Mpa.
READ AND FOLLOW THIS SAFETY INFORMATION CAREFULLY KEEP THESE INSTRUCTIONS
2.Disposal
Dispose of the dishwasher packaging material correctly.
All packaging materials can be recycled.
Plastic parts are marked with the standard international abbreviations:
■ PE——for polyethylene, e.g. sheet wrapping material
■ PSforpolystyrene, e.g. padding material
■ POM — polyoxymethylene, e.g. plastic clips
■ PP — polypropylene, e.g. Salt filler
■ ABS — Acrylonitrile Butadiene Styrene, e.g. Control Panel.
WARNING!
■ Packaging material could be dangerous for children!
For disposing of package and the appliance please go to a recycling centre. Therefore cut off the powersupplyable and makethedoorclosing device unusable.
■ Cardboard packaging is manufactured from recycled paper and should be disposed in the waste paper collection for recycling.
■ By ensuring this product is disposed of correctly, you will help prevent potential negative consequences for the environment and human health, which could otherwise be caused by inappropriate waste handling of this product.
For more detailed information about recycling of this product, please contact your local city office and your household waste disposal service.
DISPOSAL: Do not dispose this product as unsorted municipal waste. Collection of such waste separately for special treatment is necessary.
3. Operation Instruction

IMPORTANT Togetthe bestperformance from yourdishwasher, read alloperating instructions before using it for the first time.
Control Panel

- On/Off Button: To turn on/off the power supply.
- Menu Button: Press to select a menu option in the followingcycle: programmeselectiondelaytimesetting →option setting →alternative wash function selection →add Salt Consumption setting →language setting
Pressing Menu, you can choose optional functions and programmes.
3.OK Button: Confirms the menu selected after pressing the button.
Quick operation guideline:
-
- Button: Move to the left. Press once and the menu moves to the next item on the left.
-
- Button: Move to the right. Press once and the menu moves to the next item on the right
- Display Screen: Showsthedelaytime, running indicator, error codes, programmes, Language and etc.
NOTE:
- When a selected programme has finished, all of the settings will be recorded by the system, but for the language setting, it will be recorded immediately after you press the OK button.
- The display will show "add rinse or add salt" information if you press power button, reminding you to refill the rinse aidorsalt. However you can still keep using the machine following the same operations as mentioned above after pressing the MENU button once.
Dishwasher Features
Frontview
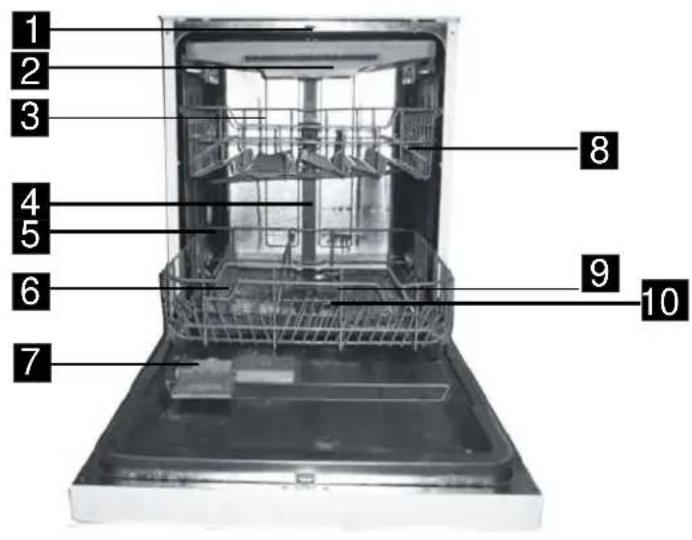
BackView
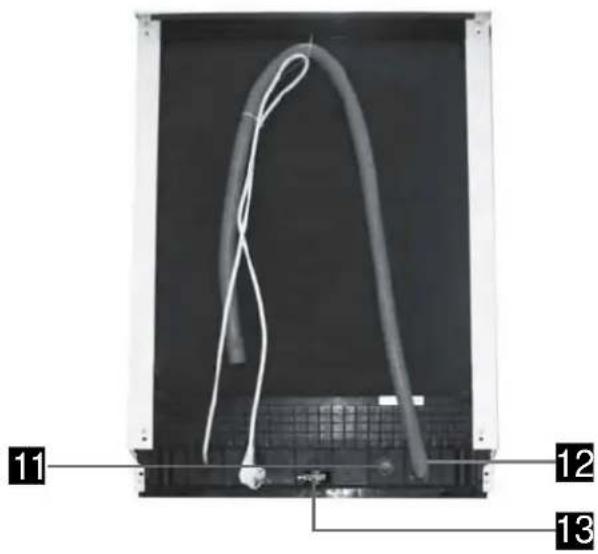
1 Topsprayarm
2 Cutlerytray
3 Upperbasket
4 Innerpipe
5 Lowerbasket
6 Saltcontainer
7 Dispenser
8 Cupshelf
9 Sprayarms
10 Filter assembly
11 Inletpipeconnector
12 Drainpipe
13 Adjuster
4. Prior using for the first time
Before using your dishwasher for the first time:
A. Set the water softener
B. Add 1.5Kg dishwasher salt and then fill the salt container with water
C. Fill the rinse aid dispenser
D. Adddetergent
A. Water Softener
The water softener must be set manually, using the water hardness dial.
The water softener is designed to remove minerals and salts from the water, which would have a detrimental or adverse effect on the operation of the appliance.
The higher the content of these minerals and salts, the harder your water is.
The softener should be adjusted according to the hardness of the water in your area. Your local Water Authority can advise you on the hardness of the water in your area.
Adjusting Salt Consumption
The dishwasher is designed to allow for adjustment in the amount of salt consumed based on the hardness of the water used. This is intended to optimise and customise the level of salt consumption.
Please follow the steps below for adjustment in salt consumption.
- Open the door, Switch on the appliance;
- Press the menu button to select Salt Consumption setting to start the water softener;
-
Press the “+” or -“ button to select the correct setting according to your water hardness, the settings will change in the following sequence: H1->H2->H3->H4->H5->H6;
-
Press the OK button to end the set up mode.
| WATERHARDNESS | Softenersetting | Saltconsumption(gram/cycle) | |||
| ^ dH | ^ fH | Clarke | mmol/l | ||
| 0~5 | 0~9 | 0~6 | 0~0.94 | H1 | 0 |
| 6-11 | 10-20 | 7-14 | 1.0-2.0 | H2 | 9 |
| 12-17 | 21-30 | 15-21 | 2.1-3.0 | H3 | 12 |
| 18-22 | 31-40 | 22-28 | 3.1-4.0 | H4 | 20 |
| 23-34 | 41-60 | 29-42 | 4.1-6.0 | H5 | 30 |
| 35-55 | 61-98 | 43-69 | 6.1-9.8 | H6 | 60 |
Note:1
1 dH=1.25Clarke=1.78fH=0.178mmol/l
DH: German degree
fH: Frenchdegree
Clark: British degree
Note:2
The factory setting is: H4 (EN 50242)
Contact your local water board for information on the hardness of your water supply.

NOTE: If your model does not have any water softener, you may skip this section.
WATERSOFTENER
The hardness of the water varies from place to place. If hard water is used in the dishwasher, deposits will form on the dishes and utensils. The appliance is equipped with a special softener that uses a salt container specifically designed to eliminate lime and minerals from the water.
B. Loading the Salt Into the Softener
Always use the salt intended for use with dishwashers.
The salt container is located beneath the lower basket and should be filled as explained in the following:
Attention!
■ Only use salt specifically designed for the use in dishwashers! Every other type of salt not specifically designed for the use in a dishwasher, especially table salt, will damage the water softener. In case of damages caused by the use of unsuitable salt the manufacturer does not give any warranty nor is liable for any damages caused.
■ Only fill with salt just before starting one of the complete washing programmes. This will prevent any grains of salt or salty water, which may have been spilled, remaining on the bottom of the machine for any period of time, which may cause corrosion.
1
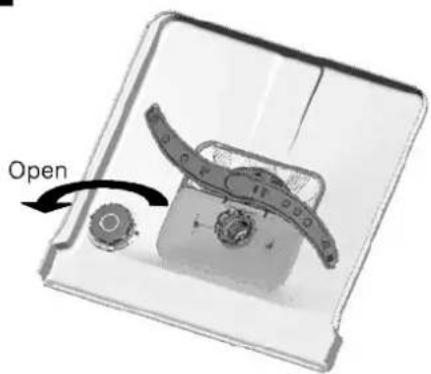
natural_image
Close-up of a mechanical device with a curved handle and two circular components, labeled 'Open' with an arrow indicating rotation (no text or symbols on the device itself)2
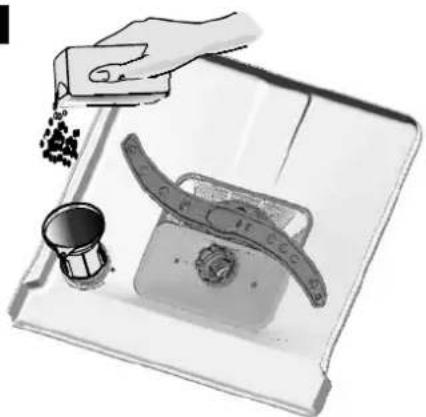
natural_image
Illustration of a hand pouring granular material into a kitchen appliance with a bowl (no text or symbols)A After the lower basket has been removed, unscrew and remove the cap from the salt container.
B Place the end of the funnel (supplied) into the hole and introduce about 1.5kg of dishwasher salt.
C Full fill the salt container with water, It is normal for a small amount of water to come out of the salt container.
D After filling the container, screw the cap tightly back clockwise.
E The salt warning light will stop illuminating after the salt container has been filled with salt.
F Immediately after filling the salt into the salt container, a washing programme should be started (Wesuggest to use a short programme). Otherwise the filter system, pump or other important parts of the machine may be damaged by salty water. This is out of warranty.

NOTE:
- The salt container must only be refilled when the salt warning light in the control panel comes on. Depending on how well the salt dissolves, the salt warning light may still be on even though the salt container is filled.
- If there are spills of the salt, a soak or a rapid programme should be run to remove the excessive salt.
C. Fill the Rinse Aid Dispenser
RinseAidDispenser
The rinse aid is released during the final rinse to prevent water from forming droplets on your dishes, which can leave spots and streaks. It also improves drying by allowing water to roll off the dishes. Your dishwasher is designed to useliquidrinseads. The rinseaddispenser is located inside the door next to the detergent dispenser. To fill the dispenser, open the cap and pour the rinse aid into the dispenser until the level indicator turns completely black. The volume of the rinse aid container is about 110ml.
FunctionofRinseAid
Rinse aid is automatically added during the last rinse, ensuring thorough rinsing, and spot and streak free drying.
Attention!
Only use branded rinse aid for dishwasher. Never fill the rinse aid dispenser with any other substances (e.g. Dishwasher cleaning agent, liquid detergent). This would damage the appliance.
When to Refill the Rinse Aid Dispenser
If there is no rinse-aid warning light in the control panel, you can estimate the amount from the colour of the optical level indicator "C" located next to the cap. When the rinse-aid container is full, the whole indicator will be dark. As the rinse-aid diminishes, the size of the dark dot decreases. You should never let the rinse aid level fall 1 / 4 full.
As the rinse aid diminishes, the size of the black dot on the rinse aid level indicator changes, as illustrated below.
Full
3/4full
1/2full
1/4 full-Should refill to eliminate spotting
Empty
natural_image
Illustration of a light bulb with a plastic cover and a magnified inset showing internal components (no text or symbols)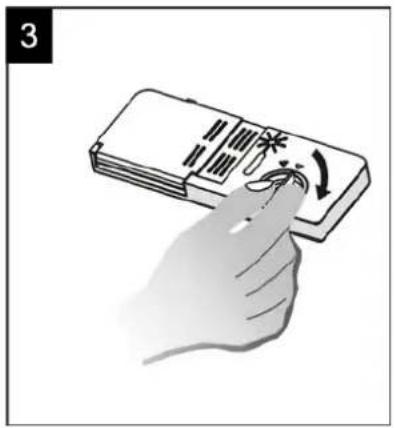
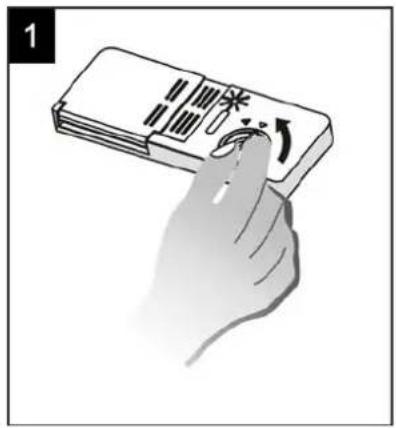
1 To open the dispenser, turn the cap to the "open" (left) arrow and lift it out.
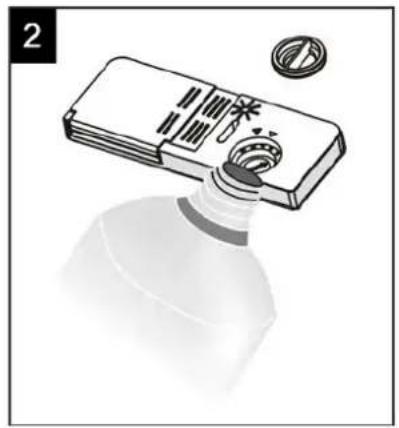
2 Pour the rinse aid into the dispenser, being careful not to overfill.
3 Replace the cap by inserting it aligned with "open" arrow and turning it to the closed (right) arrow.

NOTE: Clean up any rinse aid spilled while filling with an absorbent cloth to avoid excessive foaming
duringthenextwash. Don't forget to replace the cap before you close dishwasher door.
Adjusting Rinse Aid Dispenser
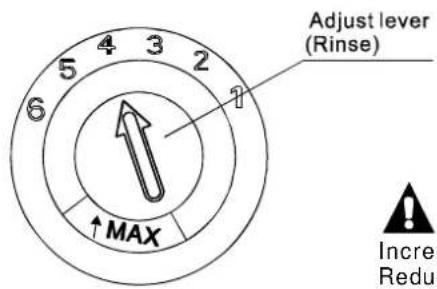
The rinse aid dispenser has six or four settings. Always start with the dispenser set on "4". If spots and poor drying are a problem, increase the amount of rinse aid dispensed by removing the dispenser lid and rotating the dial to "5". If the dishes still are not drying properly or are show spots, adjust the dial to the next higher lever until your dishes are spot-free. The recommended setting is "4". (Factoryvalueis"4".)

NOTE:
Increase the dose if there are drops of water or limespots on the dishes after washing. Reduce it if there are sticky whitish stains on your dishes or a bluish film on glassware or knifeblades.
D. Function of Detergent
Detergents with its chemical ingredients are necessary to remove dirt, crush dirt and transport it out of the dishwasher. Most of the commercial quality detergents are suitable for this purpose.
Attention!
ProperUseofDetergent
Use only detergent specifically made for the use in dishwashers. Keep your detergent fresh and dry.
Don't put powdered detergent into the dispenser until you're ready to wash dishes.
Detergents
There are 3 sorts of detergents
- With phosphate and with chlorine
- With phosphate and without chlorine
- Without phosphate and without chlorine
Normally new powdered detergent is without phosphate. Thus the water softener function of phosphate is not given. In this case we recommend to fill salt in the salt container even when the hardness of water is only 6dH. If detergents without phosphate are used in the case of hard water often white spots appear on dishes and glasses. In this case please add more detergent to reach better results. Detergents without chlorine do only bleach a little. Strong and coloured spots will not be removed completely. In this case please choose a programme with a higher temperature.
Concentrated Detergent
Based on their chemical composition, detergents can be split into two basic types:
■ conventional, alkaline detergents with caustic components
■ low alkaline concentrated detergents with natural enzymes
Detergent Tablets
Detergent tablets of different brands dissolve at different speeds. For this reason some detergent tablets cannot dissolve and develop their full cleaning power during short programmes. Therefore please uselong programmes when using detergent tablets, to ensure the complete removal of detergent residuals.
Detergent Dispenser
The dispenser must be refilled before the start of each wash cycle following the instructions provided in the wash cycle table. Your dishwasher uses less detergent and rinse aid than conventional dishwashers. Generally, only one tablespoon of detergent is needed for anormal wash load. Moreheavily soiled items need more detergent. Always add the detergent just before starting the dishwasher, otherwise it could get damp and will not dissolve properly.
Amount of Detergent to Use
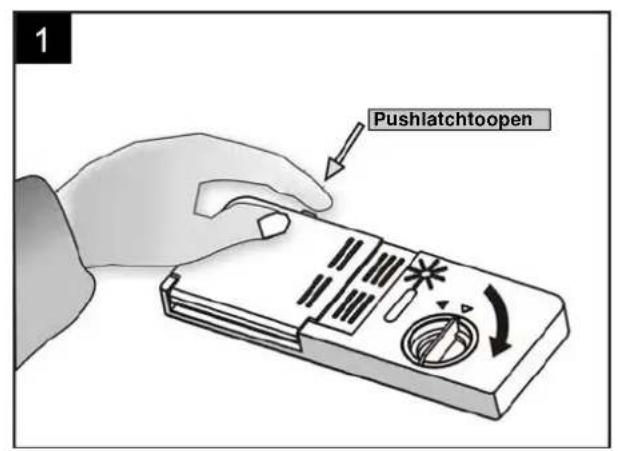
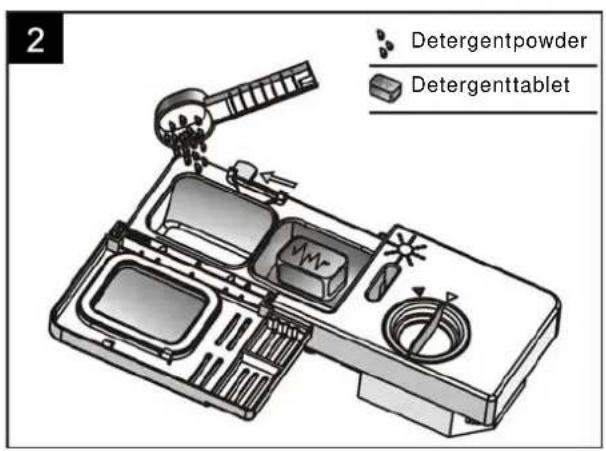
NOTE:
■ If the lid is closed: press release button. The lid will spring open.
■ Always add the detergent just before starting each wash cycle.
■ Only use branded detergent aid for dishwasher.
WARNING!
Dishwasher detergent is corrosive! Take care to keep it out of reach of children.
Fillin Detergent
Fill the detergent dispenser with detergent. The marking indicates the dosing levels, as illustrated on the right:
A Forthemainwashcycledetergent.
B Forthepre-washcycledetergent.
Please observe the manufacturers dosing and storage Recommendations as stated on the detergent packaging.
Closethelidandpressuntilitlocksinplace.
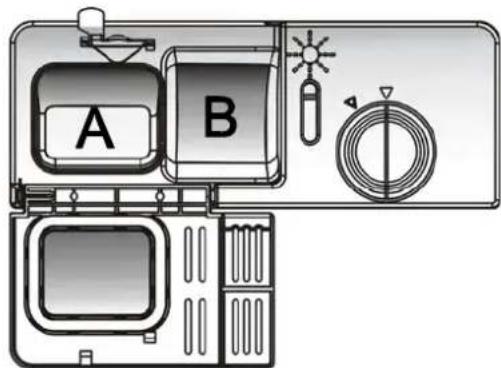
If the dishes are heavily soiled, place an additional detergent dose in the pre-wash detergent chamber. This detergent will take effect during the pre-wash phase.

NOTE:
■ You will find information about the amount of detergent for the single programme on the last page.
■ Please be aware, that according to the level soiling and the specific hardness of water differences are possible.
■ Please observe the manufacturer's recommendations on the detergent packaging.
5.Features5.
Express
For lighter loads the Express function by raising the temperature when used with the programmes: intensive, normal, economy and glass can shorten the washing time by up to 40 minutes.
Extra drying
To increase the efficiency of normal drying this feature increases the temperature at the end of the wash programme. This works with Intensive, Normal, Eco, Glass, and 1 Hour Express programmes.
Auto wash programme
Sensors intelligently check the level of cleanliness of your crockery to make maximum savings of time, energy and water. Here at Caple we want to do all that we can to save water for both ecological and financial reasons, an astonishingly low 8.4L can be used the Auto wash programme.
Cutlery tray
The clever cutlery trays sit at the top of your dishwasher and frees up much more space in the lower basket. The centre tray is easily removed to speed the delivery of your perfectly clean cutlery to your drawer.
Delay timer
The Delay timer allows the user to select the start time from 1 to 24 hours to most efficiently take advantage of convenient times and energy saving windows.
'Easy' adjustable upper basket
This feature allows the height of the upper basket to be changed (even with full loads) with the simple release of 2 conveniently placed levers.
Internal light
A well placed light helps internal illumination, and looks great too!
Aqua Stop
This system will at the first sign of any leak automatically cut off the water supply helping to avoid costly water damaged.
Alternative wash function.
This flexible system works like the Half load function, but also allows you to select either the upper or lower baskets for the load. Providing further water and energy savings for those smaller loads.
Power wash
When this Power Wash is used with five programmes (intensive, normal, economy, glass and 1 Hour Express), it can help break through very heavily soiled loads by increasing washing temperature and duration.
6. Loading the Dishwasher Baskets
Recommendation
■ Consider buying utensils which are identified as dishwasher-proof.
■ Useamild detergentthat is described as 'kindtodishes'. If necessary, seek further information from the detergent manufacturers.
■ For particular items, select a programme with as low atemperature as possible.
■ To prevent damage, do not take glass and cutlery out of the dishwasher immediately after the programme has ended.
For washing in the dishwasher the following cutlery/dishes
Are not suitable
■ Cutlery with wooden, hornchina or mother-of-pearlhandles
■ Plastic items that are not heat resistant
■ Oldercutlerywithgluedpartsthatarenot temperatureresistant
■ Bonded cutlery items or dishes
■ Pewterorcooperitems
■ Crystalglass
■ Steel items subject to rusting
■ Woodenplatters
■ Items made from synthetic fibres
Are of limited suitability
■ Some types of glasses can become dull after alargenumberofwashes
■ Silver and aluminum parts have a tendency to discolour during washing
■ Glazed patterns may fade if machine washed frequently
Attention before or after loading the Dishwasher Baskets
(For best performance of the dishwasher, follow these loading guidelines.
Features and appearance of baskets and cutlery baskets may vary from your model.)
Scrape off any large amounts of leftover food. Soften remnants of burnt food in pans.
It is not necessary to rinse the dishes under running water.
Place objects in the dishwasher in following way:
- Items such as cups, glasses, pots/pans, etc. are faced downwards.
- Curved items, or ones with recesses, should be loaded aslant so that water can run off.
- All utensils are stacked securely and can not tip over.
- All utensils are placed in the way that the spray arms can rotate freely during washing.

NOTE: Very small items should not be washed in the dishwasher as they could easily fall out of the basket.
- Load hollow items such as cups, glasses, pans etc. With the opening facing downwards so that water cannot collect in the container or a deep base.
■ Dishes and itemsof cutlery must not lie inside one another, or cover each other.
■ To avoid damage to glasses, they must not touch.
■ Load large items which are most difficult to clean into the lower basket.
■ The upper basket is designed to hold more delicate and lighter dishware such as glasses, coffee and teacups
■ Long bladed knives stored in an upright position are a potential hazard!
■ Long and/or sharp items of cutlery such as carving knives must be positioned horizontally in the upper basket.
■ Please do not overload your dishwasher. This is important for good results and for reasonable consumption of energy.
Removing the Dishes
To prevent water dripping from the upper basket into the lower basket, we recommend that you empty the lower basket first and then the upper basket.
Loading the Upper Basket
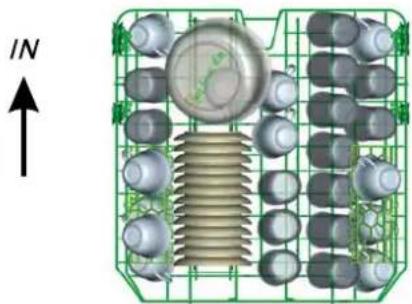
The upper basket is designed to hold more delicate and lighter dishware such as glasses, coffee and teacups and saucers, as well as plates, small bowls and shallow pans (as long as they are not too dirty). Position the dishes and cookwares that they will not get moved by the spray of water.
natural_image
3D diagram of a mechanical assembly with springs and housing, showing internal components and a north arrow (no text or symbols)Pleaseberemindedthat:
Pots, serving bowls, etc, must always be placed top down.
- Deep pots should be slanted to allow water to flow out.
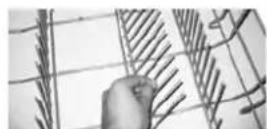
The Bottom Basket features folding spikes so that larger or more pots and pans can be loaded.
Adjusting the Upper Basket
The height of the upper basket can be adjusted in order to create more space for large utensils both for the upper /lower basket. The height of the upper basket can be adjusted to the upper position by lifting the basket up until it clicks into place. Pull upwards on the handle to lower the upper basket, see the picture below:
Lift the basket for upper position
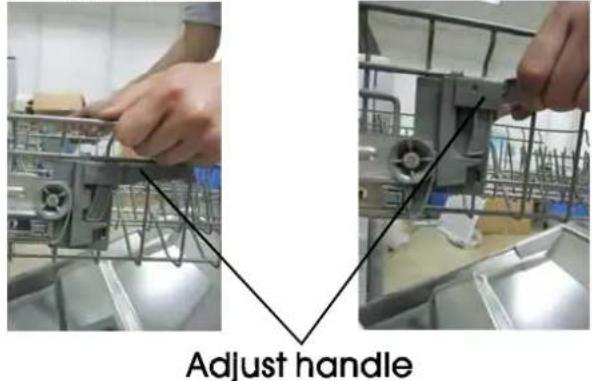
Pull up the handle to lower the basket
Loading the Lower Basket
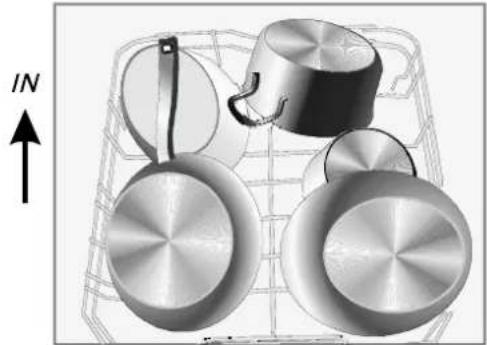
We suggest that you place large items and the most difficult to clean items are to be placed into the lower basket: such as pots, pans, lids, serving dishes and bowls, as shown in the figure below. It is preferable to place serving dishes and lids on the side of the racks in order to avoid blocking the rotation of the top spray arm.
natural_image
Illustration of kitchen utensils including a pot, lid, and panes in a basket (no text or symbols)Foldingbackthecupshelves
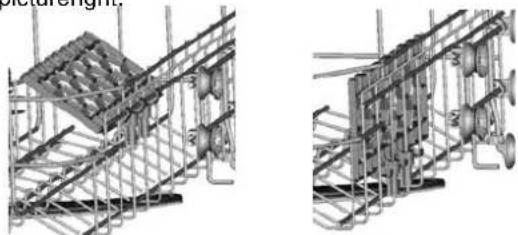
Forbetterstackingofpotsandpans, theshelvescanbefoldeddownas showinthepictureright.
natural_image
Two technical diagrams showing structural steel framework with internal components and no visible text or symbolsFoldingSpikesofLowerBasket
Forbetterstackingofpotsandpans, thespikescanbefoldeddownas shown in the picture to the right.
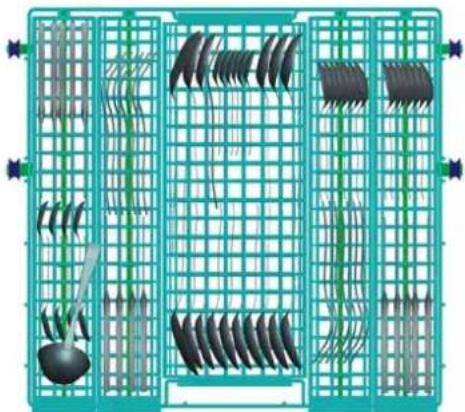
Cutlery Basket
Cutlery should be placed in the cutlery rack separately from each other in the appropriate positions, and do make sure the utensils do not nest together, this may reduce the cleaning performance.
For a top quality cleaning, place the silverware in the basket makingsurethat:
■ Theydonotnesttogether.
■ Silverwareispositionednottoholdwater.
■ Longutensilsinthemiddle.
natural_image
Diagram of a food delivery or kitchen setup with multiple rectangular compartments and kitchen utensils (no text or labels)7. Starting a washing program
Wash Cycle Table Wash Cycle Table

NOTE: (○) Means: need to add rinse aid into the Rinse-Aid Dispenser.
Water consumption doesn't include regeneration water.
| Program Program | Cycle Selection Information | Description of Cycle | Detergent pre/main | Running time(min) | Energy (Kwh) | Water (L) | Rinse Aid |
| Auto | Auto sensing wash, lightly, normally or heavily soiled crockery, with or with out dried-on food | Pre-wash (45 °C) Autowash(45-55 °C) Rinse Rinse (62 °C) Drying | 5/30g(or3in1) | 120~180 | 0.9~1.3 | 8.4~12.7 | |
| Inten. | For heaviest soiled crockery, and normally soiled pots, pans, dishes etc with dried on soiling. | Pre-wash(50 °C) Wash (65 °C) Rinse Rinse Rinse(55°C) Drying | 5/30g(or3in1) | 165 | 1.3 | 17 | |
| Normal | For normally soiled loads, such as pots, plates, glasses and lightly soiled pans. | Pre-wash(45°C) Wash (55 °C) Rinse Rinse (65 °C) Drying | 5/30g(or3in1) | 180 | 1.2 | 13 | |
| Eco (*EN 5 0242) | This is Standard programme, it is suitable to clean normally soiled tableware and it is the most efficient programme in terms of its combined energy and water consumption for that type of tableware. | Pre-wash Wash (50 °C) Rinse Rinse(65°C) Drying | 5/30g(or3in1) | 179 | 0.85 | 10 | |
| Glass | For lightly soiled crockery and glass. | Pre-wash Wash (40 °C) Rinse Rinse(60°C) Drying | 5/30g | 115 | 0.82 | 13 | |
| 60 Min | For lightly soiled loads that do not need excellent drying efficiency. | Pre-wash(50°C) Wash(60°C) Rinse (60°C) Drying | 5/30g | 60 | 1.05 | 10 | |
| Rapid | A shorter wash for lightly soiled loads and quick wash. | Wash (45 °C) Rinse Rinse (45 °C) | 20g | 40 | 0.6 | 11 | |
| Soak | To rinse dishes that you plan to wash later that day. | Pre-wash | 8 | 0.01 | 4 |

NOTE:NOTE:
*EN 5 0242 : This programme is the test cycle. The information for comparability test in accordance with EN 50242, as follows:
■ Capacity: 14 setting
■ Position Upper basket: upper wheels on rails
■ Rinse aid setting: 6
■ PI:0.49w; Po:0.45w(dishwasher is equipped with a power management system).
Turning On the Appliance
Starting a cycle wash
1 Draw out the lower and upper basket, load the dishes and push them back. It is recommended to load the lower basket first, then the upper one (see the section entitled "Loading the Dishwasher").
2 Pour in the detergent (see the section entitled "Salt, Detergent and Rinse Aid").
3 Insert the plug into the socket. The power supply is 220-240 VAC /50 HZ, the specification of the socket is 10A 250VAC. Make sure that the water supply is turned on to full pressure.
4 Open the door, press the ON/OFF Button.
5 Press the menubutton, then press “-” or “+” button change the programme as follows direction:
Auto->Intensive->Normal->Eco->Glass->60Min->Rapid->Soak;
If a programme is selected, the display screen will show it. Press the OK button, Close the door, the dishwasher will then start.
Changing the programme
A cycle that is underway can only be modified if it has been running for a short time. Otherwise, the detergent may have already been released, and the appliance may have already drained the wash water. If this is the case, the detergent dispenser must be refilled (see the section entitled "Loading the Detergent").
2 Open the door, press the menu button, then press "+" or "-" button, you can change the programme to the desired setting (see the section entitled "Starting a washcycle...").

NOTE:
If you open the door during a wash cycle, the machine will pause. The programme light will stop flashing and the buzzer will sound every minute unless you closet the door. After you close the door, the machine will start again after 10 seconds.
Forgot to Add a Dish?
Aforgottendishcanbeaddedanytimebeforethedetergentcupopens.
f Openthedoor alittle.
4 Closethe door
2 Afterthesprayarms stopworking, you canopenthedoor completely.
5 Thedishwasherwillrunafter10seconds.
3 Addforgottendishes.
At the End of the Wash Cycle
When the working cycle has finished, the buzzer of the dishwasher will sound for 8 seconds, then the dishwasher reverts automatically to off-mode after the end of the programme.(If you open the door while the buzzer is sounding you must press the on/off button to switch off the dishwasher). ,Shut off the water supply and open the door of the dishwasher.Waitforafewminutesbeforeunloadingthedishwashertoavoidhandlingthedishesandutensilswhile theyarestillhotandmoresusceptibletobreakage.Theywillalsodrybetter.
■ Switchoffthedishwasher
- The buzzer of the dishwasher will sound for 8 seconds, then the dishwasher .will revert automatically to off-mode
- Turnoffthewatertap!
■ Openthedoorcarefully.
Hot dishes are sensitive to knocks. The dishes should therefore be allowed to cool down around 15 minutes before removing from the appliance.
Open the dishwasher's door, leave it ajar and wait a few minutes before removing the dishes. This way they will be cooler and the drying will be improved.
■ Unloadingthedishwasher
It is normal that the dishwasher is wet inside.
Empty the lower basket first and then the upper one. This will avoid water dripping from the upper basket onto the dishes in the lower one.
WARNING!
It is dangerous to open the door when washing, because the hot water may scald you.
8. Maintenance and Cleaning
Filtering System
The filter prevents larger remnants of food or other objects from getting inside the pump. The residues may block the filter, in this case they must be removed.
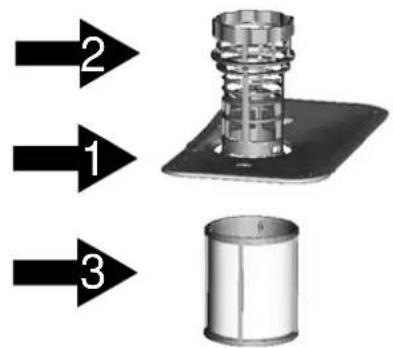
The filter system consists of a coarse filter, a flat (Main filter) And a microfilter(Fine filter).
Mainfilter 1
Food and soil particles trapped in this filter are pulverized by a special jet on the lower spray arm and washed down to drain.
Coarsefilter 2
Larger items, such as pieces of bones or glass, that could block the drain are trapped in the coarse filter. To remove the items caught by the filter, gently squeeze the tap on the top of this filter and liftout.
Finefilter 3
Thisfilterholds soil and food residues in the sumparea and prevents it from being redeposit on the dishes during wash cycle.
Filterassembly
The filter efficiently removes food particles from the wash water, allowing it to be recycled during the cycle. For best performance and results, the filter must be cleaned regularly. For this reason, it is a good idea to remove the larger food particles trapped in the filter after each wash cycle by rinsing the semicircular filter and cup under running water. To remove the filter device, pull the cup handle in the upward direction.
WARNING!
■ The dishwasher must never be used without the filters.
■ Improper replacement of the filter may reduce the performance level of the appliance and damaged dishes and utensils.
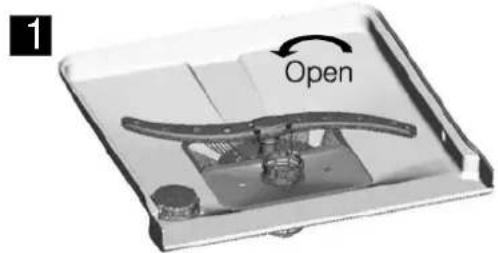
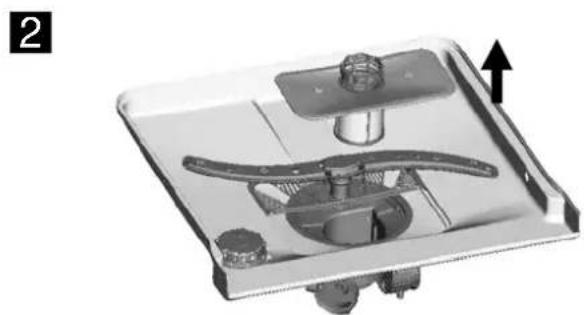
Step 1: Turn the filter in anti-clockwise direction,
natural_image
3D mechanical component diagram showing internal parts and a directional arrow (no text or symbols)Step2 lift the filter assyup
A NOTE: When following this procedure from step1 to step 2, the filter system will be removed; when following it from Step 2 to Step 1, the filter system will be installed.
Remarks:
- Inspect the filters for blocking after every time the dishwasher has been used.
- By unscrewing the coarse filter, you can remove the filter system. Remove any food remnants and cleanthe filters underrunningwater.

NOTE: The entire filter assembly should be cleaned once a week.
Cleaning the Filter
To clean the coarse filter and the fine filter, use a cleaning brush. Reassemble the filter parts as shown in the figures on the last page and reinsert the entire assembly in the dishwasher, positioning it in its seat and pressing downwards.

WARNING!
When cleaning the filters, don't knock them. Otherwise, the filters could be contorted and the performance of the dishwasher could be decreased.
Caring for the Dishwasher
The control panel can be cleaned by using a lightly dampened cloth.
After cleaning, make sure to dry it thoroughly.
For the exterior, use a good appliance polish wax.
Never use sharp objects, scouring pads or harsh cleaners on any part of the dishwasher.
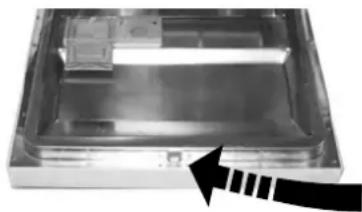
Cleaning The Door
natural_image
Interior view of a rectangular electronic device with internal components and a black arrow pointing to a component (no visible text or symbols)To clean the edge around the door, you should use only a soft warm, damp cloth. To avoid penetration of water into the door lock and electrical components, do not use aspraycleanerofanykind.

WARNING!
■ Never use a spray cleaner to clean the door panel as it may damage the door lock and electrical components.
■ Abrasive agents or some paper towels should not be used because of the risk of scratching or leaving spots on the stainless steel surface.
ProtectAgainstFreezing
Please take frost protection measures on the dishwasher in winter. Every time after washing cycles, please operate as follows :
- Cutoff the electrical power to the dishwasher.
- Turn off the water supply and disconnect the water inlet pipe from the water valve.
- Drain the water from the inlet pipe and water valve. (Use a pan to gather the water)
- Reconnect the water inlet pipe to the water valve.
- Remove the filter at the bottom of the tub and use a sponge to soak up water in the sump.

NOTE: If your dishwasher cannot work because of the ice, please contact professional service persons.
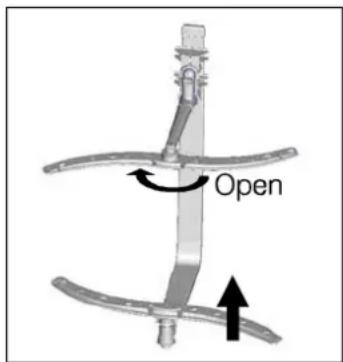
CleaningtheSprayArms
It is necessary to clean the spray arms regularly for hard waterchemicalswillclogthesprayarmjetsandbearings.
To remove the upper spray arm, hold the nut, rotate the arm clockwise to remove it.
Toremovethelowerspray arm, pull out the spray arm upward.
Wash the arms in soapy and warm water and use a soft brush to clean the jets. Replace them after rinsing them thoroughly.
How to Keep Your Dishwasher in Shape
■ After Every Wash
After every wash, turn off the water supply to the appliance and leave the door slightly open so that moisture and odours are not trapped inside.
■ RemovethePlug
Before cleaning or performing maintenance, always remove the plug from the socket.
■ No Solvents or Abrasive Cleaning
Toclean the exterior and rubber parts of the dishwasher, do not use solvents or abrasive cleaning products. Only use a cloth with warm soapy water. To remove spots or stains from the surface of the interior, use a cloth dampened with water and a little vinegar, or a cleaning product made specifically for dishwashers.
■ WhennotinUseforaLongTime
It is recommend that you run a washcycle with the dishwasher empty and then remove the plug from the socket, turn off the water supply and leave the door of the appliance slightly open. This will help the door seal to last longer and prevent odours from forming within the appliance.
■ MovingtheAppliance
If the appliance must be moved, try to keep it in the vertical position. If absolutely necessary, it can be positioned on its back.
Seals
One of the factors that cause odourstoform in the dishwasher is food that remains trapped in the seals. Periodic cleaning with a damp sponge will prevent this from occurring.
9. Installation instruction
▲Attention:
The installation of the pipes and electrical equipment should be done by professionals.

Warning
Electrical Shock Hazard Disconnect electrical power before installing dishwasher.
Failure todos o can result in deathor electrical shock.
• Installation preparation
The installation position of dishwashers should be near the existing inlet and drain hoses and powercord.
One side of the cabinet sink should be chosen to facilitate the connection of drain hoses of the dishwasher.
Note: please check the accompanying installation accessories (hook for the furniture door, screw)
Please carefully read the installation instruction.
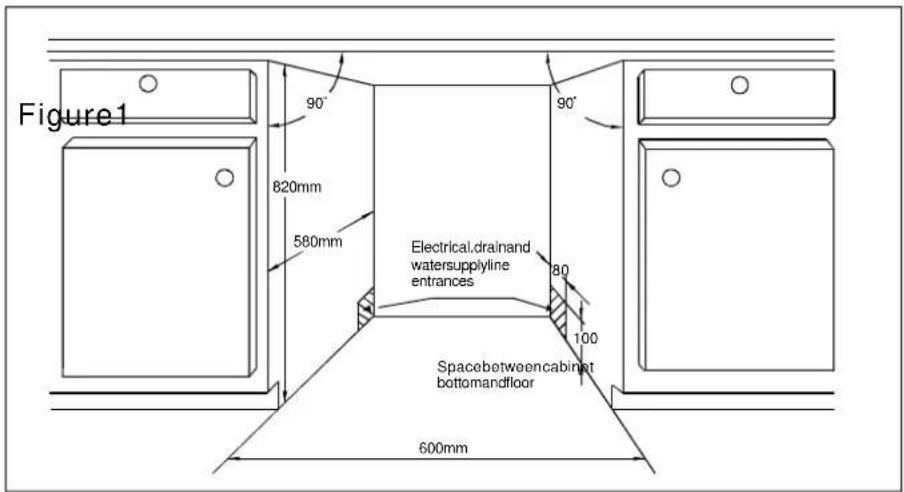
Illustrations of cabinet dimensions and installation position of the dishwasher
1 Preparations should be made before moving the dishwasher to the final location. Choose a place near the sink to facilitate the installation of inlet and drain hoses (see figure 1).
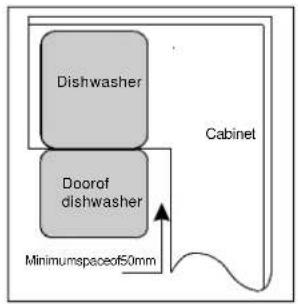
2 If dishwasher is installed at the corner of the cabinet, allow for some space (illustrated in figure 2) when the door is opened.
【 】
Cabinetdimensions
Lessthan5mm
betweenthetop
ofdishwasherand
cabinetandthe
outerooraligned
tocabinet.
【 】
Minimumspacewhen
thedoorisopened
Figure2
flowchart
graph TD
    A["Dishwasher"] --> B["Door of dishwasher"]
    B --> C["Cabinet"]
    D["Minimumspaceof50mm"] --> B
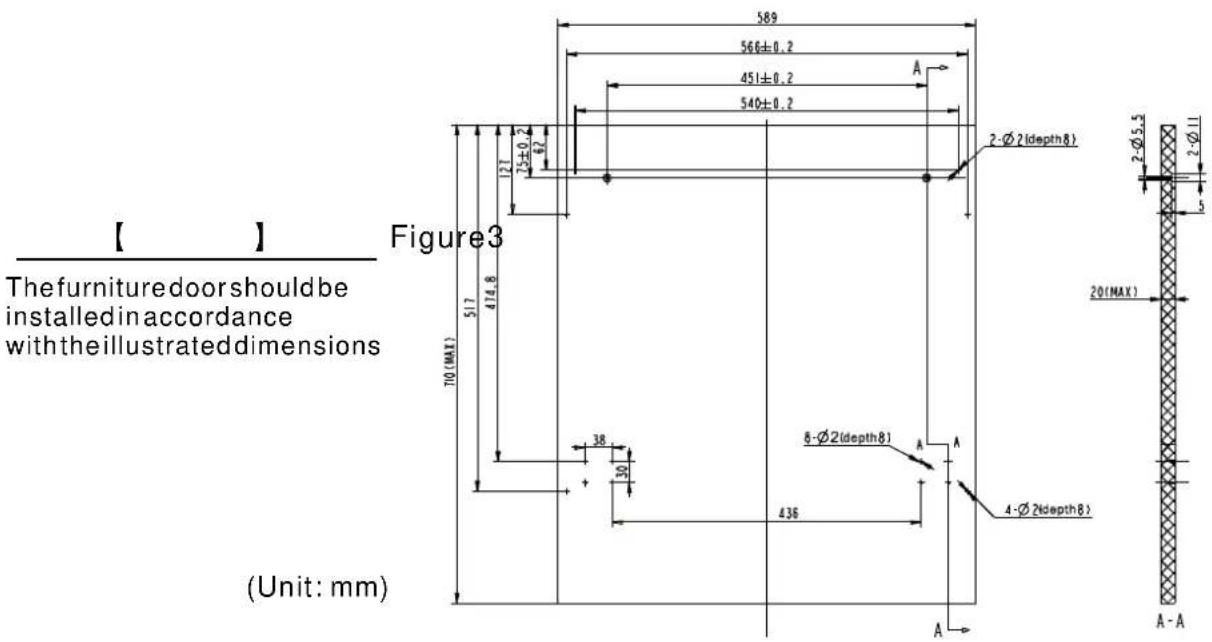
dimensions and installation Furniture door
1 The furniture door should be installed according to the Figure 3.
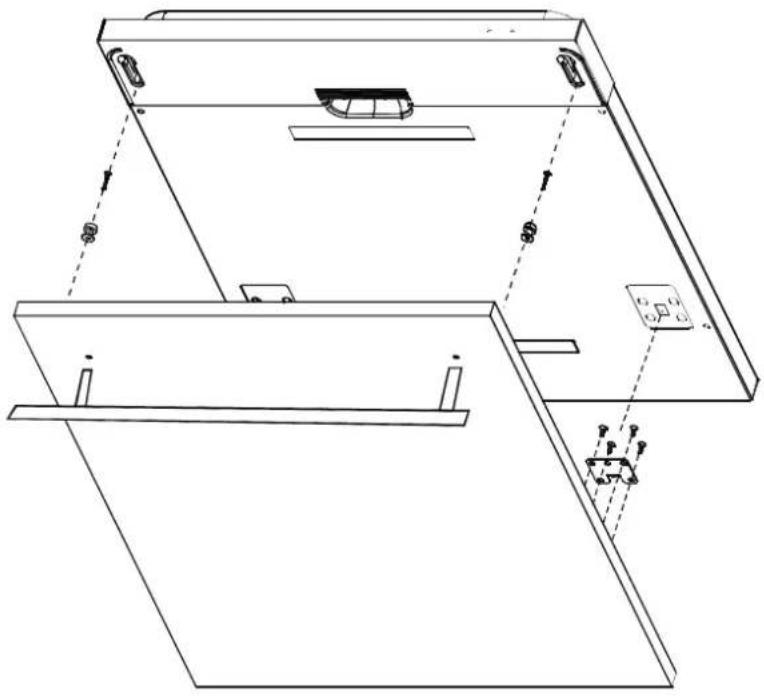
2 Install the hook on the furniture door and put the hook into the slot of the outer door of dishwasher(see figure 4a). After positioning of the panel, fix the panel onto the outer door by screwsandbolts(Seefigure4b).
【Figure4a】
Installationoffurnituredoor
natural_image
Technical line drawing of a mechanical assembly with no visible text or symbols【Figure4b】
Installation of the furnished door
- takeaway the four short screws
- pin up the four screws
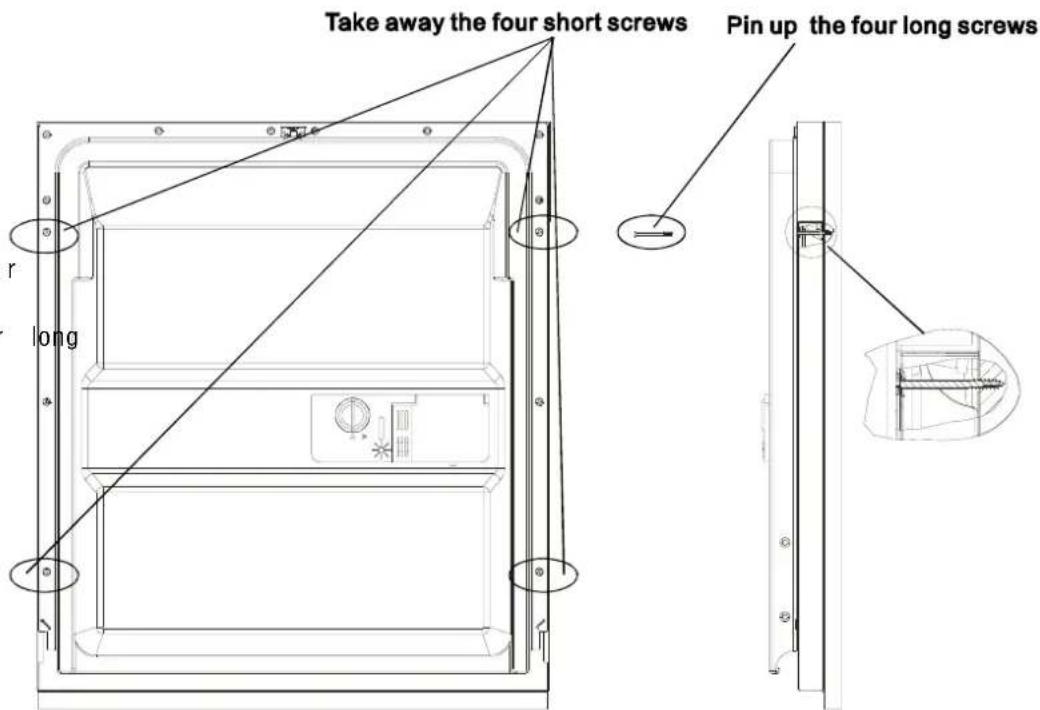
- Tension adjustment of the door spring
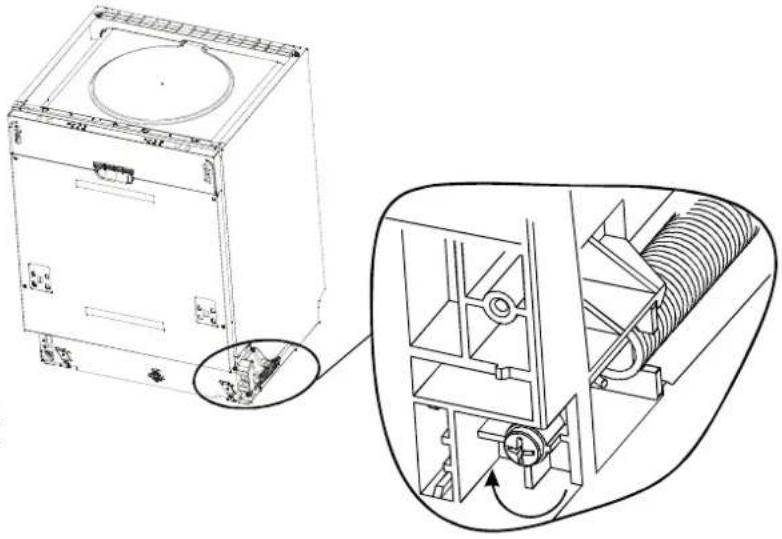
The doorsprings are set at the factory to the propertension for the outerdoor. When the furniture door is installed, you will have to adjust the door spring tension. Rotate the adjusting screw to drive the adjustorto strain or relax the steel cable (see figure 5).
Doorspringtension is correct when the door remains horizontal in the fully opened position yet rises to a close with the slight lift of a finger.
natural_image
Technical line drawing of a washing machine with internal components and a close-up inset showing internal mechanism (no text or symbols)【Figure 5】
Tension adjustment of the door spring
- Connection of drain hoses
Insert the drain hose into a drain pipe with a minimum diameter of 40mm, or let it run into the sink, making sure to avoid bending or crimping it. The top of the hose must be less than 1000mm high.
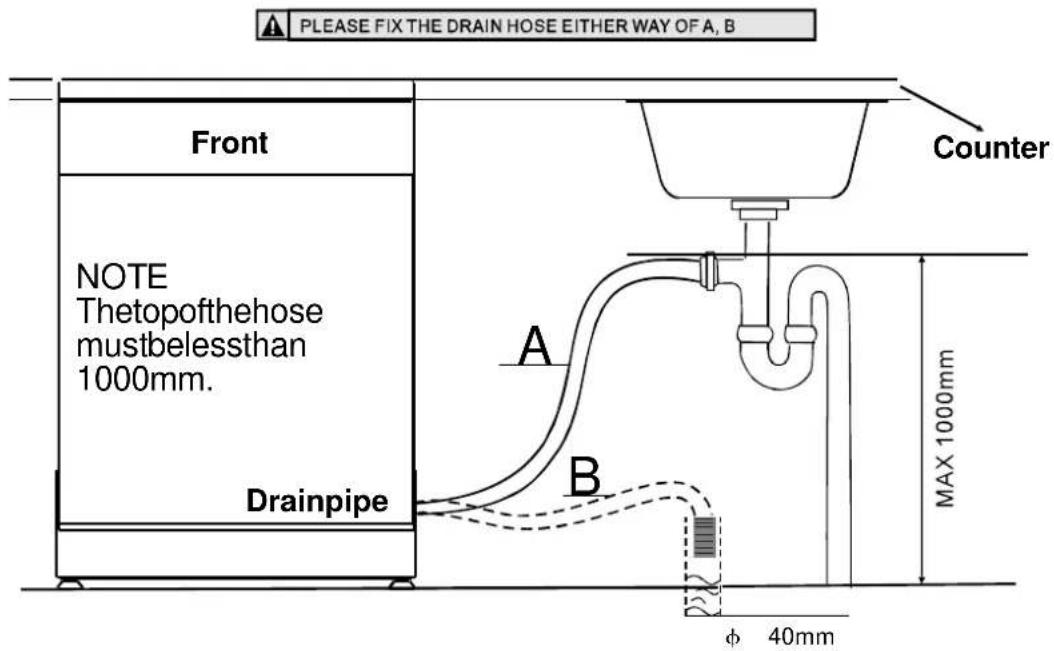
- Dishwasherinstallationsteps
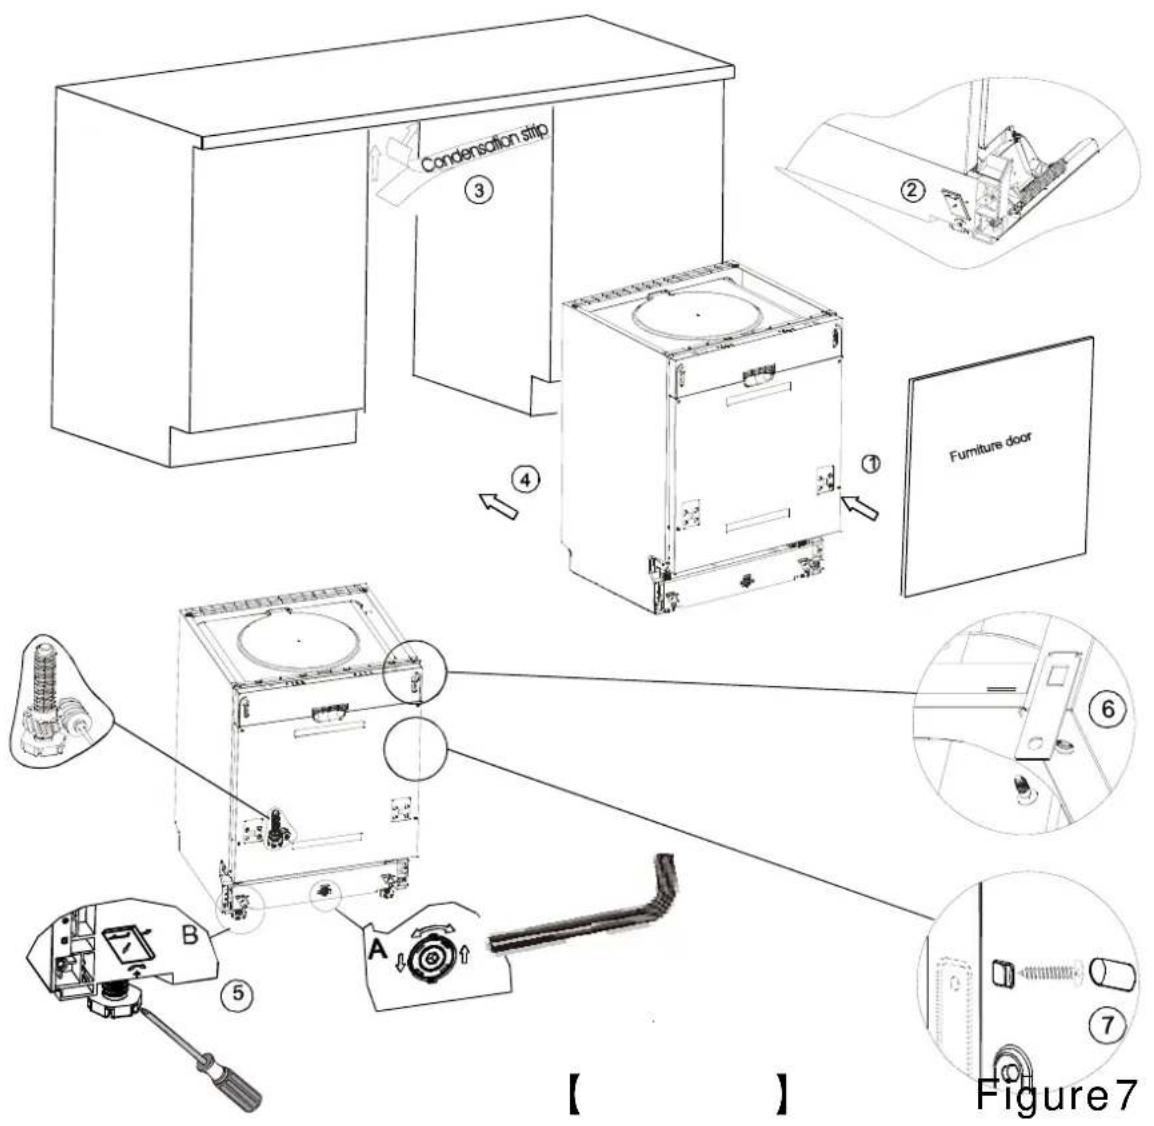
1 Install the furniture door to the outer door of the dishwasher using the brackets provided. Refer to the template for positioning of the brackets.
2 Adjust the tension of the door springs by using an Allen key turning in a clockwise motion to tighten the left and right doorsprings. Failure to do this could cause damage to your dishwasher (Illustration 2).
3 Connect the inlet hose to the cold water supply.
4 Connect the drain hose. Refer to diagram.(Figure 6)
5 Connectthepowercord.
6 Affix the condensation strip under the work surface of cabinet. Please ensure the condensation strip is flush with edge of worksurface.
7 Place the dishwasher into position.(Illustration 4)
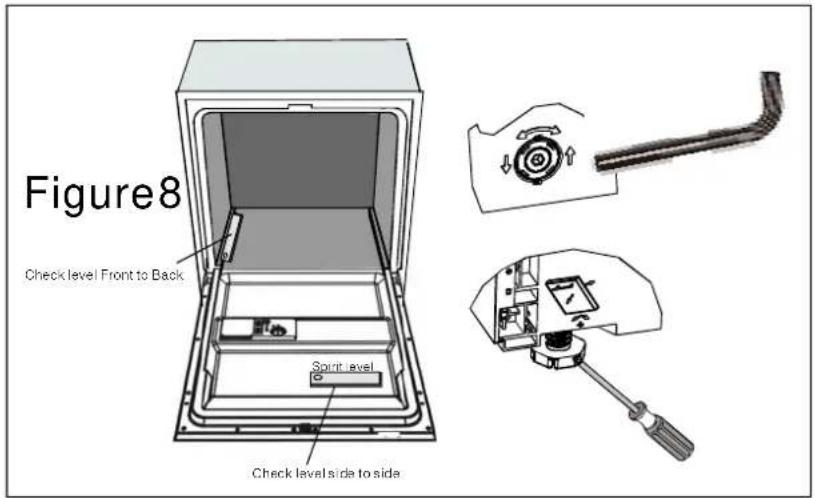
8 Level the dishwasher. The rear feet can be adjusted from the front of the dishwasher by turning the Allen screw in the middle of the base of dishwasher use an Allen key (Illustration 5A). To adjust the front feet, use a flatscrew driver and turn the front feet until the dishwasher is level (Illustration 5B).
9 The dishwasher must be secured in place. There are two ways to do this:
A. Normal work surface: Put the installation hook into the slot of the side plane and secure it to the work surface with the wood screws (Illustration 6).
B. Marble or granite work top: Fix the side with Screw. (Illustration 7).
The dishwasher must be level for proper dish rack operation and wash performance.
1 Placeaspiritlelondoorandracktrackinsidethetubasshowntocheckthatthe dishwasherislevel.
2 level the dishwasher by adjusting the three levelling legs individually.
3 When levelling the dishwasher, please pay attention not to let the dishwashertipover.
【 】
Illustration of feet adjustment
NOTE:
The maximum adjustment height of the feet is 50 mm.
Electrical Connection
Forpersonalsafety: DONOTUSEANEXTENSIONCORDORANADAPTERPLUGWITHTHISAPPLIANCE. DONOT,UNDERANYCIRCUMSTANCES,CUTORREMOVETHEEARTHING CONNECTIONFROMTHEPOWERCORD.
Electrical Requirements
Please look at the rating label to know the rating voltage and connect the dishwasher to the appropriate power supply. Use the required fuse 10 amp, time delay fuse or circuit breaker recommended and provide separate circuit serving only this appliance.
Electrical Connection
⚠ Ensure proper ground exists before use
Ensure the voltage and frequency of the power corresponds to those on the rating plate. Only insert the plug into an electrical socket which is earthed properly. If the electrical socket to which the appliance must be connected is not appropriate for the plug, replace the socket, rather than using a adaptors or the like as they could cause overheating and burns.

GROUNDING INSTRUCTIONS
This appliance must be earthed. In the event of a malfunction or breakdown, earthing will reduce the risk of electric shock by providing a pathofleast resistance for the electric current. This appliance is equipped with a cord having an equipment-earthing conductor and an earthing plug. The plug must be plugged into an appropriate outlet that is installed and earthed in accordance with all local standards and requirements.
▲WARNING!
Improper connection of the equipment-grounding conductor can result in the risk of an electric shock. Check with a qualified electrician or service representative if you are in doubt whether the appliance is properly grounded. Do not modify the plug provided with the appliance; If it is not fit for the outlet. Have a proper outlet installed by a qualified electrician.
How to Connect the safety supply hose
natural_image
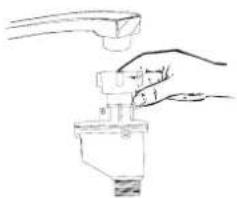
Line drawing of a hand using a tool to lift a mechanical component (no text or symbols)The appliance must be connected to the water mains using new hose-sets.
Theoldhose-setsshouldnotbereused.
Waterpressuremustbebetween0,04MPaand1MPa.Ifthepressureisbelowtheminimum consultourServiceDepartmentforadvice.
- Pull Thesafetysupplyhosescompletelyoutfromstoragecompartmentlocatedatrearof dishwasher.
- Fixthehosetothewatersupplyconnectionwitha3/4inchthread.
- Turnwaterfullyonbeforestartingthedishwasher.
About the safety supply hose.
The safety supply hose consists of the double walls. The hose's system guarantees its intervention by blocking the flow of water in case of the supply hose breaking and the air space between the supply hose itself and the outer corrugated hose is full of water.
WARNING!
A hose that attaches to a sink spray can burst if it is installed on the same water line as the dishwasher. If your sink has one, it is recommended that the hose be disconnected and the hole plugged.
How to Disconnect the safety supply hose
- Turnoffthewater.
- Release the water pressure by depressing the pressure release button. This relieves water pressure and protects you, andtheroom, from severesplashing.
- Unscrew Thesafetysupplyhose from the connection.
Cold water connection
Connect the cold waters supply hoseto a th Readed 3/4 (inch) connector and makes sure that it is fastened tightly in place.
If the water pipes are new or have not been used for an extended period of time, let the water run to make sure that the water is clear and free of impurities. If this precaution is not taken, there is a risk that the water inlet can get blocked and damagetheappliance.
Positioning the Appliance
Position the appliance in the desired location. The back should rest against the wall behind it, and the sides, along the adjacent cabinets or walls. The dishwasher is equipped with water supply and drain hoses that can be positioned either to the right or the left sides to facilitate proper installation.
How to Drain Excess Water From Hoses
If the sink is 1000mm higher from the floor, the excess water in hoses cannot be drained directly into the sink. It will be necessary to drain excess water from hoses into a bowl or suitable container that is held outside and lower than the sink.
WaterOutlet
Connect the water drain hose. The drain hose must be correctly fitted to avoid water leaks.
Ensure that the water drain hose is not linked or squashed.
ExtensionHose
If you need a drain hose extension, make sure to use a similar drain hose.
It must be no longer than 4 metres; otherwise the cleaning effect of the dishwasher could be reduced.
SyphonConnection
Insert the drain hose into a drain pipe with a minimum diameter of 40mm, or let it run into the sink, making sure to avoid bending or crimping it. The top of the hose must be less than 1000mm from the floor.
Starting the Dishwasher
The following things should be checked before starting the dishwasher.
1 The dishwasher is level and fixed properly
2 The inlet valve is open
3 Is there a leakage at the connections of the conducts
4 The wires are tightly connected
5 Thepowerisswitchedon
6 The inlet and drain hoses are not knotted
7All packing materials and printings should be taken out of the dish washer

Attention:
After installation, please make sure to keep this manual.
The content of this manual is very helpful to the users.
10. Troubleshooting Tips
Before Calling for Service
Review the following charts to help resolve common issues before calling Caple Service.
| Technical problems | Problem | Possible Causes What To Do | |
| Dishwasher doesn't start | Fuseblown,orthe circuitbreakeracted | Replacefuseorresetcircuitbreaker.Removeanyother appliancessharingthesamecircuitwiththedishwasher | |
| Powersupplyisnot turnedon | Makesurethedishwasheristurnedonandthedooris closedsecurely.Makesurethepowercordisproperlypluggedintothe wallsocket. | ||
| Waterpressureislow | Checkthatthewatersupplyisconnectedproperlyand thewateristurnedon. | ||
| Doorofdishwasher notproperlyclosed. | Makesuretoclosethedoorproperlyandlatchit. | ||
| water not pumped form dishwasher | Kinkindrainhose | Checkdrainhose. | |
| Filterclogged | Checkcoarsethefilter"Clean(eg3seffidttled) | ||
| Kitchensinkclogged | Checkthekitchensinktomakesureitisdrainingwell.Iftheproblemisthekitchensinknotdraining,youmay needaplumberratherthanaservicemanfordishwashers. | ||
| General problems | Suds in the tub | Improperdetergent | Useonlythespecialdishwaherdetergenttoavoidsuds.Ifthisoccurs,openthedishwasherandletsudsevaporate.Add1gallonofcoldwatertothetub.Closeandlatchthe dishwasher,thenselectanycycle.Dishwasherwilldrain outthewateratthefirststep.Openthedoorafterdraining isstopandcheckifthesudsisdisappeared.Repeatifnecessary. |
| Spilledrinse-aid | Alwayswipeuprinse-aidspillsimmediately. | ||
| Stained tub interior | Detergentwith colourantwasused | Makesurethatthedetergentistheonewithout colourant. | |
| White film on inside surface | Hardwaterminerals | Tocleantheinterior,useadampspongewith dishwasherdetergentandwearrubbergloves.Neveruseanyothercleanerthandishwasher detergentfortheriskoffoamingorsuds. | |
| There are rust stains on cutlery | Theaffecteditemsare notcorrosionresistant. | ||
| Aprogrammewasnot runafterdishwasher saltwasadded.Tracesofsalthave gottenintothewashcycle. | Alwaysrunthequickwashprogramme.withoutanycrockeryinthedishwasherand withoutselectingtheTurbofunction(ifpresent),afteraddingdishwashersalt. | ||
| Thelidofthesoftener isloose | Checkthelip.Ensurethefixisfine. | ||
| Noise | Knocking noise in the wash cabinet | As p a y a r m i s knockingagainst aniteminabasket | Interrupttheprogramme,andrearrangetheitems whichareobstructingthespayarm.r |
| Rattling noise in the wash cabinet | Itemsofcrockery arelooseinthe washcabinet | Interrupttheprogramme,andrearrangetheitemsofcrockery. | |
| Knocking noise in the water pipes | Thismaybecaused byon-siteinstallation orthecross-sectionof thepiping. | Thishasnoinfluenceonthedishwasherfunction.ifindoubt,contactasuitablyqualifiedplumber. | |
| Problem | Possible Causes | What To Do | |
| Unsatis-factory washing result | The dishes are not clean | Thedisheswerenot loadedcorrectly. | Seenotesin"LoadingtheDishwasherBaskets". |
| Theprogrammewas notpowerfulenough. | Selectamoreintensiveprogramme.See"WashCycleTable." | ||
| Notenoughdetergent wasdispensed. | Usemoredetergent,orchangeyourdetergent. | ||
| Itemsareblocking thepathofspayarms.r | Rearrangetheitemssothatthespaycanrotatefreely.r | ||
| Thefiltercombination in the base of wash cabinetisnotcleanor isnotcorrectlyfitted. Thismaycause thespayarmjets togetblocked. | Cleanand/orfitthefiltercombinationcorrectly.Cleanthespayarmjets.See"CleaningtheSpray Arms". | ||
| Cloudiness on glassware | Combinationofsoft waterandtoomuch detergent. | Uselessdetergentifyouhavesoftwaterandselect ashortestcycletowashtheglasswareandtoget themclean. | |
| Black or gray marks on dishes | Aluminumutensils haverubbedagainst dishes. | Useamildabrasivecleanertoeliminateethosemarks. | |
| Detergent left in dispenser cups | Dishesblock detergentcups. | Re-loadingthedishesproperly. | |
| Unsatis-factory drying result | The dishes are not drying | Improperloading | Loadthedishwasherassuggestedinthedirections. |
| Toolittlerinse-aid | Increasetheamountofrinse-aid/refilltherinse-aid dispenser. | ||
| Dishesareremoved toosoon | Donotemptyyourdishwasherimmediatelyafter washing.Openthedoorslightlysothatthesteamcan escape.Beginunloadingthedishwasheronlyonce thedishesarebarelywarmtothetouch.Emptythelow basketfirst.Thispreventswaterformdroppingoff dishesintheupperbasket. | ||
| Wrongprogram hasbeenselected | Inshortprogrammethewashingtemperatureislower. Thisalsolowerscleaningperformance.Choose aprogrammewithalongwashingtime. | ||
| Useofcutlerywith alow-qualitycoating | Waterdrainageismoredifficultwiththeseitems.Cutleryordishesofthistypearenotsuitablefor washinginthedishwasher. | ||
Error Codes
If a malfunction appears, the appliance will display error codes to warn you:
| Codes | Meanings | Possible Causes |
| Error1 | Longerinlettime. | Watersupplyisnoton,orwaterintakeis restricted,orwaterpressureistoolow. |
| Error4 | Overflow. | Someelementofthedishwasherisleaking |
| Error8 | Failureoforientationofdistributaryvalve. | Opencircuitorbrokenofdistributaryvalve. |
| ErrorC | Fault of PCB data transmission. | PCBfailure |

WARNING!
■ If overflow occurs, turn off the main water supply before calling for service.
If there is water in the base pan because of an overfill or small leak, the water should be removed before restarting the dishwasher.
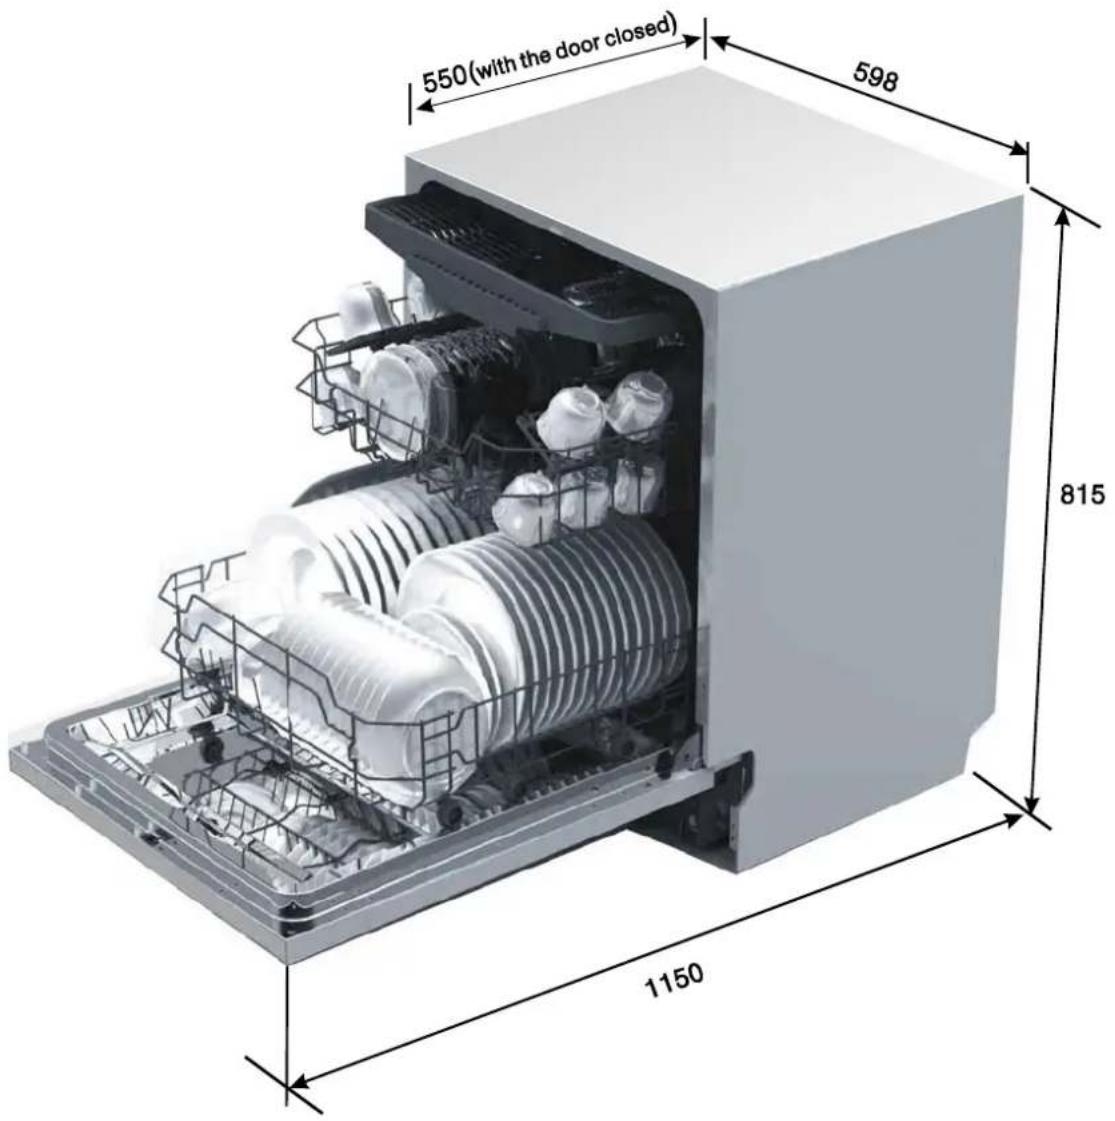
| Height:815mm | |
| Width:598mm | |
| Depth:550mm | (withthedoorclosed) |
| Water pressure: | 0.04-1.0MPa |
| Power supply: | see rating label |
| Capacity:14placesettings | |
Technical Data Sheet
Sheet of household dishwasher according to EU Directive 1059/2010:
| Manufacturer | CAPLE |
| Type/Description | Di628 |
| Standardplacesettings | 14 |
| Energy efficiency class 1 | A+++ |
| Annual energy consumption 2 | 238kWh |
| Energy consumption of the standard cleaning cycle | 0.85kWh |
| Power consumption of off-mode | 0.45W |
| Power consumption of left-on mode | 0.49W |
| Annual water consumption 3 | 2800 litre |
| Dryingefficiencyclass 4 | A |
| Standardcleaningcycle 5 | ECO50 °C |
| Programmeduration of the standardcleaningcycle | 179min |
| Noise level | 45dB(A)re1pW |
| Mounting | Buildunder |
| Could be built-in | Yes |
| Height | 81.5cm |
| Width | 59.8cm |
| Depth (with connectors) | 55cm |
| Power consumption | 1850W |
| Rated voltage/frequency | 230V~50Hz |
| Water pressure (flow pressure) | 0.4-10bar=0.04-1MPa |
NOTE:
1 A+++ (highest efficiency) to D (lowest efficiency)
② Energy consumption “238” kWh per year, based on 280 standard cleaning cycles using cold water fill and the consumption of the low power modes. Actual energy consumption will depend on how the appliance is used.
3 Water consumption “2800” litres per year, based on 280 standard cleaning cycles. Actual water consumption will depend on how the appliance is used.
4 A(highest efficiency) to G(lowest efficiency)
5 This programme is suitable for cleaning normally soiled tableware and that it is the most efficient programme in terms of its combined energy and water consumption for that type of tableware.
The device meets the European standards and the directives in the current version at delivery:
-LVD2006/95/EC
-EMC2004/108/EC
-EUP2009/125/EC
-LVD2006/95/EC -EMC2004/108/EC -EUP2009/125/EC
The above values have been measured in accordance with standards under specified operating conditions. Results may vary greatly according to quantity and pollution of the dishes, water hardness, amountofdetergent, etc.
The manual is based on the European Union's standards and rules.
Loading the baskets according to En50242:
1. Upper basket:
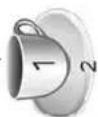
Saucers

Glasses
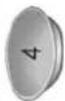
Small serving
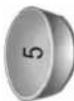
Medium serving bowl
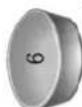
Large serving bowl
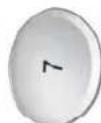
Dessert dishes
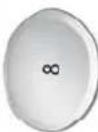
Dinner plates
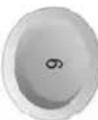
Soup plates
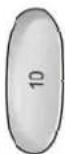
Oval platter
- Cutterly basket:
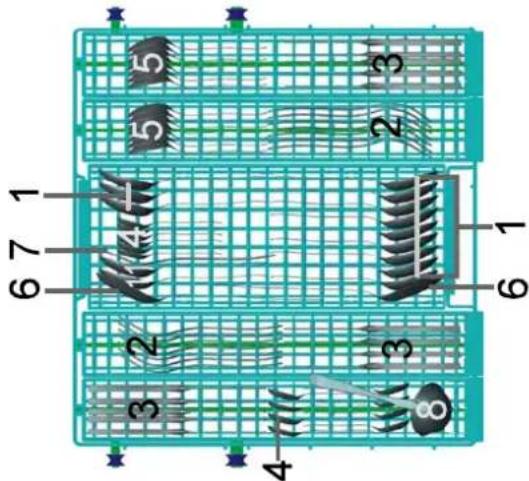
- Lower basket:
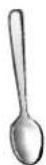
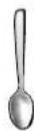
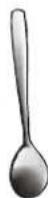
6 Serving spoons
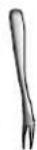
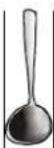
5 Dessert spoons
6 Serving spoons
7 Serving forks
8 Gravy ladles
1 Soup spoons
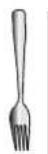
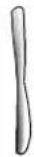
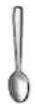
1 Soup spoons
Information for comparability tests in accordance
with EN 50242
Capacity: 14 place settings
Position of the upper basket: lower position
Programme: Eco
Rinse aid setting: 6
Softener setting: H4
- Instruction manual for integrated dishwasher
- Quick operation guide
- Mechanical indicator C.
- WARNING!
- Read this Manual
- DearCustomer,
- Before Calling for Service
- NOTE:
- IMPORTANT SAFETY INFORMATION READ ALL OF THE INSTRUCTIONS BEFORE USING
- GROUNDING INSTRUCTIONS
- ▲WARNING!
- WARNING! PROPER USE
- READ AND FOLLOW THIS SAFETY INFORMATION CAREFULLY KEEP THESE INSTRUCTIONS
- 2.Disposal
- Operation Instruction
- Dishwasher Features
- Prior using for the first time
- Water Softener
- Adjusting Salt Consumption
- Note:1
- Note:2
- WATERSOFTENER
- Loading the Salt Into the Softener
- Attention!
- Fill the Rinse Aid Dispenser
- RinseAidDispenser
- FunctionofRinseAid
- When to Refill the Rinse Aid Dispenser
- Adjusting Rinse Aid Dispenser
- Function of Detergent
- Detergents
- Concentrated Detergent
- Detergent Tablets
- Detergent Dispenser
- Amount of Detergent to Use
- Fillin Detergent
- 5.Features5.
- Express
- Extra drying
- Auto wash programme
- Cutlery tray
- Delay timer
- 'Easy' adjustable upper basket
- Internal light
- Aqua Stop
- Alternative wash function.
- Power wash
- Loading the Dishwasher Baskets
- Recommendation
- For washing in the dishwasher the following cutlery/dishes
- Are not suitable
- Are of limited suitability
- Attention before or after loading the Dishwasher Baskets
- Removing the Dishes
- Loading the Upper Basket
- Adjusting the Upper Basket
- Loading the Lower Basket
- Foldingbackthecupshelves
- FoldingSpikesofLowerBasket
- Cutlery Basket
- Starting a washing program
- Turning On the Appliance
- Starting a cycle wash
- Changing the programme
- Forgot to Add a Dish?
- At the End of the Wash Cycle
- Maintenance and Cleaning
- Filtering System
- Mainfilter 1
- Coarsefilter 2
- Finefilter 3
- Filterassembly
- Remarks:
- Cleaning the Filter
- Caring for the Dishwasher
- Cleaning The Door
- ProtectAgainstFreezing
- CleaningtheSprayArms
- How to Keep Your Dishwasher in Shape
- ■ After Every Wash
- ■ RemovethePlug
- ■ No Solvents or Abrasive Cleaning
- ■ WhennotinUseforaLongTime
- ■ MovingtheAppliance
- Seals
- Installation instruction
- ▲Attention:
- Warning
- • Installation preparation
- dimensions and installation Furniture door
- - Tension adjustment of the door spring
- - Connection of drain hoses
- - Dishwasherinstallationsteps
- 【 】
- Electrical Connection
- Electrical Requirements
- How to Connect the safety supply hose
- About the safety supply hose.
- How to Disconnect the safety supply hose
- Cold water connection
- Positioning the Appliance
- How to Drain Excess Water From Hoses
- WaterOutlet
- ExtensionHose
- SyphonConnection
- Starting the Dishwasher
- Troubleshooting Tips
- Error Codes
- Technical Data Sheet
- Loading the baskets according to En50242:
- Upper basket:
Brand : Caple
Model : Di628
Category : Dishwasher