
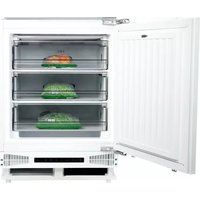
FW281 - Freezer CDA - Free user manual and instructions
Find the device manual for free FW281 CDA in PDF.


| Product Type | Integrated under counter freezer |
| Brand | CDA |
| Model | FW281 |
| Dimensions (H x W x D) | Approximately 820 x 595 x 550 mm |
| Weight | Approximately 35 kg |
| Net Capacity | Approximately 100 L |
| Power Supply | 220-240 V ~ 50 Hz |
| Fuse Rating | 13 A (BS 1362) |
| Climate Class | N/ST (suitable for ambient temperatures 16°C to 38°C) |
| Noise Level | Approximately 42 dB(A) |
| Controls | Thermostat dial (1 to 5) and super freeze switch |
| Super Freeze Function | Yes, runs compressor continuously for faster freezing (max 24 hours) |
| Indicator Lights | Power (green), Over-temperature (red), Super freeze (yellow) |
| Defrost | Manual defrost required when ice exceeds 5 mm |
| Door Reversible | Yes |
| Decor Door Compatible | Yes, with mounting kit |
| Installation Clearance | Allow ventilation; plinth must not block vents |
| Cleaning | Bicarbonate of soda solution; no abrasive products |
| Safety Features | Earthing required; CE marked; WEEE disposal |
| Spare Parts Availability | Contact CDA Customer Care |
Frequently Asked Questions - FW281 CDA
User questions about FW281 CDA
0 question about this device. Answer the ones you know or ask your own.
Ask a new question about this device
Download the instructions for your Freezer in PDF format for free! Find your manual FW281 - CDA and take your electronic device back in hand. On this page are published all the documents necessary for the use of your device. FW281 by CDA.
USER MANUAL FW281 CDA
FW281 integrated under counter freezer
Manual for Installation, Use and Maintenance

C|D|A|

Important
The CDA Group Ltd cannot be held responsible for injuries or losses caused by incorrect use or installation of this product. Please note that CDA reserve the right to invalidate the guarantee supplied with this product following incorrect installation or misuse of the appliance.
This appliance is not designed to be used by people (including children) with reduced physical, sensorial or mental capacity, or who lack experience or knowledge about it, unless they have had supervision or instructions on how to use the appliance by someone who is responsible for their safety.
Under no circumstances should any external covers be removed for servicing or maintenance except by suitably qualified personnel.
Appliance information:
Please enter the details on the appliance rating plate below for reference, to assist CDA Customer Care in the event of a fault with your appliance and to register your appliance for guarantee purposes.
Appliance Model
Serial Number
CE Declarations of Conformity:
This appliance has been designed, constructed and marketed in compliance with safety requirements of EEC Directive 2006/95/EEC (Low voltage) and requirements of EMC Directive 2004/108/EEC.
This appliance has been manufactured to the strictest standards and complies with all applicable legislation, including Electrical safety (LVD) and Electromagnetic interference compatibility (EMC). Parts intended to come into contact with food conform to EEC/89/109.4
IMPORTANT INFORMATION FOR CORRECT DISPOSAL OF THE PRODUCT IN ACCORDANCE WITH EC DIRECTIVE 2002/96/EC.
At the end of its working life, the product must not be disposed of as urban waste. It must be taken to a special local authority differentiated waste collection centre or to a dealer providing this service.
Disposing of a household appliance separately avoids possible negative consequences for the environment and health deriving from inappropriate disposal and enables the constituent materials to be recovered to obtain significant savings in energy and resources. As a reminder of the need to dispose of household appliances separately, the product is marked with a crossed-out wheeled dustbin.
Before first use
You must allow the freezer to settle for at least twenty four hours prior to switching the power on.
It is recommended that you clean the interior of the appliance prior to first use, using a solution of bicarbonate of soda and warm water and then thoroughly drying the interior.
The freezer may have an odour to it at first use. This will disappear as the appliance cools.
Please note:
The appliance will work continuously until it gets down to the correct temperature.
If the appliance is switched off, you should allow five minutes before switching it on again to prevent unnecessary damage to the compressor.
Prior to the installation you should remove the protective transparent polythene film which covers the side panels and the door.
Controls and Use
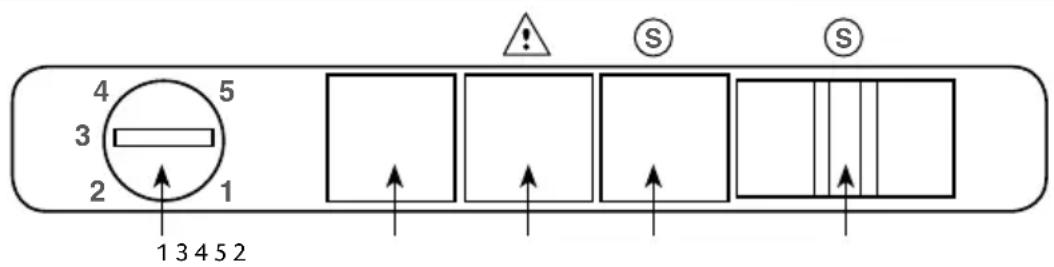
1. Thermostat dial
The thermostat automatically keeps the internal temperature at a constant level. The temperature is regulated by the thermostat dial, located on the freezer control panel. To change the temperature, turn the dial anti-clockwise from 1 (highest temperature) to 5 (coldest temperature). We recommend that you start with the appliance set to position 3.
2. Super freeze switch
This freezer is equipped with a super freeze function. This allows the freezer compressor to run continuously and so freezes food more quickly. To select this function, push the switch across until the super freeze indicator light (5) illuminates. To switch the function off, then push the switch back across until the indicator light goes out again.
Note that this should not be used for more than 24 hours.
3. Power indicator light
This green light will illuminate when the freezer is switched on.
4. Over temperature indicator light
This red light will illuminate when the temperature inside the freezer is too high. This may illuminate after the door has been opened, or when fresh food is added and should switch off again once the temperature within the freezer has stabilised.
5. Super freeze indicator light
This yellow light will illuminate when the super freeze function has been switched on with the super freeze switch (2).
Use
- The freezer compartments are designed to store frozen food.
- Never put warm or hot foods in the freezer, allow them to cool fully first.
- Follow the instructions on the packaging for storage of frozen food. If no information is provided, foods should not be stored for more than three months after the purchase date.
- Never put sparkling drinks or bottles of liquid in the freezer as they can explode.
Care and cleaning
Always disconnect the appliance from the power before any cleaning or maintenance.
• The refrigerator section should be cleaned using a solution of bicarbonate of soda and lukewarm water.
• Do not use abrasive products or detergents. After washing, rinse and dry thoroughly.
- Clean the shelves and balconies separately by hand using soap and water. Do not put them in the dishwasher.
- The evaporating tray and water drain hole (at the back of the refrigerator compartment) should be cleaned periodically to prevent the defrosted water from collecting inside the refrigerator compartment. The drain plug can be used to clear the drain hole.
• Once cleaning is complete, reconnect the mains power supply.
- If the appliance is not used for prolonged periods of time, unplug and clean the appliance. The doors should be left slightly open to prevent the formation of mildew and smell.
Defrosting the freezer
Do not use heaters or defrosting sprays in this appliance.
- Never use any metallic or sharp objects to remove the ice as this could damage the lining.
• The freezer compartment should be defrosted regularly to ensure the most efficient running of the freezer. - Once the ice is more than 5mm thick, the freezer should be defrosted.
- First remove the freezer drawers.
• To speed up the process, place a bowl of warm water in the base of the freezer compartment.
Once defrosting is complete, dry the inside of the freezer compartment with a sponge or clean cloth.
Troubleshooting
If you have any problems with your appliance, you should check the troubleshooting prior to calling CDA Customer Care to prevent unnecessary service calls and potential cost.
If the appliance is not working
- Check there is power to the appliance:
- The house fuses are intact and the fuse in the plug has not blown.
• The thermostat is not set to 0 (off position). - The plug socket is functioning fine. To check this, plug another electrical appliance in to see if the socket is working.
• The temperature of the room is adequate (10 °C or above).
The appliance is working, but not very well
• The appliance is not overloaded.
• The thermostat is set to an appropriate temperature.
• The door is closing properly.
- The cooling system at the rear of the appliance is clean and free of dust, and not touching the rear wall.
• There is enough ventilation at the side and rear walls.
• The temperature of the room is adequate (10 °C or above).
The appliance is noisy
• The appliance is level and stable.
- The side and rear walls are clear, and there is nothing resting on the appliance.
- The cooling gas in the refrigerator will make a slight bubbling noise, even when the compressor is not running.
There is water in the lower part of the refrigerator compartment
- The drain hole in the channel at the back of the compartment is clear.
Installation
This appliance must never be installed close to heat sources i.e. heating elements, cookers or in damp places The appliance should be mounted on a piece of wood (for example a section of worktop or kitchen carcass) if a raised floor is to be fitted, if the kitchen floor is to be tiled after installation, or if the installation height of the appliance is greater than 850 mm.
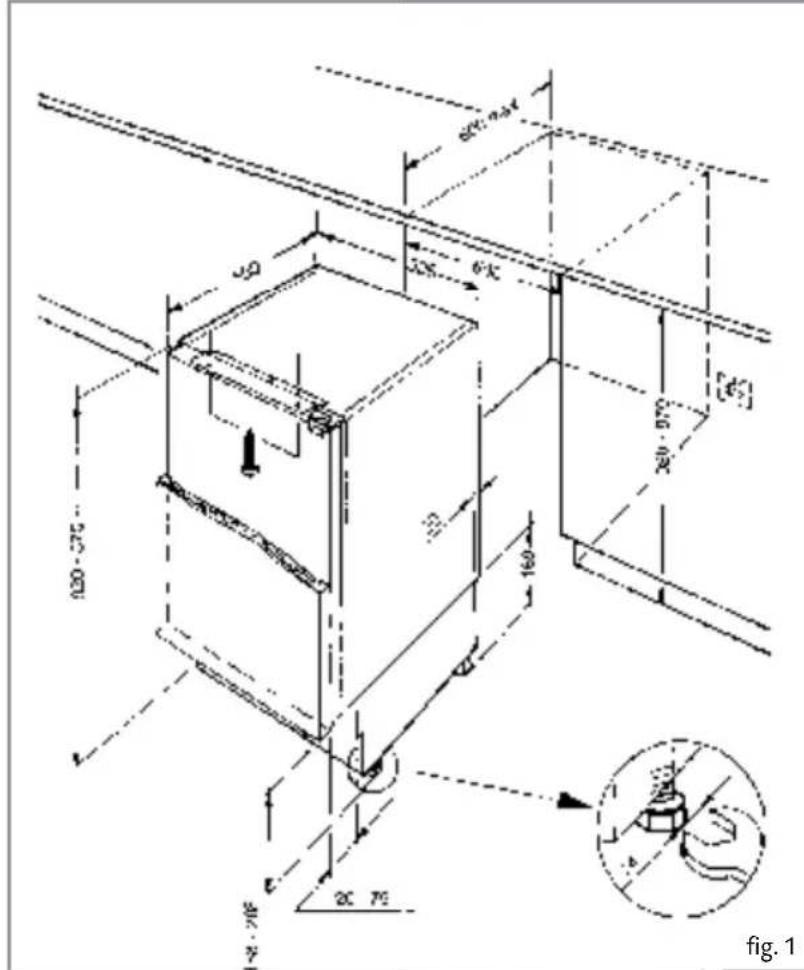
Fig. 1 - Dimensions of the appliance.
Fig. 2 - Dimensions for installation in adjacent units.

Reversing the door
It is possible to reverse the door on this appliance, if required.
To do so, follow the steps below:
- Loosen the hinge fixing screws (1).
- Open the door.
- Lever off the corner caps (3) with a knife blade.
- Insert the hinge fixing screws (1) on the opposite side.
- Remove the door fixing screws (2) and relocate the hinges according to figure 3.
- Locate the door on the hinge fixing screws (1) and tighten.
Do not turn the door upside down.
- Insert the corner caps (3) in the exposed holes.

fig. 3
Installing the decor door
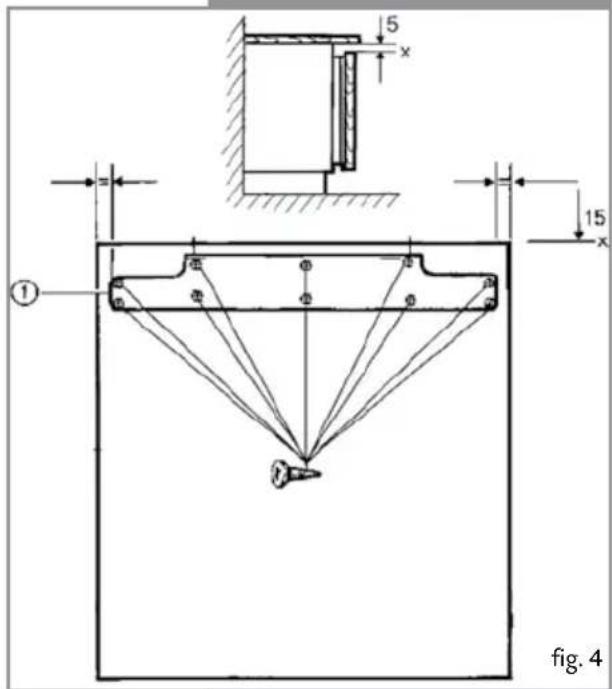
- Screw mounting bracket (1) onto decor door using the screws supplied (as show in figure 4).
• Fit the correct side towards the hinges. - Ensure there is a 5mm clearance between the underside of the worktop and upper edge (X) of the decor panel.
- Screw the four adjusting pins (2) fully into the appliance door.
- Position the decor door on the appliance door, introduce the locating pins at top into the slots in the mounting plate and open out according to detail in figure 5 (about 9mm).

Installing under a worktop
- Adjust the feet to the required height.
- Push the appliance into the niche until the decor door is flush with the adjacent furniture items, adjust the feet if necessary.
- Pre-adjust the appliance at slots (4) as shown in figure 8, into the mounting plate on the worktop.
Adjusting the plinth depth (figure 6)
- Lift out the decor door.
- Grip the plinth at the ventilation grille and align until flush with adjacent furniture items, or join up to the continuous plinth if fitted. Cut away the continuous plinth trim as illustrated for ventilation.
Never cover over the ventilation slots.
Once installed the plinth must not block the ventilation slots in the appliance. This may require cutting the plinth down. Failure to ensure adequate ventilation may invalidate the warranty.
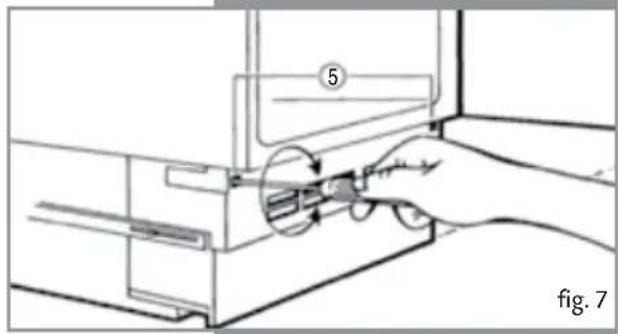
- Attach the appliance plinth at screws (5), turning screws clockwise until considerable resistance is felt (figure 7).
• To adjust the plinth height, turn the screws anti-clockwise through approximately 8 to 10 revolutions.
Adjusting the decor door
- Position the decor door on the appliance. Open loose locking nuts.
- Adjust height Y at locating pin (14mm wrench) as shown in figure 8, Y = + / - 3.5mm .
- Adjust side measurement X at slots on mounting bracket at top, X=max, +/- 3mm.
- Open out lower locating pins until contact is made with the mounting plate. Secure with locking nuts.
- If necessary, adjust the alignment of the lower decor panel edge at 10x12 hole in mounting bracket, Z= +/- 2MM. Then tighten the locking nuts again.
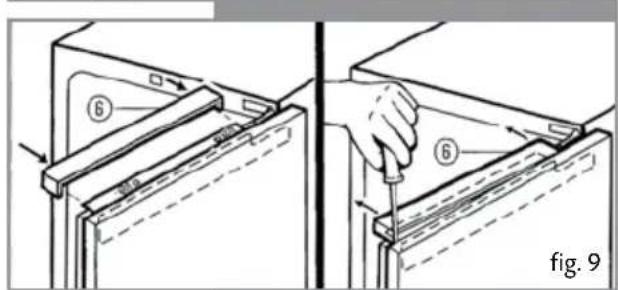
- Push on cover trim (6) and engage (to remove, lever out the trim strip with a screwdriver as illustrated in figure 9).
- When aligned, secure the appliance to the worktop at retaining slots.
Important: The cover trim (6) must be fitted as this turns off the light when the door is closed.


Electrical information
Warning! This appliance must be earthed.

The mains lead of this appliance has been fitted with a BS 1363A 13 amp fused plug. To change a fuse in this type of plug, follow the steps below:
- Remove the fuse cover and fuse.
- Fit replacement 13A fuse, ASTA approved to BS 1362 type, into the fuse cover.
- Replace fuse cover.
Important: Do not use the appliance without the fuse cover in position.
How to connect an alternative plug
If the fitted plug is not suitable for your socket outlet, then it should be cut off and disposed of safely to avoid possible shock hazard. A suitable alternative plug of at least 13 Amp rating to BS 1363 should be used.
As the colours of the wires in the mains lead of this appliance may not correspond with the coloured markings identifying the terminals in your plug, proceed as follows:-
- The wire which is coloured GREEN and YELLOW must be connected to the terminal which is marked with letter (E) or by the Earth symbol 1/2 or coloured GREEN and YELLOW.
- The wire which is coloured BLUE must be connected to the terminal which is marked with the letter (N), or coloured BLACK.
- The wire which is coloured BROWN must be connected to the terminal which is marked with the letter (L) or coloured RED.
If in doubt regarding the electrical connection of this appliance, consult a qualified electrician. Do not shorten the supply cable, the appliance may require removing for servicing.
N.B. Ensure that the plug socket is situated in an easily accessible place.
|C|D|A
To contact our Customer Care Department, or for Service, please contact us on the details below.

- FW281 INTEGRATED UNDER COUNTER FREEZER
- C|D|A
- IMPORTANT
- APPLIANCE INFORMATION
- CE DECLARATIONS OF CONFORMITY
- IMPORTANT INFORMATION FOR CORRECT DISPOSAL OF THE PRODUCT IN ACCORDANCE WITH EC DIRECTIVE 2002/96/EC
- BEFORE FIRST USE
- PLEASE NOTE
- CONTROLS AND USE
- THERMOSTAT DIAL
- SUPER FREEZE SWITCH
- POWER INDICATOR LIGHT
- OVER TEMPERATURE INDICATOR LIGHT
- SUPER FREEZE INDICATOR LIGHT
- USE
- CARE AND CLEANING
- ALWAYS DISCONNECT THE APPLIANCE FROM THE POWER BEFORE ANY CLEANING OR MAINTENANCE
- DEFROSTING THE FREEZER
- DO NOT USE HEATERS OR DEFROSTING SPRAYS IN THIS APPLIANCE
- TROUBLESHOOTING
- IF THE APPLIANCE IS NOT WORKING
- THE APPLIANCE IS WORKING, BUT NOT VERY WELL
- THE APPLIANCE IS NOISY
- THERE IS WATER IN THE LOWER PART OF THE REFRIGERATOR COMPARTMENT
- INSTALLATION
- REVERSING THE DOOR
- DO NOT TURN THE DOOR UPSIDE DOWN
- INSTALLING THE DECOR DOOR
- INSTALLING UNDER A WORKTOP
- ADJUSTING THE PLINTH DEPTH (FIGURE 6)
- NEVER COVER OVER THE VENTILATION SLOTS
- ONCE INSTALLED THE PLINTH MUST NOT BLOCK THE VENTILATION SLOTS IN THE APPLIANCE. THIS MAY REQUIRE CUTTING THE PLINTH DOWN. FAILURE TO ENSURE ADEQUATE VENTILATION MAY INVALIDATE THE WARRANTY
- ADJUSTING THE DECOR DOOR
- IMPORTANT: THE COVER TRIM (6) MUST BE FITTED AS THIS TURNS OFF THE LIGHT WHEN THE DOOR IS CLOSED
- ELECTRICAL INFORMATION
- HOW TO CONNECT AN ALTERNATIVE PLUG
Brand : CDA
Model : FW281
Category : Freezer