
iD450 - Pocket Camcorder POLAROID - Free user manual and instructions
Find the device manual for free iD450 POLAROID in PDF.


| Product Type | Pocket Camcorder (High Definition Digital Video Camera) |
| Dimensions (L x H x W) | 58 mm x 112 mm x 17 mm |
| Weight (without battery) | 105 g |
| Power Source | Lithium-ion rechargeable battery (supplied) via AC adapter or USB |
| Charging Time (adapter) | Approximately 4-5 hours |
| Image Sensor | 5 Mega Pixel CMOS |
| Video Resolution | Full HD 1080p (1920x1080) at 30 fps; HD+ 720p (1280x720) at 60 fps; HD 720p at 30 fps; VGA 640x480 at 30 fps |
| Photo Resolution | 16 MP (4608x3456 interpolated), 5 MP (2592x1944), 3 MP (2048x1536) |
| Video Format | AVI (H.264) |
| Photo Format | JPEG |
| Optical/Digital Zoom | 16x digital zoom only |
| Display | 3-inch touch screen LCD |
| Storage Media | Built-in 128 MB memory (partial for firmware); microSD/SDHC/SDXC up to 64 GB (optional) |
| WiFi Connectivity | 802.11 a/b/g/n; supports live streaming to Ustream and wireless PC connection |
| Video Output | HDMI (to HDTV) |
| PC Interface | Mini USB 2.0 (for transfer and WiVideo) |
| Special Features | Time Lapse, Slow Motion, Motion Detection, Face Tracking, Digital Light, Scene modes (Auto, Skin, Night, Backlight, Black/White, Classic, Negative) |
| White Balance | Auto, Daylight, Fluorescent, Tungsten |
| ISO Sensitivity (Photo) | Auto, 800, 1600 |
| Self-Timer | 10 seconds delay |
| Battery Life (approx.) | Not specified; use fully charged battery for WiFi streaming |
| Included Accessories | USB cable, HDMI cable, AC adapter, lithium-ion battery, quick guide, CD-ROM (software & manual), pouch, strap |
| Care Instructions | Do not drop, puncture or disassemble; avoid high temperature and water; remove battery if not used for long periods |
| Safety Warnings | Use only supplied accessories and battery; charge only with supplied adapter; do not expose to heat or fire |
Frequently Asked Questions - iD450 POLAROID
User questions about iD450 POLAROID
0 question about this device. Answer the ones you know or ask your own.
Ask a new question about this device
Download the instructions for your Pocket Camcorder in PDF format for free! Find your manual iD450 - POLAROID and take your electronic device back in hand. On this page are published all the documents necessary for the use of your device. iD450 by POLAROID.
USER MANUAL iD450 POLAROID
High Definition Digital Video Camera

User's Manual
Read This Before Using the Camera
SAFETY INSTRUCTIONS
Do not drop, puncture or disassemble the camera.
Use the camera with care. Rough handling may damage the internal components.
Do not expose the camera to high temperature. Avoid contact with water.
Please notice that the camera body may become warm when operating it for an extended period.
Test for proper operation before using the camera.
Only use accessories supplied by the manufacturer.
Use only the type of battery that came with your camera.
Remove the battery if the camera is not going to be used for long periods.
Product Information
- Designs and specifications of the camera are subject to change without notice. This includes primary product specifications, software, and this user's manual.
This User's Manual is a general reference guide for the camera. - The illustrations in this manual may not be the same as the actual design of your camera and those you see on the LCD screen.
Contents
Read This Before Using the Camera 2
Section 1 Getting to Know Your Camera 4
Section 2 Getting Started....7
Section 3 Enjoying the Record Mode .... 10
Section 4 Enjoying the Playback Mode 23
Section 5 Setting Your Camera 28
Section 6 WiFi to Cloud-Ustream 32
Section 7 WiFi to PC-WiVideo Program 36
Section 8 Viewing Photos and Videos on TV 41
Section 9 Viewing Video & Photo on PC 42
Section 10 Specifications and System Requirements .... 43
Section 11 Troubleshooting....45
Section 12 Techinal Support....47
Section 12 Warranty Card ....48
Section 1
Getting to Know Your Camera
Overview
This camera with a 5 Mega Pixel sensor can take H.264 format videos. The H.264 technology allows for extended video recording with less memory. High quality images up to 16 mega-pixels can also be delivered smoothly. With a color LCD monitor, you can view and examine the video and photo easily.
◆ The 3" LCD touch panel is an ideal platform for you to operate your camera. The menu options are accessible with your fingertip. With the touch panel, you can select the options directly and quickly.
The camera also features video recording at an HD resolution of 1920x1080. You can also connect it to an HDTV via an HDMI cable, and easily playback the recorded high-definition videos on the wide screen HDTV.
◆ Moreover, the camera is equipped with WiFi module and the exclusive application. You can broadcast live streaming of the camera on Ustream website via WiFi. Your family and friends can watch the live video streaming of the camera on their smart phones, tablets, or computers.
The camera can also connect with your computer via WiFi. It can be a wireless webcam for your on-line video chatting. Through WiFi connecting, you can transfer the videos and photos on your computer, and monitor live video from your camera.
ISO sensitivity and color balance can either be adjusted automatically or changed manually. A 16x digital zoom helps you to control over the video and photo you take. The varied effect options, such as Time Lapse and Slow Motion, make recording more fun.
The built-in memory allows you to take photos and to record videos without a memory card. The memory card slot allows users to increase the storage capacity.

Note
Partial memory of the built-in memory is used for the camera's Firmware code• and software.
- Install the bundled ArcSoft MediaImpression application for viewing the videos correctly on the computer.
- For the WiFi connectivity working correctly, make sure the bundled WiVideo program (for Windows® based systems only) is installed and the wireless LAN module of your computer is activated.
Standard Accessories
Unpack the package and make sure all standard accessories listed are included:
- USB Cable
- HDMI Cable
- Adaptor
• Lithium-ion Rechargeable Battery - Quick Guide
• CD-ROM (Software, User's Manual) - Pouch
- Strap
EN
Front View

Bottom View


Section 2
Getting Started
Loading the Battery
Before using the camera, you must load the supplied Lithium-ion rechargeable battery.
Slide the battery cover down and remove.1.
Insert the battery according to the correct polarity marks (+ or -).2.
Close the battery cover firmly.3.


Note
Different battery types and surrounding temperatures may affect the battery performance.
- Never expose the battery to a heating equipment (e.g., microwave oven) and attempt to dispose of a battery by burning or by throwing it into a fire. Heat can cause the battery to explode and/or release caustic liquid, both which may possibly cause serious injury.
- Turn the power off and stop using the battery if you observe the condition of excessive heat on the battery.
EN
Charge your battery
You must use the supplied power charger and the USB cable.
A blinking light will indicate active charging.
In adapter charging mode, the full charging time for a depleted battery is about 4-5 hours and the light will turn off automatically after the charging is completed.
In PC USB charging mode, a longer charging time is required.

Note
Never charge the battery by a method other than as instructed. Doing so may cause a fire or explosion possibly resulting in serious injury.
Use the supplied AC adapter only with the indicated power supply voltage.
Use with any other power supply voltage might cause electric shock.
Be sure that the power outlet you plug the adapter into is easily accessible. When you need to disconnect power from the camera, be sure to unplug the power cord from the electrical outlet.

natural_image
Diagram of a device rear panel with ports and connectors, showing cable insertion (no text or symbols)
Inserting and Removing a Micro SD Card (Optional)
The camera comes with an internal memory which allows you to store photos and videos. You can expand the memory capacity by using an optional micro SD memory card.
Remove the battery cover and the battery.1.
Insert the memory card into the slot until it locks properly. 2.
To remove an installed micro SD card, press the card inwards to release it.
When the card pops out, gently remove it from its slot.4.
Recommended memory capacity: 1GB or above.5.

Turning the Camera On
To turn on the camera: •
Flip out the LCD panel; the camera will turn on automatically.1.
Or press the [Power Button2.] for one second to turn it on.
Configuring the Initial Date and Time Setup
The time setting screen appears to allow you to setup date and time:
| Operation Display Screen | |
| Touch Year, Month, Day, Hour, Minute, and AM/PM to set.1.Adjust the numeric value by touching 2. ▲ ▼Touch the OK icon (3. on) to validate the setting.Touch the Exit icon 4. ▲ ) to exit. ( |  |
Getting Started
- To record video: Touch (on-screen icon) on the screen to switch to the Video mode. (The Video Mode LED Indicator lights up.) Press the [Record Button] to record video. To stop recording, press it again.
- To take a photo: Touch 📋 (on-screen icon) on the screen to switch to the Photo mode. (The Photo Mode LED Indicator lights up.) Press the [Record Button] to take photo.
- To view stored videos and photos: Touch 📋 on the screen to switch to the Playback mode.
Turning the Camera Off
- To turn off the camera: You can either press the [Power Button] for one second, or you can place the LCD panel back to its original position.
Section 3
Enjoying the Record Mode
Button Function
 | Record Button:In the Video Mode, press to take video. To stop recording, press it again.In the Photo Mode, press to take photo.2. |
 | Tele Button:Zoom In.1.Wide ButtonZoom out.1. |
 | Power Button:Press down for one second to turn on or turn off the camera.1. |
 | WiFi Button:WiFi On/Off.1. |
LCD Monitor Information
The indicators shown below may display on LCD:

| (1) | Video Resolution | |
 | Full HD (1080p 30 fps) | |
 | HD+ (720p 60 fps) | |
 | HD (720p 30 fps) | |
 | VGA (640X480) | |
 | Slow Motion (Record video at QVGA resolution.) | |
| Photo Resolution | ||
 | 16MP | |
 | 5MP | |
 | 3MP | |
| (2) | 00:06:30 | Recording time of the video that can still be taken at current resolution |
| 1000 | Number of images that can still be taken at current resolution | |
| (3) |  | Micro SD Card Inserted |
| (4) |  | Date Printing On (Photo Only) |
| (5) |  | Face Tracking On (Photo Only) |
| (6) | Scene | |
 | Skin | |
| [A4WW] | Night | |
| [038K] | Backlight | |
 | Black/White | |
 | Classic | |
| [4764] | Negative | |
| (7) | White Balance | |
 | Daylight | |
| [C4TX] | Fluorescent | |
| [0X28] | Tungsten | |
| (8) | [XW44] | Time Lapse (Video Recording Only) |
| (9) | [4472] | Stabilization (Video Recording Only) |
| (10) | [23YD] | Digital Light On |
| [09VCD] | Light On | |
| (11) |  | WiFi signal strength |
| [T05K] | WiFi to PC On | |
| (12) | [09K7] | Battery: full power |
| [XHOW] | Battery: high power | |
 | Battery: medium power | |
| [44KA] | Battery: low power | |
| [38A2] | Battery: no power | |
| [X70R] | DC power mode | |
| (13) | [008K] | Zoom meter: 1X~16X (16X Digital zoom) |
 | Motion Detection (Video Recording Only) | |
EN
(14) Self-time  ed ed | ||
| On-screen touchable function icon | ||
| (15) |  | Playback Mode On |
| (16) |  | Menu On |
| (17) |  | Toggle [Video Mode] and [Photo Mode] |

Note
Tap on the screen to display the icons. Tap again to hide the icons.
Stabilization and Slow Motion functions cannot be used simultaneously.
Motion Detect, Slow Motion, and Time Lapse functions can not be used simultaneously.
Motion Detect, Sl• ow Motion, and Zooming functions cannot be used simultaneously.
The WiFi signal strength indicates the connection strength between the access point
and your camera. Some access points do not allow you to connect to the network. Some
network require the authentication from the network service provider (NSP) Please follow the
instruction on the screen or contact with the network service provider.
Video Recording
- Touch (on-screen icon) on the screen to switch to the Video mode. (The Video Mode LED Indicator lights up.) Press the [Record Button] to start recording. When a video is being recorded, a time indicator will display on the LCD monitor (00:06:30). To stop recording, press it again.
Touch 📋 on the screen to view the recorded video.
Four resolution settings are available: •
| Video Quality | |
 | Full HD (1080p 30 fps) |
 | HD (720p 60 fps) |
 | HD (720p 30 fps) |
 | VGA (640X480) |

Note
- When Slow Motion function is activated, the video resolution is QVGA. The view angle becomes smaller when the Slow Motion is activated.
Photo Capturing
- Touch (on-screen icon) on the screen to switch to the Photo mode. (The Photo Mode LED Indicator
lights up.) Press the [Record Button] to take photo.
Touch 📋 on the screen to view the photo.
Three resolution settings are available: •
| Image Quality | |
| 16 Mega Pixels | |
| 5 Mega Pixels | |
| 3 Mega Pixels | |
Using Zoom Function
The zoom magnifies images when recording video or taking photo.
It can be set from 1X\~16X (16X Digital zoom)2.
Options for Record Menu

| Video Photo Setting* | ||
| Resolution•Light•Scene•White Balance•Stabilization•Motion Detect•Slow Motion•Time Lapse• | Resolution•Face Tracking•Date Printing•ISO•Self-Timer | UstreamWiFi IDMenu SoundTVLanguageTime SettingFormatDefault Setting |
* Please refer to Section 5 for the detailed information about [Setting].
* Please refer to Section 6 for the detailed information about [Ustream].
Video Menu
| Operation Display Screen | |
| Touch [OHK4] on the screen to open the Menu. The menu will show on the screen.The first page contains 8 options-- Video Resolution, Light, Scene, White Balance, Video Stabilization, Motion Detect, Slow Motion, and Time Lapse --for you to adjust the camera settings.Touch the Exit icon 3. ) to exit. ( | 2. |

Video Resolution
Four resolution settings are available.
• Full HD (1080p 30) (Full HD (1080p30)): Record videos at 1920x1080p 30 fps resolution.
HD+ (720p 60):• Record videos at 1280x720p 60 fps resolution.
HD (720p 30):• Record videos at 1280x720p 30 fps resolution.
VGA (640X480): • Record videos at 640x480p 30 fps resolution.
| Operation Display Screen | |
| In the Video menu, touch the [Video Resolution] icon on the screen.Touch to select the desired option.2.3. Touch the OK icon (OK) to validate the setting.4. Touch the Return icon ( ) to return. | 1. |

Light
Three light settings are available.
Light OFF• : The light is turned off.
Light ON• : The light will be turned on and keep providing light.
- Digital Light: To extend the dynamic range for backlight and high contrast sense so that the objects will be brighter and clearer.
| Operation Display Screen | |
| In the Video menu,1. touch the [Light] icon on the screen.Touch to select the desired option.2.Touch the OK icon (3. OK) to validate the setting.Touch the Return icon 4. ) to return. ( |  |
 |  |
| Without Digital Light Digital Light ON | |

Scene
You can select the mode according to the scene condition.
Auto:• Shoot without any special effect on the image.
- Skin: Shoot with an effect that makes skin tones more natural.
• Night: Use Night Mode for night scenes or low light conditions. - Backlight: You can take shots when the bright light is behind the subject.
- Black/White: The image is converted to black-and-white.
• Classic: The image is converted to a sepia look. - Negative: The image is converted as the negative of the normal.
| Operation Display Screen | |
| 1. In the Video menu, touch the [Scene] icon on the screen.Touch to select the desired option.2.Touch the OK icon (3. OK) to validate the setting.Touch the Return icon 4. ) to return. ( |  |

Note
- To avoid blurry image, place the camera on a flat, steady surface, or use a tripod in the Night Mode.
EN

White Balance
The camera adjusts the color balance of images automatically. Three manual white balance settings are available:
Auto: • The camera automatically adjusts white balance.
Daylight: • Under outdoor condition.
Fluorescent: • Under fluorescent light condition.
Tungsten: • Under tungsten light condition.
| Operation Display Screen | ||
| In the Video menu, touch the [White Balance] icon on the screen.Touch to select the desired option.2.Touch the OK icon (3. OK) to validate the setting.Touch the Return icon 4. ) to return. ( | 1. |  |

Video Stabilization
Record with an effect of reducing camera shake to result in more stable video.
| Operation Display Screen | |
| 1. In the Video menu, touch the [Video Stabilization] icon on the screen.2. Touch to select [On] ( [ ] or [Off] ( [ ]).Touch the Return icon 3. ) to return. ( | 00:06:30Video Stabilization |


Motion Detection
Record videos automatically when the camera detects a movement.
| Operation Display Screen | |
| In the Video menu, touch the [1. Motion Detect] icon on the screen.Touch to select [2. )or [Off(n)]. ()Touch the Return icon 3. ) to return. (The camera will start to record video automatically if it detects a movement. It will stop recording if it does not detect a movement. |  |

Slow Motion
Record videos with slow motion effect. When playing the video, the playback time will be longer than the actual recording time. Some occasions you can use this effect are the skill demonstration of athletic activities of all kinds, or a key moment in an athletic game.
| Operation Display Screen | |
| In the Video menu, touch the [Slow Motion] icon on the screen. Touch to select [2.] or [Off(n)]. Touch the Return icon 3.) to return. ( | (  |

Note
While Slow Motion function is activated, audio is not recorded and zoom is disabled. The view angle may become smaller when the Slow Motion is activated. When Slow Motion function is activated, the video resolution is QVGA.

Time Lapse
Record still images at specific intervals you can set and play them as one video file. This effect is good for recording cloudscapes, seed germinating and flowers opening.
Off:• Disable Time Lapse.
• 1 Second.: Record one frame per second.
• 3 Seconds: Record one frame every 3 seconds.
• 5 Seconds: Record one frame every 5 seconds.
| Operation Display Screen | |
| 1. In the Video menu, touch the [Time Lapse] icon on the screen.2. Touch to select the desired option.3. Touch the OK icon (OK) to validate the setting.Touch the Return icon 4.) to return. ( |  |
Photo Menu
| Operation Display Screen | |
| Touch on the screen to open the Menu. The menu will show on the screen.Swipe on the menu screen to change the page.2.The second page contains 5 options-- Photo Resolution, 3.Face Tracking, Date Printing, ISO, and Self-Timer --for you to adjust the camera settings.Touch the Exit icon 4.) to exit. ( |  |

Photo Resolution
Three resolution settings are available.
16MP:Shoot photo at 4608 x 3456, 16MP quality.
5MP• :Shoot photo at 2592 x 1944, 5MP quality.
3MP• :Shoot photo at 2048 x 1536, 3MP quality.
| Operation Display Screen | |
| In the Photo menu, touch the [Photo Resolution] icon on the screen.Touch to select the desired option.2.Touch the OK icon (3. OK) to validate the setting.Touch the Return icon 4. ) to return. ( |  |

Face Tracking
The camera can detect human face(s) and focus on the face(s) automatically. This function can works with photo capturing. It is wonderful for capturing beautiful portraits in backlight situation.
| Operation Display Screen | |
| In the Photo menu, touch the [Face Tracking] icon on the screen.2. Touch to select [On] ( [ ] or [Off] ( [ ]).Touch the Return icon 3. [ ] ) to return. ( | 1.  |

Note
- When Face Tracking is activated, aim the camera at the human face(s). The focus frame(s) will show on the LCD before the [Record Button] is pressed.
EN

Date Printing
Imprint the date and time on the photo.
| Operation Display Screen | |
| In the Photo menu, touch the [Date Printing] 1. icon on the screen.Touch to select [2. )or [Off(n)]. oTouch the Return icon 3. ) to return. ( |  |
| As the function is activated, the date will appear on the 4. corner of the photo. |  |

Note
Date Printing function can not be used in Video Record Mode.

ISO
The camera adjusts the ISO sensitivity of its images automatically. Two manual ISO sensitivity settings are available. (800/1600). The larger the number, the higher the ISO sensitivity. Select the lower setting to shoot a smoother image. Select the higher setting to shoot a photo in a dark poorly lit location, or to shoot a subject moving at a high rate of speed.
| Operation Display Screen | |
| In the Photo menu, touch the [ISO] icon on the screen.1.Touch to select the desired option.2.Touch the OK icon (3.0k) to validate the setting.Touch the Return icon 4.0k) to return. ( |  |

Note
The image may become noisy when the ISO number is large.

Self-Timer
The self-timer allows you to take photos with a ten-second time delay. The LED light on the front of the camera will also blink. The speed of blinking will increase just before the photo is taken.
| Operation Display Screen | |
| In the Photo menu, touch the [Self-Timer] icon on the screen.Touch to select [2. )or [Off(n)]. oTouch the Return icon 3. ) to return. ( | 1. |
Section 4
Enjoying the Playback Mode
Button Function
The Buttons have the following functions in Playback Mode.
 | Record Button:Press to go the Record Mode1. |
 | Tele Button:Volume increase. 1.Zoom in the photo2.Wide ButtonVolume decrease. 1.Zoom out the photo2. |
 | Power Button:Press down for one second to turn on or turn off the camera.1. |
 | WiFi Button:WiFi On/Off.1. |
LCD Monitor Information
Indicators on the LCD screen while in Playback Mode:

| (1) | Video Resolution | |
 | Full HD (1080p 30 fps) | |
 | HD+ (720p 60 fps) | |
 | HD (720p 30 fps) | |
 | VGA (640×480) | |
 | Slow Motion (QVGA) | |
| Photo Resolution | ||
 | 16MP | |
 | 5MP | |
 | 3MP | |
| (2) | 00: :30 :30 | Video playback time counter. |
| 0088/0093 | Current number/ Total number of photo/video. | |
 | ||
| (3) Volume | ||
| (4) |  | Return |
 | Video stop | |
| (5) |  | Previous video/photo |
EN
| (6) |  | Video fast rewind |
| (7) |  | Video play |
 | Video pause | |
| (8) |  | Video fast forward |
| (9) |  | Next video/photo |
| (10) |  | Delete |
| (11) |  | Slideshow |
 | Slideshow stop | |
| (12) |  | Magnification Indicator |
Operations for Playback Mode
The Playback Mode is for viewing and managing videos and photos on the built-in memory or on an SD Card.
| Operation Display Screen | |
| T1. on the screen to switch to the Playback mode. |  |
| Touch 2 to go to the Video Playback Mode.Touch 3 to go to the Photo Playback Mode)Touch 4 to back to Record Mode. |  |
Video Playback
| Operation Display Screen | |
| In the Video Playback mode, touch 1 play or pause the video.Swipe to the right or touch 2 to go to the previous video; swipe to the left or touch to go to the next video.While playing video, touch 3 fast rewind/ forward.Touch 4. to adjust the volumeTouch to exit. |  |

Note
When the LCD is idle for a few seconds, the playback function icons will disappear • automatically. Tap again to show the bar.
Delete Videos
| Operation Display Screen | |
| T1. o to go to the Delete option screen. |  |
| Touch [Yes] to delete the current video or [No] to cancel the operation and to exit; touch [All (Delete All)] to delete all videos.Before all videos are about to be deleted, a confirmation screen will appear; touch [Yes] to execute the operation and [No] to cancel the operation. | 2. |
 |

Note
If a memory card has been inserted, you can only delete those videos stored on the card.
Photo Playback
| Operation Display Screen | |
| In the Photo Playback mode,1. swipe to the right or touch to go to the previous photo; swipe to the left or touch to go to the next photo.While the photo is selected, press [Tele Button] to magnify.(The magnification Indicator appears on the screen)To navigate the magnified photo, press on the screen and move as well.Press [Wide Button] to zoom out or exit the magnification mode.Touch 5 / 1 tart or to stop the slide show.Touch 6 to exit. |  |

Note
When the LCD is idle for a few seconds, the playback function icons will disappear • automatically. Tap again to show the bar.
Delete Photo
| Operation Display Screen | |
| Touch to go to the Delete option screen. |  |
| Touch [Yes] to delete the current photo or [No] to cancel the operation and to exit; touch [All (Delete All)] to delete all photos.Before all photos are deleted, a confirmation screen will appear; touch [Yes] to execute the operation and [No] to cancel the operation. | 2.  |

Note
If a memory card has been inserted, you can only delete those photos stored on the card.
Section 5
Setting Your Camera
Setting Menu
| Operation Display Screen | |
| Touch on the screen to open the Menu. The menu will show on the screen.Swipe on the menu screen to change the page.2.The fourth page contains 8 options 3.camera setup. They are Ustream, WiFi ID, Menu Sound (operation sound), TV, Language, Time Setting, Format, and Default Setting.Touch the Exit icon 4.) to exit. ( |  |

WiFi ID
Edit the WiFi ID & Password for [WiFi to PC]. (Refer to section 7)
| Operation Display Screen | |
| In the Setting menu, touch the [WiFi ID] 1. icon on the screen. |  |
| Go to the WiFi ID & Password screen.2.Touch on the column to go to the 3.you can edit the WiFi ID & Password. |   |

Sound
Enable or disable the keypad tone and the operation sound.
| Operation Display Screen | |
| In the Setting menu, touch the [Sound] 1. icon on the screen.Touch to select [2. )or [Off(n)]. oTouch the Return icon 3. ) to return. ( |  |

TV
Ensure that the appropriate TV standard of your area is selected – either NTSC or PAL. Wrong TV system setting may cause image flickers.
• NTSC(60Hz):USA, Canada, Japan, South Korea and Taiwan, etc.
• PAL(50Hz):UK, Europe, China, Australia, Singapore and Hong Kong, etc.
| Operation Display Screen | |
| In the Setting menu, touch the [TV] icon on the screen.1Touch to select [PAL] or [NTSC].2.Touch the OK icon (3. OK) to validate the setting.Touch the Return icon 4. ) to return. ( |  |

Language
Use this option to select the language of the user interface.
| Operation Display Screen | |
| In the Setting menu, touch the [Language] icon on the screen.2. Touch to select the desired option.Touch the OK icon (3. OK) to validate the setting.Touch the Return icon 4. ) to return. ( | 1. |

Time Setting
| Operation Display Screen | |
| In the Setting menu, touch the [Time Setting] icon on the screen to enter the time setting screen.Touch Year, Month, Day, Hour, Minute, and AM/PM to set.2.Adjust the numeric value by touching 3. ▲ / ▼Touch the [OK] icon to validate the setting.4.Touch the Return icon 5. ▲ ) to return. ( | 1. |

Format
- Yes: Format the built-in memory (When no memory card is installed) / Memory Card (When a memory card is installed).
- No: Do not format the built-in memory (When no memory card is installed) / Memory Card (When a memory card is installed).
| Operation Display Screen | |
| In the Setting menu, touch the [Format] icon on the screen.Touch to select [Yes] or [No] 2.√×). (Touch [Yes]to enter the confirmation screen.) | 1. |
| Touch the [Yes3]icon to execute the operation and the [No]icon to cancel the operation. |  |

Note
- All the data will be erased if the memory card is formatted. Make sure all the data are copied to your PC before formatting the memory card.

Default Setting
To restore the default factory setting, select this option.
| Operation Display Screen | |
| In the Setting menu, touch the [Default Setting] icon on the screen.Touch to select [Yes] or [No] 2. (Touch [Yes] to enter the confirmation screen.) |  |
| Touch the [Yes3] icon to execute the operation and the [No] icon to cancel the operation. |  |

Note
The WiFi setting, such as profile of access points and Ustream account information will be • erased.
The following table indicates the camera's default settings
| Setting Default Factory Setting | |
| Resolution FHD (1080p 30) for Video | 5MP for Photo |
| Video Stabilization Off | |
| Light Off | |
| Scene Auto | |
| White Balance | Auto |
| Motion Detection | Off |
| Slow Motion | Off |
| Time Lapse Off | |
| Self-Timer | Off |
| Face Tracking Off | |
| Date Printing | Off |
| ISO | Auto |
| Password of WiFi ID | 0000 |
| Sound | On |
| TV | Depends on shipping area |
| Language | Depends on shipping area |
| Volume | Level 3 |
Section 6
WiFi to Cloud-Ustream
Start to use Ustream
Ustream enables you to free broadcast the live video of your camera. People can watch your broadcasting on their iPhone, iPad, iPod touch, Android phones/tablets, or PC on Ustream website/ APP anytime, anywhere.
First, you need to pre-register an account at Ustream website (www.ustream.com).
(If you already have an account, please skip.)
| Operation Screen | |
| Go to1.http://www.ustream.com/.Click on [Login/Sign Up], and follow the instruction 2. step by step to create your username and password.The website will create a default channel for you to 3. start broadcasting. |   |
| More you can do:Create a channelClick on [Create a Channel]. Follow the instruction to 1. create your channel.Or go to [Dashboard], and select [Manage My 2. Channel].Manage your channelEdit or check your channel information in [Manage 1. My Channel] section. (Default is a public channel)Select the category.2.Change the channel name.3.Or you can make your channel to be private in 4. [Advanced Settings]. |   |
EN
Prepare to broadcast on Ustream
Ensure you have a working AP(Access Point) device to get ready to start broadcasting.
USTREAM

natural_image
Line drawing of a flip-flop device with a screen and buttons (no text or symbols)
natural_image
Line drawing of a wireless router with signal waves (no text or symbols)Broadcast live streaming on Ustream
| Select Ustream on [Setting] page.1. |  | |
| Log in your Ustream account.2.(1) Tap on the blank and the keypad screen shows up.(2) When you complete, touch the [Enter] icon to save it.NoteWhen execute [Default Setting], the account • information of the websites will be erased.Make sure you create the channel on Ustream • website for your broadcast. For detailed setup procedure, please refer to Ustream website. |    | |
| The camera lists available Access Points. Please 3. select one for WiFi connection. |  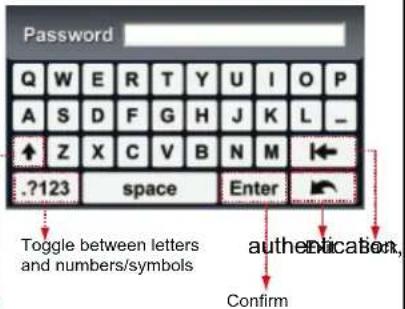 6apital Lock 6apital Lock | |
| Icon Description | ||
| Currently connecting AP | ||
| Secured network: Requires the password to access the AP. | ||
| Signal strength | ||
| Up Down cursor: Change the pages. | ||
| AP Profile information: Check the status or you can remove its profile. | ||
| Select the desired AP4. (Network) to connect to.If the selected AP requires the password 5.you will enter the keypad screen.Enter the password and touch the [Enter] icon to confirm it.Or touch the [Return] icon7. to exit. | ||
| When the connection is 8. established, the signal strength will show on the top of the screen.Once the 9. connection to the network has been established, the camera automatically connects to Ustream server and starts streaming.To cancel streaming, touch the [10. terminate streaming. |  | |
| 11. The video streaming will be broadcasted on the Ustream website.12. People who has your account / channel name, they can visit Ustream website and watch the live video streaming from you camera through their various devices, such as computers, tablets, or smart phones.(Free download Ustream App on App Store/ Andriod Market. Go to Ustream website/App. Enter the username in search bar.) |  | |
The screen shown the icon [Connecting Failed] (18) indicates the camera does not connect to the network correctly.


Note
The possible reasons for "Connecting Failed" could be (1) wrong password; (2) you are not in the wireless network area of the AP. (3) the camera does not support the type of encryption used on the AP. This model only supports WEP/WPA/WPA2 personal type of encryption, but not up to enterprise level (4) your network requires PPPoE account/password information.
This camera only supports the AP(SSID) named in English/number/symbols (ASCII characters).
You can only enter text in English, regardless of the OSD language.
Some AP routers do not allow you to connect to the network (e.g. firewall).
You may be charged by the network service provider.
Please stay away from any electronic equipment since the radio frequency signals may interfere connecting.
When streaming on Ustream, the record/ zoom functions are disabled.
The camera cannot connect to the network while it is connected to an HDTV via the cable, or vice versa.
It may take time to scan and connect to the AP/network or to upload. The stream speed is affected by the Internet connection speed or other factors.
Please be sure the battery is fully charged before connecting to the network. It may take time to upload.
If you do not have an account, please sign up on the website first.
- The social website update is the subject to change without notice. (e.g. password validation, create a channel) Please visit the website first to update your account setting.
- Ustream may not be allowed to access in certain regions or networks.
- Please avoid transferring the confidential files and setting your personal account information on the open networks or in public areas. The data transferred via WiFi could be leaked.
EN
Section 7
WiFi to PC-WiVideo Program
Advanced Operation on Your Computer - WiVideo
The camera can connect to your computer via WiFi or USB. Once you launch the [WiVideo] application (for Windows® based systems only) on your computer, it will search for your camera and connect to it. Then, you can operate more functions on your computer. There are several functions as below:
Transfer the files from the camera. (WiFi/USB connection)
Watch live streaming video from the camera on your computer. • (WiFi connection)
Use the camera as a wireless webcam for online video chatting. • (WiFi connection)
Install [WiVideo] on your computer
To connect to the camera and launch [WiVideo] application via WiFi correctly, you have to install this program firstly. It is a perfect platform for you to watch live streaming video from your camera and use the camera as a webcam for your online video chatting.
Follow the steps below to install the [WiVideo] on the computer.
Connect the camera to your computer by using the supplied USB cable.1.

After making a USB connection, the program installs automatically, or the AutoPlay window 2. appears. (It may be different based on OS recognition. If the AutoPlay window does not appear. Please click [My Computer]-->[WiVideo] to execute the installation of this program.
| Windows XP Win7 | |
![POLAROID iD450 - Install [WiVideo] on your computer - 2](/content/2026/05/959452/images/b0a78ff5044e18e4c426ca1a15a74d089c5210baa3566396f5c8267f614ba48e.jpg) (Install automatically) (Install automatically) | ![POLAROID iD450 - Install [WiVideo] on your computer - 3](/content/2026/05/959452/images/be80a009c04c53ab87bd4df3cce0536cefa092385feb86452fcae36daf949e99.jpg) (AutoPlay window) (AutoPlay window) |
![POLAROID iD450 - Install [WiVideo] on your computer - 4](/content/2026/05/959452/images/864a767f7f38e24c0c4b3aeee77a9b72b8c746ec3de9f82d4dbbd2650e860666.jpg) (Path to WiVideo.exe) (Path to WiVideo.exe) (Path to WiVideo.exe) (Path to WiVideo.exe) | ![POLAROID iD450 - Install [WiVideo] on your computer - 5](/content/2026/05/959452/images/466c767bf4e1722e715b5ae9618de4f020ea8e448aa20a90f8130bf4d7564173.jpg) |
Follow the on-screen instructions to complete the installation.3.
The shortcut of WiVideo (4.1) shows on the desktop. (Or you can find the application at [Start]-->[All Program].)
The main screen appears automatically on the desktop.5.

![POLAROID iD450 - Install [WiVideo] on your computer - 7](/content/2026/05/959452/images/5bf94d30e495771467c59f169b9eecc9aa4a31f09c05900952d83d92cf7a222c.jpg)
Note
If ArcSoft MedialImpression is not installed, WiVideo program will install the H.264 Codec • (ffdshow-a free software under GPL license) for viewing the videos correctly.
- To install correctly, you have to log out /quit from the Instant Message (IM) application before the installation.
WiVideo is for Windows® based systems only.
EN
When the installation is completed, you can unplug the USB cable. 6.

natural_image
Diagram showing a device with ports and an attached cable, no text or symbols presentUsing WiVideo via WiFi Connection
| Operation Screen | |
| On your camera:Press WiFi Button 1. to show the WiFi ID and password.(The default password is 0000. WiFi ID and password can be edited on camera Setting menu.) |  |
| On your computer:Double click on the [WiVideo] shortcut 2. on the desktop. (make sure the [WiVideo] application is installed in your computer.)Click [Detect WiFi Camera] button to search for your camera.*One task window may pop out to ask you to select your camera when there are two or more WiFi cameras in the same wireless network range.Select the WiFi ID and input the Password shown on 4. your camera for the WiVideo task window. Then, click [OK].Once the connection is 5. established, the signal of WiFi to PC will show on the top of the screen. |   |
The WiVideo application serves 3 options while connecting via WiFi:
| Function Description | |
| TRANSFER You can | remote access the videos and photos stored in your camera.You can transfer or delete the files on your computer. |
| LIVE VIDEO Watch | live streaming from your camera on your computer.The video resolution can be selected. |
| VIDEO CHAT Use | your camera as a wireless webcam for online video chatting(You have to select this device as your webcam on the camera/audio setting first.)**You have to select [WiVideo Camera] as your webcam/microphone for the online video chatting. |

Note
For the WiFi connectivity working correctly, make sure the bundled WiVideo (for Windows ^® )
based systems only) is installed and the wireless LAN module of your computer is activated.
Make sure your computer connects with your access point (AP) correctly and your camera is • in the same range of the WLAN.
For the much more stable video streaming when using LIVE VIDEO or VIDEO CHAT, please make sure the WiFi signal strength shows 2 bars ( ) or above on the camera.
To boost the WiFi signal strength, you can move the camera closer to your computer.
If the camera is far from your computer or the AP device, it may take longer to connect to the • network. (The signal and the radio frequency may be interfered.)
To prevent the camera from turning off accidentally, please be sure the battery is fully charged.
Using WiVideo via USB Connection
Connect the camera to your computer by using the supplied USB cable.1.
- After making a USB connection, the main screen will appear. Or please click [WiVideo] shortcut on the desktop to execute the application. Or you can find it at [Start]-->[All Program].


natural_image
Illustration of a laptop connected to a vertical device via cable, showing network connections (no text or symbols)The WiVideo application serves 1 option while connecting via USB:
| Function Description | |
| TRANSFER | You can access the videos and photos stored in your camera and upload files to the social websites.UploadSelect the videos/photos on the thumbnail screen. 1.Click on [Upload].2.The website options appears.3.Select the website and check the username/Email and password of the specific social website in the fields.Click on [OK] to upload.5. |

Note
LIVE VIDEO and VIDEO CHAT are not available during USB connecting.
Some • social websites may not be allowed to access in certain regions or networks.
Your computer must have internet access to upload files to the website.
If you do not have a account, please sign up on the website first.
- The social website update is the subject to change without notice. (e.g. password validation, create a channel) Please visit the website first to update your account setting.
EN
Section 8
Viewing Photos and Videos on TV
Connecting to a High-Definition 16:9(Wide) TV
Connect the HDMI cable to your camera's HDMI Out port.1.
Connect the other end of the cable to a television.2.
Set the video input source of your TV to "HDMI."3.
- The steps for viewing stored videos and photos on an HDTV are exactly the same as for viewing them on the LCD monitor.


Note
Some icons on the LCD screen do not display when the camera is connected to an HDTV. Some functions may not be accessible while the camera is connected to an HDTV.
Installing Bundled Software
The CD-ROM supplied with this camera contains 2 pieces of software.
- ArcSoft MedialImpression is a user-friendly application that helps you managing your media, burning your video into DVD, and uploading your files to the web sites easily.
- Adobe Reader is a popular program that you need to have installed to read the User's Manual. Many computer users will find they already have this software installed on their computer.
To install the bundled software:
Insert the CD-ROM into your computer's CD-ROM drive. The autorun screen appears.1.
Follow the on-screen instructions to complete the installation.2.

Note
Detailed information can be found in the online help of all the bundled software.
Install the bundled software application, ArcSoft MedialImpression, for viewing the video • correctly on a computer.
Transferring Photos or Videos to a Computer
You can transfer photos or videos stored on your camera to a computer and send them in e-mails to friends or post them on the web sites.
To do this you should:
Connect the computer and camera with the supplied mini USB 2.0 cable.1.
To access photos and videos on your memory card: Videos and photos can be found on your 2. computer at My Computer\ SD\DCIM\100MEDIA (path will vary depending on the name of the memory card).
To access photos and videos in the camera's internal memory: Videos and photos can be found 3. on your computer at My Computer\DV\DCIM\100MEDIA
Under this folder, you can view, delete, move, or copy any video/photo you want.4.
Section 10
Specifications and System Requirements
Specification
| Image sensor 5 Mega pixel CMOS sensor | |
| Operation modes Video record, Photo record, Live streaming via WiFi, Wireless webcam | |
| Lens Fixed Focus (F 2.8) | |
| Focus range HD+(720p 60) & HD(720p 30): 60 cm ~ infinityPhoto & Full HD (1080p 30):110 cm ~ infinity | |
| Zoom 1X~16X (16X Digital zoom) | |
| Shutter Electronic | |
| LCD monitor 3" touch LCD | |
| Storage media Built-in 128MB memory (partial memory is used for firmware code and software)Micro SD/SDHC/SDXC card slot support (up to 64GB) | |
| Image resolution 16MP: 4608 x 3456 (16M pixels) (Interpolated)5MP: 2592x1944 (5M pixels)3MP: 2048x1536 (3M pixels) | |
| Video resolution Full HD (1080p 30): 1920X1080(30fps)HD+ (720p 60): 1280X720(60fps)HD (720p 30): 1280X720(30fps)VGA (640X480): 640X480(30fps) | |
| White balance Auto/Manual (Daylight, Fluorescent, Tungsten) | |
| ISO Auto/800/1600 | |
| Self-timer 10 seconds delay | |
| Light Light On/ Digital Light / Light Off | |
| File format Photo: JPG | Video: AVI (H.264) |
| Image play | Single image/Slideshow |
| PC interface | Mini USB 2.0 port |
| TV out | HDMI |
| WiFi | Compatible with WiFi 802.11 a/b/g/n |
| Battery | Lithium-ion rechargeable battery |
| Dimension 58mm (L) × 112mm (H) × 17mm (W) | |
| Weight | 105 g ( without battery) |
System requirements
Microsoft Windows XP(SP3 or above)/Vista/7•
Intel /AMD Dual-Core CPU or above
1GB• System memory and free
2GB System hard disk space•
Available USB 1.1/2.0 port or above•
WiFi a/b/g/n capability•

Note
The LCD screen is manufactured using extremely high-precision technology, so over 99.99% of the pixels are operational for effective use. However, some tiny black and/or bright dots (white, red, blue or green) may appear on the LCD screen. These dots are a normal result of the manufacturing process, and do not affect the recording.
Section 11
Troubleshooting
Troubleshooting
If the camera fails to function as expected, check the list of the common problems below.
| Problem/Situation Remediation/Solution | |
| Cannot turn on the camera. The power turns off suddenly. | Power is off. Press the [Power Button] to turn on.· |
| Battery pack is weak or depleted. Recharge the battery pack.· | |
| Camera cannot be turned on after plugging power adapter. | Please make sure that you use the supplied power adapter and connect it to the power outlet correctly. |
| WiFi icon does not appear after pressing WiFi button. | Battery pack is low. Recharge the battery pack.· |
| The files on the memory card do not display smoothly when the LCD shows the “!” marking. | “!” means the micro SD card is low speed or contains ·corrupted files. To solve this, format the microSD card using the camera instead of a computer. (Please refer to the detailed Format instruction in Section 5). |
| The card has some problems and can not be recognized. ·Change the card with another one. | |
| Or please change the micro SD card to a high speed one.· | |
| Cannot take video/photo. Memory | is full. Delete some unnecessary videos/photos or ·insert a new micro SD card. |
| Power is off. Press the [Power Button] to turn on.· | |
| The camera is frozen. Please remove the battery/unplug the adapter. Then, insert ·the battery/plug the adapter and turn on the camera again. | |
| The date imprinted on the photo is incorrect | Set the date and time in the [Setting] menu.· |
| Why do some of my indoor photos look blurry and dark? | ·Poor lighting. Take photo in better lighting. |
| ·The camera extends photo exposure time under low light/indoor condition. Keep the camera (and the target subject) steady for several seconds when taking photos. | |
| ·Place the camera on a flat and steady surface, or use a tripod when take photo. | |
| The color of the video/photo is not natural. | ·Select the proper white balance option to match the light source. |
| When the camera is connected to the PC via USB cable, many Autoplay windows may pop out. They indicate the disks of the camera. | ·“DV” indicates the internal memory of the camera.·“Removable Disk” indicates the external memory (memory card installed in the camera).·“WiVideo” indicates the bundled program. If you want to install this program, please double-click on it to start installation automatically. |
| The LCD shows [Connecting Failed] after pressing WiFi Button. | The password configuration does not match to the AP you want to connect. |
| The AP router or the computer is not turned on. Turn the AP router or your computer on. | |
| The camera is not in the wireless network service area or weak network signal. Please make sure the AP router is able to access the Internet. | |
| The camera does not support the type of encryption used on the AP. This model only supports WEP/WPA/WPA2 personal type of encryption, but not up to enterprise level. | |
| Your network requires PPPoE account/password information. | |
| Some AP routers do not allow you to connect to the network (e.g. firewall). | |
| The social websites update their websites without notice. Please visit the website first to update your account setting or upgrade the firmware and WiVideo program. | |
| The WiVideo program cannot be installed. | Check the computer system compatibility. |
Section 12
Technical Support
Technical Support
For technical support issues please visit our website at www.polaroid.com. For further assistance, you can also call our technical support department toll free at 877-408-0033, or for e-mail support, please contact us at polaroid@sakar.com.
© 2012 All Rights Reserved
Warranty Card
This warranty covers the original consumer purchaser only and is not transferable.
This warranty covers products that fail to function properly UNDER NORMAL USAGE, due to defects in material or workmanship. Your product will be repaired or replaced at no charge for parts or labor for a period of one year.
What Is Not Covered by Warranty
Damages or malfunctions not resulting from defects in material or workmanship and damages or malfunctions from other than normal use, including but limited to, repair by unauthorized parties, tampering, modification or accident.
To obtain Warranty Service and Troubleshooting information:
Call 877-408-0033 or Visit our website at www.polaroid.com.
To receive Warranty service along with the name and address of an authorized product service center, the original consumer purchaser must contact us for problem determination and service procedures. Proof of purchase in the form of a bill of sale or receipted invoice, evidencing that the Product is within the applicable Warranty period(s), MUST be presented in order to obtain the requested service. It is your responsibility to properly package and send any defective products along with a dated copy of proof of purchase, a written explanation of the problem, and a valid return address to the authorized service center at your expense. Do not include any other items or accessories with the defective product. Any products received by the authorized service center that are not covered by warranty will be returned unrepaired.
NO WARRANTIES, WHETHER EXPRESS OR IMPLIED, INCLUDING, BUT NOT LIMITED TO, ANY IMPLIED WARRANTIES OF MERCHANTABILITY OR FITNESS FOR A PARTICULAR PURPOSE, OTHER THAN THOSE EXPRESSLY DESCRIBED ABOVE SHALL APPLY. DISTRIBUTOR FURTHER DISCLAIMS ALL WARRANTIES AFTER THE EXPRESS WARRANTY PERIOD STATED ABOVE. NO OTHER EXPRESS WARRANTY OR GUARANTY GIVEN BY ANY PERSON, FIRM OR ENTITY WITH RESPECT TO THE PRODUCT SHALL BE BINDING ON DISTRIBUTOR. REPAIR, REPLACEMENT, OR REFUND OF THE ORIGINAL PURCHASE PRICE - AT DISTRIBUTOR'S SOLE DISCRETION - ARE THE EXCLUSIVE REMEDIES OF THE CONSUMER. IN NO EVENT WILL DISTRIBUTOR, ITS MANUFACTURERS, OR PLR IP HOLDINGS, LLC BE LIABLE FOR ANY INCIDENTAL, DIRECT, INDIRECT, SPECIAL, PUNITIVE OR CONSEQUENTIAL DAMAGES (SUCH AS, BUT NOT LIMITED TO, DAMAGES FOR LOSS OF PROFITS, BUSINESS, SAVINGS, DATA OR RECORDS) CAUSED BY THE USE, MISUSE OR INABILITY TO USE THE PRODUCT. EXCEPT AS STATED HEREIN, NO OTHER WARRANTIES SHALL APPLY. NOTWITHSTANDING THE FOREGOING, CONSUMER'S RECOVERY AGAINST DISTRIBUTOR SHALL NOT
EXCEED THE PURCHASE PRICE OF THE PRODUCT SOLD BY DISTRIBUTOR. THIS WARRANTY SHALL NOT EXTEND TO ANYONE OTHER THAN THE ORIGINAL CONSUMER WHO PURCHASED THE PRODUCT AND IS NOT TRANSFERABLE.
Some countries, states or provinces do not allow the exclusion or limitation of incidental or consequential damages or allow limitations on warranties, so limitation or exclusions may not apply to you. This warranty gives you specific legal rights, and you may have other rights that vary from state to state or province to province. Contact your authorized retailer to determine if another warranty applies.
This product is manufactured, distributed and sold by SAKAR International, Inc. Polaroid, Polaroid & Pixel, Made in Polaroid and Polaroid Classic Border Logo are trademarks of PLR IP Holdings, LLC, used under license. All other trademarks are the property of the respective owner, who has not sponsored, endorsed or approved this product. PLR IP Holdings, LLC does not manufacture this product or provide any Manufacturer's Warranty or support.
E-Waste - PLR IP Holdings, LLC, its licensees, affiliates, and Sakar International, Inc. fully supports all electronic waste initiatives. As responsible stewards of the environment, and to avoid violating established laws, you should properly dispose of this product in compliance with all applicable regulations, directives or other governances in the area where you reside. Please check with local authorities or the retailer where you purchased this product to determine a location where you can appropriately dispose of the product.
You may also go to www.polaroid.com and reference Social Responsibility to learn more about the specific laws in your area and to locate a collection facility near your home.
If your electronic device has internal memory on which personal or other confidential data may be stored, you may want to perform a data sanitization process before you dispose of your device to assure another party cannot access your personal data. Data sanitization varies by the type of product and its software, and you may want to research the best sanitization process for your device before disposal. You may also check with your local recycling facility to determine their data sanitization procedures during the recycling process.
This device complies with the part 15 of the FCC rules. Operation is subject to the following two conditions: (1) this device may not cause harmful interference, and (2) this device must accept any interference received, including interference that may cause undesired operation.
Caution: changes or modifications not expressly approved by the party responsible for compliance could void the user's authority to operate the equipment.
NOTE: This equipment has been tested and found to comply with the limits for a Class B digital device, pursuant to Part 15 of the FCC Rules. These limits are designed to provide reasonable protection against harmful interference in a residential installation. This equipment generates, uses and can radiate radio frequency energy and, if not installed and used in accordance with instructions may cause harmful interference to radio or television reception, which can be determined by turning the equipment off and on. The user is encouraged to try to correct the interference by one or more of the following measures:
Reorient or relocate the receiving antenna.
Increase the separation between the equipment and receiver.
Connect the equipment into an outlet on a circuit different from that to which the receiver is connected.
Consult the dealer or experienced radio/ TV technician for help.
- High Definition Digital Video Camera
- Read This Before Using the Camera
- SAFETY INSTRUCTIONS
- Product Information
- Contents
- Section 1
- Getting to Know Your Camera
- Overview
- Note
- Standard Accessories
- Front View
- Bottom View
- Section 2
- Getting Started
- Loading the Battery
- Charge your battery
- Inserting and Removing a Micro SD Card (Optional)
- Turning the Camera On
- Configuring the Initial Date and Time Setup
- Turning the Camera Off
- Section 3
- Enjoying the Record Mode
- LCD Monitor Information
- Video Recording
- Photo Capturing
- Using Zoom Function
- Options for Record Menu
- Video Menu
- Video Resolution
- Light
- Scene
- White Balance
- Video Stabilization
- Motion Detection
- Slow Motion
- Time Lapse
- Photo Menu
- Photo Resolution
- Face Tracking
- Date Printing
- ISO
- Self-Timer
- Section 4
- Enjoying the Playback Mode
- Button Function
- Operations for Playback Mode
- Video Playback
- Delete Videos
- Photo Playback
- Section 5
- Setting Your Camera
- Setting Menu
- WiFi ID
- Sound
- TV
- Language
- Time Setting
- Format
- Default Setting
- Section 6
- WiFi to Cloud-Ustream
- Start to use Ustream
- Prepare to broadcast on Ustream
- USTREAM
- Broadcast live streaming on Ustream
- Section 7
- WiFi to PC-WiVideo Program
- Advanced Operation on Your Computer - WiVideo
- Install [WiVideo] on your computer
- Using WiVideo via WiFi Connection
- Using WiVideo via USB Connection
- Section 8
- Viewing Photos and Videos on TV
- Connecting to a High-Definition 16:9(Wide) TV
- Installing Bundled Software
- Transferring Photos or Videos to a Computer
- To do this you should:
- Section 10
- Specifications and System Requirements
- System requirements
- Section 11
- Troubleshooting
- Section 12
- Technical Support
- Warranty Card
- What Is Not Covered by Warranty
- To obtain Warranty Service and Troubleshooting information:
- Call 877-408-0033 or Visit our website at www.polaroid.com.
Brand : POLAROID
Model : iD450
Category : Pocket Camcorder