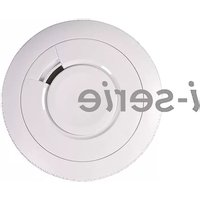
Ei156TLH - Smoke detector Ei Electronics - Free user manual and instructions
Find the device manual for free Ei156TLH Ei Electronics in PDF.


| Product Type | Smoke Detector |
| Model | Ei156TLH |
| Brand | Ei Electronics |
| Sensor Type | Optical |
| Power Source | Sealed lithium battery (10-year life) |
| Battery Life | 10 years |
| Dimensions (Diameter x Height) | Approx. 100 mm x 40 mm |
| Weight | Approx. 200 g |
| Mounting | Ceiling or wall mount |
| Test Button | Yes |
| Hush/Silence Button | Yes |
| Alarm Indicator | Red LED |
| Power Indicator | Green LED (flashes every 40-60 seconds) |
| Low Battery Warning | Chirp every 40-60 seconds |
| End-of-Life Warning | Chirp 3 times per minute |
| Interconnectable | Yes (up to 12 units) |
| Operating Temperature | 4°C to 40°C (40°F to 104°F) |
| Storage Temperature | -10°C to 50°C (14°F to 122°F) |
| Humidity Range | 15% to 90% RH (non-condensing) |
| Standards Compliance | EN 14604 |
| Maintenance | Vacuum clean every month |
| Repairability | Non-repairable; replace entire unit after 10 years |
| Warranty | 5 years (typical) |
Frequently Asked Questions - Ei156TLH Ei Electronics
User questions about Ei156TLH Ei Electronics
0 question about this device. Answer the ones you know or ask your own.
Ask a new question about this device
Download the instructions for your Smoke detector in PDF format for free! Find your manual Ei156TLH - Ei Electronics and take your electronic device back in hand. On this page are published all the documents necessary for the use of your device. Ei156TLH by Ei Electronics.
USER MANUAL Ei156TLH Ei Electronics
LOCATING ALARMS
SMOKE ALARMS
Sufficient smoke must enter the Smoke Alarm before it will respond. The Smoke Alarm needs to be within 7.5 metres (25 ft) of the fire to respond quickly. It also needs to be in a position where its alarm can be heard throughout your home, so it can wake the occupants in time for all to escape. A single Smoke Alarm will give some protection if it is properly installed, but most homes will require two or more to ensure that a reliable early warning is given. For maximum protection you should put individual Smoke Alarms in all the rooms where fire is most likely to break out, (apart from kitchens etc. see Locations to Avoid).
A Smoke Alarm should be located between the sleeping area and the most likely sources of fire (living room or kitchen for example), But it should not be more than 7.5 metres (25 ft) from the door to any room where a fire might start, and block the escape route from the house.
Important: This Smoke Alarm is designed for a single occu-pancy in a residential type environment.
HEAT ALARMS
The Heat Alarm gives a fire warning when the temperature at the unit reaches 58 C. It is ideal for kitchens, garages, boiler houses and other areas where there are normally high levels of fumes, smoke or dust i.e. places where Smoke Alarms cannot be installed without the risk of excessive nuisance alarms. A Heat Alarm should only be used in a room adjoining an escape
route, in conjunction with Smoke Alarms on the escape routes.
All the Heat Alarms and Smoke Alarms should be interconnected to ensure the early warning will be heard, particularly by somebody sleeping. A properly designed early warning fire system ensures the alarm is given before the escape routes because blocked with smoke. Therefore there must be Smoke Alarms along the escape routes as Heat Alarms would not give sufficient warning. However, a fire in a closed room (e.g., kitchen) adjoining the escape route, can eventually cause the corridor to become smoke-logged due to smoke leaking out from around the door before adequate warning can be given by detectors in the corridor. (Smoke leaking out from a room is often cool and slow moving so it can take a long time to rise to the ceiling, and travel to a detector which could be some distance away). A Heat Alarm in the closed room will give early warning of fire in that room and help overcome this problem.
Figure 2 illustrates where Heat Alarms and Smoke Alarms should be located in a typical two storey house. Note the spacings in “Recommended Protection” which ensure the early detection of fire and that warning will be heard.
Locate Heat Alarms in rooms adjoining or on escape routes - kitchens, garages, boiler houses etc. where Smoke Alarms are unsuitable. Install within 5.3m (17 feet) of potential sources of fire.
Single Storey Dwelling
If the Home is on one level (a bungalow or mobile home for example) you should put the first Smoke Alarm in a corridor or hall way between the sleeping and living areas. Place it as near to the living area as possible, but make sure you can hear it loudly enough to wake a person in the bedrooms. (for example, see figure 3)
Single Storey Dwelling with Recommended Protection
Figure 3

If the bungalow is very large and the corridor or hallway is more than say 15 metres (50 ft) long, one Smoke Alarm will not be sufficient. This is because no matter where it is located it will be more than 7.5 metres from potential fires.
In houses with more than one sleeping area, Smoke Alarms should be placed between each sleeping area and the living area.
Multi Storey Dwellings
If the home is on more than one level the best place for the first Smoke Alarm is in the downstairs hallway near the stairs. This is because smoke is likely to be detectable in the hallway before it reaches the upstairs landing and bedrooms. The second Smoke Alarm should be upstairs, because the downstairs Smoke Alarm is unlikely to detect the smoke from a fire in a bedroom upstairs (see figure 2).
Maximum Protection
For maximum protection you should put individual Smoke Alarms in all the rooms where fire is most likely to break out (apart from the locations to avoid, mentioned below), Ensure that they are all interconnected. The living room is the most likely place for a fire to start at night, followed by the kitchen and then the dining room. You should also consider putting Smoke Alarms in any bedrooms where fires might occur, for instance, where there is an electrical appliance such as an electric blanket or heater, or where the occupant is a smoker. You could also consider putting Smoke Alarms in any rooms where the occupant is unable to respond very well to a fire starting in the room, such as an elderly or sick person or a very young child.
Checking you can hear the Smoke & Heat Alarms
With the Alarm sounding in its intended location, check you are able to hear it in each bedroom with the door closed, above the
PAGE 2,3,4&5
B12931
REV-2
sound of the radio. The radio should be set to a reasonably loud conversation level. If you can't hear it over your radio the chances are that it wouldn't wake a person.
If a Smoke Alarm is too far away for it to wake a person, it is best to link it to another Smoke Alarm or Heat Alarm near the bedroom. The following alarms Ei 151TL / 154TL / 156TLH / 155H / 150 can be interconnected - when one alarm senses smoke, all interconnected alarms respond (see below for further details).
LOCATIONS TO AVOID
Don't place Smoke Alarms in any of the following areas:
Bathrooms, kitchens, shower rooms, garages or other rooms where the smoke alarm may be triggered by steam, condensation, normal smoke or fumes. Keep at least 6 metres (20 feet) away from sources of smoke - wall mounting if necessary.
Don't place Heat Alarms in any of the following areas:
Bathrooms, shower rooms or other room where the unit may be triggered by steam or condensation.
Don't place Smoke or Heat Alarms in any of the following areas:
Places where the normal temperature can exceed 40 C (104 F) or be below 4 C (39 F) e.g. attics, furnace rooms etc. Directly above ovens or kettles, as the heat/steam could cause nuisance alarms.
Near a decorative object, door, light fitting, window molding etc., that may prevent smoke or heat from entering the Alarm.
Surfaces that are normally warmer or colder than the rest of the room (for example attic hatches, uninsulated exterior walls etc). Temperature differences might stop smoke or heat from reaching the unit.
Next to or directly above heaters or air conditioning vents, windows, wall vents etc. that can change the direction of airflow.
In very high or awkward areas (e.g. over stair shafts) where it may be difficult to reach the alarm (for testing or hushing). Locate away from very dusty or dirty areas as dust build-up in the chamber can impair performance. It can also block the insect screen mesh and prevent smoke from entering the smoke detector chamber.
Locate the unit at least 1 metre (3 feet) from dimmer controlled lights and wiring - some dimmers can cause interference.
Locate unit at least 1.5m (5 feet) and route wiring at least 1m (3 feet) away for fluorescent light fittings as electrical "noise" and/or flickering may effect the unit. Do not wire into the same circuit as fluorescent lights or dimmers.
Do not locate in insect infested areas. Small insects getting into the smoke detector chamber can cause intermitter alarms. Insects and contamination on the Heat Alarm sensor can increase its response time.
POSITIONING SMOKE & HEAT ALARMS
The location must comply with applicable building regulations. Ceiling Mounting
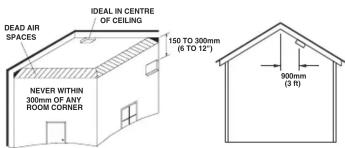
Hot smoke rises and spreads out, so a central ceiling position is the preferred location. The air is "dead" and does not move in corners, therefore Smoke & Heat Alarms must be mounted away from corners. Place the unit at least 300mm (12 inches) from any light fitting or decorative object which might obstruct smoke / heat entering the Smoke Alarm. Keep at least 300mm (12 inches) away from walls. See figure 4.
On a sloping Ceiling
In areas with sloping or peaked ceilings install your Smoke Alarm 90 cm (3 feet) from the highest point measured horizontally (see figure 5), because “dead air” at the apex may prevent smoke from reaching the unit.
Figure 5Figure 4
Wall Mounting
When a ceiling position is not practical (for example on a ceiling having exposed beams or joists, or built-in radiant heating) put the top edge of your Smoke Alarm between 150 and 300mm (6 and 12 inches) below the ceiling. Keep at least 300mm (12 inches) from room corners. (see figure 4).
Wall mounting is not recommended for Heat Alarms.
INSTALLING SMOKE & HEAT ALARMS
The Alarm is designed to be permanently mounted on to a standard or rectangular junction box and connected to the 230 VAC, 50Hz mains supply. It requires a current of 40mA . The Alarm must not be exposed to dripping or splashing. There are important markings on the underside of the alarm.
IMPORTANT PRECAUTION: Do not install the actual alarm itself in new or renovated buildings until all work is completed (including floor coverings) and the building has been fully cleaned. The wiring can be installed when appropriate. (Excessive dust and debris from building work can
contaminate the smoke chamber or heat sensor and cause problems, it will also invalidate the guarantee). If it must be installed, cover it completely, particularly around the edges, with a dust cover (e.g. with the elasticated cover supplied or a plastic bag), until all cleaning is finished.
The Alarm must no be connected when the house wiring insulation is being checked with high voltages i.e. don't use a megger on the alarm.
WARNING: Mains operated Alarms should be installed and interconnected by a qualified electrician in accordance with the Regulations for Electrical Installations published by the Institution of Electrical Engineers (UK). Failure to install this Alarm or rectly may expose the user to shock or fire hazards.
WARNING: The Alarm must be continuously powered 24 hours a day so it is important that it is not on a circuit that can be turned off by a switch.
Note: BS 5839-Part 6:1995 gives the following recommendations regarding the mains supply to be used in different situations. A grade D system consists of one or more mains powered Smoke Alarms, each with an integral standby supply. (The Ei 151TL, Ei 156TLH Smoke Alarms and Ei 154TL Heat Alarms with rechargeable lithium back-up cells can be used in a grade D system). A grade E system consists of one or more mains powered Smoke Alarms with no standby supply. (The Ei 150, Ei 155H Smoke Alarms & Ei 154TL Heat Alarms can be used in a grade E system).
The power supply for Alarms in a grade D system should be derived from the public electricity supply to the dwelling. The mains supply to the Alarms should take the form of either:
(a) an independent circuit at the dwelling's main distribution board, in which case no other electrical equipment should be connected to this circuit (other than a dedicated monitoring device installed to indicate failure of the mains supply to the Alarms); or
(b) a separately electrically protected, regularly used local lighting circuit. The power supply for Alarms in a grade E system should be derived from the public electricity supply to the dwelling. The mains supply to the Alarm(s) should comprise a single independent circuit at the dwelling's main distribution board. No other electrical equipment should be connected to this circuit (other than a dedicated monitoring device installed to indicate failure of the mains supply to the Alarms).
If Alarms are being interconnected, all Alarms should be connected to a single circuit.
INSTALLATION
-
Select a location complying with the above advice.
-
Disconnect the AC mains supply from the circuit that is going to be used.
-
Install a junction box where the alarm is to be placed. If the mounting plate is going to be screwed directly on to the junction box ensure the orientation of the box will leave the Smoke Alarm squarely aligned to the rectangular walls. We recommend the
use of 6243Y mains cable - use the third core for the interconnect line. Do not use an earth wire for the interconnect line.
-
Remove the mounting plate from the Smoke Alarm by releasing the tamper-proofing catch with a small screwdriver as shown in Figure 1 and sliding the Smoke Alarm from the plate.
-
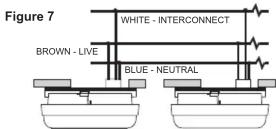
The wires in the plug supplied are colour coded as follows: Brown : Live Blue : Neutral
Blue : Neutral White : Interconnect
The Brown wire must be connected to the terminal/wire which is marked with the letter L or coloured Red or Brown.
The Blue wire must be connected to the terminal/wire which is marked with the letter N or coloured Black or Blue.
Failure to do this will damage interconnected alarms.
The extra insulation on the white wire must not be removed unless the Alarms are being interconnected. To interconnect the Alarms connect all the White wires together as shown in Figure 7.
N.B. The Alarm is not to be earthed so no connection is to be made to terminals or wires marked with the letter E, the symbol or coloured Green or Green and Yellow.
(There are two blue wires in the plug which are joined together. This is to disconnect the battery when the plug is removed on the Ei 151TL, Ei 154TL & Ei 156TLH models).

- When correctly terminated, route the plug and wires through the rectangular slot in the mounting plate. Screw the mounting plate to the junction box in the orientation required to have the rectangular Smoke Alarm aligned squarely with the walls. En - sure that there is a clear space behind the rectangular hole in the mounting plate. This will allow the plug which protrudes from the Smoke Alarm to move freely as it is slid into position.
Ensure the gasket seals around the edge of the junction box / hole in the ceiling. This is to prevent air draughts affecting the smoke / heat entering the alarm. If the orifice is too large it should be sealed with a silicone rubber or equivalent.
- Push the plug firmly on to the socket in the back of the Alarm being careful to orientate the polarized plug correctly. Slide the Alarm on to the mounting bracket until the tamper-proof clip clicks into place.
CAUTION: Do not attempt to remove the Alarm without first re leasing the tamper clip as shown in Figure 1.
- Connect the mains power to the Smoke Alarm circuit. Check the operation of the Alarm as outlined below.
INTERCONNECTING Ei SMOKE ALARMS & HEAT ALARMS
Note: A maximum of twelve Ei 150 / 151TL / 154TL / 155H / 156TLH / 130 / 131 / 134 / 136 Smoke Alarms or Heat Alarms may be interconnected along with anEi 158 pattress with relay (see Accessories below).
(If you want to connect more than twelve alarms contact your distributor).
Systems using more than 3 or 4 alarms must be very carefully planned to ensure nuisance alarms are not excessive. e.g. from cooking or weekly testing.
Smoke Alarm Locator Switch (Ei 159) should be incorporated into the system and be readily accessible to all occupants so that the source of an alarm can be quickly identified.
All alarms must be cleaned and maintained regularly.
A qualified person must be on call to quickly remove any faulty alarms (i.e. units with red light flashing), which are causing all the alarms to sound.
WARNING: Do not connect these Alarms to any other type of Ei Alarm, or to any other model produced by another manufacturer, apart from those listed above. Doing this may
damage the Alarms and could result in a shock or fire hazard. The interconnect wire (minimum 0.75mm cable) must be treated as if it was live. It should be insulated and sheathed.
A maximum of 250 metres (820 ft) of wire can be used (maximum resistance between detectors 50 ohms).
These Smoke Alarms should be interconnected only within the confines of a single family living unit. If they are connected between different units there may be excessive nuisance alarms. Everybody may not be aware that they are being tested or that it is a nuisance alarm caused by cooking etc.
CHECKING THE OPERATION OF THE ALARMS
INSPECTION & TESTING PROCEDURE
After installation check all the Alarms
(i) Check that the green mains indicator light is on. (If it is off check circuit breakers, fuses and wiring etc.) Check the red light behind the button or on the cover flashes every 40 seconds.
(ii) Press the test button (see figure 8) for up to 10 seconds to ensure the sensor chamber, electron
ics and sounder are working. A red light behind the test button or on the cover, will flash while horn is sounding. The alarm will stop when the button is released. Pressing the test button simulates the effect of smoke or heat during a real fire and is the best way to ensure the Alarm is operating correctly.
WARNING: DO NOT TEST WITH FLAME.
This can set fire to the Alarm and damage the house.
We do not recommend testing with smoke or heat as the results can be misleading unless special apparatus is used.
Pressing and releasing the test / hush button or an optical alarm (Ei156TLH or Ei155H) puts it into hush mode. The smoke sensitivity is reduced and the red light flashes every 10 seconds (instead of every 40 seconds). The optical alarm automatically resets to normal sensitivity after 10 minutes. (If an alarm is going to be checked with smoke in a suitable apparatus, the test / hush button must not be pressed beforehand as this makes the unit sensitive for 10 minutes.)
(iii) Check for any sign of contamination such as cobwebs or dust and clean the alarm as described in the "User Instructions" leaflet.
Interconnected alarms
Test the first unit by pressing the button. All the detectors should alarm within about 5 seconds of the first horn sounding and the red light on the first unit only will flash about once a second. Check all the other units similarly.
(Note: Ionisation and Heat Alarms signal to other interconnected alarms about 4 seconds after their own horn sounds. Optical alarms signal within about a second).

Figure 8
Checking Rechargeable Cells
(Models Ei 151TL, Ei 154TL & Ei 156TLH only)
- When the unit is beeping:
The Alarm automatically monitors the cells every 40 seconds to ensure that they are satisfactory. If a problem is identified it will give a short beep every 40 seconds. If the unit is giving beeps then check the following:
(i) Check that the green mains power light is on. If it is off the Alarm has been powered from the battery and the beeps indicate it is depleted. Re-connect the mains, check fuse, circuit breakers and wiring. If in doubt contact a qualified electrician. The beeps should cease within 2 hours as the battery charges up.
(ii) Check that the hush button has not been pressed inadvertently (Ei 151TL only). This also causes beeps every 40 seconds for up to 15 minutes. Press the test button to cancel hush mode beeps.
(iii) The cells may be depleted. The beeps should cease within 2 hours as the cells charge up. Fully charged, the cells will provide up to 6 months back-up without mains power.
(iv) On the Optical Smoke Alarms only Ei 155H & Ei 156TLH) if the unit beeps and the red light does not flash at the same time it indicates a problem with the smoke chamber - see Cleaning the Smoke Alarm in the "User Instructions" leaflet.
If all of the above possible causes of beeps have been ruled out but the beeping has still persisted for over 2 hours with the green light on - the rechargeable cells may be defective. The Alarm must be returned to the manufacturer for repair or replacement (see section Getting Your Smoke Alarm Serviced - in the "User Instructions" leaflet).
2. Manual Testing:
The functioning of the rechargeable cells (applicable to models Ei 151TL, Ei 154TL & Ei 156TLH only) can be checked as follows:
(i) Ensure that the alarm has been connected to the mains, green light on, for a least 2 days for the battery to charge.
(ii) Turn off the mains power at the distribution board and check that the green indicator light is extinguished. Do not remove the plug from the rear as this will disconnect the cells.
(iii) Press the test button and ensure the horn sounds loudly for 10 seconds.
(iv) Release the test button and watch it carefully for one minute: The red light behind the test button or on the cover will flash at least once.
The unit must not give a beep which indicates the cells are low.
(v) Turn on the mains supply at the distribution board only if the unit passes all the above tests.
Note: If the mains is disconnected and the cells are almost depleted the unit will beep every 40 seconds for at least 72 hours. This is to remind the user to reconnect the mains supply.
The unit will operate from the mains alone, even with a fully depleted or a defective battery, though it may not give sufficient warning of fire if the mains supply is disconnected for any reason.
If there are any problems get a qualified electrician to inspect the house wiring and connections to the alarms. If there are still problems the unit must be returned for examination (see section on Getting Your Smoke Alarm Serviced - in the "User Instructions" leaflet.
ACCESSORIES
(a) Surface Mounting Kits Ei157 & Ei158:
The Smoke Alarm can be surface mounted without the need to form a cavity for the plug and supply wires by using the Ei157 Kit. This is particularly useful with concrete surfaces, with retro-fitting and surface wiring.
The Ei158 Kit is similar but also includes a relay rated 250V AC / 5 amps. This is useful for remote signalling and turning on lights.
(b) Smoke Alarm Locator Ei159:
The Smoke Alarm locator is recommended for systems with three or more Smoke / Heat Alarms as it helps quickly identify the unit in alarm and reduces the impact of nuisance alarms.
When three or more units are interconnected with alarms sounding, pressing the Smoke Alarm Locator button will silence all units for 10 minutes, except those sensing fire. It is easily installed between the interconnect and neutral wires.
What is the best Smoke Alarm - Optical or Ionlonisation ?
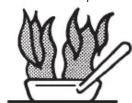
Both types respond in all standard fires but each type may respond faster to particular fires as shown. Ei Electronics manufactures complementary Smoke Alarms, Optical Smoke Alarm (Ei156TLH & Ei155H) and Ionisation Smoke Alarm (Ei151TL & Ei150). For dual protection install each type.

Ionisation Sensor
Best for fast flaming fires
- small smoke particles
The Home Office states (in FB2):
"If your home has more than one floor, at least one alarm should be fitted on each level. In this case a combination of Optical and Ionisation alarms, preferably interconnected, will give the best protection."
FIVE YEAR PRODUCT GUARANTEE
El Electronics guarantees this Smoke Alarm for five years from date of purchase against any defects that are due to faulty materials or workmanship. This guarantee only applies to normal conditions of use and service, and does not include damage resulting from accident, neglect, misuse, unauthorised dismantling, or contamination howsoever caused. This guarantee excludes incidental and consequential damage. If this Alarm should become defective within the guarantee period, it must be returned to the ElCo, with proof of purchase, carefully packaged, with the problem clearly stated (see section Getting Your Smoke Alarm Serviced - in the "User Instructions" leaflet). We shall at our discretion repair or replace the faulty unit.
Do not interfere with the Smoke Alarm or attempt to tamper with it. This will invalidate the guarantee, but more importantly may expose the user to shock or fire hazards.
This guarantee is in addition to your statutory rights as a consumer.
Aico Ltd., Mile End Business Park,
Maesbury Rd, Oswestry, Shropshire SY10 8NN, U.K.
Telephone : 0870 758 4000.
Website : www.aico.co.uk
Ei Electronics. Shannon, Co. Clare, Ireland.
Website : www.eielectronics.com
TROUBLESHOOTING
ALARM SOUNDS FOR NO APPARENT REASON:
(1) Identify the alarm source. On all interconnected units, the red light under the test button or on the cover will flash rapidly only on the unit which is the source of the alarm.
(2) Check for fumes, steam etc. from the kitchen or bathroom. Paint and other fumes can cause nuisance alarms.
(3) Press the hush button on the Ei151TL & Ei150. On the Ei151TLH & Ei155H press the combined test/hush button.
(4) If alarm does not stop, switch off mains and remove unit (see figure 1). (only remove alarm with red light flashing, the others are probably satisfactory).
ALARMS BEEPS CONTINUOUSLY:
(1) Alarms may be in 'hush mode'. Press the test button for 10 seconds to reset the unit (Ei151TL or Ei150 only).
(2) Cells may be flat due to mains failure (Ei151TL, 154TL, 156TLH only). Check the green mains light is on. If not, check fuse, circuit breakers and wiring connections.
(3) If the above fails to turn on the green light, a fault may exist. Switch off mains and remove the unit (see figure 1). Or press the hush button on the Ei151TL / 150 or press the combined test/hush button on the Ei156TLH / 155H
(4) If the green mains light is on and the action in (1) above has not silenced the beeping, a fault may exist. Remove the unit (see figure 1).
INTERCONNECTED ALARM DO NOT ALL SOUND:
(1) Hold test button for 10 seconds after first alarm has sounded to ensure signal is transmitted to all units.
(2) Switch off mains and check that live, neutral and interconnect cables have been correctly connected and that the connections are tight.
FREQUENT NUISANCE ALARMS OCCUR:
(1) Close kitchen / bathroom door when in use.
(2) Ensure that the alarm is sited at least 6m away from sources of fumes.
(3) Contamination from insects, paint or paint fumes may have occurred. Clean the alarm - see "User Instructions" leaflet.
(4) If the problem persists, resiting of the unit should be considered. Alternatively, replace the unit with an Optical unit, as assuming that the problem is with an Ionisation type alarm.
PAGE 14,15 & 1
B12931
REV-2

Professional
230V AC SMOKE & HEAT ALARMS
RECHARGEABLE LITHIUM CELL BACKUP


IONISATION
WITH HUSH
OPTICAL
WITH HUSH
HEAT
MODELS Ei151TL MODELS Ei156TLH MODELS Ei154TL
& Ei150 (WITHOU
BACKUP CELLS)
& Ei155H(WITHOUT
BACKUP CELLS)
LEAVE WITH USER
SITING & INSTALLATION INSTRUCTIONS
READ THIS FIRST

IDEALLY INSTALL IN THE CENTRE OF CEILING AT LEAST 300mm (12") FROM LIGHT FITTINGS. KEEP IONISATION ALARMS AWAY FROM KITCHENS TO PREVENT NUISANCE ALARMS. INTERCONNECT ALL ALARMS.

ENSURE LIVE MAINS IS CORRECTLY CONNECTED TO BROWN SMOKE ALARM WIRE ON THE INTERCONNECTED ALARMS. OTHERWISE UNITS WILL BE DAMAGED.

DO NOT FIT ACTUAL ALARM UNTIL ALL BUILDING WORK IS COMPLETED TO AVOID CONTAMINATION. AFTER CHECKING OPERATION, COVER SMOKE ALARM WITH DUST COVER UNTIL REQUIRED FOR USE.

DO NOT MEGGER THE ALARM. DISCONNECT THE ALARM BEFORE APPLYING HIGH VOLTAGE TO HOUSE WIRING.
CHECK OPERATION OF ALARM

GREEN MAINS LIGHT IS ON.

TEST BUTTON OPERATES ON ALL ALARMS.




- LOCATING ALARMS
- SMOKE ALARMS
- HEAT ALARMS
- SINGLE STOREY DWELLING
- MULTI STOREY DWELLINGS
- MAXIMUM PROTECTION
- CHECKING YOU CAN HEAR THE SMOKE & HEAT ALARMS
- LOCATIONS TO AVOID
- POSITIONING SMOKE & HEAT ALARMS
- WALL MOUNTING
- INSTALLING SMOKE & HEAT ALARMS
- INSTALLATION
- INTERCONNECTING EI SMOKE ALARMS & HEAT ALARMS
- CHECKING THE OPERATION OF THE ALARMS
- INSPECTION & TESTING PROCEDURE
- WARNING: DO NOT TEST WITH FLAME
- INTERCONNECTED ALARMS
- CHECKING RECHARGEABLE CELLS
- MANUAL TESTING
- ACCESSORIES
- SURFACE MOUNTING KITS EI157 & EI158
- SMOKE ALARM LOCATOR EI159
- WHAT IS THE BEST SMOKE ALARM - OPTICAL OR IONLONISATION
- FIVE YEAR PRODUCT GUARANTEE
- TROUBLESHOOTING
- 230V AC SMOKE & HEAT ALARMS
- SITING & INSTALLATION INSTRUCTIONS
- READ THIS FIRST
Brand : Ei Electronics
Model : Ei156TLH
Category : Smoke detector