
TPFIT25AWK - Dehumidifier HONEYWELL - Free user manual and instructions
Find the device manual for free TPFIT25AWK HONEYWELL in PDF.


| Product Type | Dehumidifier |
| Brand | Honeywell |
| Model | TPFIT25AWK |
| Dehumidification Capacity | 25 pints per day (at 80°F, 60% RH) |
| Coverage Area | Up to 1,500 sq ft |
| Water Tank Capacity | 1.6 gallons (6.1 liters) |
| Continuous Drain | Yes, with hose connection (1/4 inch female thread) |
| Power Supply | 120 Volts, 60 Hz, 4.0 Amps |
| Energy Consumption | 425 Watts (approx) |
| Energy Efficiency | 1.7 liters/kWh (Energy Factor) |
| Air Filter | Washable, reusable dust filter |
| Control Type | Digital display with touch buttons |
| Humidistat | Adjustable (30% to 90% RH) |
| Fan Speeds | 2 (High and Low) |
| Noise Level | 51 dB (in low speed) |
| Auto Shut Off | Yes, when bucket full or selected humidity achieved |
| Defrost Function | Automatic defrost protection |
| Dimensions (H x W x D) | 24.2 x 15.0 x 12.0 inches |
| Weight | 33.5 lbs (15.2 kg) |
| Caster Wheels | Yes, 4 casters for mobility |
| Warranty | 1-year limited (parts and labor) |
| Certifications | ENERGY STAR certified |
Frequently Asked Questions - TPFIT25AWK HONEYWELL
User questions about TPFIT25AWK HONEYWELL
0 question about this device. Answer the ones you know or ask your own.
Ask a new question about this device
Download the instructions for your Dehumidifier in PDF format for free! Find your manual TPFIT25AWK - HONEYWELL and take your electronic device back in hand. On this page are published all the documents necessary for the use of your device. TPFIT25AWK by HONEYWELL.
USER MANUAL TPFIT25AWK HONEYWELL
Read and save these instructions before use
natural_image
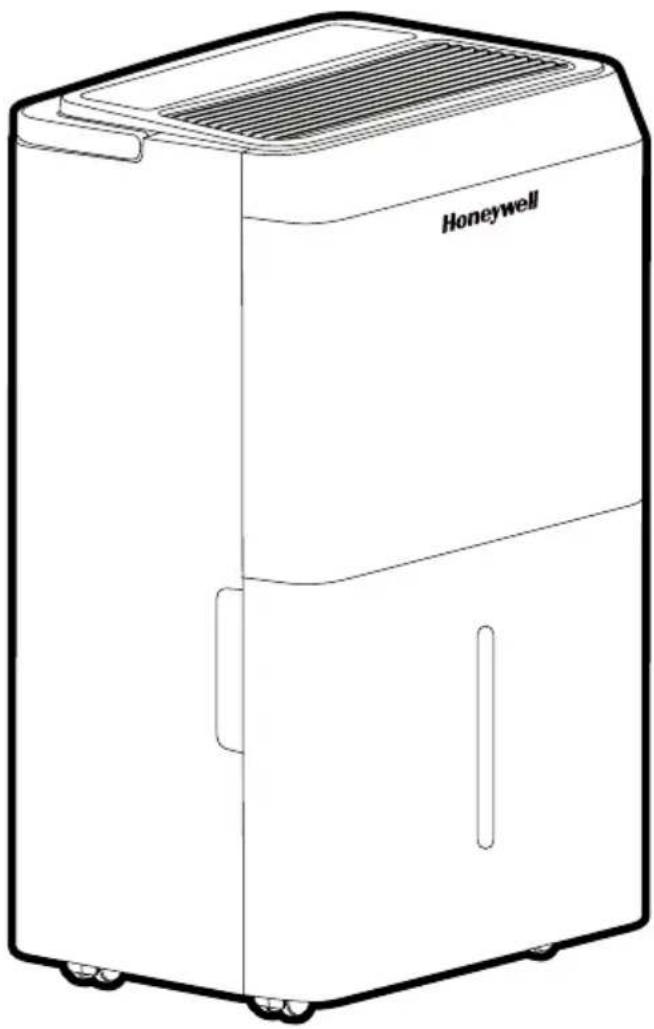
Line drawing of a Honeywell industrial device with front panel and wheels (no text or symbols on body)Customer Support:
Assistance Au Client:
Check the website for FAQ's, usage guides and more!

Contact UsProduct Registr
^ Canada Customer Support service available for models sold in Canada only.
^ Le Service Client Canadien est disponible uniquement pour les modèles vendus sur le territoire Canadien.
^ Servicio de Atención A Clientes en Canadá disponible solo para modelos vendidos en Canadá.
SMART PORTABLE DEHUMIDIFIER WITH WIFI CONNECTIVITY & VOICE CONTROL
For Models: TPFIT25AWK / TPFIT32AWK Smart Portable Dehumidifer with WiFi Connectivity
The Smart Portable Dehumidifier has added features to allow you to operate the dehumidifier remotely using a smart device, and to use voice commands through an Amazon Echo device, to control the unit.
Set up the Honeywell Air Comfort App on your smart phone or tablet to connect the Honeywell Smart Portable Dehumidifier for WiFi and Voice control (only available for Smart Dehumidifier models).
- Apps are frequently updated. Download the most recent App user manual from the below link:

https://honeywellaircomfort.com/pages/app-manuals
- Download the Honeywell Air Comfort App on your smart phone or tablet.


IMPORTANT: A 2.4 GHz Wi-Fi network is required for proper connection and operation between the Dehumidifier and the App. Other networks should be deleted, as they can interfere with connectivity.
NOTE: The Smart Portable Dehumidifier does not have to be connected to the Honeywell Air Comfort App to function. You can still operate manually using the unit's control panel.
Thank you for purchasing a Honeywell Portable Dehumidifier. This User Manual is intended to provide you with important information needed to set up, operate, maintain and troubleshoot this product.
SAFETY RULES
WARNING -- READ AND SAVE THESE INSTRUCTIONS BEFORE USING THIS PRODUCT.
The use of electrical products may create hazards that include, but are not limited to injury, fire, electrical shock. Failure to follow these instructions may damage and/or impair its operation and void the warranty. In case there is any inconsistency or conflict between the English version and any other language version of the content of this material, the English version shall prevail.
When using electrical appliances, basic safety precautions should always be followed:
• DO NOT touch the dehumidifier or the electrical plug with wet hands.
- Check the household voltage to ensure it matches the appliance's specification.
- Before operating, remove all packaging material and check for any damage that may have occurred during shipping.
• DO NOT operate any product with a damaged cord or plug.
• DO NOT use an extension cord with this appliance.
- DO NOT run power cord under carpeting, or cover it with rugs or runners. Keep the cord away from areas where it may be tripped over.
• Always power off and unplug the dehumidifier before emptying the water tank.
- The water collected in the tank must be discarded. The water should never be used for drinking.
- Always unplug the dehumidifier and remove the water from the water tank before cleaning, servicing or relocating the unit.
- Remove the power cord from the electrical receptacle by grasping and pulling on the power cord plug-end only, never pull the cord.
- This appliance has been manufactured for use in domestic environments and must not be used for other purposes.
- DO NOT use the product in areas where gasoline, paint or other flammable goods and objects are used or stored.
- This dehumidifier is designed for indoor residential applications only. It should not be used for commercial or industrial applications.
- DO NOT attempt to repair or adjust any electrical or mechanical functions of the dehumidifier, as this may cause danger and void the warranty.
• DO NOT cover the air inlet or outlet on the appliance as this may cause the unit to fail.
- DO NOT insert or allow objects to enter any ventilation or exhaust opening as this may damage the product and could cause electrical shock or fire.
• DO NOT let children play with this appliance, packaging or included plastic bag.
- If the unit is damaged or it malfunctions, do not continue to operate it. Unplug the product from the electrical outlet. Refer to the troubleshooting section and contact the customer support center.
• Always place the dehumidifier on a leveled floor.
- Never install the product near a bathtub or any water container.
- Store in a dry area, away from direct sunlight, when not in use.
- This appliance and its packaging materials are not intended for use by persons (including children or elderly) with reduced physical, sensory or mental capabilities, or lack of experience and knowledge, unless they have been given supervision or instructions concerning the use of the appliance by a person responsible for their safety.
- Always grip the top handle and keep the unit upright when transporting from room to room – DO NOT tilt the product on its side or upside-down.
- If the dehumidifier was transported tilted on its side, you must position it upright again and wait at least 4 hours before using it.
- WARNING: To reduce the risk of fire or electric shock, do not use this appliance with any solid state speed control device.
| SYMBOL NOTE EXPLANATION | ||
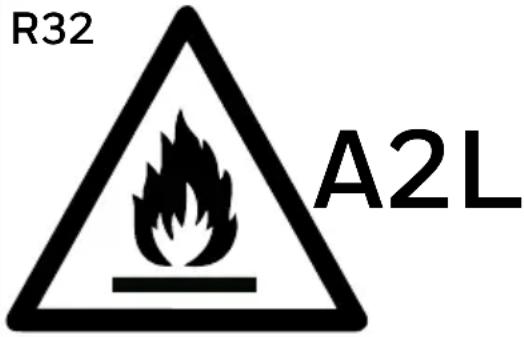 | WARNING | This symbol shows that this appliance uses a flammable refrigerant. If the refrigerant is leaked and exposed to an external ignition source, there is a risk of fire. |
 | CAUTION | This symbol shows that the operation manual should be read carefully. |
 | CAUTION | This symbol shows that a service personnel should be handling this equipment with reference to the installation manual. |
 | CAUTION | This symbol shows that information is available, such as the operating manual or installation manual. |
Additional warnings for appliances with R32 refrigerant gas.
- Read the instructions carefully before using the appliance.
• R32 refrigerant gas complies with UL60335-2-40 / UL60335-1. - This appliance contains a certain number of grams (see rating label at the back of the unit) of R32 refrigerant gas. The maximum refrigerant charge amount is not greater than R32 0.105kg (For TPFIT25) R32 0.11kg (for TPFIT32) based on UL60335-2-40.
- When defrosting or cleaning, do not use any method other than those recommended by the manufacturer.
- Do not place the appliance in a room with continuous sources of ignition (e.g. open flame, operating gas appliance, or working electrical heater).
- Do not pierce and do not burn.
- Do not perforate any part of the refrigerant circuit.
• Refrigerant gas may be odorless.
- Accumulation of possible refrigerant leaks in an unventilated room could lead to fire or explosion should the refrigerant come in contact with electric heaters, stoves, or other sources of ignition.
- The appliance must be stored in a way to prevent mechanical damage and in a well-vented area.
- Only individuals authorized by an accredited organization certifying their competence to handle refrigerants in compliance with industry legislation should work on the refrigerant circuit.
- Servicing shall be performed only as recommended by the manufacturer.
- All working procedures that affect safety means shall only be carried by competent persons.

Repair must be performed based on the recommendations from the manufacturer. Maintenance and repair that requires the assistance of other qualified personnel must be performed under the supervision of specialists in the use of flammable refrigerants.
Transportation, marking, and storage for units.
- Transport of equipment containing flammable refrigerants must comply with local transport regulations.
- Marketing of equipment using signs must comply with local regulations.
- Disposal of equipment using flammable refrigerants must comply with national regulations.
- The storage of equipment should be in accordance with the manufacturer's instructions.
- Storage package protection should be constructed such that mechanical damage to the equipment inside the package will not cause a leak of the refrigerant charge.
The maximum number of pieces of equipment permitted to be stored together will be determined by local regulations.
HOW A DEHUMIDIFIER WORKS
When the dehumidifier is switched ON, a fan pulls moisture-laden air into the dehumidifier where it passes through dehumidifying coils inside the unit. These coils condense moisture from the air and collect it in the water tank. The dry air is then exhausted from the dehumidifier. The air flows through the air vents of the dehumidifier into the room as dry, warm air.
IMPORTANT: The dehumidifier is designed to operate between 41°F (5°C) and 89°F (32°C). The dehumidifier's performance may be greatly reduced if room temperature is beyond this temperature range.
SELECTING A LOCATION - IMPORTANT
- Before using the dehumidifier, place the unit UPRIGHT for at least 1 hour before use to allow the refrigerant to stabilize. If the unit was tilted on its side or upside-down during transportation, set the unit upright for 4 hours before use.
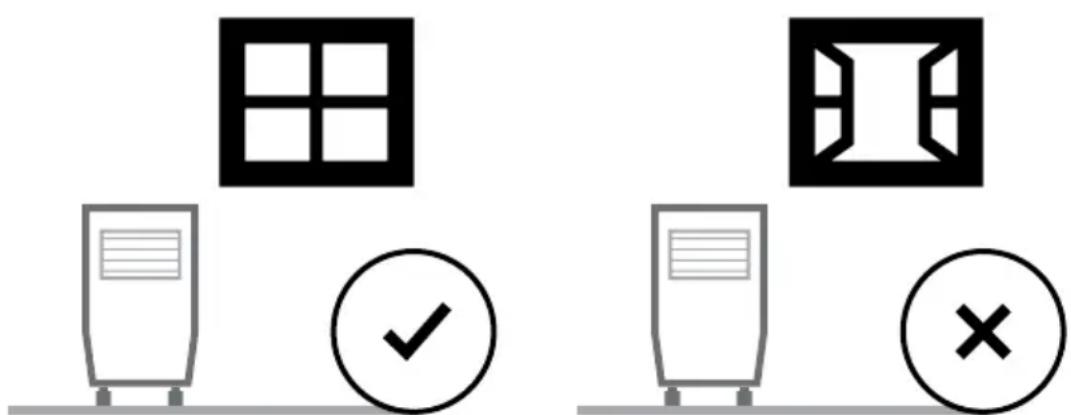
- For optimal efficiency, the dehumidifier must be operated in an enclosed area. Keep all doors, windows and other outside entrances to the room closed.
SELECTING A LOCATION - IMPORTANT (CONTINUED)
- Place the dehumidifier in an area where the temperature will not drop below 41^ F (5°C)
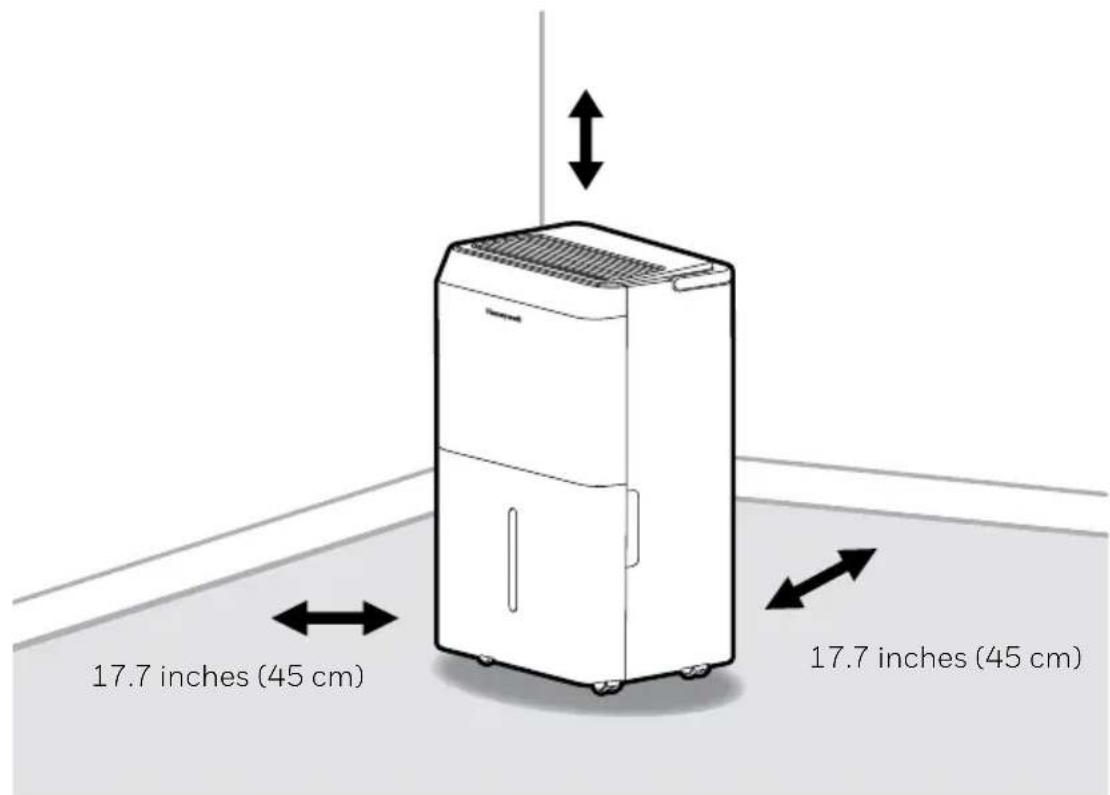
- Place the dehumidifier at least 17.7 inches (45 cm) away from other objects (e.g. curtains or furniture) that may restrict airflow from the back or through the air vents of the unit.
• The dehumidifier must be positioned on a level floor.
IMPORTANT: The effectiveness of the dehumidifier can be influenced by different factors. One factor is the rate at which new, moisture-laden air enters the room and the amount of air circulating in and out of the area to be dehumidified. For example, if a door to a basement is constantly opened, letting new, moisture-laden air into the room, dehumidification will take longer than if the door was kept closed. If the dehumidifier is in a room with a storage closet or cabinets, it will have little or no effect in drying the inside of the storage closet or cabinets unless there is adequate circulation of air in and out of these spaces. To dehumidify these spaces, open the storage door or cabinet doors to allow air circulation. You may find that installing a second dehumidifier may be required for larger enclosed areas.
UNPACKAGING THE DEHUMIDIFIER
This Dehumidifier is packaged with a colored or transparent tape to secure some parts during transportation. Remove the colored or transparent packaging tape from the unit.
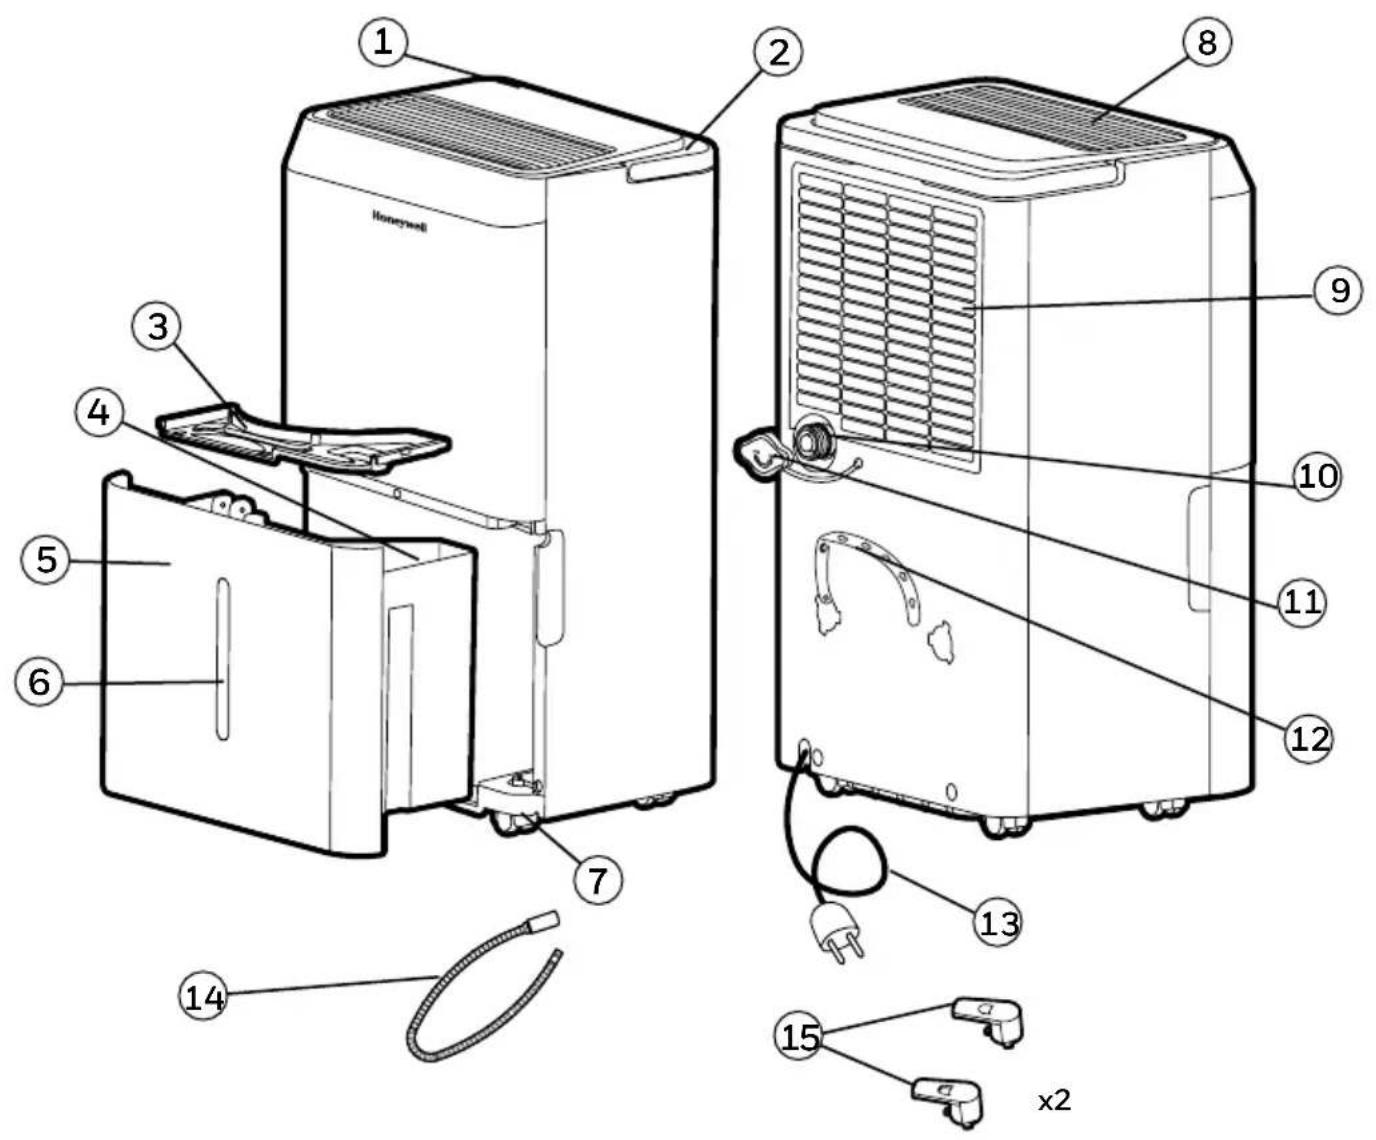
- Gently pull the water tank from out of the dehumidifier
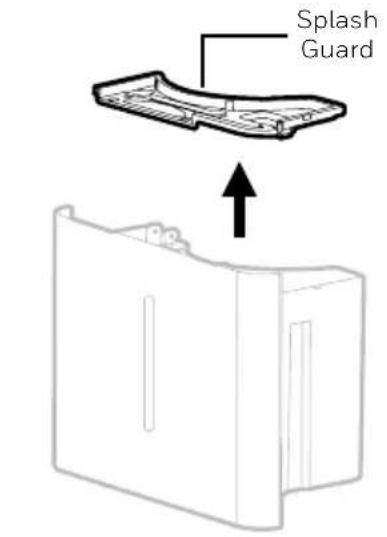
- Remove the splash guard from the top part of the water tank.
- Take out the power plug, drain hose and other accessories, which is placed inside the tank of the dehumidifier.
- Once all accessories have been removed. Make sure that the tank is properly positioned.
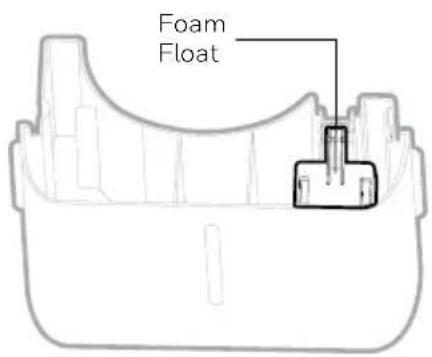
There is a Foam Float inside the water tank that senses the water level to automatically stop dehumidification when the water tank is full. Make sure the Foam Float is positioned correctly inside the water tank by ensuring it lies level with the top edge of the water tank.
DO NOT REMOVE THIS FOAM FLOAT.
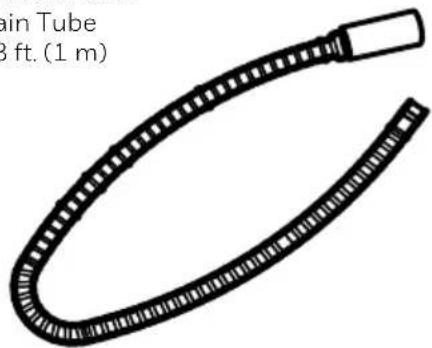
Continuous Water Drain Tube
Inner Dia: 0.5 in (1.27cm);
Length: 3.28 ft (1 m)
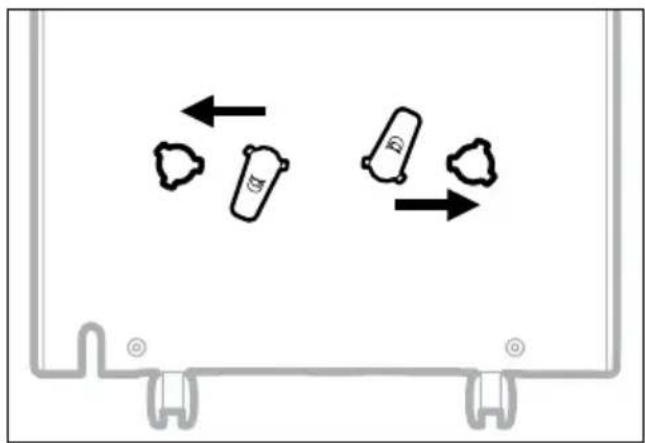
Once you have removed the cord winder accessories from the water tank - follow the steps below.
Step 1: Line up the cord winder pieces to the mounting holes.
natural_image
Diagram showing three cylindrical objects with arrows indicating movement or flow, enclosed in a rectangular frame (no text or symbols)Step 2: Rotate 45-degrees clock-wise.
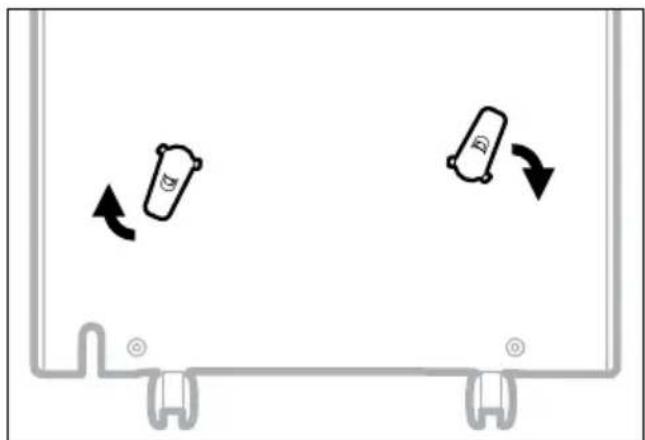
natural_image
Diagram showing two cylindrical objects moving in a container with directional arrows indicating movement (no text or symbols)Step 3: Once you hear "click", then you know the cord winder is ready for use.
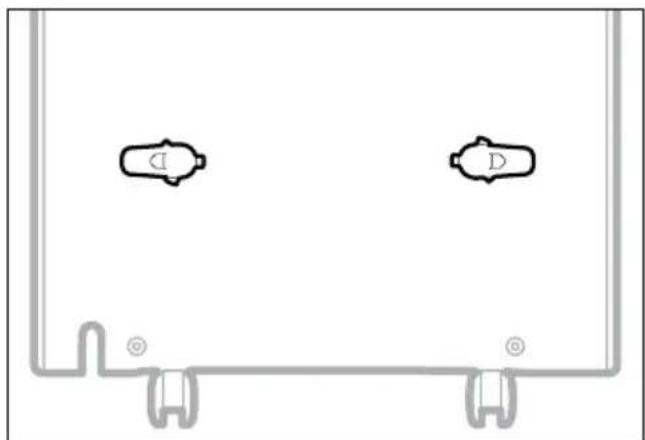
natural_image
Pure diagram of two identical mechanical components with mounting brackets, no text or symbols presentNOTE: Once the installation of the cord winder has been completed. The cord winder cannot be removed. The installation is permanent.
CONTROL PANEL
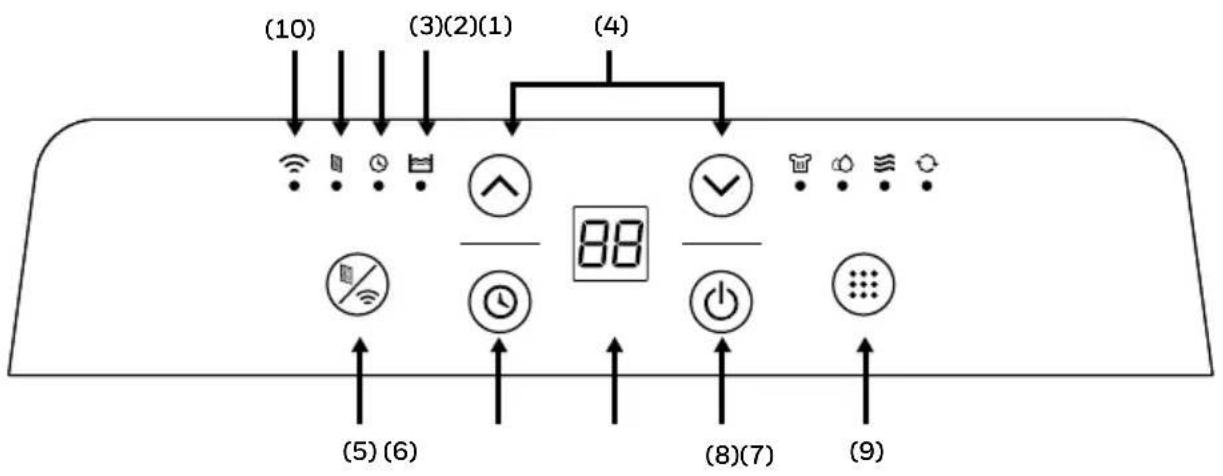
1) Filter Indicator light 8) Power Control
2) Timer Indicator Light 9) Mode Controls
3) Water Full Indicator Light - Laundry Mode
4) Humidity / Timer Set Controls - Dehumidifying Mode
5) Filter Alert - Comfort Mode
6) Timer Control - Continuous Mode
7) Display Screen


10^) Wi-Fi Indicator light
^ THIS IS ONLY FOR MODEL TPFIT25AWK / TPFIT32AWK WITH WIFI SMART FEATURES
NOTE: For detailed instructions to set up your dehumidifier for connected operation from your smart phone or tablet, separate user manual can be downloaded at:

https://honeywellaircomfort.com/pages/app-manuals
FUNCTION BUTTONS
WI-FI PAIRING^
Before turning on Dehumidifier, press the button 6 times within 4 seconds to start WIFI pairing mode. The display screen will show "CF" when in Wi-Fi pairing mode. When the Smart Dehumidifier is connected to the wifi function, the indicator light will be illuminated.
^ THIS IS ONLY FOR MODEL TPFIT25AWK / TPFIT32AWK WITH WI-FI SMART FEATURES
POWER CONTROL ⏻
Press to switch the dehumidifier ON or OFF.
DISPLAY SCREEN
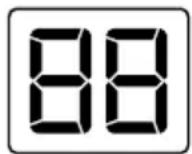
When the unit is switched ON, the Display Screen shows the current humidity percentage and previous mode setting.
MODE SETTING

Settings: Laundry Mode, Dehumidifying Mode, Comfort Mode & Continuous Mode. The corresponding indicator light will illuminate to indicate the current mode setting.
Dehumidifying Mode

Press ∧ or ∨ to adjust your preferred humidity level. Set the desired humidity in % by pressing 🌐 button, it will increase in increments of 5%. The adjustable Relative Humidity (RH) range is between 30% RH to 90% RH. Two seconds after setting the preferred humidity setting, the display will revert back to displaying the current humidity,
Dehumidifier maintains a balanced low speed for whole room dehumidification. Adjust humidity level as desired (30%RH to 90%RH).
Laundry Mode
Adjust desired humidity level by pressing ∧ or ∨ as described in Dehumidifying Mode Ⓞ.
Dehumidifier runs on high speed for more powerful dehumidification intended for drying clothes. Hang wet clothing in the same room as the dehumidifier, taking care not to allow wet clothes to be hung over the dehumidifier or cause any water to drip onto the dehumidifier.
Close windows and doors for faster laundry drying.
FUNCTION BUTTONS (CONTINUED)
Comfort Mode

Dehumidifier automatically adjusts dehumidification Relative Humidity (RH) percentage settings based on ambient room temperature, for hassle-free operation.
When ambient room temperature is 18^ C / 64^ F or lower, the dehumidifier adjusts to 55% RH.
When ambient room temperature is between 18^ C / 64^ F and 25^ C / 77^ F, the dehumidifier adjusts to 50% RH.
When ambient room temperature is 25^ C / 77^ F, or above, the dehumidifier adjusts to 45% RH.
Continuous Mode

The dehumidifier runs continuously with a target of 30%RH or below, on low speed setting. This mode is used for rooms with more severe dampness and needs continuous dehumidification. Desired humidity level cannot be adjusted in this mode and will need to be manually switched OFF, unless unit stops due to a full water tank.
Display Sleep Mode
The top display dims after 1 minute of button inactivity, and then turns off after 3 minutes of inactivity. Display lights up again when any button is pressed. Mode indicator lights remain ON in display sleep mode to indicate current settings.
WATER TANK FULL ALERT

When the Water Tank is full, the indicator will be illuminated. The unit will beep for 3 seconds. The compressor and fan will shut off at the same time. To switch off the indicator light, empty the water tank and when replacing it ensure the tank is secured properly in place.
IMPORTANT: Do not place the Water Tank on the floor when full. In case of an uneven base which may cause the tank to spillover.
TIMER CONTROL
The dehumidifier can be set to automatically switch ON or OFF for a selected period of time (between 0.5-24 hour intervals). The Timer hours selection is displayed on the Display Screen.
NOTE: Before setting the Timer control, make sure there is power to the unit.
Auto-Off Timer:
While the unit is running, press 🔒, the timer 🔒 indicator light will flash, press ∧ or ∨ to select the number of hours (0.5-24 hours) you want the unit to run before it switches off. In 5 seconds without the operation, the Timer start function, the timer 🔒 indicator light is illuminated. Timer must be set again after each use.
Auto-On Timer:
When unit is in Standby Mode, press 🔒, the timer 🔒 indicator light will flash, press ∧ or √ to select the number of hours (0.5-24 hours) until you want the unit to automatically start running. In 5 seconds without the operation, the Timer start function, the timer 🔒 indicator light is illuminated. You could decide the mode and adjust the humidity level that you preferred, then the unit will turn on and continue running until the water tank is full (unless the unit is set up for continuous draining) or until you switch it off manually. Timer must be set again after each use.
NOTE: To cancel any Timer settings, simply press 📁 again, and the timer 📁 indicator light will disappear.
FILTER ALERT
When the Filter Alert Light is ON, it is time to clean the filter. Switch the unit OFF and carefully remove the filter from the unit and clean. Replace the filter and switch ON the unit.
The Filter Alert Light should not be illuminated until the filter requires cleaning again. The frequency of filter cleaning depends on room environment conditions. Some rooms may require changing more frequently than others.
NOTE: To cancel the filter alert, simply press / , and indicator light will disappear.
AUTO RESTART FUNCTION
This unit is equipped with an Auto Restart feature. When there is a power outage, the dehumidifier should automatically resume all its previous settings upon regaining power. If it doesn't, simply Power ON the unit and reset the settings as desired.
AUTOMATIC DEFROST
Frost may build up on the internal coils of the unit. When there is frost build up, the internal compressor will turn off and the fan will continue to run until the frost has melted. Once the internal coils have defrosted and dried, the compressor or fan will automatically restart and dehumidifying will resume.
DRAINING THE WATER

WARNING: Always drain and discard water collected from dehumidification. The water is not clean and cannot be used for drinking.
1. Draining water collected in the Water Tank
The condensed water can be collected directly into the water tank. When the water tank is full, the dehumidifier will automatically shut OFF and the 📋 indicator will illuminate on the control panel followed by a beeping sound.
IMPORTANT: Do not move the dehumidifier when the Water Tank is full as it will be heavy and can cause water spillage.
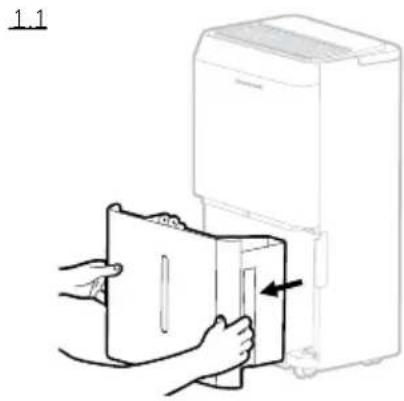
1.1 Locate the water tank at the front of the dehumidifier. Gently pull the water tank out.
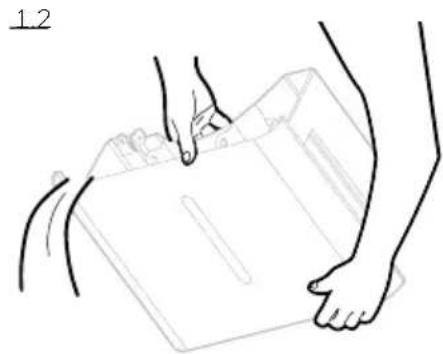
1.2 Carry the water tank to a sink to empty.
1.3 Replace the empty water tank back into the front of the dehumidifier. Please make sure that the tank is properly positioned. The safety feature ensures that any misalignment of the tank and the unit will prevent the unit from turning back on.
IMPORTANT: Improper alignment or positioning of the water tank will cause the unit to pause operation, the warning light on top of the dehumidifier will illuminate followed by a beeping sound, until the water tank is fitted properly.
NOTE: There is a Foam Float inside the water tank that senses the water level to automatically stop dehumidification when the water tank is full. Make sure the Foam Float is positioned correctly inside the water tank by ensuring it lies level with the top edge of the water tank.
DO NOT REMOVE THIS FOAM FLOAT.
natural_image
Line drawing of two hands pressing down on a rectangular object (no text or symbols)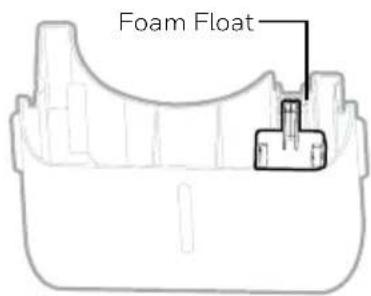
DRAINING THE WATER (CONTINUED)
2. Continuous Water Drainage – Using a Continuous Water Drain Tube
A continuous water drainage tube is included with this unit. To activate the continuous water draining function, you will require a suitable water drain (e.g. sink or drain hole at floor level) near the dehumidifier.
Continuous Water
Drain Tube
3.28 ft. (1 m)
natural_image
Diagram of a coiled tube with a flat end, labeled 'main Tube 3 ft. (1 m)' (no other text or symbols)Continuous Water Drain Cap
natural_image
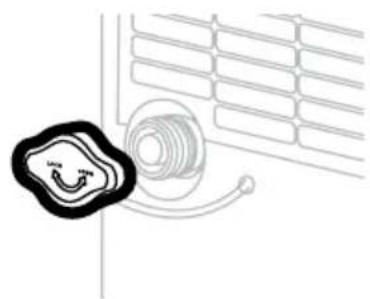
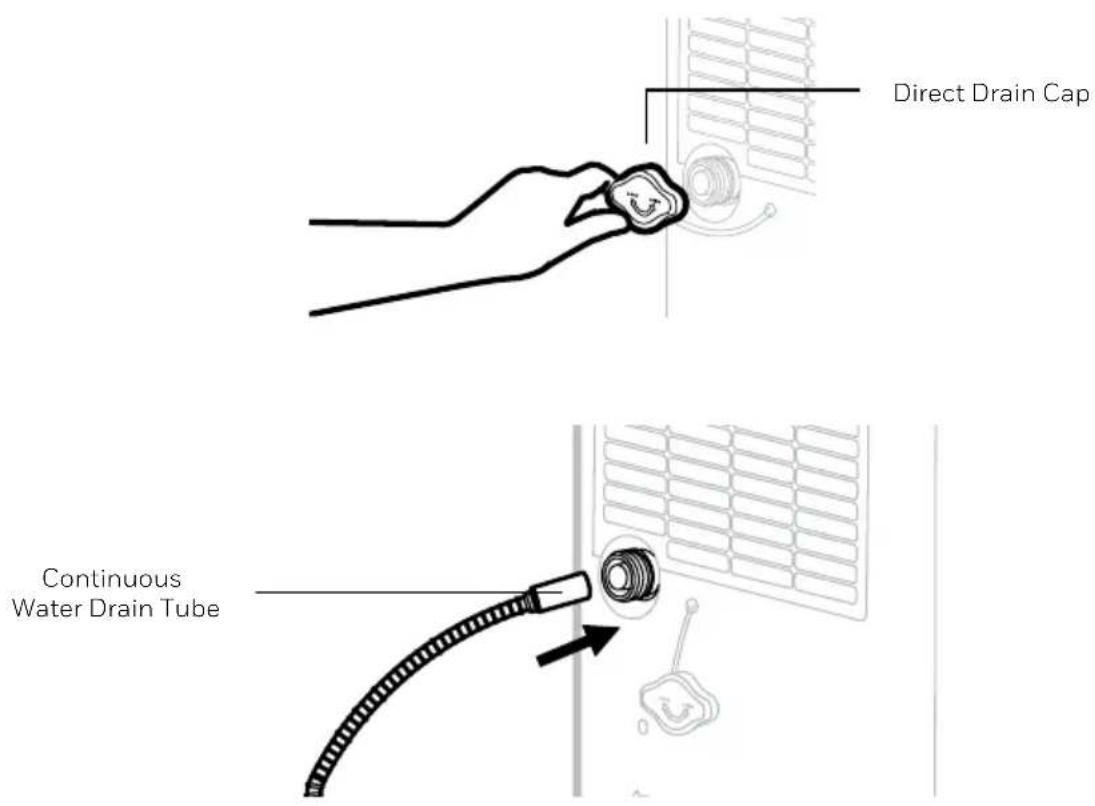
Simple line drawing of a car air conditioner unit with a coiled tube and a hanging sensor (no text or symbols)2.1 Locate the drain outlet at the back of the unit. Unscrew and remove the Direct Drain Cap. Insert and screw the Continuous Water Drain Tube into the Direct Drain Outlet.
DRAINING THE WATER (CONTINUED)
2.2 If there are leaks, the Continuous Water Drain Tube and Cap may have loosened and may not be connected properly. Disconnect, replace and tighten again.
2.3 Position the other end of the Continuous Water Drain Tube in the sink or drain. Make sure the tube is not bent or kinked which might stop the water flow. Make sure the tube is secured over the drain and will not fall out of place causing unwanted water spillage.
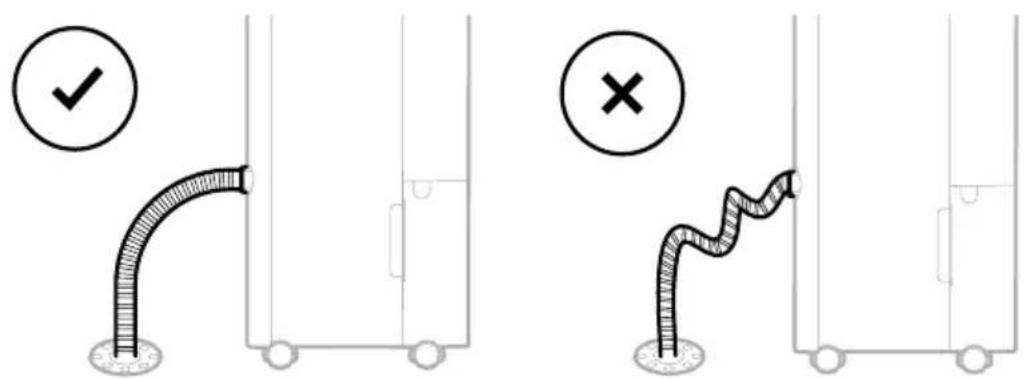
IMPORTANT: Make sure water can flow down the Continuous Water Drain Tube by keeping the tube angled down and free of bends or kinks.
IMPORTANT: If the unit is placed on uneven ground, or the Drain Tube is installed incorrectly, the water may fill the water tank and stop running. Please check whether the ground is uneven and reinstall the Drain Tube.
CLEANING & MAINTENANCE
WARNING: Always switch OFF the dehumidifier and unplug it from the electrical outlet before attempting any cleaning or maintenance of this product.
Appliance Maintenance:
- Switch OFF the appliance before disconnecting the power supply.
- Only use a soft cloth to clean the appliance.
Dust Filter Maintenance:
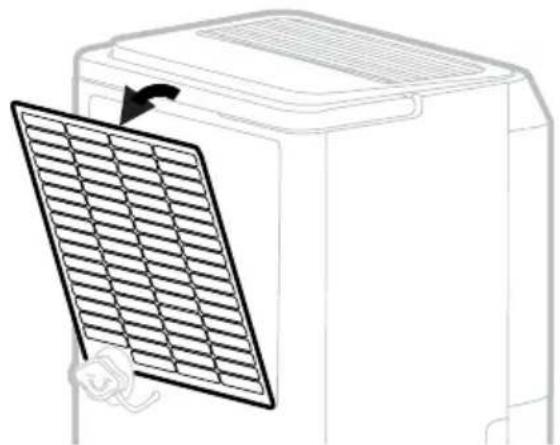
The Dust Filter located at the back of the unit helps to remove dust particles from the air. A dirty filter clogged by dust particles can reduce the efficiency of the dehumidifier. For optimum dehumidification, it is recommended to clean the dust filter every 2 weeks:
- Switch off and unplug the dehumidifier from the electrical outlet.
- Carefully pull out the dust filter from the dehumidifier.
- Rinse the dust filter under running water, or vacuum away the dust with a vacuum cleaner.
- After cleaning the dust filter, dry in a cool, shaded place, then carefully reinstall into the unit.
natural_image
Line drawing of a solar panel mounted on a device, showing internal grid structure and airflow direction (no text or symbols)End of Season Storage & Maintenance:
If the appliance will not be used for an extended period of time:
- Switch OFF the unit and unplug from the electrical power outlet.
- Empty the water tank and let it dry. If your dehumidifier is connected to the continuous drain hose, you must disconnect the hose, dry and then replace the drain cap back into the drain outlet.
- Remove the air filter and clean with water. Let the air filter dry and reinstall back into the unit.
• Make sure all parts of the dehumidifier and accessories are dry before storage. - Cover the dehumidifier with a cloth/ plastic bag before storage, to protect the surface from dust and scratches.
- It is recommended to coil the power cord and store it off the floor to ensure it is protected from bends and kinks.
- Store the unit upright in a dry location, away from direct sunlight.
The following troubleshooting guide addresses the most common problems. If problems persist, call customer service.
For more troubleshooting steps please visit:
https://honeywellaircomfort.com/pages/portable-dehumidifier-faqs
| PROBLEM POSSIBLE CAUSE SOLUTION | ||
| Dehumidifier does not start | No electricity. Check for power. | |
| The power cord is not properly plugged in. | Remove and reconnect the power cord. | |
| The water tank is not in the correct position. | Position the water tank correctly into the unit. Unit will not operate until the water tank is secure in place. | |
| Unit runs but the humidity level does not decrease | The humidity level setting is too high. | Decrease the humidity level setting. |
| A door or window is open, letting in new moisture. | Make sure all windows or doors to the outside are closed and tightly sealed. | |
| There are other sources of humidity in the room (e.g. boiling water in pot). | Switch on the dehumidifier when these sources are not present. | |
| The temperature in the room is too low. | The dehumidifier is designed to operate between 41°F (5°C) and 89°F (32°C). Moisture removal is greatly reduced if room temperatures exceed this temperature range. | |
| The dust filter is dirty/ blocked. | Clean the dust filter. | |
| Air outlet or intake is blocked, or drain outlet or drain tubes are blocked. | Remove blockage. | |
TROUBLESHOOTING GUIDE (CONTINUED)
| PROBLEM POSSIBLE CAUSE SOLUTION | ||
| Unit runs but the humidity level does not decrease | Insufficient time for the dehumidifier to remove moisture. | After initial installation, allow 24 hours to maintain desired dryness. |
| Dehumidifier runs constantly/does not stop | Area to be dehumidified is too large. | The capacity of your dehumidifier may not be adequate for the room it is used in. It is recommended to add an extra dehumidifier for large areas. |
| A door or window is open, letting in new moisture. | Make sure all windows or doors to the outside are closed and tightly sealed. | |
| Water Tank Full is illuminated and the unit is beeping | The water tank is full. Empty the water tank. | |
| The water tank is not in the correct position. | Position the water tank correctly into the unit. Unit will not operate until the water tank is secure in place. | |
| The unit is blowing cold air out of the top vent | The purpose of the top air vent is to distribute air into the room. | The temperature of the air from the vent depends on the room environment and other factors. It can fluctuate and this is normal. No action required. |
| Frost appears on the coils | Dehumidifier has been recently turned on in low room temperatures (usually below 41°F (5°C)). | Frost can be a normal occurrence. Switch OFF the dehumidifier and let the frost melt completely, before turning the unit ON again. Make sure room temperature is above 41°F (5°C) before turning On again. |
| Connected the continuous drain but the water condensation is not draining out the tube | Some floors may have an uneven surface which may affect the continuous drainage function | Raise the front of the Dehumidifier 1⁄2 to 1 inch (1.27 cm to 2.54 cm) from the floor. The water condensation will drain out the back hose and not into the bucket. |
TROUBLESHOOTING GUIDE (CONTINUED)
| PROBLEM POSSIBLE CAUSE SOLUTION | ||
| Water on the floor | The garden hose/ drain hose may be loose. | Check the connections between the hose and the drain outlet on the unit. See Continuous Water Drainage section.Check the tube of cap for tighten. |
| You intended to use the water tank to collect water but the continuous drain hose is still connected. | Disconnect the hose and replace the rubber stopper and drain cap if using the water tank to collect water. See Continuous Water Drainage section. | |
| Noise | Fan is working. | Wind from the fan can create sounds during operation. This is a normal sound. |
| Compressor is working. | There is a sound when the compressor turns on. The compressor will activate periodically based on humidity settings. This is normal. | |
| CODE POSSIBLE CAUSE POSSIBLE SOLUTIONS | ||
| EH | Humidity Sensor misalignment, malfunction or connection issue. | If the display shows “EH” flashing 3 times, it indicates the humidity Sensor may not be working . When this happens, the dehumidifier can still continue to function without the sensor, by setting the target humidity and turning off manually when it has reached the target setting. Alternatively, you can set the Timer to set the unit to turn off/ on after a set time period. The tank full alert will continue to function as usual. The humidity sensor is not a part that can be replaced in this model. |
| E2 | Possible temperature sensor issue. | Reset the Unit: Turn dehumidifier OFF and unplug from power source for 24 hours and turn ON again.Contact Customer Support if the code reappears. |
| E3 | Refrigeration System Protection | If E3 appears, check if the ambient room temperature has exceeded 89.6°F (32°C). If yes, the unit may not run until the room ambient temperature has reduced to below 86°F (30°C) for at least 2 hours, or try to remove the unit to a cooler room for at least 2 hours before running dehumidification mode again.Reset the Unit: If the code reappears, turn dehumidifier OFF and unplug from power source for 24 hours and turn ON again in a room with temperature below 86°F (30°C). Contact Customer Support if the code reappears. |
JMATEK North America LLC
Alpharetta, Georgia 30005 USA
Phone: 1-800-474-2147
Email: usinfo@jmatek.com
Web:www.HoneywellAirComfort.com
Made in China
© 2024 JMATEK Limited. All rights reserved.
The Honeywell Trademark is used under license
from Honeywell International Inc.
Honeywell International Inc. makes no
representations or warranties with respect to this product.
This product is manufactured by Airtek Int'l Corp. Ltd.
- SMART PORTABLE DEHUMIDIFIER WITH WIFI CONNECTIVITY & VOICE CONTROL
- For Models: TPFIT25AWK / TPFIT32AWK Smart Portable Dehumidifer with WiFi Connectivity
- SAFETY RULES
- WARNING -- READ AND SAVE THESE INSTRUCTIONS BEFORE USING THIS PRODUCT.
- When using electrical appliances, basic safety precautions should always be followed:
- Additional warnings for appliances with R32 refrigerant gas.
- Transportation, marking, and storage for units.
- HOW A DEHUMIDIFIER WORKS
- SELECTING A LOCATION - IMPORTANT
- SELECTING A LOCATION - IMPORTANT (CONTINUED)
- UNPACKAGING THE DEHUMIDIFIER
- CONTROL PANEL
- FUNCTION BUTTONS
- WI-FI PAIRING^
- ^ THIS IS ONLY FOR MODEL TPFIT25AWK / TPFIT32AWK WITH WI-FI SMART FEATURES
- POWER CONTROL ⏻
- DISPLAY SCREEN
- MODE SETTING
- Dehumidifying Mode
- Laundry Mode
- FUNCTION BUTTONS (CONTINUED)
- Comfort Mode
- Continuous Mode
- Display Sleep Mode
- WATER TANK FULL ALERT
- TIMER CONTROL
- Auto-Off Timer:
- Auto-On Timer:
- FILTER ALERT
- AUTO RESTART FUNCTION
- AUTOMATIC DEFROST
- DRAINING THE WATER
- Draining water collected in the Water Tank
- DRAINING THE WATER (CONTINUED)
- Continuous Water Drainage – Using a Continuous Water Drain Tube
- CLEANING & MAINTENANCE
- Appliance Maintenance:
- Dust Filter Maintenance:
- End of Season Storage & Maintenance:
- If the appliance will not be used for an extended period of time:
- For more troubleshooting steps please visit:
- TROUBLESHOOTING GUIDE (CONTINUED)
Brand : HONEYWELL
Model : TPFIT25AWK
Category : Dehumidifier