
TMK 100 AAP - Fastening accessory Extron - Free user manual and instructions
Find the device manual for free TMK 100 AAP Extron in PDF.


| Product Type | Mounting Kit for AAP (Architectural Adapter Plate) |
| Dimensions (H x W x D) | 10.0 x 10.0 x 2.0 in (254 x 254 x 51 mm) |
| Weight | 1.0 lb (0.45 kg) |
| Material | Cold-rolled steel |
| Finish | Black powder coat |
| Compatibility | Extron AAP plates and compatible devices |
| Mounting Type | Rack-mountable or surface-mount |
| Included Parts | Mounting brackets, screws, and installation guide |
| Load Capacity | 11 lb (5 kg) |
| Operating Temperature Range | 32°F to 104°F (0°C to 40°C) |
| RoHS Compliant | Yes |
| Warranty | 3 years |
| Cleaning Instructions | Wipe with a dry, lint-free cloth; do not use liquids or abrasives |
| Safety Notices | Follow all installation instructions; secure to a stable surface |
Frequently Asked Questions - TMK 100 AAP Extron
User questions about TMK 100 AAP Extron
0 question about this device. Answer the ones you know or ask your own.
Ask a new question about this device
Download the instructions for your Fastening accessory in PDF format for free! Find your manual TMK 100 AAP - Extron and take your electronic device back in hand. On this page are published all the documents necessary for the use of your device. TMK 100 AAP by Extron.
USER MANUAL TMK 100 AAP Extron
TMK Series • Installation Guide
The TMK series Table Mount Kits allow under-table installation for up to two single-space AAPs (TMK 120 AAP) or up to three single-space AAPs (TMK 130 AAP). Both kits secure to the underside of a table. The kits can also be mounted side-by-side for applications requiring additional AAP spaces.
NOTE: The location must consider that cables are connected to the AAPs both from the front and from the rear, and the bracket and AAPs must be readily visible to prevent accidental contact.

ATTENTION: Do not drill through the table or furniture. If the table is too thin or of a different material for the supplied screws, use an appropriate type and length.
Mount the TMK bracket as follows:

natural_image
Isometric diagram of a table with a rectangular base and a tool, showing no text or symbols.1 Mark the four keyhole locations at the desired mounting location.
2 Drill 3/32-inch (2.4 mm) diameter, 1/4 inch (6.3 mm) deep pilot holes.
3 Install #6 x 1/2 inch wood screws into the pilot holes. Tighten until 1/4 inch protrudes.

natural_image
Technical line drawing of a mechanical housing assembly with mounting holes and internal components (no text or symbols)4 Install AAPs in the faceplate.
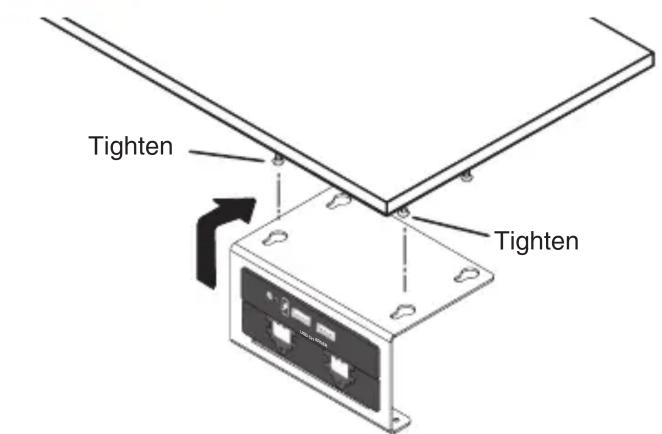
5 Slide the faceplate onto the screws. Tighten the front keyhole screws only.
natural_image
Isometric line drawing of a device with a flat top and internal components, showing a directional arrow (no text or symbols)6 Connect the cables and wiring to the AAPs.

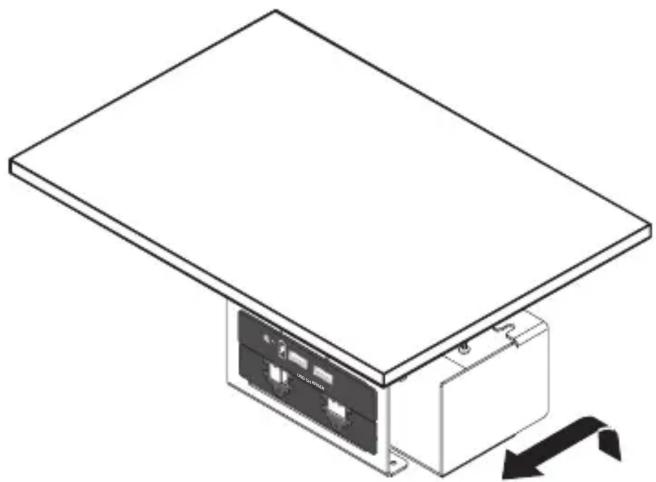
7 Slide the cover up and into the faceplate. Make certain the rear slots of the cover slide into the rear keyhole screws.
8 Install the two sheet metal screws to secure the faceplate and cover together.
9 Tighten the two rear keyhole screws through the openings in the cover.
| Extron USA Headquarters+1.800.633.9876 (Inside USA/Canada Only)Extron USA - West Extron USA - East+1.714.491.1500 +1.919.850.1000+1.714.491.1517 FAX +1.919.850.1001 FAX | Extron Europe+800.3987.6673 (Inside Europe Only)+31.33.453.4040+31.33.453.4050 FAX | Extron India1800.3070.3777 (Inside India Only)+91.80.3055.3777+91.80.3055.3737 FAX | |
| Extron Japan+81.3.3511.7655+81.3.3511.7656 FAX | Extron China+86.21.3760.1568+86.21.3760.1566 FAX | ||
| Extron Asia+65.6383.4400+65.6383.4664 FAX | Extron Middle East+971.4.299.1800+971.4.299.1880 FAX | Extron Korea+82.2.3444.1571+82.2.3444.1575 FAX | |
Brand : Extron
Model : TMK 100 AAP
Category : Fastening accessory