
480 MacroZoom - Camcorder BOLEX - Free user manual and instructions
Find the device manual for free 480 MacroZoom BOLEX in PDF.


| Product Type | Super 8 Camcorder |
| Model | 480 MacroZoom |
| Brand | Bolex |
| Lens | Bolex Macrozoom 7-56 mm f/1.8 |
| Zoom Range | 8x (7 to 56 mm) |
| Film Format | Super 8, 50 ft. cartridges |
| Filming Speeds | 18, 24, 40 frames per second |
| Power Source | Five 1.5 V alkaline batteries (e.g., Mallory Mn 1500, Eveready E 91) |
| Battery Life | Up to 20 cartridges with fresh alkaline batteries |
| Exposure System | Automatic TTL (through-the-lens) with manual correction (+/- 1 stop) and diaphragm lock |
| Viewfinder | Reflex with split-image rangefinder, adjustable eyepiece (+3 to -3 diopters) |
| Macro Capability | Yes, down to lens touching subject, covering approx. 1 inch area |
| Power Zoom | Yes, with two speeds (slow/fast) |
| Special Effects | Fade-in/out, dissolves, remote control, single-frame, time-lapse |
| ActionLight | Yes, front indicator lamp (can be switched off) |
| Conversion Filter | Built-in, retractable for daylight/artificial light |
| Accessories Included | Sunshade, rubber eyecup, lens cover, cable release, shoulder strap, grey filter, flash shoe, key for filter retraction |
| Dimensions | Not specified in manual; typical Super 8 camcorder dimensions |
| Weight | Not specified in manual; typical Super 8 camcorder weight |
| Care Instructions | Remove batteries when not in use; clean lens with soft brush/cloth; protect from extreme temperatures, dust, moisture |
Frequently Asked Questions - 480 MacroZoom BOLEX
User questions about 480 MacroZoom BOLEX
0 question about this device. Answer the ones you know or ask your own.
Ask a new question about this device
Download the instructions for your Camcorder in PDF format for free! Find your manual 480 MacroZoom - BOLEX and take your electronic device back in hand. On this page are published all the documents necessary for the use of your device. 480 MacroZoom by BOLEX.
USER MANUAL 480 MacroZoom BOLEX
Contents
Page
Your camera is supplied with:
1 sunshade (thread: M 55 x 0.75 mm)
1 rubber eyecup
1 lens cover
1 flexible cable release with locking crown
1 shoulder-strap
1 key for retracting conversion filter
1 grey filter (4 times)
1 flash-shoe
1 cap for the conversion filter retraction slot
Note
We strongly recommend that you film at least one cartridge and examine the results before leaving on a trip or filming an important event. This will help you to get acquainted with the camera and, if in doubt, give you the opportunity to see your Bolex dealer for advice or help.
Adjusting the eyepiece. 2
Inserting the batteries . 2
Checking the batteries 4
Use of accumulators and accumulator charger . . . . . 4
Loading the camera 5
Unloading the camera . 5
Filming speeds 5
Methods of operation . 6
Filming with remote-control cable 7
Electronic running control 8
ActionLight® 8
Footage counter . . . . . . . . . . . . . . . 8
Framing the subject 9
Focusing 10
Fixed focus setting 10
Depth of field 11
Automatic exposure system . 11
Modification of the time of reaction of the diaphragm 12
Manual correction of the aperture 12
Locking the diaphragm 13
Fade-ins and fade-outs 14
Filming in daylight and artificial light 15
Synchro-flash/synchro-sound socket 15
Macro shots . 16
Care of camera 17
Accessories available on request 18
A few tips enabling you to add interest and life to your movies. 20
Depth of field charts . . . . . . . . . . . 22
Get to know your camera
Your camera has been designed to take Super 8 films in Kodak 50 ft. cartridges.
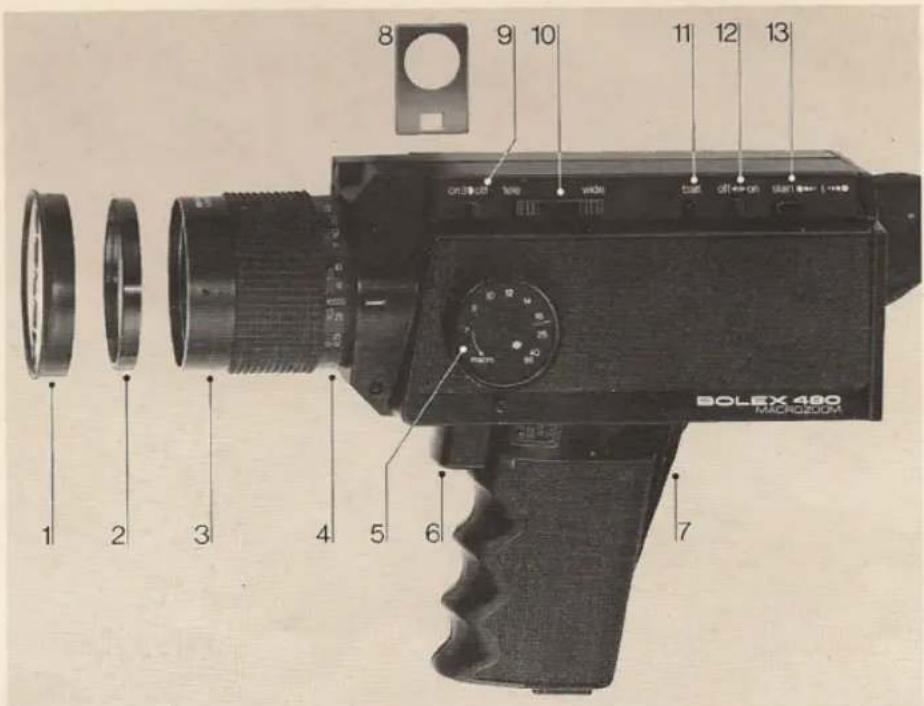
1 Lens cover
2 Grey filter (4 times)
3 Bolex Macrozoom® lens 7-56 mm f/1.8
4 Distance setting ring
5 Manual zoom knob
6 Camera release
7 Switch bar for connecting batteries
8 Key for retracting conversion filter
9 ActionLight® switch
10 Rocker switch for power zooming
11 Battery test button
12 Preselection button for dissolves
13 Start key for dissolves
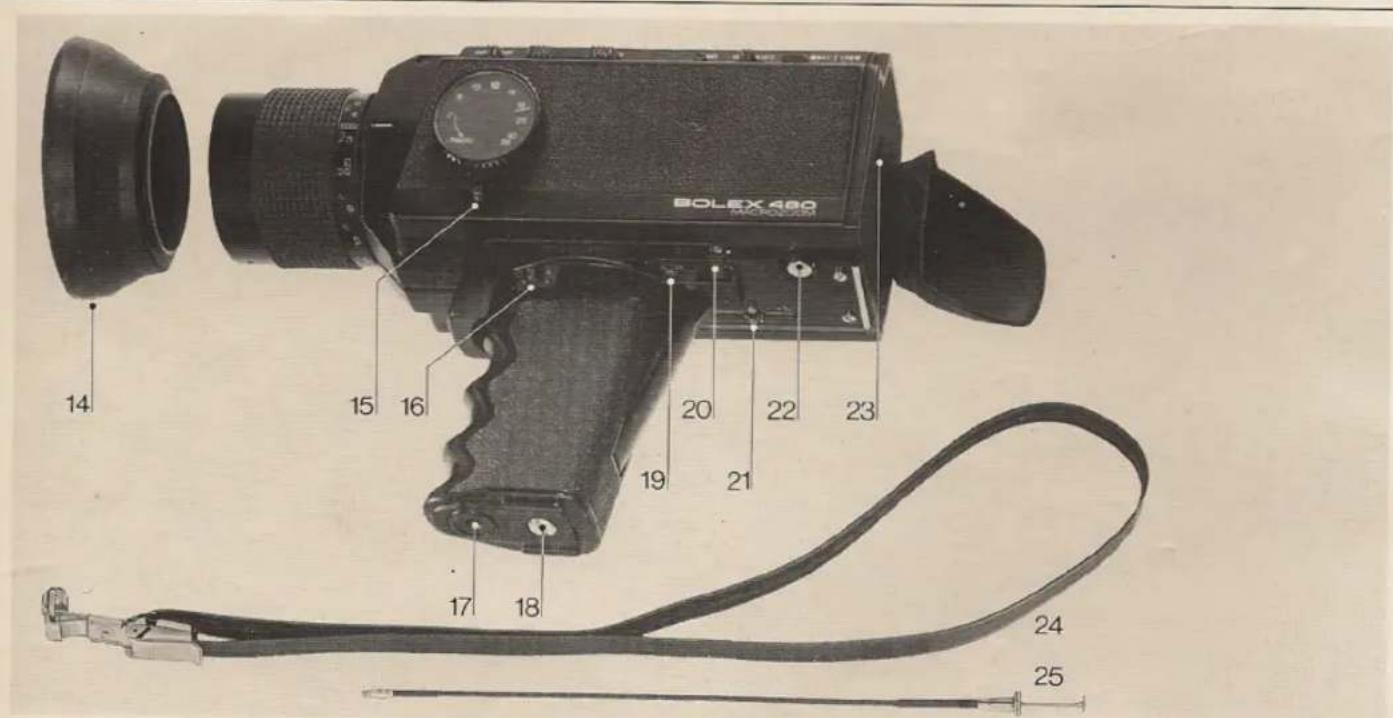
14 Sunshade
15 Macro button
16 Power-zoom speed selector (2 speeds)
17 Tripod bushing
18 Battery housing locking screw
19 Film speed selector (18, 24 or 40 frames per second)
20 Sliding cover over flexible cable release socket for normal running and single-frame operation
21 Aperture override control
22 Lid lock
23 Adjustable footage counter, with disk for marking footage on inside of lid
24 Shoulder-strap
25 Flexible cable release
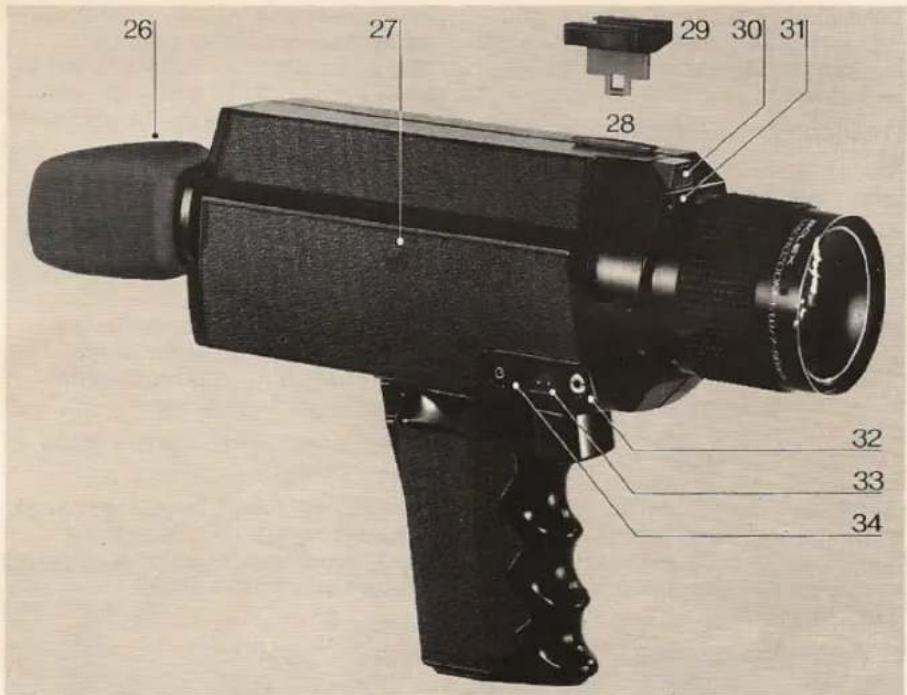
26 Finder eyepiece with rubber eyecup
27 Film plane
28 Cap for lamp-holding or key slot
29 Flash-shoe
30 ActionLight®
31 Cable release socket for diaphragm lock
32 Remote-control cable socket *
33 Accumulator recharging socket *
34 Synchro-flash/synchro-sound socket
* available as accessories
Adjusting the reflex finder eyepiece
natural_image
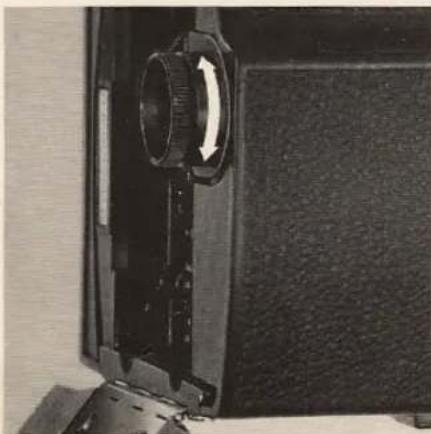
Close-up of a camera lens component with an arrow indicating rotation (no text or symbols visible)For accurate focusing with the split image rangefinder, the eyepiece must be adjusted to your eyesight (+3 to —3 diopters).
Proceed as following:
Set the zoom knob to the longest focal length (56 mm).
Open the lid by pressing the locking button.
Unscrew the finder eyepiece anticlockwise.
Now there are two possibilities:
-
Set the focusing ring to infinity ( ). Look at a subject with a prominent vertical line at least 500 ft. away (telegraph pole, TV antenna, wall) and while viewing, turn the finder eyepiece clockwise until this vertical line appears continuous (not broken) across the dividing line of the split image field.
-
Set the focusing ring to 7'. Place the camera at a distance of exactly 7' (measured from the film plane) from a subject with vertical lines (door or window frame) and set the finder eye-piece as indicated above.
Eyecup
The eyecup can be set to any position; therefore viewing with right or left eye is possible.
Inserting the batteries (five 1.5 V cells)
We recommend the use of alkaline-manganese batteries, such as MALLORY Mn 1500, EVEREADY E 91, RAY-O-VAC 815, RCA VS 1334, etc. These batteries deliver more power and last longer.
If you use ordinary batteries, select leak-proof ones only, Any damage caused by leakage of the electrolyte inside the camera is not covered by our guarantee.
A set of new alkaline batteries provides sufficient power for filming over twenty 50 ft. cartridges under normal conditions of use.
Battery power drops sharply at low temperatures.
As a general rule, it is best to change batteries once a year, even if the above-mentioned number of cartridges has not been filmed.
natural_image
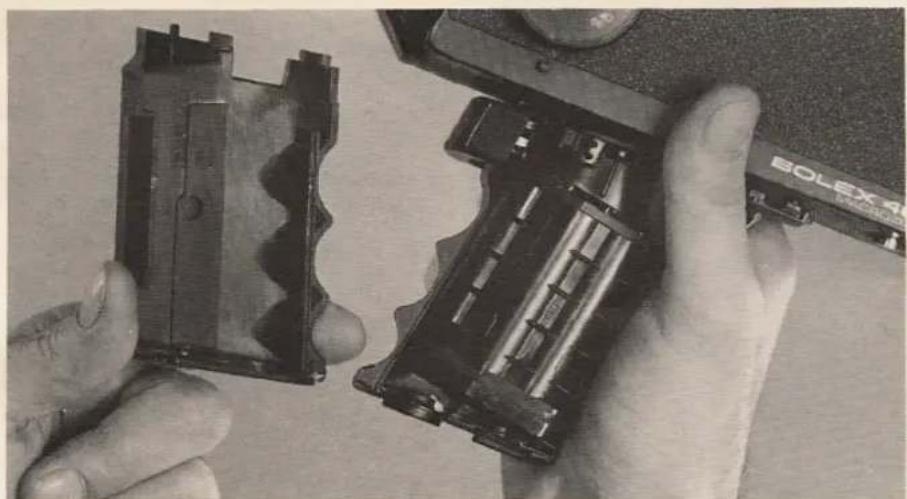
Close-up of hands holding and working on a battery pack, no visible text or symbolsRelease the screw in the base of the hand grip.
Pull off the top half of the hand grip and remove the battery container.
Unscrew the lid retaining screw and remove the lid.
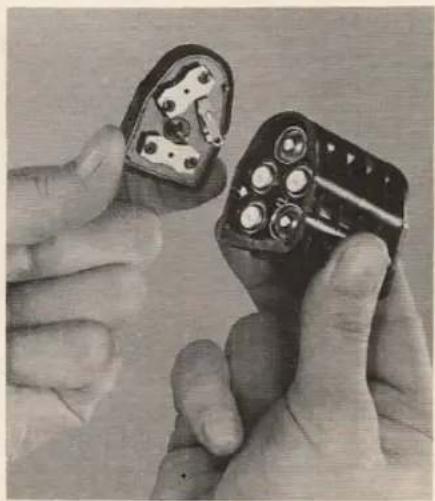
Insert five batteries in correct position: the + pole of each battery must be next to a + sign on the container. Close the container by replacing the lid and tightening the screw.
Insert the battery container in the hand grip so that the three contact points at one side of the container are in contact with the springs inside the hand grip. Replace the top cover of the hand grip and tighten the locking screw.
natural_image
Close-up of hands holding two electronic components with visible pins and contacts (no text or symbols)Checking the batteries
Use of accumulators and an accumulator charger
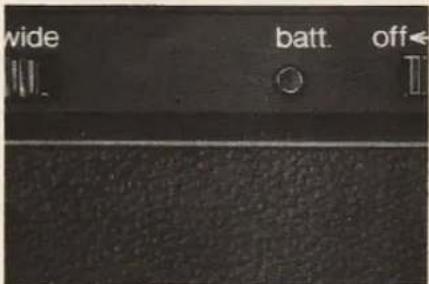
Before using your camera, it is important always to check the condition of the batteries.
Hold the camera by the hand grip and press on the switch bar connecting the batteries.
Press on the button marked «batt»: when the batteries are in good working order, a red light appears in the viewfinder; if the red signal does not appear, the batteries need changing.
(available as accessories)
natural_image
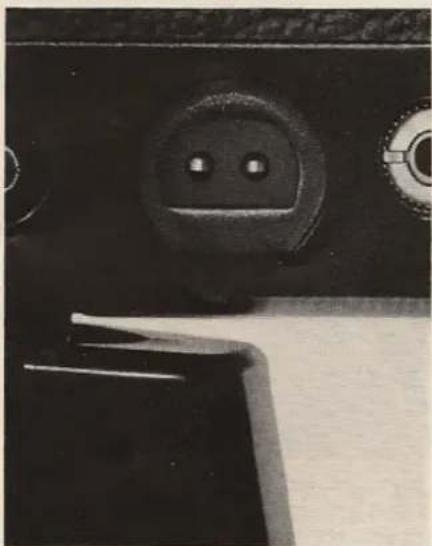
Close-up of a black electronic device's head panel with two circular buttons and a rectangular button (no visible text or symbols)Instead of the manganese alkaline batteries referred to so far, your camera may be equipped with SAFT Ni-Cd VR 0.5 AA or Varta Ni-Cd DEAC 451 RS type accumulators. These accumulators are inserted in exactly the same way as ordinary batteries. They can be recharged about 1000 times; at 14° F, they are capable of filming over ten 50 ft. cartridges in quick succession. They are recharged while still in the camera, by means
of a charger plugged into the socket provided for the purpose; two chargers are available:
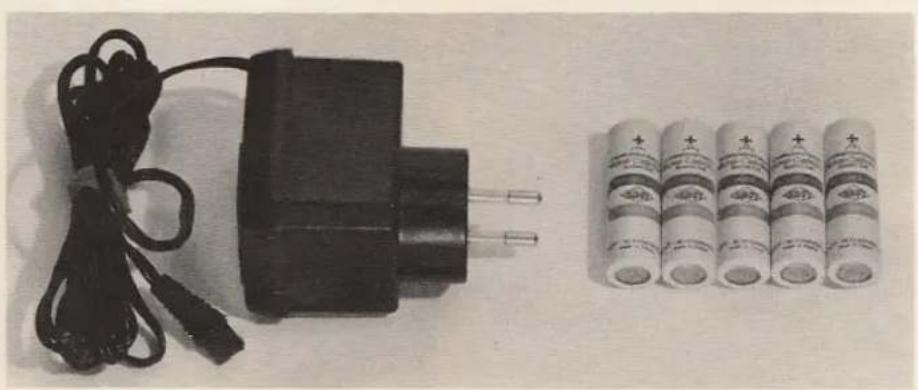
- Bolex charger for plugging into the mains (110-250 V\~ / 50-60 cycles)
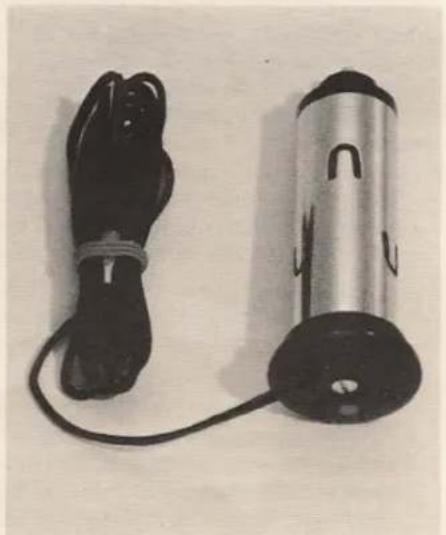
- Bolex charger for plugging into the cigarette lighter on your car (12 V)
(See illustration page 18)
Loading the camera
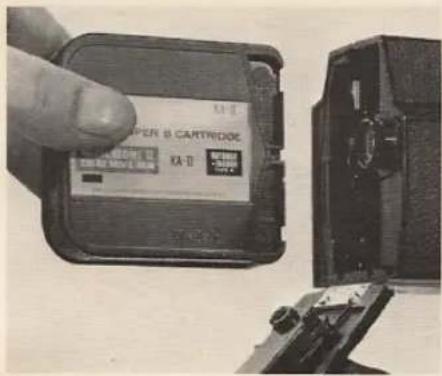
Open the camera lid by pressing on the locking button.
Insert the film cartridge (label to the right). A notch on the cartridge automatically sets the exposure system to the speed of the film inserted. This system works with films of speeds of 40 to 160 ASA (17 to 23 DIN) for artificial light, and 25 to 100 ASA (15 to 21 DIN) for daylight.
N.B.: If you use 200 ASA (24 DIN) film, set the aperture override control to — ^1/2 (see page 12).
Close the camera lid.
Unloading the camera
Hold the camera with the back downwards.
Press the locking button to make the lid open and the cartridge slide out.
If the film is completely exposed, the lettering «EXPOSED» must be visible in the film gate of the cartridge.
Filming speeds
natural_image
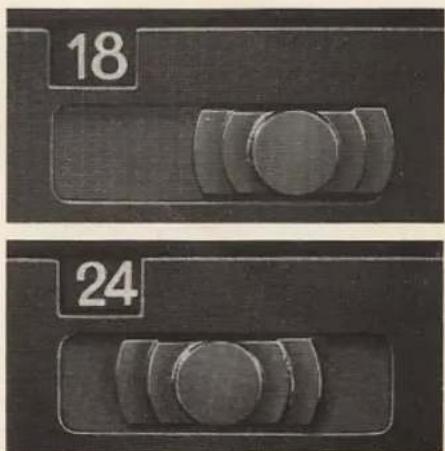
Two identical grayscale images showing circular objects on rectangular bases, labeled with numbers 18 and 24 (no text or symbols on objects)Using the filming speed selector located underneath the camera, you can set the filming speed to 18, 24 or 40 frames per second.
18 frames per second is the normal speed for amateur filming.
24 frames per second is used for slow motion effects, panning or shots taken from a moving vehicle; it is also used for obtaining the best quality of sound when magnetic sound is to be added subsequently to the film.
Methods of operation
natural_image
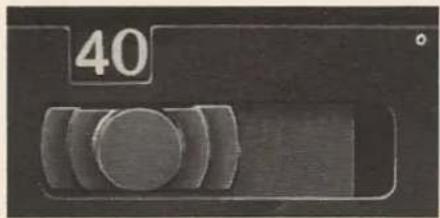
Close-up of a mechanical component with circular features and a number 40, no visible text or symbolsA speed of 40 frames per second when projected at the normal rate of 18 frames per second gives a very slow motion effect. This slow motion is extremely useful for analysing rapid movements or, from a purely aesthetic point of view, for showing the beauty of certain gestures.
It should be noted that the exposure system automatically compensates for the difference in light received by the film when changing from one speed to another.
natural_image
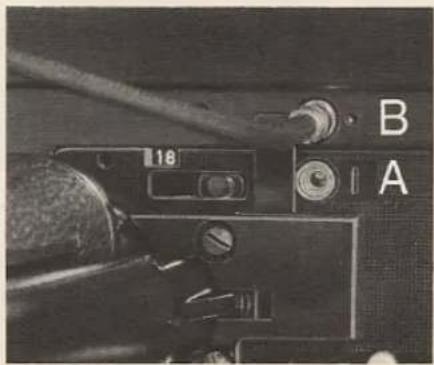
Close-up of a mechanical device with labeled parts A and B, showing no readable text or symbols beyond labelsYou can work your camera in normal, continuous and single-frame operation.
Normal operation \*
Hold the hand grip so as to press firmly against the switch bar on the back: in this way you connect up the batteries to the motor and the automatic exposure system, and at the same time allow access to the two sockets (A) and (B).
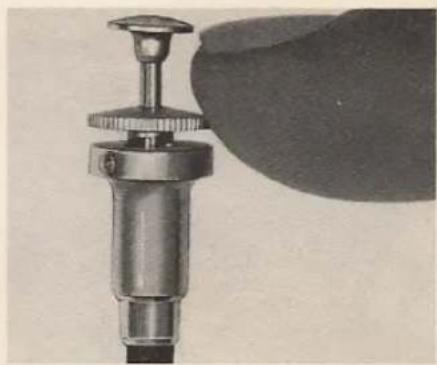
You can now operate the mechanism, either by pressing on the release trigger or by using the flexible cable release supplied with the camera, which you will first of all have to screw into the socket (A).
Before using the flexible cable release, in normal operation, you must
natural_image
Close-up of a metallic mechanical component with a knob and handle, possibly a pump or actuator (no visible text or symbols)push the small crown in and turn in a clockwise direction.
N.B.: Between two sequences, avoid pressing on the hand grip and do not forget to remove the cable release: this enables the switch bar to return to its initial position, and the batteries are then disconnected, which helps prolong their life.
Continuous operation \*
To set the camera to continuous operation, screw the flexible cable release as above into socket (A), but this time turn its small crown in an anti-clockwise direction: when you press on the end, the cable release automatically locks in position: to unlock it, press on the small crown.
Filming with remote-control cable
This method of operation is used, for example, if you want to include yourself in the picture.
Single-frame filming \*
Here too, you will use the flexible cable release, but this time you must screw it into socket (B). This method of operation allows you to make titles and animated cartoons, time-lapse sequences, etc.; for this, the camera must be placed on a tripod or a steady support so as to avoid any risk of accidental movement, and the filming speed selector must be set to 18 frames per second. Keep the cable release slightly bent so as to avoid any risk of jerking the camera.
* N.B.: If you film without looking through the viewfinder, for example when the camera is mounted on a tripod, you must cover the eyepiece with your hand to avoid any stray light getting in and fogging the film.
(available as accessory)
natural_image
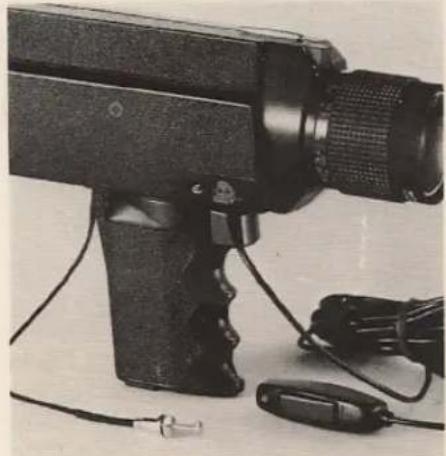
Black handheld electronic device with attached wires and connector (no visible text or symbols)You can operate the mechanism of your camera by means of a remote-control cable (length 20 ft.). This cable is particularly useful, for example, for self-filming, filming animals, etc.
Proceed as follows:
screw the camera onto a tripod;
insert the remote-control cable into the socket provided for the purpose; the cable switch must be in the open position;
with the flexible cable release, set the camera to «Continuous operation»
(see previous chapter); the camera will not start yet;
you can now set the camera in motion by means of the remote-control cable switch.
Remarks
a) At the end of a scene, the shutter may stop in the open position; if this should happen the last frame of the scene will be fogged and must be cut out.
b) Do not forget that when you film without looking through the view-finder you must cover up the eye-piece to avoid any admission of stray light that might fog the film.
Electronic running control
ActionLight®
Footage counter
natural_image
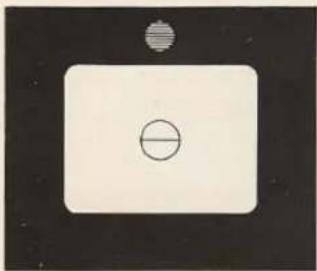
Simple diagram with a circle inside a rectangle and a small circle above it, no text or symbols present.If a red light appears in the view-finder during filming, this may mean:
that the camera is not loaded (no film);
that the film is finished;
that the film is not being moved forward; it may, for example, be jammed in the cartridge: if this is so, take out the cartridge, and push the film a few perforations forward by hand; put the cartridge back in the camera: the film should advance without trouble.
N.B.: Before opening the camera lid do not forget to note the length of film still unexposed. Jot this figure down on the disk situated on the inside of the lid (see «Footage counter»).
natural_image
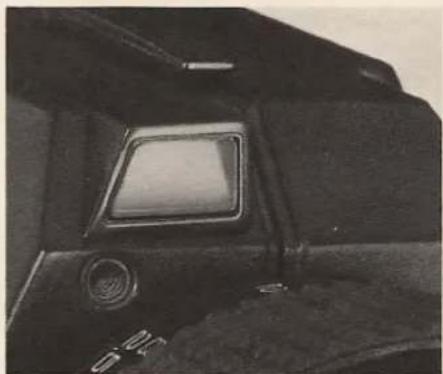
Close-up of a camera's front panel showing the screen and lens (no visible text or symbols)In some cases, especially when filming synchro-sound, it is advantageous for the actors to know when the camera goes into action. This is accomplished with an action light located on the front of the camera, above the lens. It lights up as soon as the camera starts filming. This lamp can be disconnected by means of a switch.
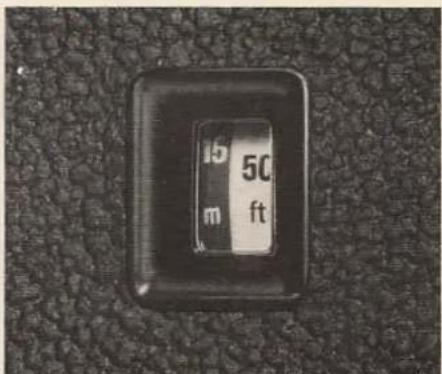
The footage counter, which indicates the length of film left unexposed in the cartridge, is visible in a window situated at the back of the camera (length in feet on the right, in metres on the left).
If a red light appears in the viewfinder, this indicates that the end of the film has been reached, whether or not the counter has reached «0».
The counter automatically returns to the starting position (15 m / 50 ft) every time the lid of the camera is opened.
If necessary, you can unload your camera even if the cartridge is not fully exposed: only the visible part of the film will be fogged. Before opening the camera lid do not forget to
Framing the subject
natural_image
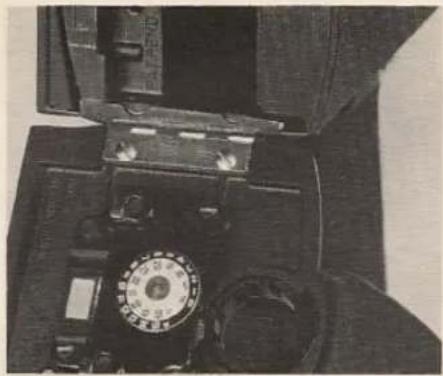
Close-up of a vintage mechanical device with a circular dial and control panel (no visible text or symbols)note the length of film still unexposed. Jot this figure down on the disk situated on the inside of the lid.
When you wish to continue filming, proceed as follows:
press on the lid locking button to release the footage counter adjusting knob;
by means of this knob, set the footage counter to the figure marked on the disk;
release the lid locking button: this locks the footage counter adjusting knob.
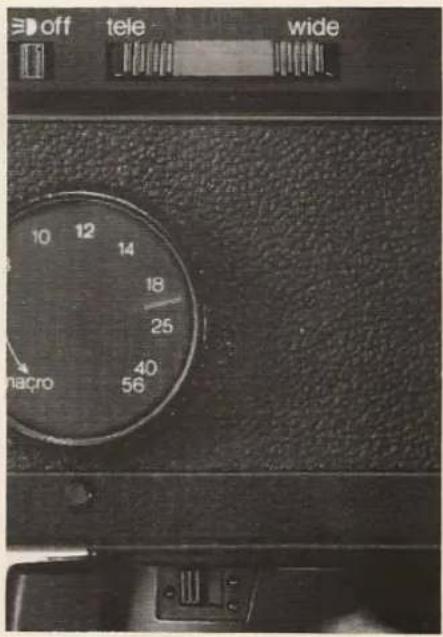
The focal length of the zoom lens can be set anywhere between 7 and 56 mm, wherever the lens covers exactly the desired area. This can be done manually or with the power zoom motor.
Manual setting
Turn the zoom knob forward or back.
Power zoom
Hold the camera grip so that the switch bar is fully depressed.
Depress the front or rear of the power zooming switch:
T = telephoto, W = wide-angle.
You can select the zooming speed:
- slow speed; fast speed.
Zooming
The focal length can also be changed during filming for zoom effects which give the impression of moving towards or away from the subject.
Power zooming produces smooth and continuous zoom effects, even with handheld cameras.
By depressing the macro button, the zoom knob can be turned into the macro range either manually or with the motor (see page 16).
Focusing
Always focus with the lens set to the longest focal length (56 mm).
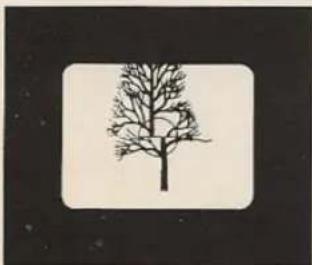
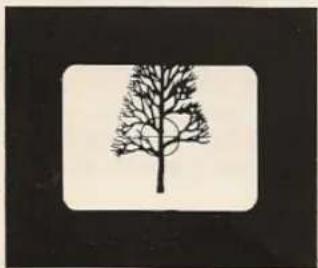
Look for a prominent vertical line in the subject and turn the focusing ring until this vertical line appears continuous (without being broken) across the dividing line of the split image field.
natural_image
Simple line drawing of a bare tree with a bird perched on it, enclosed in a rounded square frame (no text or symbols)When focused, the lens can be set at any focal length and the image will stay in focus (as long as the actual subject distance remains constant).
natural_image
Black-and-white illustration of a bare tree with two branches, enclosed in a rounded square frame (no text or symbols)Should the vertical line become slightly broken when zooming towards the wide angle, do not try to re-focus. This is caused by the design of the optical system and has no practical significance.
If one half of the split image field appears unsharp or darker, move the camera slightly sideways or up and down in front of the eye until both halves of the field appear equally bright.
Fixed focus setting
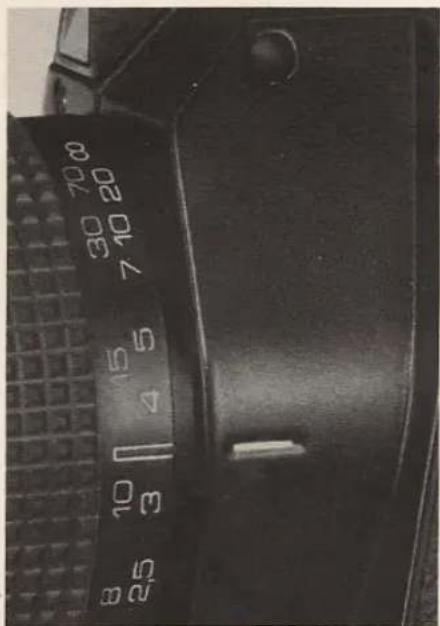
For instant readiness the focusing ring can be set to the mark between 10 and 13 feet and the zoom knob to 12. This combination provides a sharp image from about 6^1/2 feet to infinity, even in relatively poor light.
Depth of field
The depth of field is the zone of sharp focus and depends on the focal length, the lens aperture and the focusing distance.
Depth of field is shallow when lens is set at:
a) long focal lengths (towards 56 mm)
b) large apertures (towards f/1.8)
c) short distances.
Depth of field is large when lens is set at:
a) short focal lengths (towards 7 mm)
b) small apertures (towards f/22)
c) long distances.
Consult the depth of field charts in this instruction manual.
Automatic exposure system
The diaphragm opens and closes fully automatically, controlled by a photoresistance fed by the motor batteries.
The light is measured through the lens taking into account the sensitivity (ASA speed) of the film by means of a special notch in the film cartridge. For films of 200 ASA (24 DIN), the aperture correction switch is set to -1/2 (see page 12).
A glance in the viewfinder shows whether the light is not sufficient or too bright for filming.
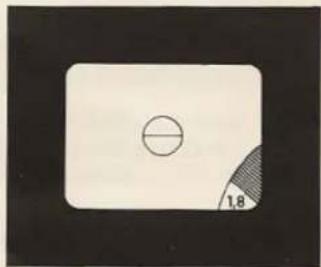
a) The light is just good enough for filming, but if the red zone becomes any larger than on our illustration, your film will be under-exposed. The dividing line between the red zone and the colorless zone corresponds to an f/1.8 aperture.
natural_image
Simple diagram with a circle inside a rectangle and a shaded region labeled '1.8' (no text or symbols beyond the label)N.B.: When filming outdoors at night (illuminations, fireworks, neon or electric signs, etc.) you can still obtain excellent results even if the red zone becomes larger than on our illustration.
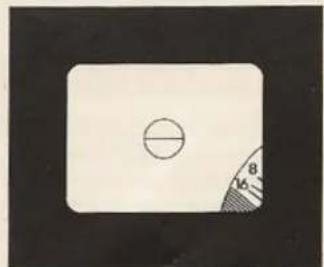
b) The light is very bright but still suitable for filming; however, if the red zone becomes any larger than on our illustration, your film will be over-exposed. The dividing line between the red zone and the colorless zone corresponds to an f/22 aperture.
natural_image
Simple diagram with a circle and a shaded sector, no text or symbols presentModification of the diaphragm reaction time
Deliberate aperture correction
Remarks:
- When filming in snow, by the sea-side or against the light, with a color film of a sensitivity equal to or less than 40 ASA (17 DIN), you can film even if the red zone becomes larger than on our illustration;
- The grey filter supplied with your camera is to be used only if you are using a film of a sensitivity greater than 100 ASA (21 DIN), or when you wish to reduce the aperture by two stops, in order to make dissolves (see page 14) or to reduce the depth of field (see page 11).
When you push the preselection button for dissolves (see page 14) to the position «on», the automatic diaphragm setting device reacts much more slowly than usual; in this way, you can avoid too rapid and too frequent fluctuations in exposure, when filming certain types of scenes (shots of road traffic, panoramic views of subjects with violent contrasts of lighting, etc.).
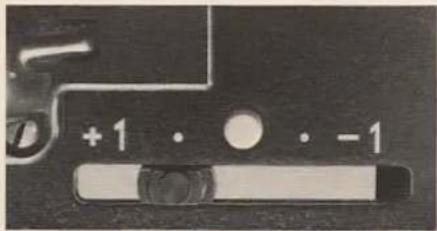
By means of a sliding switch in the base of the camera, deliberate over- and underexposures can be made without eliminating the automatic diaphragm control.
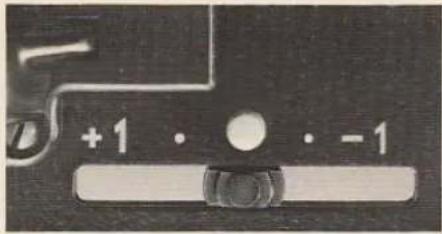
By pressing the red locking button, the switch can be moved to "+ 1" or "— 1", or to intermediate positions corresponding to "+ 1/2" or "— 1/2".
At the + 1 setting the diaphragm is opened by one stop which is useful for backlighted shots, portraits against large bright areas.
At the — 1 setting the diaphragm is closed down by one stop to reduce exposure (for shots from a dark doorway, for instance).
The diaphragm locking system
Important:
Return the aperture correction button to its center position.
The diaphragm locking system permits setting the aperture to provide correct exposure for a certain subject area within a scene. This is helpful in scenes with great contrast — a person in front of a bright background, a spotlighted performer on a dark stage, for instance.
If the meter is used normally and automatically in such cases, the dark or bright background area influences the diaphragm setting, thereby under- or overexposing the main subject.
The diaphragm locking system can be used to overcome exposure problems in such cases.
Using the diaphragm locking system, perfect exposure can be obtained as follows:
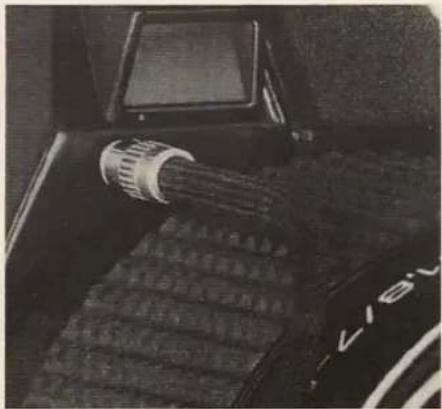
a) Screw the cable release in the socket for diaphragm lock.
b) Zoom in so that the view through the finder shows the main subject only (no background area).
c) After having turned the little crown anti-clockwise, lock the diaphragm in set position with the cable release lock.
d) With the diaphragm locked, zoom back to cover the desired area and film.
natural_image
Close-up of a mechanical component with textured surface and visible internal structure (no text or symbols)e) At the end of the exposure, un-screw the cable release.
N.B.: By turning the camera towards a more or less luminous zone as desired, you can lock the diaphragm at any setting you wish, which is equivalent to manual setting of the diaphragm.
Fade-ins and fade-outs
Fade out: a gradual darkening at the end of the scene to indicate a change of time or location.
Fade-in: a film that starts suddenly with a title or a bright scene does not look as pleasant and professional as one that gradually changes from dark to light by a fade-in.
If two scenes of greatly different brightness follow each other, end one with a fade-out, start the other with a fade-in. The change in brightness is then less objectionable. The total length of fade-out and fade-in should not exceed 4 seconds.
Your camera allows you to make fade-outs and fade-ins by slowly closing and opening the diaphragm. These dissolves naturally can only be obtained if the diaphragm is not already closed down too far. The maximum effect is achieved when the aperture is f/5.6 or larger (i.e. f/4 - f/2.8 - etc.). If the diaphragm is closed too far (f/8 - f/11 - f/16), you can use the neutral grey filter supplied with the camera: this opens the diaphragm two stops more without affecting the exposure or color.
At an aperture of f/5.6, the length of a dissolve is about two seconds, when the projection speed and the filming speed are identical.
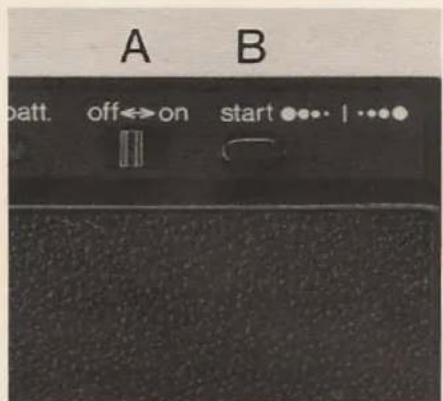
check the diaphragm aperture and, if necessary, place the grey filter on the lens;
push preselection button (A) to position «on»;
film normally and, at the end of the sequence, press on the «start» key (B) until the diaphragm scale is at the end of its run (red zone), and then immediately let go of the release;
release the «start» key (B);
do not forget to reset the preselection button (A) to «off».
Filming in daylight and artificial light
Synchro-flash/synchro-sound socket
To make a fade-in:
check the diaphragm aperture and, if necessary, place the grey filter on the lens;
set the preselection button «A» to «on»;
look through the viewfinder, press the start key (B) until the diaphragm scale is at the end of its run (red zone);
press on the release and, at the same time, let go of the « start» key (B);
the diaphragm opens slowly until it is at the working aperture, and you can continue to film normally;
after completing the sequence, do not forget to reset the preselection button «A» to «off».
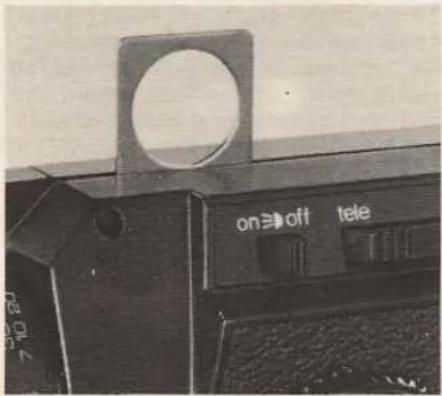
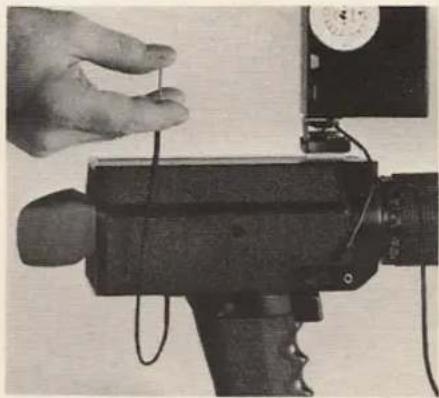
The camera is equipped with a conversion filter which is normally in position and the camera therefore set for filming in daylight. For indoor filming, the movielight can be mounted on the camera by inserting the base of the lamp into the slot on the camera. This moves the conversion filter out of position, thereby assuring good color rendition in artificial light scenes. If artificial light scenes are made without the light mounted on the camera, insert the key, supplied with the camera, into the slot to assure proper position of the filter.
Remove the key for daylight scenes.
natural_image
Close-up of a hand holding a thin wire attached to a mechanical device (no visible text or symbols)The same socket can be used for synchronizing an electronic flash or for connecting up a tape-recorder.
Filming with electronic flash
By single-frame filming with an electronic flash plugged into the socket provided for the purpose, you can film poorly lighted static subjects, obtain time-lapse effects (growth of a flower, for example), etc.
The possibilities open to you depend to a large extent on the electronic
Macro shots
flash you use (number of flashes between two recharges, strength of flash, etc.). Do not forget that a scene lasting only 5 seconds on projection requires 90 frames at the rate of 18 frames/second.
Take the following precautions:
mount the camera on a steady support (tripod);
determine the correct aperture based on the electronic flash unit and its distance from the subject by means of the following formula:
$$ \text { diaphragm } = \frac {\text { guide number }}{\text { distance in feet }} $$
Example: guide number 80 distance 10 ft. 8010 = f/8
Lock the diaphragm at the aperture determined by the formula.
N.B.: since the optical system in Super 8 cameras has a greater light loss than in still cameras, it is recommended to use a film sensitivity half the rated speed (ASA 20 instead of 40) when determining the guide number.
To mount the electronic flash on the camera, use the flash-shoe provided for this purpose, which slides into the slot located on top of the camera and intended above all for holding the key for retracting the conversion filter.
We recommend you to make a few test runs before filming an important sequence with electronic flash for the first time.
Synchro-sound filming
The contact used for the synchronization of an electronic flash gives off one impulse per frame and can also be used for connecting a tape-recorder for synchro-sound recording.
Your photographic dealer will gladly give you information concerning the different possibilities.
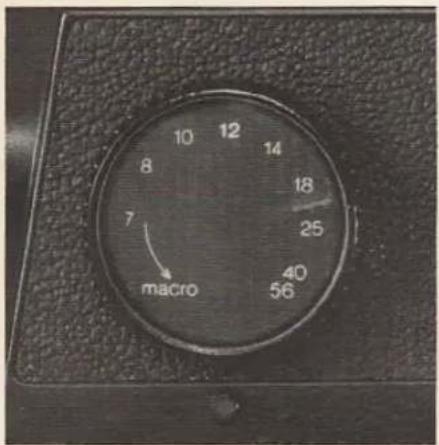
After pressing the macro button, the zoom knob can be turned either by hand or with the power zoom motor into the macro range, thereby extending the focusing range from infinity down to where the lens touches the subject, covering an area approximately an inch in size.
When the zoom knob is in the Macro zone, the lens is set to wide-angle position, which ensures greater depth of field and good picture steadiness even if you film holding the camera in your hand.
Care of camera
| Width of area covered (inches) | 6" | 4" | 2 ^1/2 " | 1— ^3/2 " |
| Distance, subject to front of lens (inches) | 6 ^1/2 " | 4" | 2— ^1/8 " | 1— ^1/8 " |
In the Macro position, the coincidence rangefinder is also used for focusing. The actual setting is done by means of the zoom knob, and must be done accurately because of the shallow depth of field (see last-but-one page of the Instructions).
Chart above shows area coverage at different distances with the focus setting at infinity and zoom knob in macro range.
When turning the zoom knob out of the macro range, the macro button jumps out and prevents accidental turning of the knob back into the macro range.
Special effects and transitions
The Bolex Macrozoom® lens allows you to make special effects, heightening the interest of your film: you will be able, for example, to film slides or titles that you wish to include in your film (see "Bolex Macro Set" under "Accessories available separately", page 18); you will also be able to create smooth and pleasing transitions from one scene to the next.
By zooming from a long shot into the macro range, a pleasing and effective focus transition from a distant to a close subject is obtained. Vice versa, a continuous focus transition from a close to a distant subject is obtained by turning the zoom knob out of the macro range.
A scene can be ended by turning the zoom knob into the macro position (after pressing the macro button), thereby throwing the subject completely out of focus. The next scene can be "focused in" by turning the zoom knob out of the macro position until the subject is in sharp focus.
When the camera is not used over extended periods, remove the batteries from the battery container and store them in a cool place. Damage to the camera through leaking batteries is not covered by the guarantee.
Clean the lens surfaces with a soft brush or a soft linen cloth. (Do not rub hard — this may damage the lens coating.)
Open the lid and clean the cartridge compartment with a brush.
Protect the camera from excessive heat or cold, dust and moisture. (Do not keep the camera in glove compartment or on the window shelf of your car.)
Accessories available separately
natural_image
Black-and-white photo of a casino card with multiple cards and a circular object, no visible text or symbols.Bolex Macro Set
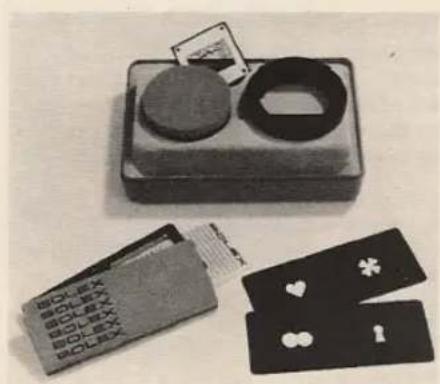
The Bolex Macro Set comprises a number of accessories simplifying the taking of Macro shots of slides, and stationary or moving titles, as well as iris effects, filming through cut-out masks (keyhole, heart, binoculars).
The accessories forming part of the Bolex Macro Set include a slide holder, a slide and transparent celluloids for titles, printed letter transfers, a mask for iris effects, cut-out masks and a Macro Close-Up lens.
Remote-control cable
For use of this cable, see page 7.
natural_image
Electric motor with attached cable and two batteries on a plain surface (no text or symbols visible)Bolex accumulator chargers
For description and use of these Bolex chargers, see page 4.
Bolex charger for plugging into the mains (110-250 V\~ / 50-60 cycles): supplied with 5 accumulators.
Bolex charger for plugging into the cigarette lighter in your car (12 V) : supplied without accumulators.
natural_image
Two electronic devices with black cables and connectors, one connected to a cable (no visible text or symbols)A few tips enabling you to add interest and life to your movies
Framing
● Pay great attention to clarity: a picture must be easily taken in by the spectator and, for this, have only one centre of interest, be free of all superfluous detail. You will have to learn to select only what really interests you and matters in a scene; try to focus attention on the main subject and choose your frame without trying to include too much.
- Remember that close-ups and extreme close-ups are very expressive and spectacular.
- As a general rule, avoid excessive symmetry: for instance, the horizon must never divide the picture into two equal halves, and the main subject must not be kept right in the middle of the picture from one end of a sequence to another.
- Learn to use close-ups to obtain contrasting effects, which will add relief to your sequences.
In order not to bore your audience
- Do not forget that a spectator's attention begins to flag as soon as he has grasped the significance of a shot; avoid too long sequences therefore, otherwise your film will become boring. On the other hand, do not make your scenes too short either; if you do, your film will be chopped up and incomprehensible. Five to ten seconds per scene represents a good average length.
- Do not be afraid to keep changing the angle of your shots. Film your subject from the front, from the back, three-quarters view, in profile. Use high-angle shots
(shooting down, from top to bottom) and low-angle shots (upwards, from bottom to top). In a high-angle shot, the subject is dominated, dwarfed, threatened, giving an impression of weakness. In a low-angle shot the subject dominates, dwarfs, threatens, giving an impression of strength.
- Do not overdo the moving of your camera while filming: remember that it is the subject that ought to move and not your camera. Do not overdo panning either, or zoom effects; they soon become boring: keep them strictly for scenes where they are really justified.
- Images that "dance" and "jerk" on the screen are extremely unpleasant and sometimes downright annoying for the spectator. The slightest jerkiness of the camera when filming is amplified considerably in projection: it is important therefore to film under the best possible conditions of steadiness, especially if you are using the zoom. Although your camera has been designed for ease of holding, if circumstances require or permit do not hesitate to use a tripod or a monopod.
- Add titles to your film and liven it up with unexpected transitions between the various sequences.
● A film is always more or less a story in pictures: do not pad out your story unnecessarily with details of no great importance. Your film does not have to reconstitute an action in its entirety. You cannot, for example, film your whole trip to the Côte d'Azur in full detail: a suitcase being packed, car doors being shut, one or two sequences showing picturesque scenes on the way down and you can move directly on
to shots of the beach. You have only to show a few characteristic sequences which flow smoothly into each other for the spectator to follow the thread of your story perfectly and to use his imagination to fill in any gaps between the various sequences. Do the same to describe an action taking place in a much smaller lapse of time: since movies manipulate time as they please and offer you the possibility of condensing, learn to be brief in your way of telling a story on film, mercilessly cut out any shots that are of no real importance: do it first of all while actually filming, and editing will be much easier or even quite unnecessary.
Light and shade
- Learn how to use the vataries of the sun and weather: the play of light and shade offers great scope. A brilliantly lit scene with clear-cut shadows creates a stark atmosphere full of passion: when the light is diffused, the contours of the shadows blurred and cotton-wooly, the atmosphere becomes soft, dreamlike and even mysterious and unreal.
- Shadow represents the contrast with reality; although being merely a more or less dark, more or less clear-cut shape, it possesses, through its immateriality, considerable power of expression. A shadow may be short or exaggeratedly long, narrow or exaggeratedly wide: filming the shadow cast by an object can give you quite amusing or comic effects, but sometimes impressive, and even hallucinating ones. The play of shadows can very well constitute the main interest of a sequence.
- Reflections, too, may be very expressive or very suggestive; depending on the nature of the reflecting material and the lighting of the subject, they vary in sharpness, and may be more or less deformed. More descriptive and less immaterial than a shadow, a reflection has however a fugitive character and allows vague, fleeting effects, which may also become surprising and strange. Faithful reflections in a window, motionless reflections spread on the swelling curve of a silver teapot or crystal vase, luminous and moving reflections on the surface of water, on the black, wet surface of a street... the possibilities are infinite. Make use of reflections, they have their place in cinema.
- Use backlighting effects: apart from shots of sunrises and sunsets filmed for their own sake, against-the-light filming enables you to create the illusion of a halo round your subject and surround it with a violent, vibrant light or, on the contrary, a soft, delicate aura.
Invisible camera
- While children generally remain quite natural in front of a camera, the same is far from true of adults who, for the most part, as soon as they see a lens pointed at them, start to pose, to "act" (... sometimes well, sometimes less so!); their gestures lose all spontaneity, all sincerity, and become artificial, false, their attitudes become affected. When filming adults, try therefore to do so without their knowing.
Fantasy and illusion
- Use single-frame filming: for this you will need the flexible cable release supplied with your camera, which should be mounted on a tripod and "framed" once and for all. Film the visitors to an exhibition from above, taking one frame every second: on the screen, you will see them move jerkily, frantically and funnily. Take a shot every ten seconds after framing a portion of sky with moving cloud formations: on projection, you will see a wild turmoil of clouds, breaking up, turning and twisting in torment. From very close to, take a shot about every two minutes of a tulip opening (the steadiness of the subject is then as important as that of the camera): on your screen, you will see it open its corolla in a few seconds. By giving free rein to your imagination, you will find a thousand and one subjects similar to the three suggested above, lending themselves to single-frame filming and successful enough to be included in your film.
- Single-frame filming also enables you to lend movement to inanimate objects. You will, for example, become the magician who breathes life into a doll. Perfect camera steadiness and unchanging framing are absolutely necessary. Take four to five pictures of the doll in a given attitude, then slightly alter the position of the arms, legs and head, according to the movements you want it to perform, and then take another four or five shots; change the position of the doll again, film, and so on. On the screen, the doll's movements will appear more or less jerky, depending on the number of shots taken in each position and the
varying degree of difference between the successive positions of the subject. Following the same principle, you can for example liven up an itinerary on a map by means of little silhouettes of vehicles, make titles whose letters jump into place all on their own, etc. The field of animation is unlimited: with a little experiment and originality, you will certainly discover more than enough ideas to brighten up your films.
- By stopping and starting filming, you can become a conjuror. For tricks of this kind, the camera must remain perfectly still and the framing the same. Film a scene in a given setting, then stop filming for a moment: change the number or position of the actors or objects, or replace one by another, then start filming again. On projection, the spectator will notice sudden appearances or disappearances, sudden moves or exchanges. A person reaches out for a candle: this disappears into thin air and changes suddenly into a flashlight; naturally the actor must keep absolutely still during the lapse of time required for the removal or substitution, and until filming starts again.
Stopping and starting filming will enable you to show a table laying itself, to pack an incredible number of people into a small cupboard, to make unusual objects appear where they are least expected; in this way, completely according to your fancy, you can obtain amusing, surprising or frightening effects.
Depth of field charts
The depth of field charts show the range of sharpness at various distances, focal lengths and diaphragm openings — and should be consulted when it is necessary to have subjects at different distances in sharp focus.
The charts show that shorter focal lengths provide greater depth of fied.
Example for determining depth of field:
Focal length used 25 mm (page 24).
Aperture: f/5.6.
Subject distance: 10 feet
Depth of field extends frot 6' 5" to
22'6".
Focal length 7 mm Depth of field in feet
| Feet | Aperture | ||||||||||
| 1,8 | 2 | 2,4 | 2,8 | 4 | 5,6 | 8 | 11 | 16 | 22 | ||
| ∞ | 6'9 -∞ | 6'2 -∞ | 5'4 -∞ | 4'6 -∞ | 3'3 -∞ | 2'5 -∞ | 1,9 -∞ | 1'5 -∞ | 1'1 -∞ | 10 -∞ | |
| 70 | 6'3 -∞ | 5'8 -∞ | 5' -∞ | 4'3 -∞ | 3'1 -∞ | 2'4 -∞ | 1,9 -∞ | 1'4 -∞ | 1'1 -∞ | 10 -∞ | |
| 30 | 5'8 -∞ | 5'2 -∞ | 4'7 -∞ | 4' -∞ | 3' -∞ | 2'3 -∞ | 1,9 -∞ | 1'4 -∞ | 1' -∞ | 10 -∞ | |
| 15 | 4'10 -∞ | 4'6 -∞ | 4' -∞ | 3'7 -∞ | 2'9 -∞ | 2'2 -∞ | 1'8 -∞ | 1'4 -∞ | 1' -∞ | 10 -∞ | |
| 10 | 4'2 -∞ | 3'11 -∞ | 3'7 -∞ | 3'3 -∞ | 2'7 -∞ | 2'1 -∞ | 1'7 -∞ | 1'3 -∞ | 1' -∞ | 10 -∞ | |
| 8 | 3'10 -∞ | 3'8 -∞ | 3'4 -∞ | 3' -∞ | 2'5 -∞ | 2' -∞ | 1'7 -∞ | 1'3 -∞ | 1' -∞ | 10 -∞ | |
| 7 | 3'7 -∞ | 3'5 -∞ | 3'2 -∞ | 2'11 -∞ | 2'4 -∞ | 1'11 -∞ | 1'6 -∞ | 1'3 -∞ | 111⁄2 -∞ | 91⁄2 -∞ | |
| 6 | 3'4 -48'9 | 3'2 -∞ | 3' -∞ | 2'9 -∞ | 2'3 -∞ | 1'10 -∞ | 1'6 -∞ | 1'3 -∞ | 111⁄2 -∞ | 91⁄2 -∞ | |
| 5 | 3'1 -17'6 | 2'11 -24'9 | 2'9 -60' | 2'6 -∞ | 2'2 -∞ | 1'9 -∞ | 1'5 -∞ | 1'2 -∞ | 11 -∞ | 91⁄2 -∞ | |
| 4 | 2'8 -8'11 | 2'7 -10'5 | 2'5 -18' | 2'3 -34' | 2' -∞ | 1'8 -∞ | 1'4 -∞ | 1'2 -∞ | 11 -∞ | 9 -∞ | |
Focal length 10 mm Depth of field in feet
Focal length 14 mm Depth of field in feet
| Feet | Aperture | ||||||||||||
| 1,8 | 2 | 2,4 | 2,8 | 4 | 5,6 | 8 | |||||||
| ∞ | 24'4 | -∞ | 22' | -∞ | 18'8 | -∞ | 15'9 | -∞ | 11'1 | -∞ | 8' | -∞ | 5'8 |
| 70 | 18'2 | -∞ | 16'9 | -∞ | 14'10 | -∞ | 12'11 | -∞ | 9'7 | -∞ | 7'2 | -∞ | 5'3 |
| 30 | 13'7 | -∞ | 12'9 | -∞ | 11'7 | -∞ | 10'5 | -∞ | 8,2 | -∞ | 6'4 | -∞ | 4'10 |
| 15 | 9'5 | -38'6 | 9' | -47' | 8'4 | -90' | 7'9 | -∞ | 6'6 | -∞ | 5'4 | -∞ | 4'2 |
| 10 | 7'2 | -16'8 | 7' | -18' | 6'7 | -22' | 6'3 | -26'10 | 5'4 | -100' | 4'7 | -∞ | 3'8 |
| 8 | 6'1 | -11'8 | 5'11 | -12'4 | 5'8 | -14'1 | 5'5 | -15'10 | 4'9 | -28' | 4'1 | -∞ | 3'5 |
| 7 | 5'6 | -9'8 | 5'5 | -10'1 | 5'2 | -11'2 | 4'11 | -12'3 | 4'5 | -18'5 | 3'10 | -56' | 3'3 |
| 6 | 4'11 | -7'10 | 4'10 | -8'1 | 4'8 | -8'9 | 4'5 | -9'5 | 4' | -12'8 | 3'6 | -23'4 | 3' |
| 5 | 4'3 | -6'2 | 4'2 | -6'4 | 4' | -6'9 | 3'11 | -7'2 | 3'4 | -8'10 | 3'2 | -12'10 | 2'9 |
| 4 | 3'6 | -4'8 | 3'5 | -4'9 | 3'4 | -5' | 3'3 | -5'3 | 3' | -6' | 2'9 | -7'8 | 2'5 |
Focal length 25 mm Depth of field in feet
| Feet | Aperture | |||||||||||||||
| 1,8 | 2 | 2,4 | 2,8 | 4 | 5,6 | 8 | 11 | |||||||||
| ∞ | 56' | -∞ | 50' | -∞ | 42' | -∞ | 36' | -∞ | 25' | -∞ | 18' | -∞ | 12'6 | -∞ | 9'2 | -∞ |
| 70 | 31' | -∞ | 29'3 | -∞ | 26'2 | -∞ | 23'9 | -∞ | 18'6 | -∞ | 14'3 | -∞ | 10'8 | -∞ | 8'1 | -∞ |
| 30 | 19'6 | -65' | 18'10 | -75' | 17'5 | -110' | 16'4 | -∞ | 13'8 | -∞ | 11'3 | -∞ | 8'11 | -∞ | 7' | -∞ |
| 15 | 11'10 | -20'6 | 11'7 | -21'4 | 11'1 | -23'5 | 10'7 | -25'9 | 9'5 | -37' | 8'2 | -92' | 6'10 | -∞ | 5'9 | -∞ |
| 10 | 8'6 | -12'2 | 8'4 | -12'5 | 8'1 | -13'1 | 7'10 | -13'10 | 7'2 | -16'7 | 6'5 | -22'6 | 5'7 | -49' | 4'10 | -∞ |
| 8 | 7' | -9'4 | 6'11 | -9'6 | 6'9 | -9'8 | 6'7 | -10'3 | 6'1 | -11'8 | 5'7 | -14'5 | 4'11 | -22' | 4'4 | -64' |
| 7 | 6'3 | -8' | 6'2 | -8'1 | 6' | -8'4 | 5'11 | -8'8 | 5'6 | -9'8 | 5'1 | -11'5 | 4'6 | -15'9 | 4' | -30' |
| 6 | 5'5 | -6'8 | 5'5 | -6'9 | 5'4 | -6'11 | 5'2 | -7'2 | 4'10 | -7'10 | 4'6 | -9' | 4'1 | -11'5 | 3'8 | -17'4 |
| 5 | 4'7 | -5'6 | 4'7 | -5'6 | 4'6 | -5'7 | 4'5 | -5'9 | 4'2 | -6'3 | 3'11 | -6'11 | 3'7 | -8'3 | 3'3 | -11' |
| 4 | 3'9 | -4'3 | 3'9 | -4'4 | 3'8 | -4'5 | 3'7 | -4'6 | 3'6 | -4'9 | 3'4 | -5'1 | 3'1 | -5'10 | 2'10 | -7'1 |
Focal length 40 mm Depth of field in feet
| Feet | Aperture | ||||||||||||||||
| 1,8 | 2 | 2'4 | 2,8 | 4 | 5,6 | 8 | 11 | 16 | 22 | ||||||||
| ∞ | 144' | -∞ | 130' | -∞ | 108' | -∞ | 92' | -∞ | 65' | -∞ | 46' | -∞ | 32' | -∞ | 23'4 | -∞ | 16' |
| 70 | 47' | -136' | 45' | -153' | 42' | -190' | 40' | -290' | 34' | -∞ | 28' | -∞ | 22' | -∞ | 17'6 | -∞ | 13' |
| 30 | 24'10 | -38' | 24'4 | -39' | 23'5 | -42' | 22'7 | -45' | 20'5 | -56' | 18'1 | -87' | 15'5 | -∞ | 13'1 | -∞ | 10'4 |
| 15 | 13'7 | -16'9 | 13'5 | -17' | 13'2 | -17'5 | 12'11 | -18' | 12'2 | -19'8 | 11'3 | -22'5 | 10'2 | -28'5 | 9'1 | -43' | 7'8 |
| 10 | 9'4 | -10'9 | 9'3 | -10'10 | 9'2 | -11' | 9' | -11'3 | 8'8 | -11'11 | 8'2 | -12'10 | 7'7 | -14'8 | 6'11 | -17'9 | 6'1 |
| 8 | 7'7 | -8'6 | 7'6 | -8'6 | 7'6 | -8'8 | 7'4 | -8'9 | 7'1 | -9'2 | 6'9 | -9'9 | 6'4 | -10'9 | 5'11 | -12'4 | 5'3 |
| 7 | 6'8 | -7'4 | 6'8 | -7'5 | 6'7 | -7'6 | 6'6 | -7'7 | 6'4 | -7'11 | 6'1 | -8'4 | 5'9 | -9' | 5'4 | -10'2 | 4'10 |
| 6 | 5'9 | -6'3 | 5'9 | -6'3 | 5'8 | -6'4 | 5'8 | -6'5 | 5'6 | -6'8 | 5'3 | -6'11 | 5' | -7'5 | 4'9 | -8'2 | 4'4 |
| 5 | 4'10 | -5'2 | 4'10 | -5'2 | 4'9 | -5'3 | 4'9 | -5'3 | 4'8 | -5'5 | 4'6 | -5'8 | 4'4 | -6' | 4'1 | -6'5 | 3'9 |
| 4 | 3'11 | -4'1 | 3'11 | -4'1 | 3'11 | -4'2 | 3'10 | -4'2 | 3'9 | -4'3 | 3'8 | -4'5 | 3'6 | -4'7 | 3'5 | -4'11 | 3'2 |
Focal length 56 mm Depth of field in feet
| Feet | Aperture | |||||||||||||||||||
| 1,8 | 2 | 2,4 | 2,8 | 4 | 5,6 | 8 | 11 | 16 | 22 | |||||||||||
| ∞ | 280' | -∞ | 253' | -∞ | 212' | -∞ | 180' | -∞ | 126' | -∞ | 90' | -∞ | 63' | -∞ | 45'6 | -∞ | 31' | -∞ | 22'6 | -∞ |
| 70 | 56' | -93' | 55' | -97' | 52' | -106' | 50' | -115' | 45' | -160' | 39' | -320' | 32'9 | -∞ | 27'3 | -∞ | 21'3 | -∞ | 16'9 | -∞ |
| 30 | 27' | -33'9 | 26'9 | -34'3 | 26'2 | -35'3 | 25'7 | -36'3 | 24'1 | -39'9 | 22'3 | -45'8 | 20' | -58'6 | 17'9 | -90' | 15' | -∞ | 12'6 | -∞ |
| 15 | 14'2 | -15'11 | 14'1 | -16' | 13'11 | -16'3 | 13'9 | -16'5 | 13'4 | -17'2 | 12'9 | -18'3 | 11'11 | -20'1 | 11'1 | -23' | 9'10 | -30'2 | 8'8 | -48' |
| 10 | 9'8 | -10'5 | 9'7 | -10'6 | 9'6 | -10'7 | 9'5 | -10'8 | 9'2 | -10'11 | 8'11 | -11'5 | 8'6 | -12'1 | 8' | -13'2 | 7'4 | -15'4 | 6'8 | -19'1 |
| 8 | 7'9 | -8'3 | 7'9 | -8'3 | 7'8 | -8'4 | 7'7 | -8'5 | 7'6 | -8'7 | 7'3 | -8'11 | 7' | -9'4 | 6'8 | -10' | 6'2 | -11'3 | 5'8 | -13'2 |
| 7 | 6'10 | -7'2 | 6'10 | -7'3 | 6'9 | -7'3 | 6'8 | -7'4 | 6'7 | -7'6 | 6'5 | -7'8 | 6'2 | -8' | 5'11 | -8'6 | 5'6 | -9'5 | 5'1 | -10'9 |
| 6 | 5'10 | -6'2 | 5'10 | -6'2 | 5'10 | -6'3 | 5'9 | -6'3 | 5'8 | -6'4 | 5'7 | -6'6 | 5'5 | -6'9 | 5'2 | -7'1 | 4'10 | -7'9 | 4'6 | -8'8 |
| 5 | 4'11 | -5'1 | 4'11 | -5'1 | 4'10 | -5'2 | 4'10 | -5'2 | 4'9 | -5'3 | 4'8 | -5'4 | 4'7 | -5'6 | 4'5 | -5'9 | 4'2 | -6'2 | 3'11 | -6'10 |
| 4 | 3'11 | -4'1 | 3'11 | -4'1 | 3'11 | -4'1 | 3'11 | -4'2 | 3'10 | -4'2 | 3'9 | -4'3 | 3'8 | -4'4 | 3'7 | -4'6 | 3'5 | -4'9 | 3'3 | -5'2 |
Macro range Depth of field in inches
| Distance setting: infinityB = Width of subject fieldExample:B = 2^5/s'' (65 mm)Aperture: f/5.6Depth of field: 1^1/s'' (30 mm) | Aperture | B = 6'' | 4'' | 2^1/_2'' | 1^3/_4'' | 1^3/_16'' | |||||||||||
| 1,8 | — | ^7/_8 - + | 1^1/_8 | — | ^3/_8 - + | ^3/_8 | — | ^3/_16 - + | ^3/_16 | — | ^3/_32 - + | ^3/_32 | — | ^1/_32 - + | ^1/_32 | ||
| 2 | — | 1 | — | 1^1/_4 | — | ^3/_8 - + | ^1/_3 | — | ^3/_16 - + | ^3/_16 | — | ^3/_32 - + | ^3/_32 | — | ^1/_32 - + | ^1/_32 | |
| 2,4 | — | 1^1/_8 - + | 1^5/_8 | — | ^3/_8 - + | ^1/_3 | — | ^1/_4 - + | ^1/_4 | — | ^1/_8 - + | ^1/_8 | — | ^1/_16 - + | ^1/_16 | ||
| 2,8 | — | 1^3/_8 - + | 1^7/_8 | — | ^1/_2 - + | ^5/_8 | — | ^1/_4 - + | ^5/_16 | — | ^1/_8 - + | ^3/_16 | — | ^1/_16 - + | ^1/_16 | ||
| 4 | — | 1^3/_4 - + | 3 | — | ^5/_8 - + | ^3/_4 | — | ^3/_8 - + | ^3/_8 | — | ^1/_4 - + | ^1/_4 | — | ^3/_32 - + | ^1/_8 | ||
| 5,6 | — | 2^1/_4 - + | 5 | — | ^7/_8 - + | 1^1/_8 | — | ^1/_2 - + | ^5/_8 | — | ^1/_4 - + | ^3/_8 | — | ^1/_8 - + | ^1/_8 | ||
| 8 | — | 3 | — | 10 | — | 1^1/_8 - + | 1^3/_4 | — | ^5/_8 - + | 1 | — | ^3/_8 - + | ^1/_2 | — | ^3/_16 - + | ^3/_16 | |
| 11 | — | 3^1/_2 - + | 24 | — | 1^1/_2 - + | 3 | — | ^7/_8 - + | 1^1/_2 | — | ^3/_8 - + | ^5/_8 | — | ^1/_4 - + | ^1/_4 | ||
| 16 | — | 4^1/_4 - | — | 1^3/_4 - + | 5 | — | 1^1/_4 - + | 2^5/_8 | — | ^5/_8 - + | 1 | — | ^1/_4 - + | ^3/_8 | |||
| 22 | — | 5 | — | ∞ | — | 2^1/_4 - + | 12 | — | 1^1/_2 - + | 5^1/_4 | — | ^3/_4 - + | 2 | — | ^3/_8 - + | ^2/_8 | |
Bolex International S. A., Yverdon (Switzerland)
After-sales service
Through our world-wide organization, we can offer efficient and reliable after-sales service in practically every part of the world. If service is required, return your camera to a Bolex dealer or directly to the Bolex service center. Please quote the serial number in any correspondence with your Bolex dealer or distributor.
BOLEX
Hallmark of high quality
Bolex International S.A. reserves the right to modify, without prior notice, the appearance and specifications of the camera described in the present Instructions for Use.
ME 4-002/74 Anglais Printed in Austria
- Contents
- Your camera is supplied with:
- Note
- Get to know your camera
- Adjusting the reflex finder eyepiece
- Eyecup
- Inserting the batteries (five 1.5 V cells)
- Checking the batteries
- Use of accumulators and an accumulator charger
- Loading the camera
- Unloading the camera
- Filming speeds
- Methods of operation
- Normal operation \*
- Continuous operation \*
- Filming with remote-control cable
- Single-frame filming \*
- Remarks
- Electronic running control
- ActionLight®
- Footage counter
- Framing the subject
- Manual setting
- Power zoom
- Zooming
- Focusing
- Depth of field
- Automatic exposure system
- Modification of the diaphragm reaction time
- Deliberate aperture correction
- Remarks:
- The diaphragm locking system
- Important:
- Fade-ins and fade-outs
- Filming in daylight and artificial light
- Synchro-flash/synchro-sound socket
- To make a fade-in:
- Filming with electronic flash
- Macro shots
- Synchro-sound filming
- Care of camera
- Special effects and transitions
- Bolex Macro Set
- Remote-control cable
- Bolex accumulator chargers
- A few tips enabling you to add interest and life to your movies
- Framing
- In order not to bore your audience
- Light and shade
- Invisible camera
- Fantasy and illusion
- Depth of field charts
- Example for determining depth of field:
- After-sales service
Brand : BOLEX
Model : 480 MacroZoom
Category : Camcorder