
R4S - Professional audio equipment Antelope Audio - Free user manual and instructions
Find the device manual for free R4S Antelope Audio in PDF.


| Product Type | Bus-powered remote control for Satori monitoring controller |
| Dimensions (W x H x D) | 220 mm × 55 mm × 85 mm (8.66" × 2.22" × 3.31") |
| Weight | 0.71 kg (1.57 lb) |
| Power Supply | Bus-powered via USB 2.0 (no external power required) |
| USB Interface | USB 2.0 Full-Speed, Type B connector |
| Controls | Rotary encoder, Input Select (Ch1-8), Sum, Monitor Select (1-4), Talkback, Mono, Dim, M/S, Sub buttons |
| Trim Offset | Press and hold Monitor or Input button, then rotate encoder to adjust trim (-6 dB to +6 dB); double-press to reset to 0 dB |
| Talkback | Activates talkback microphone; distribution configurable via Control Panel app |
| Monitor Output Selection | Four monitor outputs selectable, source fed to selected output |
| Mono/Dim/M-S/Sub Functions | Mono sums to mono; Dim applies -20 dB attenuation; M/S selects sum or difference; Sub activates LFE output |
| Operating Temperature | 0°C to 50°C (32°F to 122°F) |
| Compatibility | Designed exclusively for Satori monitoring controller |
| Cleaning | Use specialized electronics cleaners; avoid harsh chemicals |
| Safety | Do not remove screws; no user-serviceable parts; keep away from moisture; operate in ventilated area |
| Warranty | 1-year limited warranty; requires online activation via Antelope ID |
Frequently Asked Questions - R4S Antelope Audio
User questions about R4S Antelope Audio
0 question about this device. Answer the ones you know or ask your own.
Ask a new question about this device
Download the instructions for your Professional audio equipment in PDF format for free! Find your manual R4S - Antelope Audio and take your electronic device back in hand. On this page are published all the documents necessary for the use of your device. R4S by Antelope Audio.
USER MANUAL R4S Antelope Audio
TEC Award Winning High-End Monitoring Controller
SATORI & R4S
CONTENTS
BEFORE YOU BEGIN 3
INSTALLATION GUIDE 4
ACTIVATE YOUR PRODUCT WARRANTY 7
FRONT PANELS EXPLAINED 8
Satori 8
R4S 10
REAR PANELS EXPLAINED 12
Satori 12
R4S 13
CONTROL PANEL APPLICATION 14
CUSTOMER SUPPORT INFORMATION 14
MY ANTELOPE AUDIO PRODUCT ISN'T WORKING. 15
LIMITED WARRANTY POLICY 17
SAFETY NOTES 23
TECHNICAL SPECIFICATIONS 24
BEFORE YOU BEGIN
Thank you for purchasing Satori & R4S from Antelope Audio.
Satori is a digitally controlled, true analog monitoring and summing system designed for today's studios. The Antelope Audio Orion32 and Zen Studio interfaces have both been praised for their digital clarity, while maintaining the realism of analog sound. Thanks to advanced circuit design, Satori features the same high level of uncompromising sound quality.
The vast assortment of I/O includes 8 stereo inputs, 4 stereo speaker outputs, a subwoofer output, 4 independent headphone outs, 4 stereo summing inputs and software-driven talkback capability as well as a rear panel talkback jack mic input and a built-in microphone in the front panel.
A user-friendly control application for macOS and Windows allows for advanced remote control and also offers recallable user presets.
Satori is a perfect companion to our very popular Orion32 AD/DA interface and would complement any mixing or mastering studio – from an expanding home setup to a state-of-the-art recording facility demanding the highest level of monitoring quality today's technology can offer.
Satori is bundled with a bus-powered remote control – R4S. The remote is specially designed for Satori, completely replicating the front panel functionality. It provides engineers with ease and ergonomics, controlling Satori directly from the mix position. R4S allows for lightning fast control of all sources and monitors, as well as talkback.
Should you ever find yourself struggling, do not hesitate to contact our Customer Support team over phone, live chat and our ticket system. You can also visit Antelope
Audio on YouTube and explore our video tutorials or join the Antelope Audio
Users Facebook group and ask for advice. The Knowledge Base is also a good source of information.
Enjoy working with Satori & R4S!
Best wishes,
Team Antelope
MANDATORY ONLINE ACTIVATION
Please note that the mandatory device activation procedure requires an active Internet connection on your computer. Activating an Antelope device offline is not possible.
INSTALLATION GUIDE
Satori
Step 1: Getting Started
Connect the Satori to a power outlet using an AC power cable. Plug in the device to your computer using a USB cable.
Step 2: Install the Satori Launcher/Control Panel (macOS & Win)
Download and install the Satori Launcher/Control Panel application for Windows or macOS from here.
Open and install the Launcher/Control Panel by following the steps in the installation wizard.

Step 3: Activate your Satori
Once the installation is completed, start the application. You will be prompted to create an Antelope ID directly from the application. Fill out the necessary information and click Continue. If you already have an active Antelope ID, click on Use existing Antelope ID.
Bear in mind, that your Antelope ID is different and has no relation to your user profile on antelopeaudio.com.

Sign in using your credentials. If you have just created your Antelope ID, do not forget to activate it using the link in the e-mail you have just received.
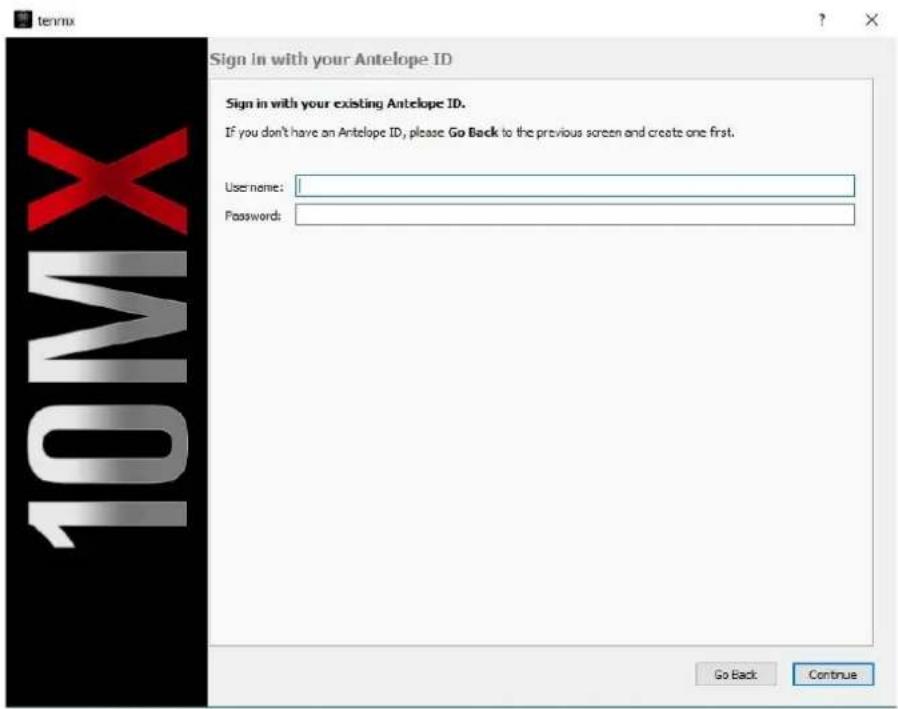
After successfully signing in your Antelope ID, you will be asked to fill in additional information concerning your recent purchase.

Once you have filled in the required information, click Done. You can now begin using your Satori.
R4S
Simply connect the USB cable between the rear panel of R4S and the computer on which you are running the Satori Control Panel application. Note that R4S is bus-powered from the USB port and does not require a separate power supply.
ACTIVATE YOUR PRODUCT WARRANTY
You will be required to activate your product warranty from the My Warranty tab in My Antelope Account. To activate your product, click on the text that sends you to the page where you can add a custom warranty.

On the following screen you will be asked to enter information about your new device and to attach your warranty. Select your device from the list under Device type and add a serial number. You can find it on the back side of your device's rack ears. After entering the serial number enter the date of purchase.
The last step is to attach your warranty. You can add multiple files (up to five) by using the plus sign. Acceptable formats are .pdf, .jpg, .png, .jpeg, .heif, and the size limit is 7 MB per file. Once you have completed the steps click Add Warranty.

After successfully completing the process, you can click on View Warranty to see if your file has been uploaded correctly.
FRONT PANELS EXPLAINED
Satori

1. Power button
Toggles Standby/On state.
2. Input select buttons channels 1-8
Input select lets you switch between your desired input source, which will be fed to your selected monitor output.
3. Sum select button
The sum select button lets you send your stereo sum to your chosen monitor output.
4. Rotary control
Large stepped relay attenuator for headphone volume and main monitor outputs.
- Press the volume attenuator to choose which output you are controlling.
- Press and hold to mute the currently selected output. i.e. Monitor outputs or headphone outputs as indicated by the LEDs.
5. Mono, Dim & M/S
- Press the mono button to sum the currently chosen monitor output to mono. This button corresponds to the last setting chosen in the Mono effects dropdown menu in the Control Panel application.
- Press the Dim button to activate the -20dB attenuator. Press once more to restore normal volume.
- When Mono is active, you also have the option to select M/S. Press the M/S button to select either the sum or the difference between the L/R channels. This lets you monitor only the centre or only the periphery of your audio.
6. Talkback button
Press the Talkback button to activate the talkback microphone. Talkback can be distributed to your chosen headphone output(s) from the Control Panel application.
7. Monitor select buttons 1-4
Press to choose between the four monitor outputs. The chosen source will be fed to the selected monitor out.
8. Headphone outputs
Two independently assignable headphone outputs (HP1 & HP2), selectable and controllable from the main volume control knob.
R4S

1. SUM Select button
Press to send the stereo sum to the chosen monitor output.
2. Input Select buttons, channels 1 - 8
Switch your desired input source, which will be fed to your chosen monitor output.
3. Talkback button
Activates the talkback microphone. Talkback can be distributed to your chosen headphone output(s) from the Control Panel application.
4. Monitor Select buttons 1 - 4
Switch between the four monitor outputs. The chosen source will be fed to the selected monitor out.
5. Rotary control
Large stepped relay attenuator for the main monitor output.
- Turn clockwise or counterclockwise to adjust level.
- Press-and-hold to mute.
- To access the Trim Offset feature, press and hold the desired 'Monitor' (1, 2, 3, 4) or 'Input' (Ch. 1 - 8) button. Turn the rotary control to adjust trim (-6dB to +6dB) or double-press to return to 0dB.
6. Mono Dim, M/S & Sub
- Press the Mono button to sum the currently chosen monitor output to mono.
- Press the Dim button to activate the -20dB attenuator. Press once more to restore normal volume.
- When Mono is active, you also have the option to choose M/S. Press the M/S button to choose either the sum or the difference between the L/R channels. This lets you monitor either the center or the periphery of your audio.
- Press the Sub button to activate the LFE (low frequency effect) output.
REAR PANELS EXPLAINED
Satori

1. Mains Power Connection
The AEC connector supports a range from 95 - 245V . This lets the device automatically accommodate mains voltage in every country.
2. USB Full-Speed
Satori uses an USB connector Type-B and lets users connect to the Windows & macOS Control Panel application.
3. 4 × Stereo Source Inputs
Four stereo inputs, one on XLR and three on TRS for connecting a wide variety of inputs.
4. 4 x Stereo Source Inputs on D-Sub with a Thru Output
D-Sub Thru, outputs all 4 stereo channels coming through Stereo input channels 5-8.
The D-Sub inputs, as well as going to the D-Sub Thru, also get summed to the stereo sum output. The D-Sub Inputs are on an 8 channel D-Sub connection. The 8 channels make up 4 stereo inputs, odd numbered inputs being the left signal and even numbered inputs being the right signal.
5. 4 x Main Stereo Monitor Outputs
Four assignable balanced stereo outputs, one over XLR, three over TRS
6. Stereo Sum Output
The stereo sum output takes the summing input channels 5-8 and creates a stereo signal output over TRS.
7. Talkback Mic Input
The talkback input lets you connect a dynamic mic for another talkback option, using your preferred microphone.
8. Balanced LFE Outputs
LFE stands for Low Frequency Effect. Balanced TRS to connect a sub-woofer, which outputs the currently selected monitor signal.
9. Headphone Outputs
Two further independently assignable headphone outputs (HP3 & HP4), selectable and controllable from the main volume attenuator and the Control Panel application.
R4S

7. USB Type-B Connector
R4S uses an USB Type-B connector for power and computer connection.
CONTROL PANEL APPLICATION

The Windows & macOS Control Panel application mirrors the functionality of Satori's front panel controls, not unlike how R4S does it. It also provides metering and save/recall of up to 5 presets. Click on PRESET 1 - 5 to recall a preset. Ctrl + Click (Win) / Command + Click (Mac) on PRESET 1 - 5 to save into that slot.
CUSTOMER SUPPORT INFORMATION
Antelope Audio Customer Support can be reached by the following means:
Online
Visit support.antelopeaudio.com
Phone
We are there for you around the clock, 21 hours/day, Monday to Friday.
North America +1-916-238-1643 01:00 a.m. - 10:00 p.m. (EST)
International +44 19 2593 3423 06:00 a.m. - 03:00 a.m. (GMT)
Pour le Support francophone: +44 20 3389 8108 09:00 a.m. - 17:30 p.m. (GMT+1)
Live Chat
Live Chat is available during the following hours Monday to Friday International 06:00 a.m. - 06:00 p.m. (GMT)
Note: If you're trying to reach us outside working hours, we advise you to file a ticket in
our customer support system or leave a voice message.
Additional Resources
- The Antelope Audio YouTube channel is home to various tutorial videos and endorser content which you may find helpful and inspiring.
- The Antelope Audio Users Facebook group lets you interact with fellow users and some of our employees. Note, however, that it is not meant to be a support group. Please contact our customer support team for such inquiries.
- The Knowledge Base in our Customer Support section is an often-overlooked source of troubleshooting information, answers to commonly asked questions and Antelope know-how.
MY ANTELOPE AUDIO PRODUCT ISN'T WORKING.
WHAT SHOULD I DO?
If you can't find a solution on your own, please get in touch with us so we check if you are having a hardware-related issue. If this is the case, we'll guide you through the repair process. If the product should be returned, a RMA number will be issued so we can begin the procedure.
What's an RMA number?
Issuing a RMA (Return Merchandise Authorization) number is required for any factory service or repair procedure. Please, don't attempt to send us your device without receiving a RMA number first, as the device will be returned and not serviced.
How do I get an RMA number?
The Antelope Audio Customer Support team is in charge of issuing RMA numbers. Visit support.antelopeaudio.com and get in touch.
After your RMA has been issued, you will receive an email with instructions on how to proceed.
RMA shipping information
Alongside the product you are returning please, include a letter containing your full name, shipping address, RMA number issued by our technical support team and a note with a short information about the technical issue.
Please use the original box if possible, because a worn out one will surely not protect your product sufficiently on its way to the Antelope Audio HQ. Additional cushioning materials in multiple layers between the unit and the box walls to prevent from shock, vibration and various tears and scratches.
Please remove any labels or old shipment markings it may have and ensure you add your shipping address inside the box in case the original shipment label becomes illegible during transportation.
The shipping costs are covered by the owner of the product. Antelope Audio will not cover any local customs charges.
We recommend using a courier service of your choice (e.g. DHL, UPS, FedEx). The package should be insured for its real value, marked as fragile and a tracking number should be provided. We do not recommend using standard mail delivery services.
Please, don't forget to add the RMA number, issued by the Antelope Audio technical support, on all shipping paperwork.
Antelope Audio cannot be held responsible for undelivered packages – lost or damaged on the way to the Antelope Audio HQ. For damage claims, please contact your shipping service provider of choice.
Antelope Audio cannot cover any repair costs for product damages due to poor packaging.
LIMITED WARRANTY POLICY
This is a non-transferable voluntary Limited Product Warranty provided to end-customers who have purchased Antelope Audio-branded hardware product (hereinafter referred to as "Product") from an authorized Antelope Audio re-seller.
For customers covered by consumer protection laws or regulations in their country of purchase or, if different, their country of residence, the benefits conferred by Antelope Audio's Limited Warranty are in addition to, and not instead of, rights and remedies convened by such consumer protection laws and regulations and it does not exclude, limit or suspend buyer's rights arising from consumer law. Consumers have the right to choose whether to claim service under the Antelope Audio Limited Warranty or under their consumer law rights.
All claims made under the Antelope Audio Limited Warranty will be governed by the terms set out in this warranty document.
Warranty Coverage
Antelope Audio warrants that the Product will be free from defects in material and workmanship for the period of 1 (one) year commencing on the date of purchase of Product by end-customer from authorized Antelope Audio's re-seller.
Except where explicitly prohibited by applicable local law, this warranty is limited to the original purchaser and is non-transferable. This warranty provides you with specific legal rights, and you may have additional rights that vary under local laws.
In general, this warranty means your Antelope Audio hardware product will operate in accordance with published technical specifications, as specified by its data-sheet, and in the operating environment for which it was intended for the length of the warranty period.
This version of the warranty applies to products purchased on or after January 1, 2018. For prior versions of the Antelope Audio limited warranty, please contact customer service.
Limited Factory Refurbished (B-stock) Warranty
Antelope Audio warrants products sold as "B-stock, Factory Refurbished or Open Box" to be free from defects in materials (unless otherwise stated in product description) and workmanship. Only products purchased from an authorized dealer or directly from Antelope Audio are covered by this Warranty.
The Limited Factory Refurbished (B-stock) Warranty is valid for the period of 6 (six) months, commencing on the date of purchase of Product, if local regulations do not require otherwise.
All warranty terms contained hereunder apply also to the B-stock Warranty, unless otherwise specified.
Remedies
Antelope Audio's entire liability and your exclusive remedy for any Antelope Audio Product that is not operating in accordance with its published technical specifications is at Antelope Audio's discretion:
1) to repair the Product at Antelope Audio's expense using new or equivalent-to-new refurbished parts in good working condition; or
2) to replace the Product at Antelope Audio's expense with a product with equivalent functionality formed from new and/or equivalent-to new refurbished parts in good working condition, or
3) to refund the price paid. Should Antelope Audio decide to refund the price paid, it may deduct from the paid Product's price any damages caused to the Product; where, within fourteen (14) days of the expiration of the warranty period,(i) Antelope Audio has received written notice of any nonconformity;(ii) after Antelope Audio's written authorization, customer has returned the nonconforming product to the designated place; and (iii)Antelope Audio has determined that the Product is nonconforming and that such non conformity is not the result of any of the exclusions designated below.
These warranty obligations are conditioned upon the hardware being returned to the original place of purchase, or another place as directed by Antelope Audio, with the original sales receipt attached. You will be required to pay shipping and handling charges for returning the product. You may be required to pay any other applicable tariffs, duties, taxes, or other fees with regard to returning the products.
Any repaired or replacement Product will be warranted for the remainder of the original warranty period.
Obsolete or Discontinued Products
An obsolete or discontinued product will be repaired or replaced with the same product if available. If Antelope Audio is unable to replace your obsolete or discontinued product with the same product, Antelope Audio will replace the obsolete or discontinued product, in its sole discretion, with a product having similar function and capacity.
Exclusions
This warranty does not cover problems or damage resulting from, but not limited to, any of the following: (i)Wear and tear associated with normal use; (ii)Any modification, abuse, accident, disassembly, misapplication, misuse, negligence, acts of God, accident; (iii)Unauthorized repair or attempted repair by anyone other than Antelope Audio or someone authorized by Antelope Audio to do warranty work; any unauthorized repairs will void this warranty(iv)Any improper operation, maintenance or installation, including any use not in accordance with any supplied product instructions; (v)Connection to any improper voltage supply; (vi)Use of consumables or spare parts not supplied by Antelope Audio, except where such restriction is prohibited by applicable local law; (vii)Any other cause which does not relate to a Product defect in materials or workmanship.
The warranty does not apply to any Products which have been subject to misuse, neglect, accident or modification or which have been soldered or altered such that they are not capable of being tested under normal test conditions.
This warranty does not cover (i) any counterfeit products, i.e. Products that Antelope Audio, at its sole discretion, determines were not manufactured by Antelope Audio or any
of its authorized manufacturing partners; (ii) Products purchased from a person or entity which is not an authorized dealer or re-seller of Antelope Audio; (iii) Product sold "as is" or "with all faults", to the extent permitted by local law.
This warranty is not valid in case any manufacturer label(s), serial numbers, date stamp(s) or warranty sticker(s) has been altered or removed from the Product.
Limitation of Liability
ANTELOPE AUDIO SHALL NOT BE LIABLE FOR ANY SPECIAL, INCIDENTAL, INDIRECT, OR CONSEQUENTIAL DAMAGES WHATSOEVER, INCLUDING BUT NOT LIMITED TO LOSS OF PROFITS, REVENUE, OR DATA (WHETHER DIRECT OR INDIRECT) OR COMMERCIAL LOSS FOR BREACH OF ANY EXPRESS OR IMPLIED WARRANTY ON YOUR PRODUCT EVEN IF Antelope Audio HAS BEEN ADVISED PREVIOUSLY OF THE POSSIBILITY OF SUCH DAMAGES. Some local laws do not allow the exclusion or limitation of special, indirect, incidental or consequential damages, so this limitation or exclusion may not apply in your jurisdiction.
ANTELOPE AUDIO WILL NOT ASSUME OR AUTHORIZE ANY OTHER PERSON TO ASSUME FOR IT ANY OTHER LIABILITY IN CONNECTION WITH ITS PRODUCTS.
Data Recovery
In the event of data loss using Antelope Audio storage devices, Antelope Audio is not responsible for backing up or recovering any data that you may have lost.
No Other Warranties
No Antelope Audio employee, dealer, re-seller, or other agent is authorized to make any modification, extension, or addition to this warranty.
How to Make a Warranty Claim
Valid warranty claims should be processed through your point of purchase. Please also verify the return policy directly with the retailer where you purchased your product. Any warranty claims that cannot reprocessed through your original point of purchase should be addressed directly to Antelope Audio. Our customer service contact information can be found on the web or in the documentation included with your Product.
Returning Your Product
In the event that you need to return your Antelope Audio products for repair or replacement, Antelope Audio will provide you with a Return Merchandise Authorization Number (RMA#) as well as return instructions. Do not return your product without prior approval from Antelope Audio. Any product returned without a valid unique RMA# will be refused and returned to the sender at the sender's expense. To avoid problems at the time of receipt, clearly write your RMA# on the outside of the package and include a copy of your RMA confirmation-mail within the package.
In certain situations, for in-warranty units, we may (entirely at our opinion) offer you a temporary replacement unit, provided that we have such on stock in your state. To request a temporary replacement unit, a valid credit card must be provided to secure the new replacement unit for shipping prior to Antelope Audio receiving the defective one.
Request a Return Material Authorization Number (RMA#)
Please follow these steps to obtain an RMA number:
(I) For end user customers, submit a claim online at: support.antelopeaudio.com. For business to business (B2B) / Direct customers of Antelope Audio please email us at techsupport@antelopeaudio.com
(ii) A valid proof of purchase is required for RMA processing (i.e. receipt, invoice, etc). Antelope Audio will provide you with the RMA number within 2 working days as of the claim submission date.
RMA Return Addresses
We have multiple RMA receiving locations worldwide. Your RMA confirmation will specify the specific return address you must use when sending your RMA package. Any packages received at an unauthorized location may be refused and returned to the sender at the sender's expense.
Products Lost or Damaged During Transit
The original packaging material should be used to pack the product for return; if the original packaging is not available, you should use such materials that provide the same or greater protection to the product. All packages that arrive with any external damage or appear inadequately packed will be refused and returned to the sender at the sender's expense. We are not responsible for damage incurred during shipping to our RMA receiving locations or for lost or stolen products.
Company information
Antelope Audio is the trade name, under which the company Elektrosfera Ltd., registered under the legislation of the Republic of Bulgaria with UIN: 131052590, is doing business and is worldwide known. Elsewhere in this document where the trade name Antelope Audio is used shall refer to Elektrosfera Ltd., with address of management: Tsarigradsko Shose Blvd., 7th km, Building of BIC IZOT, floor 6, Mladost region, Sofia, Bulgaria.
If any term hereunder is held to be illegal or unenforceable, it shall be severed from this warranty and the legality or enforce ability of the remaining terms shall not be affected.
SAFETY NOTES
To reduce the risk of electrical shocks, fire, and related hazards:
- Do not remove screws, cover, or cabinet. There are no user serviceable parts inside. Refer servicing to qualified service personnel.
- Do not expose this device to rain, moisture or spillover of liquid of any kind.
- Should any form of liquid or a foreign object enter the device, do not use it. Switch off the device and then unplug it from the power source. Do not operate the device again until the foreign object is removed, or the liquid has completely dried and its residues fully cleaned up.
- Do not handle the power cables with wet hands!
- Make sure the device is switched off when plugging/unplugging it to/from the power source.
- Avoid placing things on the cabinet or using the device in a narrow and poorly ventilated place which could affect its operation or the operation of other closely located components.
- If anything goes wrong, turn off the device first and then unplug the power. Do not attempt to repair the device yourself. Consult authorized service personnel or your dealer instead.
- Do not install near any heat sources such as radiators, stoves, or other apparatus (including amplifiers) that produce heat.
- Do not use harsh chemicals to clean your unit. Clean only with specialized cleaners for electronics equipment.
- Connect all your devices before powering your unit.
- This unit is connected via its power cord to the mains safety earth.
- Never operate the unit without this earth connection.
- DC power supply cable should be routed so that it is not likely to be walked on or squeezed by items placed upon or against it.
- To completely turn off the device, unplug the power cable first from the outlet and then from the rear panel of the unit.
- Both occasional and continued exposure to high sound pressure levels can cause permanent ear damage via headphones and monitors.
- Your unit should always be un-racked when traveling or in a flight case.
- The device is designed to operate in a temperate environment, with a correct Operating Temperature of 0–50°C, 32–122°F.
TECHNICAL SPECIFICATIONS
Satori
Analog Inputs
4 x Stereo Pair Line Level Inputs. Ch1 on XLR & Ch2-4 on TRS
4 x Stereo Line Level Inputs on D-Sub 25
1 x Talkback Mic Preamp on TRS
Analog Outputs
4 x Stereo Line Level Outputs on D-Sub 25
4 x Stereo Pair Monitor Outputs, Mon1 on XLR and Mon2-4 on TRS
1 x Line Level Stereo Sum Output on TRS
1 x LFE Output on TRS
4 x Headphone Outputs (two on the rear and two on the front) on TRS
USB I/O
USB 2.0 Hi-Speed, Type B
For use with the software control panel
Dynamic Range
132dB
THD + N
127dB
Operating temperature
0-50°C / 32-122°F
Weight
\~2kg / 4,4lb approx.
Dimensions
Width: 483 mm / 19" /Rack/
Height: 44 mm(1U) / 1,75"
Depth: 220 mm / 8,66"
Power Supply
AC Universal input \~95-245 V
Power Consumption
25 Watts Max.
R4S
USB: USB 2.0 Full-Speed interface on USB Type B connector
Operating Temperature: 0-50°C, 32-122°F
Weight (unit): 0.71 kg, 1.57 lb
Dimensions (unit): 220 mm(W) × 55 mm(H) × 85 mm(D), 8.66"(W) × 2.22 "(H) × 3.31"(D)
- SATORI & R4S
- CONTENTS
- BEFORE YOU BEGIN
- MANDATORY ONLINE ACTIVATION
- INSTALLATION GUIDE
- SATORI
- STEP 3: ACTIVATE YOUR SATORI
- R4S
- ACTIVATE YOUR PRODUCT WARRANTY
- FRONT PANELS EXPLAINED
- POWER BUTTON
- INPUT SELECT BUTTONS CHANNELS 1-8
- SUM SELECT BUTTON
- ROTARY CONTROL
- MONO, DIM & M/S
- TALKBACK BUTTON
- MONITOR SELECT BUTTONS 1-4
- HEADPHONE OUTPUTS
- INPUT SELECT BUTTONS, CHANNELS 1 - 8
- MONITOR SELECT BUTTONS 1 - 4
- MONO DIM, M/S & SUB
- REAR PANELS EXPLAINED
- MAINS POWER CONNECTION
- USB FULL-SPEED
- 4 × STEREO SOURCE INPUTS
- 4 X STEREO SOURCE INPUTS ON D-SUB WITH A THRU OUTPUT
- 4 X MAIN STEREO MONITOR OUTPUTS
- STEREO SUM OUTPUT
- TALKBACK MIC INPUT
- BALANCED LFE OUTPUTS
- USB TYPE-B CONNECTOR
- CONTROL PANEL APPLICATION
- CUSTOMER SUPPORT INFORMATION
- ONLINE
- PHONE
- LIVE CHAT
- ADDITIONAL RESOURCES
- MY ANTELOPE AUDIO PRODUCT ISN'T WORKING
- WHAT SHOULD I DO
- RMA SHIPPING INFORMATION
- LIMITED WARRANTY POLICY
- WARRANTY COVERAGE
- REMEDIES
- OBSOLETE OR DISCONTINUED PRODUCTS
- EXCLUSIONS
- LIMITATION OF LIABILITY
- DATA RECOVERY
- NO OTHER WARRANTIES
- HOW TO MAKE A WARRANTY CLAIM
- RETURNING YOUR PRODUCT
- REQUEST A RETURN MATERIAL AUTHORIZATION NUMBER (RMA#)
- RMA RETURN ADDRESSES
- PRODUCTS LOST OR DAMAGED DURING TRANSIT
- COMPANY INFORMATION
- SAFETY NOTES
- TECHNICAL SPECIFICATIONS
Brand : Antelope Audio
Model : R4S
Category : Professional audio equipment